

Page 1
MODWAY BED FRAME
Thank you for purchasing the MOD-5347/5348/5349/5350/5351/5352 TWIN/FULL/QUEEN BED FRAME!
Before you start, here is some helpful advice:
1.We suggest you spend a short time reading through this leaflet and then follow the simple step by step
instructions.
2.Owing to the size and weight of the bed frame, we recommend that it is assembled by two adults, on a carpeted
or padded area, in the room that it is intended for. Approx assembly time: 45 minutes.
3.Please do not use any tools other than those provided or recommended in these instructions.
4.Please do not throw away any of the packaging or the instruction until you have checked all the components and
hardware and the furniture is fully assembled. Please ensure that the packaging is disposed of in a safe
environmentally friendly way.
5.Assemble all components loosely until advised to tighten. Depending on use, it may be necessary to tighten the
components from time to time, so please save the tools that has been provided.
6.Please keep all fitting out of reach of children.
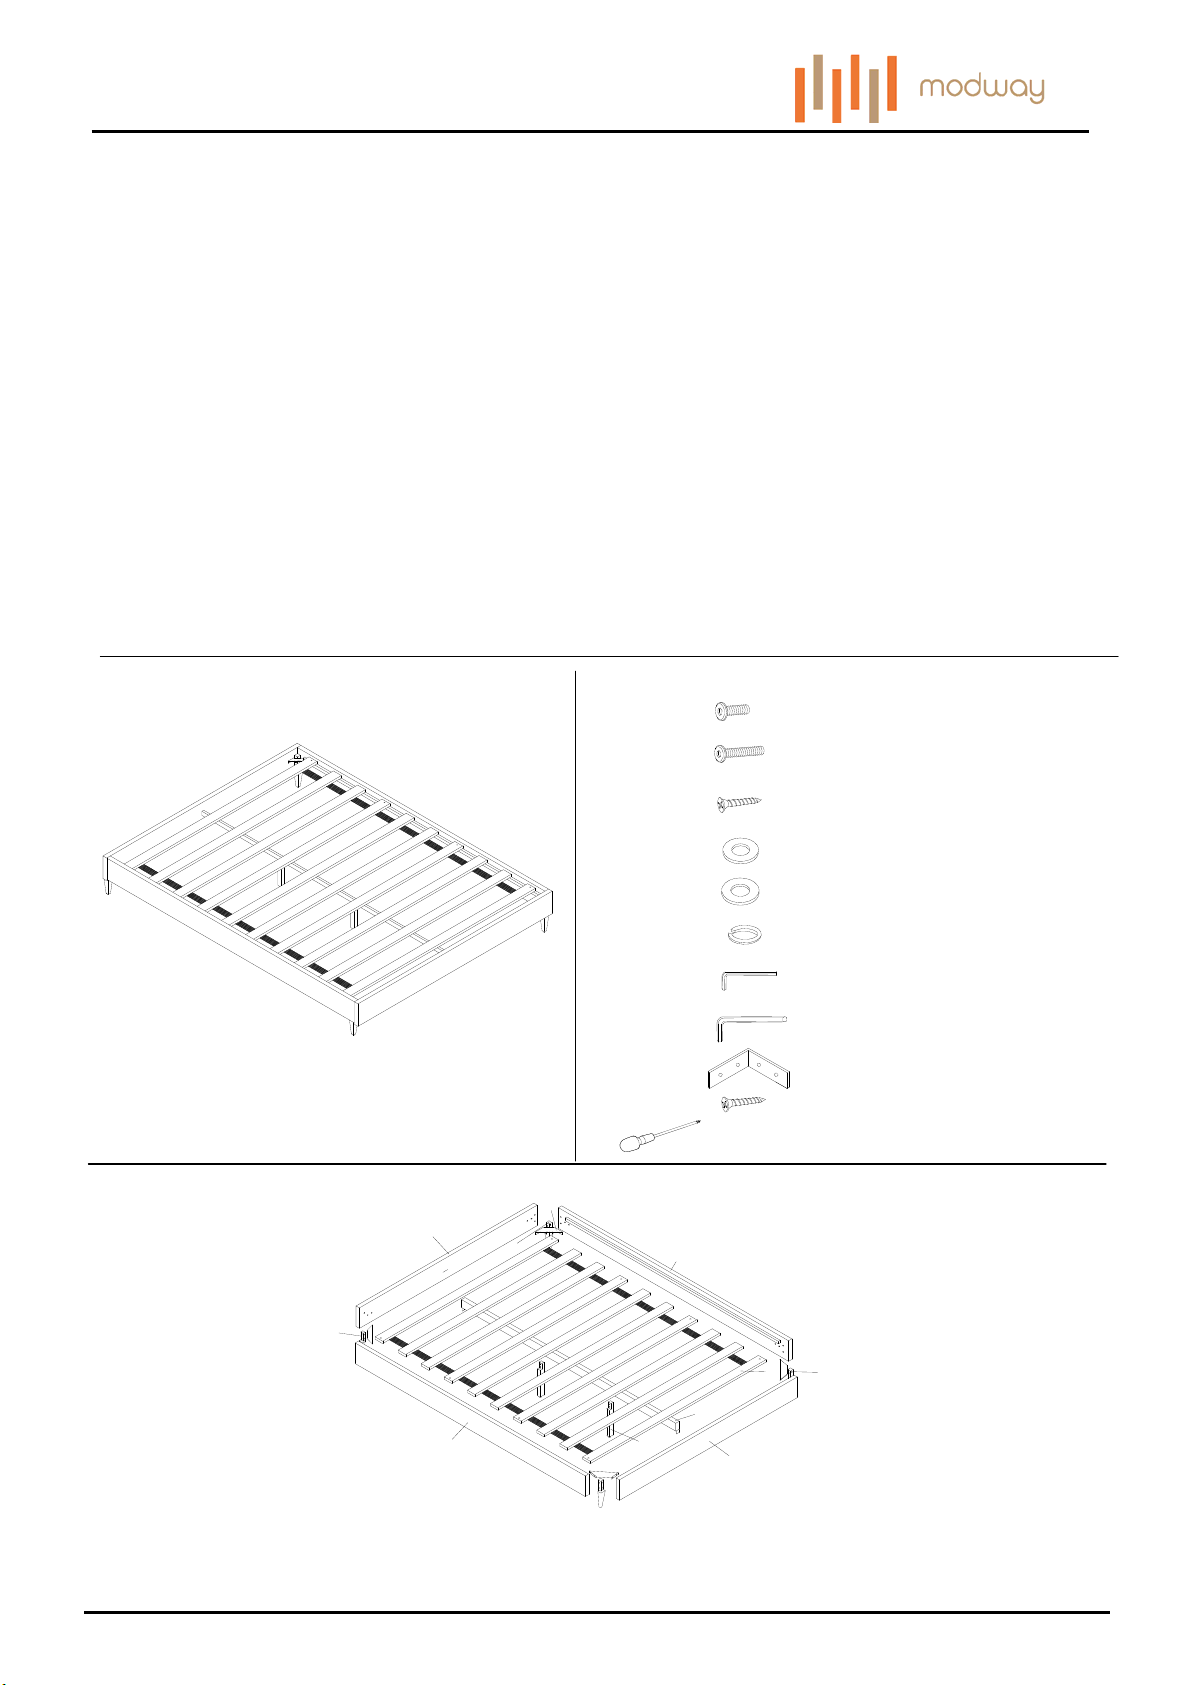
Component:
Hardware:
A
B
C
D
E
F
G
H
J
K
PHILLIPHS HEAD SCREW DRIVER
Bolt M8x25mm x16
Bolt M6x45mm x16
Screw M4x35mm x14
Flat Washer M6 x16
Flat Washer M8 x16
Spring Washer M8 x16
Allen Wrench M4 x1
Allen Wrench M5 x1
Connect Plate x4
Screw M4x20mm x16
NOT PROVIDED
8
1
5
2
6
7
6
3
2
4
1
5
Short Board x2
1
Ⅰx2
Leg
5
Customer Service 908-368-1025︱www.modwayfurniture.com Page 1 of 6
Long Board x2
2
6
Ⅱ x2
Leg
Center Rail x1
3
Slats x10
7
Support Leg x2
4
Metal Corner Plate x4
8
Page 2
MODWAY BED FRAME
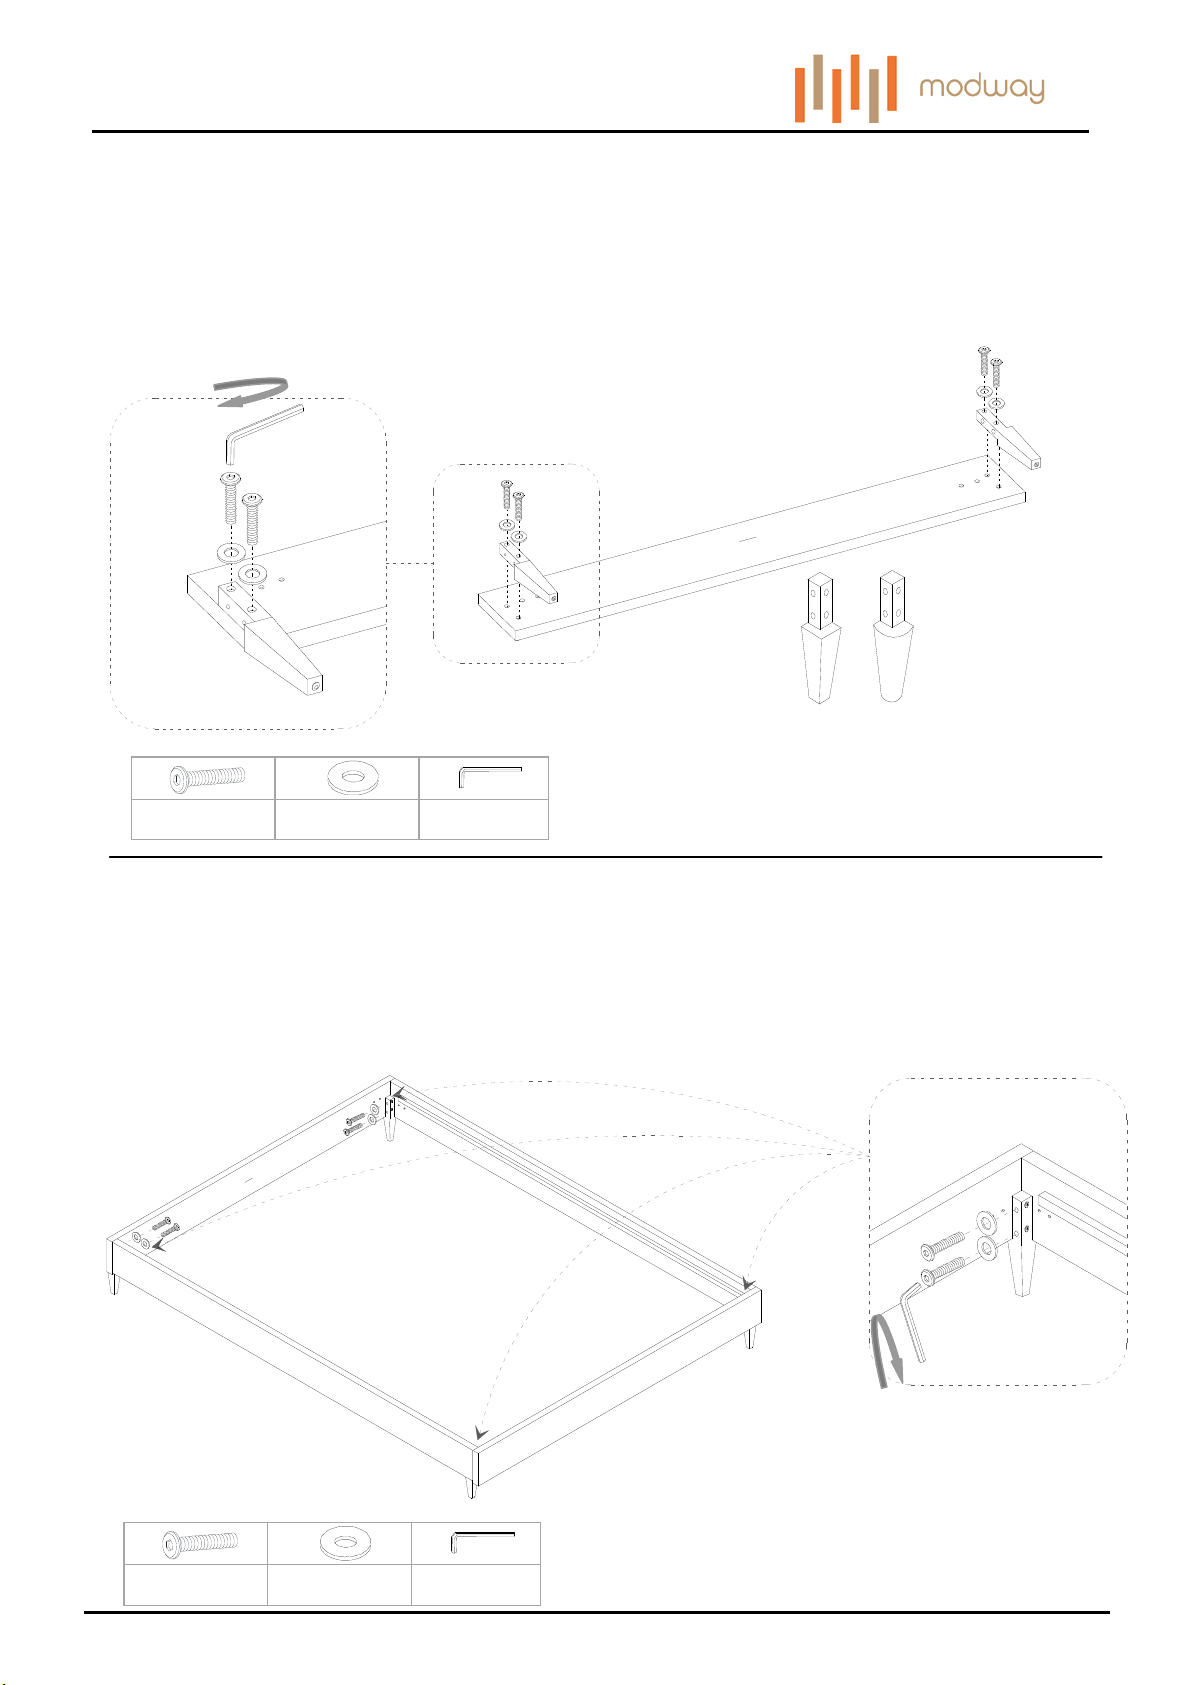
STEP 1:
Put 1 piece of Short Board (1) upside down on a carpeted or padded area by two adults
Attach 1 piece of Leg (5) and 1 piece of Leg (6) into the Short Board (1) by using 4 pieces of Bolt (B) and 4 pieces
of Flat Washer (D) as shown.
Use Allen Wrench (G) to tighten the Bolts (B) clockwise until secure.
Repeat the same steps for the remaining 1 piece of Short Board (1) ,1 piece of Leg (5) and 1 piece of Leg (6).
B
G
B
5
B
D
B
D
1
B
B
6
1
Mod-5355 Leg
6
Note: There are two kinds of legs designed for
this Bed Frame(Mod-5355 or Mod 5356) .
Bx8 Dx8 Gx1
STEP 2:
Place 1 piece of Long Board (2) to 2 pieces of assembled Short Board (1) by two adults
Attach them by using 4 pieces of Bolt (B) and 4 pieces of Flat Washer (D) as shown.
Use Allen Wrench (G) to tighten the Bolts (B) clockwise until secure.
Repeat the same steps for the remaining 1 piece of Long Board (2).
Mod-5356 Leg
Hardware & Tool required
B
B
1
B
B
2
2
B
D
1
D
B
G
2
Bx8 Dx8 Gx1
Customer Service 908-368-1025︱www.modwayfurniture.com Page 2 of 6
1
Hardware & Tool required
Page 3
MODWAY BED FRAME
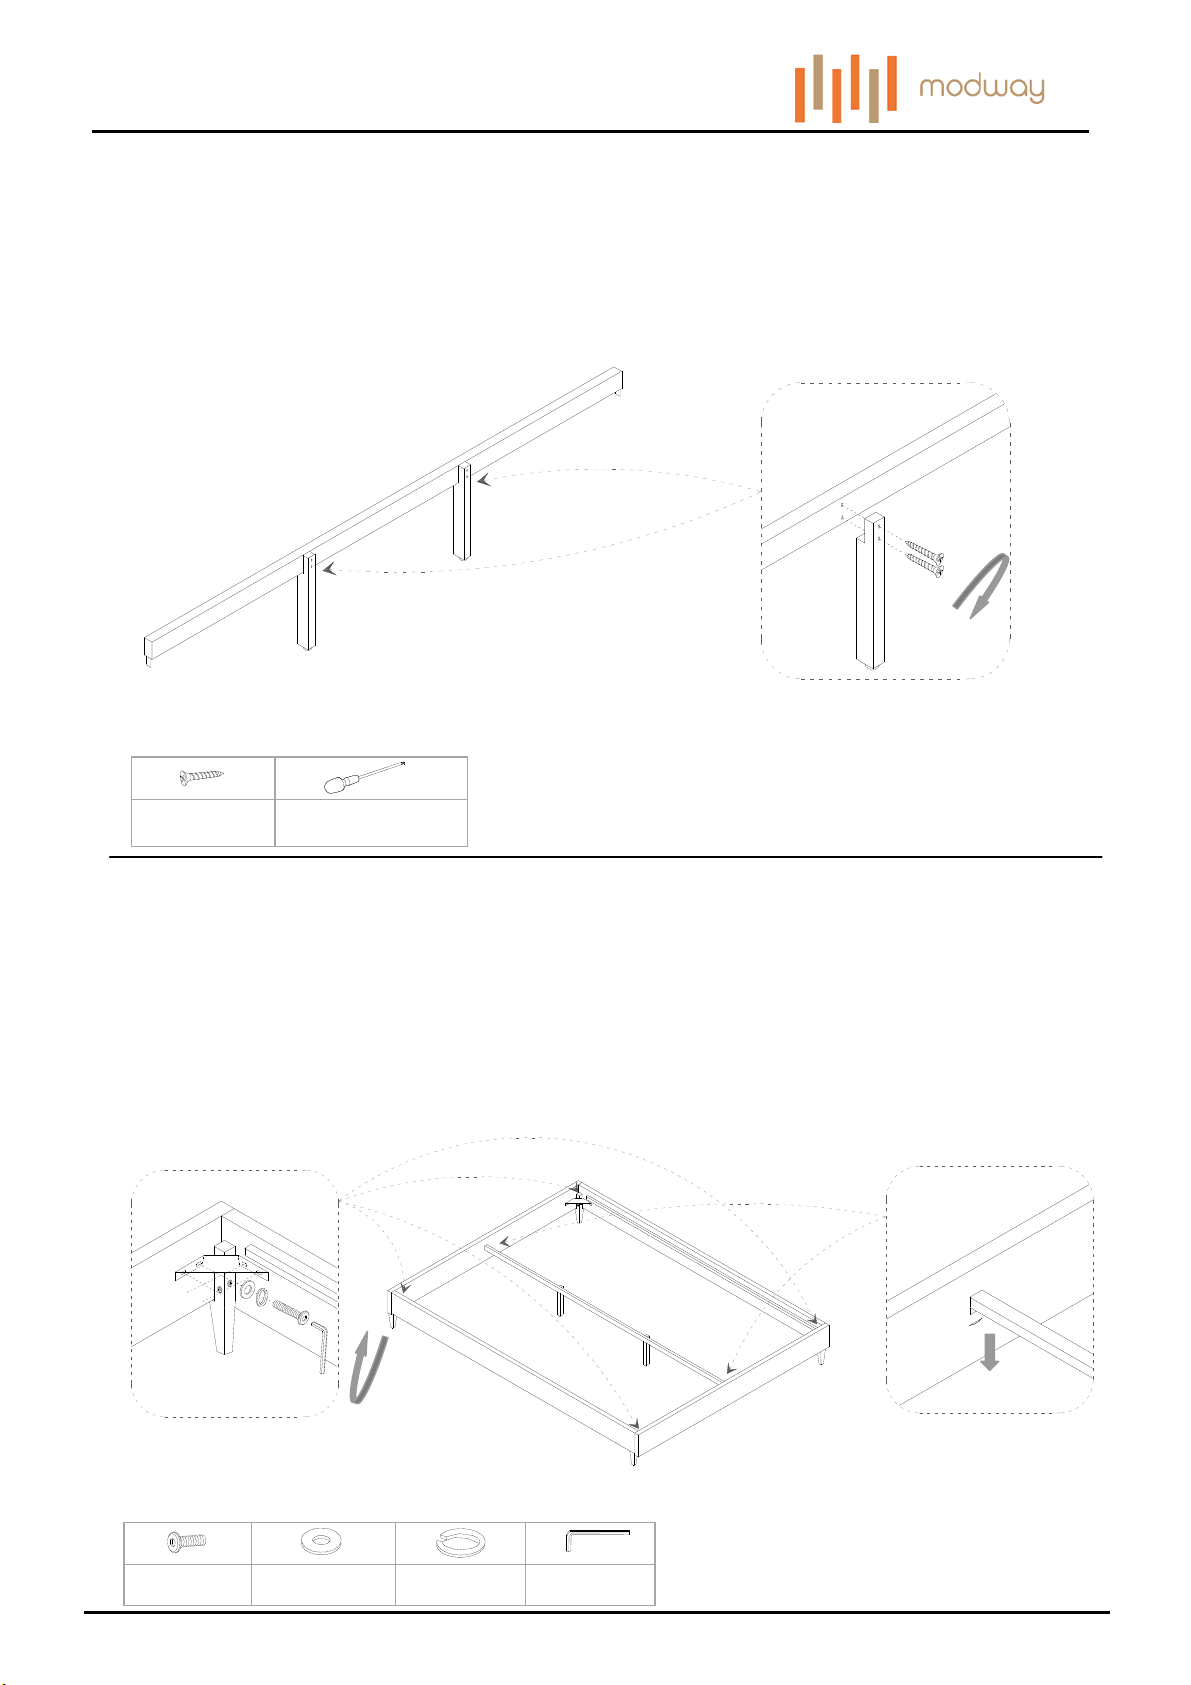
STEP 3:
Attach 2 pieces of Support Leg (4) into the Center Rail (3) as shown.
Secure the Support Leg (4) into the Center Rail (3) by using 4 pieces of Screw (C) as shown.
Tighten the Screws (C) with Phillips Head Screw Driver (Not provided).
3
4
4
3
C
C
4
Cx4
STEP 4:
Secure 1piece of Metal Corner Plate (8) into the Short Board (1) and Long Board (2) by using 4 pieces of Bolt (A)
with 4 pieces of Spring Washer (F), 4 pieces of Flat Washer (E) as shown.
Repeat the same steps for the remaining 3 pieces of Metal Corner Plate (8).
Place the assembled Center Rails (3) to the Short Board(1).
Insert the hook on the each end of Center Rail(3) into the notch on the Short Board (1).
Repeat the same steps for the remaining assembled Center Rail (3).
Phillips Head Screw
Driver( not provided)
Hardware & Tool required
Notch on the
Short Board
1
1
8
E
F
A
2
H
1
2
3
3
2
Ax16 Ex16 Hx1
Customer Service 908-368-1025︱www.modwayfurniture.com Page 3 of 6
Fx16
1
Hardware & Tool required
Hooks on the
end of Center Rail
Page 4
MODWAY BED FRAME
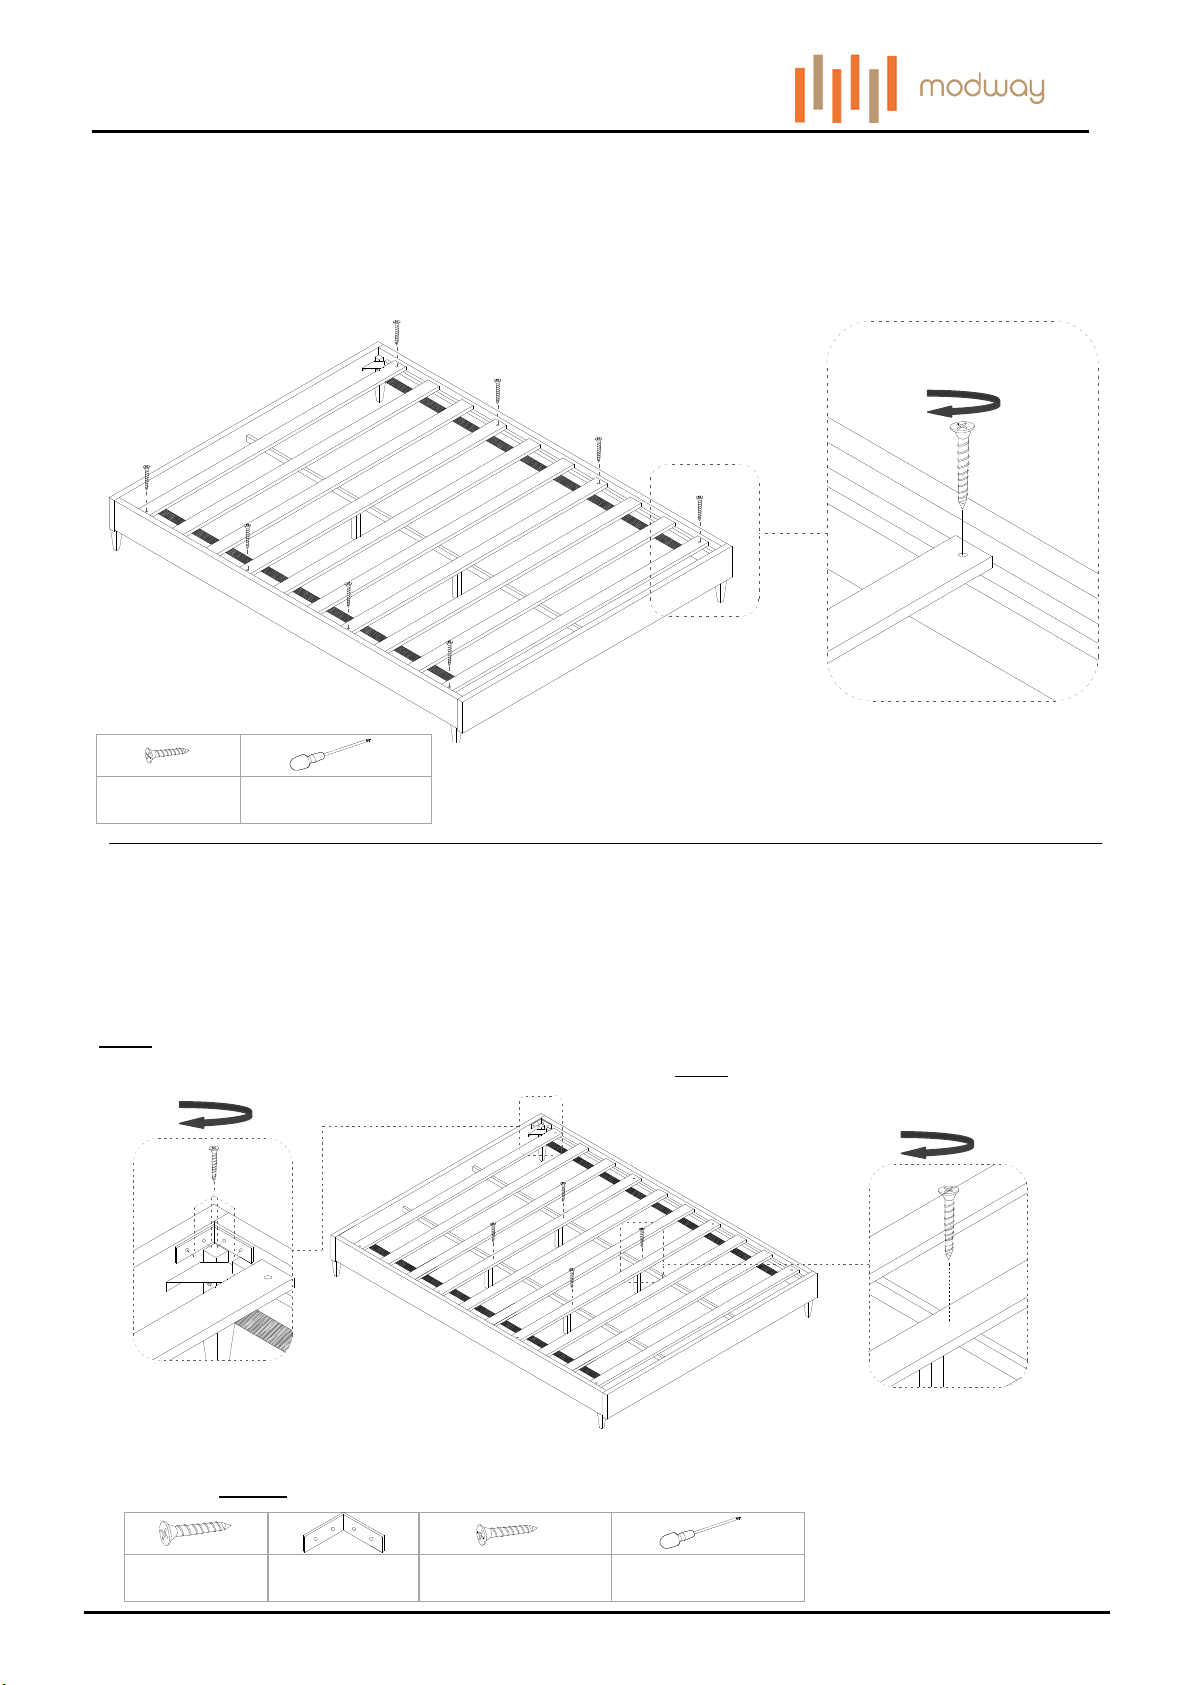
STEP 5:
Place the Slats (7) to the Long Boards (2) as shown.
Secure 4 pieces of Slat (7) which have countersink Holes on each end into the Long Board (2) by using 8 pieces of
Screw (C) as shown.
Tighten the Screws (C) with Phillips Head Screw Driver (Not provided).
7
2
7
7
7
C
7
7
7
7
7
7
2
Cx8
STEP 6:
In order to strengthen the construction of bed, Please do the steps as below.
Secure 4 pieces of Connect Plate (J) to each corner of assembled bed by using 16 pieces of Screw (K) as shown.
Secure 2 pieces of Screw (C) into the Slat (7) on the top of Support Legs (4) as shown.
Tighten the Screws (C&K) with Phillips Head Screw Driver (Not provided).
Phillips Head Screw
Driver( not provided)
Hardware & Tool required
7
2
Note: No pre-drilled holes are designed at this step. Please
secure the Screw (K) into Short/Long Board (1/2) directly
when Connect Plate (J) are on the right position.
K
7
J
4
7
Assembly is completed. The bed frame is ready to use now!
NOTE: Hardware may loosen over time. Periodically check that all connections are tight.
Cx2
Jx4
Kx16
Note: No pre-drilled holes are designed at this step.
Pease make sure Screws (C) are on the center of
Slat (7) and Center Rail (3) during securing.
4
Phillips Head Screw
Driver( not provided)
C
7
4
Hardware & Tool required
Customer Service 908-368-1025︱www.modwayfurniture.com Page 4 of 6
Page 5
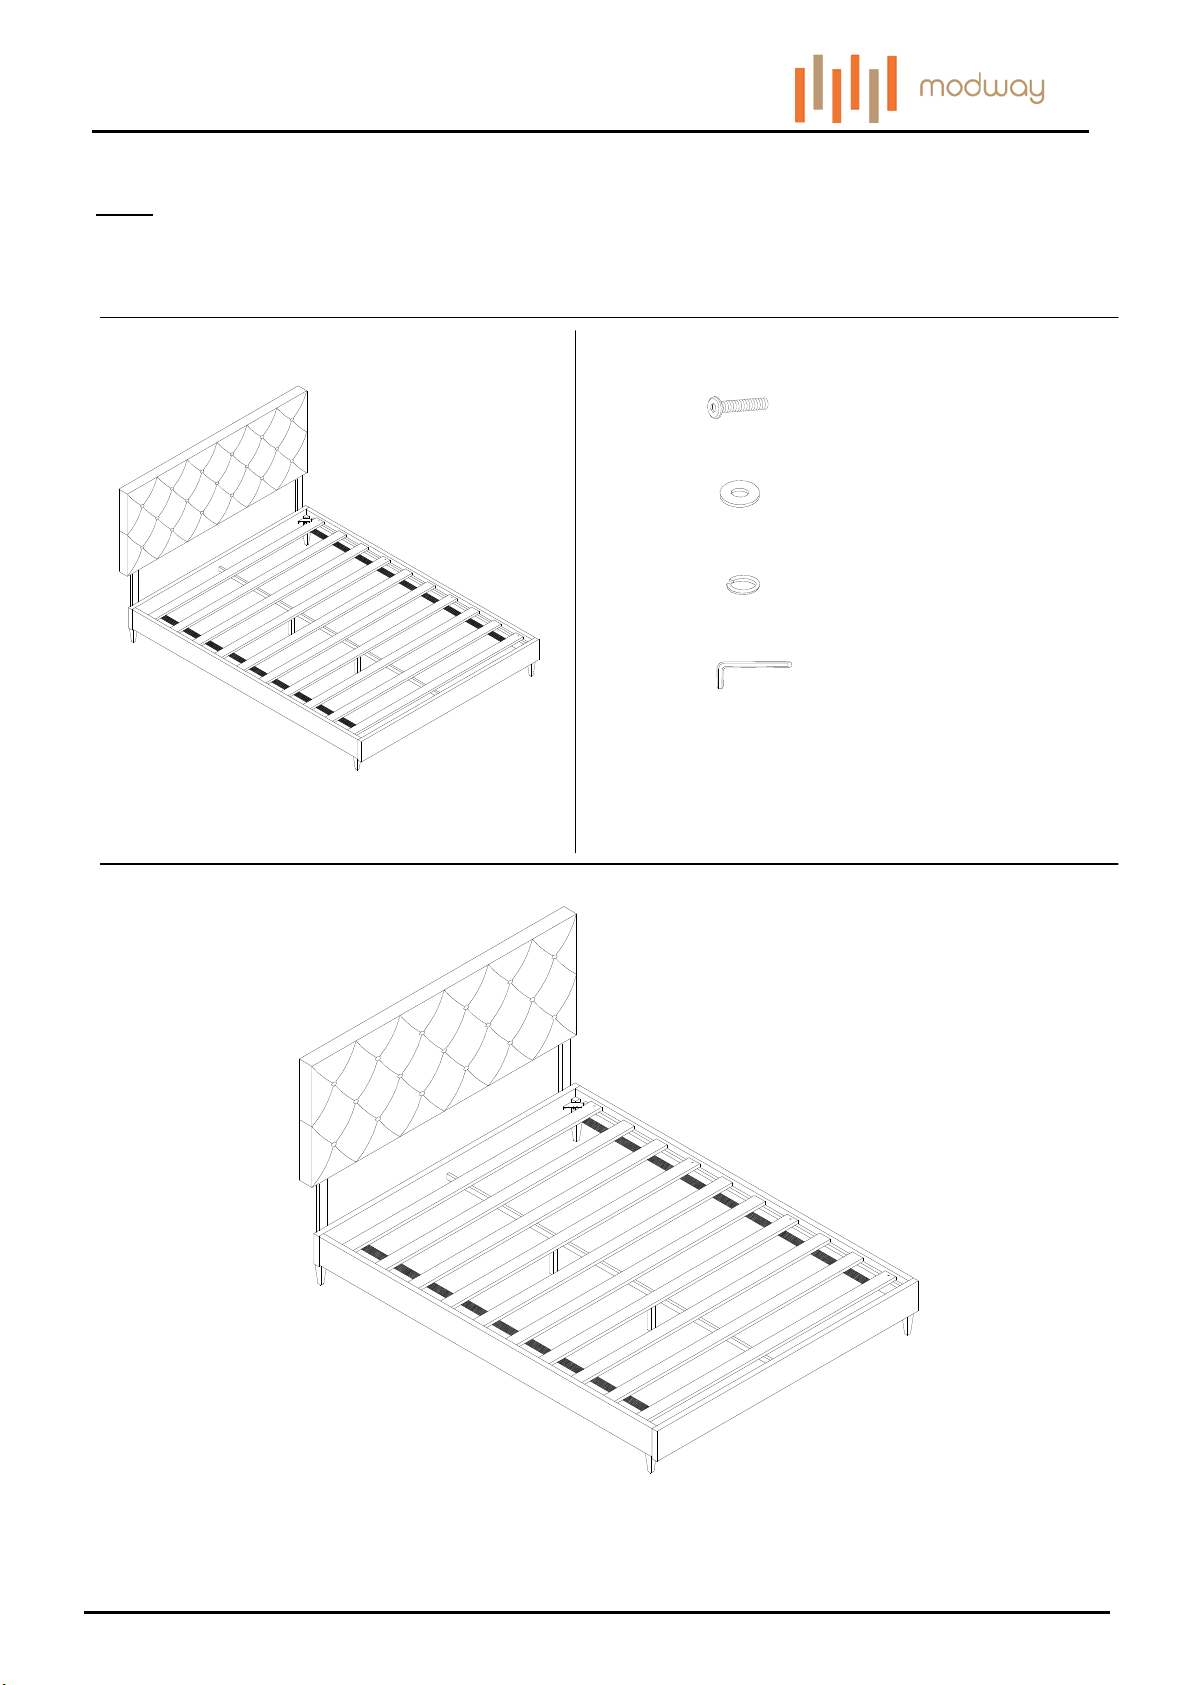
MODWAY CONNECTING BED FRAME TO HEADBOARD
ASSEMBLY INSTRUCTIONS
Note: This is assembly instruction for MODWAY Full/Twin/Queen/King Bed Frame MOD5347/5348/5349/5350/
5351/5352/5353/5354 to connect Headboard MOD 5365/5366/5367/5368/5369/5370/5371/5372/5373/5374/
5375/5376/5377/5378/5379/5380/5381/5382/5383/5384/5385/5386/5387/5388/5389/5390/5391/5392/5393/5394/
5395/5396/5397/5398/5399/5400/5401/5402/5403/5404/5405/5406/5407/5408.
Hardware:
Component:
1
A
C
Bolt M6x45mm x4
Flat Washer M6xD22mm x4
D Spring Washer M6 x4
F
Allen Wrench M4 x1
Important: All the hardware is packed with the
headboard you are buying. Please only use the
above hardware from Headboard Hardware Package
to assemble the Bed Frame and Headboard.
2
2
1
Headboard x1
(Style may vary)
Customer Service 908-368-1025︱www.modwayfurniture.com Page 5 of 6
Bed Frame x1
(Style may vary)
Page 6
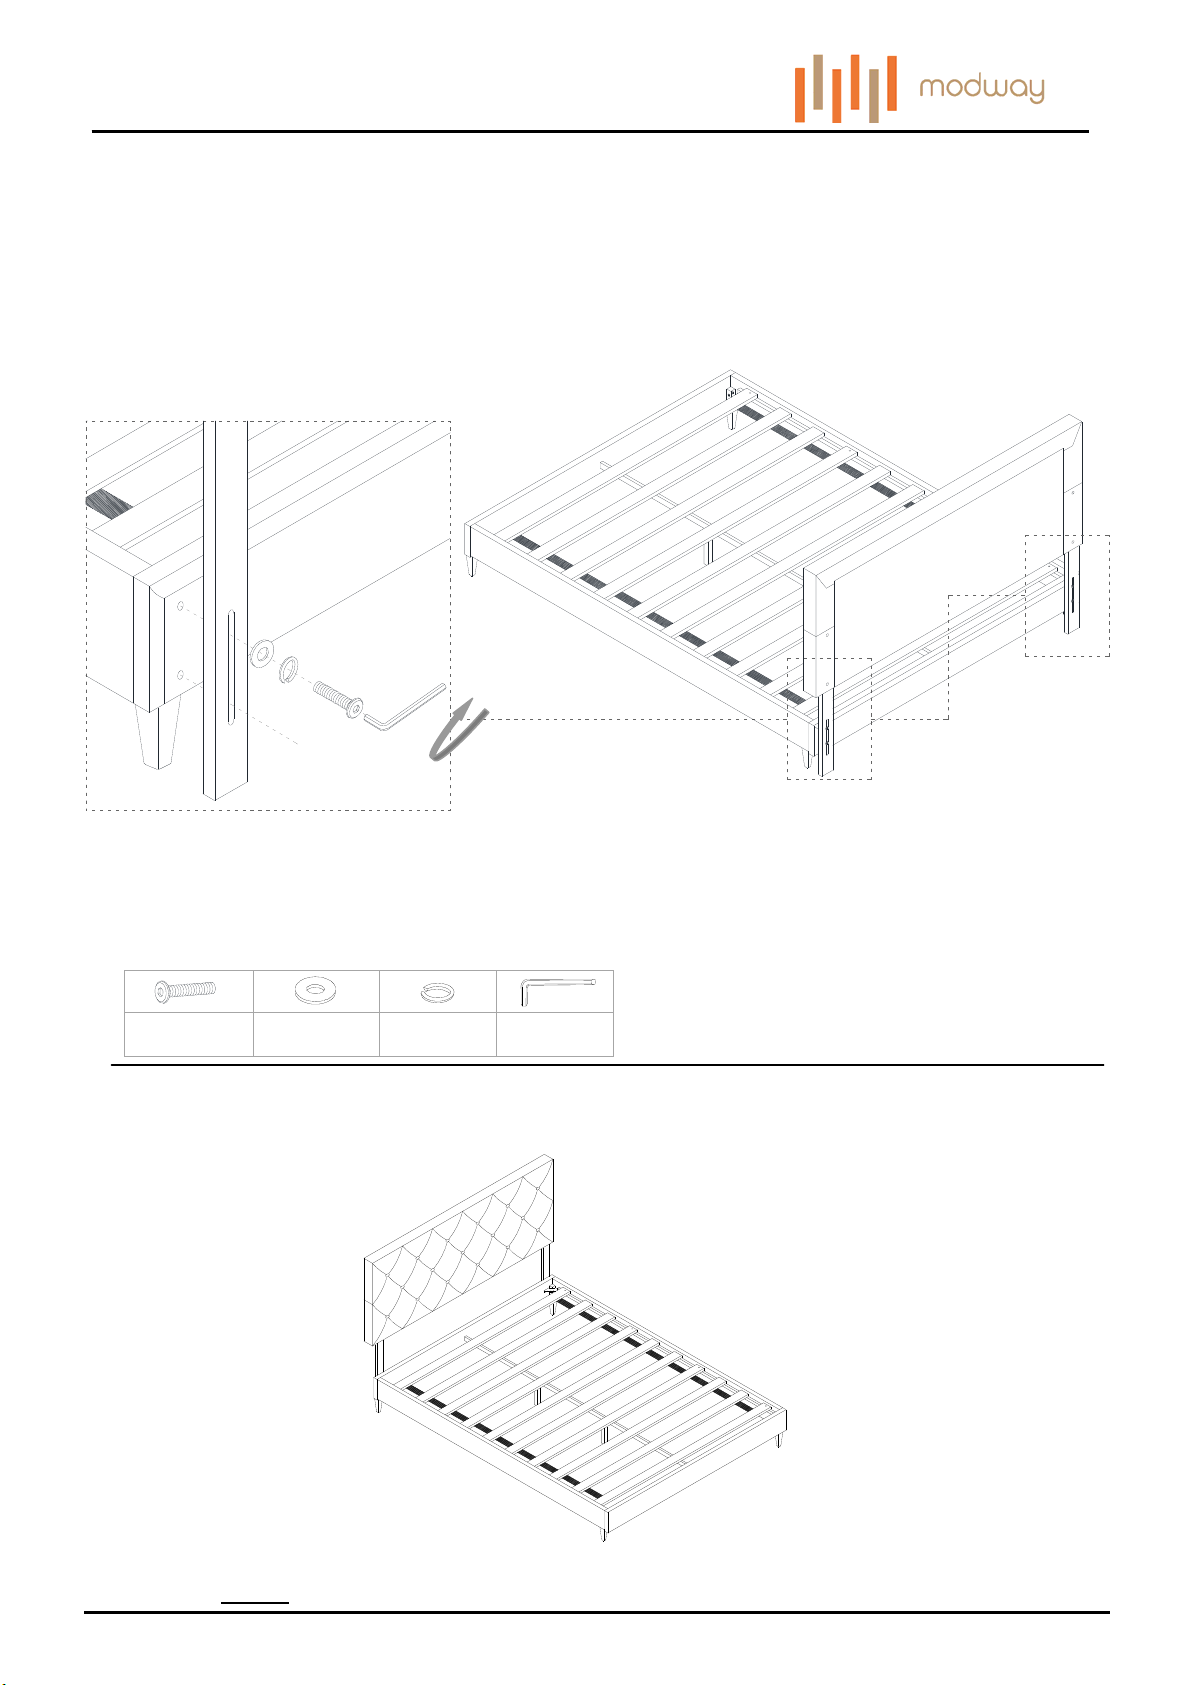
MODWAY CONNECTING BED FRAME TO HEADBOARD
STEP 1:
Line up the Bed Frame (2) board’s pre-drilled holes to match those of the Headboard (1).
Secure the Headboard (1) to the Bed Frame (2) by using 2 pieces of Bolt (A) with 2 pieces of Spring Washer (D), 2 pieces
of Flat Washer (C) into the Bed Frame (2).
Then tighten the Bolts (A) by using the Allen Wrench (F).
Repeat the same procedure for each bolt and each side of the Bed Frame (2).
2
1
2
C
D
A
F
Ax4 Cx4 Dx4 Fx1
STEP 2:
Carefully position the assembled bed to the desired location by four adults.
1
Hardware & Tool required
Assembly is completed. The bed is ready to use now!
NOTE: Hardware may loosen over time. Periodically check that all connections are tight.
Customer Service 908-368-1025︱www.modwayfurniture.com Page 6 of 6
 Loading...