

Page 1
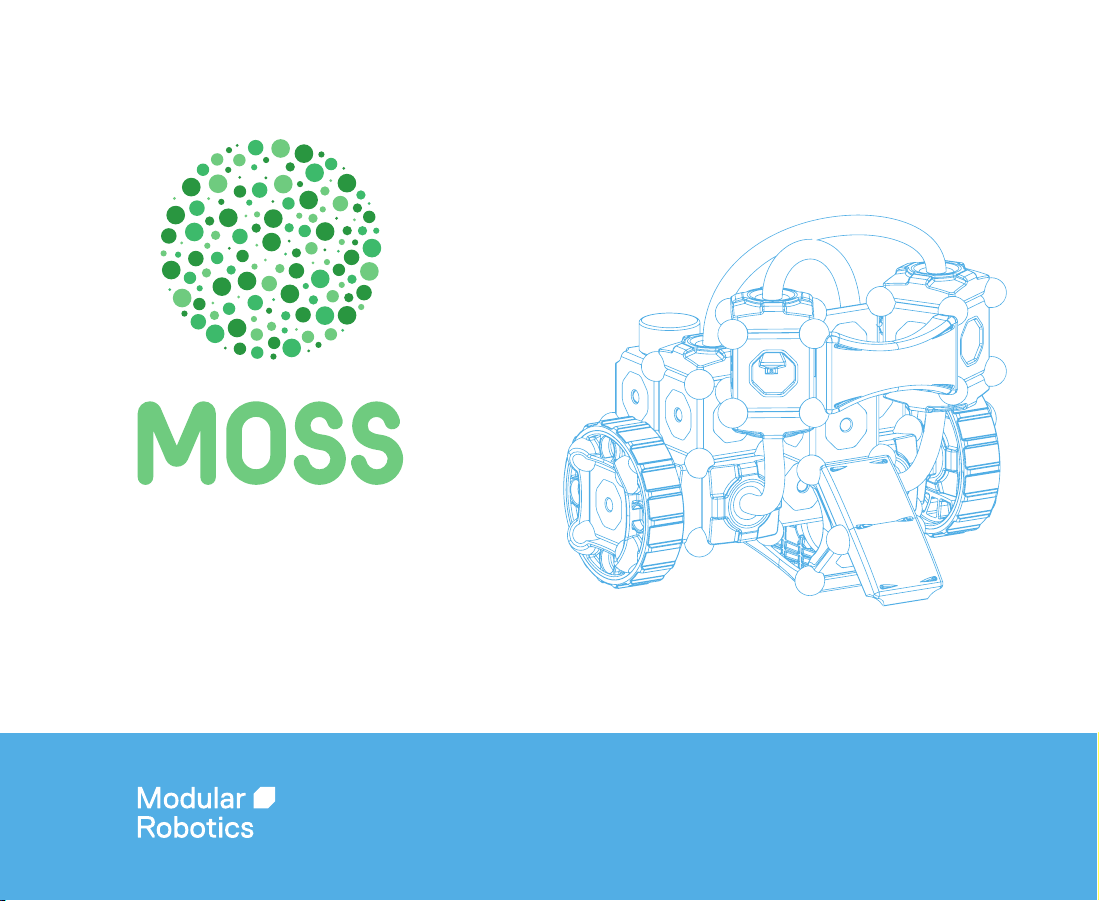
Exofabulatronixx 5200
Guide to Getting Started
Page 2
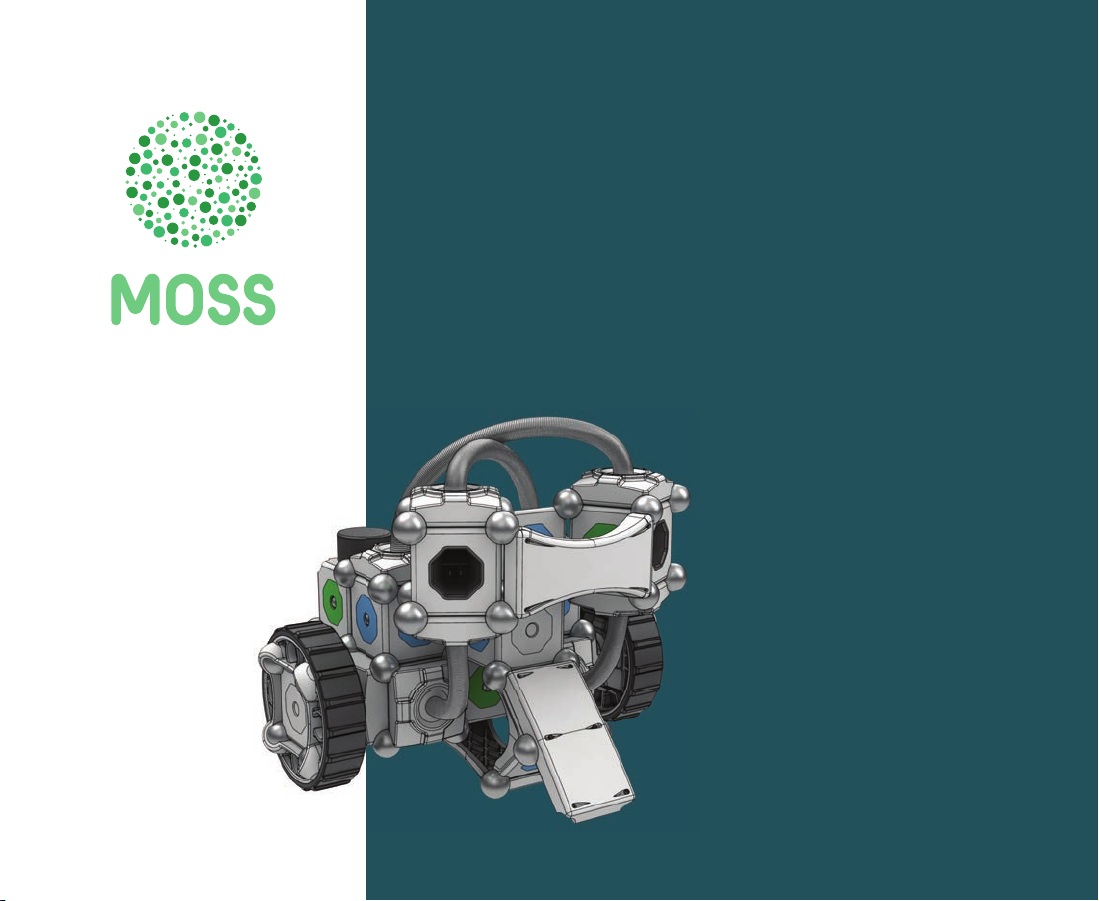
MOSS is designed and assembled by Modular Robotics in
Boulder, CO USA from components made all over the world.
Modular Robotics
3085 Blu Street
Boulder, CO 80301
(303) 656-9407
For questions and more robots, visit:
www.modrobotics.com
Page 3
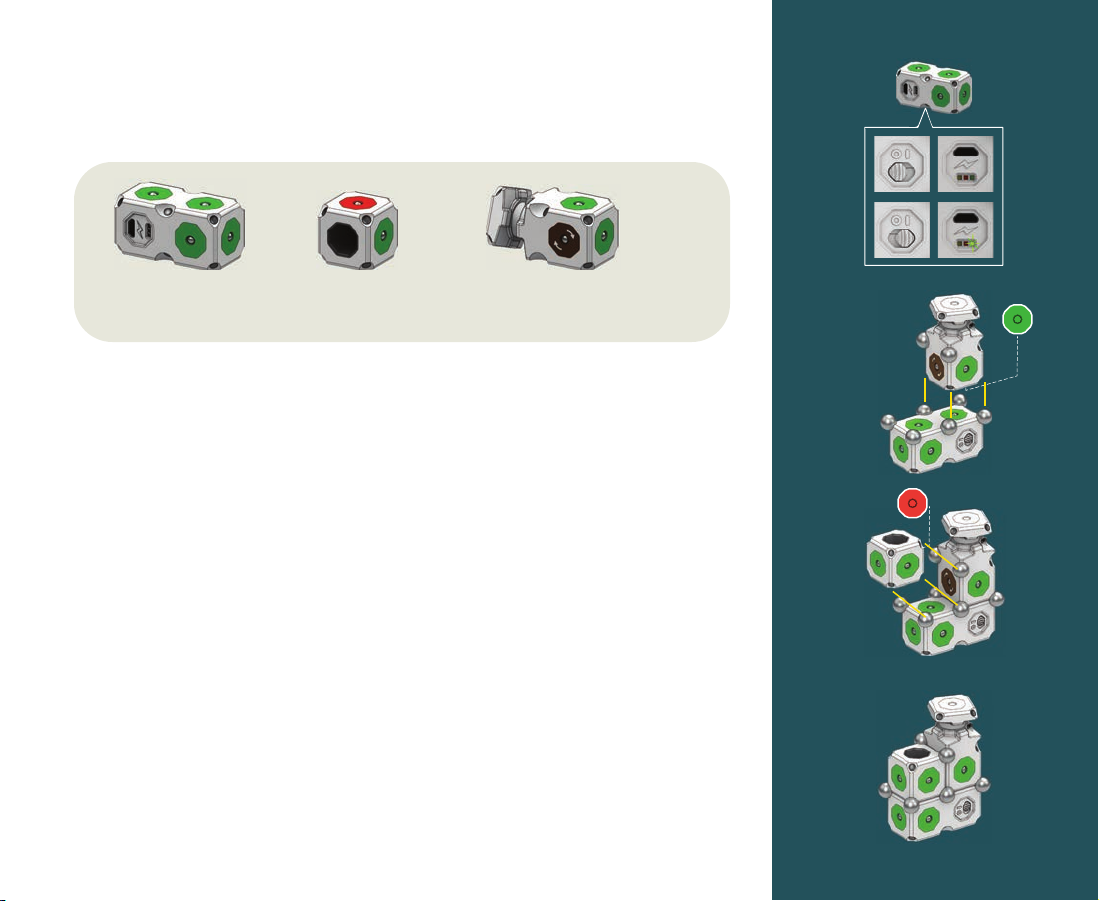
1. Getting Started
A
Extended
Battery
x1
Every MOSS robot needs a Battery Block. The Exofabulatronixx 5200
A
kit includes one Extended Battery Block. Flip the power switch on and
the green LED will tell you that your Extended Battery Block is
charged. It’ll turn red when it’s getting low, but you can recharge it
using the included Micro USB cable. Just plug it into your computer
until the yellow charging light turns o!
Attach a Motor Block so that one of its green power faces is
B
connected to a green power face on the Extended Battery Block. Now
the Motor Block is powered, but it still needs an input to tell it how to
spin.
Attach a Proximity Sensor with one of its green faces connected to a
C
green power face on the Extended Battery Block. Make sure that the
red data-output face of the Proximity Sensor is connected to one of
the Motor’s brown data-input faces.
Woo! You just created a simple MOSS robot. The Motor now responds
D
to the Proximity Sensor. Move your hand in front of it to nd the sweet
spot where the Motor stops and changes direction.
Proximity
Sensor
x1
Motor
x1
B
C
D
Page 4
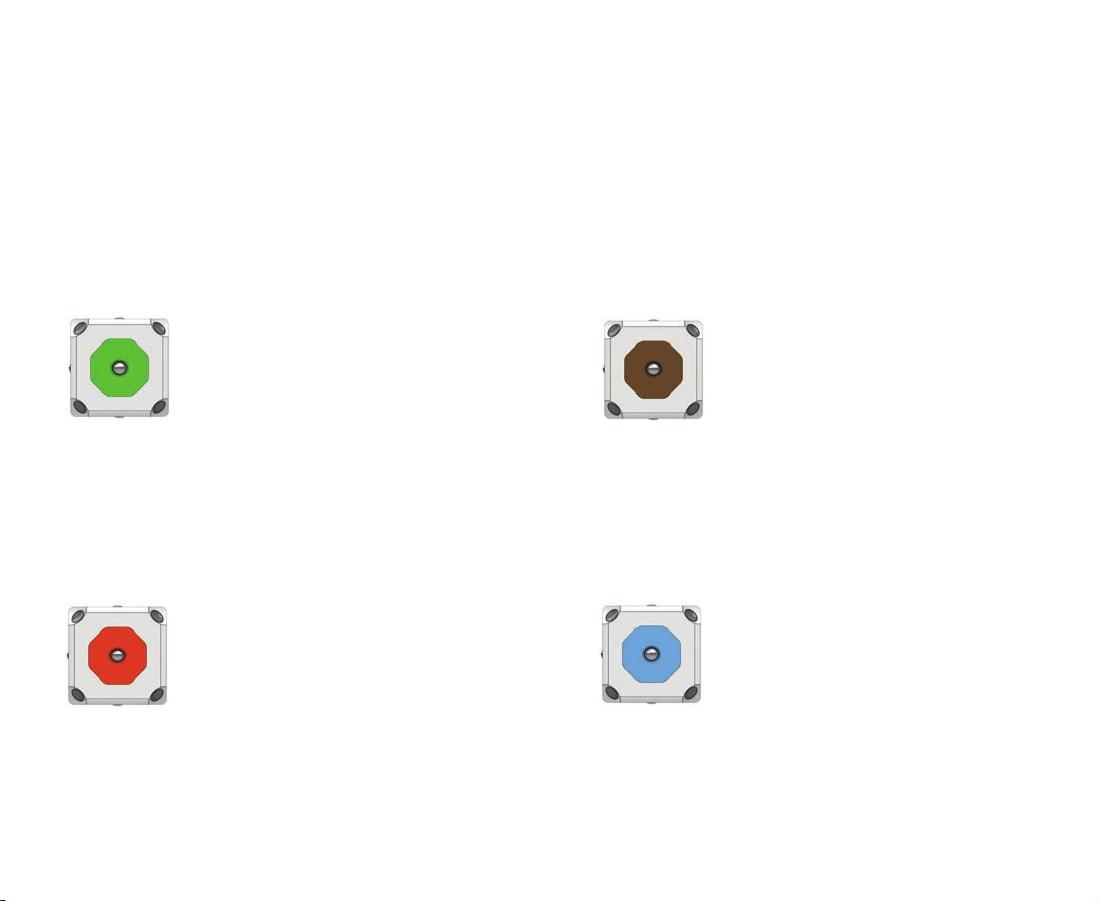
2. Face Colors
Understanding the colors of MOSS faces is essential to building robots. Power and
Data must ow through your construction without mixing. If they do, you won’t hurt
MOSS, but your robot may misbehave.
Power
Green faces route power
throughout a MOSS robot.
Once a block is powered by
connecting a green face to a
Battery Block, its other
green faces will power more
blocks.
Data Out
Red faces broadcast data.
For instance, the red face on
a Proximity Sensor sends out
data according to how close
it is to an object.
Data In
Brown faces listen for data
to tell that block what to do.
Connect a red face on a
sensor to the brown face on
a Motor Block and it’ll drive
according to the sensor’s
output.
Pass-through
Blue faces can conduct
either Power or Data, but not
both at once. You can use
the blue faces on a Flexy
Block to connect two faces
that can’t be arranged to
touch.
Page 5
3a. The Brain Block
Introduction:
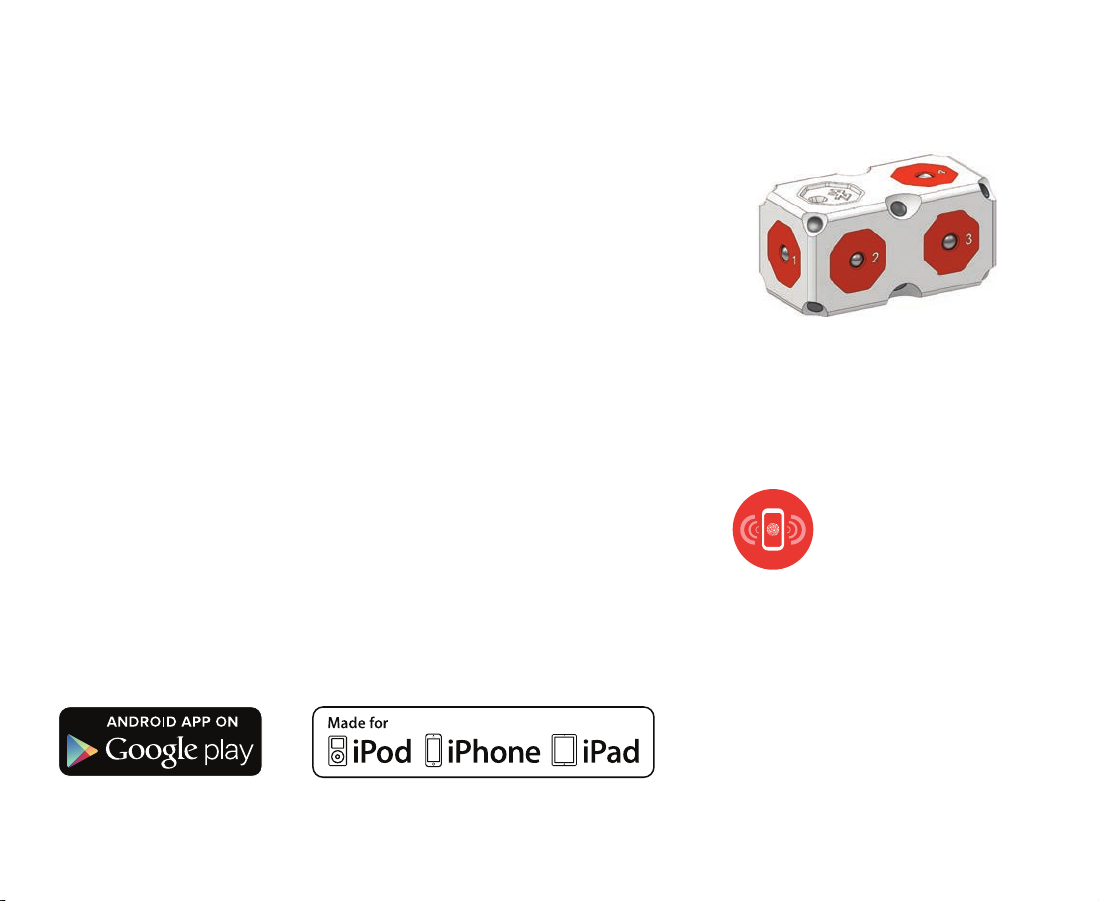
You can remotely control your robot with Bluetooth using a Brain
Block! The Exofabulatronixx 5200 includes a Double Brain Block. The
Double Brain has eight red data faces, numbered one through eight.
You can use the Double Brain to pair your constructions with any of
our free iOS or Android MOSS mobile apps. Pair your Double Brain to a
Mac or PC to reprogram your Brain Block using MOSS Scratch or
MOSS Flash. By pairing with dierent applications you can remotely
control your constructions, read data from sensors, and reprogram
your construction to exhibit entirely new behaviors. Learn more at
www.modrobotics.com/moss
Two constructions in this guide require the use of the Brain Block.
You’ll need to pair via Bluetooth with a mobile app to control and
maneuver those robots.
As you build, note the numbered faces on
the Double Brain Block. They correspond to
the numbered controls in apps such as
MOSS Control.
Look for this symbol to know
when a construction requires
a Bluetooth-connected
mobile device to operate.
“Made for iPod,””Made for iPhone,” and “Made for iPad” mean that an electronic accessory has been designed to connect
specically to iPod, iPhone, or iPad, respectively, and has been certied by the developer to meet Apple performance
standards. Apple is not responsible for the operation of this device or its compliance with safety and regulatory standards.
Please note that use of the accessory with iPod, iPhone or iPad may aect wireless performance.
Made for Apple iPhone®, iPad®, and iPod®
iPhone 5s
iPhone 5c
iPhone 5
iPhone 4s
iPhone4
iPhone 3GS
iPad (4th generation)
iPad mini
iPad (3rd generation)
iPad 2
iPod touch (5th generation)
iPod touch (4th generation)
Page 6
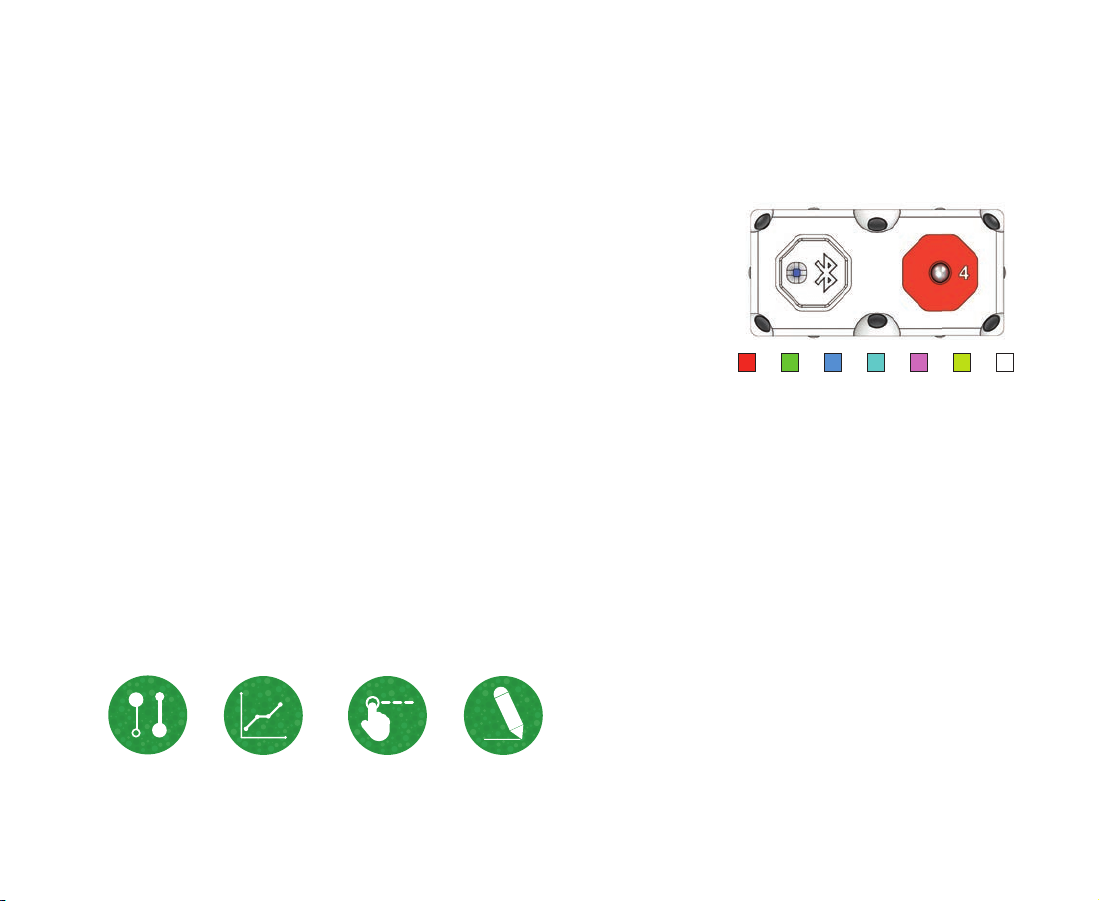
3b. Pairing the Brain Block
When using your Double Brain Block you’ll need to pair it with an
A
Android or iOS mobile device. Before you begin, make sure your
device has Bluetooth capability and it is turned ON.
Connect your Double Brain Block to the Extended Battery and
B
turn the battery on. If you do not see a series of ashing colors on
your Double Brain Block or need help with this step, please refer
to Section “1. Getting Started.”
Once you power on your construction, you’ll need to use your
C
mobile device to complete the pairing. Open your Bluetooth
settings and look for the MOSS Brain Block you wish to pair with.
For additional help please refer to your specic device’s support
guide.
When you pair with a MOSS Brain Block, its LED indicator light
D
will turn solid blue indicating a successful connection. You are now
ready to use one of our free mobile apps to play!
R G B C M Y W
The ashing lights on a Brain Block are
the identifying code. Each color
corresponds to a letter at the end of a
MOSS block name. For example a red
light corresponds with the letter “R.”
Use the three color codes to tell
MOSS brains apart.
Control Log Dashboard Sketch
To learn more about our mobile apps visit www.modrobotics.com/moss/apps
Page 7
Robot 1806: Braitenbird
The splendid Braitenbird is a ightless MOSS robot that uses two
proximity-sensing “eyes” to detect and avoid obstacles. A robotic
marvel of magical movement inspired by the writings of Valentino
Braitenberg. Build this adventurous avian wanderer and watch it
navigate through a forest of standing books with incredibly lifelike
behavior.
Page 8
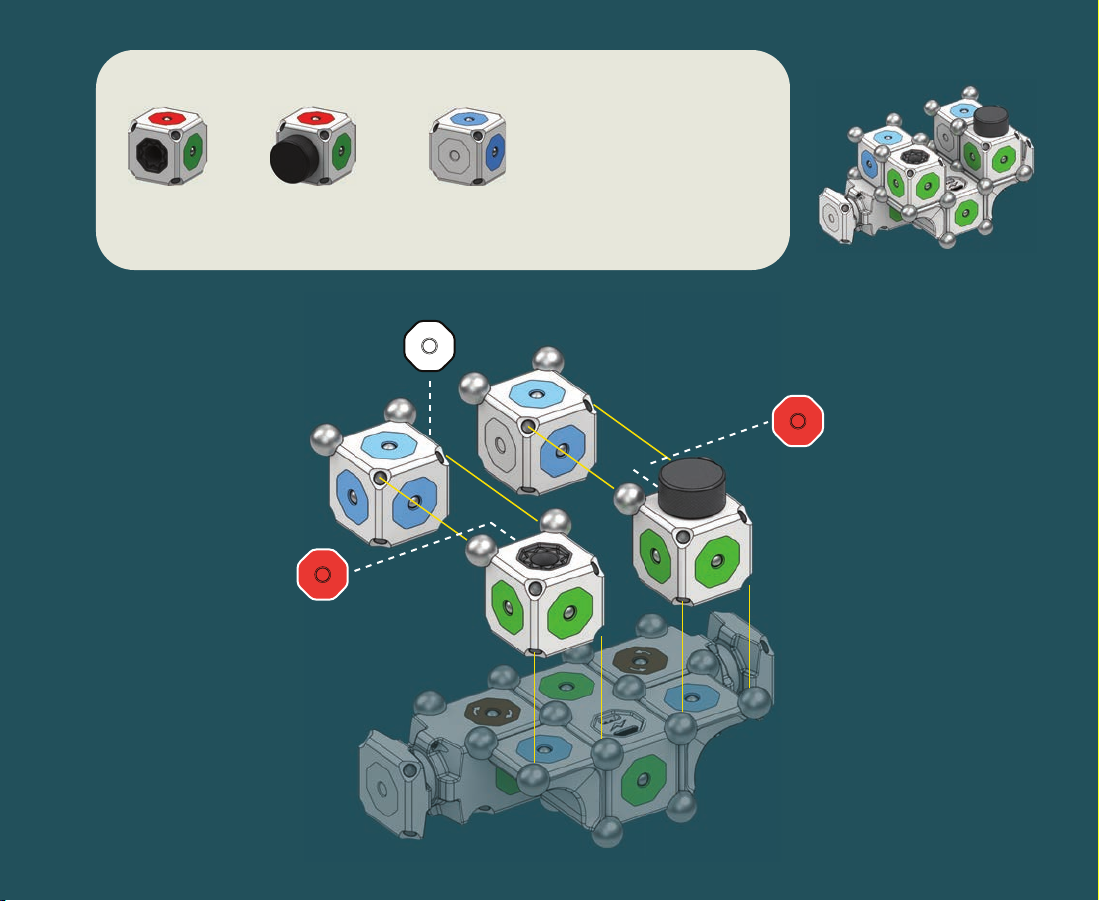
Extended Battery
x1
1
Corner
x2
Motor
x2
Robot 1806: Braitenbird
section 1 of 5
Page 9
Microphone
Sensor
x1
2
Knob
Sensor
x1
Hub
x2
Robot 1806: Braitenbird
section 2 of 5
Page 10
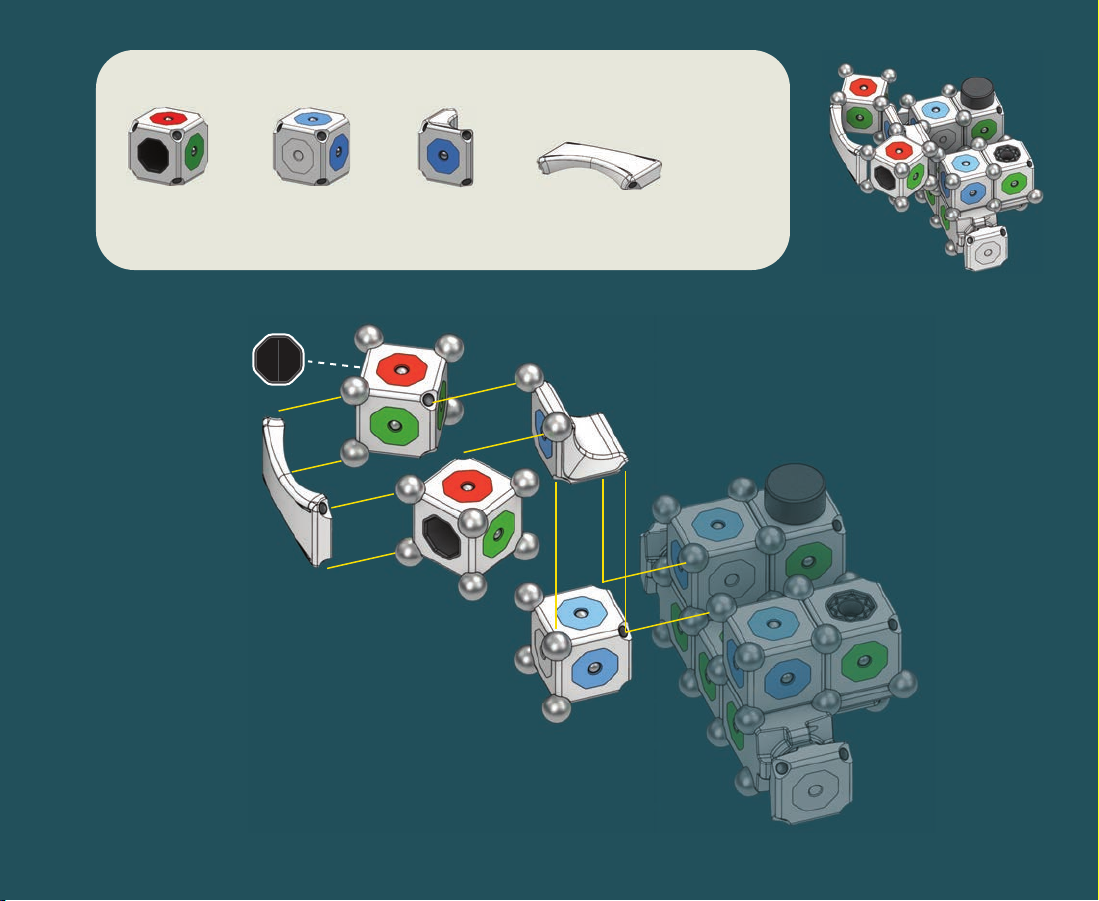
Proximity
Sensor
x2
3
Hub
x1
Corner
x1
Arch Brace
x1
Robot 1806: Braitenbird
section 3 of 5
Page 11
Short Flexy
x2
4
Corner
x1
Arch Brace
x1
Short Brace
x1
Robot 1806: Braitenbird
section 4 of 5
Page 12

Wheel
x2
5
Long Flexy
x2
Robot 1806: Braitenbird
section 5 of 5
Page 13

Adjust the Knob Sensor to tune
Braitenbird’s forward movement
to the left or right.
Play Guide:
Braitenbird
Braitenbird uses two
Proximity Sensors to sense
and avoid obstacles.
The Proximity Sensor uses
infrared light to detect
objects. Sensors may need
to get close to dark objects
to detect them.
If Braitenbird gets stuck, free it
by clapping your hands to trigger
the Microphone Sensor.
Try building a maze out of
books for your Braitenbird
to wander through!
Page 14

Robot 1806:
Braitenbird
Page 15

Robot 704: Inquisitronic
to guide you!
Harness the spirit of cosmic exploration with the MOSS planetary
rover, Inquisitronic. This remote-controlled, two-wheel-drive vehicle
is adept at exploring the mysterious terrain under your bed. Is that
your long-lost sock or an alien life form? Shed some light on the
matter with the proximity-sensing ashlight arm. Take readings of
ambient brightness and noise with the rear-mounted sensors. This
is your opportunity to explore new worlds with only your curiosity
to guide you!
Connected Device
Required
Page 16

Double Brain
x1
1
Hub
x2
Corner
x2
Motor
x2
Robot 704: Inquisitronic
section 1 of 4
Page 17

Pivot
x1
2
Extended Batteryx1Microphone
Sensor
x1
Brightness
Sensor
x1
Axle
x1
Corner
x1
Robot 704: Inquisitronic
section 2 of 4
Page 18

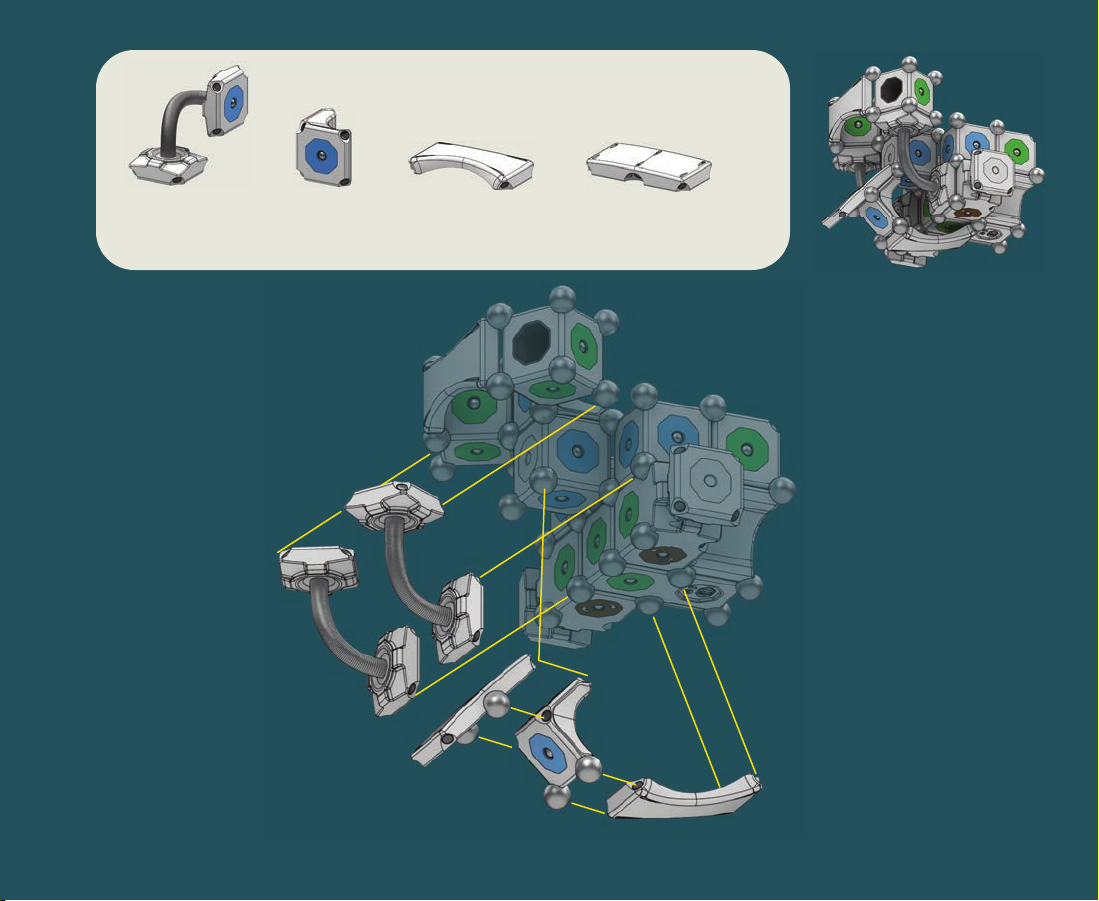
Flashlight
x1
Corner
x1
Proximity
Sensor
x1
Pivot
x1
3
Robot 704: Inquisitronic
section 3 of 4
Wheel
x2
Long Brace
x1
Page 19

Short Brace
x2
Arch Brace
x1
Wheel
x2
Short Flexy
x1
4
Robot 704: Inquisitronic
section 4 of 4
Corner Brace
x1
Long Brace
x1
Page 20

2
Microphone
Sensor
6
Forward &
Reverse
Play Guide:
Inquisitronic
The Brightness and
Microphone Sensors send
data to your mobile device.
If you aren’t seeing data,
make sure you’ve switched
the in-app controls to data
inputs, not action outputs.
3
Brightness
Sensor
7
Up &
Down
5
Forward &
Reverse
Inquisitronic is a dierential
drive robot. To turn, spin
your Motors in opposite
directions.
The Flashlight at the end of
Inquisitronic’s arm is
activated by the Proximity
Sensor. The closer it is to
an object, the brighter it
glows!
Page 21

Robot 704:
Inquisitronic
Page 22

Robot 53: Jawbotdamut
Jawbotdamut is a remote-controlled, front-end loading MOSS
robot. Got an avalanche of plastic bricks blocking your dollhouse
driveway? No problem, this wacky robo-wonder can power through
and clear a path for Bo Peep to rescue her sheep. Saving toys is all
in a day’s work for this run-of-the-mill hero whose eyes will set your
heart aglow.
Connected Device
Required
Page 23

Extended
Battery
x1
1
Brightness
Sensor
x1
Corner
x2
Motor
x2
Pivot
x1
Robot 53: Jawbotdamut
section 1 of 7
Page 24

Double Brain
x1
Hub
x1
Corner
x1
Axle
x1
Short Brace
x1
2
Robot 53: Jawbotdamut
section 2 of 7
Long Brace
x1
Page 25

Hub
x2
3
Axle
x1
Corner Brace
x2
Long Brace
x1
Robot 53: Jawbotdamut
section 3 of 7
Page 26

Pivot
x1
4
Corner Brace
x2
Corner
x2
Proximity
Sensor
x1
Brightness
Sensor
x1
Robot 53: Jawbotdamut
section 4 of 7
Page 27

Hub
x2
5
Flashlight
x2
Corner
x2
Robot 53: Jawbotdamut
section 5 of 7
Page 28

Wheel
x2
6
Long Flexy
x1
Arch Brace
x2
Short Brace
x1
Robot 53: Jawbotdamut
section 6 of 7
Page 29

Wheel
x2
7
Long Flexy
x1
Arch Brace
x2
Robot 53: Jawbotdamut
section 7 of 7
Page 30

4
Left &
Right
7
Lifting
1
Forward &
Reverse
8
Lights
Play Guide:
Jawbotdamut
Push, carry and plow your
way through dominos or
ping-pong balls. Looking for
a challenge? See if you can
scoop two ping-pong balls
into the bucket at once.
Modify the Jawbotdamut’s
bucket to discover new
ways to scoop, carry and
plow!
Is your Jawbotdamut
spinning in circles? Doublecheck the arrows on your
Motor’s brown data-in
faces.
Page 31

Robot 53:
Jawbotdamut
Page 32

4. Available Blocks
The MOSS robot construction system is comprised of blocks that you can combine to build a multitudinous
variety of robots. Use the following index of blocks to see what is available or visit www.modrobotics.com/moss
to discover new MOSS robots.
Extended Battery
The Extended Battery is a
rechargeable LiPo battery that
powers your robots.
Proximity Sensor
The Proximity Sensor helps your
robot measure distance to the
closest object using infrared
light.
Double Brain
The Double Brain Block uses
Bluetooth wireless communication
to link your robot to a mobile
device or computer.
Knob Sensor
The Knob Sensor uses a
potentiometer to precisely
control a data value.
Brightness Sensor
The MOSS Brightness
Sensor is tuned to respond
to bright sources of light, like
a ashlight or the sun.
Mic Sensor
The Mic Sensor measures the
level of noise around it.
Page 33

Pivot
The Pivot provides a powered
articulation to robot
construction. Use it to create
steering mechanisms or
powered hinges.
Motor
The Motor has a rotating end
that can be used to power a
rolling wheel. Experiment with
the orientation of your motor
block and create new types of
movement.
Flashlight
The Flashlight glows brightly
when activated. Use it to
light your path or trigger a
Brightness Sensor.
Wheel
The MOSS Wheel is a support
piece that can translate the
rotating face of an Axle or Motor
into smooth motion.
Axle
The MOSS Axle is a support
piece with the unique ability to
spin along one axis.
Corner
The Corner is a connective
block that can link and
support nearby faces.
Page 34

Hub
The Hub is a connective block
that can link nearby faces. The
humble Hub is one of the most
versatile pieces of MOSS
thanks to its unique ability to
split, connect, or average
signals to multiple blocks.
Long Flexy
The Long Flexy is a connective
block that allows you to connect
power or data across four
standard block lengths.
Short Flexy
The Short Flexy is a
connective block that
allows you to connect
power or data across two
standard block lengths.
Long Brace
The Long Brace spans three
standard block lengths. This
block is the best choice to
stengthen areas of your robot.
Short Brace
The Short Brace spans two
standard block lengths, providing
connective support for up to six
steel spheres.
Corner Brace
The Corner Brace spans
three standard block
lengths with a 90 degree
bend in the middle.
Page 35

Important Information About MOSS:
General: Not for use by children under the age of 8. Do not get MOSS wet! Do not
submerge, burn, puncture, crush, microwave, or expose MOSS to extreme heat or re.
Keep MOSS out of the dirt - magnetic particles will stick to the connectors and may
cause damage. Do not connect the MOSS Battery Block to more than one power
source. MOSS charges at 5V DC ( ). Your MOSS packaging should be retained
because it contains important information about the manufacturer.
Cleaning: Before cleaning, disconnect the Battery block from the USB charging cable.
Use a lightly moistened (with water), soft, lint-free cloth to clean MOSS.
DO NOT USE alcohol, household cleaners, ammonia, window cleaner, aerosol sprays,
solvents or abrasives. Do not spray water directly on the product. Do not let moisture
enter any openings.
!
WARNING
WARNING: Not suitable for children under 8 years old. This product contains small parts
with magnets. Swallowing these parts can cause the magnets to stick together across
the intestines causing serious injuries or death. Seek immediate medical attention if the
small parts are swallowed.
Page 36

You’ve just begun your journey to the summit of Mount
Im’awesome’Atbuilding’robots. To reach its exhilarating peak you
need only let your imagination run wild. The robots you’ve built in this
guide are a tiny portion of the creations available to you. Let your
intuition and imagination guide you to create the robots you’ve
always wanted to build.
We hope you enjoy MOSS and can’t wait to see what you build!
Please share your creations with us on Facebook or Twitter using the
hashtag:
myMOSS
#
Want more robot construction ideas? Visit:
www.modrobotics.com
 Loading...