

Page 1
emotion for professional people
user’s manual
emotion for professional people
ovens
ovens
emotion
emotion
Page 2

dear customer,
we thank you and congratulate you for purchasing this equipment; we hope
this is the beginning of a positive and lasting collaboration.
This manual contains all the information necessary for the use and
maintenance of the equipment.
We therefore advise you to read it carefully and keep it with care for future
consultations.
Enjoy your work!
Page 3

warnings ................................................................................................... 4
reminders for the user .......................................................................................4
pictogram explanations ....................................................................................6
information ............................................................................................8
some information .............................................................................................. 8
cooking advice ............................................................................................8
useful accessories .......................................................................................9
cooking phases: what they are and what they are used for ...............................10
how to use the Multipoint core probe supplied .................................................11
sous-vide cooking ...........................................................................................12
how to use mobile ovens .................................................................................. 13
use ..............................................................................................................14
how to navigate between pages .......................................................................14
setting the initial settings (time, date, etc ...) ...................................................... 16
setting the language ....................................................................................16
selecting the unit of measure ....................................................................... 17
setting the date ...........................................................................................17
selecting the time zone ................................................................................ 18
setting the time ............................................................................................ 19
information ..................................................................................................19
managing programs (recipes) ......................................................................20
HACCP protocol ..........................................................................................21
cooking! ...........................................................................................................22
manual cooking ........................................................................................... 24
automatic cooking with recipes (programs) ..................................................35
multilevel .....................................................................................................39
Best Chef ....................................................................................................47
cooling ........................................................................................................48
recipes ........................................................................................................50
maintenance ........................................................................................ 56
routine cleaning ................................................................................................56
safety warnings ................................................................................................56
cleaning the cooking chamber .......................................................................... 58
Cleaning with manual shower ......................................................................59
Rinsing program .......................................................................................... 59
MANUAL washing .......................................................................................60
Automatic washing ...................................................................................... 61
How to load the detergent ........................................................................... 62
cleaning the external surfaces, glass and Touch Screen panel ..........................63
cleaning the internal seal...................................................................................63
cleaning the trolley ............................................................................................63
cleaning the tray grid ........................................................................................63
managing the boiler (if any) ...............................................................................64
how to descale ............................................................................................ 65
downtime .........................................................................................................66
end-of-life disposal ...........................................................................................66
service ......................................................................................................... 68
something is not working? ................................................................................ 68
Page 4
warnings
reminders for the user
pictogram explanations
reminders for the user
Failure to comply with the following rules can
4
6
all liability.
- Before use and ordinary maintenance of the equipment read
this manual carefully and take care to keep it for any further
future consultation by the various operators. Contact the
Manufacturer, if some parts cannot be understood.
- In case of transfer of the equipment, hand this booklet to
the new user.
- Use, cleaning and maintenance other than those indicated
in this manual are considered improper and may cause
damage, injury or fatal accidents, void the warranty and
relieve the Manufacturer from all liability.
- This appliance must only be used by qualied personnel to cook
food in professional kitchens: any other use is not compliant with
the intended use and therefore dangerous.
- The manufacturer has designed and built this equipment according
to the regulations in force and with the best safety systems with
the aim of reducing the risks, however a residual risk remains that
will be decreased further by the user who has to comply with the
rules in this use and maintenance manual.
- If the appliance does not work or you notice any functional
or structural anomalies, disconnect it from the power and
water supplies and contact a Service Centre authorized by
the Manufacturer without attempting to repair it yourself. For a
possible repair request the use of original spare parts.
- Do not obstruct the side vents.
- The equipment must be easily movable for any extraordinary
maintenance: make sure that any masonry work following the
installation (e.g. construction of walls, replacement of doors with
narrower ones, renovations, etc ...) does not hinder handling.
- The appliance may be used by children aged 8 or less and by
persons with reduced physical, sensory or mental abilities, or
lacking experience or the necessary knowledge, provided they
are monitored or after they have received instructions concerning
the safe use of the appliance and understand the dangers inherent
to it. Children must not play with the appliance. Cleaning and
maintenance must be carried out by the user and not by children
without supervision.
result in damage and injury, even death, will void
the warranty and relieves the Manufacturer from
4
Page 5

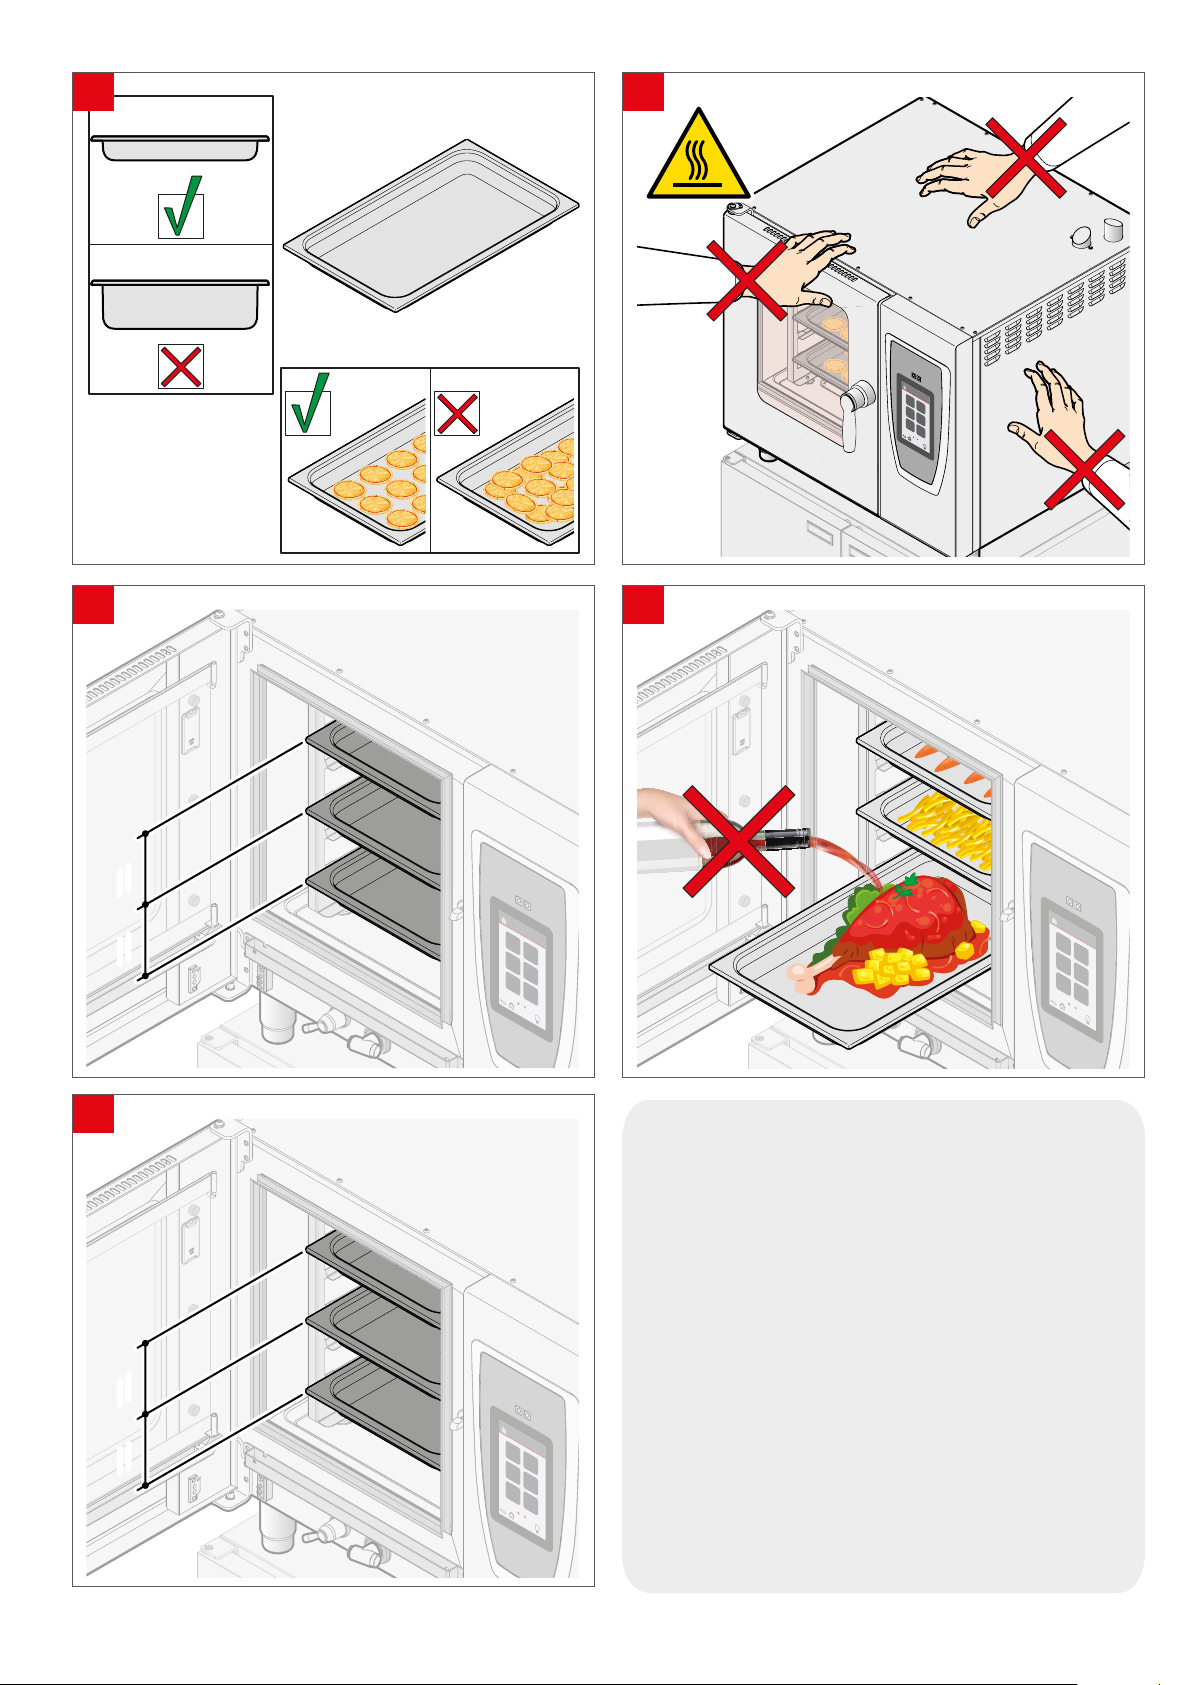
- When cooking particularly fatty foods with grills (for example roasts or poultry), place a container
on the bottom of the cooking chamber to collect any fat.
- Before use, make sure that there are no non-conforming objects (instruction booklets, plastic bags
or anything else) or detergent residues inside the cooking chamber; in the same way make sure that
the smoke ue is free from obstructions and there are no ammable materials near it.
- On rst use, operate the appliance for 30-40 min. at 200°C in order to eliminate the processing
residues; wait for the chamber to cool and start a SHORT wash. Before each use, carefully clean
and dry accessories and trays too.
- To move containers, accessories and other objects inside the cooking chamber, always wear
protective thermal clothing (PPE) suitable for the use in question (e.g. thermal gloves).
- To prevent burns, do not use containers lled with liquids or food that turn into a liquid state when
cooked, at levels higher than those that can be seen.
- During cooking and until the food has cooled, the external and internal parts of the oven
could be very hot (temperature higher than 60°C / 140°F). To avoid the risk of burns, do
not touch the areas marked with this symbol.
- Pay the utmost attention when removing the trays from the oven chamber, especially if they contain
liquids.
- Pay particular attention when opening the door during and after cooking, especially if you used
steam: scalding hazard.
- Do not salt in the oven chamber.
- Do not use easily ammable food or liquids (e.g. alcohol) during cooking.
- Keep the cooking chamber always clean, performing a daily cleaning after each cooking: if not
removed from inside, fat or food residues could ignite!
- If used, remove the core probe from the food before removing the trays from the oven. Before
removing the trays, check that the probe cable is not obstructing the extraction of the trays.
Handle the probe carefully as it is very sharp and reaches high temperatures after use.
- Do not open the oven door during washing as there is a risk of injury due to the impeller movement,
hot vapours and the aggressiveness of the chemical detergents used.
- The replacement of the detergent and rinse aid packs must be carried out very carefully, avoiding
contact with eyes and skin. In case of contact with eyes, rinse thoroughly with running water and
contact a doctor.
- Do not place heat sources (e.g. grills, fryers, etc.) or easily ammable or combustible substances
near the appliance (e.g. diesel, petrol, bottles of spirits, etc ...).
- Only use the core probe supplied by the Manufacturer.
only for floor ovens with trolley
- Lock the parking brakes of the front wheels of the trolleys whenever you do not need to move
them.
- Always lock the trays inserted in the guides.
- Pay the utmost care when moving the trays because they can contain hot liquids that can
overow and the trolleys can tip over (for example when transporting them on uneven surfaces
or through doors).
- Do not overload the trays inserted in the trolley! The maximum allowed load is 90 kg.
5
Page 6
warnings
pictogram explanations
The installation and use instructions are valid for all models unless otherwise specied by the following pictograms:
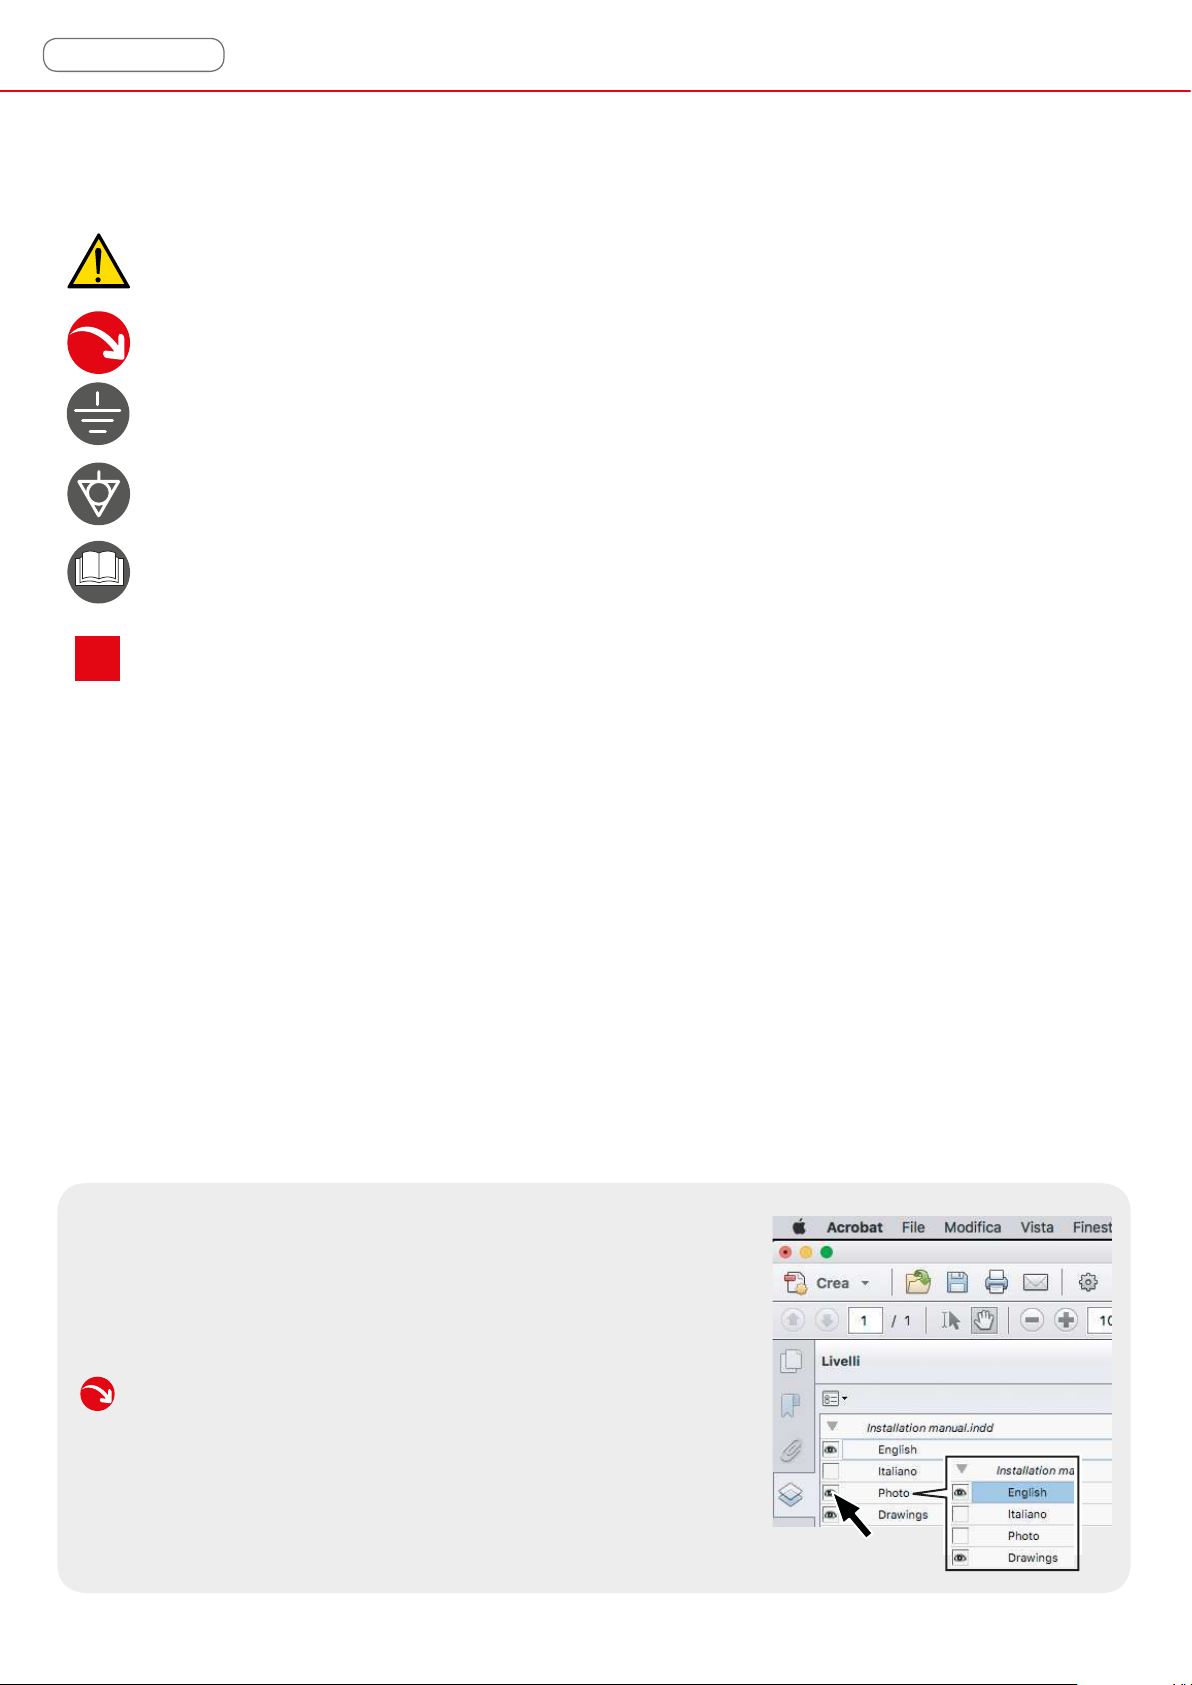
Danger! Situation of immediate danger or dangerous situation that might cause injury or death.
Useful tips and information
Grounding symbol
Equipotential symbol
Read the instruction manual
1
Indicates the Figure or Table to which the text refers
digital version
The digital version of the booklet, available in PDF format, is interactive; for
example, a simple "click" on the written text or page numbers lets you access
the indicated contents.
If you need to print the booklet, we recommend deactivating the "Photo”
level of Acrobat.
Drawings, texts and contents will be printed but coloured photos will be
eliminated: in this way it will be possible to save a lot of printing ink and,
consequently, to protect the environment!
6
Page 7
personal notes
7
Page 8

information
some information
some information
Below are some tips and concepts that, combined with your experience, will allow you
to get excellent performance from your equipment and ensure maximum safety of use.
8
cooking advice
- During cooking, open the door as little as possible;
if the appliance is not used at full load, evenly distribute the trays over the whole
-
1
height of the chamber to ensure good air circulation between them: this will
improve the results and reduce cooking time;
-
use trays with low edges and distribute the food evenly in a single layer. For
2
optimal performance, the Manufacturer recommends its own trays;
-
during cooking and until cool, be careful when you touch the external and
3
internal parts of the oven as they may be very hot (temperature higher than
60°C/140°F).
do not use easily ammable food or liquids (e.g. alcohol) during cooking;
-
4
- when cooking particularly fatty foods with grills (for example roasts or poultry),
place a container on the bottom of the cooking chamber to collect any fat;
- preheating is always recommended to obtain better cooking results (except for
special cooking requiring a "cold” start). When the set preheating temperature has
been reached, the oven will beep and a window will be displayed to indicate that
it is time to put the dishes in the oven; when the door is closed, cooking will start
automatically according to the set parameters
- do not overload the equipment. Exceeding the expected load can lead to damage to
the equipment and to less than optimal cooking results;
- during the insertion or extraction of trays, be careful not to hit the Touch Screen with
them.
In the very rst uses, due to the evaporation of the humidity of the insulating
materials, the equipment will produce unpleasant fumes and odours that will
gradually disappear with the subsequent operating cycles.
When there is an interruption of the power supply (for example a blackout) and
cooking was in progress, when the supply is restored, the oven automatically
restarts from the point where it was interrupted.
Cooking takes place only when the door is closed, for safety reasons. When,
during a cooking operation, the door is opened, the oven stops temporarily and
signals the fact with a message on the display.
To resume cooking, simply close the door.
If, after cooking at high temperatures, you intend to cook food that require low
temperatures, the "Cooling - chamber cooling" function page 48 is available,
which quickly cools the cooking chamber to the desired temperature.
After cooking meat, let it rest wrapped in aluminium foil: for a few minutes cooking
will continue by thermal inertia ("Carry Over"). Wait until the temperature drops to
around 60°C ("Rest" phase); proceed then with cutting the meat which will be
particularly tasty and juicy.
Pay particular attention when opening the door during and after cooking,
especially if you used steam: scalding hazard.
8
Page 9
1
3
2
5
==
==
4
useful accessories
Studied by catering professionals to be the right aid
for every chef:
- trays for all kinds of cooking: for fried foods,
omelettes, baguettes, of all possible sizes and in
the best materials;
- tray-holding complementary trestles and tray
trolley included in the EM E 20/11-D model;
- condensation hoods designed specically for
Emotion ovens;
- oven-dedicated detergents and cleaning materials.
9
Page 10
information
cooking phases: what they are and what they are used for
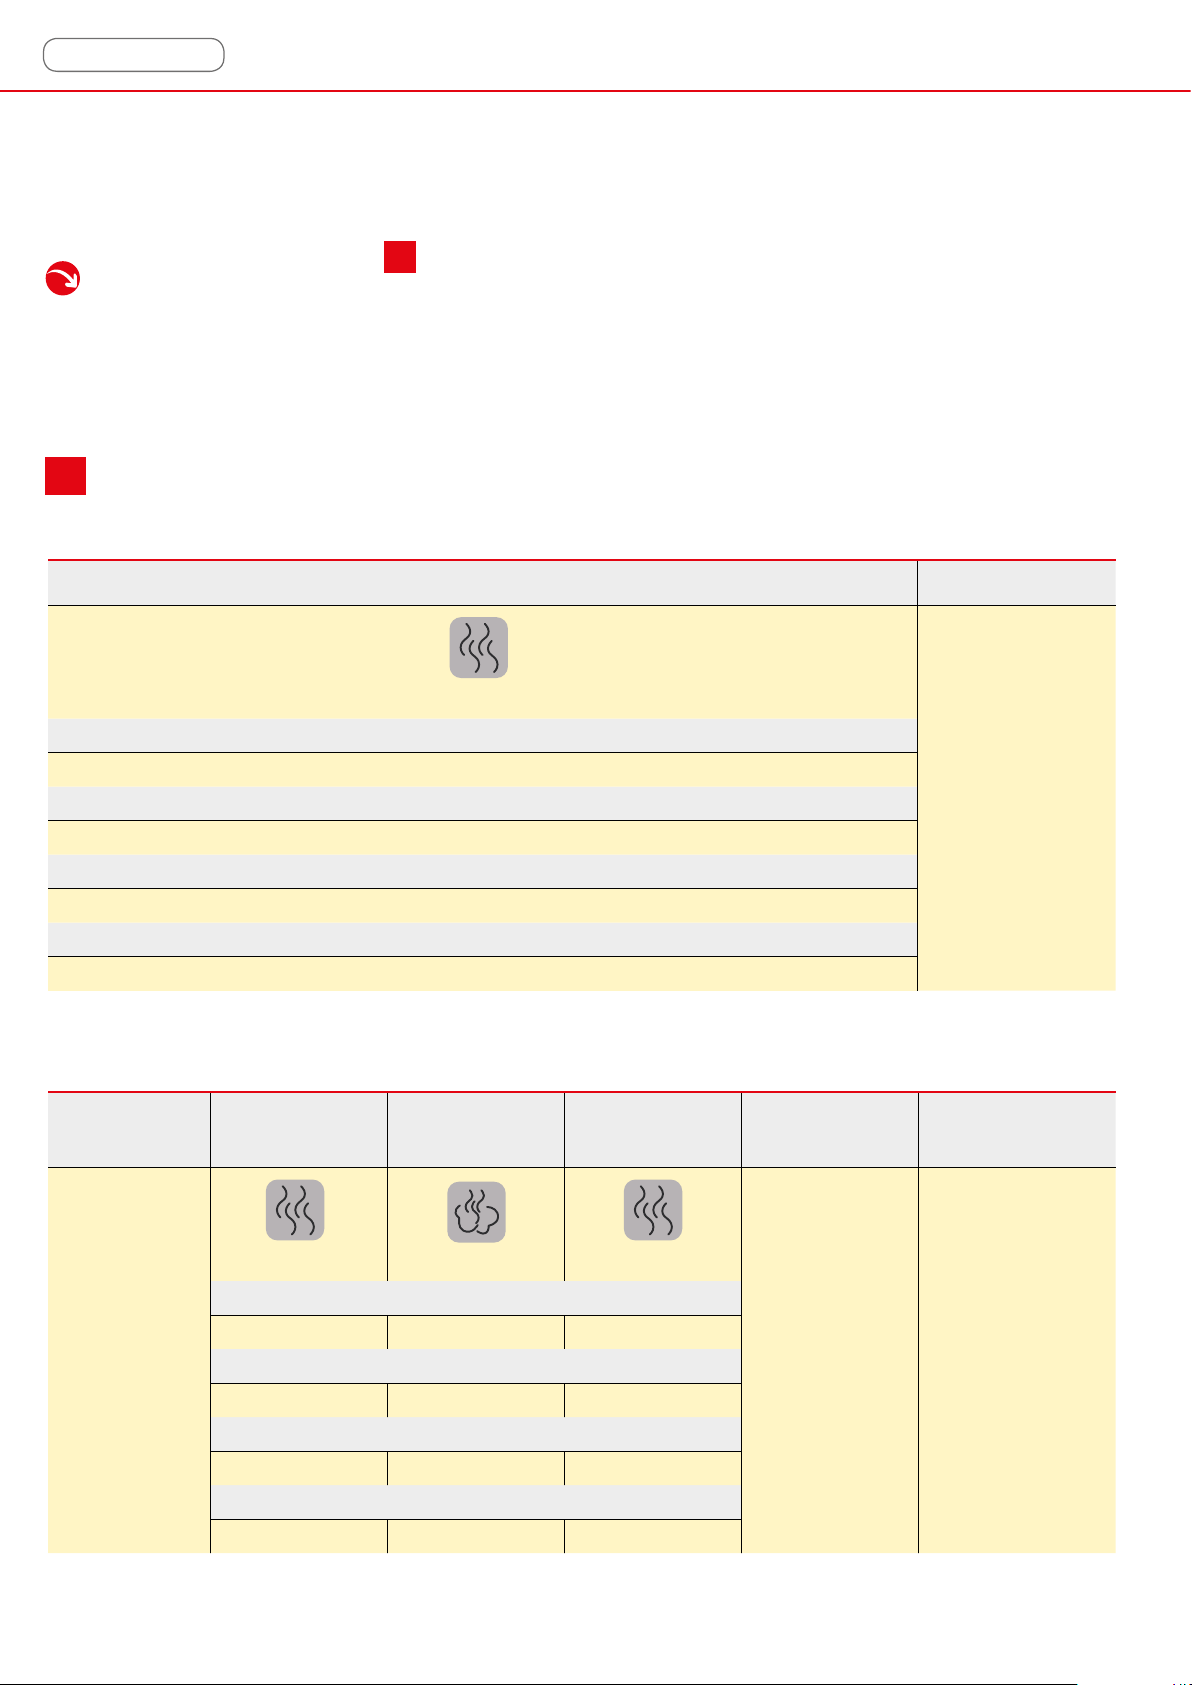
Cooking can consist of a minimum of 1 cooking phase or, for better results, up to a maximum of 16 cooking phases, each
characterized by different cooking types and parameters (for example, some phases can be set according to time, others with
core probe). It is not necessary to use all the phases, for example only two or three can be used.
In the example shown in the table A you can see the difference between cooking a roast managed with a single phase
and with several phases (recommended).
Using the phases means being able to accurately control cooking at all times, modulating the temperature, humidity and fan
speed as required.
cooking phase table
A
cooking a roast using 1 phase
PHASE 1 (it is always necessary to set at least 1 phase) TOTAL TIME
convection
duration
90 minutes
temperature
200°C
fan speed
1
humidity/extraction
humidity 80%
cooking a roast using multiple phases (recommended mode)
PRE-HEATING
temperature
210°C
PHASE 1
(browning)
convection combined (Combi) convection
15 minutes 75° in the core 7 minutes
190°C 130°C 190°C
PHASE 2
(internal cooking)
duration
temperature
PHASE 3
(final browning)
90 minutes
PHASES
from 4 to 16
not used about 90 minutes
TOTAL TIME
10
fan speed
5 3 5
humidity/extraction
vent closed humidity 80% vent closed
Page 11

how to use the Multipoint core probe
supplied
The equipment is supplied with a Multipoint core probe.
When the probe reaches the temperature set by the user, it
means that, both on the surface and in the innermost part ("the
core”), the food is cooked and therefore cooking is stopped.
Traditional probes measure the temperature of the food
in which they are inserted, only on the tip of the probe,
while the Multipoint probe detects the temperature in
several points and provides the average value of these
detections. This allows more precise measurements as errors
are avoided; for example, in traditional probes, if the tip is very
close to the bones, the detected temperature may not reect
the real core temperature.
To use the core probe, it is necessary to insert the
6
connector in the appropriate socket located in the lower
part of the appliance.
The tip of the core probe must be inserted deeply into
7
the food to be cooked, paying attention that it does not
come out. Do not put it in very fatty places near the bones
(cooking may end too early).
6
At the end of cooking, take care to remove the core
probe before removing the tray or trolley from the oven.
The core probe is very sharp and, after cooking, reaches high
temperatures!!!
Do not pull the probe by the wire to remove it!
Do not insert the hot probe in frozen food: danger of thermal
shock and consequent failure!
B
Core temperature indicative table
dishes
Fillet 53-58°C
Roastbeef 53-58°C
recommended core
temperature
7
Braised meat 80-85°C
Veal roast 72-78°C
Pork shank 80-85°C
Porchetta 68-75°C
Lamb loin 58-65°C
Chicken - Turkey (whole) 85-87°C
Salmon (slices) 58-65°C
OK
11
Page 12
information
sous-vide cooking
Sous-vide cooking ensures greater respect of the organoleptic
qualities, the preservation of vitamins contained in food and
allows cooking without added fats: it is particularly suitable for
cooking meat and vegetables, as it is more homogeneous
and preserves the softness and juiciness of the dishes.
Sous-vide cooking also allows to block the bacterial
proliferation inside the special sous-vide bags, keeping the
aromas, quality and nutritional values of your food much
longer.
For this type of cooking you need to have:
- an extremely thin single-point probe (to be requested as an
option from the manufacturer);
- specic bags for sous-vide oven cooking;
- neoprene gaskets.
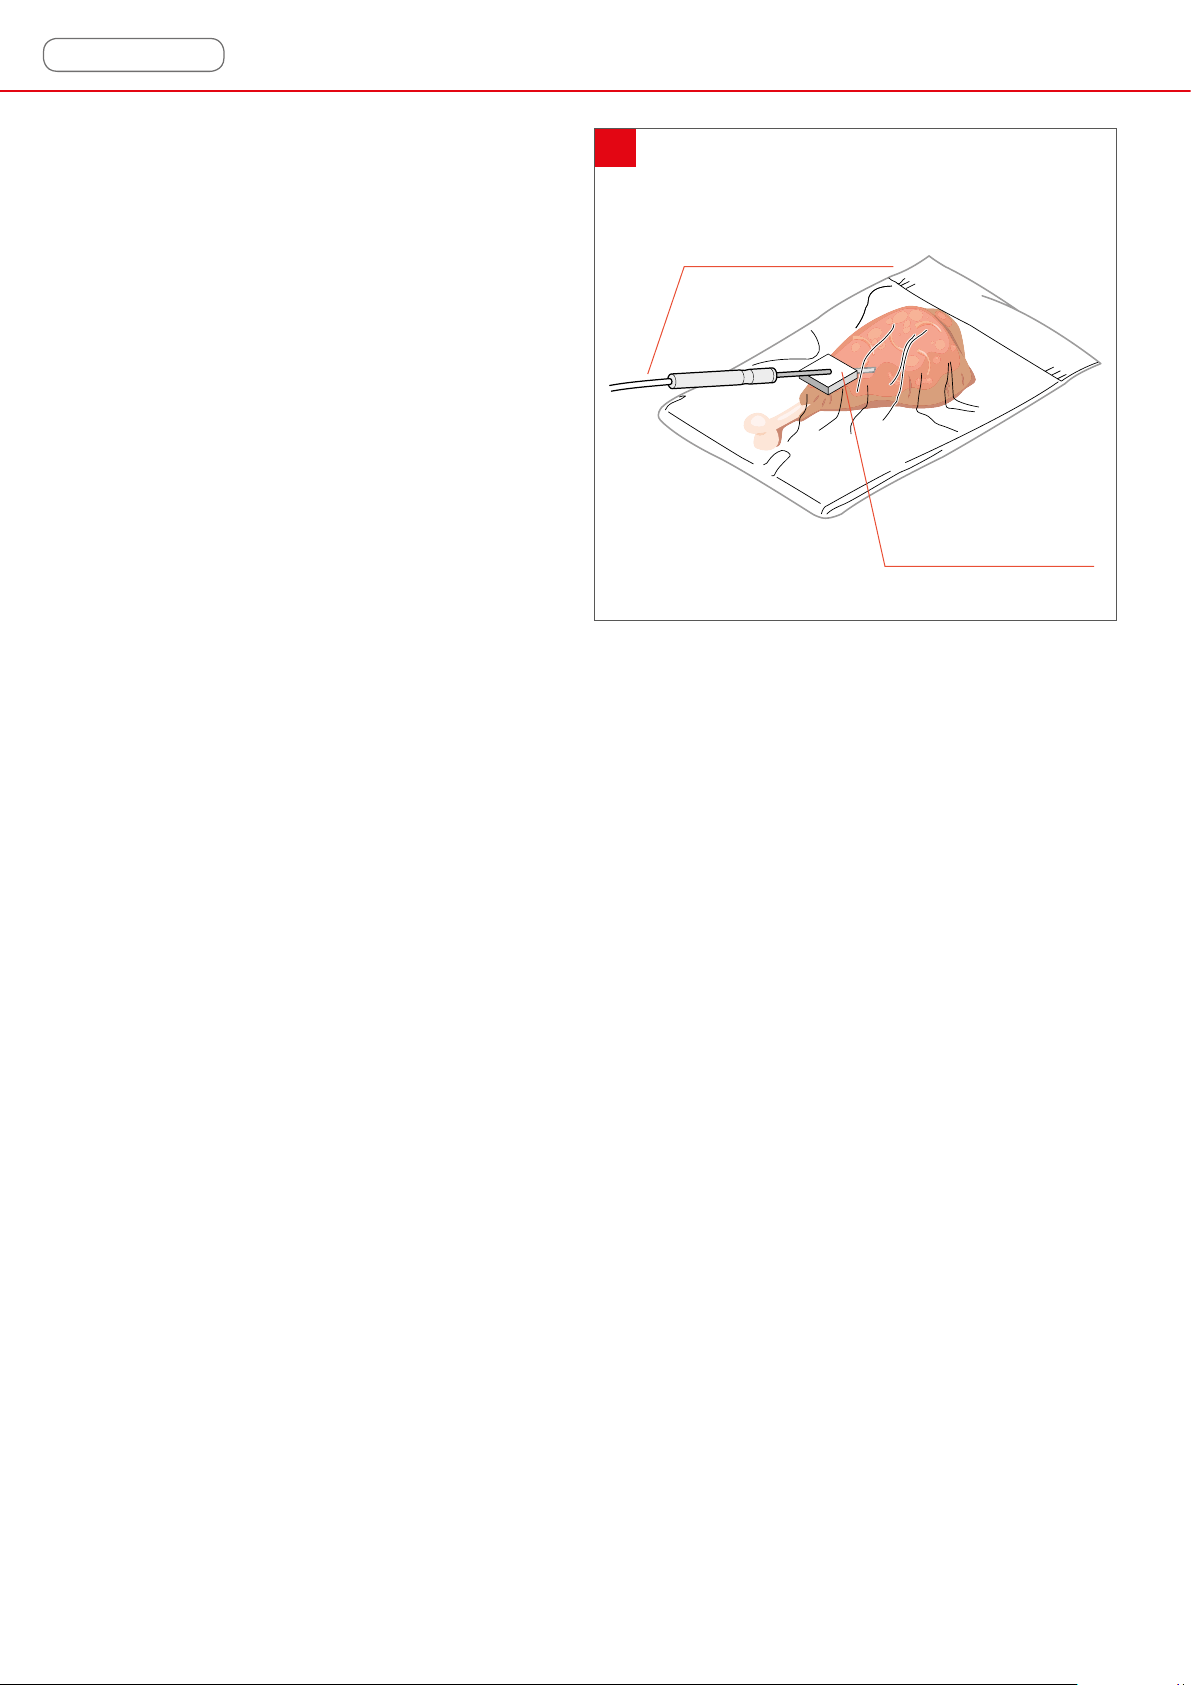
procedure
- Insert the food to be cooked in the vacuum bag; if desired,
add oil and spices;
- create the vacuum in the bag and seal it;
- apply a piece of neoprene gasket on the bag: the latter is
essential to prevent the tightness of the bag from being lost
when the probe is inserted;
- insert the single-point probe into the bag where the neoprene
gasket was previously applied;
- insert the bag with the probe inserted into the oven chamber
and cook as desired.
8
Single-point probe
(option to be requested
from the manufacturer)
Neoprene gasket
12
Page 13
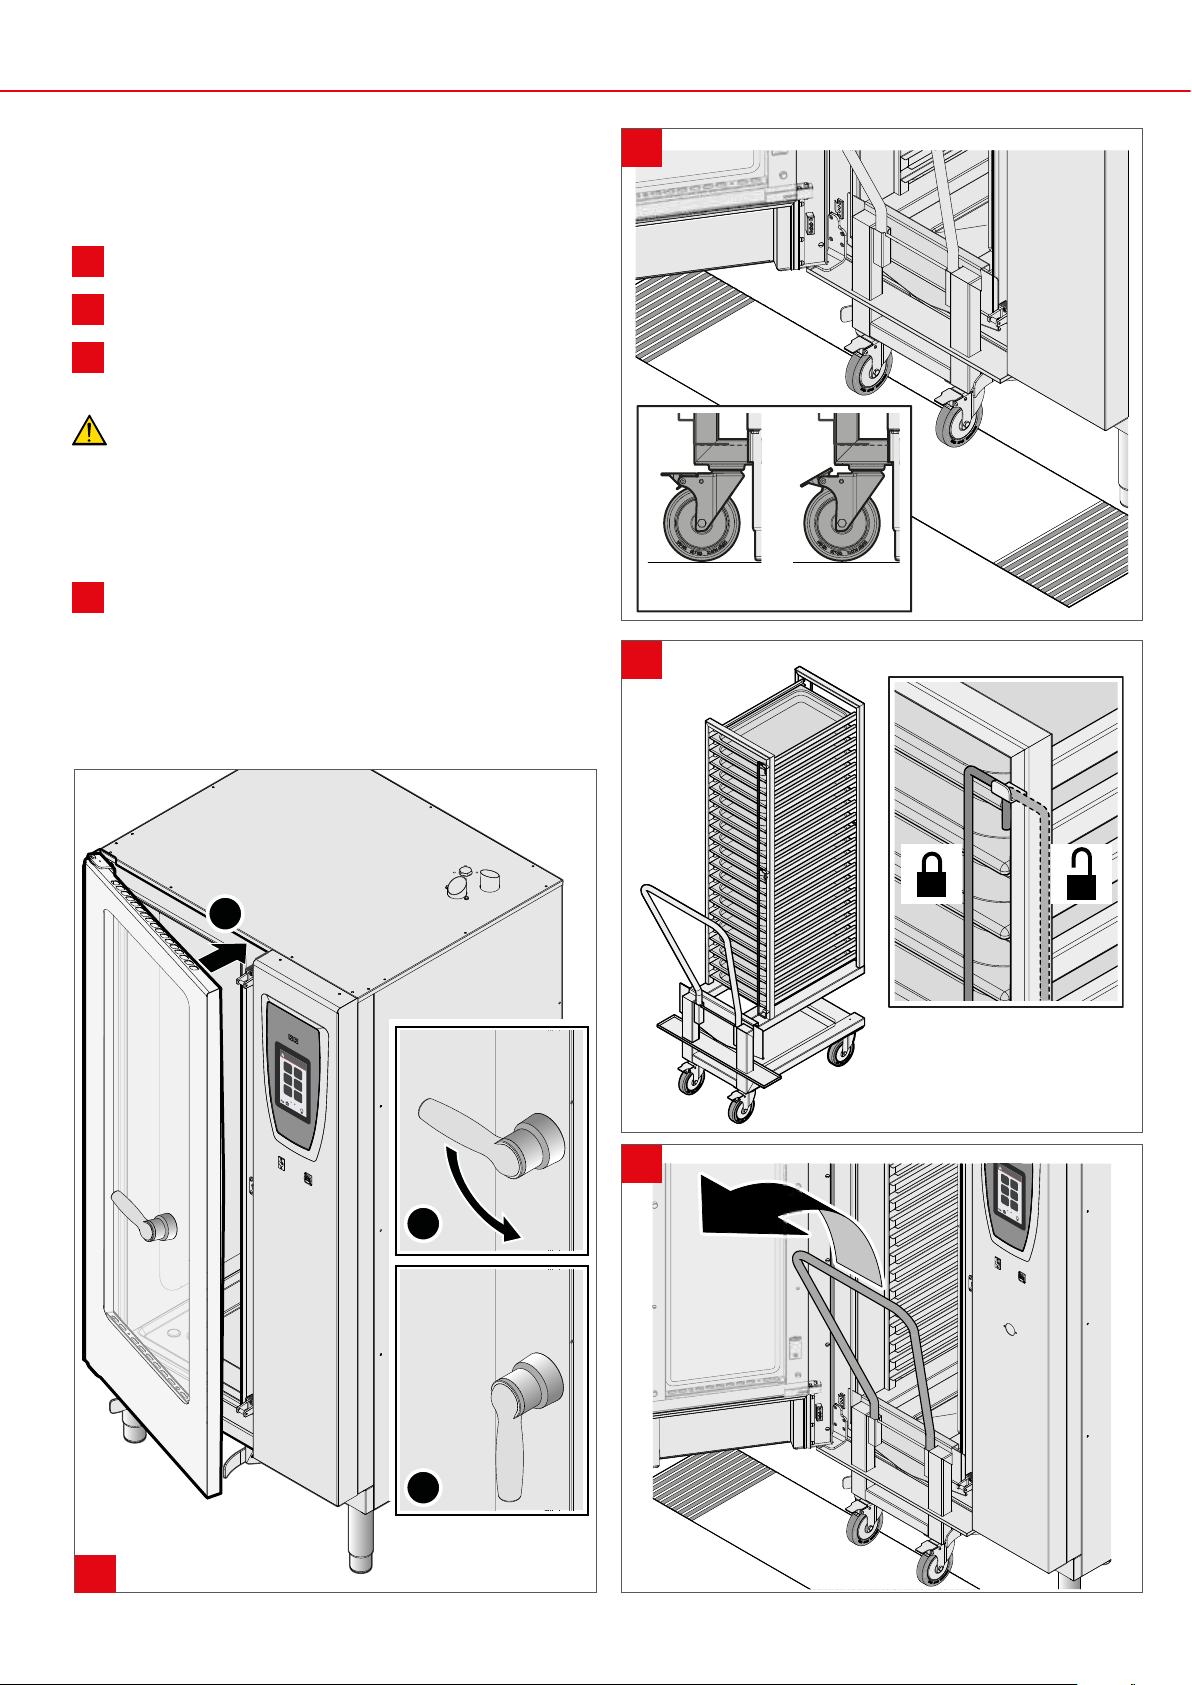
how to use mobile ovens
Mobile ovens with 20 trays provide for the use of a wheeled
trolley for inserting the trays.
Always lock the parking brakes of the front wheels of the
9
trolley whenever you do not need to move it.
Always lock the trays inserted in the guides: this will
10
prevent them from moving and causing possible burns.
After inserting the trolley into the oven chamber, remove
11
the handle by pulling it upwards
Pay the utmost care when moving the trays because
they can contain hot liquids that can overow and the
trolleys can tip over (for example when transporting them on
uneven surfaces or through doors).
Do not overload the trolleys: the maximum load allowed is 80
kg evenly distributed on the 20 GN 1/1 trays available.
9
The trolley door closure has two movements: this ensures
12
maximum safety of use.
A
unlocked locked
10
12
11
B
C
13
Page 14
use
This section explains step by step how to best use your equipment.
Simply follow the numbers and let yourself be guided to discover all the potential of
your oven:
how to navigate between pages
setting the initial settings
cooking!
14
16
22
1. how to navigate between pages
2. setting the initial settings (time, date, etc ...)
3. cooking!
1. how to navigate between pages
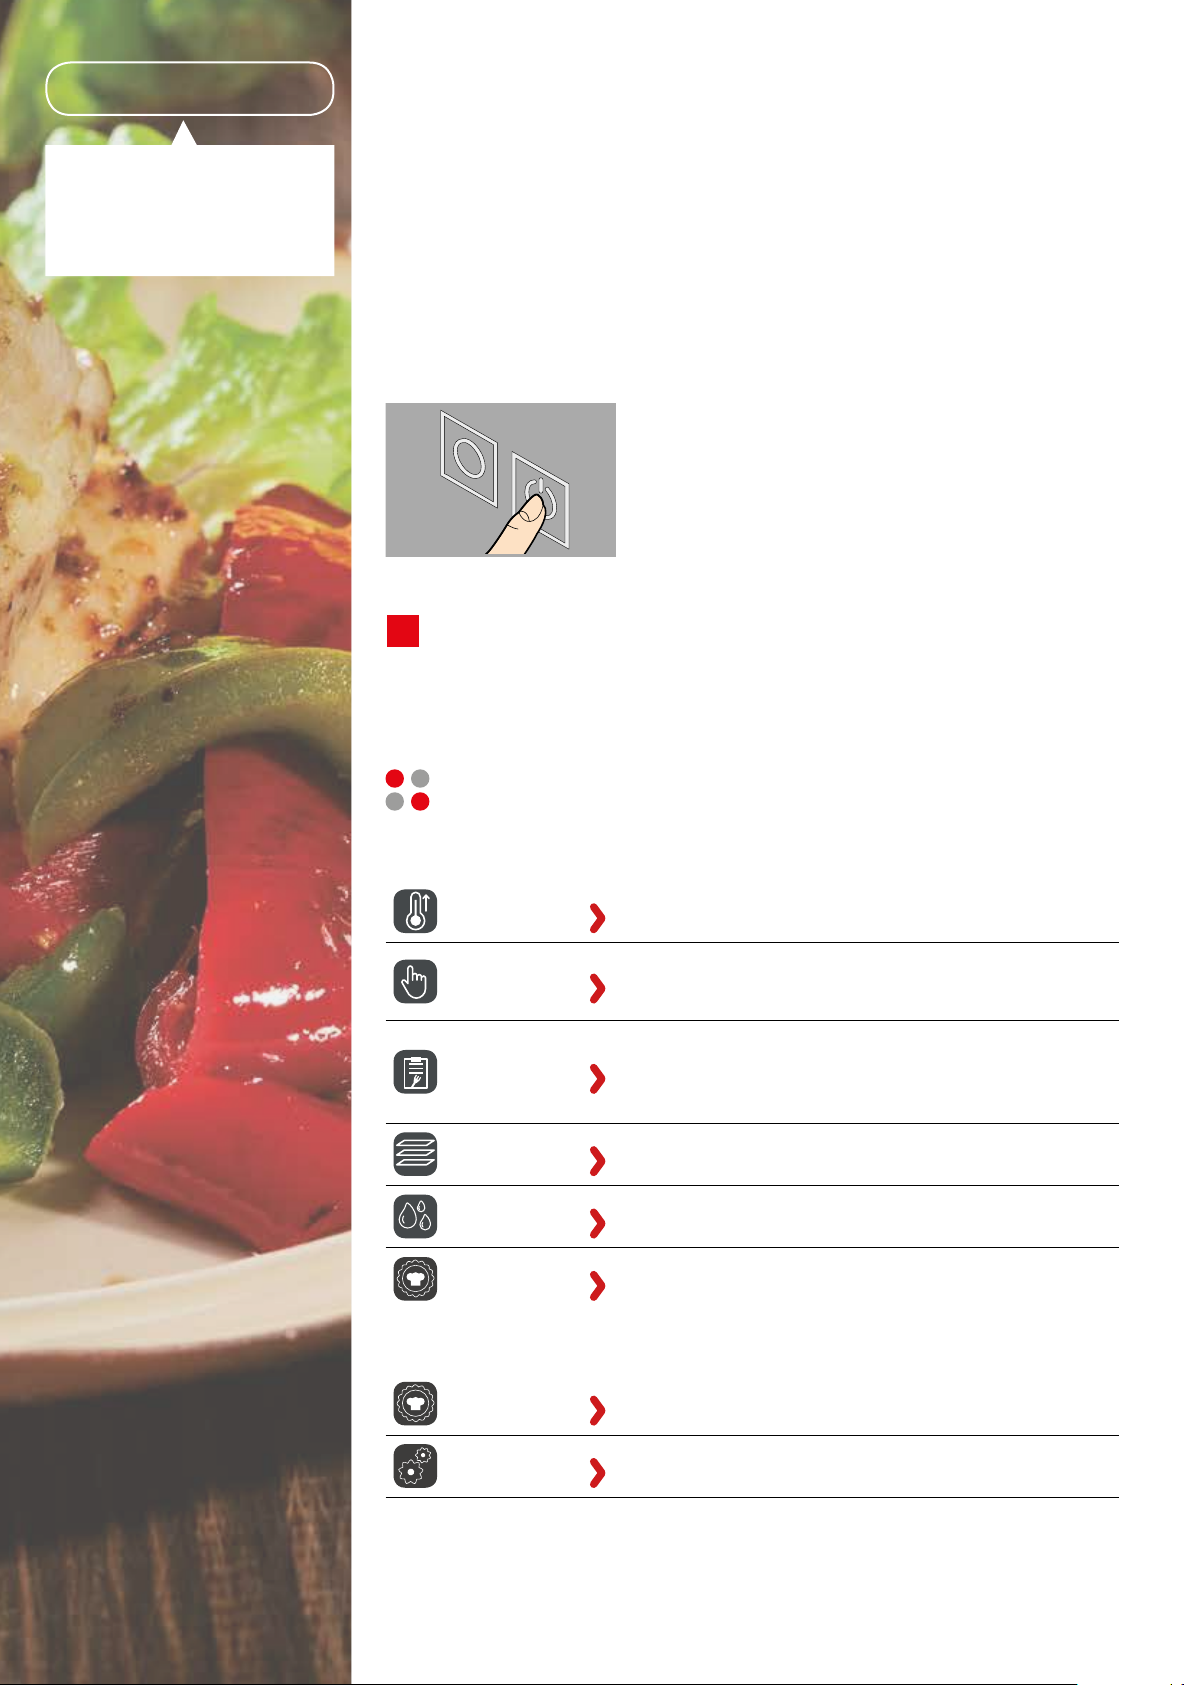
Turn on the display by pressing the ON button above the
OFF
damage the display.
After a few moments after turning the power on, the display shows a main page
13
showing 6 icons on the rst screen and 2 icons on the second screen.
If there are multiple pages as in this case, they are scrolled by dragging the nger left
or right ("scroll" function), the red dots at the bottom indicate the page displayed and
those available:
= display of page 1 of two available
= display of page 2 of two available
control panel. The button beside (OFF) turns off the
equipment at the end of the working day.
The control panel is a large Touch Screen: this means it is
extremely easy to clean and use it.
ON
It should be used only with your clean and dry ngers;
avoid using ladles, tools, etc ... as they could seriously
Page 1/2
Pre-heating
manual
Manual
Programs
Multilevel
Washing
Best Chef
Page 2/2
Cooling
p. 26
p. 24
p. 35
p.
39
p.
60
p. 47
p. 48
allows setting the oven preheating temperature
manually
according to his/her experience, the user must
set the desired cooking parameters for one or
more phases manually
collection of recipes preset at the factory or
previously stored by the user and divided into
categories to facilitate the search for the recipe
you need (e.g. starters, red meats, etc.)
cooking of multiple dishes at the same time
managing the automatic washing of the oven
chamber
collection of favourite or most used recipes
quickly cools the cooking chamber
14
Settings
p. 16
allows you to make settings (e.g. date/time, unit
of measurement, etc ...)
Page 15
13
Time and date
p.
17
and p. 19
Current temperature
in the chamber
Manual
preheating
p. 26
Programs
p. 35
13:00
13/10/2016
HOME HOME
100°c 13/10/2016
Manual
p. 24
PREHEAT COOLINGMANUAL SETTINGS
Multilevel
p.
39
13:00
100°c
Settings
p. 16
Cooling
p. 48
Washing
p.
60
PAGE 1/2 PAGE 2/2
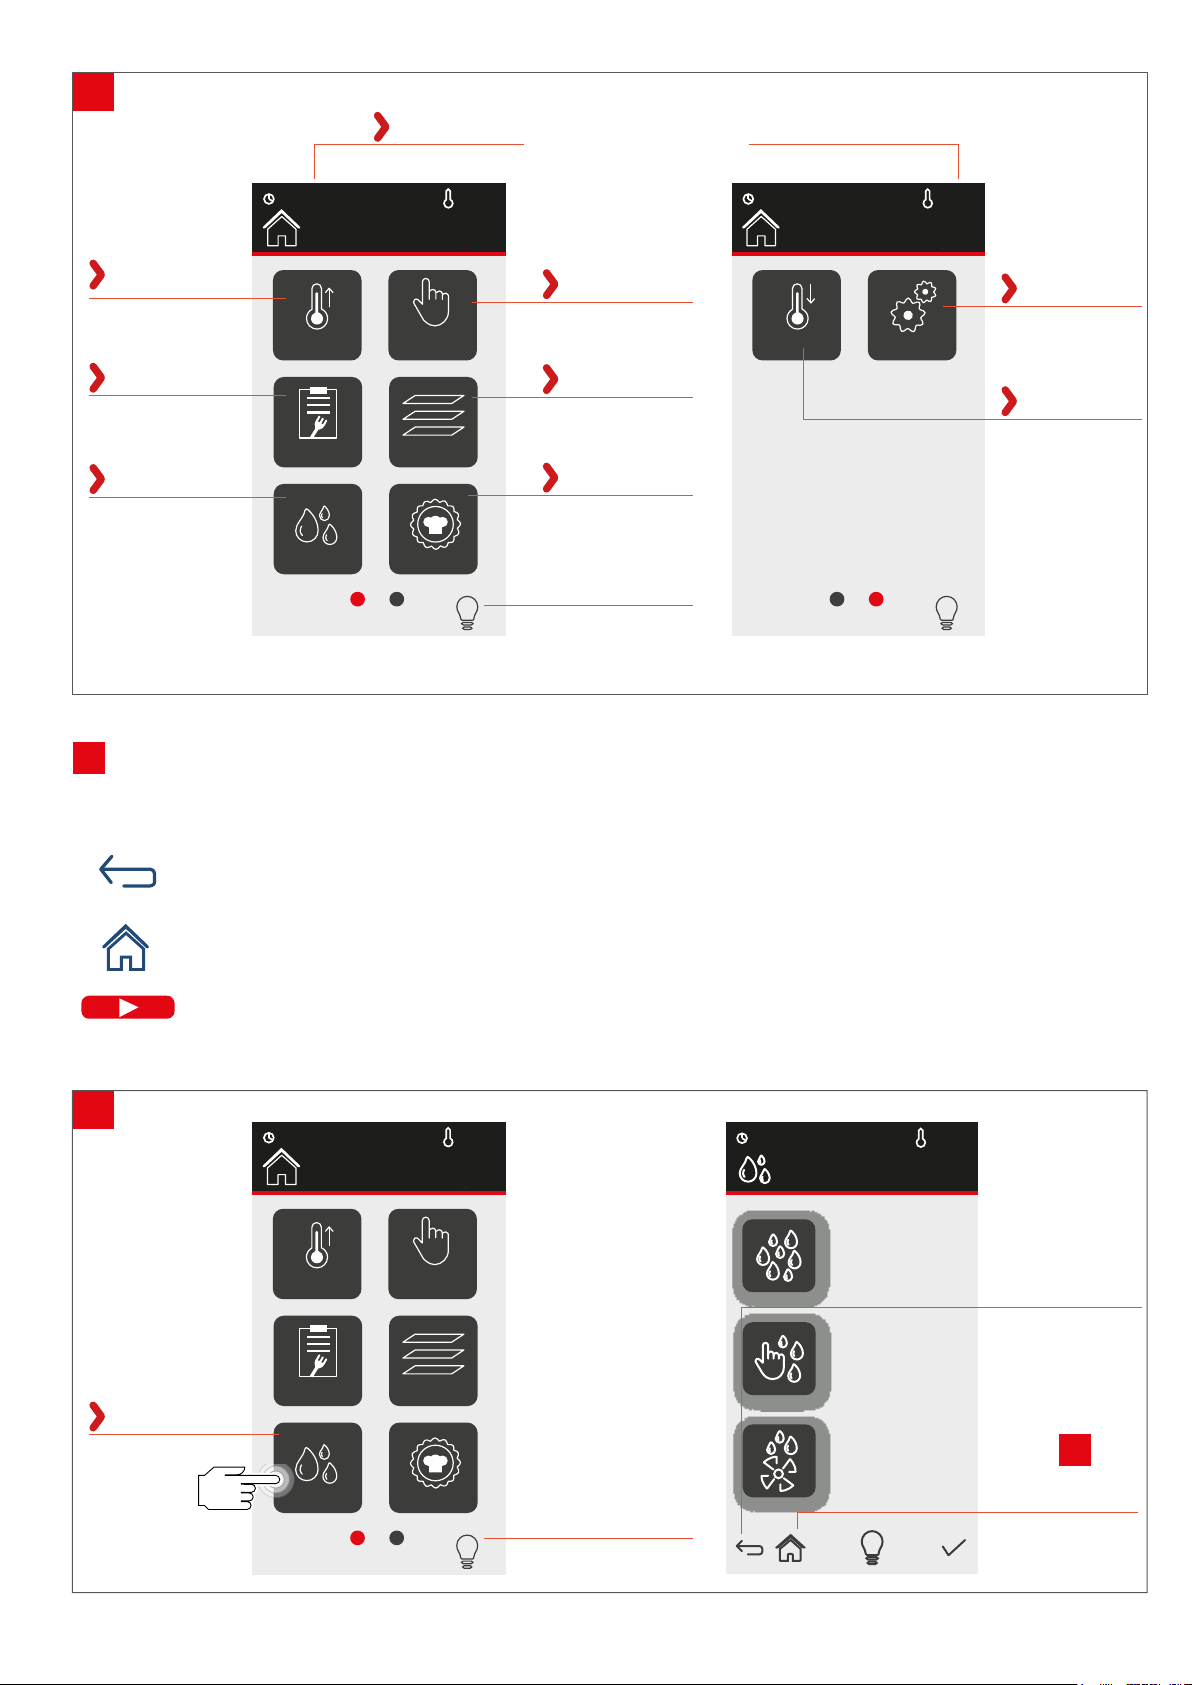
Touching an icon opens a further secondary page dedicated to the chosen topic (e.g. washing): on this you can dene
14
all the necessary settings or interventions.
MULTILEVELRECIPE BOOK
BEST CHEFCLEANING
Best Chef
p. 47
Light ON/OFF
In any secondary page, the symbol:
= brings you back to the previous page
= brings you back to the main screen
starts a manual, automatic or multilevel
=
cooking cycle
14
Washing
p.
60
13:00
13/10/2016
HOME
PREHEAT MANUAL
CLEANING BEST CHEF
100°c
13:00
CLEANING
13/10/2016
RINSING
100°c
Back to the
previous page
MANUAL
MULTILEVELRECIPE BOOK
AUTOMATIC
Light ON/OFF
Back to the
main screen
(gure 13 )
15
Page 16
use
2. setting the initial settings (time, date, etc ...)
13:00
13/10/2016
HOME
COOLING IMPOSTAZIONI
100°c
settings
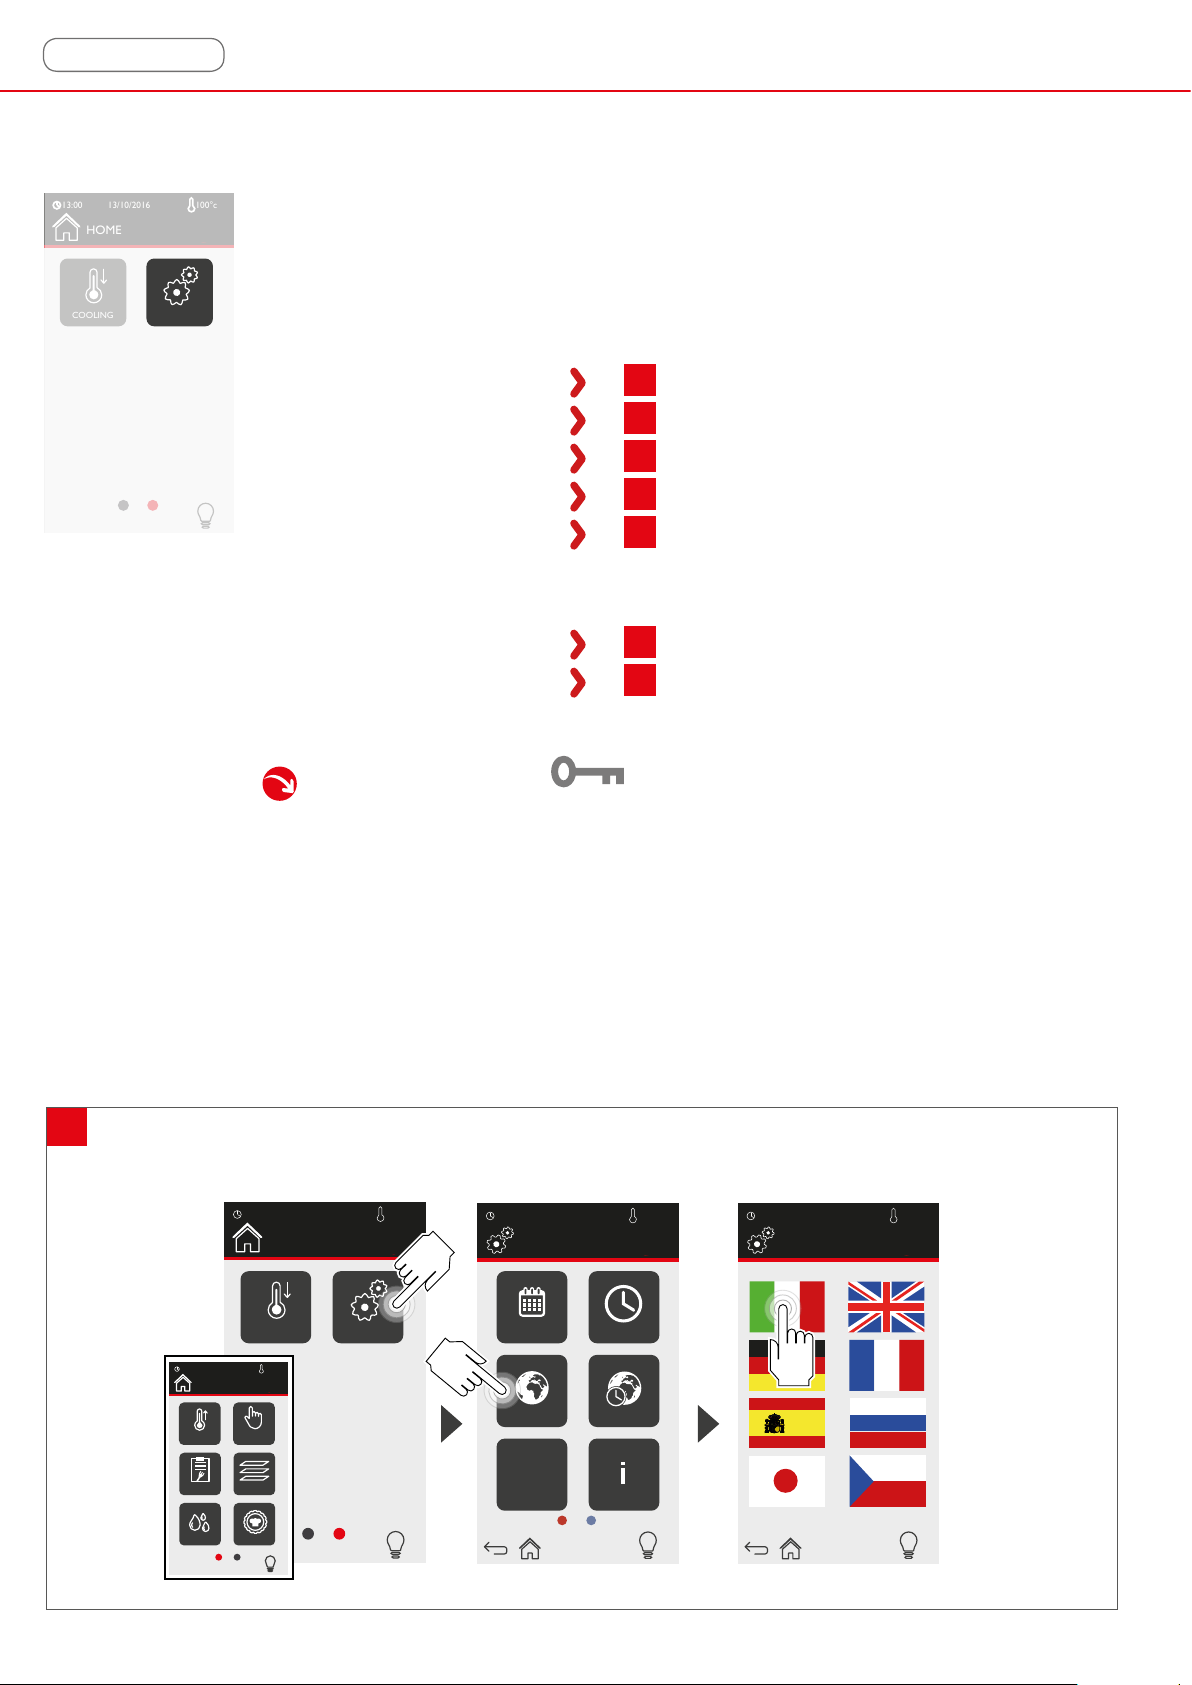
If your equipment does not include the correct date, time or language, we recommend you set them
before using the oven; the main page provides all this information at the top, so it is easy to see if
some adjustment is needed.
The primary settings to dene are:
- language g.
- unit of measurement g.
- date g.
- time g.
- time zones g.
15
17
16
18
19
In the same screen you can:
- manage programs (recipes) g.
- display the HACCP procedure g.
21
22
The menus marked with the symbol are protected by a password provided only by the
Manufacturer to specialized personnel to prevent the programming of parameters that, if set
incorrectly, might compromise the use of the oven.
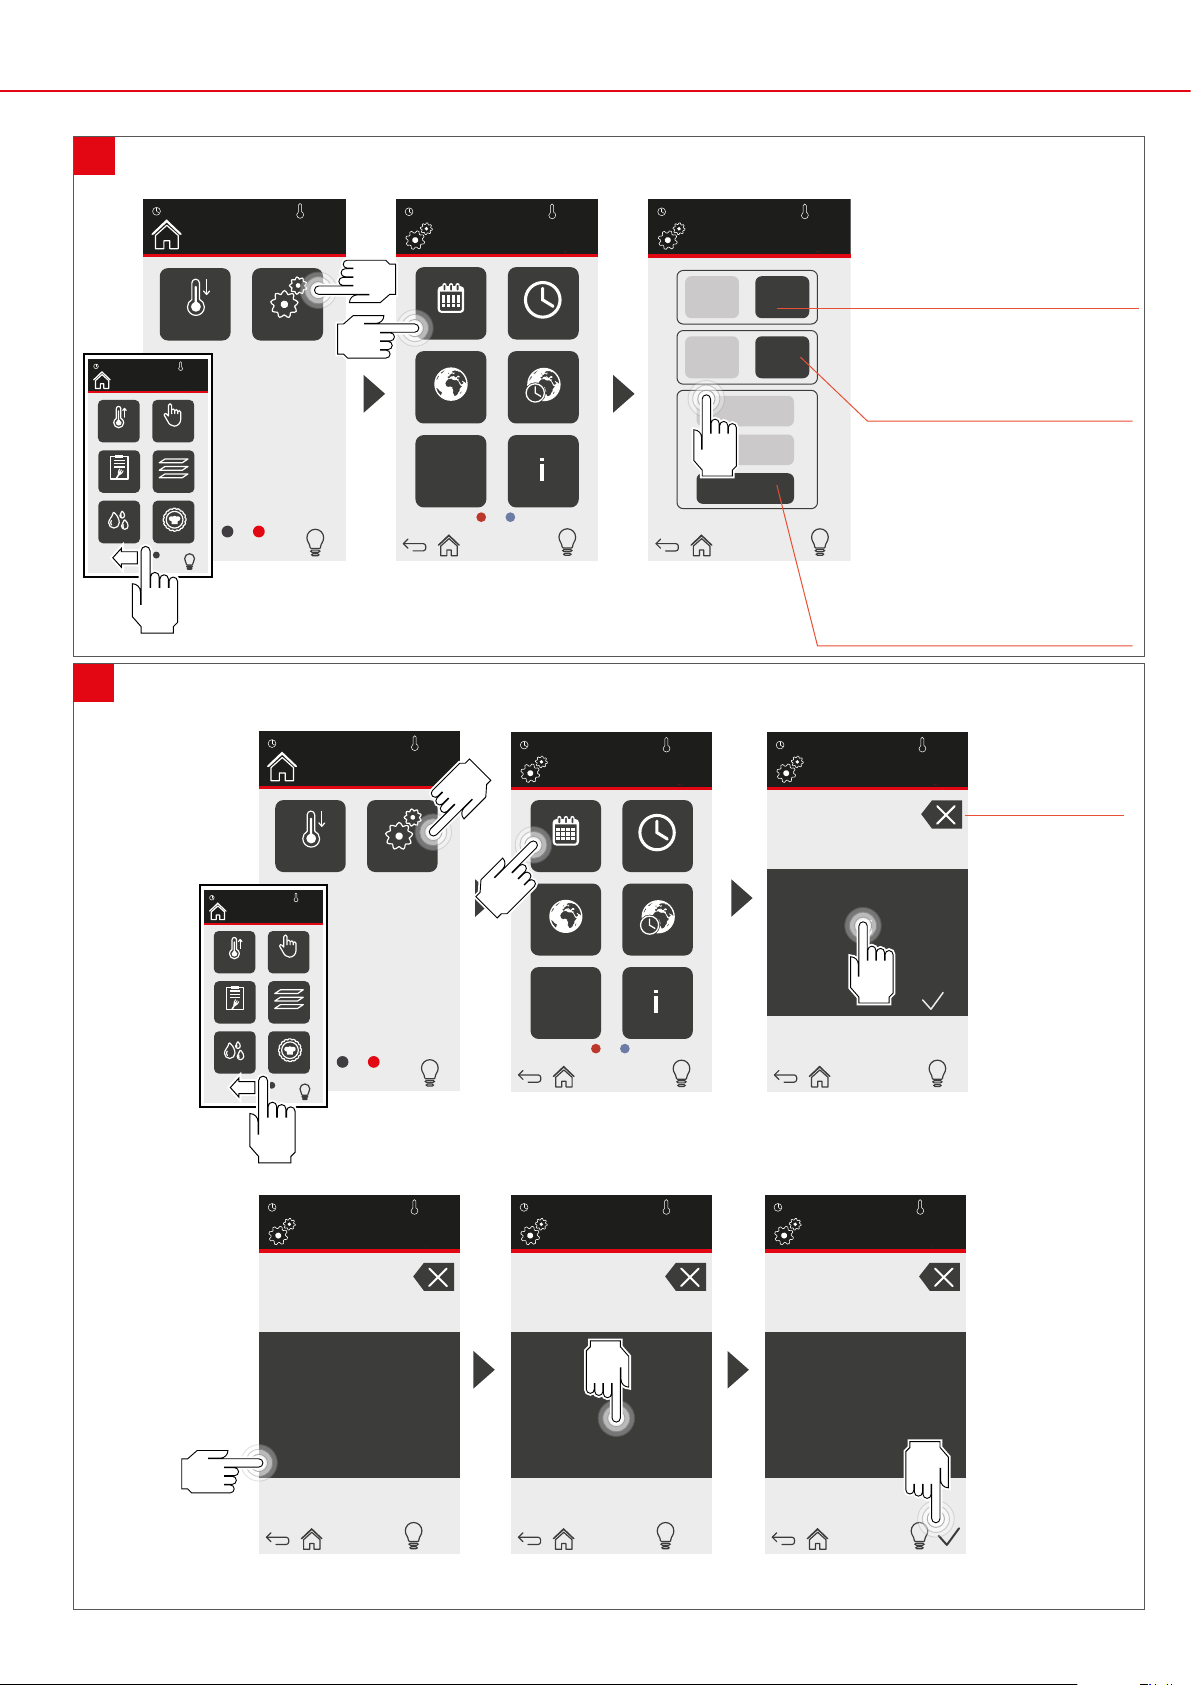
setting the language
15
13:00
13:00
13/10/2016
HOME
MANUAL
PREHEATED
MULTILEVEL
RECIPE BOOK
BEST CHEF
CLEANING
16
IMPOSTAZIONI
13/10/2016
HOME LANGUAGES
COOLING
100°c
100°c
SETTINGS
13:00
13/10/2016
SETTINGS
DATE
LANGUAGES
°C/°F
12h/24h
xx/xx/xx
100°c
TIME
TIME ZONE
INFO
13:00
13/10/2016
100°c
Page 17
selecting the unit of measure
17
13:00
13/10/2016
100°c
HOME
COOLING
13:00
13/10/2016
HOME
PREHEATED
RECIPE BOOK
CLEANING
setting the date
16
100°c
MANUAL
MULTILEVEL
BEST CHEF
SETTINGS
13:00
13/10/2016
HOME SETTINGS SETTINGS
13:00
13/10/2016
100°c
13:00
SETTING SETTING
DATE
LANGUAGES
°C/°F
12h/24h
xx/xx/xx
100°c
TIME
TIME ZONE
INFO
13:00
13/10/2016
100°c
13/10/2016
12h 24h
°C °F
dd/mm/yyyy
mm/dd/yyyy
yyyy/mm/ddd
15
13:00
100°c
set the time to 12 or 24 hours
example: three in the
afternoon
12h= 3:00 pm is displayed
24h= 15:00 is displayed
set the temperature unit of
measurement:
C°= degrees centigrade
F°= degrees Fahrenheit
set the date format
example: 24 May 2018
dd/mm/yyyy= 24 / 05 / 2018
(day/month/year)
mm/dd/yyyy= 05 / 24 / 2018
(month/day/year)
yyyy/mm/dd= 2018 / 05 / 24
(year/month/day)
if necessary,
delete the last
13/10/2016
__ __
100°c
digit entered
13:00
HOME
PREHEATED
RECIPE BOOK
CLEANING
COOLING SETTINGS
13/10/2016
100°c
MANUAL
MULTILEVEL
BEST CHEF
13:00
13/10/2016
SETTINGS SETTINGS SETTINGS
100°c
DATE
LANGUAGES
°C/°F
12h/24h
xx/xx/xx
13:00
13/10/2016
TIME
TIME ZONE
INFO
100°c
15 OCT 15 OCT 15 OCT
FEB
JAN
APR
JULY
OCT
MAY
AUG
NOV
MAR
JUNE
SEPT
DEC
1 2 3
4 5 6
7 8
0
9
DAY
1 2 3
4 5 6
7 8
0
13:00
13/10/2016
2018__ ____ __
YEARYEARMONTH
1 2 3
4 5 6
7 8
0
9
100°c
9
17
Page 18
use
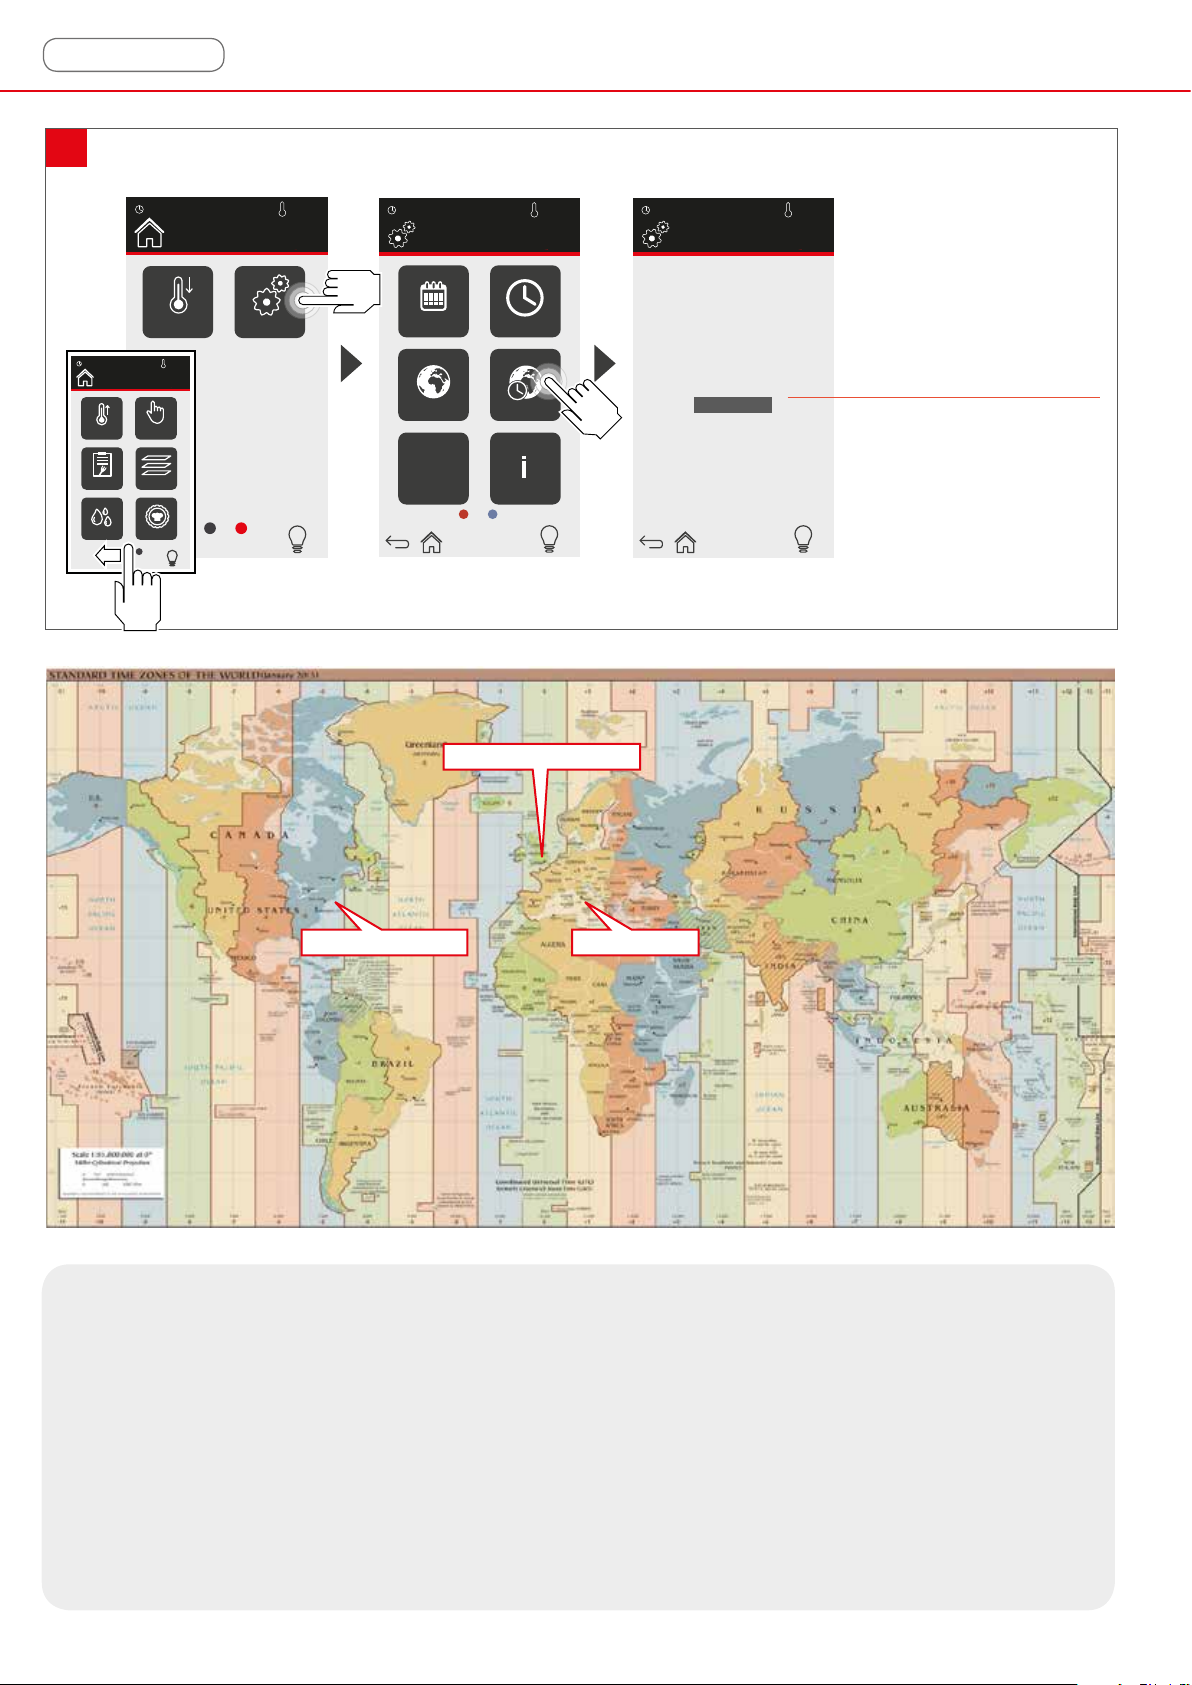
selecting the time zone
18
13:00
13:00
HOME
PREHEATED
RECIPE BOOK
CLEANING
13/10/2016
COOLING SETTINGS
13/10/2016
100°c
MANUAL
MULTILEVEL
BEST CHEF
100°c
13:00
13/10/2016
SETTINGSHOME SETTINGS
DATE
LANGUAGES
°C/°F
12h/24h
xx/xx/xx
100°c 13/10/2016
TIME
TIME ZONE
INFO
13:00
Time zone
Europe/Moscow
Europe/Nicosia
Europe/Oslo
Europe/Podgorica
Europe/Prague
Europe/Riga
Europe/Rome
Europe/Samara
Europe/San Marino
Europe/Sarajevo
Europe/Simferopol
Europe/Skopje
Europe/Soa
100°c
select the country/town of
the oven installation (e.g. if
the oven is installed in an
English town, select London)
time zones
GREENWICH UTC 0
NEW YORK UTC-5 ROMA UTC+1
The earth makes a complete rotation on its axis in 24 hours.
By dividing the 360 degrees of complete rotation by 24 hours we get regular segments: all the countries that are
located within that area will adopt the same time (the borders of the "segments" are not net but follow the countries’
borders). It has been agreed that "zero" time (UTC0) is the "segment" where Greenwich is located (London).
At this point it is 12 o'clock when the sun is exactly at the peak of meridian line 0 (longitudinal zenith). As you move
eastward the hours increase, to the west they decrease, for example:
if in Greenwich it is 12:00 in Rome (UTC + 1) it is 13:00
if in Greenwich it is 12:00 in New York (UTC-5) it is 7:00
18
Page 19
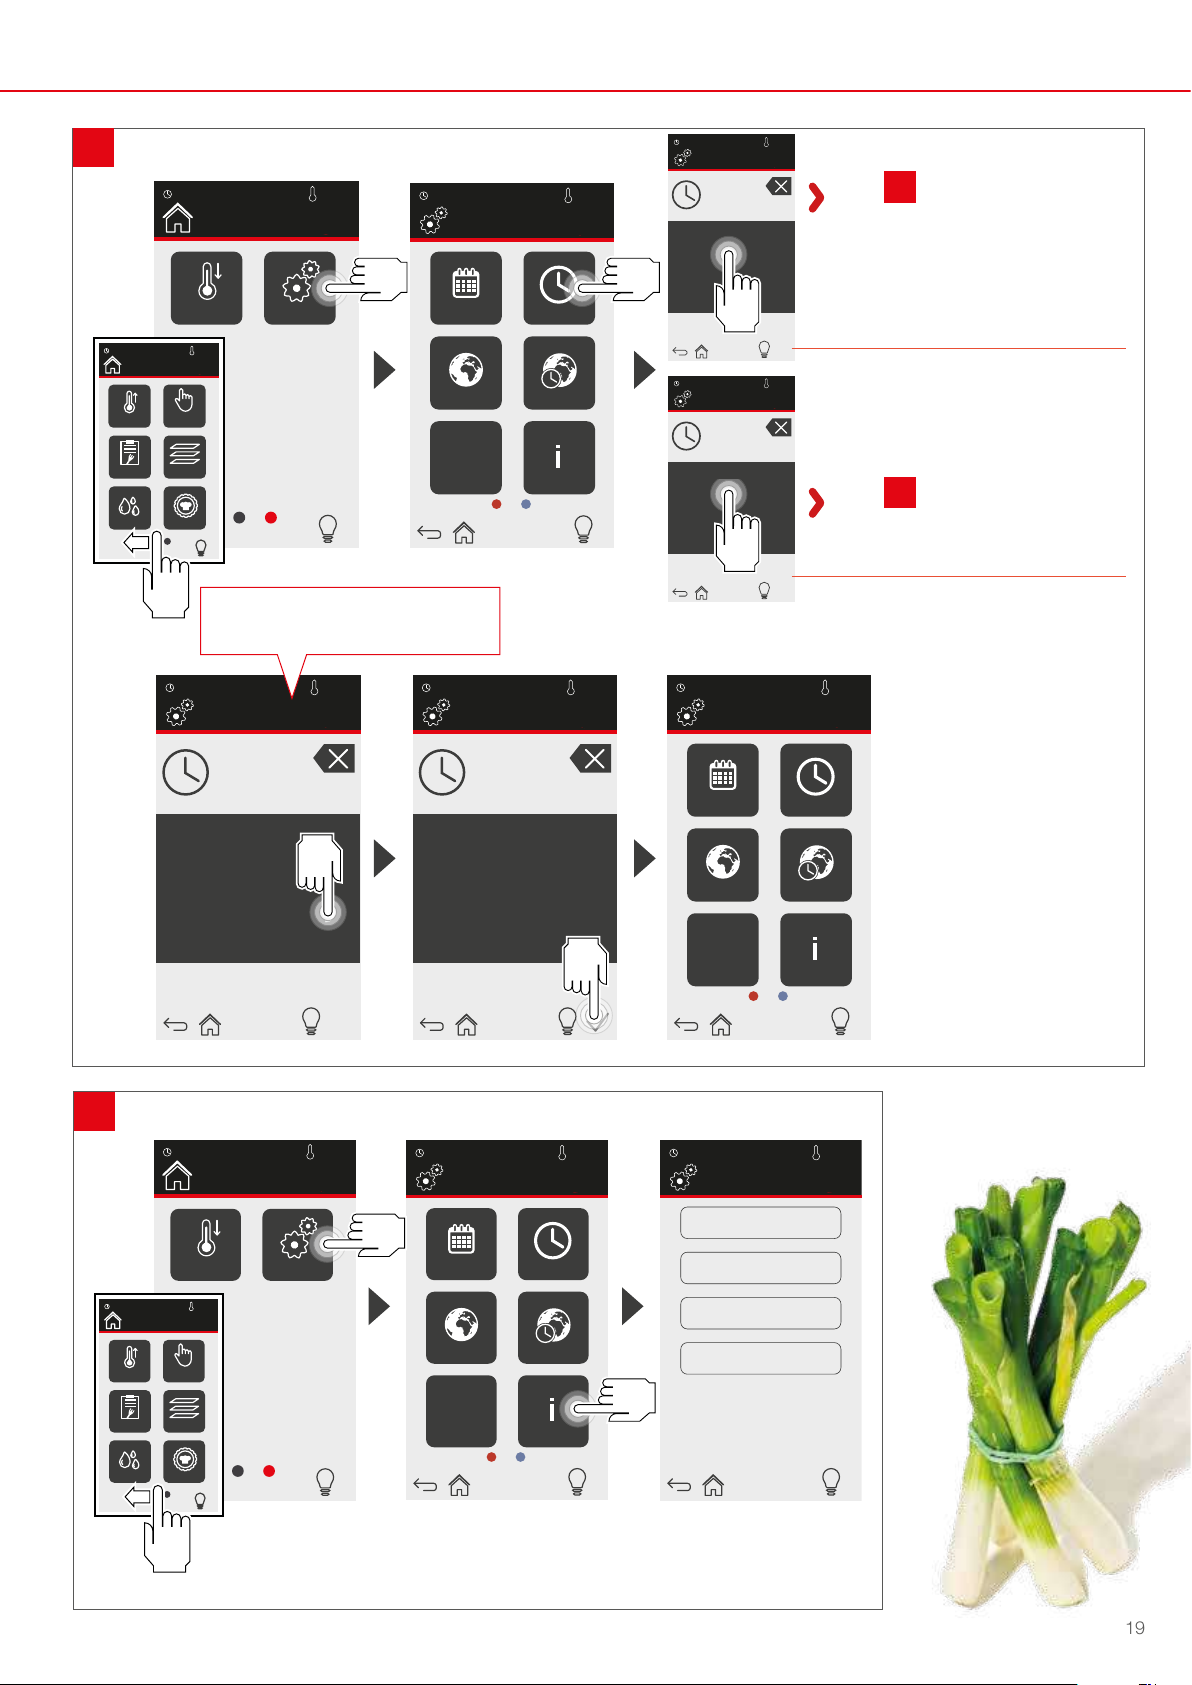
setting the time
19
13:00
COOLING SETTINGS
13:00
13/10/2016
HOME
PREHEATED
RECIPE BOOK
CLEANING
100°c
MANUAL
MULTILEVEL
BEST CHEF
step to perform only if the time
has been set to 12 hours
13/10/2016
100°c
13:00
13/10/2016
SETTINGSHOME
DATE
LANGUAGES
°C/°F
12h/24h
xx/xx/xx
100°c
TIME
TIME ZONE
INFO
13:00
13/10/2016
SETTINGS
100°c
- -:- -
time
1 2 3
4 5 6
7 809
am pm
13:00
13/10/2016
SETTINGS
100°c
- -:- -
1 2 3
4 5 6
7 809
:00 :30
if the time has been set to 12 hours
17
gure
, you can only enter
hours from 1 to 12, specifying, at
the following step, if it is pm (post
meridiem - after midday) or am (ante
meridiem - before midday)
if the time has been set to 24 hours
17
gure
, it will be possible to
enter numbers from 1 to 24
information
20
13:00
13/10/2016
HOME
PREHEATED
RECIPE BOOK
13:00
13/10/2016
SETTINGS SETTINGS SETTINGS
100°c
10:30
13:00
13/10/2016
10:30
100°c
13:00
time time
1 2 3
4 5 6
7 8
am pm
13:00
COOLING SETTINGS
MANUAL
MULTILEVEL
0
13/10/2016
HOME
100°c
9
100°c
1 2 3
4 5 6
7 8
am pm
13:00
SETTINGS
LANGUAGES
12h/24h
xx/xx/xx
0
13/10/2016
DATE
°C/°F
9
100°c 13/10/2016
TIME
TIME ZONE
INFO
LANGUAGES
13:00
MANUFACTURER’S RECIPES VERSION
13/10/2016
DATE
TIME ZONE
°C/°F
12h/24h
xx/xx/xx
SETTINGS
INTERFACE VERSION
0.1.2
BASE CARD VERSION
0.0.0.0
SERVICE VERSION
0.3.5
0.1.2
100°c
TIME
INFO
100°c
CLEANING
BEST CHEF
the page provides information on the rmware
installed on the appliance
19
Page 20
use
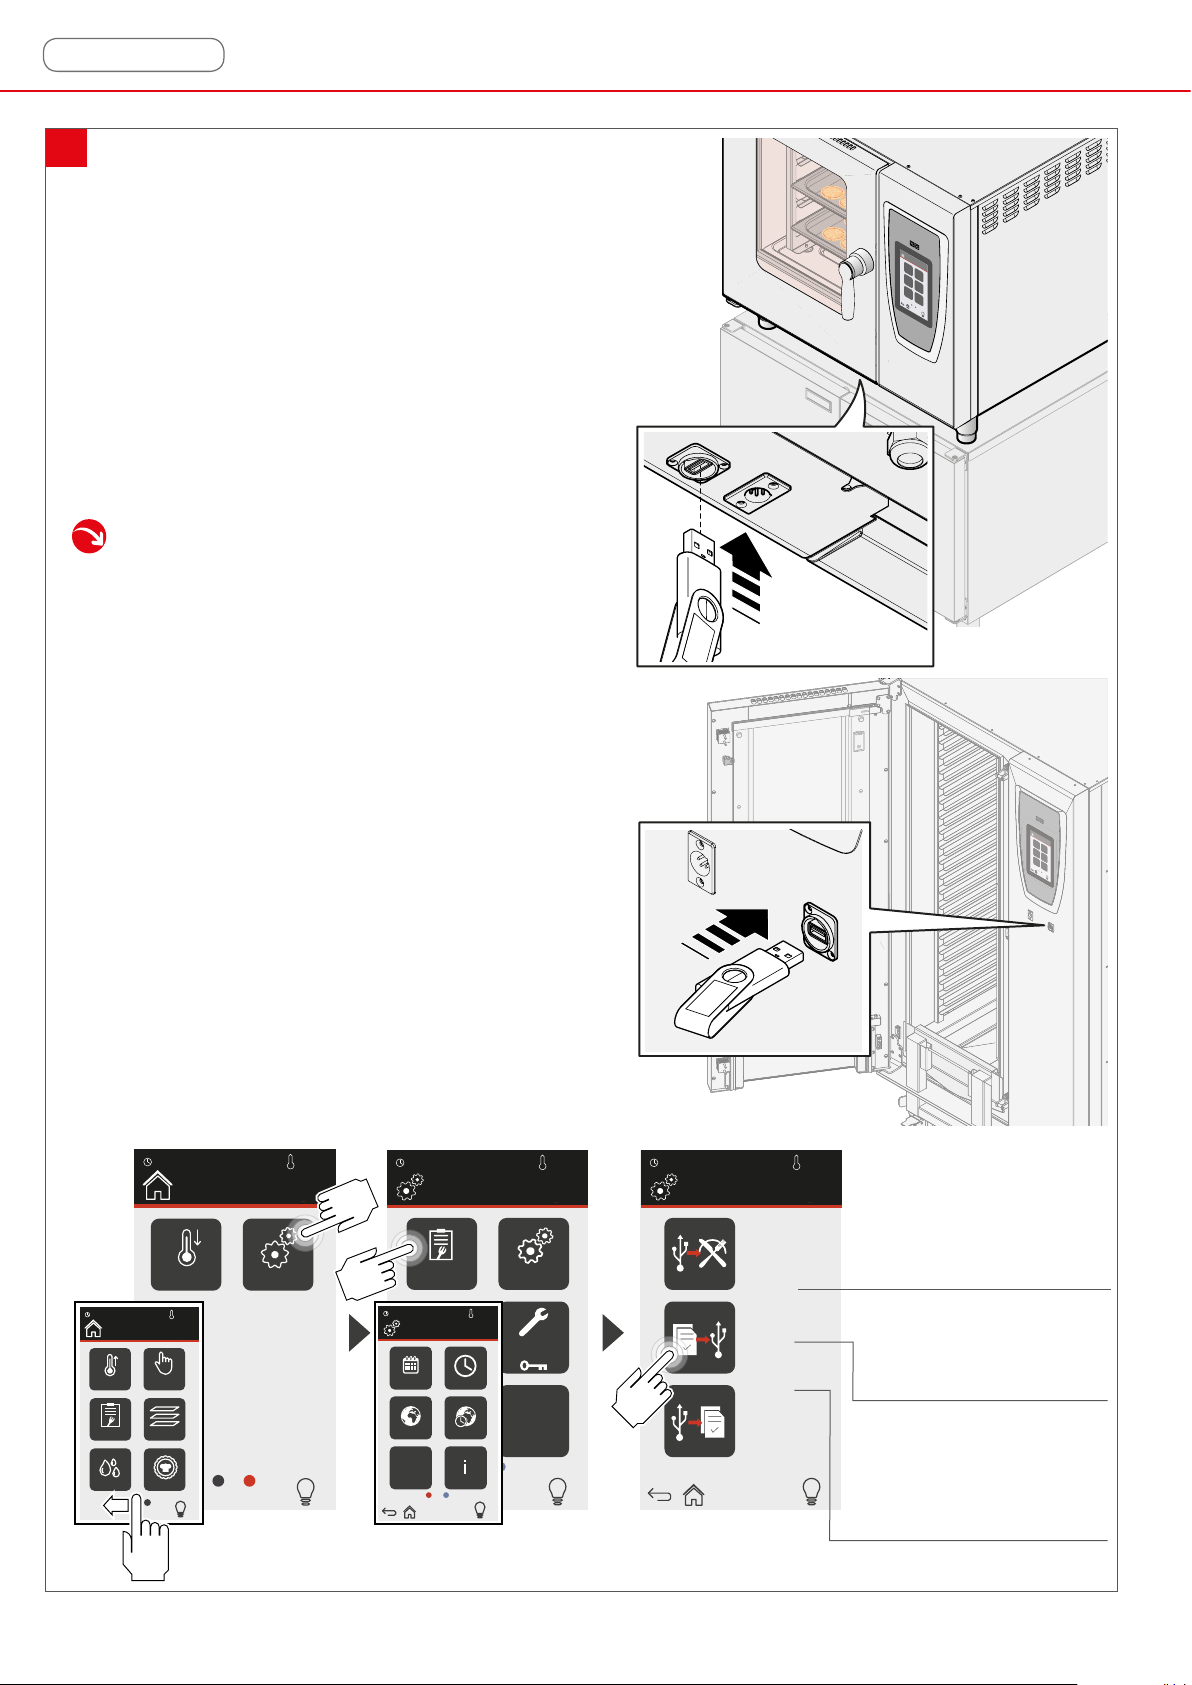
managing programs (recipes)
21
Programs are recipes:
- the user’s, saved after setting them manually;
- stored by the Manufacturer’s in the oven’s memory.
Inserting a memory stick into the USB socket in the bottom
of the appliance, you can:
- import personal recipes (created with other Emotion
ovens) or the Manufacturer’s recipes from the USB stick to
the oven memory
or
- export new recipes from the oven memory to the USB
stick.
The USB stick must be formatted FAT32.
20
13:00
PREHEATED
RECIPE BOOK
HOME
CLEANING
13/10/2016
13:00
13/10/2016
HOME SETTINGS SETTINGS
COOLING
100°c
MANUAL
MULTILEVEL
BEST CHEF
100°c
SETTINGS
13:00
13/10/2016
PROGRAM
MANAGEMENT
13:00
13/10/2016
SETTINGS
DATE TIME
HACCP
LANGUAGES TIME ZONE
°C/°F
12h/24h
xx/xx/xx
INFO
100°c 13/10/2016
FIRMWARE
UPDATE
100°c
SERVICE
13:00
100°c
IMPORT
MANUFACTURER
EXPORT MY
RECIPES
IMPORT RECIPES
import Manufacturer’s
recipes from the USB stick
to the oven memory
import personal recipes
(created with other Emotion
ovens) from the USB stick to
the oven memory
export the user’s or the
Manufacturer’s recipes to a
USB stick
Page 21
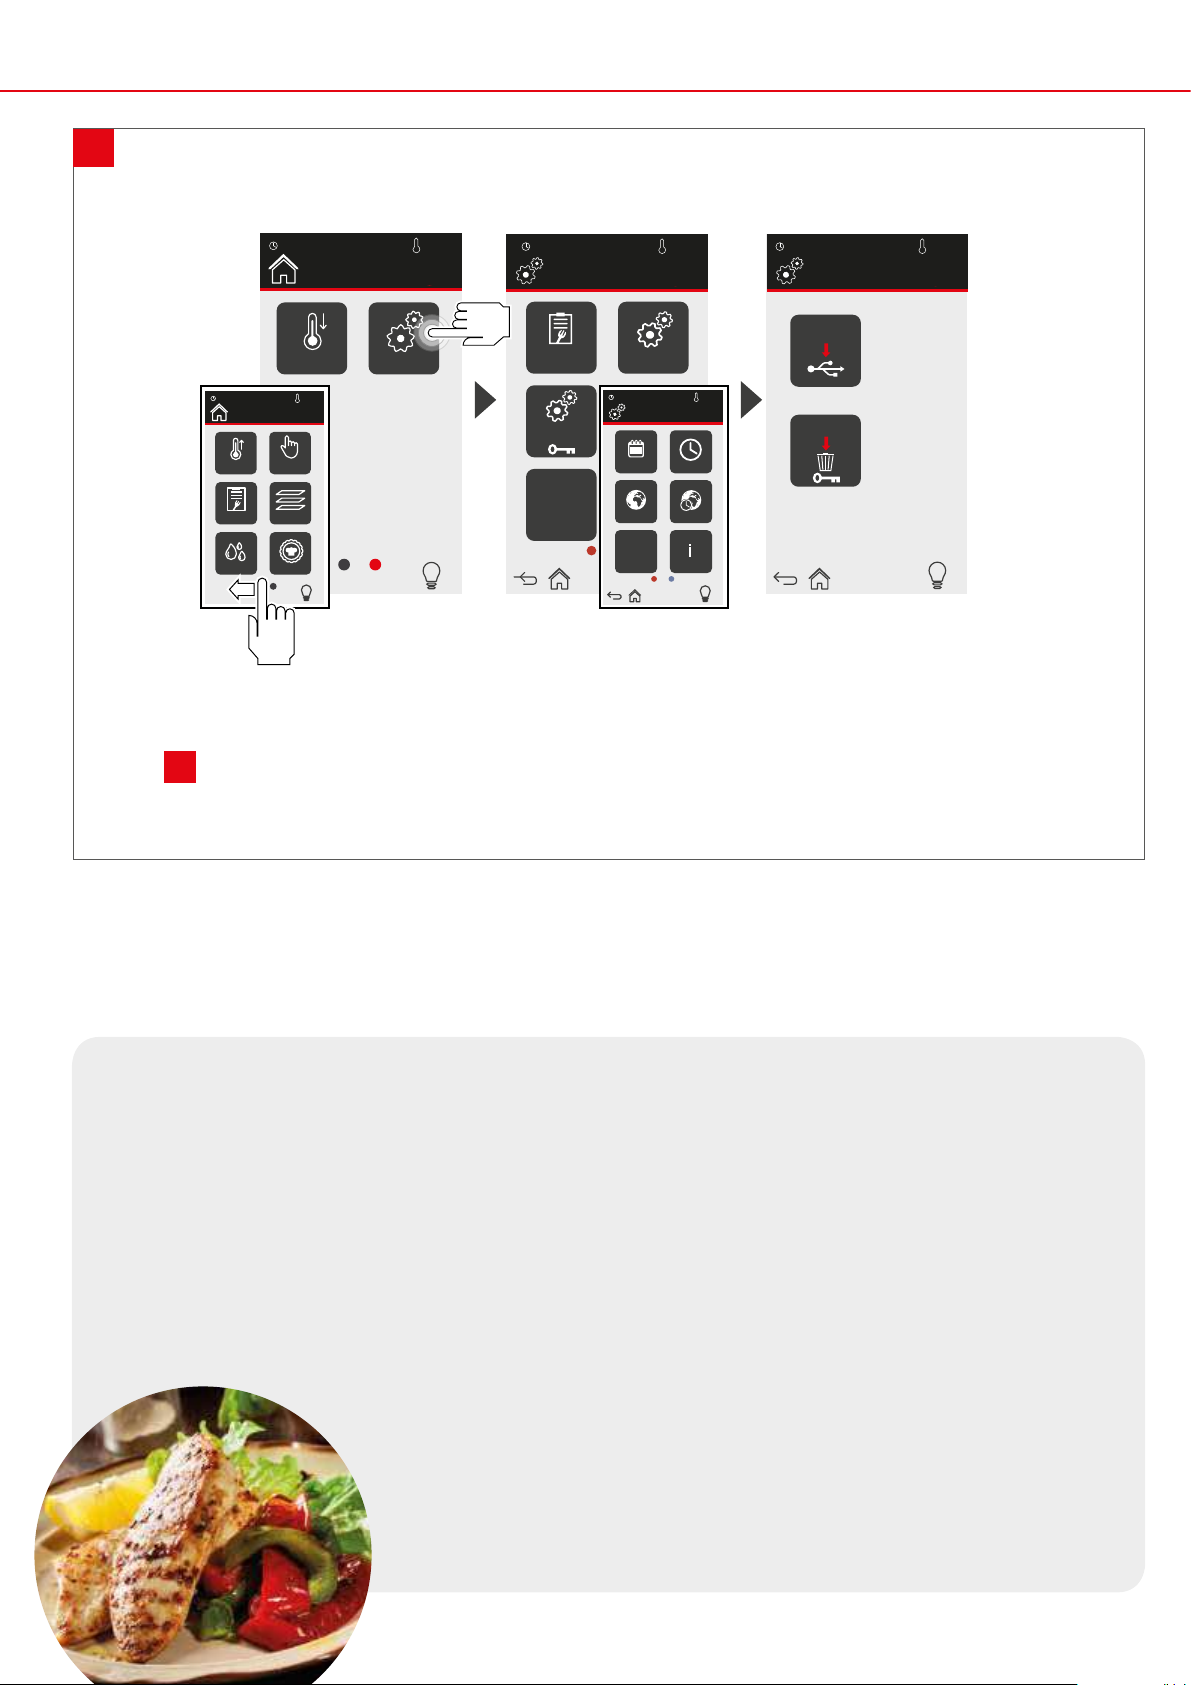
display the HACCP procedure
22
13:00
13/10/2016
HOME SETTING
100°c
13:00
13/10/2016
100°c 13/10/2016
13:00
SETTING
100°c
13:00
HOME
PREHEATED
RECIPE BOOK
CLEANING
COOLING SETTINGS
13/10/2016
100°c
MANUAL
MULTILEVEL
BEST CHEF
PROGRAM
MANAGEMENT
PARAMETERS
HACCP
FIRMWARE
UPDATE
13:00
13/10/2016
SETTINGS
DATE TIME
LANGUAGES TIME ZONE
°C/°F
12h/24h
xx/xx/xx
INFO
HACCP
100°c
HACCP
DOWNLOAD
HACCP
CANCEL
HACCP
From the screen you can download onto a personal USB stick (formatted as FAT32) a text report with all the information
of the cooking performed, as the start and end time.
See g. 22 to understand where the USB socket is on mobile or stationary ovens.
HACCP protocol
HACCP is a set of prevention procedures, useful to guarantee the food is safe and healthy.
This protocol is called HACCP (Hazard Analysis and Critical Control Points).
It was invented in the United States in the 1960s to ensure that food supplied to NASA astronauts had no negative
effect on their health or could jeopardize space missions but, since the 1990s, has also been applied to mass
consumption and made mandatory for all food business operators.
It starts from an analysis of the possible risks for bacterial, chemical or physical contamination in every phase of the
production process and in the subsequent phases such as storage, transport and sale to the consumer.
Subsequently, the "critical points" are identied, i.e. the steps during which contamination may occur with greater
probability.
On the basis of the results, constant control procedures at each processing
stage, useful to prevent any hazards, are identied and applied.
21
Page 22

use
3. cooking!
First of all, select whether to cook:
- in manual mode;
- in automatic mode (using recipes).
manual cooking
According to his/her experience, the user must set the desired cooking parameters for one or more phases:
- type of cooking (convection, combi, steam)
- temperature in the chamber;
- length of timed cooking or with core probe;
- fan speed;
- humidity input/extraction.
After setting a cooking cycle, it is advisable to save it by giving it a name and a category: this way it will be possible to nd it
quickly and reuse it as often as you wish.
p
. 24
automatic cooking p. 35
A recipe book is available, divided into three sections:
- Modular Chef: pre-set recipes, created and tested by the Constructor's chefs to achieve awless results. They are divided
into categories to make the search for the recipe you need easier( e.g. starters, red meat, etc.). The user only needs to add the
food to be cooked, choose the favourite recipe from those on offer and start it: the appliance will cook the food to perfection
in full autonomy.
- My recipes: a collection of the user’s manual recipes, saved in categories to make the search for what you need easier.
- Create new: allows you to create a new recipe and save it to reuse it later, as often as you want.
Your equipment is also equipped with some very useful additional functions that make everyday work easier:
best Chef
View all the recipes marked as favourites and the latest cooking cycles (recent); this lter speeds up the search for the recipe
you want to use.
cooling
This function is particularly useful to cook dishes that require low temperatures if another cooking cycle has just ended or if you
want to wash the chamber.
multilevel cooking
In a kitchen there is often the need to manage at the same time dishes that have the same cooking parameters but different
cooking times. Your oven helps you handle this need in three different ways:
- all-in: allows you to insert more dishes, with different cooking times, at the same time. An acoustic signal will warn you that
the tray must be removed when the time set by the user expires.
- all-out: allows you to have trays placed in the oven at different times all ready simultaneously.
- dynamic: allows you to set a timer for each tray inserted; an acoustic signal will warn to take each tray out when the set
timer expires.
p
. 48
p
. 47
p
.
39
22
Page 23

personal notes
23
Page 24

use
13:00
HOME
PREHEATED
RECIPE BOOK
13/10/2016
100°c
MANUAL
MULTILEVEL
MANUAL COOKING
According to his/her experience, the user must set the desired cooking parameters for one or more
cooking phases.
At the end of the settings it is advisable to save the recipe by giving it a name and a category: this
way it will be possible to nd it quickly and reuse it as often as required.
In the following pages each step is described in detail.
CLEANING
23
In summary, manual cooking requires the user to do the following:
1 set manual preheating (optional)
selecting the type of cooking:
- convection
2
- steam
- combi
setting the following cooking parameters for phase 1:
A temperature in the chamber;
B length of timed cooking or with core probe;
3
C humidity in/out (according to the selected type of
D fan speed;
E opening/closing the flue.
BEST CHEF
cooking);
p. 26
p. 27
p. 28
Preheating starts automatically when
any cooking cycle is started (it is however
possible to exclude it).
Its temperature is calculated autonomously by
the appliance, taking into account the cooking
parameters set by the user (e.g. type of cooking,
temperature in the chamber, etc ...).
If the user wants to manually set the preferred
preheating temperature, for example because
frozen food is inserted or if the oven is at full load,
this can be done by accessing the "Manual preheating" section on page 26
4 setting more cooking phases (option)
5 saving the recipe (option)
6 starting a recipe
24
p. 31
p. 32
p. 32
Cooking can consist of a minimum of 1
cooking phase or, for better results, up to
a maximum of 16 cooking phases, each characterized by different parameters (for example,
some phases can be set according to time, others with core probe). It is not necessary to use all
the phases, for example only two or three can be
used.
At the end of the settings it is advisable to
save the recipe by giving it a category and
a name: this way it will be possible to nd it quickly and reuse it as often as you wish.
Starting a recipe can also be delayed! See
page 34
Page 25

23
A- type of cooking
13:00
MANUAL
13/10/2016
100°c
B - temperature in the chamber
190°
C1 - time setting C2 - core probe temperature setting
C
C3 - Delta T temperature setting
00:15
D - humidity in E - ue opening/closing
0
F - fan rotation speed
setting (continuous)
additional cooking phases
saves the set recipe
Chef’s recipes on page 50
%
1
1
F - fan rotation speed setting (only
with the elements on)
delayed start
cooking start
page 34
25
Page 26

use
1. preheating
Automatic preheating
Pre-heating starts automatically after starting a man-
24
ual or automatic cooking cycle from the “Programs” sec-
tion.
The displayed page indicates the current chamber tem-
perature and the temperature to be reached (e.g. 250°C)
which is calculated autonomously by the appliance, taking
into account the cooking parameters set by the user (e.g.
type of cooking, chamber temperature, etc...).
Once the set temperature has been reached, the oven
27
emits an acoustic signal and displays an image to
indicate that it is possible to insert the trays with the food to
be cooked.
While waiting for the user to insert them, the equipment holds
the temperature reached (e.g. 250°C).
After inserting the trays, when the door is closed, manual or
automatic cooking begins without pressing any other key.
24
25
13:00
100°C 210°C
13:00
13/10/2016
HOME
13/10/2016
PREHEATING
TEMPERATURE
reached
100°c
Set
100°c
temperature to
be reached
real temperature in
the chamber
skip preheating
13:00
13/10/2016
PREHEAT
100°c
To "skip" automatic preheating and immediately switch
to the previously started cooking cycle, touch the SKIP
key
Manual preheating (option)
If you want to manually set the preheating temperature, for
example because you introduce frozen food or if you use the
oven at full load, follow this procedure:
A
25
C
touch the "preheating" symbol; a keypad appears,
B
set the desired temperature (e.g. 250°C)
start the preheating cycle by pressing the START
key
A page appears indicating the current room
26
temperature and the temperature to be reached.
Once the set temperature has been reached, the oven
27
emits an acoustic signal and displays an image to
indicate that it is possible to insert the trays with the food to
be cooked.
While waiting for the user to insert them, the equipment holds
the temperature reached (e.g. 230°C).
After inserting the trays, set manual cooking or start automatic
cooking from the "Programs" section.
When cooking starts, the default choice is automatic
preheating which, obviously, must be "skipped" with the
SKIP key as the oven chamber is already hot.
A
PREHEATED
RECIPE BOOK
CLEANING
Manual preheating
26
27
MANUAL
MULTILEVEL
BEST CHEF
13:00
13/10/2016
PREHEAT
TEMPERATURE
Set
reached
100°C 230°C
100°c
230°C
temperature
1 2 3
4 5 6
7 8 9
+ 0
temperature to
reach
real temperature in
the chamber
stops preheating
B
X
C
To "stop" manual preheating touch the LOCK
key.
26
Page 27

2. selecting the type of cooking
The oven allows three different cooking modes:
C
- convection cooking
- combi cooking
- steam cooking
Select the preferred cooking type, choosing among the
28
available ones and touching the corresponding icon (e.g.
convection cooking):
C
cooking types table
28
13:00
MANUAL
1
1
13/10/2016
190°
00:15
100°c
C
0
%
type of cooking
Convection cooking
The food cooks thanks to the dry
heat generated by the elements
and diffused by the fans, whose
speed varies as required by the user.
The ventilation inside the cooking
chamber ensures smoother and
faster cooking.
Mixed cooking cycles
(combi)
Food is cooked with a percentage
of humidity selected by the user.
The ventilation inside the cooking
chamber ensures smoother and
faster cooking.
programmable
temperature
from
30°C
to
290°C
from
30°C
to
290°C
humidity in
in convection
cooking cycles
humidity cannot
be let in
from 0%
to 99%,
programmable
as desired by
the user
humidity out
(flue vent)
the user can
choose:
closed ue
open ue
the opening/
closing of
the ue vent
is managed
independently
by the oven
recommended for ...
- browning dishes
- grilling dishes
- dry pastry baking
- frozen food cooking
- cooking almost all
dishes (maintains good
internal softness)
- leavening bakery
products
Steaming
Food is steamed. The steam inside
the cooking chamber is evenly
spread by the powerful fans whose
speed is varies as required by the
user.
from
30°C
to
130°C
in steam
cooking the
humidity is xed
at 100%, not
modiable
ue vent always
closed without
the possibility of
opening it
- cooking delicate dishes
(e.g. vegetables)
- cooking sauces and
creams
- pasteurization
- sous-vide cooking
- regeneration
- leavening bakery
products
27
Page 28

use
3. setting the parameters
A - Temperature in the chamber
Choosing the right cooking temperature is essential to achieve
optimal cooking results.
To set the temperature, A touch the “temperature” eld,
29
B
enter the desired value via the displayed keyboard
C
(e.g. 190°C) and
If you wish to change the unit of measurement from
centigrades to Fahrenheit or vice-versa, see page 17
conrm with .
.
29
13:00
A
1
13/10/2016
MANUAL
1
190°
00:00
0
13:00
100°c
C
13/10/2016
MANUAL
190°C
temperature
1 2 3
100°c
4 5 6
%
7 8 9
+ 0
B
X
C
B - Cooking duration
The end of cooking can be set in three ways:
timed: cooking ends automatically when the set
time expires (range: from 1 minute to 40 hours);
with core probe: cooking ends automatically when
the temperature detected by the probe reaches the
set value;
with DeltaT (Δt): cooking stops automatically when
the temperature detected by the core probe reaches
the set value.
During the cycle, the oven increases or lowers the
chamber temperature automatically to maintain the Delta T
(Δt) value set by the user constant (e.g. 30°C)
By denition:
Delta T (Δt) = Chamber temp. – (minus) Core probe temp.
For further information on how the core probe works,
page 11
To set the timed cycle or the cycle with core probe, A
30
touch the “time” or “core probe” elds, B enter the desired
C
value using the displayed keypad and
If you want the oven to work continuously, touch the
“time” eld, enter “0” using the displayed keypad and
conrm with
30
31
13:00
A
1
13:00
1
MANUAL
1
MANUAL
1
13/10/2016
190°
00:15
0
13/10/2016
190°
70°C
100°c
C
13:00
13/10/2016
MANUAL
01:30
time
1 2 3
100°c
4 5 6
%
100°c
C
A
B
0
%
7 8 9
+ 0
B
13:00
13/10/2016
MANUAL
30°C
temperature
1 2 3
4 5 6
7 8 9
+ 0
100°c
13:00
MANUAL
X
1 2 3
4 5 6
7 8 9
+ 0
X
C
13/10/2016
70°C
temperature
100°c
X
conrm with
If you want to use the DeltaT function, it is necessary to
31
set both the core probe
B
touching the corresponding elds, setting the desired
A
temperature and the DeltaT
values using the displayed keypad and conrming with
28
Page 29

C - D - Humidity input/extraction
To cook some food it is preferable if the environment inside the chamber is very humid, on the contrary, for others, it is useful
to extract excess moisture.
The possibilities of intervention are related to the type of cooking selected by the user:
type of cooking humidity in
Convection cooking
Mixed cooking cycles (combi)
Steaming
To open or close the flue vent A touch the
32
corresponding icon and set the desired status:
closed ue
in convection cooking cycles humidity
cannot be let in
from 0% to 99%, programmable as
desired by the user
in steam cooking the humidity is xed
at 100%, not modiable
33
A
B
C
open ue
humidity out
(flue vent open)
the opening/closing of the ue vent is
managed by the user
the opening/closing of the ue vent is
managed independently by the oven,
the user cannot intervene
ue vent always closed without the
possibility of opening it
To let humidity into mixed cycles (combi):
touch the “humidity” eld
enter the desired value using the displayed keyboard
conrm with
32
13:00
1
1
13/10/2016
MANUAL
190°
00:15
100°c
C
0
%
A
33
13:00
1
1
13/10/2016
MANUAL
190°
00:15
A
70
100°c
C
%
13:00
13/10/2016
MANUAL
70%
humidity
1 2 3
4 5 6
B
7 8 9
+ 0
delta T, a really special function
This type of cooking is suitable for meat, medium- or large-sized roasts in particular that benet from slow cooking at
low temperature, remaining tender and minimizing weight loss.
By denition:
Delta T (Δt)= Temperature in the chamber - (minus) Core probe temperature
Example: Δt 130°C = 200°C (Chamber temp.) - 70°C (Core probe temp.)
100°c
X
C
If you choose this mode for the end of cooking, you need to set the temperature in the
chamber as well as the Delta T temperature.
29
Page 30

use
E- Fan rotation speed
The fans can rotate continuously (Convection) or they can
rotate only when the elements are on (Semistatic).
A
34
Touch the icon corresponding to the desired mode
(in the example “Convection” mode has been selected):
34
13:00
13/10/2016
MANUAL MANUAL
190°
100°c
C
13:00
CONVECTION SEMISTATIC
13/10/2016
100°c
CONVECTION
the fans rotate continually
SEMISTATIC
the fans rotate only when the elements are on
B
In the next page displayed, set the rotation speed that is
most suitable for the cycle you want to run - for some tips,
refer to the table
C
Conrm with
D
For better cooking, the fans periodically reverse the
direction of rotation both in "Convection" and "Semistatic"
modes. The inversion is managed autonomously by the oven
according to the cooking duration set without having to set
anything else.
00:15
A
0
%
1
1
B
C
D
Fan rotation speed table
type of rotation
30
CONVECTION
the fans rotate continually
SEMISTATIC
the fans rotate only when the
elements are on
rotation speed suitable for ...
full load cooking
steam cooking
slow cooking
all types of cooking
“pushed” cycles”
(e.g. browning,
toasting)
steam cooking
slow cooking
for patisserie
all types of cooking
for patisserie
full load cooking
“pushed” cycles
for patisserie
Page 31

4. setting more cooking phases
After setting all the parameters of phase 1, more cooking
phases can be set, if required.
For further information on cooking phases page 10
35
13:00
13/10/2016
MANUAL
200°
100°c
C
13:00
13/10/2016
MANUAL
cooking phases
1 2 3 4
200°
100°c
C
A
35
Touch the “Phases” eld
B
press the “+” key to add all the phases required (e.g.
4 phases)
C
touch the phase you wish to program (e.g. phase 2): the
number turns red
D
conrm with
You return to the manual cooking setting page: the new
36
phase must be set as explained for the previous one.
When new phases are created, they take the parameters of
the last set phase by default: to change them, simply touch
them and set them as usual.
In the same way it is possible to eliminate the cooking phases
(even when cooking has already started), by touching the
number of the phase to be eliminated and conrming with
the "-" key.
Cooking can consist of a minimum of 1 cooking phase
or, for better results, up to a maximum of 16 cooking
phases, each characterized by different cooking types
(convection, combi and steam) and parameters (for example,
some phases can be set according to time, others with core
probe).
1
1
36
phase 2 of 4 is
being set
01:30
100
A
01:30
C
%
B
100
%
+ -
1
1
D
13:00
13/10/2016
MANUAL
200°
100°c
C
01:30
100
%
2
4
It is not necessary to use all the phases, for example only two
or three can be used.
31
Page 32

use
5. saving the set cooking cycle
After setting a cooking cycle, it is advisable to save it by giving
it a category and a name: this way it will be possible to nd
it quickly and reuse it as often as you wish.
38
13:00
13/10/2016
MANUAL
100°c
38
A
Press the key.
B
39
On the displayed pages, select in which category
your recipe must be saved (in the example “First courses”)
and its name (in the example “Lasagne”).
C
Conrm with
Personal recipes, saved in the “Manual Cooking”
section, are used again by accessing “Programs”
“My recipes” and selecting the category containing the recipe
you are looking for (e.g. First courses).
It is possible to save a cooking cycle even when it is
completed (for example to check the result). In this
case, however, the oven will not take into account the changes
made during cooking (for example a change in temperature).
39
190°
00:15
A
1
1
13:00
13/10/2016
MANUAL MANUAL
MY RECIPES
FIRST COURSES RED MEAT
POULTRY
B
VEGETABLES
SOUS-VIDE
COOKING
PASTRY
PRODUCTS
MULTILEVEL
REGENERATION
100°c
FISH
EGGS
REGENERATION
FINISHING
BREAD
PRODUCTS
LEAVENING
OTHER
C
0
%
13:00
W E R T Y U I O PQ
Z
?123
13/10/2016
ENTER RECIPE NAME
Lasagne
S D F G H J K L FineA
XCV B N M ! ?
/
100°c
C
x
, .
6. starting the cycle
Start the cycle by pressing the START key: the
37
automatic preheating cycle starts that you can “skip” by
pressing the
preheating must be carried out without any food in the
oven chamber; in the case of mobile ovens, for preheating
to start, a trolley with no trays must be placed in the oven
chamber.
When the set preheating temperature has been reached, the
oven emits an acoustic signal to indicate that it is time to put
the food in the oven. In case of mobile ovens, using gloves,
remove the trolley from the cooking chamber paying attention
because it is very hot, ll it with trays and push it back in (to
facilitate this operation it is advisable to buy two trolleys so a
second trolley can be lled with trays).
key (for further information) p. 26)
37
13:00
1
1
13/10/2016
MANUAL
210°
03:00
100
100°c
13/10/2016
PREHEAT
100°c
13:00
C
TEMPERATURE
Setreached
%
100°C 250°C
32
Page 33

13/10/2016
13:00
MANUALE
100°c
40 41
When the door is closed, the first cooking phase
starts, based on the set parameters, and a summary
is displayed of the set temperature and duration (either timed or
with core probe).
If you wish to change some changes during the cooking
cycle, touch any point of the summary page.
You return to the setup page where you can:
42
- block and "skip" the phase in progress;
- add or remove cooking phases;
- change the parameters of the selected phase, acting as
usual.
Cooking will end at the end of the set time (end of timed
cycle) or when the core or Delta T temperature is reached
(end of cycle with core probe or Delta T).
To stop a cooking cycle prematurely, press the STOP
key
Please note that some changes are not possible as they
depend on the type of cooking chosen for the phase in
progress (for example in convection cooking it is not possible
to add humidity).
Refer to table
for more information.
C
40
41
13:00
13/10/2016
MANUAL
100°c
real temperature in
reached
100°C
230°C
Set
remaining
00:45
01:30
1
/
Set
3
the chamber
temperature to
be reached
time remaining
(hours: minutes)
set time
phase in progress
example of end of timed cycle
13:00
13/10/2016
MANUAL
reached
100°C
230°C
Set
remaining
100°c
real temperature in
the chamber
temperature to
be reached
real core
temperature
40°C
set core
75°C
2
Set
/
3
temperature
phase in progress
42
changes during the cycle in progress
cooking phases
1 2 3
200°
C
touch the phase
(highlighted in red)
you wish to skip or
of which you wish
to change the
parameters
cooking phases
1 2 3 4
200°
C
01:30
+ -
add or remove phases
to the cycle in progress
by touching the “+” o “-”
symbols.
example of core probe cycle end
13:00
13/10/2016
MANUAL
210°
03:00
100°c
C
after selecting the phase to be
modied, change its cooking
parameters (in the example
70
%
of phase 2/3) as for the initial
setting
2
3
stops the cycle
in progress
stops and skips the phase in
progress (in the example phase
2/3, going straight to phase 3/3)
33
Page 34

use
Delayed start
The function allows delaying a cycle by pausing it until the time entered.
Touch the “programmed start” icon;
43
enter the start time (e.g. 11:00) and select if at the beginning:
40
preheating starts
preheating is excluded
conrm with
.
Once the time is set (e.g. 11:00) cooking starts with the parameters set by the user.
The user can stop the pause at any time by pressing the STOP
key
43 44 45
13:00
13/10/2016
MANUAL MANUAL
200°
01:30
100
1
1
100°c
C
13:00
1 2 3
4 5 6
%
7
:00 :30
13/10/2016
11 : 00
programmed
start
8 9
0
100°c
X
13:00
13/10/2016
MANUAL
START PLANNED
11:00
100°c
FOR
34
Stops the function and gets
cooking to start immediately
Page 35

13:00
HOME
PREHEATED
RECIPE BOOK
13/10/2016
MANUAL
MULTILEVEL
100°c
AUTOMATIC COOKING WITH RECIPES (PROGRAMS)
A recipe book is available, divided into three sections:
Modular Chef: collection of pre-set recipes, created and tested by the Manufacturer’s Chefs
47
to obtain excellent results.
They are divided into categories to make the recipe search easier (e.g. starters, red meat, etc.).
The user only needs to add the food to be cooked, choose the favourite recipe from those on offer
and start it: the appliance will cook the food to perfection in full autonomy.
My recipes: a collection of the user’s personal recipes, saved in categories to make the search
51
for what you need easier.
CLEANING
BEST CHEF
Create new: allows you to create a new recipe and save it to reuse it later, as often as you
46
want.
If there are multiple pages, they are scrolled by dragging the nger left or right (scroll function), the red dots at the bottom
indicate the page displayed and those available:
= display of page 1 of two available
= display of page 2 of two available
Chef’s recipes on page 50
create new
Allows you to create a new recipe and save it to reuse it later,
46
13:00
HOME
13/10/2016
100°c
13:00
13/10/2016
RECIPE BOOK
100°c
as often as you want.
The parameter setting procedure is the same as in the “Manual
cooking” section on page 24
PREHEATED
MANUAL
MODULAR
CHEF
RECIPE BOOK
CLEANING
MULTILEVEL
BEST CHEF
MY
RECIPES
CREATE
NEW
35
Page 36

use
Modular Chef
A collection of pre-set recipes, created and tested by the
Manufacturer’s Chefs to obtain excellent results.
They are divided into categories to make the recipe search
easier (e.g. starters, red meat, etc...).
47
13:00
PREHEATED
HOME
13/10/2016
MANUAL
100°c
13:00
13/10/2016
RECIPE BOOK
100°c
MODULAR
CHEF
Select the category (e.g. Fish) and the recipe you are
48
interested in (e.g. Grilled fillet of fi );
in the displayed page you can:
49
A select how well cooked (normal, medium, well done)
the dish you wish to cook must be;
B view and modify the cooking parameters of the
recipe, acting as if you were setting the parameters of a
manual recipe (page 24);
all the Modular Chef recipes can be modied only
temporarily, i.e. they are valid only for the cycle that
is about to start but will not be stored; this means that,
when the recipe is used again, it will have the original
factory-set parameters and not those modied by the
user.
C copy the recipe;
this function allows copying the Modular Chef
recipe, giving it a new name (e.g. Grilled fillet of fish
with potatoes) and modifying its cooking parameters
permanently as required (page 24); the new personal
recipe will be added to the “My recipes” section.
E view some useful suggestions to make a perfect dish
(such as the ingredients to use, etc.);
48
49
RECIPE BOOK
CLEANING
13:00
13/10/2016
MODULAR CHEF
STARTERS
WHITE MEAT
FISH
MULTILEVEL
BEST CHEF
100°c
FIRST COURSES
RED MEAT
POULTRY
13:00
MODULAR CHEF
01
- Fried squid
02
- Grilled llets of sh
03
-- Grilled cod llet
04
- Steamed llet of sh
05
- Breaded llet of sh
06
- Fillet of swordsh
13:00
13/10/2016
MODULAR CHEF
- Grilled llets of sh
13/10/2016
FISH
MY
RECIPES
CREATE
NEW
100°c
100°c
F identify the recipe as a “favourite” to nd it more easily
later on, looking for it in the “Best Chef” section p. 47
A - degree of cooking
B - cooking parameters
C - copies the recipe
D - starts the recipe
F - identies the recipe as a
“favourite”
13:00
13/10/2016
Roast-beef
INGREDIENTI
Girello 3,700 kg
Erbe 0,010 kg
Olio 0,050 kg
Sale q.b.
Pepe q.b
PROCEDIMENTO
Preparazione
Con un coltello da carne ben alato pulire il girello di
bovino eliminando qualsiasi traccia di grasso o pelle,
poi con lo spago legare stretto cercando di mantenere
una forma il più possibile cilindrica. Mettere nella
teglia posizionando la sonda al centro del roast-beef e
insaporire con le erbe, il sale, il pepe e l’olio.
Cottura
Preriscaldare il forno a 230°C.
Procedere con il cicolo di cottura (fase 1 e 2).
100°c
E - suggestions
NORMAL MEDIUM
SET INFO
COPY
WELL DONE
FAVOURITES
36
Page 37

50
Start the cycle by pressing the START key: the
automatic preheating cycle starts that you can “skip” by
pressing the
key (for further information) p. 26).
preheating must be carried out without any food in the
oven chamber; in the case of mobile ovens, for preheating
to start, a trolley with no trays must be placed in the oven
chamber.
When the set preheating temperature has been reached, the
oven emits an acoustic signal to indicate that it is time to put
the food in the oven. In case of mobile ovens, using gloves,
remove the trolley from the cooking chamber paying attention
because it is very hot, ll it with trays and push it back in (to
facilitate this operation it is advisable to buy two trolleys so a
second trolley can be lled with trays).
Push the food in and close the door: the appliance will cook
the food perfectly, in full autonomy.
50
13:00
13/10/2016
MODULAR CHEF PREHEAT
Grilled llets of sh
NORMAL MEDIUM WELL DONE
SET INFO
COPY
100°c
FAVOURITES
13:00
13/10/2016
TEMPERATURE
Setreached
100°C 250°C
100°c
37
Page 38

use
my recipes
Collection of the user’s personal recipes, divided into
categories to make the search for what you need easier.
This collection includes:
- the recipes saved in the “Manual” section
-
the recipes copied from the “Programs” - “Modular Chef”
section;
- the recipes saved from the “Programs” - “Create new”
section
Choose the category (e.g. Fish) and the recipe you are
52
interested in (e.g. Grilled fillet of fish with potato );
in the displayed page you can:
53
A give the recipe a new name (e.g. Grilled filled of fish
with potatoes might become Grilled fis );
51
52
13:00
HOME
PREHEATED
RECIPE BOOK
CLEANING
13:00
13/10/2016
13/10/2016
MANUAL
MULTILEVEL
BEST CHEF
100°c
100°c
13:00
13/10/2016
RECIPE BOOK
13:00
13/10/2016
MY RECIPESMY RECIPES
100°c
MODULAR
CHEF
MY
RECIPES
CREATE
NEW
100°c
B view and modify the cooking parameters of the
recipe, acting as if you were setting the parameters of a
manual recipe (page 24);
all the recipes can be modied only temporarily, i.e.
they are valid only for the cycle that is about to start
but will not be stored; this means that, when the recipe is
used again, it will have the original parameters previously
set by the user.
C copy the recipe;
this function allows copying the recipe, giving it a
new name (e.g. Grilled fillet of bream) and modify its
cooking parameters permanently as required (page
24); the new personal recipe will be added to the “My
recipes” section.
E delete the recipe: a pop-up asks you to conrm the
deletion: the recipe is then deleted without the possibility
of getting it back;
F identify the recipe as a “favourite” to nd it more
easily later on.
54
Start the cycle by pressing the START key:
the automatic preheating cycle starts that you can “skip”
by pressing the
key (for further information) p.
26).
preheating must be carried out without any food in the
oven chamber; in the case of mobile ovens, for preheating
to start, a trolley with no trays must be placed in the oven
chamber.
When the set preheating temperature has been reached, the
oven emits an acoustic signal to indicate that it is time to put
the food in the oven. In case of mobile ovens, using gloves,
remove the trolley from the cooking chamber paying attention
because it is very hot, ll it with trays and push it back in (to
facilitate this operation it is advisable to buy two trolleys so a
second trolley can be lled with trays).
Push the food in and close the door: the appliance will cook
the food perfectly, in full autonomy.
STARTERS
WHITE MEAT
FISH
FIRST COURSES
RED MEAT
POULTRY
53
E - information on the recipe
A - renames the cooking cycle
B - cooking parameters
C - copies the recipe
D - starts the recipe
F - identies the recipe as a
“favourite”
13:00
54
13/10/2016
MY RECIPES
- Grilled llets of sh
with potatoes
SET DELETE
COPY
RENAME
100°c
FAVOURITES
- Grilled llets of sh with
01
potatoes
02
- Cod llet
03
- Fillets of bream
13:00
13/10/2016
MY RECIPES
- Grilled llets of sh with
potatoes
SET DELETE
COPY
RENAME
13:00
13/10/2016
PREHEAT
TEMPERATURE
100°C 250°C
100°c
FAVOURITES
100°c
Setreached
38
Page 39

13:00
HOME
PREHEATED
RECIPE BOOK
WASHING
13/10/2016
MANUAL
MULTILEVEL
BEST CHEF
100°c
MULTILEVEL
In a kitchen there is often the need to manage at the same time dishes that have the same cooking
parameters but different cooking times, for instance during events, catering, etc.
Your oven helps you manage this requirement in three different ways:
all-in p. 40
allows you to insert at the same time trays with different cooking times, set by the user. A beep
will warn you to take each tray out at the end of the set time.
all-out p. 42
allows you to take out at the same time trays with different cooking times, set by the user.
dynamic p. 44
allows you to set a duration and end of cooking time for each tray inserted; an acoustic signal
will warn you to take each tray out when the set time expires.
39
Page 40

T1-T2-T3 h 10:00
ALL - IN
TIMER: 15 min. TIMER: 25 min.
T3 h 10:15
T2 h 10:25
TIMER: 70°C
T1 h 11:45
IN
OUT
beep beep beep
use
all-in
IN
55
The user sets timed cooking times or cycles with core probe for each of them:
55
The ALL-IN function allows you to put multiple trays into the oven at the same time (in the example, trays
T1-T2-T3 are all put into the oven at 10:00)
timed: the timer goes off at the end of the set time (e.g. 15 min);
with core probe: cooking ends when the temperature detected by the probe reaches the set value (e.g.70°C).
In the example, tray T1 timer is set on 15 min., T2 on 25 min. and T3 uses the core probe that must reach 70°C.
OUT
A beep and a display will warn you to take each tray out when its timer goes off (in the example, tray T1 is taken out
at 10:15, tray T2 at 10:25, and T3 when the core probe detects that the chicken has reached an internal temperature of 70°C.
55
40
Page 41

Setting the function
56 57
Access the function and set the cooking
parameters (such as type of cooking, temperature,
fan speed, ue opening/closing, humidity in) as for any manual
cooking cycle (see page 24).
A
57
Touch the “multilevel” eld: a numbered list is
displayed that corresponds to the trays in the oven
B
Touch the “set” eld to set a timer for each tray.
A screenshot is displayed, where you can choose if you
58
want to set a timer or a core probe.
A
Select the preferred mode and B enter the desired value
using the displayed keypad.
C
Conrm with
56
13:00
HOME
PREHEATED
RECIPE BOOK
CLEANING
13/10/2016
MANUAL
MULTILEVEL
BEST CHEF
100°c
13:00
MULTILEVEL
13/10/2016
ALL - IN
ALL - OUT
DYNAMIC
100°c
Start with the START key.
58
A window is displayed that shows, for each tray:
A) the remaining time (timed cooking) or the current core
probe temperature (cycle with core probe)
B) set duration (timed duration) or core temperature to be
reached (duration with core probe).
Colours help to understand times visually:
End of timed cycle:
green: less than one minute remaining to the set time
yellow: less than ve minutes remaining to the set time
red: more than ve minutes remaining to the set
time
End of core probe cooking cycle:
green: less than 5°C to reaching the set temperature
yellow: less than 4°C to reaching the set temperature
red: more than 10°C to reaching the set temperature
When a timer goes off, the number of the tray to take out is
displayed.
57
58
13:00
A
MULTILEVEL
ALL-IN
13:00
MULTILEVEL
ALL-IN
A
13/10/2016
200°
100
1 2 3
4 5 6
13/10/2016
LEVEL 1
- - : - -
100°c
C
%
100°c
13:00
MULTILEVEL
ALL-IN
set end of cooking
- - : - - - - : - -
1
- - : - - - - : - -
2
- - : - - - - : - -
3
- - : - - - - : - -
4
- - : - - - - : - -
5
- - : - - - - : - -
6
13:00
MULTILEVEL
ALL-IN
01:30
time
13/10/2016
13/10/2016
100°c
B
100°c
LEVEL 1
1 2 3
4 5 6
B
7 8 9
+ 0
C
X
C
59
13:00
13/10/2016
MULTILEVEL
ALL-IN
set setend of cooking end of cooking
0:15
1
0:25
2
70°C
3
4
5
6
100°c
- - : - -
- - : - -
- - : - -
13:00
MULTILEVEL
ALL-IN
1
2
3
4
5
6
13/10/2016
00:15
00:04
00:25
00:14
70°C 70°C
100°c
A) (end of timed cycle)
time remaining totaking the tray out (tray ready)
if the remaining time exceeds 3 minutes, it is displayed as hours:
minutes
if the remaining time is less than 3 minutes, it is displayed as
minutes: seconds
A) (end of cooking with core probe)
current core temperature
B) set cooking duration
or set core temperature
41
Page 42

use
all-out
IN-A
60
For each of them, the user sets a timer, that is a cooking cycle (in the example tray T1 timer is 1 hour, tray T2 is 25 min. and tray T3 is 15 min.).
Then the user puts the first tray into the oven, the one with the longest cooking time (in the example tray T1 with the
chicken that needs 1 hour’s cooking will go into the oven).
60
tray (in the example, tray T2 will be placed in the oven at 11:35, T3 at 11:45).
60
Setting the function
The ALL-OUT function allows you to have trays put into the oven at different times all ready at the same time.
The cooking time must take into account what time the dish must be ready! For example, if I want everything ready for
12:00 and the longest cooking time is 1 hour, it will be necessary to put the tray in the oven at 11:00.
IN-B
When ready, a beep and a display will warn it is time to place in the oven the other trays.
In fact, the oven calculates the moment when the food must go in autonomously, according to the cooking time of the
OUT
This way all trays will be ready at the same time (in the example at 12:00).
61 62
62
B
Touch the “set” eld to set a timer (cooking time) for each tray.
Access the function and set the cooking parameters (such as type of cooking, temperature, fan speed, ue opening/
closing, humidity in) as for any manual cooking cycle (see page 24).
A
Touch the “multilevel” eld: a numbered list is displayed that corresponds to the trays in the oven (in the example the
oven contains 6 trays and therefore there are 6 positions).
60
IN - A IN - B
TIMER: 25 min.
T2 h 11:35
TIMER: 15 min.TIMER: 1 ora
T3 h 11:45T1 h 11:00
beep beep
42
OUT
T1-T2-T3 h 12:00
ALL - OUT
beep
Page 43

A
63
63
enter the desired value using the displayed keyboard.
B
Conrm with
Put the tray with the longest cooking time into the oven.
61
13:00
HOME
13/10/2016
100°c
13:00
MULTILEVEL
13/10/2016
100°c
The cooking time must take into account what time the
dish must be ready! For example, if I want everything
ready for 12:00 and the longest cooking time is 1 hour, it will
be necessary to put the tray in the oven at 11:00.
Start with the START key.
When ready, a beep and a display will warn it is time to
64
place in the oven the other trays, specifying the tray
number.
In fact, the oven calculates the moment when the food must
go in autonomously, according to the cooking time of
the tray (in the example, tray T2 will be placed in the oven at
11:35, T3 at 11:45).
A window is displayed that shows, for each tray:
A) the remaining cooking time (if already in)
B) the remaining time before it goes into the oven (if not
already in); if the tray is already in, the display shows 00:00.
C) duration set in hours: minutes
Colours help to understand times visually:
green: (tray in) less than one minute remaining to the
set time
(tray not yet in) less than a minute remaining
62
13:00
MULTILEVEL
ALL-OUT
A
PREHEATED
RECIPE BOOK
CLEANING
13/10/2016
200°
100
1 2 3
4 5 6
C
%
MANUAL
MULTILEVEL
BEST CHEF
100°c
ALL - IN
ALL - OUT
DYNAMIC
13:00
13/10/2016
MULTILEVEL
ALL-OUT
remaining set end of cooking
- - : - -
1
2
3
4
5
6
- - : - - - - : - -
- - : - -
- - : - - - - : - -
- - : - -
- - : - - - - : - -
- - : - -
- - : - - - - : - -
- - : - -
- - : - - - - : - -
B
- - : - - - - : - -
- - : - -
100°c
yellow: (tray in) less than ve minutes remaining to the
set time
(tray not yet in) less than ve minutes remaining
red: (tray in) more than ten minutes remaining to the
set time
(tray not yet in) more than ten minutes remaining
A beep warns when all the trays are ready.
64
13:00
MULTILEVEL
ALL-OUT
- - : - -
1
2
3
4
5
6
- - : - - - - : - -
- - : - -
- - : - - - - : - -
- - : - -
- - : - - - - : - -
- - : - -
- - : - - - - : - -
- - : - -
- - : - - - - : - -
- - : - - - - : - -
- - : - -
100°c
63
13:00
13/10/2016
MULTILEVEL
ALL-OUT
1
2
3
4
5
6
01:00
00:00
00:25
00:00
00:15
00:15
- - : - - - - : - -
- - : - -
- - : - - - - : - -
- - : - -
- - : - -
- - : - - - - : - -
13:00
13/10/2016
MULTILEVEL
ALL-OUT
01:00
time
100°c
LEVEL 1
1 2 3
A
4 5 6
7 8 9
+ 0
100°c13/10/2016
setset end of cookingend of cooking remainingremaining
01:00
00:25
00:15
A) Time remaining to taking the
tray out (tray ready)
if the remaining time exceeds 3 minutes, it
is displayed as hours: minutes
if the remaining time is less than 3 minutes,
it is displayed as minutes: seconds
C) Cooking duration set in hours:
minutes
X
B
B) remaining time to putting the
tray in
43
Page 44

use
dynamic
IN
65
In the example:
tray T1: cooking time 1 hour, you want it ready for 12:00 -> the beep warns you to put it into the oven at 11:00
tray T2: cooking time 25 minutes, you want it ready for 12:00 -> the beep warns you to put it into the oven at 11:35
tray T2: cooking time 15 minutes, you want it ready for 11:45 -> the beep warns you to put it into the oven at 11:45
The cooking time can be set based on time or core probe:
65
In the example:
Trays T1 and T2 will be ready at 12:00
Tray T3 will be ready at 11:45
Allows setting an end of cooking time and a timer, that is the cooking duration for each tray you wish to place
in the oven; a beep warns when to insert each tray so that it is ready at the set time.
timed: the timer goes off at the end of the set time (e.g. 15 min);
with core probe: cooking ends when the temperature detected by the probe reaches the set value (e.g.70°C).
OUT
At the set times, an acoustic signal will warn you to remove the oven tray(s) that is(are) ready.
65
T3 h 11:45
OUT
IN
TIMER: 15 min.TIMER: 1 ora TIMER: 25 min.
T3 h 11:45T1 h 11:00
T1-T2 h 12:00
T2 h 11:35
beepbeepbeep
44
DYNAMIC
beepbeep
Page 45

Setting the function
66 67
Access the function and set the cooking
parameters (such as type of cooking, temperature,
fan speed, ue opening/closing, humidity in) as for any manual
cooking cycle (see page 24).
A
67
Touch the “multilevel” eld: a numbered list is
displayed that corresponds to the trays in the oven (in
the example the oven contains 6 trays and therefore there are
6 positions).
B
Touch the “set” eld to set a timer (cooking time) for
each tray.
66
13:00
HOME
PREHEATED
RECIPE BOOK
13/10/2016
MANUAL
MULTILEVEL
100°c
13:00
MULTILEVEL
13/10/2016
ALL - IN
ALL - OUT
100°c
In the displayed window you can choose if you want to
68
set the timed duration or the duration with the core
probe (“set” eld) and enter the end of cooking time (“end
of cooking” eld).
A
Select the preferred mode and B enter the desired value
using the displayed keypad.
C
Conrm with
D
Touch the “end of cooking” eld and E enter the desired
time using the displayed keypad.
F
G Conrm with
In the example:
tray T1: cooking duration 1 hour,
you want it ready for 12:00
-> the beep warns you to put it into the oven at 11:00
tray T2: cooking duration 25 minutes,
you want it ready for 12:00
-> the beep warns you to put it into the oven at 11:35
tray T3: cooking duration 15 minutes,
you want it ready for 11:45
-> the beep warns you to put it into the oven at 11:30
67
CLEANING
13:00
A
13/10/2016
MULTILEVEL
DYNAMIC
200°
100
1 2 3
4 5 6
BEST CHEF
C
%
100°c
DYNAMIC
13:00
B
13/10/2016
MULTILEVEL
DYNAMIC
remaining set
- - : - -
1
2
3
4
5
6
- - : - - - - : - -
- - : - -
- - : - - - - : - -
- - : - -
- - : - - - - : - -
- - : - -
- - : - - - - : - -
- - : - -
- - : - - - - : - -
- - : - - - - : - -
- - : - -
100°c
end of cooking
68
13:00
13/10/2016
MULTILEVEL
DYNAMIC
A
END OF COOKING
LEVEL 1
- - : - -
SET
- - : - -
100°c
13:00
13/10/2016
13/10/2016
E
100°c
B
X
100°c
X
C
G
MULTILEVEL
DYNAMIC
01:00
time
1 2 3
4 5 6
7 8 9
+ 0
D
13:00
MULTILEVEL
DYNAMIC
12:00
end of cooking
1 2 3
4 5 6
7 8 9
:00 :300
G
4545
Page 46

use
69
Start with the START key.
A window is displayed that shows, for each tray:
A) time to get out the tray (tray ready) (e.g. 12:00 = midday)
B) set cooking time (e.g. 01:00 = one hour)
C) the remaining time before the tray goes into the oven (if still out); if the tray is already in, the display shows 00:00
End of timed cycle:
green: (tray in) less than one minute remaining to the set time
(tray not yet in) less than a minute remaining
yellow: (tray in) less than ve minutes remaining to the set time
(tray not yet in) less than ve minutes remaining
red: (tray in) more than ten minutes remaining to the set time
(tray not yet in) more than ten minutes remaining
End of core probe cooking cycle:
green: less than 5°C to reaching the set temperature
yellow: less than 4°C to reaching the set temperature
red: more than 10°C to reaching the set temperature
A beep warns when each tray is ready.
In the example:
tray T1: ready at 12:00
tray T2: ready at 12:00
tray T3: ready at 11:45
69
13:00
MULTILEVEL
DYNAMIC
remaining remainingset set
1
00:00
00:05
2
00:15 11:45
3
- - : - -
4
- - : - -
5
- - : - - - - : - -
6
13/10/2016
01:00 12:00
00:25 12:00
00:15
- - : - - - - : - -
- - : - - - - : - -
- - : - -
100°c
end of cooking
13:00
13/10/2016
MULTILEVEL
DYNAMIC
1
2
3
4
5
6
01:00 12:00
00:00
00:25 12:00
00:05
00:15
00:15 11:45
- - : - - - - : - -
- - : - -
- - : - - - - : - -
- - : - -
- - : - -
- - : - - - - : - -
100°c
end of cooking
A) time to get the tray out
(e.g. 12:00 = midday)
B) cooking duration set in hours:
minutes
46
B) remaining time to putting the
tray in
(e.g. 00:15 = 15 minutes)
Page 47

13:00
PREHEATED
13/10/2016
HOME
MANUAL
100°c
BEST CHEF
View all the recipes marked as favourites and the latest cooking cycles (recent); this lter speeds
up the search for the recipe you want to use.
To delete a recipe from these lists, simply deselect the corresponding key
70
RECIPE BOOK
CLEANING
13:00
HOME
PREHEATED
RECIPE BOOK
CLEANING
13/10/2016
MULTILEVEL
BEST CHEF
MANUAL
A
MULTILEVEL
BEST CHEF
100°c
13:00
13:00
13/10/2016
BEST CHEF FAVOURITES FAVOURITES
B
FAVOURITES
RECENT
13/10/2016
01 - Filetti di pesce alla griglia
- Grilled llets of sh
02 - Lasagne alla bolognese
- Lasagne Bologna style
03 - Broccoli e patate grigliate
- Broccoli and grilled potatoes
04 -
- Roast veal
100°c
C
13:00
- Grilled llets of sh
02 -
NORMAL MEDIUM WELL DONE
SET INFO
COPY
D
13/10/2016
100°c
The key shows
the recipe as
a favourite,
touching it again
deselects it
FAVOURITES
E
“Modular Chef”
(Manufacturer’s)
recipe shown as
favourite
47
Page 48

use
13:00
HOME
COOLING
13/10/2016
SETTINGS
100°c
COOLING
Quickly cools the cooking chamber.
This function is particularly useful to cook dishes that require low temperatures if another cooking
cycle has just ended or if you want to wash the chamber.
A
71
C
A page is displayed showing the current temperature in the chamber and the temperature to
be reached; once this is reached, the oven beeps and this stops when the door is open or when
Select the function.
B
set the temperature you want the cooking chamber to reach.
Start with the START key.
the
key is pressed.
No other function can be used with cooling in progress.
Cooling can be carried out either with the door closed or open. It is advisable to keep the door closed initially and open it
when the temperature has lowered.
Pay particular attention to opening the door when the function is in progress: scalding hazard.
71
13:00
HOME
13/10/2016
100°c
13:00
13/10/2016
COOLING COOLING
100°c
13/10/2016
100°c
13:00
100°C
COOLING
A
SETTINGS
1 2 3
4 5 6
7 8 9
C
+ 0
B
TEMPERATURE
Setreached
130°C 100°C
X
temperature to
be reached
real temperature in
the chamber
48
stops the
function
Page 49

personal notes
49
Page 50

recipes
baguette
pizza
grilled prawns
grilled chicken
51
51
52
52
chef’s recipes
In this part of the manual, preparation suggestions are given to obtain balanced,
impeccably cooked dishes with excellent avour.
The recipes can be cooked using:
- manual cooking p. 22
According to his/her experience, the user must set the desired cooking parameters
for one or more cooking phases.
frollini
cherry tart
lasagna Bologna style
cont of cherry tomatoes
53
53
54
54
- automatic/Modular Chef cooking p. 35
A collection of pre-set recipes, created and tested by the Manufacturer’s Chefs to
obtain excellent results.
The recipe is organized as follows:
baguette recipe name
bread
products
ingredients all the ingredients used to make the recipe expressed in kg or
type of tray the best tray to make the recipe. On request to the Manufacturer,
preparation step by step preparation procedure
cooking how to cook your dish perfectly.
recipe category
number of pieces
1 kg = 10 x 100 grams (hg)
1 kg = 100 decagrams (dag)
1 kg = 1000 grams (g)
trays are available suitable for any cooking (baguette, fried food,
omelettes, etc...)
p. 31 No. of phases to set ex. 1
p. 26
p. 28 cooking temperature ex. 220°C
p. 28 cooking duration ex. 17
p. 29 humidity in the chamber ex. 20%
preheating
temperature
ex. 220°C
50
ex. 4
p. 30 fan speed
p. 29 ue vent ex. closed
p. 27 cooking mode ex. combi
how many trays are used ex. 1
the desired nishing degree
mise en place the best way to present your recipe once it is out of the oven
where not specied, convection fans are meant
ex. well cooked pizza
in this case, in manual
cooking it is sufcient to
change the cooking time as
indicated in the table, while
in automatic cooking
choose the cooking level
49
(g.
cooking degree)
Parameter A -
Page 51

baguette
BREAD PRODUCTS
BREAD PRODUCTS
ingredients (4 baguettes)
Manitoba our 0.300 kg
00 w300 our 0.600 kg
Brewer’s yeast 0.020 kg
Water 0.700 kg
Salt 0.015 kg
Extra-virgin olive oil 0.020 kg
type of tray
Perforated stainless steel tray for
baguettes
Phase Temp. Minutes Humidity Fan Vent
1 220°C 17 20% 4 closed combi 1 --
preparation
1. In the planetary mixer weigh the our and salt and start mixing.
2. Then, while the our and salt are mixing, add ¾ of the water and oil stated in the recipe
very slowly (¾ = 0.525 kg of water and 0.015 kg of oil mixed together).
3. Add the brewer's yeast and, slowly, add the remaining water and oil (¼ = 0.175 kg of
water and 0.005 kg of oil mixed together). The dough must be homogeneous and
must not stick to the planetary bowl.
4. When the dough is ready let it rest for 30 minutes.
5. Next, divide the dough into 4 small pieces of 420 grams each and shape as baguettes.
6. Place the baguettes in micro-perforated bread trays.
7. Leave to rise at 28/30°C for 90 minutes.
cooking
Preheat the oven manually to 220°C and proceed to cooking following the indicated
parameters (skip the automatic preheating that starts when the recipe is started because
the oven is already hot).
mise en place
After cooking, place the baguettes on a grille to eliminate the cooking moisture.
Cooking
Trays Finish
pizza
ingredients (5 pizzas)
Manitoba our 0.600 kg
w300 our 1.200 kg
Fresh brewer’s yeast 0.040 kg
Water (ambient temperature)
Salt 0.050 kg
Olive oil 0.020 kg
Lard 0.100 kg
Whole milk 0.200 kg
Sugar 0.005 kg
Tomato passata 2.870 kg
Olive oil 0.150 kg
Salt 0.040 kg
Oregano (dried and chopped)
Mozzarella 1.870 kg
0.800 kg
0.150 kg
Phase Temp. Minutes Humidity Fan Vent
1 180°C 15 20% 3 closed combi 5 --
200°C 4 0% 4 open convection 5
2
200°C 6 0% 4 open convection 5
200°C 8 0% 4 open convection 5
preparation
1. Melt the yeast and sugar in a part of water.
2. Mix the our with the salt and, continuing to mix, gradually add the remaining water and
the olive oil; lastly add the mixture of dissolved yeast, water and sugar and work well
until the dough is smooth and homogeneous.
3. Put the dough in the leavening cabinet until it has doubled in volume.
4. Once ready, divide it into 0.550 kg pieces per baking sheet and work it until you get a
smooth and even ball.
5. Let stand for at least 10 minutes covering with a cloth.
6. Then, with the help of a rolling pin, roll out the dough on a oured surface until you obtain
an evenly thick sheet of dough that will be placed on the baking trays to rise again.
7. Meanwhile, mix the tomatoes with salt, oregano and olive oil. With the help of a spoon,
spread the pizza base with the tomato evenly, taking care not to press excessively.
cooking
Preheat the oven manually to 170°C and cook following the indicated parameters (skip
the automatic preheating that starts when the recipe is started because the oven is
already hot). At the end of step 1, remove the pizza from the oven, sprinkle it evenly with
the mozzarella and nish cooking (step 2).
Cooking
Trays Finish
normal
medium
well done
type of tray
5X20mm enamelled tray
mise en place
Let it cool for a few minutes and cut.
51
Page 52

use
grilled prawns
FISH
POULTRY
ingredients (about 8 portions)
Fresh L1 prawns 2.210 kg
Olive oil 0.100 kg
type of tray
Phase Temp. Minutes Humidity Fan Vent
210°C 4 40% 2 closed combi 1 normal
1
210°C 6 40% 2 closed combi 1 medium
210°C 8 40% 2 closed combi 1
preparation
1. Peel the prawns and remove the black thread.
2. Place them on a plate and brush them with olive oil on both sides
3. Place them on a grid keeping them equidistant from each other.
cooking
Preheat the oven manually to 210°C and proceed to cooking following the indicated
parameters (skip the automatic preheating that starts when the recipe is started because
the oven is already hot).
mise en place
Create the dish with the prawns and garnish with grilled vegetables or to taste. Sprinkle
with extra virgin olive oil and coarse avoured salt.
Cooking
Trays Finish
well done
Fish grille
grilled chicken
ingredients (about 5 portions)
Fresh chicken breast 0.740 kg
Olive oil 0.070 kg
Salt 0.045 kg
Mixed herbs 0.030 kg
Phase Temp. Minutes Humidity Fan Vent
210°C 5 10% 5 closed combi 1 normal
1
210°C 7 10% 5 closed combi 1 medium
210°C 10 10% 5 closed combi 1
preparation
1. Cut the chicken breast into 1cm-thick slices, beat them lightly and season with the oil,
salt and nely chopped mixed herbs
2. Place the chicken breasts on the grille.
cooking
Preheat the oven manually to 210°C and proceed to cooking following the indicated
parameters (skip the automatic preheating that starts when the recipe is started because
the oven is already hot).
mise en place
Cooking
Trays Finish
well done
type of tray
Silverstone aluminium grille tray
52
Serve with lemon slices an cooked vegetables.
Page 53

frollini (pastry)
PASTRY PRODUCTS
PASTRY PRODUCTS
ingredients (about 90 biscuits)
Biscuit our 0.200 kg
Butter (soft) 0.180 kg
Granulated sugar 0.070 kg
Whole eggs 1
Liquid vanilla as required
Table salt as required
Phase Temp. Minutes Humidity Fan Vent
Cooking
Trays Finish
1 170°C 15 0% 3 open combi 1 --
preparation
1. Put the softened (not melted) butter in the planetary mixer with the sugar and beat until
frothy.
2. Incorporate the egg, liquid vanilla, salt and whisk for a few minutes; nally slowly add the
our.
3. With the help of a sac-a-poche with a lined nozzle, form the biscuits on the tray lined with
parchment paper. They can be decorated with dried or candied fruit.
cooking
Preheat the oven manually to 170°C and bake following the indicated parameters (skip
the automatic preheating that starts when the recipe is started because the oven is
already hot).
mise en place
When cooked, let them cool on a steel surface, and, once cold, ice them with dark or
white chocolate, or both.
type of tray
20mm non-stick tray
cherry tart (pastry products)
Phase Temp. Minutes Humidity Fan Vent
1 160°C 18 0% 4 open combi 1 medium
preparation
Shortcrust pastry:
1. Soften the butter to room temperature, add the sugar and mix.
2. Add the eggs incorporating them well and nally the our, sifted with the baking powder.
3. Put the dough in a container sealed with lm and let it rest in the refrigerator for at least
1 hour.
ingredients (1 x 28cm tart)
0 our 0.800 kg
(soft) 0.400 kg
Butter
Granulated sugar 0.200 kg
Whole eggs 4
Baking powder 1 sachet
Lemon avouring 1
Jam 0.760 kg
4. With the help of a rolling pin, roll out the pastry on a smooth and oured surface until it
reaches a thickness of about 1 cm.
5. Put the pastry in the non-stick mould and puncture it repeatedly with a fork.
6. Spread the jam evenly and nish with lattice.
cooking
Bake according to the stated parameters.
mise en place
Cooking
Trays Finish
type of tray
28cm tart mould
Serve with whipped cream on the side.
53
Page 54

use
lasagna Bologna style
FIRST COURSES
VEGETABLES
ingredients (about 24 portions)
Yellow pasta
Meat ragù 2.080 kg
Béchamel 3.600 kg
Grated cheese 0.600 kg
type of tray
60 mm non-stick aluminium tray
(pre-cooked)
1.000 kg
Phase Temp. Minutes Humidity Fan Vent
1 165°C 40 40% 2 closed combi 1 --
180°C 3 10% 3 closed combi 1 normal
2
180°C 5 10% 3 closed combi 1 medium
180°C 8 10% 3 closed combi 1
preparation
1. Spread a layer of béchamel in the bottom of a pan.
2. Place the rst pasta sheet and evenly spread 0.660 kg of béchamel over its entire surface.
3. Put about 0.420 kg of ragù over the béchamel, spreading it evenly.
4. Sprinkle with grated cheese and proceed with the other 4 layers in the same order:
pasta, béchamel sauce, ragù and cheese.
cooking
Preheat the oven manually to 190°C and bake following the indicated parameters (skip
the automatic preheating that starts when the recipe is started because the oven is
already hot).
Once cooked, let the lasagna rest for at least 5/10 minutes before cutting.
mise en place
Serve with a sprig of parsley.
Cooking
Trays Finish
well done
confit of cherry tomatoes
ingredients (1 x 28cm tart)
Cherry tomatoes 0.560 kg
Herbs 0.010 kg
Oregano 0.010 kg
Salt as required
Pepper as required
Oil as required
Phase Temp. Minutes Humidity Fan Vent
1 130°C 90 0%
preparation
Shortcrust pastry:
1. Clean the cherry tomatoes in cold water.
2. Then cut the tomatoes in half.
3. Place them on the tray adding the herbs, oregano, salt, pepper, oil and mix everything
evenly.
cooking
Preheat the oven manually to 130°C and bake following the indicated parameters (skip
the automatic preheating that starts when the recipe is started because the oven is
already hot).
mise en place
Use the cont of cherry tomatoes as a side dish or decoration.
4
(semistatic)
open combi 1 --
Cooking
Trays Finish
type of tray
GN 1/1 20mm tray
54
Page 55

personal notes
55
Page 56

maintenance
routine cleaning
safety warnings
routine cleaning
cooking chamber (washing)
external surfaces
glass
gasket
tray grid
boiler management
downtime
end-of-life disposal
56
58
63
63
63
63
64
66
66
Before carrying out any cleaning operation, it is necessary to
switch off the power supply of the appliance unless you intend
to use the hand shower or the washing programs: they both require
the oven to be connected to the water and the electricity networks.
During any cleaning, wear appropriate personal protective
equipment. The use of protective gloves and goggles is
essential when performing manual cleaning that involves the direct
use of detergents as they could cause injuries and burns by contact
and inhalation.
The user must only carry out ordinary cleaning operations; for
extraordinary maintenance contact a Service Centre, requesting
the intervention of an authorized technician.
The Manufacturer does not recognize damages due to lack of
maintenance or incorrect cleaning (e.g. use of unsuitable
detergents).
For the cleaning of any component or accessory DO NOT use
abrasive or aggressive or corrosive powder detergents, (e.g.
hydrochloric/muriatic or sulphuric acid, caustic soda, etc ...),
abrasive or pointed tools (e.g. abrasive sponges, scrapers, steel
brushes, etc.), steam or pressure water jets.
Warning! Do not use these tools or substances to clean the
substructure/oor under the appliance.
The supplied hand shower has been designed solely for
cleaning the inside of the cooking chamber; for this reason do
not direct the jet outside the equipment or towards people or
animals. Do not use it to add water to cooking dishes.
Cleaning with the supplied hand shower must always be
carried out in a cold oven (use the "Cooling" function, see page
48): it is very important that all the equipment is at room
temperature and not just the chamber.
When a manual or automatic wash is started, the oven
automatically raises or lowers the chamber temperature to
80°C (176°F) for get the best cleaning results.
Any washing or rinsing must be carried out with the chamber
EMPTY, without food or accessories (e.g. trays, pans, cutlery,
etc.) inside.
56
Page 57

Clean the cooking chamber at the end of each working day: the grease particles or food
residues may also ignite during cooking, causing damage to people and to the appliance itself.
Do not open the oven door for any reason during a "Manual", "Automatic" or rinsing cycle: risk
of injury due to the impeller movement and intoxication due to the vapours. However, the
oven has a safety device that, when the door is opened, interrupts the washing or rinsing cycles:
this is indicated by a message. Closing the door cancels the message and starts the washing/
rinsing again.
The temporary opening of the door is allowed only during "Manual" washing, after the acoustic
signal that warns to spray the detergent.
For safety reasons, the start of a "Manual", "Automatic" or rinsing program, only takes place
when the door is closed and if the trolley is inserted (only for mobile ovens).
In the event of a power failure, a washing cycle in progress is interrupted: when power is
restored, a message is displayed indicating that no cooking can be performed.
To enable cooking again, carry out any of the three washing programs.
Dispose of empty detergent cans in compliance with the regulations in force in the country of use.
57
Page 58

maintenance
cleaning the cooking chamber
Clean the cooking chamber at the end of each working day to maintain high levels of hygiene and to preserve the brightness
of the steel and the performance of the equipment over time; 3 washing programs are available, choose the one most
suitable for the dirt present in the room.
If you often cook "fat" foods (e.g. porchetta, roasts, etc.), between cooking cycles it is advisable to start a rinsing
program or use the hand shower to facilitate the nal cleaning and guarantee maximum hygiene at all times.
The cleaning procedures are summarized in the table, while each operation is explained in detail on the following pages;
E
before carrying out any cleaning of the chamber, carefully read the safety warnings on page 56
Cleaning methods table
E
A
RINSING
program
p. 59
cleaning with
MANUAL
SHOWER
start the ”RINSING”
(about 4 minutes)
wait for the oven to cool (if necessary, use the "Cooling"
function, see page 48): it is very important that all
the equipment is at room temperature and not just the
program
p. 59
CLEANING BETWEEN COOKING CYCLES
A
start “MANUAL”
washing
MANUAL
washing
p. 60
the oven automatically
raises or lowers the
chamber temperature
up to 80°C (176°F);
once the temperature
has been reached,
"MANUAL" washing starts
automatically.
A
chamber.
B
wait for the bleep showing
that the “RINSING”
program has been
completed
B
at the acoustic signal,
carefully open the
door and spray the
Manufacturer's spray
detergent manually using
personal protective
equipment (e.g. protective
gloves and goggles)
B
use the manual shower
to remove dirt and
food residues from the
cooking chamber
C
close the door, restart
the "MANUAL” program,
wait for the acoustic
signal indicating the end
of washing
AUTOMATIC
washing
DAILY CLEANING AT THE END OF THE WORKING DAY (WASHING)
5858
p. 61
A
start the most suitable washing cycle for the dirt in the
cooking chamber:
the oven automatically raises or lowers the chamber
temperature up to 80°C (176°F); once the temperature has
been reached, automatic washing starts.
"SOFT" light dirt
"NORMAL" normal dirt
"HARD" stubborn dirt
wait for the acoustic
signal indicating the end
B
of washing
Page 59

Cleaning with the manual shower
Use the hand shower to soften and eliminate food
72
residues.
The shower head is activated by turning the tap (OPEN) to
the left and pressing the grey button on its "head" with your
thumb.
at the end, close the tap by turning it to the right (CLOSE).
Cleaning with the supplied hand shower must always be
carried out in a cold oven (if necessary, use the "Cooling"
function, see page 48): it is very important that all the
equipment is at room temperature and not just the chamber.
The supplied hand shower has been designed solely for
cleaning the inside of the cooking chamber; for this
reason do not direct the jet outside the equipment or towards
people or animals. Do not use it to add water to cooking
dishes.
72
2
OPEN
CLOSE
1
Rinsing PROGRAM
A B
64
Select the “RINSING” program (4 minutes).
C
Start it with the START key: rinsing the oven chamber without the addition of any detergent starts.
A screen is displayed showing how much time to the end of the rinsing cycle remains (e.g. 3 minutes and 50 seconds), after
which the beep warns that the cycle has been completed and the oven can be used again.
D
To stop a cooking cycle prematurely, press the STOP key.
The automatic rinsing program does not provide for the use of detergents.
73
13:00
13/10/2016
HOME
PREHEATED
A
RECIPE BOOK
MANUAL
MULTILEVEL
100°c
13:00
13/10/2016
CLEANING
100°c
13:00
13/10/2016
CLEANING CLEANING
100°c
13:00
13/10/2016
100°c
B
RINSING
RINSING RINSING
MANUAL
04:00
3:50
CLEANING
BEST CHEF
AUTOMATIC
C D
5959
Page 60

maintenance
74
MANUAL washing
A B
Select the “MANUAL” program.
74
13:00
13/10/2016
HOME
100°c
13:00
CLEANING
13/10/2016
100°c
Start it with the START key: washing the
75
oven chamber without the addition of any detergent
starts.
Now you can still stop the cycle prematurely pressing the
STOP
key
A screen is displayed, showing how much time is remaining to
the end of the washing cycle (e.g. 9 minutes and 30 seconds).
After some time, the oven beeps: slowly open the door
76
and carefully spray the Manufacturer’s detergent
manually (special oven detergent): other products may be
incompatible with the functional and aesthetic components of
the appliance and cause damages not covered by the
warranty.
During this operation, wear appropriate personal
protective equipment (e.g. Protective gloves and
goggles).
The Manufacturer loves to protect the environment and
therefore recommends using a quantity of product
suitable for the dirt to be removed.
When the door is closed, the "MANUAL" program starts
again, without having to carry out any additional operations:
from this moment on it is no longer possible to interrupt
the washing in any way for reasons of food safety.
75
PREHEATED
RECIPE BOOK
A
CLEANING
13:00
CLEANING CLEANING
13/10/2016
MANUAL
MANUAL
MULTILEVEL
BEST CHEF
100°c
10:00
10:00
13:00
B
09:50
10:00
RINSING
MANUAL
AUTOMATIC
13/10/2016
MANUAL
PHASE 1/3PHASE 1/3
100°c
At the end of the scheduled time, an acoustic signal indicates
that the cycle is complete and the oven can be used again.
This washing mode is not recommended for mobile
ovens: given the presence of the trolley it would be
difcult to distribute the detergent effectively and evenly.
76
6060
Page 61

Automatic WASHING
A
78
Select the most suitable “AUTOMATIC” washing
cycle for the dirt in the cooking chamber:
77
13:00
HOME
13/10/2016
100°c
13:00
CLEANING
13/10/2016
100°c
SOFT about 36 minutes light dirt
NORMAL
HARD
B
Start it with the START key: a fully automatic
about 54 minutes normal dirt
about 1 hour and
13 minutes
stubborn dirt
washing cycle starts (after this no other additional operation
is required).
A screen is displayed, showing how much time is
79
remaining to the end of the washing cycle (e.g. 1 hour
and 10 minutes).
At the end of the scheduled time, an acoustic signal indicates
that the cycle is complete and the oven can be used again.
The user cannot interrupt the washing cycles in any way
for food safety reasons.
78
A
PREHEATED
RECIPE BOOK
CLEANING
13:00
CLEANING CLEANING
A
13/10/2016
AUTOMATIC
h.
0:36
h.
0:54
MANUAL
MULTILEVEL
BEST CHEF
100°c
B
13:00
RINSING
MANUAL
AUTOMATIC
13/10/2016
AUTOMATIC
h.
1:10
B
100°c
79
h.
1:13
13:00
CLEANING
13/10/2016
AUTOMATIC
h.1:10
100°c
type of washing
chosen
remaining time
6161
Page 62

maintenance
Safety warning for loading detergent
During the initial installation or when changing the
detergent use personal protective equipment (e.g.
protective goggles and gloves).
Do not touch the detergent with your bare hands. In case of
contact with skin or eyes, rinse thoroughly with running water
and contact a doctor immediately.
The safety data sheet and chemical composition of the
detergent are available from the Manufacturer. It is
advisable to request them and keep them in a place accessible
to the operators.
How to load the detergent
The equipment is provided with a small tube connected
80
to an internal pump to lift the detergent.
Insert the tube inside the detergent can, making sure it
touches the bottom.
The detergent must be positioned on the ground,
81
making sure that it does not interfere with the passage of
people. Avoid placing it on top of the oven or near other
equipment or hot objects.
80
The Manufacturer recommends using its own detergent,
specic for ovens: other products may be incompatible
with the functional and aesthetic components of the appliance
and cause damage not covered by the warranty.
82
81
6262
Page 63

cleaning the external surfaces, glass
and Touch Screen panel
Wait for the appliance to cool down (if necessary use the
"Cooling" function, see page 48) and use a cloth soaked
in warm soapy water. Finish by rinsing and drying thoroughly.
Alternatively, it is possible to use a soft cloth slightly soaked
in delicate products, specic for steel or glass surfaces
(depending on the surface to be cleaned) and follow the
instructions of the detergent manufacturer.
If you want to clean the glass even more accurately, you
83
can rotate the inner glass to clean the surface between
the two sheets of glass.
When cleaning the Touch Screen panel, take care to
avoid any inltration under it.
cleaning the internal seal
Wait for the appliance to cool down (if necessary use the
"Cooling" function, see page 48) and use a cloth soaked
in warm soapy water. Finish by rinsing and drying thoroughly.
83
1
2
cleaning the trolley
The trolley is cleaned effectively with every automatic
84
washing. After each cooking cycle, check the drip tray
condition. Clean it using hot soapy water, rinse it thoroughly
and dry it before putting it back into place.
cleaning the tray grid
Normally, manual or automatic washing also effectively
85
cleans the side supports; however, it is possible to
remove them easily by acting as shown in the gure.
Before removing them, always wait for the appliance to cool
down (if necessary use the "Cooling" function, see page 48).
Clean them using hot soapy water, rinse them thoroughly and
dry them before putting them back in place.
85
84
1
2
3
6363
Page 64

maintenance
managing the boiler (if any)
If your appliance is equipped with a boiler for steam generation,
during installation, the hardness of the water was checked
and a softener (not supplied) tted if the latter was particularly
"hard" (the ideal value should be between 9° and 14° French
degrees).
This ensures greater performance and durability of the
equipment and makes boiler descaling less frequent.
Water classification table
F
Hardness Classification
up to 7°f very soft water
from 7°f to 14°f (French degrees)
soft water
from 14°f to 22°f medium-hard water
The oven can calculate autonomously when descaling is
required and warns the user to carry it out by displaying a
warning.
If the warning is ignored, the oven continues to work but the
boiler is excluded; this means the steam delivered into the
chamber during the cooking cycles that require it, is delivered
directly.
To perform this calculation it is essential for the hardness
86
value of the inlet water to have been set during
installation or afterwards, (in the example 10°f).
This value depends on many factors and is measured using
kits found in a hardware store or aquarium shops and following
the manufacturer's instructions.
The most used kits are chemical drop reagents or paper strips
that take on a particular colour depending on the hardness of
the water.
If the equipment is sold, remember to enter the new
water hardness value as it may change from area to area.
86
from 22°f to 32°f fairly hard water
from 32°f to 54°f hard water
over 54°f very hard water
Conversion table (water hardness)
G
1°f (French degrees) 0.562°dH (German degrees)
1°dH (German degrees) 0.64 ppm TDS
1°dH (German degrees) 1.8°f (French degrees)
1°dH (German degrees) 30 μSiemens/cm
1° French
10mg calcium carbonate
(CaCO3) per litre of water
13:00
13/10/2016
100°c
A
COOLING
13:00
13/10/2016
HOME SETTING
PREHEAT
RECIPE BOOK
CLEANING
100°c
MANUAL
MULTILEVEL
BEST CHEF
SETTINGS
13:00
13:00
SETTINGS SETTINGS MANUALHOME
PROGRAM
MANAGEMENT
13/10/2016
DATE
HACCP
LANGUAGE
°C/°F
12h/24h
xx/xx/xx
13/10/2016
100°c
TIME
TIME ZONE
INFO
INFO
100°c 13/10/2016
FIRMWARE
UPDATE
SERVICE
BOILER
13:00
Working hours remaining
C
B
200 h
DESCALING
°
f
WATER
HARDNESS
100°c
13:00
13/10/2016
10°f
water hardness
1 2 3
D
4 5 6
7 8 9
+ 0
100°c
X
E
6464
Page 65

How to descale
When the warning about descaling is displayed, the oven
continues to work but it is not possible to use cycles
where steam is required (mixed cooking and steaming).
As soon as possible, unscrew the cap on the top of the
87
oven and introduce the manufacturer's descaling product
(see below for quantities).
Close the cap carefully and start the descaling procedure.
88
At the end of the scheduled time, an acoustic signal
indicates that descaling is complete and the oven can be
used again in any cooking mode.
The oven boiler has a capacity of 0.52 litres (6 and 10
trays) or 0.7 litres (20 trays).
Do not use other descaling products since they may be
incompatible with the functional and aesthetic
components of the appliance and cause damage not covered
by the warranty.
87
1
2
88
13:00
13/10/2016
HOME
COOLING
13:00
13/10/2016
HOME
PREHEAT
RECIPE BOOK
CLEANING
100°c
MANUAL
MULTILEVEL
BEST CHEF
Manufacturer’s descaler
A
SETTINGS
100°c
13:00
MANAGEMENT
13:00
SETTING
DATE
HACCP
LANGUAGE
°C/°F
12h/24h
xx/xx/xx
13/10/2016
SETTINGS
PROGRAM
13/10/2016
TIME
TIME ZONE
INFO
INFO
hours of work remaining
before descaling again
13:00
100°c 13/10/2016
13:00
100°c
SETTINGS
Working hours remaining
C
FIRMWARE
UPDATE
100°c
SERVICE
200 h
DESCALING
13/10/2016
DESCALING
--------
100°c
B
BOILER
°
f
WATER
HARDNESS
D
This detergent has been specically designed to descale the boiler of Emotion ovens.
IT IS a citric, odourless and concentrated detergent, very effective without damaging metals or gaskets.
It should be used diluted in water with a concentration of 50-70% based on the amount of scale present.
6T -10T 20T
large scale deposits, 70%
concentration
normal scale deposits, 50%
concentration
0.36 cl of product and 0.16 cl of water
0.25 cl of product and 0.25 cl of water
pour into the boiler:
pour into the boiler:
pour into the boiler:
0.49 cl of product and 0.21 cl of water
pour into the boiler:
0.35 cl of product and 0.35 cl of water
6565
Page 66

maintenance
downtime
During periods of inactivity, disconnect the power and water supplies.
Protect the external steel parts of the appliance by passing over them with a soft cloth slightly soaked with Vaseline oil.
Leave the door ajar to ensure correct air exchange.
On restarting work, before use:
- clean the equipment and accessories thoroughly;
- reconnect the equipment to the electrical and water supplies;
- inspect the appliance before using it again;
- restart the appliance at low temperature for at least 60 minutes without any food inside.
To ensure that the appliance is in perfect conditions of use and safety, it is advisable to have it maintained and inspected
by an authorized service centre at least once a year.
end-of-life disposal
To avoid any unauthorized use and risks connected to it, before disposing of the equipment:
- make sure that it is no longer possible to use it: to this end, the power cable must be cut or removed (when the
appliance is disconnected from the power supply).
- ensure that no child can be accidentally trapped inside the cooking chamber while playing, to this end lock the door opening
device (for example with adhesive tape or latches).
Disposal of the equipment
Pursuant to art. 13 of Decree-Law No. 49 of 2014 "Implementation of WEEE Directive 2012/19/EU on electrical and
electronic equipment waste", the crossed-out wheelie bin label means that the product was placed on the market after
13 August 2005 and that at the end of its useful life it must not be disposed of with other waste but separately. All the
equipment is made of recyclable metals (stainless steel, iron, aluminium, galvanized sheet, copper, etc.) in a percentage
higher than 90% by weight.
It is necessary to pay attention to the management of this product at the end of its life, reducing the negative impacts on the
environment and improving the effectiveness in the use of resources, applying the principles of “the polluter pays", and thinking
about prevention, preparation for reuse, recycling and recovery. Please note that the illegal or incorrect disposal of the product
involves the application of the penalties provided for by the current legislation.
Information on disposal in Italy
In Italy, WEEE equipment must be delivered to:
- Collection Centres (also called ecological islands or ecological platforms)
- the retailer where you purchase a new piece of equipment, that is required to collect it for free ("one-on-one" collection).
Information on disposal in European Union countries
The EU Directive on WEEE equipment has been implemented differently by each country, so if you want to dispose of this
equipment we suggest you contact the local authorities or the retailer to ask for the correct method of disposal.
6666
Page 67

personal notes
6767
Page 68

service
something is not working
68
something is not working?
Your equipment is reliable and sturdy, but sometimes small problems can arise which,
thanks to our Service Centres, will be promptly solved.
Before contacting them, we recommend you follow this short procedure:
H
- try and consult the
problem, continue reading the following procedure;
- get the oven data (serial number plate) and the date and number of the purchase
invoice of the equipment;
Serial number .........................................................................................................
Oven model. ...........................................................................................................
Invoice date ............................................................................................................
Invoice number .......................................................................................................
- carefully read the warranty sheet attached to the equipment;
- call an authorized Service Centre or contact the Dealer/Manufacturer directly with
the oven data. While waiting for the intervention, disconnect the oven from the
power and water supplies.
Manufacturer’s address:
Via Palù, 93 – 31020
San Vendemiano (TV) – Italy
tel. +39 0438 7714 - fax +39 0438 778399
and I tables. If none of the solutions proposed solve the
If there is a need to replace faulty parts, keep them and hand them to the installer
appointed for replacement, so that they can be sent to the Manufacturer for
inspection.
If there is a need to send the oven or pieces to a Service Centre or to the
Manufacturer (after getting their authorization) it is necessary to use the ORIGINAL
packaging. If that is not feasible, use other packaging, taking care that:
- the glass is well protected by thick polystyrene panels;
- the corners and sides in sheet metal are protected from possible impacts, for this
purpose use polystyrene corners and thick panels on all sides and corners;
- the door is tightly closed (if necessary, block it with adhesive tape using some
cardboard in-between);
- the oven rests on a wooden pallet and is secured to it by means of nylon straps or
strong adhesive tape (avoid direct contact between the oven and the adhesive tape
using some cardboard in-between);
- in case of mobile ovens, make sure that the trolley cannot move and lock the wheels;
- the feet are well protected against possible impacts.
Complete the packaging by inserting the oven and its protections inside a sturdy
cardboard box; we recommend you write "FRAGILE" and "DO NOT TURN UPSIDE
DOWN" outside.
Do not try and repair the oven yourself, this may cause serious damage to
people, animals and property and makes the Warranty null and void. Always use
an Authorized Service Centre and request ORIGINAL spare parts.
68
Page 69

89
Mod. EM E6/11-D
V 380-415 3N
H
O
2
W (aux)
W
Gas (1)
kg (1) Gas (2) kg (2)
model
ITEM. M atr.
kW 11,600 A Hz 50-60
A CL
serial
number
°C IP
A W
YEAR
READ MANUAL
year of production
Foam insulation
Troubleshooting table
H
Problem Solution
- Check that the appliance is correctly connected to the power supply, and that this has not been
The oven cannot be
switched on
interrupted.
- Check that the system switch is ON.
If the above solutions do not solve the problem, contact an authorized Service Centre.
The oven is ON but
cooking does not
start
The oven does not
cook evenly
- Ensure the oven door is correctly closed.
- In mobile ovens, check the trolley is inside the chamber.
- Check the cooking parameters have been set correctly (a delayed start may have been set).
- The elements and the fans are faulty (contact an authorized Service Centre).
- The oven has been loaded incorrectly, see the “cooking advice” chapter
MADE IN ITALY
p.6
No water reaches
the chamber
Water comes out
with the door closed
An alarm has
appeared on the
display
- The connection to the water supply may be incorrect (e.g. water inlet pipe kinked or loose), shut-off
valve closed or suspended water supply.
- The water inlet lters may be obstructed by impurities (contact an authorized Service Centre).
C
- "Convection" cooking has been chosen, which lets no humidity into the chamber, see table
on
p.27.
- The chamber gasket is dirty or damaged. In the latter case, contact an Authorized Service Centre.
- Disconnect the oven from the electricity and water supplies by turning off the switch and closing the
shut-off cocks; follow the indications given in the table
I
on p.70, then contact an Authorized
Service Centre or the Manufacturer specifying the type of alarm displayed.
69
Page 70

Alarm table
I
Display Description Effect Problem solution
CHAMBER THERMAL
PROTECTION
MOTOR THERMAL
PROTECTION
BOILER THERMAL
PROTECTION
CHAMBER PROBE Chamber probe damaged Appliance not working at all
DISCHARGE PROBE Discharge probe damaged
BOILER PROBE Boiler probe damaged
CORE PROBE Core probe damaged
INVERTER 1 Inverter 1 alarm
INVERTER 2 Inverter 2 alarm Motor overload
INVERTER 3 Inverter 3 alarm Motor phase missing
INVERTER 4 Inverter 4 alarm Inverter overtemperature
INVERTER 5 Inverter 5 alarm No inverter communication
LACK OF WATER Lack of water alarm Partial operation mode
COMPONENTS
OVERHEATING
SD ERROR SD memory damaged Appliance not working at all
Safety thermostat in the
chamber triggered
Motor thermal switch
triggered
Boiler safety thermostat
triggered
Control panel
overtemperature alarm
Appliance not working at all
Motor overtemperature
Overtemperature of the boiler
working only partially
Oven can be used only in
Convection mode
Oven can be used with boiler
out of control
Probe cooking cannot be
used
Inverter alarm, electronics
malfunction
Appliance not working at all
Contact an authorized
Service Centre
Switch off, let the oven cool
down and switch back on. If
the alarm continues, contact
a Service Centre
Contact an authorized
Service Centre
Check the cable and the
correct connection of
the probe. If the cable
is damaged contact an
authorized Service Centre
Contact an authorized
Service Centre
Switch off, let the oven cool
down and switch back on. If
the alarm continues, contact
a Service Centre
Contact an authorized
Service Centre
Switch off, let the oven cool
down and switch back on. If
the alarm continues, contact
a Service Centre
Switch the oven off and
back on again. If the alarm
continues, contact a Service
Centre
Check the water connection.
If the alarm continues,
contact a Service Centre
Contact an authorized
Service Centre
Page 71

Warnings
J
Display Description Effect Problem solution
WHITE SCREEN System error Oven operation blocked
SD FILED SD malfunction No data and recipe saving
NO VOLTAGE
Temporary lack of power
supply
Temporary oven block Check the power line
Contact an authorized
Service Centre
Contact an authorized
Service Centre to replace the
external memory
Page 72

Via Palù, 93 – 31020
San Vendemiano (TV) – Italy
tel. +39 0438 7714 / fax +39 0438 778399
http://www.modular.it
252.552.00 ED.01
 Loading...