

Page 1

User Guide
Page 2

B, and EN55024.
0700
© Copyright 2010 modu Ltd. All rights reserved. modu and the
modu symbol are trademarks or registered trademarks of
modu Ltd. All other company or product names are trademarks
or registered trademarks of their respective holders.
XT9 Mobile Interface is covered by patents pending worldwide.
XT9 is a trademark or registered trademark of Nuance
Communications, Inc. or its subsidiaries in the United States of
America and/or other countries
Java and all Java-based brand designations are trademarks or
registered trademarks of Sun Microsystems, Inc. in the U.S. and
other countries.
MPEG Layer-3 audio coding technology licensed from
Fraunhofer IIS and Thomson.
Declaration of Conformity
Hereby, modu Ltd. (or its subsidiaries)
declares that this modu T product is in
compliance with the essential
requirements and other relevant
provisions of Directive 1999/5/EC. A
copy of the Declaration of Conformity
can be found at
www.modumobile.com/DoC.htm.
Additionally, the product meets the
requirements of the following
standards: EN 50360 62209-1.
EN62311 IEC 62209-2, EN 60950-1, EN
50332-1, EN 301 489-1/-3/-7/-17/-24,
EN 301 511, EN 301 908-1/-2, EN 300
328, EN 300 440-1/-2, EN 55022 Class
Page 3

The Bluetooth® word mark and logos are registered trademarks
owned by Bluetooth SIG, Inc., and any use of such marks by
modu Ltd. is under license.
This document is published by modu Ltd., without any
warranty*. This document is intended only for its designated
recipient and does not constitute a representation or warranty
on behalf of modu Ltd. This document does not create any
legal obligations on modu Ltd. Any unauthorized reproduction,
transfer, use, distribution or storage of the information and/or
material contained in this document, or any part thereof, is
strictly prohibited. modu Ltd. reserves the right to modify and
replace this document at its sole discretion, without prior
notice.
*TO THE MAXIMUM EXTENT PERMITTED BY APPLICABLE LAW,
UNDER NO CIRCUMSTANCES SHALL MODU OR ANY OF ITS
LICENSORS BE RESPONSIBLE FOR ANY LOSS OF DATA OR
INCOME OR ANY SPECIAL, INCIDENTAL, CONSEQUENTIAL OR
INDIRECT DAMAGES ARISING OUT OF THE USE OF THE
INFORMATION IN THIS DOCUMENT.
THE CONTENTS OF THIS DOCUMENT ARE PROVIDED "AS IS".
EXCEPT AS REQUIRED BY APPLICABLE LAW, NO WARRANTIES
OF ANY KIND, EITHER EXPRESS OR IMPLIED, INCLUDING, BUT
NOT LIMITED TO, THE IMPLIED WARRANTIES OF
MERCHANTABILITY AND FITNESS FOR A PARTICULAR PURPOSE,
ARE MADE IN RELATION TO THE ACCURACY, RELIABILITY OR
CONTENTS OF THIS DOCUMENT. MODU RESERVES THE RIGHT
TO REVISE THE DOCUMENT OR WITHDRAW IT AT ANY TIME
WITHOUT PRIOR NOTICE.
This device may contain commodities, technology or software
subject to export laws or regulations from the U.S. and other
countries. Diversion contrary to law is prohibited.
Page 4

The crossed-out wheeled-bin symbol on your
product, literature or packaging reminds you that
the electronic products, batteries, and
accumulators must be taken to separate
collection at the end of their working life. This
requirement applies to the European Union and
other locations where separate collection systems
are available.
Do not dispose of these products as unsorted
municipal waste. By returning the products to
collection you help prevent uncontrolled waste
disposal and promote the reuse of material
resources. For more information about returning
your obsolete product, please contact your local
waste authorities or local distributor.
Page 5

Contents
CONTENTS
Getting started ................................................................... 14
Your modu™ T phone .............................................................. 14
Insert or remove the SIM card ................................................ 14
Charge the battery .................................................................. 17
Turn your modu T phone on or off .......................................... 19
Use the touch screen............................................................... 19
Options menu.......................................................................... 22
Navigate between screens ...................................................... 24
The home screen ..................................................................... 24
The what's new? screen .......................................................... 25
The status screen .................................................................... 25
The main menu ....................................................................... 27
Indications and symbols .......................................................... 28
Lock or unlock the screen ........................................................ 31
Calls.................................................................................... 32
Make a call .............................................................................. 32
Answer, reject, or silence a call ............................................... 33
Actions you can perform during a call ..................................... 33
View your call log .................................................................... 37
Delete a call from the call log .................................................. 37
Call your voicemail .................................................................. 37
Use speed dial numbers .......................................................... 38
Call waiting .............................................................................. 38
Conference calls ...................................................................... 41
View the duration of your calls ............................................... 43
Service numbers ...................................................................... 43
Fixed dialing ............................................................................ 44
5
Page 6

Contents
Contacts ............................................................................. 47
Add a contact .......................................................................... 47
Search for a contact ................................................................ 49
View details of a contact ......................................................... 51
Delete a contact ...................................................................... 51
Delete all of your contacts ...................................................... 51
Edit contact information ......................................................... 52
Assign a ringtone to a contact ................................................. 52
Assign an image to a contact ................................................... 53
Assign a speed dial number to a contact ................................. 53
Send a contact's business card via multimedia message or
Bluetooth ................................................................................ 54
Store contact information ....................................................... 55
Text messages (SMS) .......................................................... 58
Send a text message ................................................................ 58
Send a text message from the contact list .............................. 60
Send a text message from the call log ..................................... 60
Send a text message using a predefined template .................. 61
Predictive text ......................................................................... 62
Write a text message using predictive text ............................. 62
View a new text message ........................................................ 63
View a text message ................................................................ 64
View information about a text message.................................. 64
Reply to a text message .......................................................... 65
Forward a text message .......................................................... 66
Delete a text message ............................................................. 67
Delete all the text messages in a folder .................................. 67
Extract a set of numbers from a text message ........................ 68
Delivery reports ....................................................................... 70
6
Page 7

Contents
Multimedia messages (MMS) .............................................. 71
Send a multimedia message .................................................... 71
Send a multimedia message from your contact list ................ 76
Send a multimedia message to a number from your call log .. 77
Add a page to a multimedia message...................................... 77
Save or retrieve a draft version of a multimedia message ...... 79
Delete a draft multimedia message ........................................ 80
Delete all draft multimedia messages ..................................... 80
Reply to a multimedia message .............................................. 80
Forward a multimedia message from a message folder .......... 81
View the details of a multimedia message .............................. 82
Change the amount of time for a multimedia message page to
be displayed ............................................................................ 82
Delete a page from a multimedia message ............................. 83
Navigate between pages in a multimedia message................. 83
Delete a multimedia message from a message folder ............. 83
Delete all multimedia messages from a message folder ......... 83
Email messages ................................................................... 85
Send an email message ........................................................... 85
Send an email message from your contact list ........................ 91
Save or retrieve a draft version of an email message .............. 91
Receive an email message ....................................................... 92
View and save an email attachment ....................................... 94
Save the contact information of recipients of an email message
................................................................................................ 94
Reply to the sender of an email message ................................ 95
Reply to the sender and all recipients of an email message .... 96
Forward an email message ...................................................... 97
Delete an email message......................................................... 98
Delete all email messages from an email folder ...................... 98
7
Page 8

Contents
Music Player ...................................................................... 100
Add music to your modu™ T phone ...................................... 100
Play a song ............................................................................ 100
Adjust the volume ................................................................. 102
Adjust the equalizer .............................................................. 102
Use the headset .................................................................... 102
View information about a song ............................................. 102
Set your play mode ............................................................... 104
Playlists ................................................................................. 104
Start a song by clapping your hands ...................................... 108
Alarm clock ........................................................................ 110
Set an alarm .......................................................................... 110
Turn an alarm off or on ......................................................... 111
Change the settings for an alarm .......................................... 112
Delete an alarm ..................................................................... 112
Gallery ............................................................................... 113
Images ................................................................................... 113
Videos ................................................................................... 118
Copy images and videos to your modu T phone ................... 120
Send an image or video via Bluetooth ................................... 121
Receive an image or video via Bluetooth .............................. 122
Profiles .............................................................................. 123
Select a profile....................................................................... 123
Rename the normal profile ................................................... 123
Personalize the settings of the normal profile ...................... 124
Reset the normal profile settings to the factory default settings
.............................................................................................. 124
Bluetooth® ........................................................................ 125
8
Page 9

Contents
Turn Bluetooth on or off ....................................................... 125
Set your Bluetooth settings ................................................... 125
Add a Bluetooth device to your modu T phone ..................... 125
Manage your Bluetooth devices ............................................ 126
Web browser ..................................................................... 128
Access the browser ............................................................... 128
Browse the web .................................................................... 128
Use Google™ to search the web ............................................ 130
Search for text on a web page ............................................... 131
Bookmark a web page in your browser ................................. 131
Store a web page for offline viewing ..................................... 131
Exit the web .......................................................................... 132
Navigate saved web pages .................................................... 132
Manage bookmarks ............................................................... 132
Manage stored pages ............................................................ 134
Manage history ..................................................................... 137
FM radio ............................................................................ 140
Listen to the radio ................................................................. 140
Search for stations automatically .......................................... 141
Select and listen to a radio station from the station list ........ 141
Manually tune to a frequency ............................................... 141
Manually save a station in the station list ............................. 142
Manage your radio stations .................................................. 142
Calculator .......................................................................... 144
Make a calculation ................................................................ 144
Games ............................................................................... 146
Play a game ........................................................................... 146
9
Page 10

Contents
Applications ....................................................................... 147
Download an application....................................................... 147
Start an application ............................................................... 148
View an application’s properties ........................................... 148
Delete an application ............................................................ 150
Social networking .............................................................. 151
Access a social networking application ................................. 151
File manager ...................................................................... 152
View the contents of a folder ................................................ 152
View information about a file or folder ................................. 152
Create a folder ...................................................................... 153
Open a file ............................................................................. 154
Rename a file ........................................................................ 154
Send a file from your modu T phone via a multimedia message,
Bluetooth, or email message ................................................. 155
Copy a file or folder ............................................................... 156
Move a file or folder .............................................................. 156
Sort files and folders ............................................................. 157
Delete a file or folder ............................................................ 158
Check your memory card’s status ......................................... 158
Cell broadcast .................................................................... 160
View a cell broadcast message .............................................. 160
Delete a cell broadcast message ........................................... 160
Push messages ................................................................... 162
Receive a push message ........................................................ 162
View a WAP push message.................................................... 163
Settings ............................................................................. 164
10
Page 11

Contents
Change the tone settings ...................................................... 164
Change the display settings ................................................... 166
Change the language settings ............................................... 168
Set the date and time ............................................................ 168
Change call settings ............................................................... 171
Speed dial numbers ............................................................... 175
View your voicemail phone number ..................................... 177
Change your text message settings ....................................... 177
Change the multimedia message settings ............................. 178
Change the multimedia profile settings ................................ 180
Change your email settings ................................................... 185
Change your network settings............................................... 190
Change an application's settings ........................................... 191
Change an application's profile settings ................................ 192
View your connection profiles' details .................................. 194
Change the phone and SIM card security settings ................ 194
Check your software and hardware version or your IMEI code
.............................................................................................. 197
Reset your modu T phone ..................................................... 197
Change all your settings back to the factory default settings 198
Update the software version on your modu T phone ........... 198
Change cell broadcast topic settings ..................................... 199
sportify .............................................................................. 202
sportify your modu T phone .................................................. 202
Set your personal settings ..................................................... 203
Use the armband ................................................................... 203
Start your workout ................................................................ 204
Use the control box ............................................................... 206
Change workout or music settings during your workout ...... 207
11
Page 12

Contents
Send a text message, check a contact, or view your call log
during your workout ............................................................. 207
End your workout .................................................................. 207
Keep track of your workout sessions online .......................... 208
camerafy ........................................................................... 209
camerafy your modu™ T phone ............................................ 209
Take a picture ........................................................................ 209
Change your camera settings ................................................ 210
Shoot a video ........................................................................ 211
Change your video settings ................................................... 212
boostify ............................................................................. 214
boostify your modu™ T phone .............................................. 214
Answer or make a call ........................................................... 215
Listen to FM radio ................................................................. 215
Listen to music ...................................................................... 215
Use your boostify device as an alarm clock ........................... 215
Use external speakers ........................................................... 216
Unlock your modu T phone screen........................................ 216
modu™ PC Suite ................................................................. 217
General information .......................................................... 218
Care and maintenance of your modu™ T phone ................... 218
About your modu T phone .................................................... 218
Support and contact information .......................................... 218
Safety ................................................................................ 219
Symbols and information ...................................................... 219
AC adapter ............................................................................ 221
Small children ........................................................................ 222
12
Page 13

Contents
Pacemakers ........................................................................... 222
Magnetic fields ...................................................................... 223
Temperature ......................................................................... 223
Radio frequency signals ......................................................... 223
Protect your hearing ............................................................. 223
Certification information ....................................................... 224
Limited warranty ............................................................... 225
The warranty ......................................................................... 225
Conditions ............................................................................. 226
Index ................................................................................. 231
13
Page 14
Getting started
Getting started
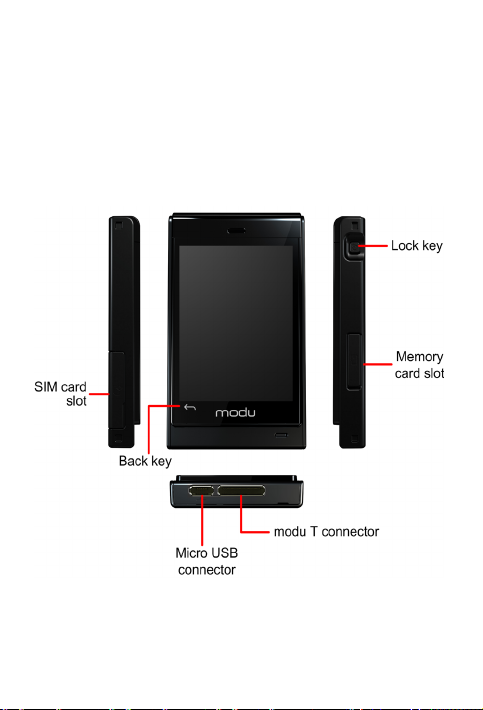
Your modu™ T phone
Your modu T phone has the following components:
A touch screen
An SD memory card
A micro USB port, where you connect your modu™
accessories (headset, AC adapter, and USB data cable)
Insert or remove the SIM card
Before inserting or removing the SIM card, turn off your modu
T phone and disconnect the charger.
14
Page 15
Getting started
» To turn off your modu T phone:
1. Press and hold the Lock key until the exit menu appears.
2. Tap power off.
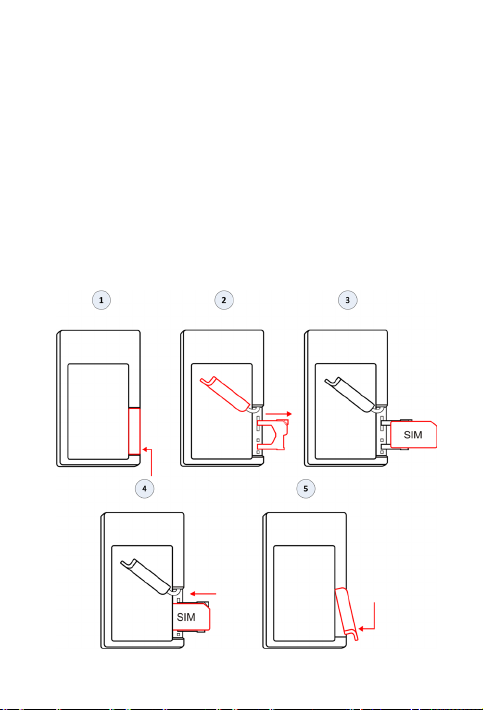
Insert the SIM card
1. Turn your modu T phone so that the back is facing you, and
open the SIM card slot cover.
2. While holding the cover back, pull the SIM card holder out.
3. Place your SIM card in the holder so that the cut corner of
the SIM card is at the top right corner.
4. Push the SIM card holder back into your modu T phone.
5. Close the cover.
15
Page 16
Getting started
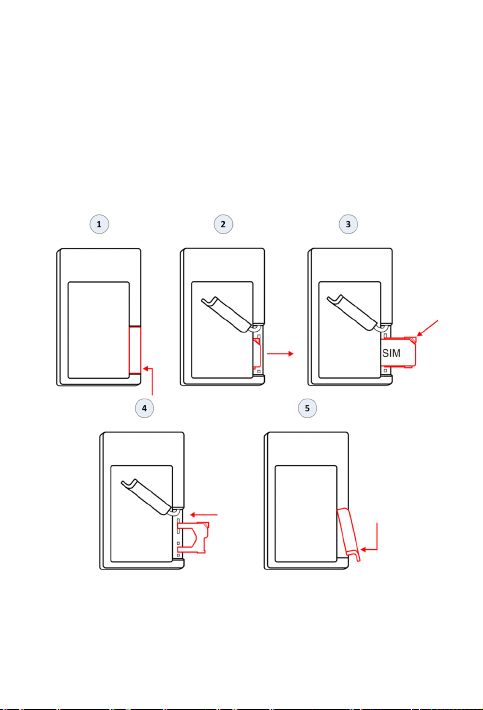
Remove the SIM card
1. Turn your modu T phone so that the back is facing you, and
open the SIM card slot cover.
2. While holding the cover back, pull the SIM card holder out.
3. Remove your SIM card by pushing down on the top right
corner of the SIM card holder, and pulling the SIM card out.
4. Push the SIM card holder back into your modu T phone.
5. Close the cover.
16
Page 17

Charge the battery
It takes two hours to fully charge your modu T phone's battery.
A fully charged battery gives you enough power for any of the
following uses:
Up to 3 hours of talk time when the phone is connected to a
3G network
Up to 7 hours of talk time when the phone is connected to a
2G network
210 hours of standby time
Up to 10 hours of music playback time
Up to 3.5 hours of video playback time
Up to 2.5 hours of Internet use when the phone is
connected to a 3G network
Up to 4.5 hours of Internet use when the phone is
connected to a 2G network
Getting started
17
Page 18

Getting started
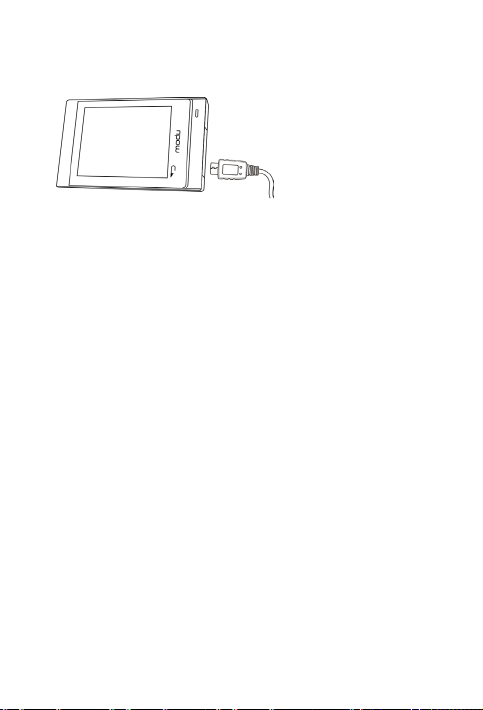
You can charge your modu T phone battery by connecting your
modu T phone to the AC adapter or by connecting your modu T
phone to the USB port on your computer.
» To charge your modu T phone battery using the AC
adapter:
1. Insert the AC plug into an electrical outlet.
2. Connect the other end of the AC adapter cable to the micro
USB port on the bottom of your modu T phone.
» To charge your modu T phone battery through your
computer:
1. Insert the USB data cable into the computer's USB port.
18
Page 19
Getting started
2. Connect the other end of the USB data cable to the micro
USB port on the bottom of your modu T phone.
Turn your modu T phone on or off
To turn your modu T phone on, press and hold the Lock key
for three seconds.
To turn your modu T phone off, from any screen press and
hold the Lock key until the exit menu appears, and then tap
power off.
Use the touch screen
There are five finger movements that you use to select or view
information on your modu T phone:
Tap: using your fingertip, touch the screen and quickly
release it.
Multi-tap: using your fingertip, repeatedly touch the
screen, quickly releasing your finger each time.
Touch and hold: using your fingertip, touch the screen and
hold your finger there for a few seconds.
Swipe: place the top part of your finger anywhere on the
screen and quickly slide your finger as follows:
• Swipe up: slide your fingertip in an upward movement.
• Swipe down: slide your fingertip in a downward
movement.
• Swipe left: slide your fingertip quickly to the left.
19
Page 20
Getting started
• Swipe right: slide your fingertip quickly to the right.
Flick: using the top part of your finger, quickly swipe your
finger up or down the screen.
On the touch screen, do the following actions to select or view
menu items or options:
To select a menu item or option, tap it.
To view all of the text of a menu item, touch and hold the
menu item.
20
Page 21
items in the list.
To scroll through a list, swipe up or down.
Getting started
To scroll slowly through a list, slowly move your finger up or
down the screen.
TIP: A scroll bar on the right side of the screen
indicates that you need to scroll to see the remaining
21
Page 22
Getting started
Options menu
You can view more options when the options icon
at the bottom of the screen.
appears
Tapping the options icon opens the options menu.
22
Page 23
Getting started
When the lines at the top and bottom of the options menu are
green, you can scroll through the list by swiping up or down.
When there are no lines at the top and bottom of the options
menu, all options in the list are visible.
23
Page 24
Getting started
Navigate between screens
To return to the previous screen, tap the Back key
or
press the Lock key.
To return to the home screen from anywhere, touch and
hold the Back key
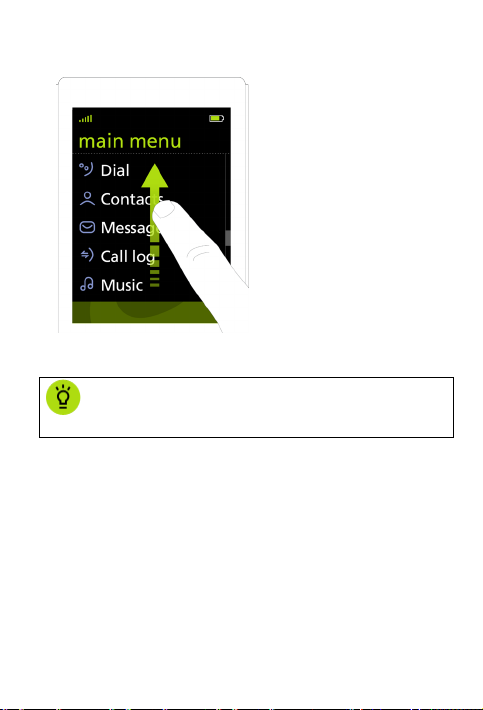
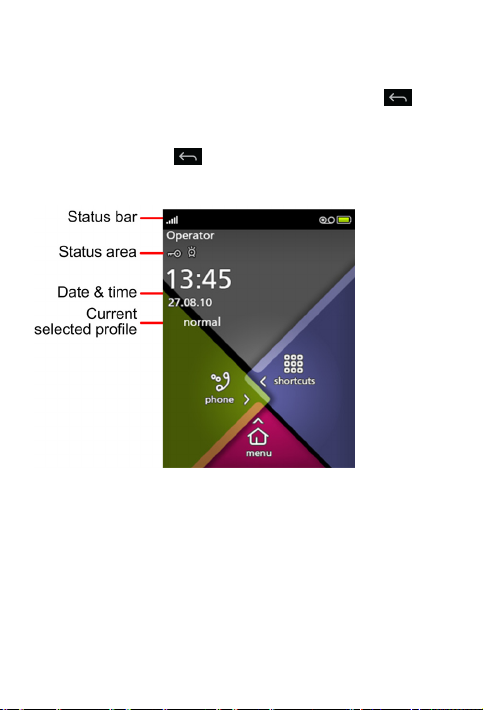
The home screen
or press and hold the Lock key.
Swipe your finger across the home screen to access all of your
modu T phone applications:
Swipe right to make a call.
Swipe left to access web applications.
Swipe up to open the main menu.
Swipe down to view notifications on the what's new?
screen and phone information on the status screen.
24
Page 25
Getting started
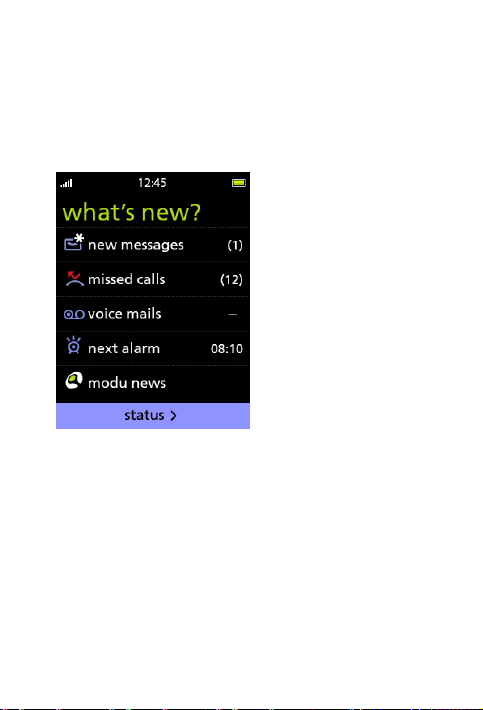
The what's new? screen
You can quickly view unread messages, view missed calls, view
your next alarm, listen to voicemail, and view the latest modu
news by checking the what's new? screen.
1. On the home screen, swipe down.
The what's new? screen appears.
2. Tap the item that you want to access.
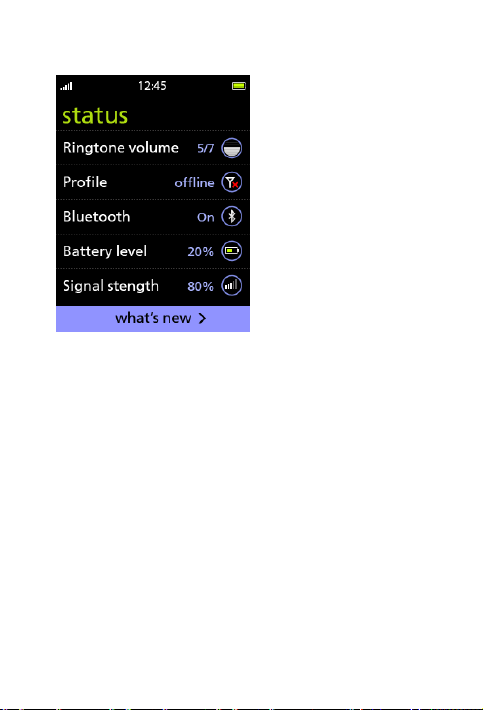
The status screen
You can quickly view your ringtone volume level, selected
profile, Bluetooth status, battery level, and signal strength by
checking the status screen.
1. On the home screen, swipe down.
25
Page 26
Getting started
2. On the what's new? screen, tap status.
3. To change your ringtone volume, profile, or Bluetooth
status, tap the desired item. For more information about
making these changes, see Set the ringtone volume on
page 165, Select a profile on page 123, or Turn Bluetooth
on or off on page 125.
26
Page 27
playlists.
videos.
page, and create bookmarks.
Download games, and view
Getting started
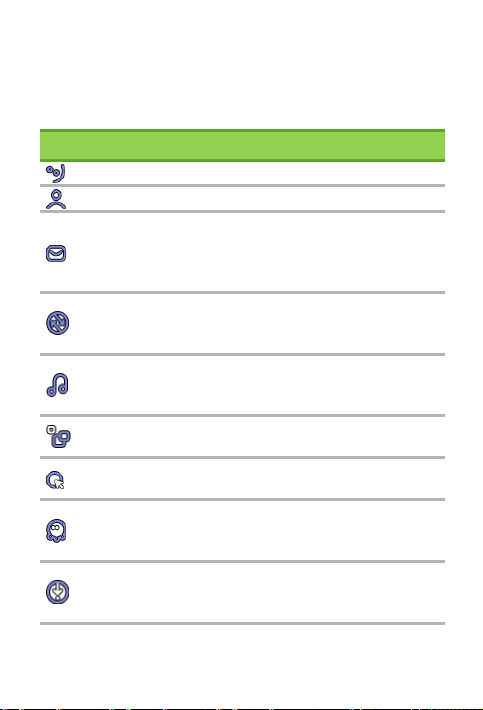
The main menu
To access the main menu, on the home screen, swipe up.
From the main menu you can open the following applications:
Icon Application Description
dial Dial a new number.
contacts Add and manage your contacts.
Create and send text messages,
messages
multimedia messages, and email
messages; view the inbox, sent
messages, and draft messages.
View incoming, outgoing, and
call log
missed calls; view call duration
information.
Play songs and view your music
music
folders; create and manage
gallery
browser
apps & games
downloads
View and manage your images and
Surf the Internet, set your home
View games, applications, and
shortcuts to web sites installed by
your service provider.
downloaded applications and
games.
27
Page 28
Getting started
Icon Application Description
Bluetooth
Set Bluetooth settings; add and
manage Bluetooth devices.
alarm clock Set and manage alarms.
calculator
FM radio
Perform simple and complex
calculations.
Listen to an FM radio station; add
and manage radio station settings.
profiles Select a profile.
View and change phone, tone,
display, network, and security
tools
settings; manage files and folders;
upgrade your phone's software
version.
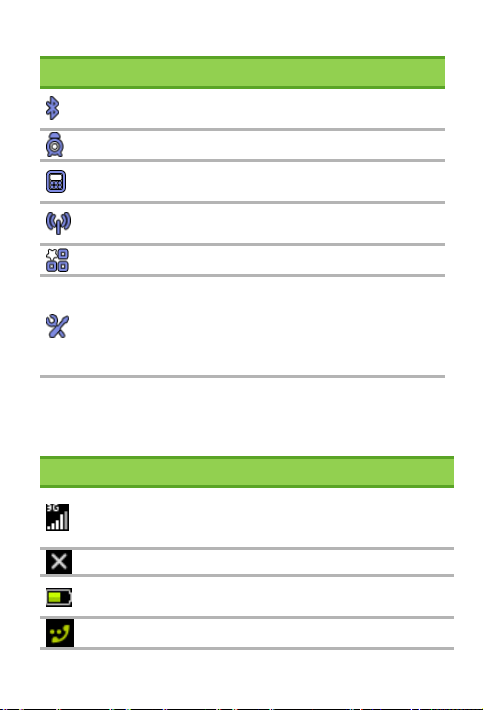
Indications and symbols
The following icons and symbols give you information about
the status of your modu T phone.
Icon Description
The number of bars shows the strength of your
cellular network signal. More bars means a stronger
signal.
There is no cellular network signal.
The colored area of the battery icon shows how
much charge is left in your battery.
You are connected to a call.
28
Page 29
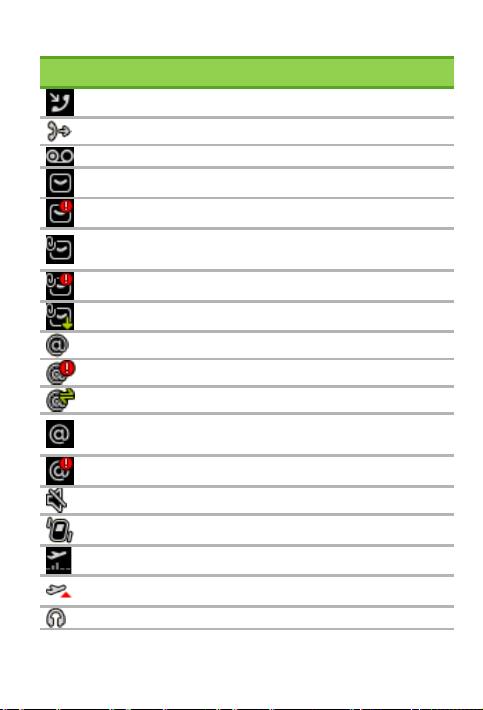
You have one or more unread WAP "push"
Icon Description
You have one or more missed calls.
All voice calls are being forwarded.
You have one or more voicemail messages.
You have one or more unread text messages.
Your text message storage is full.
You have one or more unread multimedia
messages.
Your multimedia message storage is full.
A multimedia message is being downloaded.
You have one or more unread email messages.
Your email message storage is full.
Your email account is checking for new messages.
messages.
Your email WAP "push" message storage is full.
The silent profile is activated.
The vibrate profile is activated.
The flight mode profile is activated.
Your modu T phone is in roaming mode.
Your headset is connected.
Getting started
29
Page 30
Getting started
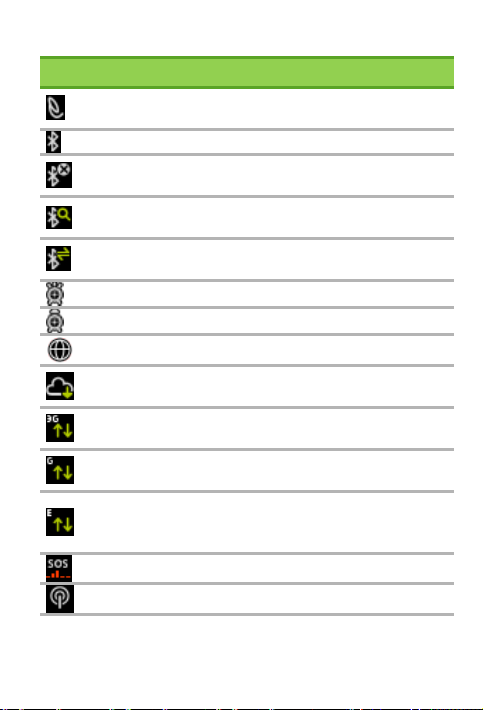
devices.
Your modu T phone is receiving an FTP update via
Your modu T phone is connected to a 3G network
Your modu T phone is connected to a 2.5G network
Your modu T phone is connected to an Edge
Icon Description
Your modu T phone is connected to a Bluetooth
headset.
Bluetooth service is active.
Your modu T phone is hidden from other Bluetooth
Your modu T phone is searching for other Bluetooth
devices.
Bluetooth is transferring a file either from or to
your modu T phone.
An alarm is set.
An alarm is going off.
You are connected to the Internet.
your service provider's network.
access point for connecting to the Internet.
access point for connecting to the Internet.
network access point for connecting to the
Internet.
Your modu T phone is in emergency mode.
Cell broadcast service is enabled.
30
Page 31

Lock or unlock the screen
Lock your modu T phone touch screen to make sure that you
don't perform an unwanted action such as deleting information
or dialing a call unintentionally.
Getting started
» To lock the screen:
From the home screen, press the Lock key.
A message indicates that you have locked your modu T
phone.
» To unlock the screen:
Press the Lock key.
31
Page 32

Calls
TIP
the Lock key.
Calls
Make a call
Call a new number
1. On the home screen, swipe right.
The keypad appears.
2. Enter the phone number that you want to call.
3. Tap call
4. When your conversation has finished, tap end
.
.
: You can also end a call by pressing and holding
Call a number from the call log
1. On the home screen, swipe right.
The keypad appears.
2. Tap call log.
3. Tap the desired log, and then select the number that you
want to call.
The options menu appears.
4. Tap call.
Call a number from the contacts list
1. On the home screen, swipe right.
The keypad appears.
2. Tap contacts.
3. Select a contact or search for a contact (see Search for a
contact).
4. Tap call.
32
Page 33

Call a number from a text message
1. On the home screen, swipe up.
The main menu appears.
2. Tap messages > inbox.
3. Select the number or contact that you want to call
4. Tap options
5. Tap call sender.
.
Answer, reject, or silence a call
To answer a call, tap accept.
To reject a call, tap reject.
To silence the ringtone, select silent.
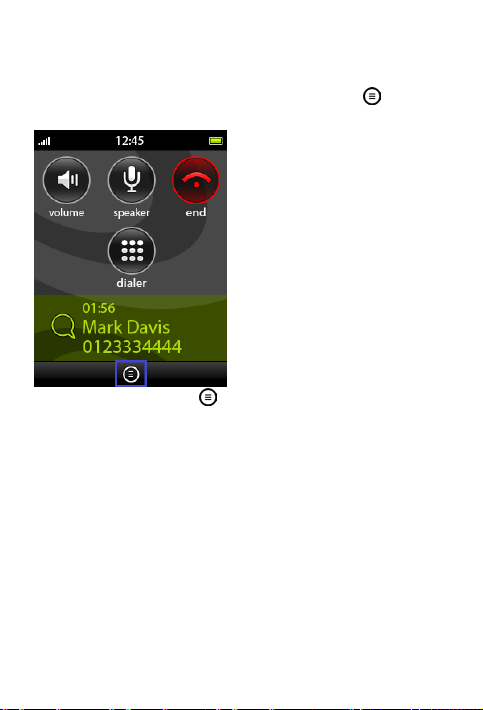
Actions you can perform during a call
Calls
After a call is connected, the screen locks to make sure that you
do not perform an unwanted action during a call.
33
Page 34

Calls
To perform an action during a call, first press the Lock key to
unlock the screen.
Adjust the volume
1. Tap volume.
2. Tap the
symbol to decrease the volume.
symbol to increase the volume, or tap the
Use the loudspeaker
To switch to the loudspeaker, tap speaker.
To switch back to the handset, tap handset.
Call another number
1. From the call screen, tap options
.
2. Use one of the following methods to place the call:
• Tap make new call, enter the number, and then tap
.
call
• Tap open contacts, select a contact, and then tap call.
• Tap open messages, select a message, tap options ,
and then tap call sender.
The first call is placed on hold.
Mute or unmute your microphone
To mute the microphone, tap options > mute.
The mute icon
cannot hear what you say.
To unmute the microphone, tap options > unmute.
appears, and the person on the line
34
Page 35

Place a call on hold or switch back to a held call
» To place a call on hold:
From the call screen, tap options
Tap hold.
The call is placed on hold, and the on hold icon
.
Calls
appears.
» To switch back to a held call:
On the call screen, tap on hold
Tap unhold.
The first call becomes active.
View the contact list
1. From the call screen, tap options
2. Tap open contacts.
3. Select a contact or search for a contact (see Search for a
contact).
.
.
35
Page 36

Calls
4. Tap the Back key
Use the headset
to return to the call screen.
1. Connect the micro USB connector on your headset to the
micro USB port on your modu™ T phone.
A message indicates that the headset is connected to your
modu T phone.
2. Accept a call or end one by pressing the Accept/End key on
the headset.
36
Page 37

View your call log
1. On the home screen, swipe up.
The main menu appears.
2. Tap call log.
The call log displays the following logs:
All calls (all missed, dialed, and received calls)
Missed calls
Outgoing calls
Incoming calls
» To view information about a call:
1. On the call log screen, tap the desired call log.
2. Tap the desired call, and then tap view details.
Delete a call from the call log
1. On the home screen, swipe up.
The main menu appears.
2. Tap call log.
3. Tap the call log that contains the call you want to delete.
4. Select the call.
The options menu appears.
5. Tap delete.
You are asked if you want to delete the call.
6. Tap yes.
Call your voicemail
Your voicemail is predefined as speed dial number 1.
On the keypad, touch and hold 1.
For more information about speed-dialing, see Speed dial
numbers on page 175.
Calls
37
Page 38

Calls
Use speed dial numbers
Speed dial numbers let you call someone by touching and
holding one key on the keypad.
Before you can use speed dial numbers, you need to assign a
speed dial number to a contact. You can assign speed dial
numbers from your contact list (see Assign a speed dial number
to a contact). You can also assign speed dial numbers from the
speed dial list (see Speed dial numbers on page 175).
Speed dial number 1 is used for your voicemail.
» To use speed dial numbers:
On the keypad, touch and hold the desired number key.
Call waiting
While you are on a call, you can receive a second call if the call
waiting option has been activated. For more information about
activating call waiting, see Turn call waiting on or off.
Answer a waiting call
If you are on a call and you receive a second call, the incoming
call information appears at the bottom of the screen.
» To answer an incoming call while you are on a call:
1. Tap accept.
38
Page 39

2. Do one of the following actions:
• Tap answer call.
The first call is placed on hold automatically.
Calls
• Tap replace call.
The first call is ended.
39
Page 40

Calls
Switch to a held call
Do one of the following actions:
• Tap on hold .
• Tap options , and then tap swap.
The connected call icon
The active call is also highlighted.
End one of the calls
1. Check whether the connected call icon
that you want to end.
2. If the icon is next to the other call, tap swap.
3. Tap end.
40
shows you which call is active.
is next to the call
Page 41

Calls
Conference calls
Set up a conference call
1. Connect to the first call either by answering an incoming
call or by initiating a call.
2. Connect to the second call in either of the following ways:
• Answer a second incoming call.
• Initiate a call by doing one of the following actions:
• Dial a number: tap keypad, enter the number, and
then tap call
.
• Select a contact: tap options , tap open contacts,
select a contact, and then tap call.
• Select a message: tap options , tap open inbox,
select a message, tap call sender.
You are now connected to two callers. The first call is on
hold, and the second call is active.
41
Page 42

Calls
NOTE
: The number of callers that can participate in a
conference call is determined by your service
provider.
3. Tap options , and then tap conference.
The callers are added to the conference, and the following
screen appears:
Speak to a conference participant privately
1. On the conference call screen, tap options
conference > private with.
2. Select the caller that you want to talk with privately.
End one of the calls in a conference
1. On the conference call screen, tap options
conference > remove participant.
2. Select the caller that you want to disconnect.
42
, and then tap
, and then tap
Page 43

Calls
Use the loudspeaker during a conference call
To switch to the loudspeaker, tap speaker.
To switch to the handset, tap handset.
Mute or unmute the microphone of your modu T phone during a conference call
To mute the microphone, tap options
, and then tap
mute.
The mute icon
appears, and the participants in the call
cannot hear what you say.
To unmute the microphone, tap options
unmute.
, and then tap
End all calls in a conference
On the conference call screen, tap end.
View the duration of your calls
You can view the call duration of your last call, outgoing calls,
incoming calls, and the total duration of all your calls.
1. On the home screen, swipe up.
The main menu appears.
2. Tap call log > call duration.
» To reset the time to 00:00 for a call duration log:
1. On the call duration screen, select a log.
The options menu appears.
2. Tap reset.
Service numbers
Service numbers (emergency, police, and directory assistance)
are automatically programmed into your modu T phone.
43
Page 44

Calls
Call a service number
You can dial a service number from the keypad or select the
number from the list of service numbers.
» To select a service number from the service number list:
1. On the home screen, swipe up.
The main menu appears.
2. Tap tools > service numbers.
3. Select the desired number.
The options menu appears.
4. Tap call.
Fixed dialing
Fixed dialing enables you to limit the contacts that you can use
for calling and for sending and receiving messages on your
modu T phone. When you turn on fixed dialing, your phone can
call only those numbers that you have specified as fixed dialing
numbers.
Turn fixed dialing on or off
To turn on fixed dialing, you need your PIN2 code. If you don't
know your PIN2 code, contact your service provider.
1. On the home screen, swipe up.
The main menu appears.
2. Tap tools > settings > security > PIN2 > fixed dialing.
3. Tap on or off.
The keypad appears.
4. Enter your PIN2 code, and tap save
.
44
Page 45

Calls
Define your fixed dialing list
To define your fixed dialing list, you need your PIN2 code. If
you don't know your PIN2 code, contact your service provider.
1. On the home screen, swipe up.
The main menu appears.
2. Tap tools > settings > security > PIN2 > fixed dialing list.
3. Tap options
, and then tap add contact.
4. Enter your PIN2 code.
5. Tap save
.
6. Tap name, and write the name of the contact.
7. Tap save
.
8. Tap number, and enter the phone number of the contact.
9. Tap save
.
10. Tap save again.
The contact is added to the fixed dialing list.
11. To add more numbers to the fixed dialing list, do the
following actions:
a. Select a contact from the fixed dialing list.
b. Tap add contact.
c. Repeat steps 3-10.
NOTE: When you add a new contact in the Fixed
dialing list, you can only enter the contact's name and
phone number.
Edit the information for a contact in the fixed dialing list
1. On the fixed dialing list screen, select the contact whose
information you want to edit.
2. Tap edit.
3. Enter your PIN2 code, and tap save
.
4. To edit the contact's name, do the following actions:
45
Page 46

Calls
a. Tap name.
b. Make the desired change to the contact's name.
c. Tap save
.
5. To edit the contact's number, do the following actions:
a. Tap number.
b. Make the desired change to the contact's number.
c. Tap save
6. Tap save.
.
Delete a contact from your fixed dialing list
1. On the fixed dialing list screen, select the contact that you
want to delete.
2. Tap delete.
3. Enter your PIN2 code.
4. Tap save
.
You are asked if you want to delete the contact
5. Tap yes.
46
Page 47

Contacts
Contacts
Add a contact
You can add a contact to your list of contacts in three ways:
By creating a new contact and entering the information in
your contact list
By using a number from the call log
By using a number from a message in your inbox
Create a contact in the contact list
1. On the home screen, swipe up.
The main menu appears.
2. Tap contacts > new contact.
The new contact screen appears.
3. Enter the contact's details.
4. Tap save.
Create a contact from a number in the call log
1. On the home screen, swipe up.
The main menu appears.
2. Tap call log.
3. Select the log that contains the number that you want to
enter, and then select the desired number.
4. Tap save.
5. Use one of the following methods to create the contact:
• Tap new contact, and do the following actions:
a. Tap the desired number type (mobile, home, work,
other, pager, or fax).
b. Enter the contact's details.
c. Tap save.
• Tap existing contact, and do the following actions:
47
Page 48

Contacts
a. Select a contact, or search for a contact (see Search
for a contact).
b. Tap the type of number (mobile, home, work, other,
pager, or fax).
c. If the selected number type exists for this contact,
and you are asked if you want to replace the
number, tap yes or select a different number type.
d. Tap save.
Create a contact by using a number from a text message
1. On the home screen, swipe up.
The main menu appears.
2. Tap messages.
3. Select the desired folder.
Your list of messages appears.
4. Select the message that came from the desired number.
5. Tap options
.
6. Tap save contact.
7. Use one of the following methods to create the contact:
• Tap new contact, and do the following actions:
a. Enter the contact's details.
b. Tap save.
• Tap existing contact, and do the following actions:
a. Select a contact, or search for a contact (see Search
for a contact).
b. Select the desired number type (mobile, home,
work, other, pager, or fax).
c. If the selected number type exists for this contact,
and you are asked if you want to replace the
number, tap yes or select a different number type.
48
Page 49

Contacts
d. Tap save.
Search for a contact
You can use the fast scroll feature or the search command to
search for a contact.
» To use the fast scroll feature to search for a contact:
1. On the home screen, swipe up.
The main menu appears.
2. Tap contacts.
3. On the contacts screen, flick your finger up (a quick swipe
up).
49
Page 50

Contacts
Your list of contacts begins to scroll quickly. The first letter
of the first contact name in the list appears in a box, and
then the letter in the box advances alphabetically according
to the first letter of each name in your contact list.
NOTE: Only the letters that represent names that you
have entered appear. For example, if no names begin
with the letter "p", that letter will not appear during
fast scrolling.
4. When the first letter of the name that you are looking for
appears, tap the letter in the box.
The list stops scrolling, and the first contact that starts with
the selected letter is displayed.
» To use the Search command to search for a contact:
1. On the home screen, swipe up.
The main menu appears.
2. Tap contacts > search.
50
Page 51

Contacts
3. Write the first letter or first two letters of the contact's
name.
4. Tap search
.
The first name that begins with the letters that you wrote is
found. If no name begins with those letters, a message
displays "no match".
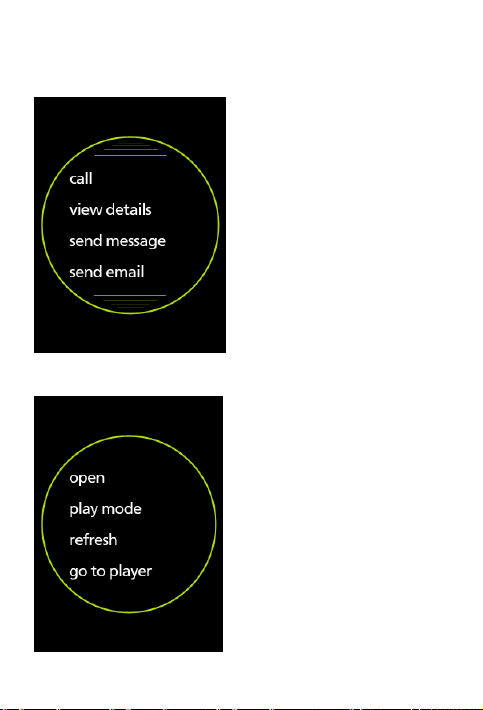
View details of a contact
1. On the home screen, swipe up.
The main menu appears.
2. Tap contacts.
3. Select the contact whose information you want to view.
The options menu appears.
4. Tap view details.
Delete a contact
1. On the home screen, swipe up.
The main menu appears.
2. Tap contacts.
3. Select the contact that you want to delete.
The options menu appears.
4. Tap delete.
You are asked if you want to delete the contact.
5. Tap yes.
Delete all of your contacts
1. On the home screen, swipe up.
The main menu appears.
2. Tap contacts.
3. Select any contact.
The options menu appears.
51
Page 52

Contacts
4. Tap advanced > delete all.
You are asked if you want to delete all of your contacts.
5. Tap yes.
Edit contact information
1. On the home screen, swipe up.
The main menu appears.
2. Tap contacts.
3. Select the contact whose information you want to edit.
The options menu appears.
4. Tap edit.
The contact's details appear.
5. Edit the desired details.
6. Tap save.
Assign a ringtone to a contact
1. On the home screen, swipe up.
The main menu appears.
2. Tap contacts.
3. Select a contact.
The options menu appears.
4. Tap assign ringtone.
5. Use one of the following methods to select a ringtone:
• Tap standard tones, and do the following actions:
a. Select a ringtone.
The options menu appears.
b. Tap play to listen to the ringtone, or tap select to
assign the ringtone to your contact.
c. If you tapped play and want to select the ringtone,
tap the ringtone again, and then tap select.
52
Page 53

• Tap phone tones, and do the following actions:
a. Locate the folder that contains the desired ringtone.
b. Select the desired ringtone.
The options menu appears.
c. Tap play to listen to the ringtone, or tap select to
assign the ringtone to your contact.
d. If you tapped play and want to select the ringtone,
tap the ringtone again, and then tap select.
The ringtone is assigned to the contact.
Assign an image to a contact
1. On the home screen, swipe up.
The main menu appears.
2. Tap contacts.
3. Select a contact.
The options menu appears.
4. Tap assign image.
5. Locate the folder that contains the desired image.
6. Select the image.
The image is assigned to the contact.
Assign a speed dial number to a contact
1. On the home screen, swipe up.
The main menu appears.
2. Tap contacts.
3. Select any contact.
4. Tap speed dial.
5. Select a speed dial number.
The options menu appears.
6. Tap assign.
The select contact screen appears.
Contacts
53
Page 54

Contacts
7. Select the contact that you want to assign the speed dial
number to.
8. If you have multiple phone numbers for the contact, select
the number that you want to use for speed dialing.
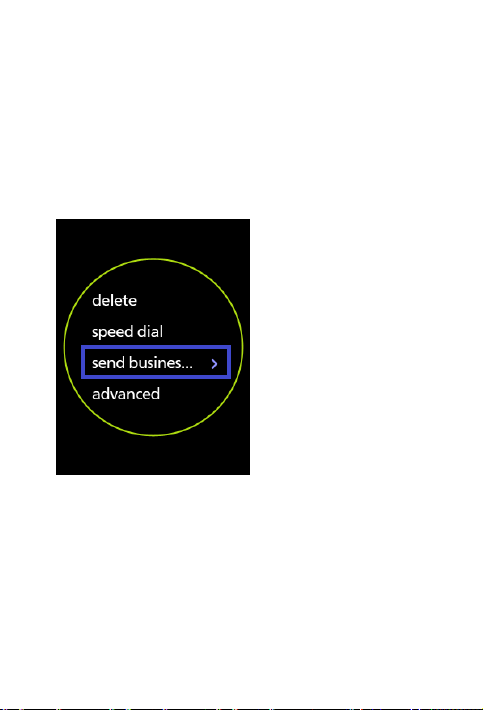
Send a contact's business card via multimedia message or Bluetooth
» To send a contact's business card via a multimedia
message:
1. On the home screen, swipe up.
The main menu appears.
2. Select the contact whose information you want to send.
The options menu appears.
3. Tap send business card > via MMS.
The MMS preview screen appears.
4. Tap options
5. Select a recipient using one of the following methods:
, and then tap send.
• Tap from contact, and then select a contact.
• Tap enter new number, enter the phone number, and
then tap save
.
• Tap email, write the email address, and then tap save
.
The recipient list screen appears
6. Select the recipient.
The options menu appears.
7. Tap send.
You are asked to confirm the sending of the multimedia
message.
8. Tap yes.
54
Page 55

Contacts
» To send a contact's business card via Bluetooth:
1. On the home screen, swipe up.
The main menu appears.
2. Select the contact whose business card you want to send.
The options menu appears.
3. Tap send business card > via Bluetooth.
4. If you are asked if you want to turn on Bluetooth, tap yes.
Your modu™ T phone searches for a device, and then a
message appears with a list of found devices.
5. Select the desired Bluetooth device, and then tap select.
After the recipient accepts the file, a message notifies you
that the file was sent.
Store contact information
You can copy all your contacts or a specific contact to your SIM
card, and you can choose where you want contact information
to be saved when you create a new contact.
Copy a contact to your SIM card
NOTE: When you copy a contact from your phone
memory to the SIM card, some of the information may
not be copied Depending on the SIM card that you
have, one of the following sets of information is
copied with the contact:
The contact's name and one number
The contact's name, three phone numbers for the
1. On the home screen, swipe up.
2. Tap contacts.
contact, and the contact's email address
The main menu appears.
55
Page 56

Contacts
NOTE: When you copy a contact from your phone
3. Select the contact that you want to copy to your SIM card.
The options menu appears.
4. Tap advanced > copy to SIM.
You are asked if you want to begin the copying process.
5. Tap yes.
Copy all contacts to your SIM card
memory to the SIM card, some of the information may
not be copied Depending on the SIM card that you
have, one of the following sets of information is
copied with the contact:
The contact's name and one number
The contact's name, three phone numbers for the
1. On the home screen, swipe up.
contact, and the contact's email address
The main menu appears.
2. Tap contacts.
3. Select any contact.
The options menu appears.
4. Tap advanced > copy all to SIM.
You are asked if you want to begin the copying process.
5. Tap yes.
Select the memory to use for saving new contacts
1. On the home screen, swipe up.
The main menu appears.
2. Tap contacts.
3. Select any contact.
The options menu appears.
56
Page 57

Contacts
4. Tap advanced > change source.
5. Tap one of the following options:
• phone: saves new contacts to your phone's memory.
• SIM card: saves new contacts to your SIM card.
Check how much space is left for contacts on your phone and SIM card
1. On the home screen, swipe up.
The main menu appears.
2. Tap contacts.
3. Select any contact.
The options menu appears.
4. Tap advanced > memory status.
The memory status screen indicates the number of
contacts saved in your phone memory and SIM card, and
the remaining amount of space left for contacts in your
phone memory and SIM card.
57
Page 58

Text messages (SMS)
Send
Sends your text message.
Text messages (SMS)
Send a text message
1. On the home screen, swipe up.
The main menu appears.
2. Tap messages > new message.
The keypad appears.
3. Write your text message.
4. Tap send
.
5. Do one of the following actions:
• Tap select contact, select the contact(s) that you want
to send the message to, and then tap OK.
• Tap enter number, enter the phone number of the
recipient, and then tap save
When writing a text message, you can use any of the following
options by tapping options
.
:
message
preview
add symbol
change language
58
Displays your message in a full-screen view.
To close the message preview screen, tap
.
close
Displays the symbol keys.
Tap close to return to the letter keys.
Displays a list of languages. Tap the
language that you want to select.
Page 59

Displays the following options:
page 62.
save as draft
Saves your text in the drafts folder.
writing options
predictive text
Text messages (SMS)
Abc: changes the capitalization mode to
uppercase for the first letter of a word in a
sentence.
abc: changes the capitalization mode to all
lowercase letters.
ABC: changes the capitalization mode to all
uppercase letters.
123: changes the keypad to number mode.
NOTE: The language that you select
determines the capitalization modes that
are available.
Turns the predictive text mode on or off.
Predictive text mode is off by default. For
more information, see Predictive text on
insert template
the text from the template into your text
message.
Displays a list of templates and then inserts
Keypad shortcuts for writing messages
When writing a text message, you can use the following keypad
shortcuts:
Tap
Touch and hold
Tap the
key to erase a letter.
key to erase all text.
key to switch between the capitalization
modes.
59
Page 60

Text messages (SMS)
NOTE
: The capitalization modes that are available
depend on the selected language.
Tap to display the symbol keypad.
On the symbol keypad, tap
to switch between the
smiley face keypad and the symbol keypad.
On the symbol keypad or smiley face keypad, tap
to
return to the main keypad.
Touch and hold the text display area to see a full-screen
preview of your message.
Send a text message from the contact list
1. On the home screen, swipe up.
The main menu appears.
2. Tap contacts.
3. Select the name of the recipient or search for a contact (see
Search for a contact on page 49).
The options menu appears.
4. Tap send message.
5. If you have multiple phone numbers for the contact, select
the desired number.
6. Write your text message.
7. Tap send
.
Send a text message from the call log
1. On the home screen, swipe up.
The main menu appears.
2. Tap call log.
3. Select the call log that contains the number where you
want to send the message.
60
Page 61

Text messages (SMS)
4. Select the call from the number where you want to send
the message.
The options menu appears.
5. Tap send message.
6. Write your text message.
7. Tap send
.
Send a text message using a predefined template
Your modu™ T phone comes with predefined text message
templates to help you write messages quickly—for example, "I
will be home late.".
1. On the home screen, swipe up.
The main menu appears.
2. Tap messages > templates > text messages.
The SMS templates screen displays a list of predefined
templates.
3. Select the desired template.
The options menu appears.
4. Tap use in message.
The keypad appears.
5. (Optional) Add text to the message.
6. Tap send
.
7. Do one of the following actions:
• Tap select contact, select the contact(s) that you want
to send the message to, and then tap OK.
• Tap enter number, enter the phone number of the
recipient, and then tap save
.
61
Page 62

Text messages (SMS)
NOTE
Predictive text
Predictive text enables you to write text quickly. As you write
letters, the predictive text mode "predicts" the word that you
want to write and enters the correct letter for you. When you
write i predictive text mode, the groups of letters are
underlined.
» To turn on predictive text:
Do one of the following actions:
• On the keypad, touch and hold the symbol key .
• On the keypad, tap options , and then tap predictive
text > on.
When you write, an underline appears under the letter
groups.
» To turn off predictive text:
Touch and hold the XT9 key
Write a text message using predictive text
1. Find the key that includes the first letter of the word that
you want to write, and tap the key once. For example, if you
want to write "call", tap the abc key once.
: The letter that you want may not appear in the
text display area until you finish entering all of the
letters in the word.
2. Find the keys for the remaining letters of the word, and tap
each key once.
.
62
Page 63

NOTE
Text messages (SMS)
: A different word might appear in the text
display area while you are writing but when you finish,
the correct word replaces that one.
3. If the word that you want to write does not appear in the
text display area, tap the XT9 key
repeatedly until the
desired word appears.
If the phone does not suggest the word that you want to
write and a question mark symbol ? appears at the end of
the set of letters, do these actions:
a. Tap the spell key.
b. Write the word, and tap the space key
Predictive text resumes.
.
View a new text message
When you receive a text message, your modu T phone tells you
that you have a new message.
1. Tap view.
The inbox appears. The unread messages icon
indicates
messages that you haven't read.
2. Select the desired unread message.
» To check how many unread messages you have:
1. On the home screen, swipe up.
The main menu appears.
2. Tap messages.
3. Look at the number next to inbox (for example, "2/10"). The
first number indicates how many unread messages you
have. The second number indicates the total number of
messages that you have.
63
Page 64

Text messages (SMS)
View a text message
» To view a text message in your inbox:
1. On the home screen, swipe up.
The main menu appears.
2. Tap messages > inbox.
Your list of messages appears.
3. Select the message that you want to view.
» To view a text message in one of your folders (sent items,
drafts, or outbox):
1. On the home screen, swipe up.
The main menu appears.
2. Tap messages.
3. Select the desired folder.
Your list of messages appears.
4. Select the message that you want to view.
The options menu appears.
5. Tap open.
View information about a text message
» To view information about a text message in your inbox:
1. On the home screen, swipe up.
The main menu appears.
2. Tap messages > inbox.
Your list of messages appears.
3. Select the message whose information you want to view.
4. Tap options
5. Tap view details.
.
64
Page 65

Text messages (SMS)
» To view information about a text message in one of your
folders (sent items, drafts, or outbox):
1. On the home screen, swipe up.
The main menu appears.
2. Tap messages.
3. Select the folder that contains the message whose
information you want to view.
Your list of messages appears.
4. Select the message.
The options menu appears.
5. Tap view details.
Reply to a text message
» To reply to a message that you are viewing:
1. On the message screen, tap options
2. Tap reply.
The keypad appears.
3. Write your text message.
4. Tap send
.
.
» To reply to a message that is in your inbox:
1. On the home screen, swipe up.
The main menu appears.
2. Tap messages > inbox.
3. Select the desired text message.
4. Tap options
5. Tap reply.
The keypad appears.
6. Write your text message.
7. Tap send
.
.
65
Page 66

Text messages (SMS)
Forward a text message
» To forward a message that you are viewing:
1. On the message screen, tap options
2. Tap forward.
The keypad appears.
3. (Optional) Write additional text.
4. Tap send
5. Do one of the following actions:
.
.
• Tap select contact, select the contact(s) that you want
to forward the message to, and then tap OK.
• Tap enter number, enter the phone number of the
recipient, and then tap save
.
» To forward a message that is in your inbox or another
message folder:
1. On the home screen, swipe up.
The main menu appears.
2. Tap messages.
3. Select the folder of the message that you want to forward
(inbox, sent items, drafts, or outbox).
4. Select the desired text message.
5. Tap options
6. Tap forward.
The keypad appears.
7. (Optional) Write additional text.
8. Tap send
9. Do one of the following actions:
.
.
66
Page 67

Text messages (SMS)
• Tap select contact, select the contact(s) that you want
to forward the message to, and then tap OK.
• Tap enter number, enter the phone number of the
recipient, and then tap save
Delete a text message
1. On the home screen, swipe up.
The main menu appears.
2. Tap messages.
3. Select the folder that contains the message that you want
to delete.
4. Select the desired text message.
5. Tap options
.
6. Tap delete.
You are asked if you want to delete the message.
7. Tap yes.
Delete all the text messages in a folder
.
» To delete all text messages in your inbox:
1. On the home screen, swipe up.
The main menu appears.
2. Tap messages > settings > clear inbox.
You are asked if you want to delete all the messages in the
inbox.
3. Tap yes.
» To delete all text messages in one of your folders (sent
items, drafts, or outbox):
1. On the home screen, swipe up.
The main menu appears.
67
Page 68

Text messages (SMS)
2. Tap messages.
3. Select the folder that contains the messages that you want
to delete.
4. Select any message.
5. Tap options
.
6. Tap delete all.
You are asked if you want to delete all the messages in the
folder.
7. Tap yes.
Extract a set of numbers from a text message
You can extract a set of numbers—for example, a phone
number—from a text message. After you extract the phone
number, you can call the number, and then save the phone
number as a contact.
1. On the home screen, swipe up.
The main menu appears.
2. Tap messages > inbox.
3. Select the desired text message.
4. Tap options
.
5. Tap extract numbers from message.
If the message contains one set of numbers, the extracted
set of numbers appear.
If the message contains more than one set of numbers, the
sets of numbers appear in a list.
6. If more than one set of numbers appears, select the desired
set.
The options menu appears.
68
Page 69

Text messages (SMS)
» To use an extracted set of numbers for a call:
1. Extract a set of numbers from a text message.
2. On the options menu, tap dial.
The call is connected.
» To use an extracted set of numbers for sending a message:
1. Extract a set of numbers from a text message.
2. Tap send message.
3. Write your text message.
4. Tap send
.
» To save an extracted set of numbers as a contact:
1. Extract a set of numbers from a text message.
2. Tap save as contact.
3. Do one of the following actions:
• Save the number as a new contact:
a. Tap new contact.
b. Tap the desired number type.
The add contact screen appears.
c. Enter any other information for the contact.
d. Tap OK.
• Add the number to an existing contact:
a. Tap existing contact.
The contacts screen appears.
b. Select a contact or search for a contact (see Search
for a contact on page 49).
c. Tap the desired number type.
d. Enter any other information for the contact.
e. Tap OK.
69
Page 70

Text messages (SMS)
Delivery reports
Delivery reports tell you whether a text message has reached
the recipient's mobile phone successfully.
You can view your delivery reports and delete them.
To activate the delivery report option in your modu T phone,
see Change your text message settings on page 177.
View a delivery report for a text message
1. On the home screen, swipe up.
The main menu appears.
2. Tap messages > delivery reports.
The delivery reports screen appears and indicates whether
the text message was delivered or was undeliverable.
Delete a delivery report
1. On the delivery reports screen, select the delivery report
that you want to remove.
The options menu appears.
2. Tap delete.
You are asked if you want to delete the delivery report.
3. Tap yes.
Delete all delivery reports
1. On the delivery reports screen, select any one of the
delivery reports.
The options menu appears.
2. Tap delete all.
You are asked if you want to delete all delivery reports.
3. Tap yes.
70
Page 71

Multimedia messages (MMS)
Multimedia messages (MMS)
A multimedia message is a message that includes a subject line
and one or more images, audio files, and video files.
You can create a multimedia message in several ways:
By selecting new message
By selecting a contact in your contact list
By selecting a number in your call log
By forwarding a message from the inbox, the sent items
folder, or the outbox
By selecting a message stored in your drafts message folder
By using a multimedia message template
A basic multimedia message consists of one page, but a
multimedia message can have up to 20 pages.
NOTE: The maximum size of a multimedia message is
300 KB, including the text and all files, unless your
service provider has a different limit.
Each page can have text and/or the following files:
One image, audio, or video file
Two files: one image file and one audio file
A page cannot have two files of the same type.
The subject line is the same for all the pages.
Send a multimedia message
1. On the home screen, swipe up.
The main menu appears.
2. Tap messages > new message.
The keypad appears.
3. Write your message. For more information, see Send a text
message on page 58.
71
Page 72

Multimedia messages (MMS)
NOTE
: In a multimedia message, you can leave the
text area blank.
4. Tap options , and then tap add multimedia.
5. Tap the type of media that you want to send (image, video,
or audio).
The message "This message will be changed to an MMS
message" appears briefly, and then a screen appears for
selecting the media.
6. Locate and select the folder that contains the file that you
want to send.
NOTE: The maximum file size that can be added to a
message is 300 KB, unless your service provider has a
different limit. You can add the following media file
types to your message:
Images — .jpg, .jpeg, .gif, and .bmp files
Video — .mp4 and .3gp files
Audio — .amr, .mp3, .aac, and .midi files
1. Select the file that you want to send.
2. If you selected an audio file, do the following actions:
a. (Optional) From the options menu, tap play to listen to
the file; if you want to choose this file, select the file
again.
The options menu appears.
b. Tap select.
72
Page 73

The file is added to the message, and the MMS preview
screen appears.
Multimedia messages (MMS)
3. (Optional) Add a subject by doing the following actions:
a. Tap options
The keypad appears.
b. Write the subject, and tap save
The subject appears at the top of the MMS preview
screen.
4. Tap options
5. Use one of the following methods to select the message’s
recipient:
, and then tap edit subject.
.
, and then tap send.
• Tap select contact, and select a contact. For information
on how to search for a contact, see Search for a contact
on page 49.
• Tap enter number, enter a phone number, and then tap
.
save
• Tap email, write an email address, and then tap save .
73
Page 74

Multimedia messages (MMS)
The contact, phone number, or email address appears in
the message’s recipient list.
6. To send the message, select a message recipient.
The options menu appears.
7. Tap send.
You are asked if you want to send the message.
8. Tap yes.
» To add another recipient to a multimedia message:
1. From the recipient list screen, select a recipient.
2. Tap add recipient.
3. Do one of the following actions:
• Tap select contact, and select a contact. For information
on how to search for a contact, see Search for a contact
on page 49.
• Tap enter number, enter a phone number, and then tap
.
save
• Tap email, write an email address, and then tap save .
• The contact, phone number, or email address is added
to the message’s recipient list.
» To delete a recipient from a multimedia message:
1. From the recipient list, select the recipient that you want to
delete.
2. Tap delete.
You are asked if you want to delete the message.
3. Tap yes.
» To edit the subject line of a multimedia message:
74
Page 75

NOTE
NOTE: All pages in a message have the same text
Multimedia messages (MMS)
: In a multimedia message, you can write a
subject line only after you have added a file to the
message. You can also leave the subject line blank.
1. On the MMS preview screen, tap options .
2. Tap edit subject.
The keypad appears.
3. Edit the subject text
4. Tap save
.
» To add text to a message or change your message text:
1. On the MMS preview screen, tap options
2. Tap edit text.
The keypad appears.
3. Write your message.
4. Tap save
.
.
» To switch the position of your message text:
A new multimedia message displays your text below the image
or video. You can move the text to above the image or video.
position. If you move the text on one page, the text
position changes on all the pages.
1. On the MMS preview screen, tap options .
2. Tap page options > switch text position.
» To change a message’s background color:
NOTE: All pages in a message have the same background
color. If you change the color on one page, the color
changes on all the pages.
75
Page 76

Multimedia messages (MMS)
1. On the MMS preview screen, tap options
.
2. Tap page options > background color.
3. Tap the desired color.
» To preview and send a message:
You can preview a message at any time before it is sent.
Previewing enables you to listen to the attached audio files and
view the attached image or video files.
1. On the MMS preview screen, tap options
.
2. Tap message preview.
The multimedia message appears, and the attached audio
and video files play. If the message has more than one
page, the pages are shown in sequence.
3. Do one of the following actions:
• Tap play to preview the message again.
• Tap the Back key to return to the MMS preview
screen.
4. To send the message, do the following actions:
a. Tap options
b. Tap send.
c. Select a message recipient.
The options menu appears.
d. Tap send.
You are asked if you want to send the message.
e. Tap yes.
Send a multimedia message from your contact list
1. On the home screen, swipe up.
The main menu appears.
2. Tap contacts.
76
.
Page 77

Multimedia messages (MMS)
3. Select a contact. For information on how to search for a
contact, see Search for a contact on page 49.
The options menu appears.
4. Tap send message.
The keypad appears.
5. Write and send your message. For more information about
sending a multimedia message, see Send a multimedia
message on page 71.
Send a multimedia message to a number from your call log
1. On the home screen, swipe up.
The main menu appears.
2. Tap call log.
3. Tap the desired call log (all calls, missed calls, outgoing
calls, or incoming calls).
4. Select a call.
5. Tap send message.
The keypad appears.
6. Write and send your message. For more information about
sending a multimedia message, see Send a multimedia
message on page 71.
Add a page to a multimedia message
1. On the MMS preview screen, tap options
.
2. Tap page options > insert new page.
A new multimedia message page appears.
3. Add message text to the new page by doing the following
actions:
a. On the MMS preview screen, tap options
.
b. Tap edit text.
c. Write your message.
77
Page 78

Multimedia messages (MMS)
NOTE: Each page can have text and/or the following
NOTE: The replace option is available only if there is a
d. Tap save
.
4. Add an image, video, or audio file to the new page by doing
the following actions:
files:
One image, audio, or video file
Two files: one image file and one audio file
A page cannot have two files of the same type.
The maximum file size that can be added to a message
is 300 KB, unless your service provider has a different
limit.
a. On the MMS preview screen, tap options .
b. Tap image options, video options or audio options.
c. Tap insert saved image/video/audio.
d. Locate the desired folder.
e. Locate and select the folder that contains the file that
you want to send.
f. Select the file that you want to add to the message.
The file is added to the new page.
» To replace an image, video, or audio file attached to a
message page:
file of the same type added to that page of the
message.
1. On the MMS preview screen, tap options .
2. Tap image/video/audio options.
3. Tap replace with saved image/video/audio.
4. Locate the desired folder.
78
Page 79

NOTE: The delete option is available only if the
Multimedia messages (MMS)
5. Select the file that you want to add to the message.
The old file is deleted from the message page, and the new
file is added.
» To delete an image, video, or audio file from a message
page:
message page contains a file of the type that you
select.
1. On the MMS preview screen, tap options .
2. Tap image/video/audio options.
3. Tap remove inserted image/video/audio.
The file is deleted from the message page.
Save or retrieve a draft version of a multimedia message
» To save a multimedia message to the drafts folder:
1. On the MMS preview screen, tap options
2. Tap save to drafts.
3. When asked if you want to save the message to the drafts
folder, tap yes.
The message is saved in the drafts folder.
.
» To retrieve and use a draft multimedia message:
1. On the home screen, swipe up.
The main menu appears.
2. Tap messages > drafts.
3. Select the draft message that you want to retrieve.
The options menu appears.
4. Do any of the following actions with the draft message:
79
Page 80

Multimedia messages (MMS)
NOTE: If you save this message again in the drafts
• Tap open, and edit and send the message.
NOTE: If you save this message again in the drafts
folder, the edited version will replace the original draft
message.Tap forward, and then edit and send the
message.
• The message opens for editing and sending to new
recipients.
folder, it will be saved as a new draft message.
Delete a draft multimedia message
1. On the home screen, swipe up.
The main menu appears.
2. Tap messages > drafts.
The options menu appears.
3. Tap delete.
You are asked if you want to delete the message.
4. Tap yes.
Delete all draft multimedia messages
1. On the home screen, swipe up.
The main menu appears.
2. Tap messages > drafts.
The options menu appears.
3. Tap delete all.
You are asked if you want to delete all the messages.
4. Tap yes.
Reply to a multimedia message
1. On the home screen, swipe up.
80
Page 81

NOTE
recipient list.
Multimedia messages (MMS)
The main menu appears.
2. Tap messages > inbox.
3. Select a message.
The options menu appears.
4. Tap reply.
The message editor screen appears.
5. Write your reply and send the message. For more
information about sending a multimedia message, see Send
a multimedia message on page 71.
: The phone number is already in the message’s
Forward a multimedia message from a message folder
1. On the home screen, swipe up.
The main menu appears.
2. Tap messages.
3. Tap the folder that holds the message that you want to
forward (inbox, sent items, drafts, or outbox).
4. Select a message.
The options menu appears.
5. Tap forward.
The message editor appears with the subject, message text,
and files from the original message.
6. (Optional) Add a subject, message text, or files; or replace
or delete the existing ones.
7. Tap options
.
8. Tap send.
9. Use one of the following methods to specify the message’s
recipient:
81
Page 82

Multimedia messages (MMS)
• Tap select contact, and select a contact. For information
on how to search for a contact, see Search for a contact
on page 49.
• Tap enter number, enter a phone number, and then tap
.
save
• Tap email, write an email address, and then tap save .
The contact, phone number, or email address appears in
the message’s recipient list.
10. To send the message, select a message recipient.
The options menu appears.
11. Tap send.
You are asked if you want to send the message.
12. Tap yes.
View the details of a multimedia message
1. On the home screen, swipe up.
The main menu appears.
2. Tap messages.
3. Tap a message folder (inbox, sent items, drafts, or outbox).
4. Select a message.
5. Tap options
6. Tap view details.
Change the amount of time for a multimedia message page to be displayed
1. On the MMS preview screen, tap options
2. Tap page options > page duration.
The keypad appears.
3. Enter the amount of time that you want each message page
to be displayed.
82
.
.
Page 83

NOTE
Multimedia messages (MMS)
: This value is for all pages in the message.
4. Tap save .
Delete a page from a multimedia message
1. On the MMS preview screen, tap options
2. Tap page options > delete page.
.
Navigate between pages in a multimedia message
On the MMS preview screen, tap options
, and do one of
the following actions:
• Tap next page.
• Tap previous page.
Delete a multimedia message from a message folder
1. On the home screen, swipe up.
The main menu appears.
2. Tap messages.
3. Tap a message folder (inbox, sent items, drafts, or outbox).
4. Select a message.
The options menu appears.
5. Tap delete.
You are asked if you want to delete the message.
6. Tap yes.
Delete all multimedia messages from a message folder
1. On the home screen, swipe up.
The main menu appears.
2. Tap messages.
3. Tap a message folder (inbox, sent items, drafts, or outbox).
4. Select a message.
83
Page 84

Multimedia messages (MMS)
The options menu appears.
5. Tap delete all.
You are asked if you want to delete all messages in the
selected folder.
6. Tap yes.
The messages are deleted, and the selected message folder
is empty.
84
Page 85

provider has a different limit.
NOTE: Only those contacts that have an email address
Email messages
Email messages
You can create an email message in several ways:
By tapping new email
By selecting a contact from your contact list
By forwarding an email message from the email inbox, sent
items folder, or outbox
By selecting an email message stored in your drafts email
folder
NOTE: The maximum size of an email message,
including attachments, is 1 MB, unless your service
Send an email message
1. On the home screen, swipe up.
The main menu appears.
2. Tap messages > email > new email.
3. Add recipients to the email message by doing the following
actions:
a. Tap recipients.
The options menu appears.
b. Tap edit, tap options
, and then tap add.
c. Do one of the following actions:
• Tap select contact, select one or more contacts from
your contact list, and then tap OK.
are displayed.
• Tap enter email, write the recipient’s email address,
and then tap save
.
85
Page 86

Email messages
4. Add a subject for your message by doing the following
actions:
a. Tap subject.
The options menu appears.
b. Tap edit, write the subject of the email message, and
then tap save
.
5. (Optional) Select a different email account for sending the
message, by doing the following actions:
NOTE: To set up an email account for your phone, see
Add a new email account. on page 186
a. Tap from.
The options menu appears.
b. Tap edit.
The list of email accounts that are set up in your phone
appears.
c. Select the email account that you want to use.
A message confirms that the email message will be sent
from the selected account, and the email account name
(the name that you assigned to this email profile)
appears in the from box on the new email screen.
6. Write the email text by doing the following actions:
a. Tap text.
The options menu appears.
b. Tap edit, and write the email text.
If the add signature option is set to on and you already
created a signature in your phone, the signature will be
added to the end of your email text.
NOTE: To save a signature and set the add signature
option to on, see Change your email settings on page
185.
86
Page 87

NOTE
size is displayed in the attachments box.
c. Tap save .
7. (Optional) Add an attachment to the email message by
Email messages
doing the following actions:
: The number of attached files and their total
a. Tap attachment.
The options menu appears.
b. Tap edit, tap options
, and tap add.
c. Locate the folder with the file that you want to attach to
the message.
d. Select the file that you want to attach.
The file is attached to the message, and the
attachments screen appears.
8. (Optional) Add a priority indicator to your email message by
doing the following actions:
a. On the new email screen, tap any item.
The options menu appears.
b. Tap priority, and then tap high, normal (the default
setting), or low.
The priority is changed, and the new email screen
appears.
9. Send the email message by doing the following actions:
a. On the new email screen, tap any item.
The options menu appears.
NOTE: If your email message has no recipients, the
send option is not shown.
b. Tap send.
87
Page 88

Email messages
The email message is sent, and a copy is saved in the
sent items folder if the save sent email option is set to
on.
Note:
NOTE: To set the save sent email option to on, see
Change your email settings on page 185.
» To add recipients to an email message:
1. On the new email screen, tap recipients.
The options menu appears.
2. Tap edit.
The recipient list screen appears.
3. Select any recipient.
The options menu appears.
4. Tap add, and do one of the following actions:
• Tap select contact, select one or more contacts from
your contact list, and then tap OK.
• Tap enter email, write the email address, and then tap
.
save
» To change an email recipient’s email address:
1. On the new email screen, tap recipients.
The options menu appears.
2. Tap edit.
The recipient list screen appears.
3. Select a recipient.
The options menu appears.
4. Tap edit.
5. Write the new email address, and tap save
.
88
Page 89

Email messages
» To delete a recipient from an email message:
1. On the new email screen, tap recipients.
The options menu appears.
2. Tap edit.
The recipient list screen appears.
3. Select a recipient.
The options menu appears.
4. Tap delete.
You are asked if you want to delete the recipient.
5. Tap yes.
» To move a recipient from the to line to the cc or bcc line of
an email message:
1. On the new email screen, tap recipients.
The options menu appears.
2. Tap edit.
The recipient list screen appears.
3. Select a recipient.
The options menu appears.
4. Tap change to/cc/bcc.
5. Do one of the following actions:
• Tap cc if you want this recipient’s name to be visible to
other recipients of the message.
• Tap bcc if you do not want other recipients of the
message to see this recipient’s name.
» To view an attachment of an email message:
1. On the new email screen, tap attachment.
The options menu appears.
2. Tap edit.
89
Page 90

Email messages
The attachments screen appears.
3. Select the file that you want to view.
The options menu appears.
4. Tap view.
The attachment appears or plays.
5. Tap the Back key
to return to the attachments list
screen.
» To add another attachment to an email message:
1. On the new email screen, tap attachment.
The options menu appears.
2. Tap edit.
The attachments screen appears.
3. Select a file from the attachments list.
The options menu appears.
4. Tap add.
5. Locate the folder with the file that you want to attach to
the message.
6. Select the file that you want to attach.
» To delete an attachment from an email message:
1. On the new email screen, tap attachment.
The options menu appears.
2. Tap edit.
3. Select a file from the attachments list.
The options menu appears.
4. Tap delete.
You are asked if you want to delete the attachment.
5. Tap yes.
90
Page 91

Email messages
Send an email message from your contact list
1. On the home screen, swipe up.
The main menu appears.
2. Tap contacts.
3. Select the contact that you want to send an email to.
The options menu appears.
4. Tap send email.
The new email screen appears, with the selected contact as
a recipient.
5. Write your email message, and send it. For more
information, see Send an email message on page 85.
Save or retrieve a draft version of an email message
» To save a draft version of an email message:
1. On the new email screen, tap any item.
The options menu appears.
2. Tap save to drafts.
You are asked if you want to save the message to the drafts
folder.
3. Tap yes.
» To retrieve and send a draft email message:
1. On the home screen, swipe up.
The main menu appears.
2. Tap messages > email > drafts.
3. Select the draft message that you want to retrieve.
The options menu appears.
4. Do any of the following actions with the draft message:
• Tap edit, and edit and send the message.
91
Page 92

Email messages
NOTE
Change your email settings on page 185.
drafts folder, it is saved as a new draft email message.
: If you save this email message again in the
drafts folder, the edited version replaces the original
draft version.
• Tap send.
The email message is sent, and a copy is saved in the
sent items folder if the save sent email option is set to
on.
NOTE: To set the save sent email option to on, see
• Tap forward, edit the message and add recipients if you
want, and then send the message.
NOTE: If you save this email message again in the
Receive an email message
In the email folders, the following icons are used:
The
The
The
The
New incoming email messages are stored in the email inbox.
You can receive up to 50 email messages. When you reach that
limit, no new email messages can come in until you delete
messages.
icon appears next to each email message.
icon appears next to each email message with one
or more attachments.
icon indicates an unread email message.
icon indicates an unread email message with one or
more attachments.
92
Page 93

The number of messages in each email folder is displayed next
to the folder name. In addition, the inbox has the number of
new messages displayed.
Your phone can be set to periodically check for new email
messages. This interval can be set by you from the values
available in the email account settings. You can also set this
feature to off, and the phone will only check for new email
messages when you request it. For more information on setting
auto check, see Make changes to an email account on page
188.
You can limit the size of your incoming email messages or
receive just the email sender and subject line. For more
information, see Change your general email settings on page
185.
Email messages
» To receive an email message:
1. On the home screen, swipe up.
The main menu appears.
2. Tap messages > email.
3. If the auto check interval option in the email account
profile is set to off, or you want to retrieve email messages
immediately, without waiting for the phone to check
automatically, tap retrieve emails from server.
4. Tap inbox.
5. If the download option is set to only headers, do the
following actions:
a. Select an email message.
The options menu appears.
b. Tap view.
93
Page 94

Email messages
You are asked if you want to download this email
message.
c. Tap yes.
The email viewer opens, displaying the text and the
sender’s email address.
6. If the download option is set to receive the complete email
including text and attachments, do the following actions:
a. Select an email message.
The options menu appears.
b. Tap view.
The email viewer screen opens, displaying the text and
the sender’s email address.
View and save an email attachment
1. On the email viewer screen, tap options
.
2. Tap attachment.
3. Select the attachment that you want to view or save.
The options menu appears.
4. To view or listen to the attachment, tap view.
5. To save the attachment, tap save.
If an attachment with this name already exists in the media
folder, you are asked if you want to overwrite the existing
file.
6. Tap yes.
The attachment is saved to the media folder.
Save the contact information of recipients of an email message
1. On the email viewer screen, tap options
.
2. Tap attachment.
94
Page 95

3. Select the recipient whose contact information you want to
save.
The options menu appears.
4. Do one of the following actions:
Email messages
• Add a recipient to your contacts by tapping assign to
contact.
• Update the contact information of a recipient by
tapping update contact.
Reply to the sender of an email message
» To reply to the sender of an email message from the email
viewer screen:
1. On the email viewer screen, tap options
2. Tap reply.
The new email screen appears, with the sender of the
original message in the recipient box. All other parts of the
message have the same information as the original email
message.
3. Create and send your reply. For more information, see Send
an email message on page 85.
.
» To reply to the sender of an email message from the home
screen:
1. On the home screen, swipe up.
The main menu appears.
2. Tap messages > email.
3. Select the folder that contains the email message that you
want to reply to.
4. Select the desired email message.
95
Page 96

Email messages
The options menu appears.
5. Tap reply.
The new email screen appears, with the sender of the
original message in the recipient box. All other parts of the
message have the same information as the original email
message.
6. Write and send your reply. For more information, see Send
an email message on page 85.
Reply to the sender and all recipients of an email message
» To reply to the sender and all recipients of an email
message from the email viewer screen:
1. On the email viewer screen, tap options
.
2. Tap reply all.
The new email screen appears. Your reply will be addressed
to the sender of the email message and all other recipients
of the message. All other parts of the message have the
same information as the original email message.
3. Write and send your reply. For more information, see Send
an email message on page 85.
» To reply to the sender and all recipients of an email
message from the home screen:
1. On the home screen, swipe up.
The main menu appears.
2. Tap messages > email.
3. Select the folder that contains the email message that you
want to reply to.
4. Select the desired email message.
The options menu appears.
96
Page 97

Email messages
5. Tap reply all.
The new email screen appears. Your reply will be addressed
to the sender of the email message and all other recipients
of the message. All other parts of the message have the
same information as the original email message.
6. Write and send your reply. For more information, see Send
an email message on page 85.
Forward an email message
» To forward an email message from the email viewer
screen:
1. On the email viewer screen, tap options
.
2. Tap forward.
The new email screen appears. The recipient box is empty.
All other parts have the same information as the original
email message.
3. Write and send the email message. For more information,
see Send an email message on page 85.
» To forward an email message from the home screen:
1. On the home screen, swipe up.
The main menu appears.
2. Tap messages > email.
3. Select the folder that contains the email message that you
want to forward.
4. Select the desired email message.
The options menu appears.
5. Tap forward.
97
Page 98

Email messages
The new email screen appears. The recipient box is empty.
All other parts have the same information as the original
email message.
6. Write and send the email message. For more information,
see Send an email message on page 85.
Delete an email message
» To delete an email message from the email viewer screen:
1. On the email viewer screen, tap options
2. Tap delete.
You are asked if you want to delete the email message.
3. Tap yes.
.
» To delete an email message from the home screen:
1. On the home screen, swipe up.
The main menu appears.
2. Tap email.
3. Tap the email folder that contains the message that you
want to delete (inbox, outbox, sent items, or drafts).
4. Select the email message that you want to delete.
The options menu appears.
5. Tap delete.
You are asked if you want to delete the message.
6. Tap yes.
Delete all email messages from an email folder
1. On the home screen, swipe up.
The main menu appears.
2. Tap email.
3. Tap an email folder (inbox, outbox, sent items, or drafts).
98
Page 99

4. Select any email message.
The options menu appears.
5. Tap delete all.
You are asked if you want to delete all messages in the
selected folder.
6. Tap yes.
Email messages
99
Page 100

Music Player
Music Player
Add music to your modu™ T phone
You can add music to your modu T phone by using it as a USB
mass storage device, or by using modu™ PC Suite.
After you add music to your modu T phone, your list of music is
updated or refreshed automatically when you tap music from
the main menu.
» To add music to your modu T phone via the USB cable:
1. Connect the micro USB connector on your USB data cable
to the micro USB port on your modu T phone, and then
connect the other end of the cable to your computer.
2. Tap pc connection.
A window appears displaying a few options for viewing your
modu T phone on your computer.
3. Select the option to view your modu T phone files and
folders.
4. On your computer, copy the music files to the Music folder
on your modu T phone drive.
» To add music to your modu T phone using modu™ PC Suite:
See the modu™ PC Suite help.
Play a song
1. On the home screen, swipe up.
The main menu appears.
2. Tap music.
3. Use one of the following methods to play a song or songs:
• Tap play all.
100
 Loading...