

8-504.6
5H101548A2
February, 2014
INSTALLATION AND SERVICE MANUAL
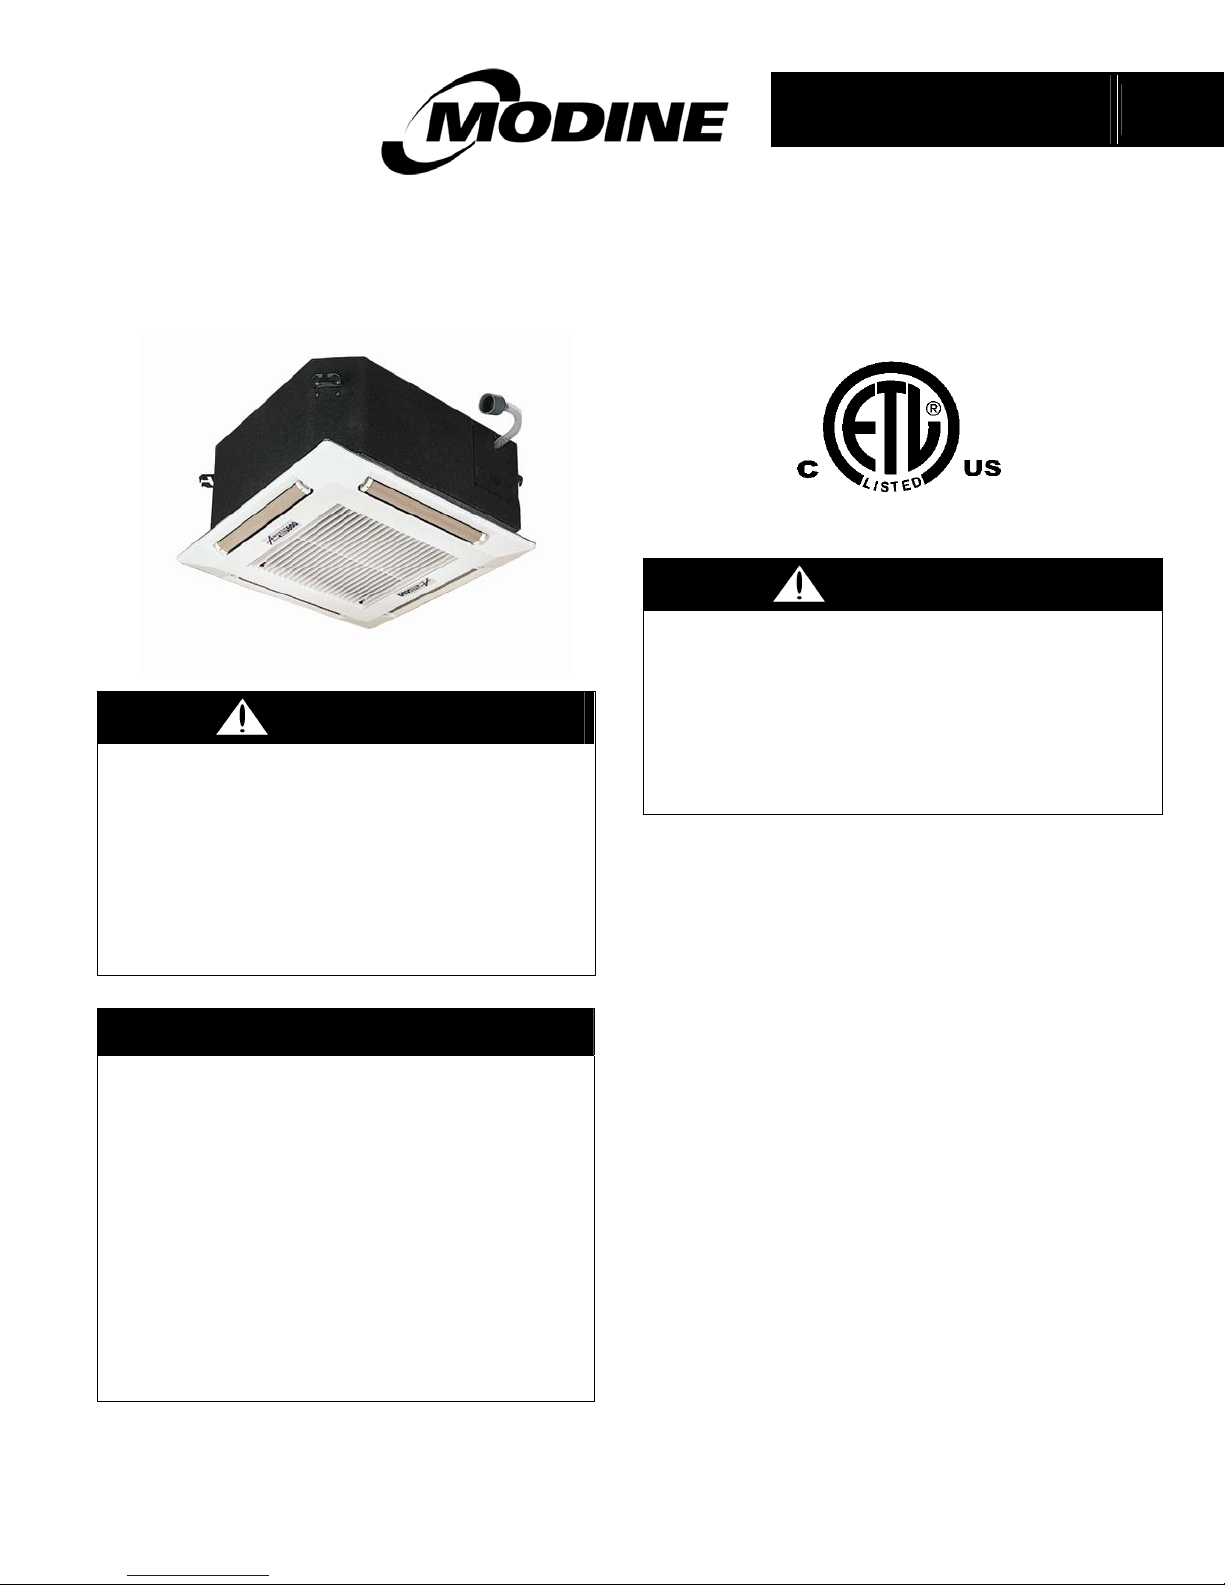
The SLIMLINE PERFORMER Ceiling Cassette
Models SSD, SSH and SCW
WARNING
Improper installation, adjustment, alteration, service
or maintenance can cause property damage, injury or
death, and could cause exposure to substances
which have been determined by various state
agencies to cause cancer, birth defects or other
reproductive harm. Read the installation, operating
and maintenance instructions thoroughly before
installing or servicing this equipment.
IMPORTANT
1. The use of this manual is specifically
intended for a qualified installation and
service agency. A qualified installation and
service agency must perform all installation
and service of these appliances.
2. SSD and SSH units contain the refrigerant
R-410A. Review the R-410A Material Safety
Data Sheet (MSDS) for hazards and first aid
measures.
3. Refrigerant charging should only be carried
out by an EPA-certified air conditioning
contractor.
This unit contains R-410A high pressure refrigerant.
Hazards exist that could result in personal injury or
death. Installation, maintenance, and service must only
be performed by an HVAC technician qualified in R410A refrigerant and using proper tools and equipment.
Due to much higher pressure of R-410A refrigerant, DO
NOT USE service equipment or tools designed for
refrigerants other than R410A.
WARNING
Inspection upon Arrival
1. Inspect unit upon arrival. In case of damage, report
immediately to transportation company and your local
factory sales representative.
2. Check serial plate on unit to verify that the power supply
meets available electric power at the point of installation.
3. Inspect unit received for conformance with description of
product ordered (including specifications where
applicable).
Please be sure to leave it with the owner when you leave the job.
This manual is the property of the owner.
SPECIAL PRECAUTIONS
SPECIAL PRECAUTIONS
THE INSTALLATION AND MAINTENANCE INSTRUCTIONS IN
THIS MANUAL MUST BE FOLLOWED TO PROVIDE SAFE,
EFFICIENT, AND TROUBLE-FREE OPERATION. IN ADDITION,
PARTICULAR CARE MUST BE EXERCISED REGARDING THE
SPECIAL PRECAUTIONS LISTED BELOW. FAILURE TO
PROPERLY ADDRESS THESE CRITICAL AREAS COULD
RESULT IN PROPERY DAMAGE OR LOSS, PERSONAL INJURY,
OR DEATH. THESE INSTRUCTIONS ARE SUBJECT TO ANY
MORE RESTRICTIVE LOCAL OR NATIONAL CODES.
HAZARD INTENSITY LEVELS
1. DANGER: Indicates an imminently hazardous situation which,
if not avoided, WILL result in death or serious injury.
WARNING: Indicates a potentially hazardous situation which,
2.
if not avoided, COULD result in death or serious injury.
CAUTION: Indicates a potentially hazardous situation which, if
3.
not avoided, MAY result in minor or moderate injury.
IMPORTANT: Indicates a situation which, if not avoided, MAY
4.
result in a potential safety concern.
DANGER
Appliances must not be installed where they may be
exposed to potentially explosive or flammable atmosphere.
WARNING
1. Disconnect power supply before making wiring
connections to prevent electrical shock and equipment
damage.
2. All appliances must be wired strictly in accordance with
the wiring diagram furnished with the appliance. Any
wiring different from the wiring diagram could result in a
hazard to persons and property.
3. Any original factory wiring that requires replacement
must be replaced with wiring material having a
temperature rating of at least 105°C.
4. Ensure that the supply voltage to the appliance, as
indicated on the serial plate, is not 5% greater than
rated voltage.
5. When servicing or repairing of this equipment, use only
factory-approved service replacement parts. A
complete replacement parts list may be obtained by
contacting Modine Manufacturing Company. Refer to
the rating plate on the appliance for complete appliance
model number, serial number and company address.
Any substitution of parts or controls not approved by the
factory will be at the owner’s risk.
CAUTION
1. SSD and SSH units contain the refrigerant R-410A.
Review the R-410A Material Safety Data Sheet
(MSDS) for hazards and first aid measures.
2. Refrigerant charging should only be carried out by an
EPA-certified air conditioning contractor.
2
8-504.6
CAUTION
1. Ensure that the supply voltage to the appliance, as
indicated on the serial plate, is not 5% less than the
rated voltage.
2. Units not approved for use in potable water systems.
3. Hot water supplied to the hot water heating option
must not exceed 200ºF temperature or 125 PSIG
pressure.
4. Do not overcharge the refrigeration system. This can
lead to elevated compressor discharge pressure and
possibly flooding to the compressor with liquid.
5. Do not attempt to reuse any mechanical or electrical
component which has been wet. Such component
must be replaced.
IMPORTANT
1. Make sure the ceiling grid is supported separately
from the appliance. The ceiling must not be
supported by any part of the appliance, fascia or
any associated wiring or pipe work.
2. Start-up and adjustment procedures should be
performed by a qualified service agency.
3. All refrigeration checks must be made by a qualified
R-410A refrigeration technician.
4. Do not release refrigerant to the atmosphere. When
adding or removing refrigerant, all national,
state/province and local laws must be followed
5. To check most of the Possible Remedies in the
troubleshooting guide listed in Tables 23.1 through
26.1, refer to the applicable sections of the manual.
Table of Contents
Inspection on Arrival
Special Precautions
Hazard Intensity Levels
SI (Metric) Conversion Factors
Unit Location
Installation
Start-Up Procedure
Start-Up Sheet - Example
Dimensions
Technical Data: SSD and SSH
Technical Data: Condensers for SSD Units
Technical Data: Condensers for SSH Units
Technical Data: SCW Units
Electrical Data – Ceiling Cassettes
Exploded Unit Drawing & Parts List: SCW 08 & 12
Exploded Unit Drawing & Parts List:
SSD/SSH/SCW 18 - 42
Maintenance – Indoor Unit
Troubleshooting – Indoor Unit
Replacement Parts
Model Nomenclature
Serial Plate Example
10-14
23-26
1
2
2
3
3-4
4-7
7-8
9
15
16
17
18
19
20
21
22
26
26
26
UNIT LOCATION
x
Table 3.1
SI (Metric) Conversion Factors
To Convert Multiply By To Obtain To Convert Multiply
“W.C. 0.249 kPa feet 0.305 m
ºF (ºF-32) x 5/9 ºC Gal/hr 0.00379 m³/hr
BTU 1.06 kJ Gal/hr 3.79 l/hr
BTU/ft3 37.3 kJ/m³ gallons 3.79 l
BTU/hr 0.000293 kW Horsepower 746 W
CFH (ft3/hr) 0.000472 m³/min inches 25.4 mm
CFH (ft3/hr) 0.00000787 m³/s pound 0.454 kg
CFM (ft3/min) 0.0283 m³/min psig 6.89 kPa
CFM (ft3/min) 0.000472 m³/s psig 27.7 “W.C.
By
To Obtain
UNIT LOCATION
DANGER
Appliances must not be installed where they may be
exposed to potentially explosive or flammable
atmosphere.
Unpacking
Remove the banding straps and lift the cardboard lid.
Remove the fascia, packed in bubble wrap, and polystyrene
packing pieces to expose the unit.
When removing the unit chassis from the box, the four
corner brackets should be utilized for lifting. In order to
protect the fascia from dirt and damage, it should be
returned to the box until it is ready to be installed.
Blank Off Pieces
When branch ducting is to be used, polystyrene pieces for
blanking off fascia openings are included with the fascia
packing. Up to two opposing sides may be blanked off. See
Installation – Duct Collars.
Positioning
Before any installation work commences, the condensing
unit location (where applicable), pipe work sizes and routes
should be designed in accordance with good refrigeration
practice.
The unit installation position should be selected with the
following points in mind:
1. The appliance must be installed on a structure that is
suitable to support the total weight of the appliance,
piping, refrigerant and condensate.
2. Piping, electrical panel and condensate pump access
panel should be readily accessible for maintenance
purposes. A clearance of 2 feet is recommended
around the electrical panel and condensate pump
access panel.
3. The unit should not be positioned less than 5 ft. from a
wall or similar obstruction, or in a position where the
discharge air could blow directly on to the thermostat.
4. The unit should not be positioned directly above any
obstructions.
5. The unit must be installed square and level.
6. The condensate drain should have sufficient downward
slope (1” in 100”) in any horizontal run between unit and
drain. Maximum condensate pump lift is 30”.
7. There should be sufficient room above the false ceiling
for installing the unit. Minimum distance as shown in
Figure 3.1 and Table 3.2.
8. In case of high humidity, clogged or damaged
condensate piping, incorrect installation or faulty
condensate pump, water may drip from the unit. Do not
install the appliance where dripping water can cause
damage.
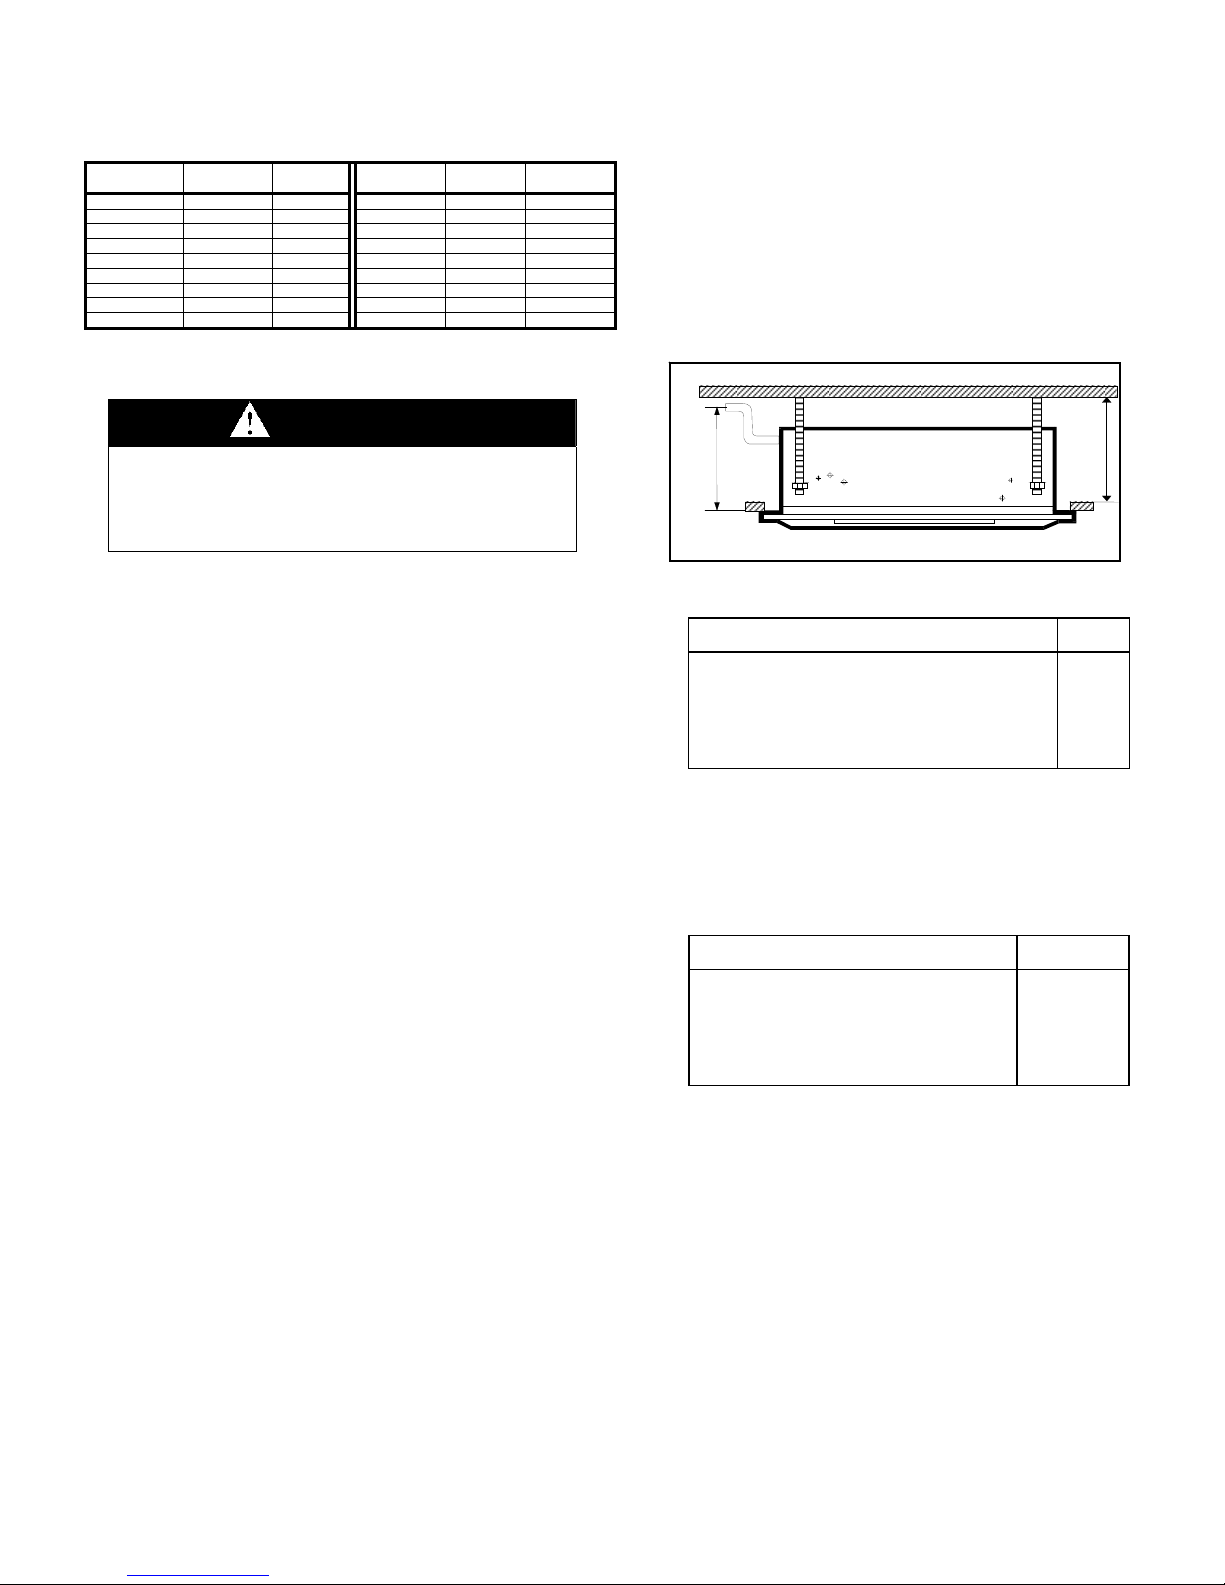
Figure 3.1
Minimum Distance to Ceiling
30”
ma
A
Table 3.2
Minimum Distance to Ceiling
Models A
SCW 08 & 12 12¾”
SCW 18 & 20 11½”
SCW 33, 36 & SSD/SSH 18 - 42 13½”
Ceiling Opening Sizes
An opening in the false ceiling will then have to be cut to the
size shown in Table 3.3.
Table 3.3
Ceiling Opening Sizes
Models L x W
SCW 0/8 & 12 23” x 23”
SSD/SSH/SCW 18, 20 & 24 34” x 34”
SSD/SSH/SCW 30, 33, 36 & 42 46” x 34”
3
8-504.6

UNIT LOCATION/INSTALLATION
A
A cardboard template for ceiling cut-out and rod positions is
included with the unit.
Positioning Electro-Mechanical Thermostat
In addition to positioning the unit correctly, it is very
important to locate the wall mounted thermostat in the
optimum position to ensure good temperature control.
Therefore the installation should be selected with the
following points in mind:
1. Position the thermostat approximately 48 inches above
floor level.
2. Do not position thermostat where it can be di rectly
affected by the unit’s discharge air stream.
3. Avoid external walls and drafts from windows and doors.
4. Avoid positioning near shelves and curtains as these
restrict air movement.
5. Avoid heat sources e.g. direct sunlight, heaters, dimmer
switches and other electrical devices.
INSTALLATION
IMPORTANT
Make sure the ceiling grid is supported separately from
the appliance. The ceiling must not be supported by any
part of the appliance, fascia or any associated wiring or
pipe work.
Hanger Bolts
The hanger bolts can now be installed (use 3/8” all thread
rod) at the centers shown in Figure 4.1 and Table 4.1.
Figure 4.1
Hanger Bolt Mounting Dimensions
B
Installation Guide
An installation guide is included in the Airedale Owner
Information packet provided with the unit. Prepare the
installation guide by folding the flat metal piece, by hand,
along the perforations as shown in Figure 4.2.
Figure 4.2
Installation Guide Setup
FOLD SIDE BACK
FOLD TAB UP
The unit can now be lifted onto the hanging rods and levele d
at the correct distance from the ceiling with the aid of the
installation guide.
1. Hold the tab on the installation guide against the bottom
of the cassette case with the guide pointing away from
the cassette. See Figure 4.3.
2. Adjust the height of the cassette until the guide is level
with the bottom of the false ceiling.
Figure 4.3
Installation Guide Position
Table 4.1
Hanger Bolt Mounting Dimensions
Models A B
SCW 08 & 12 19½” 23”
SSD/SSH/SCW 18, 20 & 24 28½” 31½”
SSD/SSH/SCW 30, 33, 36 & 42 28½” 43½””
Check the strength of the unit mounting hanger bolts. Refer
to Tables 15.1 and 18.1 for unit weights.
4
OUTER CASE
INSULATION
A
CASSETTE CASE
TAB
FALSE CEILING
GUIDE IN POSITION
INNER CASE
INS U L A T IO N
3. Secure the unit in position with locknuts and washers on
both sides of the unit bracket. Ensure the threaded rod
does not protrude more than 2” below the mounting
bracket as shown in Figure 5.1.
8-504.6

INSTALLATION
Figure 5.1
Threaded Rod Dimension
3/8”
Threaded Rod < 2”
Condensate Piping
The unit is supplied with a 3/8" ID flexible hose for
connection to copper or plastic drain piping.
When installing the unit the following points should be
remembered:
1. Maximum pump lift is 30”.
2. The highest point in the condensate piping should be as
close to the unit as possible. See Figure 5.2.
Figure 5.2
Condensate Piping
INCORRECT CORRECT
3. Condensate piping should sl ope downwards in the
direction of water flow with a minimum gradient of 1” in
100”. There must not be any uphill gradients other than
in the first 30” of piping from the unit.
4. When multiple units are connected to a comm on
condensate drain, ensure the drain is large enough to
cope with the volume of condensate from all units. It is
also recommended to have an air vent in the condensate
piping to prevent any air locks.
5. Condensate piping must not be installe d where it may be
exposed to freezing temperatures.
Duct Collars
Branch duct and fresh air duct collars can be attached to the
unit chassis by following the steps below:
1. Up to 2 branch ducts can be attached per unit.
2. Refer to the relevant dimensional drawing on pages 10 to
14 to become familiarized with knock-out hole locations.
3. The insulation is pre-cut to aid location and removal of
the relevant section. Rub hand across surface of
insulation to reveal exact location of knock-out.
4. Remove the metal knockout from the chassis.
5. Attach the duct collar to the chassis using self tappin g
screws.
6. Replace washable filter with the pleated filter provided
with fresh air duct collar kit.
Note: See Figures 10.1, 11.1, 12.1, 13.1 and 14.1 for
Branch Duct and Fresh Air Duct locations and dimensions.
Piping Installation – SSD and SSH Units
CAUTION
1. SSD and SSH units contain the refrigerant R-410A.
Review the R-410A Material Safety Data Sheet
(MSDS) for hazards and first aid measures.
2. Refrigerant charging should only be carried out by an
EPA-certified air conditioning contractor.
Note: R-410A refrigerant is the only approved refrigerant for
this system.
The unit should be piped up in accordance with good
refrigeration and/or plumbing practices.
The outdoor condensing unit must be connected to the
indoor unit coil using field supplied refrigerant grade (AC R)
copper tubing that is internally clean and dry. Units should
be installed only with the tubing sizes for the approved
system combination as specified in Tables 16.1 and 17.1.
Condensing units are factory charged with refrigerant for a
matching indoor coil plus 15 feet of field supplied lines.
See the installation and maintenance manual provided with
the condensing unit for installation, evacuation and system
charge information.
Piping Installation – Hot/Chilled Water Coils
1. Branch p iping to and from the unit should include s wing
joints to allow for expansion and contraction of the
piping without placing a strain on the unit coil.
2. Install pipe unions and shut-off valves in lines to and
from each coil to allow maintenance or replacement of
unit without shutting down and draining entire system.
See Figure 6.1.
3. Include a circuit setter in return line for water flow
regulation.
4. A drain valve (hose bib) should also be provided for
each coil line to allow removal of water from the coil if
located in an area subject to freezing.
5. It is advisable to use a pipe line strainer before each
coil.
6. Provide adequate pipe hangers, supports, or anchors to
secure the piping system independently of the unit.
5
8-504.6
INSTALLATION
Figure 6.1
Hot/Chilled Water Coil Piping Installation
Piping Insulation
Refrigerant, chilled water and condensate pipes should be
insulated right up to the unit chassis to prevent condensation
which can damage the ceiling and objects located below the
piping. Chilled water valves must also be insulated to
prevent sweating.
Wiring
WARNING
1. Disconnect power supply before making wiring
connections to prevent electrical shock and
equipment damage.
2. All appliances must be wired strictly in accordance
with the wiring diagram furnished with the appliance.
Any wiring different from the wiring diagram could
result in a hazard to persons and property.
3. Any original factory wiring that requires replacement
must be replaced with wiring material having a
temperature rating of at least 105°C.
4. Ensure that the supply voltage to the appliance, as
indicated on the serial plate, is not 5% greater than
rated voltage.
This equipment in its standard form is designed for an
electrical supply of 208-230V, 1Ph, 60Hz. When connection
to a 115V, 1Ph, 60Hz supply is necessary, a factory
mounted step up transformer must be fitted to the unit.
Any damage to or failure of units caused by incorrect wiring
of the units is not covered by warranty.
Once the refrigeration pipe work is complete, the electrical
supply can be connected by routing the cable through the
appropriate casing hole and connecting the supply and
ground cables to the unit’s power terminals. A plastic sleeve
is provided inside the control panel. Low voltage control
wiring must run through the plastic sleeve on the inside of
the control panel.
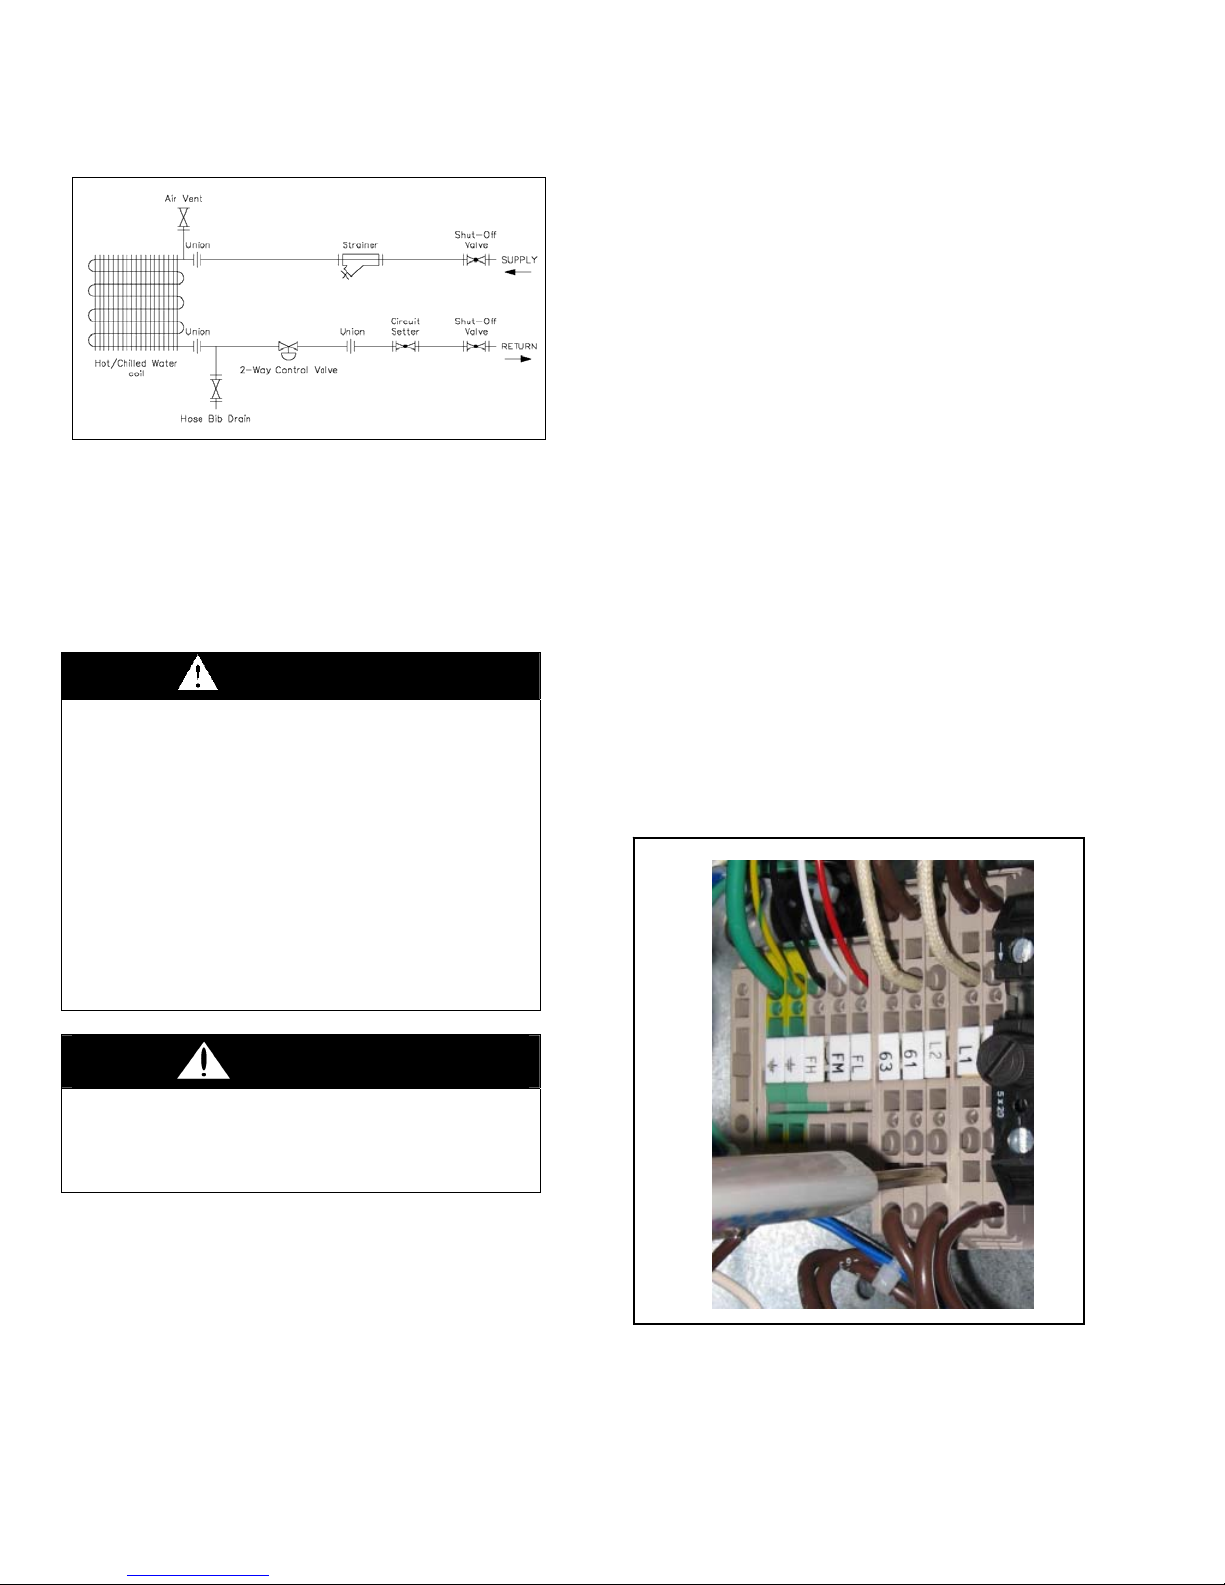
Terminal Strip Connections
The terminal strip connections are designed to clamp down
on the wires. To properly connect the wires to the terminal
strip:
1. Push a small flat head screwdriver into the square hole
on the terminal. Press firmly until the screwdriver hits
the back stop and opens the terminal. See Figure 6.2.
2. Remove approximately 3/8” of insulation from the end of
the wire and push the stripped wire into the oval hole in
the terminal.
3. Remove the screwdriver. Pull on the wire to make sure
that it is securely clamped in the terminal.
4. Make sure that the terminal clamp is in contact with bare
wire (insulation removed).
Figure 6.2
Terminal Strip
CAUTION
Ensure that the supply voltage to the appliance, as
indicated on the serial plate, is not 5% less than the rated
voltage.
Installation of wiring must conform with local building codes,
or in the absence of local codes, with the National Electric
Code ANSI/NFPA 70 – Latest Edition. Unit must be
electrically grounded in conformance to this code. In
Canada, wiring must comply with CSA C22.1, Electrical
Code.
Electric wiring must be sized to carry the full load amp draw
of the motor, starter and any controls that are used with the
unit. See Table 19.1 for Electrical Data.
6
Fascia Assembly
Once the services have been connected, the four (4) fascia
mounting bolts can be unscrewed approximately 1” from the
condensate tray support channels.
8-504.6
INSTALLATION/START-UP PROCEDURE
F
The fascia can now be unpacked for fitting to the unit
chassis. Ensure the black fir tree fasteners holding the
fascia polystyrene are pushed in firmly in case of transit
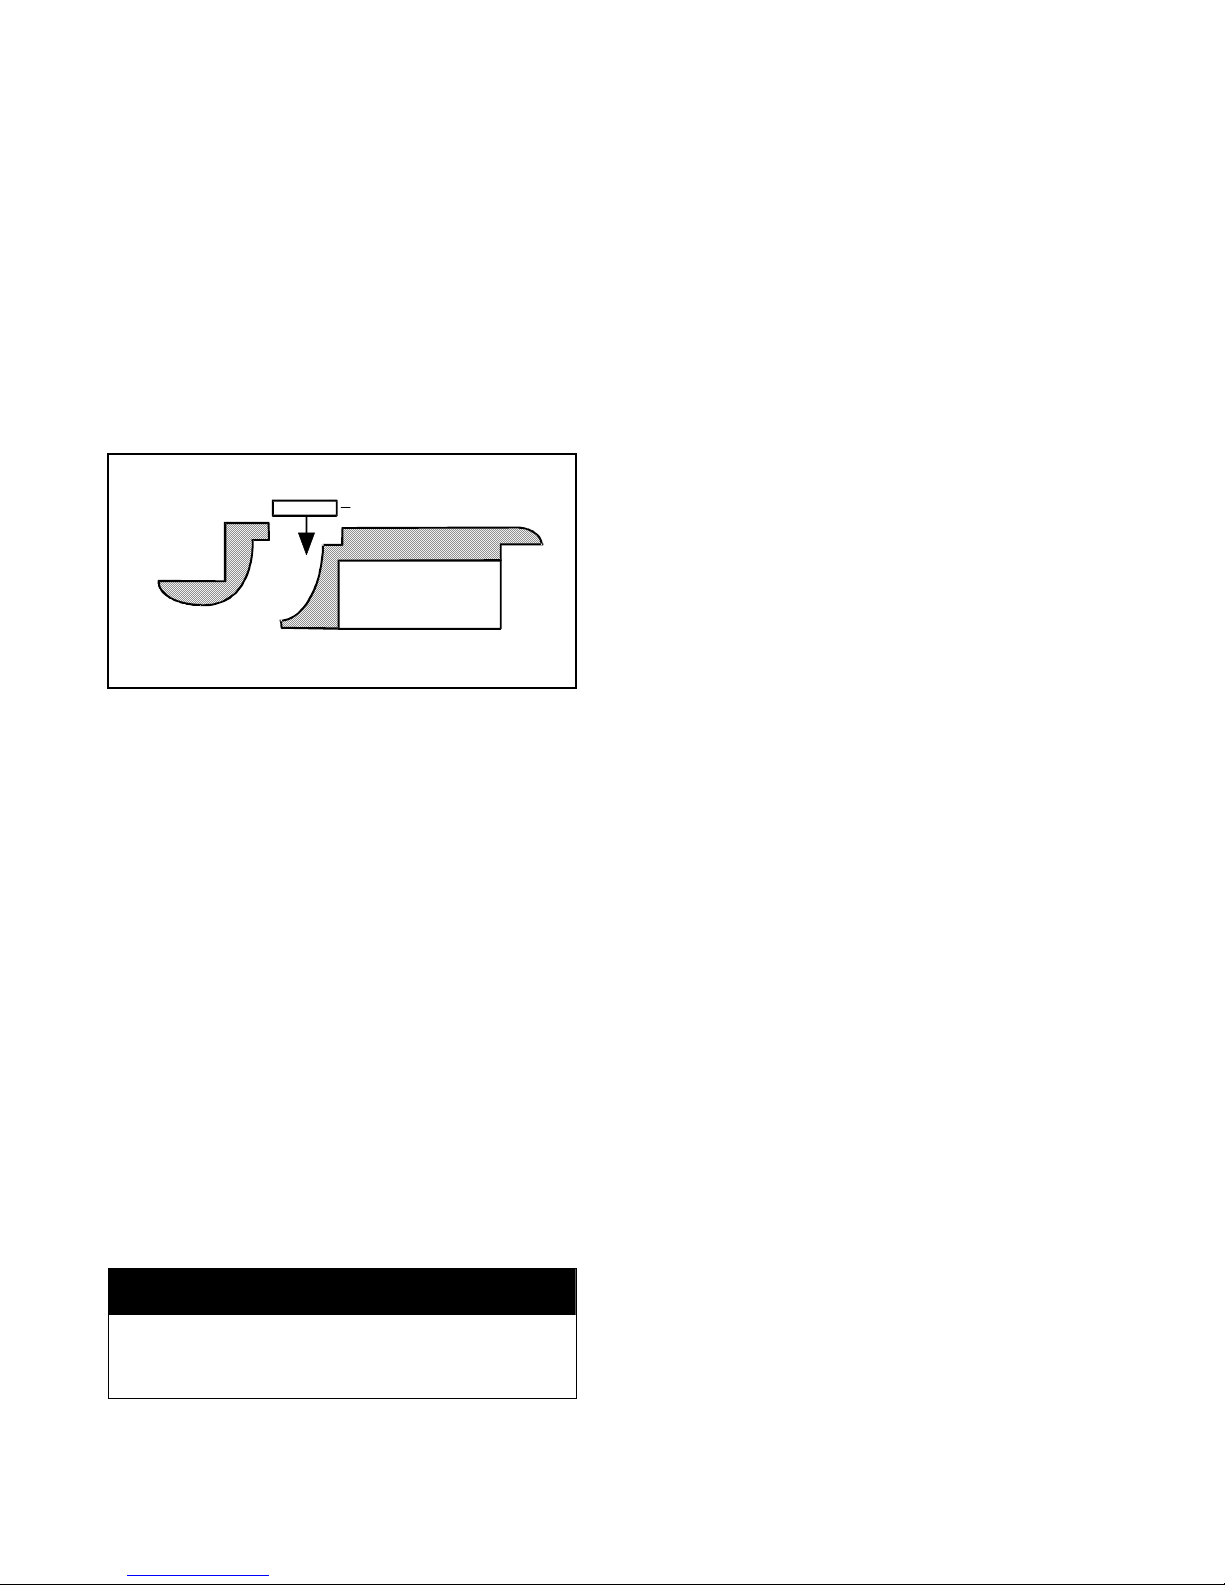
vibration. If a fascia aperture needs blanking off, then take
one of the polystyrene blanking pieces and push it into the
recess in the polystyrene fascia insulation. See Figure 7.1.
Install the fascia by removing the inlet grilles and filters,
locating the four fascia mounting bolts on the chassis
through the four keyhole brackets on the fascia and then
sliding the fascia sideways until it locks into position.
Note: Up to two non-adjacent sides can be blanked off.
Figure 7.1
Fascia Blanking Piece
ascia Blanking Piece
Side view of fascia
Note: Make sure the foam insulating strip profile on the
fascia matches the square and angled corners of the
unit housing.
Before tightening the fascia to the unit, connect the two
halves of the vane motor’s plug and socket connection
(medium and large size units).
On microprocessor controlled units, ensure that the display
panel cable is routed to the electrical panel and securely
fastened to its connector on the microprocessor circuit
board. (Refer to the unit’s electrical wiring schematic). Take
care to ensure that the connector is connected in the proper
orientation and that the wires are not routed such that they
may become trapped, cut, broken or chafed.
The fascia can now be tightened up to the unit chassis until
a good seal is obtained between fascia and chassis.
Note: Do not over tighten the bolts. To do so may cause
damage to the fascia.
With filters in place, the inlet grilles can now be fitted to the
fascia to complete the installation.
START-UP PROCEDURE
IMPORTANT
Start-up and adjustment procedures should be
performed by a qualified service agency.
See start-up sheet example - Figure 9.1
8-504.6
Pre-Start Checks
Once installation is complete it is important that the following
pre-start checks are made:
1. All piping is complete and insulate d where necessary.
2. All fans are able to rotate freely.
3. The unit and interconnecting piping have been
evacuated correctly and the condensing unit service
valves are open (SSD and SSH units only).
4. All electrical connections (both power and control) are
properly terminated.
5. All condensate drains are installed correctly.
6. The power supply is of the correct voltage and
frequency.
7. The units are properly grounded in accordance with
current electrical codes.
8. For microprocessor controlled units, check that the
display panel cable is properly connected to the
microprocessor main circuit board and that the jumper
links are correctly set (refer to unit wiring schematic). If
the links are set incorrectly, remove main power supply
before making any changes.
9. For microprocessor controlled units, check that the
battery on the main circuit board is in place and properly
connected. Check also that the batteries are installed in
infrared/pendant transmitter. When a pendant
transmitter is used, ensure it is properly located on to the
wall mounting bracket.
SSD and SSH Units – Control Circuit Checks
Note: See the installation and maintenance manual
provided with the condensing unit for start-up information.
1. Ensure that the condensing unit start-up procedure has
been carried out, as detailed in the condensing unit
installation and maintenance manual.
2. The compressor should be isolated b y removing the
connection at the Y1 terminal on the indoor unit. Main
power can now be applied to the indoor and outdoor
units. A system electrical check can now be carried out.
3. Switch on the indoor unit via the infrared/pendant
transmitter or wall mounted thermostat and check that
the fan cycles correctly. - Note, in some models there is a
2 minute fan run on time to remove residual heat from
the unit, if the unit is switched off during the heating
mode.
4. On models with microprocessor controls, check that the
High, Medium and Low fan speeds are operating
correctly by changing the fan speed via the transmitter.
5. On medium and large size units, check that the motorized
vane sweep functions correctly by toggling the function on
or off, either via the transmitter (micro units) or via the toggle
switch on the side of the electrical panel (electro-mechanical
units).
6. On micro controlled units, should it be required, check
that the built-in timer function is programmed and
operating correctly. When the timer is activated, the red
LED on the fascia display panel should be lit.
7

START-UP PROCEDURE
7. Check the operation of the condensate pump by pouring
7-8 ounces of water down the pump outlet, switch the
unit on, select cooling mode and the lowest possible
temperature set point then observe the water being
pumped from the unit.
8. Where fitted, check the operation of the hot water valv e
or the electrical heat elements by switching the system to
the heating mode and selecting the highest possible
temperature set point.
9. The compressor signal Y1 (disconnected from the indoor
unit in step 1) can now be re-connected and main power
applied to the system.
Note: The 24V power for the indoor unit control circuit is
supplied from a unit factory-installed transformer. When the
indoor and outdoor units are supplied from separate main
supplies, care must be taken to ensure that the outdoor unit
is isolated whenever the indoor unit power is removed.
Failure to do so may result in freeze ups and other damage
to the unit.
Chilled Water Unit – Control Circuit Checks
A thorough pipe work check and pressure test should be
performed before the unit controls are set up
1. Isolate the unit from the chilled water supply. A system
electrical check can now be carried out.
2. Switch on the indoor unit via the infrared/pendant
transmitter or wall mounted thermostat and check that
the fan cycles correctly. - Note, in some models there is a
2 minute fan run on time to remove residual heat from
the unit, if the unit is switched off during the heating
mode.
3. On models with microprocessor controls, check that the
High, Medium and Low fan speeds are operating
correctly by changing the fan speed via the transmitter.
4. On medium and large size units, check that the motorized
vane sweep functions correctly by toggling the function on
or off, either via the transmitter (micro units) or via the toggle
switch on the side of the electrical panel lid (electromechanical units).
5. On micro controlled units, should it be required, check
that the built-in timer function is programmed and
operating correctly. When the timer is activated, the red
LED on the fascia display panel should be lit.
6. Check the operation of the condensate pump by pouring
7-8 ounces of water down the pump outlet, switch the
unit on, select cooling mode and the lowest possible
temperature set point then observe the water being
pumped from the unit.
7. Check the operation of the chilled water valve by
switching the system to the cooling mode and forcing a
call for cooling.
8. Where fitted, check the operation of the hot water valve
or the electrical heat elements by switching the system to
the heating mode and forcing a call for heat.
9. Allow chilled water to enter the unit and vent air from the
unit by opening the 1/4" air bleed. Re-tighten the bleed
screw once all air has been removed.
10. Repeat steps 1-4 above for all units in the same system.
The units are now ready for the system balance to be
performed.
8
Sequence of Operation
Electro-Mechanical Controls: A 24V signal from the
thermostat to terminal G supplies power the blower motor(s),
condensate pump and vane motor (if equipped). A toggle
switch on the control box can be used to switch the
oscillating vanes on or off. The condensate pump will run
continuously, as long as the blower is energized. A call for
heating, at terminal W, or cooling, at terminal Y, will energize
the water valve actuator and allow water to flow through the
cassette coil. When the call for heating or cooling is satisfied
the valve will close.
If the temperature drops below the set-point of the coil freeze
stat, the water valve with automatically open to circulate
water through the coil.
If the condensate float switch detects a high level of water in
the condensate tray, the switch will open, activate the
condensate pump and disable the heating/cooling signal
until the water level drops down to normal.
Micro-Processor Controls: See the Infra-Red Remote
Controller Installation and Service Manual, 8-507.
8-504.6
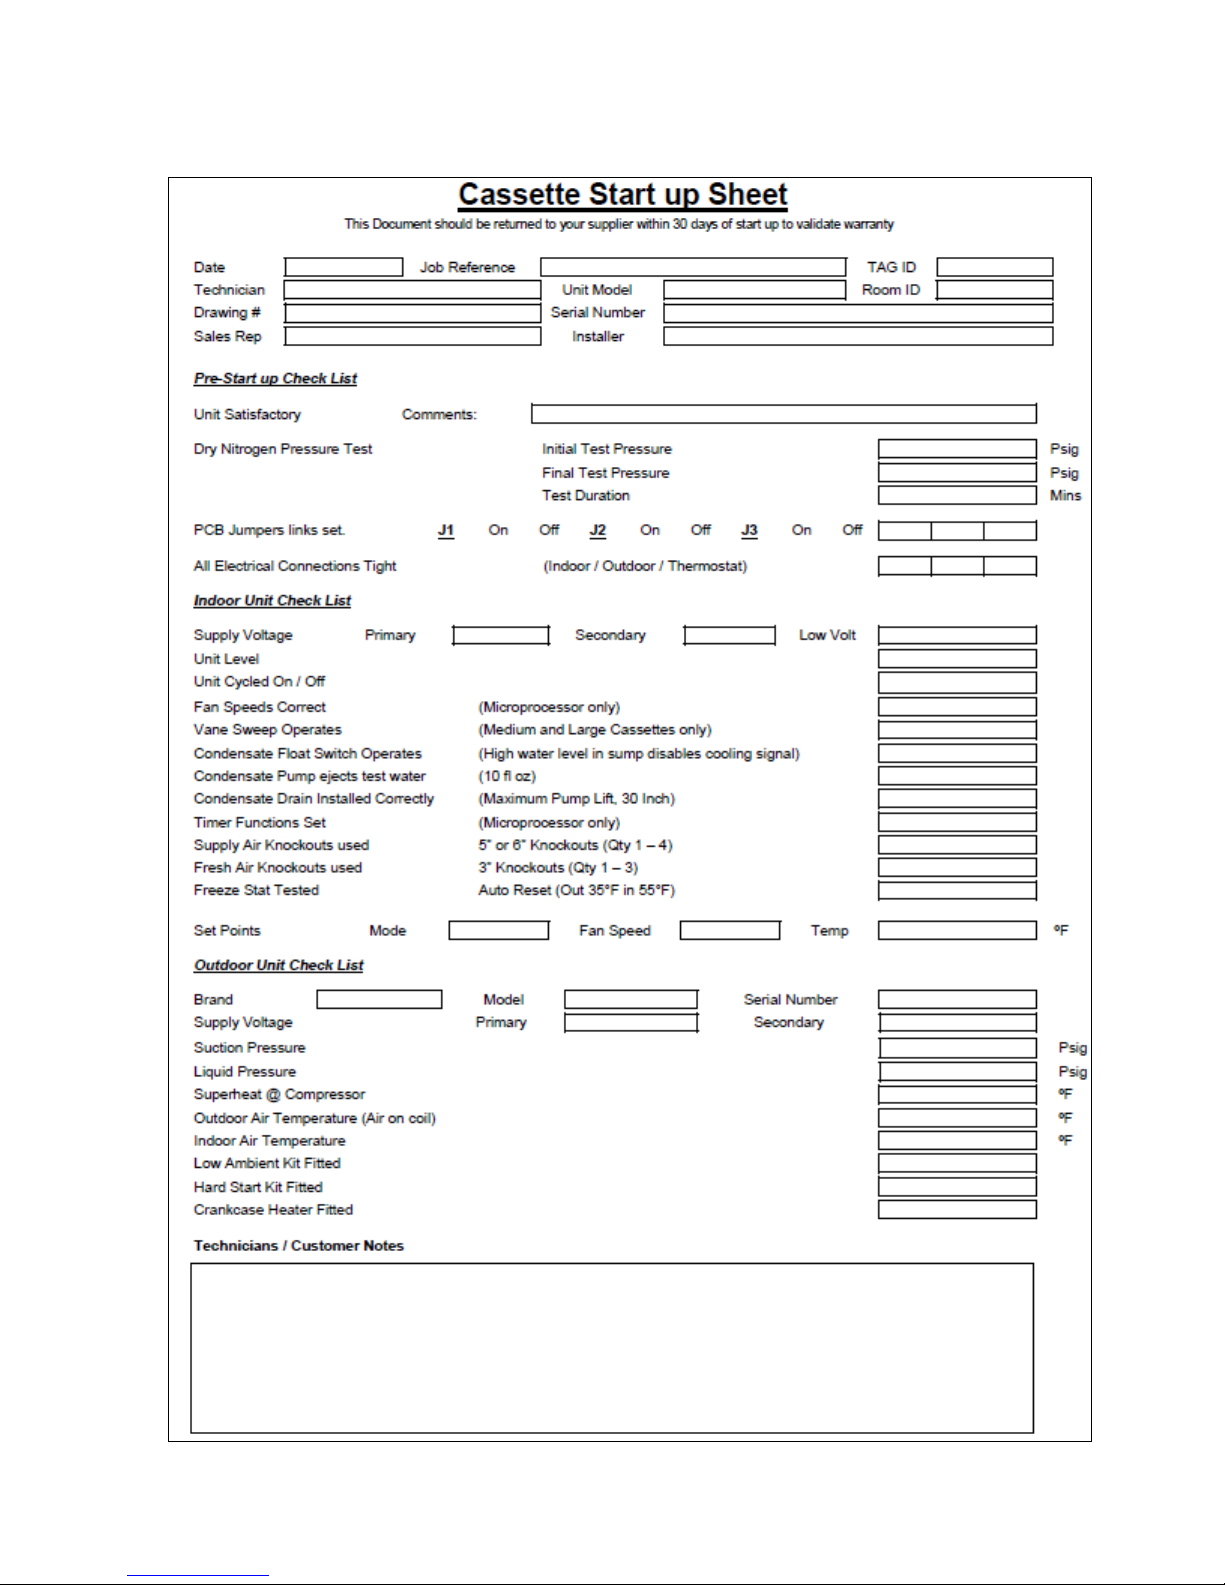
START UP SHEET – EXAMPLE
Figure 9.1
Start Up Sheet – EXAMPLE
9
8-504.6

DIMENSIONS – SMALL CHASSIS
Figure 10.1
Dimensions – Small Chassis: SCW 08 and SCW 12
25 3/16
1 11/16
25 3/16
1. CW Inlet
2. CW Outlet
3. HW Coil Inlet (Optiona l)
4. HW Coil O u tle t (Optional)
5. Branch Duct Opening (x3)
6. Fresh Air Intake (x2)
7. Pump Inspection Port
8. Condensate Drain
9. Control Panel
10. Mounting Bracket
10 11/16
2 3/4
5
5
O
7
8 13/16
5 3/16
11 5/16
4 11/16
3 11/16
8
9
2 5/8
22 1/2
22 15/16
7/8
10
12 9/16
22 1/2
19 9/16
19 1/2
3 3/8
11 1/4
A
6 1/2
5 1/8
3 3/4
A
1 7/16
2 1/16
9 13/16
1 1/8
2 3/4
6
VIEW A-A
3
2 5/8
10
3 5/8
1 2
8-504.6
4

DIMENSIONS – MEDIUM CHASSIS
Figure 11.1
Dimensions – Medium Chassis: SCW 18 and SCW 20
37
37
11/16
32 3/8
28 11/16
1. CW Coil Inlet
2. CW Coil O u tlet
3. HW Coil Inle t (Optiona l)
4. HW Coil O u tlet (Optiona l)
5. Fresh Air Intake (x3)
6. Branch Duct Opening (x4)
7. Pump Inspection Port
8. Condensate Drain
9. Control Panel
10. Mounting Bracket
2 5/8
9 1/2
2 3/4
7 13/16
A
2 3/4
3 1/8
5
A
3 3/16
1 5/16
8 11/16
11 13/16
3
8
9
32 5/16
31 3/8
12 9/16
28 9/16
3
4
4 15/16
2 3/4
VIEW A-A
10
1 13/16
8 5/8
1
6
2 3/4
4 7/8
4 5/8
1 5/8
5 5/16
7 3/4
2
5
5 3/8
6
7
5 3/8
8 13/16
11
8-504.6

DIMENSIONS – LARGE CHASSIS
Figure 12.1
Dimensions – Large Chassis: SCW 33 and SCW 36
49 3/16
2 1/4
37
32 3/8
28 11/16
1. CW Coil Inlet
2. CW Coil Outlet
3. HW Coil Inlet (Optional)
4. HW Coil Outlet (Optional)
5. Fresh Air Intake (x3)
6. Branch Duct Opening (x4)
7. Pump Inspection Port
8. Condensate Drain
9. Control Panel
10. Mounting Bracket
2 5/8
11 1/2
4 3/4
9 13/16
2 3/4
A
3 1/8
5
A
6
19 5/8
43 1/2
6 3/8
8 13/16
3 5/8
3 3/8
8
9
12 7/16
3
7/8
12 9/16
28 9/16 1 7/8
10
7 3/16
1
6
4 5/8
3
1 5/8
2 3/4
2 3/4
4
4 7/8
4 3/4
2
5
2 3/16
7 9/16
9 13/16
7
VIEW A-A
12
8-504.6

DIMENSIONS – MEDIUM CHASSIS
Figure 13.1
Dimensions – Medium Chassis: SSD/SSH 18 and SSD/SSH 24
11/16
37
1. DX Suction Line
2. DX Liquid Line
3. HW Coil Inlet (Optiona l)
4. HW Coil O utlet (Optiona l)
5. Fresh AIr Intak e (x3)
6. Branch Duct Opening (x4)
7. Pump Inspec tion P ort
8. Condensate Drain
9. Control Panel
10. Mountin g B r a c k et
37
2 5/8
11 5/8
4 3/4
32 3/8
A
28 11/16
A
32 5/16
6 1/4
4 3/8
10
12 1/16
3
8
9
31 3/8
3 7/16
4 7/8
2 3/4
10
12 9/16
1 7/828 9/16
1 5/8
4 1/16
5 1/16
6
7
6 5/16
8 13/16
5 3/4
9 13/16
1
2
4
2 3/4
3
3 1/8
5
VIEW A-A
2 3/4
2 3/4
8-504.6
9 13/16
5
4 7/8
13

DIMENSIONS – LARGE CHASSIS
Figure 14.1
Dimensions – Large Chassis: SSD/SSH 30, SSD/SSH 36 and SSD/SSH 42
1 1/8
49 3/16
37
1. DX Suction Line
2. DX Liquid Line
3. HW Coil Inle t (Optional)
4. HW Coil Outlet (Optional)
5. Fres h AIr Intak e (x 3 )
6. Branch Duct Opening (x4)
7. Pum p In s pection Port
8. Condensate Drain
9. Control Panel
10. Mounting Bracket
2 5/8
11 1/2
4 3/4
32 3/8
A
28 11/16
A
6 3/8
6 3/8
6
8
7
8 13/16
4 3/8
3
15
44 7/16
15
9
43 1/2
10
12 9/16
28 9/16 1 7/8
2 3/4
2 3/4
9 13/16
6 5/16
2 7/8
4 7/8
2 7/8
2 7/8
3 1/2
4 7/8
6 7/16
9 13/16
2 3/4
4 7/16
3 1/8
5
VIEW A-A
1
4
2
3
14
5
8-504.6
4 13/16

TECHNICAL DATA – DX COOLING ONLY AND HEAT PUMP UNITS
Table 15.1
Technical Data – DX Cooling Only and Heat Pump Units
Units SSD/SSH 18 SSD/SSH 24 SSD/SSH 30 SSD/SSH 36 SSD/SSH 42
Nominal Cooling Capacity (1) BTU/h 19200 23000 31400 38200 42500
Nominal Heating Capacity (2) BTU/h 16400 21400 27400 32400 37200
Nominal System SEER (3) 13 13 13 13 13
HSPF 7.7 7.7 7.7 7.7 7.7
Construction
Material: Fascia High Impact Polystyrene
Material: Chassis Galvanized Steel
Color: Fascia Pearl Grey
Fire rating UL94 VO
Evaporator
Type Finned Tube
Quantity 1 1 1 1 1
Face Area Ft² 4.0 4.0 5.2 5.2 5.2
Nominal Airflow High cfm 590 670 920 1000 1130
Med cfm 540 590 800 920 1000
Low cfm 465 540 680 800 920
Discharge 4-way 4-way 4-way 4-way 4-way
Fan
Type Centrifugal
Quantity 1 1 2 2 2
Diameter in 14 14 14 14 14
Horsepower (per fan) HP 1/8 1/8 1/8 1/8 1/8
Refrigeration
Number of Circuits 1 1 1 1 1
Refrigerant Type R-410A R-410A R-410A R-410A R-410A
Weights
Weight - Chassis lb 66 66 97 97 97
Weight - Fascia lb 18 18 21 21 21
Connections (4)
Suction in 3/4 3/4 3/4 3/4 3/4
Liquid in 3/8 3/8 3/8 3/8 3/8
Condensate (ID) in 3/8 3/8 3/8 3/8 3/8
Filtration
Type Wire Framed Periframe (Standard)
Quantity 2 2 3 3 3
Arrestance 80% 80% 80% 80% 80%
Condensate Pump
Maximum Head in 30 30 30 30 30
Nominal Flowrate gpm 0.1 0.1 0.1 0.1 0.1
Options
Electric Heating Capacity kW 3.0 3.0 5.0 5.0 5.0
HW Heating Capacity (5) BTU/h 38,746 41,993 56,609 59,600 64,268
HW Coil Connection (OD) in 7/8 7/8 7/8 7/8 7/8
Max Branch Duct Connections (qty) 2 2 2 2 2
Branch Duct Diameter in 5 5 6 6 6
Branch Duct Air Volume (6) cfm 115 130 180 200 220
Fresh Air Connections (qty) 1-3 1-3 1-3 1-3 1-3
Fresh Air Duct Diameter in 3 3 3 3 3
Fresh Air Volume (7) cfm 60 65 85 90 95
(1) Nominal cooling capacity based on 80/67°F DB/WB and 95/75ºF DB/WB ambient
(2) Nominal heating capacity based on 70/60°F DB/WB and 47/43°F DB/WB ambient.
(3) Test conditions based on ARI 210/240.
(4) Refrigerant line sizes should always match condensing unit connection sizes.
(5) Nominal heating capacity based on 70/60°F DB/WB and water temperature of 180ºF inlet / 160ºF outlet.
(6) Maximum air volume available through one branch duct 6' long, with Cassette fan(s) at high speed and corresponding fascia
aperture closed.
(7) Maximum fresh air through all knockouts connected to one 10' long duct with fan at high speed.
15
8-504.6

TECHNICAL DATA – CONDENSERS FOR DX COOLING ONLY UNITS
Table 16.1
Technical Data – Condensers for DX Cooling Only Units
Units
Performance
Nominal System Cooling Capacity BTU/h 18,000 24,000 30,000 36,000 42,000
Nominal System SEER 13 13 13 13 13
Construction
Material: Chassis Pre-Treated Galvanized Painted Steel
Color Champagne
Dimensions/Weights
Height (includes Fan Guard) in 28 28 28 28 30
Width in 23½ 23½ 23½ 29 29
Depth in 23½ 23½ 23½ 29 29
Weight lb 97 129 131 145 173
Compressor
Type
Crankcase Heater Fitted No No No No No
Condenser
Coil Construction
Connections (1)
Suction in
Liquid in
Refrigerant Charge
Condenser-factory charge lbs-oz 3 - 3 3 - 13 3 - 14 4 - 9 4 - 5
Charge Per Foot of Pipework oz 0.58 0.62 0.62 0.62 0.67
(1) Refrigerant line sizes should always match condensing unit connection sizes.
SSD 18 SSD 24 SSD 30 SSD 36 SSD 42
YCJD18 YCJD24 YCJD30 YCJD36 YCJD42
Rotary Recip Recip Recip Recip
Plate Fin
Microchannel
5/8 3/4 3/4 3/4 7/8
3/8 3/8 3/8 3/8 3/8
Plate Fin
Microchannel
Cassette Unit
Condenser Model
Plate Fin
Microchannel
Plate Fin
Microchannel
Plate Fin
Microchannel
16
8-504.6

TECHNICAL DATA – CONDENSERS FOR HEAT PUMP UNITS
Table 17.1
Technical Data – Condensers for Heat Pump Units
Units
Performance
Nominal System Cooling Capacity BTU/h 18,000 24,000 30,000 36,000 42,000
Nominal System SEER 13 13 13 13 13
Construction
Material: Chassis Pre-Treated Galvanized Painted Steel
Color Champagne
Dimensions/Weights
Height (includes Fan Guard) in 28 32 36 40 40
Width in 34 34 34 34 34
Depth in 34 34 34 34 34
Weight lb 172 184 196 208 208
Compressor
Type
Crankcase Heater Fitted
Condenser
Coil Construction
Connections (1)
Suction in 3/4 3/4 3/4 3/4 7/8
Liquid in
Refrigerant Charge
Condenser-factory charge lbs-oz 6 - 6 8 - 13 9 - 0 9 - 7 9 - 12
Charge Required-Per Foot of
Pipework oz 0.62 0.62 0.62 0.62
(1) Refrigerant line sizes should always match condensing unit connection sizes.
SSH 18 SSH 24 SSH 30 SSH 36 SSH 42
YHJD18 YHJD24 YHJD30 YHJD36 YHJD42
Scroll Recip Recip Recip Scroll
No Yes Yes Yes
Round Tube
Plate Fin
3/8 3/8 3/8 3/8
Round Tube
Plate Fin
Cassette Unit
Condenser Model
Round Tube
Plate Fin
No
Round Tube
Plate Fin
3/8
0.67
Round Tube
Plate Fin
17
8-504.6

TECHNICAL DATA – CHILLED WATER UNITS
Table 18.1
Technical Data – Chilled Water Units
Nominal Cooling Capacity (1) BTU/h 6,601 11,091 17,592 19,087 29,722 35,258
Construction
Material: Fascia High Impact Polystyrene
Material: Chassis Galvanized Steel
Color: Fascia Pearl Grey
Fire rating UL94 VO
Chilled Water Coil
Type Finned Tube
Quantity 1 1 1 1 1 1
Face Area Ft² 1.8 1.8 2.8 2.8 5.2 5.2
Nominal Airflow High cfm 350 350 630 700 970 1160
Med cfm 300 300 530 630 890 970
Low cfm 260 260 500 530 785 890
Discharge 4-way 4-way 4-way 4-way 4-way 4-way
Unit water Volume gal 0.29 0.29 0.45 0.45 0.79 0.79
Fan
Type Centrifugal
Quantity 1 1 1 1 2 2
Diameter in 12 12 15 15 14 14
Horsepower (per fan) HP 1/8 1/8 1/8 1/8 1/8 1/8
Units
Weights
Weight - Chassis lb 40 40 64 64 97 97
Weight - Fascia lb 5 5 18 18 21 21
Connections
Chilled Water Inlet in 5/8 5/8 7/8 7/8 7/8 7/8
Chilled Water Outlet in 5/8 5/8 7/8 7/8 7/8 7/8
Condensate (ID) in 3/8 3/8 3/8 3/8 3/8 3/8
Filtration
Type Wire Framed Periframe (Standard(
Quantity 1 1 2 2 3 3
Arrestance 80% 80% 80% 80% 80% 80%
Condensate Pump
Maximum Head in 30 30 30 30 30 30
Nominal Flowrate gpm 0.1 0.1 0.1 0.1 0.1 0.1
Options
Electric Heating Capacity kW 1.5 1.5 3.0 3.0 5.0 5.0
HW Heating Capacity (2) BTU/h 13,799 N/A 29,258 30,946 46,455 51,600
HW Coil Connection (OD) in 5/8 N/A 5/8 5/8 5/8 5/8
Max Branch Duct Connections (qty) 2 2 2 2 2 2
Branch Duct Diameter in 5 5 5 5 6 6
Ducted Air Volume (3) cfm 80 80 100 125 200 220
Fresh Air Connections (qty) 1-2 1-2 1-3 1-3 1-3 1-3
Fresh Air Duct Diameter in 3 3 3 3 3 3
Fresh Air Volume (4) cfm 40 40 60 65 90 95
(1) Nominal cooling capacity based on 80/67°F DB/WB and water temperature of 45ºF inlet / 55ºF outlet.
(2) Nominal heating capacity based on 70/60°F DB/WB and water temperature of 180ºF inlet / 160ºF outlet.
(3) Maximum air volume available through one branch duct 6' long, with Cassette fan(s) at high speed and corresponding fascia
aperture closed.
(4) Maximum fresh air through all knockouts connected to one 10' long duct with fan at high speed.
SCW08 SCW12 SCW 18 SCW 20 SCW 33 SCW 36
18
8-504.6

ELECTRICAL DATA – CEILING CASSETTES
Table 19.1
Electrical Data – Ceiling Cassettes
Nominal
Capacity
(Digit4,5)
08and12
SmallChassis
18,20and24
Medium
Chassis
30,33,36and
42
LargeChassis
SupplyVoltage
(Digit6)
A:115/60/1
J:110/50/1
B:208/60/1
C:230/60/1
K:220/50/1
H:277/60/1‐‐ ‐0.3 0.4 15
A:115/60/1
J:110/50/1
B:208/60/1
C:230/60/1
K:220/50/1
H:277/60/1‐‐ ‐0.5 0.6 15
A:115/60/1
J:110/50/1
B:208/60/1
C:230/60/1
K:220/50/1
H:277/60/1‐‐ ‐0.8 1.0 15
Performance(WithElectricHeat) Performa nce(NoElectricHeat)
Recommended
FLA MCA
FuseSize FLA MCA
‐ ‐ ‐ 0.7 0.9 15
6.3 7.8 15
6.9 8.6 15
6.6 8.2 15
‐ ‐ ‐ 1.1 1.4 15
12.4 15.4 20
13.6 17.0 20
13.0 16.3 20
‐ ‐ ‐ 1.9 2.4 15
20.7 25.9 30
22.8 28.5 30
21.8 27.3 30
Recommended
FuseSize
0.4 0.4 15
0.6 0.7 15
1.0 1.2 15
19
8-504.6

EXPLODED UNIT DRAWING & PARTS LIST – SCW2/8 & SCW2/12
Figure 20.1
Exploded Unit Drawing & Parts List – SCW 08 & 12
1 Cassette Chassis 9 Fan/Motor Assembly 17 Receiver (Microprocessor Only)
2 Chilled Water Coil 10 Coil/Return Air Sensors
3 Elec t r i c Hea t e r E l e m e n t A s s e m b l y 11 Grille 19 Control Box Lid
4 Condensate Tray 12 Airedale Label 20 Control Box
5 Condensate Tray Supports (2) 13 Air Deflector Vanes (4) 21 PCB Controller (Microprocessor Only)
6 Condensate Pump 14 Freeze Protection Thermostat
7 High Level Switch 15 F ilter 23 Wall Mounted Controller (Ele ctro-
8 Condensate Pump Assembly
(Shown Inverted)
20
16 Fascia Assembly 24 Remote Handset (Microprocessor Only)
(Microprocessor Only)
(Electro-Mechanical version only)
8-504.6
18 Terminal Rail, Relays & Timer (Micro &
Electro- Mechanical Version)
22 Coil Support Brackets
Mechanical Only)

EXPLODED UNIT DRAWING & PARTS LIST – SSD/SSH/SCW 18 - 42
Figure 21.1
Exploded Unit Drawing & Parts List – SSD/SSH/SCW 18 - 42
1. Cassette Chassis
2. Evaporator Coil
3. Condensate Tray
4. Condensate Tray Support
5. High Level Switch (Shown Inverted)
6. Condensate Pump (Shown Inverted)
7. Fan & Motor Assembly
8. Fan Inlet Ring
9. Grille
10. Infrared Receiver
11. Vane
12. Vane Motor Assembly
13. Filter
14. Fascia
15. Remote Handset
16. Control Box Lid
17. Control Box PCB
18. Control Box
19. Coil Bracket
20. Expansion Valve
21
8-504.6

MAINTENANCE – INDOOR UNIT/DISASSEMBLY PROCEDURE
MAINTENANCE – INDOOR UNIT
WARNING
When servicing or repairing of this equipment, use only
factory-approved service replacement parts. Refer to
the rating plate on the appliance for complete appliance
model number, serial number and company address.
Any substitution of parts or controls not approved by the
factory will be at the owner’s risk.
CAUTION
Do not attempt to reuse any mechanical or electrical
controllers which have been wet. Replace defective
controller.
IMPORTANT
To check most of the Possible Remedies in the
troubleshooting guide listed in Tables 23.1 through 26.1,
refer to the applicable sections of the manual.
Maintenance Schedule
Every THREE (3) MONTHS
1. Check the air filter condition. Clean if necessar y (see
Filter Removal and Cleaning, below).
Every SIX (6) MONTHS
1. Same as three (3) months, PLUS
2. Clean condensate tray with biocide suitable for
polystyrene.
3. Clean fascia.
Every TWELVE (12) MONTHS
1. Same as six (6) months, PLUS
2. Check all electrical connections for security.
3. Check condensate pump operation.
4. Check the heating and cooling action, to ensure proper
operation.
Filter Removal and Cleaning
1. Disconnect power.
2. Unclip the catches along the edge of each g r ille and
allow them to hang from the fascia by the molded plastic
hinges located along the opposite edge.
3. If desired, the grilles can be removed from the fascia
completely.
4. The filter can now be easily slid out of the small plastic
retaining clips on the back of each grille.
5. Gently vacuum clean the filters on a medium vacuum
power.
6. When cleaned, the filters can be replaced by reversing
steps 2 to 4.
Recommended Spares
One complete set of air filters.
DISASSEMBLY PROCEDURE
Disconnect power supply before disassembly to prevent
electrical shock and injury from moving parts.
Fan Removal
1. Unclip the grille catches and remove the grille(s) from the
fascia.
2. a. For model sizes 08, & 12 only, remove the fascia by
loosening the four fascia mounting bolts and then slide
the fascia horizontally until it releases from the chassis.
Drain the condensate tray by removing the small black
rubber drain plug, catching the condensate (if any) in a
suitable container. Remove the self tapping screws
securing the two insulated metal condensate tray support
channels and pull the channels away from the
condensate tray. Pull the condensate tray downwards
away from the chassis.
2. b. For model sizes 18 to 42 only, remove the M6
screws from the black plastic inlet ring and pull the inlet
ring downwards from the condensate tray.
3. Remove the electrical panel lid and disconnect the fan
connections from within the electrical panel.
4. Rotate the fan by hand until two M6 nuts are visible
through the fan mounting access holes. Remove the two
nuts.
5. Rotate the fan 90° until the remaining two nut s are visible
and remove while supporting the fan to prevent it from
falling. The fan can now be dropped down from the unit.
Condensate Tray Removal
1. Unclip the grille catches and remove the grille(s) from the
fascia.
2. Remove the fascia by loosening the fascia mounti ng
bolts and then slide the fascia horizontally until it
releases from the chassis. If the unit is microprocessor
controlled, remove the display panel cable from within
the electrical panel before removing the fascia.
3. Drain the condensate tray by removing the small black
rubber drain plug, catching any condensate in a suitable
container.
4. Remove the self tapping screws securing the t wo
insulated metal condensate tray support channels and
pull the channels away from the condensate tray. Pull
the condensate tray, complete with inlet ring (inlet ring on
model sizes 18 to 42 only) downwards away from the
chassis.
Condensate Pump Removal
1. Disconnect the condensate pump and float switch wires
from inside the electrical panel.
2. Unscrew the three M4 screws holding the pump
inspection plate in place and pull the pump and mounting
bracket away from the chassis while feeding the pump
wires between condensate tray and insulation.
22
8-504.6

TROUBLESHOOTING – INDOOR UNIT
A
Table 23.1
Troubleshooting – Indoor Unit
TROUBLE
Red Alarm LED flashing
POSSIBLE CAUSE POSSIBLE REMEDY
Faulty float switch.
See section “Condensate High Level”
at 1 second intervals
(Microprocessor units only)
Red Alarm LED flashing
at 5 second intervals
(Microprocessor units only)
Both Yellow Heat &
Cool LEDs flashing
(Microprocessor units only)
Unit Will Not Operate
Fans Will Not Run
Faulty fan capacitor. Check fan capacitors, replace if necessary.
Faulty fan motor. Check fan motor protector for open circuit, replace if
Faulty PC Board. On electro-mechanical units check for a signal at “G”
Fan Trip.
Indoor coil sensor failure.
(Connected to micro terminals ‘T3’)
Return Air Sensor failure.
(Connected to micro terminals ‘T1’)
Control Board (PCB) battery
failure.
No power mains power. Check p ower supply to the unit. For micro units, check
No 24V control circuit power. Check the 24V feed from the control transformer. If not
Control circuit disabled by unit
protection device.
Infrared receiver failure.
(micro units only)
Transmitter failure.
(micro units only)
Microprocessor failure.
(micro units only)
Loose wire. Check all fan wire connections. Use unit’s electrical
See section “Fans Will Not Run”
fter checking the above, use the unit wiring schematic to
isolate the indoor coil sensor and measure the resistance.
Sensor is 50K@72°F type. Check and replace if necessary.
Use the unit wiring schematic to isolate the return air sensor
and measure the resistance. Sensor is 50K@72°F type.
Check and replace if necessary.
Check battery and replace if necessary. See the Infra-Red
Remote Controller Installation and Service Manual, 8-507,
for procedure.
power to the micro and check the on-board micro fuse.
present, check transformer windings – replace if necessary.
In some models, particularly electro-mechanical units, some
protection devices (such as freeze-stats, fan trips, etc) are
wired in line with the 24V control circuit feed to cause the
unit to shut down in an alarm condition. Use the unit’s wiring
schematic to identify these devices and investigate
accordingly.
If audible bleep is heard on signal transmission from
transmitter and the green LED is lit or flashing, receiver is
OK. If there are no LEDs lit and the unit will not respond to
the transmitter, press the On/Off button on the fascia display
panel. If the unit responds to the On/Off button receiver is
OK. Check transmitter.
Try new batteries first, if receiver bleeps on transmitting
signal, transmitter is OK. If no response press On/Off button
on unit fascia. If the unit responds to the On/Off button
transmitter is faulty.
The microprocessor is the least likely component to be at
fault. Investigate all other possibilities in every section of this
troubleshooting guide first. Replace the micro only after all
other avenues of investigation are exhausted.
schematic to verify that fan is wired correctly.
necessary.
terminal.
On micro units check for steady green light on display panel.
23
8-504.6

TROUBLESHOOTING – INDOOR UNIT
A
Table 24.1
Troubleshooting – Indoor Unit
TROUBLE
POSSIBLE CAUSE POSSIBLE CAUSE
No Cooling
Water Leaking From
Unit
(see also “Condensate High
Level”)
Incorrect MODE setting.
(micro units only)
Set point too high. Check the set point on the transmitter or wall mounted
Compressor protection delay.
(micro units only)
Compressor protection delay.
(Electro-mechanical DX units only)
Dirty or blocked air filter.
High condensate level trip. Drain the condensate tray and investigate. See
Indoor coil temperature too low. Check refrigerant charge by measuring operating
Sensor failure.
(micro units only)
Outdoor unit tripped. Check outdoor unit - refer to outdoor unit
Faulty valve actuator.
(Chilled water units only)
Condensate plug loose or missing. Check that the rubber condensate plug is securely
Check that the transmitter MODE is set to Cooling or
uto Mode.
thermostat and adjust if necessary.
Check that the green On/Off LED is not flashing. If it
is flashing, wait for ten minutes then re-check if
cooling is operating. (Applies to chilled water units also)
Wait for ten minutes and then re-check if cooling is
operating.
See section “Coil Freeze”.
section “Condensate High Level”
pressures. Check filters condition. (See page 22 for
filter removal and cleaning instructions)
If any of the sensors are faulty the microprocessor will
disable the cooling operation (see AIR 8-507, Infra-
Red Controller, Installation and Service Manual).
troubleshooting section.
Check cooling signal present at actuator. Check
actuator by manually opening the valve. Replace
actuator if necessary.
fitted to the underside of the unit’s polystyrene drip
tray. On some models this is located underneath the
fascia support rails on the pump side of the unit.
PCB jumper links not set correctly.
(micro units only)
Unit installed unevenly. With fascia removed, ensure that the unit chassis is
Condensate drain piping installed
incorrectly.
Blocked/kinked condensate pipe. Check condensate piping for blocks/kinks, clear as
Condensate pump blocked or
failed.
Float switch failure. Check that the float switch operates correctly and is
Check jumper links. Refer to unit wiring diagram.
level (at the face) both front to back and left to right, to
ensure correct condensate flow.
Check that the site installed condensate gravity drain
slopes ‘downhill’ away from the unit. (See page 5 of
this manual for installation guide)
necessary. Check for a water tight connection
between the condensate outlet and the site installed
condensate gravity drain.
Clear any blockages and ensure that power is being
applied to the pump. If the pump still does not run,
replace the pump.
properly positioned. Float switch is normally closed,
opens on rise of water level.
24
8-504.6

TROUBLESHOOTING – INDOOR UNIT
A
Table 25.1
Troubleshooting – Indoor Unit
TROUBLE
Condensate High Level
(micro units: red alarm LED
will flash at one second
intervals)
Coil Freeze
No Heating (Hot Water)
No hot water / pumps failed. Check hot water source and supply to unit.
Faulty valve / actuator. Check actuator by manually opening and closing valve,
Faulty heater relay. Check signals to relay and check action of relay contacts.
No Heating (Electric Heat)
POSSIBLE CAUSE POSSIBLE REMEDY
Maximum pump lift exceeded. Check that the condensate pump head is no greater than
30”. (See page 5 of this manual for installation guide)
Blocked/kinked condensate pipe.
Condensate pump blocked or
failed.
Coil freeze up.
Cooling coil freeze protection
thermostat tripped.
(Auto-reset when freeze cleared)
Dirty or blocked air filter. Clean / replace filters as necessary. (See page 22 for
System head pressure set too
low.
Loss of refrigerant. Check system for refrigerant leaks and repair before re-
Incorrect MODE setting.
(micro units only)
Set point too low. Check the set point on the transmitter or wall mounted
Blocked or dirty filters causing
low airflow.
Incorrect MODE setting.
(micro units only)
Set point too low. Check the set point on the tra nsmitter or wall mounted
Overheat cut out tripped.
(See also section “Electric
Overheat”)
Heater element failed. Investigate and replace if necessary.
Faulty heater relay. Check signals to relay and check action of relay contacts.
See section “Water Leaking From Unit”.
See section “Water Leaking From Unit”.
coil freeze condition may have caused excessive
condensate to collect in the drip tray. See section “Coil
Freeze”.
Freeze stat is normally closed, opens during freeze.
Where fitted, the stat will disable the cooling action
(sometimes the entire system) during coil freeze
conditions. Use the unit’s wiring schematic to investigate.
filter removal and cleaning instructions)
Check condensing pressure, installation of low ambient kit
may be required.
charging.
Check that the transmitter MODE is set to Heat or Auto
Mode.
thermostat and adjust if necessary.
Check filters condition. (See page 22 for filter removal
and cleaning instructions)
replace if faulty.
Replace relay or PCB if necessary.
Check that the transmitter MODE is set to Heat or Auto
Mode.
thermostat and adjust if necessary.
Investigate cause of over heat condition.
Possible low airflow, check filter condition. (See page
22 for filter removal and cleaning instructions)
Possible fan failure. Check fans.
(See section “Fans Will Not Run”)
Remove power from unit and reset manual overheat cut-
out by rubbing. DO NOT PRESS.
Consult Factory for instruction if necessary.
Replace relay or PCB if necessary.
25
8-504.6

TROUBLESHOOTING/REPLACEMENT PARTS
MODEL NUMBER DESIGNATION/SERIAL PLATE
Table 26.1
Troubleshooting – Indoor Unit (Continued)
TROUBLE
ELECTRIC OVERHEAT
The electric heat circuit contains one automatic reset and one manual reset overheat cutout protection switch for each electric heat element fitted to the unit. The cut-outs are
wired in line with the main power flowing in each element and operate as describ ed below.
1. Auto Cut-out – if the auto cut-out trips, the electric heat is temporarily disabled until
the unit temperature falls and causes the overheat cut-out to automatically reset.
2. Manual Cut-out – if the manual cut-out trips, the electric heat is disabled until the unit
temperature falls and the overheat cut-out is manually reset. It will typically take five
minutes for the unit temperature to fall sufficiently to allow the cut-out to be reset. The
cut-out should only be reset by a qualified and competent electrician and with the
mains power switched off. Ensure the elements have cooled sufficiently.
REPLACEMENT PARTS
For ease of identification when ordering replacement parts or
contacting the factory about your unit, please quote the unit
type and unit serial number. This information can be found
on the serial plate attached to your unit. See Figure 26.2.
When a component part fails, a replacement part should be
obtained through our Parts Department. If the part is
considered to be under warranty, the following details are
required to process this requirement:
1. Full description of part required, including Unit’s part
number, if known.
2. The original equipment serial number.
3. An appropriate purchase order number.
Figure 26.1
Model Number Designations
Figure 26.2
Serial Plate EXAMPLE
26
8-504.6

THIS PAGE INTENTIONALLY LEFT BLANK
27
8-504.6

COMMERCIAL WARRANTY
Seller warrants its products to be free from defects in material and
workmanship, EXCLUSIVE, HOWEVER, of failures attributable to the use of
materials substituted under emergency conditions for materials normally
employed. This warranty covers replacement of any parts furnished from
the factory of Seller, but does not cover labor of any kind and materials not
furnished by Seller, or any charges for any such labor or materials, whether
such labor, materials or charges thereon are due to replacement of parts,
adjustments, repairs, or any other work done. This warranty does not apply
to any equipment which shall have been repaired or altered outside the
factory of Seller in any way so as, in the judgment of Seller, to affect its
stability, nor which has been subjected to misuse, negligence, or operating
conditions in excess of those for which such equipment was designed. This
warranty does not cover the effects of physical or chemical properties of
water or steam or other liquids or gases used in the equipment.
BUYER AGREES THAT SELLER’S WARRANTY OF ITS PRODUCTS TO
BE FREE FROM DEFECT IN MATERIAL AND WORKMANSHIP, AS
LIMITED HEREIN, SHALL BE IN LIEU OF AND EXCLUSIVE OF AL L
OTHER WARRANTIES, EITHER EXPRESS OR IMPLIED, WHETHER
ARISING FROM LAW, COURSE OF DEALING, USAGE OF TRADE, OR
OTHERWISE, THERE ARE NO OTHER WARRANTIES, INCLUDING
WARRANTY OF MERCHANTABILITY OR FITNESS FOR PURPOSE,
WHICH EXTEND BEYOND THE PRODUCT DESCRIPTION CONFIRMED
BY BUYER AND SELLER AS OF THE DATE OF FINAL AGREEMENT.
This warranty is void if the input to the product exceeds the rated input as
indicated on the product serial plate by more than 5% on gas-fired and oilfired units, or if the product in the judgment of SELLER has been installed in
a corrosive atmosphere, or subjected to corrosive fluids or gases, been
subjected to misuse, negligence, accident, excessive thermal shock,
excessive humidity, physical damage, impact, abrasion, unauthorized
alterations, or operation contrary to SELLER’S printed instructions, or if the
serial number has been altered, defaced or removed.
BUYER’S REMEDY FOR BREACH OF WARRANTY, EXCLUSIVE OF ALL
OTHER REMEDIES PROVIDED BY LAW, IS LIMITED TO REPAIR OR
REPLACEMENT AT THE FACTORY OF SELLER, ANY COMPONENT
Component
Applicable Models
Heat Exchangers
Gas-Fired Units except PSH/BSH
Heat Exchangers
Low Intensity Infrared Units
Compressors
Condensing Units for Cassettes
Burners
Low Intensity Infrared Units
Other
Components excluding Heat Exchangers,
Coils, Condensers, Burners, Sheet Metal
Heat Exchangers/Coils
Indoor and Outdoor Duct Fur naces and
System Units, PSH/BSH, Steam/Hot Water
Units, Oil-Fired Units, Electric Units,
Cassettes, Vertical Unit Ventilators,
Geothermal Units
Compressors
Vertical Unit Ventilators, Ge othermal Units
Burners
High Intensity Infrared Units
Sheet Metal Parts
All Products
Modine Manufacturing Company has a continuous product improvement program, and therefore reserves the right to change design and specifications without notice.
TEN YEARS FROM DATE OF FIRST BENEFICIAL USE BY BUYER OR ANY OTHER USER, WITHIN
TEN YEARS FROM DATE OF RESALE BY BUYER OR ANY OTHER USER, WITHIN TEN YEARS FROM
DATE OF RESALE BY BUYER IN ANY UNCHANGED CONDITION, OR WITHIN ONE HUNDRED
TWENTY-SIX MONTHS FROM DATE OF SHIPMENT FROM SELLER, WHICHEVER OCCURS FIRST
FIVE YEARS FROM DATE OF FIRST BENEFICIAL USE BY BUYER OR ANY OTHER USER, WITHIN
FIVE YEARS FROM DATE OF RESALE BY BUYER OR ANY OTHER USER, WITHIN FIVE YEARS
FROM DATE OF RESALE BY BUYER IN ANY UNCHANGED CONDITION, OR WITHIN SIXTY-SIX
MONTHS FROM DATE OF SHIPMENT FROM SELLER, WHICHEVER OCCURS FIRST
TWO YEARS FROM DATE OF FIRST BENEFICIAL USE BY BU YER OR ANY OTHER USER, WITHIN
TWO YEARS FROM DATE OF RESALE BY BUYER IN ANY UNCHANGED CON D ITION, OR WITHIN
THIRTY MONTHS FROM DATE OF SHIPMENT FROM SELLER, WHICHEVER OCCURS FIRST
ONE YEAR FROM DATE OF FIRST BENEFICIAL USE BY BUYER OR ANY OTHER USER, WITHIN
ONE YEAR FROM DATE OF RESALE BY BUYER IN ANY UNCHANGED CONDITION, OR WITHIN
EIGHTEEN MONTHS FROM DATE OF SHIPMENT FROM SELLER, WHICHEVER OCCURS FIRST
WHICH SHALL, WITHIN THE APPLICABLE WARRANTY PERIOD
DEFINED HEREIN AND UPON PRIOR WRITTEN APPROVAL, BE
RETURNED TO SELLER WITH TRANSPORTATION CHARGES PREPAID
AND WHICH THE EXAMINATION OF SELLER SHALL DISCLOSE TO
HAVE BEEN DEFECTIVE; EXCEPT THAT WHEN THE PRODUCT IS TO
BE USED BY BUYER AS A COMPONENT PART OF EQUIPMENT
MANUFACTURED BY BUYER, BUYER’S REMEDY FOR BREACH, AS
LIMITED HEREIN, SHALL BE LIMITED TO ONE YEAR FROM DATE OF
SHIPMENT FROM SELLER. FOR GAS-FIRED PRODUCTS INSTALLED IN
HIGH HUMIDITY APPLICATIONS AND UTILIZING STAINLESS STEEL
HEAT EXCHANGERS, BUYER’S REMEDY FOR BREACH, AS LIMITED
HEREIN, SHALL BE LIMITED TO TEN YEARS FROM DATE OF
SHIPMENT FROM SELLER.
These warranties are issued only to the original owner-user and cannot be
transferred or assigned. No provision is made in these warranties for any
labor allowance or field labor participation. Seller will not honor any
expenses incurred in its behalf with regard to repairs to any of Seller’s
products. No credit shall be issued for any defective part returned without
proper written authorization (including, but not limited to, model number,
serial number, date of failure, etc.) and freight prepaid.
OPTIONAL SUPPLEMENTAL WARRANTY
Provided a supplemental warranty has been purchased, Seller extends the
warranty herein for an additional four (4) years on certain compressors.
Provided a supplemental warranty has been purchased, Seller extends the
warranty herein for an additional four (4) years or nine (9) years on certain
heat exchangers.
EXCLUSION OF CONSUMABLES & CONDITIONS BEYOND SELLER’S
CONTROL
The above referenced warranty shall not be applicable to any of the
following items: refrigerant gas, belts, filters, fuses and other items
consumed or worn out by normal wear and tear or conditions beyond
Seller’s control, including (without limitation as to generality) polluted or
contaminated or foreign matter contained in the air or water utilized for heat
exchanger (condenser) cooling or if the failure of the part is caused by
improper air or water supply, or improper or incorrect sizing of power supply.
“APPLICABLE WARRANTY PERIOD”
Commercial Products Group
Modine Manufacturing Company
1500 DeKoven Avenue
Racine, WI 53403
Phone: 1.866.823.1631 (toll free)
www.modinehvac.com/schoolsystems
Modine Manufacturing Company 2014
 Loading...