

Page 1
INSTALLATION AND SERVICE MANUAL
Concentric Venting and Two Pipe Venting
for Models DFS/DBS/DCS/IFS/IBS/ICS/PSH/BSH
WARNING
1. Gas fired heating equipment must be vented - do
not operate unvented.
2. A built-in power exhauster is provided - additional
external power exhausters are not required or
permitted.
3. If you are replacing an existing heater, it may be
necessary to resize the venting systems. Improperly
sized venting systems can result in vent gas
leakage or the formation of condensate. Refer to
the National Fuel Gas Code ANSI Z223.1 (NFPA 54)
or CSA B149.1 - latest edition. Failure to follow
these instructions can result in serious injury or
death.
4. Under no circumstances should two sections of
double wall vent pipe be joined together within one
horizontal vent system due to the inability to verify
complete seal of inner pipes.
IMPORTANT
Installation must conform with local building codes
or in the absence of local codes, with Part 7, Venting
of Equipment, of the National Fuel Gas Code, ANSI
Z223.1 (NFPA 54) - latest edition. In Canada
installation must be in accordance with CSA B149.1.
Section A - General Instructions - All Units
A1. If the unit heater being installed is replacing existing
equipment and using the existing vent system from that
equipment, inspect the venting system for proper size and
horizontal pitch, as required in the National Fuel Gas Code,
ANSI Z223.1 (NFPA 54) or CSA B149.1 Installation Code
- latest edition and these instructions. Determine that there
is no blockage or restriction, leakage, corrosion and other
deficiencies, which could cause an unsafe condition.
A2. The vent pipe should be galvanized steel or other suitable
corrosion resistant material. Follow the National Fuel Gas
Code for minimum thickness of vent material. The minimum
thickness for connectors varies depending on the pipe
diameter. Do not vent unit with PVC or other forms of plastic
venting material. (EXCEPTION: PTC55-260 units are vented
with PVC.)
A3. All heaters come with factory installed vent and combustion
air adapters for attaching the vent pipe to the heater. Attach
the vent pipe to the adapter with 3 corrosion resistant
screws. (Drill pilot holes through the vent pipe and adapter
prior to screwing in place). Vent pipe must not be smaller
than the connector size.
THIS MANUAL IS THE PROPERTY OF THE OWNER.
PLEASE BE SURE TO LEAVE IT WITH THE OWNER WHEN YOU LEAVE THE JOB.
75-536.3
5H75153 Rev C
December, 2012
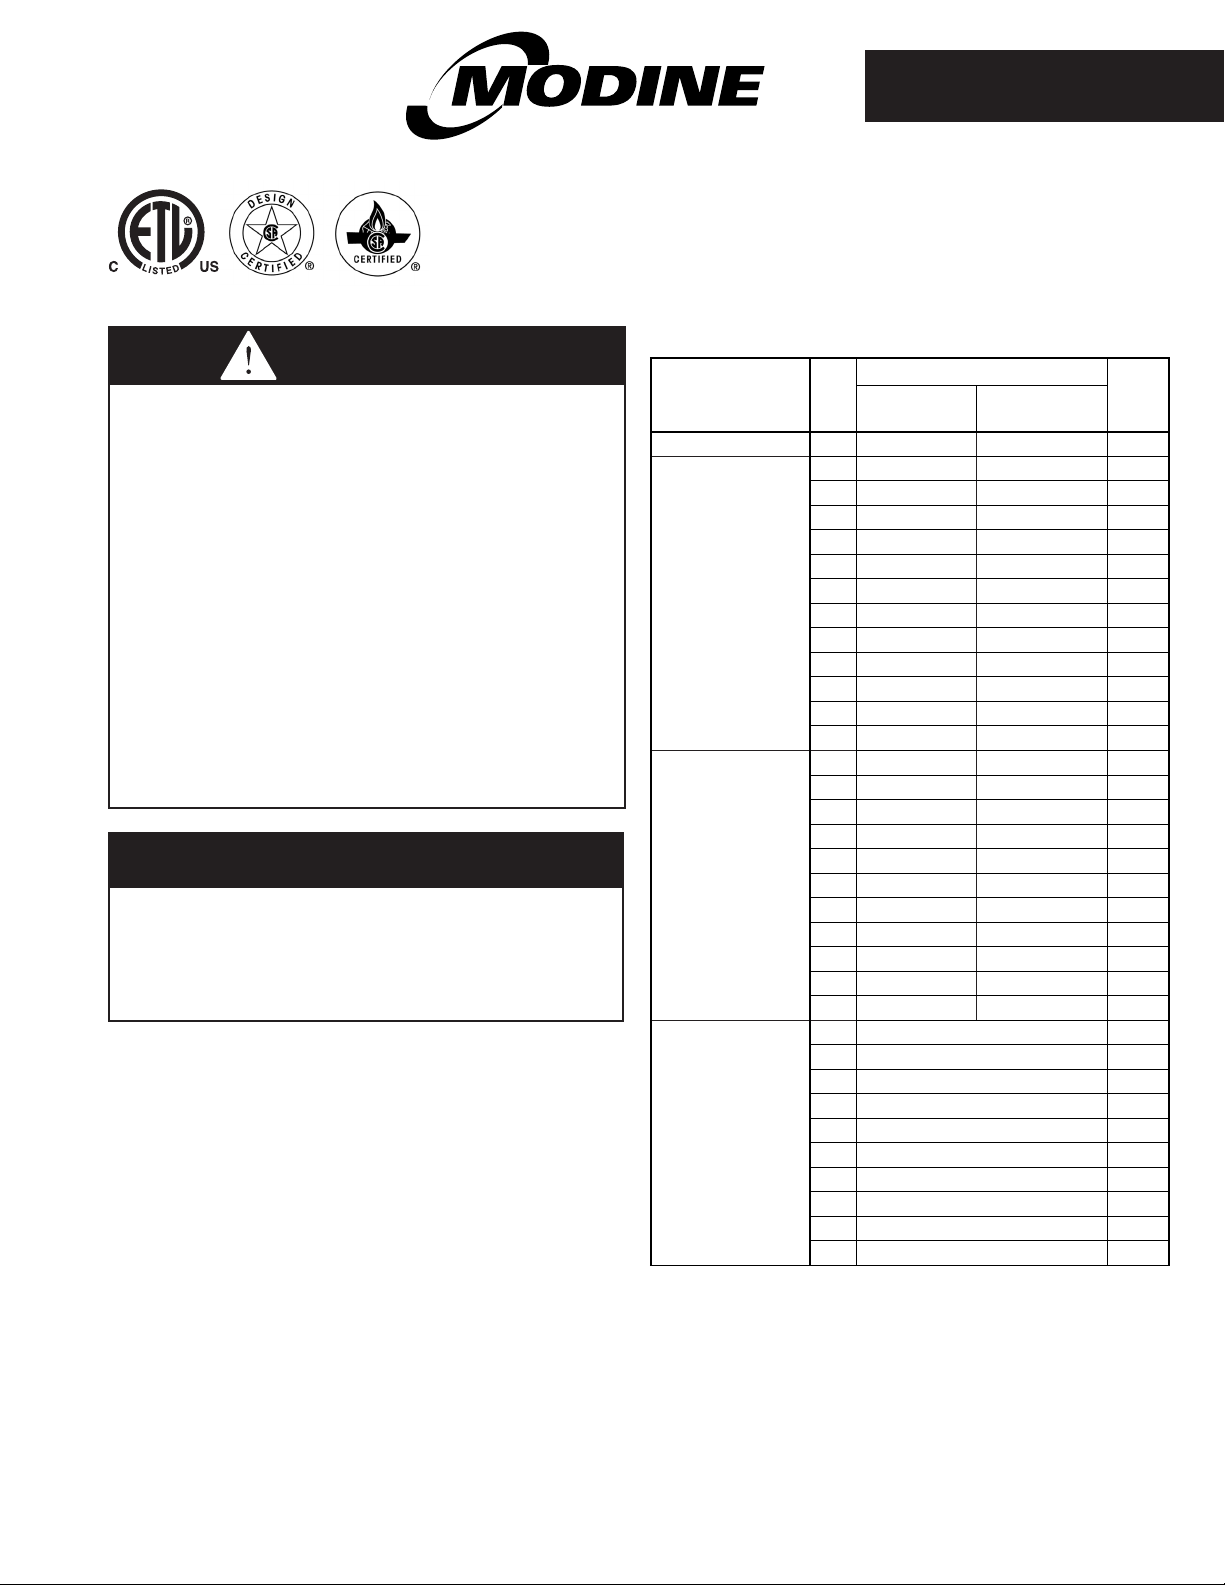
Table 1.1 - Concentric Vent Pipe Sizes
Single Wall Pipe
Model Size
PTS/BTS/HDS/HDC 30 4" 4"-6" 3"
DFS/DBS/DCS 75 4" 4"-6" 4"
IFS/IBS/ICS 100 4" 4"-6" 4"
PTC 55 3" 3"
B-Vent must have 1/4" air gap (OD is 1/2" larger than ID).
A4. Make the vent system as straight as possible and limit the
total vent pipe lengths as shown in the applicable Installation
& Service manual..
A5. A minimum of 12" straight pipe is recommended from the
flue outlet before turns in the vent pipe.
A6. Horizontal sections of vent pipe are to be installed with a
minimum downward slope from the appliance of 1/4 inch per
foot and suspended securely from overhead structures at
points not greater than 3' apart.
Combustion Air
(to unit)
45 4" 4"-6" 3"
60 4" 4"-6" 4"
75 4" 4"-6" 4"
100 4" 4"-6" 4"
125 4" 4"-6" 4"
150 4" 4"-6" 4"
175 4" 4"-6" 4"
200 4" 4"-6" 4"
250 6" 6"-8" 6"
300 6" 6"-8" 6"
350 6" 6"-8" 6"
400 6" 6"-8" 6"
125 4" 4"-6" 4"
150 4" 4"-6" 4"
175 4" 4"-6" 4"
200 6" 6"-8" 6"
225 6" 6"-8" 6"
250 6" 6"-8" 6"
300 6" 6"-8" 6"
350 6" 6"-8" 6"
400 6" 6"-8" 6"
65 3" 3"
85 3" 3"
110 3" 3"
135 3" 3"
156 4" 4"
180 4" 4"
215 4" 4"
260 4" 4"
310 4"-6" 4"
Combustion Air
(external)
Type B
Vent
Pipe
Page 2
INSTALLATION - VENTING
A7. Fasten individual lengths of vent together with at least 3
corrosion resistant sheet metal screws.
A8. Keep single wall vent pipe at least 6" from combustible
materials. For double wall vent pipe, follow the vent
pipe manufacturer’s clearances to combustibles. The
minimum distance from combustible materials is based
on the combustible material surface not exceeding 160°F.
Clearance from the vent pipe (or the top of the unit) may be
required to be greater than 6" if heat damage other than fire
could result (such as material distortion or discoloration).
A9. Avoid venting through unheated space when possible. When
venting does pass through an unheated space or if the unit
is installed in an environment that promotes condensation,
insulate runs greater than 5' to minimize condensation.
Inspect for leakage prior to insulating and use insulation that
is noncombustible with a rating of not less than 400°F. Install
a tee fitting at the low point of the vent system and provide a
drip leg with a clean out cap.
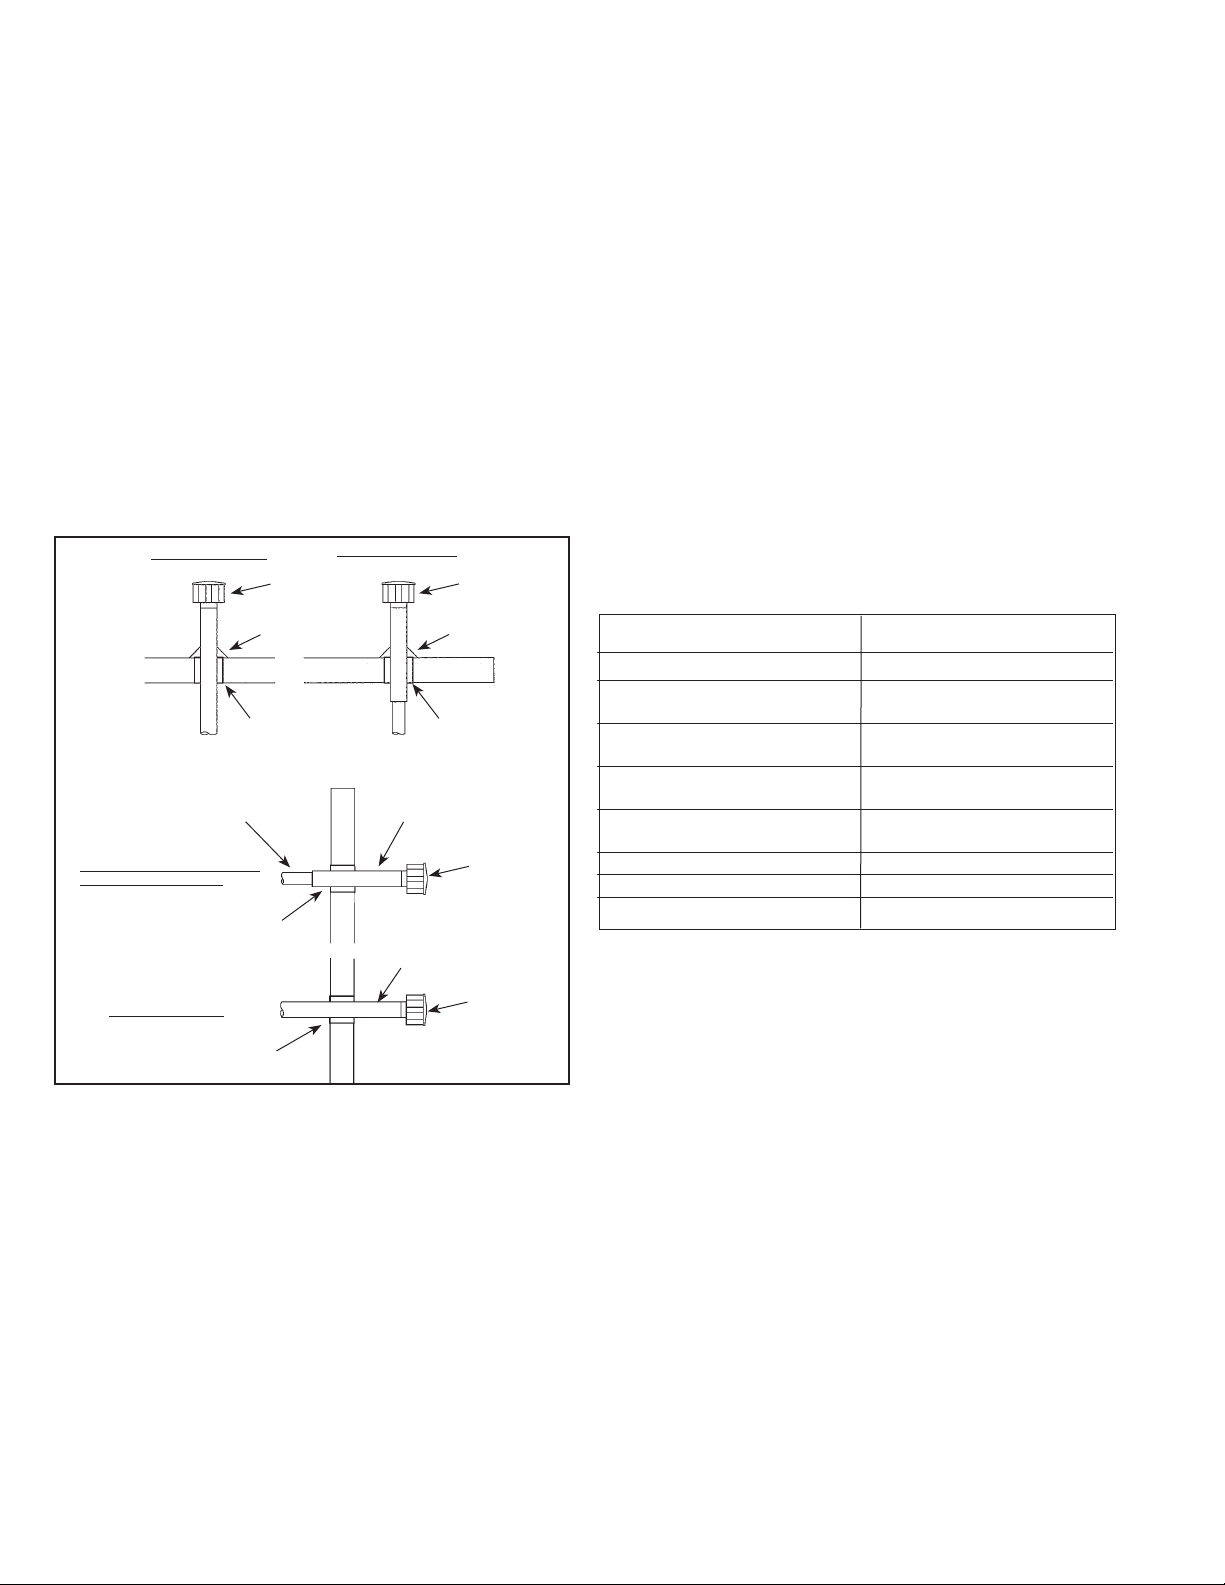
Figure 2.1 - Venting Through Combustible Roof
or Wall
Single Wall Vent Pipe
Flashing
Listed
Thimble
Single
Wall
Single Wall Vent Pipe Terminating
with Double wall vent pipe.
Clearance Specified
by Type B Vent Mfg.
Single Wall Vent Pipe
Listed
Thimble
See Instruction A12 for attaching single wall pipe to double wall pipe
A10. When the vent passes through a combustible INTERIOR
wall or floor, a metal thimble 4" greater than the vent
diameter is necessary. If there is 6' or more of vent pipe in
the open space between the appliance and where the vent
pipe passes through the wall or floor, the thimble need only
be 2" greater than the diameter of the vent pipe. If a thimble
is not used, all combustible material must be cut away to
provide 6" of clearance. Where authorities have jurisdiction,
Type B vent may be used for the last section of vent pipe to
maintain clearance to combustibles while passing through
wall or floor. See Figure 2.1. Any material used to close the
opening must be noncombustible.
A11. All seams and joints of the single wall pipe must be sealed
with metallic tape or silastic suitable for temperatures up to
400°F. Wrap the tape two full turns around the vent pipe.
One continuous section of double wall vent pipe may be
used within the vent system. Refer to instruction A12 in
"Section A – General Instructions – All Units" for attaching
double wall pipe to single wall pipe.
2
Double Wall Vent Pipe
Specified
Terminal
Specified
Terminal
Flashing
Clearance Specified
by Type B Vent Mfg.
Double
Wall
Specified
Terminal
Single
Wall
Specified
Terminal
6-583.4
A12. The following are General Instructions for Double Wall
(Type B) Terminal Pipe Installation:
How to attach a single wall vent terminal to double wall
(Type B) vent pipe:
1. Look for the "flow" arrow on the vent pipe.
2. Slide the vent terminal inside the exhaust end of the
double wall vent pipe.
3. Drill (3) holes through the pipe and the vent terminal.
Using 3/4" long sheet metal screws, attach the cap to the
pipe. Do not over tighten.
How to connect a single wall vent system to a double
wall (Type B) vent pipe:
1. Slide the single wall pipe inside the inner wall of the
double wall pipe.
2. Drill (3) holes through both walls of the single and double
wall vent pipes. Using 3/4" sheet metal screws, attach the
two pieces of pipe. Do not over tighten.
3. The gap between the single and double wall pipe must be
sealed but it is not necessary to fill the full volume of the
annular area. To seal, run a large bead of 400°F silastic
around the gap.
A13. Vent termination clearances must be maintained:
Table 2.1 - Vent Termination Clearances
Minimum Clearances for
Structure Vent Terminal Location
Forced air inlet within 10 feet 3 feet above
Combustion air inlet of another
appliance 6 feet all directions
Door, window, gravity air inlet, 4 feet horizontal and below
or any building opening 1 foot above
Electric meter, gas meter, gas 4 feet horizontal (U.S.)
regulator, and relief equipment 6 feet horizontal (Canada)
Gas regulator
6 feet horizontal (Canada)
Adjoining building or parapet wall 6 feet all directions
Adjacent public walkways 7 feet all directions
Grade (ground level) 3 feet above
Do not terminate the vent directly above a gas meter or regulator.
The vent must be at least 6" higher than anticipated snow depth.
A14. Do NOT vent this appliance into a masonry chimney.
A15. Do NOT use dampers or other devices in the vent or
combustion air pipes.
A16. The venting system must be exclusive to a single appliance
and no other appliance is allowed to be vented into it.
A17. Precautions must be taken to prevent degradation of
building materials by flue products.
A18. Single wall vent pipe must not pass through any
unoccupied attic, inside wall, concealed space, or floor.
A19. Uninsulated single wall vent pipe must not be used
outdoors for venting appliances in regions where the 99%
winter design temperature is below 32°F.
A20. Long runs of horizontal or vertical combustion air pipes
may require insulation in very cold climates to prevent the
buildup of condensation on the outside of the pipe where
the pipe passes through conditioned spaces.
A21. Vertical combustion air pipes should be fitted with a tee
with a drip leg and a clean out cap to prevent against the
possibility of any moisture in the combustion air pipe from
entering the unit. The drip leg should be inspected and
cleaned out periodically during the heating season.
A22. In addition to following these General Instructions, specific
instructions for Vertical and Horizontal vent systems in 2-Pipe
or Concentric Vent configurations must also be followed.
3 feet horizontal (U.S.)
Page 3
INSTALLATION - VENTING
Section D - Concentric Vent System Installation
D1. This section applies to both horizontally and vertically vented
concentric vent systems as defined in "Section A – General
Instructions – All Units", and is in addition to the instructions
in that section.
D2. When utilizing the concentric vent option, it should
have been predetermined whether the appliance will be
horizontally or vertically vented. Before proceeding, verify
that the concentric vent kit received contains the correct
components for the installation:
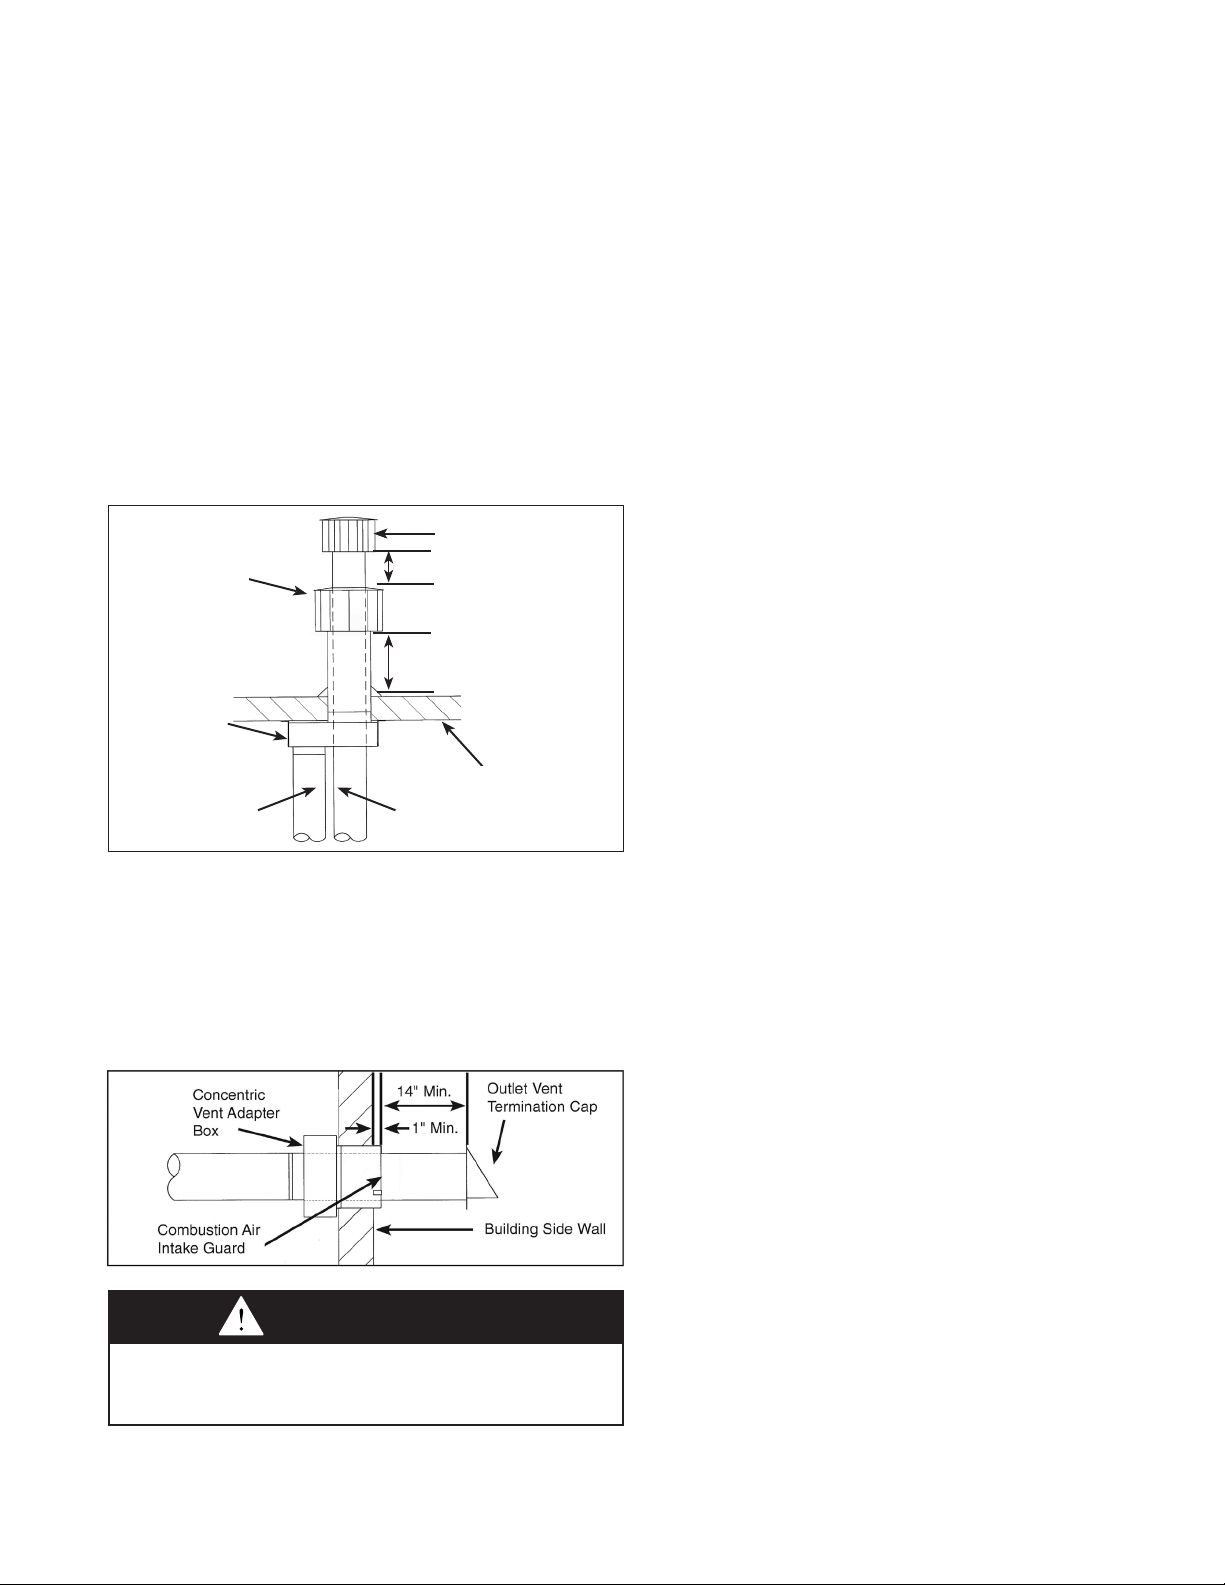
For Vertically Vented Units (Refer to Figure 3.1):
•Concentricadapterassembly(sameforhorizontaland
vertical kits)
•StandardGarySteel1092venttermination
•Speciallydesignedinletterminal(part#5H75154B1)
Figure 3.1 - Vertical Concentric Vent Kit
Components
Outlet Vent
Combustion Air
Inlet Terminal
Concentric
Vent Adapter
Box
Combustion Air Exhaust
6" Min.
12" Min.*
Termination Cap
* Size according
to expected
snow depth.
Building
Roof / Ceiling
For Horizontally Vented Units (Refer to Figure 3.2):
•Concentricadapterassembly(sameforhorizontaland
vertical kits)
•Specialventterminationcap(part#5H75150B1)
•Specialinletairguard
Figure 3.2 - Horizontal Concentric Vent Kit
Components
CAUTION
The concentric vent adapter box must be installed inside
of the structure or building. Do not install this box on the
exterior of a building or structure.
D3. Once the kit contents have been verified as correct for the
direction of venting, the concentric vent adapter box is to
be installed. Determine the location of the box. Be sure to
maintain all clearances as listed in these instructions.
D4. The adapter box is to be mounted on the interior side of
the building. It must not be mounted outside the building.
The adapter box has integral mounting holes for ease of
installation.
D5. The adapter box can be mounted flush to the wall (for
horizontal kits) or to the ceiling (for vertical kits). The box can
also be offset from the wall or ceiling by using field supplied
brackets. When mounting the box, consider serviceability
and access to the vent and combustion air pipes. If the
box is to be mounted using field supplied brackets, these
brackets must be strong enough to rigidly secure the box
to the wall or ceiling, and should be made from corrosion
resistant material.
D6. Determine the length of the vent pipe and combustion
air inlet pipe for the selected location. THE VENT PIPE
WILL PASS THROUGH THE CONCENTRIC VENT BOX.
THE LAST SECTION OF VENT PIPE IS A CONTINUOUS
LENGTH OF DOUBLE WALL "B" VENT. See section A12
for attaching and terminating double wall pipe. Begin with
pipe lengths on the concentric pipe side of the adapter box
referring to Figure 4.1. These pipes will extend through the
building wall or roof as well as any added length for the
thickness of the wall and the offset from any field installed
brackets.
For Vertical Concentric Vent Kits (refer to Figure 3.1):
•Thebottomofthecombustionairintakepipemust
terminate above the snow line, or at least 12 inches above
the roof, whichever distance is greater.
•Thebottomoftheventcapmustterminateatleast
6 inches above the top of the combustion air intake cap.
For Horizontal Concentric Vent Kits (refer to Figure 3.2):
•Thecombustionairintakepipemustterminateatleast
1 inch from the wall to prevent water from running down
the wall and into the pipe.
•Thebackoftheventcapmustterminateatleast14inches
from the combustion air intake pipe.
D7. Cut the concentric side vent and combustion air pipes to
the proper length as determined in the previous step. See
Table 4.1 for Combustion Air and Vent Pipe sizes. The pipes
must be single wall galvanized or stainless steel material,
except for the last section of vent pipe, which must be one
continuous length of double wall B-vent extended through
the concentric vent box and combustion air inlet pipe on
the concentric side of the box. NOTE: No clearance to
combustible material is required for the building penetration,
which should be sized according to the external Combustion
Air Inlet pipe diameter.
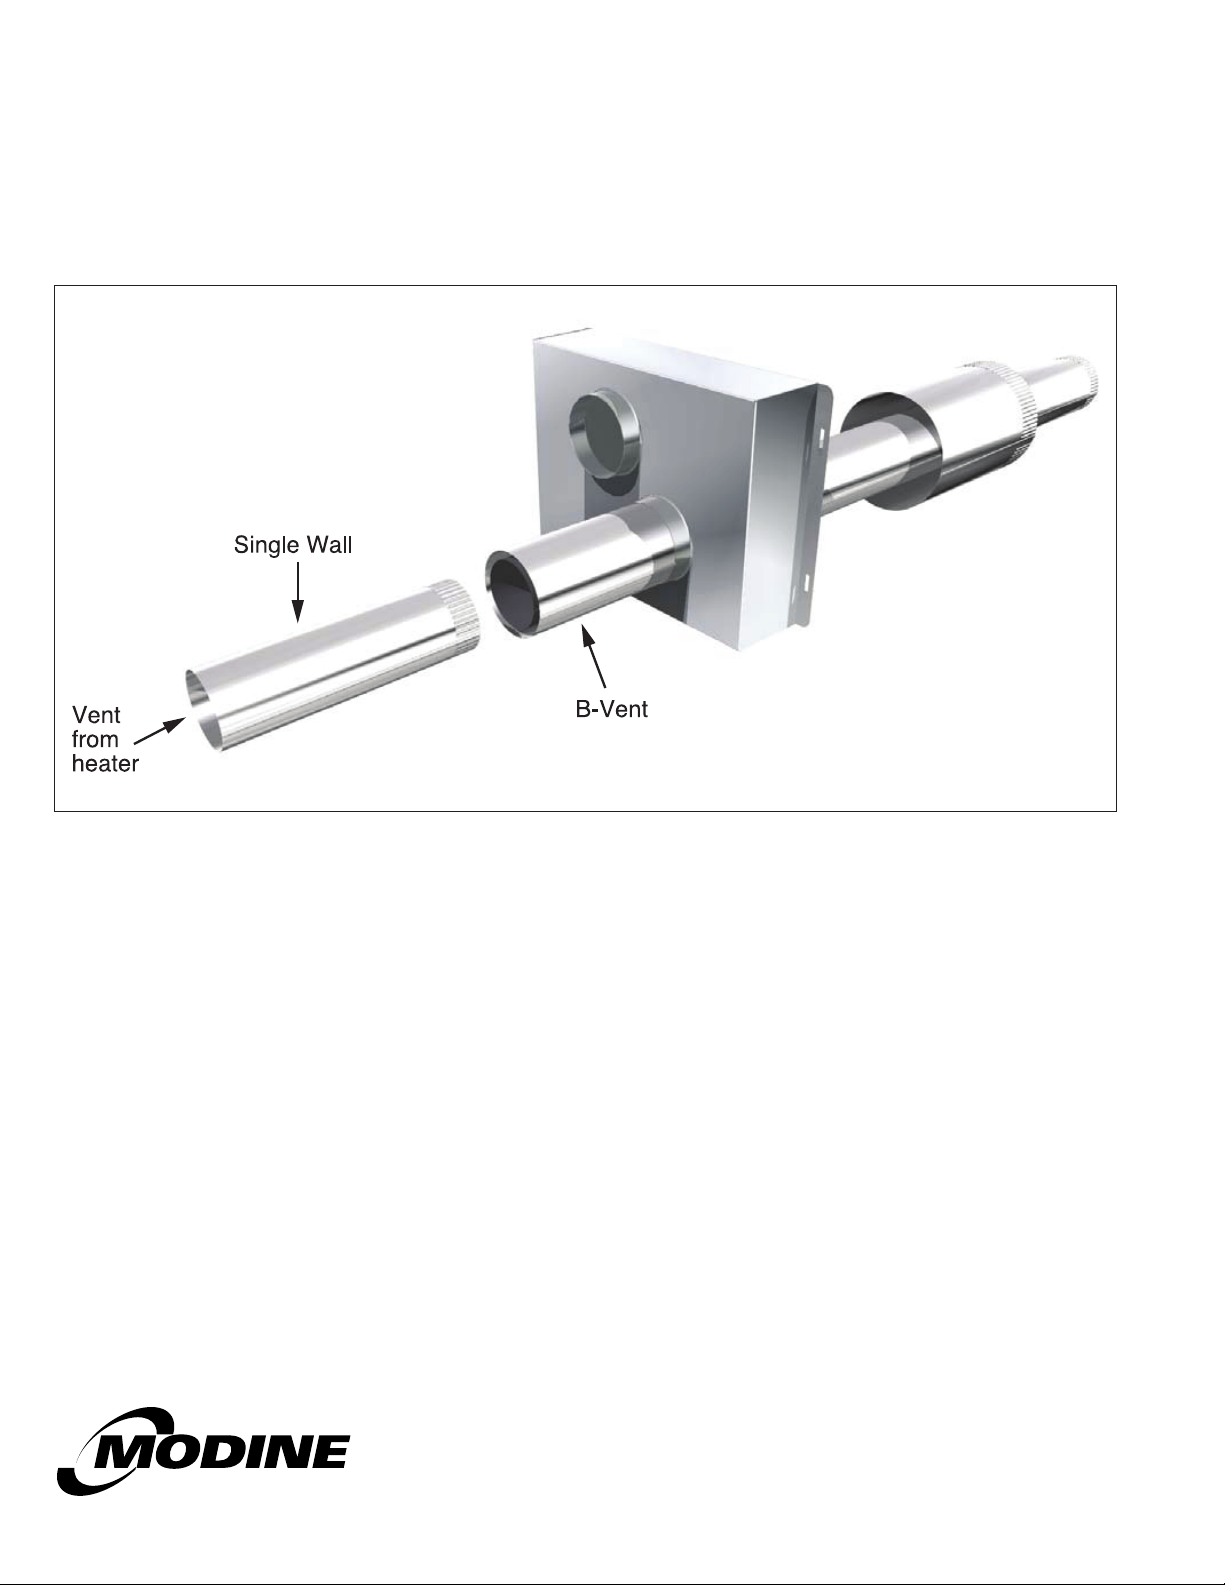
D8. Allow the concentric side vent pipe to pass through the
concentric vent adapter box, as shown in Figure 4.1. Attach
the double wall vent pipe to the single wall vent pipe that
goes to the unit. Be sure to seal the joint and the open area
around the double wall vent. Seal all joints and seams using
sealant suitable for temperatures up to 400°F.
D9. Slide the combustion air pipe over the vent pipe and attach
to the air inlet of the concentric adapter box, as shown in
Figure 4.1, using at least 3 corrosion resistant sheet metal
screws. Seal the joint and seam using sealant suitable for
temperatures up to 400°F.
D10. Place this assembly (the adapter box, vent pipe and
combustion air pipe) through the wall or roof and verify that
the distance requirements as defined in Step D7 are met.
Securely attach the assembly to the building.
75-536.3
3
Page 4
INSTALLATION - VENTING
D11. From outside the building, caulk the gap between the
combustion air intake pipe and the building penetration.
D12. Attach the combustion air intake and vent pipe terminations
as follows:
D13. Install vent pipe and combustion air pipe between unit
heater and concentric vent adapter box as outlined in
"Section A – General Instructions – All Units".
D14. Once venting is complete, proceed to the section titled
"Installation - Gas Connections" in the unit Installation &
Service Manual.
Figure 4.1 - Adapter Box with Combustion Air Intake Pipe Attached
For Vertical Concentric Vent Kits (refer to Figure 3.1):
•Slidethecombustionaircapdownovertheventpipeand
fasten it to the combustion air pipe with at least 3 corrosion
resistant sheet metal screws.
•Attachtheventcaptotheventpipeusingatleast3corrosion
resistant sheet metal screws. Refer to instruction A12 for
connecting terminal to double wall pipe.
•Caulkthegapbetweenthecombustionaircapandthevent
pipe with silicone sealant, or other appropriate sealants
suitable for metal to metal contact and for temperatures
up to 400° F.
© Modine Manufacturing Company 2012
For Horizontal Concentric Vent Kits (refer to Figure 3.2):
•Attachthecombustionairintakeguardusingcorrosion
resistant screws at the end of the combustion air intake pipe
to prevent animals and debris from entering.
•Attachtheventcaptotheventpipeusingatleast3corrosion
resistant sheet metal screws.
Commercial Products Group
Modine Manufacturing Company
1500 DeKoven Avenue
Racine, WI 53403
Phone: 1.800.828.4328 (HEAT)
www.modinehvac.com
 Loading...