

Page 1
DESIGNED FOR THE PROFESSIONAL INSTALLER
OUR QUALITY CAN’T BE MEASURED
®
OUR QUALITY CAN’T BE MEASURED
®
MAK-21MAK-21
ACCESS KEYPAD
INSTRUCTION MANUAL
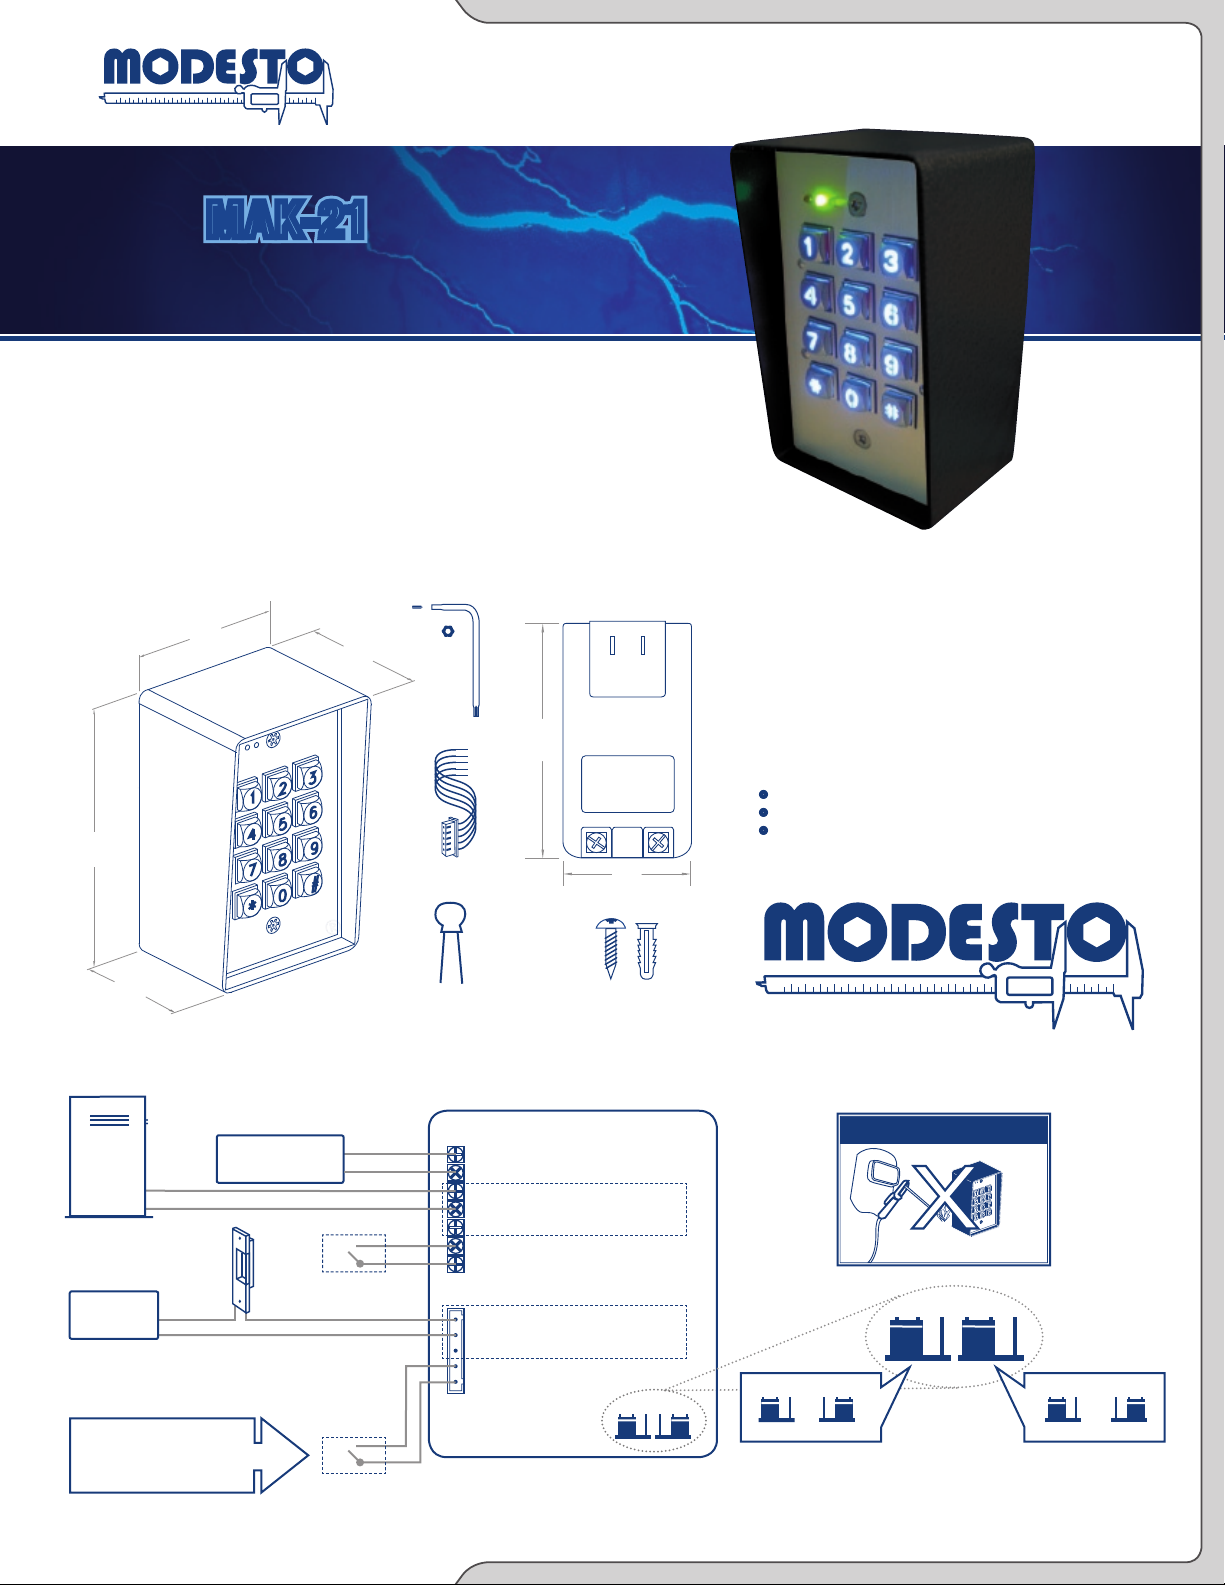
Specifications :
• Operating Voltage is 12 VDC
• Current Draw: Average 15 ma, Peak 100 ma @ 12 VDC
• Relays Electric Current: 2A Max @ 30 VDC : 4A @ 120 VAC
• Optimal Operating Temperature: -20 to +70
• Factory Master Code: 1234
• Invalid Code Lock Out:
master or entry codes are attempted.
The system will shut down for 60 seconds after 30 incorrect
˚C (-4 to +158 ˚F)
Dimensions & Contents
3”
2½”
4¾”
21/8”
MAK-21
Installation and Wiring Instructions & Diagrams
12 VDC
Power Su pply
Gate Op erator
Elect ric
Stri ke
Transf ormer
IMPOR TANT
Transform er or power supply h as to provide t he right vol tage requi red
by the stri ke. The door st rike must have a varis tor across t he door
strike ter minals to suppre ss the back EMF of the st rike - failur e to do
so will dam age the relay cont acts and el ectroni c compone nts.
!
Contact door re ed switch.
This reed switch is used to
reset the re -locking time to
0 seco nds when the d oor is
moved.
+
-
Reque st to Exit
WRENCH
HARNESS
VARISTOR
+
-
N.O.
Com.
N.C
P.B.
P.B.
N.O. (Blue)
Com. (Green)
N.C
Reed ( Brown)
Reed ( Brown)
NOTE
Reed swi tch cuts off o utput
from rel ay 1 when the reed
switch is tr iggered.
3¾”
.
. (Yellow)
POWER SUPPLY
21/8”
SCREWS & PLASTIC
WALL ANCHORS X 4
Figur e 1
Relay 1
Relay 2
4OR5 RESET
System Signals
SOUND SIGNAL
• 1 Beep: Correct PIN Codes, Any Key Pressed
• 2 Beeps: Entering or exiting from Programing mode
• 3 Beeps: Error
• 5 Beeps: Master Code Reset
• 5 Beeps, followed by 5 more beeps:
Successful System Reset
LED SIGNAL
• Green LED: Power On, Stand-by
• Red LED: Relay 1 Activated
• Yellow LED: Relay 2 Activated
CAU TION!
DO NOT WELD
NOTE: Metal use d for the keypad
housin g is NOT steel .
4OR5 RESET
Figur e 2 Figur e 3
Syste m 4 or 5 digit
code set ting
4 digit
Setting th e 4 or 5 digit code and resetting to the Master Code
5 digit
Maste r Code resett ing to
Factor y Code “12345 ”
Reset ting Norma l
Page 2
Quick Programming Guide
OUR QUALITY CAN’T BE MEASURED
®
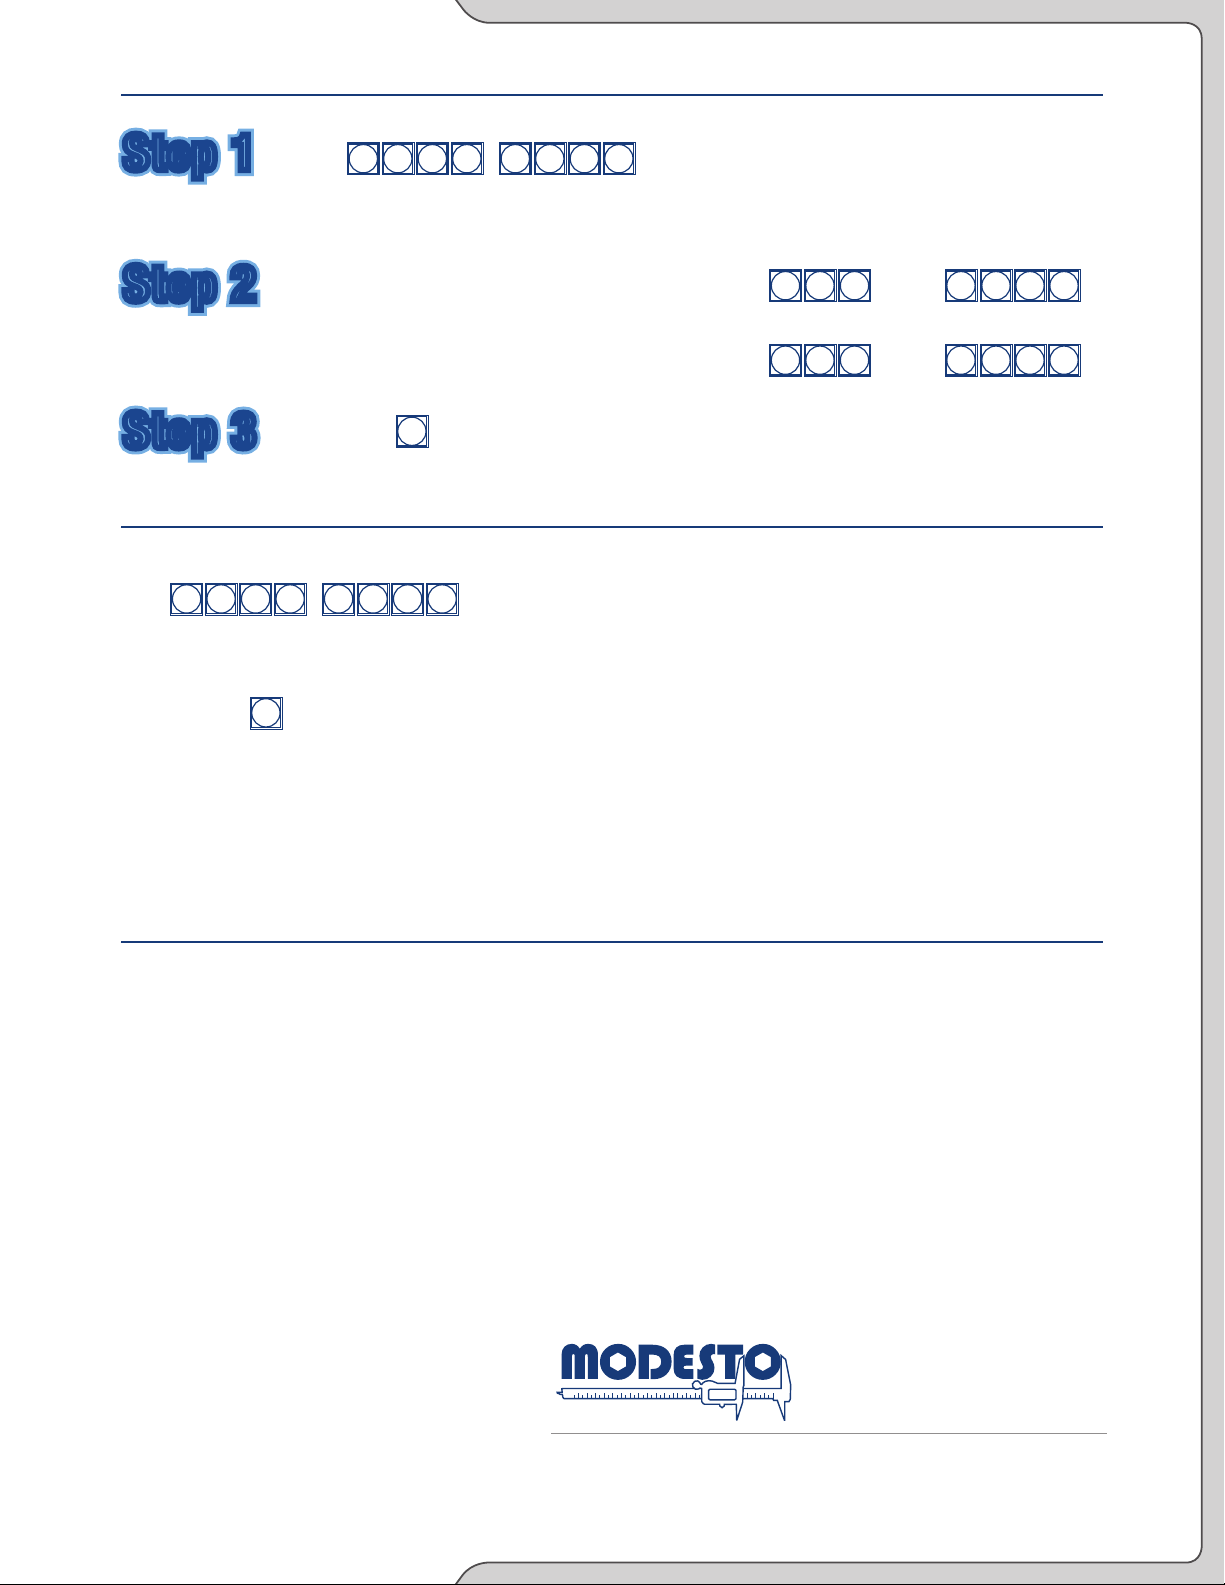
ENTER PROGRAMMING MODE
Step 1
Step 1
Press
1
2
(You will hear two beeps)
1
2
3
3
4
4
NOTE: If aft er 60 sec onds, yo u do not ente r any code s or data ,
the syst em will au tomatic ally exi t from programming mod e.
ADDING RELAY 1 MOMENTARY ENTRY CODE(S)
You have up to 20 entry code slots fro m (*01 to *20)
Step 2
Step 2
To program one ent ry code, you enter the entr y code
slot , followed by the four digit entry code.
(You will hear a beep after ever y entry)
EXITING PROGRAMMING MODE
Step 3
Step 3
Press to exit progr amming
#
(You will hear two beeps)
Complete Programming Guide
ENTER PROGRAMMING MODE
Press
1
2
3
4
1
2
3
4
NOTE: If after 60 seco nds, you do not enter any codes or d ata,
the syst em will automatic ally exi t from programming mod e.
(You will hear two beeps)
EXITING PROGRAMMING MODE
Press to exit progr amming
#
(You will hear two beeps)
Example A: To program entry code 5555 to relay 1
Press
Press
0
*
Example B: To program entry code 5894 to relay 1
0
*
[beep] [beep]
1
[beep] [beep]
2
5
5
5
5
8
9
5
4
ENTERING ENTRY CODES FOR RELAY 1
• Enter Programming Mode ( You will hear two beeps).
• Enter the ent ry code slot c hoose, betwe en
• Enter the 4 dig it or 5 digit code of your choice ( You will hear one beep).
(You ca nnot use c odes 00 00, 00000, 1234, 12345, or th e maste r code as any entry c ode.)
• Repeat for additional cod es
• Press # to exit ( You will hear two beeps
01 to *20 (You will hear one beep ).
*
).
ENTERING ENTRY CODE FOR RELAY 2
• Enter Programming Mode ( You will hear two beeps).
• Enter
• Enter the 4 dig it or 5 digit code of your choice ( You will hear one beep).
(You ca nnot use c odes 00 00, 00000, 1234, 12345, or th e maste r code as any entry c ode.)
• Press # to exit ( You will hear two beeps).
21 (You will hear one beep) ( You can only have one code on relay 2).
*
DELETING ENTRY CODES
• Enter Programming Mode ( You will hear two beeps).
• Enter the ent ry code slot you want to delete followed by 000 0
(You will hear one beep).
Example: To delete the entr y code in s lot 06 you wo uld ente r:
• Press # to exit ( You will hear two beeps).
06 and th en 0000 [beep ]
*
Other Programming Options
PROGRAMMING RELAY 1 STRIKE TIME
• Enter Programming Mode [two beeps]
• Enter
• Enter the number of seconds you
want the
(01-99 seconds ) [beep]
• Press # to exit [two beeps]
30 [beep]
*
relay to remain active
SETTING RELAY 1
AS A LATCH RELAY
• Enter Programming
Mode [two beeps ]
• Enter
• Enter 00 [beep]
• Press # to exit
COMPLETE RESET OF KEYPAD
• Open keypad
• Locate jumper labeled RESET
• Move jumper to the resetting position
as shown in Figure 3.
• You will hear 5 beeps, wait 5 more seconds
and then you will hear 5 more beeps.
• Keypad has been successfully reset, return
jumper to the normal position as shown in Figure 3.
30 [beep]
*
[two beeps]
PROGRAMMING RELAY 2 STRIKE TIME
• Enter Programming Mode [two beeps]
• Enter
• Enter the number of seconds you
want the
(01-99 seconds) [beep]
• Press # to exit [two beeps]
SETTING RELAY 2
AS A LATCH RELAY
• Enter Programming
Mode [two beeps ]
• Enter
*
• Enter 00 [beep]
• Press # to exit [two beeps]
31 [beep]
*
relay to remain active
31 [beep]
RESET TO DEFAULT MASTER CODE
• Open keypad
• Locate jumper labeled RESET
• Move jumper to the resetting position as shown in Figure 3.
• You will hear 5 beeps to indicate a successful reset.
• Once reset is successful, return jumper to the normal
position as shown in Figure 3.
CHANGING THE
MASTER CODE
• Enter Programming
Mode [two beeps ]
• Enter
• Enter the new 4 digit
master code [beep]
• Press # to exit [two beeps]
WARRA NTY: This product is warra nted a gainst defe cts in mate rial and wo rkman ship while used in
norma l service for a pe riod of 1 ye ar from t he date of s ale to the origina l custom er.
00 [beep]
*
SETTING KEYPAD TO USE
5 DIGIT ENTRY CODES
• Open keypad
• Locate 4OR5 jumper.
• Set jumper to the appropriate
digit setting as shown in Figure 2.
© 2009 Al l Rights R eser ved. Product spe cificat ions may c hange wi thout not ice. REV. 02-10
 Loading...