

Moderno M6RSST User Manual
11
INTRODUCTION
Thank you for purchasing Moderno speakers. When properly installed
your new speakers will give you years of entertainment pleasure.
This manual will teach you about your new speakers and will show
you how to install and get the very best performance from them.
Please read it thoroughly.
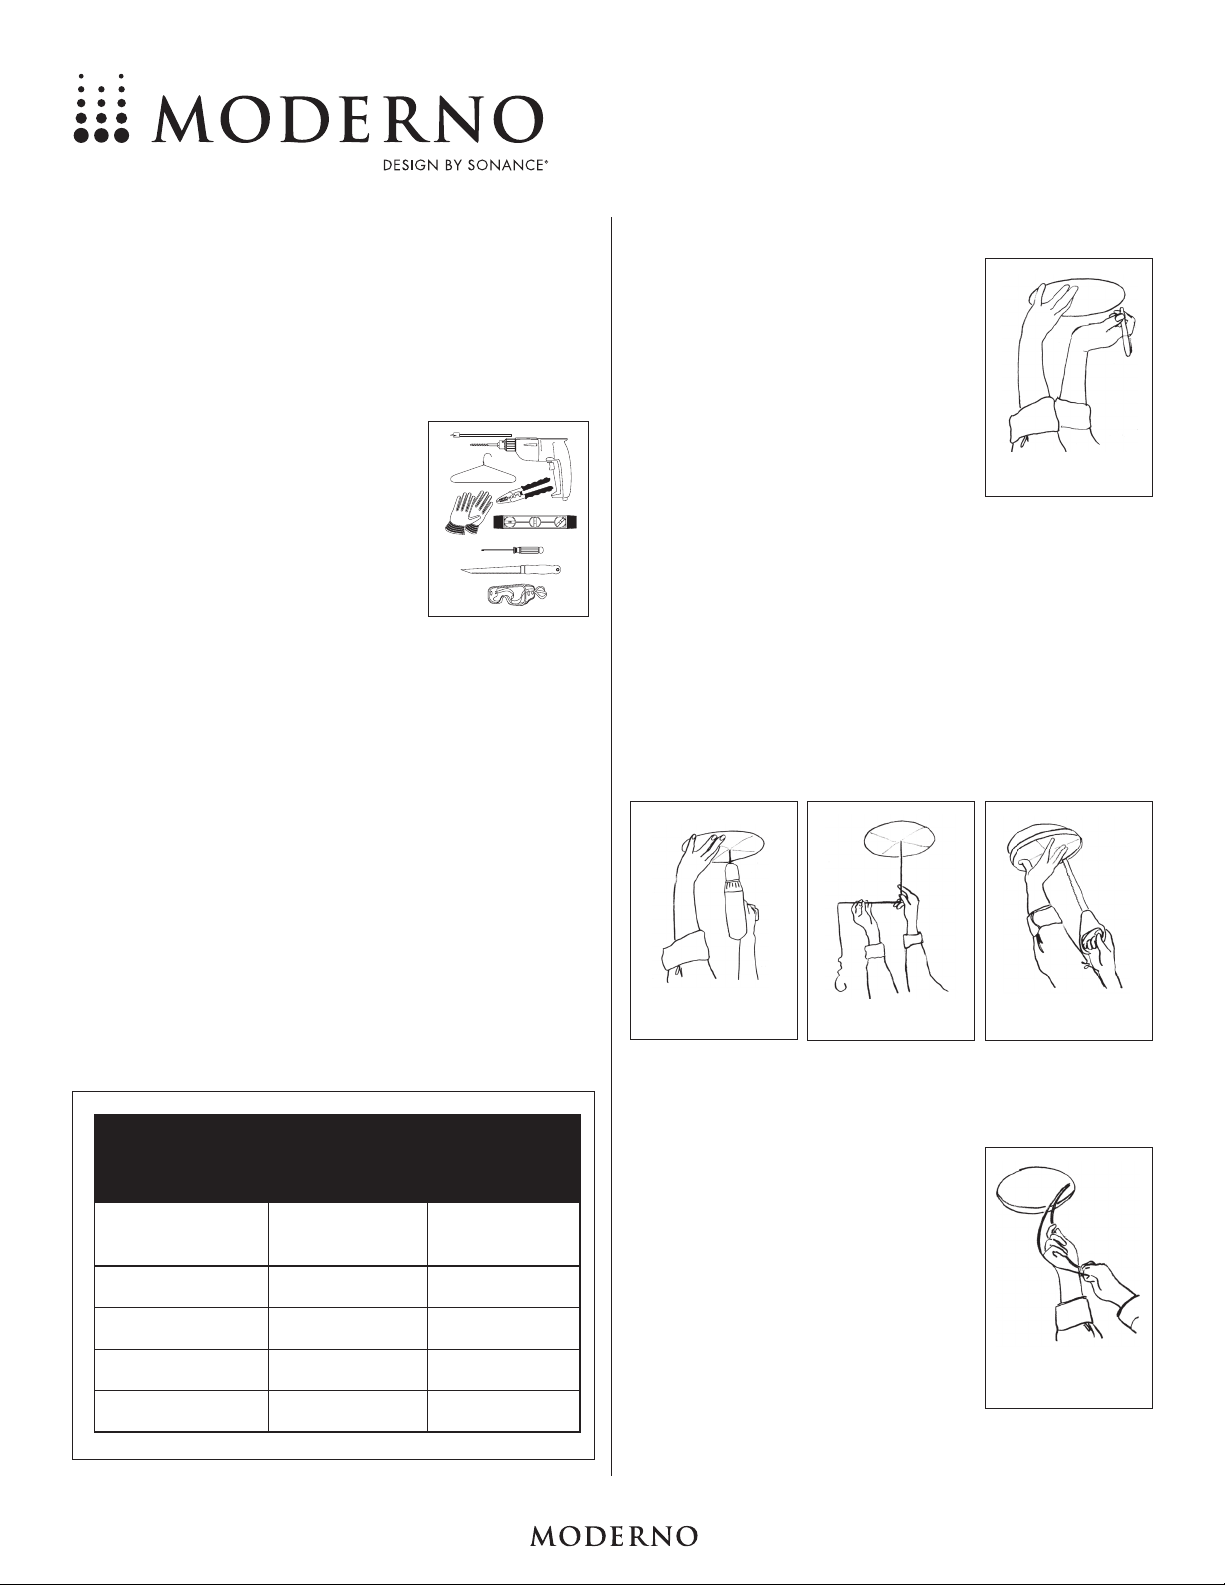
TOOLS NEEDED
You will need the following tools to install your Moderno speakers:
• Pencil
• Keyhole or drywall saw
• Philips screwdriver
• Small level
• Fish tape or coat hanger
• Wire strippers
• Gloves
• Safety goggles
• Drill with ¼” – ½” bit (for test hole) and 1”
Flat bit (if drilling through studs)
BOX CONTENTS
Your Moderno speaker box should contain the following items:
(1) Moderno M6R SST speaker
(1) Paintable grille
(1) Mounting cutout template (in packaging)
SPEAKER PLACEMENT
Moderno M6R SST Single Stereo Technology®speakers are ideal for
use in hallways, bathrooms, closets, or in any location where listeners
will be moving around or where a pair of stereo speakers would be
impractical. Because a single M6R SST speaker reproduces both
stereo channels from a single location, it will deliver outstanding
audio performance from an extremely wide variety of mounting
locations and can be mounted in either a wall or a ceiling.
Moderno M6R SST speakers have very smooth and predictable offaxis response, so they provide excellent coverage in distributed audio
systems from a wide variety of installation locations. The chart below
show how far apart the speakers can be placed at different ceiling
heights while still providing good coverage for all listeners.
The distances are based on ear heights of 62” for standing listeners
and 40” for seated listeners.
INSTALLING THE SPEAKERS
Step 1. Determine the location for the
speaker (see
Speaker Placement
on
page 1). Center the speaker
between the wall studs or ceiling
joists. Tap the wall or ceiling and listen for a “hollow” sound, or use a
stud finder to locate studs.
Step 2. Position the included cutout template
where the speaker is to be located
and trace the outline on the wall or
ceiling with a pencil.
• Make sure the speakers are even
with each other and level.
IMPORTANT: The edges of the cutout outline
must be at least ¾” away from any studs, to
allow room for the RotoLock
®
clamps to operate.
N
OTE
: R
EADSTEP6 ABOUT RUNNING SPEAKER WIRE BEFORE DECIDING
ON THE FINAL SPEAKER LOCATIONS
.
Step 3. Drill a small hole in the center of the outline you just traced.
Step 4. Insert a coat hanger wire into the hole to feel-around for pos-
sible obstructions. If there are obstructions, patch the hole and
select another location for the speaker. Make sure that any
studs will be at least ¾” away from the edges of the cutout.
Step 5. Carefully cut the outline of the mounting hole using a keyhole
or drywall saw. Remove the drywall from the cutout.
IMPORTANT: Make sure your amplifier’s power
is turned off before performing Step 6.
Step 6. Run the speaker cable from the speaker outputs of your
amplifier to the speaker locations.
Use high-quality cable such as
HomeTech HTC100 16/4 cable. Pull
the cables through the mounting
holes you cut in the wall.
• Allow a few extra feet of cable, and
leave enough cable slack so you
can strip the insulation from the
conductors when you’re ready to
connect to the speakers.
N
OTE
: I
F SPEAKER CABLE IS TO BE RUN
THROUGH WALLS OR CEILINGS
,
THE CABLE
MUST
BE
UL-
AND
CL-
RATED FOR YOUR
SAFETY AND BUILDING CODE COMPLIANCE
.
CONTINUED ON PAGE 2
M6R SST SINGLE-STEREO
TECHNOLOGY®SPEAKER
INSTRUCTION M ANUAL
S
PEAKER SPACING (IN FEET
)
FOR A DISTRIBUTED AUDIO SYSTEM
S
TANDING
L
ISTENER
S
EATED
L
ISTENER
10-
F
OOT CEILING
12-
F
OOT CEILING
14-
F
OOT CEILING
8-
F
OOT CEILING
9.5’ Apart
13.5’ Apart
17.5’ Apart
21.5’ Apart
5.7’ Apart
9.7’ Apart
13.7’ Apart
17.7’ Apart
Steps 1 and 2
Step 3
Step 4
Step 5
Step 6
MODERNO M6R SST SING LE-STEREO TECHNOLOGY®SPEAKER
22
CONTINUED FROM PAGE 1
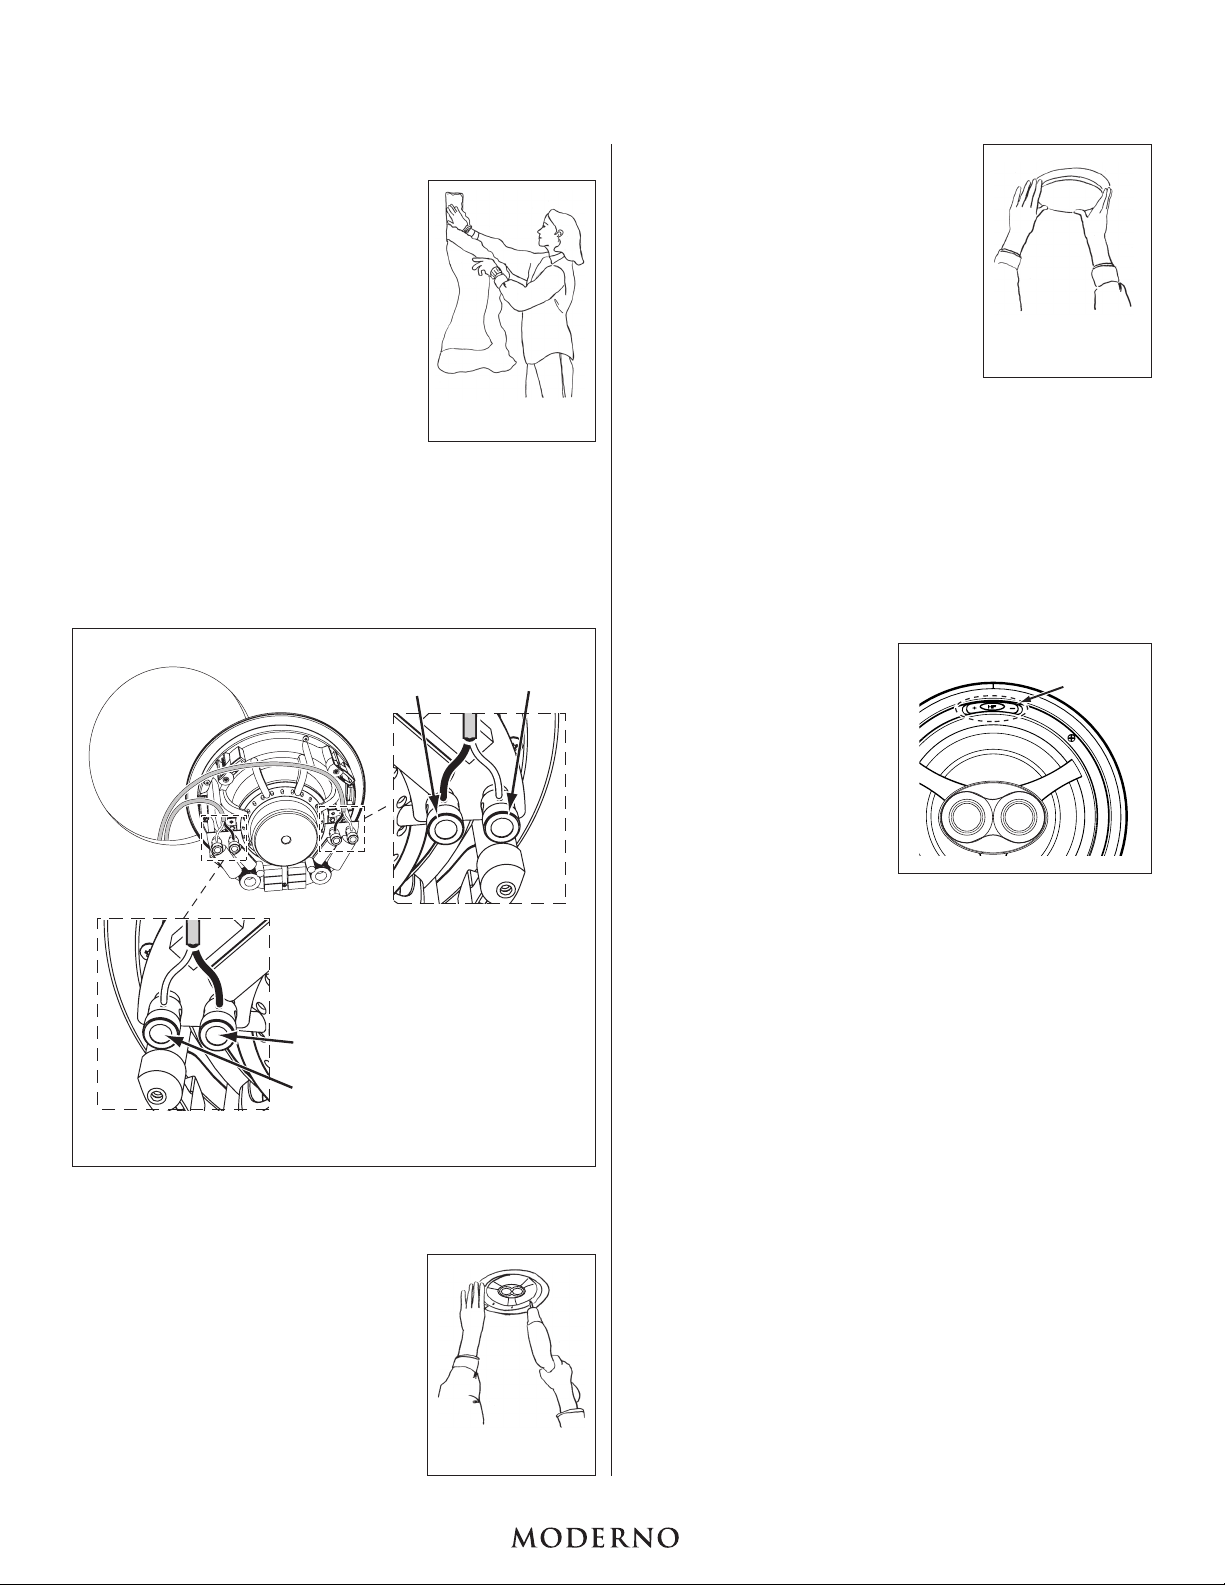
Step 7. Speaker performance can be
enhanced by insulating the wall or
ceiling cavity with fiberglass insulation. When insulating speakers, it is
best to use a sheet of unfaced fiberglass insulation behind and around
the sides of the speaker.
Step 8. Connect the positive (“+”) wires from
both amplifier channels to the
speaker’s red terminals. Connect
the negative (“–”) wires from both
amplifier channels to the speaker’s
black terminals.
• The speaker’s connector posts are
spring-loaded. Push the top of
each connector post down to open the connector and insert
the exposed wires into the holes in the posts.
IMPORTANT: Be sure not to let any stray ‘+’ and ‘–’
wires touch each other. Touching wires can cause a
short-circuit that could damage your amplifier.
• Double-check that you connected amplifier “+” to speaker
“+” and amplifier “–” to speaker “–”.
Step 9. Make sure all the RotoLock clamps are in the full clockwise
position so that they are tucked within the mounting hole’s
border. Insert the speaker into the mounting hole.
Step 10. Tighten the four screws on the front of
the speaker baffle evenly until the
speaker is seated snugly and evenly
against the wall or ceiling.
IMPORTANT: If you are using a
drill or electric screwdriver to
tighten the screws be sure use the
lowest torque setting.
Step 11. Install the grilles by placing them
into the speaker baffles. Powerful
magnets on the grilles and on the
speaker baffles will hold the grilles
firmly on the speakers.
PAINTING THE
GRILLES
Moderno grilles may be painted to colormatch their surroundings.
1. Remove the grilles from the speakers.
2. Remove the scrim cloth that is attached
to the backs of the grilles. (The adhesive that holds the cloth in
place is reusable.)
3. Paint the grilles with very thin paint (5 parts thinner to 1 part
paint), being careful not to plug the holes.
4. When the paint has fully dried, re-attach the scrim cloths to the
backs of the grilles.
5. Re-install the grilles on the speakers.
ADJUSTMENTS
Tweeter Level Control
The Moderno M6R SST speaker
has a tweeter level control
switch that lets you boost or cut
the tweeter level by 3dB. This
allows you to adjust the
speaker’s brightness to better
match your listening room or
personal taste.
Once you have installed the
speakers, listen to a variety of
music that you are familiar with.
If the music all tends to sound
too bright or dull, use the
Tweeter Level Control to
compensate. If some recordings sound dull and some sound bright
the speaker is accurately reproducing differences in the recordings,
and you should leave the control in the middle (0dB) position.
SPECIFICATIONS
M6R SST
Tweeter: Two 1" (25mm) Silk domes
Woofer: 6½" (133mm) Woven glass fiber cone,
rubber surround
Frequency Response: 45Hz – 20kHz ±3dB
Impedance: 8 Ohms nominal
Power Handling: 100 Watts maximum
Sensitivity: 92dB SPL (2.83V 1 meter)
Grille Material: Perforated metal
Adjustments: ±3dB Tweeter Level
Dimensions (Dia x D): 9” x 3¾” (229mm x 95mm)
Cutout Dim. (Dia): 8
1
/
8
" (206mm)
Shipping Weight: 4 lbs. (3.2kg) Each
Step 7
Red Cap
“+”
Red Cap
“+”
Black Cap
“—”
Black Cap
“—”
Step 8
Step 10
Step 11
Tweeter Level
Control
 Loading...