

Page 1
5 Port Universal Charger
with Amazon Voice Service
MODEL NO.:
CR25
Page 2
Contents
Thank you for purchasing our product. For operation and security, read this manual
carefully and keep it handy for future reference.
Contents.............................................................................................................................................01
Features..............................................................................................................................................01
Warnings and Precautions..................................................................................................................02
Important Safety Instructions..............................................................................................................03
Quick Start On Charging Your Device
What’s in the Gift box.........................................................................................................................08
Location of Functions -
Operations -11
Setup............................................................................................................................................12-21
Troubleshooting..................................................................................................................................22
Care and Maintenance
Specifications
....................................................................................................................................10
....................................................................................................................09 10
.......................................................................................................................23
.....................................................................................................................................24
............................................................................................04-07
Features
Ch arge an y 5 port able de vices at once
• Features SCD Technology
Smart Current Detection ens ures proper device protection by adju sting the
current flow needed to each dev ice.
• Charges 5 Dev ice s, 3 in Cradles
Charge any 5 device s, with capability of 3 standing up right, simultaneously.
Note: Charges all smart phones and tablets of 5V from 0~2.1A.
01
Page 3
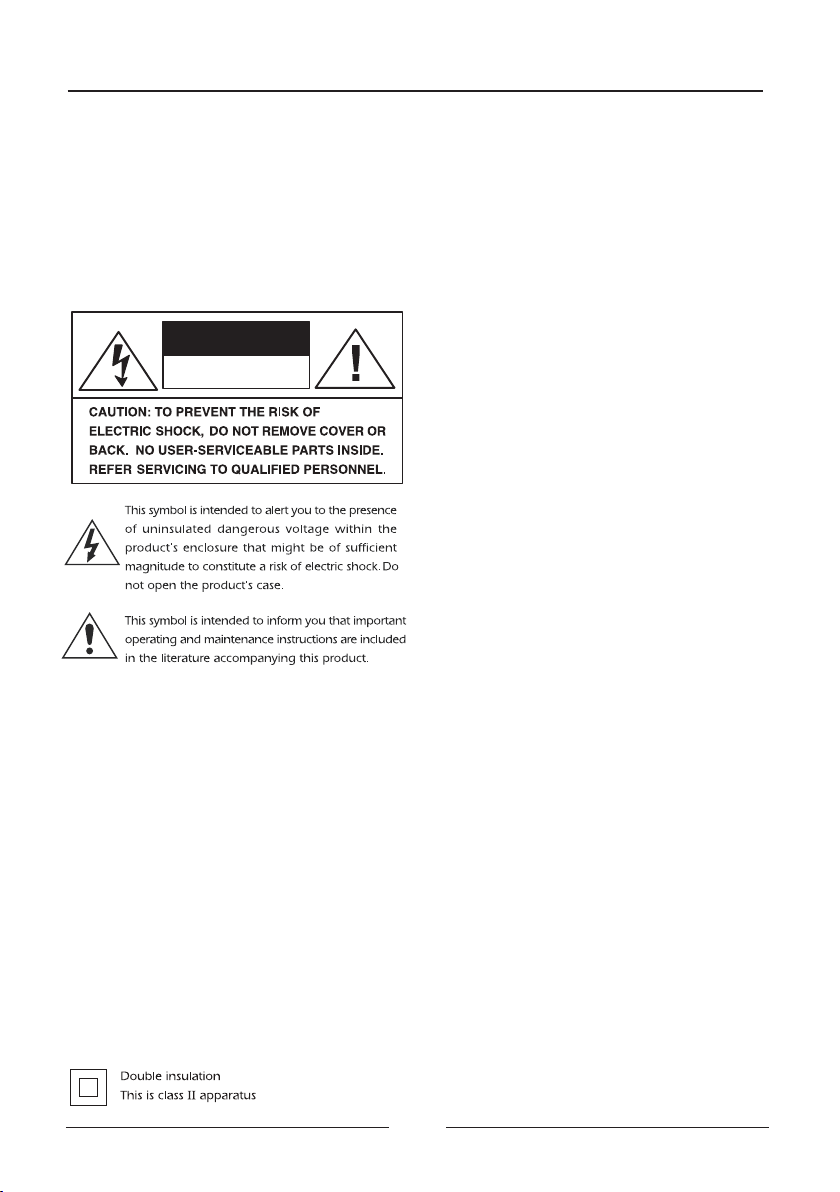
Warnings and Precautions
WARNING: To reduc e th e ri sk o f fi re o r el ec tr ic
shock, do not ex po se t hi s ap pa ra tu s to r ai n or
moisture.
CAUTION: Use o f co nt ro ls o r ad ju st me nt s or
performanc e of p ro ce du re s ot he r th an t ho se
specified ma y re su lt i n ha za rd ou s ra di at io n
exposure.
*Caution Mar ki ng a nd r at in g pl at e wa s
located at botto m en cl os ur e of t he a pp ar at us
CAUTION
RISK OF ELECTRIC SHOCK
DO NOT OPEN
Main plug is use d to d is co nn ec t de vi ce a nd i t
should remai n re ad il y op er ab le d ur in g in te nd ed
use. In order to d is co nn ec t th e ap pa ra tu s fr om t he
mains comple te ly, the mains plug should be
disconnect ed f ro m th e ma in s so ck et o ut le t
completely. ( fo r ap pa ra tus with power cordset as
disconnect d ev ic e)
Battery shal l no t be e xp os ed t o ex ce ss iv e he at
such as sunshi ne , fi re o r th e li ke .
Location of la be l on t he a pp ar at us i f th at l ab el w as
aff ix ed under a lid or on the bottom of the
apparatus wi th a m as s no t ex ce ed in g 7k g.
SAFETY
When connecting or disconnecting the AC cord, grip
the plug and not the cord itself. Pulling the cord may
damage it and create a hazard.
When you are not going to use the unit for a long period
of time, disconnect the AC cord.
MOISTURE AND CONDENSATION
If unit is exposed to moisture and extreme cold
temperatures, then moved to a warm environment,
condensation may form on internal components. Under
these circumstances, powering the unit on may cause
damage to the unit or cause harm to the user. Allow the
unit to stand in a warm environment for 1 to 3 hours and
allow the unit to air dry safely.
WHEN IN USE
Do not use this unit in extremely hot, cold, dusty, or
humid conditions.
Do not restrict the air flow of the unit by placing it on
carpet or covering.
FCC Information
This device complies with part 15 of FCC Rules.
Operation is subject to the following two conditions:
(1). This device may not cause harmful interference.
(2). This device must accept any interference received,
including interference that may cause undesirable
operation.
NOTE: This equipment has been tested and found to
comply with the limits for a Class B digital device,
pursuant to Part 15 of the FCC Rules. These limits
are designed to provide reasonable protection against
harmful interference in a residential installation. This
equipment generates, uses and can radiate radio
frequency energy and,
in accordance with the instructions, may
cause harmful interference to radio
communications. However, there is no
guarantee that interference will not occur in a
particular installation. If this equipment does cause
harmful interference to radio or television
reception, which can be determined by turning the
equipment off and on, the user is encouraged
to try to correct the interference by one or more of
the following measures:
- Reorient or relocate the receiving antenna.
- Increase the separation between the equipment and
receiver.
- Connect the equipment into an outlet on a circuit
different from that to which the receiver is connected.
- Consult
technician for help.
This equipment complies with FCC radiation exposure
limits set forth for an uncontrolled environment. This
equipment should be installed and operated with
minimum distance 20cm between the radiator & your
body.
CAUTION: Changes or modifications not expressly
approved by the party responsible for compliance could
void the user’s authority to operate the equipment.
the dealer or an experienced radio/TV
if not installed and used
02
Page 4
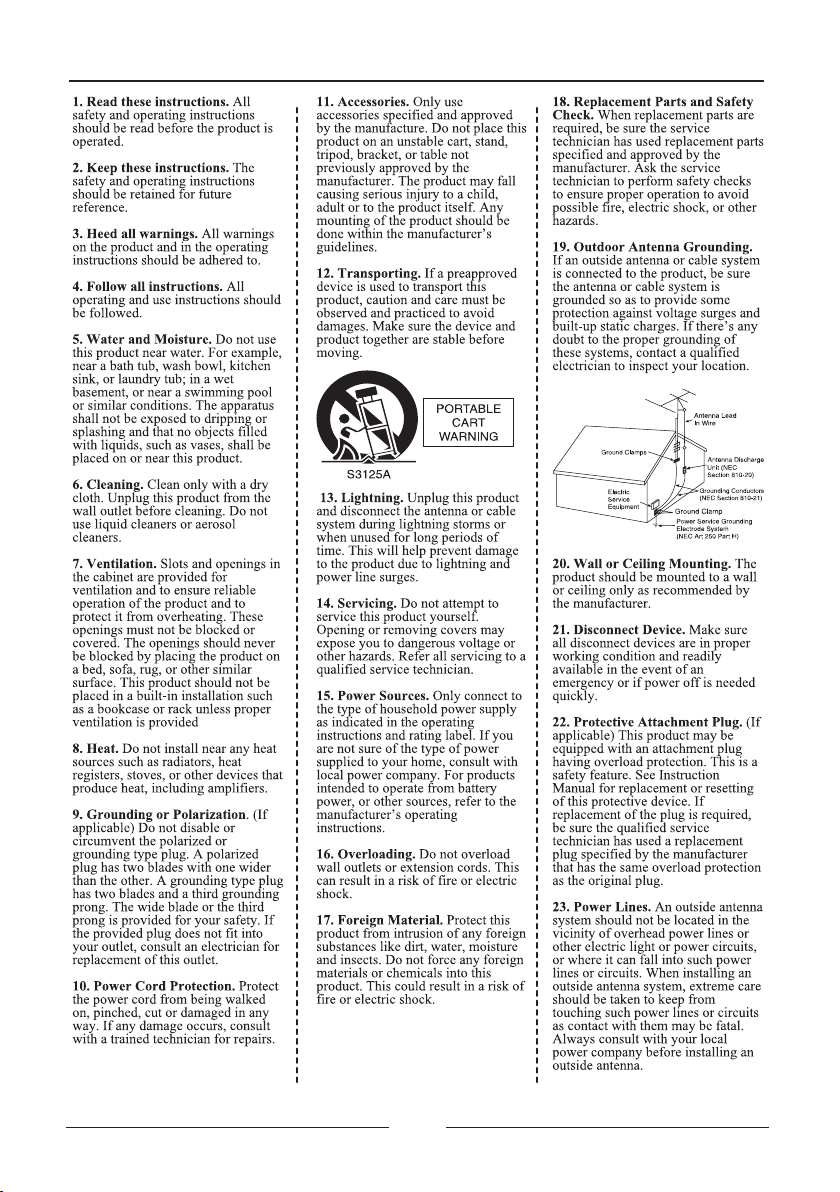
Important Safety Instructions
03
Page 5
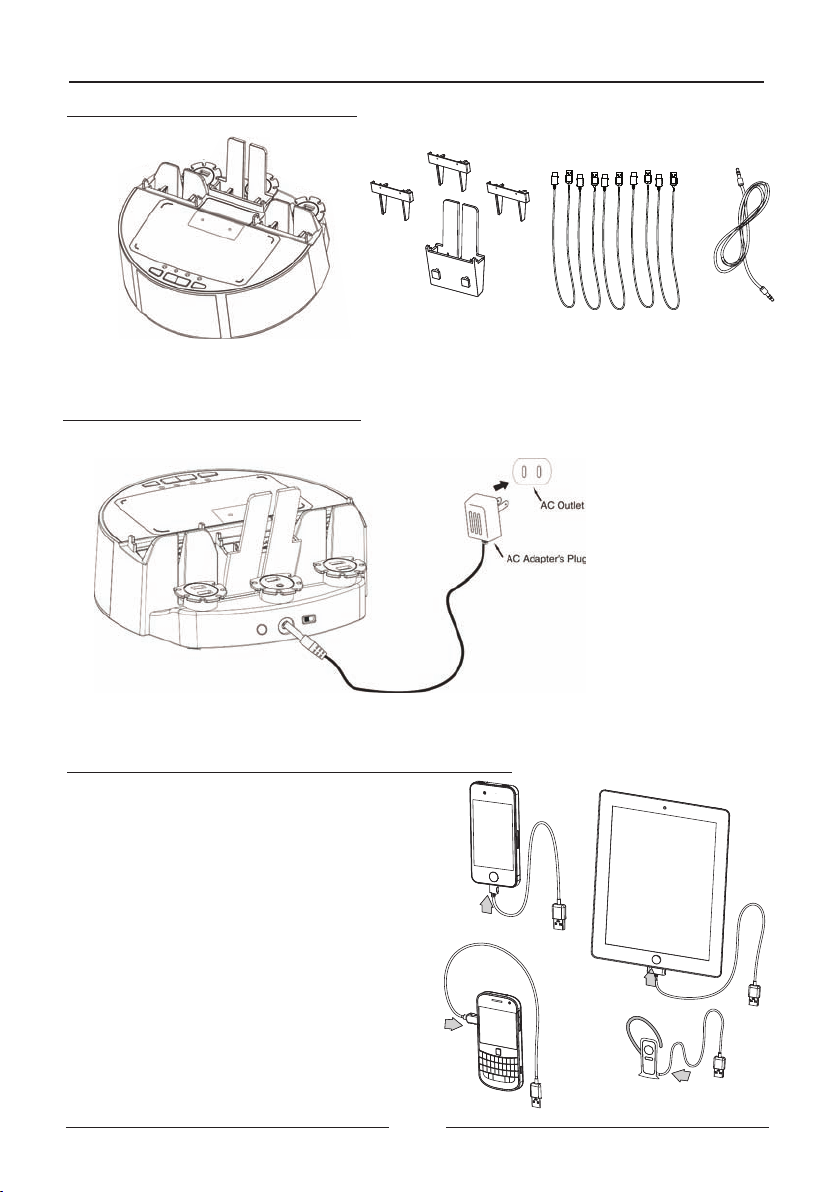
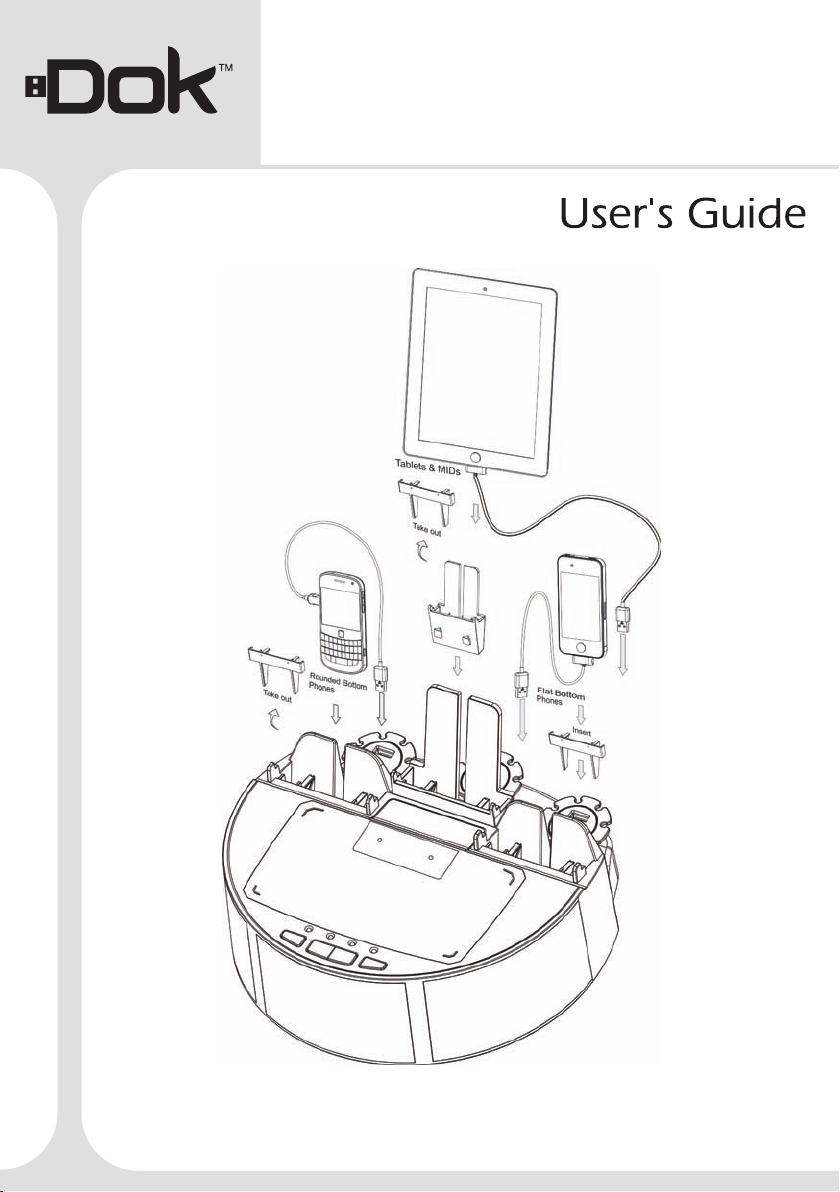
Quick Start On Charging Your Device
Re move It ems fr om Pack age
Co nnect U nit to P ower Ou tlet
Ho w to Use th e CR25 t o Charg e Your D evice
1. Connecting you r devices and the unit;
Conn ect your de vice to a USB p ort
Flat Bottom Phones
Round Bottom Phones
04
Tablets & MIDs
Other Devices
Page 6
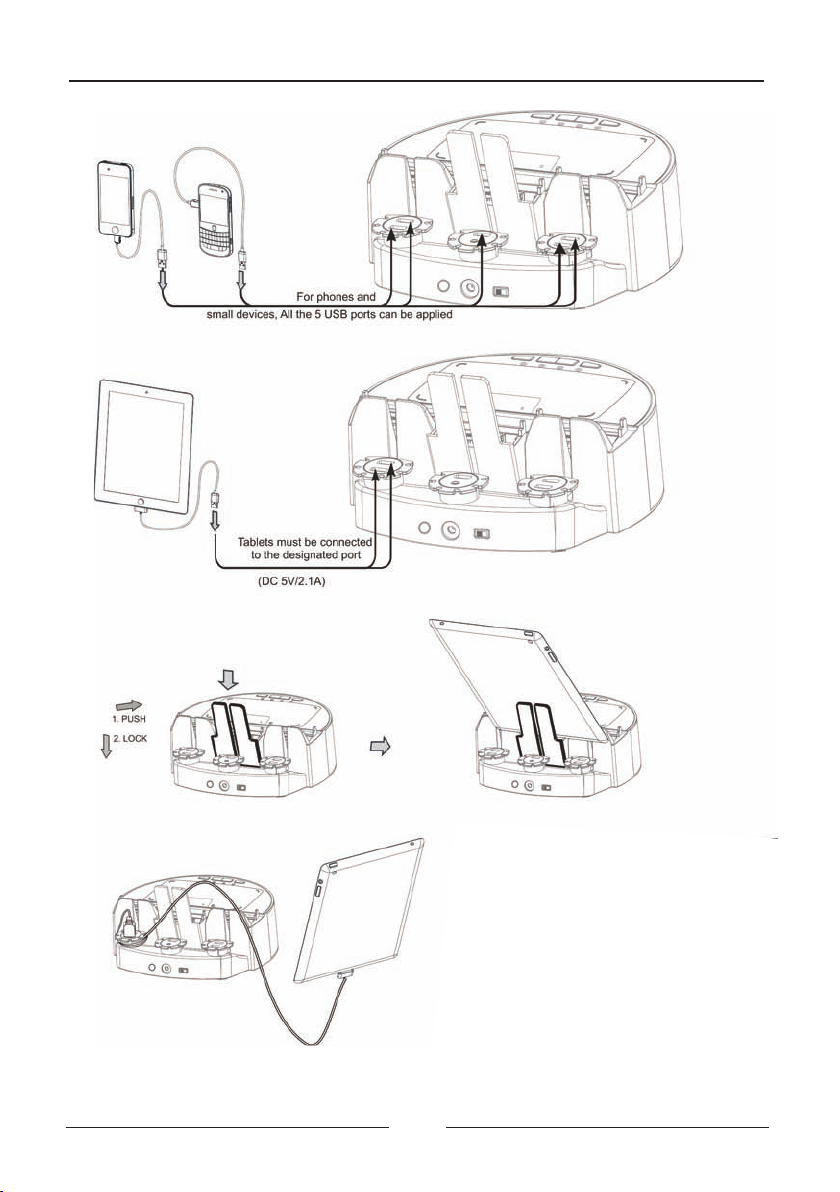
Quick Start On Charging Your Device
2. Connect your dev ice to any of the 5 USB ports available
05
Page 7
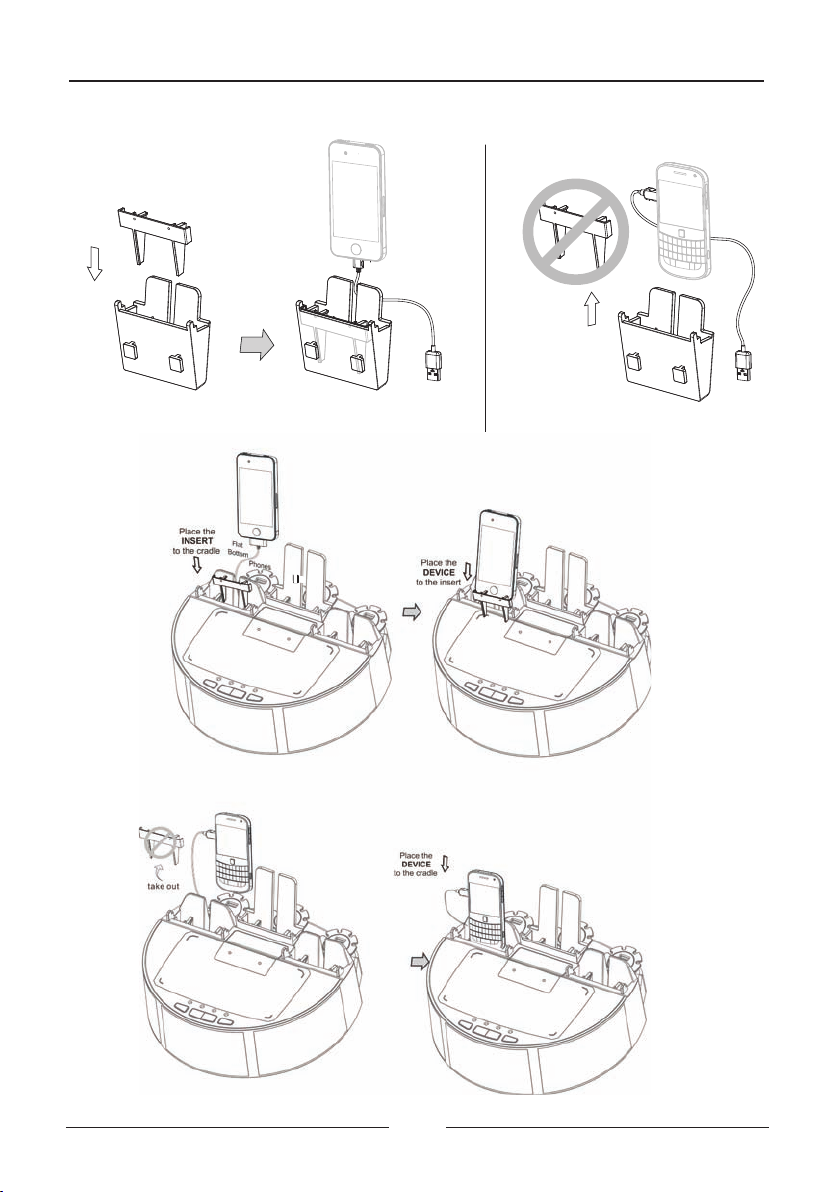
Quick Start On Charging Your Device
3. Your pho ne's shape will determine if an ins ert is needed. Use the insert for fla t
bottom phones. Ro und bottom phones do not need the ins ert.
Optional Insert
A
For FLAT bottom phones
B
For ROUND bottom ph ones
06
Page 8
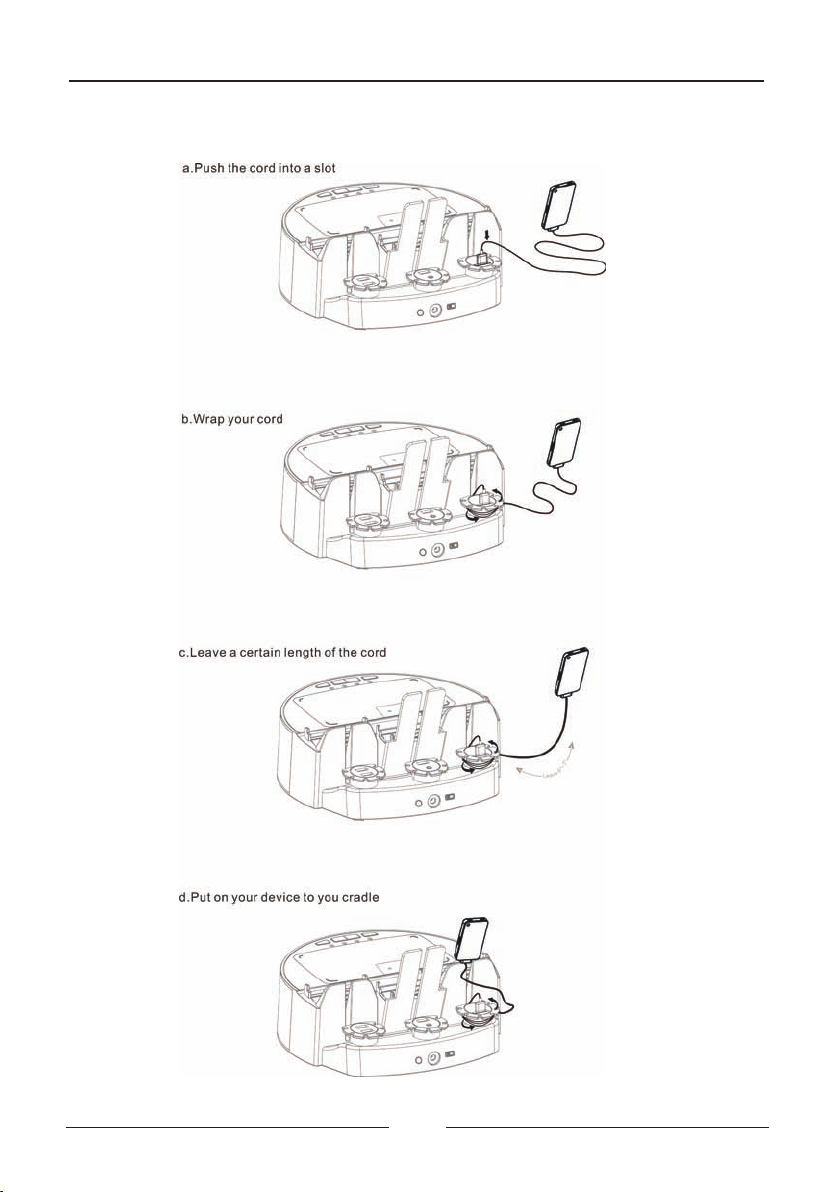
Quick Start On Charging Your Device
4. Wrap the Cord
07
Page 9

What’s in the Gift box?
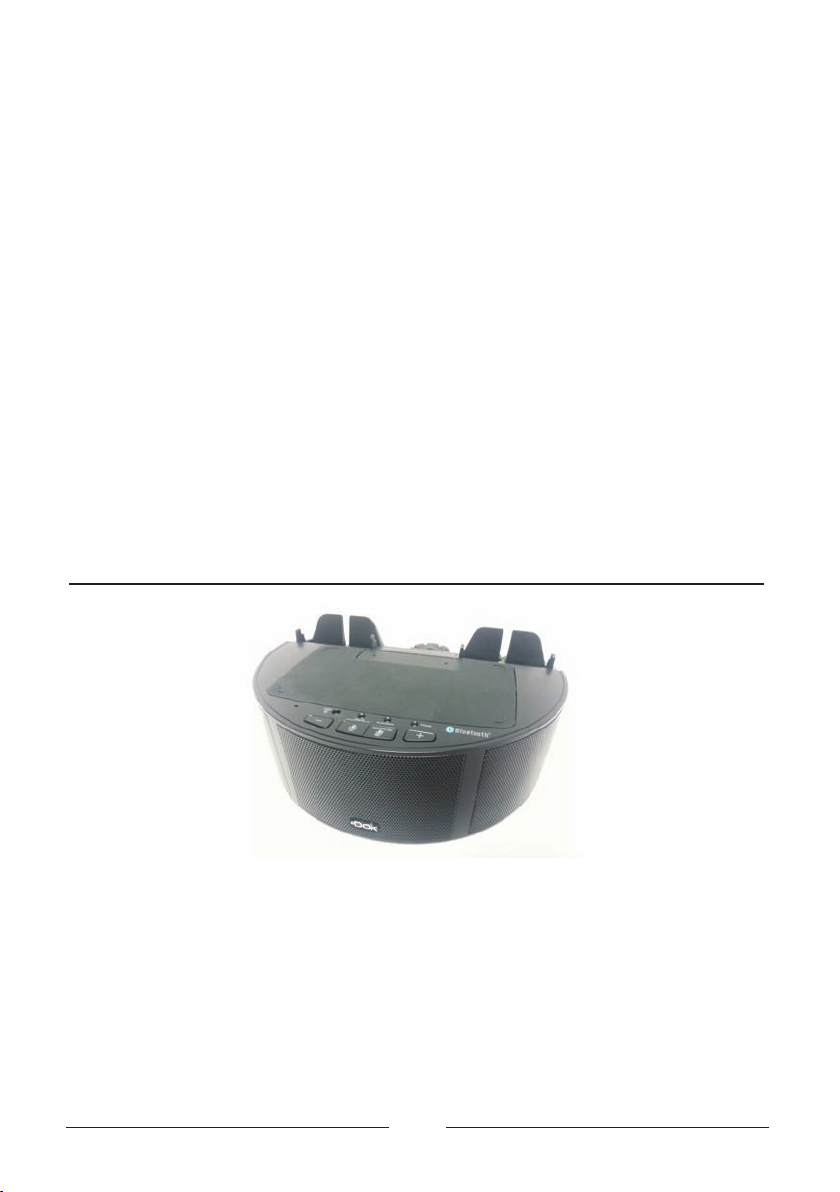
CR25 Base Unit
Speaker (AUX IN) Cable
5 Port Un ivers al Char ger
with Am azon Vo ice Ser vice
MODEL NO.:
CR25
1 Device Cradles &
3 Cradle Inserts
USB Phone Charging Cable
User’s Manual
08
Page 10

Location of Functions
AUX IN
1. indi cator
2. Wi Fi indi cator
3. VOL UME - butto n
4. button
5.
SOURCE / button
6. VOL UME + butto n
7. POW ER indica tor
BLUE TOOTH ind icator
8.
9. Mic phone
12
9
10. DC 5 V / 2.1A USB po rts
11. AU X IN jack
12. 5V / 1 A USB ports
13. WP S button
14. DC I N jack
15. PO WER ON/OF F switch
16. Sp eaker (L)
17. Sp eaker (R)
11
10
1
2
3
4 5
13 14 15
16
17
8
7
6
09
Page 11

Solid Red – Alexa mute
Operations
In dic ator Ligh ts
Mode /Connec tion LED
POWE R Solid red – POW ER, W i-Fi Stan dby Mod e.
Soli d Blue – Amaz on Alexa li steni ng/respon ding.
Flas hing Blue - A mazon Ale xa search ing
BLUE TOOTH Fla shing – Rea dy for pa ir.
BLUE TOOTH Sol id Blue – Pai re d to Blue tooth dev ice.
AUX IN S olid Yell ow – Aux In ( 3.5mm aud io input) i n use.
Po wer C onnecti on
This p roduct oper ates on powe r supply.
Plug t he AC Adapt or into a hou sehol d outlet AC s ource.
Co nne cti ng the A C Ada pte r
1 Inse rt the DC plu g of the AC ada pter (i ncluded ) into th e DC Jack of th e unit.
.
2. Ful ly insert t he blades o f the AC ad apter (in clude d) into the s lots of a wor king
wall s ocket as sh own.
3. Sli de POWER ON /OFF swit ch to ON lo cation, P OWER in dicator w ill light u p.
Wi Fi Al exa Opera tio n
Ab out A lexa
Alex a is Amazon 's cloud- based v oice serv ice tha t is always g etting sm arter. Alexa provi des
capa bilitie s or skills t hat ena bles cust omers t o interac t with devi ces in a mo re i ntuitiv e way
usin g just your v oice.
Just a sk Alexa to a nswer que stion s, play mus ic, read the ne ws, get w eather an d traffic repor ts,
add th ings to you r to-do lis t, cont ro l your smar t home, voc abula ry and preferen ces with ne w
feat ures contin ually bei ng adde d.
En abl e Alexa
Down load DOK Ap p and conne ct your W IFI ALEXA W ITH BLU ETOOTH SP EAKER to in ter net.
Then p lease log i n your Amaz on Acco unt in DOK Ap p to enab le the Alex a functio n.
In tro duction t o DOK
DOK is a n ext-gen eration i ntell igent spe aker wi th Alexa, A mazon's c loud- based voi ce service.
Wi Fi Alex a with Blue tooth Spe aker he lps you to co nnect to online mu sic, podc asts, a nd news
with o ur built- in system .
1. Sli de POWER ON /OFF swit ch to tur n the uni t on.
2.
Press and hold the SOURCE/ button to select WiFi function, a chime will sound and the
indi cator wil l light off. Th e unit is n ow ready to sea rc h and conne cting you r ro uter.
3. Ope n DOK App on yo ur phone, i t will se arch system a utomati cally, if there is no ex istin g
syst em, pleas e follow th e infor mation to i nput de vice name a nd passwo rd a nd clic k “confir m”.
4. Press WPS button o n re ar side of un it to connect the rout er. after 1 0-15 se conds, yo u will
hear a voice to prompt you the connection is successful.
Note: If you find your device is unable to connect, press and hold WPS button 10 seconds, repeat
the above steps 2-4 again.
5. Press the button to call Alexa and talking.
AC 110 V/50Hz ~ AC 2 40V/60H z
WiFi
10
Page 12

Operations
BL UET OOTH Oper ati on
Pair ing a Bluet ooth enab led Dev ice with th e WiF i Alexa with Bluet ooth Spea ker.
1. Sli de POWER ON /OFF swit ch to tur n the uni t on.
2.
Press and hold the SOURCE/
the Bl uetooth i ndicato r will fl ash. Star t pairi ng pro cess to c onnect to y our Bluetooth de vice.
3. Tur n on Blue tooth f unction o f your de vice and en able the se arch or sca n functio n to find
CR25 ( see your de vice's in struc tions to ad d or setu p a Bluetoo th device ).
4. Sel ect CR25 from t he device l ist whe n it appear s on you devi ce screen . If req uired,
ente r the pass co de “0000” t o pair (l ink) CR25 w ith you r device.
5. Onc e paired with a d evice, th e indic ator will l ight stea dily an d your will h ear the s ound
to con firm that p airing is c omple ted.
6. If yo u want CR25 c hange to pa ir with a nother Bl uetoo th device . You wil l turn off th e
Blue tooth dev ice to disc onnec t wirelessl y for the fir st time . After repea t steps 3 to 5 fo r
next B luetoot h device.
To C onn ect Previ ous ly Pa ired B lue too th Device
CR25 c an store one prev iously pa ired device f or quic k pairing d uring pow er on. Wh en the
unit i s powered on an d the previou sly paired de vice is f ound with in the oper ating r ange,
the un it will pai r the devic e autom aticall y.
Pl ayi ng from a BLU ETO OTH D evic e
You ca n play musi c from your Bluetoot h device wi re lessly to CR-25 af ter pairi ng.
1. Sel ecting yo ur favori te song , press the PLAY but ton on your B lueto oth devic e to
play o r pause the B luetoot h devic e playbac k.
2. Adj ust both th e VOLUME +/ - butto ns of your CR -25 and y our Bluet ooth devi ce
unti l you reach a com fortabl e liste ning leve l.
button to select Bluetooth function, a chime will sound and
AU X IN Op era tion
This u nit provide s an auxili ary aud io signal i nput jack f or conn ecting ex ter nal audio
devi ces like MP 3 players , CD play ers and lis ten to th em through th e speaker s of this u nit.
1. Use a n audio cab le with one 3 .5 mm ste re o plug on eac h end of the ca ble.
2. Plu g one end int o the AUX IN Ja ck on the m ain unit an d the oth er end of the c able into
the Li ne-out Ja ck or Headp hone Ja ck of your ex ter nal audio d evice.
3. Tur n on the un it and ex terna l audio d evice.
To select auxiliary audio input, press and hold the SOURCE/ button to select AUX IN mode.
4.
AUX IN indicator will light up.
5. The v olume lev el can now be c ontroll ed through th e main unit . Opera te all othe r functio ns
on the a uxiliar y device as u sual.
11
Page 13

Setup
1. Download the Alexa App
Download the Amazon Alexa app to your device by scanning the appropriate QR
code below or search for the Amazon Alexa app in the Google Play™ Store, or
Apple App Store
The Amazon Alexa app connects your Concierge speaker to Alexa’s voice services.
It’s also where you see an overview of your requests and manage your contacts,
lists, news, music and settings.
Once downloaded, open the Alexa app and log into your Amazon account. If you do
not already have an Amazon account, choose “Create a new Amazon account” and
enter the requested info. Once logged in, the app will prompt you for setup. You can
add these details now by choosing “Get Started,” or skip these steps and complete
the process later. You cannot use Alexa Voice Services if you aren’t logged
into an Amazon account.
2. Download the DOK App
Download the DOK app to your device by scanning the QR codes below or search
for the DOK app in the Google Play™ Store, or Apple App Store
®
.
AppleAndroid
QR code QR code
®
.
AppleAndroid
QR code QR code
The DOK app lets you play music and audio from streaming services like
Spotify, iHeartRadio and others. It also controls the speaker’s other functions, such
as Multi-room play, Multi-channel play, etc.
Note: This app is designed for mobile devices only, such as smartphones
or Wi-Fi enabled tablets. It is not available for use on regular desktop or
laptop computers.
12
Page 14

Setup
3. Connect to Wi-Fi
To use the speaker’s Wi-Fi features, the speaker and your mobile device must both
be connected to a Wi-Fi network. The app will guide you through the process, just
follow the on-screen instructions and have your network password ready.
After the initial connection, the speaker will remember the Wi-Fi network and
automatically connect to it when it is in Wi-Fi Mode. If the speaker should become
disconnected or will not connect normally, repeat the steps below.
Initial Wi-Fi Connection
Note: If you have a dual band wireless router, be sure to connect using
the 2.4GHz band.
1.
Slide the POWER ON/OFF switch to turn the unit on. The WiFi indicator
may off light after first powering on. this is normal, please wait a few time
untill a chime sound will hear to confirm in WiFi Standby mode.
2. Pr
ess and hold the Pair (WPS) button on the speaker.
3. Open the DOK app on your device and press “Add Device”. Follow the
on-screen prompts and enter your Wi-Fi password .
4.
The app will display it’s progress as it configures the speaker and your Wi-Fi
network. When the speaker and your device are successfully connected to Wi-Fi,
a voice will announce the connection . Press “Finished” to start using the app .
13
Page 15

Setup
14
Page 16

Setup
4. Connect to Your Amazon Account
With the Wi-Fi connection complete, the DOK app can now link the speaker with the
Amazon Alexa app on your device. Apple devices will ask you to manually link with
the Amazon Alexa app. Android devices will do this automatically, however, if for
some reason the DOK app does not automatically link with Amazon Alexa app, follow
the steps below.
Manual Setup
1. From the Music Player Screen, swipe right or press the icon in the top left of the
screen to access the Main Menu .
2. Select Amazon Alexa from the list
3. Enter your Amazon account login information as requested
4. When login is successful, press Next to fnish setup and begin using Alexa
5. Things to Try with Alexa
Now that you’re connected, try interacting with Alexa. Start by saying “Alexa,”
followed by a command or question. Here are some examples:
» “Alexa, tell me a joke.”
» “Alexa, what’s in the news?”
» “Alexa, what can you do?”
While the speaker is on (in Wi-Fi mode) , Alexa is in
command or question from you. All you need to do is say “Alexa..” within range
the speaker’s microphones and she will respond. When of Alexa is listening and
responding to your commands, LED will be in solid blue.
button on the speaker to the manually activate Alexa.
You can also press
standby mode, awaiting a
You can mute Alexa and disable the microphones by pressing the
LED will change to solid red . In this mode, the speaker’s audio will still work
normally.
15
button. The
Page 17

Setup
16
Page 18

Setup
DOK App
Music Player Screen
This is the default screen when you open DOK app.
1
3
4 6
5
2
7
1. Main Menu
2. Device List
3. Repeat/Shuffle
4. Previous
5. PLAT
6. Next
7. Volume
17
Page 19

Setup
Main Menu Screen
1
2
3
4
5
6
1. Search
Search for songs, albums and artists.
2. Favorites
Open songs, artists, albums, or
stations that you have saved.
3. My Music
Open music that is stored on your
mobile device.
4. Internet Music Services
Available third-party music apps.
5. Add more Services
Press to add more third-party apps.
6. Bluetooth/Line In Mode
Press to enable Bluetooth or the
3.5mm audio input (Aux In).
18
Page 20

Setup
DOK App
Device List Screen
1
2
3
1. Add Device
Add more speakers for more
play options.
2. Speaker Settings
Rename a speaker, set preset
stations, and fnd additional
information on a speaker.
4
3. Audio Channel
Press to set audio channels for the
speaker: L / R / LR (left/right/stereo).
4. Play All
Play music on all connected
speakers.
19
Page 21

Setup
Multi-room Play
Place speakers in any room and use the app to play music from the speaker of your
choice. You can play different songs from different speakers, set individual volume
levels, or you can link all of the speakers to play the same song.
Multi-mode
» In the Device List, press and hold a device icon for two seconds, then drag
towards another device to link the speakers together.
Solo-mode
» Press and hold the device icon, then drag downwards past the dotted line.
Multi-channel Play with Multiple Speakers
You can use two or more speakers in one room for a surround sound effect by
setting the Audio Channel selector to “LR” (stereo) for all of the speakers.
You can also use two speakers at once for stereo play by setting the Audio
Channel selector to “L” and “R” for the “left” and “right” speaker respectively.
20
Page 22

Setup
DOK App
Internet Music Services
The DOK app supports and can play songs from Spotify, iHeartRadio, and
others. Similar to the setup process for Alexa, some of these third-party services
will prompt you to log in and link your account with the DOK app so that it can
access media you already have saved with that service.
21
Page 23

Troubleshooting
PROBLEM POSSIBLE SOLUTION
Cannot complete
Wi-Fi network setup
» Make sure the speaker has power and is charged.
» Make sure you are connecting to the correct
Wi-Fi network.
» If using a dual band wireless router, be sure to
use the 2.4GHz band.
» Be sure to enable Wi-Fi on your mobile device.
» Test your internet connection by loading/reloading
a web page. If you cannot load the page, you
may need to restart your router.
» Uninstall then reinstall the app, power the speaker
OFF, then ON, and restart setup.
Intermittent audio/Audio
doesn’t play
Bluetooth won’t play or
fails to connect
Aux In won’t play
White noise/Speaker will
not function properly
» Make sure the volume on the speaker or your
connected device is not too low.
» Interference or weak Wi-Fi signal may be
interrupting reception (possible sources could be
microwaves, cell phone signals, etc.). Move the
system to another location to test.
» Stop other applications that may be streaming
media from the internet.
» Make sure the volume on your Bluetooth device is
turned up to an audible level.
» Make sure the speaker has power and is charged.
» Make sure both the speaker and your device are
in Bluetooth mode.
» Stay within 3 ft. of the speaker when pairing.
» Make sure the audio cable is firmly connected to
the audio ports of both devices.
» Make sure the volume on the speaker or your
connected device is not too low.
» Press the Source/ button to manually switch
to AUX i n mode.
» Power the speaker OFF, then ON again.
22
Page 24

Care and Maintenance
1. Cle an the unit w ith a soft, d amp (ne ver wet) cl oth. So lvent or de tergent s hould n ever be use d.
2. Avoid operatin g your unit u nder di rect s unlig ht or in hot, h umid or d usty plac es to reduce th e
risk o f fire or elect ric shock .
3. Kee p your unit a way from heat ing app liances a nd sources of e lectr ical nois e such as
fluo rescent lam ps or motor s.
4. Unp lug the uni t from the elec trica l power out let immed iatel y in case of ma lfunction.
Specifications
Powe r Adaptor : AC 110V/5 0Hz ~ AC 24 0V/60Hz
DC Inp ut: DC5V / 5 A
Wi Fi: 2.4G Hz
Blue tooth: Bl uetooth S pecif ication v ersio n 4.2
Audio Power output: 2W (RMS) x2
802. 11 b/g/n
Supp ort profile A 2DP
23
Page 25

ORDER FORM
ACCESSORY USB CHARGING CORDS
USB charging cords for pre-Smart Phone generations
AP Devices
Price: $5.00
Sku: UCAP
Buy Now q
Mini USB
Price: $5.00
Sku: UCMV3
Buy Now q
Make Checks or Money Orders Payable to: DOK Solution, LLC. Add $3.00 S&H.
PLEASE PRINT CLEARLY
Name:
Address:
City:
State: Zip:
Samsung/Tablet
Price: $5.00
Sku: UC800
Buy Now q
Micro USB
Price: $5.00
Sku: UCMV8
Buy Now q
Phone:
Email:
Brand of Phone: Model No.:
q Visa q MasterCard q Discover q AMEX
CC#
Exp Date: / CVV (3 Digits) Signature:
Prin ted in ch ina
 Loading...