

Page 1
Model:CM2
Bluetooth wireless sound system with Light show
Instruction Manual
0
Page 2

IMPORTANT SAFETY INSTRUCTIONS
1. Read these instructions.
2. Keep these instructions.
3. Heed all warnings.
4. Follow all instructions.
5. Do not use this apparatus near water.
6. Clean only with a dry cloth.
7. Do not block any ventilation openings. Install in accordance with the manufacturer’s instructions.
8. Do not install near any heat sources such as radiators, heat registers, stoves, or other apparatus
(including amplifiers) that produce heat.
9. Do not defeat the safety purpose of the polarized or grounding-type plug. A polarized plug has
two blades with one wider than the other. A grounding type plug has two blades and a third
grounding prong. The wide blade or third prong are provided for your safety. If the provided
plug does not fit into your outlet, consult an electrician for replacement of the obsolete outlet
10. Protect the power cord from being walked on or pinched particularly at plugs, convenience
receptacles, and the point where they exit from the apparatus.
11. Only use attachments/accessories specified by the manufacturer.
12. Use only with a cart, stand, tripod, bracket, or table specified by the
manufacturer, or sold with the apparatus. When a cart is used, use caution
when moving the cart/ apparatus combination to avoid injury from tip-over.
Portable Cart Warning.
13. Unplug this apparatus during lightning storms or when unused for long periods of time.
14. Refer all servicing to qualified service personnel. Servicing is required when the apparatus has
been damaged in any way, such as power-supply cord or plug is damaged, liquid has been
spilled or objects have fallen into the apparatus, the apparatus has been exposed to rain or
moisture, does not operate normally, or has been dropped.
.
15. The apparatus shall not be exposed to dripping or splashing water and no object filled with
liquids such as vases shall be placed on the apparatus.
16. The battery shall not be exposed to excessive heat such as sunshine, fire or the like.
17. The MAINS plug is used as disconnect device, which shall remain readily operable.
COMPLIANCE WITH FCC REGULATION
This device complies with Part 15 of the FCC Rules. Operation is subject to the
following two conditions:
(1) this device may not cause harmful interference, and
1
Page 3

(2) this device must accept any interference received, including interference that
may cause undesired operation.
Note: This equipment has been tested and found to comply with the limits for a
Class B digital device, pursuant to Part 15 of the FCC Rules. These limits are
designed to provide reasonable protection against harmful interference in a
residential installation. This equipment generates, uses and can radiate radio
frequency energy and, if not installed and used in accordance with the instructions,
may cause harmful interference to radio communications. However, there is no
guarantee that interference will not occur in a particular installation. If this equipment
does cause harmful interference to radio or television reception, which can be
determined by turning the equipment off and on, the user is encouraged to try to
correct the interference by one or more of the following measures:
- Reorient or relocate the receiving antenna.
- Increase the separation between the equipment and receiver.
- Connect the equipment into an outlet on a circuit different from that to which the
receiver is connected.
- Consult the dealer or an experienced radio/TV technician for help.
FCC RF warning s
exposure requirement. The device can be used in portable exposure condition
without restriction.
tatement: The device has been evaluated to meet general RF
WARNING
Changes or modifications not expressly approved by the party responsibl e for
compliance could void the user’s authority to operate the equipment.
Table of Contents
Your Bluetooth Wireless Sound System ……………….…….……………3
Features
Includes
Orientation………....………………….…..………………………………..…4
Front Features & Controls
Rear input & Control
General operation ……………..…………………………………………..…5
Power connection
Charging Instructions
Charging the battery for first time
Recharging the internal battery
Battery Note and Care
Mic connection
Guitar connection
2
Page 4

Audio Output connection
Bluetooth operation ………………………………….………………………6
Pairing a Bluetooth Device for the First Time
Playing Audio Wirelessly
USB Player operation ………………..………………………………………7
Listening to the radio
Setting the radio station presets
Auxiliary operation ………..……………………………….…………………7
AUX IN Connection
AUX OUT Connection
Party Lighting ..…………………..………………………….………………..8
Specifications …………..………………………………………………..……8
Trouble Shooting ……………………………………..…………………..…..9
Your Bluetooth Wireless Sound System with Light Show
Features
Supports Bluetooth v2.1
Supports profile A2DP (Advanced Audio Distribution Profile)
Supports automatic device pairing
Wireless range: 33 fee
USB DC input
3.5mm Aux input
Easy access knob for volume control
Audio output for external amplifier
ON/OFF main power switch
ON/OFF Disco Light switch
Build-in rechargeable battery
Build-in speaker
less than 1W
Power Output
Includes
Micro-USB to USB cable
User manual
3
Page 5

Orientation
Front Features & Controls
Rear input & Controls
4
Page 6

General operations
This unit operates on a built-in Li-ion battery that can be recharged either using the USB port on your
computer or from a USB power adaptor (not included) with a rated output of DC 5V/1.2A and up.
Power Connection
Requires a Micro-USB to USB cable (included)
1. Using a Micro-USB to USB cable (included), connect the larger USB plug to the USB port of a
powered on computer or USB power adaptor.
Note: Be sure the computer is not sleep mode.
2. Connect the smaller Micro-USB plug into the Micro-USB port of the rear of the unit.
3. Plug the USB power adaptor’s AC plugs into an AC outlet.
When the unit is not operated by the AC power or unused for long periods
of the time, please remove the power adaptor from the wall outlet and
unplug from the main unit.
Charging instructions
This unit operates on a built-in Li-ion battery that can be recharged from the powered on computer or
a USB power adaptor (not included) with a rated output of DC 5V/1.2A and up.
CHARGING THE BATTERY FOR FIRST TIME
1.) Charge the built-in Li-ion battery a minimum of 8 hours prior to first use.
Connect a Micro-USB to USB cable (see “Power connection”) into the main unit and auto to
charging the internal Li-ion battery. The BATTERY INDICATOR will solid light red while
charging.
2.) Observe the internal battery charging level by the BATTERY INDICATOR when the internal
battery charge is low, the BATTERY INDICATOR will turn “ON and FLASH” alerting you to recharge
the internal battery as soon as possible. The BATTERY INDICATOR will turn “OFF” when the unit is
fully charged.
5
Page 7

RECHARGING THE INTERNAL BATTERY
After prolonged use, the internal battery will become weak and the operation may become intermittent.
When the internal battery charge is low, the BATTERY INDICATOR will show “ON and FLASH”
alerting you to recharge the internal battery as soon as possible.
Note: 1. Charging time will vary if you are listening to music while charging the internal battery. We
recommend you switch off the unit power during the charging process.
2. To prolong the life of a rechargeable battery, it is recommended to completely discharge it
before fully charging it again.
3. Rechargeable batteries need to be cycled for maximum performance and longer battery life.
If you don’t use the player that often, be sure to recharge the battery at least once a month in
order to keep the internal battery working properly.
Battery Note and Care
Do not burn or bury batteries.
Do not puncture or crush.
Do not disassemble.
Do not dispose of batteries in fire, batteries may explode or leak
Li-ion batteries must be recycled. Do not dispose of in the trash.
Use only chargers rated for Li-ion cells. Be sure the charger’s voltage and current settings are
correct for the battery pack being charged.
Charge batteries on a fireproof surface and away from flammable items or liquids.
Batteries should NEVER be left unattended while charging. Only adults should charge the
batteries.
Follow the manufacturer’s instructions for charging the product and do not charge longer than
recommended. Unplug the charger when the battery is charged or not in use.
Bluetooth operation
Pairing a Bluetooth Device for the First Time
1. Slide the POWER ON/OFF switch on the rear of the unit to ON to turn on the unit. The PAIR
INDICATOR will light blue and a sound “iDance CUBE mini, Bluetooth on
INDICATOR is flash light and ready to pair (link) with your Bluetooth device.
Make sure no audio cable is connected to AUX IN Jack.
When pairing, remain within 3 feet of the unit.
2. Using the native controls on your Bluetooth device, select the CM1 in your Bluetooth settings to
pair. If your device requests a password, enter the default password “0000”.
Refer to the user’s manual for your specific device for instructions on pairing and connecting
Bluetooth devices.
3. When successfully paired and connected, a sound “Bluetooth mode” will issue from the unit, the
PAIR INDICATOR will remain lit.
After initial pairing, the unit will stay paired unless unpaired manually by the user or erased
6
” is heard. The PAIR
Page 8

due to a reset of the device. If your device should become unpaired or you find it is unable
to connect, repeat the above steps.
Playing Audio Wirelessly
1. After pairing to a Bluetooth device, use the native controls on the connected Bluetooth Device
or press the BLUETOOTH button of the unit to select a track.
2. Play, pause a selected track using the native controls on the connected Bluetooth Device.
3. Audio played through the connected Bluetooth Device will now be heard through the speakers.
4. Press to adjust the volume up or down to obtain the desired volume level.
5. Slide POWER ON/OFF switch to turn off the unit.
Auxiliary operation
AUX IN Connection
You can pla y other music sources (iPod, MP3 or othe r digital audio players) through the speak ers of
this unit b y connect i ng t he AUX IN Ja ck t o your ex ter nal pl a yer ’s audio out j ack or headphone jack
1. Plug one end of a 3.5mm audio input cable (not included) into the AUX IN Jack on the rear of
the unit, and plug the other end of the cable into the audio output on the external music player
or other source.
Note: Make sure your external music player is turn ON.
2. Slide the POWER ON/OFF switch on the rear of the unit to ON to turn on the unit. PAIR
INDICATOR will light BLUE and a sound “iDance CUBE mini, Aux mode“ is heard.
3. Start playing the device you plugged into AUX IN input.
4. Press to adjust the volume up or down to obtain the desired volume level.
5. Slide POWER ON/OFF switch to OFF to turn off the unit. Remember to shut down the
external player power.
Note: In Bluetooth mode, the audio cable plug into the AUX IN jack, the unit will change to AUX mode
automatically.
7
Page 9
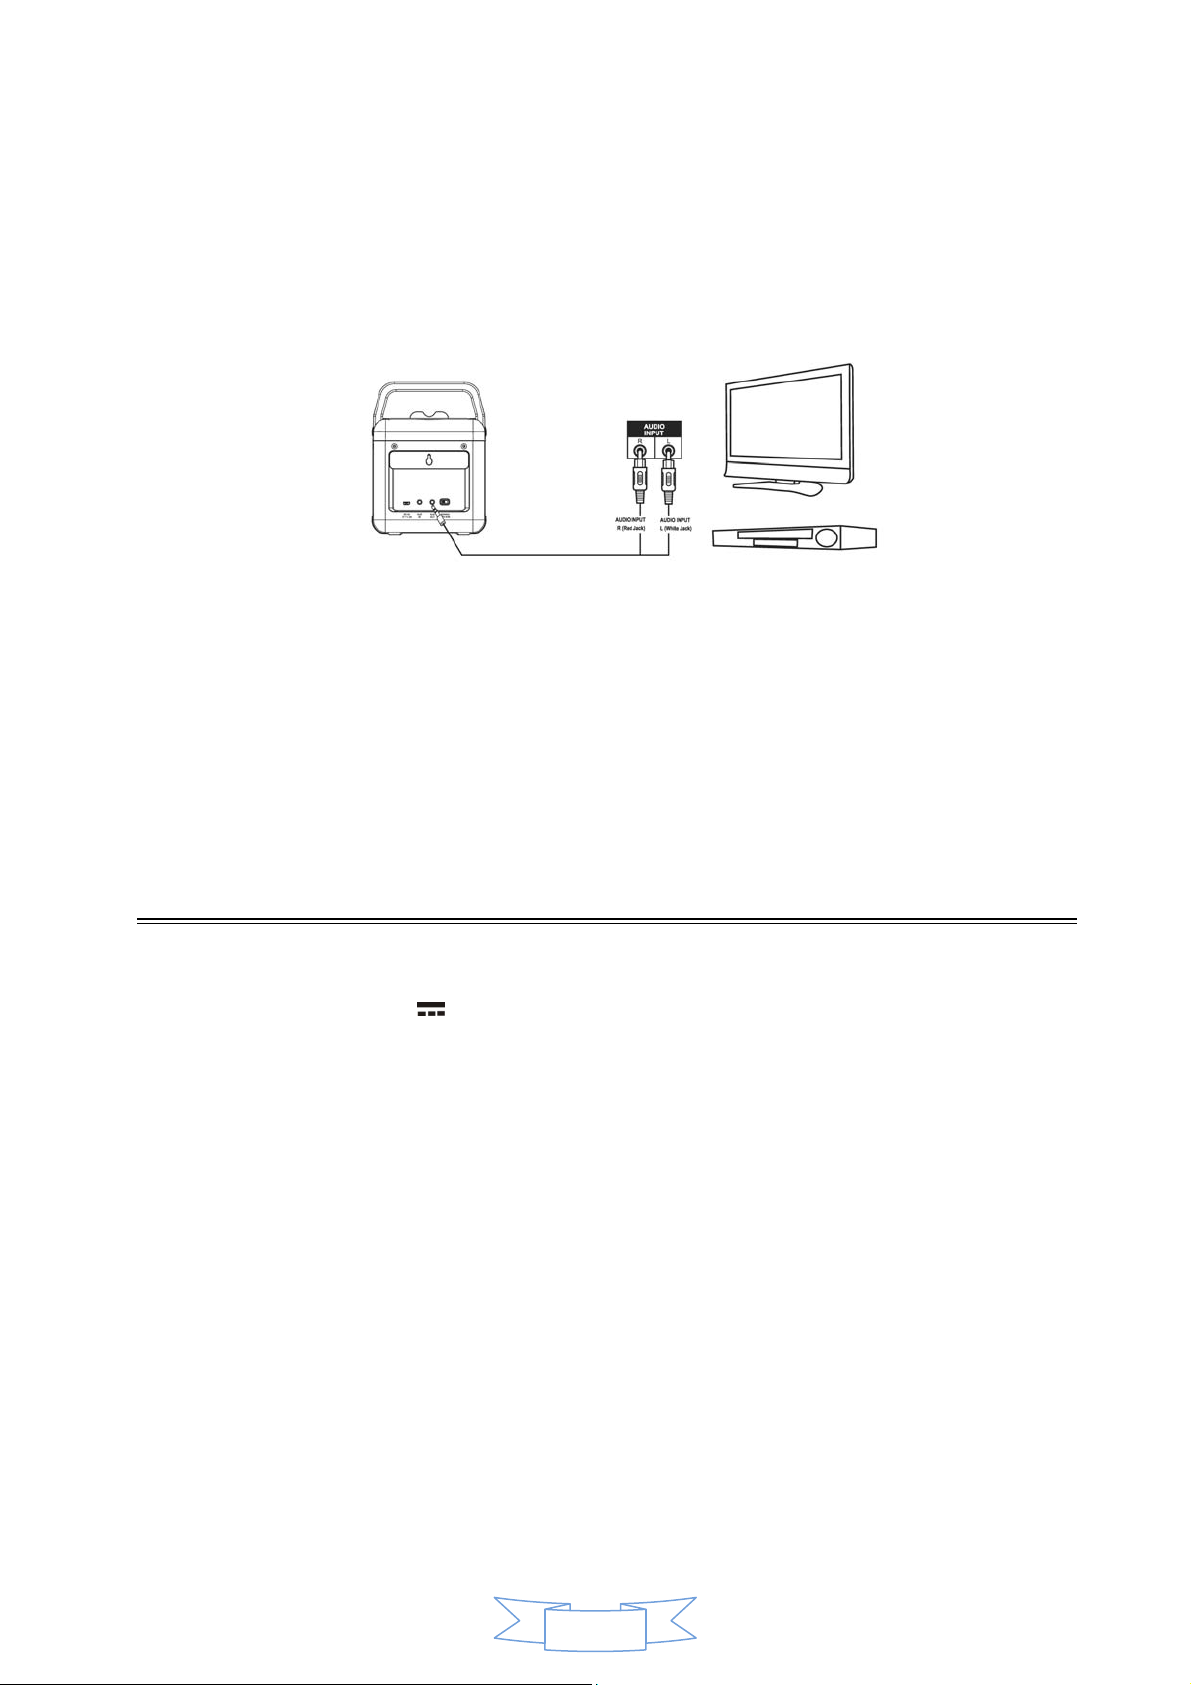
AUX OUT Connection
Please follow the steps below to connect audio signal from the unit to your home audio system.
1. Locate the multi-colored RCA cables (not included).
2. Connect audio cable’s 3.5mm plug to the AUDIO OUT jacks of the back side of your unit.
3. Connect the other ends of the audio cable’s white and red plugs to the external unit’s audio input
white and red jacks
Party Lighting
Slide the POWER ON/OFF switch on the rear of the unit to ON to turn on the unit and the party light
Show. Press and hold the LIGHT button to turn off the light show, press and hold again to turn on the
light show. If you are change the mode of light show, press the Light button.
Specification
Power Requirement:
Power Source: DC 5V
Battery: Build-in rechargeable lithium battery
Bluetooth: Bluetooth Specification version 2.1
Support profile A2DP
Audio Power output: 3 W (RMS)
Speaker: 2 Ohms. 3” inch.
Dimensions: 16.7 cm(H) x 12.8 cm(W) x 13.2 cm(D)
Weight: 0.51 Kg.
1.2A (Micro USB)
8
Page 10

Trouble Shooting
PROBLEM POSSIBLE CAUSE REMEDY
GENERAL
No Charging The USB power adaptor (not included) is
not plugged into a wall outlet or the USB
cable (include) is not plugged into the mini
USB jack on the unit.
Wall outlet is not functioning.
Computer USB port is not functioning.
No Sound The unit battery is exhausted.
Volume set too low.
The unit does not to
operation of any
button.
Under the influence of electrostatic
phenomenon, the product may malfunction
and require user to reset the unit.
BLUETOOTH
No sound when
playing audio via
Bluetooth
Your Bluetooth device has been paired
properly.
The unit placement out of range.
The volume control of your Bluetooth
device is set at too low.
The volume control of the unit is set at too
low.
AUXILIARY
No sound in AUX
mode
Volume at minimum.
External device not connected properly
Plug the USB power adaptor (not
included) into a wall outlet and plug
the USB cable (included) into the
mini jack on the unit.
Plug another device into the same
outlet to confirm the outlet is
working.
Make sure your computer power is
turned on and try another USB port.
Recharge the unit battery.
Press the volume+ button to
increase the sound level.
Slide the POWER switch to turn off
10 seconds to reset the unit.
Pairing your Bluetooth device
according to the “Pairing a
Bluetooth Device for the First
Time” section.
Relocate the unit within Bluetooth
operating range (30 feet).
Increase the volume of your
Bluetooth device.
Increase the volume of the unit to
press to your wish..
Adjust the volume knob.
Clear contacts pins and connect
again.
9
Page 11

10
 Loading...