


Karaoke
System with Bluetooth
MET8021BT
User’s Guide

FCC Warnings
Warning: Changes or modifications to this unit not expressly approved by the
party responsible for compliance could void the user’s authority to operate the
equipment.
Note: This equipment has been tested and found to comply with the limits for a
Class B digital device, pursuant to Part 15 of the FCC Rules. These limits are
designed to provide reasonable protection against harmful interference in a
residential installation. This equipment generates, uses and can radiate radio
frequency energy and, if not installed and used in accordance with the
instructions, may cause harmful interference to radio communications.
However, there is no guarantee that interference will not occur in a particular
installation. If this equipment does cause harmful interference to radio or
FCC ID: 2ANH7-MEF8021BT
television reception, which can be determined by turning the equipment off and
on, the user is encouraged to try to correct the interference by one or more of
the following measures:
Reorient or relocate the receiving antenna.
Increase the separation between the equipment and receiver.
Connect the equipment into an outlet on a circuit different from that to
which the receiver is connected.
Consult the dealer or an experienced radio/TV technician for help.
This equipment complies with FCC radiation exposure limits set forth for an
uncontrolled environment.
This equipment should be installed and operated with minimum distance 20
cm between the radiator & your body.
This device complies with Part 15 of the FCC Rules. Operation is subject to the
following two conditions:
(1) This device may not cause harmful interference, and
(2) This device must accept any interference received, including interference
that may cause undesired operation.
SAFETY INSTRUCTIONS & WARNINGS
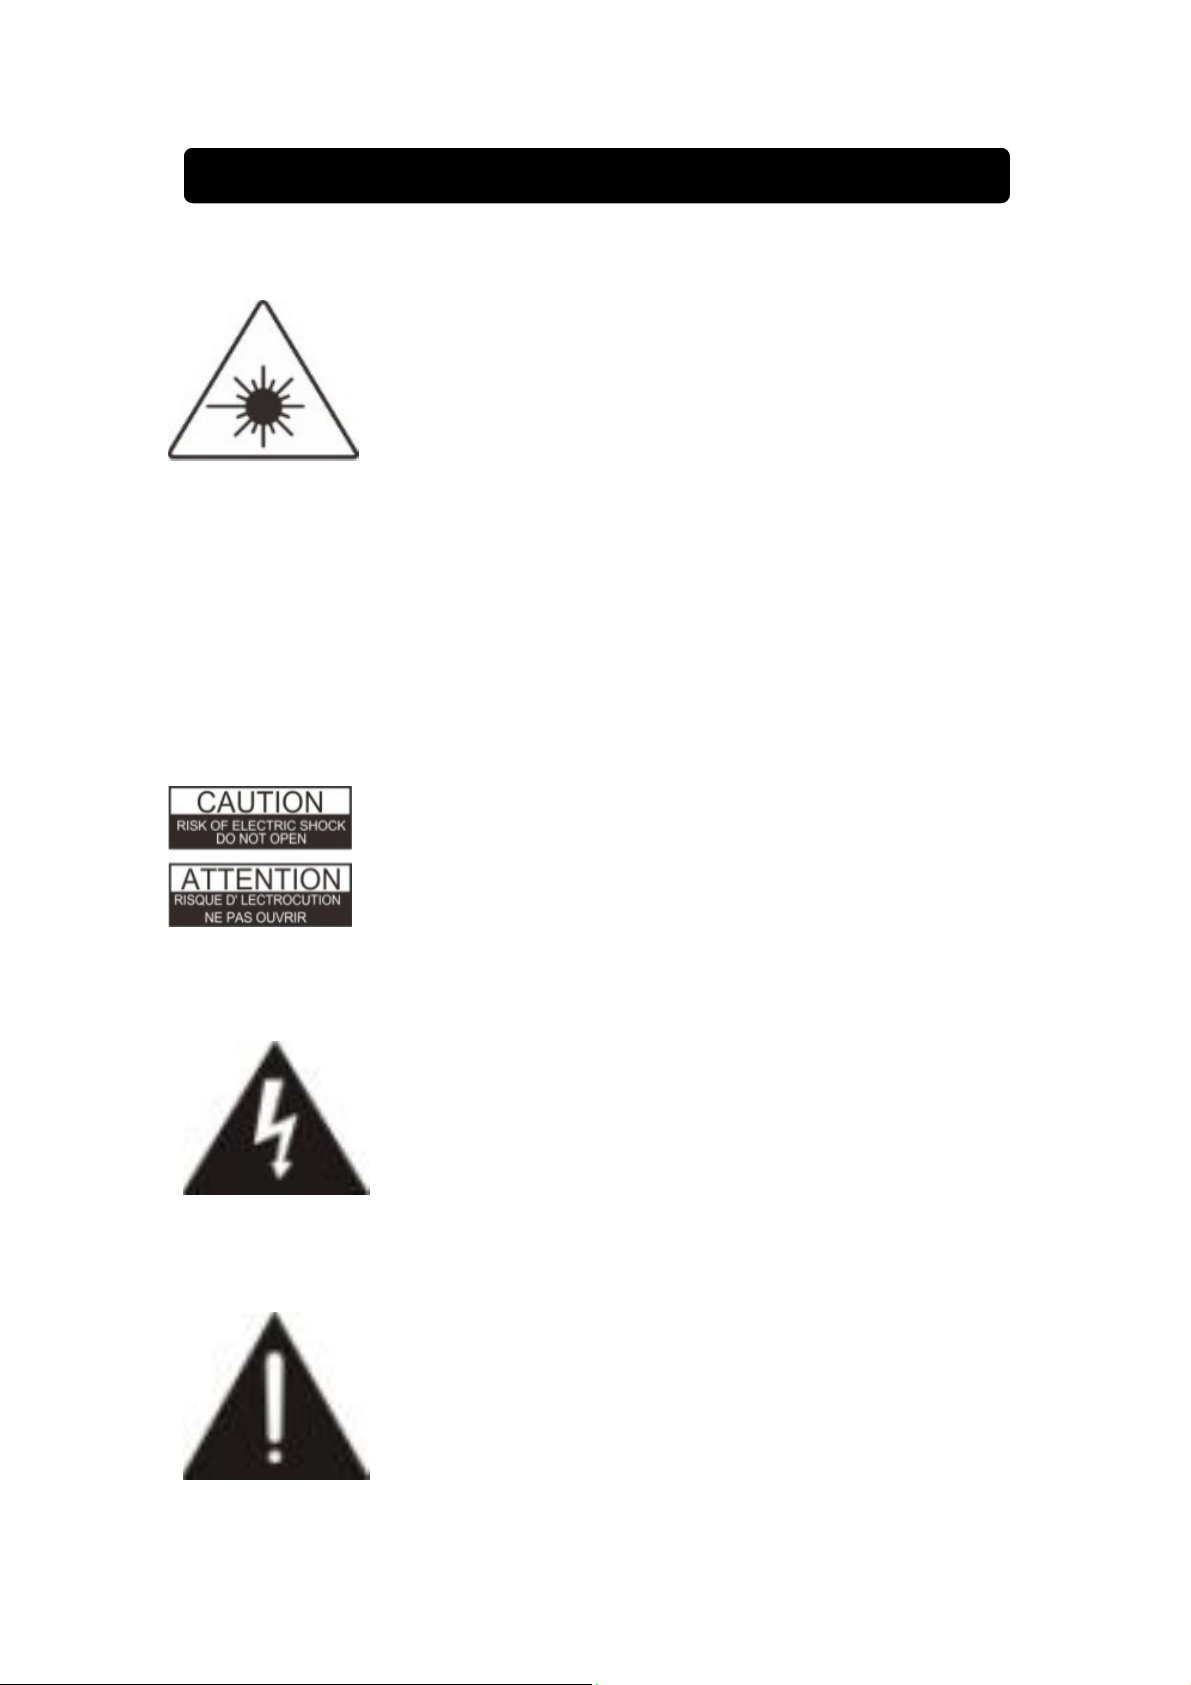
This product utilizes a class 1 laser to read compact
Discs. This laser compact Disc Player is equipped with
safety switches to avoid exposure when the CD door is
open and the safety interlocks are defeated. invisible
laser radiation is present when the Player’s lid is open and the system’s
interlock has failed or been defeated. it is very important that you avoid
direct exposure to the laser beam at all times. Please do not attempt to
defeat or bypass the safety switches.
WARNING: TO REDUCE THE RISK OF ELECTRIC
SHOCK, DO NOT REMOVE COVER (OR BACK). NO
USER- SERVICEABLE PARTS INSIDE. REFER
SERVICING TO QUALIFIED SERVICE PERSONNEL.
The lightning flash with arrowhead symbol, within an
equilateral triangle, is intended to alert the user to the
presence of uninsulated "dangerous voltage" within the
product's enclosure that may be of sufficient magnitude to
constitute a risk of electric shock to persons.
The exclamation point within an equilateral triangle is
intended to alert the user to the presence of important
operating and maintenance (servicing) instructions in the
literature accompanying the appliance.

W ARNING AND PRECAUTION
1. Read these instructions.
2. Keep these instructions.
3. Heed all warnings.
4. Follow all instructions.
5. Do not use this apparatus near water.
6. Clean only with dry cloth.
7. Do not block any ventilation openings. Install in accordance with the
manufacturer’s instructions.
8. Do not install near any heat sources such as radiators, heat registers,
stoves, or other apparatus (including amplifiers) that produce heat.
9. Do not defeat the safety purpose of the polarized or grounding-type plug. A
polarized plug has two blades with one wider than the other. A grounding
type plug has two blades and a third grounding prong. The wide blade or
the third prong are provided for your safety. If the provided plug does not fit
into your outlet, consult an electrician for replacement of the obsolete
outlet.
10. Protect the power cord from being walked on or pinched particularly at
plugs, convenience receptacles, and the point where they exit from the
apparatus.
11. Only use attachments/accessories specified by the manufacturer.
12. Use only with the cart, stand, tripod, bracket, or table
specified by the manufacturer, or sold with the apparatus.
When a cart is used, use caution when moving the
cart/apparatus combination to avoid injury from tip-over.
13. Unplug this apparatus during lightning storms or when unused for long
periods of time.
14. Refer all servicing to qualified service personnel. Servicing is required
when the apparatus has been damaged in any way, such as power-supply
cord or plug is damaged, liquid has been spilled or objects have fallen into
the apparatus, the apparatus has been exposed to rain or moisture, does
not operate normally, or has been dropped.
This symbol indicates that this product incorporates double insulation
between hazardous mains voltage and user accessible parts
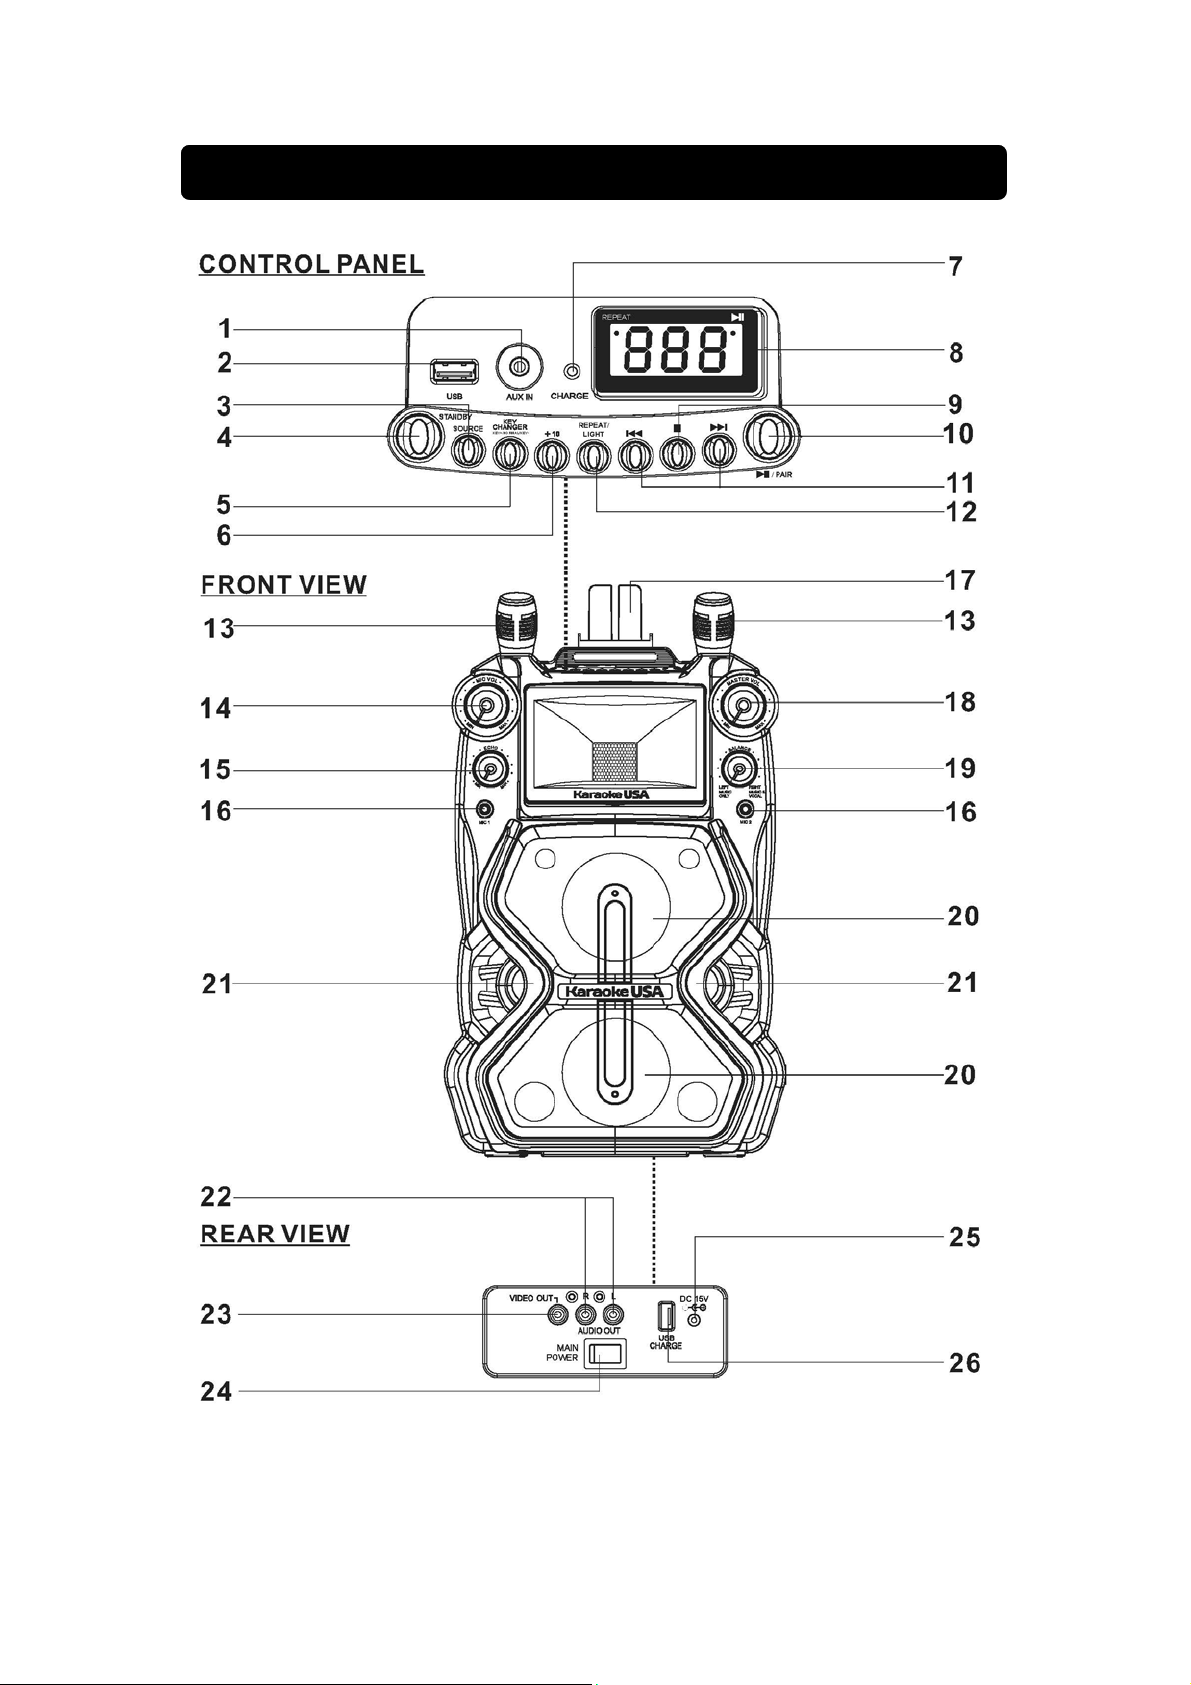
MAIN UNIT LOCATION CONTROLS 1.1

MAIN UNIT LOCATION CONTROLS 1.2
CONTROLS:
1. AUX input : Connect external device for Aux play back.
2. USB input : Connect to USB device for USB play back.
3. SOURCE button: Press to select SD CARD (Built-in) /BLUETOOTH / AUX
IN / USB .
4. STANDBY button : Press to turn on or turn off to standby mode.
5. KEY CHANGER button: Press repeatedly to select the key changer.
6. + 10 button: Press to search the track by ten.
7. CHARGE indicator: It will be show the information of charge status for
built-in battery.
8. LED display : Shows SD CARD (Built-in)/USB playing information.
9. STOP button: Press to stop a loader USB playing
10. button: Press to play or pause a loader USB. In Bluetooth
mode, hold the button to reconnect Bluetooth pairing.
11. SKIP/ SEARCH button: Press to search/skip backwards or
forwards track.
12. REPEAT / LIGHT button: Press to REPEAT function for loader SD CARD
(Built-in) or USB mode. Press and hold to turn on or off disco light
13. MICROPHONE : Included 1 set microphone.
14. MIC VOL dial: Rotate to adjust the volume from the microphone.
15. ECHO dial: Rotate to adjust echo sound effect.
16. MIC inputs: Connect external microphones.
17. CRADLE: Place your mobile on the unit.
18. MASTER VOL. dial: Rotate to adjust the main volume sound level.
19. BALANCE button: Rotate to hear the music and vocals or L / R channel.
20. SPEAKER: Built-in speaker for main unit sound output.
21. DISCO LIGHT: The panel will be light when turn on.
22. AUDIO OUT RCA jack: Connect to TV / external device audio input.
23. VIDEO OUT RCA jack: Connect to TV video input.
24. MAIN POWER switch: Press to turn on / off unit main power.
25. DC INPUT Jack: Connect power adapter for AC power.
26. USB CHARGE port : Connect to mobile battery charging.
DISPLAY INDICATOR FUNCTION:

POWER & CHARGING
Connect Power Adapter
Plug the included AC/DC power adapter into the standard wall outlet to power
the unit. Connect small end to DC INPUT jack of your unit. After adapter
connection, the CHARGE indicator on the control panel of unit will light red.
When the battery is fully charged; the CHARGE indicator will turn green.
When the battery is at 10% power, the CHARGE indicator will flash red in
standby mode, alerting you to recharge the internal battery. as soon as
possible.
Battery Note and Care
Do not burn or bury batteries.
Do not puncture or crush.
Do not disassemble.
Do not dispose of batteries in fire,
batteries may explode or leak
Li-ion batteries must be recycled. Do not
dispose of in the trash.
Use only chargers rated for Li-ion cells.
Be sure the charger’s voltage and
current settings are correct for the
battery pack being charged.
Charge batteries on a fireproof surface and away from flammable items or liquids.
Batteries should NEVER be left unattended while charging. Only adults should charge
the batteries.
Follow the manufacturer’s instructions for charging the product and do not charge
longer than recommended. Unplug the charger when the battery is charged or not in
use.
Slide the MAIN POWER switch to ON position,then KARAOKE MACHINE to
turn to SD CARD (Built-in) mode and total songs number of CARD will show
on LED display. Press STANDBY button to turn off or on the unit.

USING MICROPHONE
Requires a microphone (included 1 microphone) .
1. Plug the microphone (see below figure) into the MIC 1 INPUT or MIC 2
INPUT.
2. Slide the ON /OFF switch of microphone.
3. Use the MIC VOL
dial to adjust the volume of audio sound from the
microphone.
SETUP CRADLE
INSTALL CRADLE INTO THE UNIT
Install the cradle (included ) to hold the Mobile & Tablet onto unit.

SETUP CRADLE
PLACE EXTERNAL DEVICE
Insert Personal Player / Mobile Phone / Tablet with cradle onto the unit.
Require an USB cable (included) to connect USB CHARGE port for battery
charging.
1. Plug the standard end of the USB cable into the USB CHARGE port located
on the rear of the unit. Plug the small end of the USB cable into the device
you wish to charge.
2. Observe the battery charge indicator on your device and the charging will
start immediately.
3. Remove the charging cable when charging complete.
NOTES:
USB CHARGE port supplies DC 5V 500mA output,
USB CHARGE port cannot support data transfer or connect to computer.
Do not connect USB port of this unit to other external power charger USB ports or
computer, it may damage both units and void the warranty.
CHARGING YOUR MOBILE

DISCO LIGHT
When unit turn on, the disco light will show on speaker panel. Press and hold
the REPEAT/ LIGHT button to turn on or turn off the disco light show.
USING AVC / ECHO / BALANCE
ECHO
Turn on KARAOKE MACHINE and connect microphone. Adjust the ECHO
knob of KARAOKE MACHINE to enhance your voice for a concert hall effect.
BALANCE
Turn on KARAOKE MACHINE and rotate the BALANCE knob to hear the
music and vocals or to hear the music only.
NOTE: To use the BALANCE function, a CD+G disc must be used. Otherwise it will
operate as a standard BALANCE control.
CONNECTING TO A TELEVISION / EXT. DEVICE
AUX IN ( AUDIO IN / LINE IN )
To connect a MP3 Player or other Audio Device you will need a 3.5mm
Auxiliary Cable.
1. Connect a 3.5mm Auxiliary Cable to the AUX IN jack on top of unit and to
the Audio Output or Phones on the audio device you wish to play.
2. Press SOURCE button to AUX-IN mode.
3. Turn on both units.
4. After the connection, the external devic e will sound from speakers of your
unit

CONNECTING TO A TELEVISION / EXT. DEVICE CONTINUE
COMPOSITE VIDEO OUTPUT
1. Require an RCA video cable and plug the included RCA audio/video cable
into the VIDEO OUT and a composite video input on a television.
2. Adjust the television to the correct input setting.
3. When playing a SD CARD (Built-in) or USB ( MP3+G) that the unit will
output written lyrics / video / image to the connected television.
RCA AUDIO OUTPUT
1. Require an RCA audio cable and plug the included RCA audio/video cable
into the AUDIO OUT and a RCA audio input on a television or stereo
system.
2. Adjust the television or stereo system to the correct input setting.
3. When playing the SD CARD (Built-in) / USB / Bluetooth that the unit will
output audio to the connected television or stereo system. Use the external
device to control the output sound level.
INSTALL USB MEMORY STICK
LOADING A USB MEMORY STICK
1. Connect power (follow POWER & CHARGING page).
2. Plug the USB memory stick to USB input port (on top of main
unit).
3. Press STANDBY button turn on the unit
4. Press the SOURCE button to USB mode. The total songs number of USB
memory stick will show on LED display.

USING USB PLAY BACK
PLAY AND PAUSE
1. Follow the instructions for Loading a USB Memory Stick
2. Press the button to begin playing the loaded USB./SD. Rotate
the MASTER VOLUME dial to select the sound level.
3. To temporarily stop playing, press the button once to Pause
mode. To resume play, press the button again.
4. To stop play a loading USB Memory Stick, press the STOP button.
FAST SKIP / SEARCH TRACK
1. Press SKIP / SEARCH buttons to skip between next or previous tracks or
chapter.
2. When USB playing, press and hold SKIP / SEARCH button to
fast skip / search. Note: For MP3 files only..
REPEAT FUNCTION
Press the REPEAT/LIGHT button, the indicator light on projector screen or TV
screen.
1. When USB playback, press the REPEAT/LIGHT button once to play the
current track. The REPEAT indicator will blink on LED display.
2. When USB playback, press the REPEAT/LIGHT button twice to play all
track. The REPEAT indicator will light steadily on LED display.
3. To cancel the repeat function: press the REPEAT/LIGHT button repeatedly
until the REPEAT indicator off or press the STOP button to stop.

USING BULETOOTH
Connecting Bluetooth to your Smartphone / Tablet
1. Press SOURCE button to BLUETOOTH mode. The “bt” will flash on the
LED display.
2. Press and hold the button to begin pairing.
When pairing, remain within 3 feet of the unit.
3. On your Smartphone / Tablet, turn on Bluetooth and enable device
scanning.
4. When l , shows on the Bluetooth scan, select it to connect it to your device.
Refer to the user’s manual for your specific device for instructions on
pairing and connecting Bluetooth devices.
5. When both devices are successfully connected, the “bt” will stop flashing
on the LED display and audible chime will sound through the speaker. You
are ready to play music wirelessly from your device.
6. Press the / PAIR button of the unit, external Bluetooth device to start
music playback.
7. To temporarily stop playing, press the button once to Pause
mode. To resume play, press the button again.
8. Press of the unit next / previous of external Bluetooth device to
switch between music tracks.
After initial pairing, the unit will stay p aired unless unpaired manually by the
user or erased due to a reset of the device. If your device should become
unpaired or you find it is unable to connect, repeat the above steps.

AC Power
Adapter Connect DC Jack
DC Input
USB Input Jack (Top View)
USB Port (Rear View)
USB Input Jack (Top View)
Bluetooth
Master Power Output
Loud Speakers Spec
Specifications are typical, individual units might vary. They are subject to continuous
improvement without notice and without incurring any obligation.
SPECIFICATION
AC Input : 120-240V , 50 / 60 Hz ,
DC Output : 12V
DC 12V
Support 32GB memory
For battery charging of external mobile
Support 32GB memory
V4.2
3W x 2 RMS
3 Inch, 3.5 Watt , 3 Ohm x 2 pcs
2A
2A
 Loading...