

UNDER-COUNTER BLUETOOTH
KITCHEN TV/DVD PLAYER
MODEL NO.: ONA16AV011
INSTRUCTION MANUAL
PLEASE READ BEFORE OPERATING THIS EQUIPMENT
Warnings and Precautions
TO PREVENT FIRE OR SHOCK HAZARDS, DO NOT EXPOSE THIS UNIT TO
RAIN OR MOISTURE.
This symbol, located on back or bottom of the unit, is
intended to alert the user to the presence of uninsulated
“dangerous voltage” within the product’s enclosure that
may be of sufficient magnitude to constitute a risk of
electric shock to persons.
This symbol, located on back or bottom of the unit, is
intended to alert the user to the presence of important
operating and maintenance (servicing) instructions in
the literature accompanying the appliance.
This product utilizes a Class 1 laser to read Compact
Discs. This laser Compact Disc Player is equipped with
safety switches to avoid exposure when the CD door
is open and the safety interlocks are defeated. Invisible
laser radiation is present when the CD Player’s lid
is open and the system’s interlock has failed or been
defeated. It is very important that you avoid direct
exposure to the laser beam at all times. Please do not
attempt to defeat or bypass the safety switches.
CAUTION: TO PREVENT ELECTRIC SHOCK,
MATCH WIDE BLADE OF PLUG TO WIDE SLOT,
FULLY INSERT.
To reduce the risk of electric shock, do not remove
cover (or back). There are no user-serviceable parts
inside. Please refer any servicing to qualified service
personnel.
This device complies with part 15 of the FCC rules.
operation is subject to the following two conditions:
(1) This device may not cause harmful interference, and
(2) this device must accept any interference received,
including interference that may cause undesired operation.
NOTE: This equipment has been tested and found to
comply with the limits for a Class B digital device,
pursuant to Part 15 of the FCC Rules. These limits
are designed to provide reasonable protection against
harmful interference in a residential installation. This
equipment generates, uses, and can radiate radio
frequency energy and, if not installed and used in
accordance with the instructions, may cause harmful
interference to radio communications. However, there
is no guarantee that interference will not occur in a
particular installation. If this equipment does cause
harmful interference to radio or television reception,
which can be determined by turning the equipment
off and on, the user is encouraged to try to correct the
interference by one or more of the following measures:
• Reorient or relocate the receiving antenna.
• Increase the separation between the equipment and
receiver.
• Connect the equipment into an outlet on a circuit
different from that to which the receiver is
connected.
• Consult the dealer or an experienced radio/TV
technician for help.
WARNING: Changes or modifications to this unit
not expressly approved by the party responsible for
compliance could void the user’s authority to operate
the equipment.
Do not mix old and new batteries.
Do not mix alkaline, standard (carbon-zinc), or
rechargeable (ni-cad, ni-mh, etc) batteries.
1
Important Safety Instructions
1. Read Instructions - All the safety and
operating instruction should be read before the
product is operated.
2.
Retain Instructions - The safety and
operating instruction should be retained for
future reference.
3.
Heed Warnings - All warning on the product
and in the operating instructions should be
adhered to.
4.
Follow instructions - All operating and use
instructions should be followed.
5.
Cleaning - Unplug this product from the
wall outlet before cleaning. Do not use liquid
cleaners or aerosol cleaners. Clean only with a
dry cloth.
6.
Attachments - Do not use attachments not
recommended by the product manufacturer as
they may cause hazards.
7.
Water and Moisture - Do not use this product
near water - for example, near a bath tub, wash
bowl, kitchen sink, or laundry tub; in a wet
basement, or near a swimming pool, and the
like. The apparatus shall not be exposed to
dripping or splashing and that no objects filled
with liquids, such as vases, shall be placed on
apparatus.
8.
Accessories - Do not place this product on
an unstable cart, stand tripod, bracket, or
table. The product may fall, causing serious
injury to a child or adult, and serious damage
to the product. Use only with a cart, stand,
tripod, bracket, or table recommended by the
manufacturer, or sold with the product. Any
mounting of the product should follow the
manufacturer’s instructions, and should use
a mounting accessory recommended by the
manufacturer.
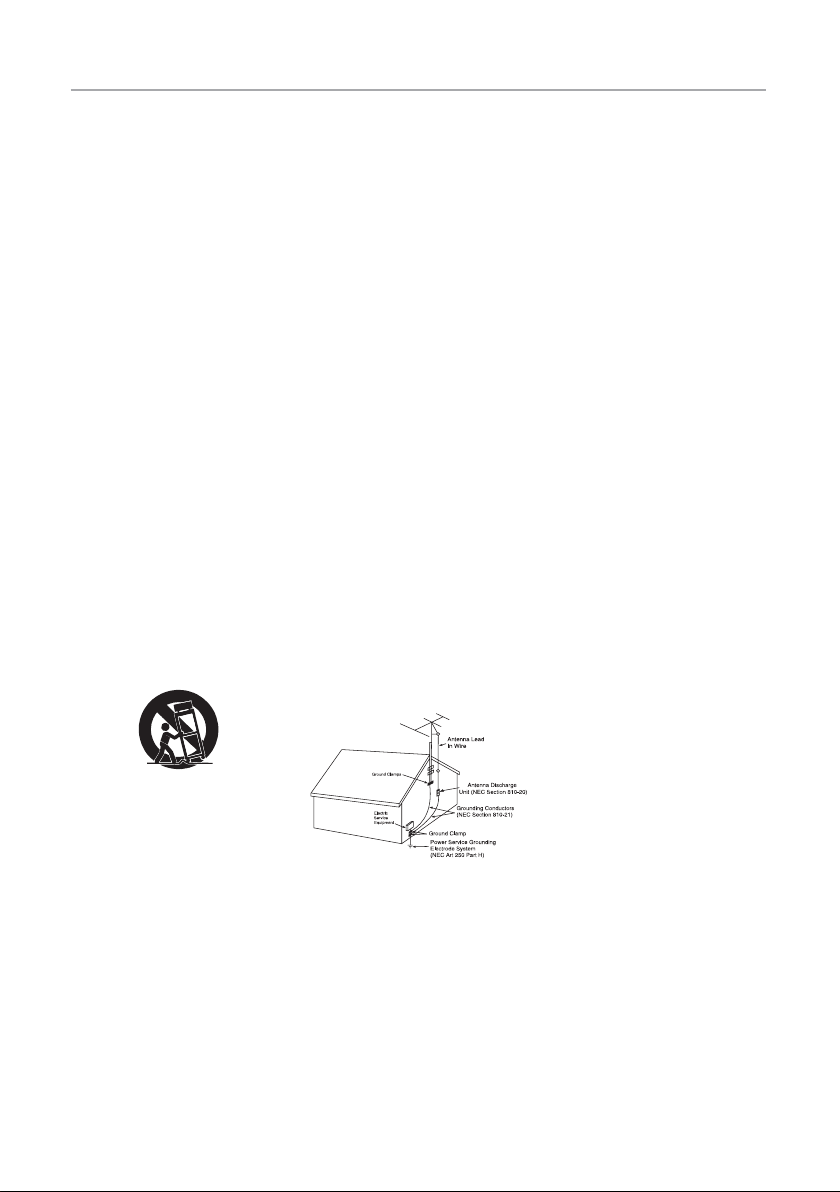
9. A product and cart combination should be
moved with care. Quick stops, excessive force,
and uneven surfaces may cause the appliance
and cart combination to overturn.
See figure:
10.
Ventilation - Slots and openings in the cabinet
are provided for ventilation and to ensure
reliable operation of the product and to protect
it from overheating, and these openings must
not be blocked or covered. The openings
should never be blocked by placing the
product on a bed, sofa, rug, or other similar
surface. This product should not be placed in a
built-in installation such as a bookcase or rack
unless proper ventilation is provided or the
manufacturer’s instruction have been adhered
to.
11.
Power Sources - This product should be
operated only from the type of power source
indicated on the marking label. If you are not
sure of the type of power supply to your home,
consult your product dealer or local power
company. For products intended to operate
from battery power, or other sources, refer to
the operating instruction.
12.
Grounding or Polarization - This product
may be equipped with a polarized alternatingcurrent line plug (a plug having one blade
wider than the other). This plug will fit into
the power outlet only one way. This is a safety
feature. If you are unable to insert the plug
fully into the outlet, try reversing the plug. If
the plug should still fail to fit, contact your
electrician to replace your obsolete outlet. Do
not defeat the safety purpose of the polarizes
plug.
Alternate Warnings
equipped with a three-wire grounding-type
plug, a plug having a third (grounding) pin.
This plug will only fit into a grounding-type
power outlet. This is a safety feature. If you
are unable to insert the plug into the outlet,
contact your electrician to replace your
obsolete outlet. Do not defeat the safety
purpose of the grounding-type plug.
13.
Power-Cord Protection - Power supply cords
should be routed so that they are not likely to
be walked on or pinched by items placed upon
or against them, paying particular attention to
cords at plugs, convenience receptacles, and
point where they exit from the product.
14.
Protective Attachment Plug - The product
is equipped with an attachment plug having
overload protection. This is a safety feature.
See Instruction Manual for replacement or
resetting of protective device. If replacement
of the plug is required, be sure the service
technician has used a replacement plug
specified by the manufacturer that has the
same overload protection as the original plug.
15.
Outdoor Antenna Grounding - If an
outside antenna is connected to the receiver,
be sure the antenna system is grounded
so as to provide some protection against
voltage surges and built-up static charges.
Article 810 of the National Electrical Code,
ANSI/NFPA 70, provides information with
regard to proper grounding of the mast and
supporting structure, grounding of the mast
and supporting structure, grounding of the
lead-in wire to an antenna-discharge unit, size
of grounding conductors, location of antennadischarge unit, connection to grounding
electrodes, and requirements for the grounding
electrode.
See figure:
16.
Lightning - For added protection for this
product during a lightning storm, or when it
is left unattended and unused for long periods
of time, unplug it from the wall outlet and
disconnect the antenna or cable system. This
will prevent damage to the product due to
lightning and power-line surges.
17.
Power Lines - An outside antenna system
should not be located in the vicinity of
overhead power lines or other electric light or
power circuits, or where it can fall into such
power lines or circuits. When installing an
outside antenna system, extreme care should
be taken to keep from touching such power
lines or circuits as contact with them might be
fatal.
18.
Overloading - Do not overload wall outlets,
extension cords, or integral convenience
- This product is
receptacles as this can result in a risk of fire or
electric shock.
19.
Object and Liquid Entry - Never push
objects of any kind into this product through
openings as they may touch dangerous voltage
points or short-out parts that could result in a
fire or electric shock. Never spill liquid of any
kind on the product.
20.
Servicing - Do not attempt to service this
product yourself as opening or removing
covers may expose you to dangerous voltage
or other hazards. Refer all servicing to
qualified service personnel.
21.
Damage Requiring Service - Unplug
this product from the wall outlet and refer
servicing to qualified service personnel under
the following conditions:
a) When the power-supply cord or plug is
damaged,
b) If liquid has been spilled, or objects have
fallen into the product,
c) If the product has been exposed to rain or
water,
d) If the product does not operate normally
by following the operating instructions.
Adjust only those controls that are covered
by the operating instructions as an improper
adjustment of other controls may result in
damage and will often require extensive work
by a qualified technician to restore the product
to its normal operation.
e) If the product has been dropped or
damaged in any way, and
f) When the product exhibits a distinct change
in performance - this indicates a need for
service.
22.
Replacement Parts - When replacement parts
are required, be sure the service technician
has used replacement parts specified by the
manufacturer or have the same characteristics
as the original part. Unauthorized substitutions
may result in fire, electric shock, or other
hazards.
23.
Safety Check - Upon completion of any
service or repairs to this product, ask the
service technician to perform safety checks
to determine that the product is in proper
operating condition.
24.
Wall or Ceiling Mounting - The product
should be mounted to a wall or ceiling only as
recommended by the manufacturer.
25.
Heat - The product should be situated away
from heat sources such as radiators, heat
registers, stoves, or other products (including
amplifiers) that produce heat. Battery shall not
be exposed to excessive heat such as sunshine,
fire, or the like.
26. Main plug is used as disconnect device and
it should remain readily operable during
intended use. In order to disconnect the
apparatus from the mains completely, the
mains plug should be disconnected from the
mains socket outlet completely.
27. Excessive sound pressure from earphones and
headphones can cause hearing loss.
2
ACCESSORIES
Before you start setting up please make sure you have all the accessories
in the box.
1. User Manual
2. Power Adapter
3. Remote Control
4. Mounting Bolts & Spacers
5. Cable Pack
6. Mounting Template
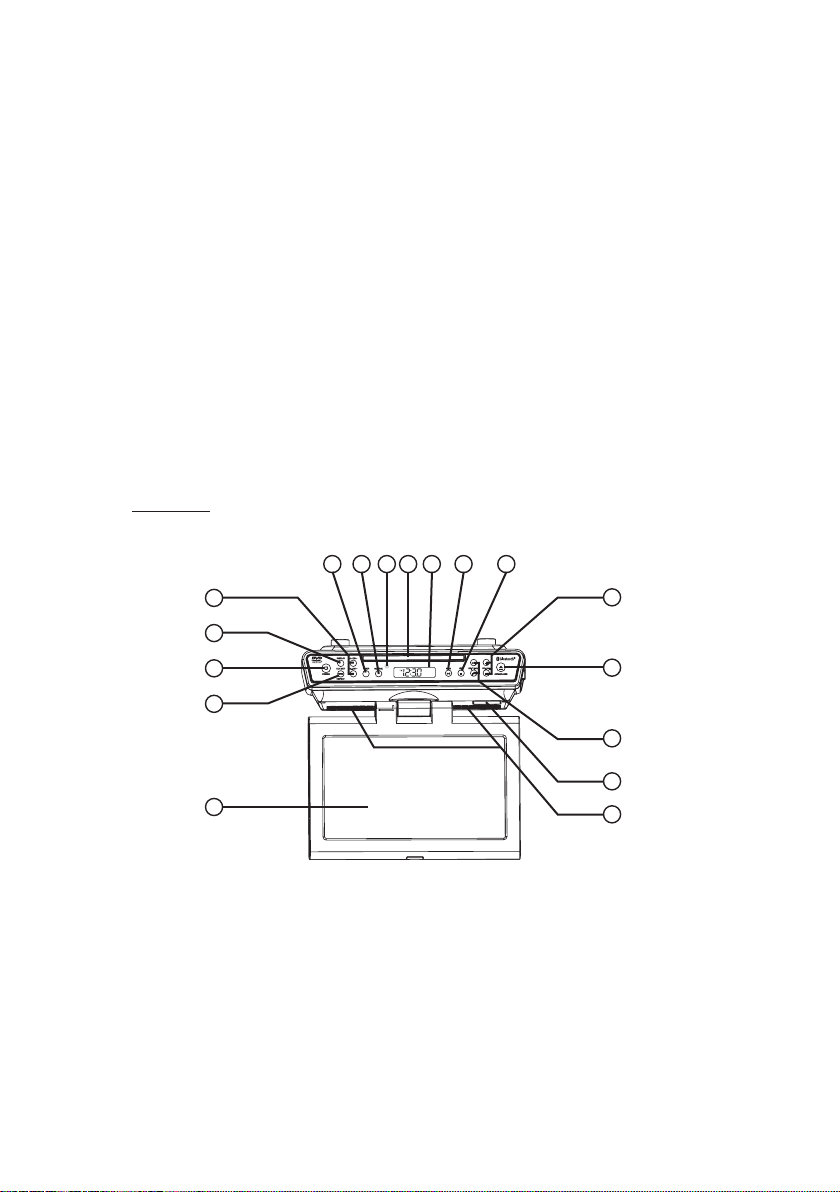
TV FRONT VIEW & INPUT CONNECTIONS
Front view
9
876
10 11 12
5
4
13
3
2
1
14
15
16
17
3
1. LED SCREEN 10” screen size display.
2. CLK SET / MEM / REPEAT Press to set the clock or save a radio station
or choose repeat mode.
3. STANDBY Press to power the system on or off.
4. DISPLAY
5. M+/CH+ , M-/CH-
6. TIMER Press to set the count down timer.
7. SOURCE Press to switch to DVD, Bluetooth, USB, Radio, TV, AUX
in modes.
8. REMOTE SENSOR Detected the command signal form remote
control.
9. DISC COMPARTMENT
10. LCD DISPLAY
11. PLAY/ PAUSE, PAIR Press to play or pause a loaded DVD or USB.
12. STOP/USB In DVD Mode, Press and hold to switch USB mode.In DVD or
USB Mode, press to stop during play.
13. VOLUME+, VOLUME- Press to increasing or decreasing the volume.
14. OPEN/CLOSE When in DVD modes,press this botton to open/close
the disc compartment door.
15. SKIP+/TUNE+, SKIP-/TUNE-Press to go forward or go back chapter.
16. BATTERY COMPARTMENT Insert 2 AAA size batteries (not
included) for backup the clock and radio presets are preserved.
17. SPEAKERS
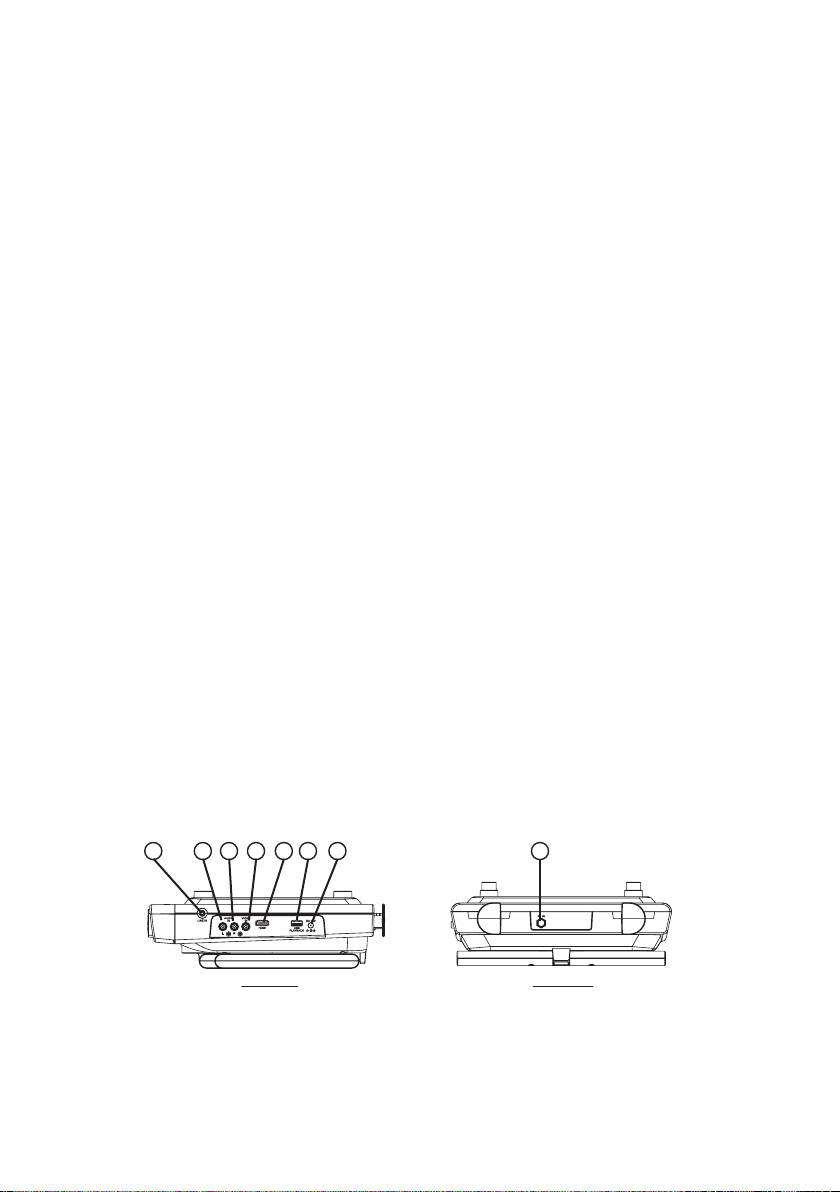
INPUT CONNECTIONS
LEFT SIDE REAR SIDE
87654321
4
1. LINE IN Connected to external device by 3.5mm stereo plug audio
input cable (not included).
2. AUDIO L. IN Composite Audio Left-White
3. AUDIO R. IN Composite Audio Right-Red
4. VIDEO IN Composite Video-Yellow
5. HDMI PORT
6. USB PORT
7. DC 12V
8. RF IN
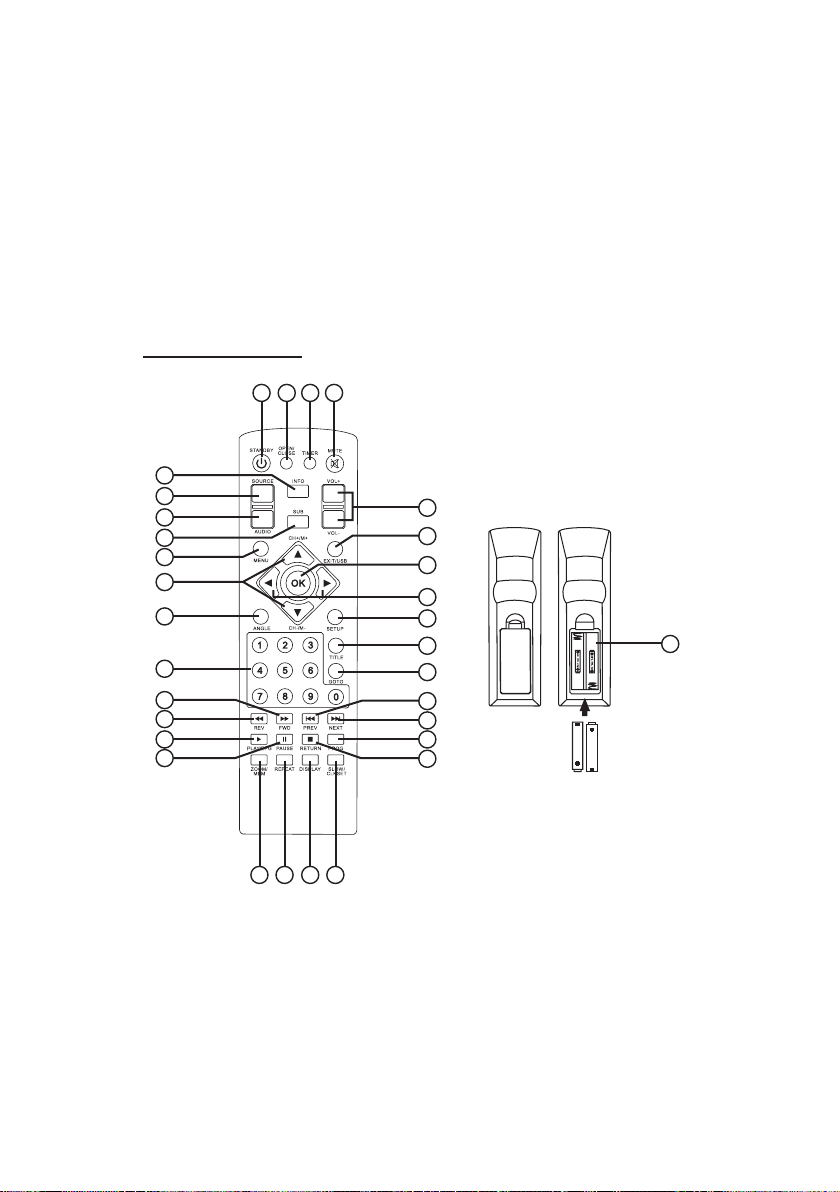
REMOTE CONTROL
32
41
31
30
29
28
27
26
25
24
23
22
21
20
5
6
7
8
9
10
11
12
13
14
15
32
17 161819
1. STANDBY For switching On or switching On.
2. OPEN/CLOSE When in DVD modes, press this botton to open/close the
disc compartment door.
3. TIMER Press to set the count down timer.
4. MUTE Press to turn off or on the sound.
5. VOL +/- Press to increasing or decreasing the volume.
6. EXIT/USB In DVD Mode, press to switch USB mode.
7. OK Select/Confirm: For selecting a Menu or confirm a selected Option.
Under DTV and TV Mode press once to display the Channels List.
5

8. Press to choose one of items on-screen and to adjust one of
its related values.
9. SETUP In DVD Mode and TV Mode, press to access DVD/TV system
menu.
10. TITLE In DVD Mode, press to shows the title of the disk.
11. GOTO In DVD and USB Mode, press to show the operation icon of the
disk.
12. In DVD and USB Mode, this button will move you back to play
the previous programme in you list.
13. In DVD and USB Mode, this button will move you forward to play
the next programme in you list.
14. PROGRAM In USB Mode, press to come into program status.
15. / RETURN In DVD and USB Mode, you can stop items playing that
you have previously recorded.
16. SLOW/CLKSET Press to enjoy the slow motion at a 1/2x, 1/3x, 1/4x,
1/5x, 1/6x, 1/7x, normal. In STANDBY Mode, press and hold to set the
clock.
17. DISPLAY Press to display the clock time information 2 seconds.
18. REPEAT For DVD disc playing, press to repeat title, chapter, all or
close repeat. For USB mode playing, press to repeat1, dir,all or close
repeat.
19. ZOOM/MEM DVD Mode, the picture may be enlarged by up to 4 items
picture. Press this button repeatedly, the zoom scales will be 2x, 3x, 4x,
1/2, 1/3, 1/4.In FM Mode, press to save the radio station.
20. In DVD and USB Mode, you can pause items that are playing that
you recorded previously.
21. In DVD and USB Mode, this button will start to play the programme.
22. In DVD and USB Mode, this button will start to rewind the
programme.
23. In DVD and USB Mode, this button will start to fast forward the
programme.
24. 0–9 Press to ente rthe title/chapters numbers, etc.
25. ANGLE During athletic match, contect or the atrecal program, press this
button continually on remote controller to select various angle to view the
same image (this operation works only for the disc with multi angle
encoded).
26. Press to choose one of items on-screen and to change its values.
27. MENU In DVD Mode, press to return to the MENU.
In TV Mode, press to open and close the MENU.
28. SUB This function may enable you to select multi subtitle language.
29. AUDIO Press this button to select audio output in USB Mode.
30. SOURCE Press this botton repeatedly to switch through the modes:
DVD / TV / BT / FM / HDMI / AV / LINE.
31. INFO
32. Batteries installation
6

OPERATING INSTRUCTIONS
PPOWER CONNECTION
This product operates on 120V~ 60Hz power supply. Plug the AC Adaptor
into a household outlet AC source.
CONNECTING THE AC ADAPTER
1. Insert the DC plug of the AC adapter (included) into the DC Jack of the
unit.
2. Fully insert the blades of the AC adapter (included) into the slots of a
working wall socket as shown.
3. The LCD DISPLAY of the unit will show a flashing time of “12:00”
prompting you that the time is not valid and needs to be adjusted to the
right time as soon as possible.
4. After correctly setting up the time (as described in the next section),
your unit is now in standby mode.
BATTERY BACKUP
This unit is equipped with a battery
back-up system, requiring two DC 1.5V
UM-3 type batteries (not included).
Insert the battery in the BATTERY
COMPARTMENT, making certain that
the positive and negative (+ and -)
sides are properly aligned. If power
failure occurs, the clock automatically
switches to the battery power supply,
the clock continue running internally
and the radio presets are preserved.
When power returns, the unit switches
back to AC adaptor again.
NOTE: The display will not exhibit time during power failure but the clock
will keep correct time internally.
7

BATTERY CARE
S
• Use only the size and type of batteries specified.
• If the unit is not to be used for an extended period of time, remove the
battery.
• Old or leaking batteries can cause damage to the unit and may void the
warranty.
• Do not try to recharge batteries not intended to be recharged; they can
overheat and rupture (Follow battery manufacturer’s directions).
• Do not dispose of batteries in fire, batteries may leak or explode.
SS
EETTTTIINNGG TTHHEE DDIIGGIITTAALL CCLLOOCCKK
1. In standby mode, press and hold the CLK SET / MEM / REPEAT button.
The hour time digitswill blink.
2. Press the SKIP / TUNE or buttons to set the current hour. Press
and hold the button for fast to setting.Press the CLK SET / MEM /
REPEAT button again to confirm and the minute time digits will blink.
3. Press the SKIP / TUNE or buttons to set the current minute.
Press and hold the button for fast to setting.
4. Press the CLK SET / MEM / REPEAT button again and confirm the
current time is set.
NOTE:The PM icon will light when the hour is set in the PM
SSEETTTTIINNGG TTIIMMEERR
In any mode, press the TIMER button, the TIMER icon with time “180” will
displayed and flash.
1. Press the TIMER button again, the timer time will count down 10 minute.
Repeat to press this button to adjust the timer in decrements of 10
minute.
2. Press the SKIP / TUNE or to adjust the timer in increments /
decrements of 1 minute.Press and hold the button for fast to setting.
3. After the set time has expired, the under counter music system will
alarm.
4. To cancel the alarm after it has sounded, press the button.
8

DDVD OPERATION
1. Press the
on the unit.
2. Press the SOURCE button on the main unit or remote control
repeatedly to select DVD mode and the “dvd” will appea ron LCD display
and LED screen turn on.
3. Press the OPEN/CLOSE button to open the disc compartment, insert
disc into the disc compartment with the title side upwards.
4. Press again the OPEN/CLOSE button to close the disc compartment
and playback automatically.
Note: This unit can identify different disk formats. DVD disk formats which
are compatible: CD, CD-R, CD-RW, MP3, MP4, VCD, DVD, DVD+/-R,
DVD+/-RW.
SETUP
The unit has a separate menu system to set up the DVD playback.
When in DVD Mode, press the SETUP button on the remote control to
enter the main menu of the system setup.
1. When you have entered the menu setup system press the direction button
marked or to move the cursor. When in this system you need to
setup the following four sections:
2. Press the direction button or on the System Setup page and move
the cursor to thes elected item. Press OK to confirm the item selected.
Use or to adjust and use SETUP button to return to the previous
item.
3. On the System Setup page press SETUP button to exit.
STANDBY button on the main unit or remote control to turn
• SYSTEM
• DISPLAY
• SOUND
• VIDEO
SYSTEM
a) TV SYSTEM – Choose the TV operating system to suit the playback
type. Select from : NTSC / AUTO / PAL.
b) SCREEN SAVE – Choose ON to saving the screen.
c) ASPECT RATIO – Select from: 16:9 / 4:3PS / 4:3LB
PS: The screen will display the picture in 4:3 ratio leaving a black
border to either side of the picture.
LB: The screen will display the picture in a more suitable 16:9 ratio
which is more appropriate for this model.
d) RESUME – Select ON or OFF.
e) RESET-Return to Factory default.
9

DISPLAY
U
LANGUAGE – Choose the language for the operation system.
Select from: ENGLISH / CHINESE / DEUTSH / SPANISH / FRENCH /
PORTUGUESE.
HORA OSD - Choose the setup menu show on the screen of the time.
Select from : 5 seconds / 10 seconds / 30 seconds / 60 seconds / Never.
AUDIO LANGUAGE – Choose the language for playing of disks, subject to
the DVD being in one of the language listed. Select from: ENGLISH /
JAPANESE / FRENCH / SPANISH / PORTUGUESE / LATIN / GERMAN /
CHINESE.
SUBTITLE LANGUAGE - Choose the language for on screen subtitles.
Subject to the DVD having this feature in one of the language listed. Select
from: ENGLISH / JAPANESE / FRENCH / SPANISH / PORTUGUESE /
GERMAN / OFF / CHINESE.
MENU LANGUAGE - Choose the language for disc menu, subject to the
DVD having this feature in one of the language listed. Select from: ENGLISH
/ JAPANESE / FRENCH / SPANISH / PORTUGUESE / LATIN / GERMAN /
CHINESE.
SOUND
SOUND MODE – Choose the sound effect for playback .
Select from: STANDARD / MUSIC / SPEECH / MOVIE.
DOWN MIX – You can select three different audio outputs˖STEREO / VSS /
LT/RT.
DYNAMIC RANGE – Choose dynamic range OFF / 1/8 / 2/8 / 3/8 / 4/8 / 5/8 /
6/8 / 7/8 / FULL.
VIDEO
PICTURE MODE – Choose the picture SOFT / OPTIMAL / STANDARD.
COLOR TEMP – STANDARD / WARM / COOL.
SB OPERATION
U
In DVD Mode, press the USB button on main unit or Remote control to switch
between DVD or USB Mode. If Memory Stick inserted the USB port, it can
playback automatically. Press PLAY/PAUSE button to pause or STOP button
to stop the track.
Press buttons on either the unit or Remote control to select previous or /
next track and press OK button to confirm.
10

PROGRAMMING USB PLAYBACK
This unit can be programmed to play up to 16 tracks/files in USB mode.
Press to come into program status; using direction button or move the
cursor to select the desired track, then press OK button to enter the program
lists. When playback the program lists, press or buttons to enter program
menu, and press again this button to playback programmed list.
TTV OPERATION
How to Navigate Source
5. Press the POWER button to turn on the unit.
6. Press the SOURCE button to repeatedly to select TV mode and the “tv”
will appear on LCD display and turn on.
7. Press the SETUP button on the remote control to display the Main
Menu on LED screen.
• TV Channel
1. Press the M+/CH+ or M-/CH- buttons on Main unit or Remote control to
select Search Menu, then press OK button to enter the following sub
menus.
11

2. Press M+/CH+ or M-/CH-buttonson Main unit or Remote control select
Auto Search to scan your available channels and auto saving.
•Picture
1. Press the M+/CH+ or M-/CH- buttons on Main unit or Remote control to
select Config Menu, then press OK button to enter the following sub
menus.
2. Press M+/CH+ or M-/CH-buttonson Main unit or Remote control select
Picture, then press OK button to enter the following sub menus and
press buttons on Remote control to adjust the value in the sub menu.
Aspect Ratio : The LED screen will display the picture in 16:9 Wide
TV Format :NTSC
type.
•Caption
1. Press the M+/CH+ or M-/CH- buttons on Main unit or Remote control to
select Caption, then press OK button to enter the following sub menus.
2. Press M+/CH+ or M-/CH-buttonson Main unit or Remote control select CC
Display, then press OK button to enter the following sub menus and
press buttons on Remote control to adjust the value in the sub menu.
screen(Default) /AUTO/ 16:9 Pillar Box / 16:9 Pan
& Scan / 4:3 Letter Box / 4:3 Pan & Scan / 4:3 Full
ratio leaving a black border to either side of the
picture.
(Default) / PAL TV operating system to suit the playback
12

CC Display : Select CC OFF(Default) / CC1 / CC2 / CC3 / CC4 / CC5
/CC6to displayed on screen.
CC Position: Select AUTO (Default)/ Top / Bottom to displayed on
screen.
Font Color :SelectDefault / White / Black / Red / Green / Blue /
Yel l ow / Ma g enta / Cyan font colorto displayed on
screen.
• OSD Language
Choose the language for the operating system.
1. Press the M+/CH+ or M-/CH- buttons on Main unit or Remote control to
select Config Menu, then press OK button to enter the following sub
menus.
Press M+/CH+ or M-/CH-buttonson Main unit or Remote control select
2.
OSD Language, then press OK button to enter the following sub menus
and press buttons on Remote control to select English(Default) /
French / Portuguese / Spanish from the sub menu.
• Restore Factory Default
1. Press the M+/CH+ or M-/CH- buttons on Main unit or Remote control to
select System Menu, then press OK button to enter the following sub
menus.
2. Press M+/CH+ or M-/CH-buttons on Main unit or Remote control select
Restore Factory Default, then press OK button to enter the following sub
menus and press OK button again to confirm restore the TV to factory
default settings.
BBLUETOOTH OPERATION
ABOUT PAIRING
Pairing is the term used when two Bluetooth devices are connected
wirelessly for the first time. This allows the devices to see each other
and sets up a one to one communication channel between both
devices.
To begin pairing with a Bluetooth device
1. Press the POWERbutton to turn on the unit.
2. Press the SOURCE button to repeatedly to select Bluetooth mode and
the icon will displayed and flash on LCD, you will start pairing
process to connect to your Bluetooth device.
13

3. Turn on Bluetooth function of your device and enable the search or scan
function to find ONA16AV011 (see your device’s instructions to add or
setup a Bluetooth device).
4. Select ONA16AV011from the device list when it appears on you device
screen. If required, enter the pass code “0000” to pair (link)
ONA16AV011 with your device.
5. Once paired with a device, the icon will light steadily and your will
hear a sound confirms that pairing is completed.
6. If you want ONA16AV011 change to pair with another Bluetooth device.
Press and hold the PLAY/PAUSE, PAIR button for about 4~5 seconds.
The icon will flash, a tone beep soundwill be heard to confirm the unit
will go into Pairing/Discoverable mode again. Repeat steps 3 and 5.
To connect previously paired Bluetooth device
ONA16AV011 can store one previously paired device for quick pairing
during power on. When the unit is powered on and the previously paired
device is found within the operating range, the unit will pair the device
automatically.
NOTE:
• Due to different operating system of Bluetooth devices, the time taken
by pairing process might be different. If the pairing cannot be successful
in the first time, please try to restart the pairing process by pressing and
holding the PLAY/PAUSE, PAIR buttonagain until the icon flash.
• The pairing time might be longer for the first time pairing or pairing a
new Bluetooth device.
• Make sure you have the latest firmware for your Bluetooth mobile
devices.
• Make sure your device is working properly. Check your device’s manual
for details on Bluetooth pairing and linking.
• Refer to manual of your cell phones, tablet PC, computer or other
Bluetooth enabled device for Bluetooth operation since it may vary from
model to model.
PLAYING FROM A BLUETOOTH DEVICE
You can play music from your Bluetooth device wirelessly to
ONA16AV011 after pairing.
1. Selecting your favorite song, press the PLAY button on your Bluetooth
device or the PLAY/PAUSE, PAIRbuttonon ONA16AV011 to play or
pause the Bluetooth device playback.
2. Adjust both theVOLUME +/- buttons of your ONA16AV011 and your
Bluetooth device until you reach a comfortable listening level.
14

Notes:
1. Your Bluetooth enabled device will not play the music through the
speaker, even if connected (linked), if the device does not support
A2DP profile.
2. Remember to turn off the ONA16AV011 when you have finished
listening, s
3. Don't forget to switch off the power of your external audio device as
well
LLISTENING TO THE RADIO
1. Press the button to turn on the unit.
2. Press the SOURCEbutton to repeatedly to select FM mode, the FM
frequencywill show on LCD display.
3. Press the SKIP / TUNE or buttons to select the desired radio
station. If you press and hold the SKIP / TUNE buttons for 2
seconds, then release, the unit will automatically scan to the next
broadcasting station.
4. Press the button to turn the radio OFF.
TO SET/RECALL RADIO PRESETS
1. In FM mode, press the SKIP / TUNE or buttons to select the
desired radio station.
2. Press the CLK SET / MEMbutton to enable the program function and
the program number “P01” will appear on the LCD display and “MEM”
icon flashing.
3. Press the M+ / CH+ or M- / CH-buttons to select the desired program
number of program.
4. Press the CLK SET / MEMbutton to confirm.
5. Repeat above steps #1 thru #4 to preset up to 20 stations.
6. To retrieve one of the preset stations already programmed, press M+ /
CH+ or M- / CH-buttons until you reach the desired program number of
the station.
et the
button to the STANDBY mode.
or
15

L
INE IN OPERATION
L
This unit provides an auxiliary audio signal input jack for connecting
external audio devices like MP3 players, CD players and listen to them
through the speakers of this unit.
1. Use an audio cable (not included) with one 3.5 mm stereo plug on each
end of the cable.
2. Plug one end into the LINE IN Jack on the main unit and the other end
of the cable into the Line-out Jack or Headphone Jack of your external
audio device.
3. Turn on the unit and external audio device.
4. To select auxiliary audio input, tap the SOURCE button to select LINE IN
mode. “LINE IN” icon appears on display.
5. The volume level can now be controlled through the main unit. Operate
all other functions on the auxiliary device as usual.
NOTE:
If you connect this unit to the Line-Out Jack of your external device then
you only need to adjust the volume control of this unit. If you connected
the Headphone Jack of your external device then you may need to
adjust both the volume control of your external device and the volume
control of this unit to find the most desirable volume setting.
RESETTING YOUR CLOCK RADIO
If the system does not respond or exhibits erratic or intermittent operation,
you may have experienced an electrostatic discharge (ESD) or a power
surge that triggered the internal microcontroller to shut down automatically.
If this occurs, simply disconnect the AC Adaptor and remove the system
back-up battery, wait for at least 3 minutes and then setup the unit again
as if you were using it for the very first time.
16
 Loading...