

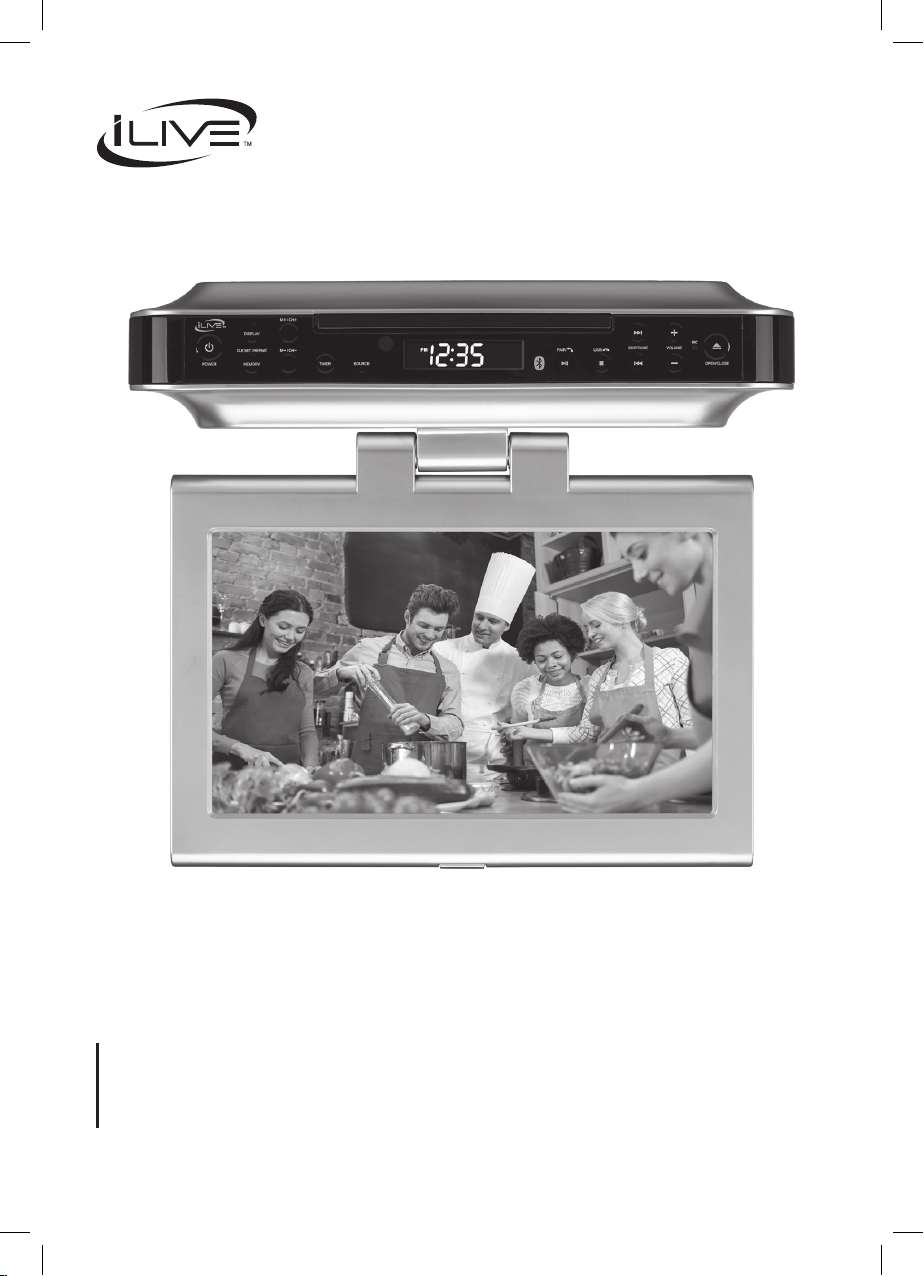
Wireless Undercabinet TV/DVD/Music System
User’s Guide for Model IKTD1016 v1620-01
For the most up-to-date version of this User’s Guide, go to www.iLiveElectronics.com

This equipment complies with FCC RF radiation exposure
limits set forth for an uncontrolled environment.
This equipment should be installed and operated with a
minimum distance of 20 centimeters between the radiator and
your body

Table of Contents
Setup � � � � � � � � � � � � � � � � � � � � � � � � � � � � � � � � � � � � � � � � � � � � � � � � � � � � � � � � � � � � � � � � � � � � � � � � � � � � � � � � � � � � � � � � � � � � � � � � � � 5
Features & Specications
Includes
Power
Battery Backup
Orientation � � � � � � � � � � � � � � � � � � � � � � � � � � � � � � � � � � � � � � � � � � � � � � � � � � � � � � � � � � � � � � � � � � � � � � � � � � � � � � � � � � � � � � � � � � � � 6
Front Controls
Side Inputs
Remote � � � � � � � � � � � � � � � � � � � � � � � � � � � � � � � � � � � � � � � � � � � � � � � � � � � � � � � � � � � � � � � � � � � � � � � � � � � � � � � � � � � � � � � � � � � � � � � � 7
Remote Functions
Remote Batteries
Audio Inputs � � � � � � � � � � � � � � � � � � � � � � � � � � � � � � � � � � � � � � � � � � � � � � � � � � � � � � � � � � � � � � � � � � � � � � � � � � � � � � � � � � � � � � � � � � � 8
Connecting Cable/TV Antenna
Composite Video (Aux In)
Connecting HDMI
Other Devices � � � � � � � � � � � � � � � � � � � � � � � � � � � � � � � � � � � � � � � � � � � � � � � � � � � � � � � � � � � � � � � � � � � � � � � � � � � � � � � � � � � � � � � � � 10
Using a USB Drive
Line In (3.5mm Audio Input)
Bluetooth Wireless � � � � � � � � � � � � � � � � � � � � � � � � � � � � � � � � � � � � � � � � � � � � � � � � � � � � � � � � � � � � � � � � � � � � � � � � � � � � � � � � � � � � 12
Pairing to a Device & Playing Audio
Using the Speakerphone
Radio � � � � � � � � � � � � � � � � � � � � � � � � � � � � � � � � � � � � � � � � � � � � � � � � � � � � � � � � � � � � � � � � � � � � � � � � � � � � � � � � � � � � � � � � � � � � � � � � � 13
Radio Reception
Tuning the FM Radio
Saving and Playing a Station as a Preset
DVD & CD � � � � � � � � � � � � � � � � � � � � � � � � � � � � � � � � � � � � � � � � � � � � � � � � � � � � � � � � � � � � � � � � � � � � � � � � � � � � � � � � � � � � � � � � � � � � � 14
Loading and Playing a DVD/CD
Programming a DVD or CD
Clock & Timer � � � � � � � � � � � � � � � � � � � � � � � � � � � � � � � � � � � � � � � � � � � � � � � � � � � � � � � � � � � � � � � � � � � � � � � � � � � � � � � � � � � � � � � � � 15
Setting the Clock
Setting the Timer
Disabling the Timer
Company Information � � � � � � � � � � � � � � � � � � � � � � � � � � � � � � � � � � � � � � � � � � � � � � � � � � � � � � � � � � � � � � � � � � � � � � � � � � � � � � � � � 16
Contact Information
Warranty
International Support
4
Setup
Features & Specications
• Bluetooth wireless
• Wireless range: 60 feet
• 10" swivel TFT LCD display: 1024 x 600 resolution
• ATSC tuner
• DVD player: DVD, DVD±R/RW
• CD player: CD, CD-R/RW, JPEG CD
• Built-in microphone for handsfree speakerphone
• Digital FM radio (PLL)
• Station memory presets (20 FM)
• Negative LCD display with white backlight
• Audio/Video Inputs: HDMI, Composite, 3.5mm
audio, RF antenna, USB
• DC power input: requires an AC/DC power adapter
(included)
• Battery backup: requires 2 AA batteries (not
included)
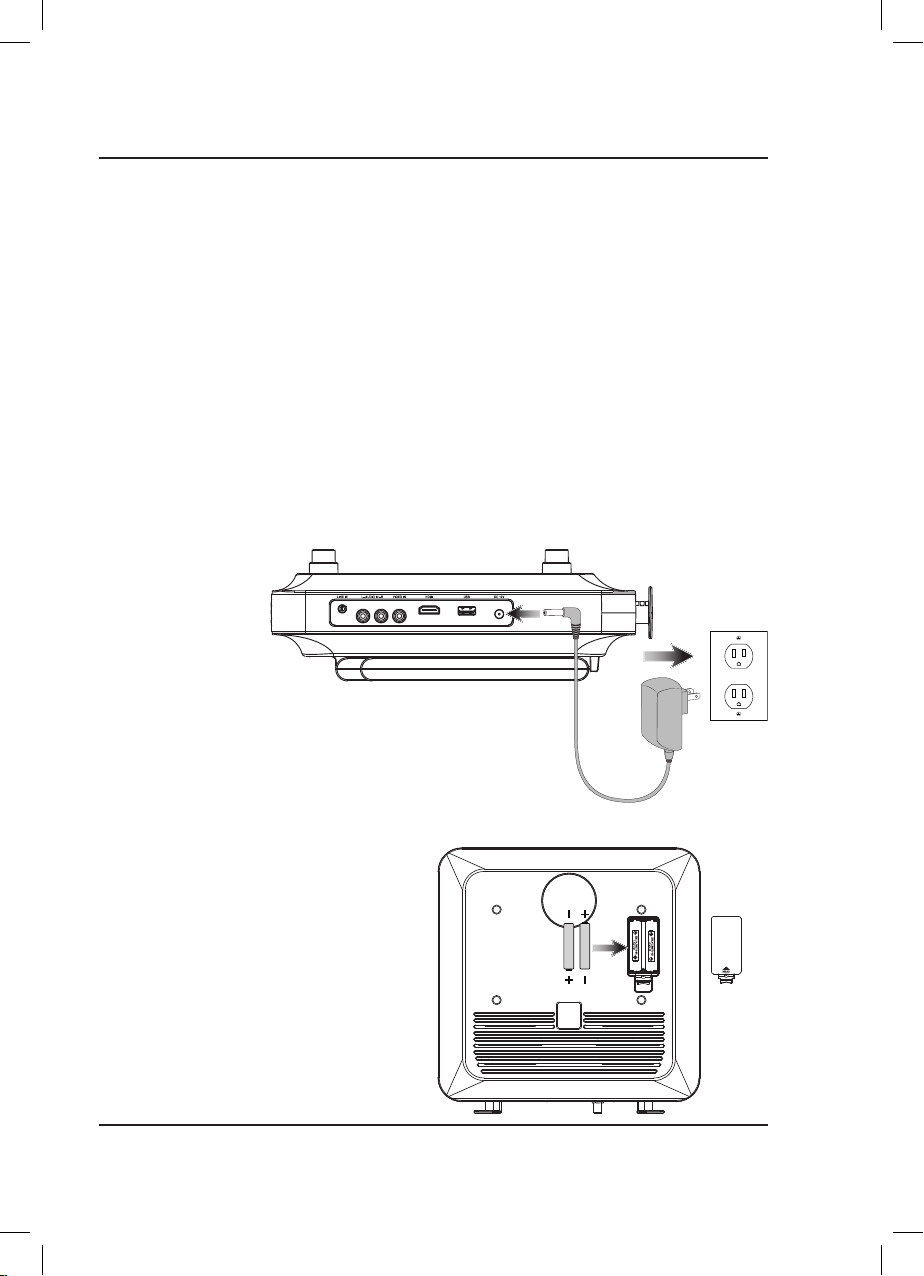
Power
Plug the small end of
the power cord into the
DC Input on the side of
the unit, and the large
plug into a standard wall
outlet.
Includes
• Remote control
• AC/DC power adapter
• Wall-mount hardware and instructions
• User's guide
Battery Backup
Requires 2, AA-size, batteries (not included).
The battery backup is intended for short power
outages only. The unit’s primary functions
cannot run on the battery backup alone.
AA
AA
5

Orientation
Front Controls
Channel ±/
Memory Presets
DisplayPower Skip/
Side Inputs
Memory
Timer
Stereo
Inputs
Remote
Sensor
Source
HDMI Input
Disc Tray
Pair/Play/Pause/
Speakerphone
DC Power
Input
Stop/USB/
End Call
Tune
Volume ±
Open/
Close
Disc Tray
Microphone
Composite
Video Input
USB PortLine In
Screen
Latch
6

Remote
Remote Functions
Press to power the television o or on.
Open or close the disc tray.
Press to adjust the television channel.
Press to select subtitle language.
Press to adjust the television volume.
Press to mute the volume.
Press to make selections in the on screen
Press to access the loaded DVD’s menu.
Press to enter channel numbers, DVD
Press to search through an individual
Press to stop an individual chapter or
Press to zoom in or out on a loaded DVD.
Press to set FM radio memory presets.
Press to repeat a title, chapter, track, or
GoTo/Number Keypad
chapters/scenes, etc.
Press to play or pause an individual
Power
Open/Close
Channel +/ −
Subtitle
Volume +/ −
Mute
OK/Arrows
menus.
Menu
Reverse/Fast Fwd
chapter or track
Stop
track during play.
Play/Pause
chapter or track.
Zoom/Mem
Repeat
entire disc.
Timer
Press to set the timer.
Source
Press to select media source.
Audio/CC
Press to adjust the audio settings and
closed captions for the loaded DVD.
Volume +/ −
Press to adjust the volume.
Exit/USB
Press to exit the setup menu.
Press to access connected USB drive.
Setup
Press to view the TV or DVD setup menu.
Title
Press to access the title menu on a
loaded DVD.
Skip Back/Forward
Press to skip between chapters or tracks.
Angle
Press to view alternate angles on
supported DVDs.
Prog
Press to program a loaded disc to play
titles, chapters, or tracks in a specied
order.
Display
Press to change the info displayed on
the unit's LCD display.
Slow/Clkset
Press to activate slow motion.
Press to set the clock.
Remote Batteries
Remote control: requires 2 AAA batteries (not included).
AAA
AAA
7

Audio Inputs
Connecting Cable/TV Antenna
You will need a cable/antenna wire (not included).
1. Connect the Cable/Antenna wire to the input on the rear of the unit.
2. Press the Source button to switch to tV.
3. Press the Setup button to access the setup menu.
4. Using the Arrow Keys on the remote, select Search and press OK.
5. Select Auto Search to begin scanning for available channels.
Composite Video (Aux In)
You will need composite video (yellow) and RCA stereo (red,white) cables (not included).
1. Connect the video output on your media device to the corresponding color coded video inputs on
the television with a Composite Video cable.
2. Connect the audio output on your media device to the corresponding color coded audio input on
the television with stereo RCA cables.
3. Press the Source button to switch to the connected input AU (Aux In).
Connecting HDMI
HDMI oers superior sound and picture quality when compared to Composite or other connection types,
and is the easiest way to connect your media devices to the television.
You will need a device that supports HDMI and a HDMI cable (not included).
1. Connect the device’s HDMI output to the HDMI input on the side of the unit.
2. Press the Source button to switch to the connected input Hd (HDMI).
8

Connecting Cable/TV Antenna - Detail
Stereo RCA Inputs (Aux In) - Detail
Connecting HDMI - Detail
HDMI
9

Other Devices
Using a USB Drive
1. Load a USB drive into the USB Port on the side of the unit.
2. Press the Source button to switch to DVD.
3. Press and hold the USB button on the unit or press the USB button on the remote to switch to
USB.
4. Use the Arrow/OK buttons to select and play content from the connected USB drive.
Line In (3.5mm Audio Input)
You will need a 3.5 mm audio input cable (not included).
1. Connect a 3.5mm audio cable to the Line In Input on the side of the unit and the audio output/
headphone jack on an audio device.
2. Power the unit on and press the Source button to switch to Line In.
3. Use the native controls on the connected device to play your audio through the unit.
10

Using a USB Drive - Detail
Line In - Detail
11

Bluetooth Wireless
Pairing to a Device & Playing Audio
After initial pairing, the unit will stay paired unless unpaired manually by the user or erased due to a
reset of the device. If your device should become unpaired or you nd it is unable to connect, repeat the
steps listed here.
1. Power the unit on and press the Source button to select
the display will begin ashing slowly.
2. Hold the Pair button to begin pairing. The pairing indicator will begin quickly ashing blue. When
pairing, remain within 3 feet of the unit.
3. Using the controls on your Bluetooth device, scan for and select IKTD1016 in your Bluetooth
settings to pair. If your device requests a password, enter the default password 0 0 0 0 .
Refer to the user’s manual for your specic device for instructions on pairing and connecting
Bluetooth devices.
4. When successfully paired, the pairing indicator will turn solid and an audible chime will sound
from the speaker.
5. Use the controls on the connected device to select and begin playing audio. Audio played through
the connected Bluetooth device will now be heard through the speaker.
6. Use the controls on the unit or the connected device to play, pause, and adjust volume.
Using the Speakerphone
1. When a call is received, a ringtone will sound through the unit.
2. Press the
3. The incoming call received through the device will now be heard through the speaker.
4. To end the call, press the
button to accept the call, or accept the call using the controls on the connected phone.
button or end the call using the controls on the connected device.
(Bluetooth). The pairing indicator on
12

Radio
Radio Reception
An FM receiver is built into the unit. To improve radio reception, adjust the position of the unit.
Tuning the FM Radio
1. Press the Power button to turn the under cabinet music system on.
2. Press the Source button to switch to Rd (FM Radio Mode).
3. Press the Skip/Tune buttons to tune the radio manually. Press and hold the Skip/Tune button to
scan for available stations.
Saving and Playing a Station as a Preset
1. Tune to the desired station.
2. Press the Mem button, the preset number will appear on the display.
3. Press the M +/- buttons to adjust to the desired preset number.
4. Press the Mem button to save the current radio station to
the selected preset.
5. Press the M +/- buttons to cycle through preset radio stations.
13

DVD & CD
Note: This unit is not compatible with MP3 CDs.
Loading and Playing a DVD/CD
1. Press the Source button to select DVD.
2. Press the open/close button to open the Disc Tray and place a disc into the tray, label side facing up.
3. Press the open/close button to close the Disc Tray
4. Use the controls on the remote or the unit to play, pause, adjust volume, etc.
Programming a DVD or CD
1. While a DVD or CD is playing, press the Program button on the remote.
2. Using the Number Keypad enter in the chapters or tracks in the order you want them to play.
3. Highlight the on-screen Play button using the Arrow buttons and press OK.
4. The programmed chapters and tracks will now play in the designated order.
5. To cancel a program, press the Stop button twice.
14

Clock & Timer
Setting the Clock
1. With the power o, press and hold the Clk Set/Mem button. The hour on the display will begin
ashing.
2. Press the Skip/Tune buttons to set the hour.
3. Press the Clk Set button again, the minutes on the display will begin ashing.
4. Press the Skip/Tune buttons to set the minutes.
5. Press the Clk Set button to nish setting the time, or wait for the display to stop ashing.
Setting the Timer
1. Press the Timer buttons to adjust the timer in increments of 10 min.
2. Wait for the display to stop ashing.
3. After the set time has expired, the under cabinet music system will sound an alarm.
Disabling the Timer
To cancel the alarm after it has sounded, press the Power button.
To cancel the timer before the alarm has sounded, press the Timer button until the display reads 00 and
the timer light is no longer lit.
15

Company Information
Contact Information
Website: www.iLiveElectronics.com
Email Support: prodinfo@dpiinc.com
Email Parts: partsinfo@dpiinc.com
Phone Support: 1-888-999-4215
Warranty
For Warranty Information and the most up-to-date version of this User’s Guide, go to:
www.iLiveElectronics.com
International Support
To download this User’s Guide in English, Spanish, and French, or to get answers to frequently asked
questions, visit the support section at: www.iLiveElectronics.com
Para descargar este Manual del Usuario en inglés, español y francés, o para obtener respuestas a preguntas
frecuentes, visite la sección de apoyo en: www.iLiveElectronics.com
Pour télécharger ce guide de l’utilisateur en anglais, espagnol ou français, ou pour obtenir des réponses à
des questions fréquemment posées, consultez la rubrique d’assistance sur: www.iLiveElectronics.com
Copyright © 2016 Digital Products International (DPI, Inc.) All other trademarks appearing herein are the
property of their respective owners. Specications are subject to change without notice.
16
 Loading...