

MODEL NO. SP2412-BLACK-PL
OWNER'S MANUAL
BLUETOOTH FM PORTABLE SPEAKER
PLEASE READ BEFORE OPERATING THIS EQUIPMENT
1
2
3

Table of Contents
Your Bluetooth FM portable speaker …...…………………………………5
Features
Includes
Charging instructions …..…………..……………………………………..… 5
Charging the battery for first time
Recharging the internal battery
Battery Note and Care
Orientation …………………………………..……………………………..… 6
Front Features & Controls
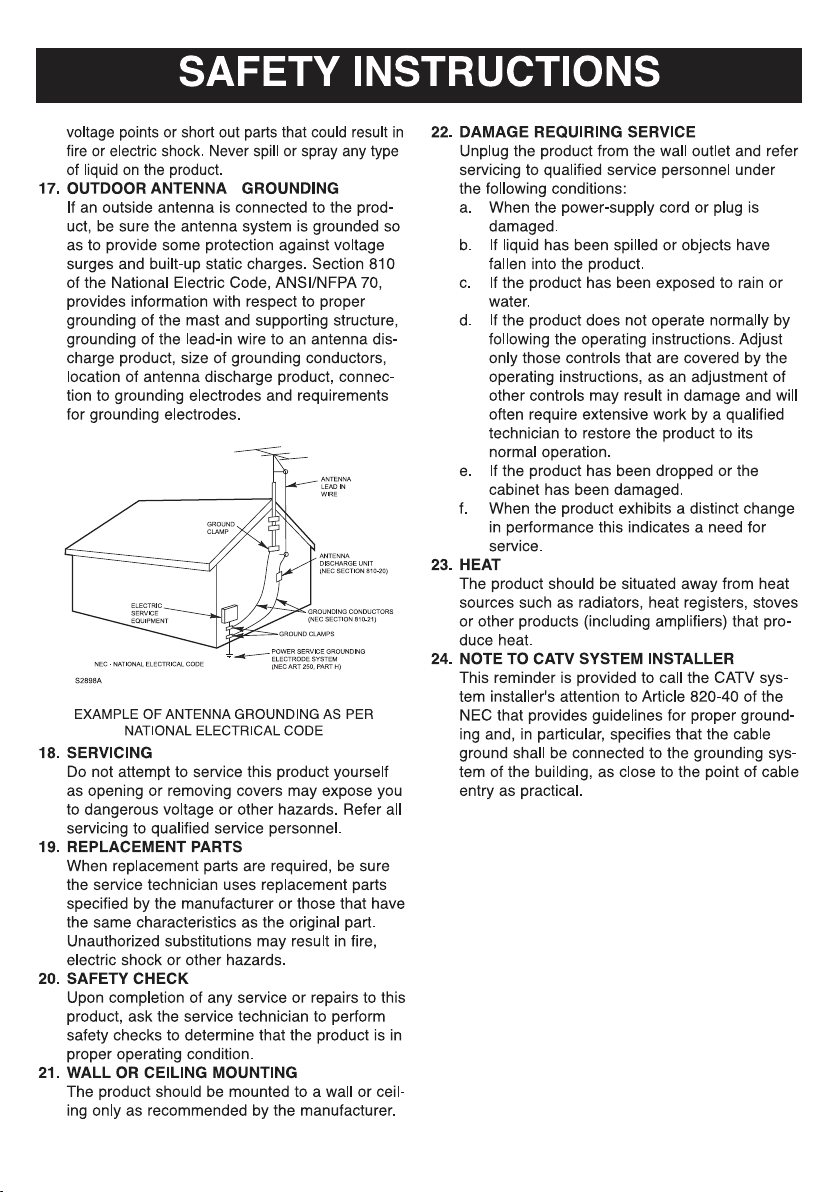
Rear inputs
Bluetooth operation ………………………………….……………………… 7
Pairing a Bluetooth Device for the First Time
Playing Audio Wirelessly
Radio operation ………………..….………………………………………… 8
Listening to the radio
Setting the radio station presets
Auxiliary operation ………..……………………………….………………… 8
Specifications …………..………………………………………………..……9
Trouble Shooting ……………………………………..………………………10
4

Your Bluetooth FM portable speaker
Features
• Supports Bluetooth v2.1
• Supports profile A2DP (Advanced Audio
Distribution Profile)
• Supports automatic device pairing
• Wireless range: 33 feet
• Pairing button
• Play/pause button
• Skip forward/back button
• On/off button
• Digital volume control
• 20 FM station memory preset
• 4 digit red LED display
• Charge indicator
• 3.5mm audio input
• Build-in rechargeable battery
• Build-in FM antenna
• Build-in stereo speaker
Includes
• USB Cable
• User manual
Charging instructions
This unit operates on a built-in Li-ion battery that can be recharged either using the USB port on
your computer or from a USB power adaptor (not included) with a rated output of DC 5V/500mA and
up.
Note: The micro USB CHARGING JACK located on this unit is only designed for charging the built-in
Li-ion battery.
CHARGING THE BATTERY FOR FIRST TIME
1.) Charge the built-in Li-ion battery a minimum of 2 hours prior to first use.
Plug the unit into the USB port on your computer or into a USB power adaptor
(not included) using the included USB cable.
2.) The CHARGE INDICATOR will turn “ON” while charging and turn “OFF” when the unit is fully
charged. Unplug the USB cable from the power source once the battery is fully charged.
RECHARGING THE INTERNAL BATTERY
After prolonged use, the internal battery will become weak and the operation may become intermittent.
When the internal battery charge is low, the CHARGE INDICATOR will turn “ON and FLASH” alerting
you to recharge the internal battery as soon as possible.
Plug the unit into a USB port on your computer or into a DC 5V/500mA and up USB power adaptor
(not included) using the included USB cable. Disconnect the USB cable from the speaker as soon as
it is fully charged.
Note: 1. Charging time will vary if you are listening to music while charging the internal battery. We
recommend you switch off the unit power during the charging process.
2. To prolong the life of a rechargeable battery, it is recommended to completely discharge it
before fully charging it again.
3. Rechargeable batteries need to be cycled for maximum performance and longer battery life.
If you don’t use the player that often, be sure to recharge the battery at least once a month in
order to keep the internal battery working properly.
Battery Note and Care
• Do not burn or bury batteries.
• Do not puncture or crush.
• Do not disassemble.
• Do not dispose of batteries in fire, batteries may explode or leak
• Li-ion batteries must be recycled. Do not dispose of in the trash.
• Use only chargers rated for Li-ion cells. Be sure the charger’s voltage and current settings are
correct for the battery pack being charged.
• Charge batteries on a fireproof surface and away from flammable items or liquids.
• Batteries should NEVER be left unattended while charging. Only adults should charge the
batteries.
• Follow the manufacturer’s instructions for charging the product and do not charge longer than
recommended. Unplug the charger when the battery is charged or not in use.
5

Orientation
Front Features & Controls
PAIRING / MEM+
In Bluetooth mode, press and
hold to begin pairing to a device.
Press to play or pause the
current tracks.
In Radio mode, press to recall
the preset stations.
PRESET
FM Station
Press to set the
program and
confirmed.
SOURCE
Selector
Press to select
between difference
Press to power
the unit on or off.
indicator
LED Display
Speakers
sources.
POWER
control
POWER
SKIP+/- ,
TUN+/- Search
In Bluetooth mode, press
to skip the previous or next
song to a device. In Radio
mode, press and hold to
scan the previous or next
FM stations.
VOLUME +/-
Press to adjust the volume
up or down to set the
sound level.
CHARGE indicator
Flash: Battery Low
Light : Battery in charging
Light off: Battery fully
voltage
Rear input
AUX IN DC IN (Micro USB)
6

Bluetooth operation
Pairing a Bluetooth Device for the First Time
1. Power on the unit by pressing the Power button, power indicator will turn on and “ HI ”
appear on LED Display 3 seconds.
2. Press the Source button on the front of the unit repeatedly until “ bt ” appear on LED display
and the sound “ Do “ will be heard. After press and hold the Pairing button.
The “ bt ” will flash quickly. When pairing, remain within 3 feet of the unit.
3. Using the native controls on your Bluetooth device, select the SP2412 in your Bluetooth
settings to pair. If your device requests a password, enter the default password “0000”.
Refer to the user’s manual for your specific device for instructions on pairing and connecting
Bluetooth devices.
4. When successfully paired and connected, a sound “ Dingdong” will issue from the unit and
the “ bt ” will display remain lit.
After initial pairing, the unit will stay paired unless unpaired manually by the user or erased
due to a reset of the device. If your device should become unpaired or you find it is unable to
connect, repeat the above steps.
Playing Audio Wirelessly
1. After pairing to a Bluetooth device, use the native controls on the connected Bluetooth
Device to select a track.
2. Play, pause or skip a selected track using the native controls on the connected Bluetooth
Device or the controls on the unit.
3. Audio played through the connected Bluetooth Device will now be heard through the
speakers.
4. Adjust the VOLUME +/- to obtain the desired volume level.
5. Press POWER button again to turn off the unit.
7

Radio operation
Listening to the radio
1. Press the Power button, power indicator will turn on and “ HI ” appear on LED display 3
seconds.
2. Press the Source button on the front of the unit repeatedly until FM frequency will show on LED
display.
3. Press and hold the TUN+ or TUN- button to search the next/previous available station.
4. If the reception is poor, try manual tuning to fine-tune the station. Press the TUN+ button or
TUN- button briefly to manually tune through the frequency band.
5. Adjust the VOL + / VOL – buttons to obtain the desired volume level.
6. Press POWER button again to turn off the unit.
Setting the Radio Station Presets
The SP2412 allows you to store up to 20 stations for easy recall at any time.
1. Press the Power button, power indicator will turn on and “ HI ” appear on LED display 3
seconds.
2. Press the Source button on the front of the unit repeatedly until FM frequency will show on LED
display.
3. Press the TUN+ button or TUN- button to select the desired station.
4. Press and hold the PRESET button 2 seconds to enable the program function and the program
number “P01” will show on the LED display and flashing.
5. Press the TUN+ button or TUN- button to select the desired program number of program.
6. Press the PRESET button again to confirm.
7. Repeat above steps #3 thru #6 to preset up to 20 stations.
8. To retrieve one of the preset stations already programmed, press MEM+ button repeatedly until
you reach the desired program number of the station.
Auxiliary operation
3.5mm audio input cable not included.
1. Plug one end of a 3.5mm audio input cable into the AUX IN input on the rear of the unit, and
plug the other end of the cable into the audio output on the external music player or other
source.
Note: Make sure your external music player is turn ON.
2. Press the POWER button to power the unit on. and “ HI ” appear on LED Display 3 seconds.
3. Set the Source button on the front of the unit repeatedly until “ AU ” appear on LED display.
4. Adjust the VOL + / VOL – buttons to obtain the desired volume level of music playback from
the speakers on the unit.
5. Press POWER button again to turn off the unit. Remember to shut down the external player
power.
8

Specification
Power Requirement:
DC input : DC 5V 500mA (Micro USB)
Battery: build-in rechargeable lithium battery
Frequency Range: FM 87.5 – 108 MHz
Bluetooth: Bluetooth Specification version 2.1
Support profile A2DP
Audio Power output: 1.5W (RMS) x 2
Speaker: 4 Ohms. 2 1/2 inch. x 2
Dimensions: 22.8 cm(H) x 25.0 cm(W) x 12.8 cm(D)
Weight: 0.65 Kg.
9

Trouble Shooting
PROBLEM POSSIBLE CAUSE REMEDY
GENERAL
No Charging The USB power adaptor (not
The unit does not to operation
of any button
included) is not plugged into a
wall outlet or the USB cable
(included) is not plugged into the
mini USB jack on the unit.
Wall outlet is not functioning.
Computer USB port is not
functioning.
Volume set too low.
Under the influence of
electrostatic phenomenon, the
product may malfunction and
require user to reset the unit.
BLUETOOTH
No sound when playing audio via
Bluetooth
Your Bluetooth device has been
paired properly.
The unit placement out of range.
The volume control of your
Bluetooth device is set at too
low.
The volume control of the main
unit is set at too low.
Plug the USB power adaptor (not
included) into a wall outlet and
plug the USB cable (included)
into the mini USB jack on the
unit..
Plug another device into the
same outlet to confirm the outlet
is working.
Make sure your computer power
is turned on and try another USB
port.
.detsuahxe si yrettab tinu ehT dnuoS oN
Recharge the unit battery.
Press the volume+ button to
increase the sound level.
Press and hold the POWER
button 5 seconds to reset the
unit.
Pairing your Bluetooth device
according to the “Pairing a
Bluetooth Device for the First
Time” section.
Relocate the unit within
Bluetooth operating range (33
feet).
Increase the volume of your
Bluetooth device.
Increase the volume of the main
unit to turn to your wish.
RADIO
Noise or sound distorted on FM
broadcast
Station not tuned properly for
FM.
FM reception is weak.
AUXILIARY
No sound in AUX mode Volume at minimum.
External device not connected
properly.
10
Retune the FM broadcast
station.
Relocate the position of the unit.
Adjust the volume knob.
Clear contact pins and connect
again.


Worning
This device complies with Part 15 of the FCC Rules. Operation is subject to the following two
conditions: (1) this device may not cause harmful interference, and (2) this device must accept
any interference received, including interference that may cause und esire d operation.
changes or modifications not expressly approved by the party responsible for compliance could
void the user's authority to operate the equipment.
NOTE: This equipment has been tested and found to comply with the limits for a
Class B digital device, pursuant to Part 15 of the FCC Rules. These limits are
designed to provide reasonable protection against harmful interference in a
residential installation. This equipment generates, uses and can radiate radio
frequency energy and, if not installed and used in accordance with the
instructions, may cause harmful interference to radio communications. However,
there is no guarantee that interference will not occur in a particular installation.
If this equipment does cause harmful interference to radio or television reception,
which can be determined by turning the equipment off and on, the user is
encouraged to try to correct the interference by one or more of the following
measures:
-- Reorient or relocate the receiving antenna.
-- Increase the separation between the equipment and receiver.
-- Connect the equipment into an outlet on a circuit different
from that to which the receiver is connected.
-- Consult the dealer or an experienced radio/TV technician for help.
RF Exposure Statement
To maintain compliance with FCC’s RF Exposure guidelines, This equipment sho uld be installe d
and operated with minimum distance between 20cm the radiator your body: Use only the
supplied antenna.
 Loading...