

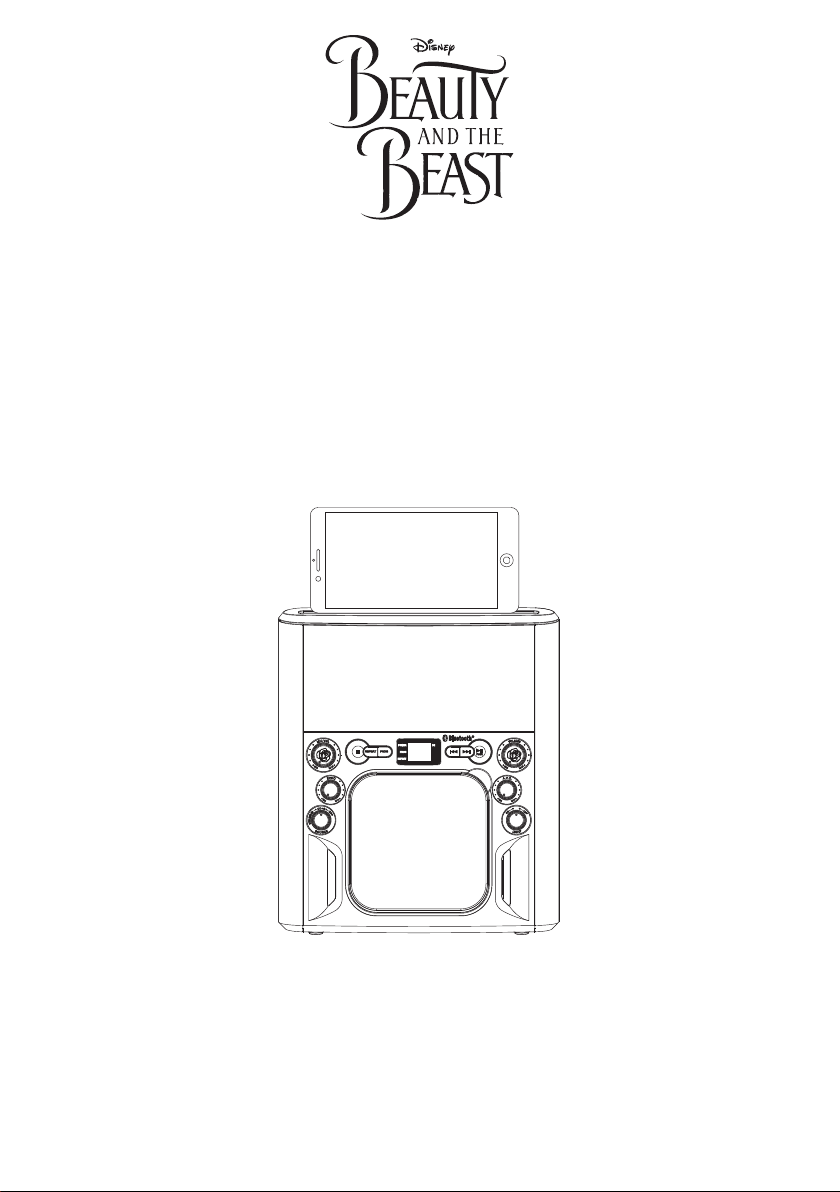
BEAUTY AND THE BEAST
SLIM/FLAT CD-G KARAOKE
ITEM. KO3-08121-FR
OWNER’S MANUAL
PLEASE READ BEFORE OPERATING THIS EQUIPMENT
Warnings and Precautions
• CAUTION
• WARNING: To reduce the risk of fire or electric shock,
• AVERTISSEMENMTY: Pour réduire le risque d’incendie
• CAUTION: Use of controls or adjustments or performance
• WARNING: Changes or modifcations to this unit not
• WARNING: Do not place the unit on top of any soft,
• CAUTION: Danger of explosion if battery is incorrectly
• PRÉCAUTION: Danger d’explosion si les piles sont
• WARNING: There is a danger of explosion if you
:
THE WIDE BLADE OF THE PLUG TO THE WIDE SLOT,
AND THEN FULLY INSERT.
TO PREVENT ELECTRIC SHOCK, MATCH
do not expose this apparatus to rain or moisture.
ou de choc électrique, ne pas exposer cet appareil sous
la pluie et l’humidité.
of procedures other than those specifed may result in
hazardous radiation exposure.
expressly approved by the party responsible for
compliance could void the user’s authority to operate
the equipment.
porous, or sensitive surfaces to avoid damaging the
surface. Use a protective barrier between the unit
and surface to protect the surface.
replaced. Replace only with the same or equivalent type.
remplacées de façon incorrect. Remplacer les piles
seulement par le même type de pile ou l’équivalent.
attempt to charge standard Alkaline batteries.
Only charge NiMH batteries.
• WARNING: Lithium batteries, like all rechargeable
batteries are recyclable and should not be recycled or
disposed of in normal household waste. Contact your
local government for disposal or recycling practices in
your area. They should never be incinerated since
they might explode.
• WARNING: Shock hazard - Do Not Open.
• AVIC: RISQUE DE CHOC ÉLECTRIQUE - NE PAS
OUVRIR
Do not mix old and new batteries.
Do not mix alkaline, standard (carbon-zinc), or
rechargeable (ni-cad, ni-mh, etc) batteries.
No mezcle baterías viejas y nuevas.
No mezcle baterías alcalinas, estándar (carbono-zinc) o
recargables (ni-cad, ni-mh, etc.).
WARN ING: TO REDUCE THE RISK OF
ELECTRIC SHOCK, DO NOT REMOVE
THE COVER (OR BACK). NO USERSERVICEABLE PARTS ARE INSIDE.
SERVICING TO QUALIFIED SERVICE
PERSONNEL.
The lightning fash with arrowhead symbol, within
an equilateral triangle, is intended to alert the user
to the presence of uninsulated "dangerous voltage"
within the product's enclosure that may be of
suffcient magnitude to constitute a risk of electric
shock to persons.
The exclamation point within an equilateral triangle
is intended to alert the user to the presence of
important operating and maintenance (servicing)
instructions in the literature accompanying the
appliance.
This product utilizes a Class 1 laser to read
Compact Discs. This laser Compact Disc Player is
equipped with safety switches to avoid exposure
when the CD door is open and the safety interlocks
are defeated. Invisible laser radiation is present
when the CD Player’s lid is open and the system’s
interlock has failed or been defeated. It is very
important that you avoid direct exposure to the
laser beam at all times. Please do not attempt to
defeat or bypass the safety switches.
1
Important Safety Information
1 Read these instructions.
Keep these instructions.
2
Heed all warnings.
3
4
Follow all instructions.
Do not use this apparatus near water.
5
Clean only with a dry cloth.
6
Do not block any ventilation openings. Install in
7
accordance with the manufacturer’s instructions.
Do not install near any heat sources such as radiators,
8
heat registers, stoves, or any other apparatus (including
amplifers) that produce heat.
Do not defeat the safety purpose of the polarized or
9
grounding type plug. A polarized plug has two blades
with one wider than the other. A grounding type plug
has two blades and a third grounding prong. The wide
blade or the third prong are provided for your safety.
When the provided plug does not ft into your outlet,
consult an electrician for replacement of the obsolete
outlet.
Protect the power cord from being walked on or
10
pinched particularly at the plug, and the point
where it exits from the apparatus.
11
Only use attachments/accessories specifed by the
manufacturer.
12.
13. Unplug this apparatus during lightning storms or
when unused for long periods of time.
14. Refer all servicing to qualifed service personnel.
Servicing is required when the apparatus has been
damaged in any way, or if the power supply
or plug is damaged, if liquid has been spilled or
objects have fallen into the apparatus, the
apparatus has been exposed to rain or moisture,
does not operate normally, or has been dropped.
Use only with a cart, stand, tripod,
bracket, or table specifed by the
manufacturer, or sold with the apparatus.
When a cart is used, use caution when
moving the cart/apparatus combination
to avoid injury from tip-over.
FCC Warnings
NOTE: This equipment has been tested and found to comply
with the limits for a Class B digital device, pursuant to Part 15 of the
FCC Rules. These limits are designed to provide reasonable
protection against harmful interference in a residential installation.
This equipment generates, uses, and can radiate radio frequency
energy and, if not installed and used in accordance with the
instructions, may cause harmful interference to radio communications.
However, there is no guarantee that interference will not occur in a
particular installation. If this equipment does cause harmful
interference to radio or television reception, which can be determined
by turning the equipment off and on, the user is encouraged to try to
correct the interference by one or more of the following measures:
•
Reorient or relocate the receiving antenna.
•
Increase the separation between the equipment and receiver.
•
Connect the equipment into an outlet on a circuit different from
that to which the receiver is connected.
•
Consult the dealer or an experienced radio/TV technician for
help .
This device complies with part 15 of the fcc rules. Operation is
subject to the following two conditions. (1) This device may not cause
harmful interference, and (2) this device must accept any interference
received. including interference that may cause undesired operation.
Additional Warnings
•
The apparatus shall not be exposed to dripping or splashing and
that no objects flled with liquids, such as vases, shall be placed
on the apparatus.
L’appareil ne doit pas être exposé aux écoulements ou aux
éclaboussures et aucun objet ne contenant de liquide, tel qu’un
vase, ne doit être placé sur l’objet.
•
Inserted batteries should not be exposed to excessive heat such
as that from sunshine or fire.
Les piles ne doivent pas être exposées à de forte chaleur, tel qu’à
la lumière du soleil, au feu ou autres choses de semblable.
•
The marking information is located at the rear or back of apparatus.
Les informations de marquage est situé à l’arrière ou à l’arrière de
l’appareil.
2
Feature / Included
Features
• CD player: Plays CD+G, CD, CD-R/RW Discs
• Flashing Lights On The Top and The Handle
• Bluetooth wireless stereo audio streaming
• Support A2DP Profiles for most smart phones / laptops
• Microphone Volume Controls
• Echo Control
• AVC (Auto Voice Control) Control
•Red LEDdisplay
• Microphone Jacks, 6.3mm x2
• Composite video output
• RCA audio output
• Line in jack 3.5mm (Aux input / Audio input)
• Built-in speakers
• Power: Requires AC power adapter or Batteries 6 x UM2
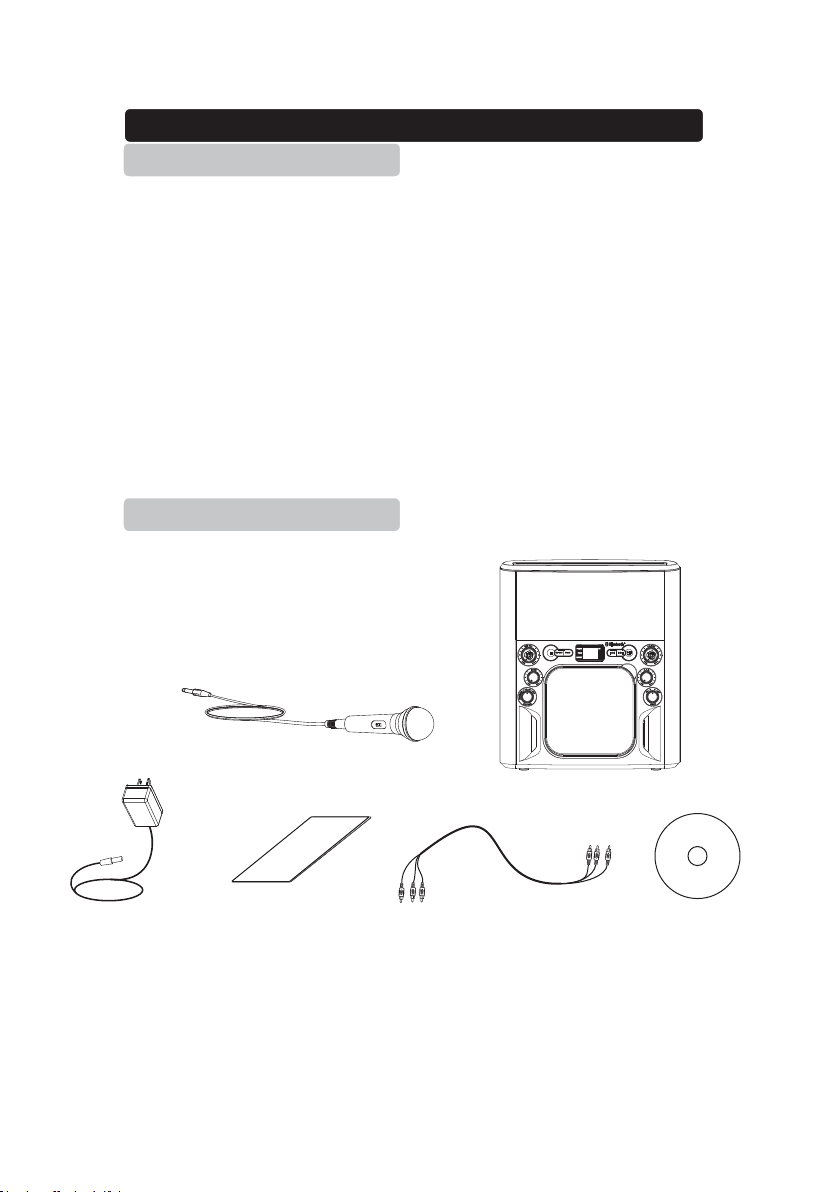
Included
•
Slim/Flat CDG Karaoke
• Microphones
• RCA audio/video cable
• AC power adapter
• User Manual
• Bonus CD
Microphone
AC Power Adapter User’s Manual
Slim/Flat CDG Karaoke
RCA Audio/Video Cable
3
Bonus CD

Contents
Warnings and Precautions . . . . . . . . . . . . . . . . . . . . . . . . . . . . .
Important Safety Information . . . . . . . . . . . . . . . . . . . . . . . . . . .
Feature / Included. . . . . . . . . . . . . . . . . . . . . . . . . . . . . . . . . . . . .
- Features
- Included
Contents. . . . . . . . . . . . . . . . . . . . . . . . . . . . . . . . . . . . . . . . . . . .
Location Controls. . . . . . . . . . . . . . . . . . . . . . . . . . . . . . . . . . . . .
Display Indicator Message . . . . . . . . . . . . . . . . . . . . . . . . . . . . . . .
Setup Power. . . . . . . . . . . . . . . . . . . . . . . . . . . . . . . . . . . . . . . . . .
- Connect Power Adapter
- Battery Operation
Connect Ext. Device & Sound From Main Unit Speaker. . . . . . .
- LINE IN (AUX In / AUDIO In)
Using CD+G , CDs. . . . . . . . . . . . . . . . . . . . . . . . . . . . . . . . . . . . .
- Loading a Disc
- Playing a Disc
- Repeat Function
- Programming a Disc up to 20 tracks
Connecting Bluetooth to Your Smartphone / Tablet . . . . . . . . . 10
Connecting to a Television / DVD / Ext. Device. . . . . . . . . . . . . .
- Composite Video Output
- RCA Audio Output
Using Microphones . . . . . . . . . . . . . . . . . . . . . . . . . . . . . . . . . . . .
Using AVC and ECHO / BALANCE . . . . . . . . . . . . . . . . . . . . . . . .
- AVC
- ECHO
- BALANCE
Using Light Effect . . . . . . . . . . . . . . . . . . . . . . . . . . . . . . . . . . . . . 12
Specification . . . . .
. . . . . . . . . . . . . . . . . . . . . . . . . . . . . . . . . . . .
1
2
3
4
5,6
7
8
8
7,8
11
11
12
12
4

Location Controls
1 2 3
5
7
6
4
15 161718 19 2 0
89 10
21 22
11
121314
5

Location Controls
23 24
1.
SOURCE: Rotate to select BT/Line in, CD+G, OFF mode
2.
ECHO Dial: Rotate to adjust echo sound effect.
3.
MIC VOLUME Dial: Rotate to adjust the volume from the MIC input.
4.
STOP Button: Press to stop a disc playing.
REPEAT Button: Press repeatedly to set the current track or entire
5.
disc to repeat.
PROGRAM Button: Press to program a loader disc to play
6.
tracks in
7.
DISPLAY: Show disc tracks number and current operation.
8.
SKIP/SEARCH(Back): Press to skip previous tracks on loader
disc. Press
9.
SKIP/SEARCH(Forward): Press to skip next tracks on loader disc.
Press
10.
PLAY / PAUSE / PAIR Button:
In CD mode, press to play or pause a loader disc.
In BT mode, press to connect another BT device.
MASTER VOLUME Dial: Rotate to adjust the main volume
11.
sound level.
12.
A.V.C Dial: Turn to adjust the Voice control.
LIGHT Switch: Rotate this switch to turn on / off Disco Lights.
13.
CD DOOR: Open the door to install disc.
14.
15.
MIC1 INPUT Jack: Connect a microphone into MIC1 jack.
16.
MIC HOLDER: Place the microphones into the holder.
17.
AUDIO OUT R (Line out / Aux out) Jack: Connect to external
device audio
18.
AUDIO OUT L (Line out / Aux out) Jack: Connect to external
device audio
specified order.
and hold to fast-rewind the current track on a loader disc.
and hold to fast-forward the current track on a loader disc.
input R.
input L.
6

Location Controls
DEO O
VI
19.
LINE IN (Aux in / Audio in): Connect to external device audio output.
0.
2
21.
MIC2
DC
22.
23.
BATTERY COMPARTMENT:
batteries for
24.
BATTERY
UT Jack: Co
INPUT
INPUT
Jack: Connect
COMPARTMENT COVER
nnect to TV v
Jack: Connect a microphone into MIC2 jack
power
DC power.
ideo input.
adapter
Insert six
Display Indicator Message
POWER Indicator: Will be light when unit turn
on.
PROG (Program) Indicator: Will be light / flash
when program mode turn on.
REPEAT Indicator: Will be flash / light when
REPEAT function turn on.
PLAY / PAUSE Indicator: Will be light / flash
when disc playing.
for
AC power.
size “C” or UM
PR OG
lndic at or
.
-2
PO WER
lndic at or
RE PEAT
lndic at or
PALY/ PAUS E
lndic at or
7

Setup Power
)
Connect Power Adapter
Plug the included AC adapter into the standard AC power outlet to power the
SLIM/FLAT CDG KARAOKE. Connect small end to DC INPUT jack of main
unit. After adapter connection, rotate the SOURCE selector to CD+G mode or
Line in/BT mode position to turn on the unit."
AC ~1 20 V 60 Hz
REA R SIDE OF M AIN UNI T
AC adapt er
Battery Operation
Before installing batteries (not included),ensure that the unit is disconnected from
the mains supply.
Remove the battery compartment cover on the back of the unit by carefully
pushing the two lugs left. The battery cover can then be lifted away. Fit the 1.5V
(UM2) x 6 pcs batteries (not included), referring to the polarity markings. Finally,
replace the cover
For battery operation, remove the adapter from the wall outlet and unplug from
the unit.
Warning!
1. Danger of explosion if batteries are incorrectly replaced.
2. Replace batteries with the same equivalent type only.
Connect Ext. Device & Sound From Main Unit Speaker
LINE IN (AUX In/ AUDIO In
To connect a MP3 Player or other Audio Device you will need a 3.5mm
Auxiliary Cable (not included).
1. Connect a 3.5mm Auxiliary Cable to the LINE IN jack at the rear side of unit
and to the Audio Output or Phones on the audio device you wish to play.
Rotate
2.
the SOURCE selector of the Unit to LINE IN / BT posi
SLIM/FLAT CDG KARAOKE display will show AU.
3. Make sure your external music player is turned on..
tion and the
8

4. Start music playback on your external music player.
Adjust VOLUME dial to control the sound level of music playback from the
5.
speakers on the unit.
Please note:-If not use this function, please unplug it to the main unit.
REAR SIDE OF MAIN UNIT
TO H
EADP HONE IN PUT
Using CD+G, CDs
Loading a Disc
1. Power on by rotate the SOURCE Selector to CD+G position.
2. Pull out the CD DOOR by DOOR OPEN AREA.
3. Load a disc into the compartment with the printed side facing you.
4. Gently close the CD DOOR. The CDG PLAYER begins to read the disc.
The Display will display the total number of tracks.
5. Press PLAY/PAUSE button to play disc. (If no disc is loaded, “
displayed).
Playing a Disc
no” will be
1. Follow the instructions for Loading a Disc.
2. Press the PLAY/PAUSE button to begin playing the loaded disc. The
PLAY/PAUSE indicator will light.
Rotate the VOLUME dial to select the sound level.
3.
4. To temporarily stop playing, press the PLAY/PAUSE button once (PAUS E
indicator will light and flash). To resume play, press the PLAY/PAUSE button one more.
5. Press SKIP/SEARCH buttons to skip between next or previous tracks.
6. Hold the SKIP/SEARCH buttons to fast search through the track.
Please note:-
7. Connect the VIDEO OUT jack to TV, the lyrics text will show on TV.
8. Press the STOP button to stop playing.
The fast-forward / fast-rewind functions will not work for CDG discs
.
Repeat Function
1. Follow the instructions for Loading a Disc and Playing a Disc
.
2. When disc installed, press the REPEAT button once and the
REPEAT indicator flash. The unit will play the current track repeatedly.
9

3. When disc installed, press the REPEAT button twice and REPEAT indicator
will be light. The unit will play the entire disc repeatedly.
4. To cancel the repeat function: press the REPEAT button repeatedly
the REPEAT indicator light off or press the STOP button twice to stop.
Programming a Disc up to 20
1. When disc playing, press the STOP button to stop mode.
2. Press the PROGRAM button and the PROG indicator will
light.
3. Press the SKIP / SEARCH buttons to forward or back to select a
desired track number.
4. Press the PROGRAM button to confirm.
5. Repeat steps 3 and 4 to program to play in a specified order.
6. Press the PLAY/PAUSE button to start the program playing.
7. Press the STOP button twice to cancel a program.
tracks
Connecting Bluetooth to Your Smartphone / Tablet
Rotate the SOURCE selector to BT/LINE IN position to connect your
1.
external Bluetooth device and the display will show bt and flash.
2. Set the Bluetooth function of your external device to ON and begin searching
for devices.
Note: The effective distance between your external device and this apparatus
is 10 meters (30 feet).
Once “ JT1067 ” appears on the paired device list of your external device, select it.
3.
Notes: If cannot connect, press PAIR button to reconnect again.
4. If you are asked for a password, enter “0000”
5. When both devices are successfully connected an audible chime will sound
and the display will show bt and stop flash, now you are ready to play music
wirelessly from your device.
6. Press the PLAY button of external Bluetooth device to start music playback.
7. Press the NEXT / PREV of the unit or external Bluetooth device to switch
between music tracks.
Note: After initial pairing, the unit will stay paired unless unpaired manually by
the user or erased due to a reset of the device. If your device should become
unpaired or your find it is unable to connect, repeat the above steps or press
& hold the PAIR button again.
10

Connecting to a Television / DVD / Ext. Device
Composite Video output
Require an RCA video cable.
1. Plug the included RCA audio/video cable into the VIDEO OUT and a
composite video input on a television.
2. Adjust the television to the correct input setting.
When playing CDG discs, the SLIM/FLAT CDG KARAOKE will output
3.
written lyrics to the connected television.
RCA Audio Output
Requires an RCA audio cable.
1. Plug the included RCA audio/video cable into the AUDIO OUT and a
RCA audio input on a television or stereo system.
2. Adjust the television or stereo system to the correct input setting.
3.
When playing the disc, the SLIM/FLAT CDG KARAOKE will output
audio to the connected television or stereo system. Use the external
device to control the output sound level.
REAR VIEW OF TV OR VCR
OR HOME STEREO SYSTEM
R L
TO TV OR HOME
R L
STEREO SYSTEM
OR
Home Stere o
System
REAR SIDE OF MAIN UNIT
Using Microphones
Requires a microphone (included)
1. Plug the microphone (see below figure) into the MIC 1 INPUT or MIC 2
INPUT.
2. Slide the ON /OFF switch of MICROPHONE,
Use the MIC VOLUME dial of SLIM/FLAT CDG KARAOKE to adjust the
3.
volume of audio sound from the microphone.
REAR SIDE OF MAIN UNIT
11

Using AVC / ECHO / BALANCE
AVC
Automatic Voice Control can be activated by rotating the AVC control. The
higher this control is set to, the more the vocals on the multiplex recording will
be muted when the singer starts to sing through the microphone. When the
singer stops singing, the recorded vocals on the multiplex recording will
resume to normal.
ECHO
Adjust the ECHO dial of SLIM/FLAT CDG KARAOKE to enhance your voice
for a concert hall effect.
BALANCE
Rotate the BALANCE dial of SLIM/FLAT CDG KARAOKE to hear the music
and vocals or to hear the music only.
Notes:To use the BALANCE dial, a CD+G disc must be used. Otherwise it will
operate as a standard BALANCE control.
Using Light Effect
When the LIGHT switch setting to ON position. The light effects turn on and the
side of SLIM/FLAT CDG KARAOKE will be light on.
Specification
AC Power
Adapter Connect DC Jack
CD Player
Bluetooth
Audio Power Output
Loud Speakers Spec
Specifications are typical, individual units might vary. They are subject to continuous
improvement without notice and without incurring any obligation.
Use included adapter
AC~ Input 100-240 50/60 Hz , DC Output 5V, 1200mA
6 x "C" Batteries (Batteries not included)
Support
CDs and CDG disc
4.75 / 3.25 inch
Version 4.2 + EDR
2 x 1.8W (RMS).. 10%THD.
3 Inch, 3 Watt , 4 Ohm
GRAPHICS
12

This device complies with Part 15 of the FCC rules. Operation is subject to the
following two conditions: 1) this device may not cause harmful interference, and 2)
this device must accept any interference received, including interference that may
cause undesired operation.
Changes or modifications not expressly approved by the party responsible for
compliance could void the user's authority to operate the equipment.
This device complies with Industry Canada’s licence-exempt RSSs. Operation is
subject to the following two conditions:
(1) This device may not cause interference; and
(2) This device must accept any interference, including interference that may cause
undesired operation of the device.
Cet appareil est conforme aux CNR exemptes de licence d'Industrie Canada . Son
fonctionnement est soumis aux deux conditions suivantes :
( 1 ) Ce dispositif ne peut causer d'interférences ; et
( 2 ) Ce dispositif doit accepter toute interférence , y compris les interférences qui
peuvent causer un mauvais fonctionnement de l'appareil.
 Loading...