

Introduction
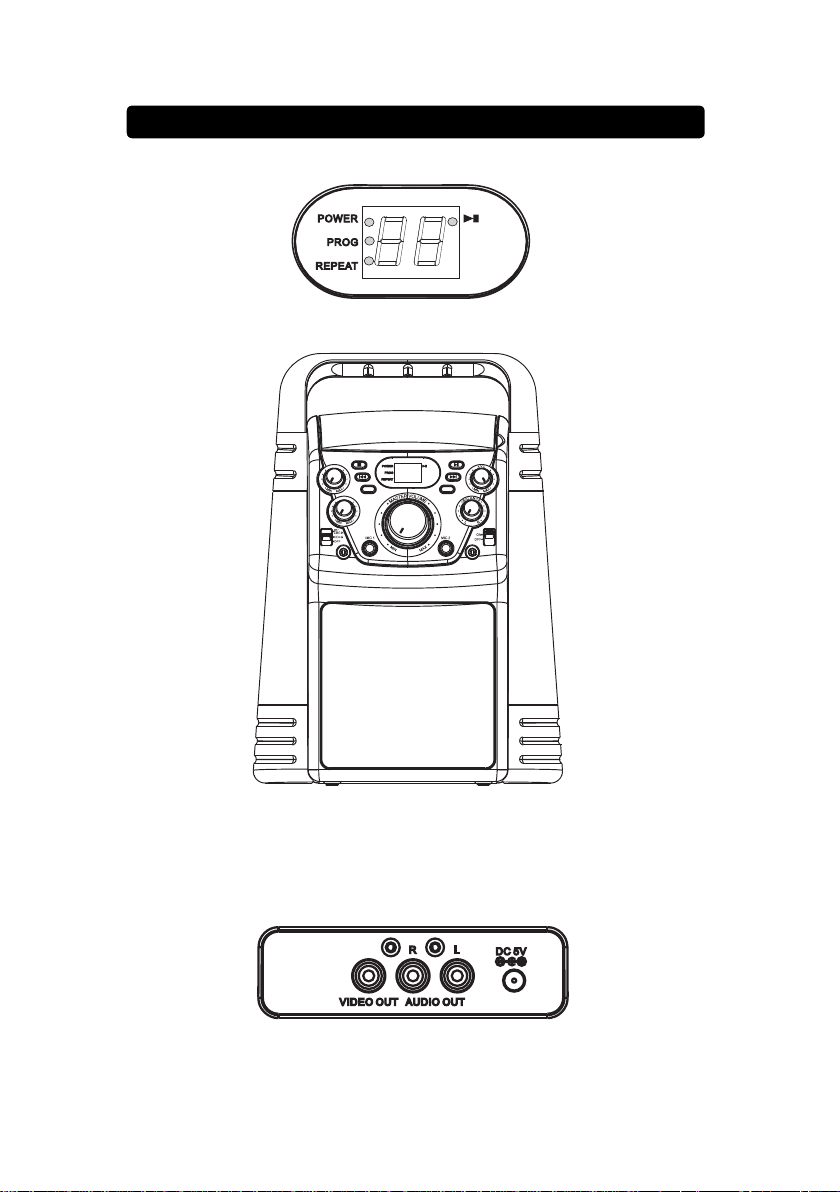
INDICATOR
1
2
3
FRONT VIEW
5
6
7
8
9
10
11
12
13
14
15
4
16
17
18
H
O
C
E
PROG
V
C
O
I
L
M
SOURCE
PHONE
S
PAIR
REPEAT
LIGHTS
LINE
IN
19
20
21
22
23
24
14
25
REAR VIEW
26
27
28
5

Location Controls
1. POWER Indicator : Will be light when unit turn on.
2. PROG ( Program) Indicator : PROG (Program) Indicator will be light /
flash when program mode
3. REPEAT Indicator: Will be flash / light when REPEAT function turn on.
4. PLAY / PAUSE Indicator :Will be light / flash when disc playing.
5. CD Door : Open the door to install disc
6.
PROG (Program)Button: Press to program a loader disc to play tracks
in specified order.
7.
SKIP/SEARCH(Back):
Press and hold to fast-rewind the current track on a loader disc.
STOP Button : Press to stop a disc playing
8.
ECHO Dial: Rotate to adjust echo sound effect.
9.
MIC VOLUME Dial : Rotate to adjust the volume from the MIC inputs.
10.
11.
SOURCE : Slide to select BT/ LINE IN , CD+G , OFF mode.
PHONES Jack: Connect to external headphone or earphone.
12.
MIC Inputs : Mic 1 input jack
13.
14.
WATER LIGHT : When music sounding, the water lights will bounce up
light.
MASTER VOLUME Dial: Rotate to adjust the main volume sound level.
15.
16.
REPEAT Button: Press repeatedly to set the current track or entire disc to
repeat.
17.
SKIP/SEARCH(Forward):
Press and hold to fast-forward the current track on a loader disc.
CD Door Open Area: Use the location area to open the CD door.
18.
19.
PLAY / PAUSE / PAIR Button:
Press to play or pause a current track.
In Bluetooth mode, Press and hold to connect another BT device.
20.
AVC Dial: Rotate to adjust the automatic voice control.
BALANCE Dial: Rotate the dial to select vocals or music only.
21.
22.
WATER DANCING Selector: Select the water dancing function on /off.
23.
LINE-IN (Aux in / Audio in) : Connect to external device audio output.
24.
MIC Input : Mic 2 input jack.
25.
SPEAKER : Unit speaker location.
26.
VIDEO OUT Jack: Connect to TV video input.
27.
AUDIO OUT (Line out / Aux out) Jack: Connect to external device audio
input.
28.
DC INPUT Jack: Connect power adapter.
Press to skip previous tracks on loader disc.
Press to skip next tracks on loader disc.
6

Placing Mobile Device
Install
Romove
Install or remove the detachable
cradle into the rear of main unit.
or
Placing the device vertical
into the cradle
7

Plug the included AC adapter into the standard AC power outlet to power the
Setup Power
Connect Power Adapter
Connect Battery Power
KARAOKE MACHINE. Connect small end to DC INPUT jack of main unit. After
adapter connection, Slide the SOURCE selector to turn on unit and slide to off
position to turn off.
REAR VIEW OF MAIN UNIT
Remove the battery compartment cover on the back of the unit by carefully
pushing the two lugs down. The battery cover can then be lifted away. Fit the
correct batteries (not included), referring to the polarity markings. Finally,
eplace the cover.
r
For battery operation, unplug the adapter first.
Batteries shall not be exposed to excessive heat such as sunshine, fire
Be sure that the batteries are installed polarity correctly.
Do not mix old and new batteries.
Only same or equivalent type batteries as recommend are to be used.
If not to be used for an extended period of time, remove the batteries.
Do not dispose of batteries in fire, battery may explode or leak. Do not try
to recharge a battery
Battery :
USE SIX SIZE “C” or
UM-2 1.5V BATTERIES
1.5V
++
1.5V 1.5V
1.5V 1.5V
++
REAR VIEW OF MAIN UNIT
1.5V
++
8

Programming a Disc
Playing a Disc
Loading a Disc
Repeat Function
Using CD+G, CDs
1. Connect power (follow SETUP POWER
2. Pull the CD DOOR OPEN AREA to open the CD DOOR.
3. Place a CD+G or CD into the CD compartment.
4. Close the CD DOOR.
5. Slide SOURCE selector to CD+G position.
page) .
1. Follow the instructions for
2. Press the PLAY/PAUSE button to begin playing the loaded disc. The
PLAY/PAUSE indicator will light.
3. Rotate the MASTER VOLUME dial to select the sound level.
4. To temporarily stop playing, press the PLAY/PAUSE button once (PLAY/PAUSE
indicator flash). To resume play, press the PLAY/PAUSEbutton one more.
5. Press SKIP / SEARCH buttons to skip between next or previous tracks.
6. Hold the SKIP / SEARCH buttons to fast search through the track.
Please note:- The fast-forward and fast-rewind functions will not work for CDG
discs.
7. Con
nect the VIDEOOUT jack to TV, the lyrics text will show on TV.
8. Press the STOP button to stop playing.
Loading a Disc
1. Follow the instructions for Loading a Disc and Playing a Disc
.
.
2. Press the REPEAT button once and REPEAT indicator flash. The unit will
play the current track repeatedly.
3. Press the REPEAT button twice and REPEAT indicator light. The unit will
play the entire disc repeatedly.
4. To cancel the repeat function: press the REPEAT button repeatedly to off
the REPEAT indicator or press the STOP button twice to stop.
1. When disc playing, press the STOP button to stop mode.
2. Press the PROG bu
tton and the program indicator will flash.
3. Press the SKIP / SEARCH buttons to select the track from the loaded disc
you wish to play first.
4. Press the PROG button to confirm.
5. Repeat steps 3 and 4 to program up to 20 tracks to play in a specified
order.
6. Press the PLAY button to start the program playing.
7. Press the STOP button twice to cancel a program.
9
 Loading...