

MODEL NO.: RPJ129
Smart Android Wi-Fi Home Theater Projector
INSTRUCTION MANUAL
PLEASE READ BEFORE OPERATING THIS EQUIPMENT
This product is manufactured and sold by Curtis International Ltd.
RCA, the RCA logo, the two dogs (Nipper and Chipper) logo, are registered trademarks
or trademarks of RCA Trademark Management and are used under license by Curtis
International Ltd. Any other product, service, company, trade or product name and logo
referenced herein are neither endorsed nor sponsored by RCA Trademark Management or
its affiliates.

Important Safety Instrucons
1. Read these Instructions.
2. Keep these Instructions.
3. Heed all Warnings.
4. Follow all instructions.
5. Do not use this apparatus near water.
6. Clean only with a dry cloth.
7. Do not block any ventilation openings. Install in accordance with the
manufacturer’s instructions.
8. Do not install near any heat sources such as radiators, heat registers, stoves,
or other apparatus (including amplifier) that product heat.
9. Protect the power cord from being walked on or pinched particularly at plugs,
convenience receptacles, and the point where they exit from the apparatus.
10. Only use attachments/accessories specified by the manufacturer.
11. Unplug this apparatus during lightning storms or when unused for long periods of time.
12. Refer all servicing to qualified service personnel. Servicing is required when
the apparatus has been damaged in any way, such as
power-supply cord or plug is damaged, liquid has been spilled
or objects have fallen into the apparatus, the apparatus has
been exposed to rain or moisture, does not operate normally, or has been dropped.
13. Use only with a cart, stand, tripod, bracket, or table specified by the manufacturer
or sold with the apparatus. When a cart is used, use caution when moving the cart/
apparatus combination to avoid injury from tip-over.
1

Addional Warnings and Precauons
1. Do not look directly into the projector light.
2. Don’t touch the projector lens
3. Mains adapter is used as disconnect device and it should remain readily operable during
intended use. In order to disconnect the apparatus from the mains completely, the mains
plug should be disconnected from the mains socket outlet completely.
4. CAUTION: Use of controls or adjustments or performance of procedures other than
those specified may result in hazardous radiation exposure.
5. WARNING: Changes or modified to this unit not expressly approved by the party
responsible for compliance could void the user’s authority to operate the equipment.
6. WARNING: Use of this unit near fluorescent lighting may cause interference regarding
use of the remote. If the unit is displaying erratic behavior move away from any
fluorescent lighting, as it may be the cause.
7. WARNING: Shock hazard - Do Not Open.
8. Caution and marking information is located at the rear or bottom of the apparatus.
9. WARNING: To reduce the risk of fire or electric shock, do not expose this apparatus to
rain, moisture, dripping, or splashing.
10. Objects filled with liquids, such as vases, shall not be placed on the apparatus.
2

FCC Warning
0
SETUP
1 2
3
4
5
6
7
8 9
FCC ID:2ANH7696PJ38
This device complies with Part 15 of the FCC rules. Operation is subject to the following
two conditions: (1) this device may not cause harmful interference, and (2) this device
must accept any interference received, including interference that may cause
undesired operation.
NOTE: This equipment has been tested and found to comply with the limits for a Class
B digital device, pursuant to Part 15 of the FCC Rules. These limits are designed to
provide reasonable protection against harmful interference in a residential installation.
This equipment generates, uses, and can radiate radio frequency energy and, if not
installed and used in accordance with the instructions, may cause harmful interference
to radio communications. However, there is no guarantee that interference will not
occur in a particular installation. If this equipment does cause harmful interference to
radio or television reception, which can be determined by turning the equipment off and
on, the user is encouraged to try to correct the interference by one or more of the
following measures:
噝 Reorient or relocate the receiving antenna.
噝 Increase the separation between the equipment and receiver.
噝 Connect the equipment into an outlet on a circuit different from that to which the
receiver is connected.
噝 Consult the dealer or an
The distance between user and products should be no less than 20cm
experienced radio/TV technician for help.
In The Box
MODELNO.: RPJ129
OK
0
Main unit
Remote AC Power Adapter Lens Cover User Manual
3
Smart Android Wi-Fi Home Theater Projector
INSTRUCTION MANUAL
PLEASE READ BEFORE OPERATING THIS EQUIPMENT
This product is manufactured and sold by Curtis International Ltd.
RCA, the RCA logo, the two dogs (Nipper and Chipper) logo, are registered trademarks
or trademarks of RCA Trademark Management and are used under license by Curtis
International Ltd. Any other product, service, company, trade or product name and logo
referenced herein are neither endorsed nor sponsored by RCA Trademark Management or
its affiliates.

Table of Contents
Important Safety Instructions ----------------------------
Additional Warnings and Precautions ---------------------- P2
FCC Warning ----------------------------------------- P3
In The Box ----------------------------------------- P3
Table of Contents -- ----------------------------------- P4
Remove & Close the Lens Cover-------------------------- P5
Placement of Your Projector----------------------------- P5
To Reduce Image Distortion -------------------- P6
Distance Between The Projector And Screen ---------------- P6
Installing your projector in the Ceiling - - - - - - - - - - - - - - - - - - - - - P6
Adjust the Vertical Position - - - - - - - - - - - - - - - - - - - - - - - - - - - - P7
Adjust the Focus and Keystone - - - - - - - - - - - - - - - - - - - - - - - P7
Controls of Remote ----------------------------------- P8
Install / Remove Batteries of Remote----------------------- P8
Controls of Projector --------------------------------- P9
Install Power Adapter --------------------------------- P10
Main Button Operation --------------------------------- P10
Connect HDMI show the Image On Projector Screen --------- P11
Connect AV Show The Image On Projector Screen ------------ P11
Connect VGA Show The Image On Projector Screen - - - - - - - - - - - P12
Connect Audio Output (Aux Out / Line Out) ------------ P13
Install USB Device ------------------------- P13
Using USBPlayback(Media Player) ----------------------- P14
Using Projector Menu 1------------------------------- P15
Using Projector Menu 2------------------------------- P16
Using Projector Menu 3------------------------------- P17
Using Projector Menu 4------------------------------- P17
Projector Home Screen------------------------------ P18
Connect to Wi-Fi-------------------------------------- P18
The Menu Settings------------------------------------- P19
Install and Uninstall Apps-------------------------------- P20
Video Streaming (playing online TV and movies) - - - - - - - - - - - - - P20
Browser Function ------------------------------------- P20
Multi-screen Interactive Connection for Phone and Projector - - - - P21
Specifications---------------------------------------- P22
P1
4
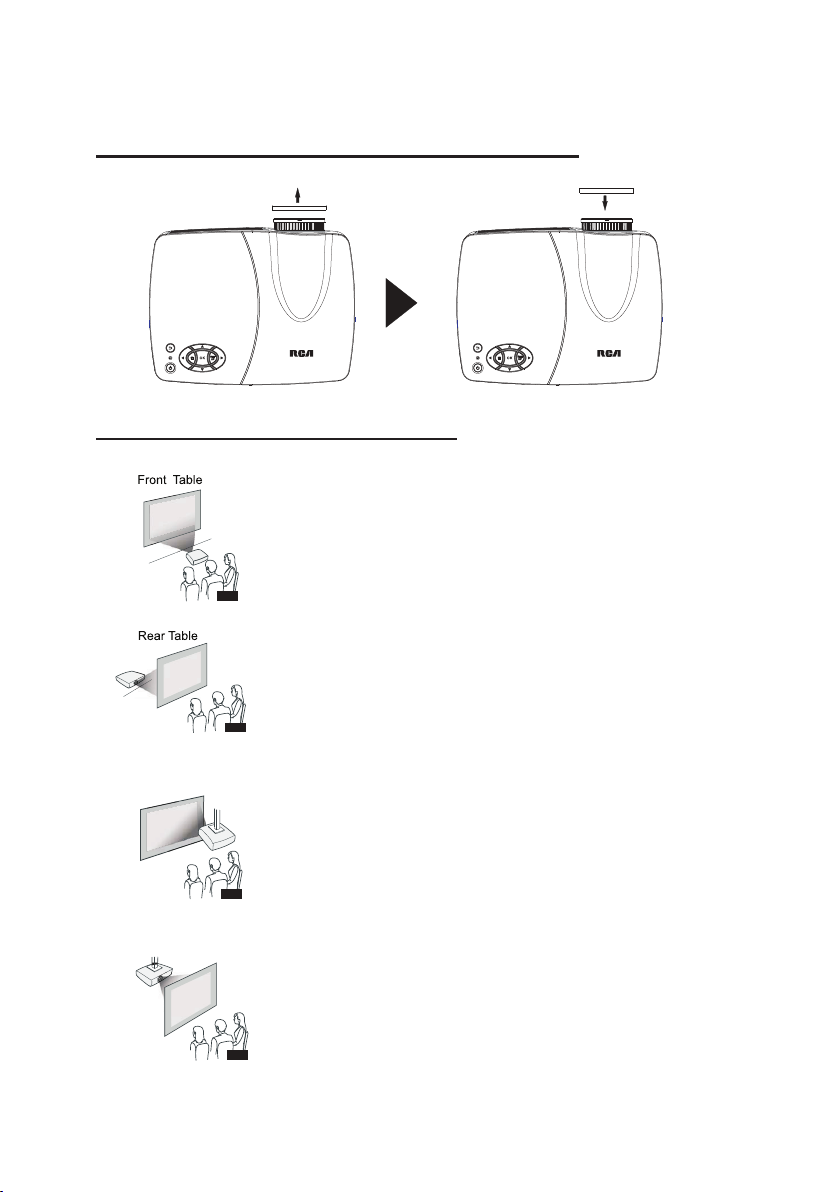
Remove & Close The Lens Cover
REMOVE
LENS COVER
LENS COVER
CLOSE
Placement of Your Projector
Your projector can be installed in four different configurations ( see picture below):
Front Table:
Select this location with the projector placed near the floor in
front of the screen. This is the most common way to position the
projector for quick setup and portability.
Rear Table:
Select this location with the projector placed near the floor
behind the screen.
NOTE: A special rear projection screen is required.
Front Ceiling
Rear Ceiling
Front Ceiling:
Select this location with the projector suspended upside-down
from the ceiling in front of the screen.
NOTE: A projector mount is required to install the projector in a
ceiling.
Rear Ceiling:
Select this location with the projector suspended upside-down
from the ceiling behind the screen.
NOTE:
A projector mount is required to install the projector in a ceiling.
special rear projection screen is required.
A
5
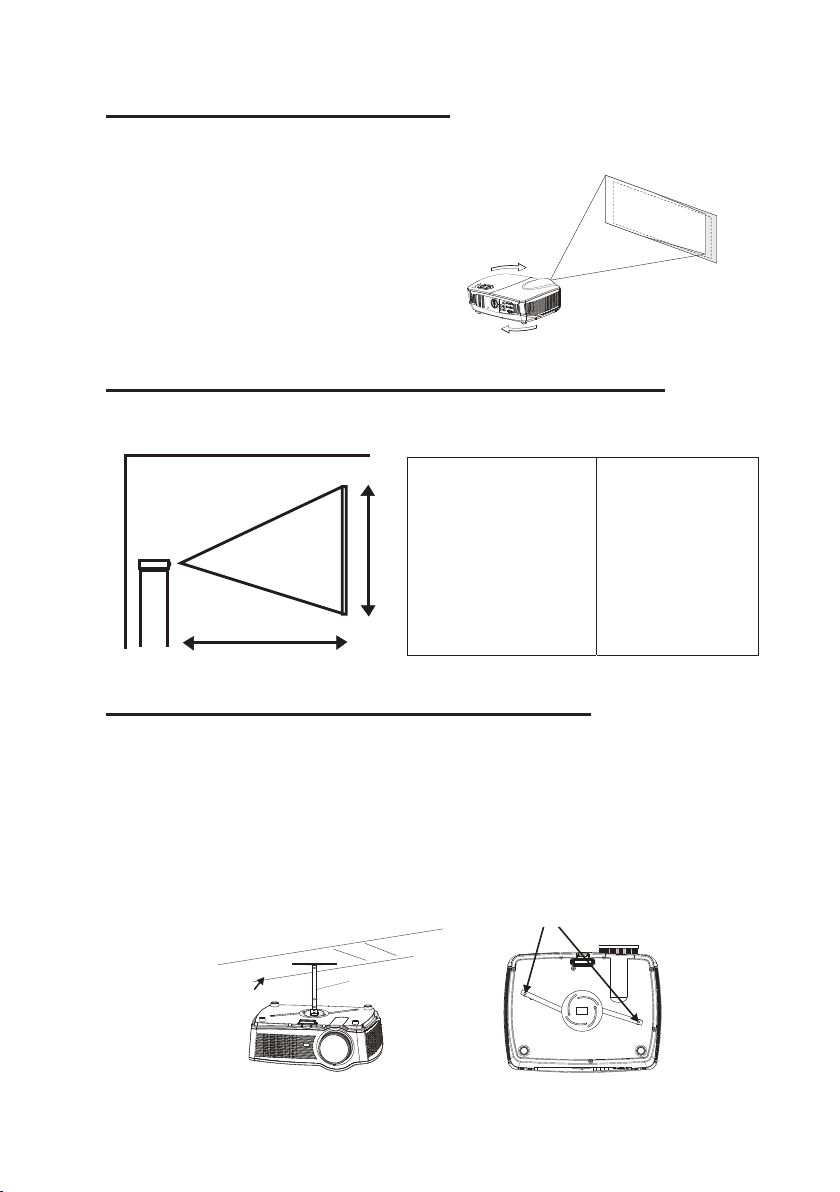
To reduce Image Distoron
• Move the projector as close to the center of the screen as possible.
• The light beam from the projector should be perpendicular to the
screen for a rectangular or square image.
Distance BetweenThe Projector and Screen
Measure the distance between the projector and where you want to position the
screen. This is the projection distance.
DISTANCE
SCREENSIZE
Distance
2.0m
2.38m
2.74m
2.82m
3.27m
3.87m
4.7m
5.65m
Screen Size
60 inch
72 inch
84 inch
86 inch
100 inch
120 inch
140 inch
160 inch
Installing Your Projector In the Ceiling
When installing the projector in the ceiling, please purchase a projector mount
recommended by an installation professional and follow the instructions that come with
the mount.
Before installing the projector in the ceiling, please check to make sure the ceiling
structure can support the weight of the projector and the mount. If in doubt, please ask
the advice from an installation professorial.
NOTE: Projector mount and screw(s) not included
FIX HANGER HOLES
CEILING
HANGER
6

Adjust The Vercal Posion
DC IN
KEYSTONE
USB 1
USB 2
HDMI 1
HDMI 2
VGA
VIDEO
Adjust the projector's vertical position by following the illustrations below:
SCREEN
VERTICAL
DIMENSION
Press the "PUSH" button (Button 3 page 9)
to extend the front leg and adjust the vertical
height of the projector.
PROJECTOR
SCREEN
DIMENSION
SCREEN
DIMENSION
VERTICAL
PROJECTOR
VERTICAL
PROJECTOR
Adjust The Focus And Keystone
Follow below picture to adjust the focus and trapezoidal screen.
Adjust the focus by turning the lens while observing the image pixels near the center of
the screen. Optimal focus is obtained when the pixels are clearly visible. Depending on
the projected screen size, the focus near the screen edges may be less sharp than the
screen center.
Keystone image is created when the projector lens is projected from above or below
the center of the screen. Keystone correction restores the distorted image to a
rectangular or square shape.
FOCUS ADJ. KNOB
KEYSTONE CORRECTION KNOB
7

Controls of Remote
0
SETUP
1 2
3
4
5
6
7
8 9
OK
POWER ON/OFF
SKIP NEXT/PREVIOUS FILE
PLAY/PAUSE
SOURCE SELECTOR
SELECT VOLUME SOUND
TO HOME PAGE
SETUP
TO SETUP PAGE
OK
MUTE AUDIO SOUND
SEARCH FORWARD OR
REWIND
SHOW MOUSE CURSOR
ENTER TO MENU
EXIT THE MENU
0~9 NUMERIC BUTTON
BACK SPACE
Install / Remove Baeries of Remote
OK
NAVIGATOR
Remove the battery compartment cover on the back of the remote by carefully sliding
to open. The battery cover can then be lifted away. Fit the correct batteries (not
included), referring to the polarity markings. Finally, replace the cover.
NOTES:
Batteries shall not be exposed to
l
excessive heat such as placing under the
sunlight or near a fire.
Please make sure the batteries are
l
installed with their correct polarities.
Do not mix old and new batteries.
l
l
Use only the same type of batteries.
Do not dispose of the batteries in fire,
l
battery may explode or leak.
Do not recharge a non-rechargeable
l
BATTERY DOOR
+-
AAA / UM4
AAA / UM4
battery.
-+
8

Controls of Projector
DC IN
KEYST ONE
USB 1
USB 2
HDMI 1
HDMI 2
VGA
VIDEO
4
PUSH
32 1
11
15
161417 18 19
1. IR Sensor ( Front Side)
2. LENS
3. ANGEL ADJ. Button
4. FOCUS ADJ. Knob
5. NAVIGATOR Buttons
6. RETURN Button
7. POWER on Indicator
8. POWER Button
9. SOURCE Button
10. SETUP Button
5
6
7
8
9510
12
13
11. KEYSTONE ADJ. Knob
12. VIDEO IN Jack
13. USB1 / USB2 Port
14. HDMI 1/ HDMI 2 Port
15. DC IN jack
16. AUDIO OUT R/L Jack
17. IR Sensor (Rear Side)
18. AUDIO IN R/L Jack
19. VGA IN Jack
9

OK
DC IN
KEYSTONE
USB 1
USB 2
HDMI 1
HDMI 2
VGA
VIDEO
Install Power Adapter
Follow below picture to connect power adapter
Connect small end of adapter FIRST. Plug the adapter body to power outlet.
Mains Socket
Main Buon Operaon
- Press the button to switch on the unit, press again to turn off.
/ SOURCE - Press the button to select input source.
- Press the button to enter Menu in Streaming Apps mode.
OK
- Press the button to return to previous status or exit the menu.
- Press the buttons to navigate and select screen item of menu.
- Press the buttons to fast search forward and rewind.
- Press the buttons to search next or previous file.
VOL+ / VOL - Press the buttons to adjust the sound level.
- Press the button to play/pause the
-
Press the button to show mouse cursor in Streaming Apps input source, press
playback.
the button again to switch back to navigation using the directional buttons.
Please use the mouse cursor when entering text and selecting items, use the
direction buttons for screen scrolling.
-
Press the button to return to Streaming Apps Home Screen.
SETUP
-Press the button to projector SETUP menu
-
Press the button to delete character and backspace in Streaming Apps mode
0~9 - Press the button to enter numbers in Streaming Apps mode
- Press the button to mute the audio. Press again to resume.
10

Connect HDMI Show The Image On Projector Screen
DC IN
KEYSTON E
USB 1
USB 2
HDMI 1
HDMI 2
VIDEO
DC IN
KEYSTON E
USB 1
USB 2
HDMI 1
HDMI 2
VGA
VIDEO
Refer to the following picture to connect a set top box, a BD/DVD player or a streaming
player to the HDMI input.
1. Turn off the unit before connect HDMI cable.
2. Aer connect, press the buon to turn on unit and power indicator will light GREEN
3. Press the / SOURCE buon to select HDMI 1 or HDMI 2 and the video from the
connected device will be shown on projector screen.
4. Press the button to turn off unit power.
CABLE NOTINCLUDE
HDMI CABLE
D
VGA
HDMI Streaming player (not included)
Video Player
Important Note:
If there is no sound from the internal speakers when playing media contents from a set top
box, BD/DVD or streaming players connecting to the HDMI input, please check the set top
box or the player's digital audio settings and make sure it is set to "PCM Stereo" mode.
Connect AV Show The Image On Projector Screen
Follow below picture to connect AV cable and device.
1. Turn off the unit before connect AV cable.
2. Use AV cable to connect follow below figure
3. After connect, press the button to turn on unit and power indicator will light
GREEN
4. Press the / SOURCE button to select AV mode and the video of AV device will
show on projector screen
5. Press the button to turn off unit power.
CABLE NOT INCLUDE
VIDEO PLAYER
11

Connect VGA Show The Image On Projector Screen
DC IN
KEYSTON E
USB 1
USB 2
HDMI 1
HDMI 2
VGA
VIDEO
Follow below picture to connect VGA cable and device.
1. Turn off the unit before connect VGA cable.
2. Press the button to turn off power of your projector before connection.
3. Aer connect, press the buon to turn on unit and power indicator will light GREEN
4. Press the / SOURCE buon to select VGA mode and the video of VGA device will
show on projector screen.
5. Press the button to turn off unit power.
NOTE BOOK
To VGA PORT
OR
COMPUTER CABLECOMPUTER CABLE
DECK TOP
Please refer to the following table to adjust the output signal from computer
Type Resolution Frequency Field Frequency
31.5 60
VGA 640x480
PC
SVGA 800x600
XGA 1024x768
NOTE: In order to get the sound from the unit, please connect AV in cable when
you connect VGA input.
34.7 70
37.9 72
37.5 75
31.4 50
35.1 56
37.9 60
46.6 70
48.1 72
46.9 75
40.3 50
48.4 60
56.5 70
12

Connect Audio Output ( Aux Out / Line Out )
DC IN
KEYSTON E
USB 1
USB 2
HDMI 1
HDMI 2
VGA
VIDEO
DC IN
KEYST ONE
USB 1
USB 2
HDMI 1
HDMI 2
VGA
VIDEO
Follow below picture to connect audio cable and device.
1. Press the button to turn off power of your projector before connection.
2. Use audio cable to connect follow below figure.
3. After connect and turn on both units. Your projector sound from external device
now.
4. After using , turn off both unit
Important Note:
If there is no sound from the stereo audio output when playing media contents from a set
top box, BD/DVD or streaming players connecting to the HDMI input, please check the set
top box or the player's digital audio settings and make sure it is set to "PCM Stereo" mode.
AV CABLE
Install USB Device
Follow below picture to install USB
Turn the unit off before install USB.
13

Using USB Playback (Media Player)
Install USB device:
1. Turn off the unit before install USB.
2. Install the USB device into USB port.
3. After connect, press the button to turn on unit and the power indicator light GREEN.
PList
Stop Repeat
PList
OK
OK
Rotate
Info
Set A
AspectPList Info SlowF StepF GoTime ZoomI ZoomO
Info
4. Press the / SOURCE button to select USB Media Player and press button
to enter.
5. Use buttons to select PHOTO/MUSIC /MOVIE/TEXT icon and press button
to enter.
6. Use the button to select Remove disk(USB) and press button to enter.
7. Use buttons to search the correct file and press the button to preview
playback file and press the button to return to previous or button of remote
OK
OK
to start playback.
8. Press button to fast search forward and rewind.
9. Press button to search next or previous file.
10. During playback, press the button to pause and press again to resume.
NOTE: Remove USB device, press the button to turn off power FIRST.
Sub-Menu on Photo screen
1. When photo playback, press the
OK
button and more function
screen show on lower (figure 1).
Pause
Prev.
Figure 1.
Stop
Next
Repeat
2. Use the button to select
icon and press the button to
play special function.
OK
ZoomI Move SlideRotate ZoomO
Sub-Menu on Music screen
1. When music playback, press the
OK
button and more function
screen show on lower (figure 2 ).
Figure 2
Pause FB FF Prev. Next Stop Set A MUTE
2. Use the button to select
icon and press the button to
play special function.
OK
PList
Info
GoTime
Sub-Menu on Movie screen
1. When movie playback, press the
OK
button and more function
screen show on lower (figure 3).
Pause
FB
Figure 3
FF Prev.
Next
2. Use the button to select
icon and press the button to
play special function.
OK
Move
Sub-Menu on Text screen
1. When text playback, press the
OK
button and more function
Figure 4
screen show on lower (figure 4).
2. Use the button to select
icon and press the button to
OK
play special function.
Pre... Nex... Prev. Next Stop
In rare cases, if the projector's speaker has no sound when playing a USB media file using USB
Media Player, please play the video by installing a compatible media player app from an app store
in Projector Home screen.
14

Using Projector Menu 1
Press SETUP button to enter projector menu. Press again to previous status.
Software Update (...
Native information
USE
TO SELECT
This System menu showed on right upper of view screen.
TO SELECT
PRESSGOK
For service center use only.
Use the button to show below information and press
PRESSGOK
SETUP button to return.
Software Update (...
USE
Native information
▽
Native inf…
Model : RPJ129
RCA
SW Ver: 2.0
LOGO: RCA
TM058-ET058
IC:MINILVDS
MMM DD YYYY
HH:MM:SS
NOTE: MMM DD YYYY is representative date of software
HH:MM:SS is representative time of software
15

Using Projector Menu 2
Press SETUP button to enter projector menu, press
select picture menu.
Picture Mode Standard
Color Temper...
Aspect
Noise Reduction
MPEG_ Noise ... >
Panel Flip Rotate 1
Projector Zoom
USE
TO SELECT
Picture Mode Standard
USE
TO SELECT
Color Temper...
USE
TO SELECT
Aspect 16:9
USE
TO SELECT
PRESSGOK
PRESSGOK
PRESSGOK
This Picture menu showed on right upper of view screen.
Use to select different picture effect to Standard / Soft /
User / Vidid. Use or to select Contrast / Brightness /
Color / Sharpness digit If chose User item. Follow below figure.
Use to select different color temperature to Cool / Medium /
Warm / User. Use or to select Red / Green / Blue digit
If chose User item. Follow below figure.
Use buttons to select screen ratio AUTO / 4:3 / 16:9.
Follow below figure.
buttons to
Noise Reduction
USE
TO SELECT
MPEG Noise
USE
TO SELECT
Panel Flip Rotate 1
USE
TO SELECT
Projector Zoom
PRESSGOK
PRESSGOK
PRESSGOK
PRESSGOK
Use buttons to select Off / Low / Middle / High / Default.
Use buttons to select Off / Low / Middle / High / Default.
Use to select rotate 0 / rotate 1 / rotate 2 / rotate 3 to set
screen angle.
Use to select different zoom scale digit 70% -100%.
Picture Mode
Customer define Parameter
Contrast 0-100
Brightness 0-100
Color 0-100
Sharpness 0-100
Color temperature
Customer define Parameter
Red 0-100
Green 0-100
Blue 0-100
Aspect Ratio
4:3 The signal in a 4:3 aspect ratio projection image
16:9 The signal in a 16:9 aspect ratio projection image
16

Using Projector Menu 3
OK
Press SETUP button to enter projector menu, press buttons to select sound
menu.
Sound Mode Standard
Balance
Surround Sound
USE
TO SELECT
This
sound menu showed on right upper of view screen.
Use to select different sound effect Standard / Music /
Sound Mode Standard
USE
TO SELECT
Balance 0
USE
TO SELECT
Surround Sound Off
PRESSGOK
PRESSGOK
PRESSGOK
Movie / Sports / User. Use or to select Treble
and Bass digit If chose User item. Follow below figure to set digit.
Use to select Balance level to -50 to +50.
Use to select different sound effect to Off /
SRS TruSurrou… / Surround.
Sound Mode - User Parameter
Trebl e 0 -100
Bass 0 -100
Using Projector Menu 4
Press SETUP button to enter projector menu, press buttons to select OPTION
menu.
OSD Language English
Restore Factory Default
Color Range AUTO
USE
TO SELECT
OSD Language English
USE
TO SELECT
Restore Factory Default
USE
TO SELECT
Color Range AUTO
PRESSGOK
PRESSGOK
PRESSGOK
T
his OPTION menu showed on right upper of viewing
screen.
OK
Use button to select different language.
Follow below figure.
Use buttons to select Y or N.
If choose “Y” that your unit will go to factory default setting.
Press OK button to change AUTO/ 0~255 /16~235
English
Dansk Hrvatski
Deutsch Italiano
France
Magyar
Norsk
Portugues
P
Nederl... Sloven...
Polski
ycc
Romaneste
Srpski
17
Suomi
Svenska
Slovakia
Chinese

Projector Home Screen
1. Press the button to turn on unit.
2. Press the / SOURCE button and use the button to select Streaming Apps.
3. Press the button to enter Projector Home
OK
Screen like the figure.
4. Use button to select application icon
and press button for operation.
OK
Note: The projector is loaded with the most updated system files and apps. From time
to time, Android system may require update patch in order to run. If you choose to
update, a Google account is required. If you do not want to update, please press the
“Return” button on the remote.
Connect to Wi-Fi
Initial Wi-Fi Connection
In Projector Home Screen, use button to select Wi-Fi Network icon and press
OK
button to enter menu.
The unit will search and show all available networks on the screen.
(if no available networks show out, Press button to turn on the Wi-Fi.)
1. Use button to select Network and press button to enter.
2. Enter password for your selected network
Use button to select character, numbers, symbols and so on,
Press button to confirm in the virtual keyboard.
>
3. Press button to exit virtual keyboard enter state
4. Use button to select “CONNECT” to connect Wi-Fi network.
OK
OK
NOTE: For easy operation or key in the password, you can connect an Android keyboard
(not included) or a mouse (not included) in the USB ports in the rear of the unit.
18

The Menu Sengs
In Projector Home Screen, use button to select
Settings icon and press button to enter Settings menu.
OK
Settings
Device
Network
Apps
Storage & reset
Preferences
Dat e & time
Language
Presonas
Security & restrictions
Account
Add accout
This Settings menu showed on right upper of view screen.
In Settings menu, the following items provide you to setup for your favorite.
l Network – for setup wireless network
l Apps – will list out the Apps which is installed.
l Storage & rest – show internal shared storage status
and Factory data reset.
l Date & time – with the following menu for setup.
Ø Set time zone – Use button to set the time zone,
press button to confirm.
Ø Use 24 hour format – Press button to set On or Off
OK
OK
l Languages – Use button to set the language,
press button to confirm.
OK
l Security & restrictions – with the following menu for setup
Ø Unknown sources – Press button to set On or Off
Ø Verify apps - Press button to set On or Off
OK
OK
l Add account – Let you add account for the Apps like Facebook,
Google, Skype, Twitter, etc.
19

Install and Uninstall Apps
Before starting, please make sure the projector is connected to a Wi-Fi network.
l Install
l Delete installed Apps
Apps
1.
In Projector Home Screen, start the app store by selecting one of the
following app stores and search for the app you want to install:
-Aptoide TV
-APKMirror
-APKPure
-Streaming App Store
2.
Download an APK file of the app, save it to the projector's internal storage, and then
install the app by selecting APPInstaller icon in Projector Home Screen.
You may also download an APK file of the app on a computer, save the file to a USB
drive, plug the USB drive into the projector's USB port and use APPInstaller to select
the file on the USB drive to install the app.
3.
After starting app installation, follow the on screen message to complete the installation. You may need to change the setting in Security > "Unknown" when prompted.
In Projector Home Screen, use button to select Settings icon and
OK
press button to enter Settings menu.
1. Use button to select Apps and press button to enter.
2. All application Apps will show which is installed on the unit.
3. You can choose which programs to be disable or uninstall.
OK
Video Streaming (playing online TV and movies)
To play any online video, please install a video streaming app such as Youtube or Crackle
by starting the app store e.g. Aptoide TV, and enter the name of the app in "Search" section.
Please note that not all apps listed in the app store operate in the projector after installation.
Important Note:
If there is no sound from the internal speakers when playing streaming media
contents from APP like Youtube, Netflix, Vudu etc. Please check the audio
settings and make sure it is set to "PCM Stereo" mode.
Browser Funcon
1. In Projector Home screen, select relative Browser icon (e.g. Chrome) to enter
browser website.
2. Key in the website address or something what you want to search.
Use button or button to move the cursor in the virtual keyboard
to select character, numbers, symbols and so on, press button to confirm in the
virtual keyboard.
NOTES:
l You can switch the numeric input keyboard, move the cursor to Virtual key
and press the button, you can switch the digital and symbol enter state.
l For easy operation, you can connect an Android keyboard (not included) or mouse
(not included)
l Before use this function, the Wireless network (Wi-Fi) is need connected.
OK
in USB port in the rear of the unit.
20
?123

Mul-screen Interacve Connecon for Phone and Projector
l Miracast
First, ensure the projector and the mobile is connected to the same wireless network.
Select Miracast icon in Projector Home Screen and tap the mobile’s settings, find the
screen sharing or wireless display (different mobile models with different names).
You can find the name of the projector Android_xxxx in the mobile screen sharing, click
the link, then click the projector to accept this connection.
The mobile device will be transferred to full-screen projector (this feature is only supported
by Android system 4.2 or above. IOS devices do not support Miracast).
Note: Please note that depending on the mobile device, Miracast may not operate as
indicated due to copyright restrictions.
21

Specifications
Light Source Type
Lumen (LED)
Display Native Resolution
HDMI Input Supported
Video Resolution.
Included Adapter Input AC100-240V,50/60Hz
Display Color
Projection Size (Optimal) 60-160 inch
Contrast 600:1
Aspect Ratio 16:9 / 4:3
Input Ports
USB Port Support USB device up to 32GB
LED
3100 (Color Brightness), 2000 (White Brightness)
1280 x 800
1080p , 1080i , 720p, 576i , 480p, and 480i
Output DC 36V, 2A
16.7M
AV / VGA / HD MI
Support Picture format: JPG, BMP, PNG
Support Audio format: MP3, WMA
Support Video format: MPEG1, MPEG2,
MPEG4, RM, AVI
WiFi 2.4GHz 802.11b/g/n
Audio Power output 2W (RMS) x2
USB
Net Weight
Product dimensions 310 mm x 234 mm x 128mm
Specifications are typical, individual units might vary. They are subject to
continuous improvement without notice and without incurring any obligation.
DC5V 100mA
2.32 KG
22
 Loading...