

Modern Electronics Factory 3931367 User Manual
Party Projector
Karaoke Movie Music System
IJP557B
User’sGuide

SAFETY INSTRUCTIONS & WARNINGS
This product utilizes a class 1 laser to read compact Discs.
This laser compact Disc Player is equipped with safety
switches to avoid exposure when the CD door is open and
the safety interlocks are defeated. invisible laser radiation is
present when the Player’s lid is open and the system’s
interlock has failed or been defeated. it is very important that
you avoid direct exposure to the laser beam at all times. Please do not attempt
to defeat or bypass the safety switches.
FCC Warnings
Warning: Changes or modifications to this unit not expressly approved by the
party responsible for compliance could void the user’s authority to operate the
equipment.
Note: This equipment has been tested and found to comply with the limits for a
class b digital device, pursuant to Part 15 of the Fcc Rules and Canada
standard. These limits are designed to provide reasonable protection against
harmful interference in a residential installation. This equipment generates,
uses, and can radiate radio frequency energy and, if not installed and used in
accordance with the instructions, may cause harmful interference to radio
communications. however, there is no guarantee that interference will not
occur in a particular installation. if this equipment does cause harmful
interference to radio or television reception, which can be determined by
turning the equipment off and on, the user is encouraged to try to correct the
interference by one or more of the following measures:
Reorient or relocate the receiving antenna.
Increase the separation between the equipment and receiver.
Connect the equipment into an outlet on a circuit different from that to
which the receiver is connected.
Consult the dealer or an experienced radio/TV technician for help.
The distance between user and products should be no less than 20cm
FCC ID: SSM3931367

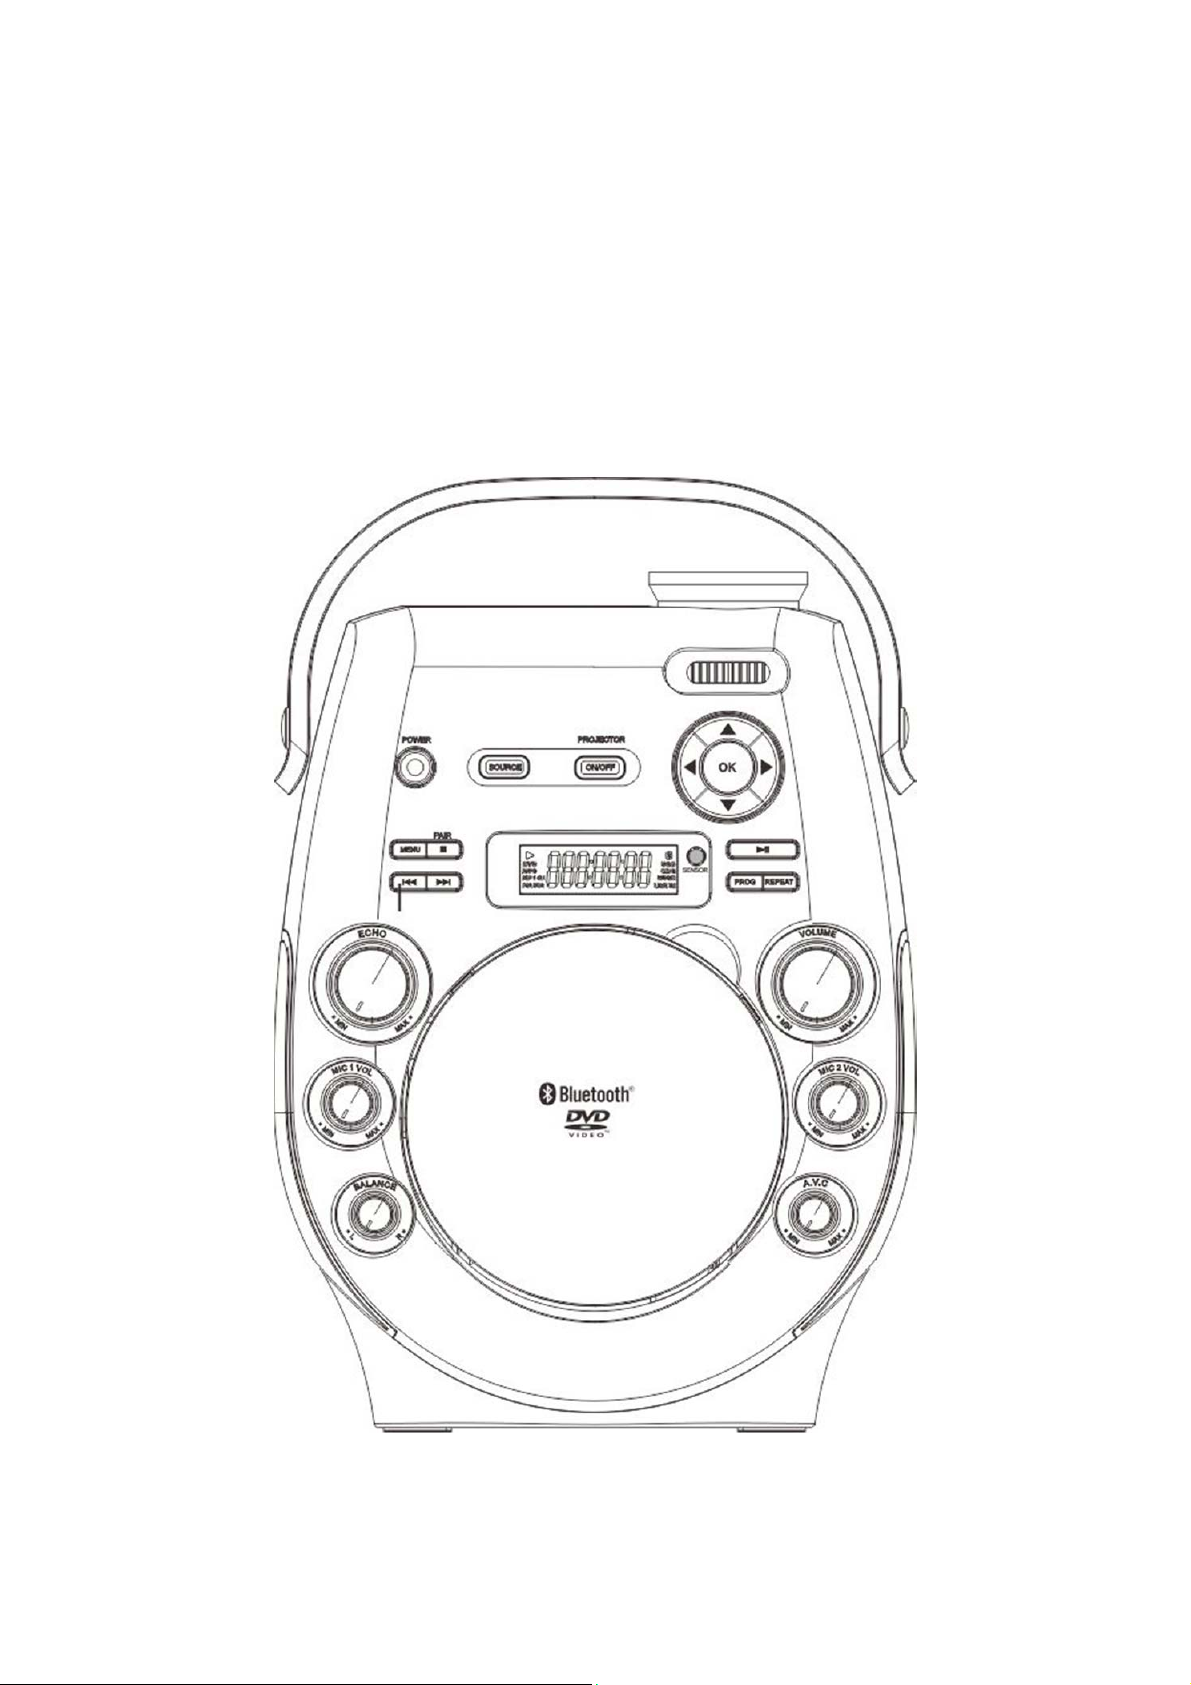
MAIN UNIT LOCATION CONTROLS 1.2
1. CARRY HANDLE: Use to remove the unit to other place.
2. PROJECTOR ON/OFF Button: Press to turn on / off projector.
3. SOURCE Button: Press to select DVD / USB / LINE IN / Bluetooth.
4. POWER Button: Press to turn on or off the unit.
5. PAIR / STOP Button: Press to stop a disc playing Hold to reconnect
Bluetooth pairing connection, when unit on Bluetooth mode.
6. MENU Button:
7. SKIP/ SEARCH Button :
8. ECHO Dial: Rotate to adjust echo sound effect.
9. MIC 1 VOL Dial: Rotate to adjust the volume from the microphone.
10. BALANCE Button:
11. SPEAKER: Built-in speaker for bigger sound output.
12. CD DOOR: Open the door to install or remove disc.
13. PROJECTOR LENS COVER: Remove the cover before use projector.
14. PROJECTOR FOCUS Adjust: Rotate to adjust focus of projector screen.
15. PROJECTOR TRAPEZOIDAL Adjust: Rotate to connect the rectangle
rescreen.
16. LCD Display: Show disc playing information
17. NETVIDATOR Buttons: Four direction select keys and OK key.
18. SENSOR Front Side: Use remote pointer to sensor to control unit.
19. PLAY / PAUSE Button: Press to play or pause a loader disc.
20. PROG Button: Press to program the loader disc to play tracks in
specified order..
21. REPEAT Button: Press repeatedly to set the current track or entire disc to
repeat playing.
22. MASTER VOLUME Dial: Rotate to adjust the main volume sound level.
23. CD Door Open Area: Use the location area to open the CD door.
24. MIC 2 VOL Dial: Rotate to adjust the volume from the microphone.
25. AVC Dial: Rotate to adjust the automatic voice control.
26. MIC 2 Inputs: Rotate to adjust the volume from the microphone.
27. HDMI Input: Connect to TV HDMI output.
28. AUX IN (LINE in / Audio in) : Connect to external device audio output.
29. PROJECTOR TILT FOOT : To adjust to correct projector screen.
30. AUDIO OUT RCA Jack: Connect to TV / ext. device audio input.
31. VIDEO OUT RCA Jack: Connect to TV video input.
32. DC INPUT Jack: Connect power adapter for AC power.
33. SENSOR Rear Side: Use remote pointer to sensor to control unit.
34. USB Input: Connect to USB device.
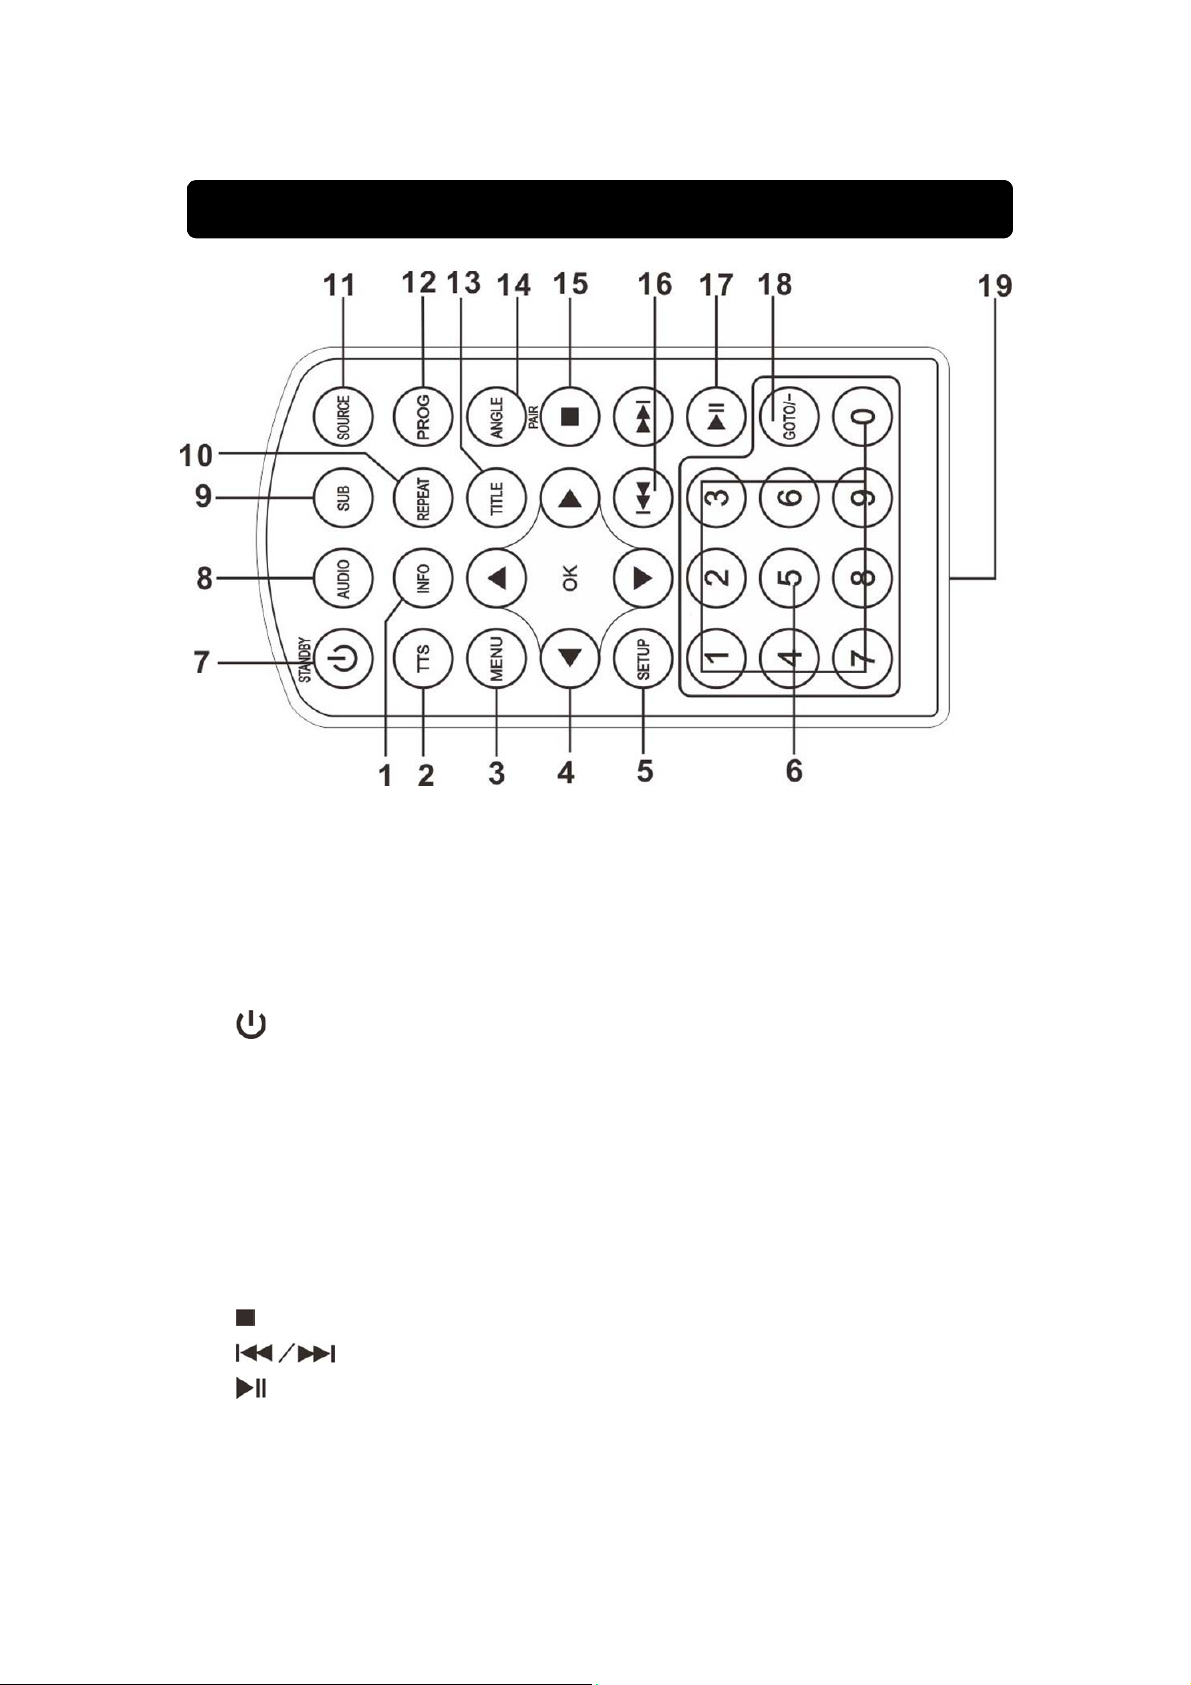
REMOTE LOCATION CONTROLS 1.1
1. INFO :Show disc information on screen
2. TTS
3. MENU: Press to enter DVD menu
4. NETVIGATOR: Four direction select keys and OK key.
5. SETU : Press to enter DVD setup menu
6. 0-9 NUMBER: Press to DVD select number
7. STANDBY: Press to turn on or off the unit.
8. AUDIO: Press to access various function.
9. SUB: Select DVD subtitle on multi-language
10. SOURCE: Press to select DVD / USB / LINE IN / Bluetooth
11. REPEAT: Allow you to repeat a title, chapter, track or disc.
12. PROG: Press to program the loader disc to play tracks in specified order..
13. TITLE: Press to switch the disc/DVD’s subtitle language.
14. ANGLE: Press to select camera angle.
15. STOP: Press stop a disc playing.
16. SKIP/SRACH: Press to search/skip backwards or forwards.
17. PLAY/PAUSE: Press to play or pause a loader disc.
18. GOTO/- : Use to jump to other track / chapter.
19. BATTERY COMPARTMENT: Installed battery for remote power.
 Loading...