

Bluetooth Portable CD Radio
MET36E
MPC5050
MPC-5050
MPC 5050
Operation Guide
PLEASE READ T H I S USER MANUAL COMPLETELY BEFORE OPER ATION
1

WARNING:
Warnings and Precautions
rain or moisture.
To reduce the risk of fire or electric shock, do not expose this apparatus to
CAUTION:
those specified may result in hazardous radiation exposure.
Changes or modifications not expressly approved by the party responsible for
compliance could void the user's authority to operate t he eq ui pment.
This device complies with Part 15 of the FCC Rules. Operation is subject to the
following two conditions: (1) this device may not cause harmful interference, and (2)
this device must accept any interference received, including interference that may
cause undesired operation.
Changes or modifications not expressly approved by the party responsible for
compliance could void the user's authority to operate the equipment.
NOTE: This equipment has been tested and found to comply with the limits for a
Class B digital device, pursuant to Part 15 of the FCC Rules. These limits are
designed to provide reasonable protection against harmful interference in a
residential installation. This equipment generates, uses and can radiate radio
Use of controls or adjustments or performance of procedures other than
frequency energy and, if not installed and used in accordance with the
instructions, may cause harmful interference to radio communications. However,
there is no guarantee that interference will not occur in a particular installation.
If this equipment does cause harmful interference to radio or television reception,
which can be determined by turning the equipment off and on, the user is
encouraged to try to correct the interference by one or more of the following
measures:
-- Reorient or relocate the receiving antenna.
-- Increase the separation between the equipment and receiver.
-- Connect the equipment into an outlet on a circuit different
from that to which the receiver is connected.
-- Consult the dealer or an experienced radio/TV technician for help.
To maintain compliance with FCC’s RF Exposure guidelines, This equipment should
be installed and operated with minimum distance between 20cm the radiator your
body: Use only the supplied antenna.
2
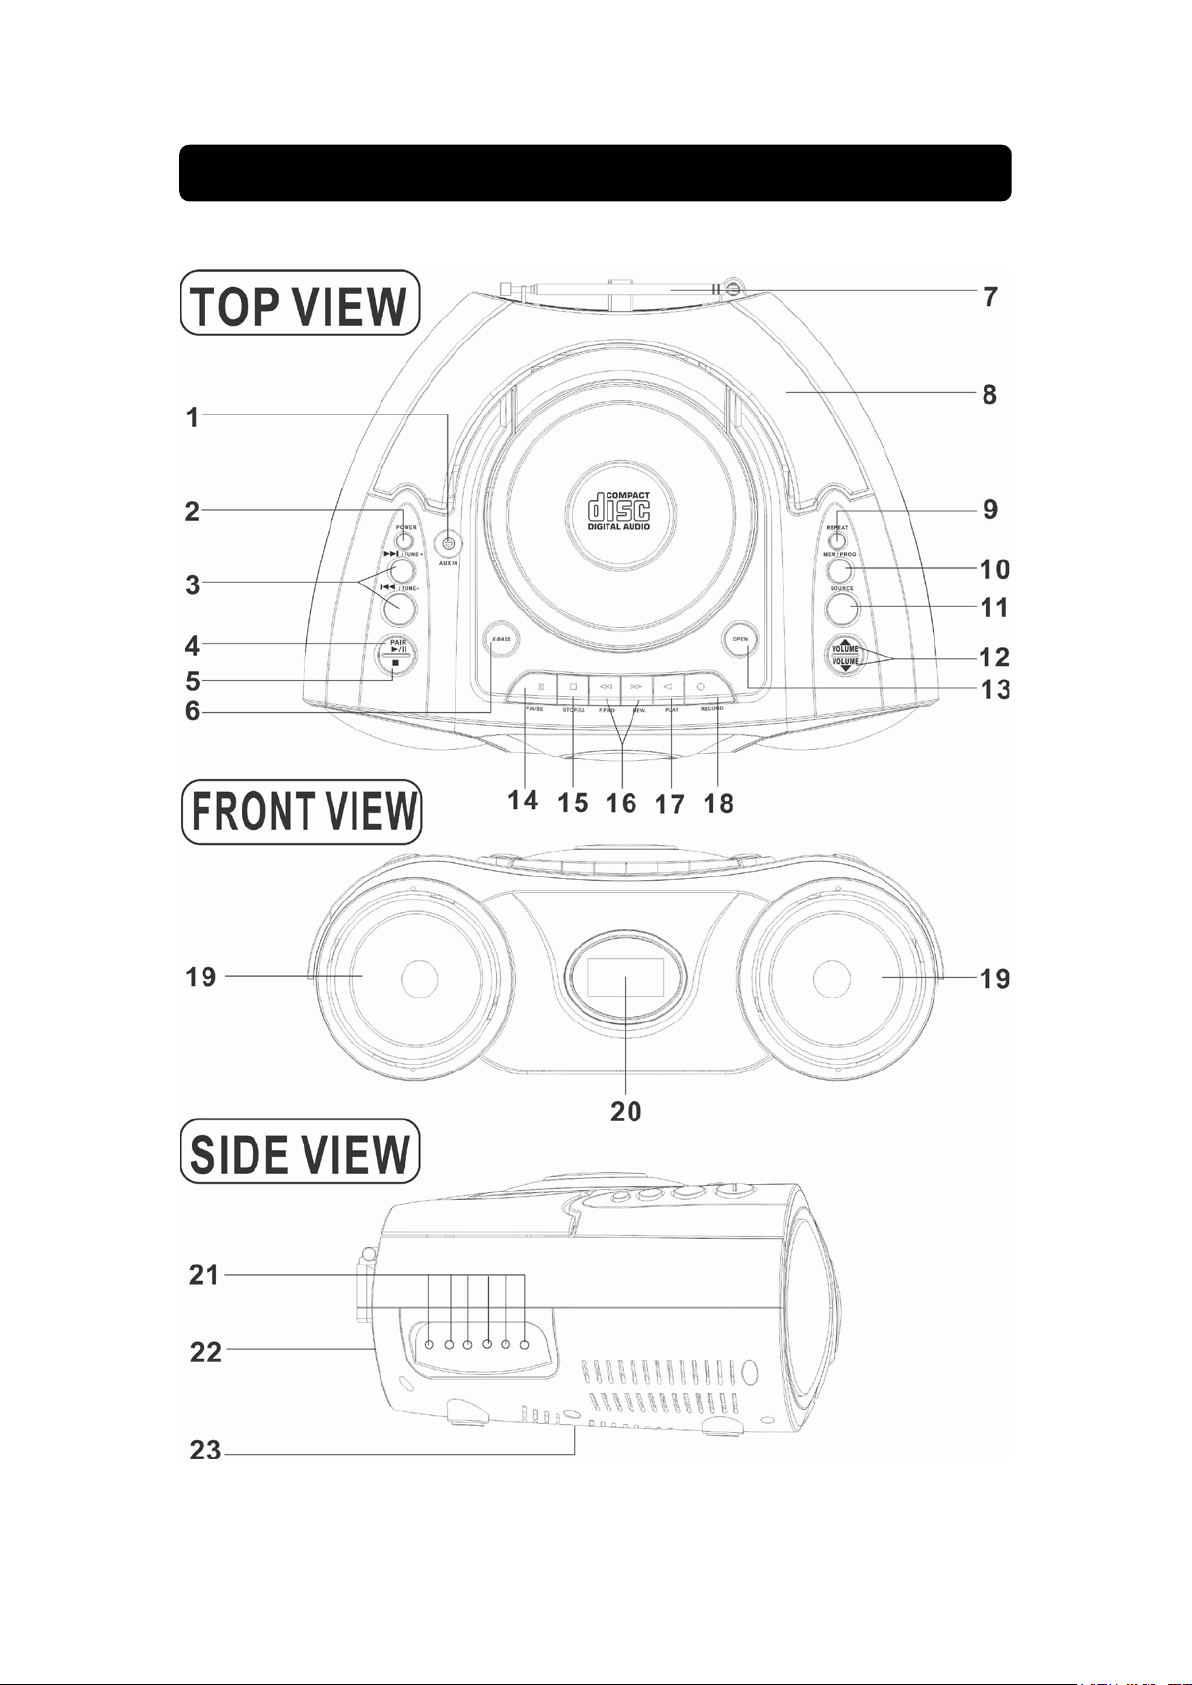
Location of the Controls
L
3

Location of the Controls
1. AUX IN Jack ( LINE IN )
2. POWER Button
3. / TUNE+ or / TUNE - Button
4. PLAY / PAUSE / PAIR Button
5. STOP / M+ (Memory Up) Button
6. X-BASS Button
7. FM Rod Antenna
8. CARRY HANDLE
9. REPEAT Button
10. MEM / PROG Button
11. SOURCE Button
12. VOLUME Buttons
13. CD OPEN Button
14. CASSETTE PAUSE Button
15. CASSETTE STOP/EJECT Button
16. CASSETTE F.FWD or REW Button
17. CASSETTE PLAY Button
18. CASSETTE REC Button
19. SPEAKERS
20. LCD Display
21. PHONES Jack
22. DC IN ( DC-6V)
23. BATTERY COMPARTMENT ( UM2 X 8)
4

Getting Started / Main Operation
DC Batteries / AC Power Operation
Power On the Unit
Press the POWER button to turn on or off unit.
Adjusting the Volume
Press the VOLUME buttons to increase or decrease the volume sound level.
Adjusting the Rod Antenna
The aerial should be extended to ensure good reception in FM radio modes. It
may be necessary to alter the position of the UNIT and/or aerial to achieve the
best signal.
Using Headphones
You will require headphones fitted with a 3.5mm diameter stereo plug and an
impedance of 8-32 ohms. The Headphone socket is located on the side of this
unit. This unit suppor t 6 hea d ph ones correct together.
X-BASS (Bass Boost)
Press the XBASS button to turn on or off x-bas s fu ncti on .
Battery Operation
Before installing batteries (not
included), ensure that the UNIT is
disconnected from the mains
supply.
Remove the battery compartment
cover on the back of the unit by
carefully pushing the two lugs
down. The battery cover can then
be lifted away.
Fit 8 x 1 .5V C-size batteries (not included), referring to the polarity markings
inside the battery compartment. Never mix old and new batteries. Finally,
replace the cover.
For battery operation, switch off the mains supply and remove the cable from
the power socket Battery operation will be selected automatically.
AC Operation
Use adapter 6V , 1.200m A (include).
Connect the small end of adapter
cable into the DC jack at the rear of
the unit. Insert the adapter plug into
a conveniently-located AC outlet.
Please ensure that your mains
supply is compatible before use.
5

recemanually
Listening the Radio
Using the Radio
1. After power connec t, press the POWER button to turn on your unit.
2. If necessary, press the SOURCE button to select FM mode.
3. The LCD DISPLAY will show the frequency of radio.
4. Press or hold the / TUNE+ or / TUNE – button to scan correct
radio frequency.
Automatic Tuning of Radio
1. In FM mode, hold / TUNE+ or / TUNE– button to automatically search for the next available station.
2. If the reception is poor, use the Manual Tuning to fine-tune the station. If
the reception does not improve, try altering the position / length of the
aerial. If the reception is still poor, scan again to determine whether a
stronger signal exi sts for the desired frequen c y.
Manual Tuning of Radio
1. In FM mode, press the / TUNE+ or / TUNE – to manually scan
through the frequency band.
2. If the reception does not improve, try altering the position / length of the
aerial. If the reception is still poor, scan again to determine whether a
stronger signal exi sts for the desired frequen c y.
Storage the Radio Presets
You can preset up to 20 stations for easy access as follows:
1. Tune to the station you wish to preset (see Using the Radio).
2. Press the MEM / PROG button, the preset station number ( P01-P20) will
show on LCD display.
3. Use the STOP / M+ button to select the preset position.
4. Press the MEM / PROG button again to save the current station into the
specified preset.
5. Repeat 1 – 4 step to storage more radio presets.
Recall a Preset Station
You can recall stored stations for easy access as follows:
1. Press the STOP / M+ button search preset station. The unit will be
sounding after select.
6

Listening CDs Disc
Insert a CDs disc.
1. Open the CD door by pressing CD OPEN button.
2. Insert a disc into the disc compartment with the title side upwards.
3. Close the CD compartment door, “- - -” is displayed for few seconds, and
the total number of title will show on display and disc will auto start play.
Remove a CDs disc.
Press the STOP / M+ button once, open the CD door by pressing CD OPEN button. Remove the CDs disc when it has stopped spinning.
Playing a CDs Disc
1. After power connect, p r ess the POWER b ut to n to turn on y our unit.
2. If necessary, press the SOURCE button to select CD mode.
3. After insert disc “- - -” will displayed for few seconds, and the total track /
file number show on display.
4. Press the PLAY / PAUSE / PAIR button to play the discs.
5. Press / TUNE+ or / TUNE– button to jump to next / previous
track playing.
6. Press and hold the / TUNE+ or / TUNE– button to skip to fast
forward/fast backward playing.
7. Press the PLAY / PAUSE / PAIR button to pause the discs playing. Press
again to resume.
8. Press the STOP / M+ button to stop the discs playing.
9. After all tracks have been played, the discs player will stop automatically.
Programming Disc
You can preset up to 20 prog r am trac k for easy access as follows:
1. When CD playing, press the STOP / M+ button to CD stop mode.
2. Press the MEM / PROG button once, and “PROG & P01” will blink on
LCD display.
3. Press the / TUNE+ or / TUNE– button until the display shows
the track number required.
4. Press the PROG button to store the selection.
5. Repeat the 3-4 steps until you have entered all the tracks.
6. To play the stored sequence, press the PLAY / PAUSE / PAIR button.
7. To cancel program, press the STOP / M+ button twice.
8. After all memory tracks have been played, the player will stop
automatically.
Using Repeat Function
1. Press the REPEAT button once to repeat current track playing.
2. Press the REPEAT button twice to repeat all tracks playing.
3. To cancel the repeat function: press the REPEAT button until “1 or ALL”
icons disappear or press the STOP / M+ button twice.
7

Listening Bluetooth Device
This unit can connected to mobile phones using a procedure by following a
few simple steps, a mobile phone can be paired with the unit in a matter of
seconds.
Setup Your Unit on Bluetooth ( BT) Mode
1. After power connect, press the POWER button to turn on your unit.
2. If necessary, press the SOURCE button to select (BT) mode ,
3. At the time, the “bt” digits flash on LCD display.
4. Finish this simply setting and go to next step below.
Set your Mobile Phone to ‘Discover’ Your Unit
1. First make sure that Bluetooth is activated on your mobile phone.
2. Then set your mobile phone to discover your unit.
3. This usually involves going to a ‘setup,’ ‘connect’ or ‘Bluetooth’ menu on
your mobile phone and selecting the option to ‘discover’ or ‘add’ a
Bluetooth device.
4. Your mobile phone will find the unit under name “MCP-5050”.
5. Your phone then asks if you want to pair with the unit.
6. Accept by pressing ‘yes’ or ‘ok’ on the phone.
7. Your phone will confirm when pairing is complete.
8. When successful pairing, the “bt” digits of LCD display will be light.
Warning:
In case of unsuccessful pairing, the “bt” digits would flash slowly. You must
follow the previous step to setting again or hold the PLAY / PAUSE / PAIR
button to manual connect again.
AFTER FIRST PAIRING
If the unit has already been paired with a Bluetooth enabled device before, it
will automatically start searching for the last paired device. Once it is found,
the “bt” digits will light. You can now start playing music from your Bluetooth
enabled device wirelessly to the unit.
8

Listening Bluetooth Device-Continuous
Listening AUX IN (LINE IN)
Playing Audio Via Bluetooth
1. When successful BT (Bluetooth) pairing, Press the PLAY / PAUSE /
PAIR button to play or pause audio files from your Blueto oth device.
2. Press / TUNE+ or / TUNE– button to jump to next / previous
music track of your Bluetooth device.
3. If press the PLAY / PAUSE / PAIR button cannot play or no music
listening. You must go to your mobile phone “Music Centre or Media
Player” to manual search music. Press the PLAY icon of your phone to
start playing.
Incoming Call
Music will automatically be paused when you have an incoming call. When
call is ended it will start playing again.
Set up your Aux- In port (Line-In , Audio-In)
This will allow you to broadcast the external unit’s sound through your unit.
CONNECTION:
1. Plug a 3.5mm audio cable into your MP3 or MP4 player Aux out / Line
–out / Audio out or phones port.
2. Plug the other end to AUX IN jack on the top of your unit.
3. Make sure both units are turned on.
4. Press the SOURCE button of your unit to change source to AUX mode
(AUH show on LCD display).
5. Set your device to start playing.
6. This will allow you to broadcast the external device sound through your
unit.
9

Listening Cassette Mu sic
Inserting or remove a Cassette Tape
1. To insert your cassette tape: Press the button to open the
cassette door. Insert your cassette tape into the compartment with
exposed section of the tape facing downwards. The side that your wish to
listen to or record onto should be facing towards you. Push the cassette
door until it locks in place.
2. To remove your cassette tape: press the button to open the
door then lift the cassette out.
Playing the Cassette Music
1. After power connect, p r ess the POWER b ut to n to turn on y our unit.
2. If necessary, press the SOURCE button to select TAPE mode.
3. When select correct , the “tAP” show on LCD display
4. Insert the cassette tape with the side that you want to listen and press the
button. Display backlight will be light on.
5. When the end of the recorded, the mechanism will stop automatically. If
you wish to play the other side of the tape, remove the cassette, turn it
round so that the other side is facing you, insert and Press the
button.
6. Press the button to fast forward / rewind though the tape.
7. Press the button when you have finished. Press the button
more to open the cassette door.
8. To avoid damage to the cassette mechani s m and your t ap e, always press
the button between each operation.
Recording Other Source Music to Cassette Tape
1. Insert a cassette into cassette compartment.
2. Select correct source you want to recoding ( CD / FM / BT/ AUX / TA P E )
and start playing the selected source.
3. If select source to TAPE mode, you can speak the voice to recording.
face to cassette door to start speaking.
You must
4. Press the button to start recording.
5. To stop the recording : Press the button once.
6. To play back the recording: Press the button to rewind and
press the button to start playing.
10
 Loading...