


CR6018D
Player II Turntable
Instruction Manual
Questions, problems, missing parts?
Before returning to the store, call Customer Service
8 a.m. – 8 p.m., EST, Monday – Friday
1-888-CROSLEY
www.crosleyradio.com

English
Safety Instructions
Read and understand this entire manual before using this product. Keep these
instructions for future reference.
1. Do not use this product near water.
2. This product should be operated only by the type of power source indicated
on the marking label or in this instruction manual.
3. Do not defeat the safety purpose of the polarized plug. A polarized plug has
two blades with one blade wider than the other. This plug will fit into the
power outlet only one way. If you are unable to insert the plug fully into the
outlet try reversing the plug. If the plug should still fail to fit, contact your
electrician.
4. Protect the power cord from being walked on or pinched particularly at plugs,
convenience receptacles, and the point where they exit from the product.
5. Do not overload wall outlets, extension cords, or integral convenience
receptacles as this can result in a risk of fire or electric shock.
6. Never push objects of any kind into this product through openings as they
may touch dangerous voltage points or short-out parts that could result in a
fire or electric shock. Never spill liquid of any kind on the product.
7. Do not attempt to service this product yourself as opening or removing
covers may expose you to dangerous voltage or other hazards. Refer all
servicing to qualified service personnel.
8. Changes or modifications to this unit not expressly approved by the party
responsible for compliance could void the user’s authority to operate the
equipment.
9. Do not use attachments not recommended by the product manufacturer as
they may cause hazards.
10. A product and cart combination should be moved with care. Quick stops,
excessive force, and uneven surfaces may cause the product and cart
combination to overturn.
11. Slots and openings in the cabinet are provided for ventilation and to ensure
reliable operation of the product and to protect it from overheating. Do not
block or cover these openings.
12. Unplug the product during lightning storm or when unused for long periods of
time.
2

English
Items in this package
Before throwing away any packaging materials, please check thoroughly and
make sure you find the following items that come along with this package:
Turntable
Turntable Lid
Speakers
Turntable slip mat
45 RPM adapter
3.5mm aux in cable
Power adaptor
Please contact Crosley customer service if there is any accessory missing from
the package. Retain the original packaging materials for exchange or return
purposes.
Specifications
Power AC power adaptor, DC output 12V 0.5A
Power consumption 12W
Speaker 3”, 8 Ω, 5 W x 2
Turntable speed 331/3, 45, 78 RPM
Replacement needle Crosley NP6
Note:
Design and specifications are subject to change without notice.
To help save power consumption, some models will comply with ERP energy
saving standard. When there is no audio input for 20 minutes, their powers will
automatically cut-off. To turn power back on and resume playing, you will need to
turn off the power and turn it on again.
3

English
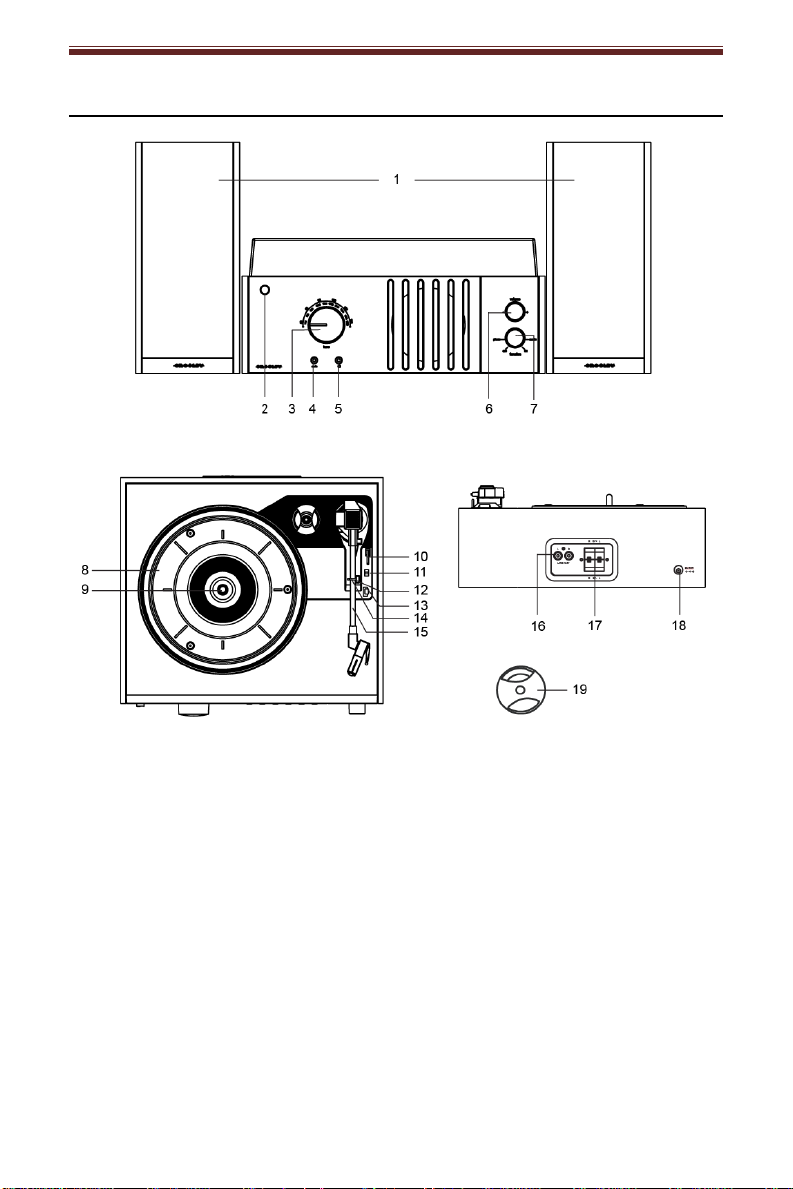
Product Description
1. Speaker
2. Power Button
3. Tuning Knob
4. Aux In Jack
5. Headphone Jack
6. Volume Knob
7. Function Knob
8. Turntable Platter
9. Turntable Spindle
10. Tonearm Lever
11. Auto-stop Switch
12. Tonearm Rest
13. Speed Switch
14. Hold Down Clip
15. Tonearm
16. RCA Jacks
17. Spring clip speaker terminals
18. Power Jack
19. 45 RPM Adapter
4

English
Initial Setup
Essential Setup
1. Place the unit on a flat and level surface. The selected location should be
stable and free from vibration.
2. Remove the tie-wrap that is holding the tonearm.
3. Place the slip mat on top of the turntable platter.
4. Connect the speakers to the Spring clip speaker terminals of the turntable.
5. Connect AC adaptor to the Power Jack of the unit.
Note: Do not plug the AC power adaptor to power outlet before all the assembly is
completed. Before turning the power on, make sure again all the connection settings
are correct. Always turn off the power when connecting or disconnecting.
Stereo System Connection
RCA Jacks
The RCA Jacks output analog line-level signals and could be connected
directly with a pair of active/powered speakers or the appropriate input of your
stereo system.
The Red plug connects with the Right channel and the White plug connects
with the Left channel.
Note: The RCA Jacks are not designed to be connected directly to the passive/unpowered
speakers. If connected to the passive speakers, the volume level will be very low.
Spring clip speaker terminals
The spring clip speaker terminals deliver amplified, speaker-level signals as
output and should be connected with the passive speakers.
Aux Input Connection
You can connect an audio device to this unit and play your music through its
speakers. To do this, rotate the Function Knob to Aux In mode, connect the
3.5mm auxiliary cable between your audio device and the Aux In Jack of this
unit and start playing.
5

English
Turntable Operation
1. Press the Power Button to turn on the power.
2. Rotate the Function Knob to PHONO position.
3. Set the Speed Switch accordingly.
4. Place the record on the turntable. Use the 45 RPM Adapter if necessary.
5. Remove the stylus protector from the stylus assembly.
Note: To avoid stylus damage, make certain the included stylus guard is in place
whenever the turntable is being moved or cleaned.
6. Release the tonearm Hold Down Clip.
Note: when the turntable is not in use, remember to lock back hold down clip.
7. Use the Tonearm Lever to lift up the tonearm.
8. Gently move the tonearm over the record where play is desired to begin. Set
the Tonearm Lever back to the down position, the tonearm will descend
slowly onto the record and begin to playback.
9. When the record is finished playing, use the Tonearm Lever again to raise
the tonearm and then return it to the Tonearm Rest. Release the lever to let
the tonearm sit back at its rest. To suspend the playback, repeat the same
steps.
10. Lock the Tonearm Clip to secure the tonearm.
Platter Auto-stop
If the Auto-stop Switch is set to ON position, the platter will stop spinning
automatically when the record plays to the end. In some rare occasion, if the
turntable stops playing before the end of the record, set the switch to OFF
position the turntable should overcome this issue.
Bluetooth Operation
1. Turn the Function Knob to Bluetooth mode , the Bluetooth Indicator will
start flashing blue.
2. Turn on the Bluetooth feature of your audio device, search for “CROSLEY
CR6018D” and pair.
3. Once your device is successfully paired with the unit, you will hear a short
confirmation sound from the unit.
4. Play and stream music from your device to the unit.
Note: Bluetooth version - 4.2
6

English
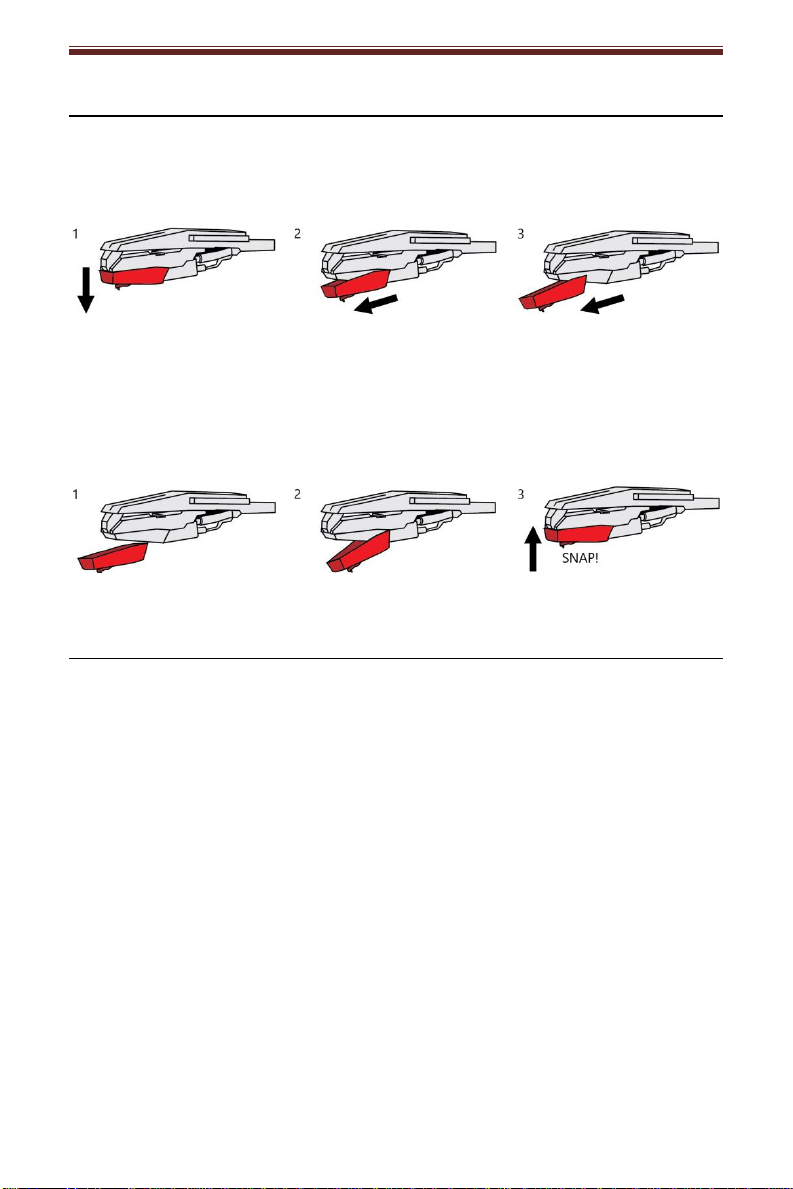
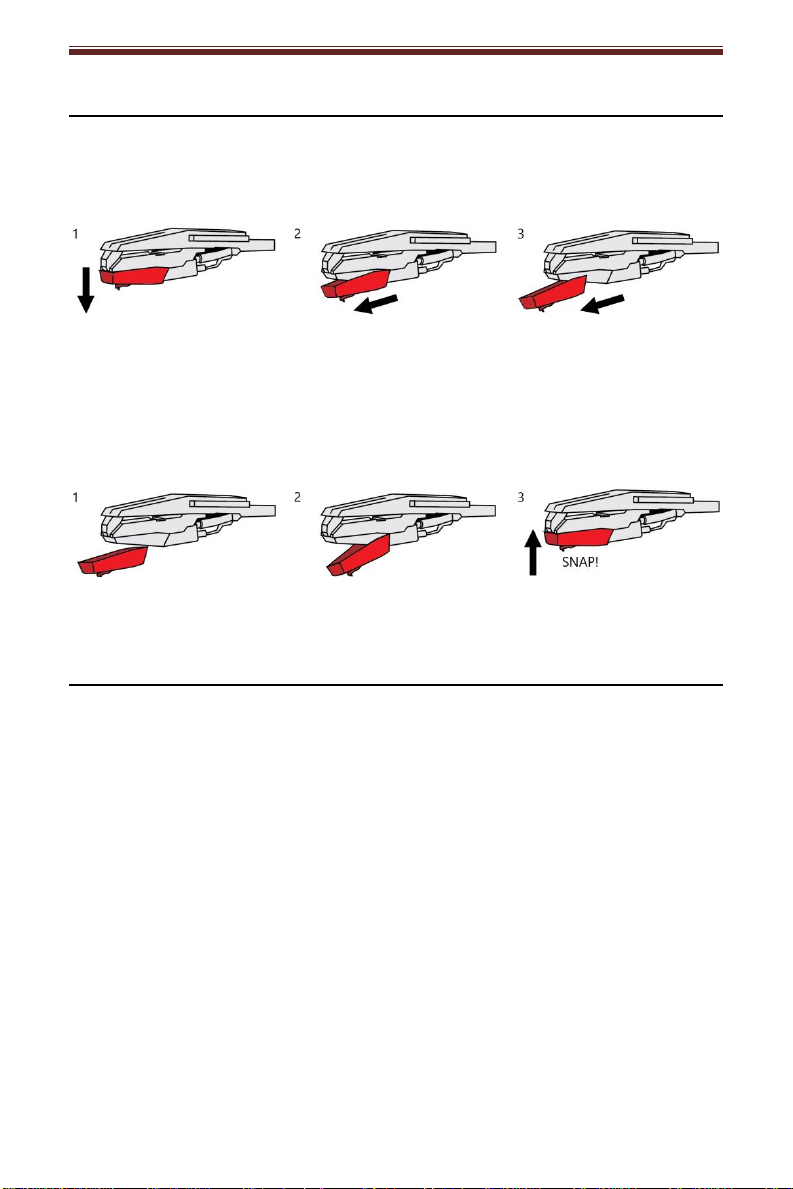
Needle Replacement
Removing Needle
1. Gently pull down the front edge of the needle.
2. Pull needle forward.
3. Pull out and remove.
Installing Needle
1. Position the needle with its tip facing down.
2. Line up the back of the needle with the cartridge.
3. Insert the needle with its front end at a downward angle and gently lift the
front of the needle upward until it snaps into place.
Radio Operation
1. Rotate the Function Knob to FM or AM position.
2. Rotate the Tuning Knob for desired radio station.
Note:
The unit is equipped with a FM wire antenna. To improve FM reception, move the
wire around until the reception is clear without interferences. Do not connect the wire
to any additional antenna.
The AM antenna is built inside the unit. If AM reception is poor, try to rotate the unit
for better reception.
7

English
Turntable Maintenance
1. Do not touch the stylus tip with your fingers. Avoid bumping the stylus on the
turntable mat or a record’s edge.
2. Clean the stylus frequently with a soft brush with a back-to-front motion only.
3. Clean the records to get rid of dust or grease with a record cleaning brush
and record cleaning solution.
4. Clean the turntable lid and turntable cabinet with a slightly damped microfiber
cloth.
Note: Do not use cleanser that contains alcohol, benzene or any other harsh chemicals,
which might damage the paint and finish of the turntable.
** Crosley offers a product line of different cleaning accessories. Please
ask your retailer or check out our website www.crosleyradio.com for
more cleaning product information.
Troubleshooting
There is no power
Power adaptor is not connected correctly.
No power at the power outlet.
To help save power consumption, some models will comply with ERP energy
saving standard. When there is no audio input for 20 minutes, their powers
will automatically cut-off. To turn power back on and resume playing, turn off
the power and turn it on again.
Power is on, but the platter does not turn
Turntable mode is not selected.
Turntable’s drive belt has slipped off.
Turntable is spinning, but there is no sound, or sound not loud enough
Stylus protector is still on.
Tone arm is lift up by the lever.
Headphone is plugged in.
8

English
FCC Statements
NOTE: This equipment has been tested and found to comply with the limits for a Class B digital device,
pursuant to part 15 of the FCC Rules. These limits are designed to provide reasonable protection
against harmful interference in a residential installation. This equipment generates uses and can radiate
radio frequency energy and, if not installed and used in accordance with the instructions, may cause
harmful interference to radio communications. However, there is no guarantee that interference will not
occur in a particular installation. If this equipment does cause harmful interference to radio or television
reception, which can be determined by turning the equipment off and on, the user is encouraged to try to
correct the interference by one or more of the following measures:
Reorient or relocate the receiving antenna.
Increase the separation between the equipment and receiver.
Connect the equipment into an outlet on a circuit different from that to which the receiver is
connected.
Consult the dealer or an experienced radio/TV technician for help
Changes or modifications not expressly approved by the party responsible for compliance could
void the user's authority to operate the equipment.
This device complies with Part 15 of the FCC Rules. Operation is subject to the following two conditions:
1. this device may not cause harmful interference, and
2. this device must accept any interference received, including interference that may cause undesired
operation.
9

CR6018D
Player II Tocadiscos
Manual de instrucciones
¿Tiene preguntas, ha tenido problemas o hay piezas faltantes?
Antes de devolver el producto a la tienda, comuníquese con nuestro Servicio al Cliente
de 8 a. m. a 6 p. m., hora del este, de lunes a viernes
1-888-CROSLEY
www.crosleyradio.com

Español
Instrucciones de seguridad
Lea y comprenda este manual en su totalidad antes de usar este producto.
Conserve estas instrucciones para consultarlas en el futuro.
1. No use este producto cerca del agua.
2. Este producto debe ser utilizado solo con el tipo de fuente de alimentación
indicado en la etiqueta o en este manual de instrucciones.
3. No subestime el propósito de seguridad del enchufe polarizado. Un enchufe
polarizado posee dos hojas; una de ellas es más ancha que la otra. Este
enchufe encajará en el tomacorriente en un solo sentido. Si no logra insertar
completamente el enchufe en el tomacorriente, pruebe invirtiendo el
enchufe. Si aún así el enchufe no encaja, comuníquese con su electricista.
4. Proteja el cable de alimentación de ser pisado o pinzado, en especial en los
enchufes, los tomacorrientes y en el punto donde el cable sale del producto.
5. No sobrecargue los tomacorrientes de pared, cables de alargue, o
receptáculos integrales, ya que puede generar un riesgo de incendio o
descarga eléctrica.
6. No introduzca objetos de ningún tipo en el producto a través de las ranuras,
ya que pueden hacer contacto con puntos de alto voltaje o provocar un
cortocircuito que ocasione fuego o una descarga eléctrica. No derrame
líquidos de ningún tipo sobre el producto.
7. No intente realizar tareas de mantenimiento por su cuenta, ya que abrir o
remover la cubierta puede exponerlo a un voltaje peligroso y a otros riesgos.
Deje toda tarea de mantenimiento en manos de un técnico de servicio
calificado.
8. Los cambios o las modificaciones que no tengan la aprobación expresa de
la parte responsable del cumplimiento pueden anular el permiso del usuario
para utilizar el equipo.
9. No utilice accesorios que no son recomendados por los fabricantes del
producto porque pueden ser peligrosos.
10. Cualquier combinación de carro y producto debe moverse con cuidado. Las
paradas súbitas, el uso de fuerza excesiva y las superficies irregulares
pueden causar que el producto y el carro se vuelquen.
11. Las ranuras de ventilación y las aberturas del gabinete son provistas para la
ventilación y para asegurar el correcto funcionamiento del producto y evitar
el recalentamiento. No bloquee ni cubra estas aberturas.
12. Desconecte el producto durante las tormentas eléctricas o cuando no se
utilice durante períodos extendidos.
2

Español
Artículos en este empaque
Antes de deshacerse de cualquier material del empaque, revíselo con atención y
asegúrese de encontrar los siguientes artículos que se incluyen en este paquete:
Tocadiscos
Tapa de tocadiscos
Altavoces
Cobertor deslizable del tocadiscos
Adaptador de 45 rpm
Cable de entrada de 3.5 mm
Transformador
Comuníquese con el Servicio al Cliente de Crosley en caso de que faltara algún
accesorio en el empaque. Conserve el material de embalaje original para
realizar cambios o devoluciones.
Especificaciones
Fuente de energía Transformador de CA, salida CC de 12 V 0,5 A
Consumo de energía 12 W
Potencia del altavoz 3”, 8 Ω, 5 W x 2
Altavoz 331/3, 45, 78 RPM
Aguja de repuesto Crosley NP6
Nota:
El diseño y las especificaciones están sujetos a cambios sin previo aviso.
Con el fin de ahorrar en el consumo de energía, algunos modelos cumplirán con
el estándar de ahorro de energía ERP (productos relacionados con la energía).
En el caso de que no se produzca la entrada de audio durante 20 minutos, estos
equipos se desactivarán automáticamente. Para volver a encenderlos y reanudar
la reproducción, deberá apagar la unidad primero y luego volver a encenderla.
3

Español
Descripción del producto
1. Altavoces
2. Botón de encendido
3. Perilla de sintonización
4. Conector de entrada auxiliar
5. Conector de auriculares
6. Perilla de volumen
7. Perilla de funciones
8. Bandeja del tocadiscos
9. Eje del tocadiscos
10. Palanca del brazo
11. Interruptor de detención
automática
12. Soporte del brazo del
tocadiscos
13. Interruptor de velocidad
14. Broche de sujeción
15. Brazo del tocadiscos
16. Conectores RCA
17. Terminales de parlantes con
conector de broche elástico
18. Conector de alimentación
19. Adaptador de 45 rpm
4

Español
Instalación inicial
Instalación indispensable
1. Coloque la unidad en una superficie plana y nivelada. El lugar seleccionado
debe ser estable y estar libre de vibraciones.
2. Quite la banda de sujeción que sostiene el brazo del tocadiscos.
3. Coloque el cobertor deslizable sobre la bandeja del tocadiscos.
4. Conecte los altavoces a los terminales de parlantes con conector de
broche elástico de la mesa giratoria.
5. Conecte el adaptador de CA al conector de alimentación de la unidad.
Nota: No enchufe el transformador de CA a un tomacorriente hasta terminar de
ensamblar las partes. Antes de encender el equipo, vuelva a asegurarse de que todos
los ajustes de conexión estén correctos. Siempre apague la unidad al conectarla o
desconectarla.
Conexión del sistema estéreo
Conectores RCA
Los conectores RCA generan señales analógicas de nivel de línea y se
pueden conectar directamente con un par de parlantes activos o en la
entrada correspondiente de su sistema estéreo.
El cable rojo se conecta en el canal derecho, y el cable blanco se conecta en
el canal izquierdo.
Nota: Los conectores RCA no están diseñados para conectarse directamente a parlantes
pasivos. Si se los conecta a parlantes pasivos, el nivel de volumen será muy bajo.
Terminales de parlantes con conector de broche elástico
Las terminales de parlantes con broche elástico brindan señales amplificadas de
nivel del parlante como salida y se deben conectar a parlantes pasivos.
Conexión de entrada auxiliar
Puede conectar un dispositivo de audio a esta unidad y reproducir su música a
través de los parlantes. Para hacerlo, gire la Perilla de funciones a modo Aux,
conecte el cable auxiliar de 3.5 mm entre su dispositivo de audio y elConector
de entrada auxiliar de esta unidad y comience a reproducir.
5

Español
Funcionamiento del tocadiscos
1. Para prender la unidad, presione el botón de encendido.
2. Gire la Perilla de funciones hasta la posición FONO.
3. Ajuste el Interruptor de velocidad según corresponda.
4. Coloque el disco en el tocadiscos. De ser necesario, utilice el Adaptador de
45 rpm.
5. Quite el protector de la aguja fonográfica de su ensamblaje.
Nota: Para evitar los daños de la aguja fonográfica, asegúrese de que el protector esté
ubicado correctamente cada vez que mueva o limpie el tocadiscos.
6. Suelte el Broche de sujeción del tocadiscos.
Nota: Cuando el tocadiscos no se utilice, recuerde volver a trabar el broche de
sujeción.
7. Use la Palanca del brazo del tocadiscos para levantar el brazo.
8. Mueva suavemente el brazo del tocadiscos sobre el disco en la parte que
desea comenzar a reproducir. Ajuste la Palanca del brazo del tocadiscos
de vuelta a la posición hacia abajo. El brazo bajará lentamente hacia el disco
y se comenzará a reproducir.
9. Cuando el disco termine de reproducirse, utilice la Palanca del brazo del
tocadiscos una vez más para levantar el brazo y volver a colocarlo en el
Soporte del brazo. Suelte la palanca para permitir que el brazo vuelva a
apoyarse sobre su soporte. Para suspender la reproducción, siga los mismos
pasos.
10. Trabe el Broche del brazo del tocadiscos para asegurarlo.
Detención automática de la bandeja
Si el Interruptor de detención automática se encuentra en la posición
ENCENDIDO, la bandeja dejará de girar automáticamente cuando el disco
termine de reproducirse. En raras ocasiones, si el tocadiscos deja de reproducir
el disco antes de que termine, ajuste el interruptor a la posición APAGADO. El
problema se debería solucionar de esta manera.
Funcionamiento de Bluetooth
1. Coloque la perilla de funciones en modo Bluetooth . La unidad emitirá un
sonido de activación.
2. Active la conexión de Bluetooth en el dispositivo de audio, busque “Crosley
CR6018D” y conéctelo.
3. Una vez que el dispositivo quede conectado correctamente, la unidad emitirá
un sonido corto de confirmación.
4. Reproduzca música en forma inalámbrica desde el dispositivo hacia la
unidad.
Nota: Versión de Bluetooth – 4.2
6
Español
Reemplazo de la aguja
Quitar la aguja
1. Tire del borde delantero de la aguja con suavidad.
2. Tire la aguja hacia adelante.
3. Tire hacia fuera y quítela.
Instalar la aguja
1. Coloque la aguja de manera tal que la punta quede hacia abajo.
2. Alinee la parte trasera de la aguja con la cápsula.
3. Introduzca la aguja con el extremo delantero en un ángulo descendente y
suavemente levante la parte delantera de la aguja hacia arriba hasta que se
trabe en su lugar.
Funcionamiento de la radio
1. Gire la Perilla de funciones hacia la posición FM o AM.
2. Gire la Perilla de sintonización para elegir la estación de radio deseada.
Nota:
En la unidad se incluye una antena de hilo FM. Para mejorar la recepción FM,
mueva el hilo hasta que la recepción sea clara y sin interferencias. No conecte el hilo
a ninguna antena adicional.
La antena AM está incorporada dentro de la unidad. Si la recepción AM no fuera
buena, intente girar la unidad para lograr una mejor recepción.
7

Español
Mantenimiento del tocadiscos
1. No toque la punta de la aguja fonográfica con los dedos. Evite golpear la
aguja fonográfica con el cobertor para el tocadiscos o con el borde del disco.
2. Limpie la aguja fonográfica con frecuencia con un cepillo suave mediante
movimientos de atrás hacia adelante.
3. Limpie los discos para quitarles el polvo o la grasa con un cepillo para limpiar
discos y con una solución de limpieza para discos.
4. Limpie la tapa del tocadiscos y el gabinete con un paño de microfibras
ligeramente humedecido.
Nota: No utilice otros limpiadores que contengan alcohol, benceno o cualquier otro
químico agresivo que pueda dañar la pintura y la terminación del tocadiscos.
** Crosley ofrece una línea de productos de distintos accesorios de
limpieza. Para obtener más información acerca de los productos de
limpieza, consulte a un comerciante o visite nuestro sitio web
www.crosleyradio.com.
Solución de problemas
La unidad no enciende.
El transformador no está conectado correctamente.
No hay energía en el tomacorriente.
Con el fin de ahorrar en el consumo de energía, algunos modelos cumplirán
con el estándar de ahorro de energía ERP (productos relacionados con la
energía). En el caso de que no se produzca la entrada de audio durante 20
minutos, estos equipos se desactivarán automáticamente. Para volver a
encender la unidad y reanudar la reproducción, apáguela y vuelva a
encenderla.
El equipo está encendido pero la bandeja no gira.
El modo tocadiscos no está seleccionado.
Se ha salido la correa de transmisión del tocadiscos.
El tocadiscos gira pero no emite sonidos o los sonidos no son lo
suficientemente fuertes.
El protector de la aguja fonográfica aún está colocado.
La palanca levanta el brazo del tocadiscos.
Los auriculares están conectados.
8

Español
Declaraciones de la FCC
NOTA: Este equipo se verificó y se comprobó que cumple con los límites para un dispositivo digital
clase B, conforme a la Sección 15 de las reglas de la Comisión Federal de Comunicaciones (FCC).
Estos límites están diseñados para brindar una protección razonable frente a interferencia perjudicial en
un establecimiento residencial. Este equipo genera, usa y puede irradiar energía de radiofrecuencia y, si
no se instala y utiliza siguiendo las instrucciones, puede causar interferencia perjudicial a las
radiocomunicaciones. Sin embargo, no existe garantía de que la interferencia no ocurrirá en una
instalación en particular. Si este equipo causa interferencia perjudicial a las radiocomunicaciones o a la
recepción televisiva, lo que se puede determinar al encender y apagar el equipo, se recomienda que el
usuario intente corregir la interferencia mediante una o más de las siguientes medidas:
• Orientar o reubicar la antena de recepción.
• Aumentar la separación entre el equipo y el receptor.
• Conectar el equipo a una toma en un circuito diferente del circuito en el que está conectado el
receptor.
• Consultar al proveedor o a un técnico con experiencia en radio/TV para obtener ayuda.
• Los cambios o modificaciones que no tengan la aprobación expresa de la parte responsable del
cumplimiento pueden anular el permiso del usuario para utilizar el equipo.
Este dispositivo cumple con la Sección 15 de las reglas de la Comisión Federal de Comunicaciones
(FCC). El uso de este equipo está sujeto a las dos condiciones siguientes:
1. este dispositivo no causa interferencia perjudicial y
2. este dispositivo debe aceptar cualquier interferencia recibida, incluso interferencia que pueda
causar un funcionamiento no deseado.
9
CR6018D
Platine tourne-disque Player II
Manuel d’utilisation
Des questions, problèmes, pièces manquantes?
Avant de retourner au magasin, appelez le service à la clientèle
De 8 h à 18 h, HNE, du lundi au vendredi
1-888-CROSLEY
www.crosleyradio.com

Français
Instructions de sécurité
Veuillez lire et comprendre l'intégralité de ce manuel avant d'utiliser ce produit.
Conservez ces instructions pour pouvoir les consulter ultérieurement.
1. Ne pas utiliser ce produit près de l’eau.
2. Ce produit doit être alimenté uniquement par le type de source
d’alimentation indiqué sur l’étiquette ou dans le présent manuel d'utilisation.
3. Ne pas tenter de modifier le dispositif de sécurité que constitue la fiche
polarisée. Une fiche polarisée a deux lames, l'une étant plus large que
l’autre. Cette fiche peut être insérée dans une prise électrique d’une seule
façon. S'il est impossible d'insérer la fiche complètement dans la prise,
inverser la fiche. Si la fiche ne peut toujours pas s’insérer entièrement,
contacter un électricien.
4. Faire en sorte que personne ne marche sur le cordon d'alimentation ou que
ce dernier ne soit pas pincé, notamment au niveau des fiches, des prises
murales et du point de sortie du produit.
5. Ne pas surcharger les prises murales, cordons de rallonge ou prises de
courant intégrales, car cela pourrait entraîner un risque d’incendie ou de
décharge électrique.
6. Ne jamais pousser d’objets, quelle que soit leur nature, dans les ouvertures,
car ils pourraient toucher des points de tension dangereux ou court-circuiter
des pièces, ce qui pourrait entraîner un incendie ou une décharge
électrique. Ne jamais renverser de liquide, quelle qu’en soit la nature, sur le
produit.
7. Ne pas tenter de réparer ce produit vous-même, car couvrir ou ôter des
couvercles pourrait vous exposer à une tension dangereuse ou à d’autres
dangers. Faire appel à une personne qualifiée pour toutes les réparations.
8. Les changements ou les modifications non approuvés expressément par la
partie responsable de la conformité pourraient annuler le droit de l’utilisateur
de faire fonctionner le matériel.
9. Ne pas utiliser d’accessoires non recommandés par le fabricant du produit,
car ils pourraient causer des dommages.
10. Il est important de déplacer avec prudence le produit s’il se trouve sur un
chariot. Les arrêts brusques, une force excessive et les surfaces inégales
peuvent entraîner le retournement du produit sur un chariot.
11. Des fentes et ouvertures sont présentes dans le boîtier pour la ventilation,
pour assurer un fonctionnement fiable du produit et pour le protéger d’une
surchauffe. Ne pas bloquer ou couvrir ces ouvertures.
12. Débrancher le produit pendant un orage ou lorsqu'il est inutilisé pendant une
période prolongée.
2

Français
Contenu de la trousse
Avant de jeter les emballages, veuillez les passer en revue minutieusement et
vérifier que vous avez les éléments suivants fournis dans cette trousse :
Tourne-disque
Couvercle du tourne-disque
Haut-parleurs
Tapis antidérapant du tourne-disque
Adaptateur 45 tours
Câble d'entrée auxiliaire de 3,5 mm
Adaptateur d’alimentation
Veuillez contacter le service à la clientèle de Crosley s'il manque des
accessoires dans la trousse. Conservez les emballages d'origine pour
procéder à un échange ou à un retour.
Spécifications
Alimentation Adaptateur c.a., sortie c.c. 12 V 0,5
Consommation électrique 12 W
Haut-parleur 3”, 8 Ω, 5 W x 2
Vitesse du tourne-disque 331/3, 45, 78 T/M
Aiguille de rechange Crosley NP6
Remarque :
La conception et les spécifications sont sujettes à modification sans préavis.
Pour contribuer à économiser de l'énergie, certains modèles se conformeront à
la norme d'économie d'énergie ERP (Energy-Related Products). En l'absence
d'entrée audio pendant 20 minutes, l'alimentation se coupera automatiquement.
Pour rétablir l’alimentation en courant et reprendre la lecture, vous devrez
éteindre l'appareil puis le rallumer.
3
Français
Description du produit
1. Haut-parleurs
2. Bouton de mise en marche
3. Bouton de syntonisation
4. Prise d'entrée aux
5. Prise pour casque d’écoute
6. Bouton de volume
7. Bouton de fonction
8. Plateau du tourne-disque
9. Broche du tourne-disque
10. Levier du bras de lecture
11. Commutateur d'arrêt
automatique
12. Support du bras de lecture
13. Sélecteur de vitesse
14. Attache de retenue
15. Bras de lecture
16. Prises RCA
17. Bornes des haut-parleurs avec
attache à ressort
18. Prise d'alimentation
19. Adaptateur 45 tours
4

Français
Configuration initiale
Configuration de base
1. Placez l'appareil sur une surface plane. L'emplacement choisi doit être stable
et sans vibration.
2. Retirez l'attache qui retient le bras de lecture.
3. Placez le tapis antidérapant sur le plateau du tourne-disque.
4. Branchez les haut - parleurs sur les bornes des haut - parleurs avec
attache à ressort du plateau tournant.
5. Branchez l'adaptateur c.a. à la prise d'alimentation de l'appareil.
Remarque : Ne branchez pas l'adaptateur c.a. à la prise avant la fin du montage. Avant
d'allumer l'appareil, vérifiez à nouveau que tous les paramètres des branchements sont
corrects. Mettez toujours l'appareil hors tension lorsque vous effectuez ou supprimez
des branchements.
Branchement du système stéréo
Prises RCA
Les prises RCA émettent des signaux de niveau de ligne analogique et
peuvent être connectées directement avec une paire de haut-parleurs
actifs/sous tension ou l'entrée appropriée de votre système stéréo.
La prise rouge se branche sur le canal droit et la prise blanche se branche
sur le canal gauche.
Remarque : Les prises RCA ne sont pas conçues pour être branchées directement aux
haut-parleurs passifs/qui ne sont pas sous tension. Si elles sont branchées aux hautparleurs passifs, le niveau du volume sera très bas.
Bornes des haut-parleurs avec attache à ressort
Les bornes des haut-parleurs avec attache à ressort émettent des signaux de
niveau haut-parleur amplifiés comme sortie et doivent être branchées aux hautparleurs passifs.
Branchement de l'entrée Aux
Vous pouvez brancher un périphérique audio à cet appareil afin d’écouter de la
musique avec vos écouteurs. Pour cela, tournez le bouton de fonction sur le
mode Aux, connectez le câble auxiliaire 3,5 mm entre votre périphérique audio et
la prise d'entrée Aux de cet appareil et commencez à écouter de la musique.
5

Français
Utilisation du tourne-disque
1. Appuyez sur la touche de mise en marche pour allumer l’appareil.
2. Mettez le bouton Fonction en position PHONO (PHONO).
3. Réglez le sélecteur de vitesse en conséquence.
4. Placez le disque sur le tourne-disque. Utilisez l'adaptateur 45 tours si
besoin.
5. Retirez la protection du stylet de son assemblage.
Remarque : Pour éviter d'endommager le stylet, vérifiez que la protection intégrée du
stylet est bien en place lorsque vous déplacez ou nettoyez le tourne-disque.
6. Relâchez l'attache de retenue du bras de lecture.
Remarque : Lorsque vous n'utilisez pas le tourne-disque, n'oubliez pas de verrouiller à
nouveau l'attache de retenue.
7. Utilisez le levier du bras de lecture pour soulever le bras de lecture.
8. Déplacez doucement le bras de lecture au-dessus du disque, là où vous
souhaitez commencer la lecture. Abaissez le levier du bras de lecture. Le
bras de lecture descendra doucement sur le disque et commencera la
lecture.
9. Lorsque la lecture du disque est terminée, utilisez à nouveau le levier du
bras de lecture pour soulever le bras de lecture et le remettre sur le support
du bras de lecture. Relâchez le levier pour reposer le bras de lecture sur
son support. Pour interrompre la lecture, répétez les mêmes étapes.
10. Verrouillez l'attache du bras de lecture pour retenir le bras de lecture.
Arrêt automatique du plateau
Si le sélecteur d'arrêt automatique est en position ON (MARCHE), le plateau
s'arrêtera automatiquement de tourner lorsque la lecture du disque sera
terminée. Dans quelques rares occasions, si le tourne-disque s'arrête de lire
avant la fin du disque, positionnez le sélecteur sur OFF (ARRÊT) : le tournedisque devrait surmonter ce problème.
Utilisation du Bluetooth
1. Mettez le bouton de fonction sur le mode Bluetooth ; le voyant Bluetooth
devient bleu et clignote.
2. Activez la fonction Bluetooth de votre appareil audio, recherchez « CROSLEY
CR6018D » et associez l'appareil.
3. Une fois votre appareil associé à l'unité, celle-ci émettra un bref son de
confirmation.
4. Lire et diffuser de la musique en continu de votre appareil sur l'unité.
Remarque : Versions de Bluetooth – 4.2
6
Français
Remplacement de l'aiguille
Retrait de l'aiguille
1. Tirez doucement vers le bas le bord avant de l'aiguille.
2. Tirez l'aiguille vers l'avant.
3. Tirez vers l’extérieur pour l'enlever.
Installation de l’aiguille
1. Positionner l’aiguille avec son extrémité vers le bas.
2. Aligner l’arrière de l’aiguille avec la cartouche.
3. Insérer l’aiguille avec son extrémité avant à un angle descendant et soulever
doucement l’avant de l’aiguille vers le haut jusqu’à ce qu’il s’enclenche.
Utilisation de la radio
1. Mettez le bouton Fonction en position FM ou AM.
2. Tournez le bouton de syntonisation pour sélectionner la station de radio
désirée.
Remarque :
L'appareil est équipé d'une antenne FM filaire. Pour améliorer la réception FM,
déplacez l'antenne jusqu’à ce que la réception soit claire et sans interférences. Ne
branchez pas le fil sur une autre antenne.
L'antenne AM est intégrée à l'appareil. Si la réception AM est faible, essayez de faire
pivoter l'appareil pour obtenir une meilleure réception.
7

Français
Entretien du tourne-disque
1. Ne pas toucher l'extrémité du stylet avec vos doigts. Éviter de cogner le stylet
sur le tapis du tourne-disque ou le bord du disque.
2. Nettoyer souvent le stylet avec une brosse douce dans un mouvement
d'arrière vers l'avant uniquement.
3. Nettoyer les disques pour retirer la poussière ou la graisse avec une brosse
de nettoyage pour disque et une solution nettoyante pour disque.
4. Nettoyer le couvercle du tourne-disque et le boîtier du tourne-disque avec un
chiffon microfibre légèrement humide.
Remarque : Ne pas utiliser d'autre nettoyant contenant de l'alcool, du benzène ou tout
autre produit chimique nocif qui pourrait endommager la peinture et la finition du
tourne-disque.
** Crosley propose toute une gamme d'accessoires de nettoyage.
Veuillez contacter votre détaillant ou consulter notre site Web
www.crosleyradio.com pour obtenir plus d'informations sur les produits
de nettoyage.
Dépannage
L’appareil ne s’allume pas
L'adaptateur d’alimentation n’est pas branché correctement.
Aucune alimentation au niveau de la prise électrique.
Pour contribuer à économiser de l'énergie, certains modèles se conformeront
à la norme d'économie d'énergie ERP (Energy-Related Products). En
l'absence d'entrée audio pendant 20 minutes, l'alimentation se coupera
automatiquement. Pour rétablir l’alimentation en courant et reprendre la
lecture, éteignez l'appareil puis rallumez-le.
L'appareil est allumé, mais le plateau ne tourne pas
Le mode tourne-disque n'est pas sélectionné.
La courroie d'entraînement du tourne-disque a glissé.
Le tourne-disque tourne, mais il n'y a pas de son ou le son n'est pas
suffisamment fort.
La protection du stylet n'a pas été enlevée.
Le bras de lecture est soulevé par le levier.
Le casque d'écoute est branché.
8

Français
Déclarations relatives à la FCC
REMARQUE : Ce matériel a été testé et jugé en conformité avec les limites pour un appareil numérique
de Classe B, conformément à la partie 15 des règles de la FCC. Ces limites ont été établies pour offrir
une protection raisonnable contre l’interférence nuisible dans une installation résidentielle. Cet appareil
produit, utilise et peut émettre de l'énergie de fréquence radio et, s'il n'est pas installé et utilisé
conformément aux instructions, il peut provoquer de l'interférence nuisible aux communications radio.
Toutefois, il n’existe aucune garantie qu’il n’y aura pas d’interférence dans une installation particulière.
Si ce matériel cause de l’interférence nuisible à la réception radio ou de télévision, qui peut être
déterminée en allumant et en éteignant le matériel, il est conseillé à l’utilisateur de tenter de remédier à
l’interférence par l’un ou plusieurs des moyens suivants :
Réorienter ou déplacer l’antenne de réception.
Augmenter la distance entre le matériel et le récepteur.
Brancher le matériel à une prise sur un circuit différent de celui du récepteur.
Consulter le détaillant ou un technicien de radio ou de télévision qualifié pour obtenir de l’aide.
Les changements ou les modifications non approuvés expressément par la partie responsable de
la conformité pourraient annuler le droit de l'utilisateur de faire fonctionner le matériel.
Cet appareil est conforme à la partie 15 des règles de la FCC. Son fonctionnement est assujetti aux
deux conditions suivantes :
1. cet appareil ne peut causer des interférences nuisibles, et
2. cet appareil doit accepter toute interférence reçue, y compris celles susceptibles de causer un
fonctionnement indésirable.
9
 Loading...