


User Manual
Model No.: CR3037A
Before using the unit, please kindly read the user manual carefully.
Thanks!
IMPORTANT SAFETY INSTRUCTIONS
Caution:
To reduce the risk of electric shock, do not dismantle the product and do not expose the apparatus to rain
or moisture.No user-serviceable parts inside. Refer servicing to qualified personnel only.
Explanation of Graphical symbols:
The lighting flash within an equilateral triangle is intended to alert you to the presence of uninsulated
dangerous voltage within the product’s enclosure that may be of sufficient magnitude to constitute an
electric shock to a person or person.
The exclamation point within an equilateral triangle is intended to alert you to the presence of important
operating and maintenance (serving) instructions in the literature accompanying the product.
To achieve the utmost in enjoyment and performance, and in order to become familiar with its features,
please read this manual carefully before attempting to operate this product. This will assure you years of t
rouble free performance and listening pleasure.
Important Notes:
⚫ This safety and operating instruction should be retained for future reference.
The apparatus should not be exposed to dripping or splashing or placed in a humid atmosphere such as a
bathroom.
⚫ Do not install the product in the following areas:
* Places exposed to direct sunlight or close to radiators
* On top of other stereo equipment that radiate too much heat .
*Blocking ventilation or in a dusty area .
*Areas where there is constant vibration .
*Humid or moist places
*Do not place near candles or other naked flames.
⚫ Operate the product only as instructed in this manual.
Before turning on the power for the first time, make sure the power
adaptor is properly connected.
For safety reasons, do not remove any covers or attempt to gain access to the inside of the product. Refer
any servicing to qualified personnel.
Do not attempt to remove any screws, or open the casing of the unit; there are no user serviceable parts
inside. Refer all servicing to qualified service personnel.
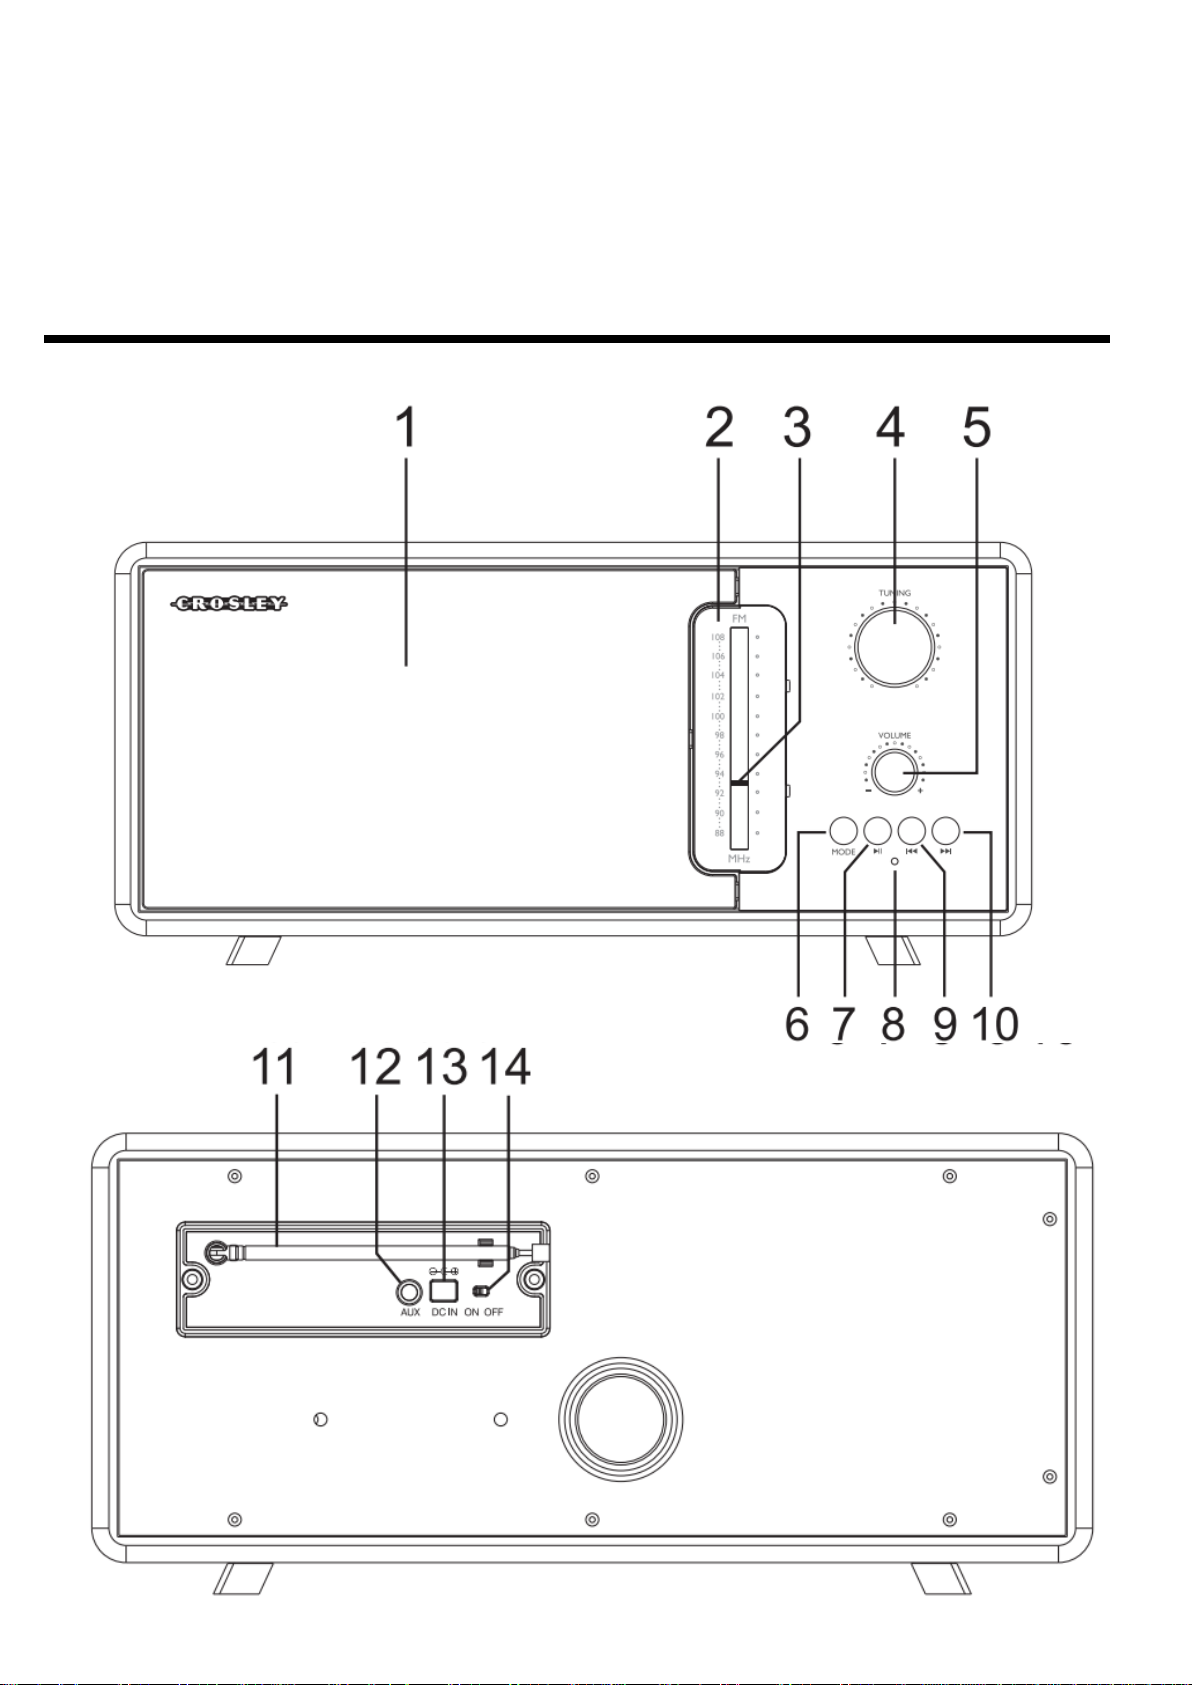
DESCRIPTION

1. SPEAKERS
2. DIAL SCALE
3. DIAL POINTER
4. TUNING KNOB
5. VOLUME KNOB
6. MODE FUNCTION BUTTONPLAY/PAUSE BUTTON
7. MODE FUNCTION LED
1) FM mode --Pink
2) Bluetooth mode--Blue
3) Aux in mode –Orange
8. PREVIOUS TRACK BUTTON
9. NEXT TRACK BUTTON
10. FM ANTENNA
11. AUX INPUT
12. DC IN
13. ON/OFF SWITCH
Initial Setup
I
1. Prior to use, check that the mains voltage is the same as the mains voltage stated on the power
adapter.
2. Plug the power adapter (main supply of 10V 1A) into an electrical outlet.
Connect the DC plug of the power adapter into the power adapter connection port (13).
3. Make sure the power switch ON/OFF SWITCH (14) on the back control panel.
4. The device LED indicator will light up in red and then the indicator light turns pink.
5. You could changes the mode via pressing the MODE FUNCTION BUTTON (6) .
6. To adjust the volume, use the rotary knob (5) to adjust the volume.
7. To press the PREVIOUS TRACK BUTTON(9) or NEXT TRACK BUTTON(10) to select the songs
you prefer to.
FM radio mode
1. Make sure the power switch on the control panel (14) is switched on “ON”, the
standby LED light red.
2. Press MODE FUNCTION BUTTON (6) for 2 sec. , the unit will enter FM mode
automatically, the FM mode LED light pink.
3. To improve the radio reception, pull out the FM antenna(11), then gently wiggle the
antenna itself back and forth.You may need to adjust the position of the antenna to
get optimum reception.
4. Turn TUNING KNOB (4) to select your favourite radio stations.
BLUETOOTH mode
1. Make sure the power switch on the control panel (14) is switched on “ON”.
2. Press MODE FUNCTION BUTTON (6) to select BLUETOOTH mode, the Bluetooth
model indicator LED(8) light blue. During the unit searching the bluetooth ,the MODE
FUNCTION LED in blue (8) is blinking.
3. Select from your portable device (Smart phone, Tablet...) the Bluetooth connection
name as “ CROSLEY CR7010A” , then confirm connection. When the bluetooth
connected successfully, the MODE FUNCTION indicator LED in blue (8) will stop
blinking.
4. Now you can transfer the music to the unit CROSLEY CR7010A and all operations
can only be operated from your mobile device.

5. Remark:
1)If the BT enabled audio player has already been paired, it will automatically connect. If
it has not been paired before search for compatible BT devices and select “CROSLEY
CR7010A” from the list of found devices.
2)If two paired BT audio players are in the same room while powering ON the device, it
cannot ‘ choose’ which BT audio player to automatically connect to, and it will not make
any connection.
3)You need to select “CROSLEY CR7010A” from the list of paired devices in the BT
menu of your BT audio player you want to connect to the device.
AUX-IN mode
1. Make sure the power switch on the control panel (14) is switched on “ON”.
2. Press MODE FUNCTION BUTTON (6) to select AUX in mode, the AUX in mode
indicator LED(8) light Orange.
3. Use the AUX in cable to connect the AUX in port(12) and your device .( Laptop,
mobile phone, MP3 players,etc).
4. You can enjoy listening to the music of your connected music player on the device.
5. You can control the tracks with your music player.
SPECIFICATIONS
DC: 10V 1A
FM: 87.5 - 108 MHz
Specifications and the design are subject to possible modifications without notice due to improvement.
STORAGE & TRANSPORTATION
When storing the device, it should first be cleaned in accordance with this user manual. The device should
be stored in its original packaging.
Always store the device in a dry and well-ventilated room and beyond the reach of children.
Protect the device against vibrations and shocks during transport.

WARNINGS
The exclamation point within the triangle is a warning sign alerting the user of important instructions accompanying the product.
The lightening flash with arrowhead symbol within the triangle is a warning sign alerting the
user of “dangerous voltage” inside the unit.
To reduce the risk of electric shock, do not remove the cover. No user serviceable parts
inside the unit. Refer all servicing to qualified personnel.
Ensure all connections are properly made before operating the unit.
This unit must not be exposed to moisture or rain.
This unit should be positioned so that it is properly ventilated. Avoid placing it, for
example, close to curtains, on the carpet or in a built-in installation such as a bookcase.
Do not expose this unit to direct sunlight or heat radiating sources.
CORRECT DISPOSAL OF THIS PRODUCT
(Waste Electrical & Electronic Equipment)
This marking shown on the product or its literature, indicates that it should not be disposed with
other household wastes at the end of its working life. To prevent possible harm to the environment or human health from uncontrolled waste disposal, please separate this from other types of
wastes and recycle it responsibly to promote the sustainable reuse of material resources. Household users should contact the retailer where they purchased this product, or their local government office, for details of where and how they can take this item for environmentally safe recycling. Business users should contact their supplier and check the terms and conditions of the purchase contract. This product should not be mixed with other commercial wastes for disposal.

NOTE: This equipment has been tested and found to comply with the limits for a
Class B digital device, pursuant to part 15 of the FCC Rules. These limits are
designed to provide reasonable protection against harmful interference in a
residential installation. This equipment generates uses and can radiate radio
frequency energy and, if not installed and used in accordance with the instructions,
may cause harmful interference to radio communications. However, there is no
guarantee that interference will not occur in a particular installation. If this
equipment does cause harmful interference to radio or television reception, which
can be determined by turning the equipment off and on, the user is encouraged to
try to correct the interference by one or more of the following measures:
- Reorient or relocate the receiving antenna.
- Increase the separation between the equipment and receiver.
-Connect the equipment into an outlet on a circuit different from that to which the
receiver is connected.
-Consult the dealer or an experienced radio/TV technician for help
Changes or modifications not expressly approved by the party responsible for compliance
could void the user's authority to operate the equipment.
This device complies with Part 15 of the FCC Rules. Operation is subject to the following
two conditions:
(1) this device may not cause harmful interference, and
(2) this device must accept any interference received, including interference that may
cause undesired operation.
This device complies with part 15 of the FCC Rules. Operation is subject to the following two
conditions:
(1) This device may not cause harmful interference, and (2) this device must accept any interference
received, including interference that may cause undesired operation
 Loading...