

Page 1

Operator’s Manual
SUMMER 2011
GRAPPLE
YOU'RE ALWAYS AHEAD...WITH A MODERN BEHIND.
66TRG
66HDG
72HDG
72XTG
78XTG
P.O. BOX 790 - BEAUMONT, TX 77704
409.833.2665 - 1.800.231.8198 FAX: 409.726.8333
www.modernusa.com
Go Galvanized!
Page 2

CHECK LIST
PRE-DELIVERY
Inspect the tiller thoroughly after assembly to be
certain it is set up properly before delivering it to
the customer. It is the purchaser and/or operator’s
responsibility to….
___ Read and understand the information contained
in this manual.
___ Operate, lubricate, assemble and maintain the
equipment in accordance with all instructions
and safety procedures in this manual.
___ Inspect the equipment and replace or repair
any parts that are damaged or worn which un
der continued operation would cause damage,
wear to other parts, or cause a safety hazard.
I have thoroughly instructed the buyer on the above described equipment, the review included the
Operator’s Manual content, equipment care, adjustments and safety information.
Date Dealer’s Rep Signature
___ Return the equipment or parts to the autho
rized Modern dealer, from where it was purchased, for service or replacement of defective
parts that are covered by warranty. (The Modern
Factory may inspect equipment or parts before
warranty claims are honored.)
___ Payment of all costs incurred by the dealer for
-
traveling to or transporting the equipment for
warranty inspection and or claims.
-
The above equipment and Operator’s Manual have been received by me and I have been thoroughly
instructed as to care, adjustments and safe operations.
Date Owner’s Signature
2 - Grapple
Page 3
!
SAFETY SECTION
!
!
The SAFETY ALERT SYMBOL indicates
that there is a potential hazard to personal safety
involved and extra safety precautions must
be taken. When you see this symbol on your
machine or in this manual, be alert and carefully
read the message that follows it.
DANGER: Indicates an imminently hazardous
situation which, if not avoided, will result in death
or serious injury. This signal word is limited to
the most extreme situations.
WARNING: Indicates a potentially hazardous
situation which, if not avoided, could result in
death or serious injury.
CAUTION: Indicates a potentially hazardous
situation which, if not avoided, may result in
minor or moderate injury. It may also be used to
alert against unsafe practices.
WARNING
READ MANUAL PRIOR TO INSTALLATION:
Improper installation, operation, or maintenance
of this equipment could result in serious injury
or death. Operators and maintenance personnel
should read this manual, as well as all manuals
related to this equipment and the prime mover
thoroughly before beginning installation,
operation, or maintenance. FOLLOW ALL SAFETY
INSTRUCTIONS IN THIS MANUAL AND THE
PRIME MOVER’S MANUAL(S).
READ AND UNDERSTAND ALL SAFETY
STATEMENTS: Read all safety decals
and safety statements in all manuals prior to
operating or working on this equipment. Know
and obey all OSHA regulations, local laws, and
other professional guidelines for your operation.
Know and follow good work practices when
assembling, maintaining, repairing, mounting,
removing, or operating this equipment.
KNOW YOUR EQUIPMENT: Know
your equipment’s capabilities, dimensions, and
operations before operating. Visually inspect
your equipment before you start, and never
operate equipment that is not in proper working
order with all safety devices intact. Check all
hardware to ensure it is tight. Make certain that
all locking pins, latches, and connection devices
are properly installed and secured. Remove and
replace any damaged, fatigued, or excessively
worn parts. Make certain all safety decals are
in place and are legible. Keep decals clean, and
replace them if they become worn or hard to
read.
WARNING
PROTECT AGAINST FLYING DEBRIS: Always
wear proper safety glasses, goggles, or a face
shield when driving pins in or out, or when any
operation causes dust, ying debris, or any other
hazardous material.
WARNING
LOWER OR SUPPORT RAISED EQUIPMENT:
Do not work under raised booms without
supporting them. Do not use support material
made of concrete blocks, logs, buckets, barrels,
or any other material that could suddenly
collapse or shift positions. Make sure support
material is solid, not decayed, warped, twisted,
or tapered. Lower booms to ground level or on
blocks. Lower booms and attachments to the
ground before leaving the cab or operator’s
station.
WARNING
DO NOT MODIFY MACHINE OR
ATTACHMENTS: Modications may weaken
the integrity of the attachment and may impair
the function, safety, life, and performance of
the attachment. When making repairs, use only
the manufacturer’s genuine parts, following
authorized instructions. Other parts may be
substandard in t and quality. Never modify any
Grapple - 3
Page 4
SAFETY SECTION
ROPS (Roll Over Protection Structure) or FOPS
(Falling Object Protective Structure) equipment
or device. Any must be authorized in writing by
the manufacturer.
WARNING
USE CARE WITH HYDRAULIC FLUID
PRESSURE: Hydraulic uid under pressure can
penetrate the skin and cause serious injury or
death. Hydraulic leaks under pressure may not
be visible. Before connecting or disconnecting
hydraulic hoses, read your prime mover’s
operator’s manual for detailed instructions on
connecting and disconnecting hydraulic hoses
or ttings.
- Keep unprotected body parts, such as face,
eyes, and arms as far away as possible from a
suspected leak. Flesh injected with hydraulic
uid may develop gangrene or other
permanent disabilities.
- Openings in the skin and minor cuts are
susceptible to infection from hydraulic uid.
- If injured by injected uid, see a doctor
at once. If your doctor is not familiar with
this type of injury, ask him to research it
immediately to determine proper treatment.
Without immediate medical treatment,
serious infection and reactions can occur.
- Wear safety glasses, protective clothing,
and use a piece of cardboard or wood when
searching or hydraulic leaks.
DO NOT USE YOUR HANDS!
WARNING
SAFELY MAINTAIN AND REPAIR
EQUIPMENT:
- Do not wear loose clothing or any accessories
that can catch in moving parts. If you have
long hair, cover or secure it so that it does not
become entangled in the equipment.
- Work on a level surface in a well-lit area.
- Use properly grounded electrical outlets and
tools.
- Use the correct tools for the job at hand.
Make sure they are in good condition for the
task required.
- Wear the protective equipment specied by
the tool manufacturer.
WARNING
SAFELY OPERATE EQUIPMENT: Do not
operate equipment until you are completely
trained by a qualied operator in how to use
the controls, know its capabilities, dimensions,
and all safety requirements. See your machine’s
manual for these instructions.
- Operate only from the operator’s station.
Always use the seat belt if the prime mover
has a ROPS. Do not use a seat belt if there
is not ROPS. Check the seat belt daily and
replace if frayed or damaged.
- Specied lift capacities must not be exceeded.
See loader specications.
- An operator must not use drugs or alcohol,
which can change their alertness or
coordination. An operator taking prescription
or over-the-counter drugs should seek
medical advice on whether or not they can
safely operate equipment.
- Never use any of these attachments for a work
platform or personnel carrier.
- Always check locking pins before tilting or
operating any attachment.
- Keep all step plates, grab bars, pedals, and
controls free of dirt, grease, debris, and oil.
- Never allow anyone to be around the
equipment when it is operating.
- Do not allow riders on the attachment or the
prime mover.
- Do not operate the equipment from anywhere
other than the correct operator’s position.
- Never leave equipment unattended with the
prime mover’s engine running, or with this
attachment in a raised position.
- Do not handle round bales unless loader
is equipped with approved bale handling
attachments.
4 - Grapple
Page 5

SAFETY SECTION
!
!
- Do not detach loader from tractor with any of
these attachments installed. Equip loader with
material bucket when detaching.
- Stop loader gradually when lowering or lifting
loads.
- Before exiting the prime mover, lower the
attachment to the ground, apply the brakes, turn
off the prime mover’s engine, and remove the
key.
- Do not alter or remove any safety feature from the
prime mover or this attachment.
- Know your work site safety rules as well as trafc
rules and ow. When in doubt on any safety issue,
contact your supervisor or safety coordinator for
an explanation.
- A heavy load can cause instability of the
prime mover. Use extreme care during
travel. Slow down on turns and watch out
for bumps. The prime mover may need addi
tional counter-weights to counter-balance the
weight of the attachment.
- Do not heap load heavy material where the
combined weight of the bucket and the material
could exceed the rated lifting capacity of the
loader.
- Be sure the load does not stick out too far in front
of the bucket. A light load sticking out too far
can have the same tipping effect as a heavy load
carried in close.
- Do not exceed the lift capacity of your loader. See
loader specications.
- Make sure all loads are secure before lifting. If
lifting with the grapple and the load appears to
be unstable, lower the load, open the grapple and
reposition the load to attain full stability.
KNOW WHERE UTILITIES ARE:
Observe overhead electrical and other utility lines.
Be sure equipment will clear them. When digging,
call your local utilities for location of buried utility
lines, gas, water, and sewer, as well as any other
hazard you may encounter. Beware of low electrical
wires when loader is raised. Serious injury or death
can result if contact is made.
WARNING
TRANSPORTING ALL ATTACHMENTS:
- Travel only with the attachment as close to the
ground as possible. Drive slowly over rough
ground and on slopes.
- When driving on public roads use safety lights,
reectors, Slow Moving Vehicle signs etc., to
prevent accidents. Check local government
regulations that may affect you.
- Do not drive close to ditches, excavations, etc.,
cave in could result.
- When on a slope, keep the load low and proceed
with extreme caution. Do not drive ACROSS a
steep slope - drive straight up and down. With
a LOADED attachment face the attachment and
load uphill. With an EMPTY attachment - face the
attachment downhill.
- Avoid sudden starts and stops while traveling up
or downhill. Avoid parking on a slope. Slow down
on sharp turns and slopes to prevent tipping and/
or loss of control. Avoid slopes when surface is wet,
slippery grass or soil. Be careful when changing
directions on slopes.
- Use extra care when loading or unloading unit onto
trailer or truck. NEVER secure rods or linkages on
unit that could be damaged when transporting.
- Do not smoke when refueling. Allow room in the
gas tank for expansion. Wipe up any spilled fuel.
Secure cap tightly when done.
MAINTAINING ALL ATTACHMENTS
- Before working on this machine, drive to a level
area, relieve hydraulic pressure, lower implement
(or if working underneath, raise and block securely),
shut off the engine, set the brakes, and remove
the ignition keys. Relieve hydraulic pressure prior
to doing any maintenance.
- Never work under equipment unless it is blocked
securely. Never depend on hydraulic system to
keep implement in raised position.
- Keep all persons away from operator control
area while performing adjustments, service, or
maintenance.
Grapple - 5
Page 6

SAFETY SECTION
!
!
MAINTAINING ALL ATTACHMENTS
continued:
- Worn, damaged, or illegible safety decals must be
replaced. New safety decals can be ordered from
your dealer or from the manufacturer.
STORAGE SAFETY
- Store the unit in an area away from human activity.
Do not permit children to play on or around the
stored unit.
- Make sure all parked machines are on a hard, level
surface and engage all safety devices. Storage
location should be level and solid to make
connecting and un-connecting to prime mover
easy.
- If blocking is used, make sure it is solid and secure
before leaving area.
MOST ACCIDENTS OCCUR BECAUSE OF NEGLECT OR
CARELESSNESS. AVOID NEEDLESS ACCIDENTS BY FOLLOWING
ALL OF THE SAFETY PRECAUTIONS LISTED BELOW.
GENERAL SAFETY PRECAUTIONS
- Machinery should be operated only by those who
are responsible and are authorized to do so.
- Stop the engine, lower all equipment, lock the
brakes, and remove the ignition key before
dismounting from the skid steer or tractor.
- Never stand between skid steer and attachment
while power unit is being connected to the
attachment.
- Loose tting clothing should not be worn, to avoid
catching on various parts.
- Detach attachment in area where children normally
do not play.
- When performing adjustments or maintenance
on an attachment, rst lower it to the ground or
block it securely at a workable height.
- Only a qualied operator should be permitted on
power unit when in operation; no riders allowed.
- Make certain everyone is in the clear before starting
power unit or raising or lowering equipment.
- Operate the power unit and attachment only while
seated in the driver’s seat.
- Reduce speed when transporting mounted
attachments to avoid bouncing and momentary
loss of steering control.
- A heavy load can cause instability of the power
unit. Use extreme care during road travel. Slow
down on turns and watch out for bumps. Power
unit may need counterweights to counter-balance
the weight of the attachment.
- Reduce speed on hillsides or curves so there is no
danger of tipping.
- Avoid driving too close to the edge of ditches or
drop-offs.
- Do not transport implement on public roads
without reectors and slow moving vehicle
emblem in daylight and with approved warning
lights at night and other periods of poor visibility.
- Keep work area clear of all debris. Never assume
an area is clear. ALWAYS CHECK.
- Check to make certain there are no buried utilities
in the work area before starting work.
- Keep alert and watch the front as well as the rear
when working with the attachment.
6 - Grapple
Page 7

This page intentionally left blank.
Grapple - 7
Page 8
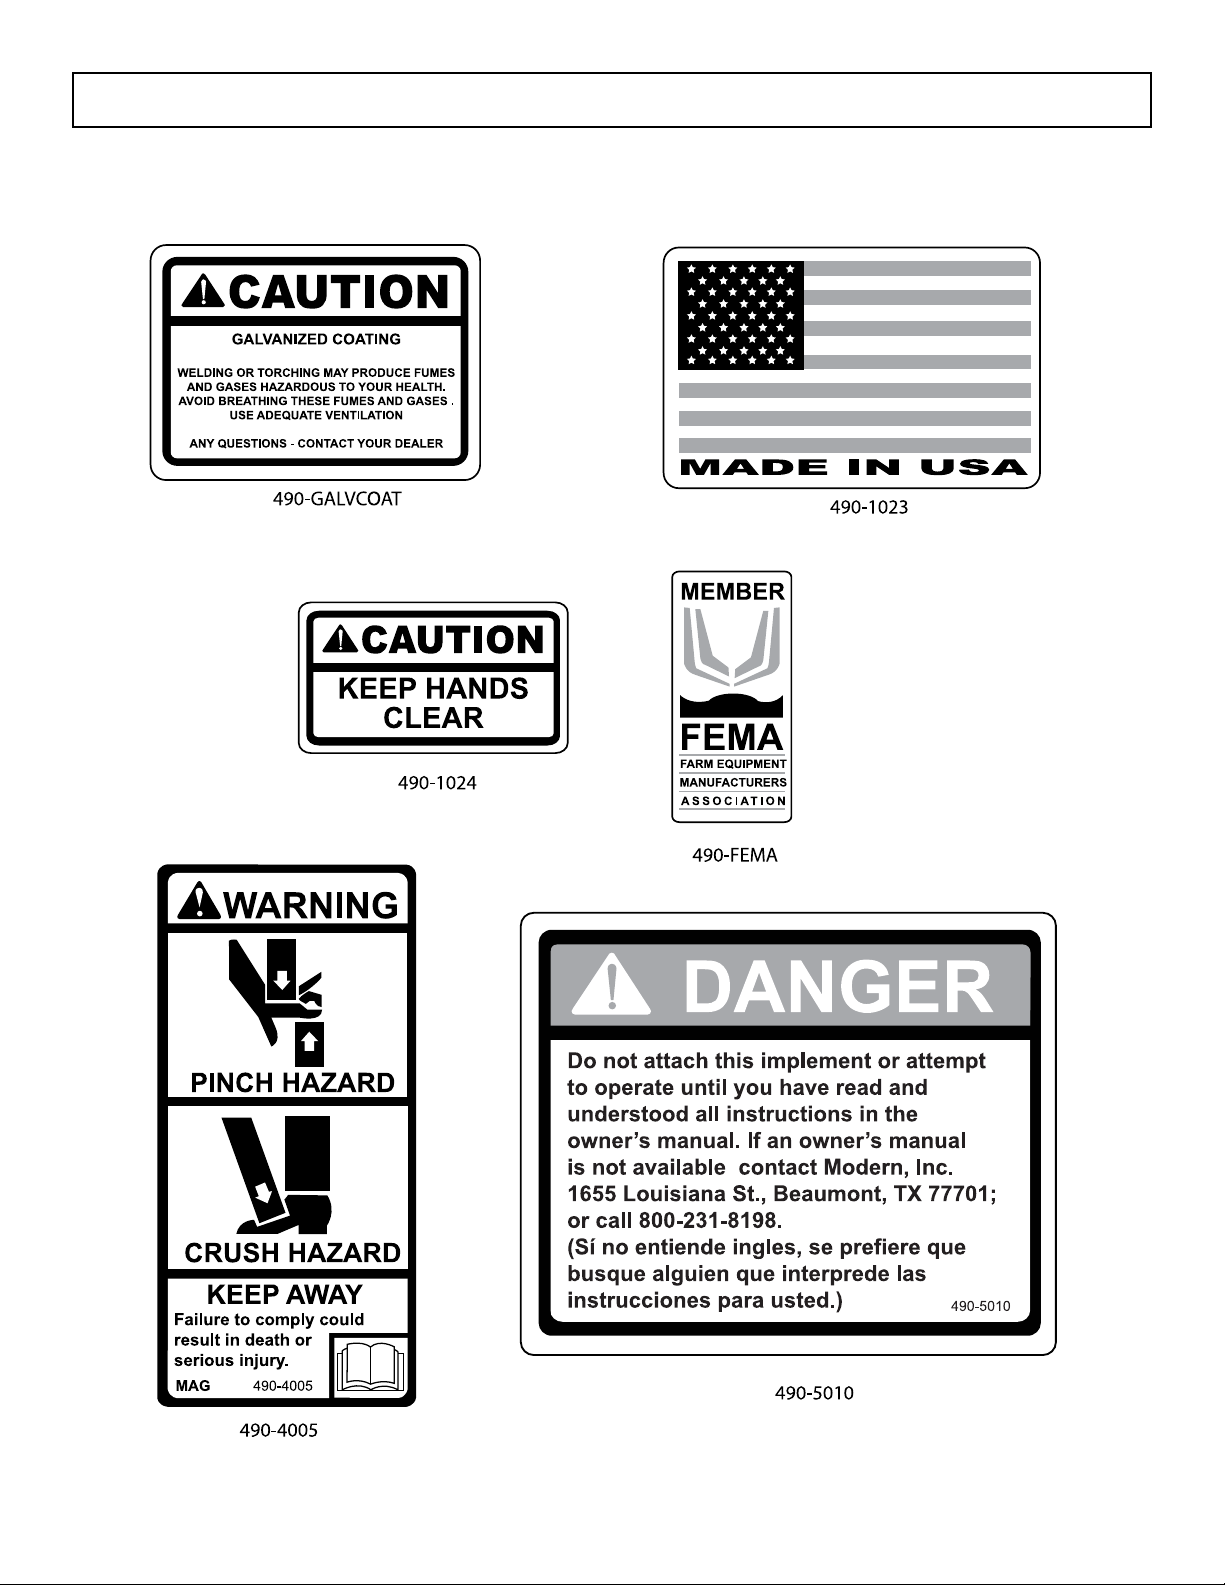
SAFETY DECALS
8 - Grapple
Page 9
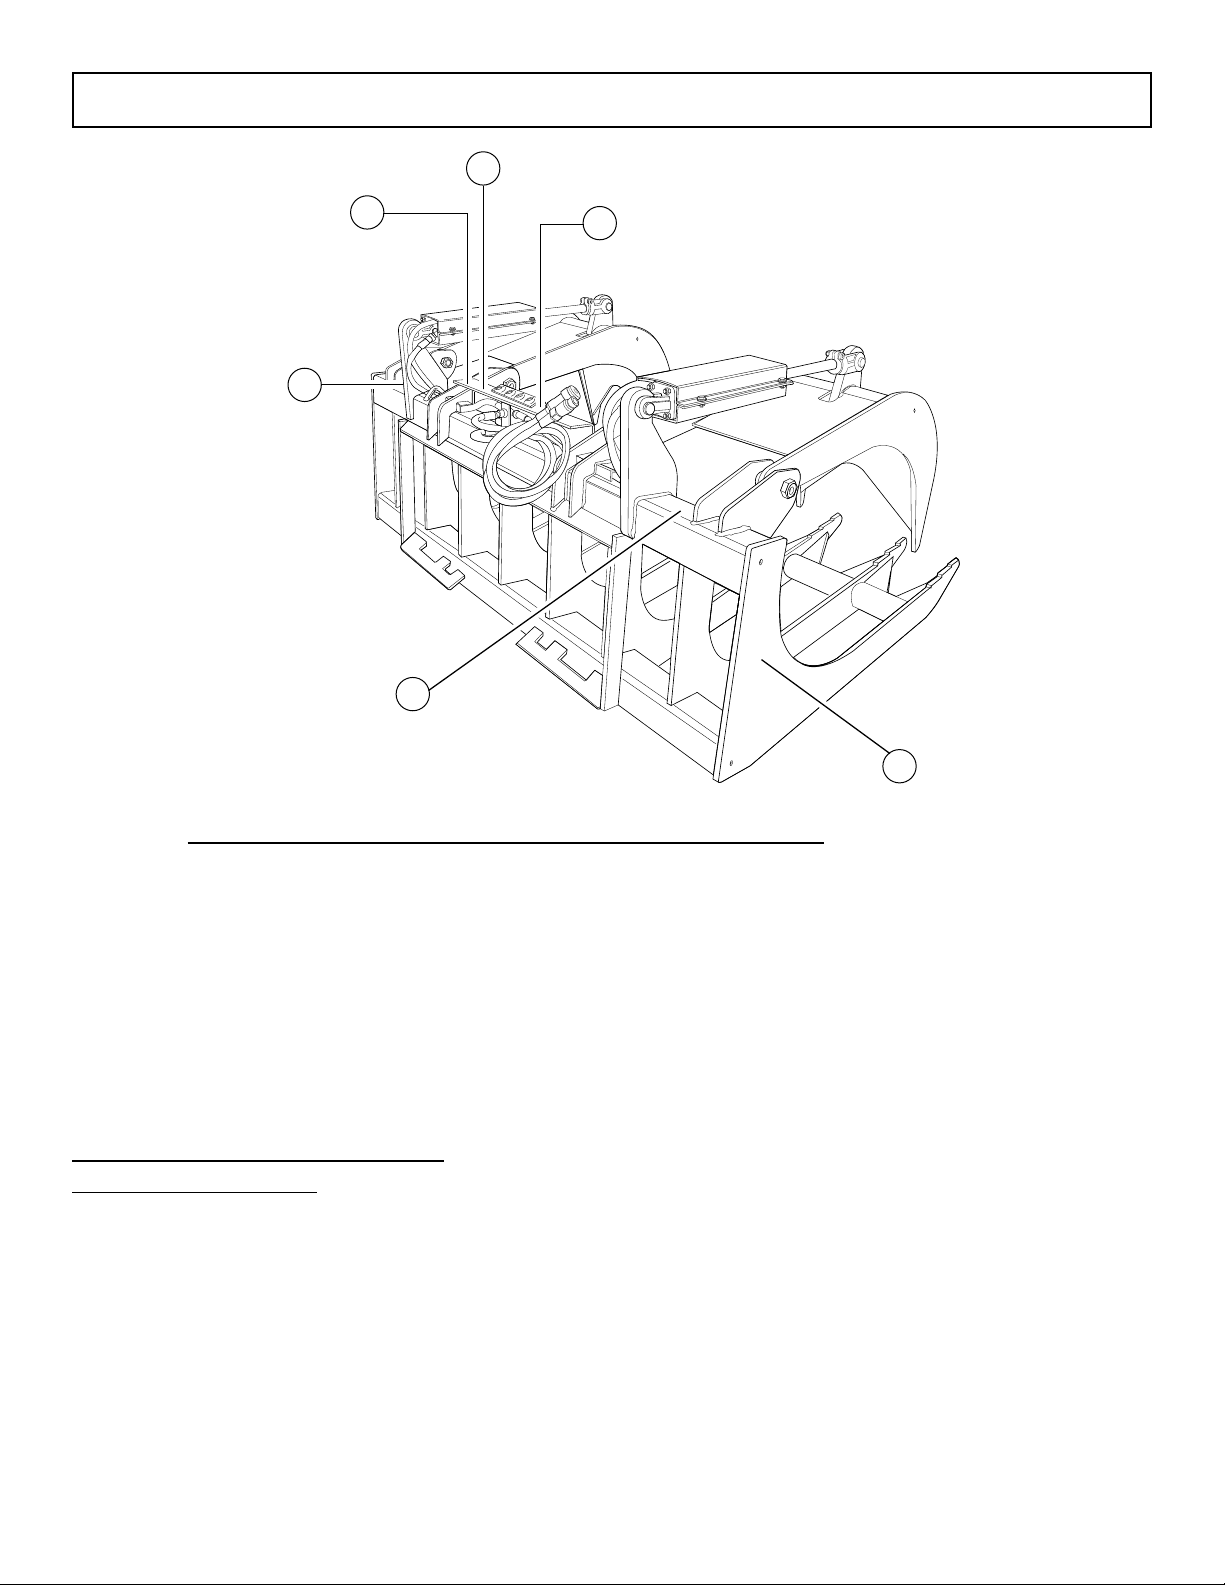
SAFETY DECAL LOCATIONS
2
1
4
5
3
6
ITEM PART NO. DESCRIPTION
1 ......................490-1023 ..............Made in USA decal
2 ......................490-FEMA .............FEMA decal
3 ......................490-1024 ..............CAUTION: Keep Hands Clear decal
4 ......................490-GALVCOAT ........CAUTION: Galvanized Coating Decal
5 ...................... 490-5010 .............DANGER: Understand instructions decal
6 ......................490-4080 ..............78” Extreme Duty Grapple side decal
. . . . . . . . . . . . . . . . . . . . . . . . 490-4078 ..............72” Extreme Duty Grapple side decal
SAFETY SIGN IDENTIFICATION
AND REPLACEMENT
The safety signs are identied by their part numbers
with reductions of the actual safety signs located on
the page. Use this information to order replacements
for missing, illegible or damaged safety signs.
When replacing parts with safety signs attached,
the safety sign must also be replaced. All Safety
Signs are free of charge. Contact your local dealer
or manufacturer for replacements.
Replacing Safety Signs
1. Clean the area of application with nonammable
solvent. 2. Wash the same area with soap and water.
3. Allow the surface to fully dry. 4. Remove the backing
from the safety sign exposing the adhesive surface.
5. Apply the safety sign to the location shown in the
parts diagram. 6. Smooth out any bubbles.
Helpful Hints: (1) Decals adhere to a warm surface
better than a cold surface. (2) Applying heat (from a
hair
dryer) will greatly improve your ability to remove
a damaged decal before preparing the surface for
installation of a new one.
Grapple - 9
Page 10
ASSEMBLY SECTION
INSTRUCTIONS
TINE OR SCRAP GRAPPLE BUCKET INSTALLATION
Attachment to Prime Mover - (continued)
9. Re-enter the primer mover. Fasten seatbelt and re-start engine.
10.Carefully raise the loader and cycle the rollback/tilt cylinders to check clearances and to ensure that the attachment
is securely mounted.
11.Cycle the grapple clamp hydraulic cylinders several times full stroke to work the air out of the cylinders.
NOTICE: When shipped, the hydraulic cylinder(s) on this product contained air. Failure to remove all the air
from the hydraulic cylinder(s) can cause uneven, jerky cylinder movement when the hydraulic con-
trols are operated and possibly allow unwanted cylinder movement when those controls are not
being operated.
REMOVING THE TINE OR SCRAP GRAPPLE BUCKET
INSTRUCTIONS
TINE OR SCRAP GRAPPLE BUCKET INSTALLATION
Attachment to Prime Mover
3. Enter the prime mover. Fasten seatbelt, start engine. Disengage the parking brake.
4. Follow the attaching procedure in the prime mover owner's manual. Align the attachment mechanism with the
mounting on the grapple bucket, attach to the prime mover or loader.
5. Engage the parking brake and shut down the prime mover. Be sure to relieve pressure to the auxiliary hydraulic
lines.
6. Unfasten safety restraints and exit the prime mover.
7.
Make sure the hydraulic couplers are clean. Connect the hydraulic lines to the prime mover. Twist the collar of the quick
couplers one-quarter turn to secure hydraulic connections. If attachment unit is being installed on a tractor loader,
purchase proper couplers and hoses as required and attach to the loader as per the manufacturers instructions.
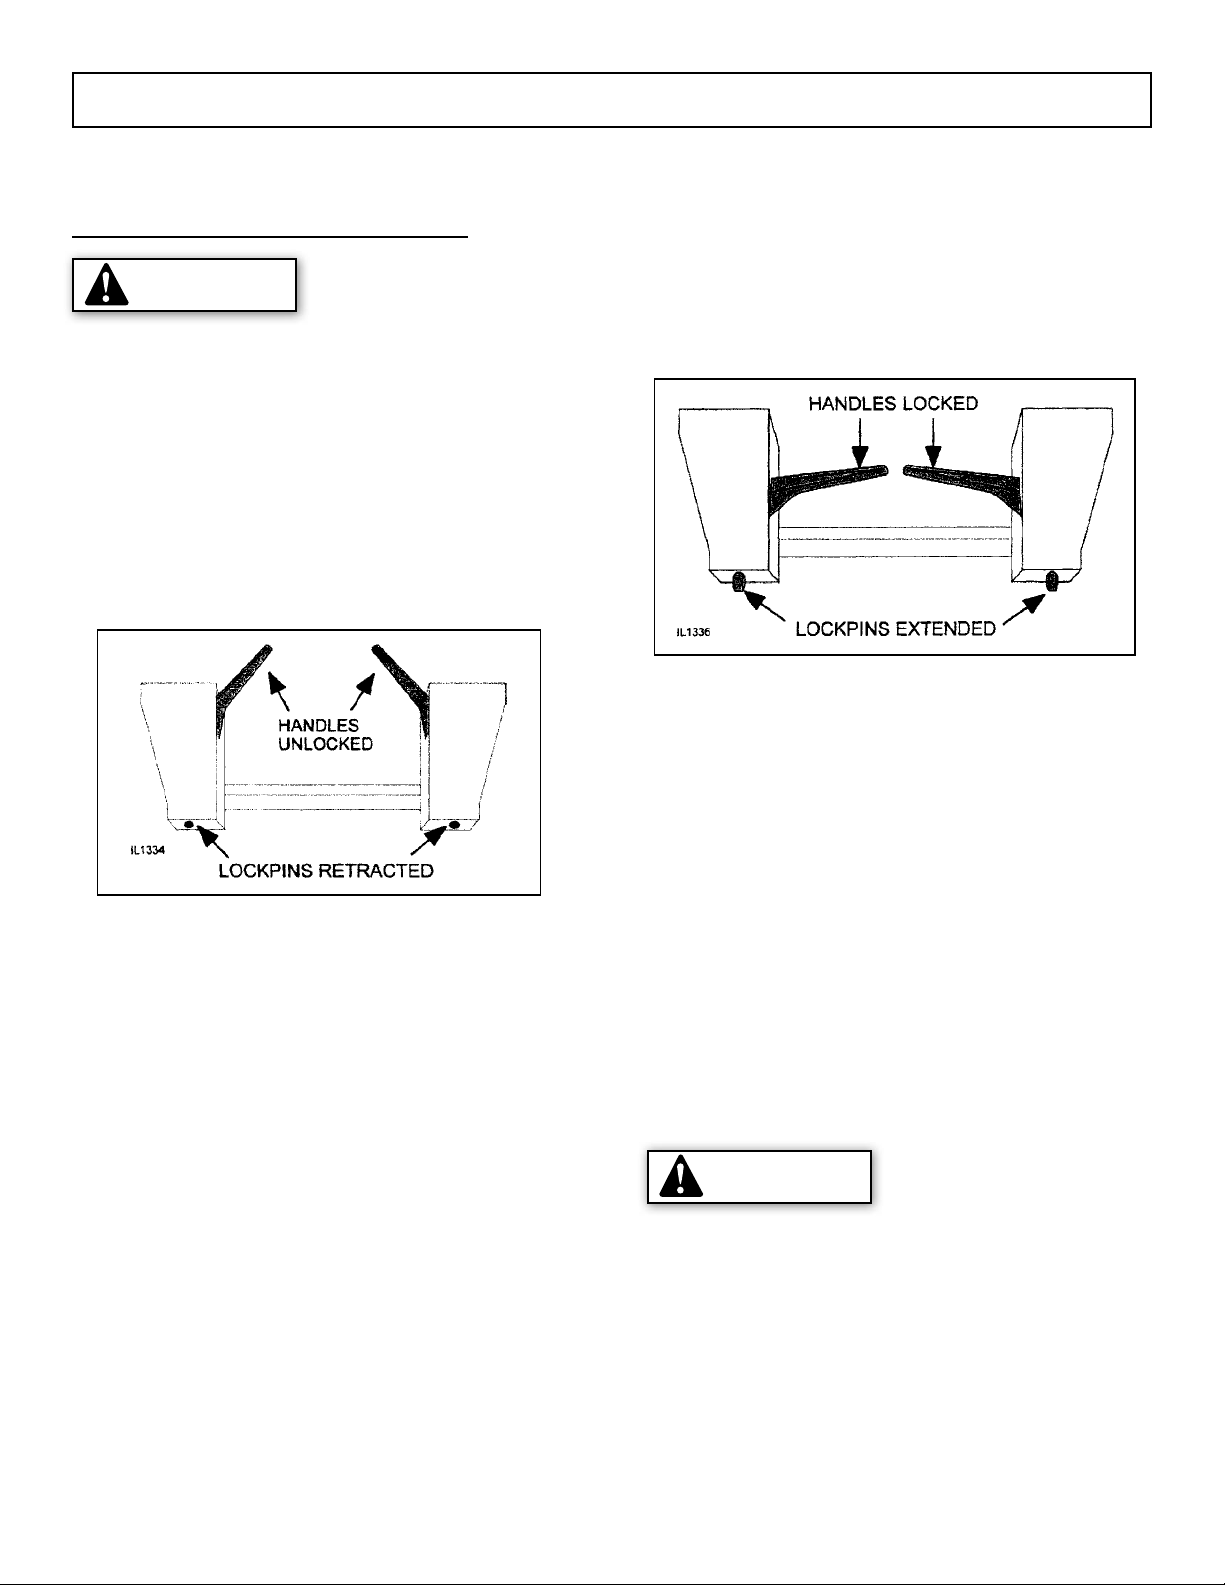
8. Engage the latching mechanism to secure attachment to loader. The lockpins must be completely extended and
secured into the retaining slots provided on the attachment. Figure 3.
1. Position the attachment on a level surface.
2. The quick attach coupler handles should be in the unlocked position with lock pins retracted, Figure 2.
Figure 2. Quick Attach Coupler Handles - Unlocked
Improper attachment of the Tine or Scrap Grapple Bucket could result in injury or death. Do
not operate this product until you have positive indication that the attachment is securely
mounted.
WARNING!
Attachment coupler handles must always be
rotated to LOCK POSITION to prevent coupler
latch from disengaging and attachment from
falling off.
WARNING!
ATTACHMENT TO PRIME MOVER
WARNING
Improper attachment of the Tine or Scrap Grapple
Bucket could result in injury or death. Do not operate
this product until you have positive indication that
the attachment is securely mounted.
1. Position the attachment on a level surface.
2. The quick attach coupler handles should be in
the unlocked position with lock pins retracted,
Figure 2.
8. Engage the latching mechanism to secure
attachment to loader. The lockpins must be
completely extended and secured into the retaining
slots provided on the attachment. Figure 3.
Figure 3. Attachment Coupler Handles - Locked
9. Re-enter the primer mover. Fasten seat belt and
re-start engine.
10. Carefully raise the loader and cycle the rollback/
tilt cylinders to check clearances and to ensure
that the attachment is securely mounted.
11. Cycle the grapple clamp hydraulic cylinders
Figure 2. Quick Attach Coupler Handles - Unlocked
3. Enter the prime mover. Fasten seat belt, start
engine. Disengage the parking brake.
4. Follow the attaching procedure in the prime mover
owner’s manual. Align the attachment mechanism
with the mounting on the grapple bucket, attach
to the prime mover or loader.
5 . Engage the parking brake and shut down the
prime mover. Be sure to relieve pressure to the
auxiliary hydraulic lines.
6. Unfasten safety restraints and exit the prime
mover.
7. Make sure the hydraulic couplers are clean. Connect
the hydraulic lines to the prime mover. Twist the
collar of the quick couplers one-quarter turn to
secure hydraulic connections. If attachment unit is
being installed on a tractor loader, purchase proper
couplers and hoses as required and attach to the
loader as per the manufacturers instructions.
several times full stroke to work the air out of the
cylinders.
NOTE: When shipped, the hydraulic cylinder(s) on this
product contained air. Failure to remove all the air from
the hydraulic cylinder(s) can cause uneven, jerky cylinder
movement when the hydraulic controls are operated
and possibly allow unwanted cylinder movement when
those controls are not being operated.
WARNING
Attachment coupler handles must always be rotated
to LOCK POSITION to prevent coupler latch from
disengaging and attachment from falling off.
10 - Grapple
Page 11
ASSEMBLY SECTION
REMOVING THE TINE OR
SCRAP GRAPPLE BUCKET
WARNING
Serious injury or death may result from disengaging
the attachment when the attachment is in an unstable
position or carrying a load. Place the attachment in a
stable position before disengaging.
CAUTION
Hoses for the attachment must be disconnected before
the quick attach is disengaged. Pulling the attachment
with the hoses could result in damage to the prime
mover or the attachment.
1. If possible, nd a level solid location to place the
attachment. This makes it easier to disconnect and to
re-connect later on.
2. Lower the attachment to the ground.
3. Engage the parking brake and shut down the prime
mover. Be sure to relieve pressure to the auxiliary
hydraulic lines.
4. Unfasten safety restraints and exit prime mover.
5. Disconnect the attachment hydraulic lines from the
prime mover. Connect quick couplers together to
keep clean.
6. Disengage attachment-locking mechanism
(mechanical type).
7. Enter prime mover, fasten safety restraints and start
the prime mover.
8. Disengage attachment-locking mechanism
(hydraulic type).
9. Disengage the parking brake, and back away from
the attachment.
Grapple - 11
Page 12
OPERATING SECTION
The operator is responsible for the safe operation of
this equipment. The operator must be properly trained.
Operators should be familiar with the attachment,
prime mover and all safety practices before starting
operation. Make sure all operators have read the
Owner’s/Operator Manual and are familiar with the
instructions and the safety rules of operation.
All reference to left, right, front, or rear are given from
the operator’s position, facing the direction of forward
travel.
NOTE: Watch for and avoid hidden obstructions, i.e., buried
pipes, rocks, concrete piers, or uneven slabs of concrete,
when operating, or attachment damage may occur. Stop
prime mover and implement immediately upon striking
an obstruction. Turn off engine, remove key, inspect, and
repair any damage before resuming operation.
The tine and scrap grapple buckets are designed to
pick up bulky, unusually shaped, or long materials that
would not stay in an ordinary bucket.
1. Approach the load so that the weight will be centered
on the bottom of the bucket. The heaviest side should
be closest to the back of the bucket and not near the
bucket edge.
2. Before lifting, make certain the bucket is completely
under the load and the bucket bottom is level or tilted
back slightly.
3. Close the grapples as much as possible and lift the
bucket slightly to be certain that the load is secure.
• Never heap load heavy material where the combined
weight of the attachment and material could exceed
the rated lifting capacity of the loader.
• Operate the attachment only when properly seated at
the operator’s station.
• Do not exceed the lift capacity of your loader. See
loader specications.
• Do not handle round bales.
• Be sure the load does not stick out too far in front of
the bucket. A light load sticking out too far can have
the same unbalanced or tipping effect as a heavy load
carried in close.
• When using the grapple, lift the load slightly and
make sure that the load is secure. If the load appears
to be unstable, lower the load, open the grapple and
reposition the load to attain full stability.
• Reduce speed when driving over rough terrain, on a
slope, or turning, to avoid overturning the vehicle.
• Avoid side slope travel whenever possible. Drive up
the slope to pick up a load and then down in reverse.
Carry loads as close to the ground as possible.
• Before exiting the prime mover, lower the bucket to
the ground, turn off the prime mover’s engine, remove
the key and apply the brakes.
• Do not detach loader from tractor with this attachment
installed. Equip loader with materials bucket when
detaching.
WARNING
NOTE: If the load appears to be unstable, lower the bucket
to the ground, open the grapple clamps and reposition the
load to attain full stability. Repeat until complete stability
is achieved.
When using the grapples as a rake to drag materials
into position for pick up, THE GRAPPLE CLAMPS
MUST BE COMPLETELY OPEN.
NOTICE: Applying a raking-type force to partially open
grapple clamps will greatly magnify the uid pressure
in the hydraulic hoses, ttings, and cylinders and may
cause component failure.
12 - Grapple
DURING USE
Avoid serious injury.
• THE GRAPPLE MOVES QUICKLY! Do not allow anyone
near the grapples.
• Never get between the grapple and the bucket.
• Do not lift any load that is taller than the height of the
fully opened grapple.
• Do not roll back this product so far that the load falls
off toward or on the operator.
• When stacking debris or loading vehicles, make sure
you are operating in an area AWAY FROM OVERHEAD
WIRES.
• Avoid holes, ditches, and obstructions which may
cause prime mover to tip.
Page 13
OPERATING SECTION
• Never allow anyone to walk or work under a raised
loader.
• Operate the loader hydraulic controls smoothly,
avoiding jerky operation.
• Stop loader gradually when lowering or lifting loads.
• Be sure that people, livestock, or pets are not standing
near the machine while operating.
• Do not lift or carry anyone on loader or in bucket or
attachment.
WARNING
TRANSPORTING THE LOAD
Avoid serious injury.
• Raise the load to the minimum height required for the
terrain that must be crossed with the load.
• Operate the prime mover so that the load always
remains level.
• Accelerate, turn, and brake gradually.
• Avoid any obstacles, bumps, or holes in your intended
path.
• Frequently check the load to make sure that the load
has not become unstable.
STORAGE
• Storage location should be level and solid to make
connecting and disconnecting easy.
• Always store in a clean, dry location away from
children and livestock.
• Leaving the unit outside will materially shorten its
life.
• Clean the unit thoroughly, removing all mud, dirt and
grease.
• Inspect for visible signs of wear, breakage, or damage.
Order any parts required, and make the necessary
repairs to avoid delays when starting the next job.
• Tighten loose nuts, capscrews, and hydraulic
connections.
• Cap hydraulic couplers to protect against
contaminates.
• Touch up all unpainted surfaces with paint, to prevent
rust.
• Coat the exposed portions of the cylinder rod with
grease.
• Grease the unit.
Grapple - 13
Page 14
MAINTENANCE SECTION
WARNING
NEVER GO UNDERNEATH EQUIPMENT. Never
place any part of the body underneath equipment or
between moveable parts even when the engine has
been turned off. Hydraulic system leak down, hydraulic
system failures, mechanical failures, or movement of
control levers can cause equipment to drop or rotate
unexpectedly and cause severe injury or death.
Read Manual for service instructions or have service
performed by a qualied dealer.
WARNING
Keep all persons away from operator control area while
performing adjustments, service, or maintenance.
Before dismounting power unit or performing any
service or maintenance, follow these steps: disengage
power to equipment, lower all raised components to
the ground, operate valve levers to release any hydraulic
pressure, set parking brake, stop engine, remove
key, and unfasten seat belt. Never leave equipment
unattended with engine running.
General Information
Your attachment was designed to be almost
maintenance free. Little effort is needed to keep it in
top condition. It is, however, important to follow these
procedures to get full performance and longevity out of
the equipment. IMPORTANT: When replacing parts, use
only factory approved replacement parts. Manufacturer
will not claim responsibility for use of unapproved parts
or accessories and/or other damages as a result of their
use.
We recommend greasing these ttings both before and
after the initial eight (8) hours of use and then every
(40) hours of use thereafter.
Thoroughly clean the grease zerks before servicing.
Dirt mixed with lubricant will rapidly wear parts. Keep
it clean.
WARNING
DAILY OR EVERY 8 HOURS OF OPERATION
Replace any missing bolts or nuts with approved
replacement parts. Check hydraulic system for
leaks. See procedure below. Visually inspect the
machine for worn parts or cracked welds. Repair
as necessary.
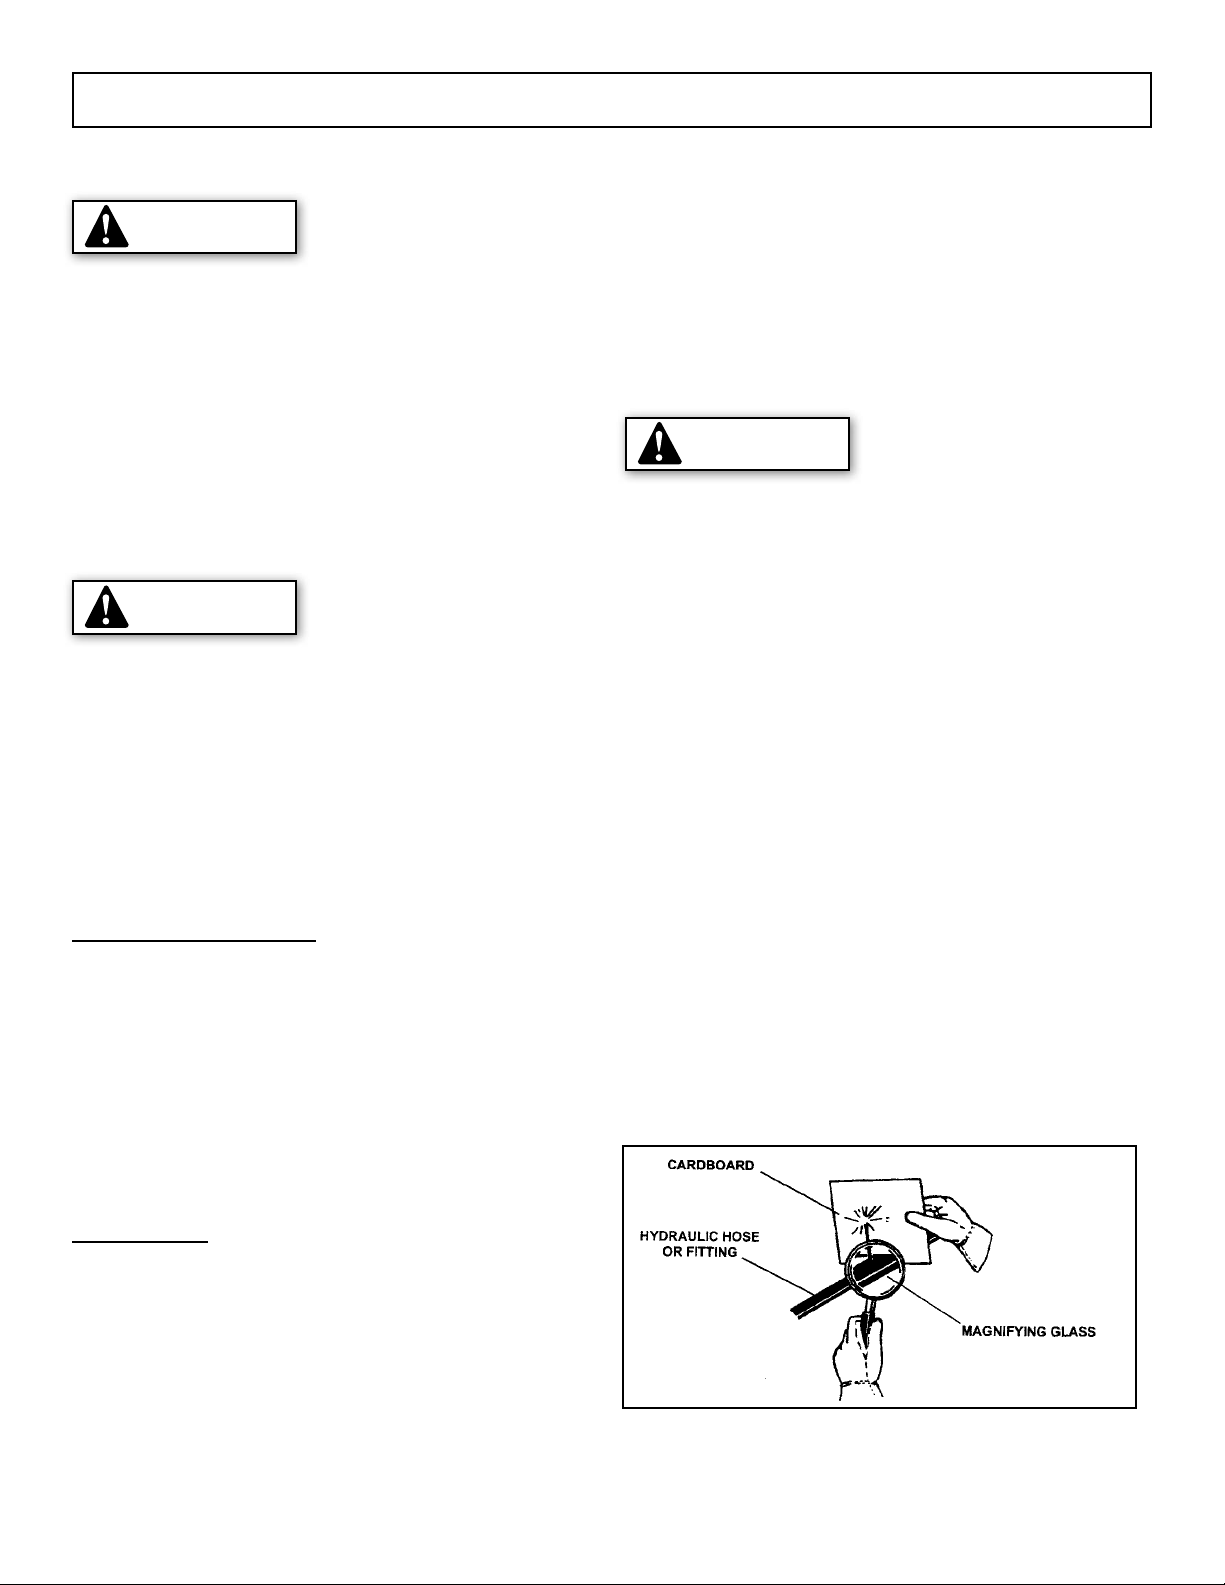
Escaping uid under pressure can have sufcient
force to penetrate the skin, causing serious personal
injury. Fluid escaping from a very small hole can be
almost invisible. Use a piece of cardboard or wood,
rather than hands to search for suspected leaks.
Keep unprotected body parts, such as face, eyes,
and arms as far away as possible from a suspected
leak. Flesh injected with hydraulic uid may develop
gangrene or other permanent disabilities.
If injured by injected uid, see a doctor at once.
If your doctor is not familiar with this type of
injury, ask him or her to research it immediately to
determine proper treatment.
Lubrication
The lubrication your Grapple Bucket will need is the
greasing of the grapple clamp pivot tube. Two grease
ttings have been installed in each clamp pivot tube to
facilitate this task.
14 - Grapple
Page 15

MAINTENANCE SECTION
WARNING
DO NOT MODIFY MACHINE OR ATTACHMENTS
Modications may weaken the integrity of the and
may impair the function, safety, life, and performance
of the attachment. When making repairs, use only the
manufacturer’s genuine parts, following authorized
instructions. Other parts may be substandard in t and
quality. Never modify any ROPS (Roll Over Protection
Structure) or FOPS (Falling Object Protective Structure)
equipment or device. Any modications must be
authorized in writing by the manufacturer.
INSTALLATION OR REPLACING OPTIONAL
CUTTING EDGE ON SCRAP GRAPPLE BUCKET
The Scrap Grapple Bucket can be equipped with an
optional reversible 3/4” X 8” cutting edge. See parts
list for length and part number for your model.
1. Raise the Scrap Grapple Bucket about 10” - 12”.
2. Place a 6” X 6” block under both ends of the bucket
about 10” behind the welded leading edge of the
bucket. Then lower the bucket so it rests securely
on the blocks.
3. Place two smaller blocks under the cutting edge so
when the cutting edge is loose from the bucket it
doesn’t fall on the ground. (These blocks will also
support the cutting edge when bolting it back on
the bucket).
NOTE: Do not block the machine any higher than necessary
to remove or install the cutting edge.
4. Remove the 3/4” hex nuts and plow bolts that secure
the cutting edge to the bucket. Turn the cutting
edge end for end and use the new edge or replace
it if both edges have been used.
5. Attach the cutting edge to the scrap bucket and
secure with the plow bolts and hex nuts previously
removed.
NOTE: If the plow bolts or hex nuts are worn, replace with
new ones.
6. Torque the hex nuts to specications given in bolt
torque chart, located in the back.
Grapple - 15
Page 16
Page 17
Page 18
Page 19
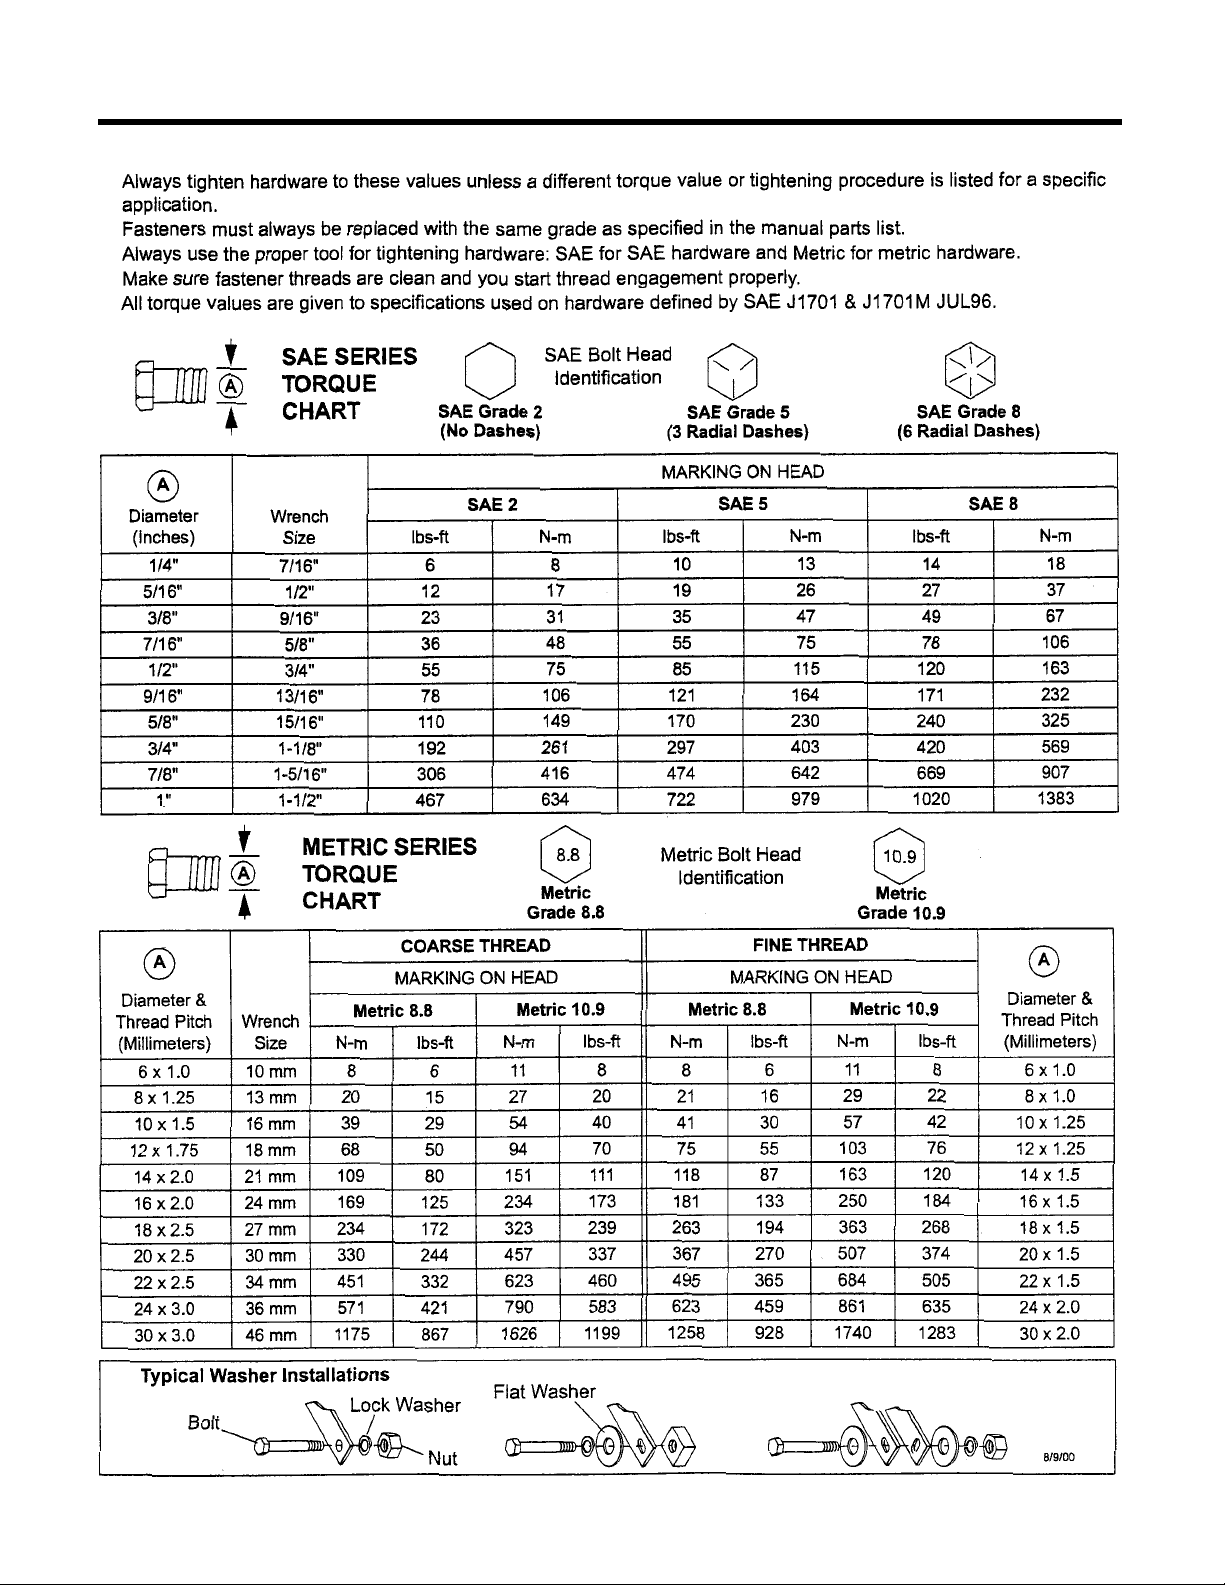
BOLT TORQUE CHART
Grapple - 19
Page 20

LIMITED WARRANTY POLICY & REGISTRATION
Modern, Inc. warrants its products for a period of one year after date of sale by authorized dealer to be free from defects in material and workmanship, and will replace at its factory, any parts that will be returned, with shipping charges prepaid, and when examined by us, will disclose it to
be defective. This warranty will not apply to implements or parts that have been subjected to misuse, negligence, accident, or that have been
altered or repaired.
1. Parts may not be returned without authorization by ModernAg Products.
2. All products returned under warranty inspection claim must be returned PREPAID to our factory.
3. Our obligation under the above warranty is limited to repair or replacement at our factory of any part or parts which Modern, Inc. decides to be
defective.
4. Products or parts that have been examined by Modern, Inc. and determined to be improperly operated, damaged by accident or negligence,
field repaired or altered, are not covered by this warranty.
5. Modern, Inc. reserves the right to change our specification and designs at any time.
6. This warranty will not obligate Modern, Inc. to bear any cost of labor for field replacement, testing, or adjustment.
DEALER: I hereby certify that:
1. The machine has been correctly assembled in accordance with
manufacturers instructions.
2. All bolts have been checked and tightened.
3. All other pre-delivery checks have been completed as per
operators manual.
4. Purchaser was given operators manual and instructed in safe and
correct usage of machine and on limitation of warranty.
5. Machine was tested and operates correctly.
PURCHASER: I hereby certify that:
1. The machine is correctly assembled.
2. Receipt of the operators manual which I have read and clearly
understood.
3. I have a clear understanding of the warranty limitations.
4. I have a clear understanding on the correct and safe operation of
the machine
5. That the machine needs regular maintenance as per instructions
in operators manual.
6. I have a clear understanding on the capacity of this machine and
am aware of its limitations.
MODEL____________________________________ SERIAL #____________________________________
DEALER____________________________________ DATE DELIVERED_____________________
DEALER’S STAMP
MAIL TO:
PURCHASERS ADDRESS:
20 - Grapple
 Loading...