

Page 1
UUsseerr GGuuiiddee
Page 2
This manual is in three sections:
1. Getting Started: Specifications, installation, and using the controls (p. 2)
2. The Quick-Setup Assistant – rapidly getting results (p. 10)
3. Advanced Setup: The Engineer’s Menu, and advanced configuration (p. 22)
CCoonnttee nnttss::
Introduction.............................................................................................................................................................
Technical Specification.....................................................................................................................................
How do I ?...............................................................................................................................................................
Getting Started.....................................................................................................................................................
Rear Terminal Connections...........................................................................................................................
DMX Wiring...........................................................................................................................................................
Number of DMX Devices Connected.....................................................................................................
Basics - Taking a First Look at the Display.............................................................................................
Using ColourStyle512 for the First Time – Quick Setup.................................................................
Using Sound-to-Light.........................................................................................................................................
Using Favourites...................................................................................................................................................
Select a Scene to be a Favourite from the Scenes Menu............................................................
Editing a Favourite..............................................................................................................................................
To Edit the Favourite’s Name........................................................................................................................
To Edit the Favourite’s Master Brightness ...........................................................................................
To Edit the Favourite’s Master Speed......................................................................................................
To Edit the “Recall at Power-up” Setting..................................................................................................
Master Speed and Master Brightness....................................................................................................
Using Quick Setup if the ColourStyle Has Been Used Before...................................................
Entering Engineer’s Mode for Detailed Configuration.................................................................
Configure Menu..................................................................................................................................................
Continued on the CD (enclosed):Continued on CD to page 50
UUsseerr GGuuiiddee -- GGeettttiinngg SSttaarrtteedd
Continued on the CD ROM, enclosed:
2
2
3
3
4
4
6
7
10
15
16
17
18
18
19
19
19
20
21
22
23
1
1
Mode Lighting - ColourStyle User Guide
Page 3
GGeettttiinngg SSttaarrtteedd -- HHooww ddoo II ......??
GGeettttiinngg SS tt aarrtteedd
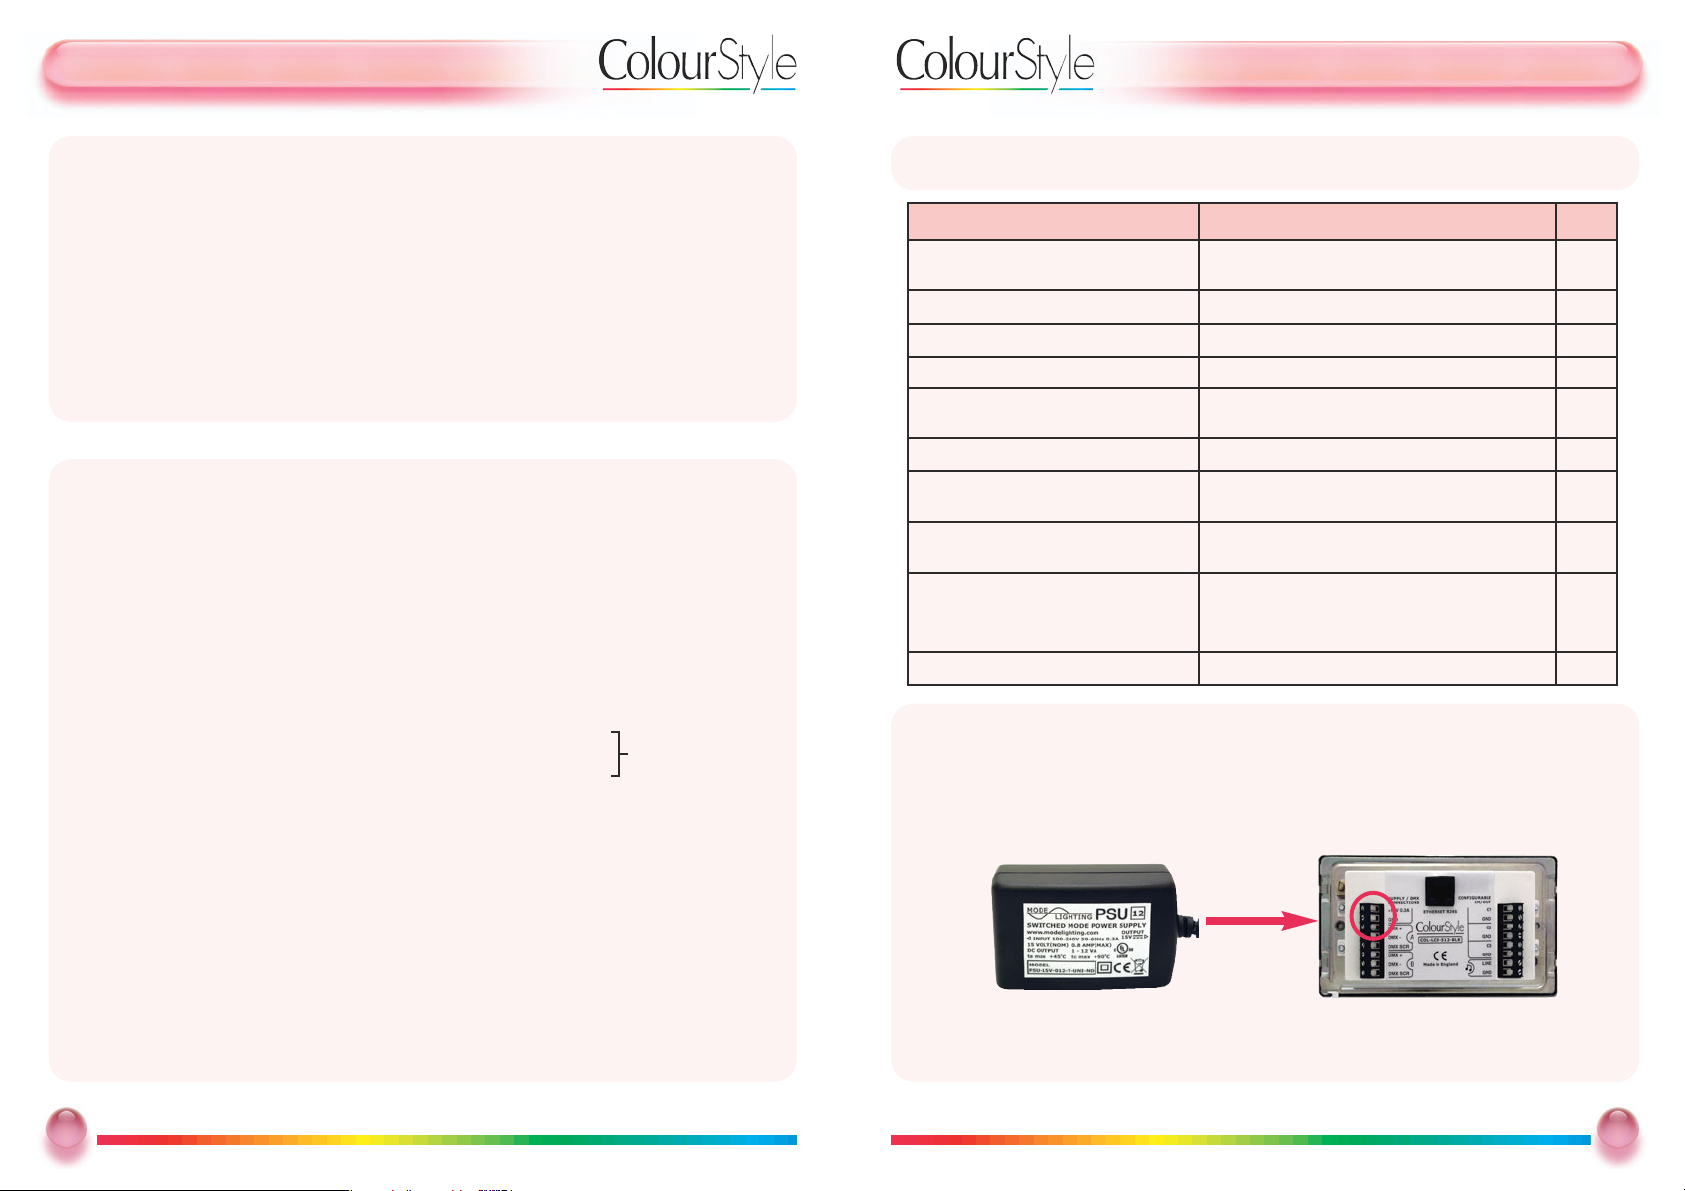
The DMX Generator can be installed in a standard 47mm UK-type double-gang
backbox. All cable connections are made on the rear of the product.
Connect a 15v DC power supply to the supply terminals on the back of the product.
(see p.6)
On the Mode PSU, supplied with the ColourStyle, the + wire has a white stripe on
it, and the – wire has no stripe.
HHooww ddoo II......??
HHooww ddoo II......?? DDeessccrriipp ttiioonn PPaaggee
Connect an LED fixture
Use the DMX screw-terminals on the rear of the
product
5
Create standard colours and patterns Use the Quick Setup Assistant 10
Change the overall brightness Use the scroll wheel to set “Master Brightness” 20
Change the speed of a sequence Use the scroll wheel to set “Master Speed” 20
Create custom colours and patterns
Add fixtures, create scenes and create sequences
using the
CCoonnffiigg uurraatt iioonn
menu options
On CD
Use a PIR sensor to activate a sequence Set a “trigger” for one of the contact inputs
On CD
Check to see if a DMX fixture is working Use the slider controls in the Test DMX Fixture feature
On CD
Rec all scenes using a web browser
Find out or set the ColourStyle’s IP address, and use
a web browser
On CD
Monitoring DMX scenes using a web
browser
Use the DMX Output Test feature to access all
channels individually or the DMX Fixture Test feature
to control an individual fixture
On CD
Find out the IP address Use Network Setup in the
CCoonnffiigg uurraatt iioonn
menu
On CD
3
3
Mode Lighting - ColourStyle User Guide
GGeettttiinngg SSttaarrtteedd -- IInnttrroodduuccttiioonn
IInnttrroodduuccttiioonn
ColourStyle from Mode Lighting is a fully-programmable, network-enabled DMX
control system.
It is a stand-alone product, that can be configured to produce patterns on DMX
fixtures in a few minutes, without having to use PC-based configuration software.
ColourStyle’s many features enable you to get up and running very quickly, or to
edit and create fully definable scenes, sequences and triggers in precise detail.
TTeecchhnniiccaall SSppeecciiffiiccaattiioonn
DMX Channels
DMX Standard
DMX refresh rate
Pow er Supply
Networking
Analogue channels
Contact inputs
Audio Input
Real-time clock
LCD Screen
Physical Size 35mm deep
Weight
Standard Fascia
Finishes
2 complete universes of 512 channels each
DMX 1990 A
Configurable, 36Hz Max
15v DC, 300mA, (included)
Ethernet 10/100 MHz - Auto uplink detection
Built-in web server
Te lnet command server
3 independent 0-10v outputs, 50mA
3 volt-free contact inputs
Line-level mono audio input for beat triggering
Built-in real-time clock, with 6-month battery back-up
128x64 pixel, monochrome with configurable RGB
backlight
Fits standard 47mm-deep UK double-gang backbox
255 grammes, without fascia
Stainless Steel
Polished Brass
Polished Chrome
White
2
2
Mode Lighting - ColourStyle User Guide
Any Combination
Page 4
UUsseerr GGuuiiddee -- DDMMXX CCoonnnneeccttoorr WWiirriinngg
DDMMXX CCoonnnneeccttoorr WWiirriinngg
ColourStyle is intended for use in fixed installations, and therefore has rising-clamp
screw-terminal connections for the DMX.
The following is a summary of common DMX pin-outs on other connectors:
DDMMXX WW iirrii nngg -- CCoonnttiinnuueedd
ColourStyle should be connected at one end of the daisy-chain, and not in the
middle. However, the default outputs created by the
QQuuiicckk SSeettuupp AAssssiissttaanntt
are
transmitted from both universes, and therefore it would be possible to have one
chain of DMX fixtures connected to output A, and another connected to output B.
Av oid long runs with power or high-voltage cables, as noise pickup can interfere
with the signal that reaches the DMX fixtures.
5
5
Mode Lighting - ColourStyle User Guide
CCoonnnneecc ttoorr
DDMMXX
+
DDMMXX -- SSccrree eenn // 00vv
3 2 1
3 2 1
1 White/
Orange
2 Orange
7+8 Brown+
Brown/White
DMX Standard
5-pin XLR
(male, pins view)
3-pin XLR
(male, pins view)
Standard RJ-45
UUsseerr GGuuiiddee -- RReeaarr TTeerrmmiinnaall CCoonnnneeccttiioonnss
RReeaarr TTeerrmmiinnaall CCoonnnneeccttiioonnss
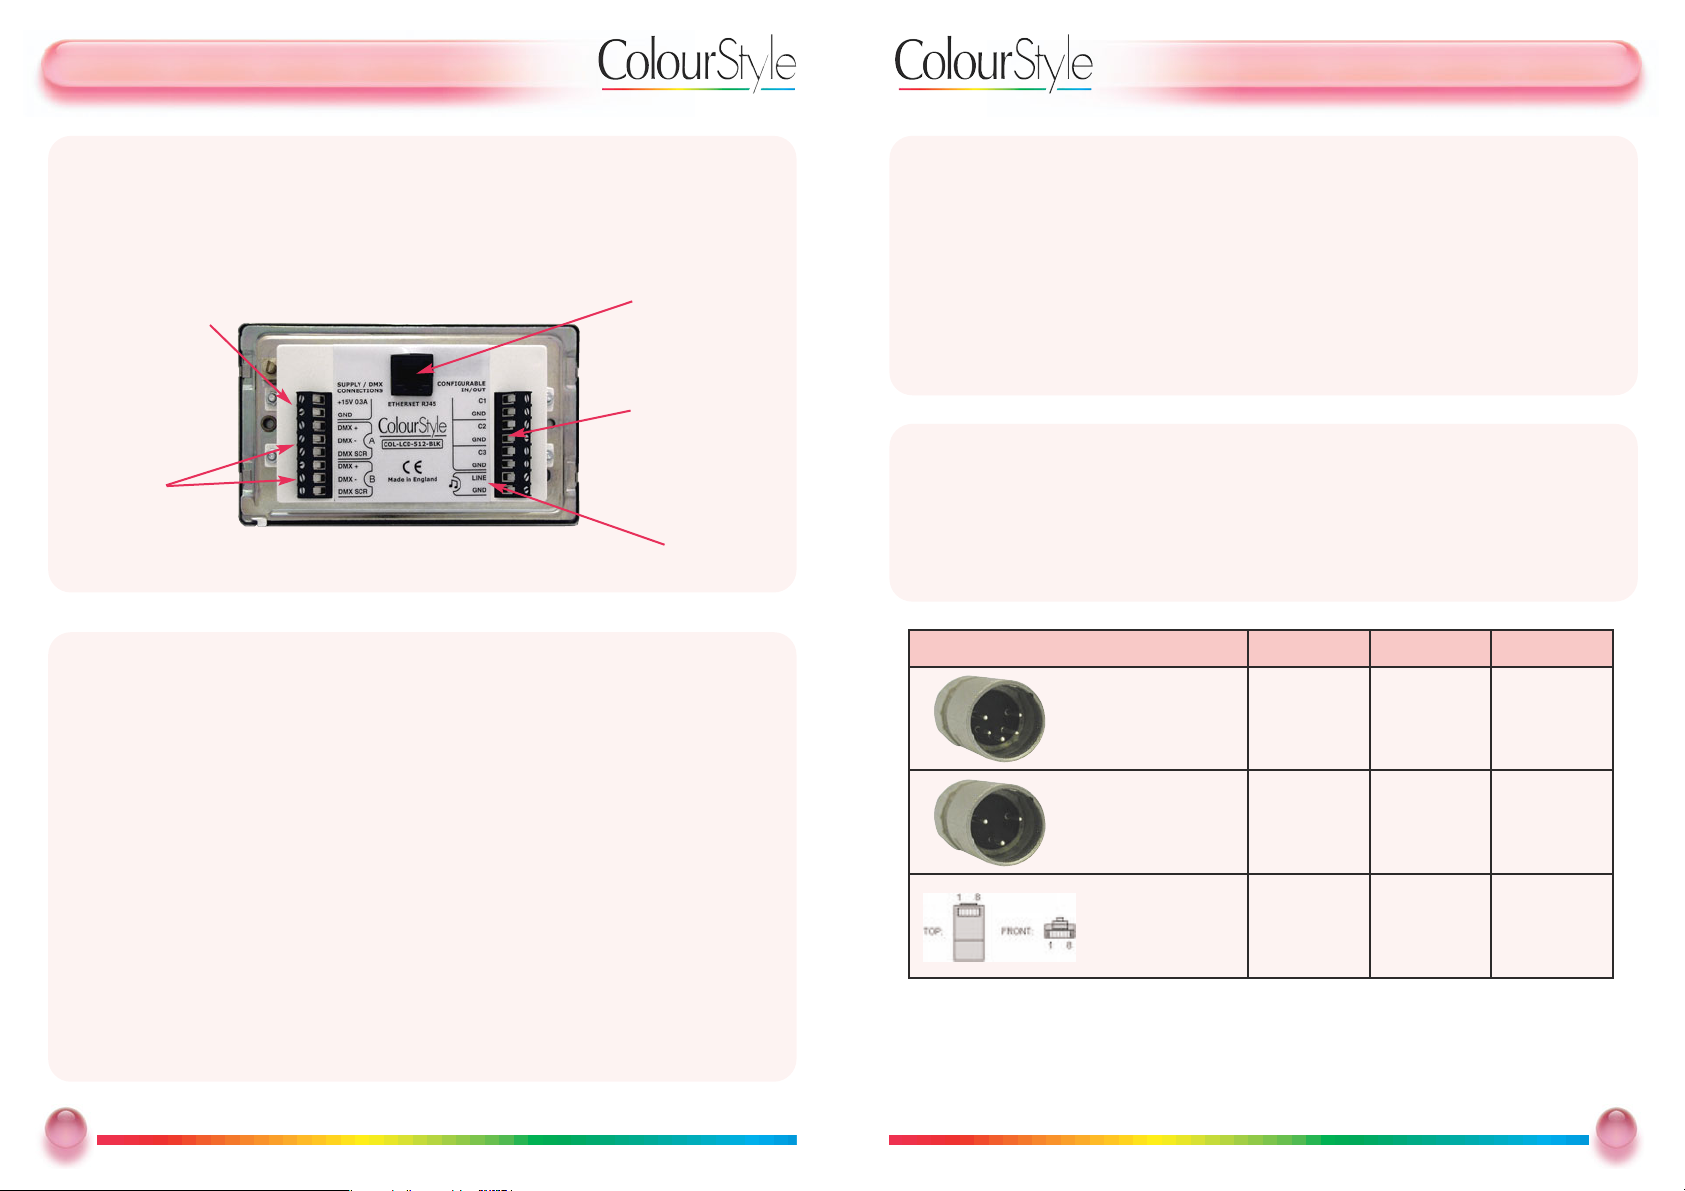
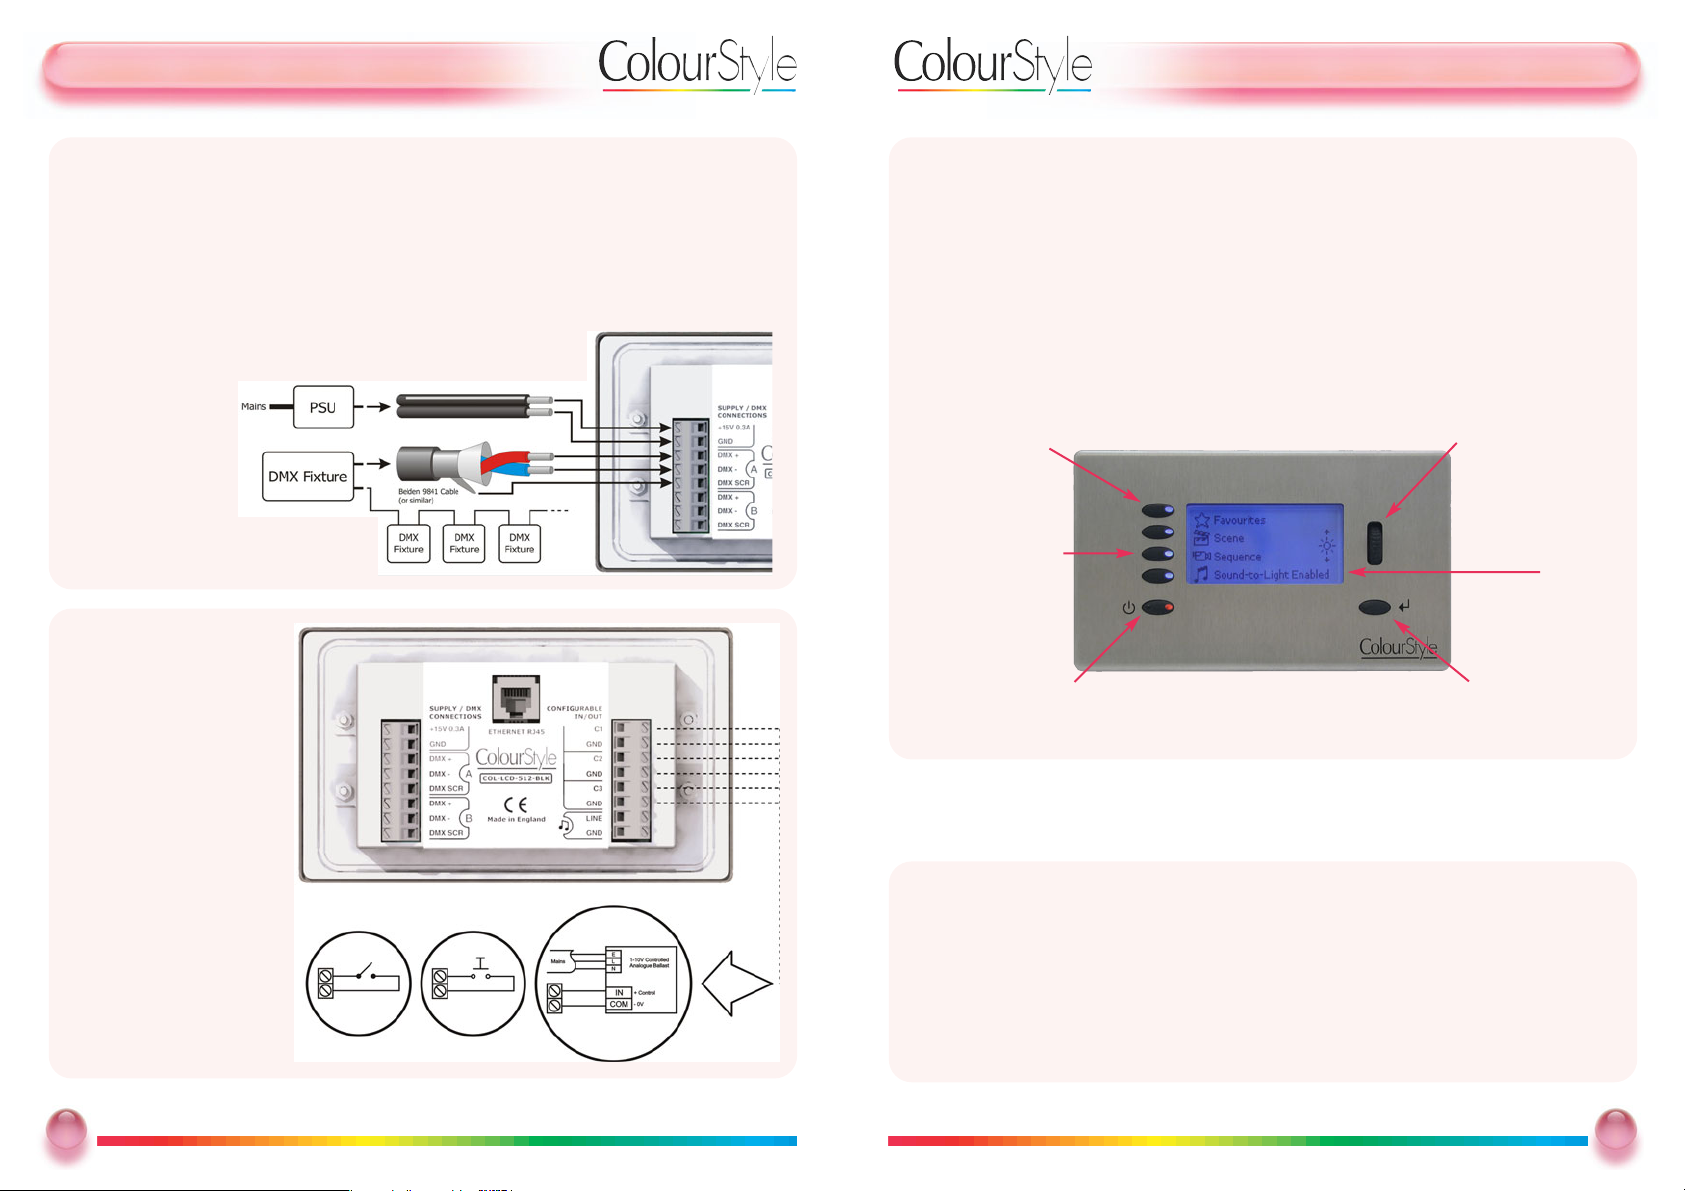
On the back of the Box are terminals for DC power, two DMX universes, and three
pairs of configurable terminals that may be used as analogue outputs or trigger
inputs..
DDMMXX WWiirriinngg
There are two separate, fully independent, DMX “Universes” on a ColourStyle. Each
has DMX +, DMX – and Screen connections via screw-terminals, as shown above.
DMX fixtures are usually wired together using a daisy-chain. The furthest device in
the chain needs to be terminated with a 120Ω resistor between DMX+ and DMX-.
For a trouble-free installation it is recommended that you use good quality shielded
cable with a twisted pair for the data, with a minimum size of 24AWG.
The DMX standard suggests a maximum length of cable of 300m, before signal
repeaters are used.
DMX wiring should not be T’d off, or star-wired. ‘Y’ connections should not be used,
as they will cause degradation in the signal quality.
4
4
Mode Lighting - ColourStyle User Guide
DC Power supply input
A and B are
independent 512-channel universes of DMX
Audio input
DMX Universe
Outputs
0-10V output, or
contact closure input
Ethernet Socket
3 pairs of config-
urable terminals
Page 5
UUsseerr GGuuiiddee -- AA FFiirrsstt LLooookk aatt tthhee CCoonnttrroollss
IInnddeeppeennddeenntt CCoonnttrrooll ooff FFiixxttuurreess
The ColourStyle is unusual in that you can connect multiple fixtures to one DMX
universe even if you want to control them totally independently of each other. This is
because the ColourStyle allows you to change any DMX channel level or group of
channels’ levels at a time without having to specify the levels of all the other channels.
For further details see the section on creating custom Scenes (see CD).
BBaassiiccss -- TTaakkiinngg aa FFiirrsstt LLooookk aatt CCoolloouurrSSttyyllee’’ss CCoonnttrroollss
Using the ColourStyle looks and feels very much like using a pocket MP3 player: you
set up scenes as if they were songs, and sequences are handled much like play-lists.
You can assign Favourite looks for quick access.
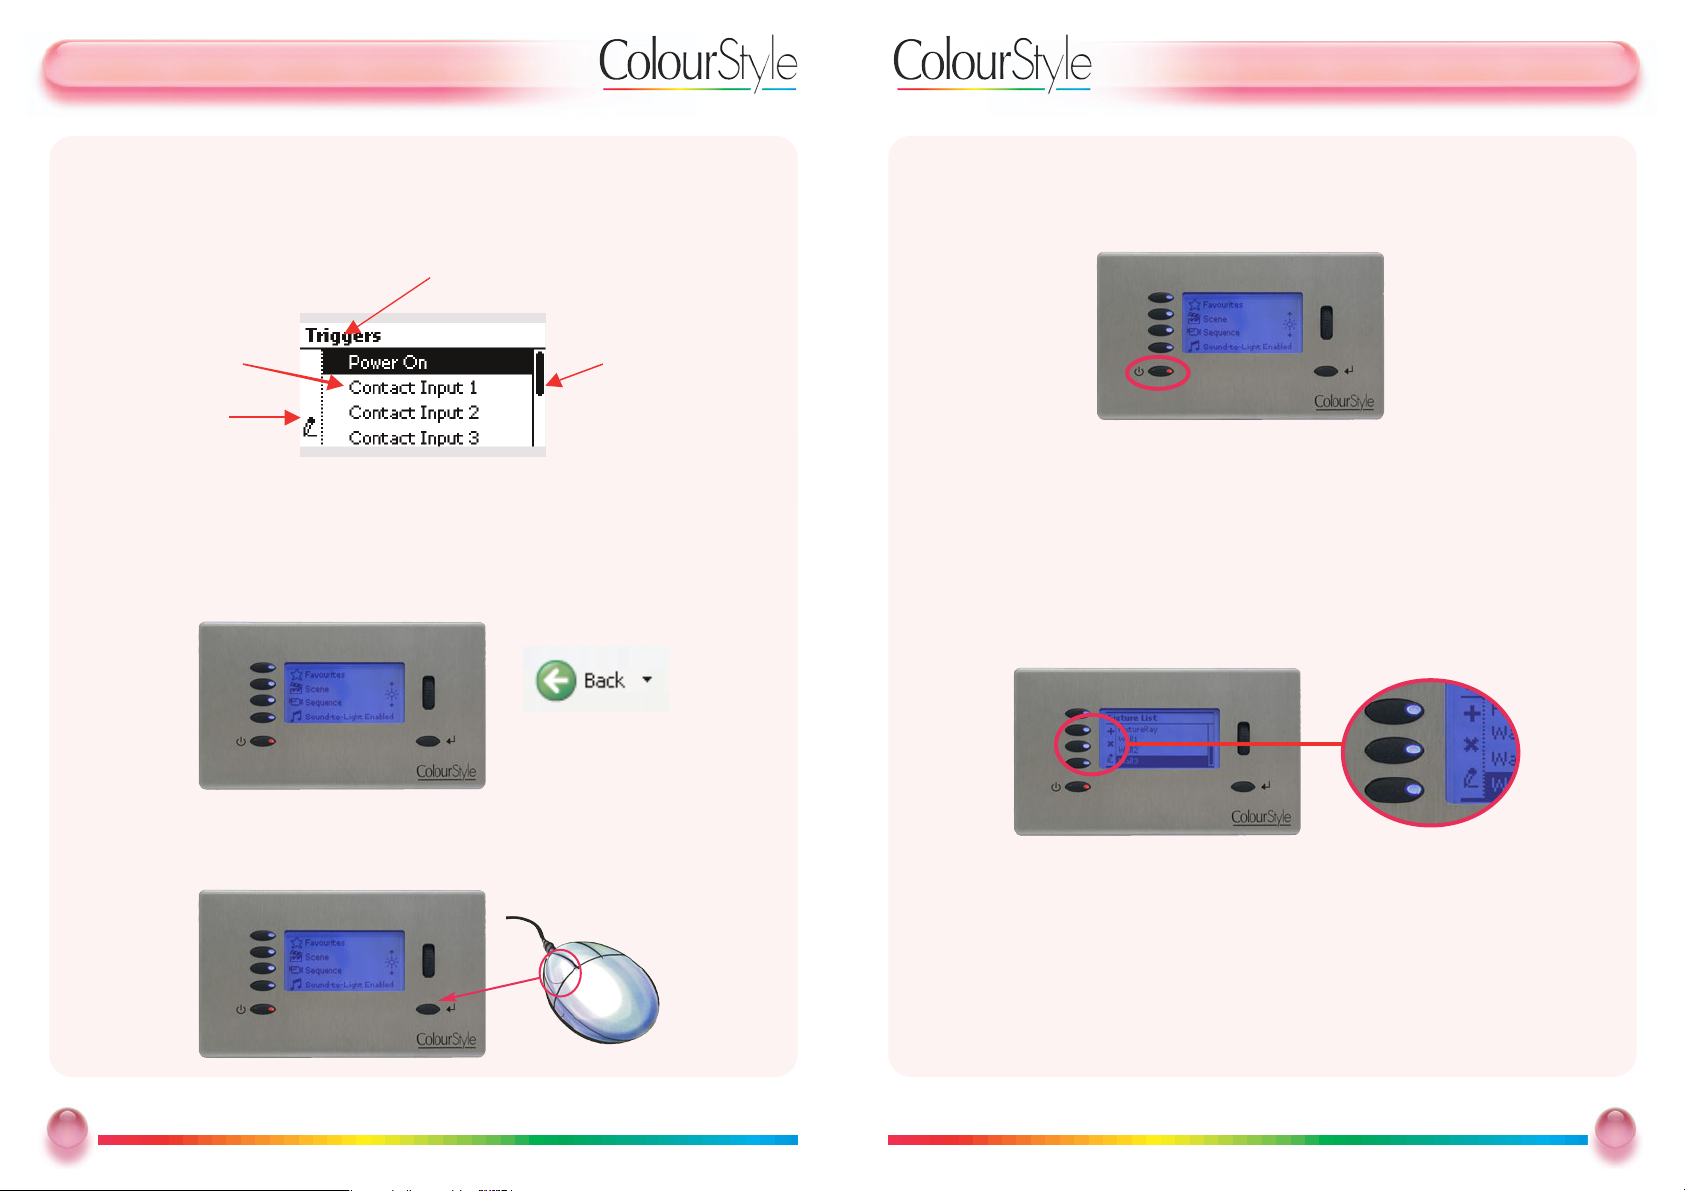
Configuring the DMX Generator is performed entirely using a combination of the
scroll-wheel, the “Back” button, the “Select” button and three soft-keys.
7
7
Mode Lighting - ColourStyle User Guide
“Back” button used to return to the
previous menu
“On / Off” button
used to “mute” the DMX output
“Select” button,
used to activate a menu option
Soft-key buttons
for selecting special features
LCD Screen
(backlit)
Scroll wheel. Used to move between
menu options or
adjust values.
UUsseerr GGuuiiddee -- CCoonnffiigguurraabbllee TTeerrmmiinnaall WWiirriinngg
CCoonnffiigguurraabbllee
TTeerrmmiinnaall WWiirriinngg
The three pairs of configurable terminals on
the rear of ColourStyle
can be configured as
either Contact Inputs or
Analogue outputs (see
page 32).
They are wired as
follows:
6
6
Mode Lighting - ColourStyle User Guide
1) Switch Input
2) Button Input
3) Fuorescent Ballast
Output
1) 2) 3)
NNuummbbeerr ooff DDMMXX DDeevviicceess CCoonnnneecctteedd
Up to 32 “loads” may be connected to each DMX universe. Modern DMX fixtures
do not present a full unit of “load” to the DMX output, and therefore more than 32
may be used. For example all DMX fixtures from Mode Lighting are 1/10th load, and
therefore 320 may be connected to each DMX Universe.
If you need to connect more than 32 fixtures-worth of “loads” then use a DMX
signal amplifier or booster.
FFuurrtthheerr iinnffoorrmmaattiioonn::
For further information on DMX wiring
and termination see:
“Recommended
Practice for DMX512,
A Guide for Users
and Installers” by Adam Bennette,
available from PLASA.
Page 6
UUsseerr GGuuiiddee -- AA FFiirrsstt LLooookk aatt tthhee DDiissppllaayy
BBaassiiccss -- TTaakkii nngg aa FF iirrss tt LLoo ookk aatt CC oolloo uurrSSttyyll ee’’ ss DDiissppllaayy -- CCoonnttiinnuu eedd
3. The bottom left-button is “On/Off”, or “Mute”.
The button is red when the output has been “muted”, and all DMX channels will be
transmitted with a value of 0.
4. The three middle buttons next to the screen on the Left-Hand Side act as soft-keys.
In some menus these have special functions, which are indicated by icons on the lefthand side:
The icon/text on the screen next to the three buttons below indicate the function of
the soft-keys (for example in the image above they are add (+) , delete (-) and Edit (!).
Some menus may not have soft-keys options, in which case the three middle buttons
do not perform any function.
9
9
Mode Lighting - ColourStyle User Guide
UUsseerr GGuuiiddee -- AA FFiirrsstt LLooookk aatt tthhee DDiissppllaayy
BBaassiiccss -- TTaakkiinngg aa FFiirrsstt LLooookk aatt CCoolloouurrSSttyyllee’’ss DDiissppllaayy
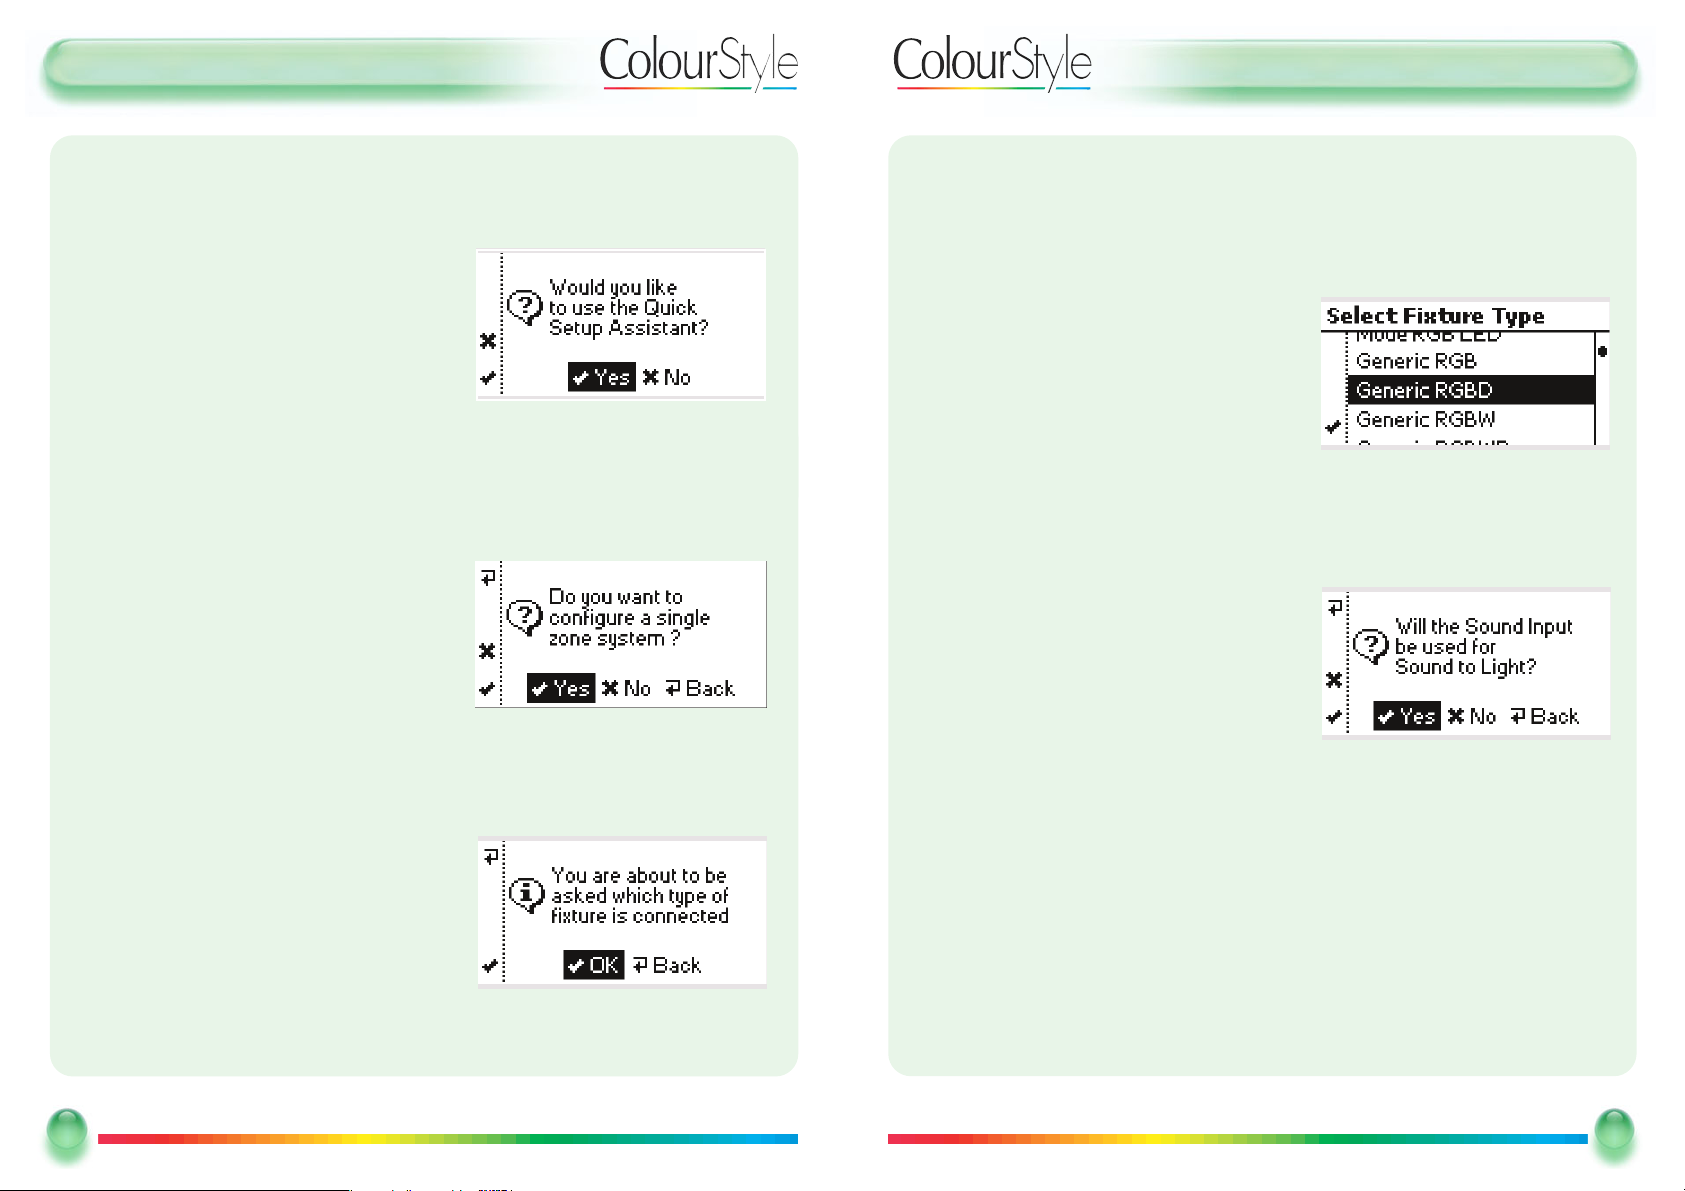
Each menu has three parts: the title, the menu options, and the scroll bar. Some
menus also have up to three extra soft-key features indicated by icons on the left
hand side.
1. The top-left button, which is next to the menu title, takes the user back to the previous
menu screen from any sub-menu. This “Back” button action is uniform throughout
the system’s operation, and is just like the “Back” button on your computer’s web
browser.
When the back button is available it will illuminate orange.
2. The bottom-right button is the “Select” button, which is used to select menu
options, to tick or un-tick toggle options, or to execute commands, or to move to the
next menu. This is just like clicking on items in a computer’s web-browser.
8
8
Mode Lighting - ColourStyle User Guide
Menu title
Menu
options
Soft key
feature
Scroll bar
Page 7
UUsseerr GGuuiiddee -- QQuuiicckk SSeettuupp -- SSiinnggllee ZZoonnee
BBaassiiccss -- UUss iinngg CC ooll oouurr SS ttyyllee551122 ffoorr tthhee FFiirrsstt TTiimmee -- QQuuii cckk SSeettuupp -- CCoonnttiinnuueedd
To re turn to the previous screen:
- Highlight the
BBaacckk
option and then press the select button
or
- Press the
BBaacckk
button, on the top-left of the
ColourStyle
- Highlight the Fixture and press
sseelleecctt
.
33..
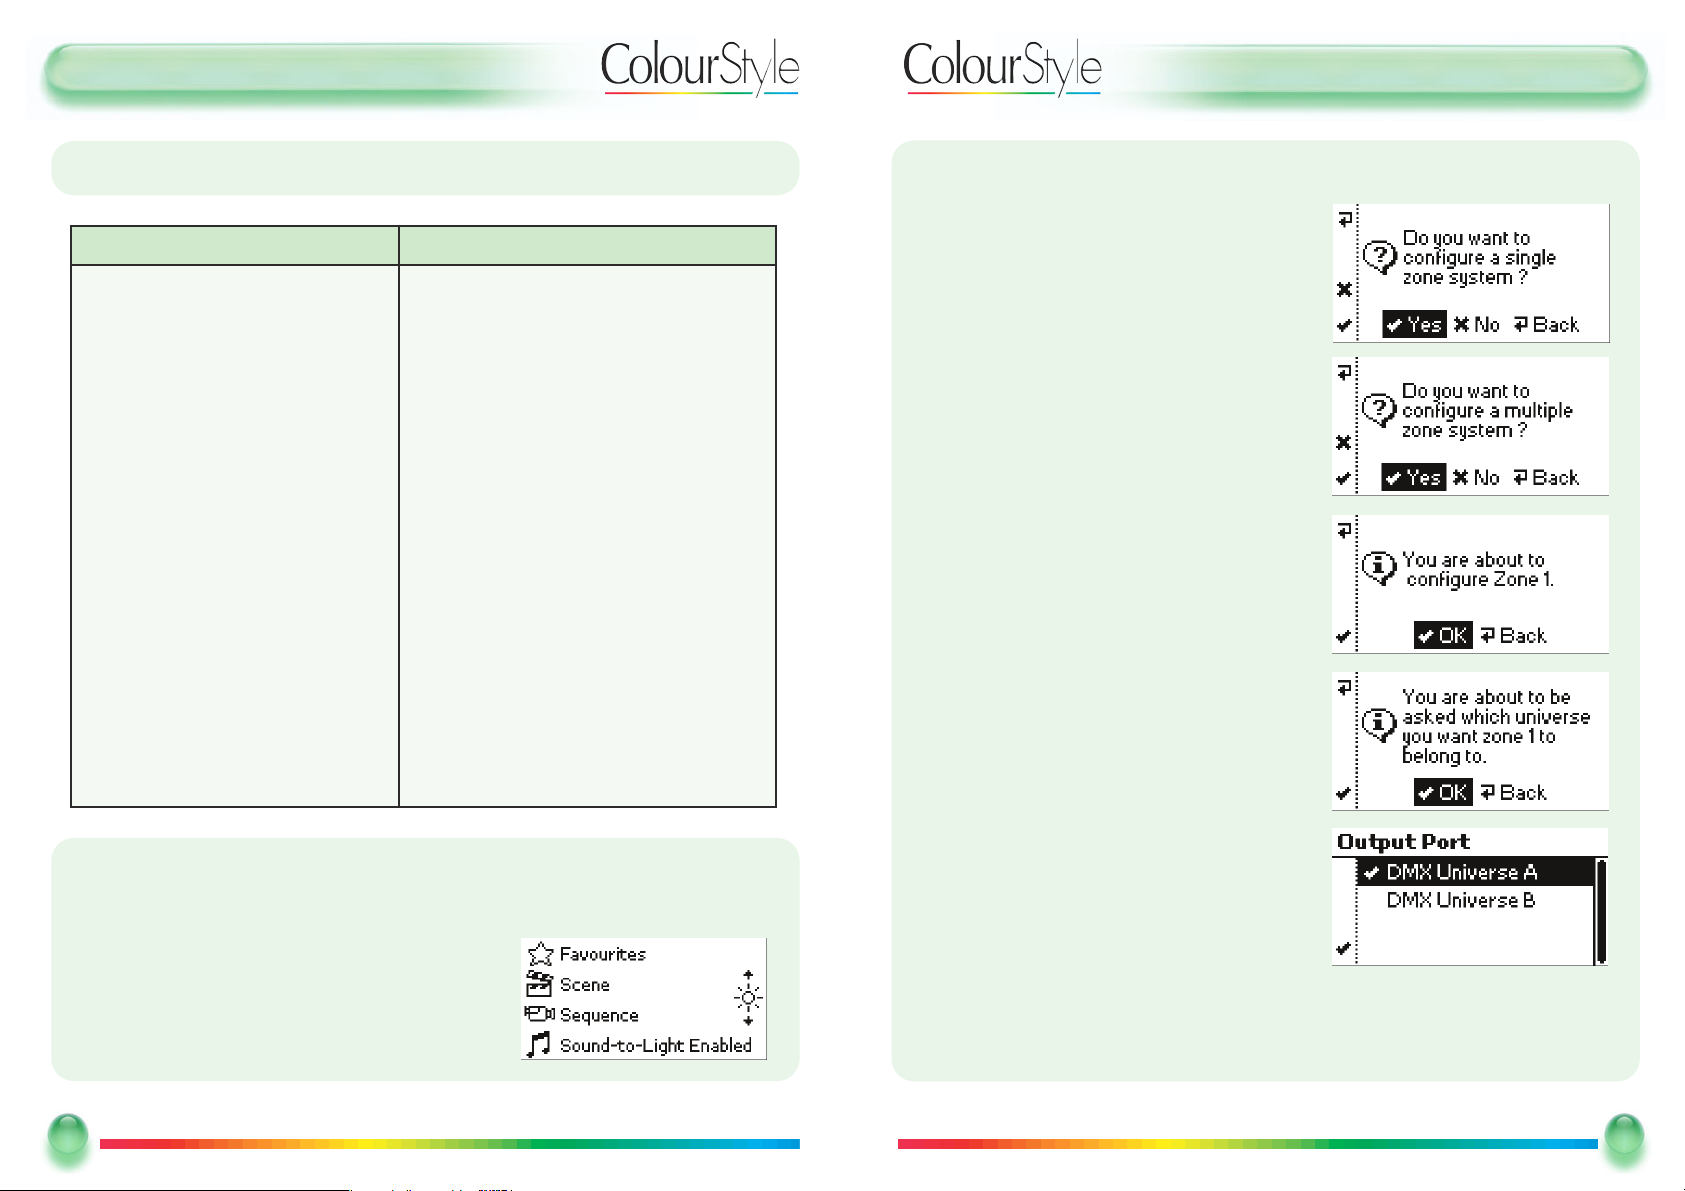
You are then asked if you plan to use the Sound-to-Light feature. This is so that if
you don’t need it then the day-to-day user interface won’t confuse users by
including the Sound-to-Light on/off switch as part of the main menu.
And that’s it!
The ColourStyle will create standard static solid colours, standard rolling-block
colours and cascading colours automatically, filling both DMX universes so that it
doesn’t matter which one has been used.
11
11
Mode Lighting - ColourStyle User Guide
UUsseerr GGuuiiddee -- FFiirrsstt TTiimmee -- QQuuiicckk SSeettuupp
BBaassiiccss -- UUssiinngg CCoolloouurrSSttyyllee551122 ffoorr tthhee FFiirrsstt TTiimmee -- QQuuiicckk SSeettuupp
The
QQuuiicckk SSeettuupp AAssssiissttaanntt
rapidly configures your ColourStyle with default colours
and sequences suitable for the fixtures that you have connected.
When your new ColourStyle512 is first
switched on the following screen is shown:
- For quick-setup, choose
YYeess
:
- Highlight the
YYeess
option in the centre of the screen and press the select button
or
- Press the soft-key next to the ✓ icon.
11..
If you select
NNoo
or ✓ instead then you will be able to configure the ColourStyle
using the
CCoonnffiigguurraattiioonn
menu options (see page 21 for further details)
You can choose between a single zone (fixtures
of one type are configured to do the same
scenes at the same time), or multiple-zones
(many different fixture types with independent
control).
- To configure a single zone, press
SSeelleecctt
or the <✓> button.
The ColourStyle will then ask you two questions in order to configure standard
scenes and sequences, for a single zone.
22 .. SSeellee cc ttiinngg tthhee DDMMXX FFiixxttuurree TTyyppee
The ColourStyle will confirm that you wish
to proceed:
TT oo pprr oocceeeedd::
- Highlight the
OOKK
option in the centre of the screen, and then press the select button
or
- Press the soft-key next to the ✓ icon.
10
10
Mode Lighting - ColourStyle User Guide
Page 8
UUsseerr GGuuiiddee -- FFiirrsstt TTiimmee -- QQuuiicckk SSeettuupp
BBaassiiccss -- UUss iinngg CC ooll oouurr SS ttyyllee551122 ffoorr tthhee FFiirrsstt TTiimmee -- QQuuii cckk SSeettuupp -- CCoonnttiinnuueedd
12
12
Mode Lighting - ColourStyle User Guide
SSttaannddaa rrdd SSttaatt iicc SSoolliidd CCoo lloouurrss SS ttaannddaarrdd SSeeqquueenncceess//CCaasscc aaddiinn gg CCoolloouurrss
White
Red
Orange Red
Orange
Gold
Ye l l o w
Green-Yellow
Lawn Green
Chartreuse
Green
Jade
Mint
Aquamarine
Cyan
Sky Blue
Deep Sky Blue
Royal Blue
Blue
Violet
Purple
Indigo
Magenta
Hot Pink
Deep Pink
Crimson
Short Rainbow
Long Rainbow
Hot Colours
Warm Colours
Cool Colours
Pa stel Chase
Arc Line
TT hhee MMaaiinn MMeennuu:: RRee ccaallllii nngg SSttaa nnddaarr dd CC ooll oouurr ss // SSee qquueenncceess aanndd FFaavvoouurriitteess
From the
mmaaiinn mmeennuu
, shown below, the user has the option to select a Favourite out-
put, or a specific Scene or Sequence.
In the main menu all four of the buttons on the left of
the screen will be illuminated blue to show that they
are available.
UUsseerr GGuuiiddee -- QQuuiicckk SSeettuupp -- MMuullttii ZZoonnee
13
13
Mode Lighting - ColourStyle User Guide
BBaassiiccss –– UUss iinngg tthhee CCooll oouurrSSttyy llee551122 ffoorr tt hhee FFiirrsstt TT iimmee –– MMuull ttii--ZZ oonnee QQuuii cckk SS eettuupp
The
MMuullttii--ZZoonnee QQuuiicckk SSeettuupp AAssssiissttaanntt
enables you to
quickly configure different fixture types or groups,
perhaps in different areas in a building, each with
the standard scenes for independent operation.
A zone is a group of identical fittings.
If you answered “
NNoo
” to configuring a single
zone system then you will be asked if you want
to configure a multi-zone system:
To configure a multi-zone system, press
SSeelleecctt
or the <✓> button.
The system will start at the first zone, and will
walk you through the setup, step-by-step:
In a multi-zone system it may be more convenient for you to connect different zones to different DMX universes, you are therefore given the
option of choosing which universe the fixtures in
the zone are connected to.
Press
OOKK
to continue.
Scroll the highlight bar onto either DMX Universe A or DMX Universe B.
Press the
SSeelleecctt
button or the ✓ soft-key to continue.
Page 9
UUsseerr GGuuiiddee -- UUssiinngg SSoouunndd --ttoo--LLiigghhtt
UUssiinngg SSoouunndd--ttoo--LLiigghhtt
ColourStyle has a built-in beat trigger system to give you a stunning lightshow, controlled
directly from your sound system.
To use sound-to light, connect a line-level audio source to the ColourStyle’s audio
input. ColourStyle detects beats, and uses them step through the current sequence.
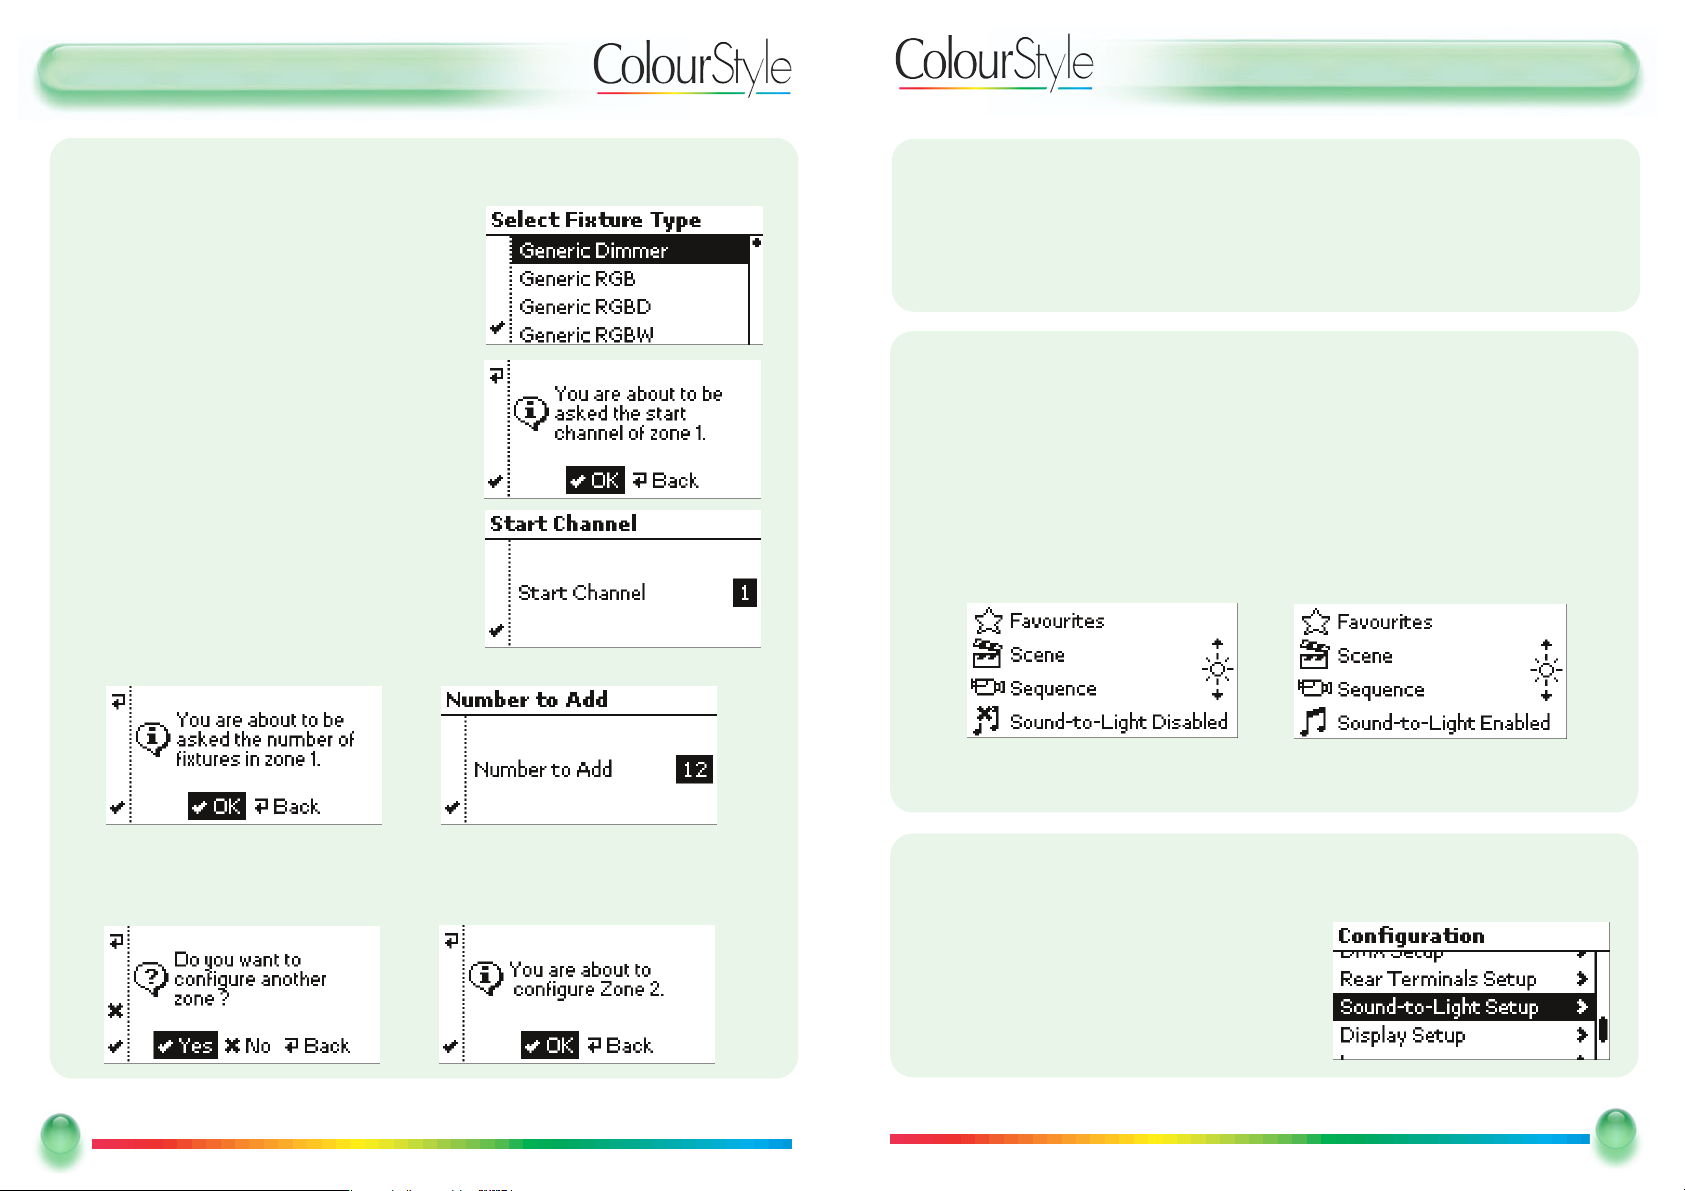
If “Sound-to-Light” was selected during the Quick Setup Assistant then it can be
enabled and disabled by toggling button 4.
The musical notes icon changes to show whether the sound-to-light is currently
controlling sequences.
EEnnaabblliinngg SSoouunndd --ttoo --LLii gghhtt iiff iitt WWaass nn’’tt SS eelleecctteedd DD uurr iinngg tthhee QQuuiicckk SSeettuu pp
Enter
CCoonnffiigguurraattiioonn
mode by pressing: 4 (following the instructions on page 22)
Scroll down to “
SSoouunndd--ttoo--LLiigghhtt SSeettuupp
”, and
press
SSeelleecctt
15
15
Mode Lighting - ColourStyle User Guide
UUsseerr GGuuiiddee -- FFiirrsstt TTiimmee -- QQuuiicckk SSeettuupp
14
14
Mode Lighting - ColourStyle User Guide
BBaassiiccss –– UUssiinngg CCoolloouurrSSttyyllee551122 ffoorr tthhee FFiirrsstt TTiimmee –– MMuullttii--ZZoonnee QQuuiicckk SSeettuupp -- CCoonnttiinnuueedd
Next, select the type of fixture used in this zone:
Move the highlighted bar to the fixture you are
using.
Press the
SSeelleecctt
button or the ✓ soft-key to
continue.
Next you will be asked to specify the DMX
channel that is used. If you are configuring several zones, then the start-channel given is the
next-available DMX channel, taking into
account all of the fixtures that have already
been added in previous zones.
If you need to, then use the scroll wheel to
adjust the starting channel.
Press the
SSeelleecctt
button or the ✓ soft-key to
continue.
You will then need to specify how many fixtures are in this zone:
If you need to then use the scroll wheel to adjust the number of fixtures.
Press the
SSeelleecctt
button or the ✓ soft-key to continue.
You will then be asked if you want to configure another zone.
Highlight
YYeess
or
NNoo
and then press
SSeelleecctt
, or use the <✓> or <✘> soft keys to
proceed.
If you are configuring another zone, then follow the on-screen instructions again.
The ColourStyle will now create scenes and sequences for each zone, as well as
“master” favourites that control all zones.
Page 10
UUsseerr GGuuiiddee -- UUssiinngg FFaavvoouurriitteess
UUssiinngg FFaavvoo uurriitteess -- CCoonnttiinnuueedd
Favourites may be renamed to indicate their use. You may have as many favourites
as you need.
Favourites are required if you want to set triggers (see p. 30 on the CD) from
external inputs or the IR remote control to activate colours or patterns on the
ColourStyle.
There are three ways of creating a new Favourite:
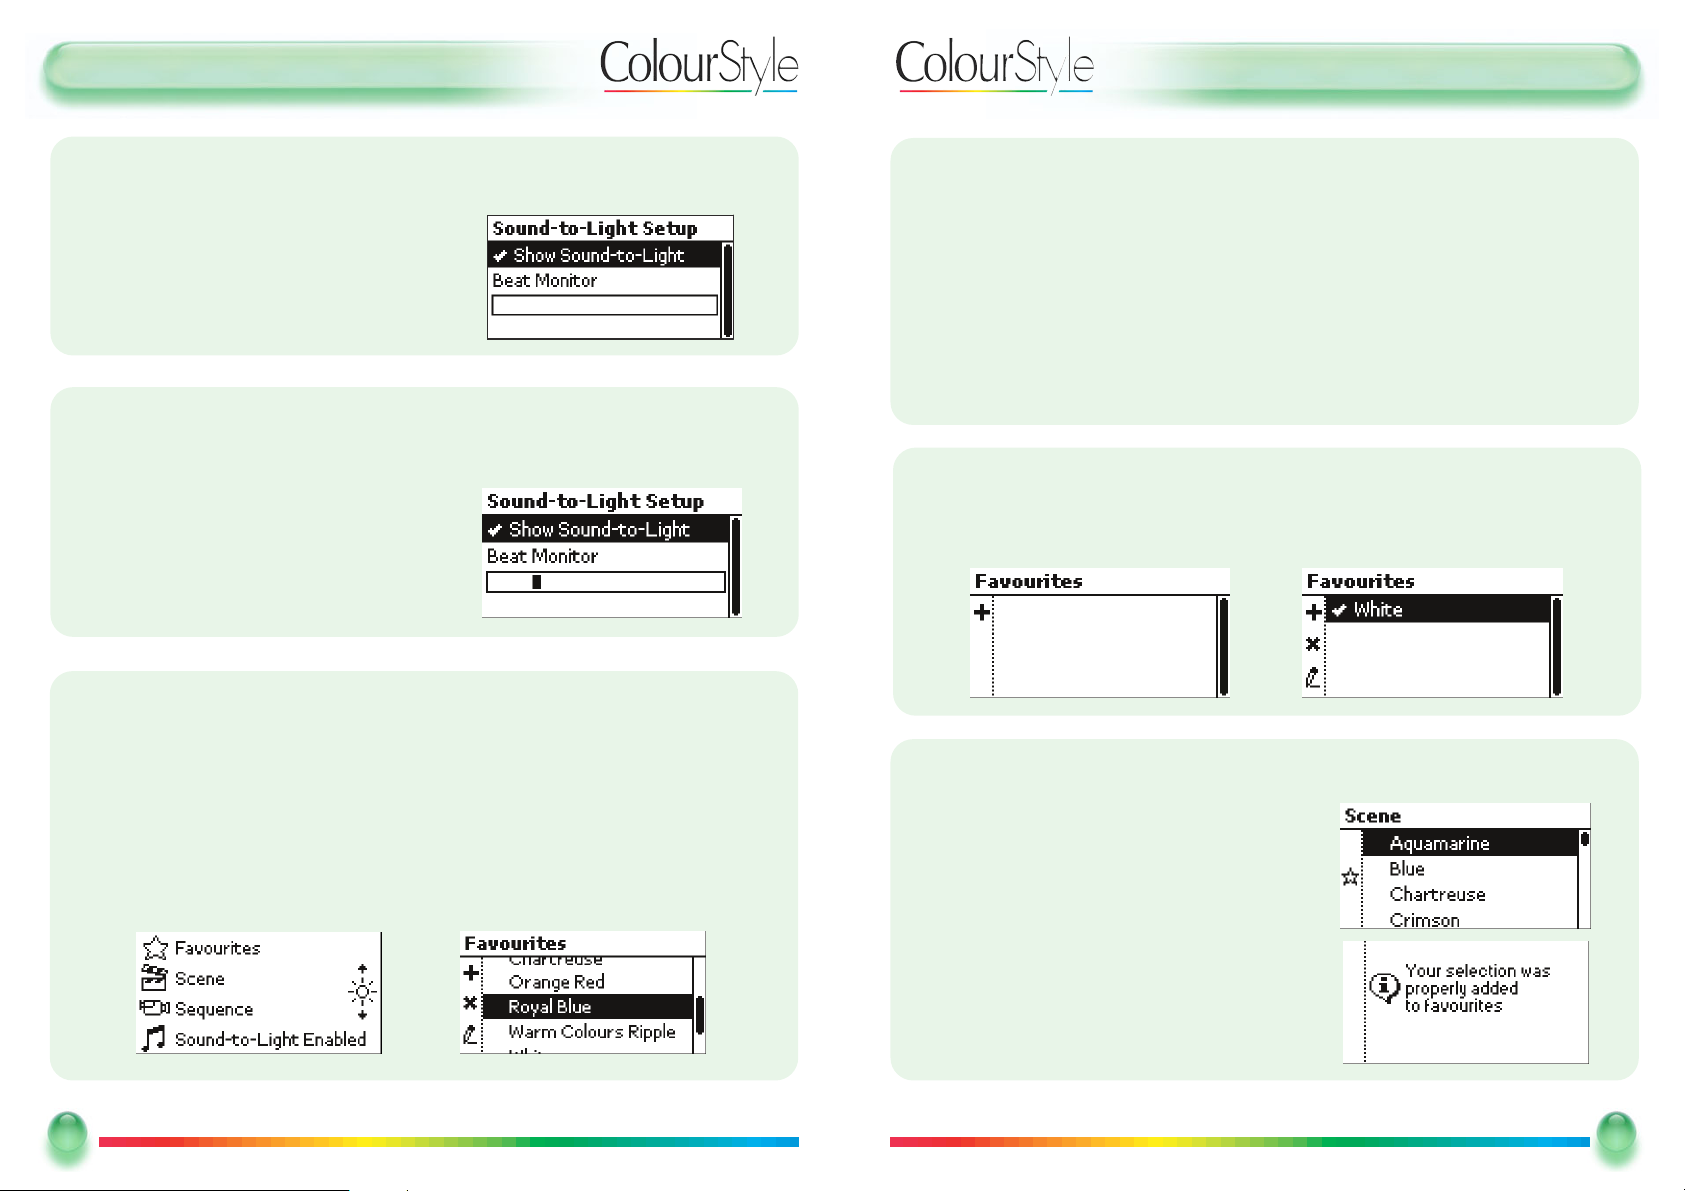
CCaa ppttuurree tt hhee CCuurrrreenntt ““LLoo ookk”” aass aa NNeeww FFaa vvoouurriittee
From the
mmaaiinn mmeennuu
press the
ffaavvoouurriitteess
soft key to display the list of favourites
Press the + soft-key to add the current “look” as a favourite.
SS eelleecctt aa SScceennee ttoo bbee aa FFaavvoouurriittee ffrroo mm tthhee SScceenneess MMeennuu
From the
mmaaiinn mmeennuu
press the
SScceennee
soft key to
display the list of scenes
Highlight the scene that you want to add to the
Favourites list
Press the ✭ soft key to add the scene, a message
will show that this has been done.
17
17
Mode Lighting - ColourStyle User Guide
UUsseerr GGuuiiddee -- UUssiinngg SSoouunndd--TToo--LLiigghhtt
UUssiinngg FFaavvoouurriitteess
A favourite is a combination of scenes/sequences with a master brightness level
and a master speed setting. A single “favourite” therefore defines a complete “look”
for the output of your ColourStyle. A venue with ColourStyle installed would typically set up favourites for common events.
Favourites are accessed by pressing the button next to the
FFaavvoouurriitteess
option, which
is at the top of the
mmaaiinn mmeennuu
:
16
16
Mode Lighting - ColourStyle User Guide
VVii eewwiinngg TThhee AAuuddiioo BBeeaattss
You can view the incoming audio beats using the “beat monitor”, which is shown in
the
SSoouunndd--ttoo--LLiigghhtt SSeettuupp
menu.
For each beat a black blob will fly across the
screen from left to right.
EEnnaabblliinngg SSoouunndd --ttoo --LLii gghhtt iiff iitt WWaassnn’’tt SSee lleecctteedd DDuurriinngg tt hhee QQuuiicckk SSee ttuupp -- CCoonnttiinnuueedd
“
SShhooww SSoouunndd--ttoo--LLiigghhtt
” will be highlighted. Use
the
sseelleecctt
button to tick or un-tick this item.
Press
BBaacckk
to return to the
ccoonnffiigguurraattiioonn
menu.
Press
BBaacckk
again to return to the
mmaaiinn mmeennuu
.
Page 11
UUsseerr GGuuiiddee -- EEddiittiinngg aa FFaavvoouurriittee
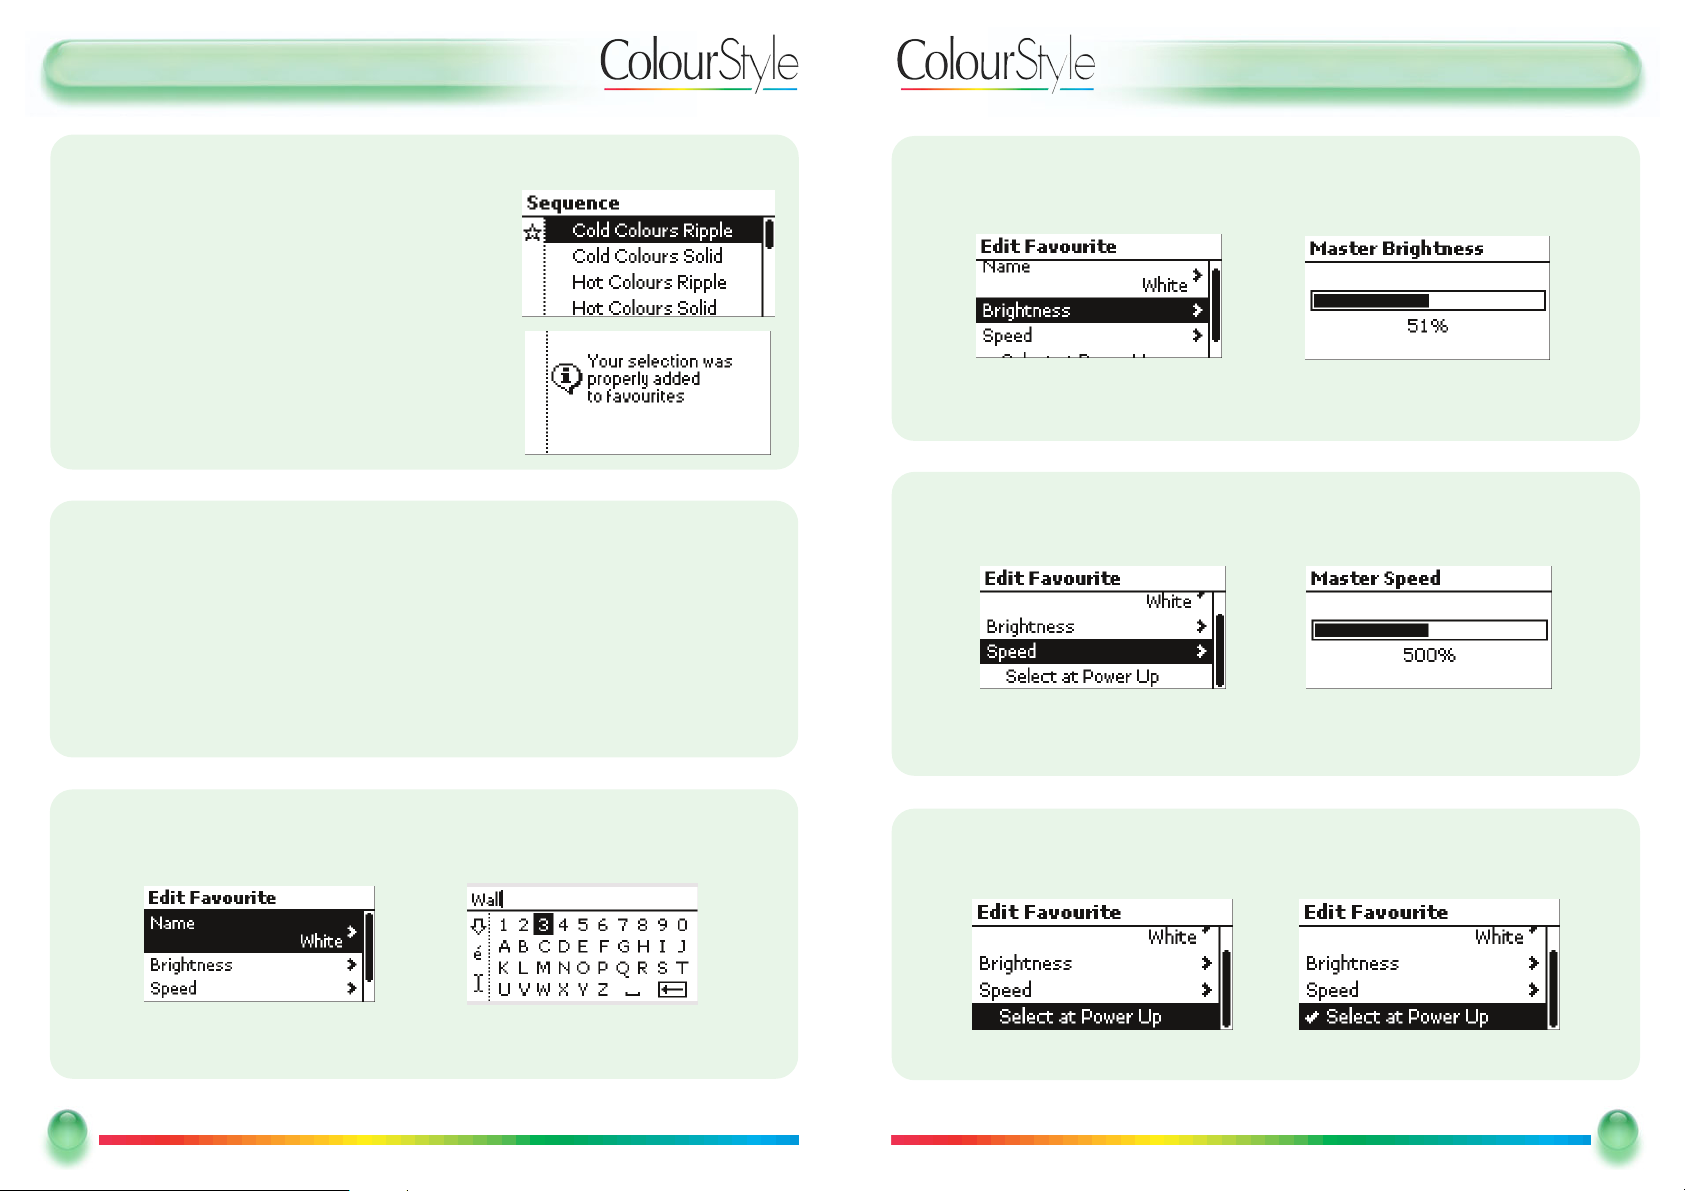
TToo EEddiitt tthhee FFaavvoouurriittee’’ss MMaasstteerr BBrriigghhttnneessss
Use the scroll wheel to highlight the
BBrriigghhttnneessss
option, and then press
SSeelleecctt
Use the scroll wheel to adjust the brightness to the level that you want
Press
BBaacckk
to return to the
EEddiitt FFaavvoouurriittee
menu
19
19
Mode Lighting - ColourStyle User Guide
TToo EEddiitt tthhee FFaavvoouurriittee’’ss MMaasstteerr SSppeeeedd
Use the scroll wheel to highlight the
SSppeeeedd
option, and then press
SSeelleecctt
Use the scroll wheel to adjust the speed to the level that you want
Press
BBaacckk
to return to the
EEddiitt FFaavvoouurriittee
menu
TToo EEddiitt tthhee ’’RReeccaallll aatt PPoowweerr--UUpp’’ SSeettttiinngg
Use the scroll wheel to highlight the
RReeccaallll aatt PPoowweerr--UUpp
option
Use the
SSeelleecctt
button to tick or un-tick the option.
UUsseerr GGuuiiddee --EEddiittiinngg aa FFaavvoouurriittee
EEddiittiinngg aa FFaavvoouurriittee
From the
mmaaiinn mmeennuu
press the
FFaavvoouurriitteess
soft key to show the list of favourites.
Select the favourite that you want to edit, and press the
eeddiitt
softkey.
You have options to change any of the following attributes
The name
The master brightness used by the favourite
The master speed applied to sequences recalled by the favourite
Whether the favourite is recalled at power-up
TToo EEddiitt aa FFaavvoouurriittee’’ss NNaammee
Highlight the
NNaammee
option, and press
SSeelleecctt
The text editor appears. For more information on using the text editor see page 35.
Once you have the name you want, press
BBaacckk
to return to the
EEddiitt FFaavvoouurriittee
menu
18
18
Mode Lighting - ColourStyle User Guide
SS eelleecctt aa SSee qquueennccee ttoo bbee aa ffaavvoouurriittee ffrr oomm tthhee SSeeqquueenncceess MMeennuu
From the
mmaaiinn mmeennuu
press the
SSeeqquueennccee
soft key to
display the list of sequences
Highlight the sequence that you want to add to the
Favourites list
Press the ✭ soft key to add the sequence, a mes-
sage will show that this has been done.
Page 12
UUsseerr GGuuiiddee -- AAcccceessiinngg QQuuiicckk SSeettuupp
UUssiinngg QQuuiicckk SSeettuupp iiff tthhee CCoolloouurrSSttyyllee HHaass BBeeeenn UUsseedd BBeeffoorree
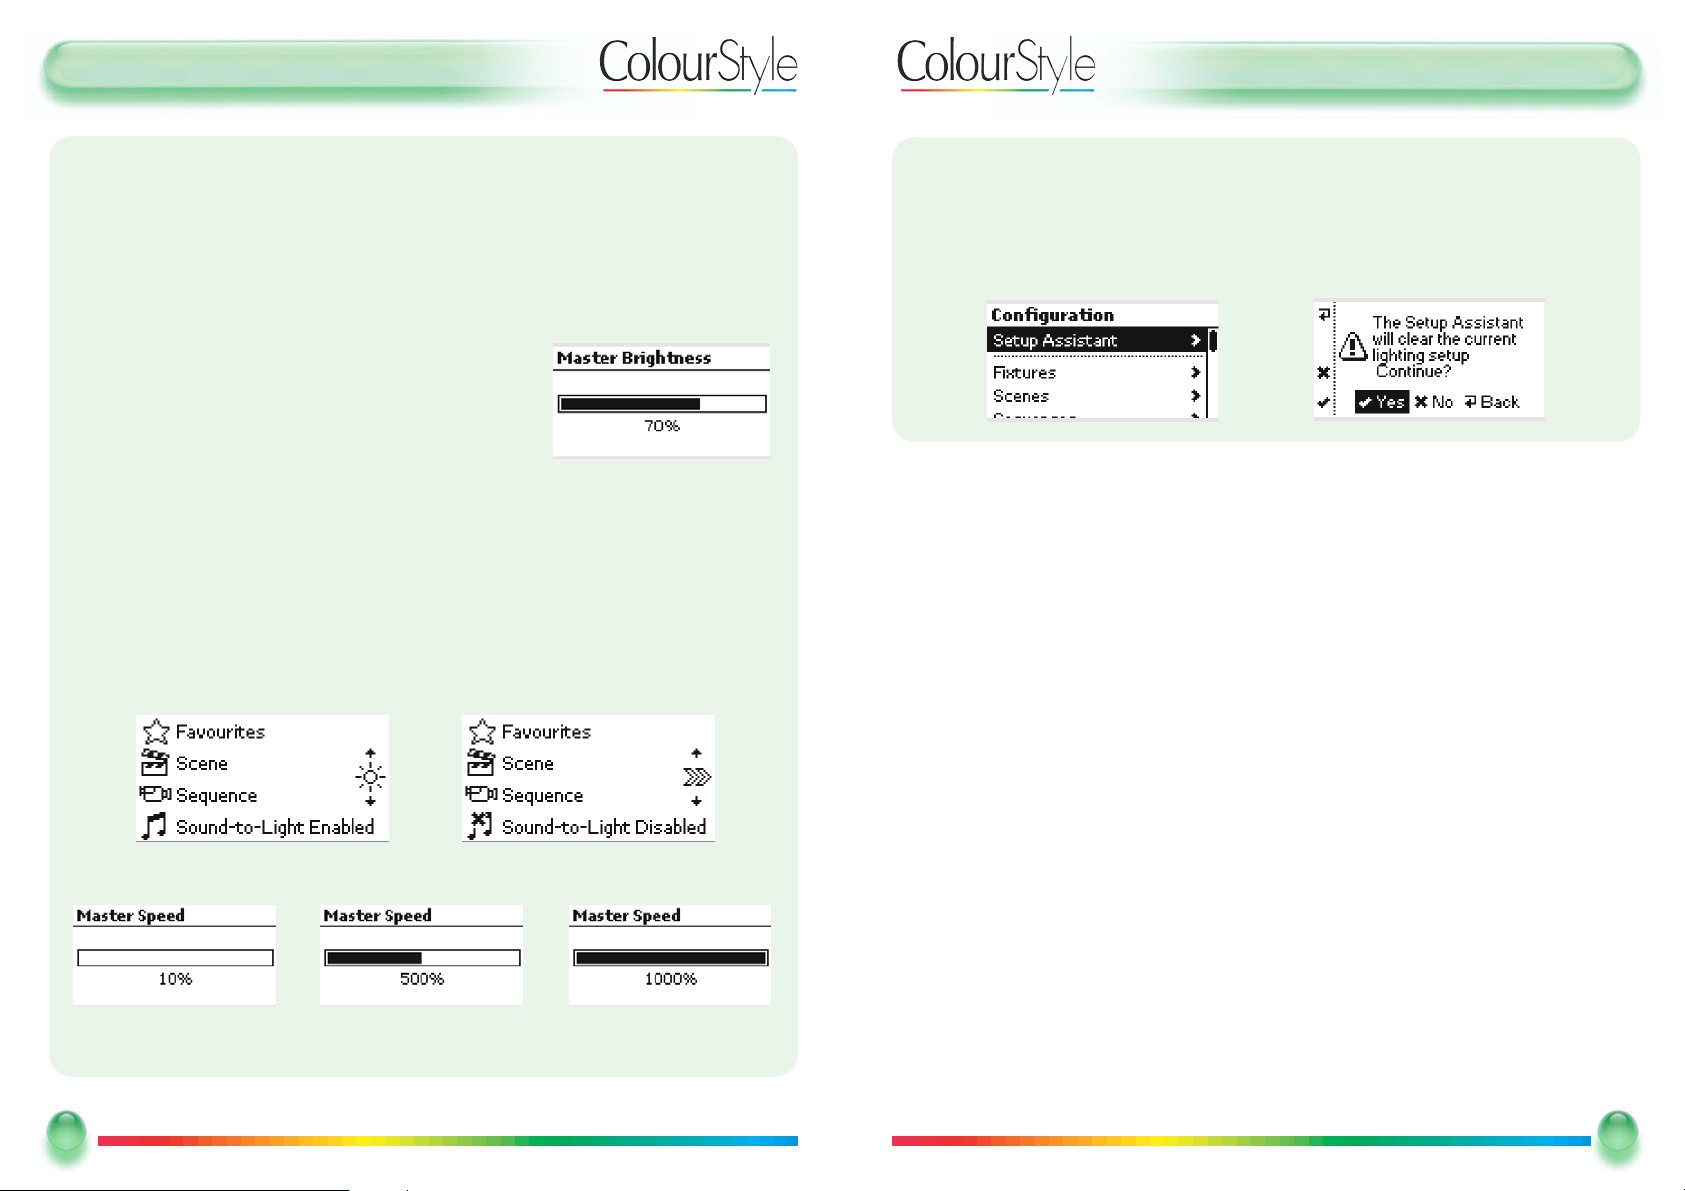
If the ColourStyle512 has been used before, the
QQuuiicckk SSeettuupp AAssssiissttaanntt
is available
via the
CCoonnffiigguurraattiioonn
menu (see page 22), and it checks to see whether you really
want to start a fresh setup:
21
21
Mode Lighting - ColourStyle User Guide
UUsseerr GGuuiiddee --MMaasstteerr SSppeeeedd//BBrriigghhttnneessss
EEddiittiinngg aa FFaavvoouurriittee
From the main menu press the Favourites soft key to show the list of favourites.
Select the favourite that you want to edit, and press the edit ! softkey.
You have options to change any of the following attributes
The name
The master brightness used by the favourite
The master speed applied to sequences recalled by the favourite
20
20
Mode Lighting - ColourStyle User Guide
MMaasstteerr SSppeeeedd aanndd MMaasstteerr BBrriigghhttnneessss
Use the
SSeelleecctt
button to choose between
MMaasstteerr BBrriigghhttnneessss
control (default) and
MMaasstteerr SSppeeeedd
control on the scroll-wheel.
By default, from the
mmaaiinn mmeennuu
, the scroll wheel is used to proportionally adjust the
brightness of all current outputs at once (think of this as working just like a “volume”
control on a hi-fi system):
Brightness may be adjusted between 0% and 100%
Any sequences which are running will be “turned up” or
“turned down” as appropriate, and will carry on running at the new brightness level.
The ColourStyle will return to the
mmaaiinn mmeennuu
after 5 seconds, or press the orange
BBaacckk
button to return to the main menu immediately.
When on the main menu, use the
SSeelleecctt
button to change between the
MMaasstteerr
BBrriigghhttnneessss
and
MMaasstteerr SSppeeeedd
function on the scroll wheel. The icon on the righthand side of the screen changes to show which function is active:
Speed may be adjusted between 10% and 1000%.
NB Speed may only be adjusted when the
SSoouunndd--ttoo--LLiigghhtt
is not active.
Page 13
UUsseerr GGuuiiddee --EEnnggiinneeeerrss MMeennuu
22
22
Mode Lighting - ColourStyle User Guide
EEnntteerriinngg EEnnggiinneeeerrss MMooddee ffoorr ddeettaaiilleedd CCoonnffiigguurraattiioonn
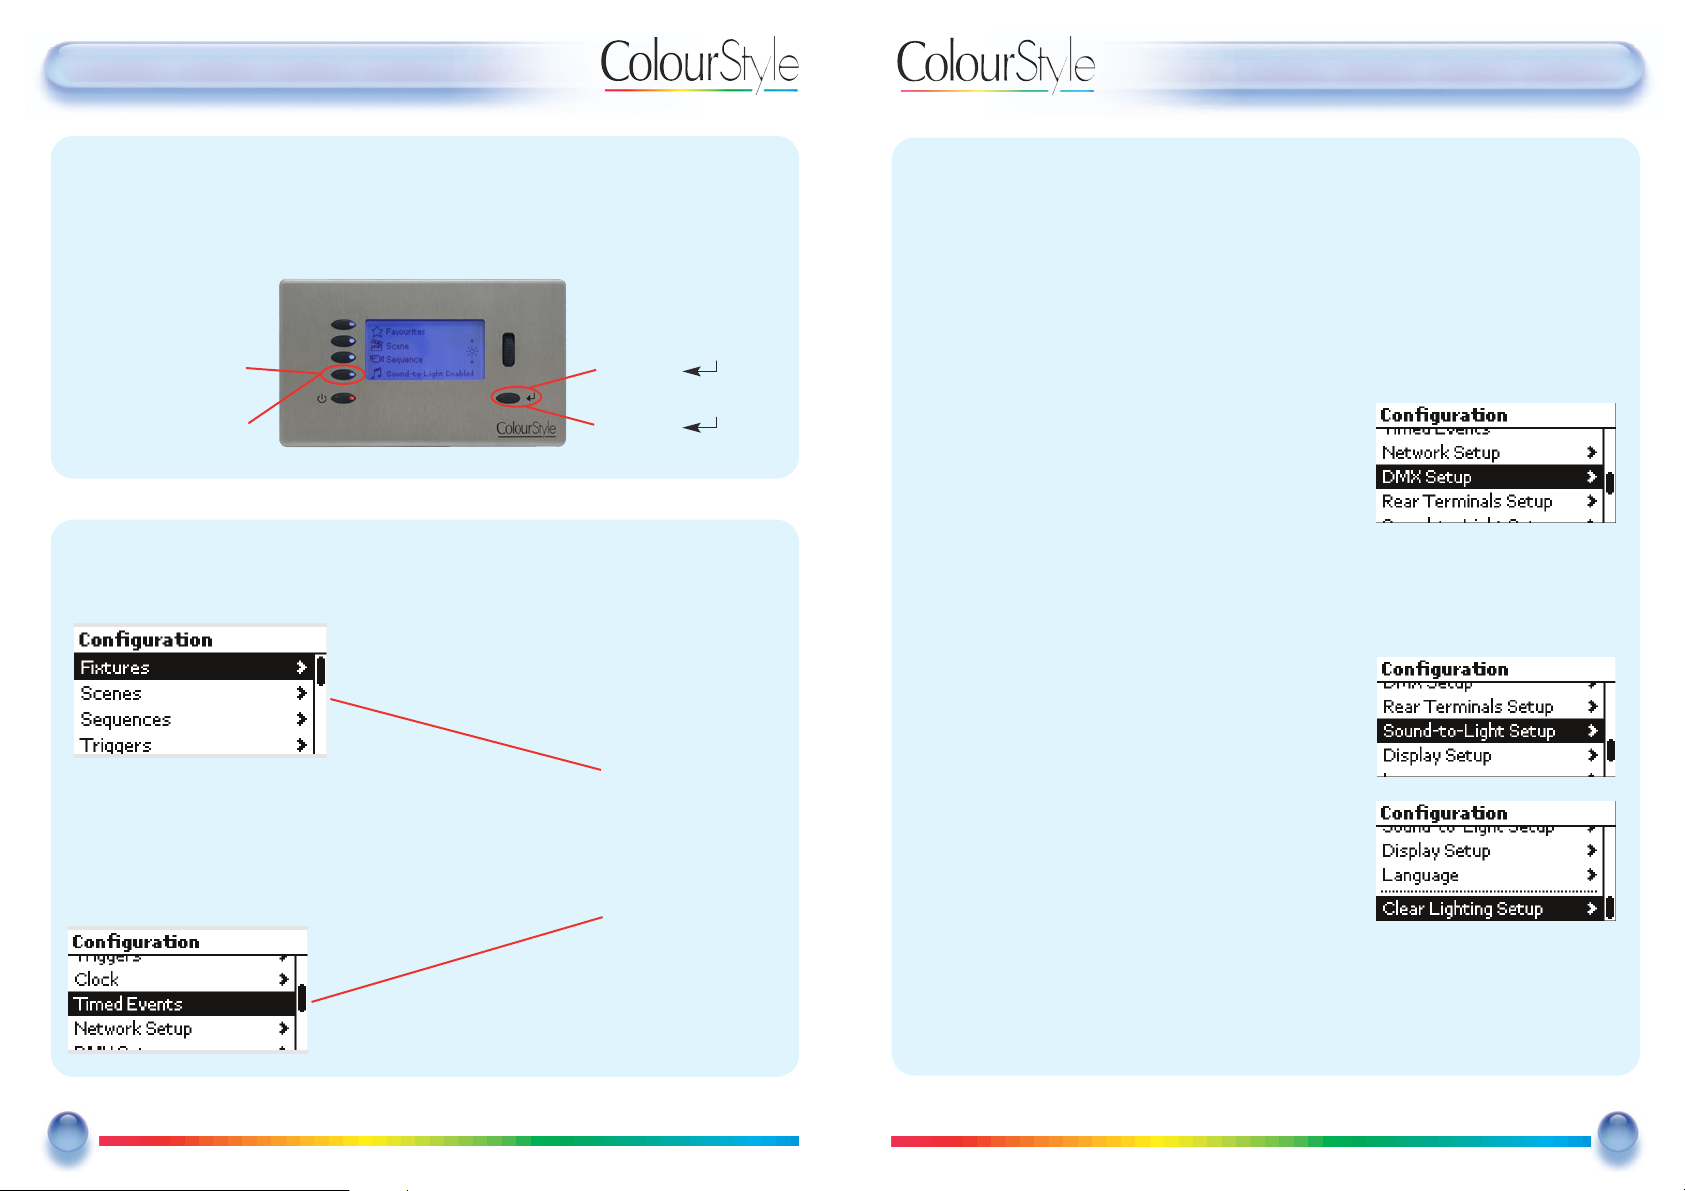
To enter Engineer’s Mode from the
MMaaiinn MMeennuu
press the fourth button (Sound-to-
Light) and the select button alternately, twice (i.e. press left, right, left, right).
CCoonnffiigguurree AAcctt iioonn MMeennuu
The
CCoonnffiigguurraattiioonn
menu is used to set up all functions of the DMX Generator:
1.) Sound-to-Light
3.) Sound-to-Light
2.) Select
4.) Select
UUsseerr GGuuiiddee -- AAcccceessiinngg QQuuiicckk SSeettuupp
CCoonnffiigguurree MMeennuu -- CCoonnttiinnuueedd
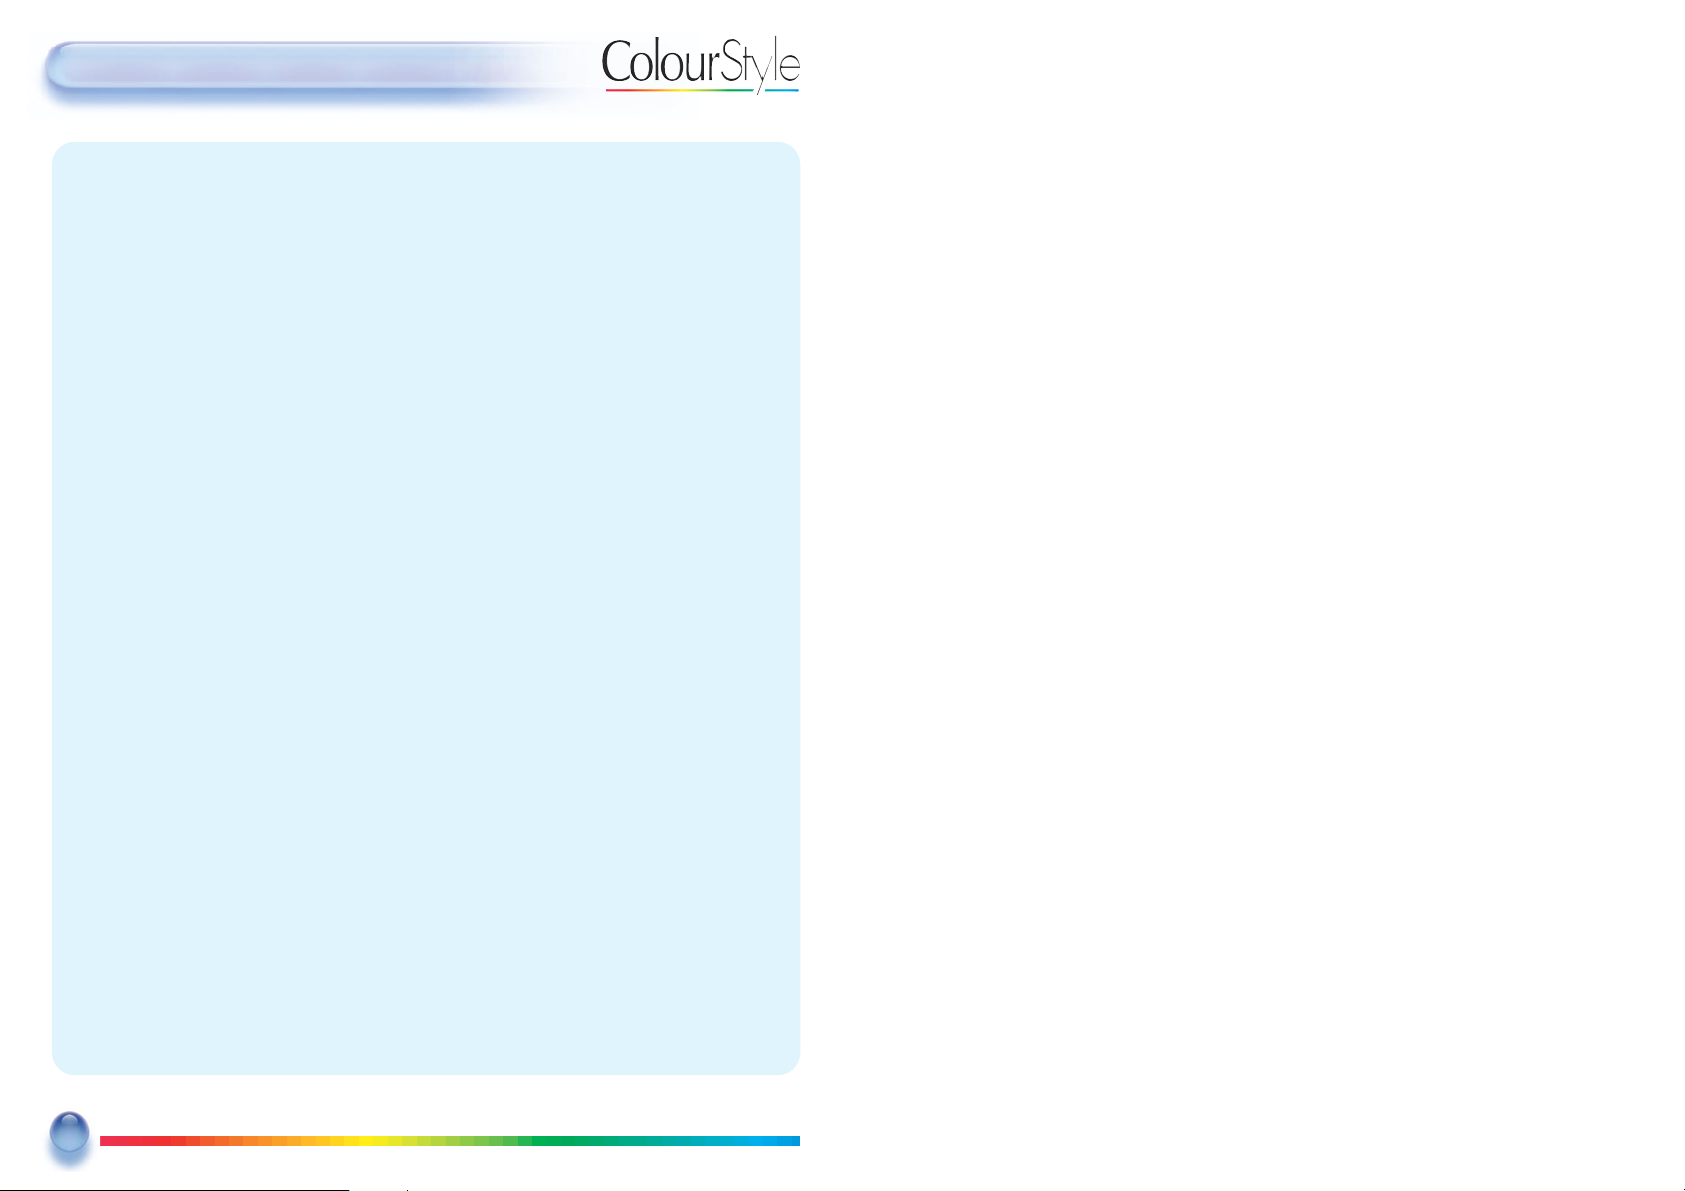
Clock: Sets the built-in real time clock, and geographical location.
Timed Events: Configures how the real-time-clock can be used to make scenes or
sequences happen at pre-programmed times or dates.
Network Setup: Configures the TCP/IP settings of the DMX Generator.
DMX Setup: Configures the number of channels
transmitted, and the timing
parameters of the DMX data, such as
the break, mark-after-break and
packet refresh timing.
Rear Terminals Setup: Selects the function of the configurable terminals on the rear
of the product, whether they are to be analogue 0-10v outputs, or
switch inputs.
Sound-to-Light Setup: Enable the Sound-to-Light
and view the “Beat Monitor”
Display Setup: Choose the backlight colour and
contrast of the display
Language: Select the display language
Clear Lighting Setup: Return to a blank system, so that new settings can be created.
23
23
Mode Lighting - ColourStyle User Guide
Fixtures; The DMX fittings connected to the ColourStyle
Scenes; Groups of static levels for channels of DMX
Sequences; The recall of scenes automatically over time
Triggers; Sets up the way in which the buttons or inputs
cause scenes or sequences to be recalled.
The scroll-bar position shows which
section of the menu
is currently on view.
Use the scroll wheel
to move up and
down between
menu items and to
bring new items
into view.
Page 14
UUsseerr GGuuiiddee --EEnnggiinneeeerrss MMeennuu
24
24
Mode Lighting - ColourStyle User Guide
CCoonnttiinn uuee dd oonn tthhee CCDD ((eenncclloosseedd))
CCoo nn tt eennttss::
Entering Engineer’s Mode for Detailed Configuration..........................................................
Configure Menu..........................................................................................................................................
Configuring ColourStyle for the First Time (without using Quick Setup Assistant)....
Defining Fixtures...........................................................................................................................................
Copying Scenes...........................................................................................................................................
Define Sequences......................................................................................................................................
Rear Terminals Setup.................................................................................................................................
Define Triggers.............................................................................................................................................
Clock Setup....................................................................................................................................................
Timed Events.................................................................................................................................................
Network Operation...................................................................................................................................
DMX Configuration....................................................................................................................................
Te s ting the DMX Output..........................................................................................................................
Network Configuration...........................................................................................................................
Language and Display Setup..............................................................................................................
The About Menu.........................................................................................................................................
Firmware Update.........................................................................................................................................
22
22
24
24
31
32
33
34
36
36
40
43
45
46
48
49
50
Page 15
Mode Lighting (UK) Limited.
The Maltings, 63 High Street, Ware, Hertfordshire,
SG12 9AD, United Kingdom.
Tel: +44 (0) 1920 462121
Fax: +44 (0) 1920 466881
email: [email protected]
website: www.modelighting.com
DS161 V.1
 Loading...