

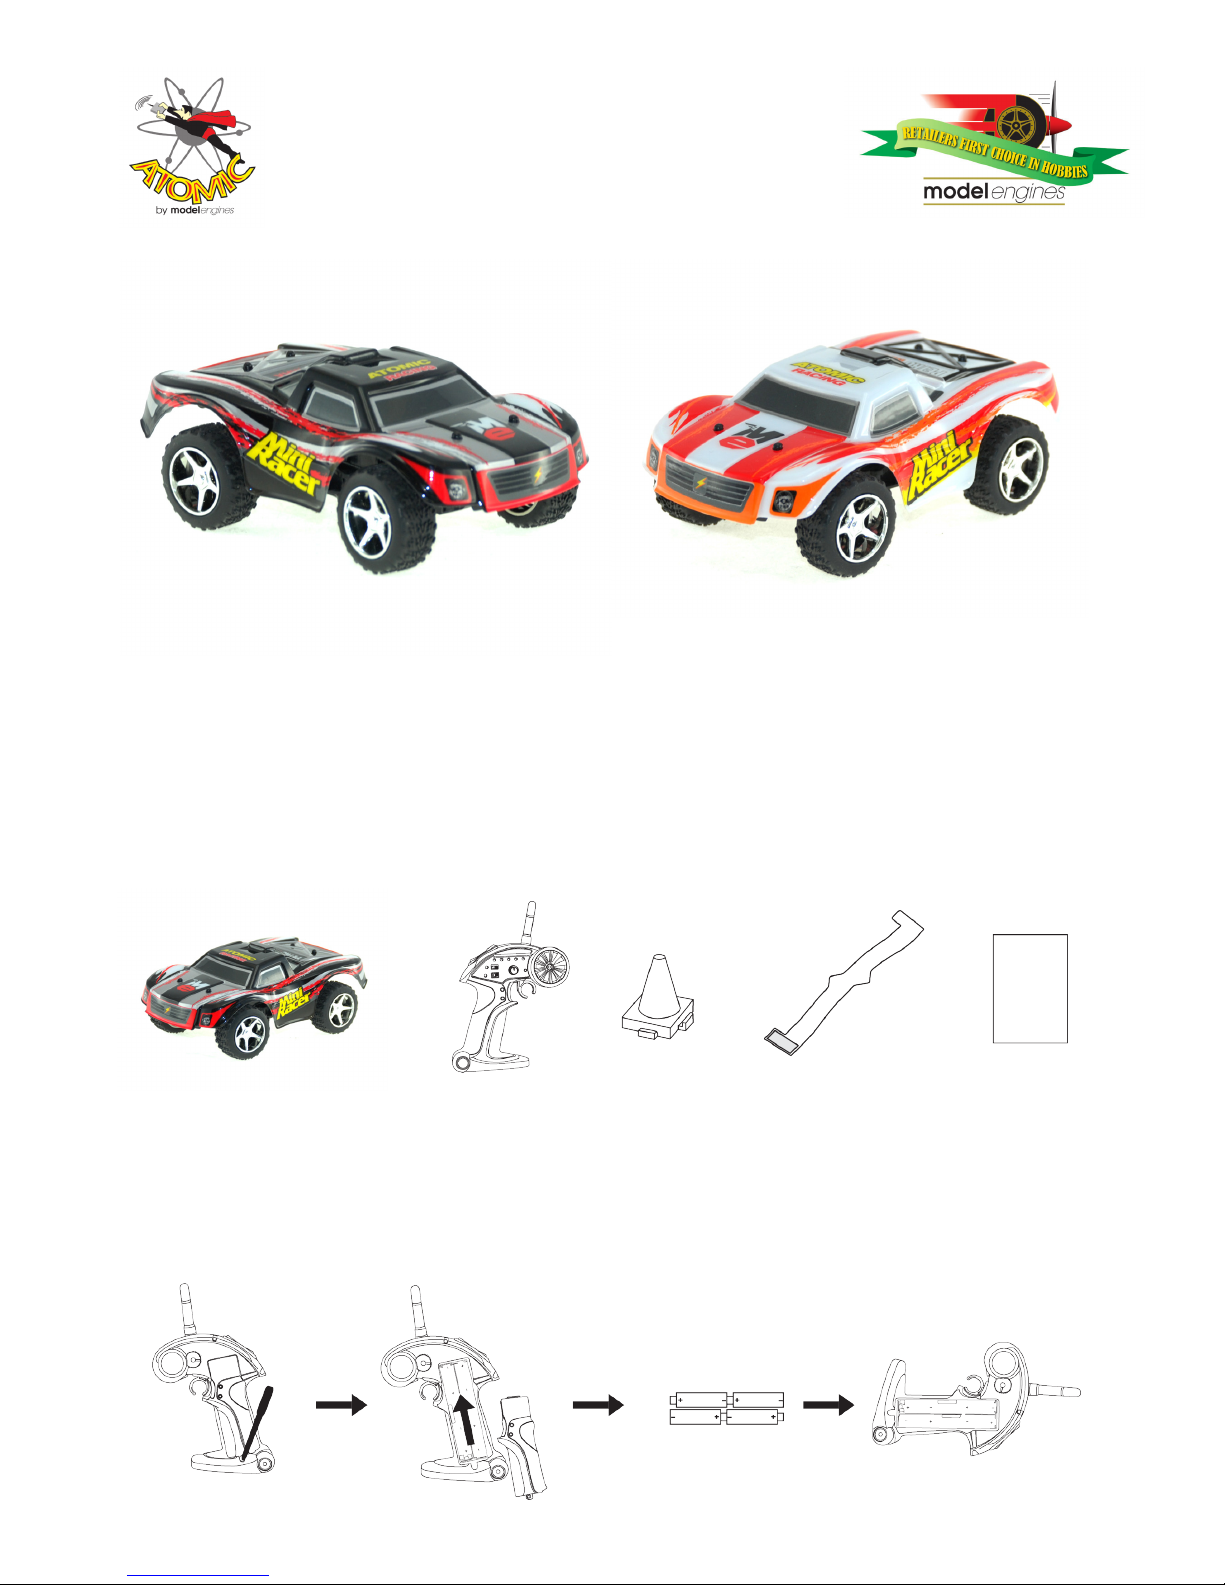
ATOMIC MINI RACER
Mini High Speed R/C Short Course Truck
INSTRUCTION MANUAL
Please read the instructions before use and retain for future reference.
e pictures may dier from the actual product, please refer to the actual product.
PRODUCT FEATURES
• Variable speeds from sedate to wild
• Gear change button for use in “5 Mode” with 5
forward gears for super high scale speed
• Self righting with roll over strip installed
• Super tough push on body shell
BOX CONTENTS
1 x Mini Racer
1x Transmitter
8x Witches Hats
1x Roll Over Strip
1x Instruction Manual
Colour Black
Colour Red
INSERT BATTERIES IN TRANSMITTER
• Using a screwdriver, undo the cross-head screw from the battery cover and remove the transmitter’s battery compartment cover by liing the cover from the screw end.
• Insert 4 good quality AA alkaline batteries making sure the polarity is correct as shown in the battery compartment. Re-attach the battery cover and secure with screw.
• High performance rechargeable LiPo battery
• Runtime up to 10 minutes
• Radio range up to 40m
• 2.4GHz proportional radio
• Mixed colours, Black or Red
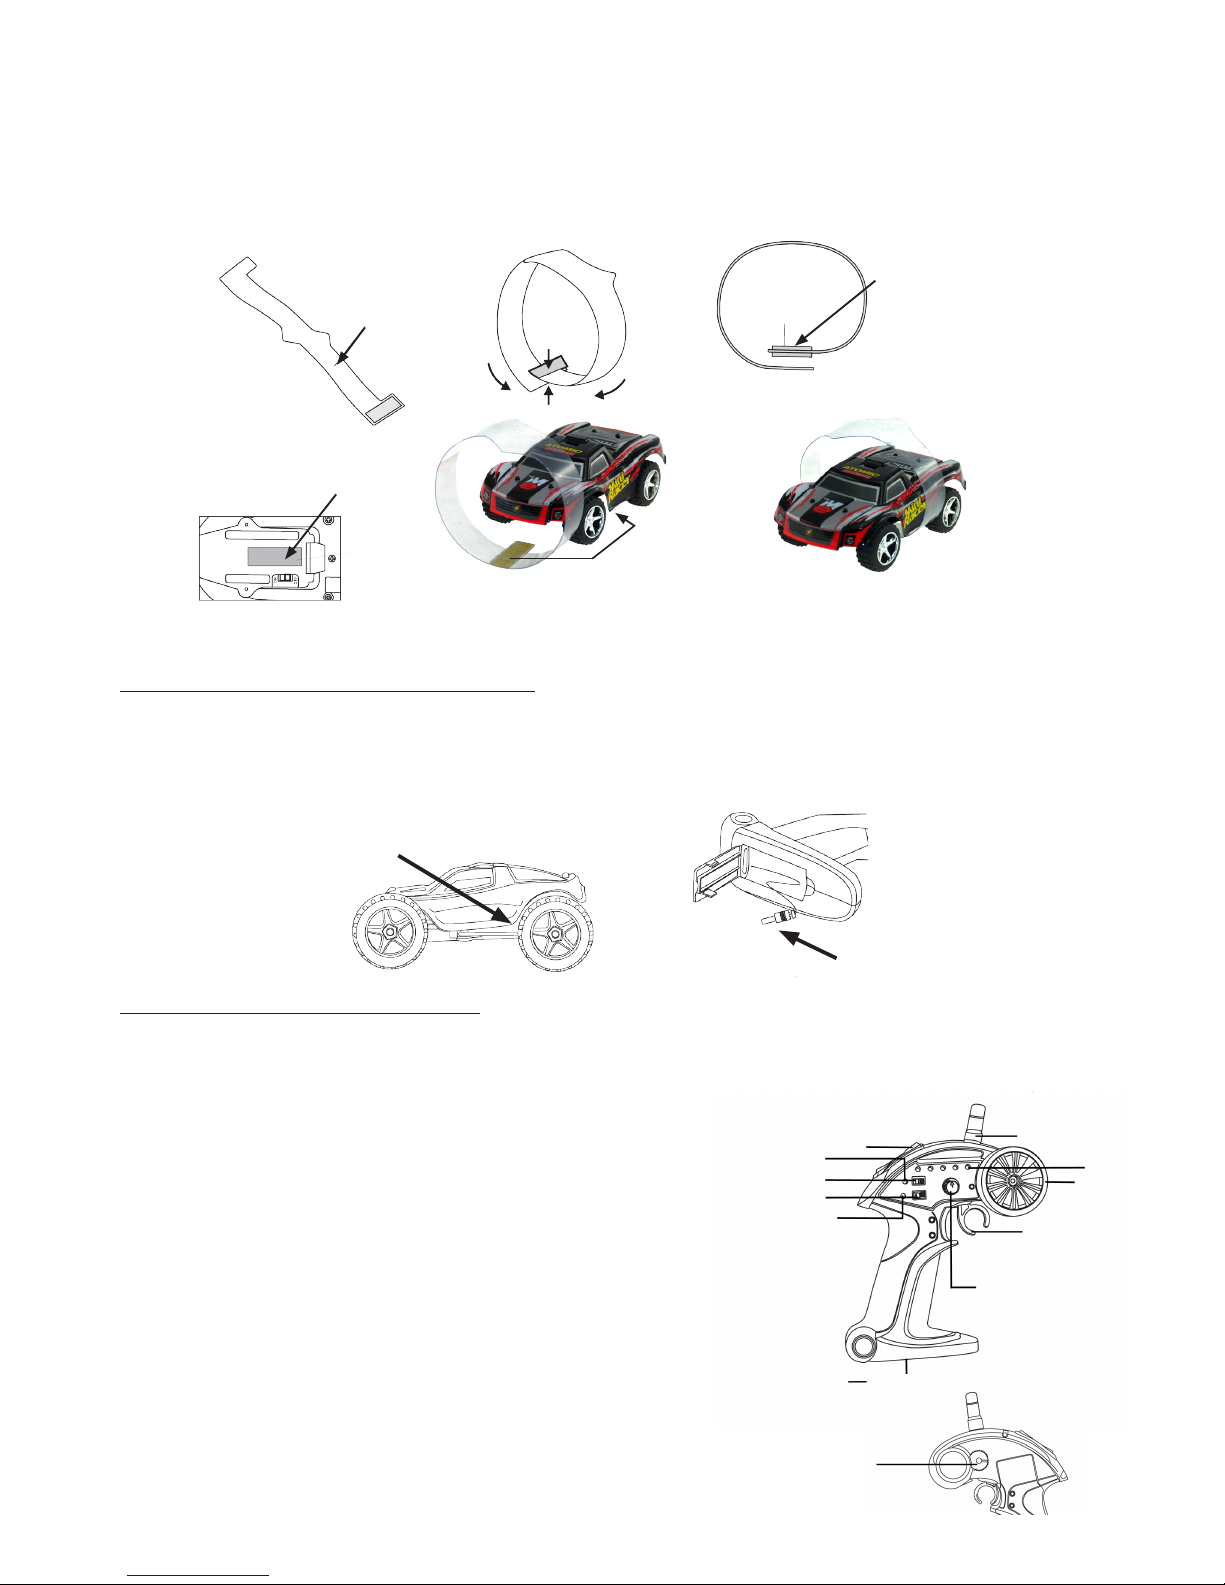
INSTALL ROLL OVER STRIP
You can protect the car and help it keep going when it ips by installing the included Roll Over Strip. Make a test circle from the
Roll Over Strip. en remove one piece of sticky tape covering to reveal the sticky surface and join the two ends of the Roll Over
Strip to make the circle. Now remove the other piece of stick tape covering from the inside of the circle and secure the it to the base
of the car as shown.
Note: Make sure the Roll Over Strip is positioned so as not interfer with the wheels of the Mini Racer.
Roll Over Strip
Stick Roll Over Strip to
bottom of Mini Racer
Mini Racer with Roll
Over Strip tted
Position on bottom of
Mini Racer to secure
Roll Over Strip
Secure inside of
Roll Over Strip
to bottom of
Mini Racer
CHARGING BATTERY IN MINI RACER
CHARGING FROM THE TRANSMITTER. Make sure the transmitter and Mini Racer is turned o. e charge lead
can be found under the cover on the base of the transmitter. Connect the charge lead to the charge port on the le hand side of the
chassis. e charge light will come on, indicating the Mini Racer is being charged. Charging will take about 40mins.
Note: Charging is complete when the charge light on the transmitter goes out.
Charge port is under the body
on the le hand side of chassis
Charge lead is under the
cover on base of transmitter
CHARGING FROM THE USB LEAD. Make sure your Mini Racer is turned o. Turn on your computer. Insert the
USB lead into a free slot on the computer. A RED light will come on. Insert the other end of the USB lead into the charge port on
the car. e RED light on the USB lead will go out indicating the Mini Racer is being charged. Charging will take about 60mins.
Note: Charging is complete when the RED light on the USB lead is on solid.
OPERATING YOUR MINI RACER
• e transmitter uses advanced 2.4Gz technology allowing precise, stable
control.
• 2.4 GHz technology allows multiple Mini Racers may be operated by
dierent modellers at the same time without interference.
• Turn on the Mini Racer by moving the switch on the base to ON. e
RED LED will come on. Immediately switch the Power Switch on the
transmitter to ON. e lights on the transmitter will ash then stay on.
• e Mini Racer is now ready for use.
• You can control the Mini Racer le and right using the steering wheel on
the transmitter.
• Speed is controlled by the throttle trigger, pull towards you for forward,
push away from you for backwards.
• In all ALL SCALE MODE the car automatically goes from slow to fast to
slow controlled by the throttle.
• In 5 MODE, you can use the SHIFT BUTTON to change gears up and
down to change speeds, with a corresponding LED on the transmitter.
2.4G Antenna
Gear Indicators
Steering wheel
Right & Le
rottle Trigger
Forward & Backward
Forward & Backwards
Trim Knob
Charge Lead
Charging Light
Mode Change Switch
Power Switch
Power LED
Gear Shi Toggle Shi
Steering Trim
Right & Le

WARNINGS, PROBLEMS AND SOLUTIONS
1. When you notice the car is slowing down, even with full throttle applied, the battery in the mini racer
is low and needs recharging. Turn o the car and the transmitter and recharge the battery in your mini
racer.
2. If you can no longer charge the mini racer from the transmitter, replace the batteries in the transmitter
with new ones. Do not mix old batteries with new ones or use dierent branded batteries at the same
time.
3. If you are not going to use your mini racer for a while, charge the battery in the mini racer before you put
it away and remove the batteries from the transmitter.
4. Do not leave your mini racer unattended while charging.
5. Do not use your mini racer in wet areas or on wet grass as water will damage the electronics. Water
damage is not covered by warranty.
6. Children under 14 need adult supervision to set up the mini racer and at all times during use.
7. If the car goes out of control, it may be out of range. Make sure you keep the mini racer within 40m.
8. If the car does not track in a straight line, use the Steering Trim knob on the transmitter to correct it.
9. If the car goes out of control at close range, the batteries in the transmitter may need to be changed.
10. Always operate the mini racer with safety in mind and never use on public roads.
11. Please keep this instruction sheet for future reference.
JUMPS AND TRICKS
You can learn to jump and do other tricks with the Mini
Racer to keep improving your driving skills.
By changing the amount of throttle during a jump, you
can make the nose of the car go up or down.
Pulling the throttle trigger (increasing
speed) during a jump will make the nose
go up.
Pushing the throttle trigger (decreasing
speed) during a jump will make the nose
go down.
Single ramp jumping
Curved ramp jumping
Holding the throttle on will cause the car to loop!
Twin ramp jumping
rottle ON then rottle OFF to
make the car y perfectly
Climbing in a bucket or a Tube
Another really cool trick is place the Mini Racer in a bucket or a
clear plastic tube of between 20 ~40cm and give it full throttle.
With practice you can make the Mini Racer defy gravity.
You can even come up with your own tricks!!!

30 DAY WARRANTY
Model Engines (Aust.) Pty. Ltd. warrants this product to be free from defects in materials or
workmanship for 30 days from the date of purchase and will repair, replace or refund the
purchase should the product prove to be defective.
This warranty does not apply to any unit or system or component which has been dropped,
damaged in a crash, improperly installed, assembled, handled or abused.
Model Engines (Aust.) Pty. Ltd. reserves the right to void the warranty if the product has
been altered or modified, has had a foreign part added, has been misused or not used for the
purpose for which it was designed, has been used near or in salt water, has been water
damaged, or if the damage has been caused by the customer’s use of the product.
Under no circumstances does Model Engines (Aust.) Pty. Ltd. warrant nor will the consumer
be entitled to consequential or incidental damages. Model Engines (Aust.) Pty. Ltd. assumes
no responsibility for any other damage, inconvenience or other claims whatsoever.
LODGING A CLAIM
To lodge a claim, present the goods to your place of purchase (retailer where you bought the
product) with your original purchase receipt and a written explanation of the defect.
The place of purchase (retailer where you bought the product) will then contact Model
Engines (Aust.) Pty. Ltd. for a Return Authority number and will return the item for warranty
assessment to Model Engines (Aust.) Pty. Ltd.. Items delivered to Model Engines (Aust.)
Pty. Ltd. for warranty assessment without a Return Authority number will be returned to
sender.
The warranty process may take up to 14 business days from the date of receipt. Model
Engines (Aust.) Pty. Ltd. must assess each item and if warranty applies must repair or replace
the item at its discretion and return it to the place of purchase (retailer where you bought the
product).
Goods presented for warranty may be replaced by refurbished goods of the same type rather
than being repaired. Refurbished parts may be used to repair the goods.
If the product is proved to be defective the cost and expenses relating to the delivery of the
goods to Model Engines (Aust.) Pty. Ltd., will be borne by Model Engines (Aust.) Pty. Ltd..
The benefits of this warranty are in addition to other rights and remedies of the customer
under any law to which this warranty relates.
Our goods come with guarantees that cannot be excluded under the Australian consumer
Law. You are entitled to a replacement or refund for a major failure and for compensation
for any other reasonably foreseeable loss or damage. You are also entitled to have the goods
repaired or replaced if the goods fail to be of acceptable quality and the failure does not
amount to a major failure.
Model Engines (Aust.) Pty. Ltd., Unit 1, 158-168 Browns Road, Noble Park, Victoria, 3174,
Australia.
www.modelengines.com.au
Ph (03) 8793 5555 warranties@modelengines.com.au
This warranty information relates to goods supplied on a wholesale basis by Model Engines
(Aust.) Pty. Ltd. to Australian Retailers. The warranty complies with Australian regulatory
requirements and supersedes all warranty information from the original manufacturer.
 Loading...