

Page 1
MODECOM
user’s manual
personal navigation
device
Page 2

www.modecom.eu
2
PERSONAL NAVIGATION DEVICE
Contents:
I. Basic Introduction 5
1. Overview 5
2. Using accessories 5
2.1 Charging by AC adapter 5
2.2 Charging by Car Charger 6
2.3 Install the Car Mount System 6
II. Main function introduction 6
1. Starting up 6
2. Navigation 7
3. Media 7
3.1 Music 8
3.2 Photo 9
3.3 Ebook 10
3.4 Video 10
4. Bluetooth 12
4.1 Phone keypad 12
4.2 Call Record 13
4.3 Pair 13
4.4 Attribute 14
4.5 Pair Devices 15
4.6 Last call record 15
5. System setting 15
5.1 Backlight 16
5.2 System Info 16
5.3 Language 18
5.4 Power 18
5.5 Volume 18
5.6 Date Time 19
III Connecting to Your PC 21
IV Battery, Charger and Safety
Precaution 22
1.1 About Charging 22
1.2 About the AC Adapter and the Car
Charger 22
1.3 About the Battery 22
V Troubleshooting and Maintenance 23
1.1 Resetting Your System 23
1.2 Power Problems 23
1.3 Screen Problems 23
1.4 Connection Problems 24
1.5 GPS Problems 24
Page 3

3
PERSONAL NAVIGATION DEVICE
personal navigation
device
GB
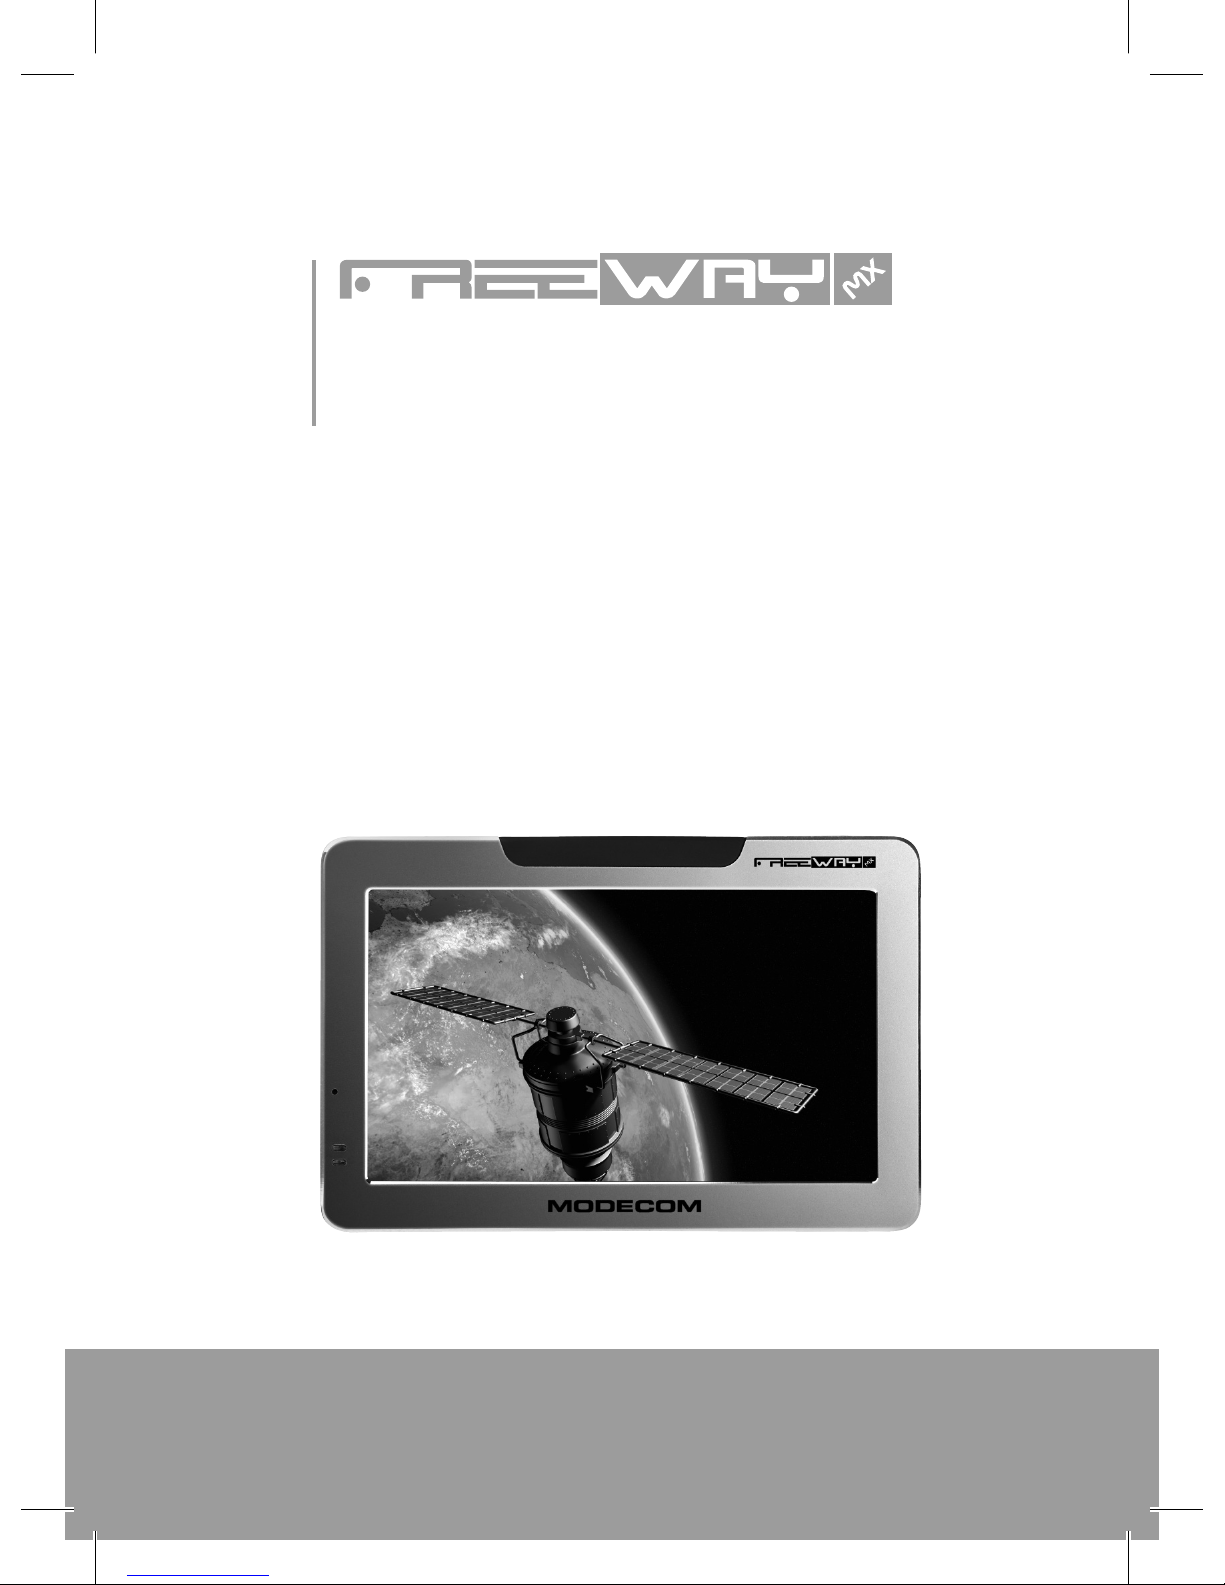
Thank you for choosing MODECOM FreeWAY MX GPS Navigation Device.
MODECOM FreeWAY MX is a new model from astonishing FreeWAY series. With big 5.0 inch
display , it is more convenient while driving a car or making the journey safer. FreeWAY MX
is one of the most advanced devices in the market. The 30 GPS channels ,allow the custo-
mer to obtains excellent positioning accuracy.
With FreeWAY MX each journey is a real pleasure as the driver can feel comfortable. The
simple user’s interface along with sensitive touch panel and voice instructions can not to
be underestimated.
MODECOM FreeWAY MX allows you to make use of many important functionalities such
as: GPS positioning, searching for speci c locations, calculating and planning optimal jo-
urney route, recording route and its playback.
Additional features such as a built-in Bluetooth module allows to pair your mobile pho-
ne with the FreeWAY MX and use it as a hand-free set. AV-IN gives possibility to connect
device with rearview camera. MODECOM FreeWAY MX is also equipped with interesting
entertainment features that can make each journey more pleasant. Device includes mul-
timedia player (for music and movie playing), photo browser and e-book reader. All les
can be storage on the SDHC card that FreeWAY MX supports. To make the journey even
more entertaining FM transmitter allows to listen to the music directly from the car spe-
akers. The stable car mount enables to set device in the most convenience position for the
driven, preventing at the same time shaking of the whole set.
It is amazing how safe and pleasant the journey has become.
Page 4

www.modecom.eu
4
PERSONAL NAVIGATION DEVICE
MODECOM cares about the product quality to satisfy both current and future customer
needs. Our customers has been accustomed to high quality, advanced technology and re-
liability of our products. For you, we are creating things exceptional in every aspect.
Choose better future – choose MODECOM!
The information contained here subject to changes without notice.
Introduction
This manual is a complete instruction for the device. Please read this manual carefully be-
fore using.
Precaution and Notice
GPS is operated and controlled under the sole responsibility of the Government of the
United States of America, who are responsible for its availability and accuracy. Any chan-
ges in GPS availability and accuracy, or in environmental conditions, may impact the ope-
ration of your device .We can not accept any liability for the availability and accuracy of
GPS.
The device is used only as a navigation aid. It is not for precise measurement of direction,
distance, location or topography. The user must follow all tra c signs and local regula-
tions along the roads.
GPS satellite signals cannot pass through solid materials (except glass). When you are insi-
de a tunnel or building, GPS position is not available.
A minimum of 4 GPS satellite signals are needed to determine current location. Signal re-
ception can be a ected by situations such as bad weather or wireless devices or dense
overhead obstacles (e.g. tall buildings).
When you get out of the car, do not leave device on the dashboard or subject to direct
sunlight. The overheating of the battery may cause malfunctions and/or dangerous con-
ditions.
Page 5

5
PERSONAL NAVIGATION DEVICE
For your own safety, do not operate the controls of the device while driving. Do not mount
where the driver’s eld of vision is blocked
In the Box
FreeWAY MX, AC adapter, Suction mount, Car charger, User manual, Bracket, USB cable,
Earphone, Mini DVD
I. Basic Introduction
1. Overview
(1) Power Switch, (2) USB Connector, (3) Earphone Jack, (4) AV-IN Port, (5) SD/SDHC Card
Slot, (6) Reset , (7) Stylus
2. Using accessories
2.1 Charging by AC adapter
Please use the AC adapter to charge the device for the rst time. To maximize the life of the
battery, the device must be full of charge for the rst time.
(1)
(2)
(3)
(4)
(5)
(6)
(7)
Page 6
www.modecom.eu
6
PERSONAL NAVIGATION DEVICE
- Plug the adapter’s DC port into the device’s USB port on its right-side panel
- Plug the adapter into the main supply socket.
- The charging indicator will light. When the unit is fully charged, the red indicator will
turn green.
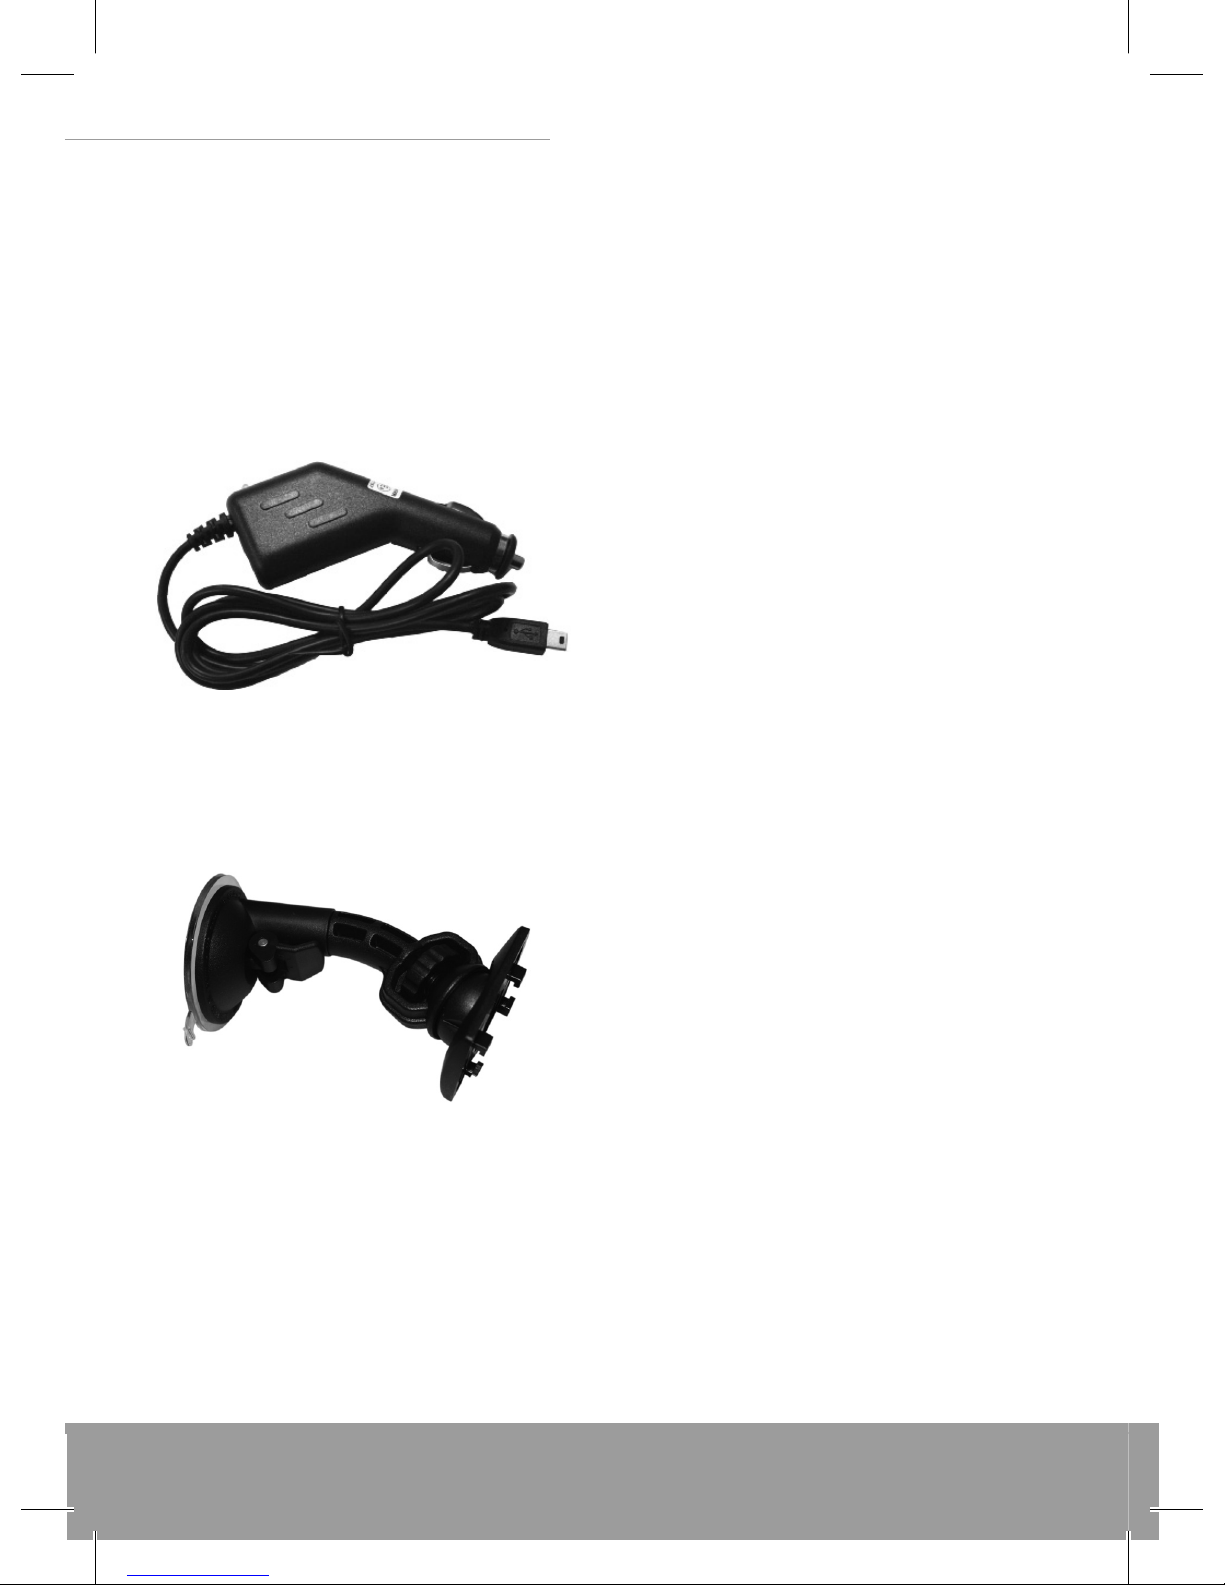
2.2 Charging by Car Charger
The car charger supplies power to your device
when you are using the device in a car.
Caution: To protect your device against sud-
den surges in current, connect the car charger
only after the car engine has been started.
Plug the car charger’s USB plug into the USB
port of the FreeWAY MX and the other end into the car’s cigarette lighter.
2.3 Install the Car Mount System
Take o the protected lm on the bottom of
the suction mount, then choose a right pla-
ce on the windscreen or side window. Make
sure that the area where the suction mount
will be xed is clear. Caution: Never place the
stand where the driver’s eld of vision is
blocked.
II. Main function introduction
1. Starting up
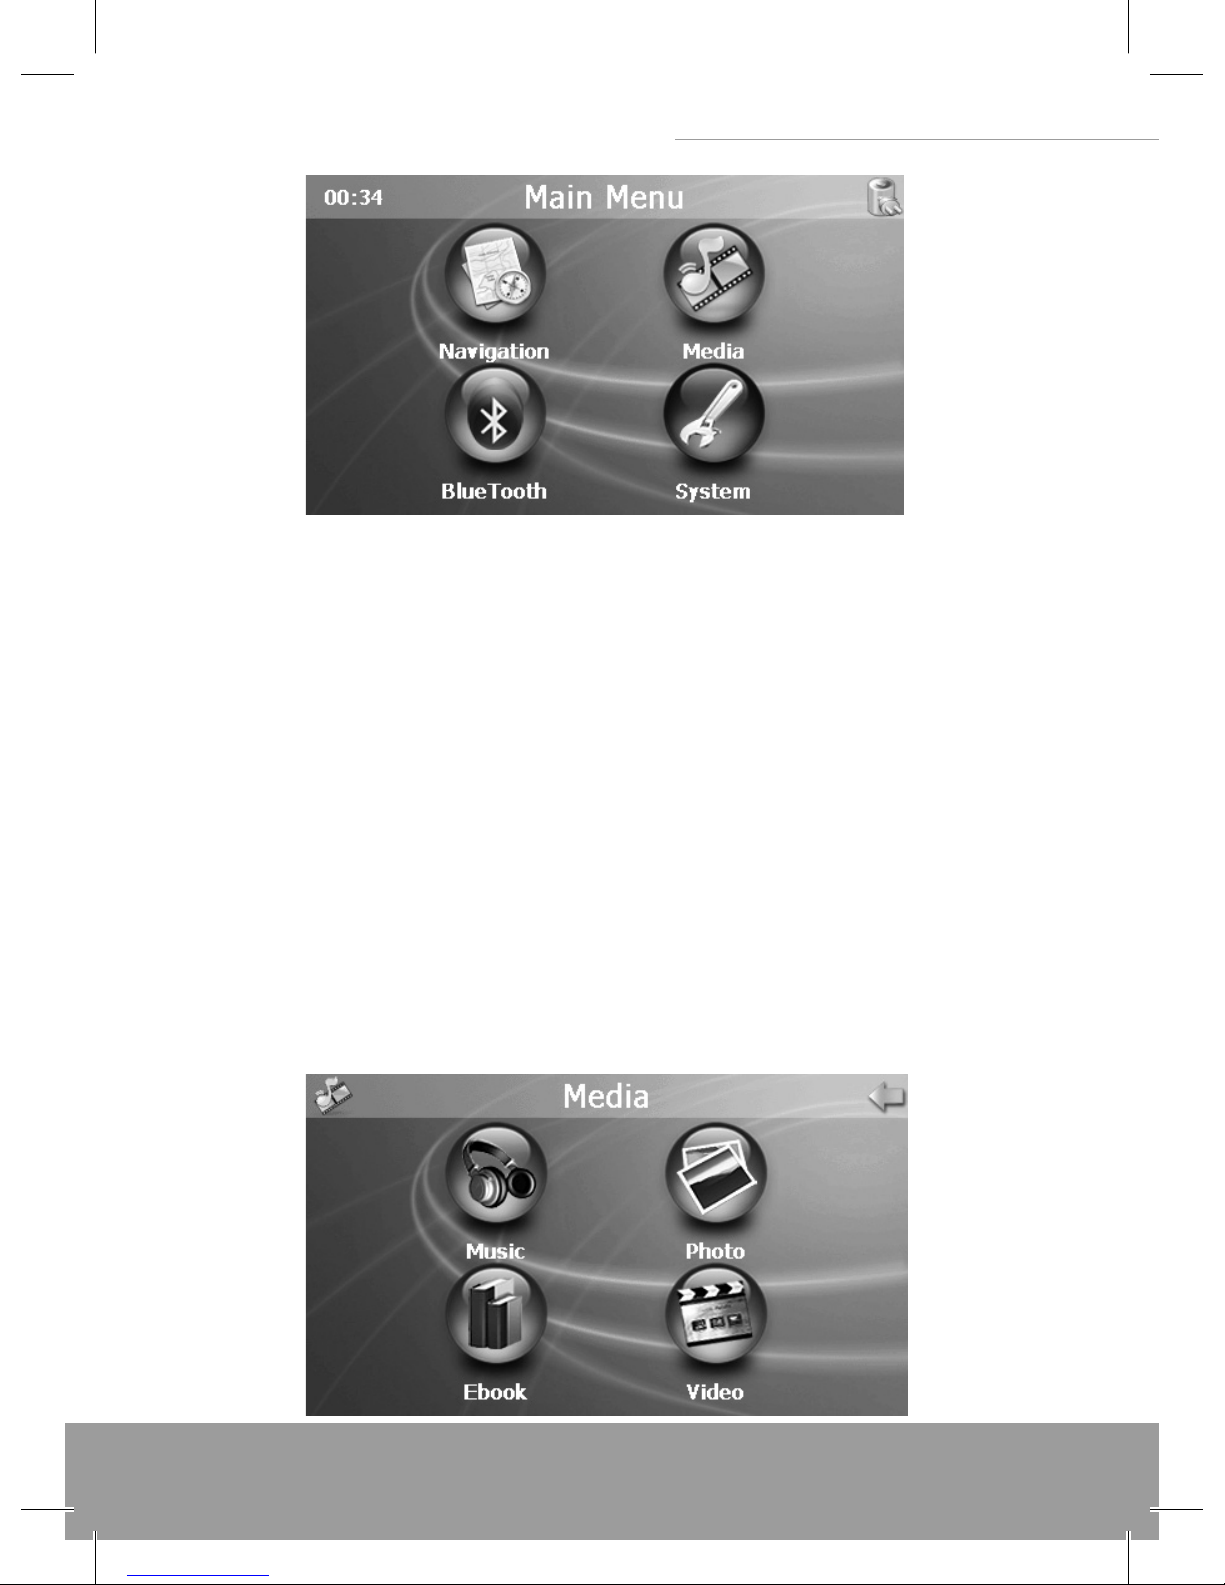
Press the Power button to power on the device, then you will enter into the Main Manu
interface.
Page 7
7
PERSONAL NAVIGATION DEVICE
2. Navigation
Insert the SD/SDHC card with map software (optional) into the slot of FreeWAY MX.
Note: Do not remove the card during GPS operation.
Double tap the “Navigation” icon on the Main Menu to start the navigation program.
Please refer to the manual of the map software.
Note: Normally it takes a bit longer to receive the GPS signal the rst time you turn on the
unit. Your device has to locate at least 3 satellites to function. This time to nd the satelli-
tes is signi cantly shorter after the rst time you use the device. If you move your unit over
300km without it being used, it may need a little more time to locate the satellites again.
3. Media
Tap the "Media" icon on the Main Menu and enter into the following interface.
Page 8
www.modecom.eu
8
PERSONAL NAVIGATION DEVICE
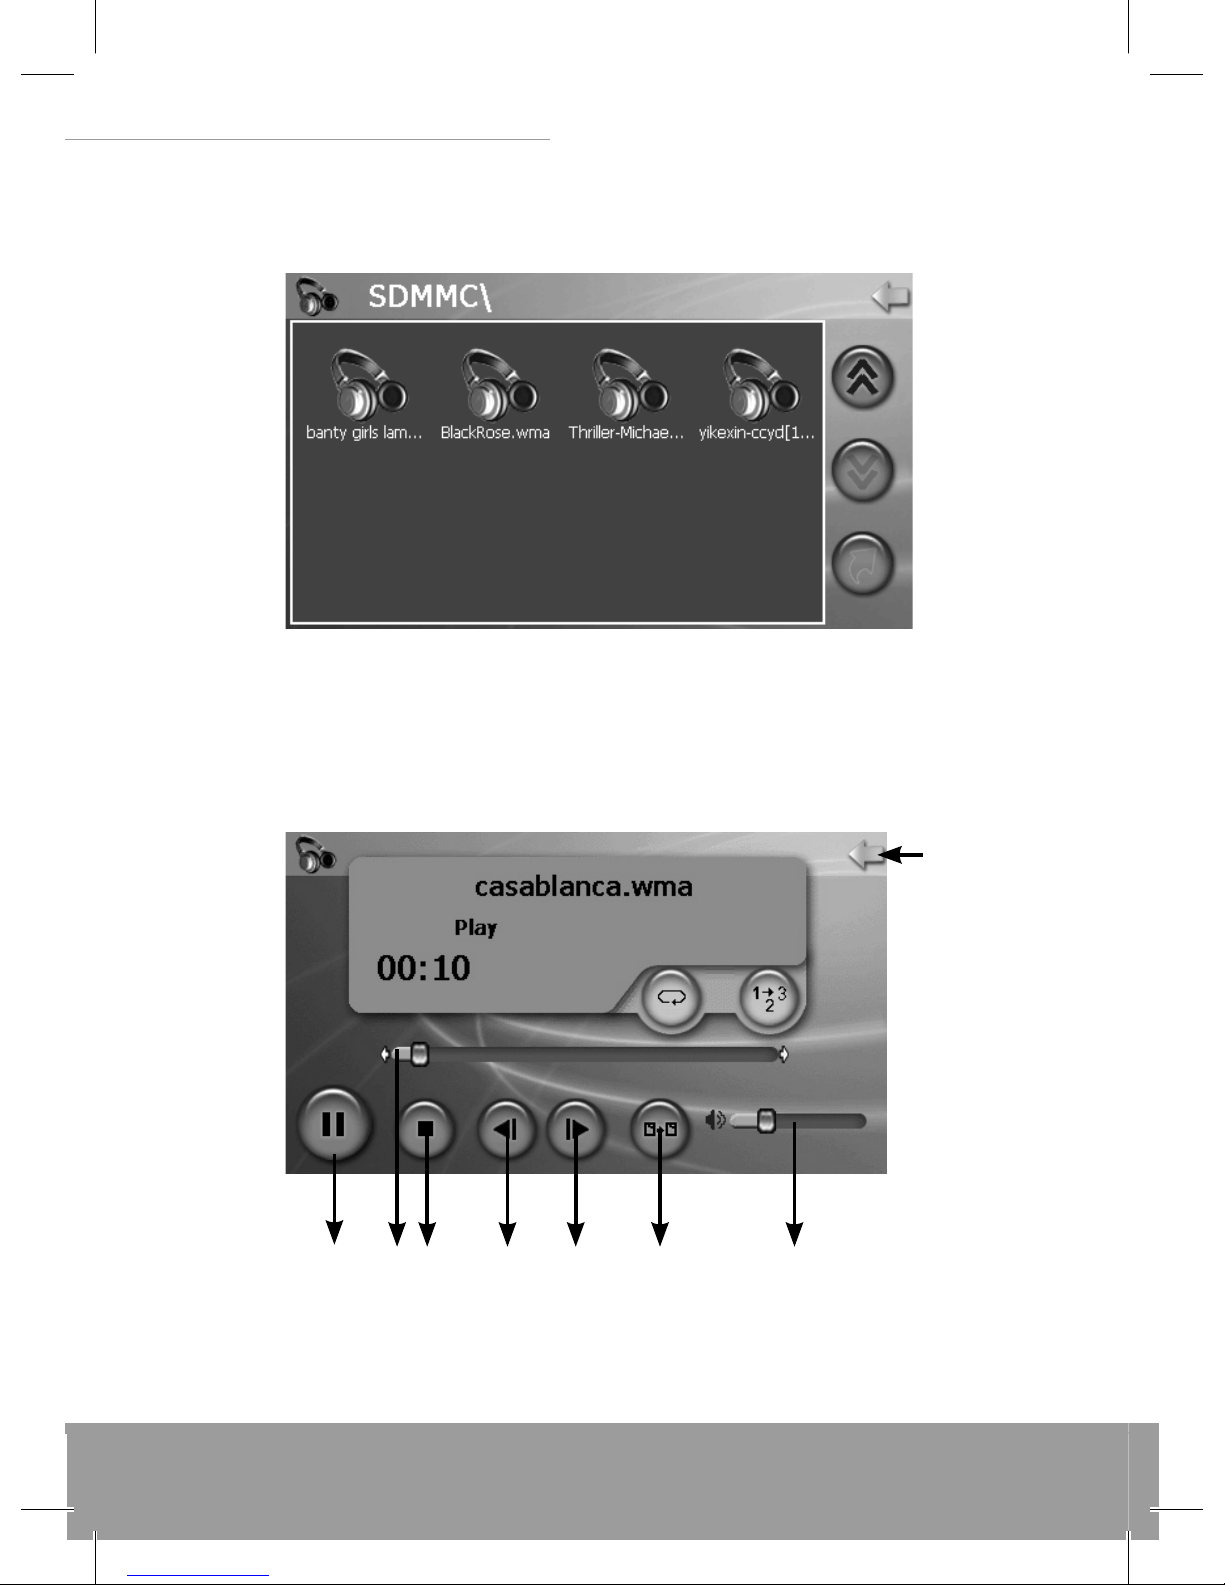
3.1 Music
1) Tap the icon “Music” on the media menu and enter into following interface.
A
B
C
A: Page Up, B: Page Down, C: Return to previous menu
2) Double tap your desired le and enter into the following interface.
A
BCDEFGH
A: Return to the Media Menu, B: Volume control, C: Return to previous menu, D: Next , E:
Previous, F: Stop, G: Speed bar, H: Pause/Play
Page 9
9
PERSONAL NAVIGATION DEVICE
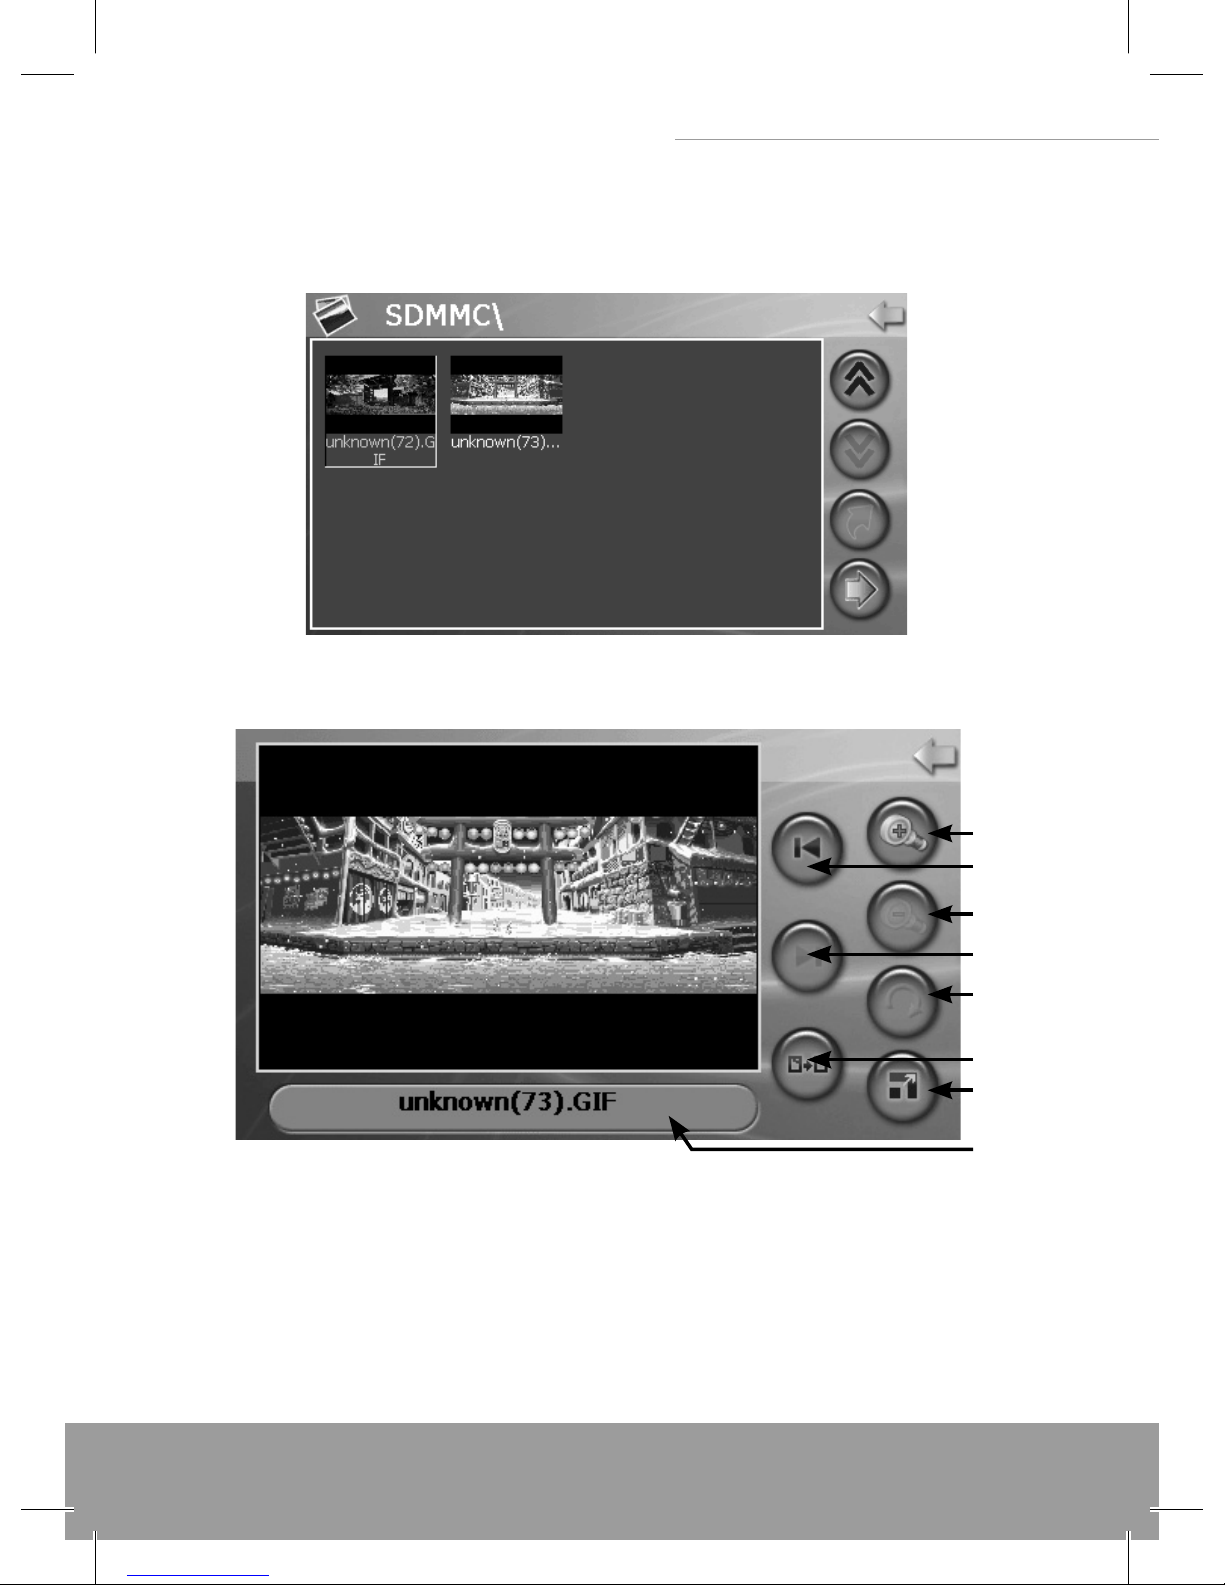
3.2 Photo
1) Tap the "Photo" icon on the media menu and enter into the following interface.
2) Double tap the le on the screen and enter into the following interface.
E
A
F
B
H
C
G
D
A: Return to the Media Menu, B: Next, C: Return to previous menu, D: Current picture
name, E: Zoom in, F: Zoom out, G: Full screen, H: Rotate
Tap “Full screen” button, it will display in full screen size.
When in full screen, double press the screen again, it will return to original playing size.
Page 10
www.modecom.eu
10
PERSONAL NAVIGATION DEVICE
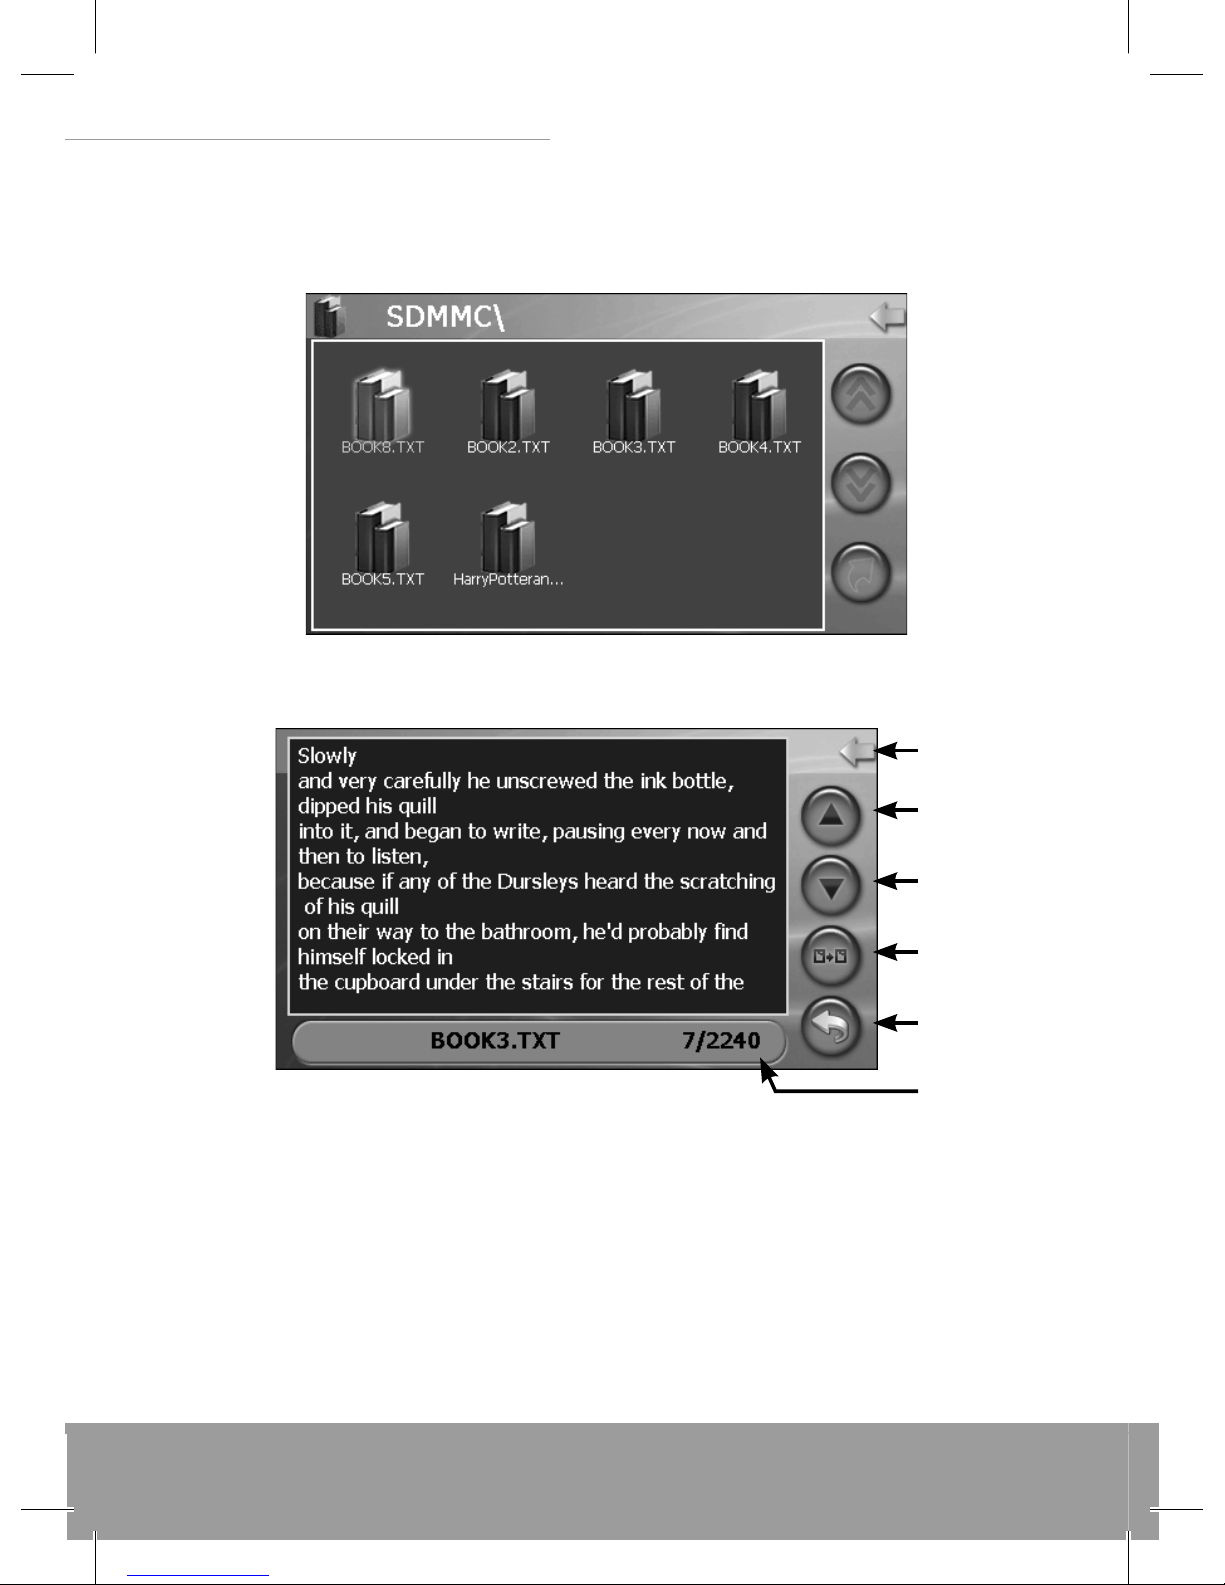
3.3 Ebook
1) Tap the "Ebook" icon on the Media menu and enter into the following interface.
2) Double tap the le and enter into the following interface.
A
B
C
D
E
F
A: Return to the Media Menu, B: Previous, C: Next, D: Return to previous menu, E: Pages
chose, F: Current page/Total pages, G: Current le name
3.4 Video
1) Tap the icon "Video" on the Media menu and enter the following interface.
Page 11

11
PERSONAL NAVIGATION DEVICE
A
B
C
A: Page Up, B: Page Down, C: Return to previous menu
2) Tap the le you desired and enter into the following interface.
A
B
F
C
G
D
EH
A: Return to the Media menu, B: Pause/play, C: StopD: Next, E: Volume control, F: Full scre-
en, G: Return to previous menu, H: Speed bar
Tap “Full screen” button or double press the screen, it will play in full screen.
When playing in full screen, double press the screen again, it will return to original play-
ing size.
Page 12
www.modecom.eu
12
PERSONAL NAVIGATION DEVICE
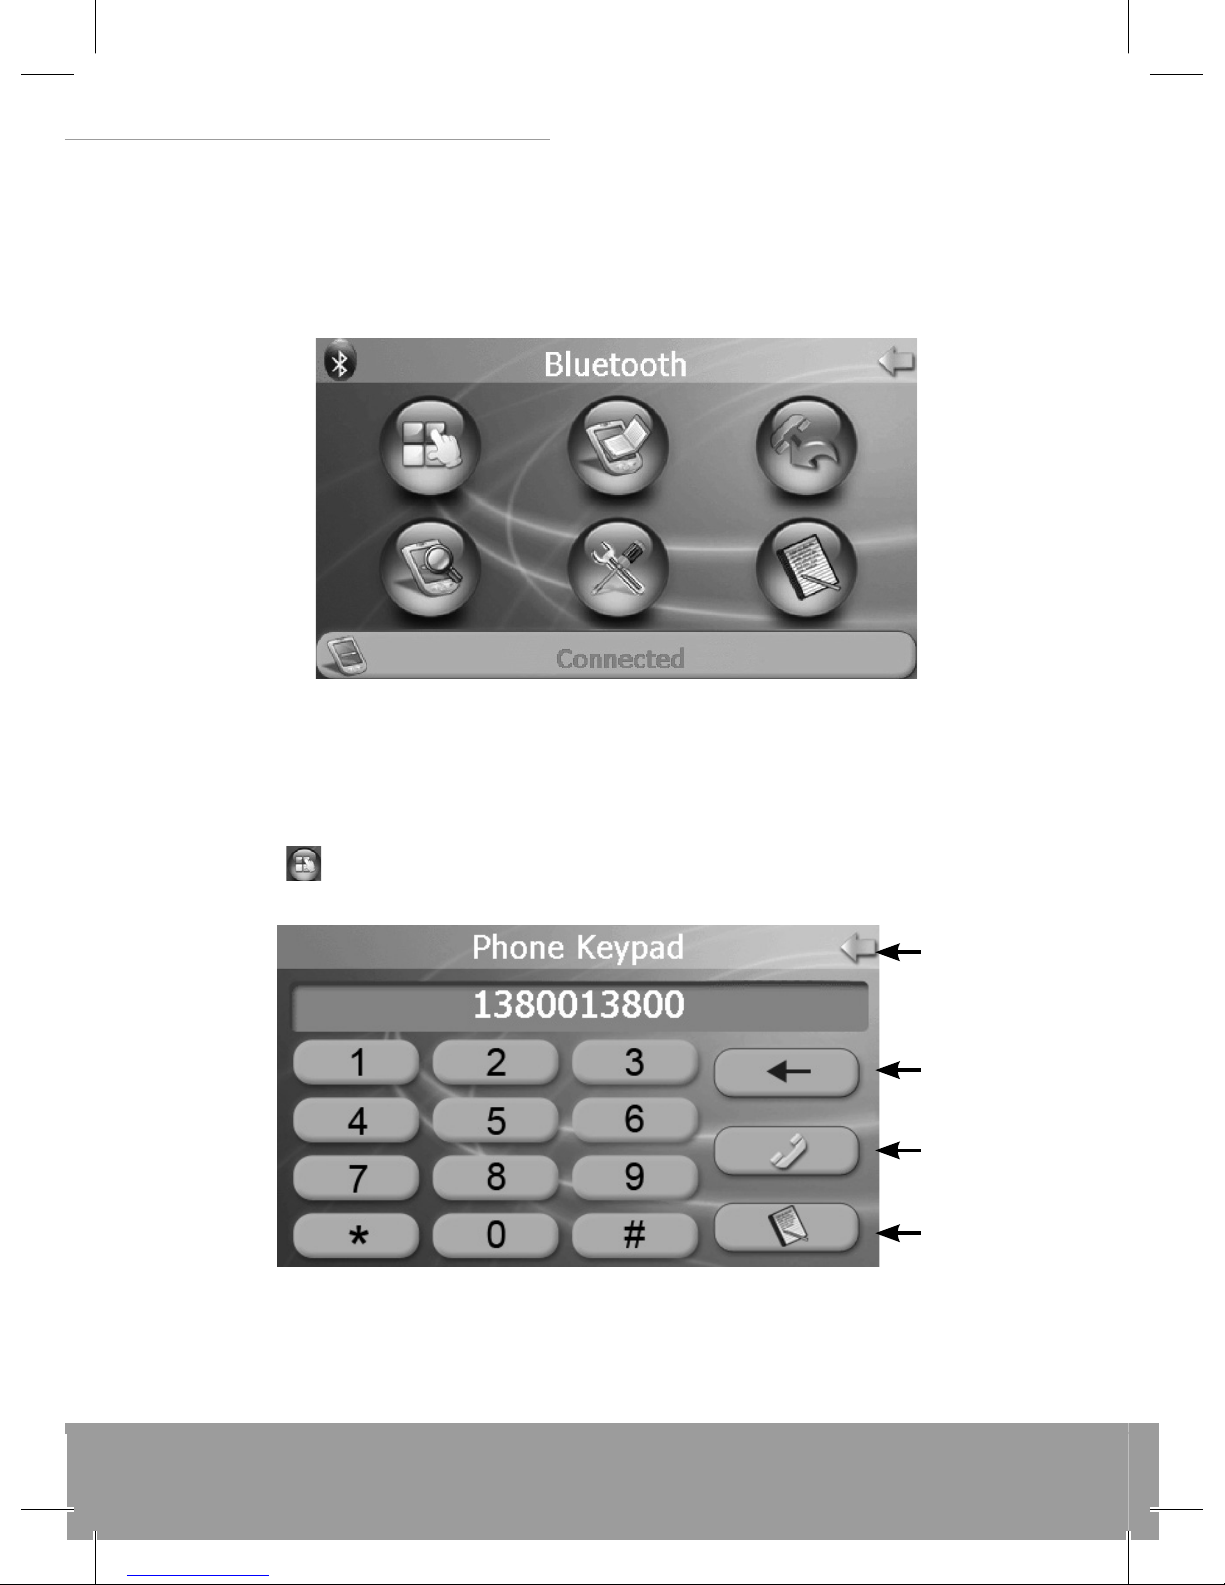
4. Bluetooth
Tap the icon “Bluetooth” on the Main Menu and enter into the following interface.
4.1 Phone keypad
Tap the icon
on the Bluetooth menu and enter into the Phone keypad interface.
A
B
C
D
A: Return to the Bluetooth menu, B: Backspace, C: Pair and connect with the mobile you
want , D: Call Record
Page 13
13
PERSONAL NAVIGATION DEVICE
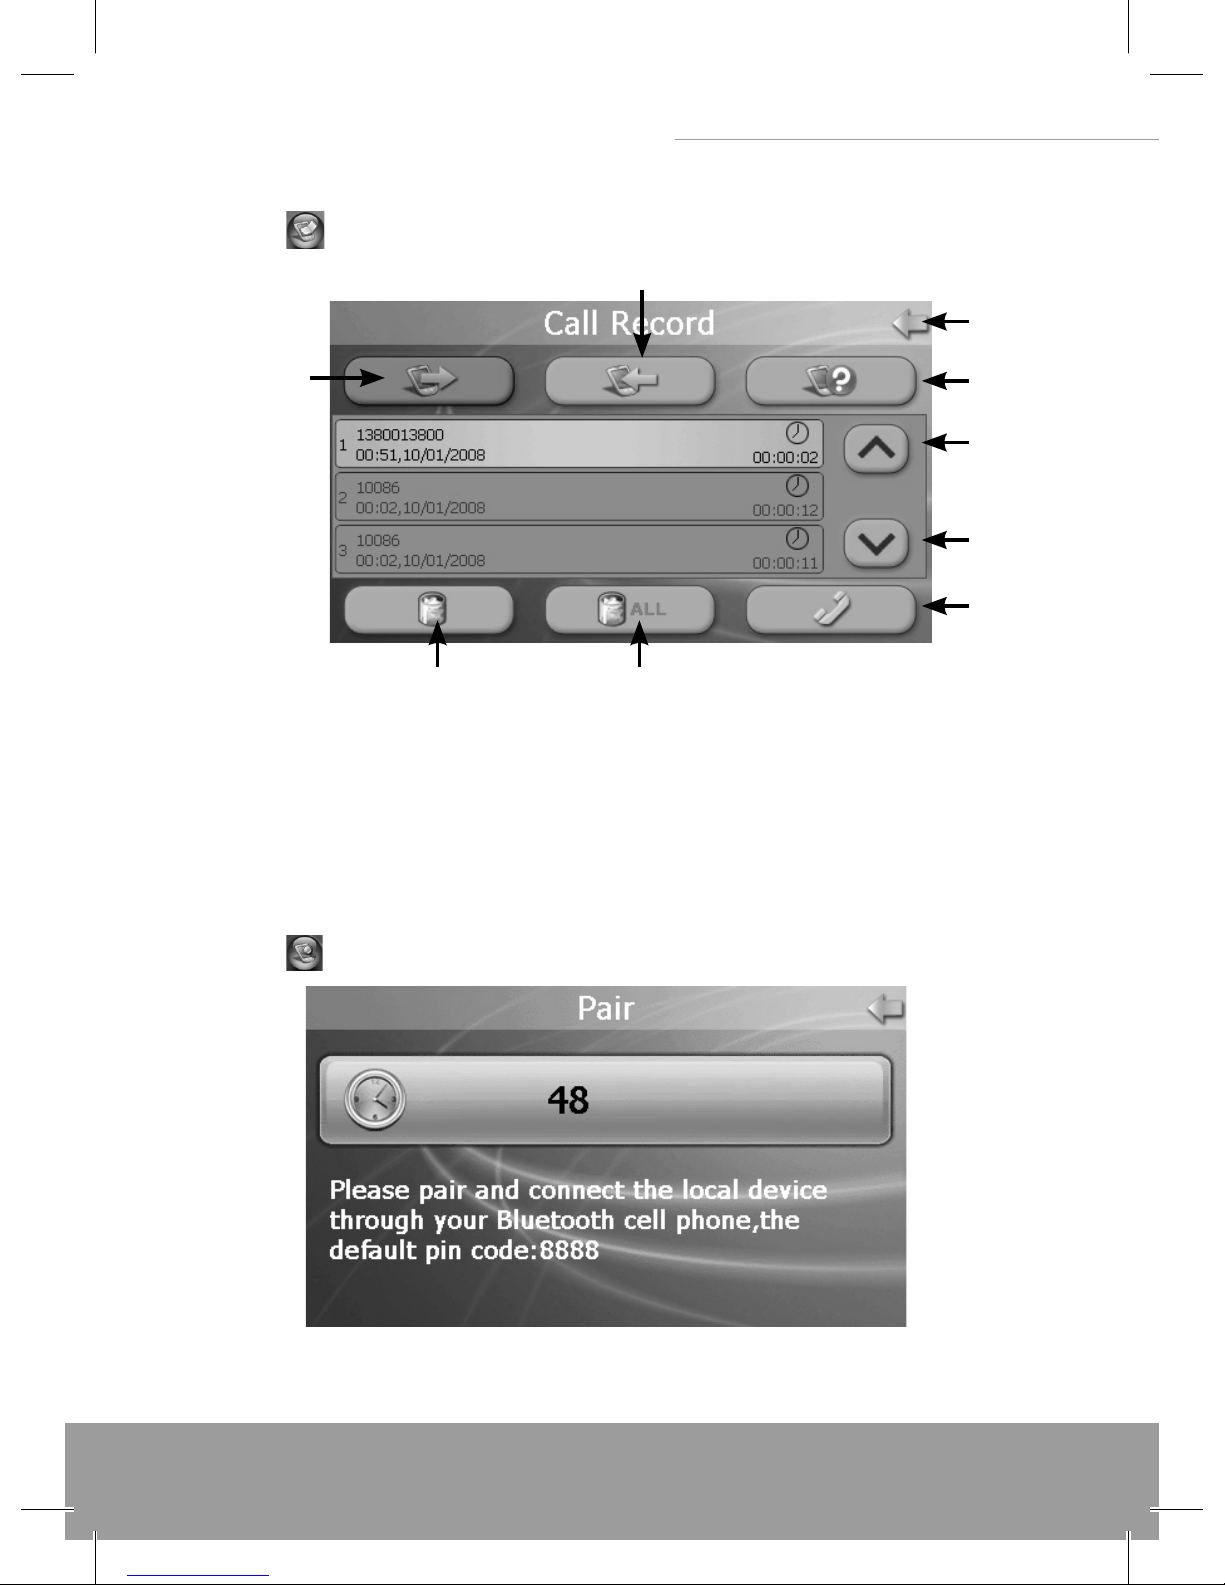
4.2 Call Record
Tap the icon
on the Bluetooth menu and enter into the Call Record interface.
A
I
G
B
C
D
E
H
F
A: Return to the Bluetooth menu, B: Previous, C: Next, D: Connect with the mobile number
that is highlighted, E: Delete all the call records, F: Delete the recorded number you chose,
G: Hang up the number you dial, H: Incoming call record, I: Outgoing call record
4.3 Pair
Tap the icon
on the Bluetooth menu and enter into the Pair interface.
While pairing turn on Bluetooth module in a mobile phone and enable pairing function.
Page 14

www.modecom.eu
14
PERSONAL NAVIGATION DEVICE
4.4 Attribute
1) Tap the icon
on the Bluetooth menu and enter into the Attribute interface.
A
B
A: PIN Setting, B: Music Setting
2) Tap “PIN Setting” button and enter into the following interface to set the PIN Code.
3) Tap “Music Setting” button and enter into the following interface.
Then choose the music as the ring of incoming call.
Page 15
15
PERSONAL NAVIGATION DEVICE
4.5 Pair Devices
Tap the icon
on the Bluetooth menu and enter into the Paired Devices interface
A
B
C
D
EF
A: Return to the Bluetooth menu, B: Up, C: Down, D: Delete all the Devices information , E:
Disconnect the Devices you chose , F: Connect the Devices you chose
4.6 Last call record
Tap the icon on the Bluetooth menu to dial last outgoing number.
5. System setting
Tap the icon "System” on the Main menu and enter into the System interface.
Page 16
www.modecom.eu
16
PERSONAL NAVIGATION DEVICE
5.1 Backlight
Tap the "Backlight" icon on the System menu and enter into the following interface.
A. Tap "-" to weaken the backlight, and tap "+" to stronger the backlight.
B. Under “Battery”, tap “<” or “>” button to select the duration of auto power o the bac-
klight.
C. Under “AC power”, tap “<” or “>” to select the duration of auto power o the backlight
when using AC adaptor.
5.2 System Info
Tap the "Sys Info" icon on the System Menu and enter into the following interface:
Page 17

17
PERSONAL NAVIGATION DEVICE
A. Tap the icon “USB” to set the USB working mode.
Choose “Mass Storage” if you want FreeWAY MX to work as mass storage device.
Choose “MS ActiveSync” if you want FreeWAY MX to connect with PC via ActiveSync.
B. Tap the icon "Calibration" to adjust the touch screen.
According to the information on the screen, press the right cross centre. Then take the
operation under instruction until the following screen display.
Page 18

www.modecom.eu
18
PERSONAL NAVIGATION DEVICE
5.3 Language
Tap the icon “Language” on the System Menu and enter into the following interface:
5.4 Power
Tap the icon “Power” on the System Menu and enter into following interface:
5.5 Volume
Tap the icon "Volume" on the System Menu and enter into the following interface:
Page 19

19
PERSONAL NAVIGATION DEVICE
A. Tap"-" or "+" to adjust volume of speaker.
B. You can select "Enable sounds for taps" and "Use FM".
C. Tap "<"or ">" icon to select a suitable frequency for FM transmitter.
Fix the transmission frequency of the FreeWAY MX rst, and then turn on car radio and
tune it at the same frequency as FreeWAY MX, and then you can hear the voice coming
out from the car radio’s loudspeaker.
5.6 Date Time
Tap the icon “Date Time” on the System Menu and enter into the following interface:
Page 20

www.modecom.eu
20
PERSONAL NAVIGATION DEVICE
A. Tap “Date" icon and then enter into the Date interface; use "<" or ">" icon to adjust the
date.
B. Tap "Time" icon and then enter into the Time interface; use "<" or ">" icon to adjust the
time.
C. Tap "Time Zone" icon and then enter into the following interface; use "<" or ">" icon to
adjust the time zone.
Page 21

21
PERSONAL NAVIGATION DEVICE
III Connecting to Your PC
The USB cable is provided for system upgrades. This USB cable will work on the PC either
with Microsoft ActiveSync® or as a Mass Storage Device.
For upgrade and more information about Microsoft ActiveSync®, please visit Microsoft
website. www.microsoft.com
Two ways to update or change the maps, the software, the multi-media les to your de-
vice.
1. Using Mass Storage Device
1.1 Set “Mass Storage” mode in FreeWAY MX. To nd it, in the Main Menu go into System/
System Info/USB.
1.2 FreeWAY MS will reset automatically.
1.3 Connect the device and PC via USB cable.
1.4 Device will be shown as Mass Storage Device.
1.5 Copy the les to the correct le path on your SD.
1.4 The device will show you the contents of the SD/SDHC card.
2. Using MS ActiveSync® software
2.1 Set up the MS ActiveSync® on the PC.
2.2 Set “MS ActiveSync” mode in FreeWAY MX. In the Main Menu go into System/System
Info/USB.
Page 22

www.modecom.eu
22
PERSONAL NAVIGATION DEVICE
2.3 FreeWAY MS will reset automatically.
2.4 Connect the device and PC via USB cable.
2.5 MS ActiveSync® will run automatically once the device connect with PC.
Caution: Map and software update must be performed according to software’s user
Manual.
IV Battery, Charger and Safety Precaution
1.1 About Charging
- Use only the AC adapter and the DC Car Charger supplied with your device. Use of ano-
ther type of AC adapter or Car Charger will result in malfunction and/or danger.
1.2 About the AC Adapter and the Car Charger
- Do not use the adapter or the car charger in a high moisture environment. Never touch
the adapter when your hands or feet are wet.
- Allow adequate ventilation around the adapter or the car charger when using it to opera-
te the device or charge the battery. Do not cover the AC adapter or the car charger with
paper or other objects that will reduce cooling. Do not use the AC adapter while it is in-
side a carrying case.
- Connect the AC adapter to a proper power source. The voltage requirements are found
on the product case and/or packaging.
- Do not use the adapter or the car charger if the cord becomes damaged.
- Do not attempt to service the unit. There are no serviceable parts inside. Replace the
unit if it is damaged or exposed to excess moisture.
1.3 About the Battery
- Use a speci ed charger approved by the manufacturer.
CAUTION: This unit contains a non-replaceable internal Lithium-Ion battery. The battery
Page 23

23
PERSONAL NAVIGATION DEVICE
can burst or explode, releasing hazardous chemicals. To reduce the risk of re or burns, do
not disassemble, crush, puncture, or dispose of in re or water.
Important instructions (for service personnel only)
- Replace only with the same or equivalent type recommended by the manufacturer.
- The battery must be recycled or disposed of properly.
- Use the battery only in the speci ed equipment.
CAUTION: Risk of explosion if battery is replaced by an incorrect type. Dispose of used bat-
teries according to the instructions.
V Troubleshooting and Maintenance
1.1 Resetting Your System
Resetting your system is similar to restarting your computer. Occasionally, you may need
to reset your device. For example, you should reset your system when it stops responding
or appears to be “frozen” or “locked up. To reset your system, press the Reset button on
left side of your device.
1.2 Power Problems
Power does not turn on when using battery power
- The remaining battery power may be too low to run your device.
- Connect the AC adapter to your device and to AC power or Connect the Car Charger to
your device and to external DC power.
1.3 Screen Problems
A) Screen is o
If the screen does not respond even after you press the power button, try the following in
order until the problem is solved:
- Connect the AC adapter to your device and to external AC power.
Page 24

www.modecom.eu
24
PERSONAL NAVIGATION DEVICE
- Connect the Car Charger to your device and to external DC power.
- Reset your system.
B) Screen responds slowly
- Make sure that your device is not running out of battery power.
C) Screen freezes
- Reset your system.
D) Screen is hard to read
- Make sure that the power is enough
- Make sure that the backlight of the display is on
- Move to a location with more light
- If the problem still exists, reset your system.
E) Inaccurate response to stylus pen taps or nger tip
- Recalibrate the touch screen.
1.4 Connection Problems
Cable Connection Problems
- Make sure that your device and your computer are both turned on before trying to es-
tablish a connection.
- Make sure that the cable is securely plugged into the USB port on your computer and on
the device. Connect the USB cable directly to your computer
- Reset your device before connecting the cable. Always disconnect your device before
you Restart your computer.
1.5 GPS Problems
When there are no valid signals available, consider the following:
- Make sure that the GPS antenna is adjusted to the horizontal position (parallel to the
ground) and it has a clear view of the sky.
Page 25

25
PERSONAL NAVIGATION DEVICE
Note that the GPS reception can be a ected by:
- Bad weather.
- Dense overhead obstacles (e.g. trees and tall buildings).
- Other wireless device in the car.
- Re ective car window tint.
Technical Specifi cation
CPU SiRF Atlas-III, dual-core, 372 MHz
Memory
Flash 128MB SLC NAND ash
RAM 64MB DRAM
Display
Dis
play
5” TFT LCD
Aspect Ratio 16:09
Resolution 480*272
p
ixels
GPS Receiver SiRF 3i+
Antenna Built- in
FM Transmitter Built- in
Bluetooth 2.0 + EDR, Hands-free
AV-IN Yes
Input/Output
Card Slot SD/SDHC card slot
S
p
eaker Built–in speaker
Head
p
hone 2.5mm Stereo Jack
USB USB 2.0, Full Speed
Batter
y
Non-removable rechargeable Li-Polymer batter
y
Operating System Microsoft Windows® CE .Net 5.0 Core version
Physical
Characteristics
Dimension 133.90(L)* 88.50(W)* 14.50(H) mm
Weight
Environment
Conditions
Temperature
O
p
eration: 0~50°C
Stora
g
e: -10~60°C
Humidity
Operation: 0~90%, Non-Condensed
Storage: 0~90%, Non-Condensed
Car Charger
In
p
ut DC +12V
Output DC +5V, 2A, via USB
AC/DC Adapter
Input AC 110~240V
Out
p
ut DC +5V, 2A, via USB
Multimedia
Video avi, mp4, wmv, mkv, asf, mpg, mpe
g
Audio mp3, wav, wma, o
gg
Text txt, xml
Photo bmp,
jpg, g
if, png, tif
Page 26

www.modecom.eu
26
PERSONAL NAVIGATION DEVICE
Wprowadzenie 28
Środki ostrożności i uwagi 28
Zawartość pudełka 29
I Podstawowe informacje 29
1. Charakterystyka 29
2. Akcesoria 30
2.1 Ładowanie adapterem AC 30
2.2 Ładowanie ładowarką
samochodową 30
2.3 Montaż uchwytu 30
II Główne funkcje 31
1. Uruchamianie 31
2. Nawigacja 31
3. Media 31
3.1 Muzyka 32
3.2 Foto 33
3.3 E-book 34
3.4 Video 34
4. Bluetooth 36
4.1 Klawiatura telefonu 36
4.2 Rejestr połączeń 36
4.3 Parowanie 37
4.4 Atrybuty 38
4.5 Sparowane urządzenia 39
4.6 Spis ostatnich rozmów 39
5. System 39
5.1 Podświetlenie 40
5.2 System Info 40
5.3 Język 42
5.4 Zasilanie 42
5.5 Głośność 42
5.6 Dzień i godzina 43
III Podłączanie do PC 45
IV Bateria, ładowarka
i środki ostrożności 46
1.1 Instrukcje dotyczące ładowania 46
1.2 Instrukcje dotyczące ładowarki sieciowej oraz ładowarki samochodowej 46
1.3 Instrukcje dotyczące baterii 47
V Rozwiązywanie problemów oraz
konserwacja 47
1.1 Resetowanie systemu 47
1.2 Problemy z zasilaniem 47
1.3 Problemy z ekranem 48
1.4 Problemy z podłączeniem 48
1.5 GPS Problemy 49
Spis treści:
Page 27

27
PERSONAL NAVIGATION DEVICE
personal navigation
device
PL
MODECOM przedstawia kolejne urządzenie GPS z niezawodnej serii FreeWAY. Tym razem
jest to model FreeWAY MX. Cechą wyróżniającą go spośród innych urządzeń jest przede
wszystkim większy bo aż 5-calowy ekran! FreeWAY MX należy do najbardziej nowocze-
snych i precyzyjnych nawigacji dostępnych na rynku, dzięki możliwości obsługi do 30 ka-
nałów GPS.
Każda podróż z FreeWAY MX to prawdziwa przyjemność. Kierowca ma pełen komfort. Do
jego dyspozycji jest bowiem przejrzyste, intuicyjne i łatwe w obsłudze menu, duży i czuły
wyświetlacz, świetne właściwości lokalizacyjne i nawigacyjne oraz system głosowy infor-
mujący go na bieżąco o wszystkim co dzieje się na trasie.
Najistotniejsze funkcje urządzenia to oczywiście ustalanie położenia GPS, wyszukiwanie
lokalizacji, obliczanie i planowanie optymalnej trasy podróży, rejestrowanie jej i odtwa-
rzanie.
Lecz MODECOM FreeWAY MX wyposażono również w wiele dodatkowych funkcji zwięk-
szających możliwości użytkowe urządzenia. Bluetooth 2.0+EDR pozwala na wykorzysta-
nie urządzenia jako zestawu głośnomówiącego, umożliwiając tym samym prowadzenie
rozmów telefonicznych podczas jazdy. Do auta można podłączyć kamerę cofania dzięki
temu, że wbudowane zostało gniazdo AV-IN. Funkcje multimedialne dodatkowo uprzy-
jemnią dłuższą wyprawę. Można bowiem słuchać muzyki, oglądać zdjęcia i lmy. Pliki
multimedialne odtwarza się z karty pamięci SD lub SDHC. Wbudowany transmiter FM
daje możliwość słuchania muzyki z karty pamięci bezpośrednio poprzez głośniki zamon-
towane w samochodzie. Wszystkie porty są schowane pod estetyczną klapką. Niezwykle
wygodna i funkcjonalna konstrukcja uchwytu, która opiera się na wykorzystaniu głowicy
Page 28

www.modecom.eu
28
PERSONAL NAVIGATION DEVICE
kulowej, umożliwia nie tylko obracanie, ale również precyzyjne ustawienie ekranu pod
najwygodniejszym dla kierowcy kątem.
To niesamowite, że teraz podróżowanie jest aż tak przyjemne.
MODECOM przykłada dużą uwagę do jakości produktu w celu spełnienie aktualnych i
przyszłych potrzeb klientów. Nasi klienci od lat korzystają z produktów wysokiej jakości,
o zaawansowanej technologii i niezawodnych. Dla Ciebie tworzymy produkty wyjątkowe
w swoim rodzaju.
Wybierz lepszą przyszłość– wybierz MODECOM!
Informacje zawarte w niniejszej instrukcji mogą ulec zmianie bez wcześniejszego powia-
domienia.
Wprowadzenie
W niniejszej instrukcji przedstawiono pełna informację dotyczącą urządzenia. Przed uży-
ciem prosimy zapoznać się z niniejszą instrukcją obsługi.
Środki ostrożności i uwagi
Za prawidłowe działanie i sterowanie GPS całkowitą odpowiedzialność ponosi rząd
Stanów Zjednoczonych Ameryki, który jest odpowiedzialny za dostępność sygnału i do-
kładność urządzenia. Jakiekolwiek zmiany dostępności i dokładności GPS, lub warunków
otoczenia mogą mieć wpływ na pracę urządzenia. Producent nie ponosi odpowiedzialno-
ści za dostępność i dokładność GPS.
Urządzenie przeznaczone jest do stosowania jako pomoc w nawigacji. Urządzenie nie jest
przeznaczone do wykonywania precyzyjnych pomiarów kierunku, odległości, lokalizacji
lub topogra i terenu. Użytkownik winien przestrzegać wszystkich znaków drogowych
oraz obowiązujących lokalnie przepisów ruchu drogowego.
Odbiór sygnału GPS satelity utrudniają i uniemożliwiają materiały stałej strukturze (wyją-
tek szkło). Sygnał GPS jest niedostępny w tunelu lub w budynku.
Page 29

29
PERSONAL NAVIGATION DEVICE
Do określenia aktualnego położenia potrzebne są minimum sygnały GPS z 4 satelitów.
Odbiór sygnału może być zakłócony przez brzydką pogodę lub urządzenie bezprzewodo-
we a także zgrupowane przeszkody (np. wysokie budynki).
Podczas opuszczania pojazdu nie zostawiać urządzenia na desce rozdzielczej lub w miej-
scu narażonym na bezpośrednie działanie promieni słonecznych. Podwyższona tempera-
tura baterii może spowodować nieprawidłowe działanie oraz/lub zagrożenie.
Ze względów bezpieczeństwa nie należy obsługiwać urządzenia podczas prowadzenia
pojazdu. Niedozwolony jest montaż urządzenia w miejscu ograniczającym widoczność
kierowcy.
Zawartość pudełka
FreeWAY MX, Adapter AC, Uchwyt, Ładowarka samochodowa, Instrukcja obsługi, Kabel
USB, Słuchawki, Mini DVD, Karta SD (opcjonalnie)
I Podstawowe informacje
1. Charakterystyka
(1)
(2)
(3)
(4)
(5)
(6)
(7)
(1) Włącznik zasilania , (2) Złącze USB , (3) Złącze słuchawek , (4) Port AV-IN , (5) Gniazdo
karty SD/SDHC , (6) Resetowanie , (7) Stylus
Page 30

www.modecom.eu
30
PERSONAL NAVIGATION DEVICE
2. Akcesoria
2.1 Ładowanie adapterem AC
Pierwsze ładowanie urządzenia należy wykonać za pomocą adaptera AC. Aby maksy-
malnie wydłużyć okres eksploatacji baterii, należy całkowicie naładować baterię podczas
pierwszego ładowania.
- Włożyć port adaptera DC do portu USB urządzenia po prawej stronie panelu
- Włożyć adapter do gniazda głównego zasilnia.
- Wskaźnik ładowania zostanie podświetlony. Po zakończeniu ładowania dioda wyświetla-
na w kolorze czerwonym zapali się na zielono.
2.2 Ładowanie ładowarką samochodową
Ładowarka samochodowa dostarcza zasilanie
do urządzenia podczas używania urządzenia w
pojeździe. Uwaga: Aby zabezpieczyć urządze-
nie przed nagłym skokiem napięcia, ładowarkę
samochodową należy podłączyć dopiero po
uruchomieniu silnika pojazdu.
Włożyć wtyczkę USB ładowarki samochodowej do portu USB FreeWAY MX a drugi koniec
włożyć do gniazda zapalniczki samochodowej.
2.3 Montaż uchwytu
Zdjąć zabezpieczającą folię z przyssawki i przy-
cisnąć w wybranym miejscu na szybie przed-
niej lub bocznej. Przed montażem sprawdzić
czy powierzchnia szyby jest czysta. Uwaga:
Niedozwolony jest montaż uchwytu w miejscu
ograniczającym widoczność kierowcy.
Page 31

31
PERSONAL NAVIGATION DEVICE
II Główne funkcje
1. Uruchamianie
Naciśnij i przytrzymaj przycisk zasilania, aby włączyć urządzenie, a następnie wyświetlone
zostanie menu główne interfejsu.
2. Nawigacja
Włóż kartę SD/SDHC z oprogramowaniem mapy (wyposażenie opcjonalne) do gniazda
FreeWAY MX.
Uwaga: Nie wyjmować karty podczas pracy GPS.
Dwukrotnie naciśnij ikonę “Nawigacja” w Menu Głównym, aby uruchomić program nawi-
gacji. Postępować zgodnie z instrukcją obsługi oprogramowania mapy.
Uwaga: Podczas pierwszego uruchomienia urządzenia lokalizacja GPS trwa nieco dłużej.
Do rozpoczęcia pracy potrzeby jest sygnał przynajmniej z 3 satelitów. Ponowne rozpoczę-
cie pracy przez urządzenie następuje nieporównywalnie szybciej. W przypadku urucho-
mienia urządzenia po przebyciu 300 km od jego wyłączenia lokalizacja sygnałów może
trwać ponownie nieco dłużej.
3. Media
Naciśnij ikonę „Media” w Menu Głównym, aby uzyskać dostęp do następującego inter-
fejsu.
Page 32

www.modecom.eu
32
PERSONAL NAVIGATION DEVICE
3.1 Muzyka
1) Naciśnij ikonę “Muzyka” w menu Media, aby uzyskać dostęp do następującego interfejsu.
A
B
C
A: W górę , B: W dół , C: Powrót do menu poprzedniego
2) Naciśnij dwukrotnie wybrany plik, aby uzyskać dostęp do następującego interfejsu.
A
BCDEFGH
A: Powrót do Menu Media, B: Głośność , C: Powrót do poprzedniego menu, D: Następny ,
E: Poprzedni , F: Stop, G: Pasek postępu, H: Pauza/Odtwarzaj
Page 33

33
PERSONAL NAVIGATION DEVICE
3.2 Foto
1) Naciśnij ikonę „Foto „ w menu Media, aby uzyskać dostęp do następującego interfejsu.
2) Dwukrotnie naciśnij plik na ekranie, aby uzyskać dostęp do następującego interfejsu
E
A
F
B
H
C
G
D
A: Powrót do Menu Media , B: Następny , C: Powrót do poprzedniego menu, D: Nazwa
oglądanego zdjęcia , E: Przybliżanie , F: Oddalanie , G: Pełny ekran , H: Obrót
Naciśnij przycisk “Pełny ekran”, aby wyświetlić zdjęcie na pełnym ekranie.
Ponowne dwukrotne naciśniecie przycisku powoduje wyświetlenie w oryginalnej wiel-
kości.
Page 34

www.modecom.eu
34
PERSONAL NAVIGATION DEVICE
3.3 E-book
1) Naciśnij ikonę „E-book „ w menu Media, aby uzyskać dostęp do następującego inter-
fejsu.
2) Dwukrotnie naciśnij plik, aby wyświetlić następujący interfejs.
A
B
C
D
E
F
A: Powrót do Menu Media , B: Poprzedni , C: Następny , D: Powrót do poprzedniego menu,
E: Wybrane strony , F: Przeglądana strona /Liczba stron , G: Nazwa przeglądanego pliku
3.4 Video
1) Naciśnij ikonę „Video” w menu Media, aby uzyskać dostęp do następującego interfejsu.
Page 35

35
PERSONAL NAVIGATION DEVICE
A
B
C
A: W górę , B: W dół , C: Powrót do poprzedniego menu
2) Naciśnij wybrany plik, aby uzyskać dostęp do następującego interfejsu.
A
B
F
C
G
D
EH
A: Powrót do menu Media , B: Pauza/odtwarzaj , C: Stop, D: Następny , E: Głośność , F:
Obraz dużej wielkości , G: Powrót do poprzedniego menu, H: Pasek postępu.
Naciśnij przycisk “Pełny ekran” lub dwukrotnie naciśnij ekran, aby wyświetlić obraz na peł-
nym ekranie.
Ponowne dwukrotne naciśniecie przycisku powoduje wyświetlenie w oryginalnej wiel-
kości.
Page 36

www.modecom.eu
36
PERSONAL NAVIGATION DEVICE
4. Bluetooth
Naciśnij ikonę “Bluetooth” w Menu Głównym, aby uzyskać dostęp do następującego in-
terfejsu.
4.1 Klawiatura telefonu
Naciśnij ikonę w menu Bluetooth, aby uzyskać dostęp do interfejsu klawiatury telefonu.
A
B
C
D
A: Powrót do menu Bluetooth , B: Cofnij , C: Połącz z wybranym telefonem , D: Spis roz-
mów
4.2 Rejestr połączeń
Naciśnij ikonę
w Menu Bluetooth, aby uzyskać dostęp do rejestru połączeń.
Page 37

37
PERSONAL NAVIGATION DEVICE
A
I
G
B
C
D
E
H
F
A: Powrót do Menu Bluetooth , B: Poprzedni , C: Następny , D: Połącz z podświetlonym nu-
merem telefonu , E: Skasuj wszystkie zapisane dane , F: Skasuj wybrany numer , G: Zawieś
wybierany numer , H: Spis połączeń przychodzących , I: Spis połączeń wychodzących
4.3 Parowanie
Naciśnij ikonę
w Menu Bluetooth, aby uzyskać dostęp do następującego interfejsu.
Podczas parowania, włącz moduł Bluetooth w telefonie komórkowym oraz funkcję pa-
rowania.
Page 38

www.modecom.eu
38
PERSONAL NAVIGATION DEVICE
4.4 Atrybuty
1) Naciśnij ikonę w menu Bluetooth, aby uzyskać dostęp do następującego interfejsu.
A
B
A: Ustawienia PIN , B: Ustawienia dzwonka
2) Naciśnij przycisk “Ustawienia PIN”, aby uzyskać dostęp do następującego interfejsu i
ustawić kod PIN.
3) Naciśnij przycisk “Ustawienia dzwonka” aby uzyskać dostęp do następującego interfejsu.
\Wybierz rodzaj dzwonka sygnalizującego rozmowę przychodząca.
Page 39

39
PERSONAL NAVIGATION DEVICE
4.5 Sparowane urządzenia
Naciśnij ikonę
w Menu Bluetooth, aby uzyskać dostęp do następującego interfejsu
A
B
C
D
EF
A: Powrót do Menu Bluetooth , B: W górę , C: W dół , D: Skasuj wszystkie informacje o urzą-
dzeniach , E: Skasuj wybrane urządzenie , F: Połącz z wybranymi urządzeniami
4.6 Spis ostatnich rozmów
Naciśnij ikonę
w Menu Bluetooth, aby wybrać ostatni wybierany numer .
5. System
Naciśnij ikonę „System” w Menu Głównym, aby uzyskać dostęp do ustawień urządzenia.
Page 40

www.modecom.eu
40
PERSONAL NAVIGATION DEVICE
5.1 Podświetlenie
Naciśnij ikonę „Podświetlenie” w menu System, aby uzyskać dostęp do następującego interfejsu.
A. Naciśnij przycisk „-”, aby zmniejszyć podświetlenie, i naciśnij „+”, aby zwiększyć
podświetlenie.
B. Przy “Akumulator“, naciśnij przycisk “<” lub “>”, aby określić automatyczne wyłączanie
podświetlania.
C. Przy “Zasilacz”, naciśnij przycisk “<” lub “>”, aby wybrać określić automatyczne wyłącza-
nie podświetlania podczas używania ładowarki.
5.2 System Info
Naciśnij ikonę „Sys Info” w menu System, aby uzyskać dostęp następującego interfejsu:
Page 41

41
PERSONAL NAVIGATION DEVICE
A. Naciśnij ikonę “USB”, aby ustawić tryb pracy USB.
Wybierz “Pamięć masowa” jeśli chcesz, aby FreeWAY MX pracował jako wymienny nośnik
danych.
Wybierz “MS ActiveSync” jeśli chcesz połączyć FreeWAY MX z PC za pomocą ActiveSync.
B. Naciśnij ikonę „Kalibracja „, aby skalibrować ekran dotykowy.
Zgodnie z informacjami na ekranie, naciśnij krzyżyk wyświetlany na środku ekranu.
Następnie postępuj zgodnie z instrukcjami do momentu zakończenia procesu.
Page 42

www.modecom.eu
42
PERSONAL NAVIGATION DEVICE
5.3 Język
Naciśnij ikonę „Język „ w menu System, aby uzyskać dostęp do następującego interfejsu:
5.4 Zasilanie
Naciśnij ikonę „Zasilanie „ w menu System, aby uzyskać dostęp do następującego inter-
fejsu:
5.5 Głośność
Naciśnij ikonę „Głośność „ w menu System, aby uzyskać dostęp do następującego inter-
fejsu:
Page 43

43
PERSONAL NAVIGATION DEVICE
A. Naciśnij przycisk „-” lub „+”, aby ustawić głośność głośnika.
B. Możesz zaznaczyć opcję „Dźwięk kliknięć” oraz
„Transmiter FM”.
C. Naciśnij przycisk „<”lub „>”, aby wybrać odpowiednią częstotliwość transmitera FM.
W pierwszej kolejności ustaw częstotliwość nadajnika FreeWAY MX, a następnie włącz ra-
dio samochodowe i ustaw na tej samej częstotliwości, co FreeWAY MX po czym usłyszysz
dźwięk z głośników samochodu.
5.6 Dzień i godzina
Naciśnij ikonę „Dzień/godzina „ w menu System, aby uzyskać dostęp do następującego
interfejsu:
Page 44

www.modecom.eu
44
PERSONAL NAVIGATION DEVICE
A. Naciśnij ikonę „Data” a następnie przejdź do interfejsu ustawień daty; za pomocą przy-
cisków „<” lub „>” ustaw datę.
B. Naciśnij ikonę „Czas „ a następnie przejdź do interfejsu ustawień czasu; za pomocą przy-
cisku „<” lub „>” ustaw godzinę.
C. Naciśnij ikonę „Strefa czasowa” a następnie przejdź do interfejsu ustawień strefy czaso-
wej; za pomocą przycisku „<” lub „>” ustaw odpowiednią, dla regionu, strefę czasową.
Page 45

45
PERSONAL NAVIGATION DEVICE
III Podłączanie do PC
Kabel USB przeznaczony jest do pobierania aktualizacji systemowych. Kabel USB dostoso-
wany jest do pracy z PC zarówno z Microsoft ActiveSync® lub jako urządzenie przenośne.
Dodatkowe informacje o aktualizacji oraz Microsoft ActiveSync®, znajdują się na stronie
internetowej Microsoft: www.microsoft.com
Dwa sposoby aktualizacji lub zmiany map, oprogramowania, plików multimedialnych.
1. Aktualizacja za pomocą wymiennego nośnika danych (USB)
1.1 Ustawić FreeWAY MX w trybie “Pamięć masowa”.
Aby ustawić tryb “Pamięć masowa” w Menu Głównym przejdź do System /System Info/
USB.
1.2 Urządzenie zostanie zresetowane automatycznie.
1.3 Połącz urządzenie oraz PC za pomocą kabla USB.
1.4 Urządzenie zostanie wykryte, jako wymienny nośnik danych.
1.5 Skopiuj pliki do odpowiedniego pliku w pamięci FreeWAY MX.
1.4 Urządzenie wyświetli zawartość karty SD/SDHC.
2. Aktualizacja za pomocą oprogramowania MS ActiveSync®
2.1 Zainstaluj na PC MS ActiveSync®.
2.2 Ustawić FreeWAY MX w trybie “MS ActiveSync”. Aby ustawić tryb “ActiveSync” w Menu
Page 46

www.modecom.eu
46
PERSONAL NAVIGATION DEVICE
Głównym przejdź do System /System Info/USB.
2.3 Urządzenie zostanie zresetowane automatycznie.
2.4 Połącz urządzenie oraz PC za pomocą kabla USB.
2.5 Oprogramowanie MS ActiveSync® zostanie uruchomione automatycznie po połącze-
niu urządzenia z PC.
Uwaga: Aktualizacja oprogramowania oraz map winna być przeprowadzana zgodnie z in-
strukcją oprogramowania mapy.
IV Bateria, ładowarka i środki ostrożności
1.1 Instrukcje dotyczące ładowania
- Stosować wyłącznie ładowarkę sieciową oraz ładowarkę samochodową dołączoną do
urządzenia. Użycie innego typu ładowarki może spowodować nieprawidłową pracę urzą-
dzenia i/lub jego uszkodzenie.
1.2 Instrukcje dotyczące ładowarki sieciowej oraz ładowarki samochodowej
- Nie stosować ładowarki sieciowej oraz ładowarki samochodowej w otoczeniu o wysokiej
wilgotności. Nie dotykać adaptera mokrymi rękoma lub stojąc w wodzie.
- Zapewnić odpowiednią wentylację dookoła ładowarki sieciowej oraz ładowarki samo-
chodowej podczas używania do obsługi urządzenia lub ładowania baterii. Nie zakrywać
ładowarki sieciowej oraz ładowarki samochodowej materiałem które może spowodować
ograniczone chłodzenie. Nie stosować ładowarki gdy urządzenie znajduje się w pudełku.
- Podłączyć ładowarkę do prawidłowego źródła zasilania. Parametry natężenia określone
są na opakowaniu produktu oraz/lub opakowaniu.
- Nie stosować ładowarki lub ładowarki samochodowej w przypadku uszkodzenia przewodu.
- Nie naprawiać urządzenia. Wewnętrzne podzespoły urządzenia nie nadają się do napra-
wy. W przypadku uszkodzenia lub oddziaływania nadmiernej wilgoci wymienić urządze-
nia na nowe.
Page 47

47
PERSONAL NAVIGATION DEVICE
1.3 Instrukcje dotyczące baterii
- Stosować wyłącznie ładowarkę rekomendowaną przez producenta urządzenia.
UWAGA: Niniejsze urządzenie zawiera wbudowaną wewnętrzną baterię litowo-jonową.
Uwaga niebezpieczeństwo wybuchu lub eksplozji oraz uwolnienia niebezpiecznych sub-
stancji chemicznych. Uwaga niebezpieczeństwo pożaru lub poparzeń! Nie demontować,
nie skręcać, nie dziurawić oraz chronić przed ogniem i wodą.
Ważne instrukcje (tylko dla personelu serwisowego)
- Akcesoria należy wymieniać na takie same lub ich odpowiedniki zalecane przez produ-
centa urządzenia.
- Utylizację lub recykling baterii należy przeprowadzać zgodnie z obowiązującymi prze-
pisami.
- Bateria jest przeznaczona do użycia wyłącznie z określonym urządzeniem.
UWAGA: W przypadku zastosowania baterii innego typu istnieje niebezpieczeństwo eks-
plozji. Zużyte baterie usuwać zgodnie z instrukcjami.
V Rozwiązywanie problemów oraz konserwacja
1.1 Resetowanie systemu
Procedura resetowania systemu jest bardzo podobna do procedury ponownego urucha-
miania komputera. Czasami konieczne jest resetowanie urządzenia. Np. system należy
zresetować w przypadku braku odpowiedzi, zatrzymywania lub zablokowania. Aby zrese-
tować system, naciśnij przycisk Reset znajdujący się po lewej stronie urządzenia.
1.2 Problemy z zasilaniem
Brak zasilania podczas używania baterii
- Rozładowana bateria.
- Podłączyć ładowarkę do urządzenia oraz do zasilania lub podłączyć ładowarkę samocho-
dową do urządzenia oraz do zewnętrznego zasilania.
Page 48

www.modecom.eu
48
PERSONAL NAVIGATION DEVICE
1.3 Problemy z ekranem
A) Brak obrazu
Jeśli brak odpowiedzi systemu po naciśnięciu przycisku zasilania, postępować zgodnie z
następującą procedurą do rozwiązania problemu:
- Podłączyć ładowarkę do urządzenia oraz do zewnętrznego źródła zasilania.
- Podłączyć ładowarkę samochodową do urządzenia oraz do zewnętrznego źródła zasi-
lania.
- Zresetuj urządzenie.
B) Powolna reakcja ekranu
- Sprawdzić czy bateria nie jest rozładowana.
C) Zatrzymywanie obrazu
- Zresetować system.
D) Obraz trudny do odczytania
- Sprawdzić zasilanie
- Sprawdzić czy włączone jest podświetlenie wyświetlacza
- Zapewnić więcej światła
- Jeśli problem nie ustępuje, zresetować system.
E) Nieprawidłowa odpowiedź na dotyk rylca lub palca
- Przeprowadzić ponowną kalibrację ekranu dotykowego.
1.4 Problemy z podłączeniem
Problemy z podłączeniem kabla
- Sprawdź czy twoje urządzenie oraz komputer zostały włączone przed próbą połączenia.
- Sprawdź czy kabel został bezpiecznie włożony do portu USB komputera oraz urządzenia.
Podłącz kabel USB bezpośrednio do komputera
- Zresetuj urządzenie przed podłączeniem kabla. Zawsze odłączaj urządzenie przed po-
nownym uruchamianiem komputera.
Page 49

49
PERSONAL NAVIGATION DEVICE
1.5 GPS Problemy
Jeśli brak widocznych innych sygnałów, należy uwzględnić następujące wskazówki:
- Sprawdzić czy antena GPS jest ustawiono w położeniu poziomym (równolegle do podło-
ża) oraz, czy nie ma widocznych przeszkód na drodze sygnału.
Należy pamiętać, że na odbiór sygnału GPS może mieć wpływ:
- brzydka pogoda,
- zgrupowane przeszkody (np. drzewa lub wysokie budynki),
- inne bezprzewodowe urządzenia w pojeździe,
- przyciemniana odblaskowa szyba pojazdu.
Dane techniczne
Procesor SiRF Atlas-III, dwurdzeniowy
Pamięć
Flash 128MB SLC pamięć NAND
RAM 64MB DRAM
Ekran
Wyświetlacz 5” TFT LCD
Proporcje ekranu 16:9
Rozdzielczość 480*272 pikseli
Odbiornik GPS SiRF 3i+
Antena Wbudowana
Transmiter FM Wbudowana
Bluetooth v2.0 + EDR, Hands-free
AV-IN Tak
Gniazda
Karty Obsługa kart SD/SDHC
Głośnik Wbudowany
Słuchawki 2.5mm Stereo Jack
USB USB 2.0, Full Speed
Bateria Akumulator Litowo-Polimerowy
System Microsoft Windows® CE .Net 5.0 Core
Parametry zyczne
Wymiary 133,90mm* 88,50mm* 14,50mm
Waga 201,7 g
Page 50

www.modecom.eu
50
PERSONAL NAVIGATION DEVICE
Warunki użytkowania
Temperatura
Pracy: 0~50°C
Przechowywania: -10~60°C
Wilgotność
Pracy: 0~90%
Przechowywania: 0~90%
Ładowarka samochodowa
Wejście DC +12V
Wyjście DC +5V, 2A, po USB
Ładowarka sieciowa
Wejście AC 110~240V
Wyjście DC +5V, 2A, po USB
Multimedia
Video avi, mp4, wmv, mkv, asf, mpg, mpeg
Audio mp3, wav, wma, ogg
Tekst txt, xml
Zdjęcia bmp, jpg, gif, png, tif
Page 51

51
PERSONAL NAVIGATION DEVICE
This symbol on our product nameplates proves its compatibility with the EU
Directive2002/96 concerning proper disposal of waste electric and electronic
equipment (WEEE). By using the appropriate disposal systems you prevent the
potential negative consequences of wrong product take-back that can pose risks to the
environment and human health. The symbol indicates that this product must not be di-
sposed of with your other waste. You must hand it over to a designated collection point
for the recycling of electrical and electronic equipment waste. The disposal of the product
should obey all the speci c Community waste management legislations. Contact your lo-
cal city o ce, your waste disposal service or the place of purchase for more information
on the collection.
Weight of the device: 201,7
g
Niniejsze urządzenie oznakowane jest zgodnie z dyrektywą Unii Europejskiej
2002/96/UE dotyczącą utylizacji urządzeń elektrycznych i elektronicznych
(WEEE). Zapewniając prawidłowe usuwanie tego produktu, zapobiegasz poten-
cjalnym negatywnym konsekwencjom dla środowiska naturalnego i zdrowia ludzkiego,
które mogą zostać zagrożone z powodu niewłaściwego sposobu usuwania tego produk-
tu. Symbol umieszczony na produkcie wskazuje, że nie można traktować go na równi z in-
nymi odpadami z gospodarstwa domowego. Należy oddać go do punktu zbiórki zajmują-
cego się recyklingiem urządzeń elektrycznych i elektronicznych. Usuwanie urządzenia
musi odbywać się zgodnie z lokalnie obowiązującymi przepisami ochrony środowiska do-
tyczącymi usuwania odpadów. Szczegółowe informacje dotyczące usuwania, odzysku i
recyklingu niniejszego produktu można uzyskać w urzędzie miejskim, zakładzie oczysz-
czania lub sklepie, w którym nabyłeś niniejszy produkt. Masa sprzętu: 201,7
g
Page 52

MODECOM S.A.
Rondo ONZ 1, 00-124 Warszawa, Polska
MODECOM
 Loading...