

Page 1
Page 2

OPERATING MANUAL ESPRESSO SYSTEM
1
Warnings and General Guidelines ................................................................................................................ 3
Product Handling and Transportation .......................................................................................................... 4
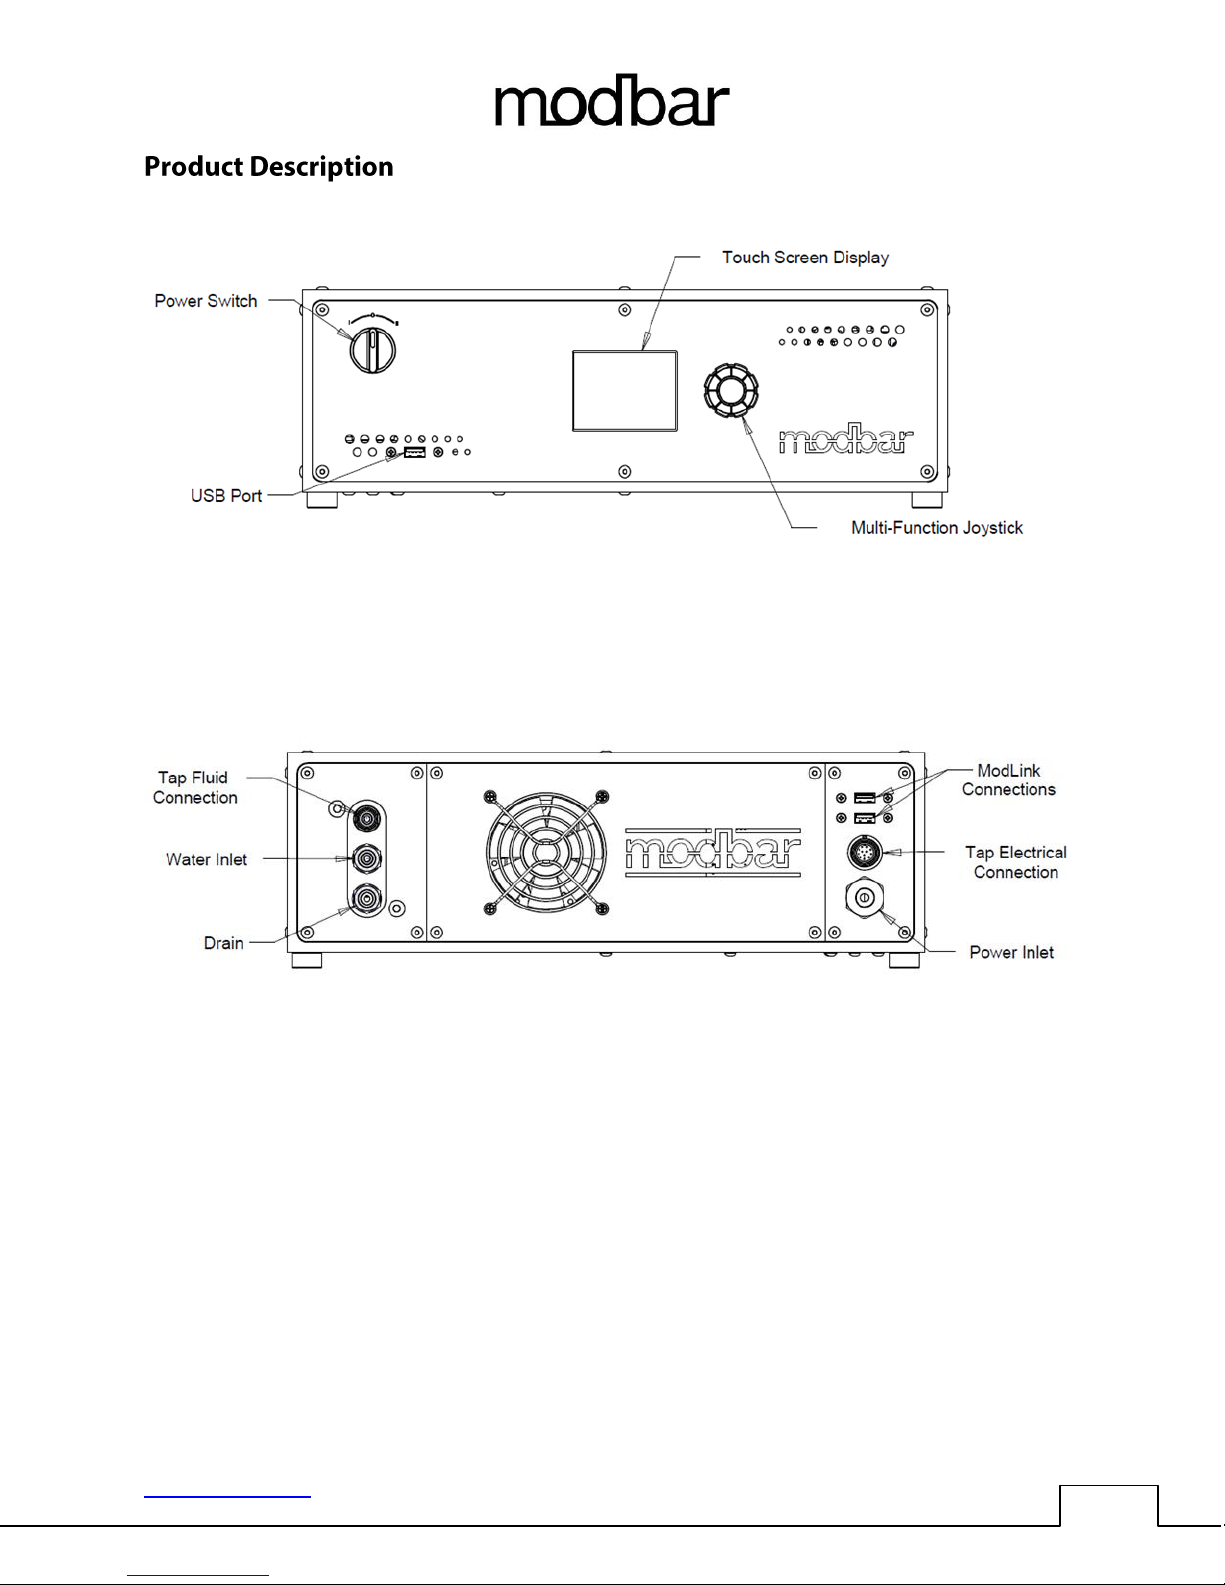
Product Description ...................................................................................................................................... 5
Power Switch Function ............................................................................................................................. 6
Startup Instructions .................................................................................................................................. 7
Installation ............................................................................................................................................ 7
General Use ........................................................................................................................................... 7
Operations and programming....................................................................................................................... 8
Equipment Operation ............................................................................................................................... 8
Interface ................................................................................................................................................ 8
Home screen ......................................................................................................................................... 9
Main settings screen: .......................................................................................................................... 10
Profile selection screen: ...................................................................................................................... 11
Pressure profiling ................................................................................................................................ 12
Profile edit screen (simple): ................................................................................................................ 13
Profile edit screen (advanced): ........................................................................................................... 13
Preferences screen: ............................................................................................................................ 14
Advanced preferences screen: ............................................................................................................ 15
Advanced preferences screen page 2: ................................................................................................ 16
Lighting screen: ................................................................................................................................... 17
File operations screen: ........................................................................................................................ 18
System info screen: ............................................................................................................................. 23
Dispensing Operations ............................................................................................................................ 24
Automatic Operations ......................................................................................................................... 24
Manual Operations ............................................................................................................................. 24
Rinsing ................................................................................................................................................. 24
Cleaning cycle ...................................................................................................................................... 25
www.modbar.com Document 001-0040-1.1| Software Version 2.0
Page 3

OPERATING MANUAL ESPRESSO SYSTEM
2
Maintenance ............................................................................................................................................... 26
General service/maintenance safety guidelines ..................................................................................... 26
Regular cleaning procedures .................................................................................................................. 26
Back flushing ....................................................................................................................................... 26
Cleaning Filters .................................................................................................................................... 26
Cleaning the diffuser screen ............................................................................................................... 27
Cleaning the exterior of the equipment ............................................................................................. 27
Water Filtration/Softener ................................................................................................................... 27
Preventative maintenance ...................................................................................................................... 28
Basic diagnostics ..................................................................................................................................... 29
Module not heating ............................................................................................................................ 29
Tap not dispensing .............................................................................................................................. 29
Pump is overshooting pressure .......................................................................................................... 29
www.modbar.com Document 001-0040-1.1| Software Version 2.0
Page 4
OPERATING MANUAL ESPRESSO SYSTEM
3
● This machine is for professional use only, and should be installed in locations where its use and
maintenance is restricted to trained personnel. Children are forbidden to operate or play with
the machine.
● The equipment must be installed to comply with the applicable federal, state, or local electrical
and plumbing code. The installation also must comply with the manufacturer’s instructions, and
must be performed by qualified and authorized personnel.
● Ensure that the specifications on the equipment name plate correspond to the main electrical
supply to which you will connect the Modbar.
● Safe electrical operation of this device will be achieved only when the connection to the power
outlet has been completed correctly and in observance of all local, national, and international
electrical codes and safety regulations, and particularly by grounding the unit. Make sure
grounding has been done properly as it represents a fundamental safety requirement. Ensure
qualified personnel check such connection.
● Improper use or installation of Modbar equipment can cause product damage and or serious
injury to end user. Modbar will not be held responsible for any damages or injuries occurring if
equipment has been misused, installed improperly, or tampered with.
● When you receive your equipment, thoroughly inspect the packaging and equipment for any
signs of damage. If damage is suspected, please contact Modbar support before attempting to
install or operate the equipment.
● Modbar equipment is not intended for use outdoors or in an unconditioned environment where
freezing temperatures may occur.
● Do not leave machine unattended during brewing processes.
● Do not use wet cloth to clean screens or switches on unit(s) as they are not waterproof.
● Repairs to Modbar equipment should be made only by trained technicians and use only Modbar
approved parts.
● Incorrect installation may cause injury and/or damages to people, animals, or objects, for which
the manufacturer shall not be held responsible.
● We do not recommend using adapters, multiple plugs and/or extension cords. If you cannot
avoid using them, make sure that they are exclusively of the kind which conforms to local,
national, and international electrical codes and safety regulations, being careful not to exceed
the power and current ratings indicated on such adapters and extension cords.
● This device must be used exclusively for the functions which it has been designed and built for.
Any other application is inappropriate and dangerous. The manufacturer shall not be
responsible for any damages caused by improper and/or irrational use.
● Using any electrical device requires that certain fundamental rules be observed.
● Do not touch the device with wet or humid hands and feet.
● Do not use the device while having no shoes on your feet.
● Do not use extension cords in bath or shower rooms.
● Do not unplug the device from the power outlet by pulling on the power supply cable.
● Do not expose the device to atmospheric agents (rain, sun, etc.).
● Do not allow children or untrained people to use this device.
● Do not clean the control panel with a wet cloth since it is not watertight.
● Before performing any maintenance and/or cleaning operations, turn the main power switch to
the OFF position and disconnect the machine from the power source by unplugging the cord or
by switching off the relative circuit breaker. For any cleaning operations, follow exclusively the
instructions contained in the manual.
www.modbar.com Document 001-0040-1.1| Software Version 2.0
Page 5
OPERATING MANUAL ESPRESSO SYSTEM
4
● If the equipment is operating in a faulty manner or breaks down, turn the main power switch to
the off position, disconnect the machine from the power source (as described in the previous
paragraph), and close the water supply valve. Do not attempt to repair it. Contact a qualified
and authorized professional to perform any repair. Any repairs must be performed exclusively
by the manufacturer or by an authorized technician using only original parts. Noncompliance
with the above could compromise the safe operation of the equipment.
● Do not obstruct air intake and exhaust grilles.
● The machine’s power supply cable must not be replaced by users. In the event that the power
supply cable is damaged, shut off the equipment, disconnect the machine from the power
supply by switching off the relative circuit breaker, and close the water supply valve. To replace
the power supply cord, contact a qualified professional.
CAUTION – Risk of fire and electric shock. Replace only with manufacturer’s cord set, part No. E-0118-01
ATTENTION - Risque d'incendie et de choc électrique . Remplacez-la uniquement avec le cordon de série
du fabricant , partie n ° E-0118-01
Modbar equipment is shipped in factory approved packaging. Upon receipt of equipment, thoroughly
inspect the packaging for damage. If damage is suspected, contact Modbar immediately.
In the event that equipment needs to be returned to Modbar, or shipped for any reason, it should be
shipped in the factory approved packaging. If you have discarded the packaging, please contact Modbar
for replacements.
The equipment must be properly drained prior to shipment, to avoid damage from freezing. If you have
questions about how to properly drain equipment for shipping, please contact Modbar support.
Do not store the equipment in places where temperature may cause water in the boilers to freeze.
www.modbar.com Document 001-0040-1.1| Software Version 2.0
Page 6
OPERATING MANUAL ESPRESSO SYSTEM
5
www.modbar.com Document 001-0040-1.1| Software Version 2.0
Page 7
OPERATING MANUAL ESPRESSO SYSTEM
6
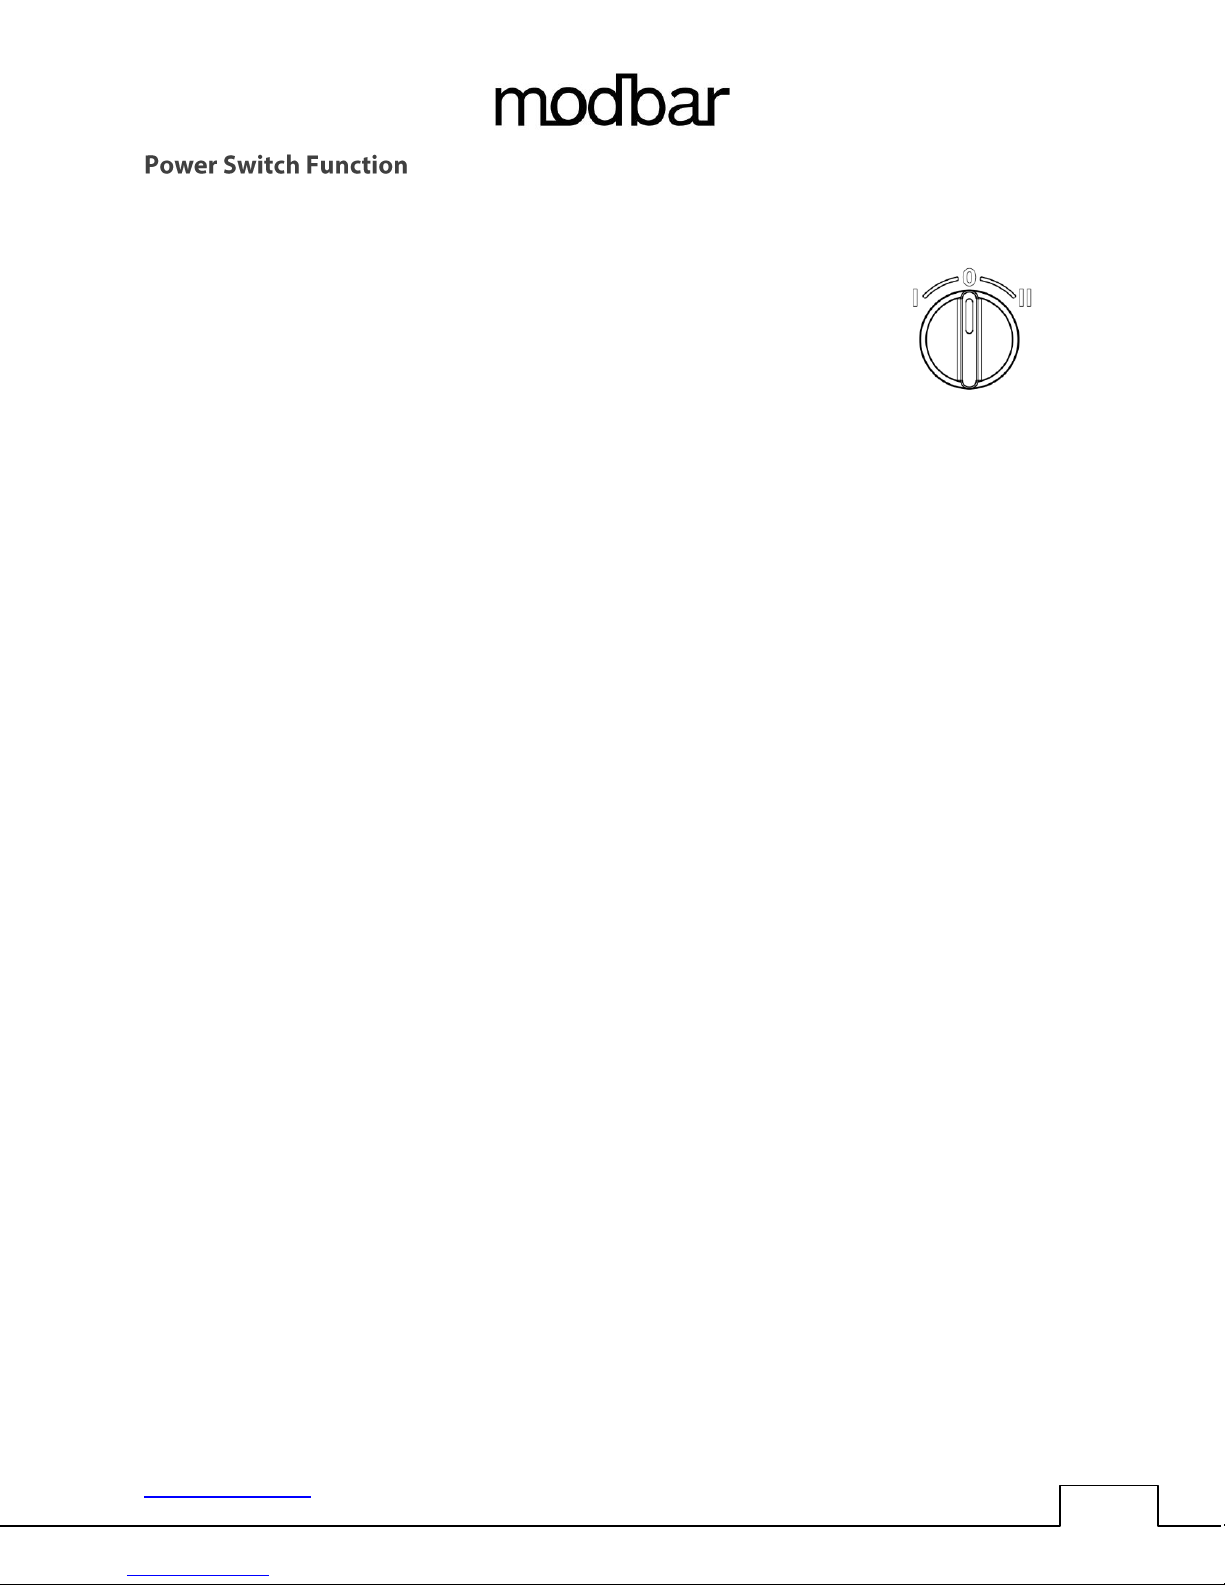
The three-position power switch on the Modbar module has three separate functions, as illustrated in
the following image.
0 - Off
In this position, the module is in the off position.
I - Standby Mode
In this position, the module is in standby mode. When in
standby mode, all operations function as normal, but no power is applied to the
heating elements. This mode is used for priming the system upon installation, and
can also be useful for some diagnostic applications.
II - Operating Mode
In this position, the module is in operating mode. Power is applied to the heating
elements, and all functions operate as normal.
www.modbar.com Document 001-0040-1.1| Software Version 2.0
Page 8
OPERATING MANUAL ESPRESSO SYSTEM
7
Upon installation, the Modbar module must be primed before use. This is accomplished by the following
steps.
● Ensure that filtered water is supplied to the module.
● Ensure that the power switch is in the off position.
● Ensure that the module power cable is plugged into its appropriate power source.
● Turn the power switch counter-clockwise to place it in standby mode.
● Actuate the tap handle in manual mode, as described in the “Dispensing Operations” section of
this guide.
● After water begins to pour from the tap (This may take some time on a new system) allow water
to flow for at least 30 seconds to ensure that the system is primed.
● At this point, it is safe to turn the switch clockwise into operating mode.
During general use, the module is already primed, and it is not necessary to prime the system. To start
the module, follow these steps:
● Ensure that filtered water is supplied to the module.
● From the off position, turn the power switch clockwise to place it into operating mode.
● At this point, the elements will begin to heat. When each heat zone reaches set temperature,
the module is ready for use.
www.modbar.com Document 001-0040-1.1| Software Version 2.0
Page 9
OPERATING MANUAL ESPRESSO SYSTEM
8
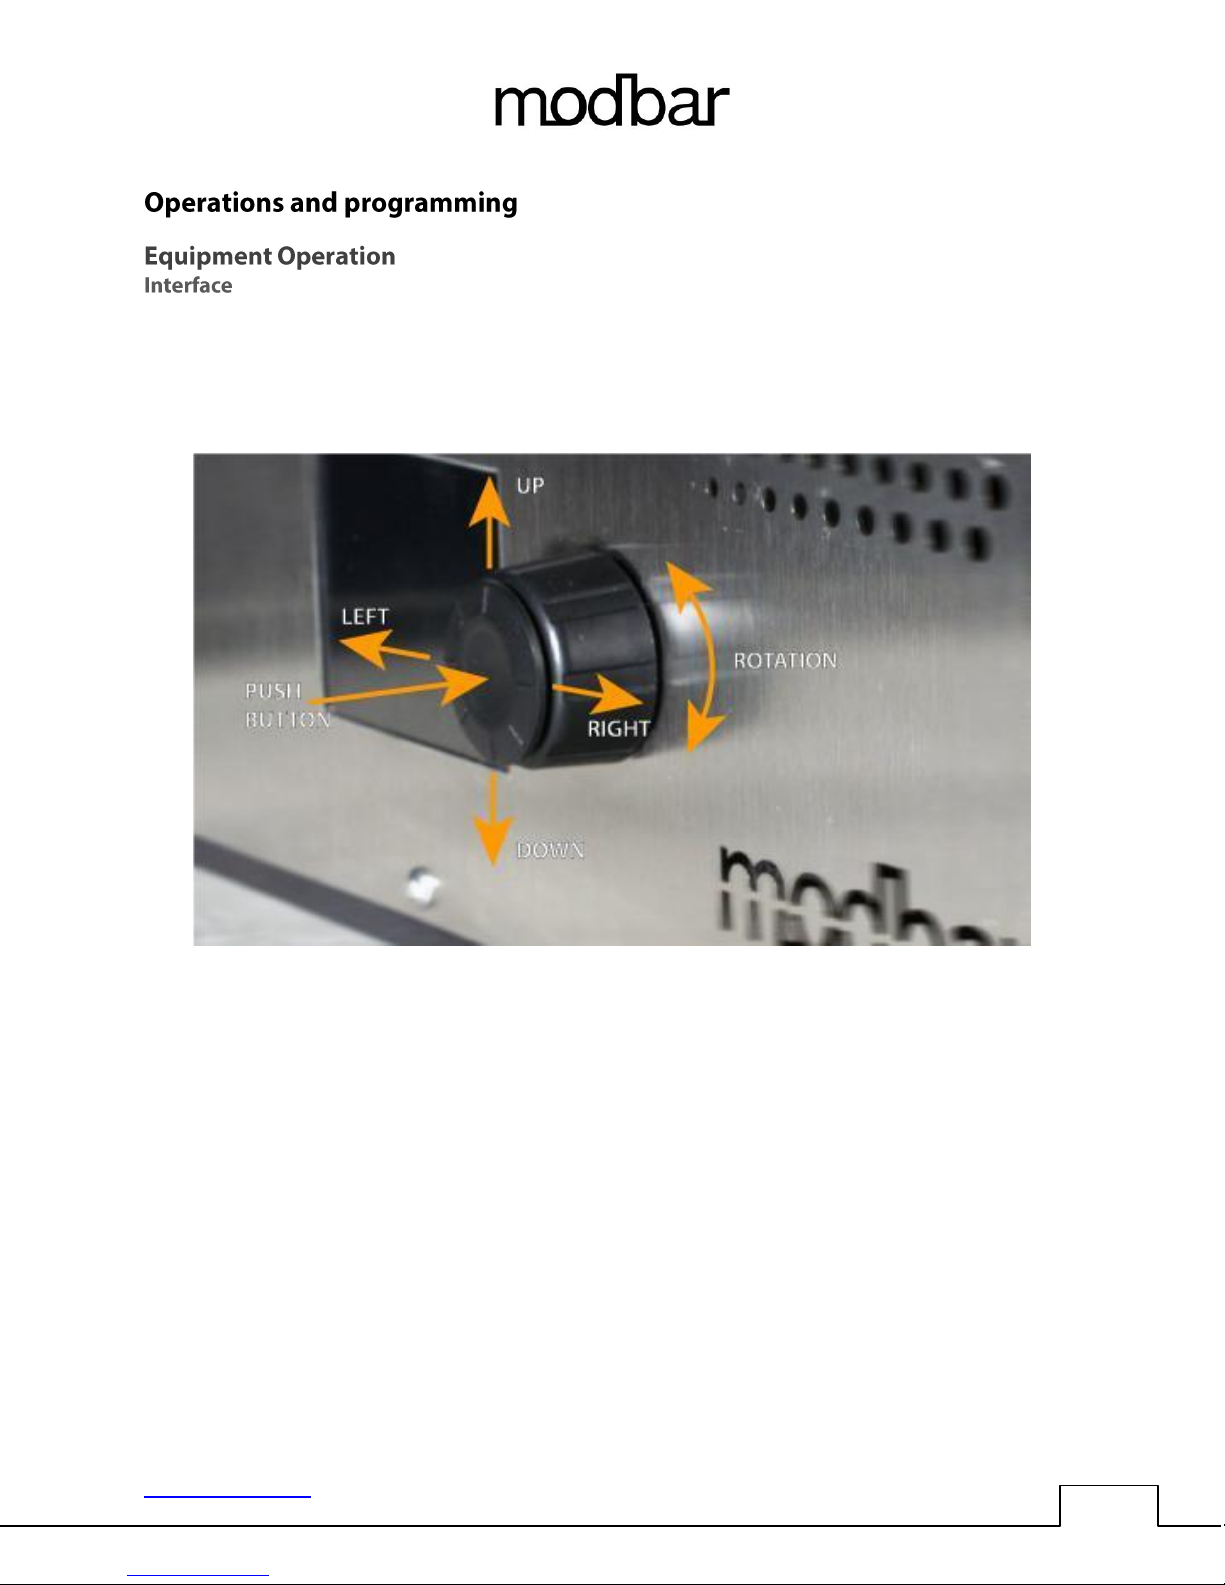
The touch screen is used for selecting and displaying data. The multi-function encoder is used for
editing data. The functions of the encoder are shown below:
www.modbar.com Document 001-0040-1.1| Software Version 2.0
Page 10
OPERATING MANUAL ESPRESSO SYSTEM
9
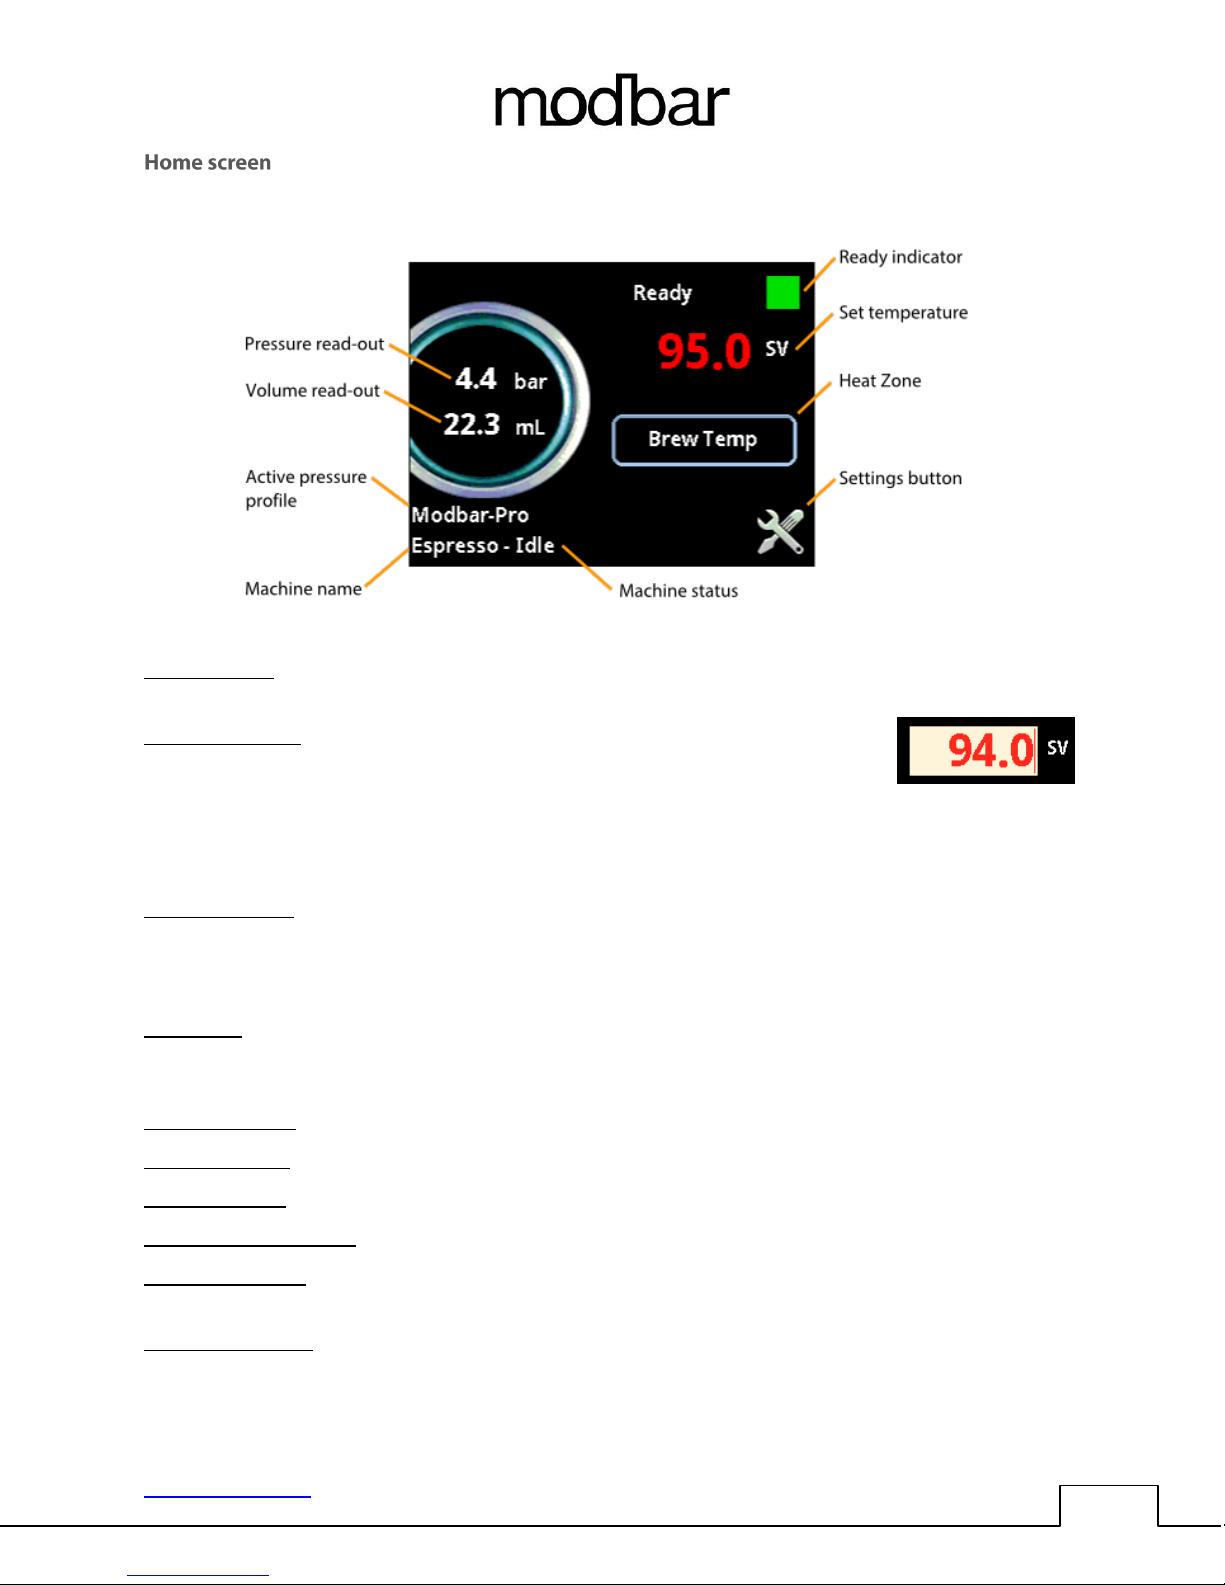
Process value: This is the current value in degrees of the active heat zone (selected by the heat zone
button).
Set temperature: This is the current set-point value in degrees for the active heat
zone. To change the set temperature, simply touch the red value on the screen
and the value will be highlighted. Rotate the encoder left or right to change the
value in 1-degree increments. Press the joystick up or down to change the
temperature in 1/10 degree increments. Press the center button on the joystick to save the change.
(These temperatures are saved to the currently selected profile)
Ready indicator: This square icon indicates whether the machine is at temperature to dispense. When
first starting the machine, the indicator will remain red in color until all temperature zones are heated to
set temperature. Once all zones are at temperature, the icon will turn green, indicating that we are now
ready to dispense.
Heat zone: In automatic temperature mode, this button has no function. In manual temperature mode,
pressing this button cycles through the 3 heat zones on the espresso system: Inlet Boiler, Outlet Boiler
and Brew Head. (Refer to “Advanced preferences screen page 2”)
Settings button: This button navigates to the main settings screen.
Machine status: Displays the current status of the module & tap.
Machine name: Displays the machine name (user editable in advanced preferences).
Active pressure profile: Displays which pressure profile is currently selected.
Volume read-out: Displays real-time fluid volume information during any given dispensing cycle
(Manual, Auto and Rinse).
Pressure read-out: Displays current pressure in the module.
Tip: When the module is in setup mode (no heaters, main switch in the left position), the pressure readout will accurately indicate your water supply pressure. *boilers must be below 70°C or 150°F
www.modbar.com Document 001-0040-1.1| Software Version 2.0
Page 11
OPERATING MANUAL ESPRESSO SYSTEM
10
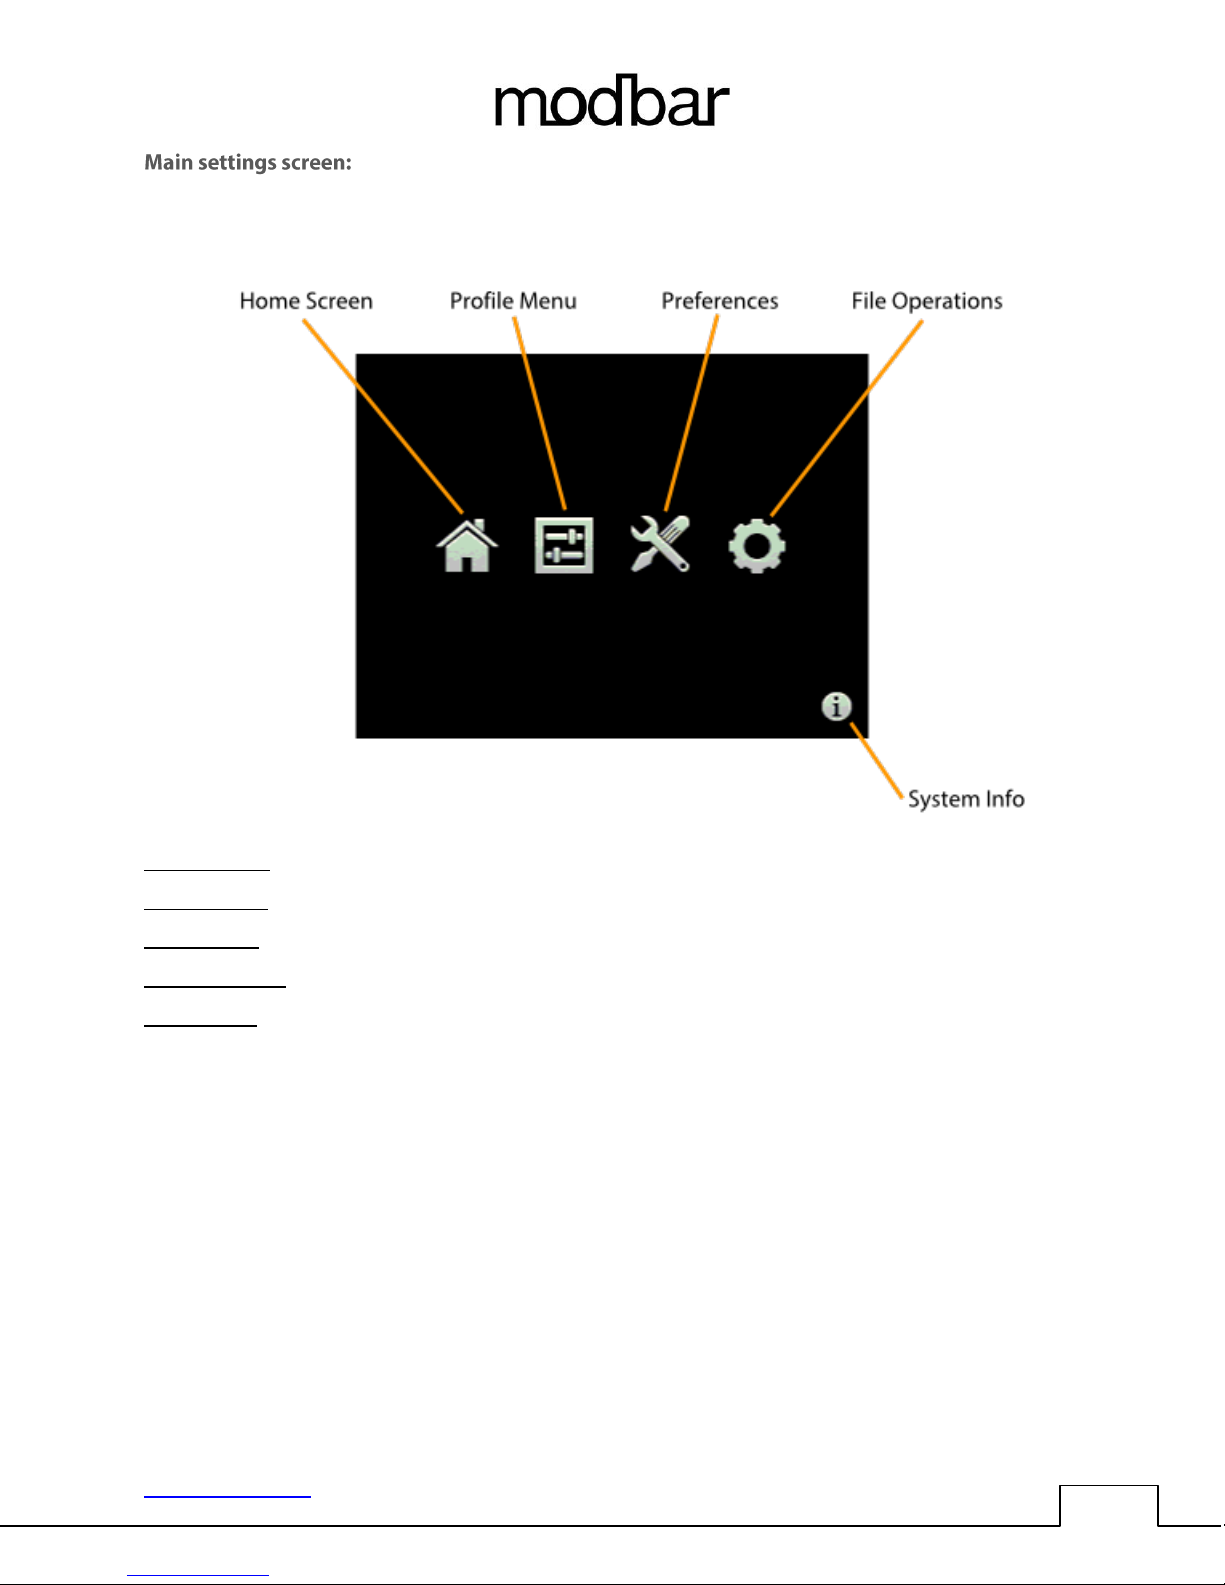
home -> main settings
Home screen: This button navigates back to the home screen / dashboard.
Profile menu: This button navigates to the profile selection menu.
Preferences: This button navigates to the system preferences page.
File operations: This button navigates to the file operations page.
System info: This button displays the system version and software information.
www.modbar.com Document 001-0040-1.1| Software Version 2.0
Page 12
OPERATING MANUAL ESPRESSO SYSTEM
11
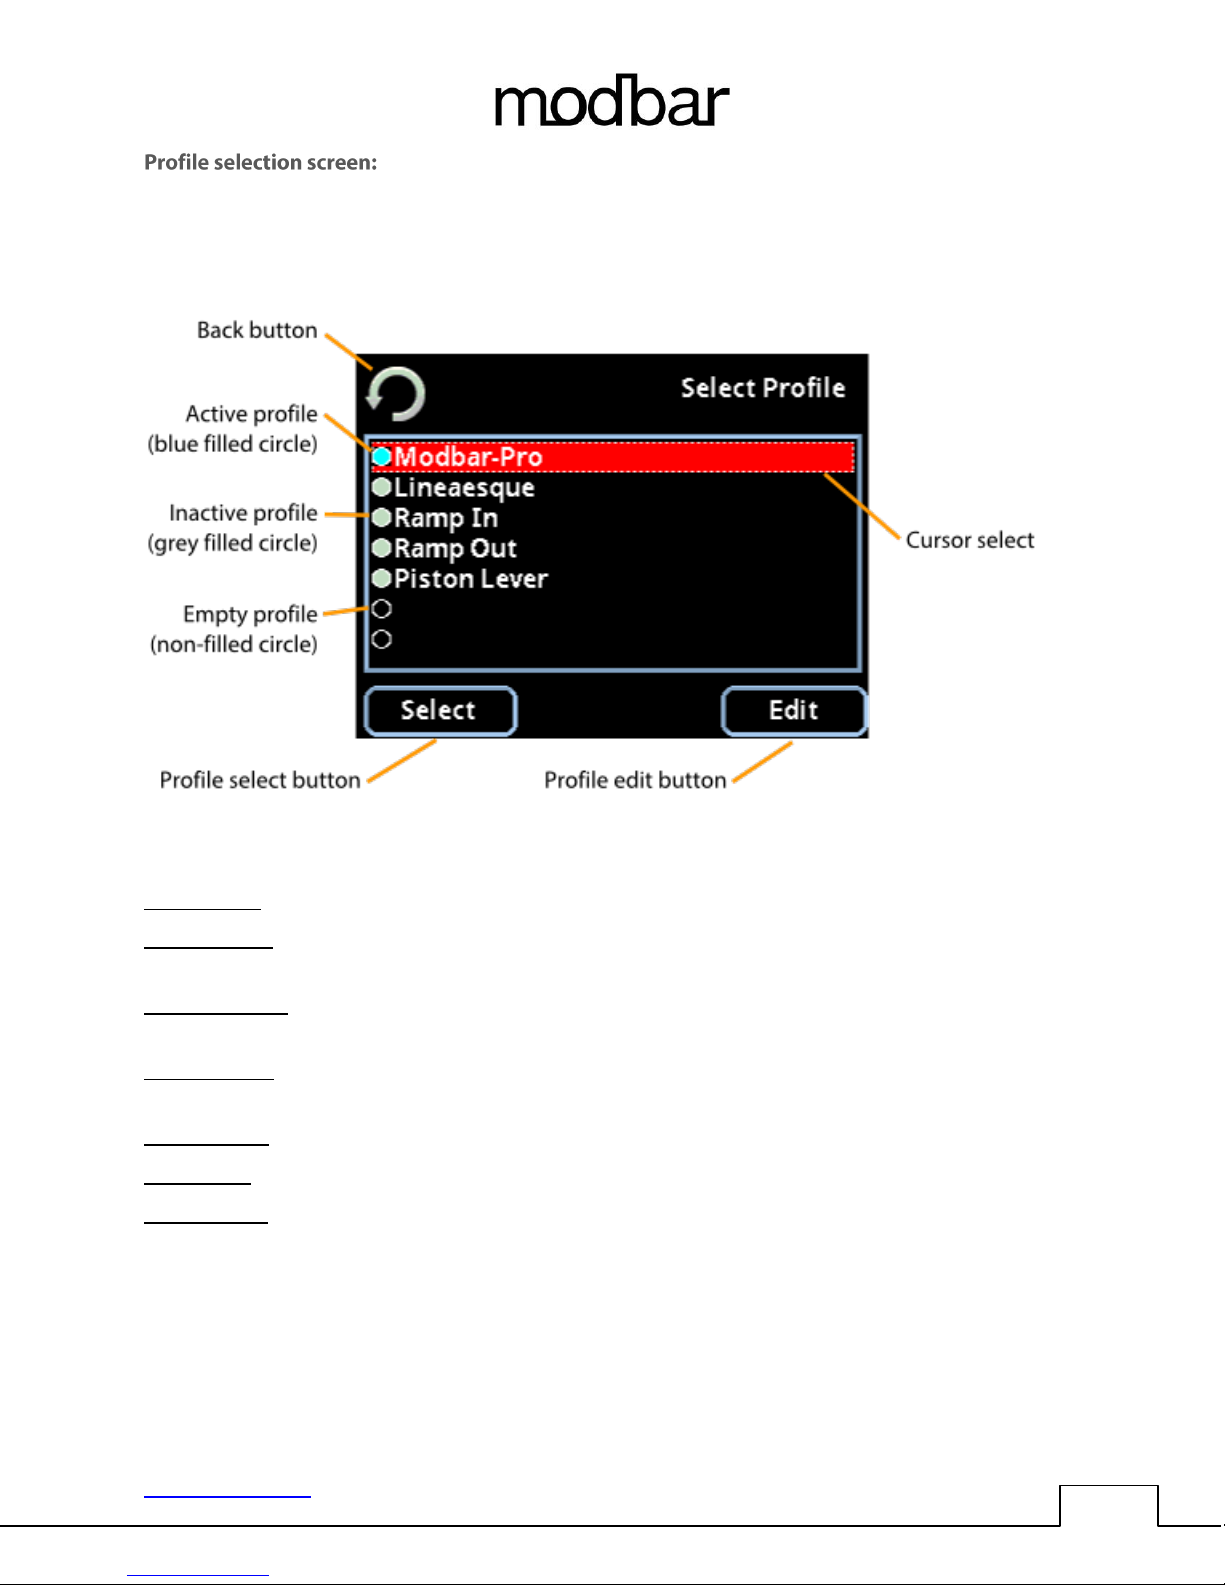
home -> main settings -> profile selection
Back button: Wherever you see the back button it will take you to the previous screen.
Active profile: This is the profile that is active and is used when the espresso tap lever is positioned to
the Automatic brewing position, indicated by the blue filled circle.
Inactive profile: These profiles are present and contain profile data, but are not currently activated,
indicated by the gray filled circle.
Empty profile: These are empty profile slots and may not be used until profiling data is entered. Empty
profiles are indicated by a non-filled circle.
Profile select: Pressing profile select will set the current cursor selected profile to the active profile.
Profile edit: Press the profile edit button to edit the profile data for the current cursor selected profile.
Cursor select: The dotted outline cursor select indicates which profile is selected on screen. You may
use the rotary encoder or up/down function of the joystick to navigate the profiles list. Pressing the
pushbutton will activate a selected profile.
Tip: When selecting a profile, this menu is also duplicated on the tap display. Depending the installed
distance between the module and tap, it is possible to navigate the menu from the tap screen and scroll
through the profiles using the encoder button. Pressing the center encoder button selects the profile
highlighted on the tap. The center encoder button also navigates to the profile selection menu from the
home screen.
www.modbar.com Document 001-0040-1.1| Software Version 2.0
Page 13
OPERATING MANUAL ESPRESSO SYSTEM
12
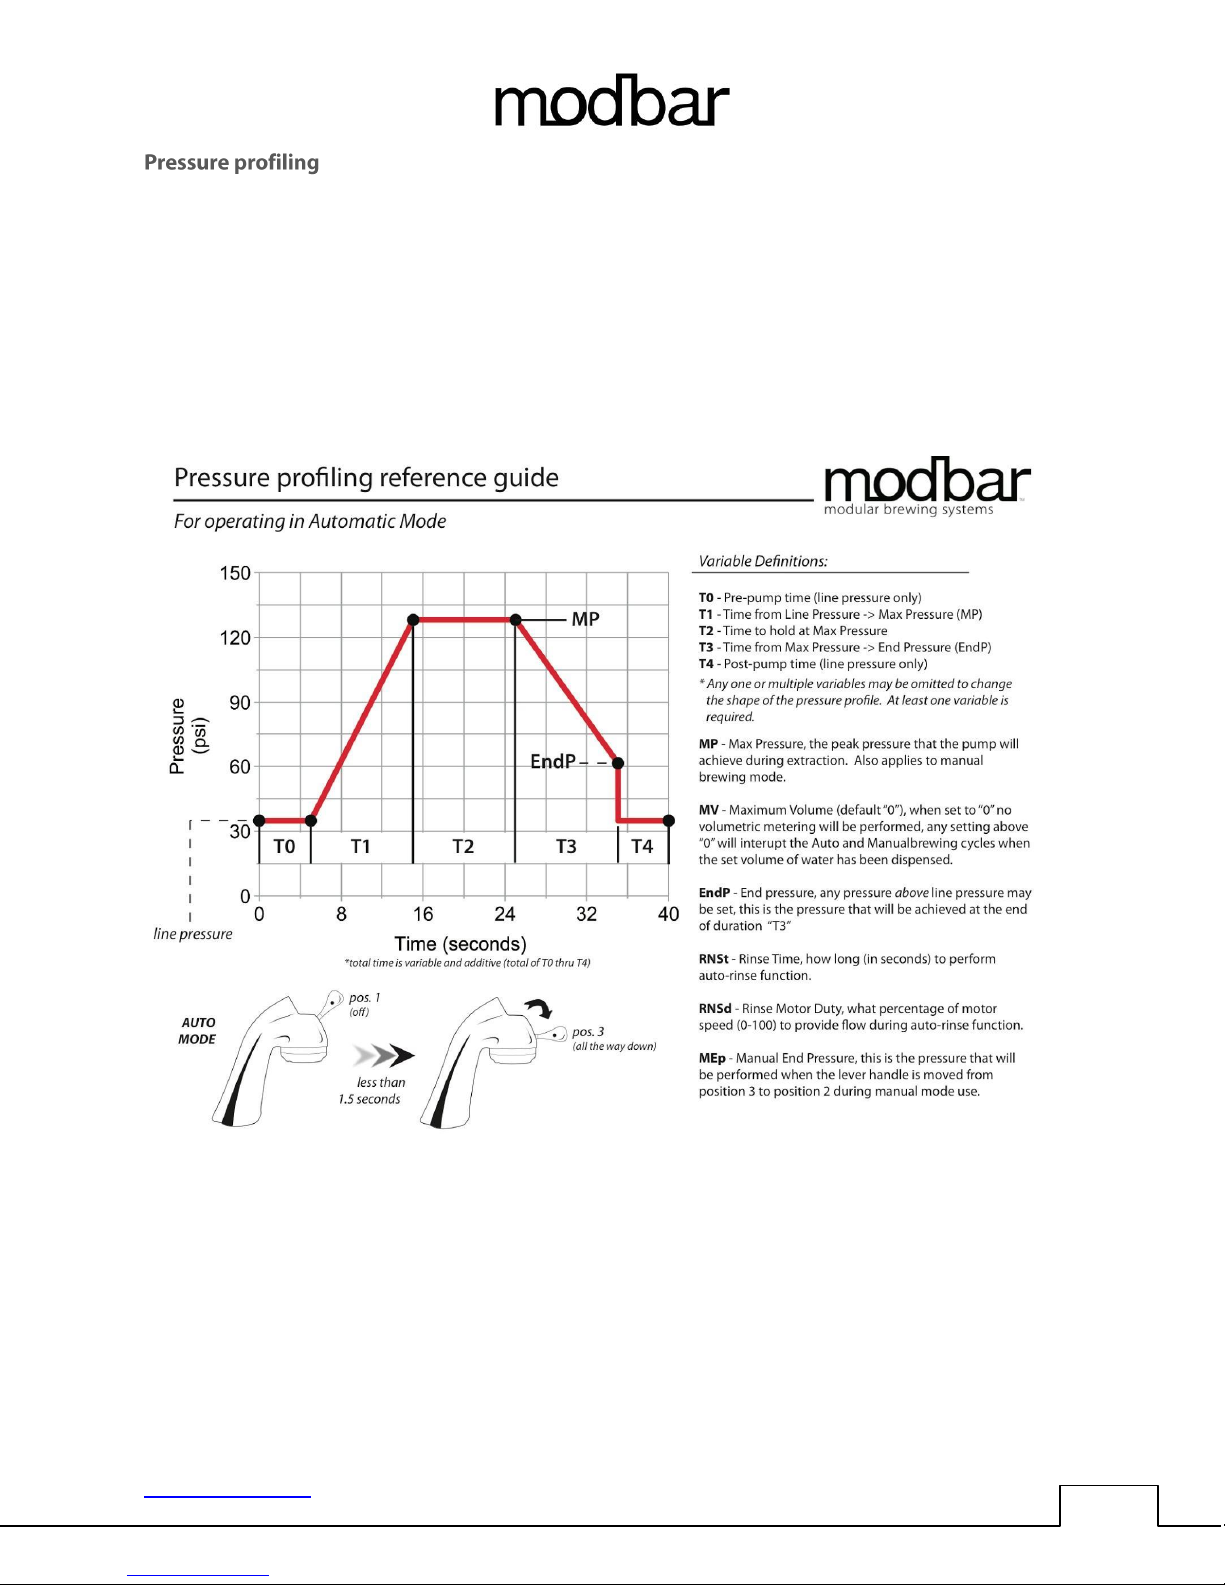
The pressure profiling capability of the Modbar espresso system can be programmed in “simple” or
“advanced” modes, each of which have their own settings screen. It is important to understand the
variables, their definitions, and how they work together to design successful profiles that provide
desirable extraction characteristics.
The system is quite extensive and is capable of simulating almost any espresso machine or pressure
condition available on the market today.
Study of the following reference guide will allow you to successfully use the simple and advanced
programming menu interfaces that follow:
www.modbar.com Document 001-0040-1.1| Software Version 2.0
Page 14
OPERATING MANUAL ESPRESSO SYSTEM
13
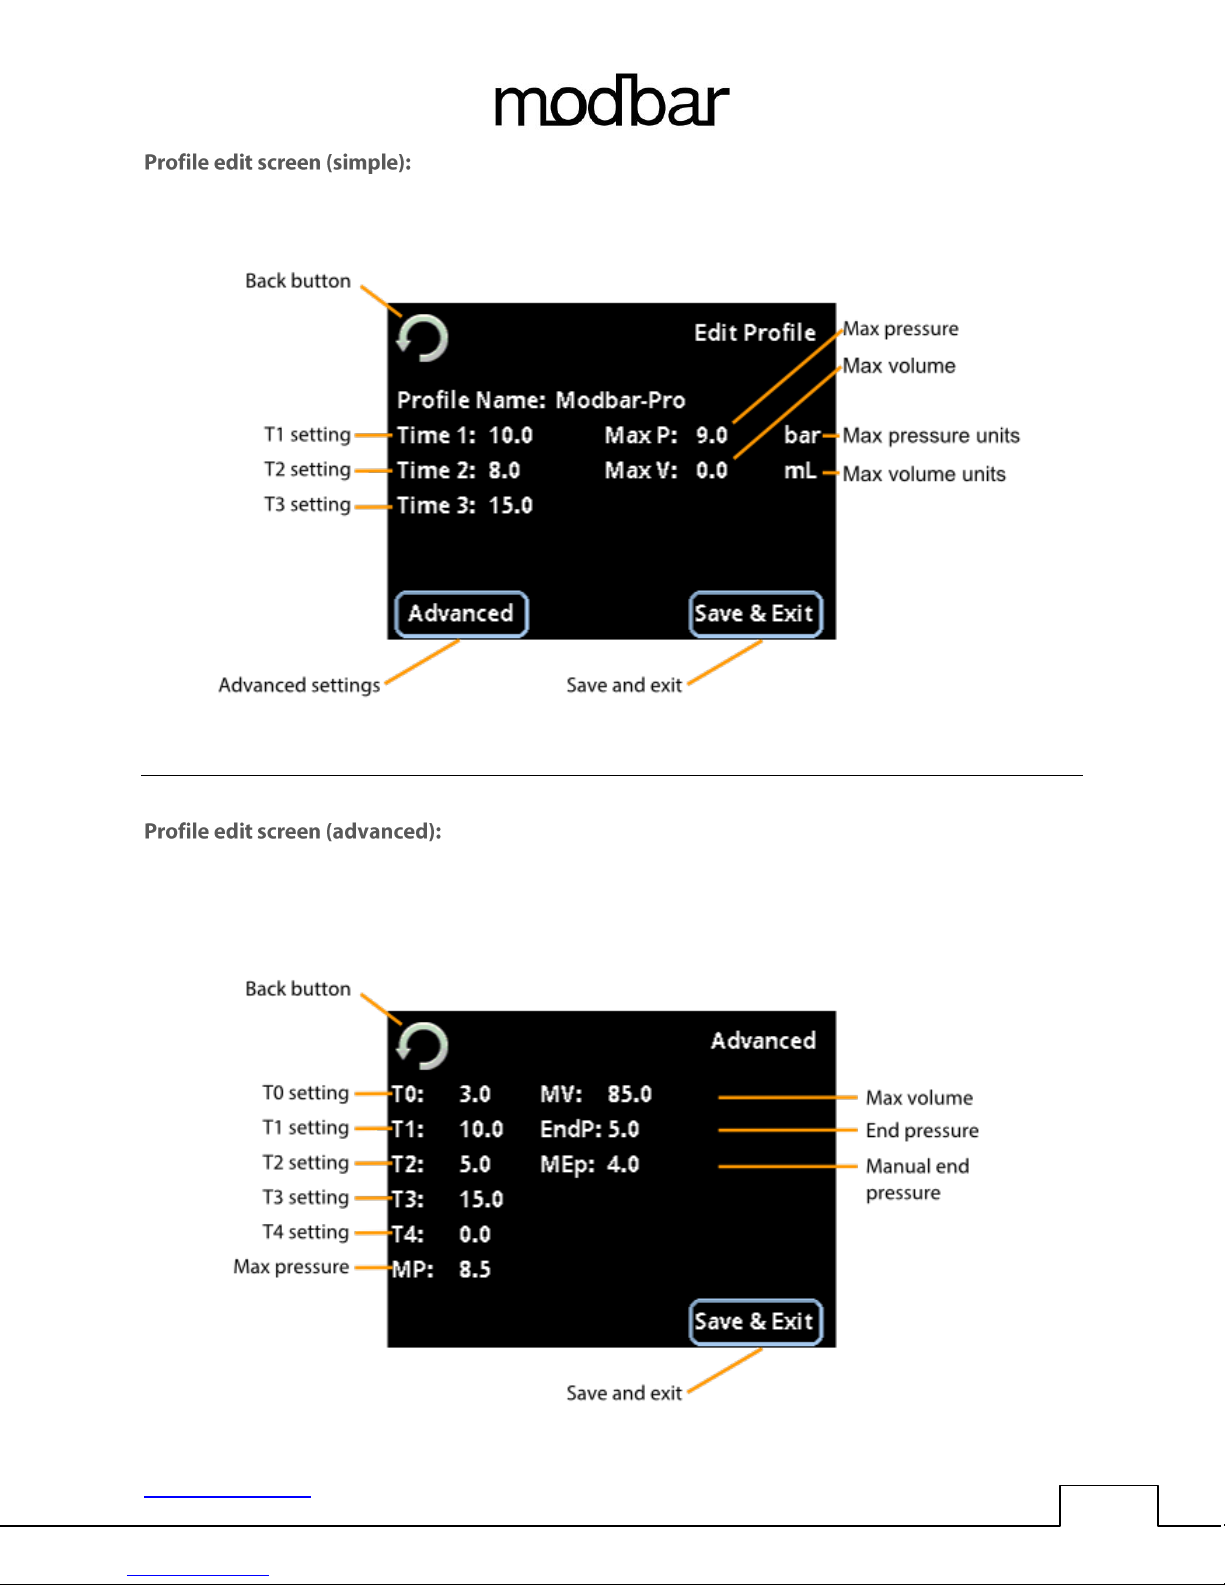
home -> main settings -> profile selection -> edit profile
home -> main settings -> profile selection -> edit profile -> advanced
www.modbar.com Document 001-0040-1.1| Software Version 2.0
Page 15
OPERATING MANUAL ESPRESSO SYSTEM
14
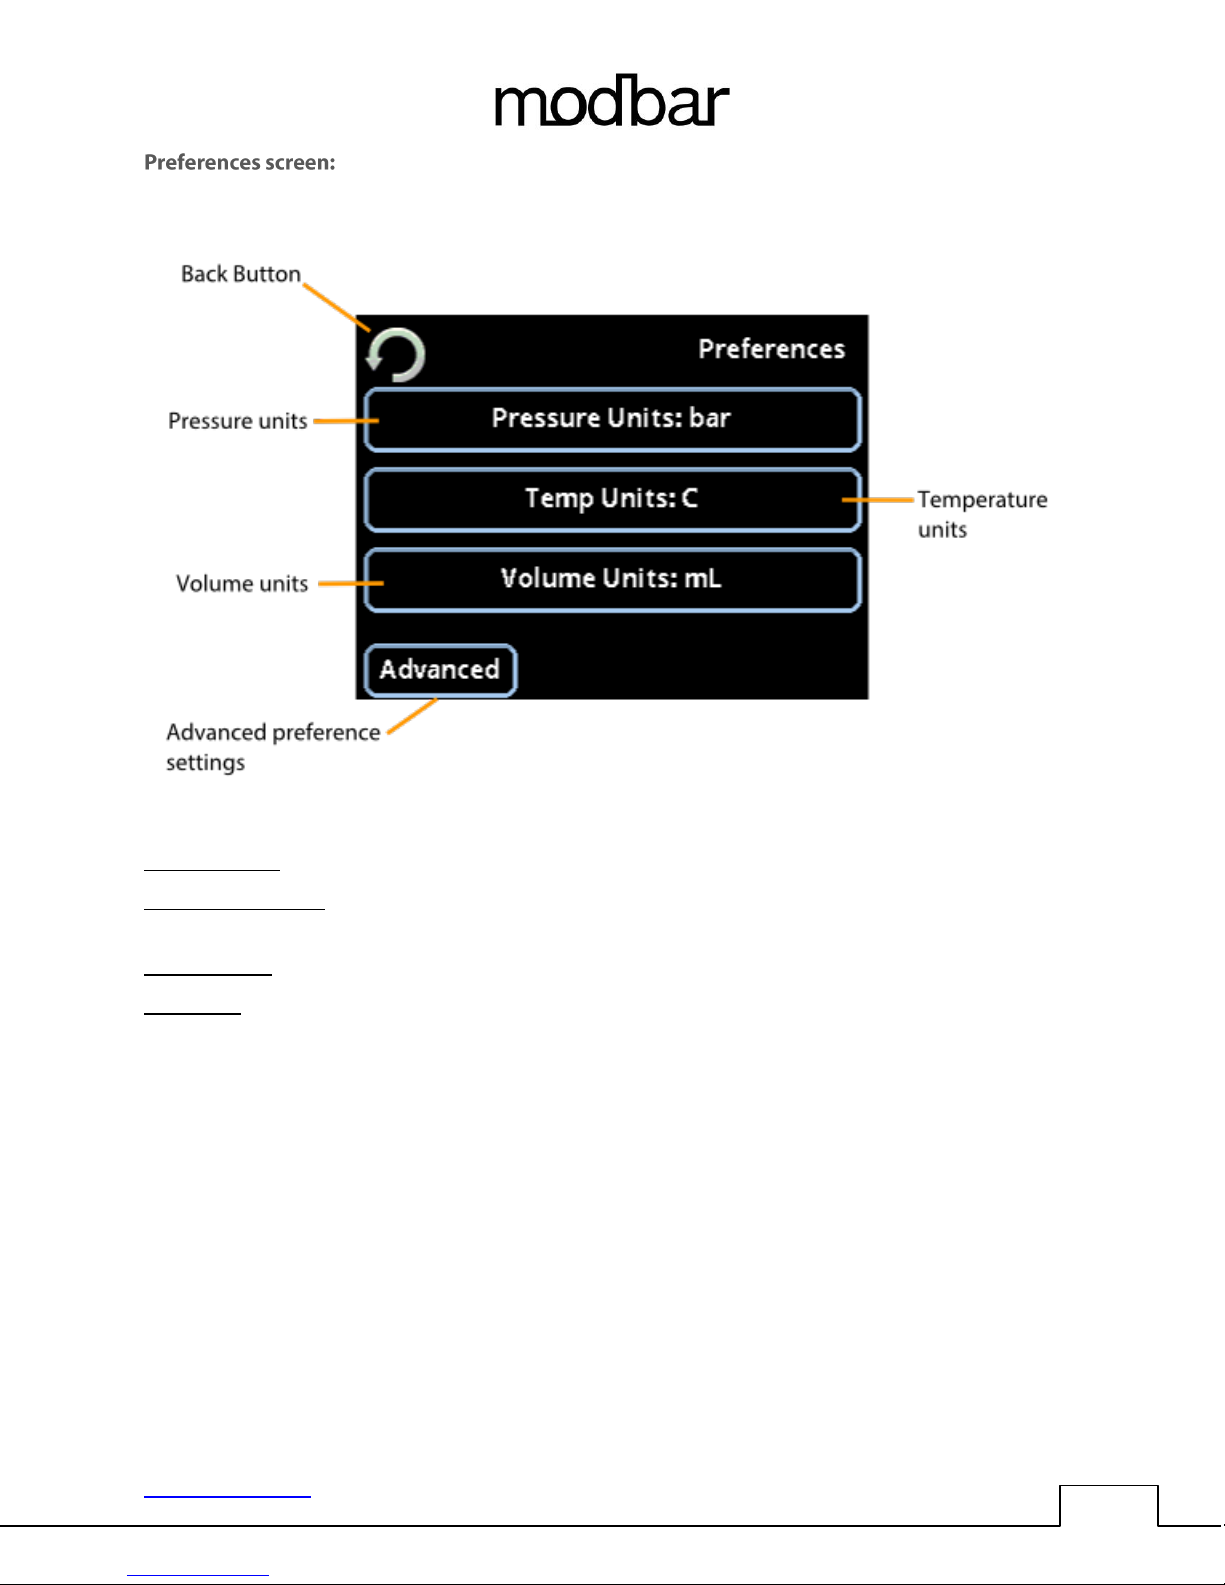
home -> main settings -> preferences
Pressure units: This button sets the system’s pressure units, in: bars or psi
Temperature units: This button sets the system’s temperature units, in: Celsius (C), Fahrenheit (F) or
Kelvin (K)
Volume units: This button sets the system’s volume units to: Milliliters (mL) or Fluid Ounces (oz.)
Advanced: This button navigates to the advanced preference settings page.
www.modbar.com Document 001-0040-1.1| Software Version 2.0
Page 16
OPERATING MANUAL ESPRESSO SYSTEM
15
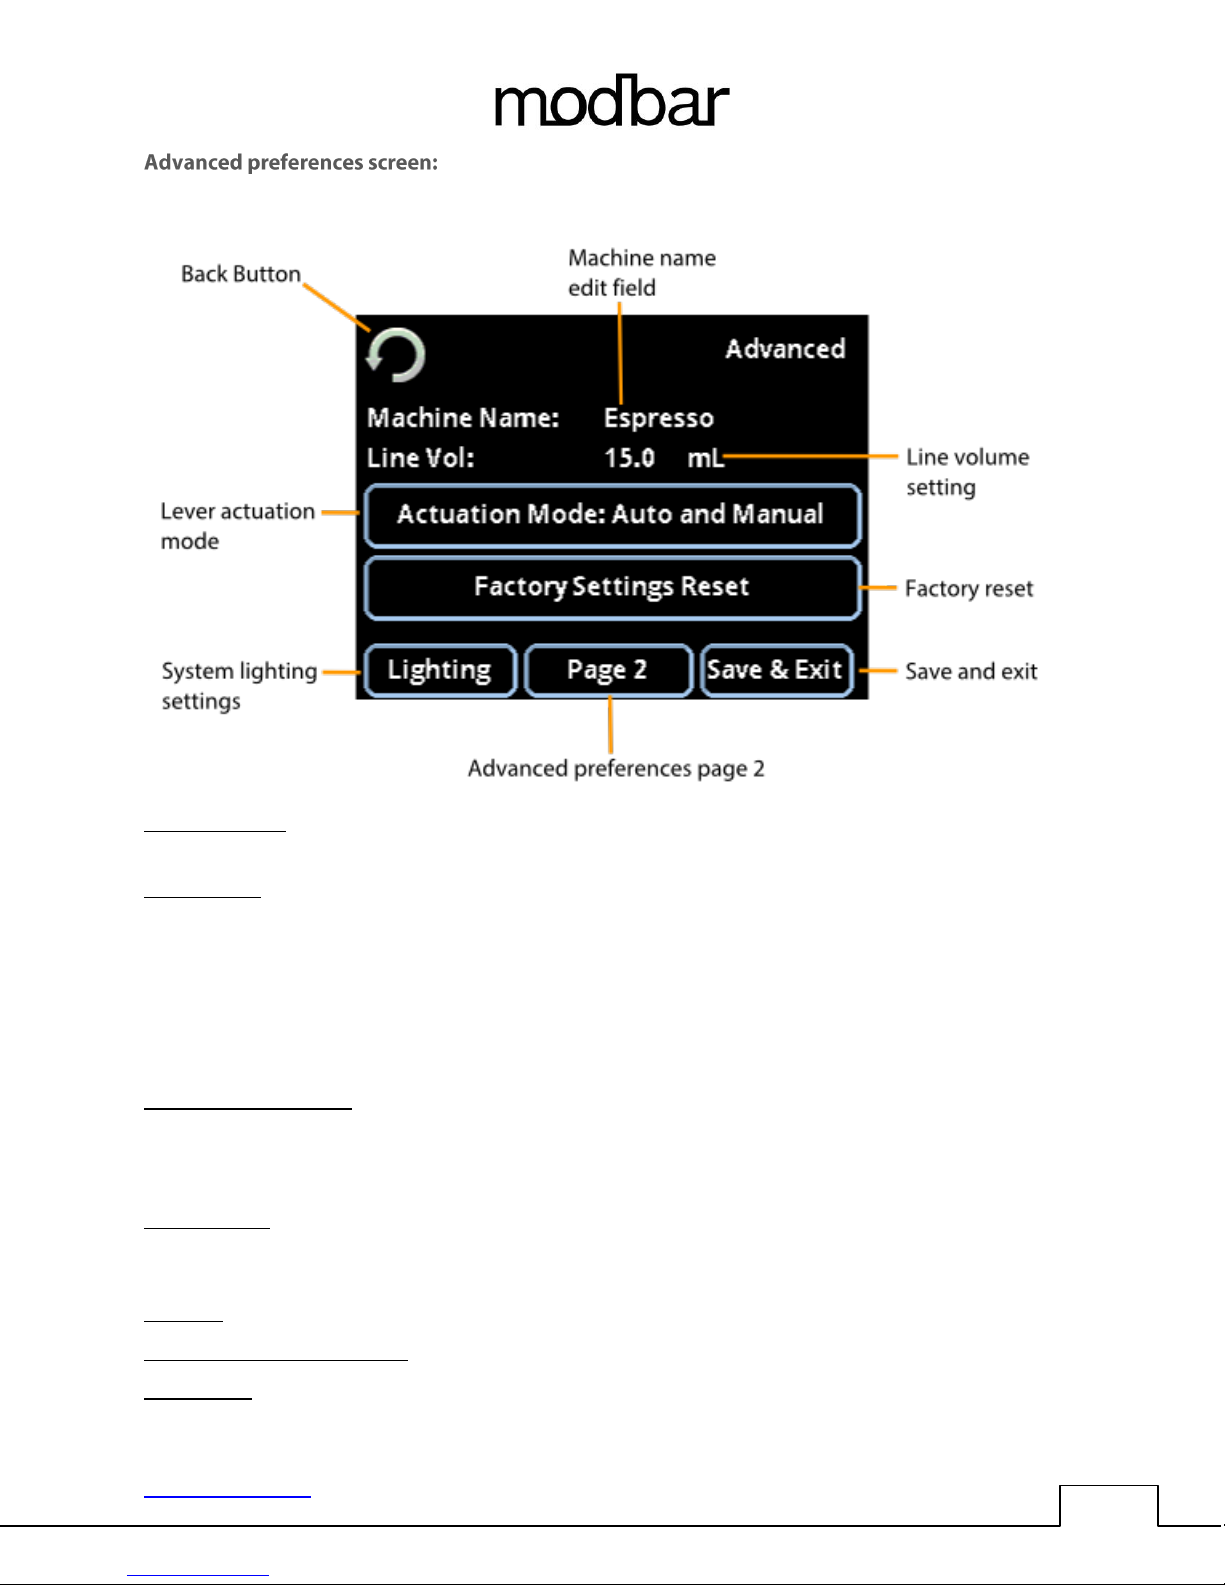
home -> main settings -> preferences -> advanced
Machine name: This is a descriptive name for the module, touch the name to highlight the field, use the
encoder wheel and push-button to rename the machine if desired.
Line volume: This value is used to accommodate for water in the line between the espresso module and
the espresso tap. It may also be used to account for water loss to absorption by the coffee puck.
The line volume setting may also be used to correct discrepancies between two different espresso
modules that are using the same brewing profile and/or volumetric setting. For example, if two
espresso modules are both programmed to dispense 36 mL and one of them dispenses slightly more
than the other, the line-volume setting may be increased on the overproducing module to adjust the
output accordingly.
Lever operation mode: Use this setting to control the behavior of the lever actuator on the espresso
tap. “Auto and Manual” allows for the use of both automatic pressure profiling mode and manual
operation mode. “Auto” limits the function to only automatic pressure profiling mode. “Manual” limits
the function to only manual operation mode.
Factory reset: This will return all of the system settings to their original factory values. ATTENTION!
You will lose all stored pressure profiles and other settings. A confirmation screen is presented to
confirm the operation of Factory Reset.
Lighting: This button navigates to the lighting settings screen.
Advance preferences page 2: This button will navigate to page 2 of the advanced preferences screen
Save & Exit: You guessed it! This button saves the settings changes and exits the current screen.
www.modbar.com Document 001-0040-1.1| Software Version 2.0
Page 17
OPERATING MANUAL ESPRESSO SYSTEM
16
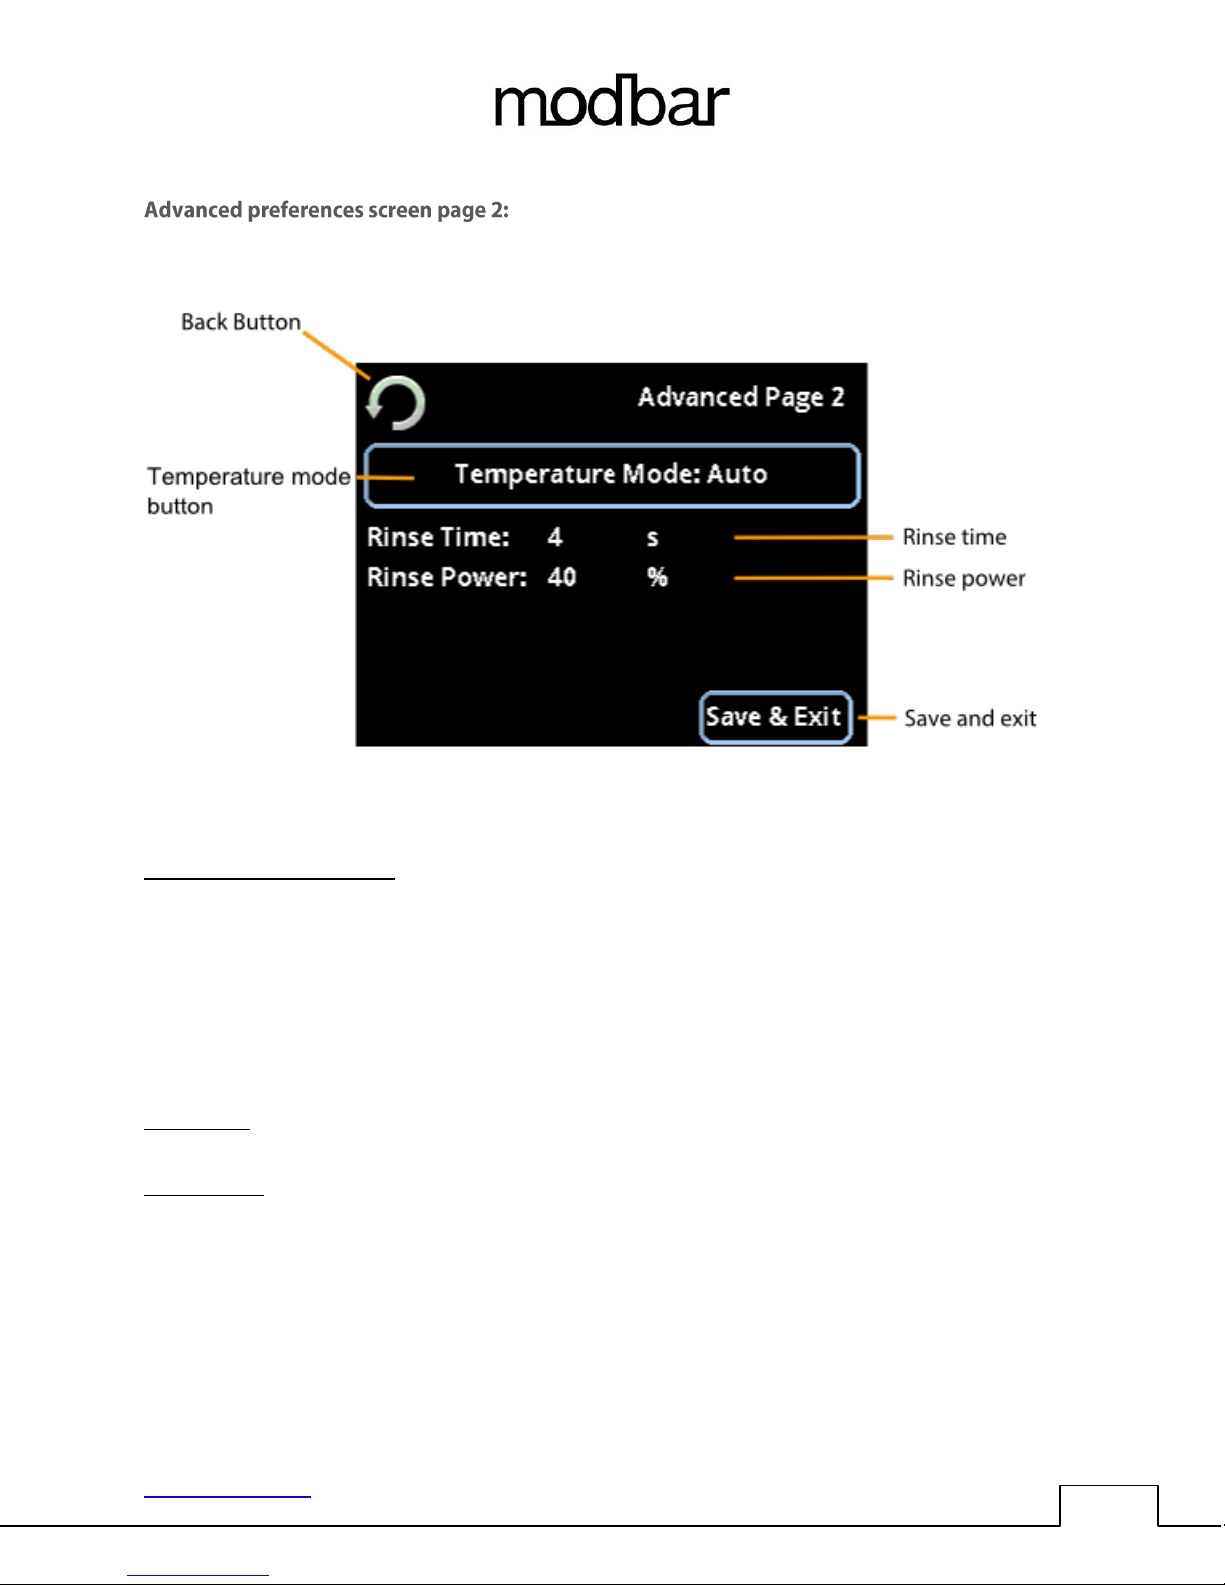
home -> main settings -> preferences -> advanced -> page 2
Temperature mode button: This button will toggle between Automatic and Manual temperature
modes.
Automatic temperature mode is calibrated at the factory to deliver the best temperature
performance using a single temperature setting.
Manual temperature mode gives you independent control over the set points of each
temperature zone from the home screen: Inlet boiler, outlet boiler, and brew head. At the
home screen, pressing the Heat Zone button will allow you to cycle through each zone and
set its temperature independently.
Rinse Time: The rinse time value controls the number of seconds of the rinse cycle, and can be modified
for a shorter or longer rinse cycle.
Rinse Power: The rinse power value controls the motor speed percentage during the rinse cycle. This
can be modified for a more powerful or less powerful rinse.
www.modbar.com Document 001-0040-1.1| Software Version 2.0
Page 18
OPERATING MANUAL ESPRESSO SYSTEM
17
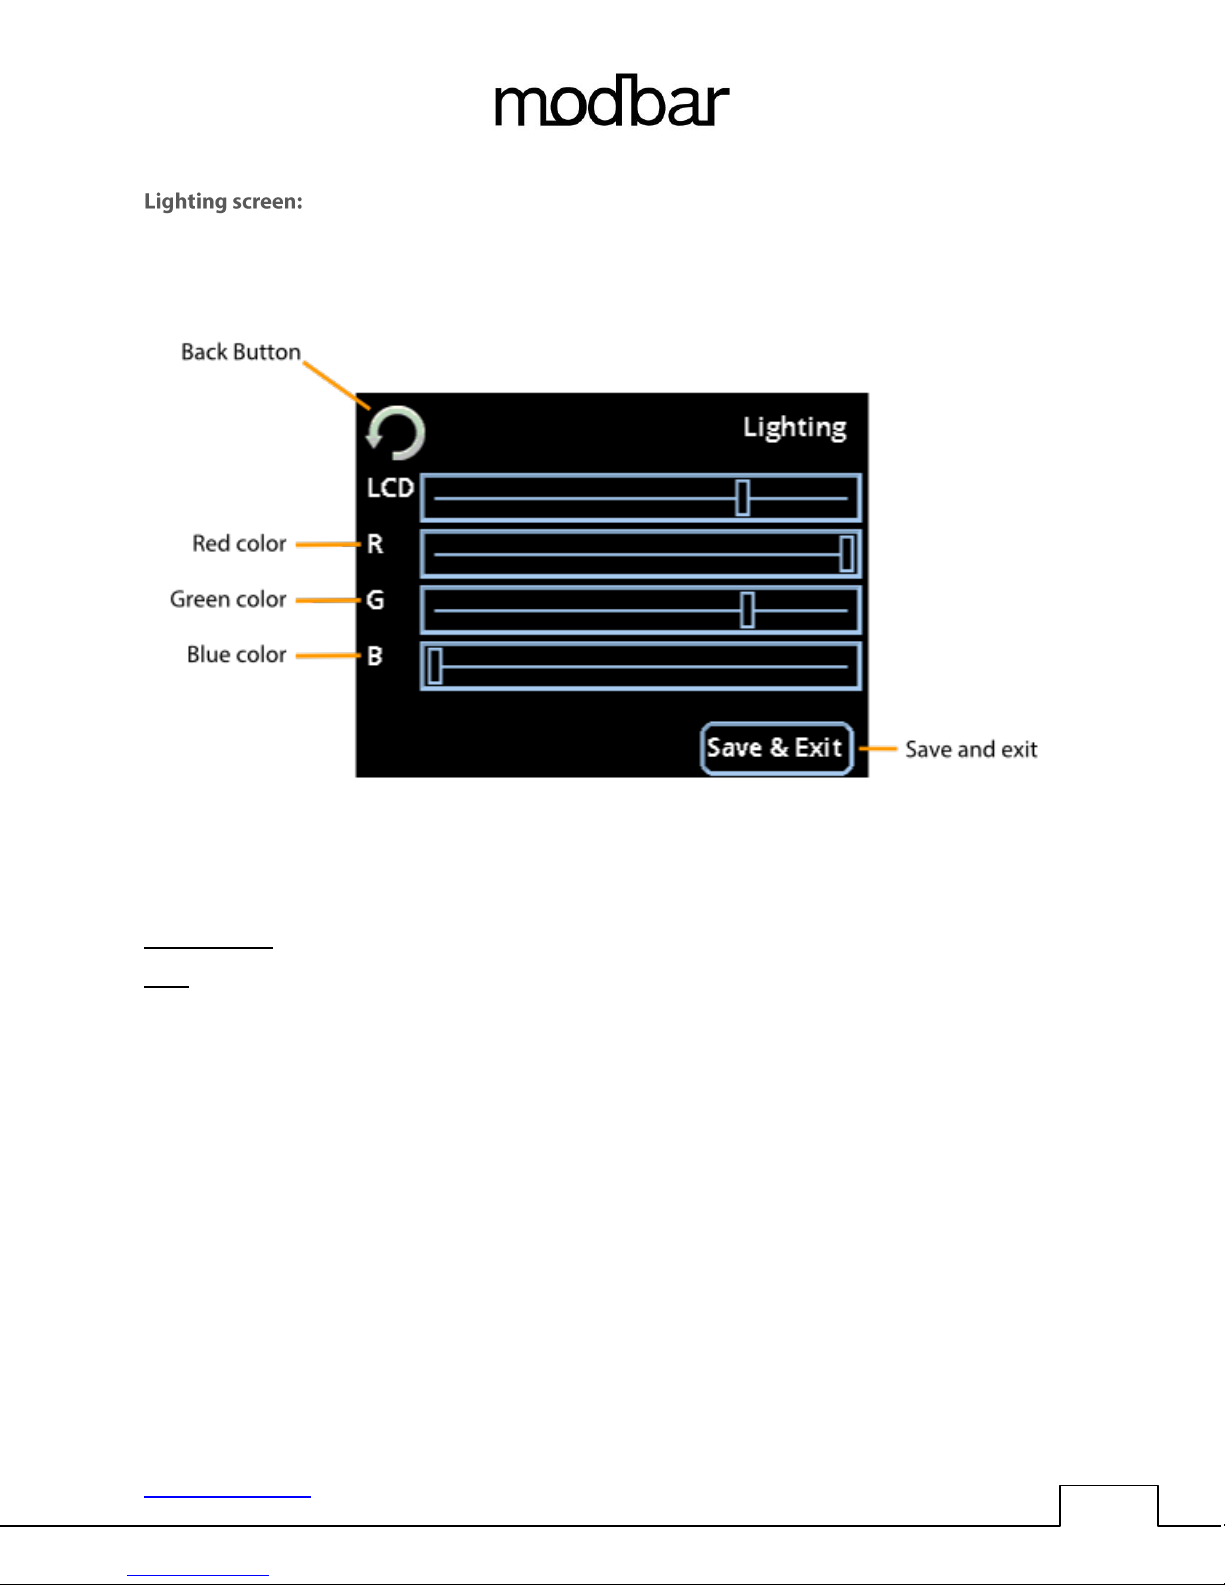
home -> main settings -> preferences -> advanced -> lighting
LCD backlight: Use this slider to control the brightness of the touch screen display.
RGB: Using the RGB color sliders you can create any color of the rainbow for the module’s
internal LED lighting.
www.modbar.com Document 001-0040-1.1| Software Version 2.0
Page 19
OPERATING MANUAL ESPRESSO SYSTEM
18
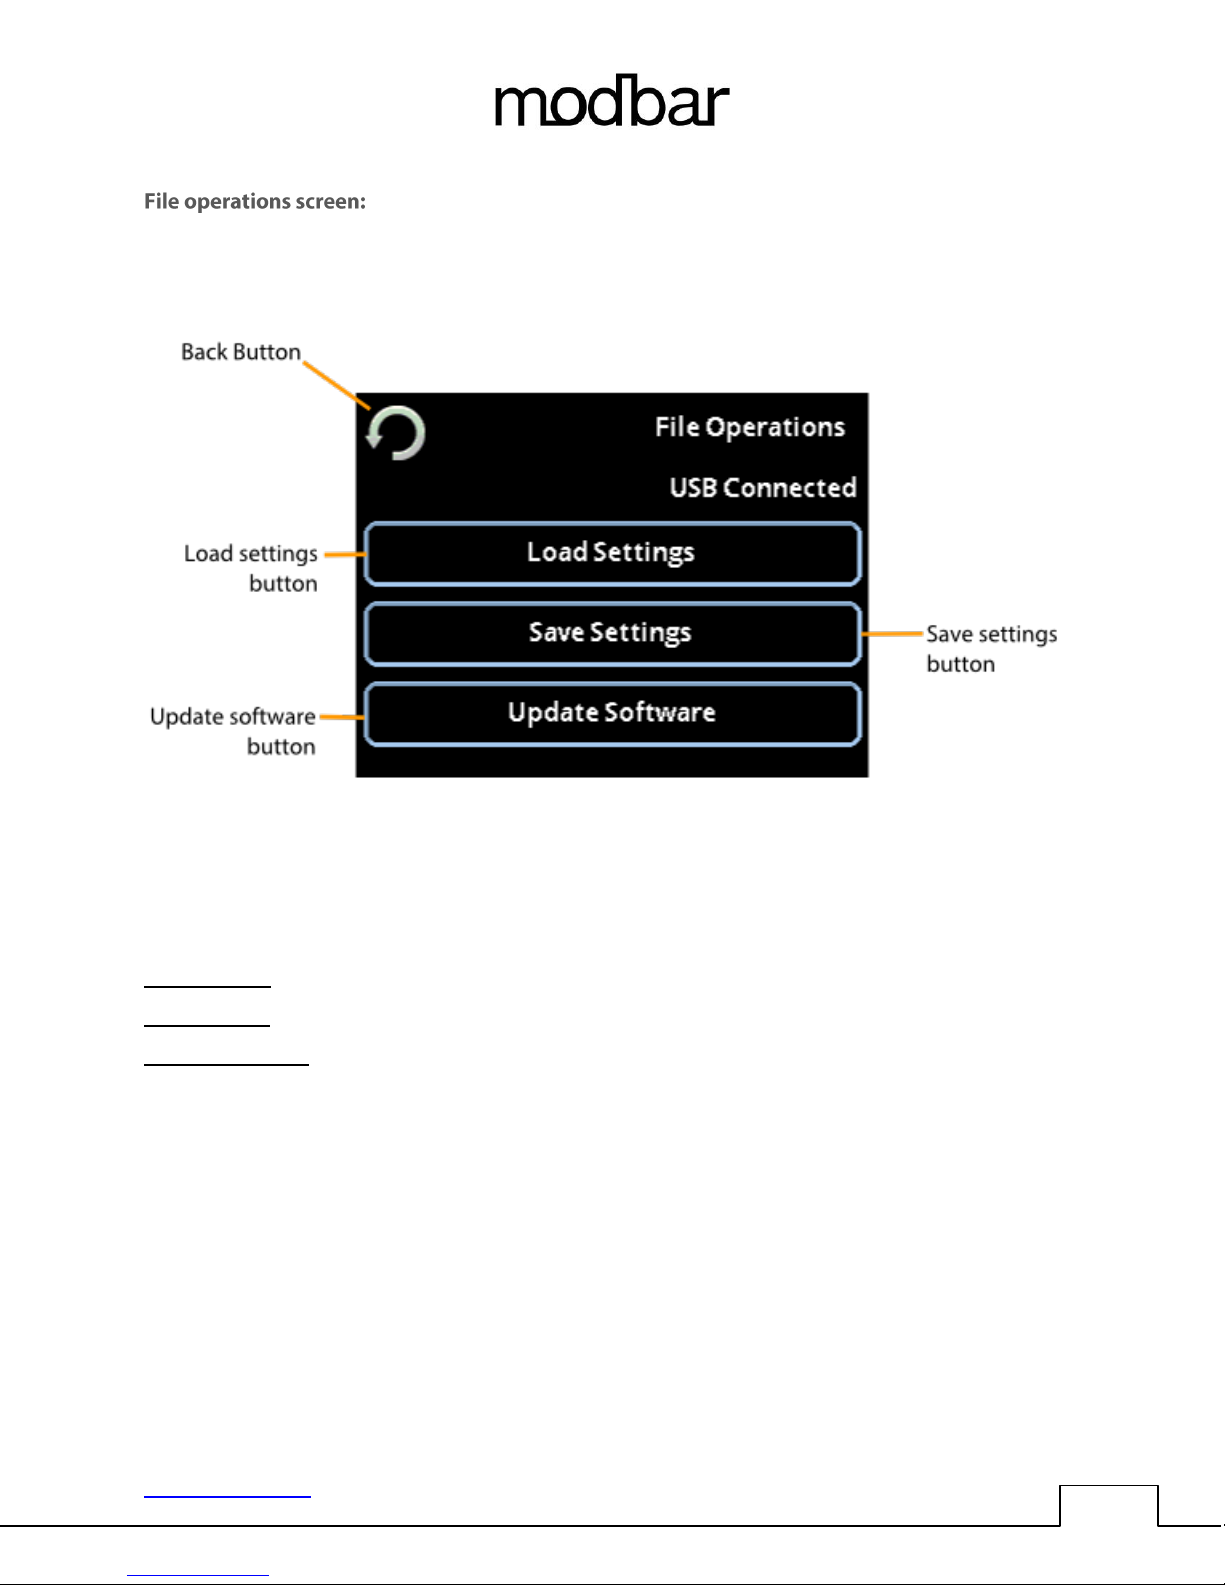
home -> main settings -> file operations
Load settings: This button will navigate to the load settings screen.
Save settings: This button will navigate to the save settings screen.
Update software: This button will navigate to the update software screen.
www.modbar.com Document 001-0040-1.1| Software Version 2.0
Page 20
OPERATING MANUAL ESPRESSO SYSTEM
19
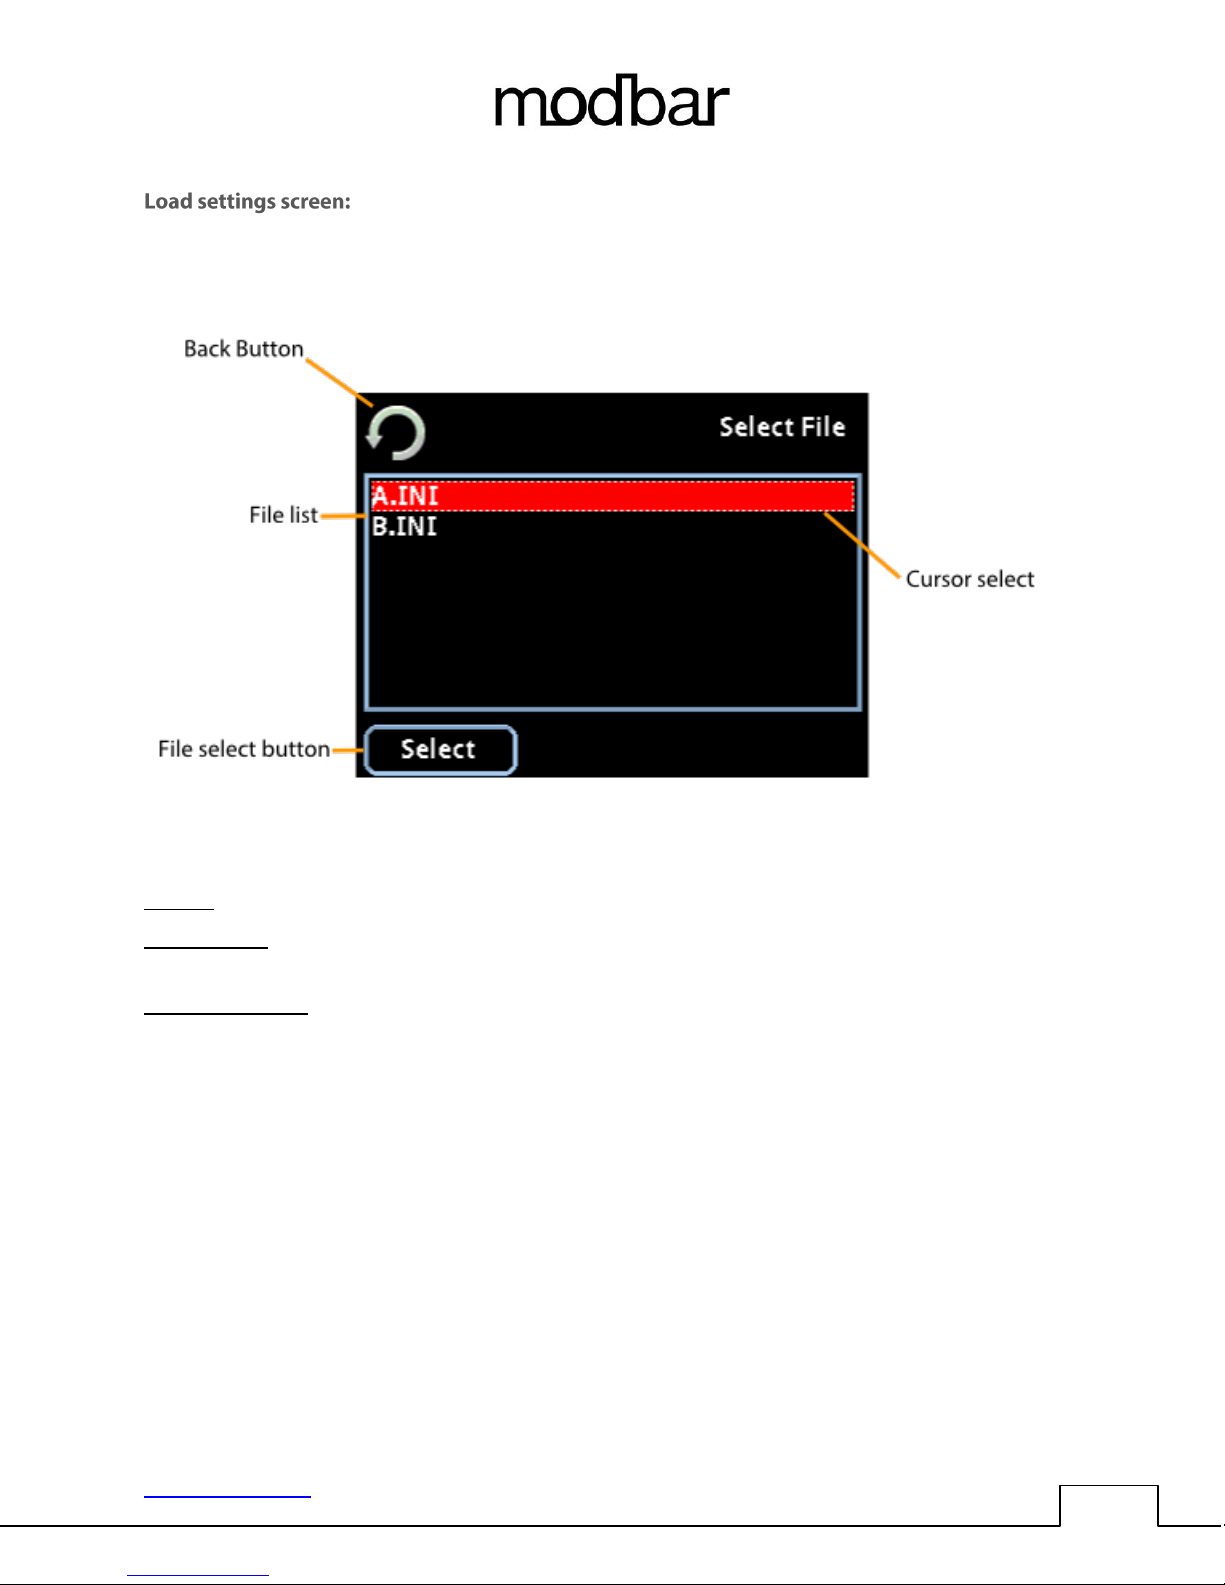
home -> main settings -> file operations -> load settings
File list: This area displays all of the settings files that are currently saved to the USB drive.
Cursor select: The dotted outline cursor select indicates which file is selected on screen. You may use
the rotary encoder or up/down function of the joystick to navigate the file list.
File select button: Pressing select will load the currently selected settings file. This includes pressure
profiles and all other user accessible settings and preferences. Note: existing profiles will be
overwritten.
www.modbar.com Document 001-0040-1.1| Software Version 2.0
Page 21
OPERATING MANUAL ESPRESSO SYSTEM
20
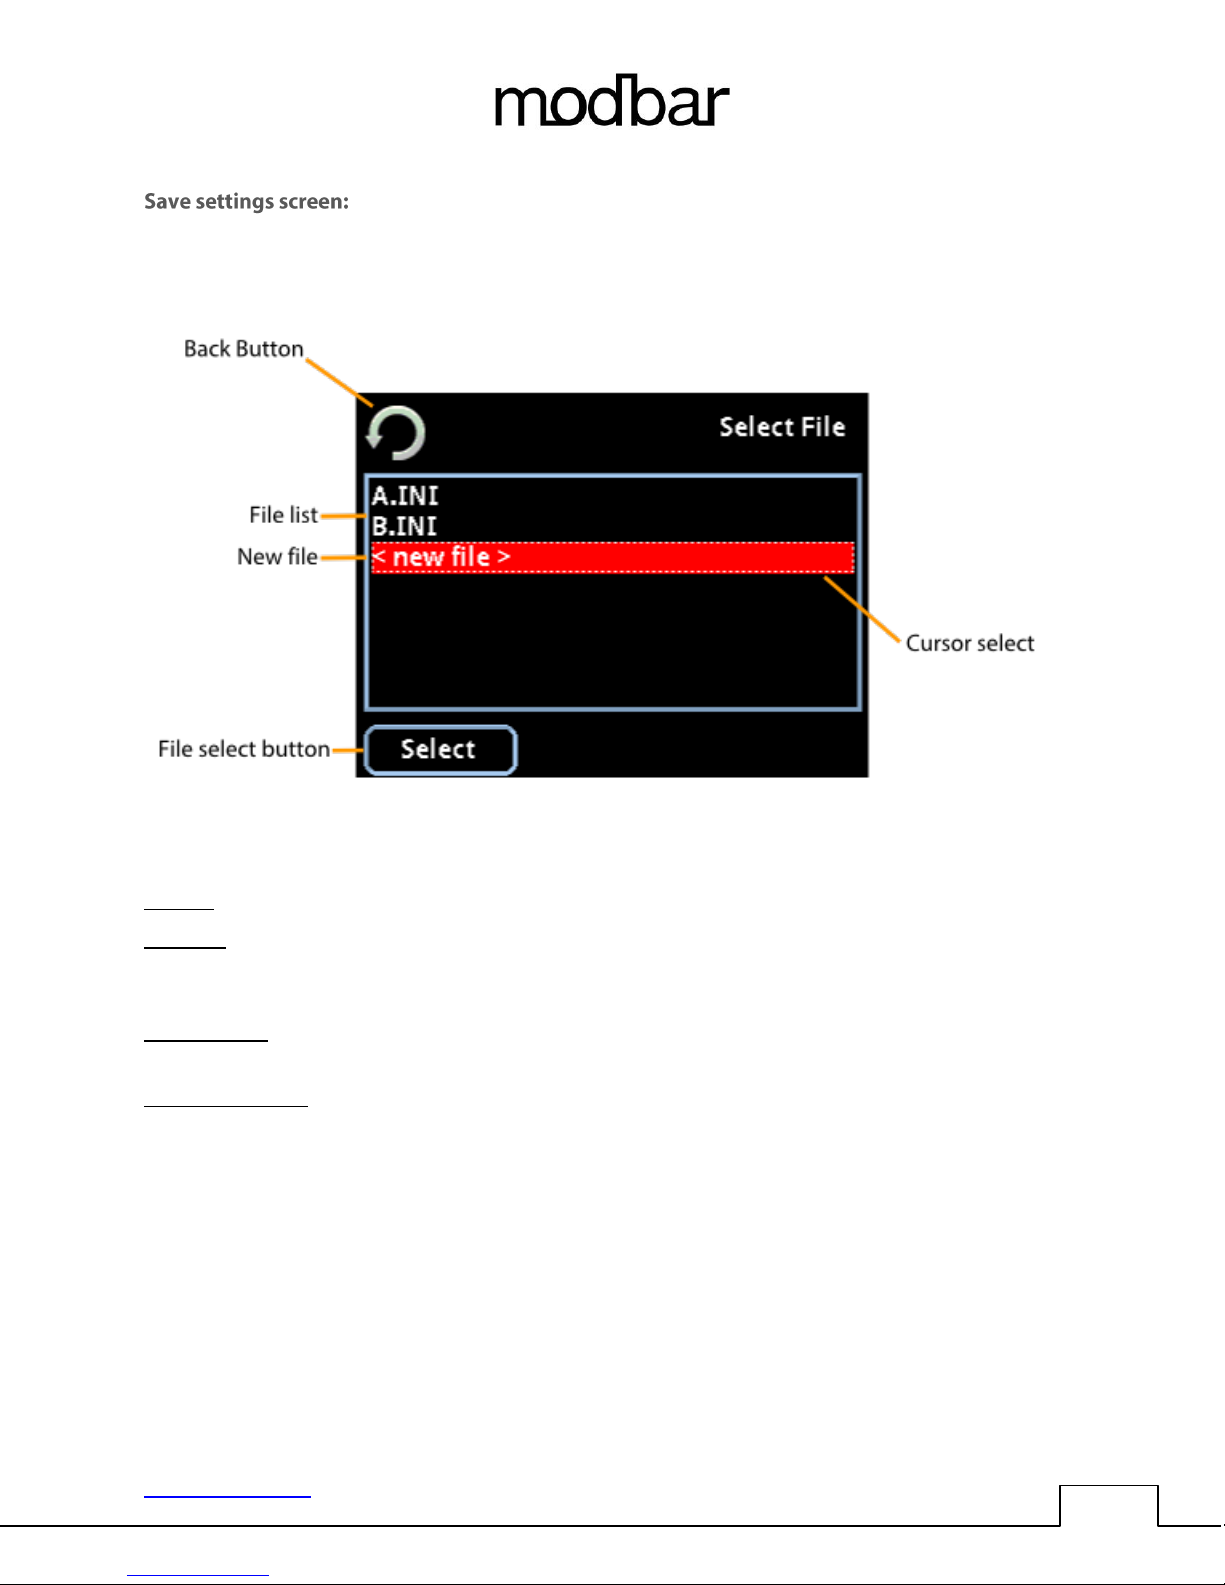
home -> main settings -> file operations -> save settings
File list: This area displays all of the settings files that are currently saved to the USB drive.
New file: This option allows the creation of a new settings file. To create a new settings file, highlight
the < new file > option, and select it by either pressing the center encoder button or the file select
button on the touch screen.
Cursor select: The dotted outline cursor select indicates which file is selected on screen. You may use
the rotary encoder or up/down function of the joystick to navigate the file list.
File select button: Pressing select will save the current settings to the selected file. This includes
pressure profiles and all other user accessible settings and preferences.
www.modbar.com Document 001-0040-1.1| Software Version 2.0
Page 22
OPERATING MANUAL ESPRESSO SYSTEM
21
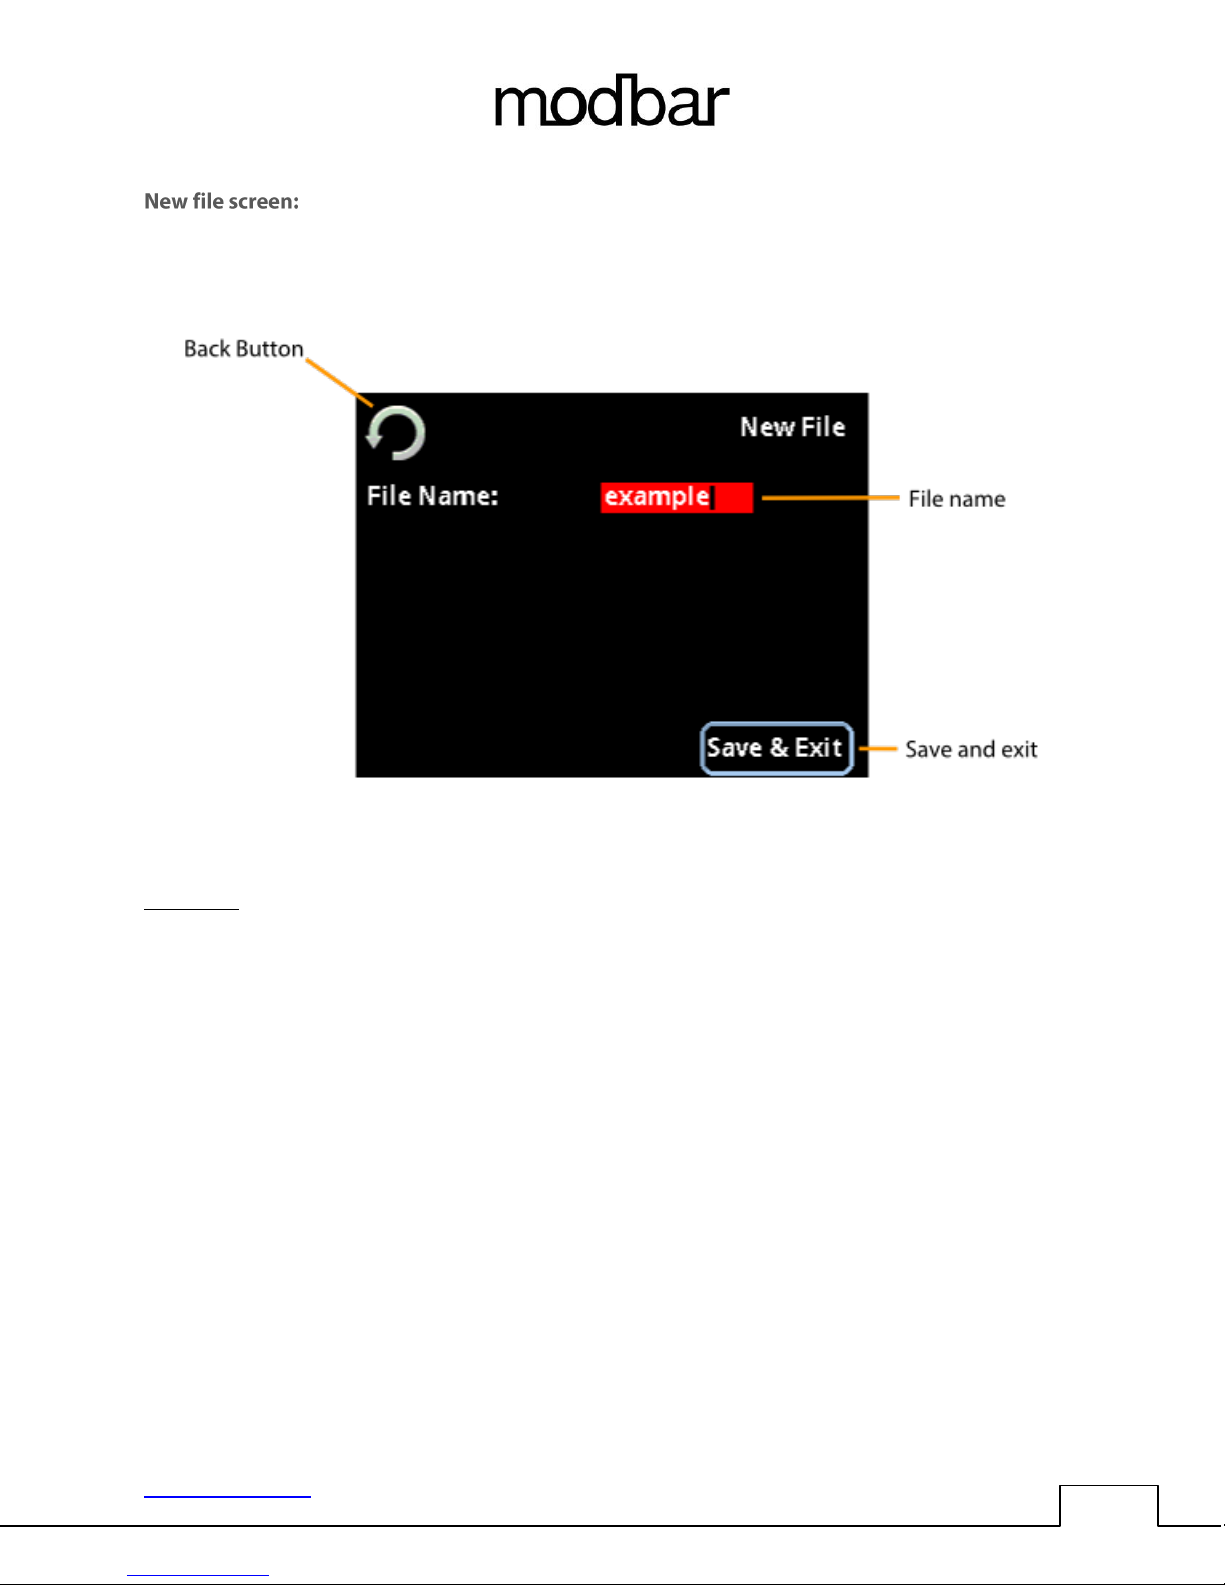
home -> main settings -> file operations -> save settings -> new file
File name: This is a descriptive name for the settings file. Touch the name to highlight the field, use the
encoder wheel and push-button to rename the file if desired.
www.modbar.com Document 001-0040-1.1| Software Version 2.0
Page 23
OPERATING MANUAL ESPRESSO SYSTEM
22
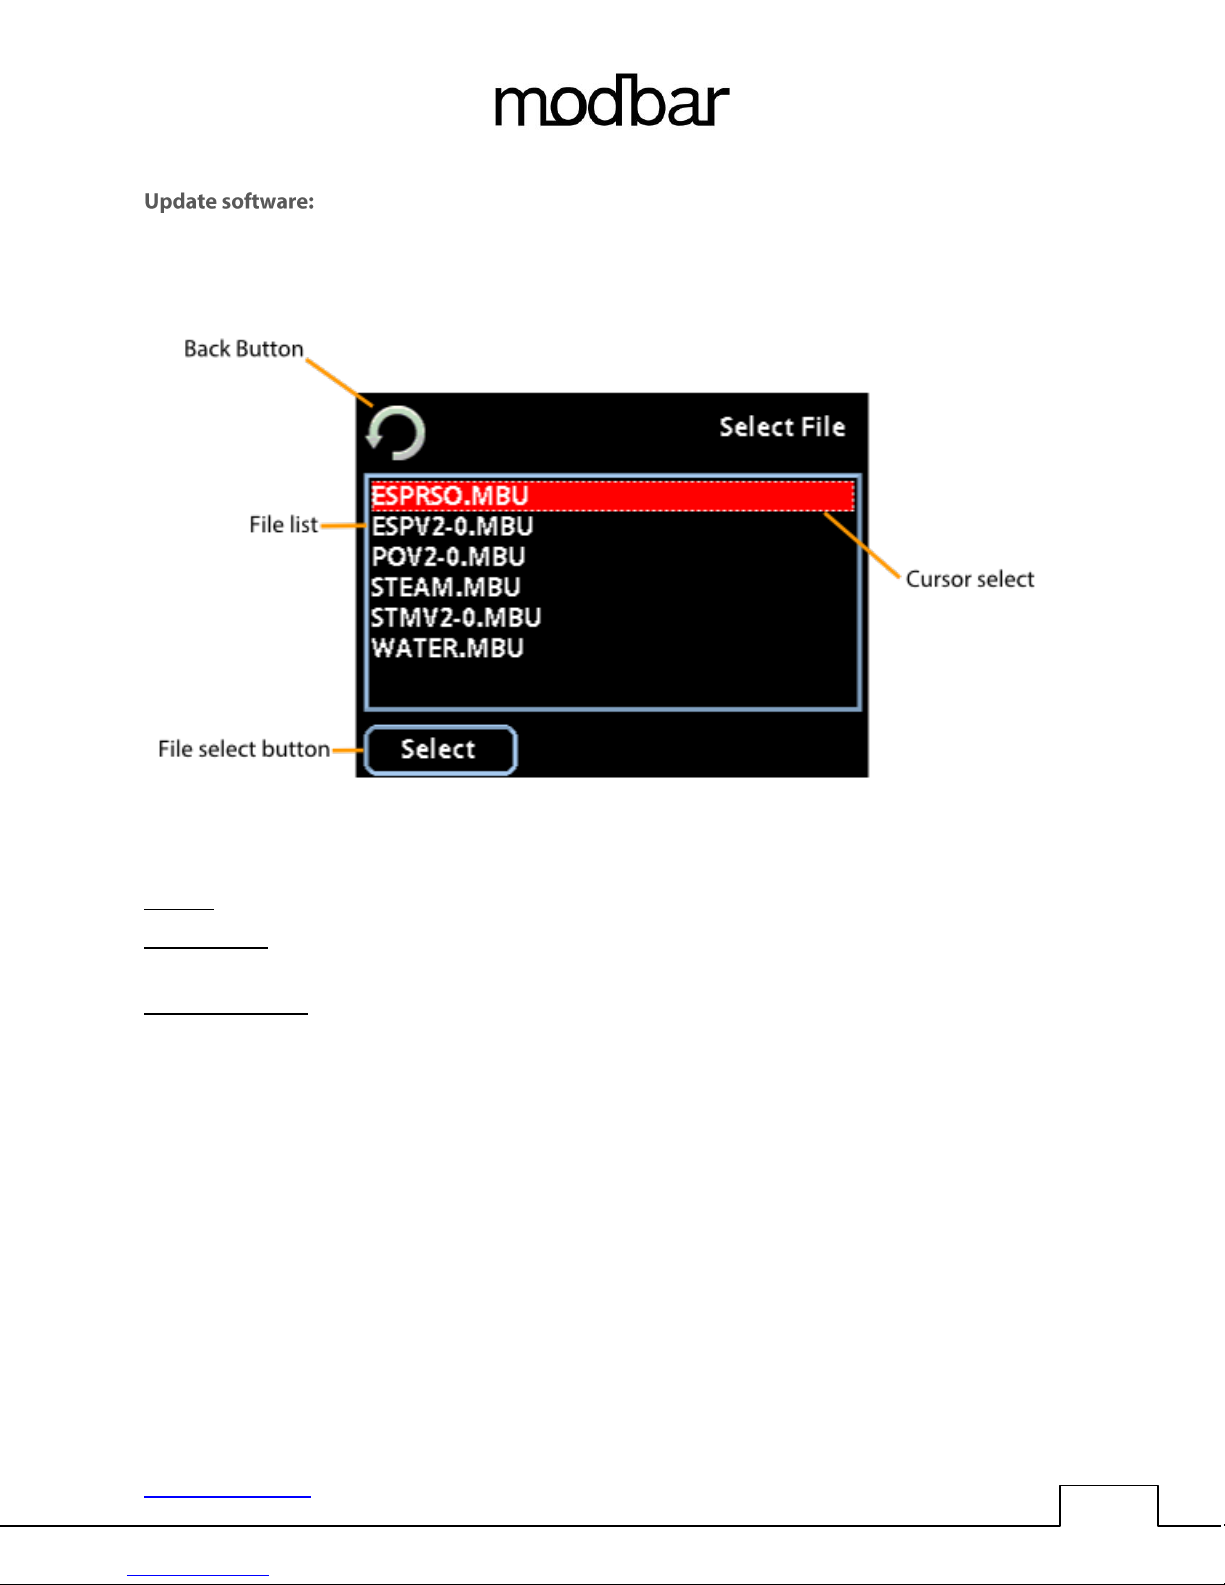
home -> main settings -> file operations -> update software
File list: This area displays all of the software update files that are currently saved to the USB drive.
Cursor select: The dotted outline cursor select indicates which file is selected on screen. You may use
the rotary encoder or up/down function of the joystick to navigate the file list.
File select button: Pressing select will install the selected software update on the system. The software
update process is complete when the machine reboots, displaying the Modbar logo on both the module
touch screen and espresso tap displays.
www.modbar.com Document 001-0040-1.1| Software Version 2.0
Page 24
OPERATING MANUAL ESPRESSO SYSTEM
23
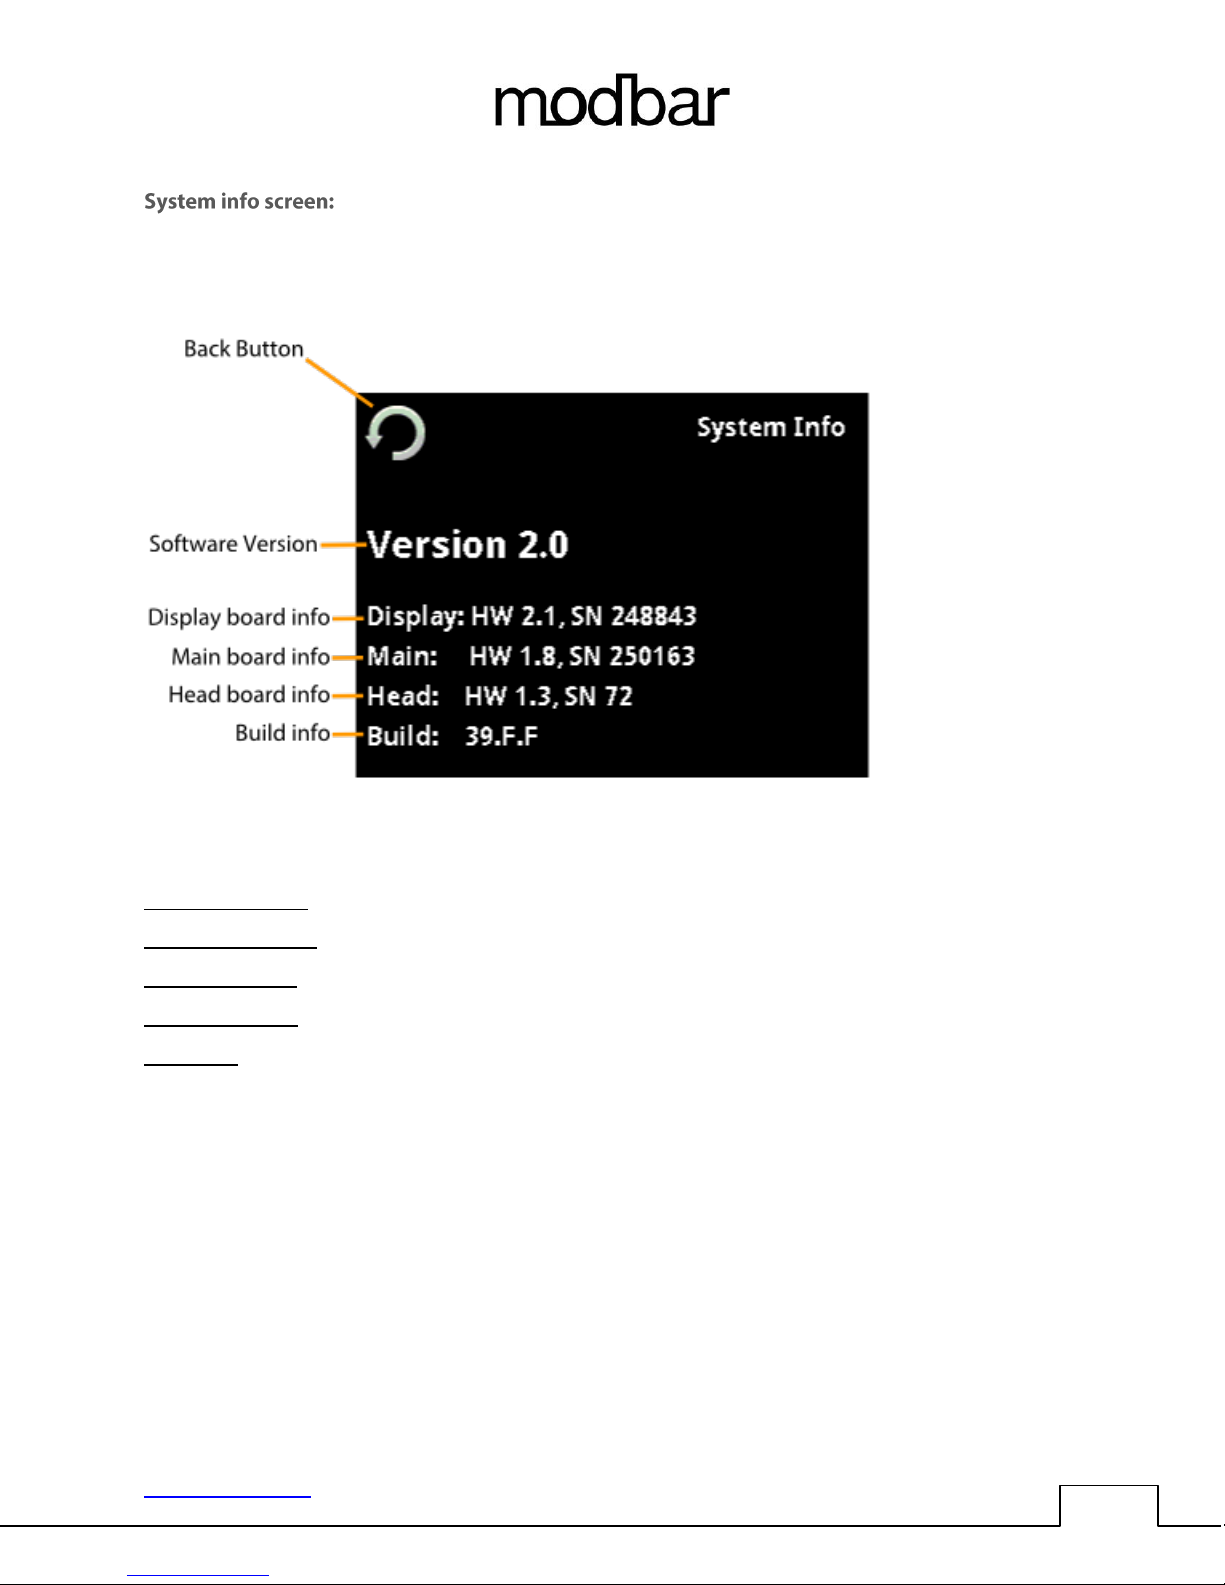
home -> main settings -> system info
Software Version: This field displays the current software version loaded on the machine.
Display board info: This field displays the hardware version and serial number of the display board.
Main board info: This field displays the hardware version and serial number of the main board.
Head board info: This field displays the hardware version and serial number of the brew head board.
Build info: This field displays the software build of each of the circuit boards in the system.
www.modbar.com Document 001-0040-1.1| Software Version 2.0
Page 25
OPERATING MANUAL ESPRESSO SYSTEM
24
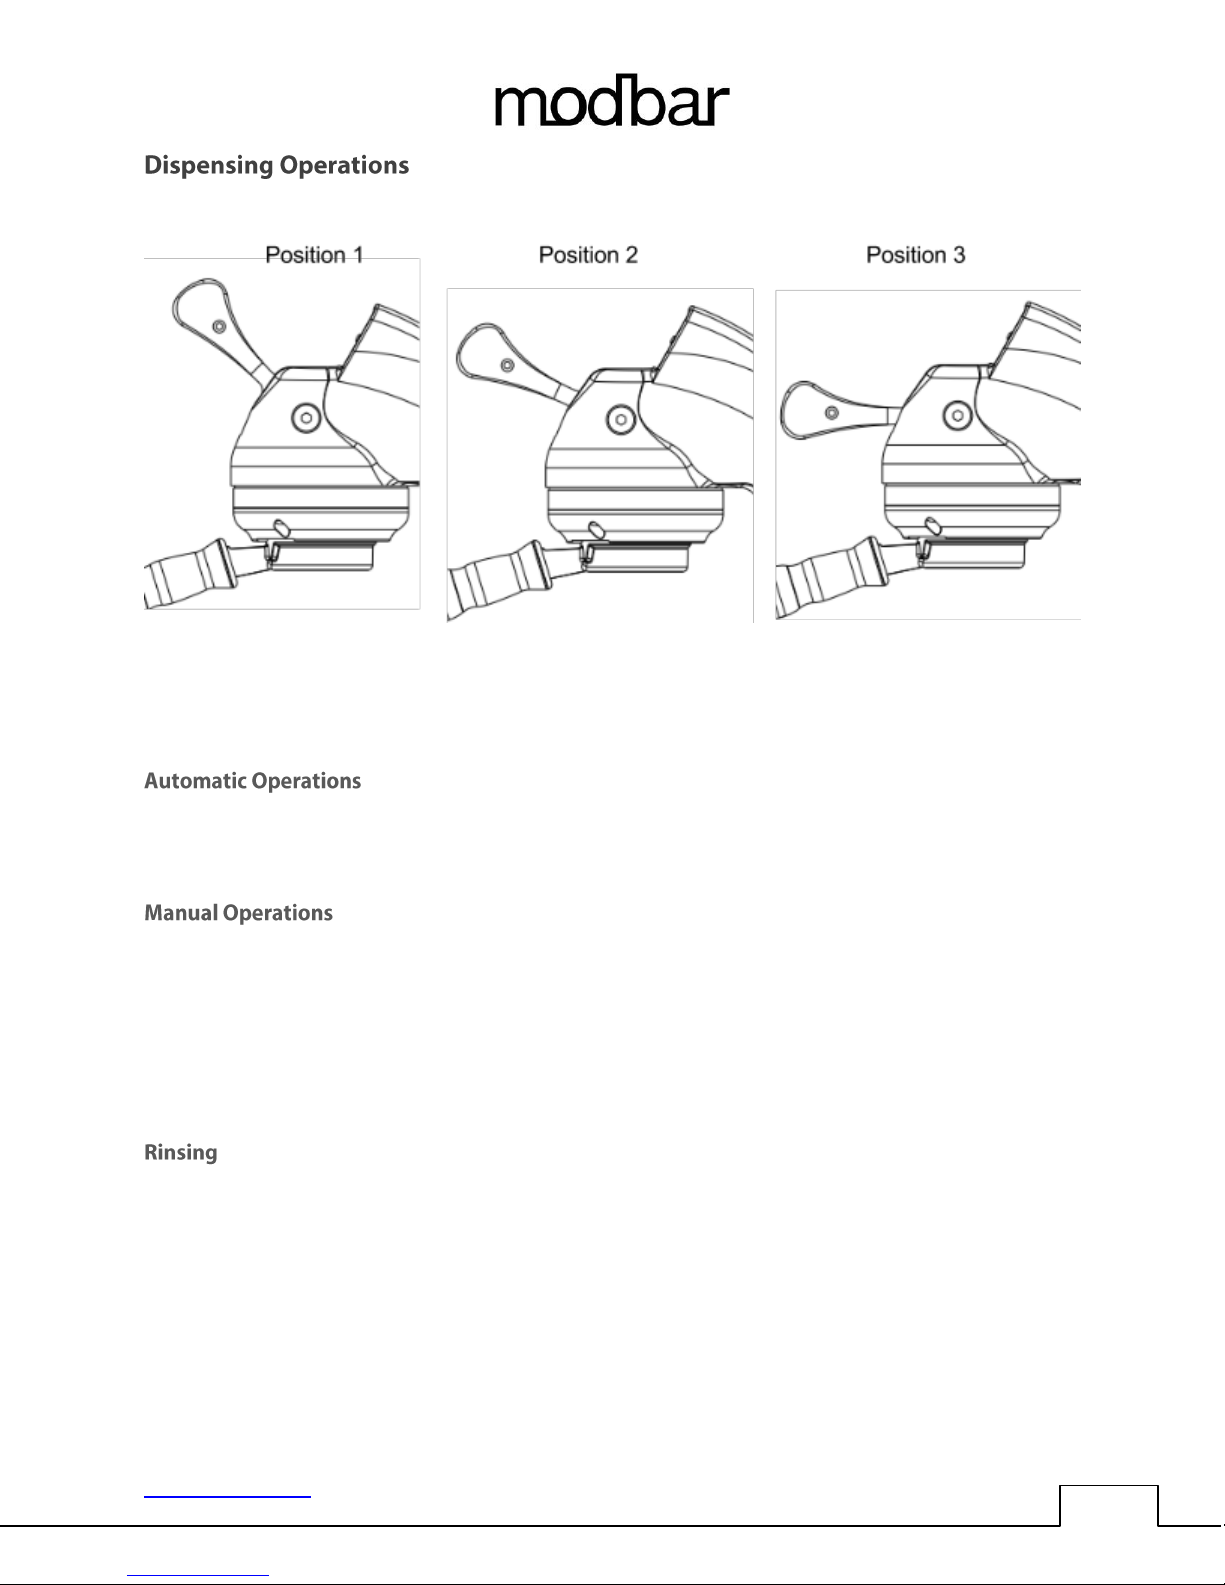
The Modbar espresso tap is able to command multiple functions using a single handle. We do this by
combining the movement of three handle positions, as illustrated in the above diagram. Following are
instructions for operating each of the tap functions.
Automatic mode dispenses using the currently selected profile to control pressure profiling. To activate
the machine in automatic mode, simply pull the handle from Position 1 to Position 3, and the tap screen
will display Auto and start counting down time based of the total time of currently selected profile.
Manual mode dispenses using only the MaxP (Maximum Pressure) and MEp (Manual End Pressure)
values from the currently selected profile. To operate in manual mode, pull the handle from Position 1
to Position 2. While the handle is at Position 2, the tap will dispense at line pressure (“pre-infusion”).
After remaining in Position 2 for a minimum of two seconds, the tap screen will display Manual and
continue counting time up from zero. To turn on the pump and dispense at MaxP place the handle in
Position 3. After dispensing at MaxP, place the handle back to Position 2 to dispense at the programmed
MEp and/or return the handle to Position 1 to cease dispensing.
To activate the pre-programmed rinse cycle, quickly move the handle from Position 1 to Position 2, and
back to Position 1. This quick toggle activates the rinse cycle as programmed in the profile screen. The
parameters for duration and pump duty cycle can both be adjusted to your personal preference.
www.modbar.com Document 001-0040-1.1| Software Version 2.0
Page 26

OPERATING MANUAL ESPRESSO SYSTEM
25
The Modbar also has integrated cleaning/back flushing cycle functionality built in. To use the cleaning
cycle:
● Activate the cleaning cycle by toggling the handle 3-times in short succession. The toggle motion
is the same as used in the rinsing cycle.
● The tap screen will display “Clean” and start counting down from 99. During this time it will
automatically cycle the pump on and off per a typical cleaning cycle.
● When finished, rinse the group well with a regular filter by actuating the rinse cycle several
times.
www.modbar.com Document 001-0040-1.1| Software Version 2.0
Page 27
OPERATING MANUAL ESPRESSO SYSTEM
26
● Before performing any maintenance and/or cleaning operations, turn the main power switch to
the OFF position and disconnect the machine from the power source by unplugging the cord or
by switching off the relative circuit breaker. For any cleaning operations, follow exclusively the
instructions contained in the manual.
● Always use care when performing maintenance, as the equipment may be hot. We recommend
allowing the equipment to fully cool before performing any maintenance procedures.
Regular cleaning procedures are important to both the longevity of the equipment and to the quality of
the beverages which it produces. Following these procedures will help ensure long life and great tasting
beverages.
Back flushing must be performed on a regular basis to ensure the proper function and cleanliness of the
espresso system. We recommend following this procedure on a nightly basis.
Put one scoop of detergent into a blind filter, and insert it into the group to be cleaned. (Use
the amount of detergent recommended on the package)
Activate the cleaning cycle by toggling the handle 3-times in short succession. The toggle motion
is the same as used in the rinsing cycle.
The tap screen will display “Clean” and start counting down from 99. During this time it will
automatically cycle the pump on and off per a typical cleaning cycle.
When finished, run a steady stream of water through the brewhead.
Re-insert the the blind filter and run the automatic cleaning cycle once more, this time removing
the filter during the pauses, dumpling water from the filter and re-inserting the filter before the
cycle re-engages the flow of water. (If water begins to flow before you have a chance to insert
the filter, wait until the cycle pauses again to avoid the risk of being splashed and burned by hot
water)
Discard the first shot of espresso before resuming normal service to “season” the brew head.
● Put 2 or 3 teaspoons of detergent powder for coffee machines in about 1/2 a liter of water
inside a heat-resistant container and boil.
● Dip filters in the boiled solution and leave them fully submerged for about 30 minutes.
● Rinse thoroughly with clean water and run hot water through one group several times with the
filters in place.
● Make one cup of coffee and discard in order to remove any unpleasant flavor
www.modbar.com Document 001-0040-1.1| Software Version 2.0
Page 28
OPERATING MANUAL ESPRESSO SYSTEM
27
Over time, coffee grounds may slowly build up on and obstruct the diffuser screen. To clean it, you must
first remove it by unscrewing the diffuser screw with a flat screwdriver.
● Put 2 or 3 teaspoons of detergent powder for coffee machines in about 1/2 a liter of
water inside a heat-resistant container and boil.
● Place diffuser screen(s) and diffuser screw(s) in the solution and leave them fully
submerged for about 30 minutes.
● Install and run hot water through each group several times with the screen installed.
The exterior of the taps and modules should be periodically cleaned. We recommend wiping the
equipment with a damp microfiber cloth. Do not use cleaning solutions containing strong acids or
caustic solutions. Take care not to use excessive liquid when cleaning around electronics, so as not to
damage them.
It is very important that the media for your water filtration is replaced on a regular basis, in accordance
with the manufacturer’s recommendations. Please refer to the documentation for your filtration system
for proper operating and cleaning instructions.
www.modbar.com Document 001-0040-1.1| Software Version 2.0
Page 29
OPERATING MANUAL ESPRESSO SYSTEM
28
- Replace group gaskets
- Replace diffuser screens
- Check brew temperature
- Check brew pressure
- Check water quality
- Inspect water dispensing solenoid valve
- Inspect plumbing for leaks or clogs
- Check all switches for proper operation
- Check filter baskets
- Replace filter baskets
- Inspect electrical wiring
- Inspect boiler safety switches
- Remove and clean/inspect boiler temperature
probes
Check the interior of the boilers, and if necessary rinse out with a proper cleaning product allowed
for food and beverage appliances
Total Dissolved Solids (All Equipment)
75-250 ppm
Total Hardness (Steam Only)
Less than 3 gpg
Total Hardness (Espresso and Pour-Over)
Less than 5 gpg
pH (All Equipment)
6.5-7.5
It is important that periodic maintenance be performed to keep your equipment in peak operating
condition. Maintenance should be carried out by a qualified technician. Depending on usage, schedules
may vary, but we recommend the following:
Every 3-4 Months
Every Year
Every 3 Years
Water quality is very important to the proper function of your Modbar equipment. Improper water
filtration can lead to serious problems with both your equipment and the quality of the coffee produced.
At a minimum, the following water standards need to be met.
For more detailed information about water quality, please visit www.modbar.com/support.
www.modbar.com Document 001-0040-1.1| Software Version 2.0
Page 30
OPERATING MANUAL ESPRESSO SYSTEM
29
Verify that the power switch is turned clockwise to the operating mode position and not counterclockwise to the standby mode position. Also, ensure that the tap is plugged in. If the module loses
communication with the tap, all heating is terminated.
The espresso module features two safety reset thermostat controlled switches, one on each boiler. The
espresso tap also features one safety reset switch on the brew head. If a boiler (or brew head) does not
heat it may be due to the activation of one of these switches, which is triggered by excess temperature
and signifies abnormal operation and possibly failed components. The safety switches mentioned are all
internal to the espresso module and espresso tap and are not user re-settable. If you believe a safety
switch has been activated, the module or tap may require service by an authorized technician. Please
contact Modbar for additional support and information.
Verify that the water supply to the module is turned on. Also, verify that there are no kinks in the fluid
line between the tap and the module. Verify that the tap display is functioning as normal. If it is not,
please check that the tap electrical connection is plugged in. If you are still having trouble, please
contact Modbar Support.
Verify that your profile has a minimum of 2 seconds programmed for T1. Less time can cause the pump
to overshoot, as it is climbing to pressure to quickly.
Also, ensure that your filtration supply is adequate for all of the equipment installed on it. In some cases,
running a sink or other equipment connected to the same filtration line as the Modbar will cause
pressure spikes during the extraction process. This is due to a sudden amount of water being drawn by a
different device. This causes the pump to compensate for the reduced flow rate, and the pressure to
spike once the device stops drawing water.
www.modbar.com Document 001-0040-1.1| Software Version 2.0
 Loading...