

Page 1
Safety warning:
For your safety we recommend that you read the entire manual before assembling or using this scooter. Mod
Scooters also recommends periodically reviewing all th e information in this manual with any younger rider who ma y
use this scooter.
Before you ride:
It is good practice to check your scooter before you ride. Younge r riders may need assistance. (see maintenance
and assembly section)
Replace all worn parts on your scooter immediately. Ridi ng with worn parts can be hazardous for both
the rider and scooter.
Mod Scooters have been designed to a high standard. Onl y replace worn parts with genuine Mod
Scooter spares and accessories. Customising your scoote r with other non Mod accessories will
invalidate any warranty.
Always wear proper protective equipment such as a helmet, kne e and elbow pads, making sure they
are adjusted to fit securely. Some skateparks will require app ropriate safety equipment to be worn for
entry to be granted so it is good practice to wear it at all times .
Always wear appropriate foot wear. Never try riding without s hoes or in loose footwear. Never wear
sandals and always keep shoe laces secure and away from m oving parts.
Bolts, etc can work lose and parts can wear over time, s o check your scooter every time you ride.
Scootering can be dangerous, so use this scooter at you r own risk and above all use with common
sense.
Under NO circumstance use your scooter in the wet. Wh eel and headset bearings will seize, the grip
tape will start to peel or fall off and the scooter may rust. N o part however new that has been used in
wet or damp conditions is applicable to any warranty or re placement.
Safe riding:
Always look up when riding and keep both hands on th e handlebars at all times.
Before riding make sure the scooter fork is facing forward.
Only ride on smooth flat surfaces away from roads and moto r vehicles, avoiding drainage grates and
sudden surface changes. Failure to do this may result i n the scooter stopping suddenly.
Be aware of your surroundings. Watch out for pedestrians, a nimals, bikes and other riders etc.
Avoid surfaces with water, wet leaves, sand, ice and loos e stones or grit on them.
Never use your scooter on grass or in the mud.
Never ride with a motorised device.
Always leave enough room to slow or stop. Be aware that different conditions and surfaces will alter
your stopping distance.
Excessive use of the brake will flat spot wheels, so avoi d braking excessively for long periods of time.
The brake can also become hot after use so do not touch t his with your bare hands.
Remember to be aware of other riders when riding. It is als o polite to practice "scooter etiquette" when
at skate parks to avoid any collisions with other riders. Take it in turns and don't rush into dropping in,
as it is dangerous and not polite!
Trick riding will damage the scooter faster as no one ever lan ds his or her first trick without binning it a
few times. Advanced riders will wear more parts than most - fact!
This scooter is designed to the highest manufacturing st andards and is extremely durable, however
parts in time will wear and are not impervious to damag e. Regular maintenance will prolong the
scooters life.
Scooter Parts:
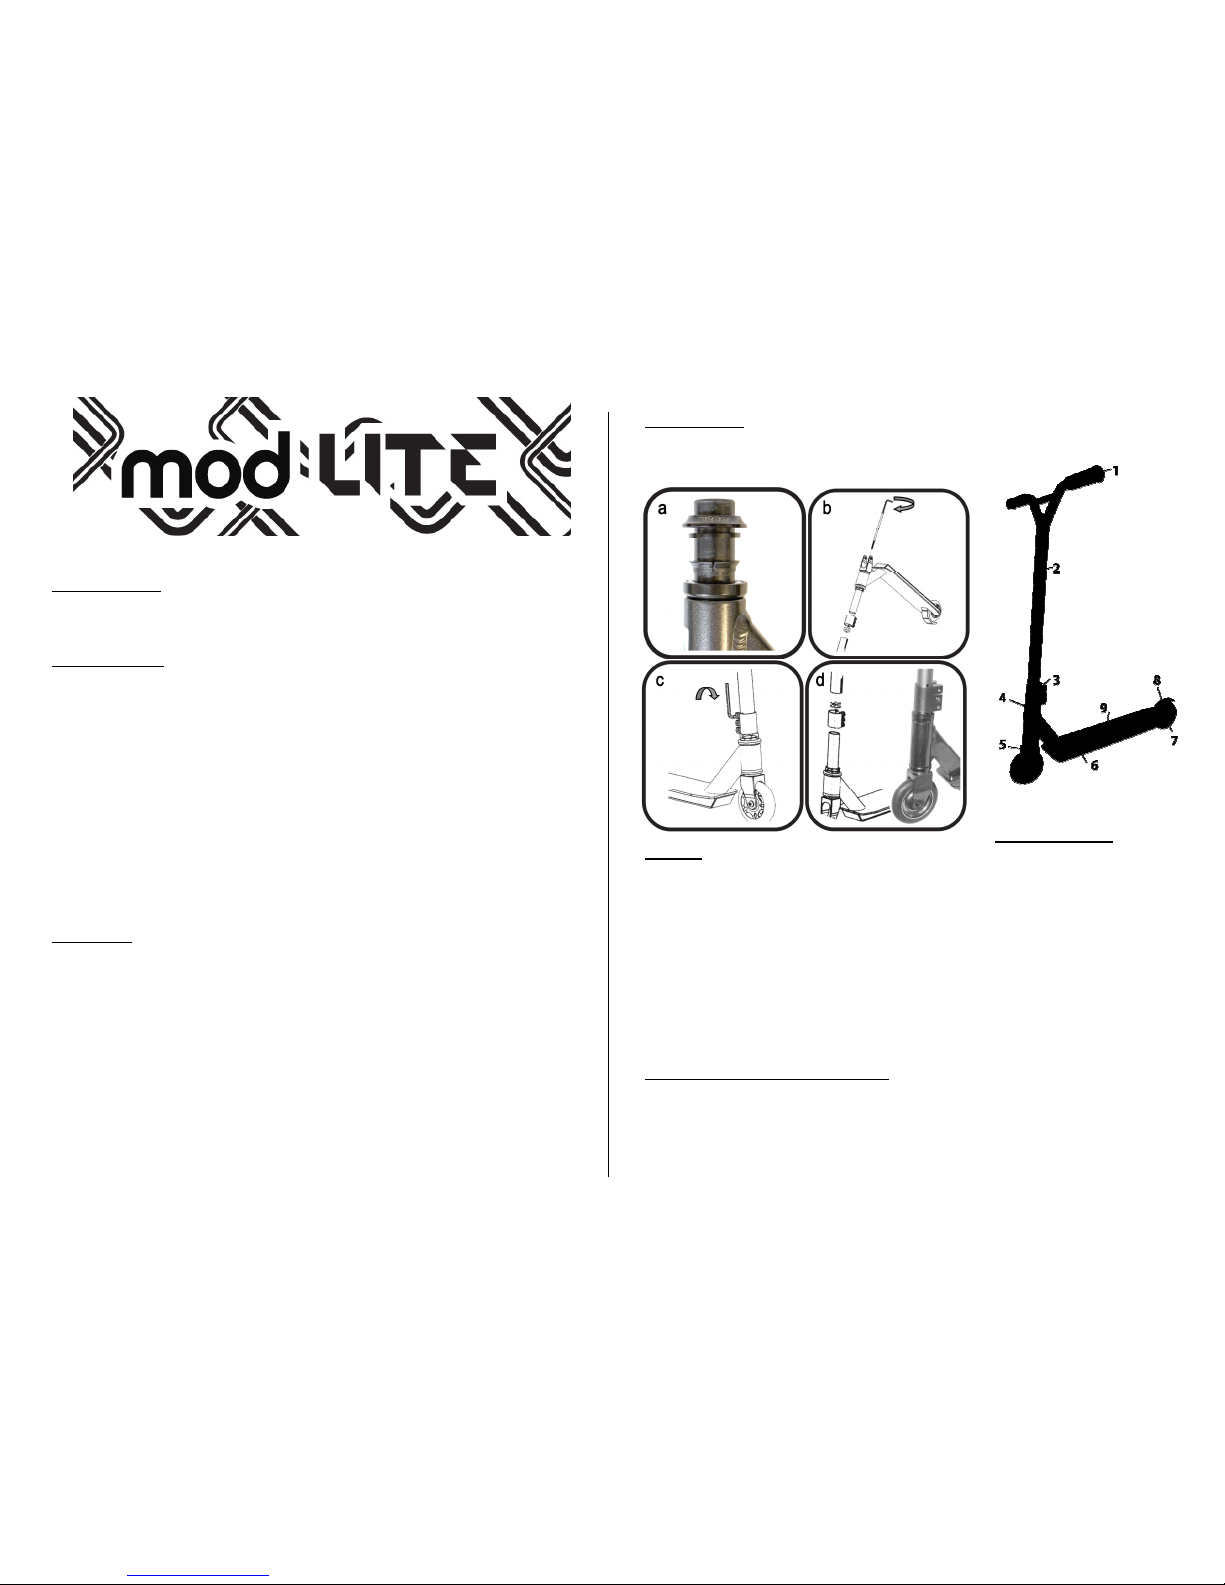
1. Handle Grips 2. Handle Bars 3. Bar Clamp 4. Headset 5. Fork
6. Deck 7. Wheel 8. Flex Fender Brake 9.
Griptape
Assembling your
scooter:
Step 1: To assemble your new scooter first unpack all components ensuring all small parts are kept safe. Then
remove the front wheel from the fork using two allen keys.
Step 2: Slide the fork into the headset from the bottom. Slide plastic heads et wedge on top of the fork, then metal
spacer washer and then headset top cap. (ref image “a”)
Step 3: Place the handle bars over your forks and tilt your scooter upside down. Tighten and align the M6 ICS bolt
that goes from the bottom of your forks into a starnut which is pre-welded inside your bars. (ref image “b”)
Step 4: As the ICS bolt becomes tighter align your front wheel so that it is facing forwards with your bars.
Step 5: Tighten up your clamp, it is very important to tighten each bolt a turn at a time. This ensures an even and
secure grip around your bars and eliminates the risk of threading your clamp. (ref image “c”)
Note Image “d” shows the internal section of your scoot er. It shows the Fork, Clamp, Starnut and Bars.
Please check all bolts are tight before use and also recheck regularly. Please read the general maintenance
section of this manual.
Changing your wheels or Bearings:
1. Remove th e wheel from your scooter using the provided allen ke ys. (ref pic 1)
2. Knock out th e bearings carefully from the middle using an allen key or pu nch and a hammer.
3. Keep the space r from the middle safe.
4. Press one o f the bearings into your wheel you may need to use a vice to keep it square or tap gently
with a rubber hammer.
5. Insert the whe el spacer, ensuring it remains in an upright position.
6. Press in your second bearing and reassemble back onto the scooter.
SCOOTER OWNERS MANUAL
Page 2

General Maintenance:
It is important to check your scooter each time you ride and carry out the required maintenance.
Wheels:
Check for play/movement in the wheels by moving the wheel side to side. If there is movement check the axle bolt
is tight. Place an allen key either side of the wheel in each socket. Twist until tight. If the wheel fails to spin then
you've tightened the axle bolt too much, so loosen the axle a small amount again till running freely. Flat spots on
wheels are caused by excessive braking and aren't class ed as a warrantable item. To avoid flat spots, use your
brake less aggressively and never in the wet.
Brake:
This scooter is fitted with a flex style brake, which can s nap over time if heavily used or landed on hard. Flex br akes
are designed to be quieter and are made from sprung met al. There is no guarantee on how long your break will
last, as each rider is different. Ensure it is kept tight with the t wo bolts underneath. It is easy to undo these and
swap over the brake if it snaps off. It is important that you re place any damaged or broken brakes immediately
before attempting to ride again.
Bearings:
The bearings in your scooter will require replacing from tim e to time. Improper use of your scooter in the wet for
example will damage your bearings causing them to seize o r make noise. Sand and grit will also damage your
bearings so avoid these types of surface. Each rider is diff erent so there will be no set time to how long bearings
will last. Oil your bearings with cycle oil or appropriate beari ng lubricant. Never use degreasers such as W D40 as
this strips the oil! Always remove damaged bearings from your wheels as riders could injure themselves or
damage the scooter.
Headset bearings:
Mod Scooters recommends oiling your headset at least once a month with cycle style oil to prolong its life. Again
never use a degreaser such as WD40 as this will strip th e headset of the oils causing excessive wear and
destroying your headset. Using your scooter in the wet will also decrease the lifespan of your headset as the water
will rust the headset and grit and grime off the road will erod e the balls inside. The headset is not covered by the
Mod Scooter warranty as it's classed as a wearable part.
Handle bars:
The bars on your scooter shouldn't bend or break under no rmal use, however abuse and overloading your bars or
attempting advanced tricks may cause your bars to bend in e xtreme cases. If you abuse your scooter or attempt
advance tricks overloading your bars then you are acceptin g the consequences and are doing so at your own risk .
Bent bars are not covered under the Mod Scooters warranty.
Handle Grips:
The grips are classed as a wearable part on the scooter and will last a long time under normal use. However abuse
such as dropping your scooter could result in damaging the ends to both your grips and bars, so are not covered in
the Mod Scooters warranty.
Deck:
The Mod Scooters deck has been designed and built to the highest standard. While every care has been made t o
ensure your product is the toughest it can be for the price, trick s such as grinds or slides over time can heavily wear
the underside of the deck. If you wish to carry out trick s such as these then you're accepting that the deck will wear
quicker than under normal use. The Mod Scooter warrant y will not cover excessive wear from grinds etc.
Grip Tape:
Mod Scooters recommends always riding using grip tape o n the deck to avoid injury. If you remove the grip then we
advise you to replace the grip before use. The grip tape is classed as a wearable part to the scooter and is
therefore not covered by the Mod Scooter warranty. Ther e is no guarantee on how long your grip tape will last as
each rider is different, but using your scooter in the wet or wit h damp/muddy footwear will decrease the life of your
grip and may mean that it could start to peel or fall off. Grip ta pe is cheaply and easily replaceable with any
standard skateboard grip tape.
The Bar clamp:
The bar clamp is designed to keep the front wheel alig ned, so it's important to keep this tight. Always tighten each
bolt a little at a time until all are fully tightened for best res ults. Never used cheap or worn allen keys as this could
round the bolt heads off. Care must always be taken when tig htening or loosening these bolts again to prevent
them from rounding off. Over time these bolts may become worn and may require a new dot of thread lock on each
bolt to stop them rattling loose. This should only be used if bolts are frequently becoming loose and should be used
sparingly. The bolts are classed as a wearable part and are n ot covered by Mod Scooters in their warranty.
Fork:
The fork is threadless and is held together to the scooter b y the compression bolt (ICS). Do not attempt to remove
the fork without unscrewing the compression bolt as this wil l damage your scooter. Using your scooter in the wet
will rust the fork and problems may arise in the separati on of the axle bolts or bars from the fork.
Compression bolt:
This bolt is found under the front wheel. You will need to f ully remove the front wheel to gain access to this bolt.
The compression is called ICS and stands for Inverted Comp ression System. It is a long M6 bolt which goes up
inside the fork and into the bars where it threads into a star nu t.
Cleaning your scooter.
When required wipe your scooter with a damp cloth to remov e any dust or dirt. Never use chemicals to clean the
frame or bearings. Always dry after with a clean cloth. Usin g your scooter in the wet or in the mud will impair
braking and wheel traction making it dangerous for the rid er and could damage your scooter.
Mod Scooters Warranty:
Mod Scooters offers a 90 day warranty on all main compone nts, however the headset, grip tape, brake, wheels,
bearings and the bar grips are classed as a wearable pa rts and are therefore not covered under this warrant y.
This warranty does not cover:
• Improper assembly of the sco oter or accessories
• Inappropriate modifications
• Normal wear and tear
• Misuse or abuse
• Deliberate damage
• Damage due to poor mainte nance
• Damage incurred from tricks which require impact from such obstacles as rails, boxes and curbs etc.
• Certain advance trick use. Eg B ri Flips, Tailwhips etc.
• Excessive forced applied to the scooter, as extreme riding will shorten the life span dramatic ally of the
scooter and it's components.
• Renting or hiring of the scoote r
Using your scooter in the wet will automatically invalidate your scooters warranty, as will fitting non Mod Scooter
parts.
Mod Scooters does not offer an extended warranty. If you pur chase such warranty, it must be honoured by the
store in which it was purchased.
Please keep your original receipt with this manual in a saf e place for future reference.
www.modscooters.co.uk
www.facebook.com/modscooters
www.youtube.com/modscootersuk
Mod Scooters Ltd
Suite 163, 116 Commercial Road, Swindon, UK, SN1 5BD
Tel: 0845 2572 056
Mod-Lite-Manual-V2
 Loading...