

Mocon CheckPoint 3 User Manual

P/N 340486-B
09/2017
CheckPoint 3
User Guide
EN

This blank page has been inserted to enable double sided
printing of the document!
DANSENSOR
CheckPoint 3 EN User Guide
P/N 340486-B
09/2017
CheckPoint 3
User Guide
Published by: MOCON Europe A/S
Rønnedevej 18
4100 Ringsted, Denmark
Tel +45 57 66 00 88
info.eu@mocon.com
www.dansensor.com
EN

DANSENSOR
2 User Guide EN CheckPoint 3
P/N 340486-B
09/2017

DANSENSOR
CheckPoint 3 EN User Guide 3
P/N 340486-B
09/2017
Table of Contents
1. Introduction. . . . . . . . . . . . . . . . . . . . . . . . . . . . . . . . . . . . . . . . . . . . 7
Register your product . . . . . . . . . . . . . . . . . . . . . . . . . . . . . . . . . . . . . . . . . 7
Important! . . . . . . . . . . . . . . . . . . . . . . . . . . . . . . . . . . . . . . . . . . . . . . . . . . . 7
Safety and Use. . . . . . . . . . . . . . . . . . . . . . . . . . . . . . . . . . . . . . . . . . . . . . . . . . . . . . . . . . . . . . . 7
About this Manual . . . . . . . . . . . . . . . . . . . . . . . . . . . . . . . . . . . . . . . . . . . . 7
Intended Use of this Manual . . . . . . . . . . . . . . . . . . . . . . . . . . . . . . . . . . . . . . . . . . . . . . . . . 7
Reservations. . . . . . . . . . . . . . . . . . . . . . . . . . . . . . . . . . . . . . . . . . . . . . . . . . . . . . . . . . . . . . . . . 7
Notes, cautions and warnings! . . . . . . . . . . . . . . . . . . . . . . . . . . . . . . . . . . . . . . . . . . . . . . . 8
Tips and recommendations . . . . . . . . . . . . . . . . . . . . . . . . . . . . . . . . . . . . . . . . . . . . . . . . . . 8
CheckPoint 3 . . . . . . . . . . . . . . . . . . . . . . . . . . . . . . . . . . . . . . . . . . . . . . . . . 9
Models . . . . . . . . . . . . . . . . . . . . . . . . . . . . . . . . . . . . . . . . . . . . . . . . . . . . . . . . . . . . . . . . . . . . . . 9
Overview . . . . . . . . . . . . . . . . . . . . . . . . . . . . . . . . . . . . . . . . . . . . . . . . . . . . . . . . . . . . . . . . . . . 10
Accessories. . . . . . . . . . . . . . . . . . . . . . . . . . . . . . . . . . . . . . . . . . . . . . . . . . . . . . . . . . . . . . . . . 11
Setting up . . . . . . . . . . . . . . . . . . . . . . . . . . . . . . . . . . . . . . . . . . . . . . . . . . . 12
Assembling the sample gas hose . . . . . . . . . . . . . . . . . . . . . . . . . . . . . . . . . . . . . . . . . . . . 12
Fitting the bumpers (option) . . . . . . . . . . . . . . . . . . . . . . . . . . . . . . . . . . . . . . . . . . . . . . . .12
2. Operation and Maintenance . . . . . . . . . . . . . . . . . . . . . . . . . . . . 13
Basics . . . . . . . . . . . . . . . . . . . . . . . . . . . . . . . . . . . . . . . . . . . . . . . . . . . . . . . 13
Switching on/off. . . . . . . . . . . . . . . . . . . . . . . . . . . . . . . . . . . . . . . . . . . . . . . . . . . . . . . . . . . .13
Restarting/resetting . . . . . . . . . . . . . . . . . . . . . . . . . . . . . . . . . . . . . . . . . . . . . . . . . . . . . . . .13
Touch screen . . . . . . . . . . . . . . . . . . . . . . . . . . . . . . . . . . . . . . . . . . . . . . . . . . . . . . . . . . . . . . . 13
Navigation . . . . . . . . . . . . . . . . . . . . . . . . . . . . . . . . . . . . . . . . . . . . . . . . . . . . . . . . . . . . . . . . .14
Typing . . . . . . . . . . . . . . . . . . . . . . . . . . . . . . . . . . . . . . . . . . . . . . . . . . . . . . . . . . . . . . . . . . . . .15
Splash screen. . . . . . . . . . . . . . . . . . . . . . . . . . . . . . . . . . . . . . . . . . . . . . . . . . . . . . . . . . . . . . . 16
Login and access levels . . . . . . . . . . . . . . . . . . . . . . . . . . . . . . . . . . . . . . . . . . . . . . . . . . . . .17
The Measuring screen . . . . . . . . . . . . . . . . . . . . . . . . . . . . . . . . . . . . . . . . . . . . . . . . . . . . . .18
Charging and monitoring the battery . . . . . . . . . . . . . . . . . . . . . . . . . . . . . . . . . . . . . . .20
Pop-up messages. . . . . . . . . . . . . . . . . . . . . . . . . . . . . . . . . . . . . . . . . . . . . . . . . . . . . . . . . . . 22
Get started . . . . . . . . . . . . . . . . . . . . . . . . . . . . . . . . . . . . . . . . . . . . . . . . . .23
Measuring. . . . . . . . . . . . . . . . . . . . . . . . . . . . . . . . . . . . . . . . . . . . . . . . . . . 24
Selecting a product for measuring. . . . . . . . . . . . . . . . . . . . . . . . . . . . . . . . . . . . . . . . . . . 24
Performing a measurement . . . . . . . . . . . . . . . . . . . . . . . . . . . . . . . . . . . . . . . . . . . . . . . . .25
WebGUI . . . . . . . . . . . . . . . . . . . . . . . . . . . . . . . . . . . . . . . . . . . . . . . . . . . . .27
Network connection . . . . . . . . . . . . . . . . . . . . . . . . . . . . . . . . . . . . . . . . . . . . . . . . . . . . . . . .28
Using the WebGUI . . . . . . . . . . . . . . . . . . . . . . . . . . . . . . . . . . . . . . . . . . . . . . . . . . . . . . . . . .32

DANSENSOR
4 User Guide EN CheckPoint 3
P/N 340486-B
09/2017
Cleaning and Maintenance . . . . . . . . . . . . . . . . . . . . . . . . . . . . . . . . . . . 42
General . . . . . . . . . . . . . . . . . . . . . . . . . . . . . . . . . . . . . . . . . . . . . . . . . . . . . . . . . . . . . . . . . . . . 42
Cleaning . . . . . . . . . . . . . . . . . . . . . . . . . . . . . . . . . . . . . . . . . . . . . . . . . . . . . . . . . . . . . . . . . . .42
Replacing filter, needle and measuring gas hose . . . . . . . . . . . . . . . . . . . . . . . . . . . . .42
3. Menus and Settings . . . . . . . . . . . . . . . . . . . . . . . . . . . . . . . . . . . .45
Main menu . . . . . . . . . . . . . . . . . . . . . . . . . . . . . . . . . . . . . . . . . . . . . . . . . . 45
Alarm . . . . . . . . . . . . . . . . . . . . . . . . . . . . . . . . . . . . . . . . . . . . . . . . . . . . . . . 46
Products . . . . . . . . . . . . . . . . . . . . . . . . . . . . . . . . . . . . . . . . . . . . . . . . . . . . 47
Active Product. . . . . . . . . . . . . . . . . . . . . . . . . . . . . . . . . . . . . . . . . . . . . . . . . . . . . . . . . . . . . .48
New product . . . . . . . . . . . . . . . . . . . . . . . . . . . . . . . . . . . . . . . . . . . . . . . . . . . . . . . . . . . . . . . 49
Find . . . . . . . . . . . . . . . . . . . . . . . . . . . . . . . . . . . . . . . . . . . . . . . . . . . . . . . . . . . . . . . . . . . . . . . .50
Data log. . . . . . . . . . . . . . . . . . . . . . . . . . . . . . . . . . . . . . . . . . . . . . . . . . . . . 51
Collected data . . . . . . . . . . . . . . . . . . . . . . . . . . . . . . . . . . . . . . . . . . . . . . . . . . . . . . . . . . . . . . 52
Diagnostics. . . . . . . . . . . . . . . . . . . . . . . . . . . . . . . . . . . . . . . . . . . . . . . . . . 54
Setup . . . . . . . . . . . . . . . . . . . . . . . . . . . . . . . . . . . . . . . . . . . . . . . . . . . . . . . 56
Data log . . . . . . . . . . . . . . . . . . . . . . . . . . . . . . . . . . . . . . . . . . . . . . . . . . . . . . . . . . . . . . . . . . . . 57
Network. . . . . . . . . . . . . . . . . . . . . . . . . . . . . . . . . . . . . . . . . . . . . . . . . . . . . . . . . . . . . . . . . . . . 58
Users . . . . . . . . . . . . . . . . . . . . . . . . . . . . . . . . . . . . . . . . . . . . . . . . . . . . . . . . . . . . . . . . . . . . . . . 59
Date/Time/Units . . . . . . . . . . . . . . . . . . . . . . . . . . . . . . . . . . . . . . . . . . . . . . . . . . . . . . . . . . . . 61
Power save . . . . . . . . . . . . . . . . . . . . . . . . . . . . . . . . . . . . . . . . . . . . . . . . . . . . . . . . . . . . . . . . .62
Supervisor PIN code . . . . . . . . . . . . . . . . . . . . . . . . . . . . . . . . . . . . . . . . . . . . . . . . . . . . . . . . 63
Display . . . . . . . . . . . . . . . . . . . . . . . . . . . . . . . . . . . . . . . . . . . . . . . . . . . . . . . . . . . . . . . . . . . . .64
Access level . . . . . . . . . . . . . . . . . . . . . . . . . . . . . . . . . . . . . . . . . . . . . . . . . 65
Calibration . . . . . . . . . . . . . . . . . . . . . . . . . . . . . . . . . . . . . . . . . . . . . . . . . .66
Calibrate: 0% CO2 . . . . . . . . . . . . . . . . . . . . . . . . . . . . . . . . . . . . . . . . . . . . . . . . . . . . . . . . . .67
Calibrate: 100% CO2 . . . . . . . . . . . . . . . . . . . . . . . . . . . . . . . . . . . . . . . . . . . . . . . . . . . . . . . .68
Restore defaults . . . . . . . . . . . . . . . . . . . . . . . . . . . . . . . . . . . . . . . . . . . . . . . . . . . . . . . . . . . . 68
Language . . . . . . . . . . . . . . . . . . . . . . . . . . . . . . . . . . . . . . . . . . . . . . . . . . . 69
4. Technical Information. . . . . . . . . . . . . . . . . . . . . . . . . . . . . . . . . . 71
Technical specifications . . . . . . . . . . . . . . . . . . . . . . . . . . . . . . . . . . . . . . 71
Electrical specifications . . . . . . . . . . . . . . . . . . . . . . . . . . . . . . . . . . . . . . . . . . . . . . . . . . . . . 71
Connectivity. . . . . . . . . . . . . . . . . . . . . . . . . . . . . . . . . . . . . . . . . . . . . . . . . . . . . . . . . . . . . . . .71
Mechanical specifications . . . . . . . . . . . . . . . . . . . . . . . . . . . . . . . . . . . . . . . . . . . . . . . . . . .71
Sensors. . . . . . . . . . . . . . . . . . . . . . . . . . . . . . . . . . . . . . . . . . . . . . . . . . . . . . . . . . . . . . . . . . . . . 72
Sampling. . . . . . . . . . . . . . . . . . . . . . . . . . . . . . . . . . . . . . . . . . . . . . . . . . . . . . . . . . . . . . . . . . . 72
Standard factory calibration specification. . . . . . . . . . . . . . . . . . . . . . . . . . . . . . . . . . . . 73
Specification conditions . . . . . . . . . . . . . . . . . . . . . . . . . . . . . . . . . . . . . . . . . . . . . . . . . . . .73
User Interface . . . . . . . . . . . . . . . . . . . . . . . . . . . . . . . . . . . . . . . . . . . . . . . . . . . . . . . . . . . . . . 73
Conformity . . . . . . . . . . . . . . . . . . . . . . . . . . . . . . . . . . . . . . . . . . . . . . . . . . . . . . . . . . . . . . . . .73

DANSENSOR
CheckPoint 3 EN User Guide 5
P/N 340486-B
09/2017
Consumable parts and options . . . . . . . . . . . . . . . . . . . . . . . . . . . . . . . 74
Ordering items . . . . . . . . . . . . . . . . . . . . . . . . . . . . . . . . . . . . . . . . . . . . . . . . . . . . . . . . . . . . . 74
Available User Guides. . . . . . . . . . . . . . . . . . . . . . . . . . . . . . . . . . . . . . . . . . . . . . . . . . . . . . . 74
Consumable parts . . . . . . . . . . . . . . . . . . . . . . . . . . . . . . . . . . . . . . . . . . . . . . . . . . . . . . . . . .74
Options . . . . . . . . . . . . . . . . . . . . . . . . . . . . . . . . . . . . . . . . . . . . . . . . . . . . . . . . . . . . . . . . . . . . 74
Appendix . . . . . . . . . . . . . . . . . . . . . . . . . . . . . . . . . . . . . . . . . . . . . . . . 75
Safety and handling instructions. . . . . . . . . . . . . . . . . . . . . . . . . . . . . . 75
Handling and maintenance . . . . . . . . . . . . . . . . . . . . . . . . . . . . . . . . . . . . . . . . . . . . . . . . . 75
Repairing. . . . . . . . . . . . . . . . . . . . . . . . . . . . . . . . . . . . . . . . . . . . . . . . . . . . . . . . . . . . . . . . . . .75
Needles . . . . . . . . . . . . . . . . . . . . . . . . . . . . . . . . . . . . . . . . . . . . . . . . . . . . . . . . . . . . . . . . . . . . 75
Battery and charging . . . . . . . . . . . . . . . . . . . . . . . . . . . . . . . . . . . . . . . . . . . . . . . . . . . . . . .76
Prolonged heat exposure . . . . . . . . . . . . . . . . . . . . . . . . . . . . . . . . . . . . . . . . . . . . . . . . . . . 76
Explosive atmospheres . . . . . . . . . . . . . . . . . . . . . . . . . . . . . . . . . . . . . . . . . . . . . . . . . . . . .76
Cleaning . . . . . . . . . . . . . . . . . . . . . . . . . . . . . . . . . . . . . . . . . . . . . . . . . . . . . . . . . . . . . . . . . . .76
Using connectors, ports, and buttons. . . . . . . . . . . . . . . . . . . . . . . . . . . . . . . . . . . . . . . . 76
Operating/storing temperatures . . . . . . . . . . . . . . . . . . . . . . . . . . . . . . . . . . . . . . . . . . . . 77
WebGUI compatible browsers . . . . . . . . . . . . . . . . . . . . . . . . . . . . . . . . 77
Toxic and Hazardous Substances or Elements. . . . . . . . . . . . . . . . . . 77

DANSENSOR
6 User Guide EN CheckPoint 3
P/N 340486-B
09/2017
DANSENSOR
CheckPoint 3 EN User Guide 7
P/N 340486-B
09/2017
1. Introduction
Register your product
Thank you for purchasing the CheckPoint 3, we hope that it will fullfil your needs.
In order to learn more about our customers and the markets we serve, we kindly ask you to fill
out the product registration form available on-line at
www.dansensor.com/register
In return we can offer to send important product information to you.
Important!
Safety and Use
WARNING! Personnel operating and maintaining the device must be familiar with
all aspects of its operation and be proficient in maintenance.
Such personnel should review the information in "Safety and handling
instructions" on page 75 to promote safety awareness.
Failure to follow the safety instructions could result in fire, electric shock, injury, or
damage to CheckPoint 3 or other property.
Prior to using the equipment it is assumed that it has been properly installed and
configured as described in this manual.
Always refer to this manual before operating or maintaining the device.
Observe all NOTES, CAUTIONS and WARNINGS - see page 8 for details.
About this Manual
Intended Use of this Manual
This manual describes the common use and maintenance procedures of the CheckPoint 3
device.
It is intended for the daily users and should be kept with the equipment for reference at all
times.
Reservations
This manual was written and illustrated using the best possible information available at the
time of publication.
Any differences between this manual and the equipment reflect improvements introduced
after the publication of the manual.
Changes, technical inaccuracies and typographic errors will be corrected in subsequent
editions.
As a part of our policy of continuous improvement, we reserve the right to alter design and
specifications without further notice.
DANSENSOR
8 User Guide EN CheckPoint 3
P/N 340486-B
09/2017
Notes, cautions and warnings!
Throughout the manual notes, cautions, and warnings are indicated with various icons and
written in bold like the example below:
CAUTION! Never use hard tools or abrasive materials when cleaning any part of the
device.
Explanation
NOTE! The operator should observe and/or act according to the information in
order to obtain the best possible function of the equipment.
CAUTION! The operator must observe and/or act according to the information in
order to avoid any mechanical or electrical damage to the equipment.
WARNING! The operator must observe and/or act according to the information in
order to avoid any personnel injury.
Tips and recommendations
Tips, recommendations and “best practise” advises are indicated as shown in the example
below:
TIP! The touch screen works best when you use the tip of a fingernail.

DANSENSOR
CheckPoint 3 EN User Guide 9
P/N 340486-B
09/2017
CheckPoint 3
CheckPoint 3 is a portable headspace gas analyzer for MAP packages. The device is based on
an all-in-one concept, and together with MOCON Dansensor’s new and innovative sensor
technology it ensures accurate and reliable measurements every time.
The embedded easy-to-use WebGUI makes it easy to create and manage users and products
and to set up product measurement details and general device settings and it enables the
control of several CheckPoint 3 units in a production environment.
All measurement data can be saved in the device’s database and exported for further analysis.
Models
3 different models are available:
CheckPoint 3 (basic), CheckPoint 3 Premium, and CheckPoint 3 Premium w/Extended
Data Pack.
The table below shows the various configuration levels.
PremiumPremium(Basic)
CheckPoint 3
O/CO
22
O/CO
22
O/CO
22
O
2
O
2
O
2
CheckPoint 3 CheckPoint 3
Extended Data Pack
O sensor
2
CO sensor
2
Simple gas alarms
Individual product settings & gas alarms
Users
Products
WiFi/Web Interface
Data logging/data export
Export of device settings
Data collection
No. of data collections
010
100
10.000
100
1.000
1.000.000
1

DANSENSOR
10 User Guide EN CheckPoint 3
P/N 340486-B
09/2017
Overview
Sample gas hose w/needle
Needle retainer
A small magnet in the needle retainer makes the needle snap into it and keeps it in place.
WARNING! Due to safety considerations the needle
should always be placed
in the retainer after measuring.
3.5" colour touch display
For intuitive operation of the device by use of explanatory icons and easy
understandable text messages and buttons.
The Button
The button has the following functions:
- Switching device on (press and release)
- Switching device off (press and hold for 3 s.)
- Start measuring (press and release)
- Resetting of the device (press and hold for 8 s.)
USB (Micro-B) connector
The USB connector is only for charging use.

DANSENSOR
CheckPoint 3 EN User Guide 11
P/N 340486-B
09/2017
Accessories
The following accessories are included with CheckPoint 3:
Power supply w/ interchangeable plugs
Plug:
Type: US EU AU UK
Area/Country*:
North America
Thailand
Taiw an
Europe Australia
New Zealand
United Kingdom
Singapore
Malaysia
* Compatibility is not limited to the indicated areas/countries.
USB cable
Use cable to connect the device to the power supply
or to a PC for charging - see
"Charging and monitoring the battery" on page 20 for details.
Septa (100 pcs.)
When performing a measurement, a septum should be applied to the package in order
to ensure a leak free gas extraction and to protect the package from tearing at the
piercing point - see "Measuring" on page 24 for details.
Needles (10 pcs.)
Needles are used to penetrate the package (and septum
) to perform a test
measurement - see "Measuring" on page 24 for details.
Filters (10 pcs.)
When performing a measurement, particles or fluids can enter the measuring system
causing damage to the instrument. Therefor a filter must be installed between the
needle
and the sample hose - see "Assembling the sample gas hose" on page 12 for
details.

DANSENSOR
12 User Guide EN CheckPoint 3
P/N 340486-B
09/2017
Setting up
Assembling the sample gas hose
1. Equip the needle holder with a filter and a needle then place the needle in the
retainer
.
WARNING! Due to safety considerations the needle should always be placed in the
retainer after measuring.
Fitting the bumpers (option)
1. Fit the bumpers onto the side plates starting from the pointed front corner.
2. When fitting the bumpers in the bottom, make sure that the notches snap properly
around the side plates keeping the bumpers in place (see details).
DANSENSOR
CheckPoint 3 EN User Guide 13
P/N 340486-B
09/2017
2. Operation and Maintenance
Basics
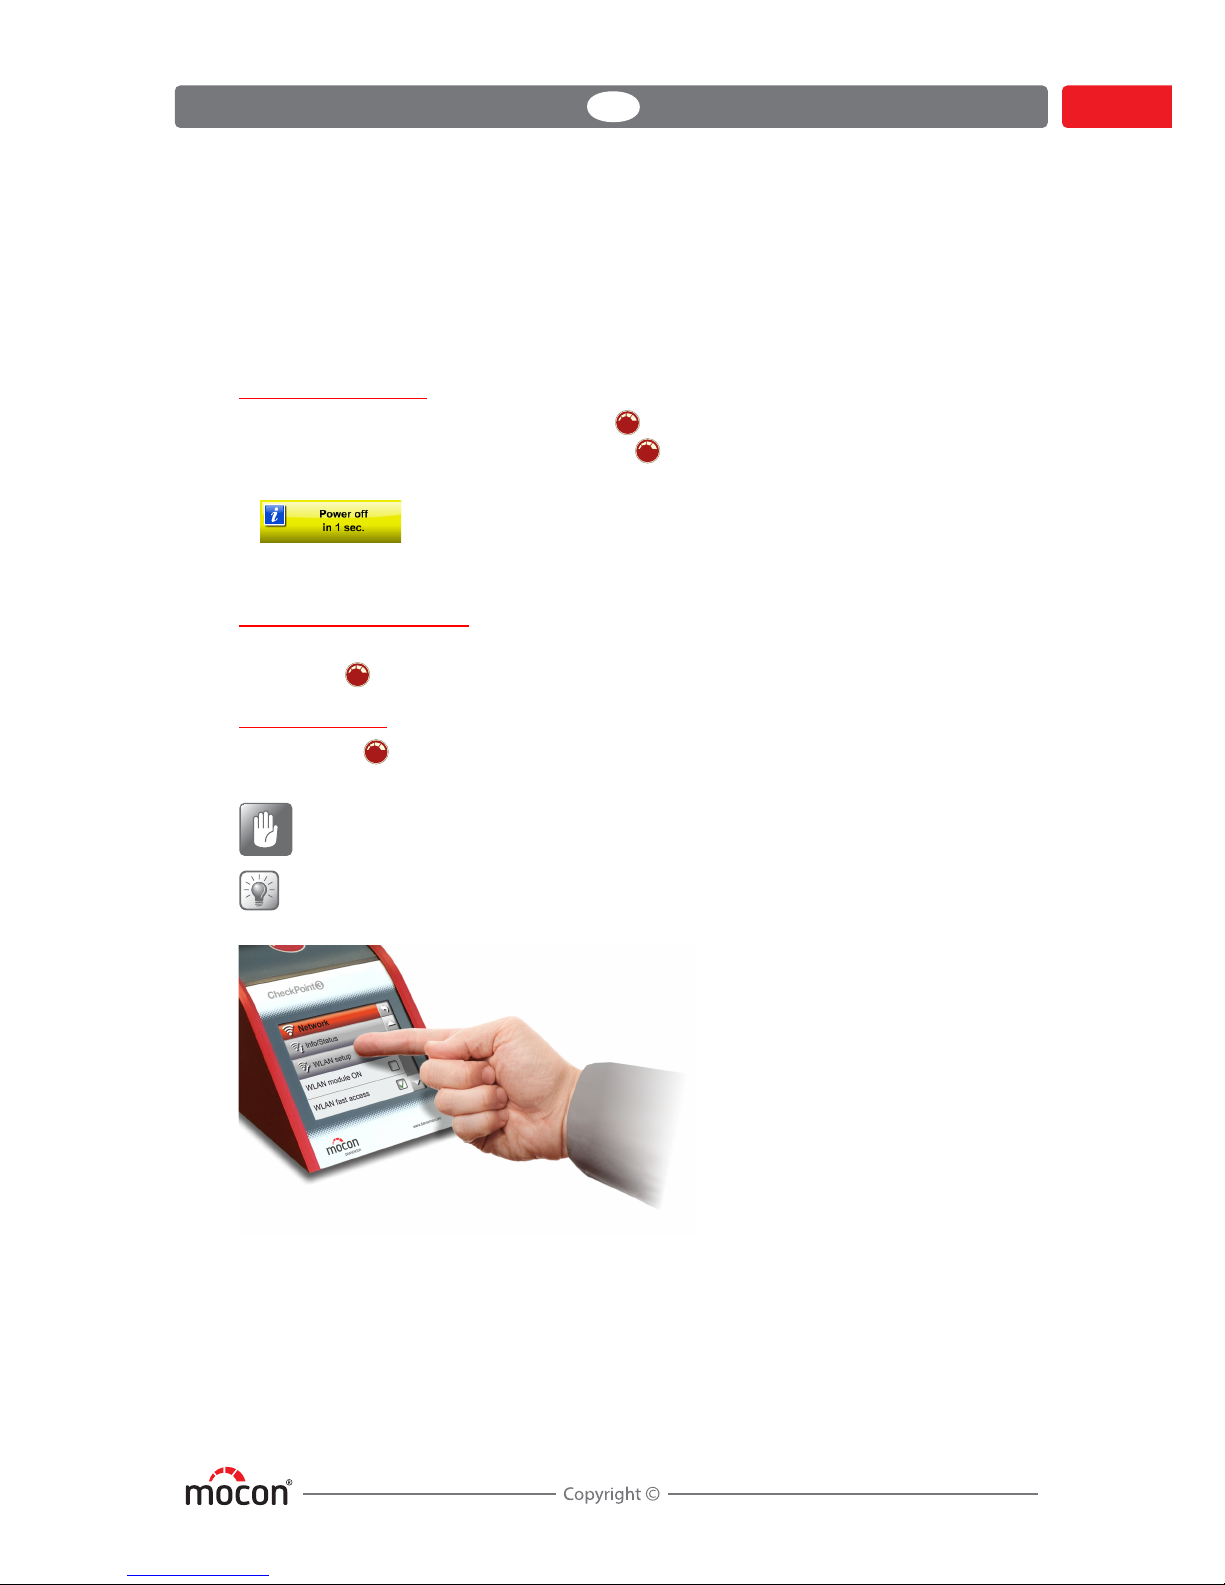
Switching on/off
To switch the device on, simply press the button.
To switch the device off, press and hold the button.
The display will show...
...and then the device shuts down.
Restarting/resetting
If device freezes or something is not working right, try restarting the device by pressing and
holding the button for approx. 8 s.
Touch screen
Except for the button on top of the device, all of the buttons you use are virtual ones on
the touch screen.
CAUTION! The touch screen should only be finger touch operated. Pencils or metal
tools can damage the touch sensitive film.
TIP! The touch screen works best when you use the tip of a fingernail.
DANSENSOR
14 User Guide EN CheckPoint 3
P/N 340486-B
09/2017
Navigation
The graphic interface offers various elements for navigating through the menu structure and
for making device settings.
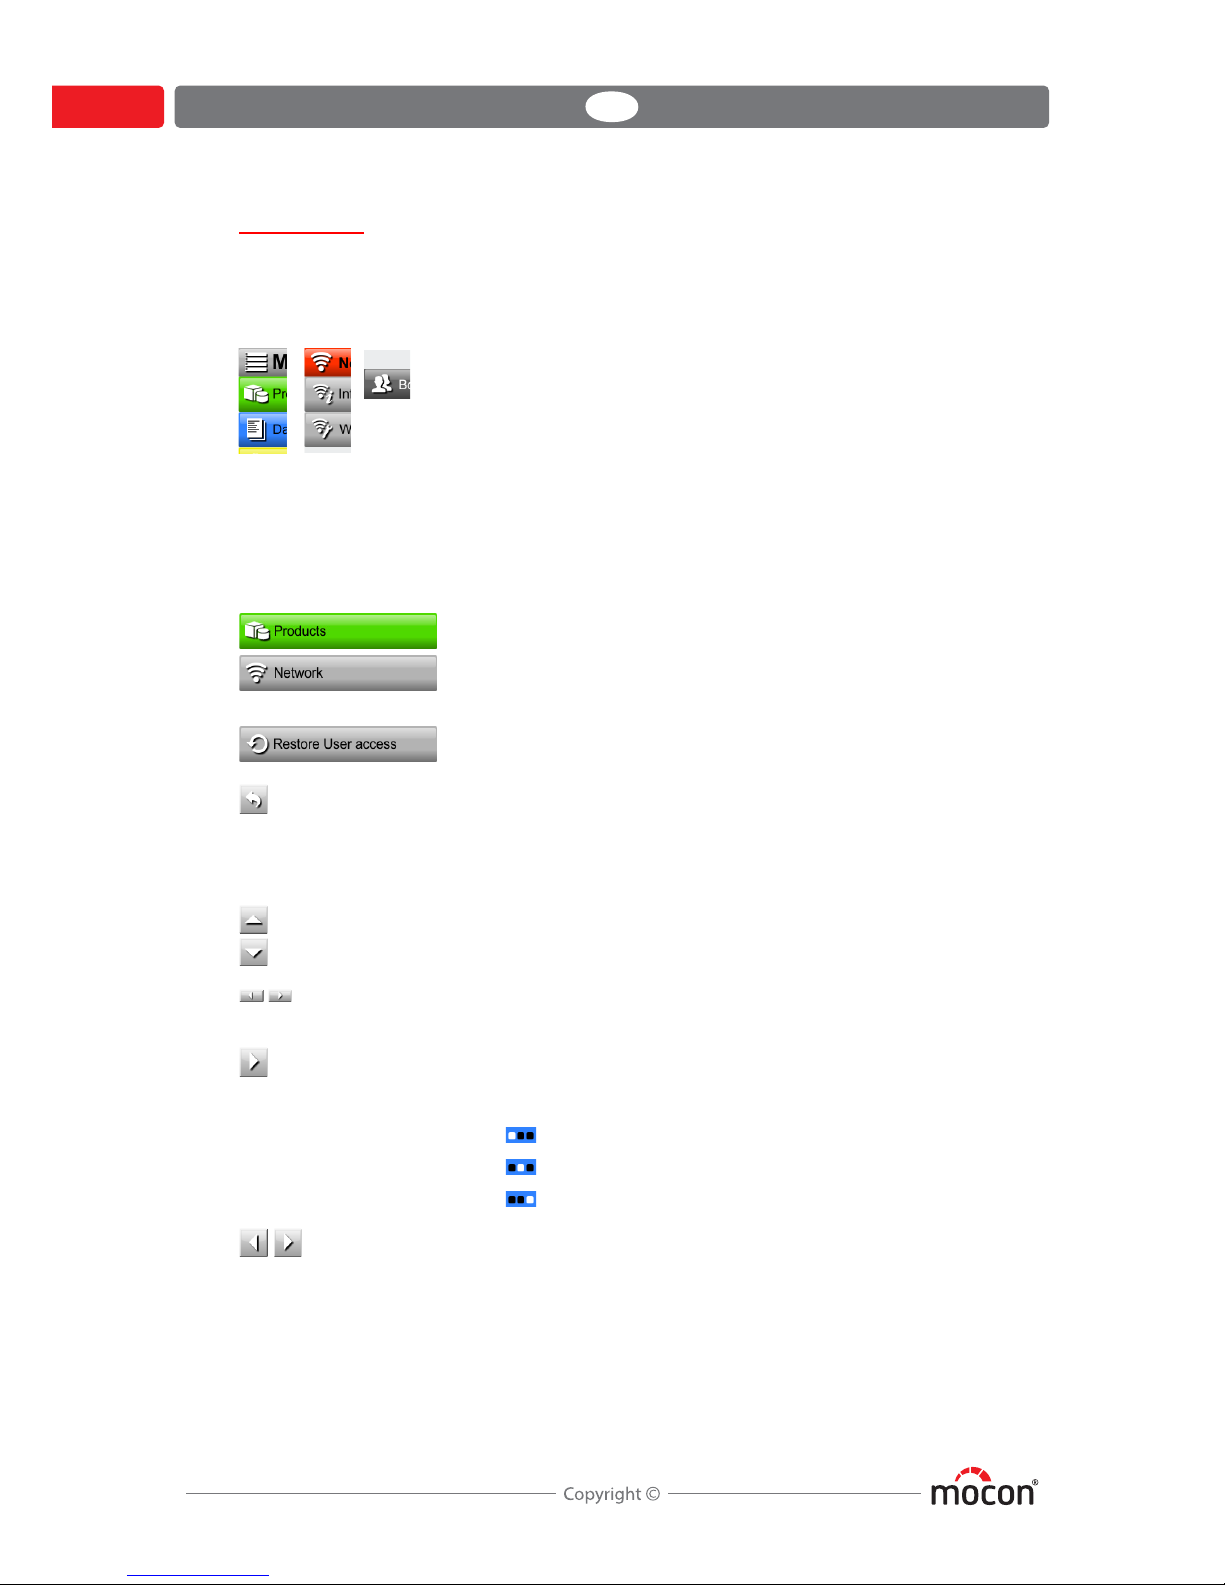
Icons
For easy function recognition. Some icons work as buttons.
Screen buttons
The various types of screen buttons and their functions are listed below:
Button type Function
Opens a submenu
Executes function
Returns to the previous window.
Undo editing end return to previous window.
When editing a product, tapping the button will save the
edited product when confirmed.
Scrolls content up/down in current window
Scrolls content left/right in current window
(In top bar)
Scrolls through pages in current window.
Page indicator shows current page:
Page 1 of 3
Page 2 of 3
Page 3 of 3
Adjust value up/down, e.g. display settings.
DANSENSOR
CheckPoint 3 EN User Guide 15
P/N 340486-B
09/2017
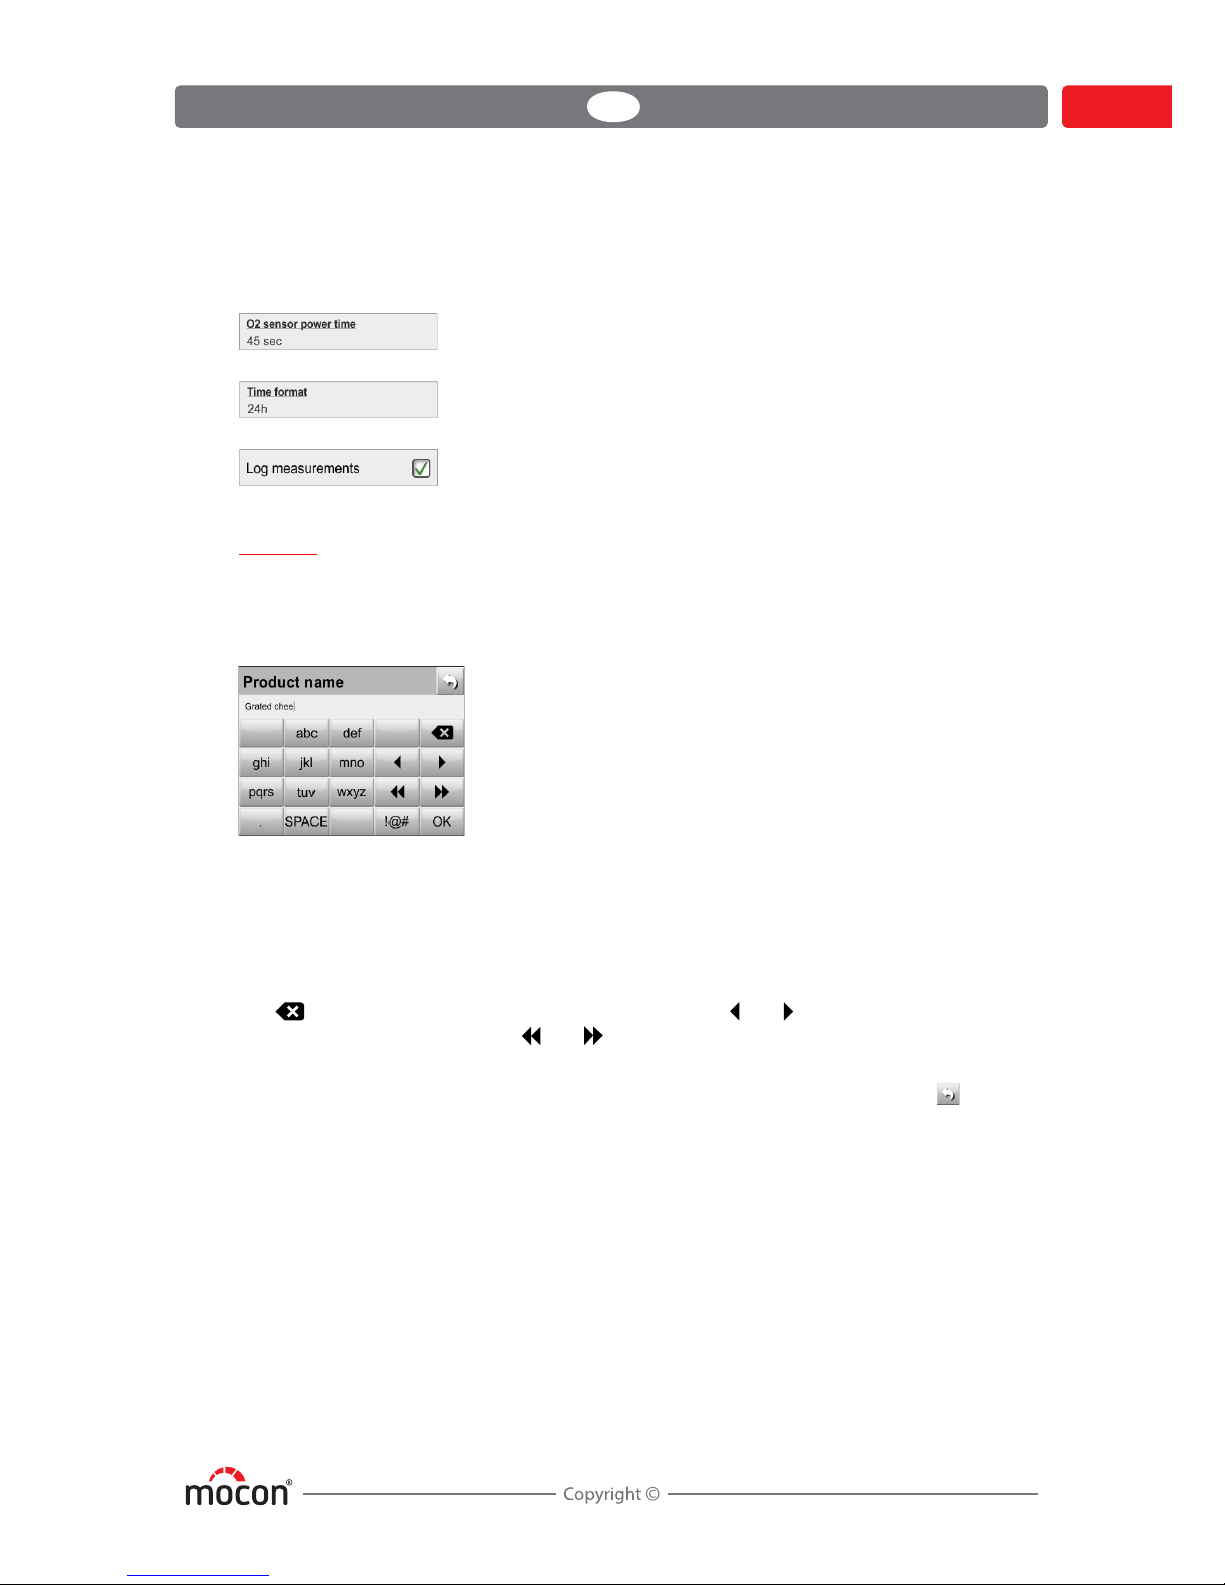
Parameters
Setting up of products and various device settings involves the following parameter types:
Typing
An onscreen keyboard lets you enter text when needed.
For example, when creating a new product, selecting the Product name parameter brings up
the onscreen keyboard, where you tap keys to type.
To switch between numbers, upper- and lowercase characters, special characters, or symbols,
tap the keyboard selection key to the left of the OK key. Please note that e.g. PIN code typing
only offers a numerical keyboard.
All typing keys except for the number keys holds 2 or more symbols or characters. Tap the
respective key repeatedly until the required character appears.
The key deletes the character to left of the cursor, the and keys move the cursor to the
left or right respectively, and the and keys make the cursor jump to the beginning or
end of the text respectively.
Tap ping the OK key confirms the input and exits the keyboard, while tapping the key will
discard the entered text and exit the keyboard.
Parameter type Tap item to...
Edit parameter. An onscreen keyboard appears for input of
text and/or numbers - see "Typing" on page 15 for details.
Toggle between options (e.g. 12h/24h)
Enable/disable function (Check/Uncheck)
DANSENSOR
16 User Guide EN CheckPoint 3
P/N 340486-B
09/2017
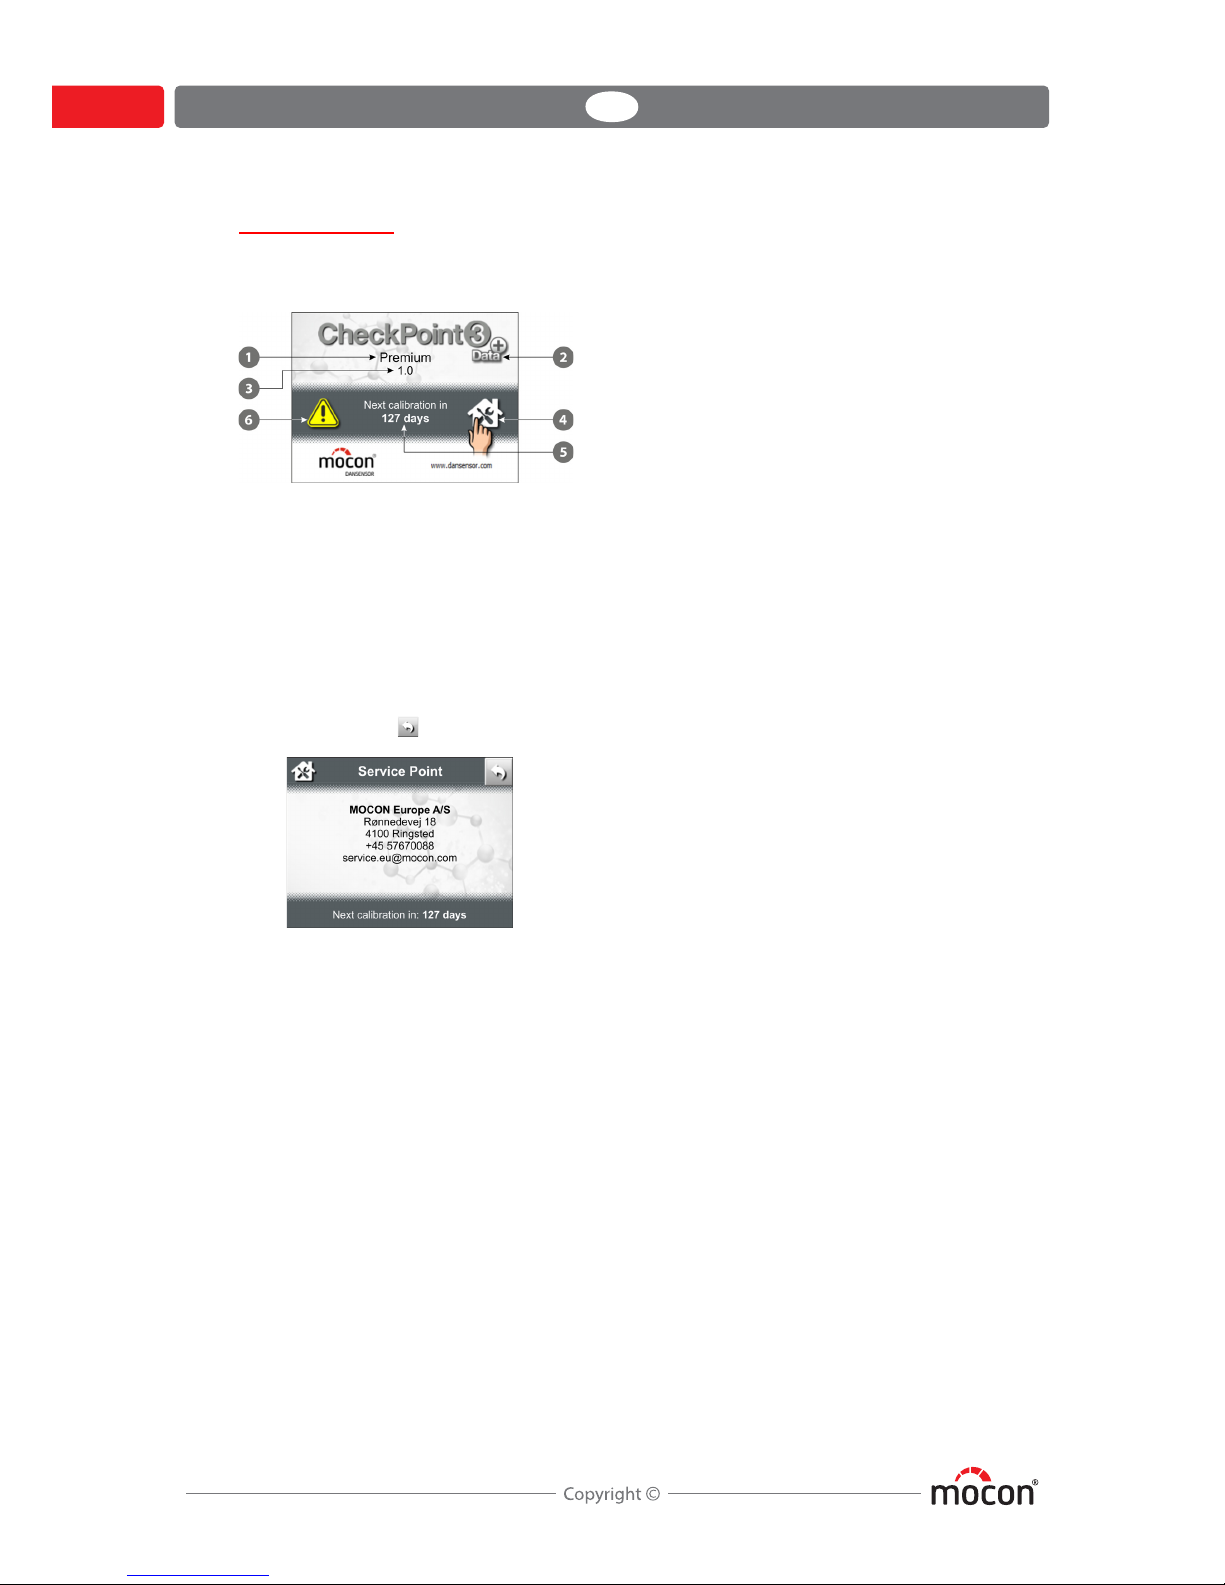
Splash screen
When the device is switched on, the splash screen is displayed for a few seconds while device
is initializing.
The splash screen displays the following:
Device model (on basic models field is empty)
Icon for Extended Data Pack (Premium models only)
Software version
Service Point
Tapping this icon will display the company information for your appointed service
provider. Tap button to exit.
Next calibration in/Calibration exceeded
Indication of days until next recommended calibration of the device’s O
2
sensor, or by
how many days calibration date has been exceeded.
Calibration alert
Displayed when calibration date has been exceeded.
DANSENSOR
CheckPoint 3 EN User Guide 17
P/N 340486-B
09/2017
Login and access levels
(Premium models only)
Login levels
Different levels of login can be set up:
NOTE! If you forget your User ID, you should create a new (ask a Supervisor).
See "Users" on page 59 for details about user and login settings.
Access levels
When device is switched on (after power off) it is locked in User access level. User access only
gives access to a limited number of functions and does not allow for parameter set-up.
To obtain full access you have to change the device to Supervisor access level.
To do so select Access level from the main Menu - see "Access level" on page 65 for details.
No login
(default setting)
At start-up the device initializes and when finished it changes
to show the measuring screen, ready for measuring. Current
user is the default User.
User login required At start-up the device initializes and when finished, you are
taken to the User screen, from where you must select a user to
go to the measuring screen, ready for measuring.
User login with ID At start-up the device initializes and when finished, you are
prompted to enter a valid User ID.
When done you are taken to the measuring screen, ready for
measuring.
DANSENSOR
18 User Guide EN CheckPoint 3
P/N 340486-B
09/2017
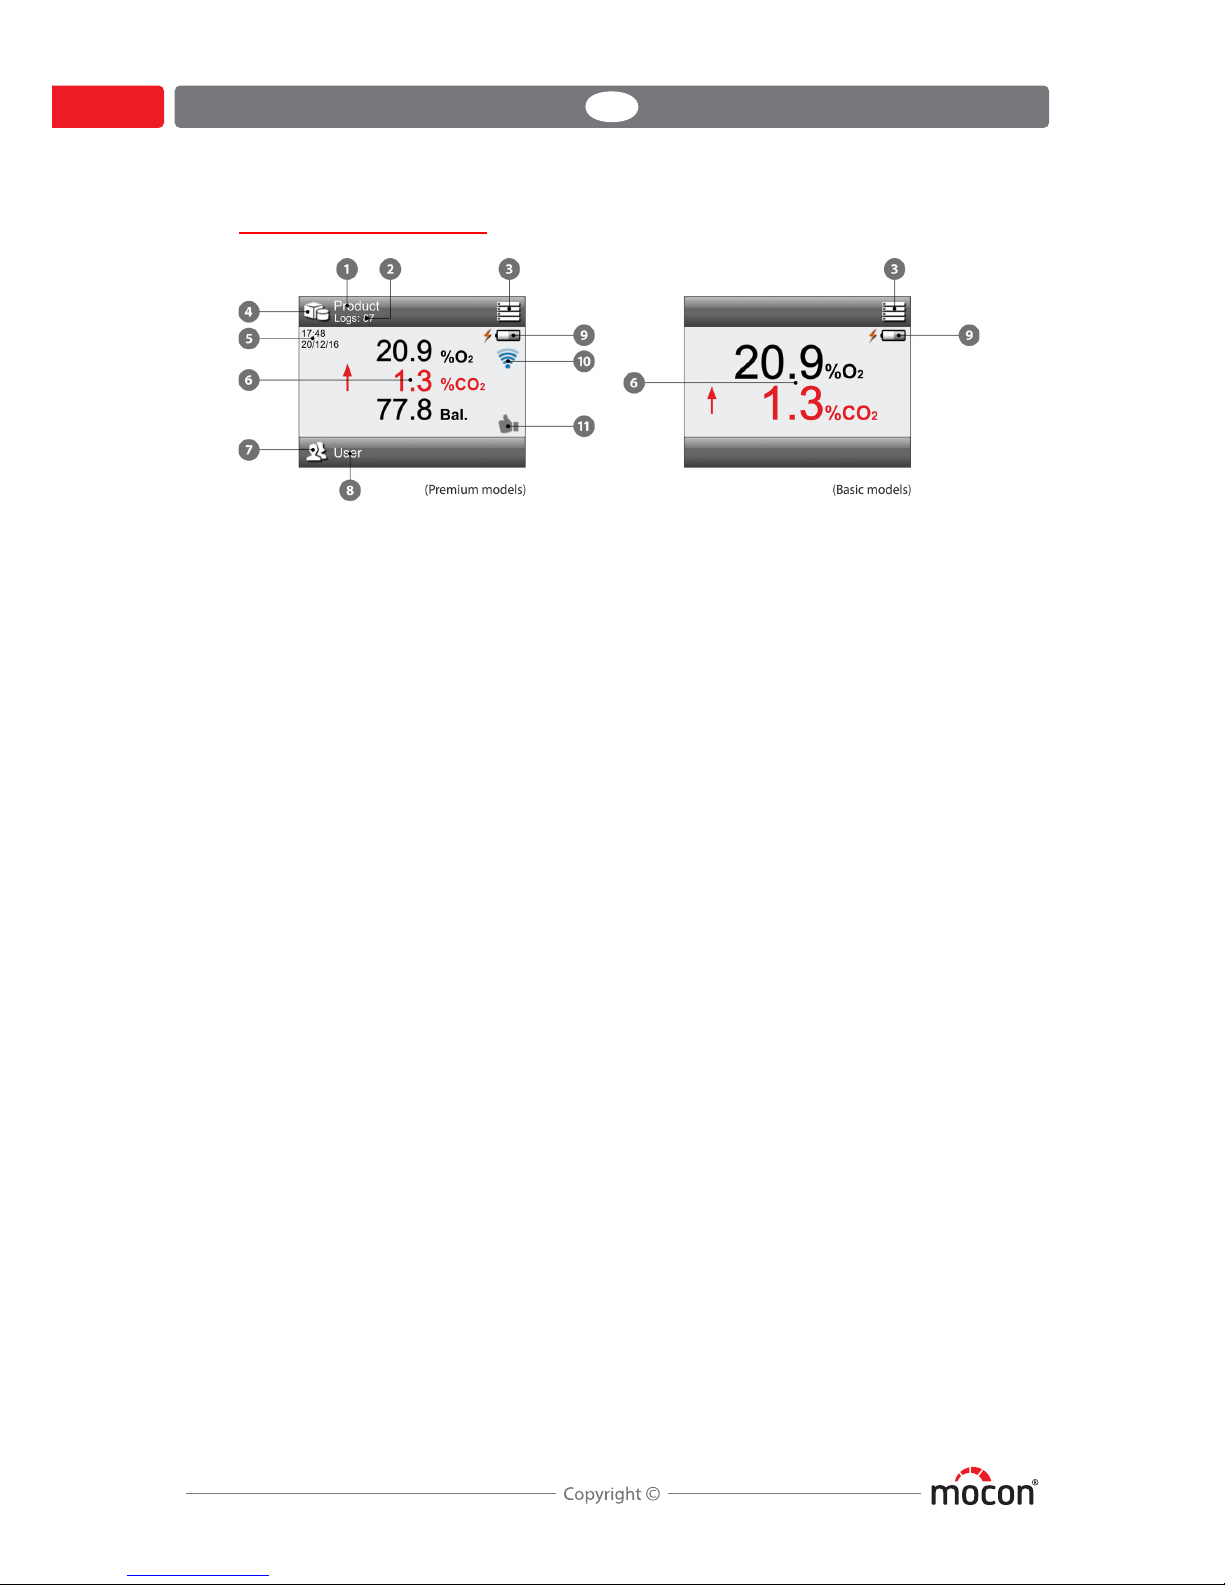
The Measuring screen
Items marked with an asterisk (*) are not available in the basic models.
Active product * Currently selected product.
To select another product, tap Products icon
.
Logs * Number of data logs in the database for the selected
product.
Menu icon Pressing this icon will take you to the “Main menu”.
See "Main menu" on page 45 for details.
Products icon * Pressing this icon will take you to the “Active Product”
menu for quick selection of a product.
See "Selecting a product for measuring" on page 24 for
details.
Time/Date * Current time and date.
Measuring result Result of the recent measurement.
Only values selected for display in the product setup are
displayed - see "New product" on page 49 for details.
Black text indicates that the result is within limits or that
no limits have been defined for this gas.
Red text indicates that the gas concentration has
exceeded the set alarm values.
The arrow symbol to the left of the value indicates
whether it is an upper or lower alarm.
User icon * Pressing this icon will take you to the User list for
selection of a user.
Active user * Currently selected user.
To select another user, press User icon
Battery level Shows current battery level and charging progress
during charging.
See "Charging and monitoring the battery" on page 20 for
details.
DANSENSOR
CheckPoint 3 EN User Guide 19
P/N 340486-B
09/2017
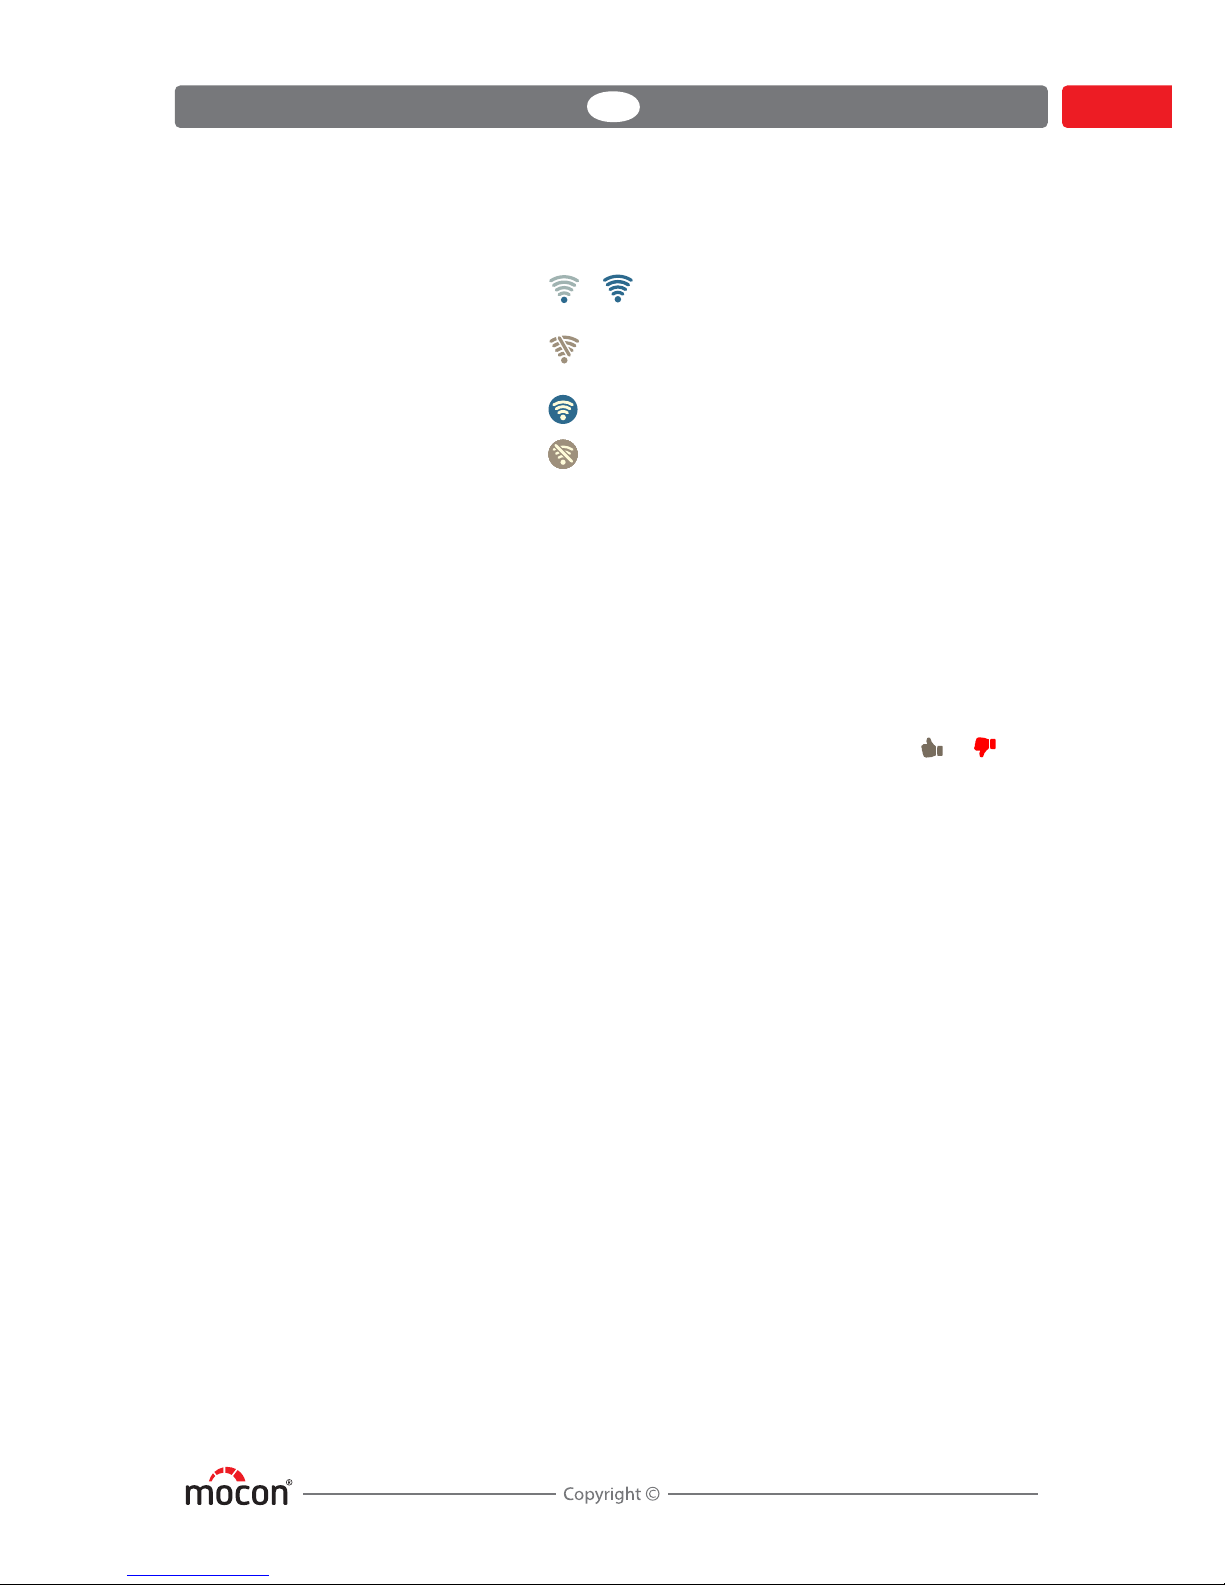
Wi-Fi status * Shows Wi-Fi connection type and/or Wi-Fi signal
strength:
..... Wi-Fi set to “Connect to Network”.
Icon indicates signal strength.
Wi-Fi set to “Connect to Network”, but Wi-Fi
module is off.
Wi-Fi set to “Create Network”
Wi-Fi set to “Create Network”, but Wi-Fi
module is off.
When Wi-Fi fast access is enabled in Network setup, the
icon also acts as a button giving fast access to the Wi-Fi
on/off setting. In this case the operator can turn the Wi-Fi
module on/off without being logged in as Supervisor.
See "Network" on page 58 for details.
Measurement validity * The icon shows the validity of the most recent
measurement.
Tapping this icon within 30 s. after performing a
measurement, will mark this measurement as invalid in
the data log, and the icon will change from to .
The icon is only visible when Invalid meas. fast access is
enabled in Data log setup, otherwise the function is only
available from the Data log menu - see "Data log" on
page 51 for details.
DANSENSOR
20 User Guide EN CheckPoint 3
P/N 340486-B
09/2017
Power saving
(Premium models only)
To save battery, the device has a 2-step power saving function:
1. After a certain time of inactivity, the device switches into power save mode by reducing
the display’s back light intensity.
2. After a certain time of inactivity in power save mode as described above, the device
automatically switches off.
NOTE! If device’s Wi-Fi module is switched on, the network activity will prevent
the device from switching off, even though the set time runs out.
To “wake up” the device when in power save mode, simply touch the screen or press the
button.
Power save settings are described in "Power save" on page 62.
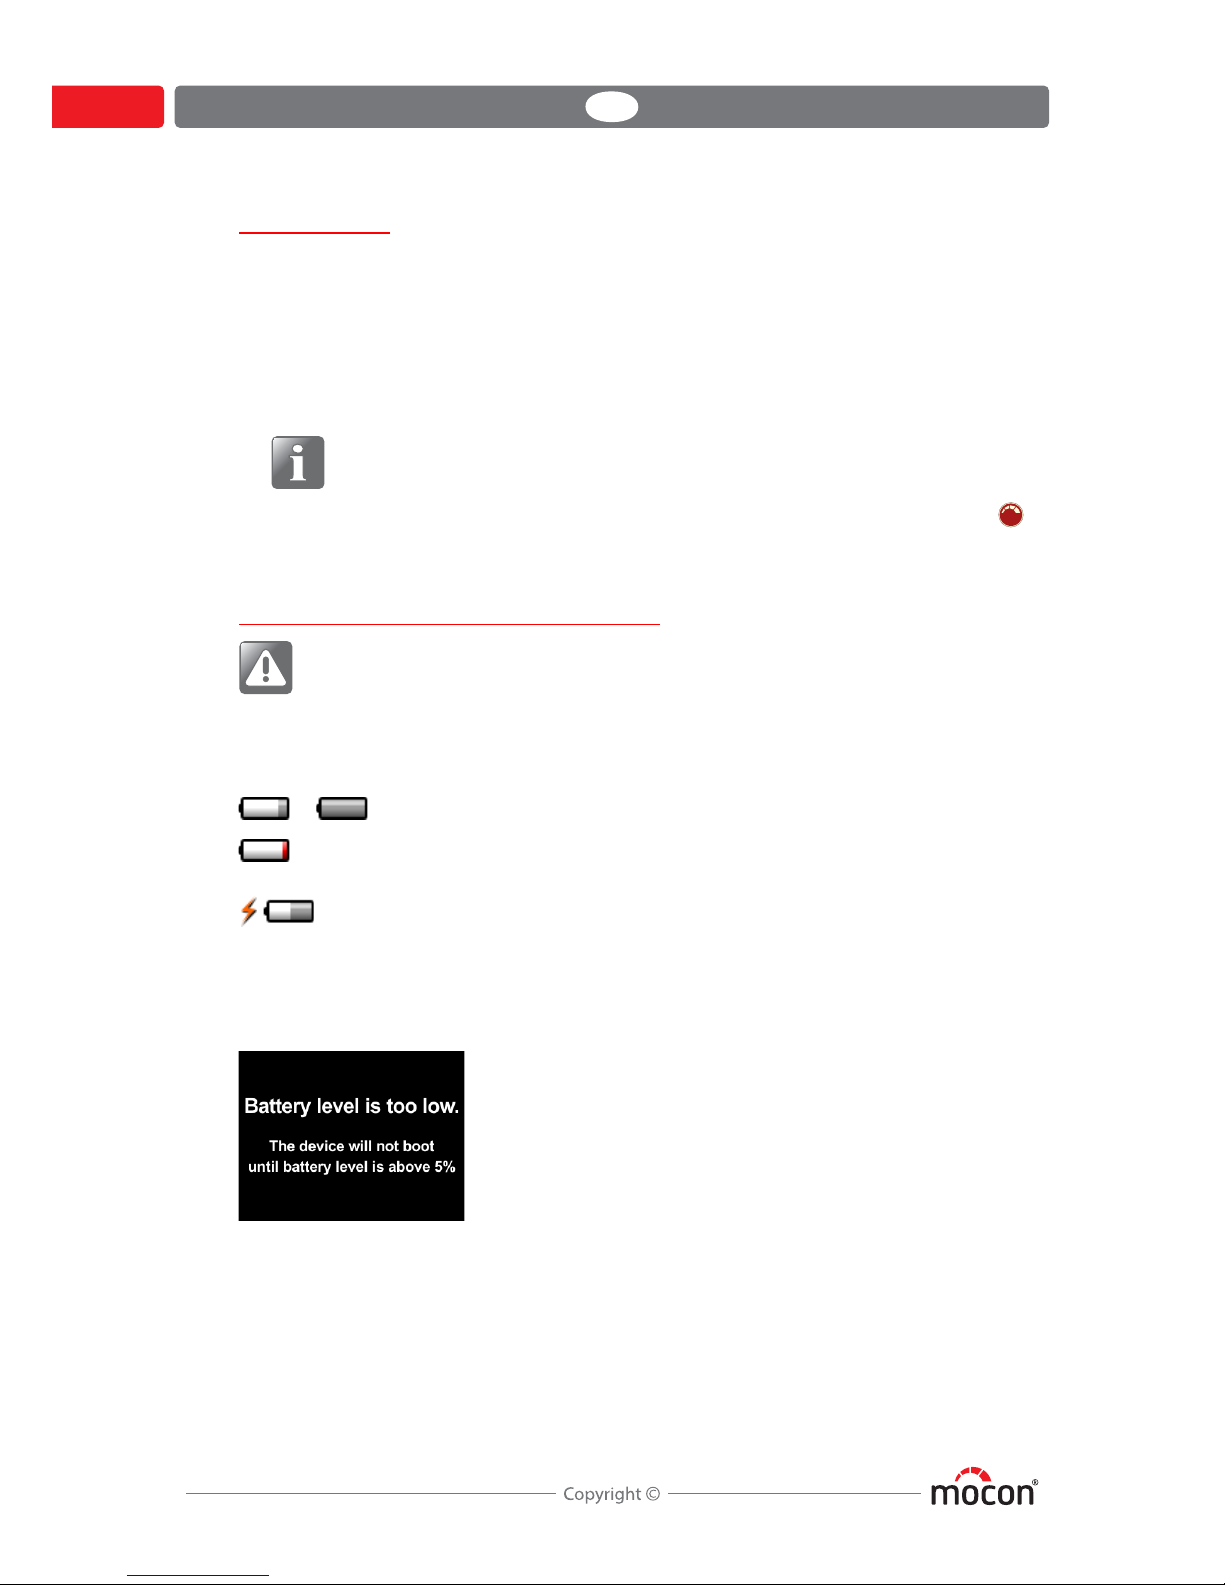
Charging and monitoring the battery
WARNING! For important safety information about the internal, rechargeable
lithium-ion battery and charging of the device, see "Safety and handling
instructions" on page 75.
The battery icon in the upper right corner of the measuring screen shows the actual battery
level or charging status:
When you attempt to switch device on while battery level is below 5%, the following screen
appears:
In this case you will need to charge the device.
.... Battery level 15 - 100%
Battery level below 15% - recharging required.
The device may power off at any time.
Battery charging. Charging level is indicated as described above.
DANSENSOR
CheckPoint 3 EN User Guide 21
P/N 340486-B
09/2017
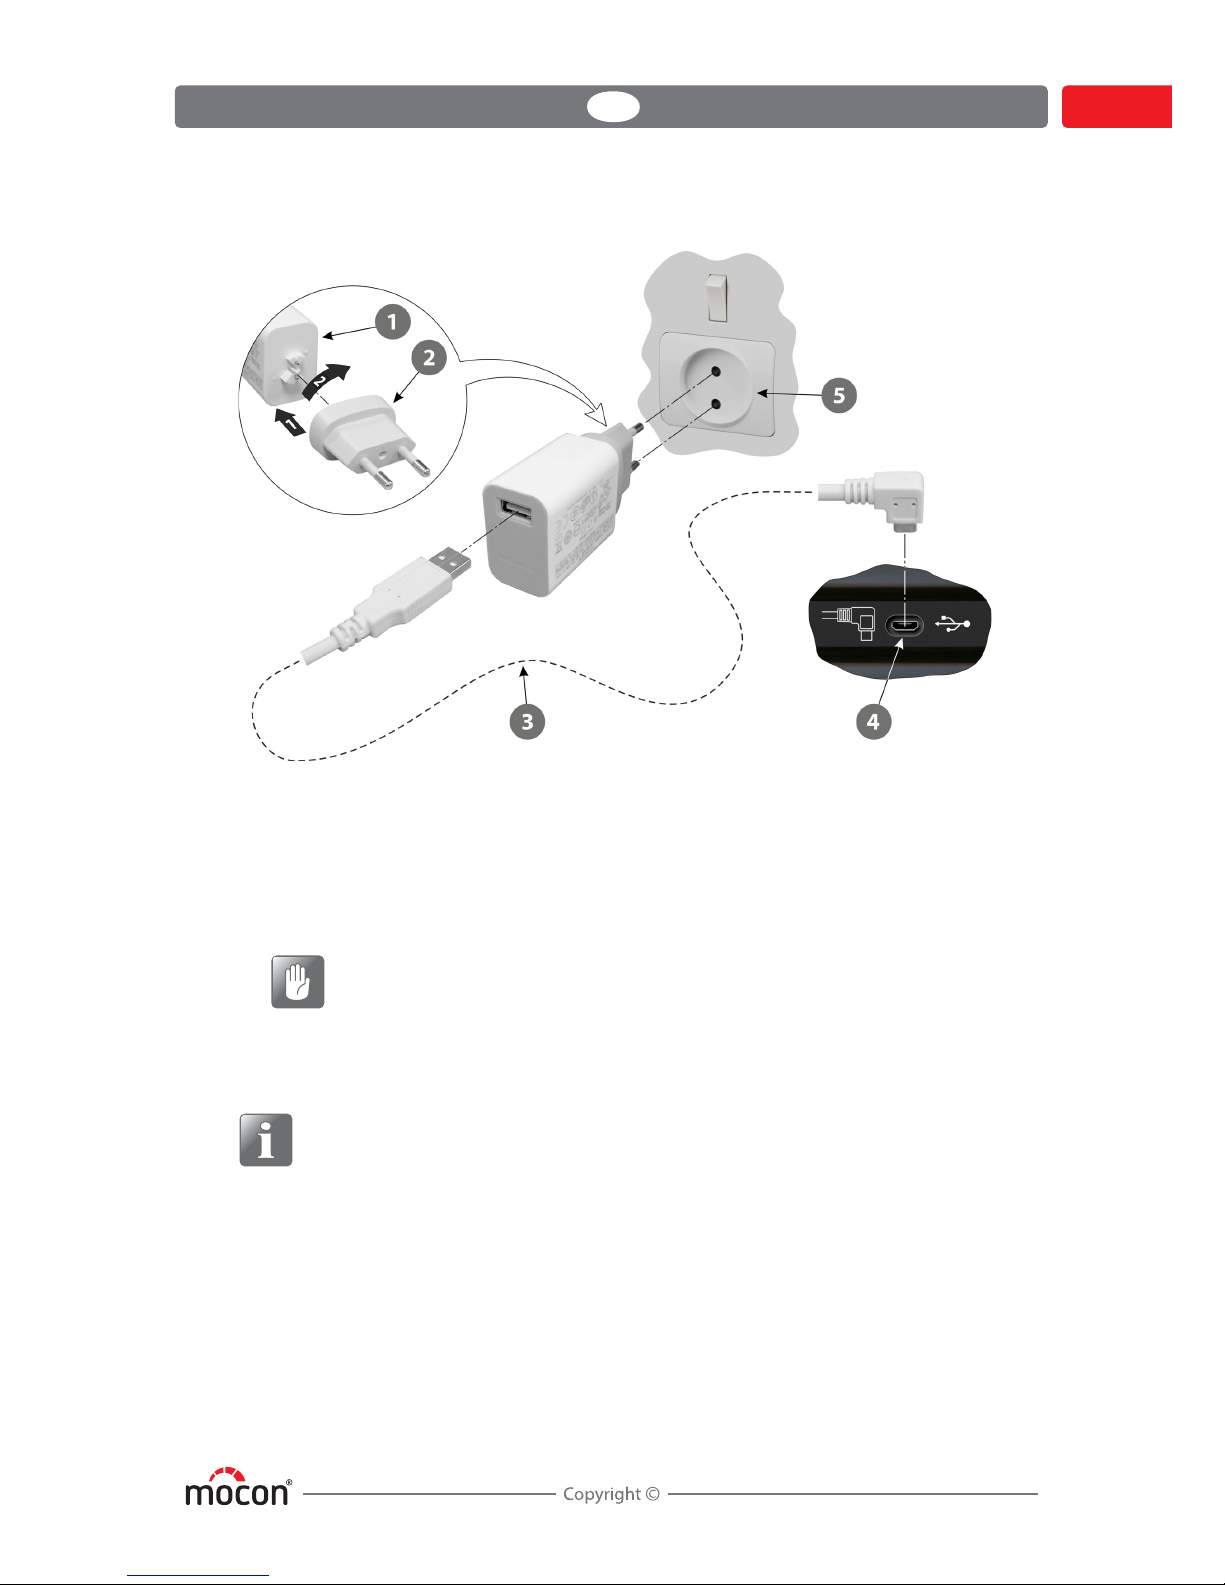
Battery charging
1. Assemble the power supply with the appropriate plug - see page 11 for plug
compatibility details.
Fit the plug onto the connector and then turn it 1/4 of a turn clockwise to lock it (see
detail).
2. Connect the cable
between the power supply and the connector underneath
the device.
CAUTION! Make sure that the cable plug matches the orientation of the
connector
.
3. Connect the power supply to the main power outlet
.
4. When charging, if the device is switched on and showing the measuring screen, the
battery indicator in the upper right corner of the display will show the charging progress.
NOTE! You can also charge the battery by connecting the device to a USB 2.0 or 3.0
port on your computer using the cable
, but you should be aware that because
the PC delivers so little power, the charging time can be up to 3 times longer than
when using the supplied power supply
, and the battery may drain instead of
charge, if device is used for measuring while charging or if the computer is turned
off or in sleep or standby mode.
DANSENSOR
22 User Guide EN CheckPoint 3
P/N 340486-B
09/2017
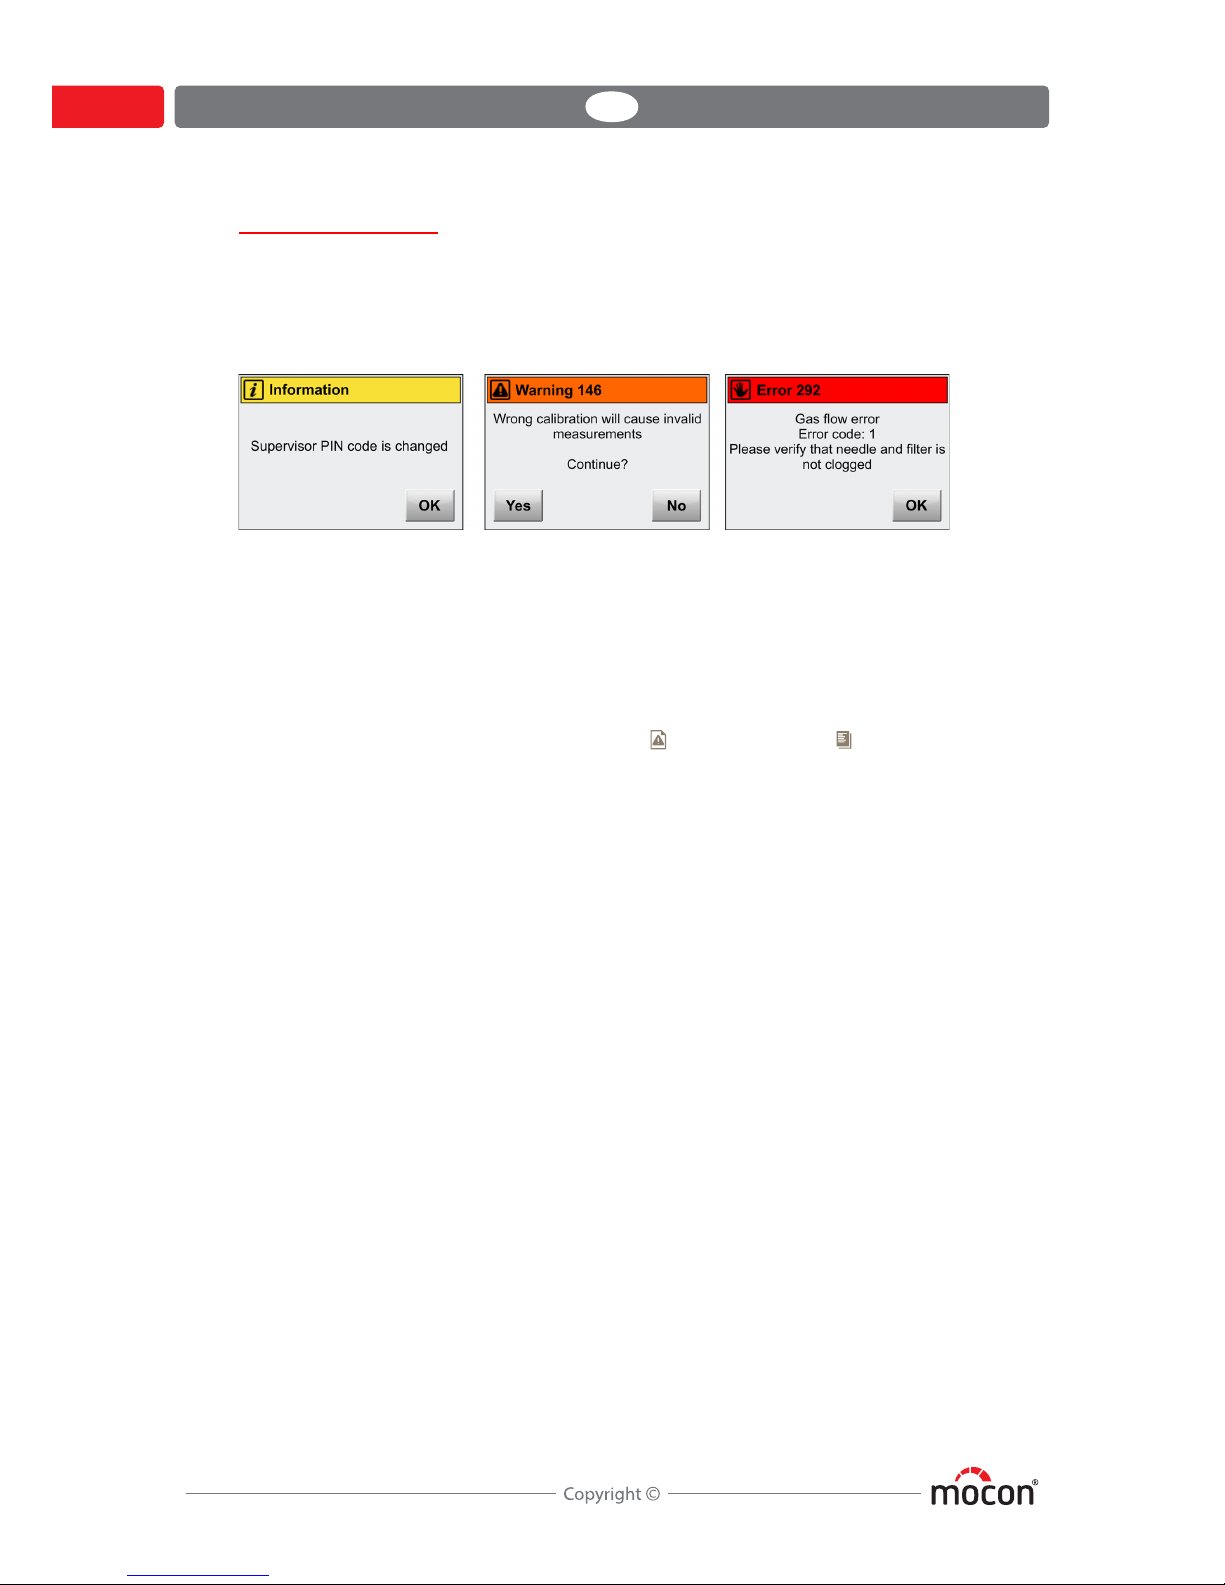
Pop-up messages
Three types of messages may occur:
• Informations
• Warnings
•Errors
Generally the Information and Warning messages are self explanatory and relates to user
interface interaction. They must be acknowledged by tapping OK or by tapping Ye s or NO to
decide how to proceed.
Error messages are mainly related to the device itself. The Error message screen proposes the
appropriate remedy to rectify the problem and must be acknowledged by tapping OK.
If one or more errors persist you should contact your service provider (see "Diagnostics" on
page 54). In these cases be sure to inform of error no. and error code.
A list of the most recent errors is available in the Error log from the Data log menu - see
"Data log" on page 51 for details.

DANSENSOR
CheckPoint 3 EN User Guide 23
P/N 340486-B
09/2017
Get started
When you start the device for the first time and before you start making measurements, it is
recommended that you perform some basic device settings.
Select language
Go to Menu -> Language to select the language in which you want to view the
different menus and messages - see "Language" on page 69 for details.
Set up gas concentration alarms
-Basic models:
Go to Menu -> Alarm to set values for when the measured gas concentrations
should appear on the measurement screen as not acceptable - see "Alarm" on page 46 for
details.
- Premium models:
Gas concentration alarms are set individually for each product - see "Products" on page 47
for details.
NOTE! You may experience shorter measurement times if appropriate gas alarms
have been set up.
Set up Products and Users
(Premium models only)
From the factory a default user and a default product have been created, but we highly
recommend that you create specific products and users, so that you can separate the
different measurements later on for use in product statistics etc. - see "Products" on page 47
and "Users" on page 59 for details.
Perform Setup
Go through the parameters available in the Setup menu and make appropriate settings
- see "Setup" on page 56 for details.
 Loading...