

Page 1
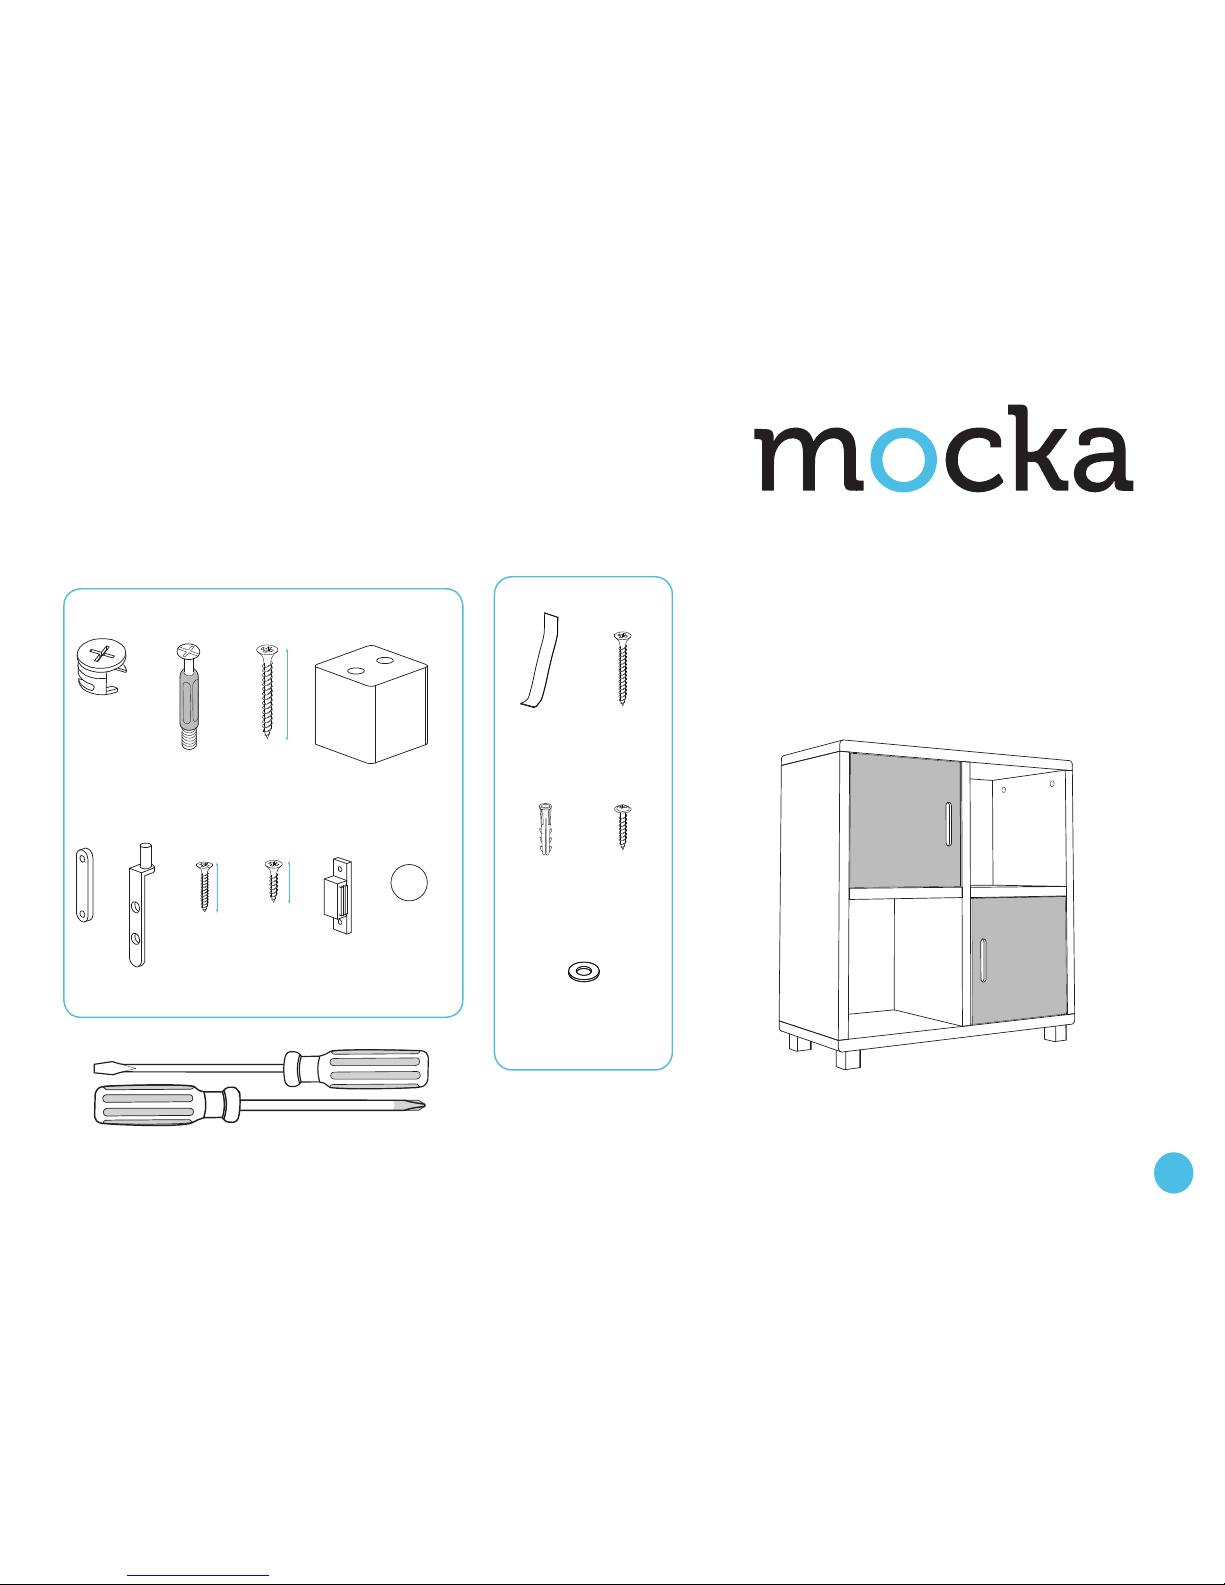
Phillips & Flathead screwdriver required
*We recommend using a Flathead screwdriver to tighten all locking nuts 100% before first use.
Please clear any loose wood from the locking nut holes before inserting the nut to ensure it locks 100%.
WARNING: Any furniture that is not anchored to a wall has the potential to
tip over in certain circumstances, i.e. if a child attempts to climb up on the
furniture or in the event of an earthquake. Accordingly, we recommend that
all furniture is anchored to a wall. We supply a free safety wall anchor with
all furniture sold and we recommend these are used to prevent your product
tipping. The fixing device provided should fit most wall types, but please
note that different wall materials may require different fixing devices from
x20
B
A
x20
C
D
E
F G
H
I
J
x8
x4
x2
x4
x4
x12
x2
x20
8 mm
12 mm
35 mm
x1
washer
Z
Wall
Screw
r/washer
screw
x1
Y
wall
anchor
x1
X
Safety
Strap
W
Hardware Supplied
Wall Strap
Storage Unit - Four Cubes
1
mocka.co.nz | mocka.com.au
Assembly Instructions
Thank you for your purchase.
Please follow the instructions below for correct assembly.
Page 2
1
2
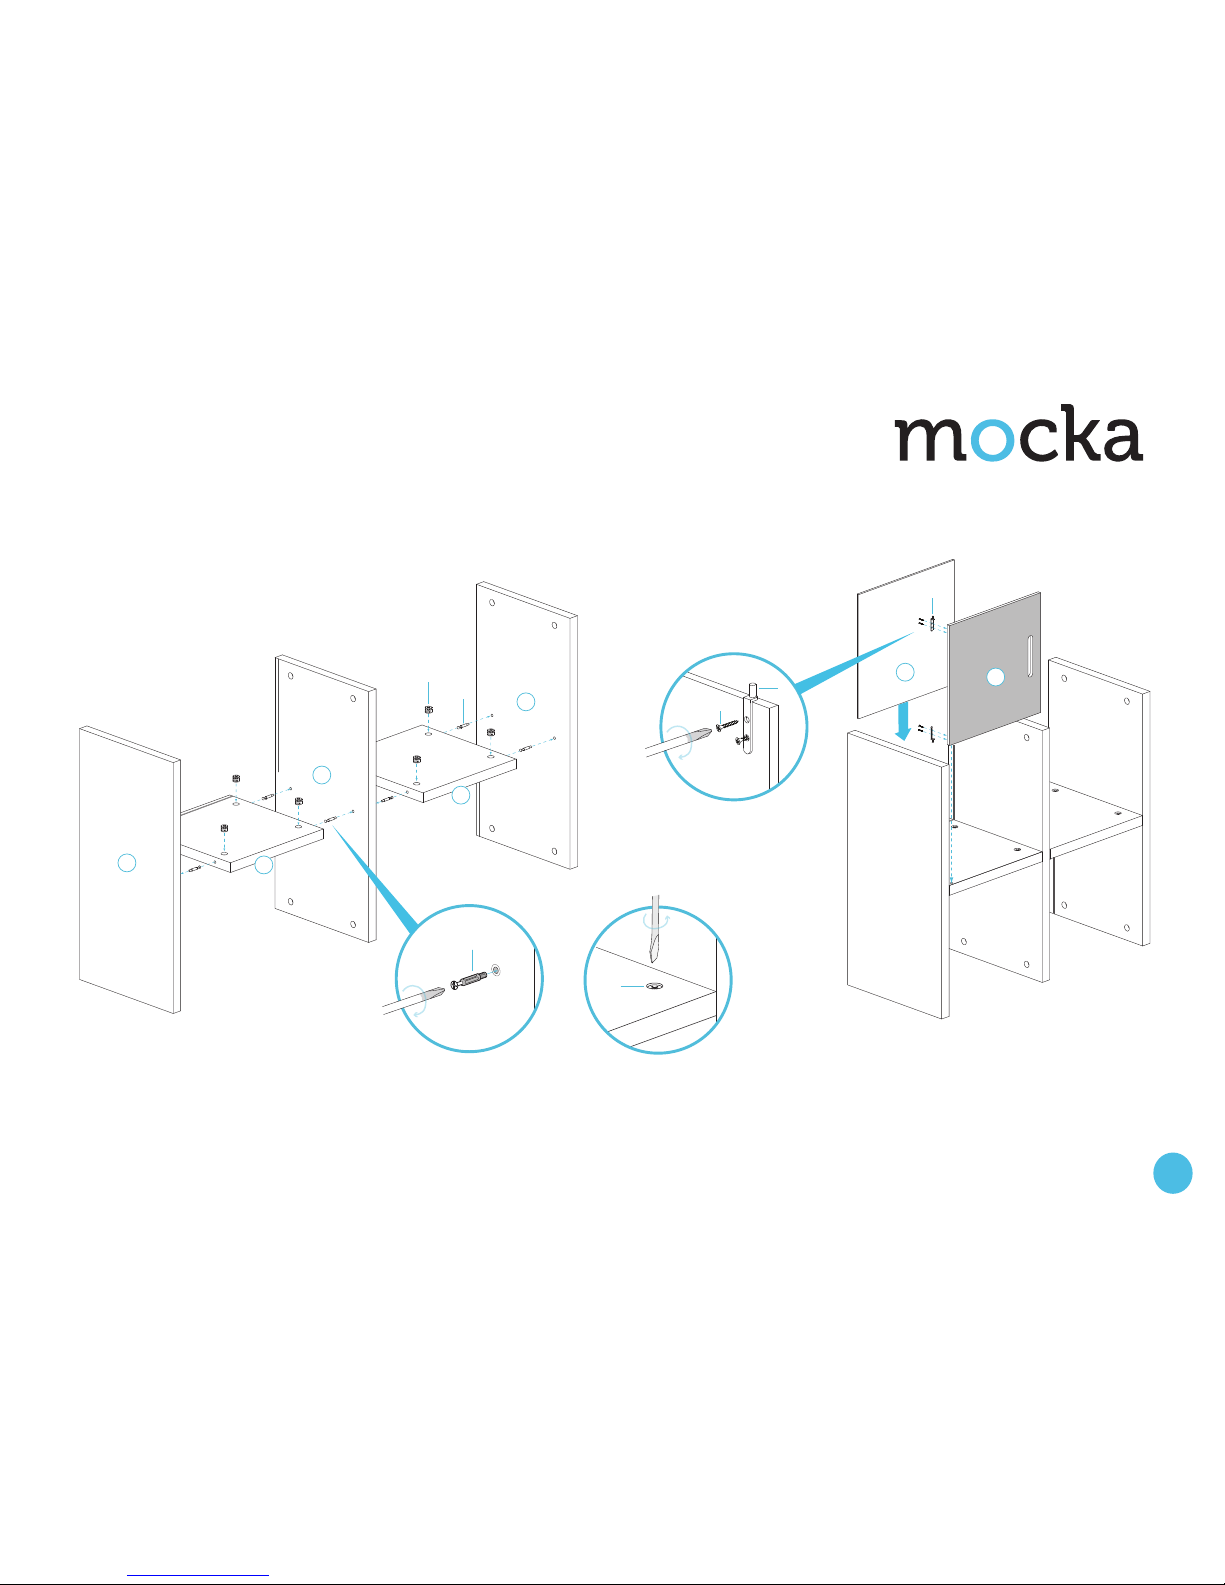
First screw in hardware (B) into side panels [1] and [3]. Slide both
panels together with the middle shelves [2] and [4], making sure the
grooved ends line up. Insert hardware (A) into the holes on shelves [2]
and [4].
Tighten (A) with a screwdriver. Slide cupboard back panel [6] into
grooves as shown. Screw hinge pins (F) into the holes in the cupboard
door. Lower door into pin hole in shelf [4].
x8
A
B
x8
3
1
4
2
6
7
F
x2
H
F
B
A
1
Storage Unit - Four Cubes
2
mocka.co.nz | mocka.com.au
Assembly Instructions
Page 3
3
4
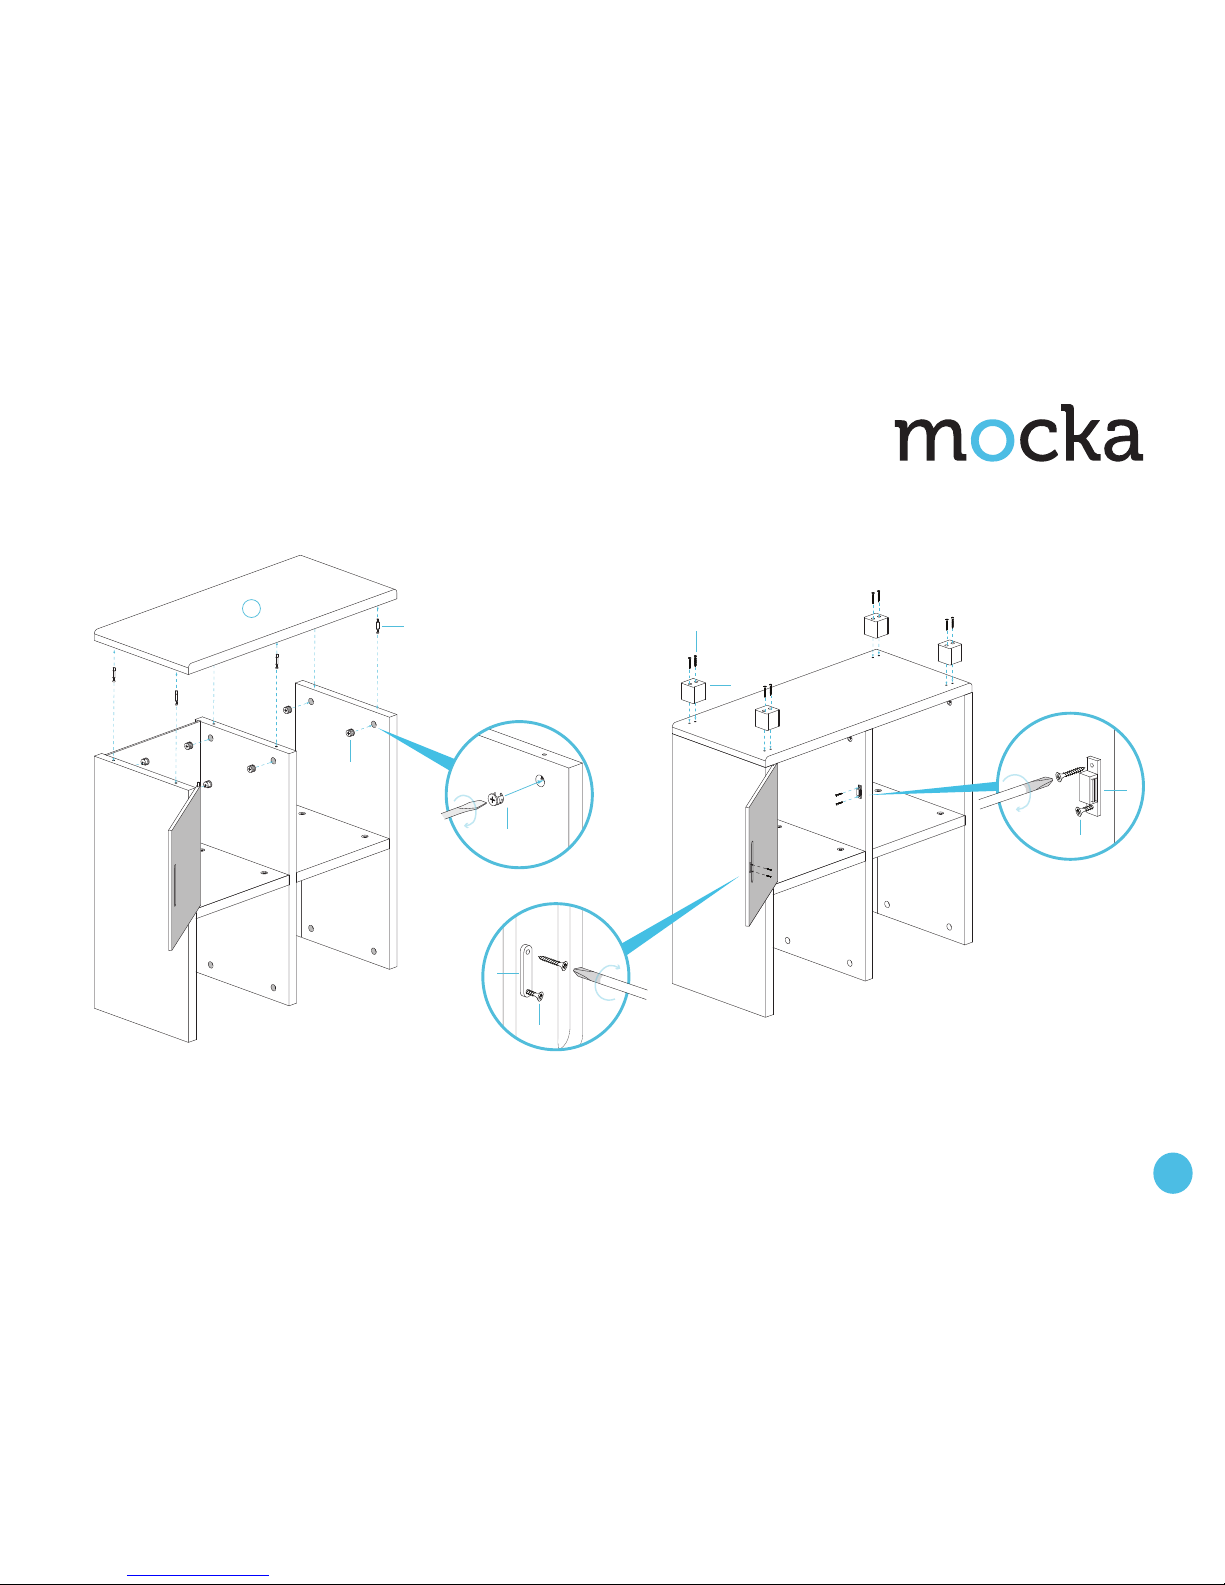
Screw in hardware (B) into base panel [8]. Place base panel on top
while sliding the ends of (B) into holes on the top of the side panels.
Make sure the door hinge pin (F) slots in. Insert and tighten hardware
(A) with screwdriver.
Attach feet blocks (D) to base panel using long screws (C) and the
pre-drilled holes in the base panel. Fasten clip plate (E) to the cupboard
door. Attach the magnetic clip (I) inside the cupboard using screws (G).
C
D
8
A
x6
x1
H
E
x1
G
I
B
A
Storage Unit - Four Cubes
3
mocka.co.nz | mocka.com.au
Assembly Instructions
Page 4
5
6
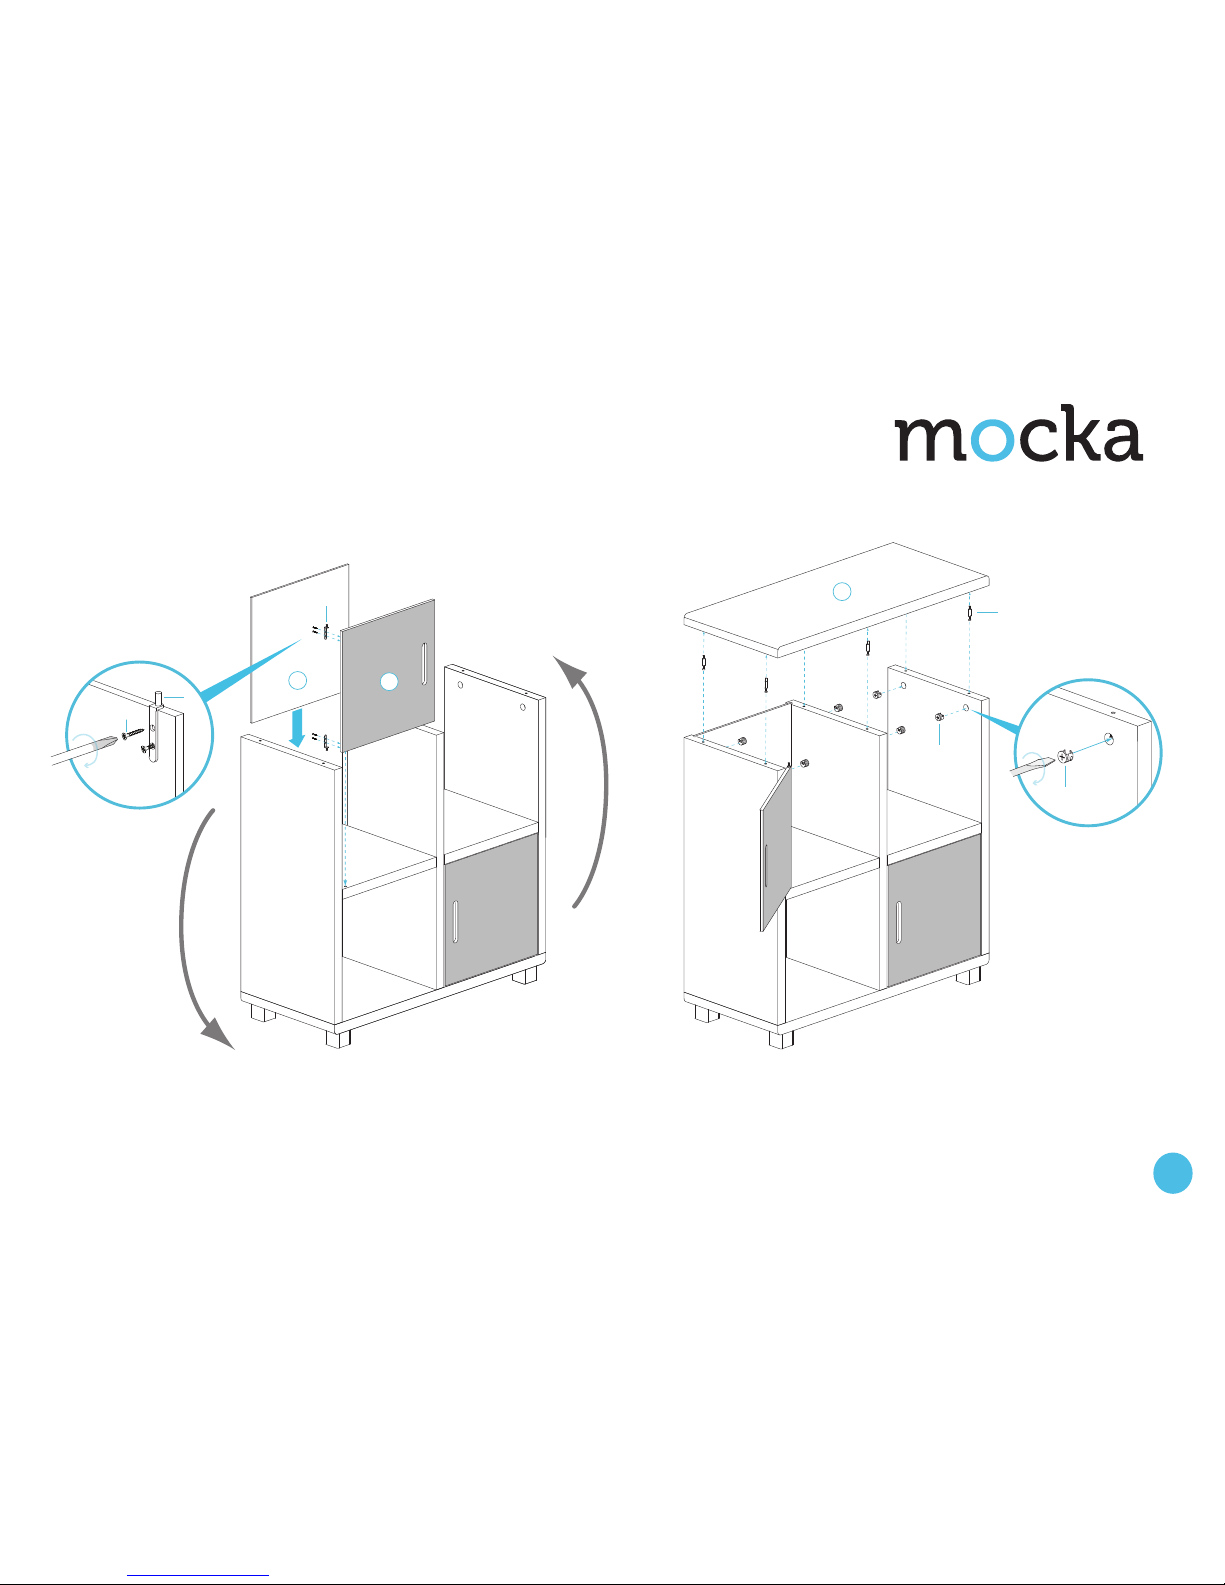
Flip Four Cube over so feet stand on the floor. Slide cupboard back
panel [6] into grooves as shown. Screw hinge pins (F) into the holes in
the cupboard door. Lower door into pin hole in shelf [4].
Screw in hardware (B) into top panel [5]. Place panel on top of side
panels while sliding the ends of (B) into the holes. Make sure the door
hinge pin (F) also fits ino top panel [5]. Insert and tighten hardware (A).
6
F
x2
H
F
5
7
A
x6
B
A
Storage Unit - Four Cubes
Assembly Instructions
4
mocka.co.nz | mocka.com.au
Page 5
Jolt Wardrobe
ASSEMBLY INSTRUCTIONS
5
mocka.co.nz | mocka.com.au
7
8
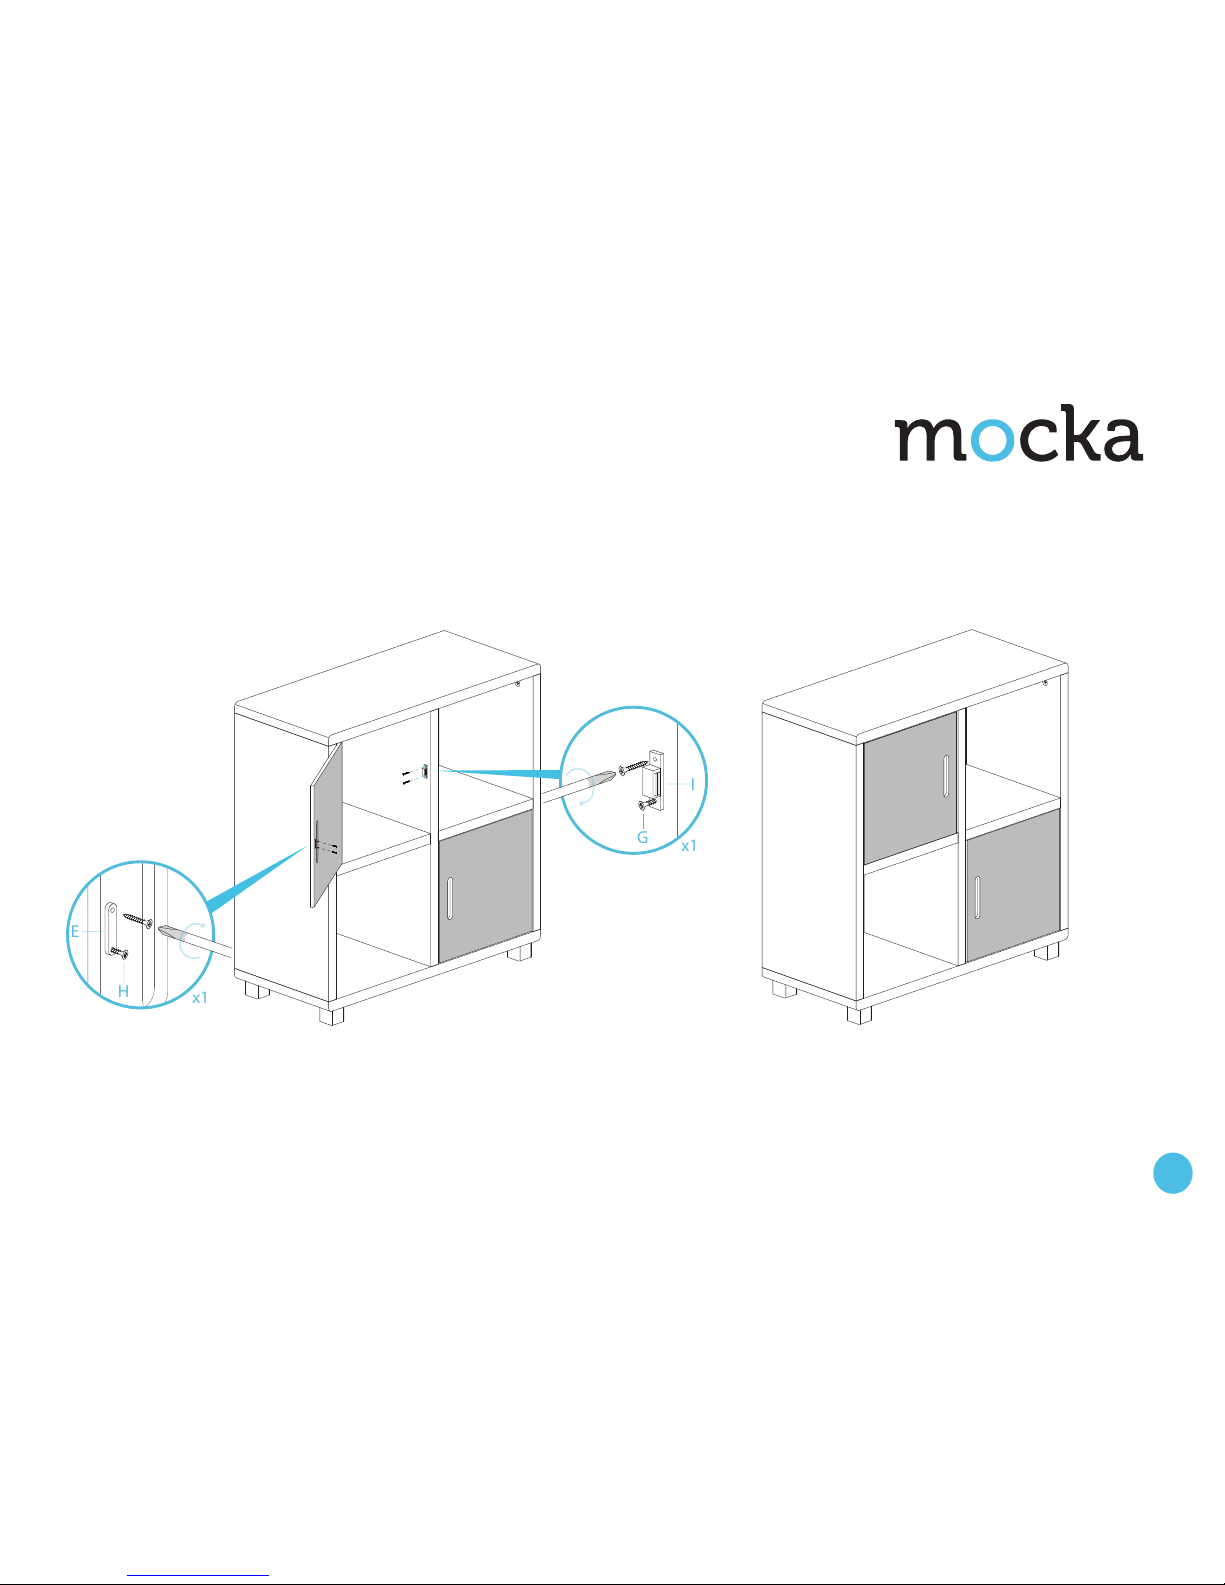
Fasten clip plate (E) to the cupboard door using screws (H). Attach the
magnetic clip (I) inside the cupboard using screws (G). Check door
closes.
Use stickers (J) to cover the holes where the hardware (A) is used.
x1
G
I
x1
H
E
Storage Unit - Four Cubes
Assembly Instructions
5
mocka.co.nz | mocka.com.au
Page 6
9
10
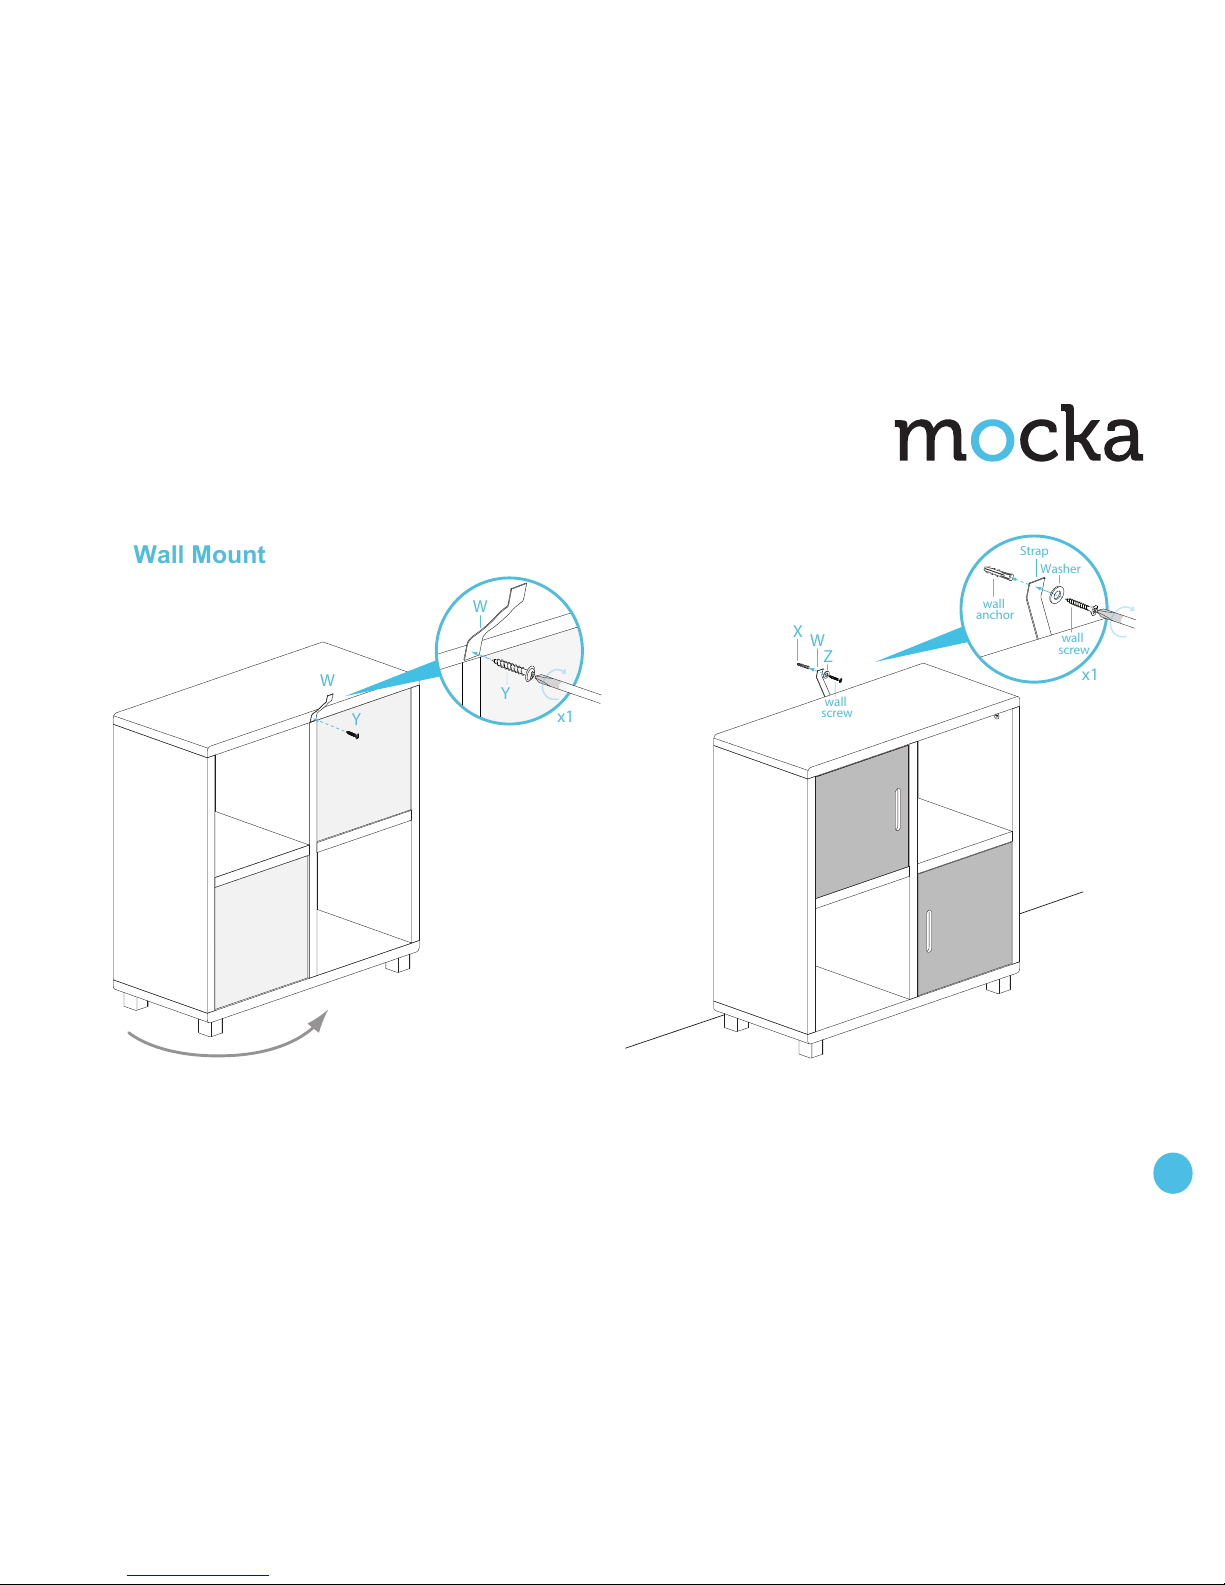
Attach the safety strap (W) to the top of the back side of the unit using
screw (Y). Tighten with a screwdriver.
Once assembled lift furniture into place, do not drag. Use a drill to create
a small hole lining up with the top of the safety strap (W). Fasten to wall
using wall anchor (X), washer (Z) and screw. Ensure the unit is balanced
and steady before use. You’re done, enjoy!
Wall Mount
Y
W
x1
Y
W
W
X
Z
x1
Washer
Strap
wall
anchor
wall
screw
wall
screw
Storage Unit - Four Cubes
Assembly Instructions
6
mocka.co.nz | mocka.com.au
 Loading...