

Mobotix M24M Allround CS-Vario Manual Manual
www.mobotix.com
The HiRes Video Company
EN
M24M: Camera Manual
HiRes Video Innovations
The German company MOBOTIX AG is known as the leading pioneer in network camera technology and its
decentralized concept has made high-resolution video systems cost ecient.
MOBOTIX AG • D-67722 Langmeil • Tel: +49-6302-9816-103 • Fax: +49-6302-9816-190 • sales@mobotix.com
Latest PDF file:
www.mobotix.com > Support > Manuals
11/2009
M24M Allround L22
M24M Allround L11
M24M Allround
CS-Vario
More Camera For Less. Guaranteed!
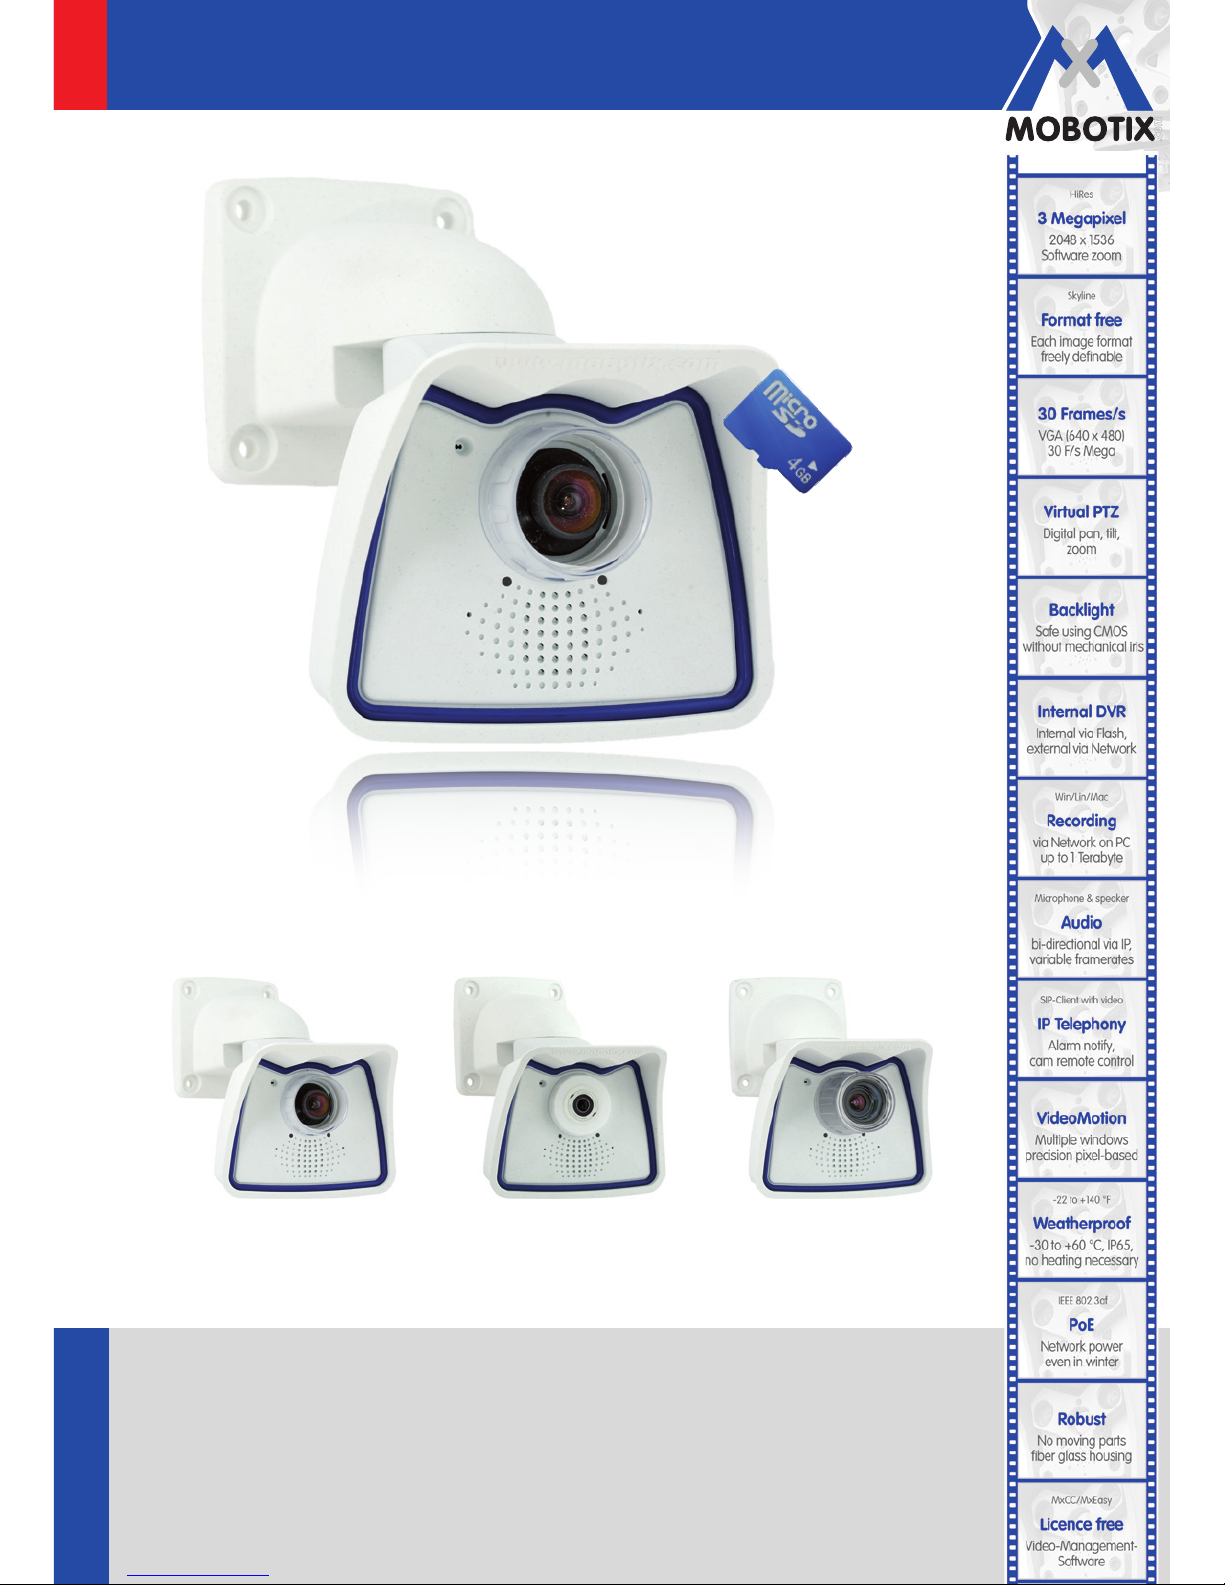
The M24M series from MOBOTIX oers extremely compact, cost-eective and exceptionally powerful
allround cameras with the widest range of lenses, including panorama version. Fully equipped with
IP66-certified housing and long-term internal storage on a MicroSD card.
2/146
© MOBOTIX AG • Security-Vision-Systems • Made in Germany
www.mobotix.com • sales@mobotix.com
M24M Camera Manual: Camera Data
Enter your camera data here.
Camera Model:
Camera Name:
Factory IP Address:
Current IP Address:
DHCP:
Admin User Name:
Admin Password:
Note
MOBOTIX oers inexpensive seminars that include workshops and practical exercises:
Basic Seminar three days, Advanced Seminar two days.
For more information, please visit www.mobotix.com.
Default User
Name: admin
Password: meinsm

3/146
© MOBOTIX AG • Security-Vision-Systems • Made in Germany
www.mobotix.com • sales@mobotix.com
Contents
CONTENTS
Foreword 6
The MOBOTIX Concept 8
MOBOTIX Hemispheric Technology 10
Superior Storage Solution 12
Added Security Value 14
Cost Benets and Technical Advantages 16
1 INTRODUCTION 18
1.1 M24M Overview 18
1.2 M24M With Hemispheric Special L11 Lens 26
1.3 M24M: HiRes Allround Camera With Widest Range Of Lenses 32
1.4 General MOBOTIX Camera Functions 34
1.5 Lens Options, Hardware And Software Features 40
2 INSTALLATION 44
2.1 Preparing The Installation 44
2.1.1 Flexible Installation Using VarioFlex Mount 44
2.1.2 Mounting To A Ceiling Or Wall 46
2.1.3 Mounting Tips For The M24M With L11 Lens (180° Fisheye) 47
2.1.4 Optional: Mounting To A Pole (With Accessories) 49
2.1.5 Network Connection And Power Supply, UPS 50
2.1.6 Preparing The Camera Connections, Wall Outlets 51
2.1.7 Wiring, Fire Prevention, Lightning And Surge Protection 52
2.2 M24M-IT/Secure: Delivered Parts, Components, Dimensions 54
2.2.1 Delivered Parts And Camera Components 54
2.2.2 Camera Housing And Connectors 55
2.2.3 Dimensions (mm) For Wall Installation 58
2.2.4 Dimensions (mm) For Ceiling Installation 58
2.2.5 Dimensions (mm) Of Wall Mount 59
2.2.6 Drilling Template (mm) Wall And Ceiling Mount 59
2.3 Available M24M Accessories - Overview 60
2.4 Mounting The Camera With Wall Mount 64
2.4.1 Mounting Instructions 64
2.4.2 VarioFlex Wall Mount 64

4/146
© MOBOTIX AG • Security-Vision-Systems • Made in Germany
www.mobotix.com • sales@mobotix.com
M24M Camera Manual: Contents
2.4.3 Required Tools 66
2.4.4 Procedure 67
2.5 Mounting The Camera With Ceiling Mount 70
2.5.1 Mounting Instructions 70
2.5.2 VarioFlex Ceiling Mount 70
2.5.3 Required Tools 72
2.5.4 Procedure 73
2.6 Mounting The Camera With Pole Mount 76
2.6.1 Mounting Instructions 76
2.6.2 Pole Mount (MX-MH-SecureFlex-ESWS) 77
2.6.3 Procedure 79
2.7 Adjusting The Camera And Changing The Lens 82
2.7.1 Adjusting The Camera 82
2.7.2 Correcting The Image Horizon (For L11 Lens Only)
82
2.7.3 Changing The Lens 83
2.8 Replacing The MicroSD Card 84
2.8.1 Removing The MicroSD Card 84
2.8.2 Inserting The MicroSD Card 85
2.9 Network And Power Connection 86
2.9.1 Notes On Cable Lengths And Power Supply 86
2.9.2 PoE Variables 86
2.9.3 Power Supply Using A Switch 87
2.9.4 Power Supply When Connected Directly To A Computer 88
2.9.5 Power Supply (PoE IEEE 802.3af) Using Power Over Ethernet Products 88
2.9.6 Camera Startup Sequence 89
3 OPERATING THE CAMERA 90
3.1 Manual And Automatic Operation - Overview 90
3.1.1 Manually Using A Computer In The 10.x.x.x IP Address Range 91
3.1.2 Automatically Using MxControlCenter Or MxEasy 92
3.1.3 Automatically Using DHCP 93
3.2 First Images And The Most Important Settings 94
3.2.1 Manually Setting Up The Network Parameters In A Browser 94
3.2.2 First Images And The Most Important Settings In The Browser 96
3.2.3 First Images And Network Parameter Configuration In MxControlCenter 98
3.2.4 First Images And Network Parameter Configuration In MxEasy 103
3.2.5 Starting The Camera With An Automatic IP Address (DHCP) 108
3.2.6 Starting The Camera With The Factory IP Address 109

5/146
Contents
© MOBOTIX AG • Security-Vision-Systems • Made in Germany
www.mobotix.com • sales@mobotix.com
3.3 Virtual PTZ 110
3.4 Correction Of Lens Distortion (L22 Only) 112
3.5 Special Hemispheric Conguration In The Browser (L11 Only) 114
3.6 MicroSD Card Recording 120
3.6.1 Introduction 120
3.6.2 Formatting The Card 122
3.6.3 Activate Recording 123
3.6.4 Accessing Camera Data 124
3.6.5 Deactivating The Card Memory 124
3.6.6 Using A MicroSD Card In A Dierent MOBOTIX Camera 125
3.6.7 Limitations On Warranty When Using Flash Storage Devices 125
3.7 Full Image Storage 126
3.8 Conguration In The Browser 128
3.8.1 Overview 128
3.8.2 General Browser Settings 128
3.8.3 Additional Configuration Options 131
3.9 Additional Notes 132
3.9.1 Protecting The Camera Against Condensation 132
3.9.2 Password For The Administration Menu 133
3.9.3 Permanently Deactivating The Microphone 134
3.9.4 Starting The Camera With The Factory IP Address 134
3.9.5 Reset The Camera To Factory Settings 134
3.9.6 Activate Event Control And Motion Detection 134
3.9.7 Deactivate Text And Logo Options 135
3.9.8 Deactivating The Daily Automatic Camera Reboot 135
3.9.9 Browser 135
3.9.10 Cleaning The Camera And Lens 136
3.9.11 Safety Warnings 136
3.9.12 Additional Information 137
Notes and Copyright Information
The enclosed Camera Software Manual contains detailed information on the camera
software. Download the latest version of this manual and the MxEasy and MxControlCenter
manuals as PDF files from www.mobotix.com (Support > Manuals). All rights reserved.
MOBOTIX, MxControlCenter, MxEasy, ExtIO and CamIO are internationally protected
trademarks of MOBOTIX AG. Microsoft, Windows and Windows Server are registered
trademarks of Microsoft Corporation. Apple, the Apple logo, Macintosh, OSX and Bonjour
are trademarks of Apple Inc. Linux is a trademark of Linus Torvalds. All other brandnames
mentioned herein may be trademarks or registered trademarks of the respective owners.
Copyright © 1999-2009 , Langmeil, Germany. Information subject to change without notice!
More information:
www.mobotix.com
6/146
M24M Camera Manual: Foreword
© MOBOTIX AG • Security-Vision-Systems • Made in Germany
www.mobotix.com • sales@mobotix.com
FOREWORD
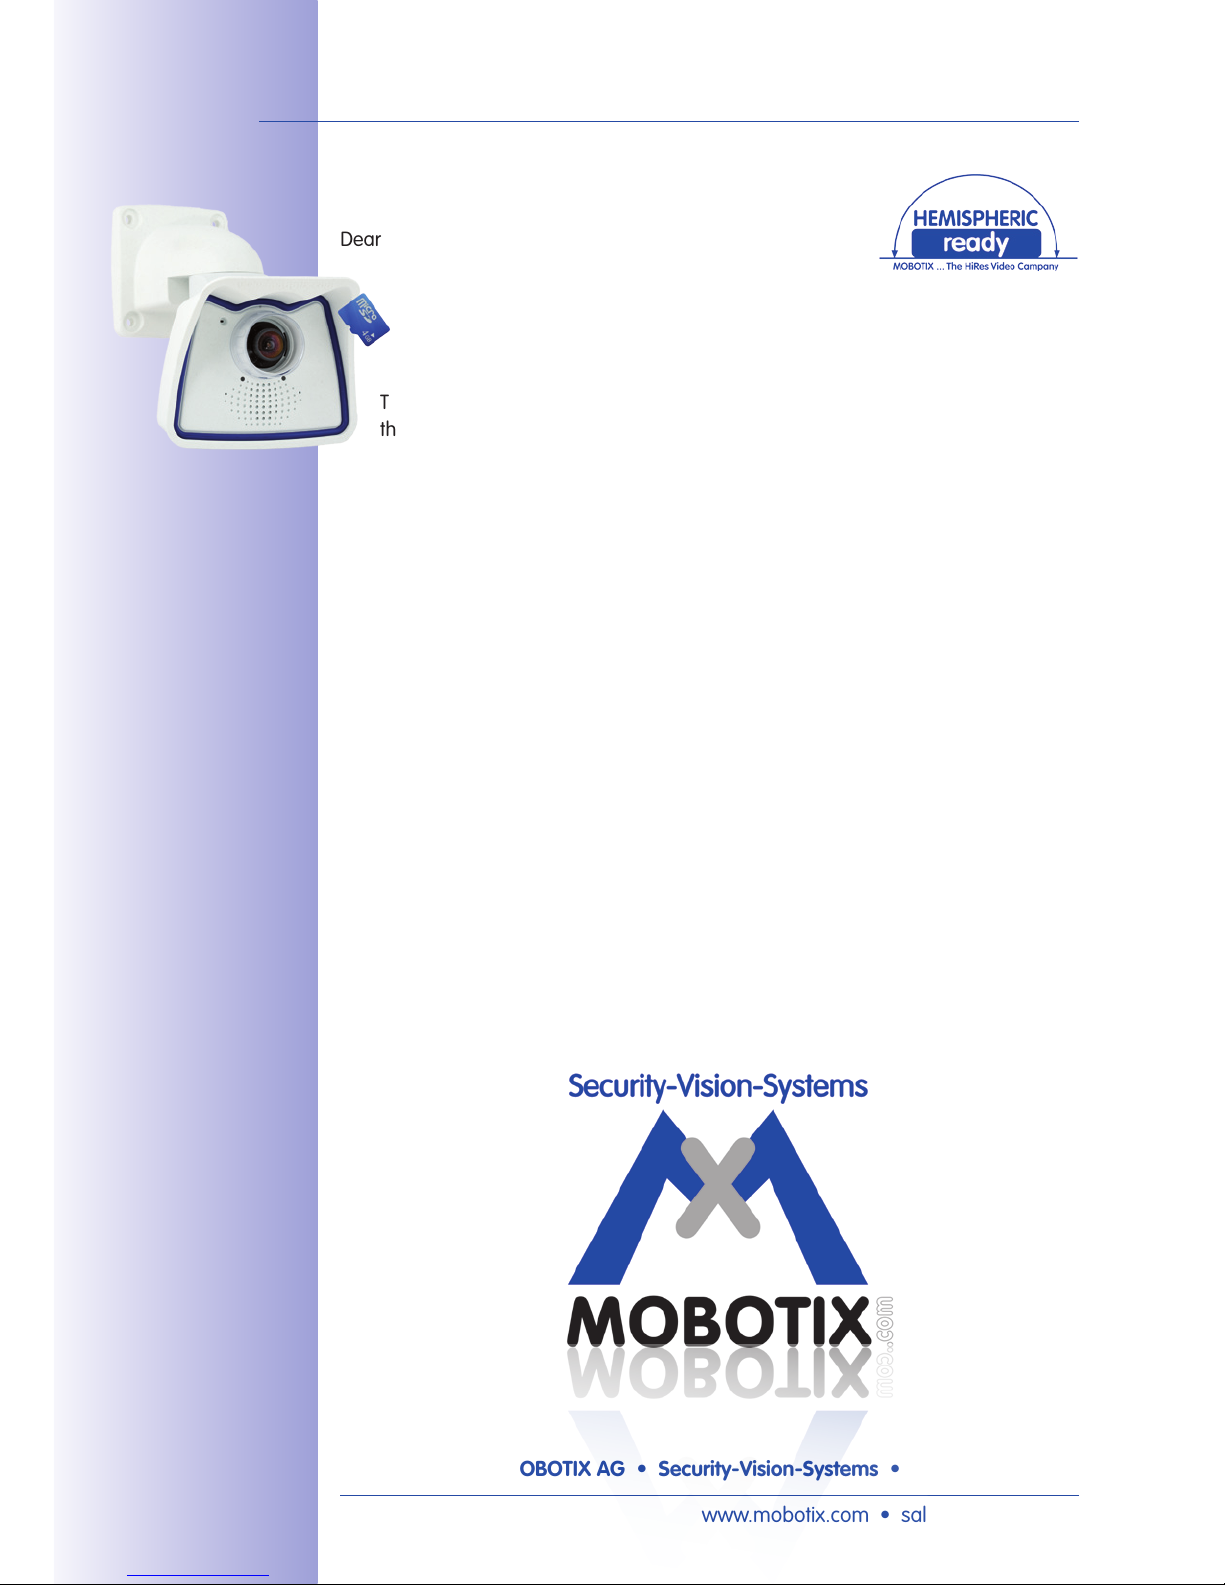
Dear MOBOTIX customer,
Congratulations on your decision to purchase an exceptionally versatile and innova-
tive premium network camera "Made in Germany." The M24M Allround Camera
features a 3.1 megapixel color sensor, an internal long-term memory with a
maximum capacity of 32GB and the latest technology platform from MOBOTIX.
This makes the M24M the first camera among the M models that can be fitted with
the MOBOTIX standard lenses (image angles from 15° to 90°), the hemispheric
L11 lens (image angle of 180°) for high-resolution panorama images and with com-
mercial CS-mount lenses.
This Camera Manual will give you an initial overview of the innovative MOBOTIX concept
that is at the core of this technology. This includes all the information you need to unpack
and install the camera (Chapter 2) and to view initial images on a PC (Chapter 3).
Please see the Software Camera Manual Part 2, included in the camera packaging, for
information on how to work with the many camera functions, such as event control or
image storage, for example.
If you would prefer to work with MxEasy or MxControlCenter instead of the browsercontrolled MOBOTIX camera software, you can download these programs for free including
a manual (PDF) from the MOBOTIX website:
www.mobotix.com/eng_US/Support/Software-Downloads
If you have any questions, our support and international sales sta are available at intl-
support@mobotix.com from Monday to Friday, 8 a.m. to 6 p.m. (German time).
Thank you for choosing MOBOTIX products and services, we trust you will be impressed
with the performance of your new M24M Allround Camera.
7/146
© MOBOTIX AG • Security-Vision-Systems • Made in Germany
www.mobotix.com • sales@mobotix.com
M24M - High-resolution
video surveillance
with optimal weather
protection (IP66)
MOBOTIX original
Double Panorama image
Original full image
High-Resolution Double Panorama
8/146
M24M Camera Manual: The MOBOTIX Concept
© MOBOTIX AG • Security-Vision-Systems • Made in Germany
www.mobotix.com • sales@mobotix.com
THE MOBOTIX CONCEPT
HiRes Video Innovations
The German company MOBOTIX AG is known as the leading pioneer in network camera
technology since its founding in 1999, and its decentralized concept has made high-
resolution video systems cost-ecient. Whether in embassies, airports, railway stations,
ports, gas stations, hotels, or on highways - over one hundred thousand MOBOTIX
video systems have been in operation on every continent for years.
Technology Leader Of Network Cameras
In a short time, MOBOTIX has gained the second place in Europe and the fourth place
worldwide in terms of market share. MOBOTIX has been producing megapixel cameras
exclusively for years and, in this area, ranks as the global market leader in high-resolution
video systems with a market share of over 60%.
Why High-Resolution Systems?
The higher the resolution, the more accurate the detail in the image. With the old analog
technology, a live image has no more than 0.4 megapixels, and a recorded image generally 0.1 megapixels (CIF). Yet, one MOBOTIX camera with 3.1 megapixels records around
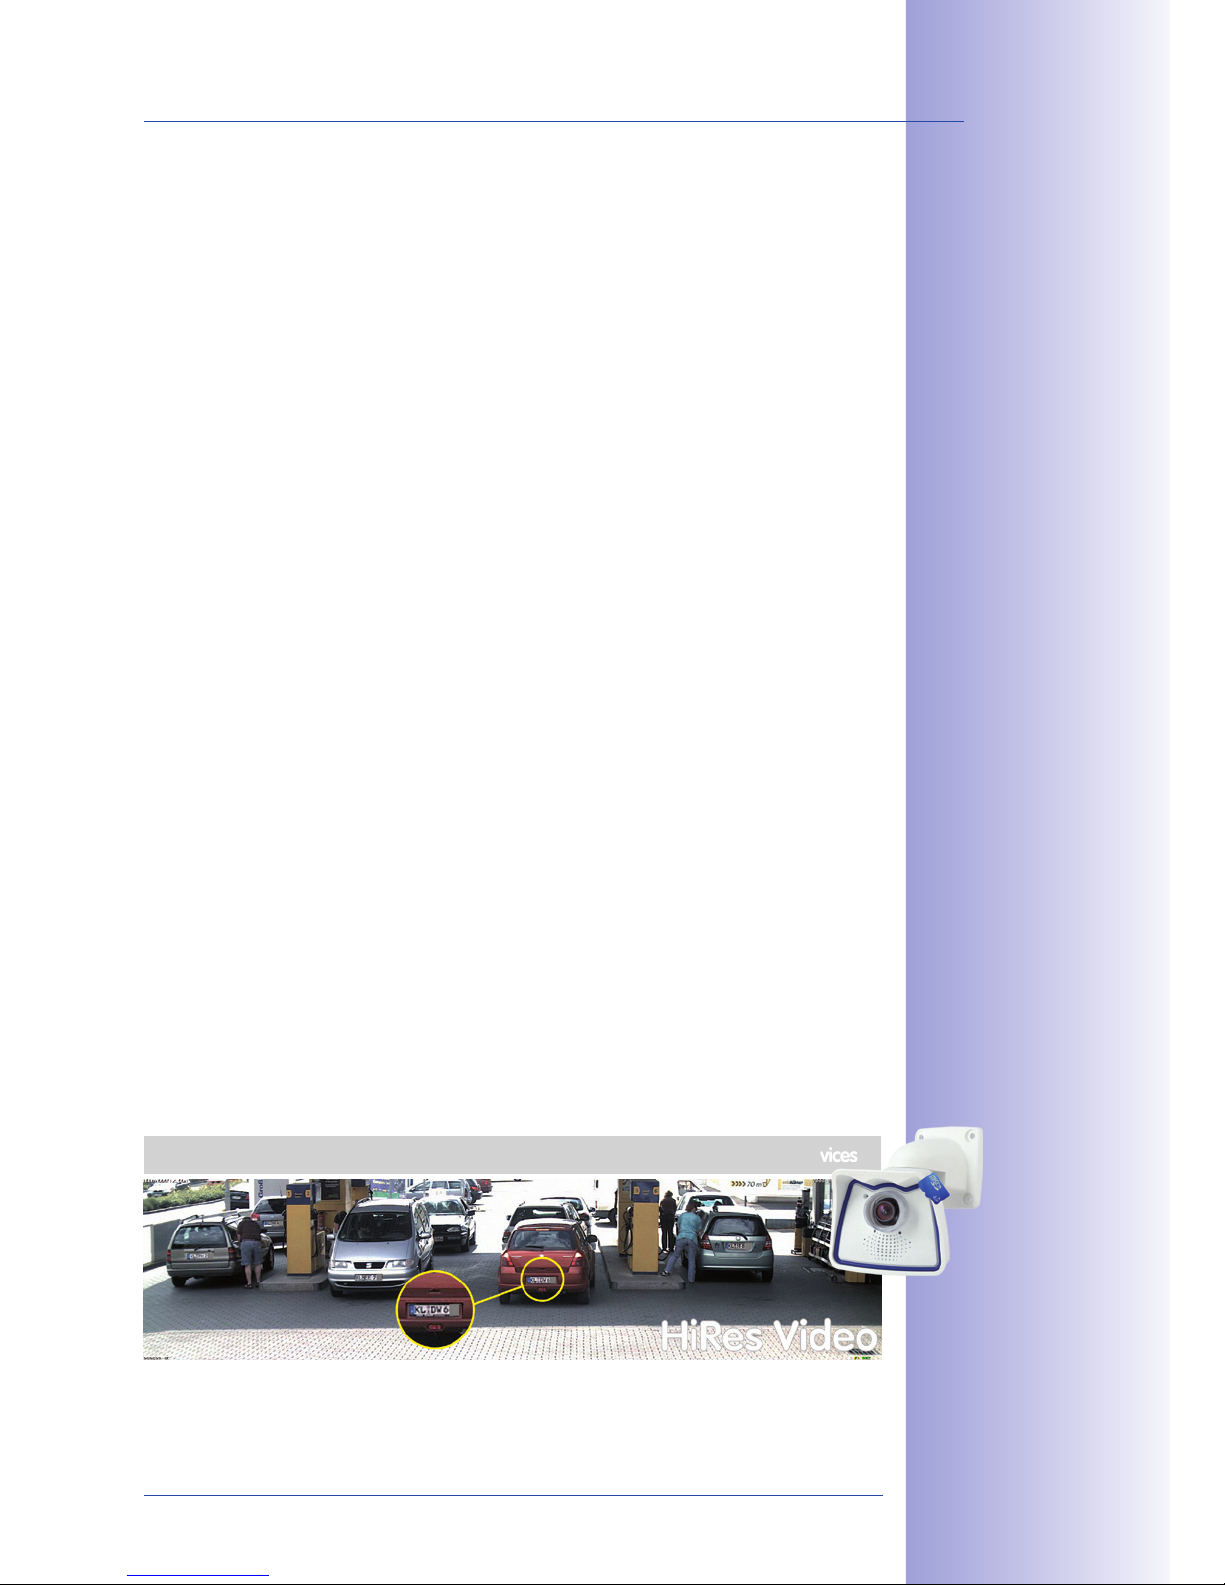
30 times more detail. This means that greater image areas, including 360° panoramas,
are possible, while still reducing the number of cameras, and thereby also the costs. For
example, four lanes of a gas station may be recorded with a single MOBOTIX camera,
instead of the four standard cameras normally necessary for such a task.
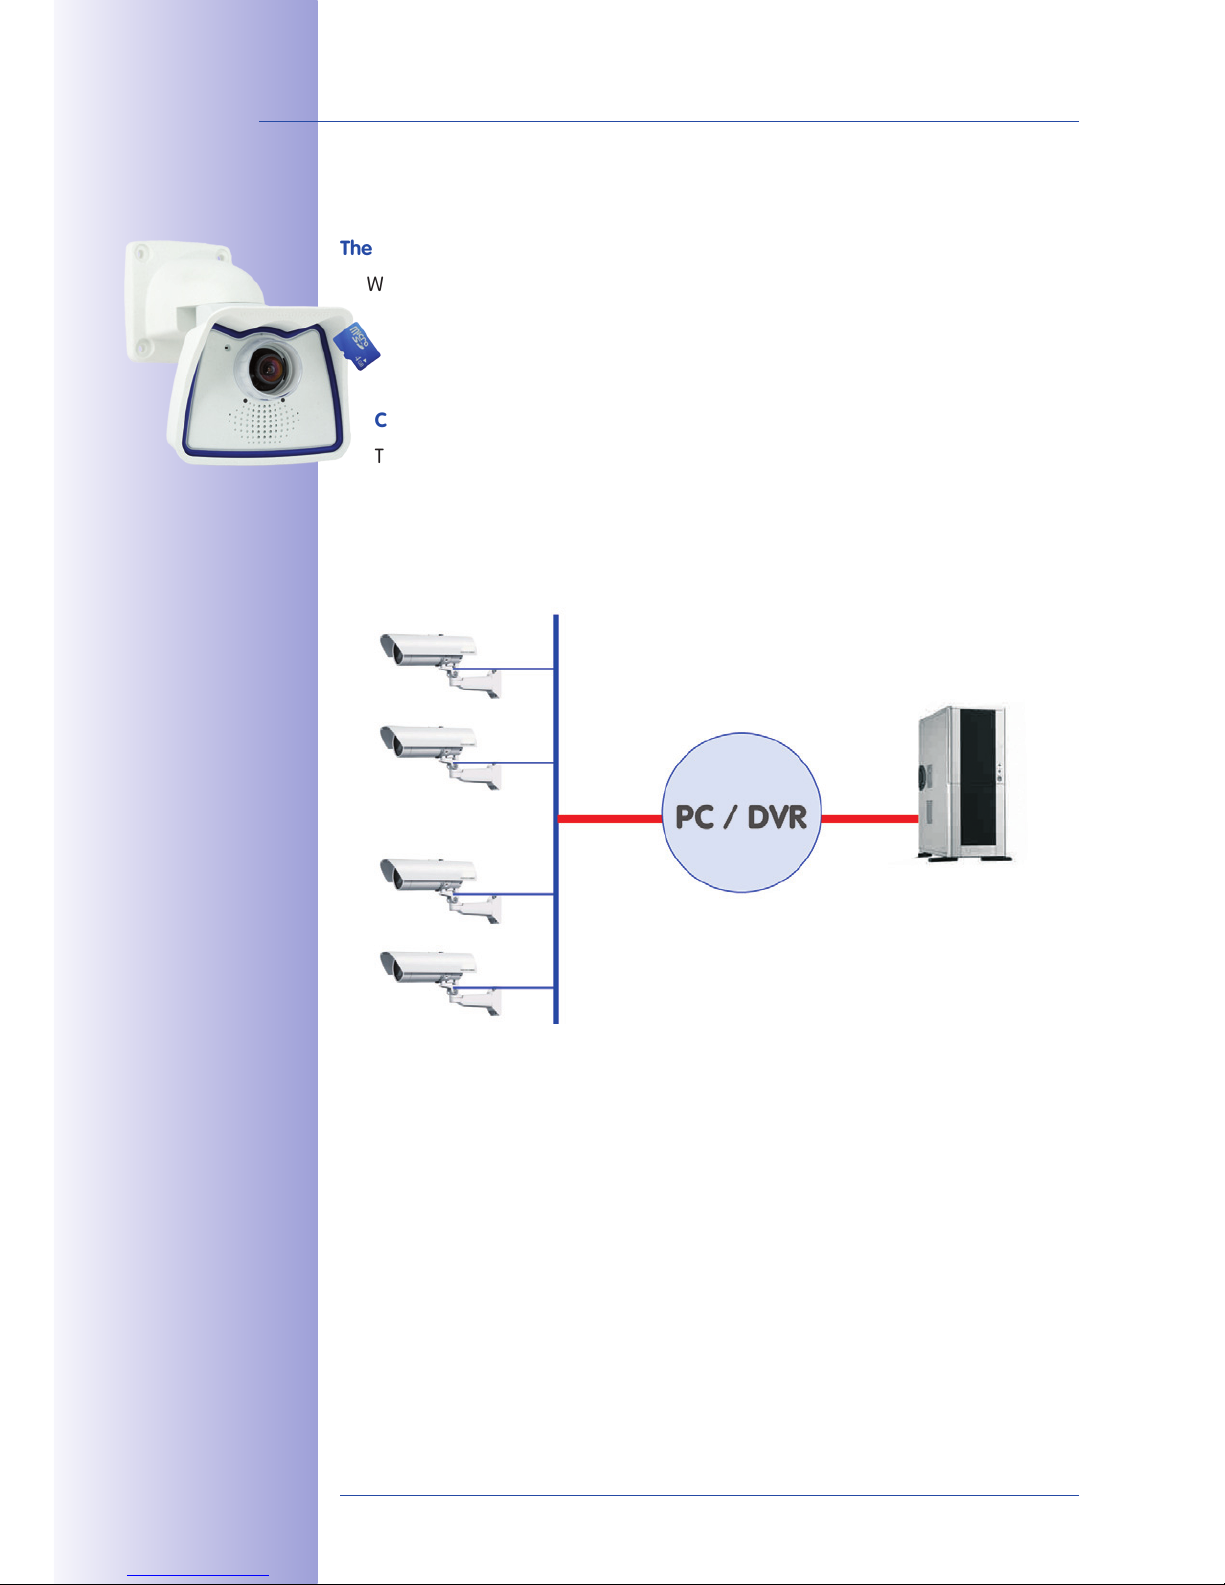
Disadvantages Of The Old Centralized Solution
Usually, cameras only supply images, while processing and recording take place later on a
central PC using video management software. This traditional centralized structure has many
limitations, since it requires highnetwork bandwidth and the PC processing power is insucient
when using several cameras. An HDTV MPEG-4 film already puts considerable strain on a PC,
how can it be expected to process dozens of high-resolution live
cameras?
Traditional centralized systems are therefore
less suitable and more
costly than high-resolution
systems due to the high
number of PCs required.
9/146
© MOBOTIX AG • Security-Vision-Systems • Made in Germany
www.mobotix.com • sales@mobotix.com
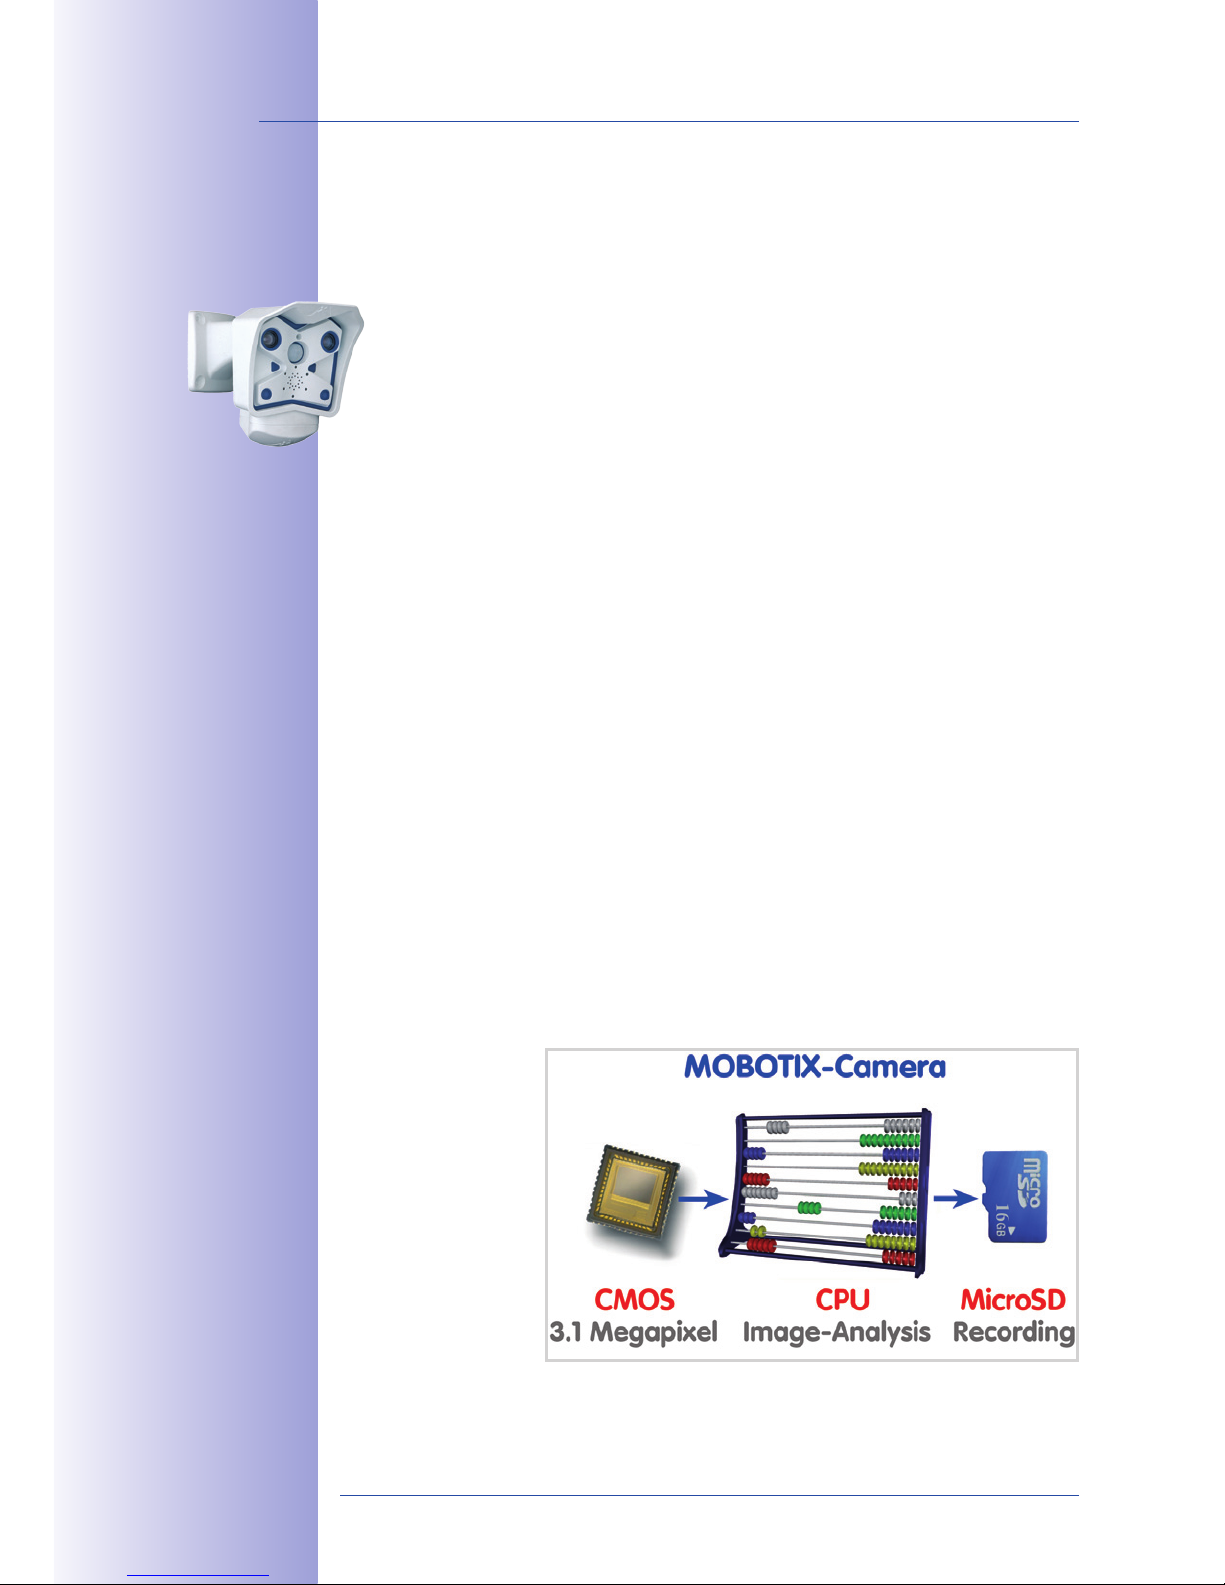
The Decentralized MOBOTIX Concept
Unlike other systems, with the decentralized MOBOTIX concept a high-speed computer
and, if requested, digital memory (MicroSD/SD card) is built into every camera for longterm recording. The PC now serves purely for viewing, not for analysis or recording. As a
result, MOBOTIX cameras can record in response to an event, even without the PC being
switched on, and digitally store the videos with sound.
The Benets
MOBOTIX video solutions therefore require significantly:
• fewer cameras due to the more accurate detail of panoramic images with megapixel technology,
•
fewer PCs/DVRs, because around 40 cameras can store high-resolution videos with
sound eciently on a single PC, or no PC at all when recording in the camera using
digital memory (USB, MicroSD/SD card),
• lower network bandwidth, because everything is processed in the camera itself
and the high-resolution images therefore do not have to be constantly transported
for analysis.
Robust And Low-Maintenance
MOBOTIX cameras have no mechanical motors for lenses or for movement. Without any
moving parts, they are therefore so robust that maintenance is reduced to a minimum.
The unique temperature range from -30°C to +60°C (-22°F to +140°F) is achieved without
heating or a fan at approximately 4 watts. Since no PC hard drive is necessary for recording, there are no parts that wear out in the entire video system.
Software Included - For Life
There are no software or licensing costs with MOBOTIX because the software is always
supplied with the camera for an unlimited number of cameras and users. The software
package supplied with the camera also includes professional control room software similar
to those used in soccer stadiums, for example. Updates are supplied free of charge on
the website. The system price for a weatherproof camera, including lens, query software,
and day-to-day recording on the MicroSD/SD card, is under 1,000 euro.
One Camera For Four Gas Station Lanes - Long-Term Recording Without Additional Devices
10/146
© MOBOTIX AG • Security-Vision-Systems • Made in Germany
www.mobotix.com • sales@mobotix.com
M24M Camera Manual: MOBOTIX Hemispheric Technology
MOBOTIX HEMISPHERIC TECHNOLOGY (M24M-SEC-D11)
Perfect Room Overview
An entire room can be eectively monitored with innovative MOBOTIX Hemispheric Technology.
For instance, one single hemispheric camera replaces the time-consuming and expen-
sive installation of several standard cameras. The first of its kind in the world, this
camera is evidence of the MOBOTIX commitment to innovation as the global leader
in megapixel video security systems.
High-Resolution 180° Panorama
When several cameras are monitoring a single room, it is dicult to understand the
room layout in its single view. This makes it hard to comprehend the overall setting. The
new panorama function of the M24M delivers a widescreen image of a high-resolution
180° allround view. High image quality is achieved through the use of a 3.1 megapixel
sensor and the new hemispheric lens.
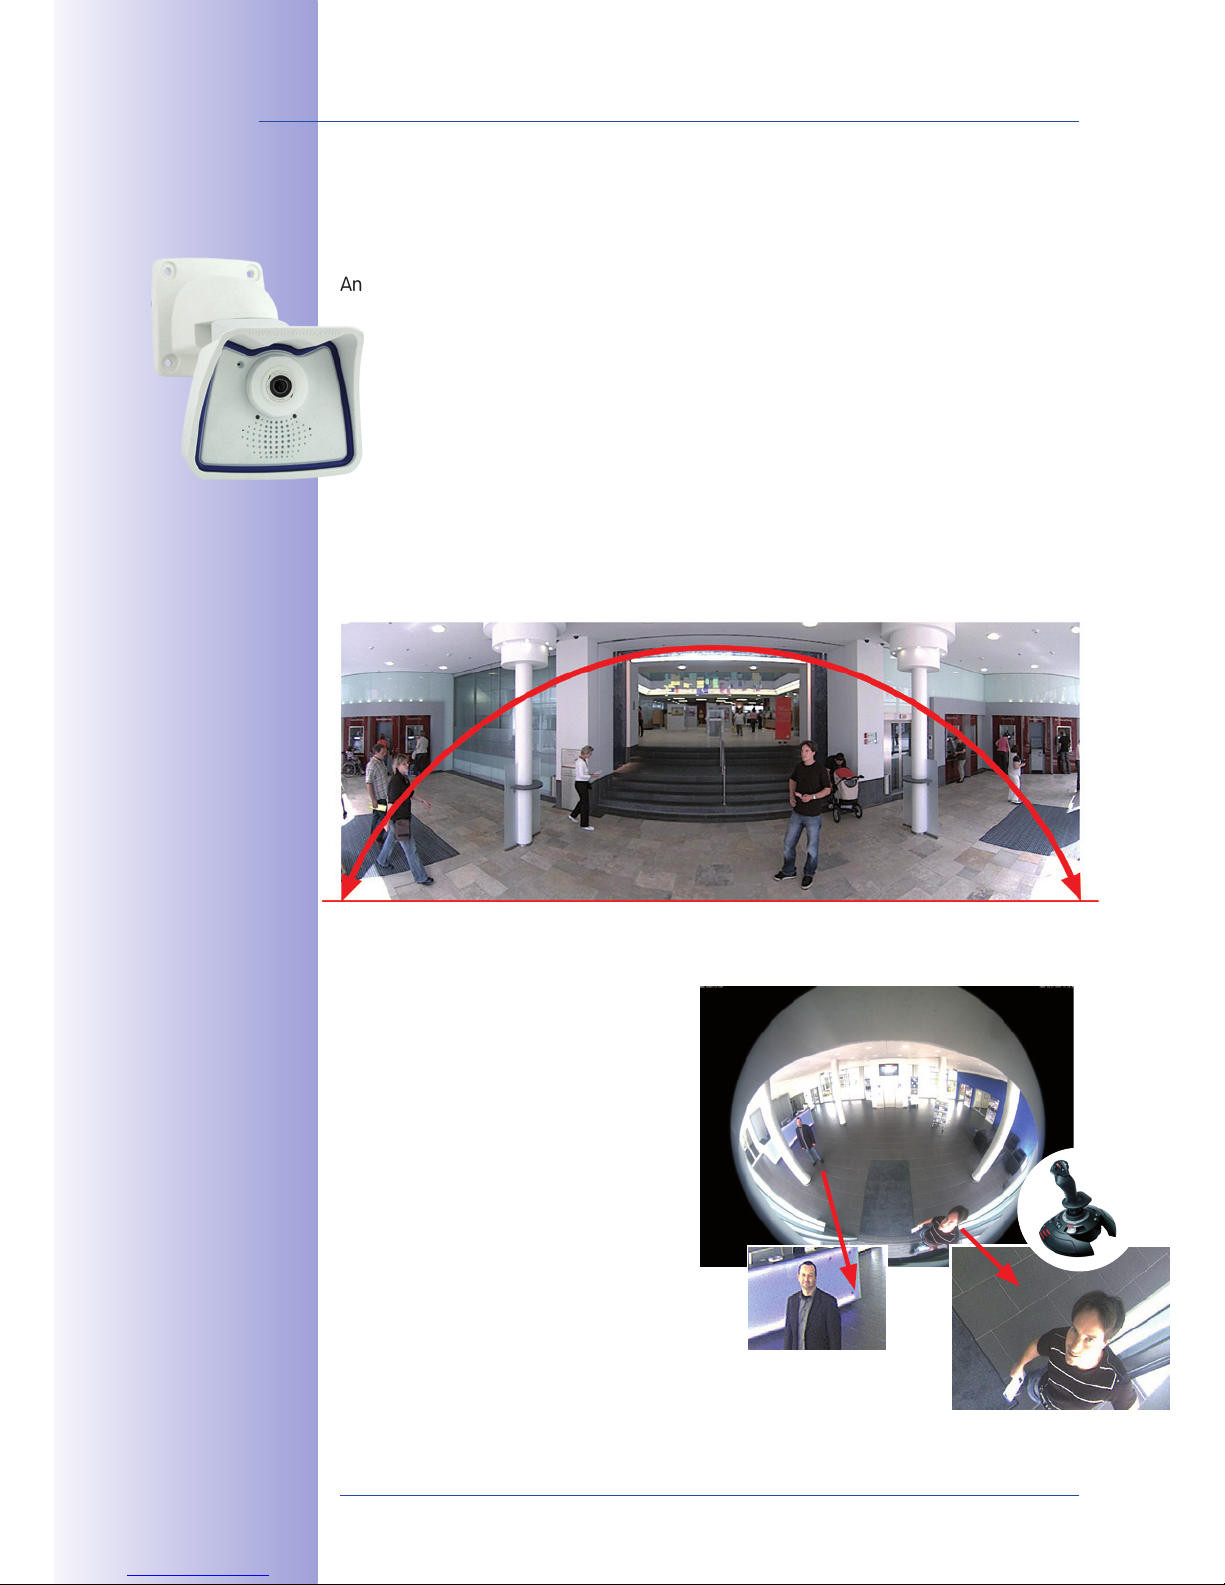
Virtual PTZ (vPTZ) - Without Motor
The M24M also zooms in on detail. The
image of the Hemispheric camera can be
continuously enlarged and any image section
examined using a joystick, for example.
Thus you have a mechanical PTZ-camera
without maintenance or wear and tear.
While zooming into a section in the live
image, a full image can be stored in the
recording for later analysis. No PTZ-camera
in the world that operates with a motor
can do that!
High-Resolution 180° Panorama
M24M with special
L11 lens and hemispheric technology
Original MOBOTIX
image; Wall-mounted at a
height of 2.3 m in a bank
vPTZ
vPTZ control, also
using a USB joystick
11/146
© MOBOTIX AG • Security-Vision-Systems • Made in Germany
www.mobotix.com • sales@mobotix.com
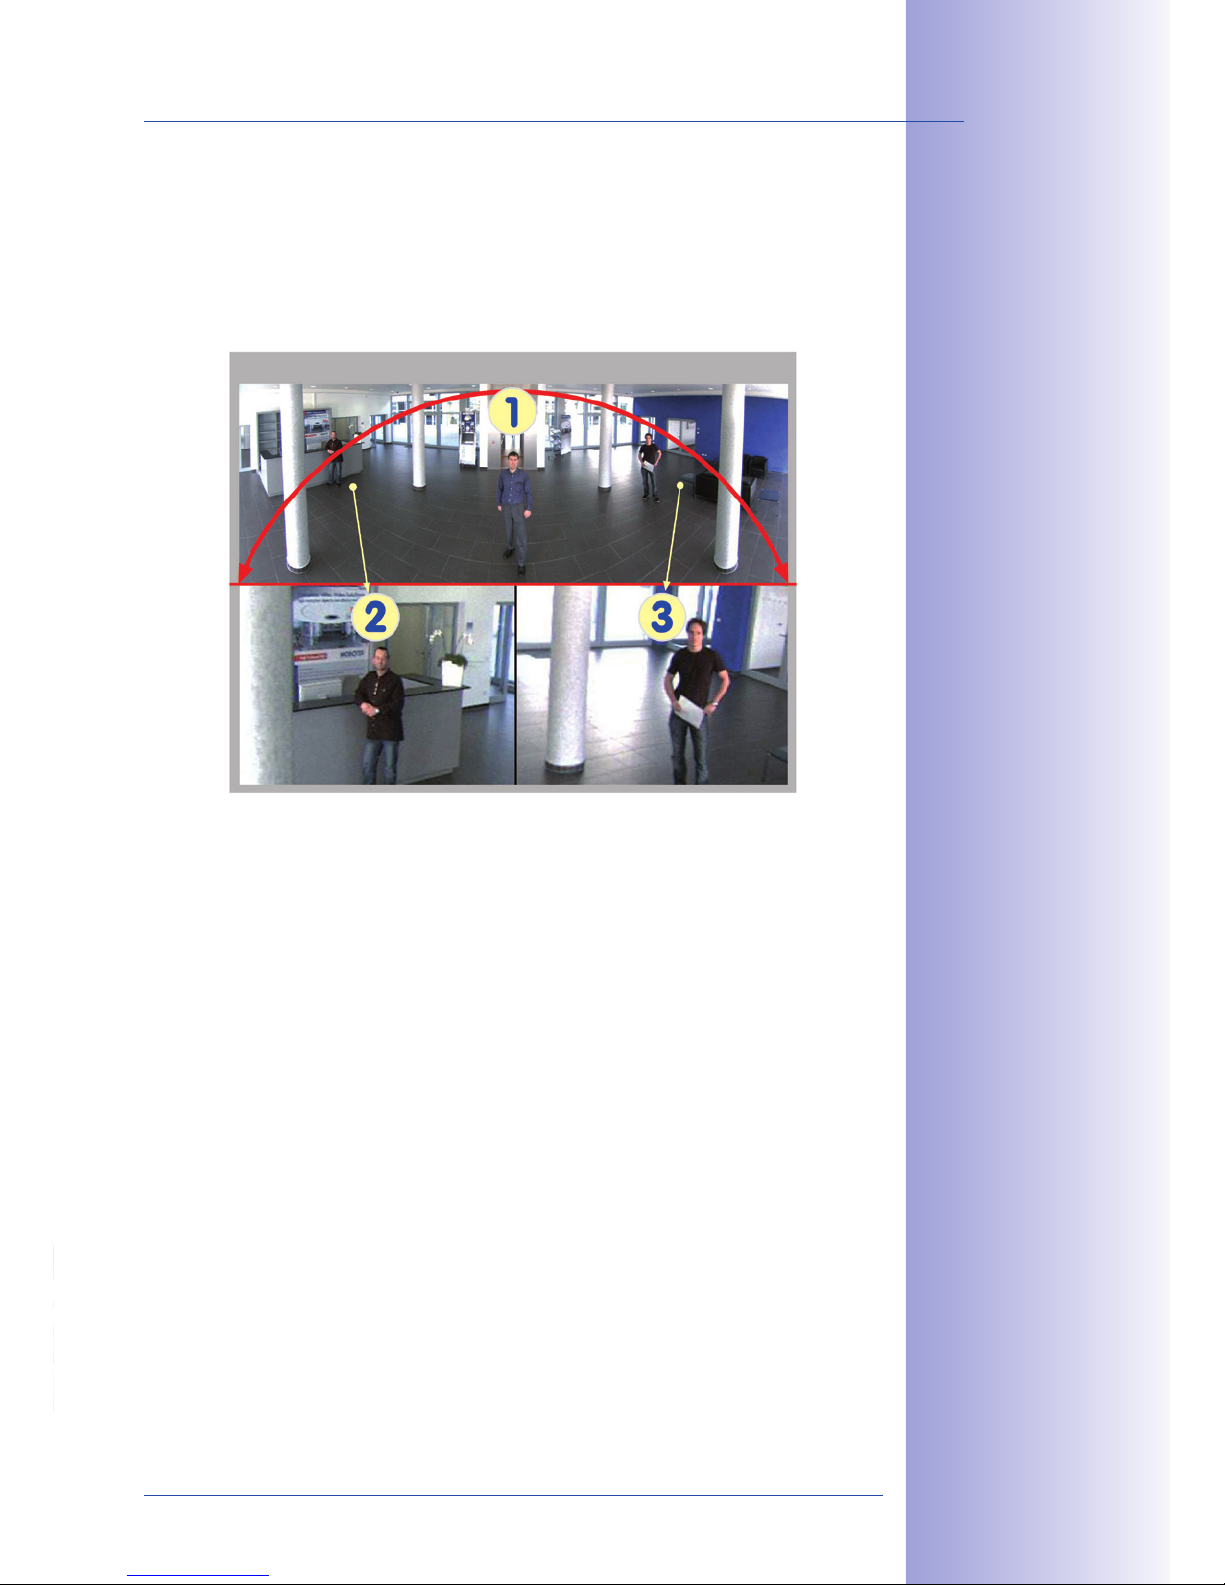
One Camera, More Views
The surround function of the M24M (ceiling mounted) immediately replaces four conventional cameras and shows four dierent directions simultaneously in quad view on a
monitor. Virtual PTZ is available for each of the four views. Together with the 180° panorama
the M24M can deliver two more views simultaneously, making it possible to see the
overview and to focus on two scenes at the same time (Display Mode “Panorama Focus“).
Highly User-Friendly
The full image from a hemispheric lens (Fisheye) is dicult to analyze. MOBOTIX solves this
problem by perfectly straightening the uneven lines in the live image using the camera
software. Since the image distortion correction of the hemispheric view and the generating
of the panoramic view take place in the camera itself, no additional load is placed on the
viewer PC, unlike a “standard” camera. Thus, displaying a large number of panoramic
cameras simultaneously on a single PC is possible.
Highly Ecient Image Transferring
While other camera systems always transfer the full images via the network for further
analysis, a MOBOTIX camera sends only the relevant image sections. Therefore, a Q24M
panorama image needs only about 1/6 of the original data volume or bandwidth. This
means up to six times more MOBOTIX cameras can transfer images over a network
compared to “standard” cameras.
Internal DVR With 32GB
The M24M stores high-resolution video with sound directly on the integrated Flash memory
without using an external recording device or PC, therefore using no additional network
load. Old recordings can be overwritten automatically or deleted after a predefined period.
The storage capacity is sucient for around 400,000 panorama images or 33 hours of
film (32 GB MicroSD).
Panorama Focus: One Camera, Three Views
High-Resolution 180° Panorama
Virtual PTZ 1 Virtual PTZ 2
Panorama Focus: Original
MOBOTIX image
12/146
M24M Camera Manual: Superior Storage Solution
© MOBOTIX AG • Security-Vision-Systems • Made in Germany
www.mobotix.com • sales@mobotix.com
SUPERIOR STORAGE SOLUTION
The Market Demands Better Image Quality
When it comes to future-proof video surveillance systems, it is not a matter of analog
or digital but whether it is high-resolution or not. It is important to note that only
HiRes video with decentralized network camera technology can be implemented
at a much lower cost than any other type of video surveillance system.
Central Storage As A Bottleneck
These days, video data is normally pre-processed and stored centrally on a PC or DVR
using video management software. Video and audio streams from all installed cameras
are directed to this central device. This system is comparable to a highway at rush hour:
the more cameras there are, the faster a data jam on the PC or DVR occurs. This means
that despite HiRes cameras, the data is generally not stored in high-resolution format.
MOBOTIX Stores HiRes Cost Eciently
MOBOTIX solves the PC storage bottleneck problem using a unique and yet amazingly
eective method - through the camera itself. High-resolution video with lip synchronized
sound is saved either remotely over the network or locally on flash memory devices (commercial SD or CF cards, USB memory).
Central PC is a bottleneck and a risk for the total system
Motion detection and prealarm buer are in the PC
(bottleneck)
Storage
NON-MOBOTIX System
13/146
© MOBOTIX AG • Security-Vision-Systems • Made in Germany
www.mobotix.com • sales@mobotix.com
Flash memory is a sophisticated form of semiconductor memory without mechanical
moving parts and represents the storage medium of the future thanks to its reliability,
ease of use and low cost.
MOBOTIX Saves To Flash
• No PC/network is required for continuous operations and there is no network load
• USB flash media can be connected directly to the camera (instead of internal SD/
MicroSD/CF card); no network is necessary
• Greater reliability (no hard drive)
• Ring buer: Old images can be overwritten automatically or automatically deleted
after a specified period of time
MOBOTIX Stores Data Reliably
The MOBOTIX Flash file system (MxFFS) prevents unauthorized persons from reading or
transferring the internally stored data, even if the card is stolen.
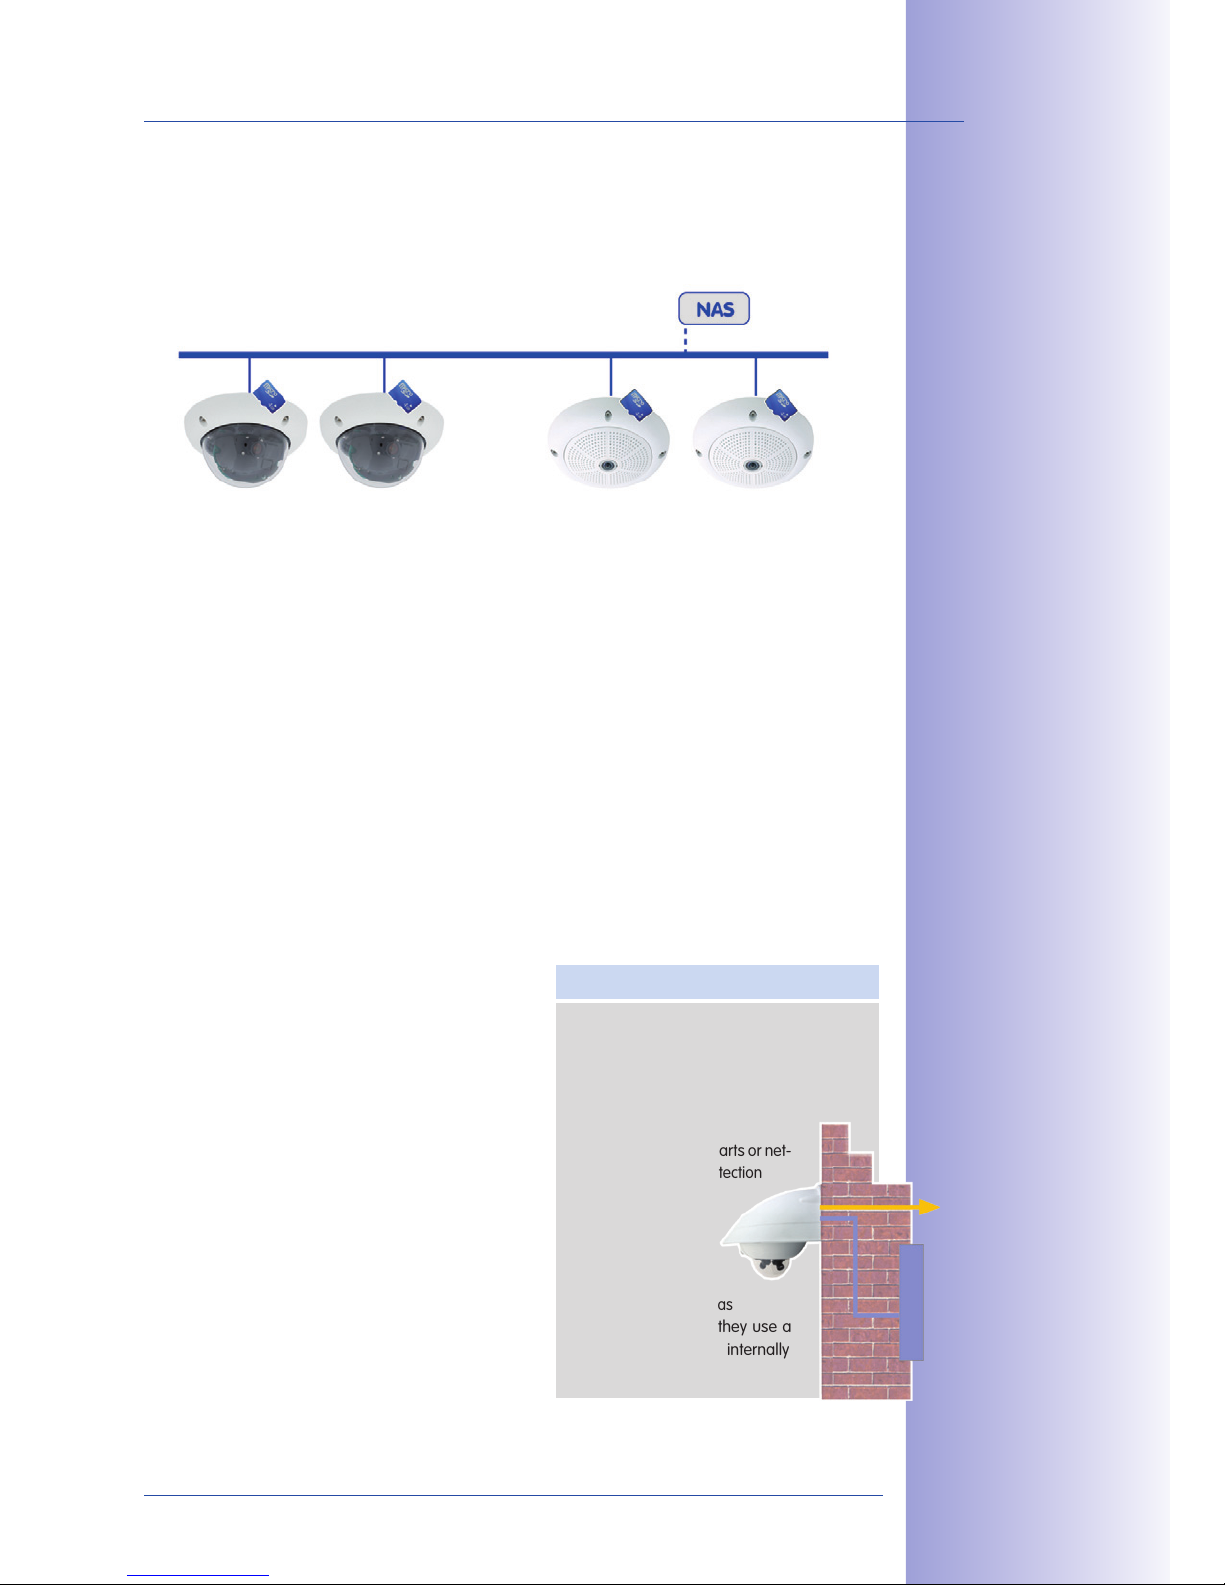
MOBOTIX Only Saves What Is Necessary
The MOBOTIX system includes three important
additional options that allow more data to be
stored for a longer time:
•
Only the relevant image sections are stored
instead of the entire image (for example,
sky or ceiling is removed)
•
Video recording only begins when relevant
events occur (such as movement in the image)
• Temporarily increased frame rate during
continuous recording of events
By connecting external memory over the network
(NAS), the system can be expanded without limitations, even while it is running.
MOBOTIX System
Network
Software and storage integrated in MOBOTIX cameras
• Inside the camera - one MicroSD card is
enough to record all day long, making central
data storage devices or PCs unnecessary
• In USB storage (connection via
USB cable) data storage without
mechanical moving parts or
net-
work load (greater protection
against data theft)
• A le server (NAS)
can store around ten
times more data from
MOBOTIX HiRes cameras
than usual because they use a
memoryorganization internally
MOBOTIX Data Storage
USB storage

14/146
M24M Camera Manual: Added Security Value
© MOBOTIX AG • Security-Vision-Systems • Made in Germany
www.mobotix.com • sales@mobotix.com
ADDED SECURITY VALUE
Robust, Low-Maintenance Technology
The real added value of MOBOTIX products is reflected in
characteristics such as enhanced functionality, long life
and robustness. In general, MOBOTIX cameras have no
moving parts. This makes the cameras very resistant to
wear and tear, and reduces both maintenance costs and
power consumption.
Alarm Management And Forwarding
Integrated sensors enable MOBOTIX cameras
to recognize when an event has occurred. If
desired, the cameras will respond immediately
with an alarm sound and will establish
a direct video and audio connection to a
control room.
Absolute Data Security
The security barriers that are built into the camera are extremely secure. The camera
images are only accessible to authorized persons and are encrypted via SSL when they
are transferred over the network.
Notication Of Failure
MOBOTIX cameras will automatically report any impairment or failure. This ensures maximum reliability and readiness for use.
Subsequent Searches
Events rarely confine themselves to just one spot. So even when you are looking at an
enlarged detail in live mode, it is always the full image that is recorded. And in this full
image, any section can always be enlarged later or whenever necessary.
Floor plan and
camera view in
MxControlCenter
(free control center
software from
MOBOTIX)
15/146
© MOBOTIX AG • Security-Vision-Systems • Made in Germany
www.mobotix.com • sales@mobotix.com
Sound Increases The Chance Of Detection
In the event of an alarm, MOBOTIX cameras can turn on their built-in microphones and
record lip-synchronous sound. They are therefore an even greater help in analyzing a
situation and easing clarification. In addition, the video system can be used for bidirectional
communication via a loudspeaker/microphone.
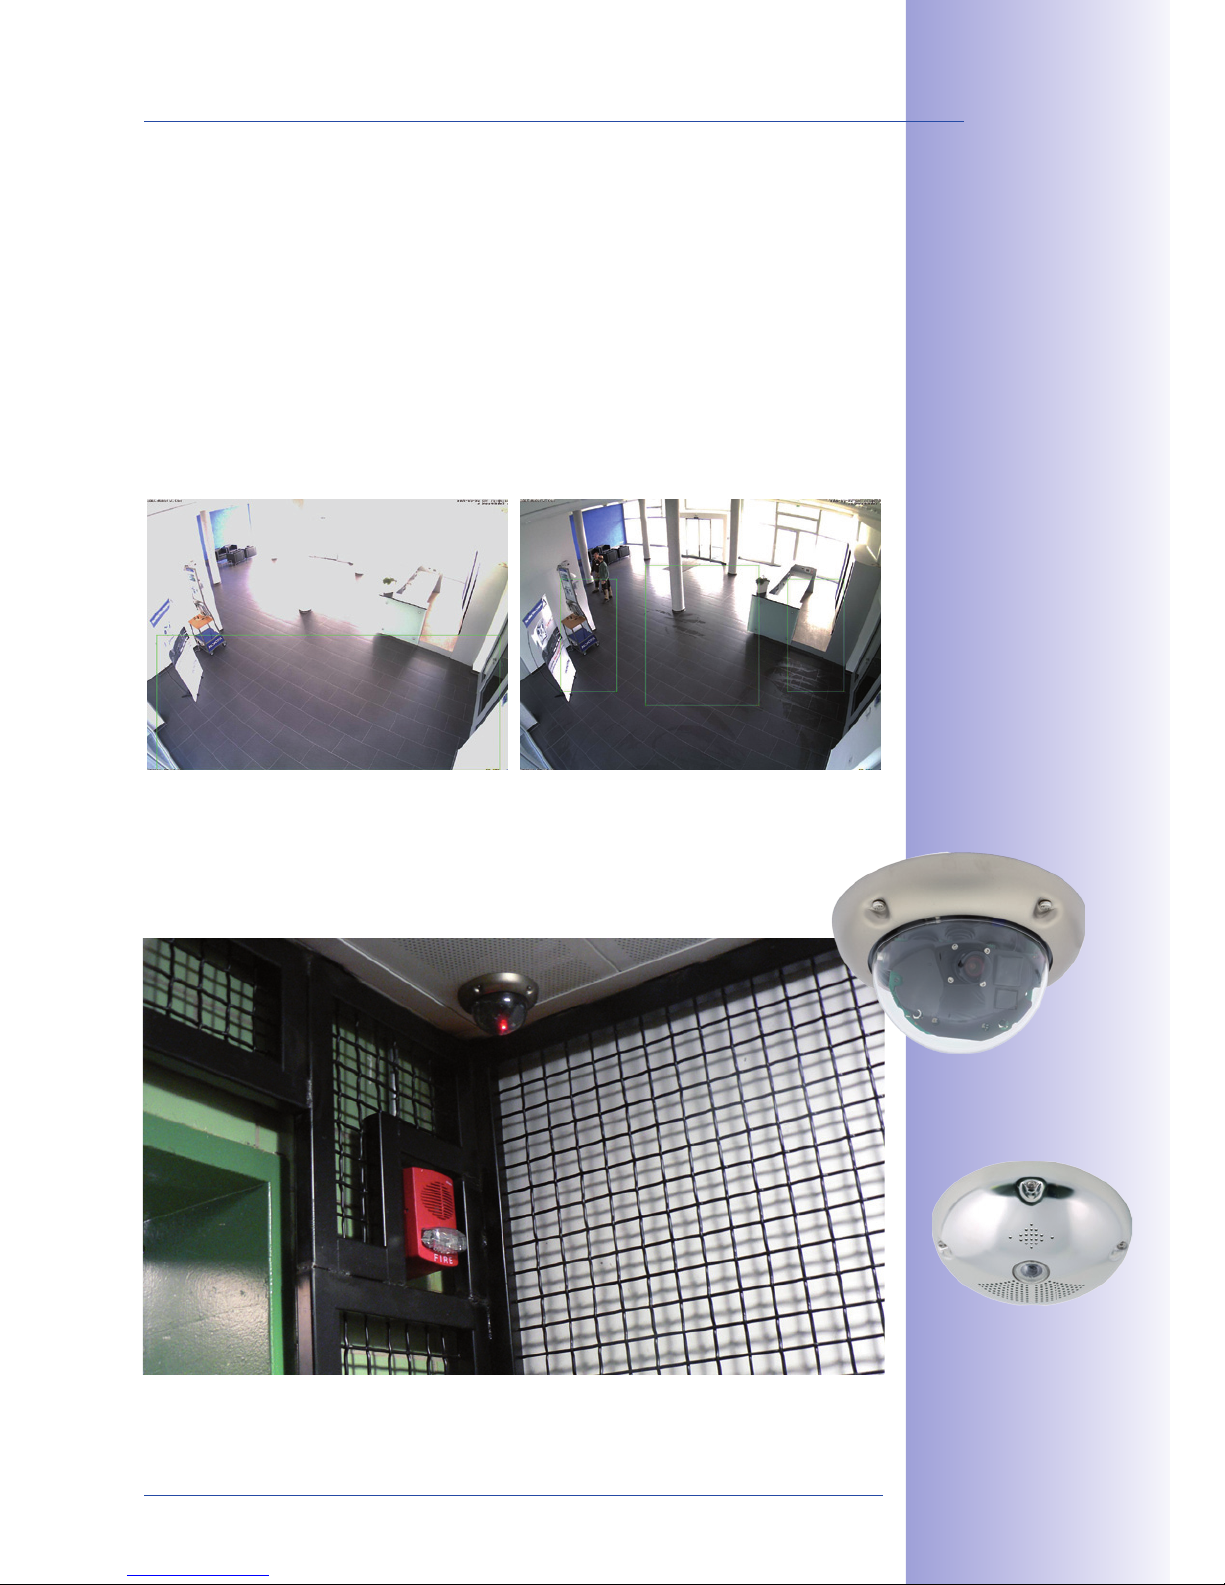
No Problems With Backlighting
MOBOTIX cameras are not adversely aected by the glare from direct sunlight. They
deliver meaningful, detailed images all the time because the camera software supports
easy programming of independent exposure windows to cope with specific situations.
This makes them ideal for rooms with large glass fronts.
Anti-Vandalism Dome Cameras
In critical environments or for outdoor use, it is often best to choose the optional
vandalism-protected MOBOTIX cameras. Their steel housing resists even the
hardest attacks, and the cameras will deliver a perfect image of the attackers.
Placing the exposure
window in the lower image
area (left image) delivers less optimum results
compared to moving
three individual exposure
windows up toward the
windows (right image)
D24M with Vandalism Set
Q24M with
Vandalism Set
16/146
M24M Camera Manual: Cost Benets and Technical Advantages
© MOBOTIX AG • Security-Vision-Systems • Made in Germany
www.mobotix.com • sales@mobotix.com
THE MOST IMPORTANT COST BENEFITS
Increased resolution reduces amount of cameras needed
1536-line, high-resolution sensors give a better overview and allow monitoring
an entire room with just one camera from the corner
Reduced installation costs at any distance
Standard Ethernet connection enables the use of use of common network
components such as fiber, copper and wireless (WLAN)
Intelligent recording technology reduces required storage
Decentralized recording technology in the camera software puts less strain on PCs
and reduces the amount of storage PCs (DVRs) by 10 times
Event-controlled image rate minimizes storage costs
Event-driven, automatically adjusted recording frame rate based on event or
sensor action reduces amount of data and storage costs
No additional power and no heating required
Anti-fogging without heating allows usage of standard PoE technology to power
the system via network and saves costs of power cabling
Backup power requirement reduced by 8 times
Low power consumption, approx. 4 watts, enables year-round (no heating
required) PoE with one centralized UPS from installation room via network
Robust and practically maintenance free
Fiberglass-reinforced composite housing with built-in cable protection and no
mechanical moving parts (no auto iris) guarantees longevity
No software and no licence costs
Control and recording software is integrated in the camera and is free of charge;
new functions are available via free software downloads
Unlimited scalability and high return of investment
While in use, more cameras and storage can be added at any time; image
format, frame rate & recording parameters can be camera specific
Additional functions and other extras included
Audio support, lens, wall mount and weatherproof housing [-30°C... +60°C
(-22°F... +140°F)] are included; microphone & speaker available in certain models
1
2
3
4
5
6
7
8
9
10
17/146
© MOBOTIX AG • Security-Vision-Systems • Made in Germany
www.mobotix.com • sales@mobotix.com
THE MOST IMPORTANT TECHNICAL ADVANTAGES
Progressive-scan instead of half-frame blur
Megapixel sensor and image processing inside camera with digital white
balance generates sharp and true color images at every scale
Sun and backlight compensation
CMOS-sensor without auto iris, digital contrast enhancement and configurable
exposure measurement zones guarantee optimal exposure control
Dual camera technology: 2-in-1
Two possible camera views with picture-in-picture technology or 180° panoramic
view; one Dual-Fixdome camera with 2.5 megapixel is enough
Long-term, high-performance Terabyte recording included
Event detection and ring buer recording by the camera itself allow
recording of 40 smooth video streams on a single PC (1200 VGA images/s)
Simultaneous recording, event search and live viewing
Live video for multiple users, recording and event search simultaneously
possible in seconds from anywhere in the world via network
Very low network load
Ecient MxPEG video codec, motion detection based recording and video
buering inside camera guarantee a very low network load
Bridging of recording during network failures
Internal camera ring buer bridges network failures and bandwidth
fluctuations of wireless links (WLAN/UMTS) for several minutes
Day & night maintenance free
Unique Day/Night camera technology without moving parts guarantees
extreme light sensitivity and ensures long-term reliability
Audio and SIP telephony
Lip-synchronized audio (live & recording); each camera is a video IP telephone
based on SIP standard with automatic alarm call and remote control
MxControlCenter included
Dual screen technology with building plans, free camera positioning,
event search, image processing, lens distortion correction and PTZ support
1
2
3
4
5
6
7
8
9
10
18/146
© MOBOTIX AG • Security-Vision-Systems • Made in Germany
www.mobotix.com • sales@mobotix.com
M24M Camera Manual: INTRODUCTION
1 INTRODUCTION
1.1 M24M Overview
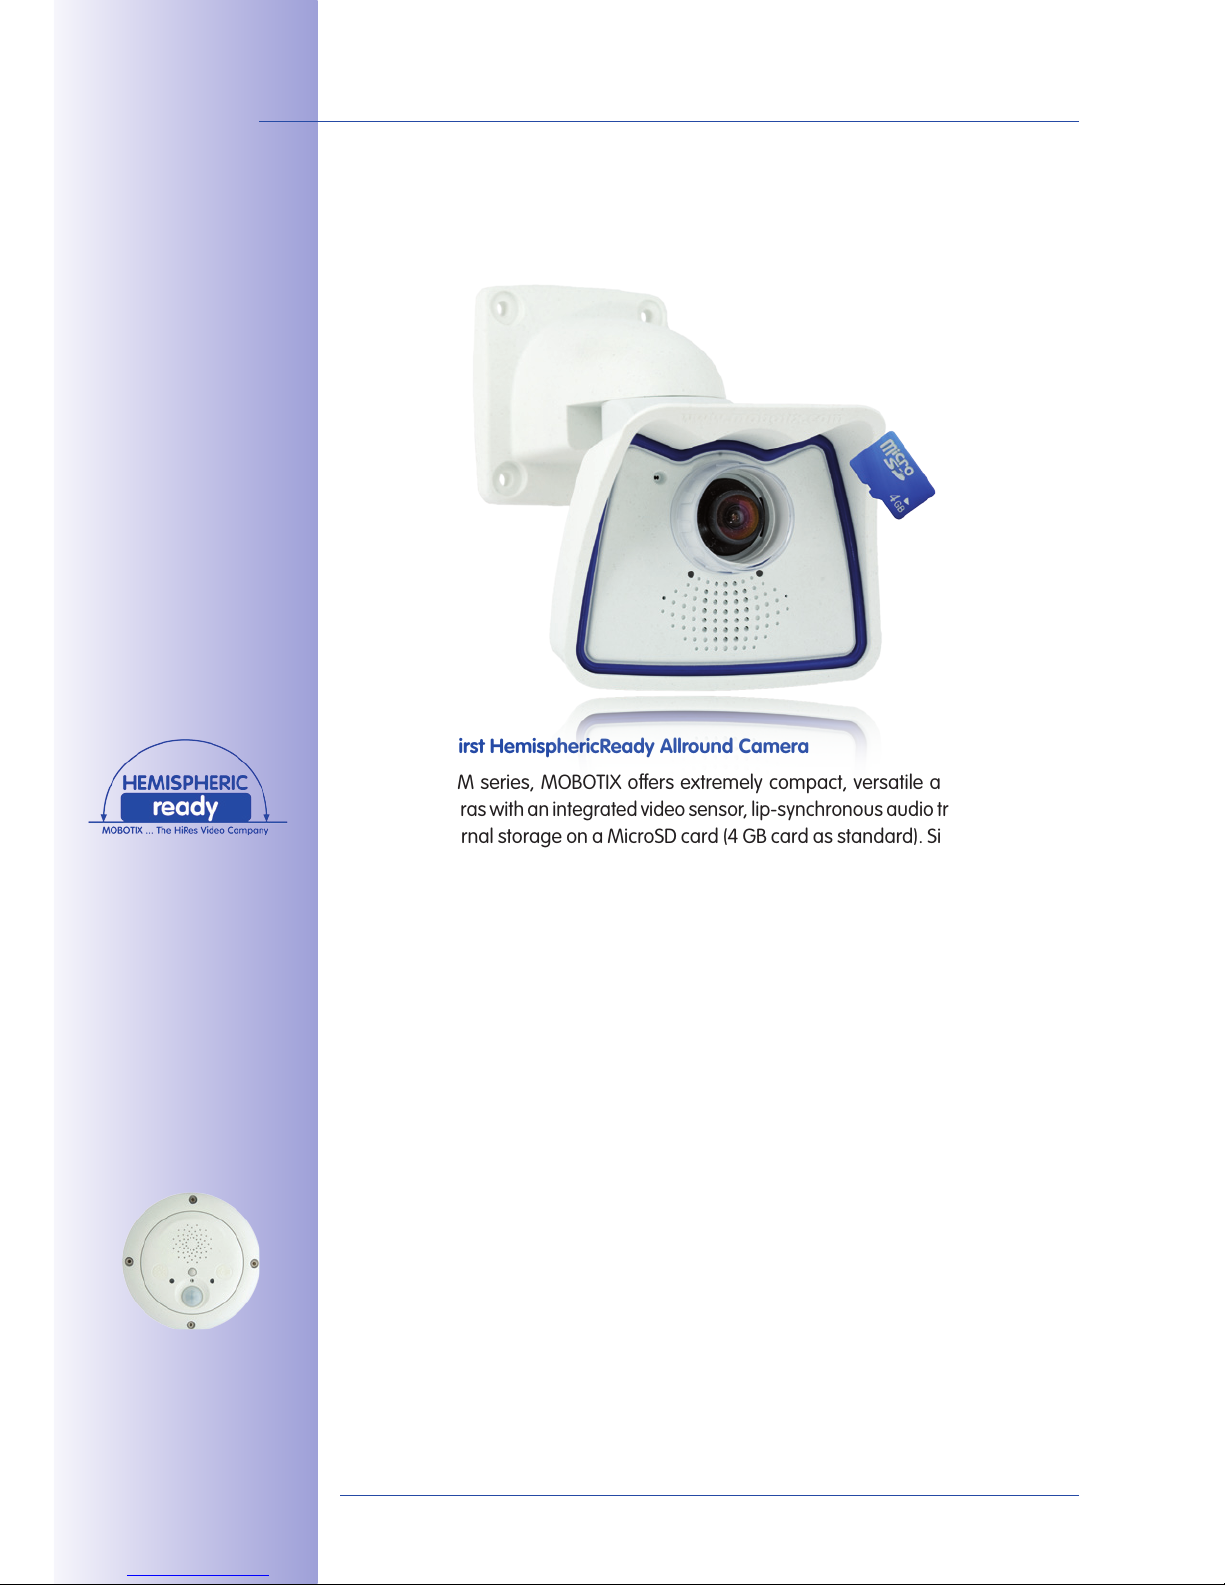
The World's First HemisphericReady Allround Camera
With the M24M series, MOBOTIX oers extremely compact, versatile and cost-eective
allround cameras with an integrated video sensor, lip-synchronous audio transmission and
long-term internal storage on a MicroSD card (4GB card as standard). Since the M24M is
equipped with the latest MOBOTIX technology platform, it is the first HempisphericReady
camera in the M series – capable of accepting the 11mm lens to give high-resolution
panoramic images.
High Frame Rates Of Up To 30fps
Like all other MOBOTIX cameras, the M24M models can generate live video streams with
high frame rates and up to 3.1 megapixels image resolution (QXGA with 2048x1536pixels).
Up to 30fps are generated at a megapixel resolution of 1280x960 pixels. Even at 3.1
megapixels, the camera will still generate up to 20fps!
A Master Of Adaptability
The M24M models are accompanied by an extensive range of easily replaceable and
interchangeable lenses and a robust lens protector made of scratchproof special-purpose
plastic or glass. Application-optimized options for installation on walls, ceilings and poles, for
supplying power, or expanding the functions of the camera are also available. Furthermore,
MOBOTIX customers can take advantage of MxEasy or the professional control center
software MxControlCenter free of charge and with an unlimited user and camera license.
If required, an M24M camera can even be upgraded to function as a powerful intercom
system by adding the MOBOTIX ExtIO module.
MOBOTIX ExtIO
(Function Extension)
19/146
M24M Overview
© MOBOTIX AG • Security-Vision-Systems • Made in Germany
www.mobotix.com • sales@mobotix.com
Robust And Practically Maintenance Free
Thanks to their low power consumption of 3watts and the total absence of mechanical
moving parts, M24M cameras feature the highest operating temperature range (-30°C
to +60°C, or -22°F to 140°F). Since MOBOTIX cameras neither fog up nor require heating,
power can be supplied via the network cabling according to
the PoE standard IEEE802.3af. M24M IT and Secure models
are completely dust-proof and resistant to water jets (IP66). The
M24M Wall and Ceiling Mount supplied as standard makes
the camera ideally suited for outdoor use and for installation over flush-mounted sockets so that the cabling remains
perfectly concealed.
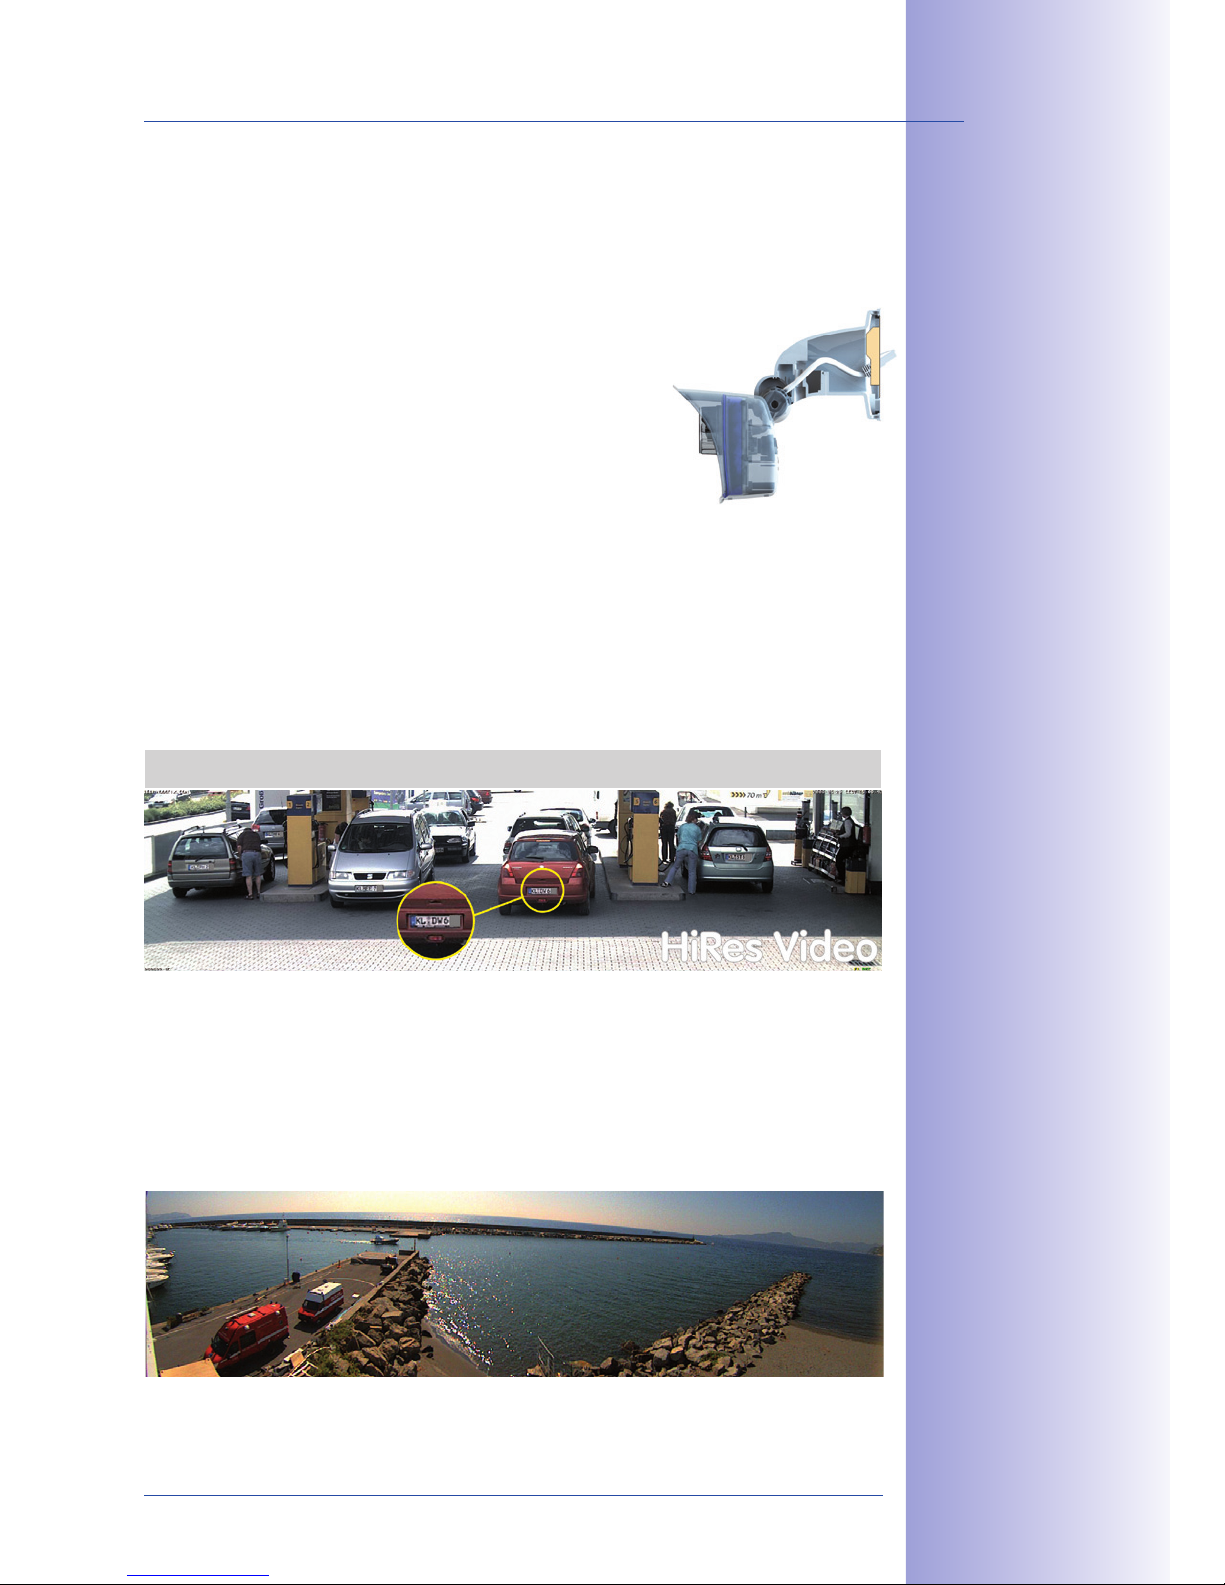
High-Resolution Sees More And Costs Less
One M24M camera equipped with a hemispheric or standard wide angle lens is usually
all that is required to monitor either an entire room or the four lanes of a gas station. The
high degree of image detail not only reduces the number of required cameras, but also
minimizes system costs by reducing the wiring complexity, emergency power requirements
and number of recording devices required. All M24M cameras feature direct recording to
integrated MicroSD cards or external USB drives and can therefore be used in standalone
operation with no additional network load.
One Camera For Four Gas Station Lanes – Long-Term Recording Without Additional Devices
Universal Application From The Vacation Home To The Airport
MOBOTIX M24M cameras are suitable for use in large-scale facilities, such as airports,
given their unlimited scalability and high performance. However, they are equally suitable
for use in small commercial or private buildings thanks to their integrated event, storage,
alarm and telephony functions. In addition, MOBOTIX recommends the M24M in combination with a hemispheric L11 lens as a superb, inspiring panorama webcam.
VarioFlex wall mount
with concealed cabling
completely covers
ush-mounted sockets
MOBOTIX original
180° Panorama
image (L11 lens)
20/146
M24M Camera Manual: INTRODUCTION
© MOBOTIX AG • Security-Vision-Systems • Made in Germany
www.mobotix.com • sales@mobotix.com
The Right Lens For Every Application
No MOBOTIX camera has ever had so many lens options! All five MOBOTIX standard
lenses, from the 15° Tele right through to the 90° Super Wide Angle, are oered with
the M24M.
Furthermore, the M24M is the first HemisphericReady camera from the M series and can
also be equipped with the hemispheric L11 lens (image angle of 180°).
The M24M-Sec-CSVario is an M24M model that is shipped with a CS mount and a
compact L24-L54 1/2" Vario lens. To protect the lens against the weather, this model
comes with a longer lens cover with an integrated glass pane which includes threads for
an external filter. This cover is suitable for lenses with a maximum diameter of 36mm
and a maximum length of 43mm. Because of the image sensor's size of 1/2", CS and C
mount lenses for 1/2" sensors or larger that are designed for megapixel image sensors
can be used. In comparison with MOBOTIX fixed lenses, Vario lenses are less robust and
less reliable in the long run. For this reason, Vario lenses are typically used in applications
where recording conditions change frequently, for example, intermittent surveillance of
construction sites.
MOBOTIX original 90°
Super Wide Angle image
MOBOTIX original
180° Panorama
image (L11 lens)
21/146
M24M Overview
© MOBOTIX AG • Security-Vision-Systems • Made in Germany
www.mobotix.com • sales@mobotix.com
You can change all M24M lenses on site whenever necessary (except the hemispheric
L11 lens). Each lens is secured by a lock ring. The ordered lens is factory-aligned and
quality-tested in the camera, which makes on-site camera focusing unnecessary in most
cases. Each M24M is available for delivery with a lens of your choosing or no lens at all.
The image area captured by the camera varies depending on the selected lens (see
Section 1.5). With a Super Wide Angle lens (L22 with 90°), for example, almost an entire
room can be recorded from just one corner. A L135 Tele lens enables an M24M with a
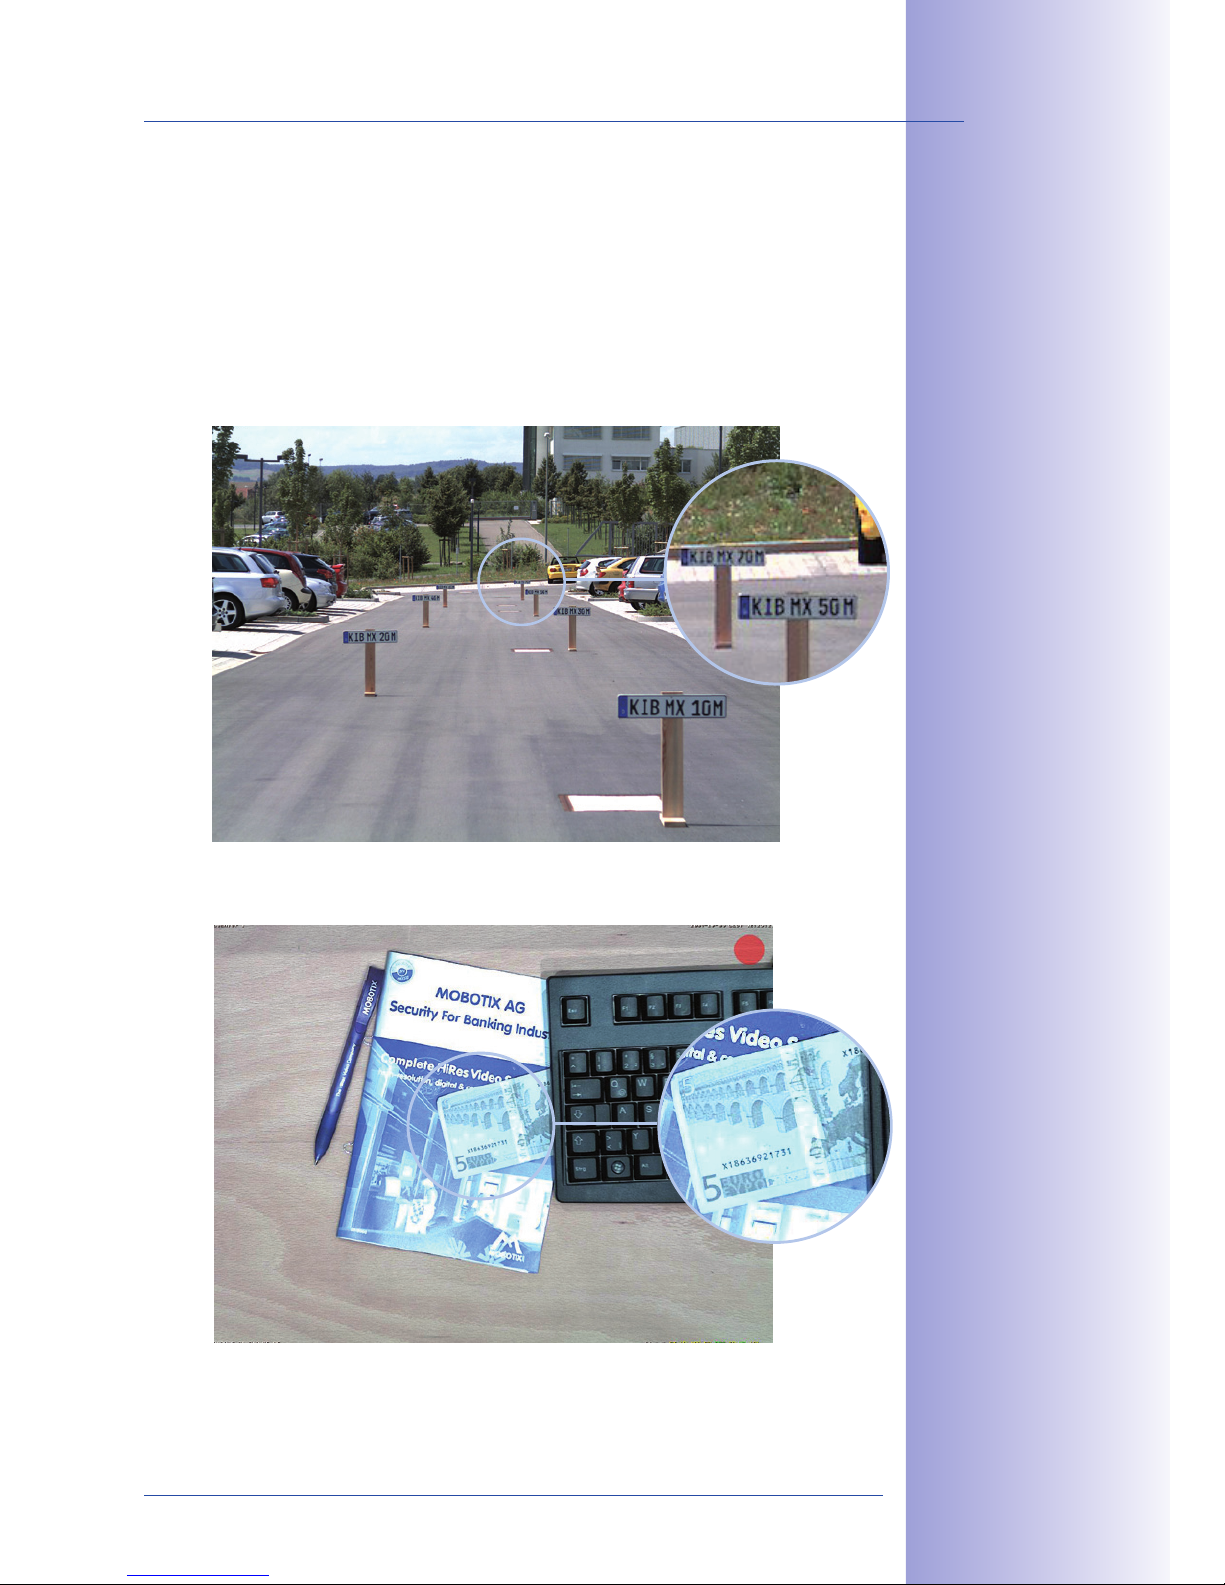
high-resolution 3.1 megapixel sensor to clearly record a license plate number, for example, from a distance of approximately 75meters.
Or even the serial number of a bill from a distance of two meters.
With an M24M equipped
with an L11 or L22
lens, the distorted
image can be corrected
by the software
MOBOTIX original
image (L135 Tele lens)
MOBOTIX original
image (L135 Tele lens)
22/146
M24M Camera Manual: INTRODUCTION
© MOBOTIX AG • Security-Vision-Systems • Made in Germany
www.mobotix.com • sales@mobotix.com
Virtual PTZ (vPTZ) – Panning, Tilting, And Zooming With No Motor
The M24M can also zoom in on detail as well. This vPTZ function (virtual Pan, Tilt, Zoom)
is a standard feature in the integrated M24M camera software. The image from the
hemispheric camera can be enlarged using, for example, the mouse wheel, a joystick
or a software-controlled PTZ panel and you can "move" the view to any section
of the image. This provides the features of a mechanical PTZ camera without
the disadvantages of maintenance and wear.
vPTZvPTZ
Quick and easy
navigation with a
USB joystick
23/146
M24M Overview
© MOBOTIX AG • Security-Vision-Systems • Made in Germany
www.mobotix.com • sales@mobotix.com
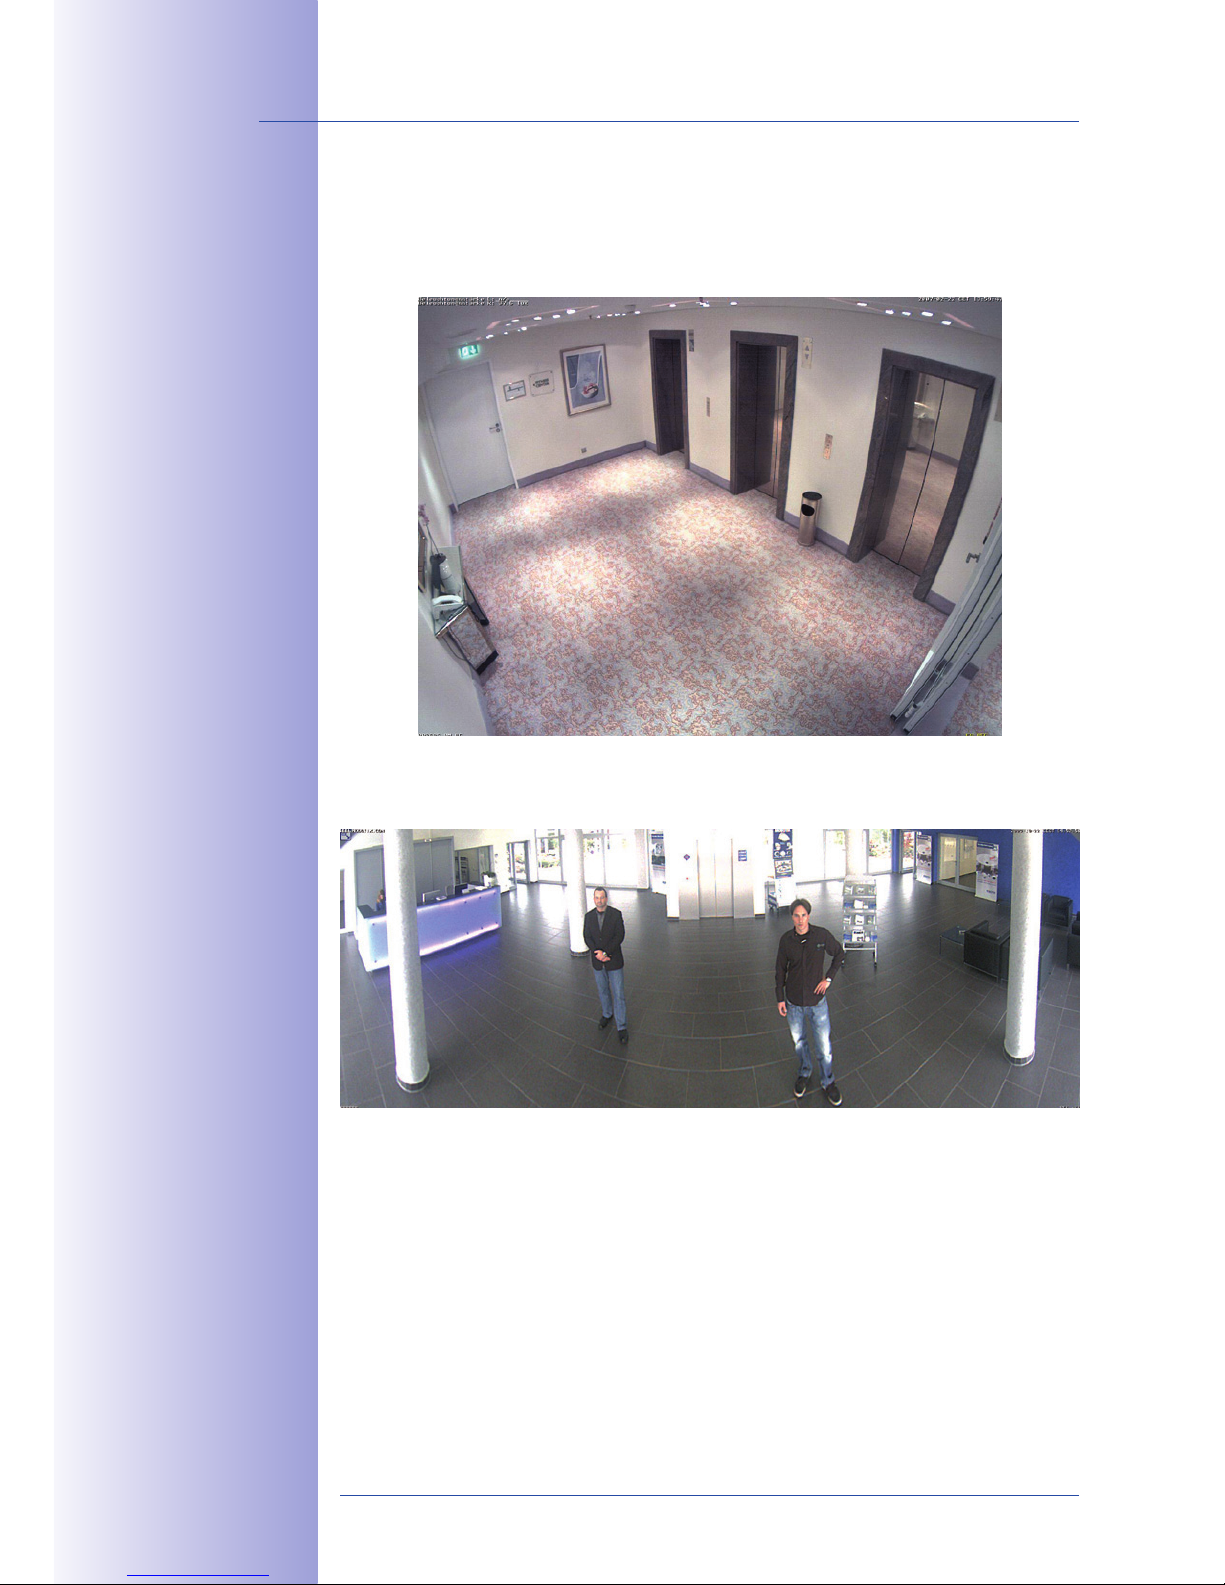
Simultaneous Zoomed Live Image And Full Image Recording
All conventional, motorized PTZ cameras only store the image that is currently viewed as
the live image (live image recording). This has one serious disadvantage as the recording can only show what has happened in the "visible" portion of the image; the rest is
lost and cannot be examined later on. For this reason, MOBOTIX has added the new full
image recording feature to the M24M. This will not store the currently viewed image that
reflects the pan/tilt position and the zoom setting chosen by the user, but the full sensor
image – without vPTZ settings. When examining the recorded images at a later date, the
vPTZ features again come into play, as they allow the visible image to be zoomed and
use the pan/tilt features to examine every corner of the recorded full image.
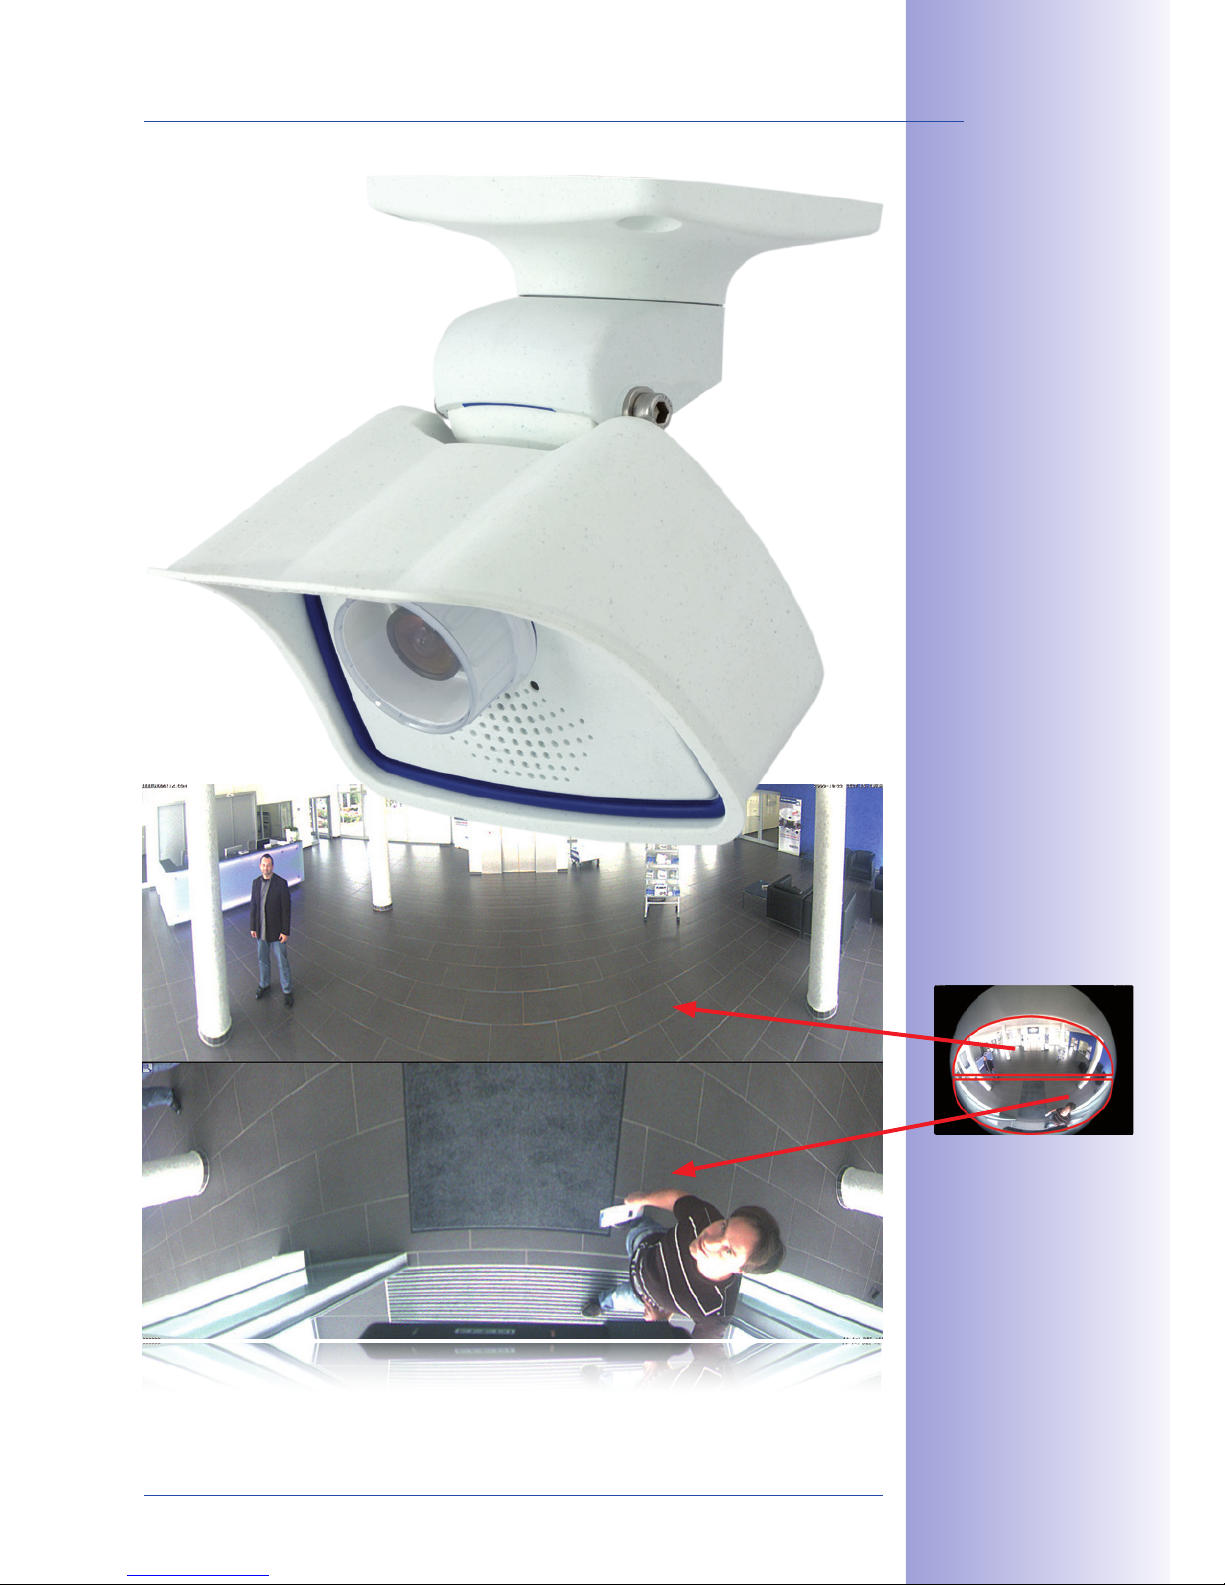
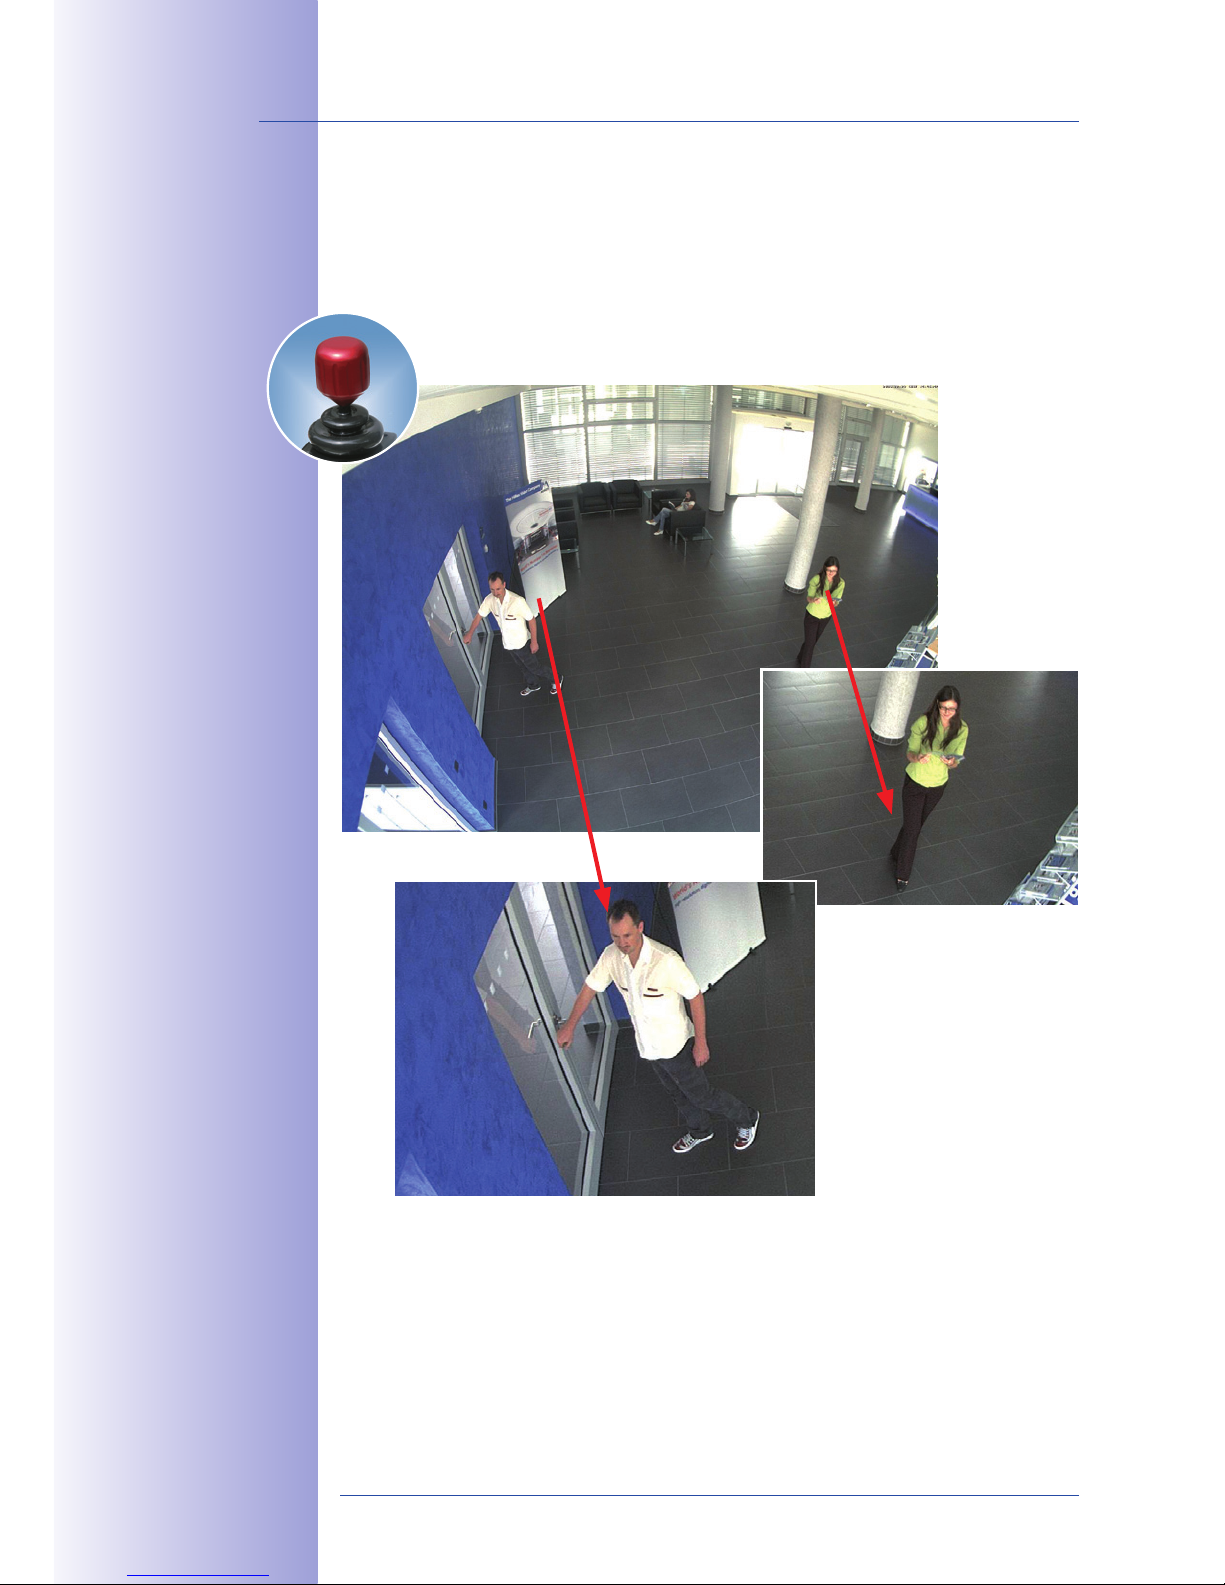
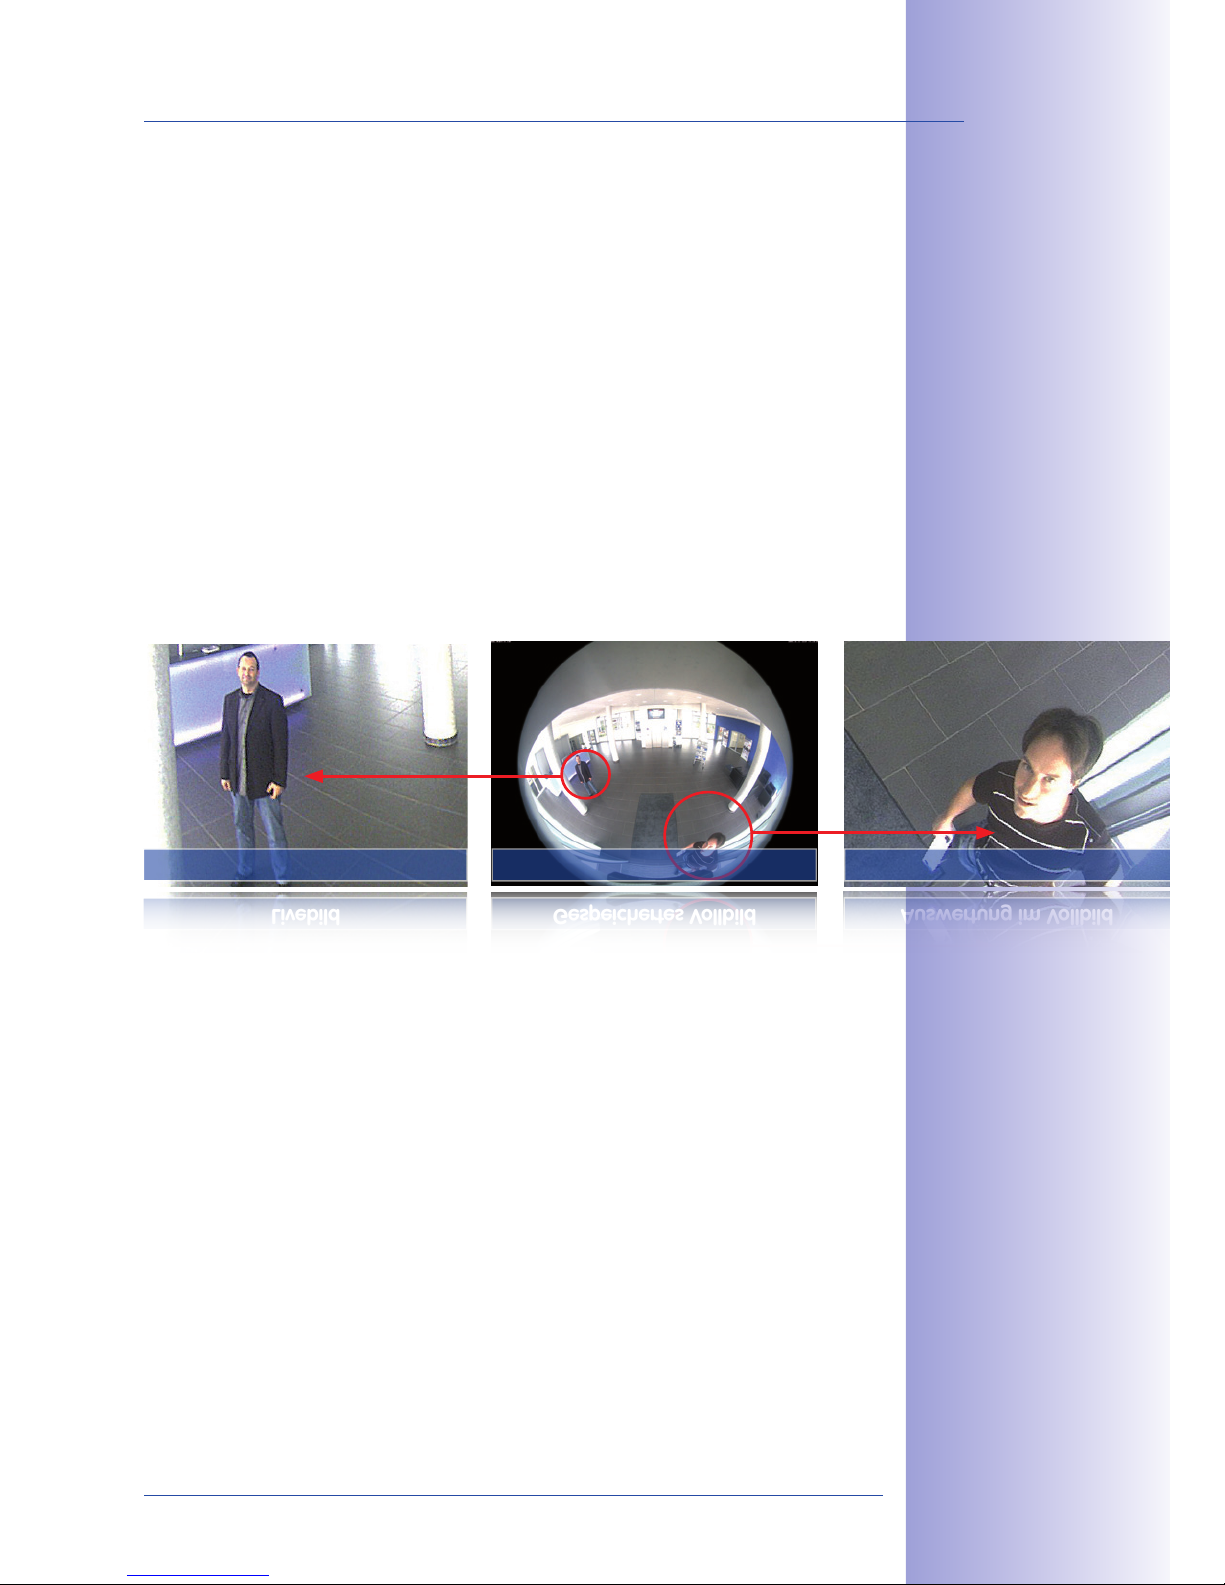
Example:The two people indicated by the red circles in the middle image would not have
been recorded by a regular PTZ camera. The full image recording of the M24M allows
you to determine, for example, the exact time at which these people entered the image
area recorded by the camera. A browser, MxControlCenter and MxEasy can be used to
examine the recorded sequences.
Live Image Analysis in Full ImageStored Full Image
Livebild Auswertung im VollbildGespeichertes Vollbild
Integrated vPTZ functions allow the complete
stored full image to be
analyzed at a later point
in time (in MxEasy and
MxControlCenter)
24/146
M24M Camera Manual: INTRODUCTION
© MOBOTIX AG • Security-Vision-Systems • Made in Germany
www.mobotix.com • sales@mobotix.com
Internal DVR
The M24M features direct recording to integrated MicroSD cards,
which makes the camera fully independent of any external storage media, even for longer periods of time. The camera internally
stores high-resolution video, without requiring an external record-
ing device or PC and therefore without overloading the network
whatsoever. Old recordings may be overwritten automatically or
automatically deleted after a specified period of time. A 32GB
MicroSD card, for example, allows the camera to store more than
half a million event images in VGA format (640x480). For security
reasons, the camera can even encrypt the stored data (available
in future software versions). Power failures are not an issue, as the
video and image sequences remain safely stored on the MicroSD card. Access to stored
video sequences is possible at any time from the camera user interface in the browser,
MxControlCenter or MxEasy. If you would like to archive sequences, you can export the
required data to a PC or USB stick for evidence purposes, for example.
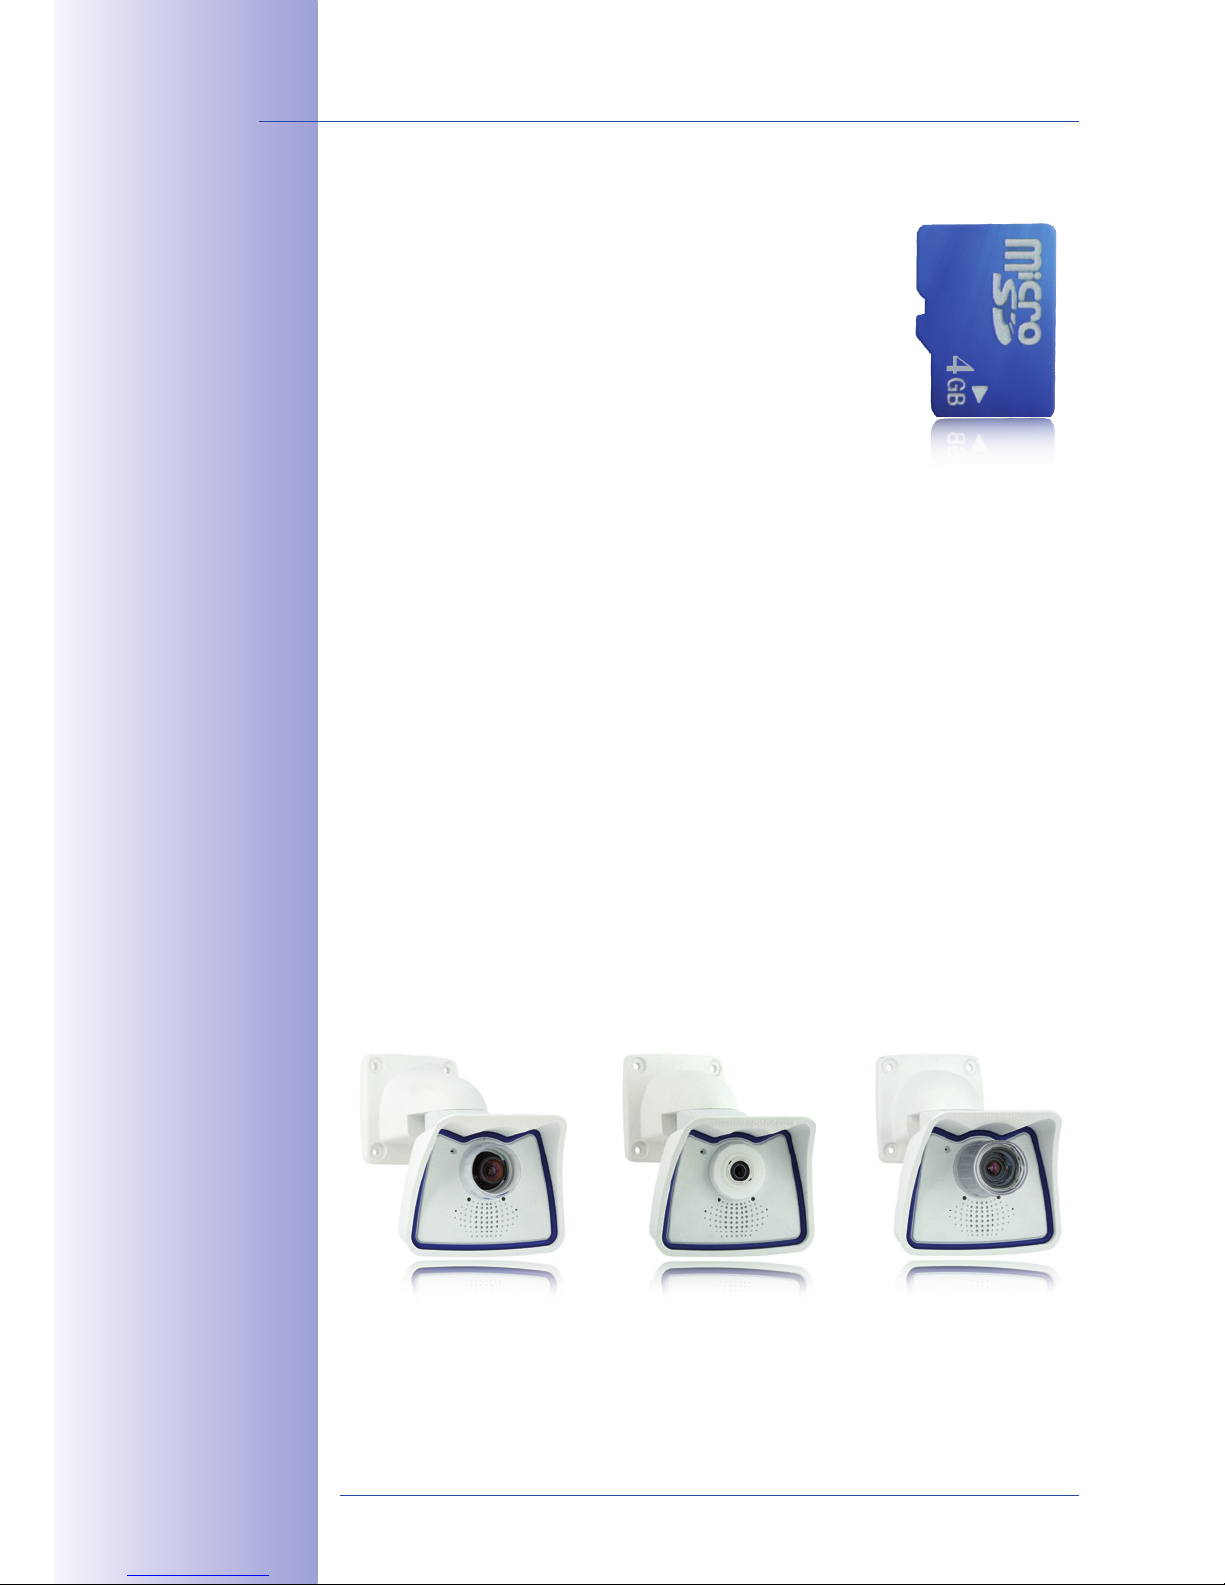
Model Versions
The M24M is available in the Secure, IT or Basic models, which all come with dierent
features. The M24M is shipped with either a color or black and white image sensor (Day/
Night) and with an L22 Super Wide Angle lens (horizontal angle of 90°) as standard.
Furthermore, ve further factory lenses with image angles of 15°, 31°, 45°, 60° and
180° as well as a version with a CS Vario lens are available upon request. Every M24M
is provided with a pre-formatted and installed 4GB MicroSD card and a VarioFlex mount
for fast and easy installation.
Due to the extreme optical distortion of the M24M with the L11 sheye lens, special
requirements must be met with regard to the alignment of the hardware and software.
For this reason, interchangeable lenses cannot be used with this version. The camera's
lens is extensively and precisely fine-tuned in the factory and should not be adjusted.
M24M models with L11
and CS Vario lenses are
only available as Secure
models (see Section
1.5 for more details)
L22–L135 L11 CS Vario

25/146
M24M Overview
© MOBOTIX AG • Security-Vision-Systems • Made in Germany
www.mobotix.com • sales@mobotix.com

26/146
M24M Camera Manual: INTRODUCTION
© MOBOTIX AG • Security-Vision-Systems • Made in Germany
www.mobotix.com • sales@mobotix.com
1.2 M24M With Hemispheric Special L11 Lens
Equipped with the 180° L11 lens, an entire room can be ideally monitored using just one
M24M, which replaces the time-consuming and expensive installation of several standard
cameras. The overview image provided by a single M24M, which may be personalized in
a number of ways according to specific user requirements, not only reduces the number of
required cameras, but also minimizes the system costs by reducing the wiring complexity,
emergency power requirements and number of recording devices required.
L11 Lens: High-Resolution 180° Panorama
When several cameras are monitoring a single room, it is dicult to understand the room
layout due to the dierent viewing directions of each individual camera. This makes it hard
to comprehend the overall setting. The new panorama function of the M24M with the
L11 lens delivers a widescreen, corrected image of a high-resolution 180° allround view.
High image quality is achieved through the use of a 3.1 megapixel color sensor and the
new hemispheric lens of the M24M.
With approximately 0.6 megapixels (1280x480 pixels), an M24M panorama image only
requires a fraction of the original data volume or bandwidth of a 3.1 megapixel full image
(1280x1536 pixels).
Full image at 3.1 megapixel (2048 x 1536 pixels)
Panorama image at 0.6 megapixel (1280 x 480 pixels)
Corrected image after
panorama correction
Economical bandwidth
usage due to smaller,
camera-corrected
images (no loss of
image information)
27/146
M24M With Hemispheric Special L11 Lens
© MOBOTIX AG • Security-Vision-Systems • Made in Germany
www.mobotix.com • sales@mobotix.com
The factory default setting of an M24M with an L11 lens
is a high-resolution 180° panorama image, in which
parts of the protective cover are still visible in the upper
right and left corners of the image.
Optimizing The M24M Panorama Image
In order to hide the protective cover in the panorama image, all that is often required is
the "panorama correction" function, which has already been integrated into the camera
software (controlling the camera via a web browser). Tilted vertical lines (if the camera is
mounted at an angle) may be optically straightened to the image edges using this func-
tion (see Section 3.5). A welcome side eect of this is that the protective cover disappears
from the image.
If this measure does not work in some
special cases (camera tilt of approximately 0°), the protective cover can be
removed from the image by zooming
and, if necessary, by using the purely
software-based downward panning
function. The displayed image section
or the panorama, as the case may be,
is reduced slightly but the image details
are enlarged as a result of zooming.
Original full image
180° panorama image
after the panorama
correction function
has been applied
Section 3.5 provides
more details and information on how the panorama
and horizon correction
works (correct distortion in the image and
position horizontally)
28/146
M24M Camera Manual: INTRODUCTION
© MOBOTIX AG • Security-Vision-Systems • Made in Germany
www.mobotix.com • sales@mobotix.com
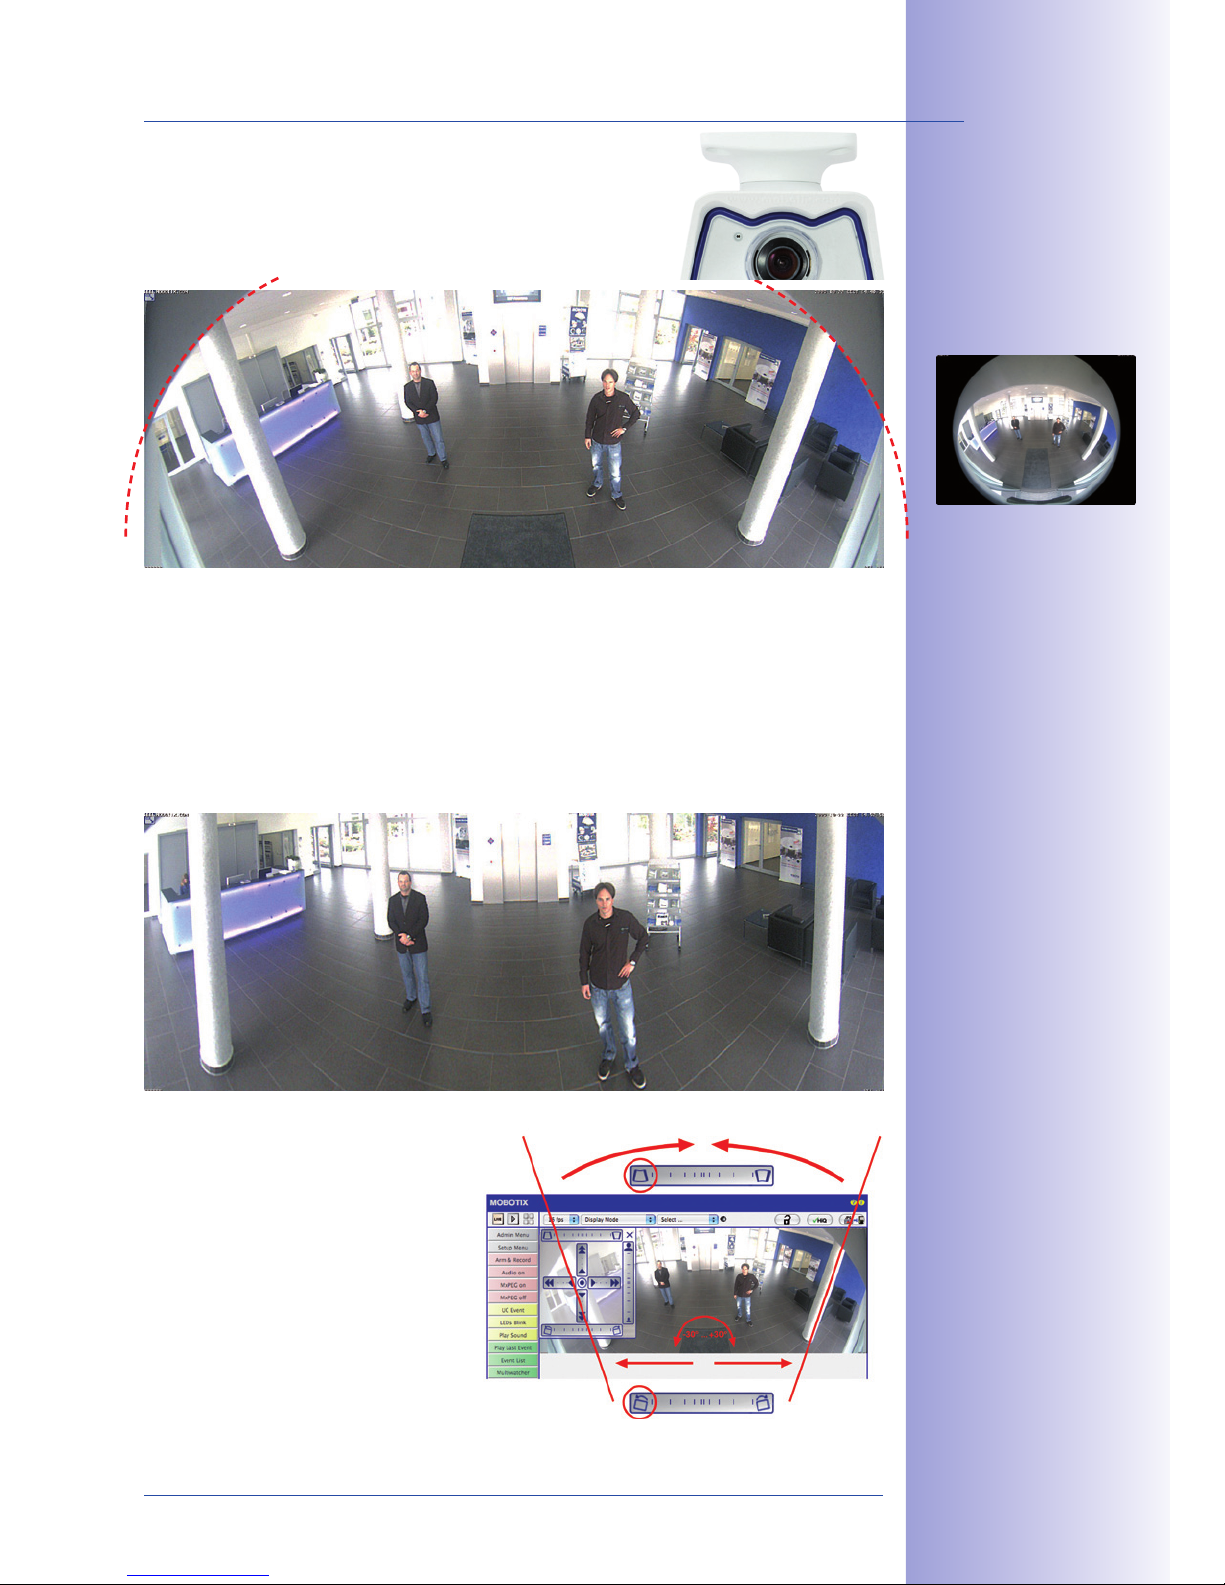
L11 Lens: Panorama Focus – One Camera, Three Views
Maximum room overview while simultaneously viewing detail in a single image: the M24M
is capable of providing two more views simultaneously with the 180° panorama, allowing
you to focus on two scenes in parallel ("Panorama Focus" display mode).
L11 Lens: Double Panorama For A Simultaneous View In Two Directions
The "Double Panorama" display mode provides a panorama image of both halves of the
area captured by the full image. Using the vPTZ functions, the panorama images can be
changed as desired. The example here shows an overview panorama of the entire room,
as well as the entrance, which would have otherwise no longer been visible in the
panorama – a superb overview for the user.
Original full image
1
32
MOBOTIX original
Panorama Focus image
1
2
3
Original full image
MOBOTIX original
Double Panorama image
29/146
M24M With Hemispheric Special L11 Lens
© MOBOTIX AG • Security-Vision-Systems • Made in Germany
www.mobotix.com • sales@mobotix.com
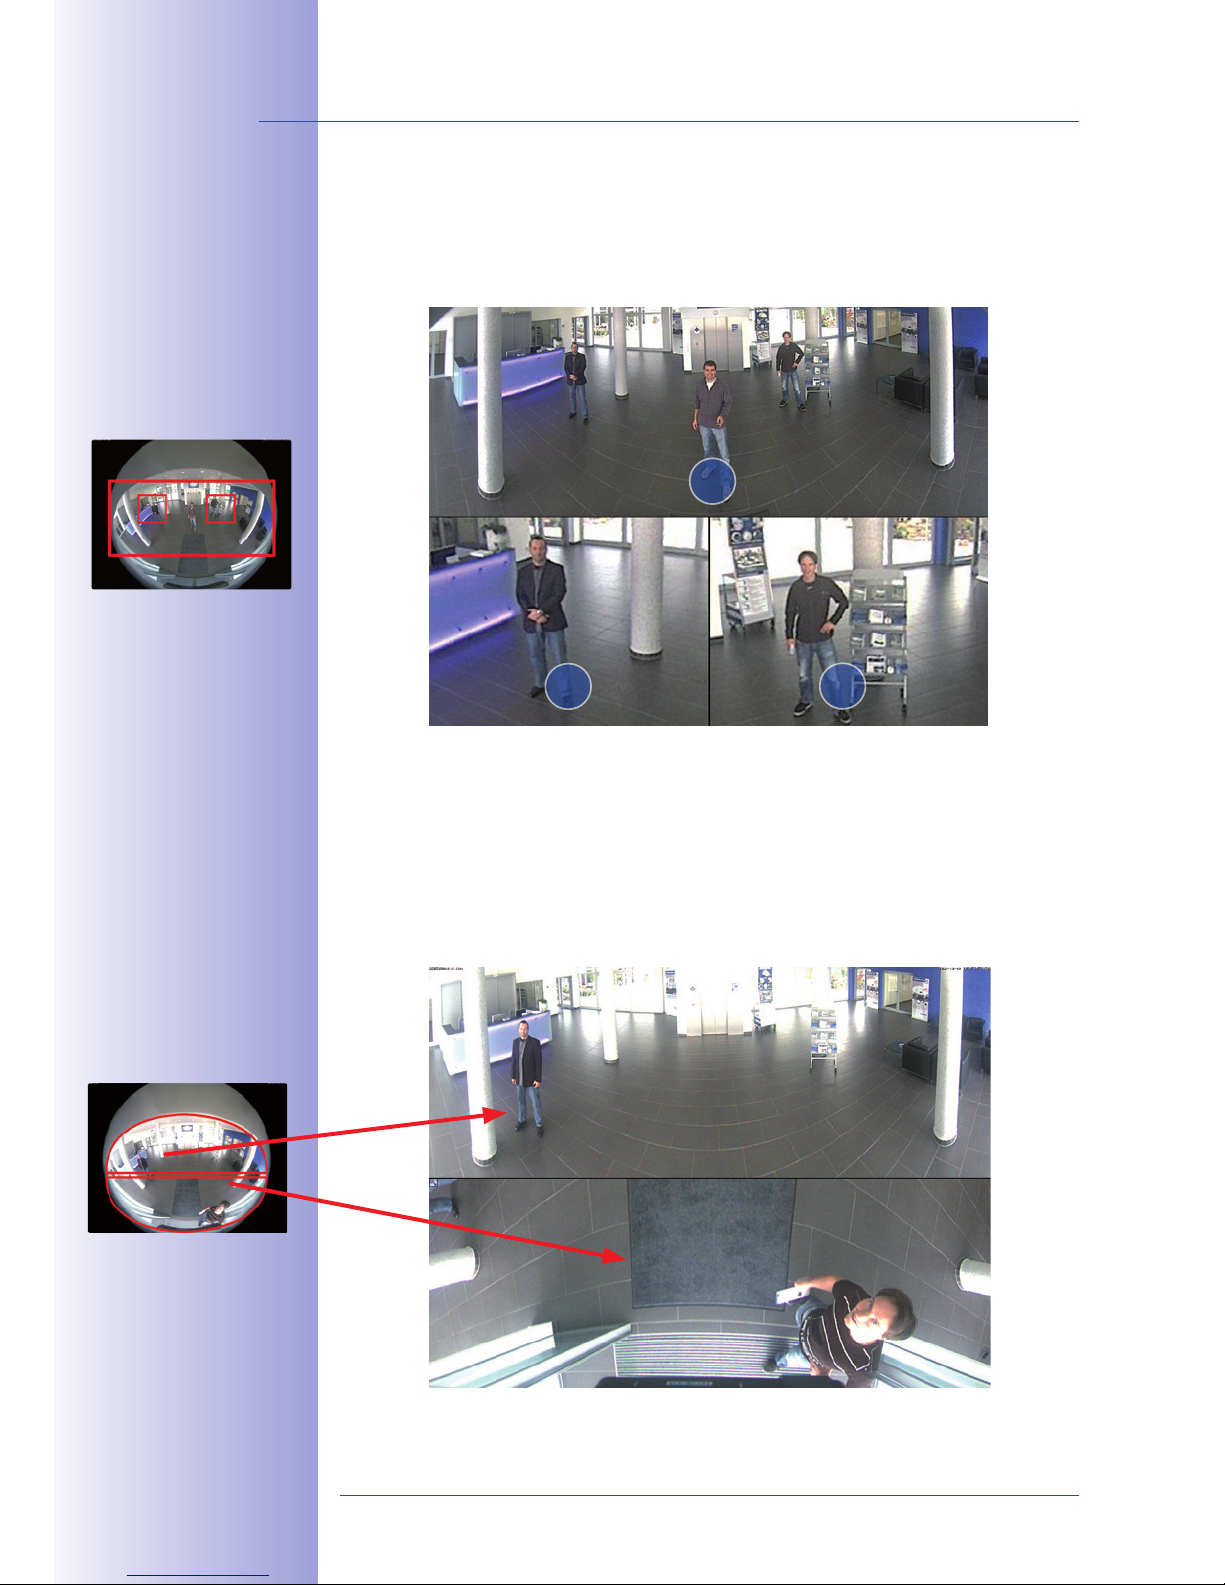
L11 Lens: Surround View (Quad View)
The M24M's "Surround" display mode replaces four cameras all at once and simultaneously delivers four dierent directions "at a glance." If the camera is installed in the ceiling
and is looking straight down, all four cardinal directions can be displayed, for example.
Each of the four views features a software-controlled
pan/tilt/zoom function (virtual PTZ), allowing it to be
customized as necessary. In order to facilitate camera
operation, the M24M can store, in addition to the
preset standard views, a total of 256 user-dened
camera views using the vPTZ function, which can
easily be brought up using joystick keys or softbuttons.
Besides being able to manually bring up specific camera
views, the camera can also show them automatically.
It does so by moving through the standard views or by
showing the first 16 saved camera views (one after
the other like in a slide show).
Original M24M image:
Each of the four
views can be indi-
vidually modied
Surround View: Quad
vPTZ & Zoom
vPTZ & Zoom
Original full image
30/146
M24M Camera Manual: INTRODUCTION
© MOBOTIX AG • Security-Vision-Systems • Made in Germany
www.mobotix.com • sales@mobotix.com
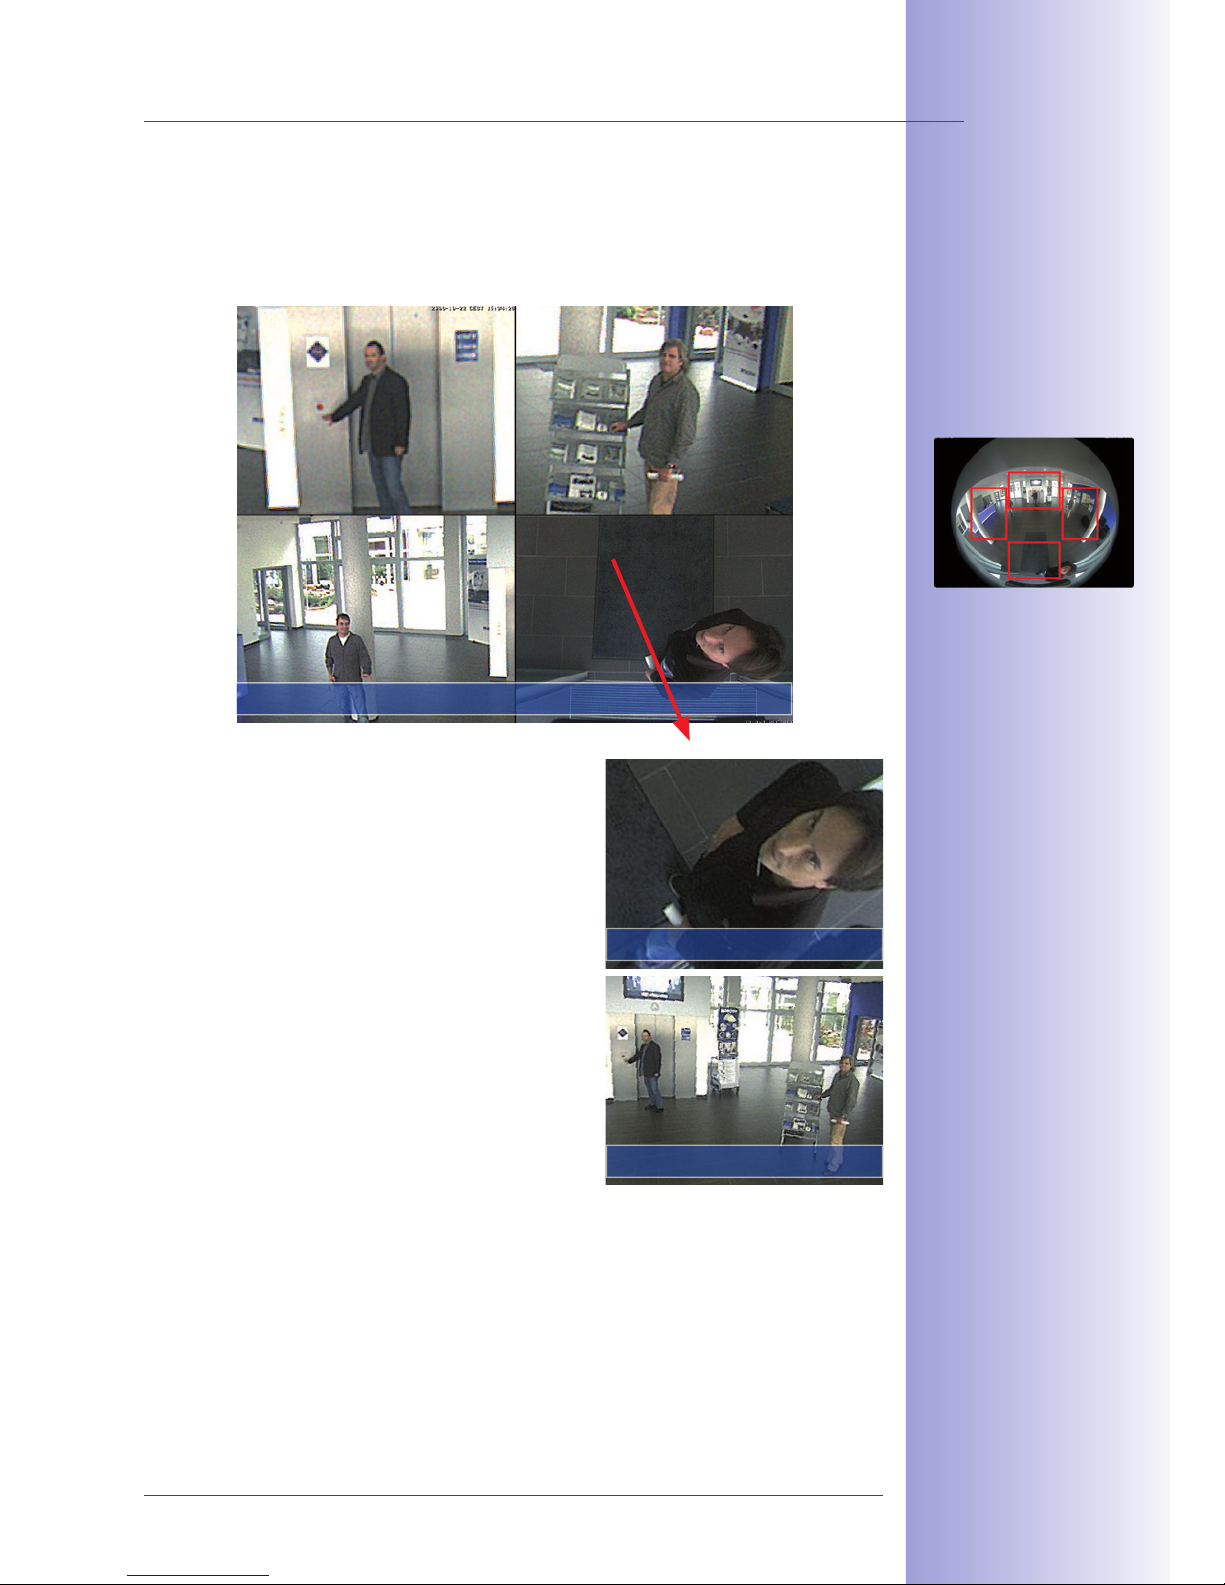
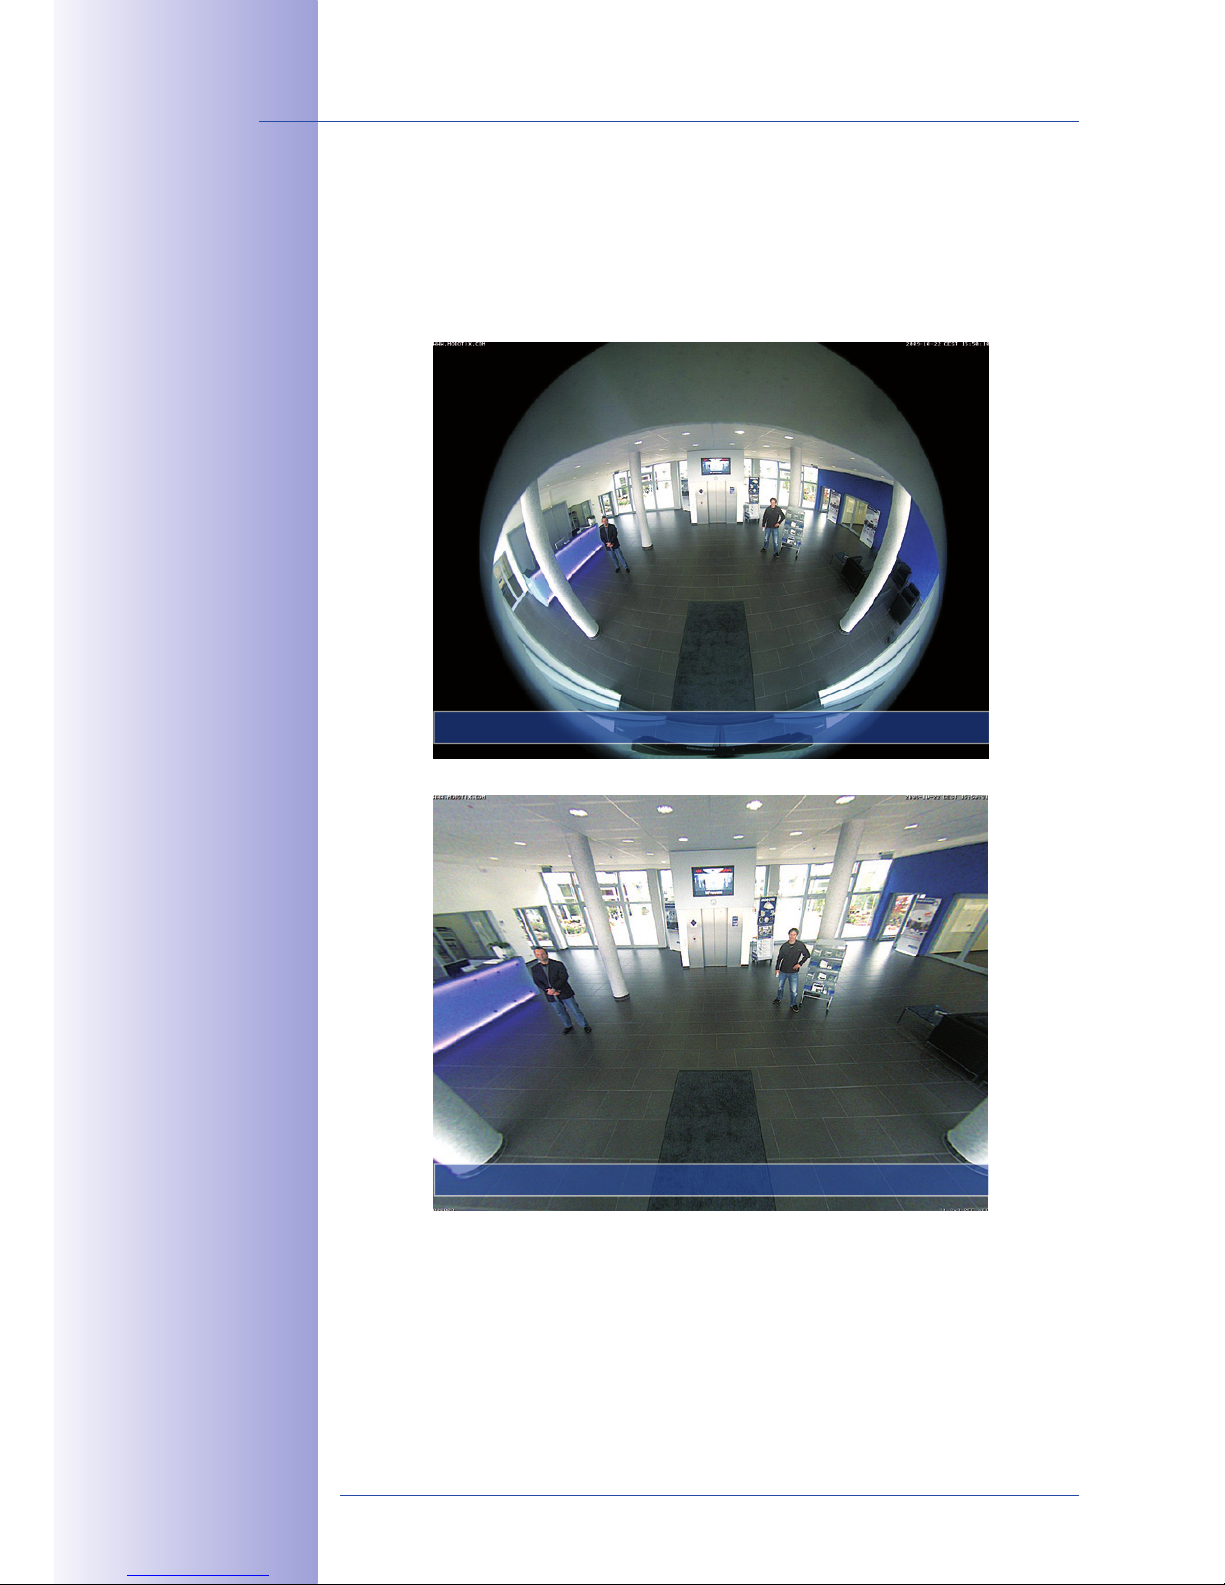
L11 Lens: Full Image And Normal View
In addition to Panorama, Double Panorama, Panorama Focus and Surround views, the
M24M image may be displayed on a monitor as the original fisheye version ("Full Image"
display mode) or as the camera-corrected image section ("Normal" display mode). Switching
to one of the other display modes described is possible at any time within seconds.
Original Fisheye Image: Full Image
Corrected Image Section: Normal
Original MOBOTIX
full image
Original MOBOTIX image
Corrected and
zoomed full image
 Loading...