

Page 1

MOBOTIX AG • Security-Vision-Systems • Made in Germany
www.mobotix.com • sales@mobotix.com • 12.06.2007
Current PDF File:
www.mobotix.com > Support > Manuals
Complete integration for web and security
D22
Camera Manual
MOBOTIX ... the new face of IP video
Part 1
Vandalism-protected
Wall bracket
with cable cover
for RJ45 wall outlet
30 Frames/s
VGA (640 x 480)
10 fps Mega
-22°F to +140°F
Weatherproof
-30°C to +60°C, IP65
no heating necessary
IEEE 802.3af
PoE
network power
even in winter
Video SIP Client
IP Telephony
alarm notify,
cam remote control
lip-syncronized audio
Recording
event-ringbuffer
30 cams each 30 fps
Backlight
safe using CMOS
without mechanical iris
Video motion
multiple windows
precision pixel-based
microphone & speaker
Audio
bi-directional via IP
variable framerates
Live viewing
30 cams at 30 fps
all on one screen
Megapixel
1280 x 960
software zoom
Robust
no moving parts
fiber glass housing
X
MOBOTIX
Security-Vision-SystemsSecurity-Vision-Systems
.
com
Page 2
© MOBOTIX AG • Security-Vision-Systems • Made in Germany
www.mobotix.com • sales@mobotix.com
D22M Camera Manual Part 1
MOBOTIX Camera Data
Enter the data of your camera here!
Camera Model:
Camera Name:
Factory IP Address:
Current IP Address:
DHCP: activated
deactivated
Admin User Name:
Admin Password:
Note: MOBOTIX offers inexpensive seminars that include a workshop and
practical excercises: Basic Seminar 3 days, Advanced Seminar 2
days. For more information, see www.mobotix.com
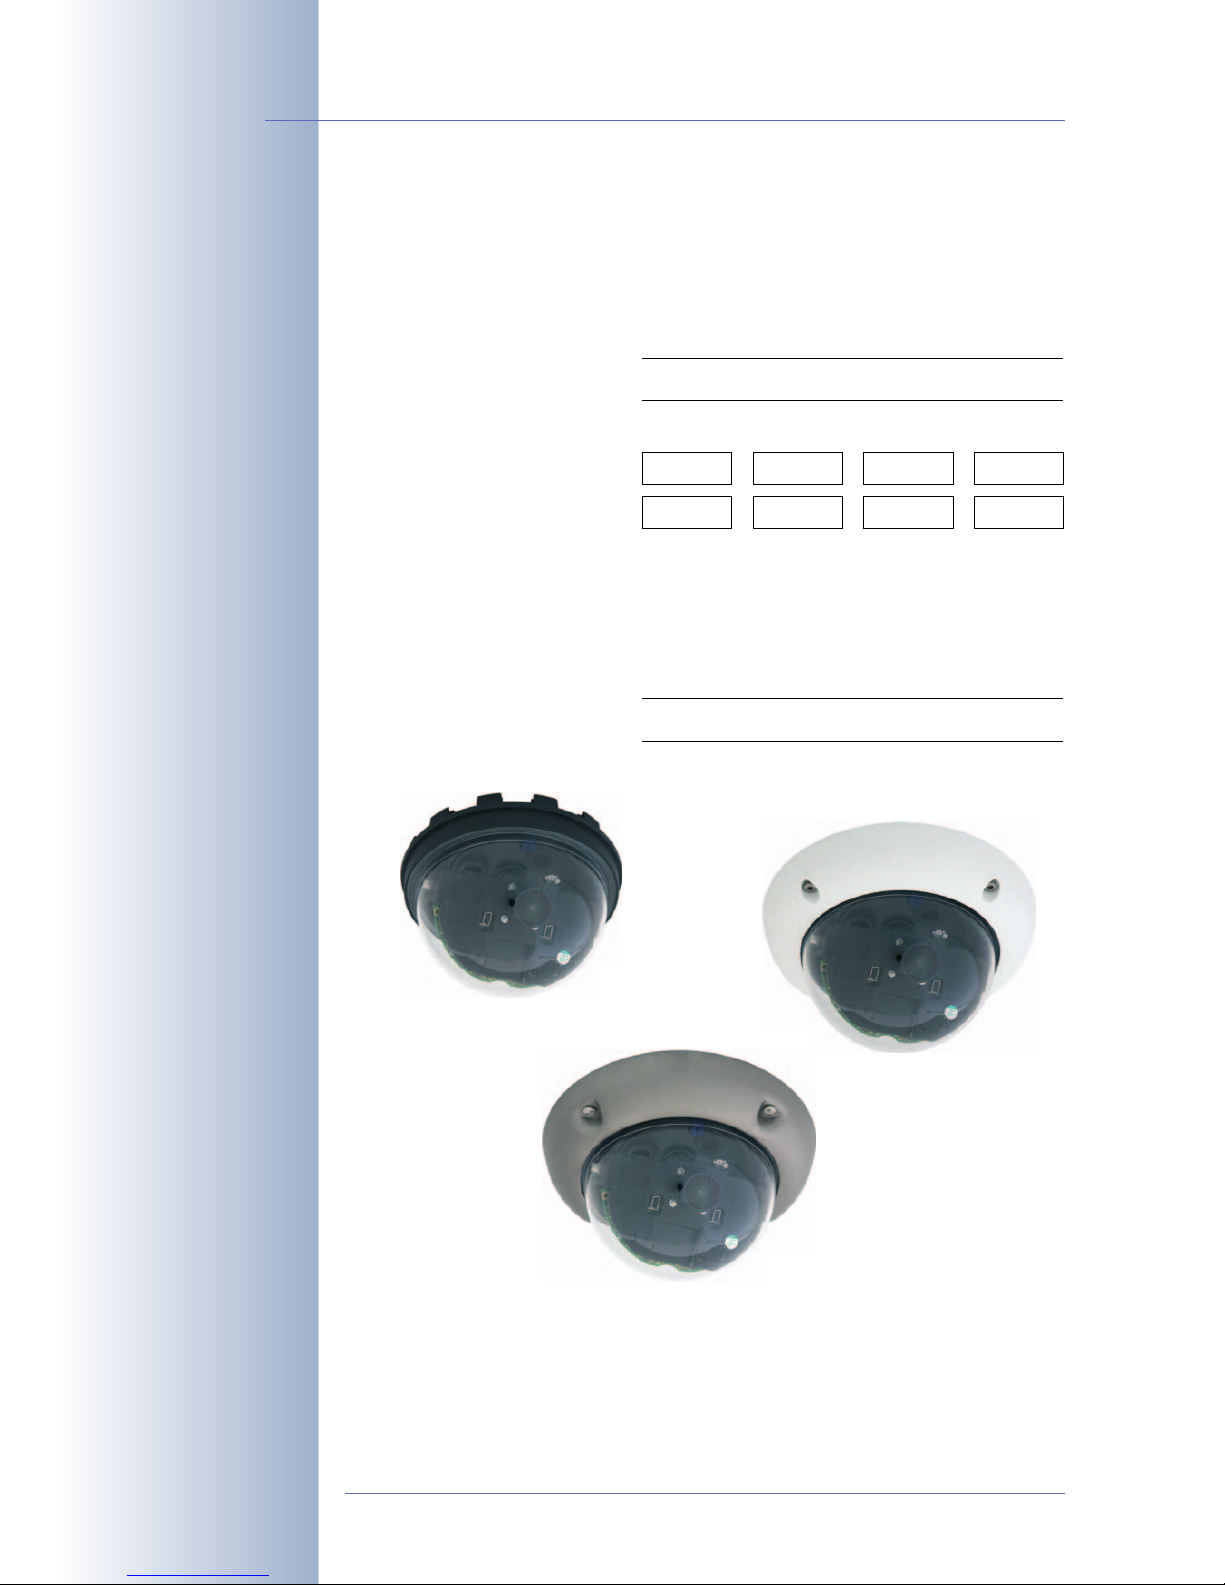
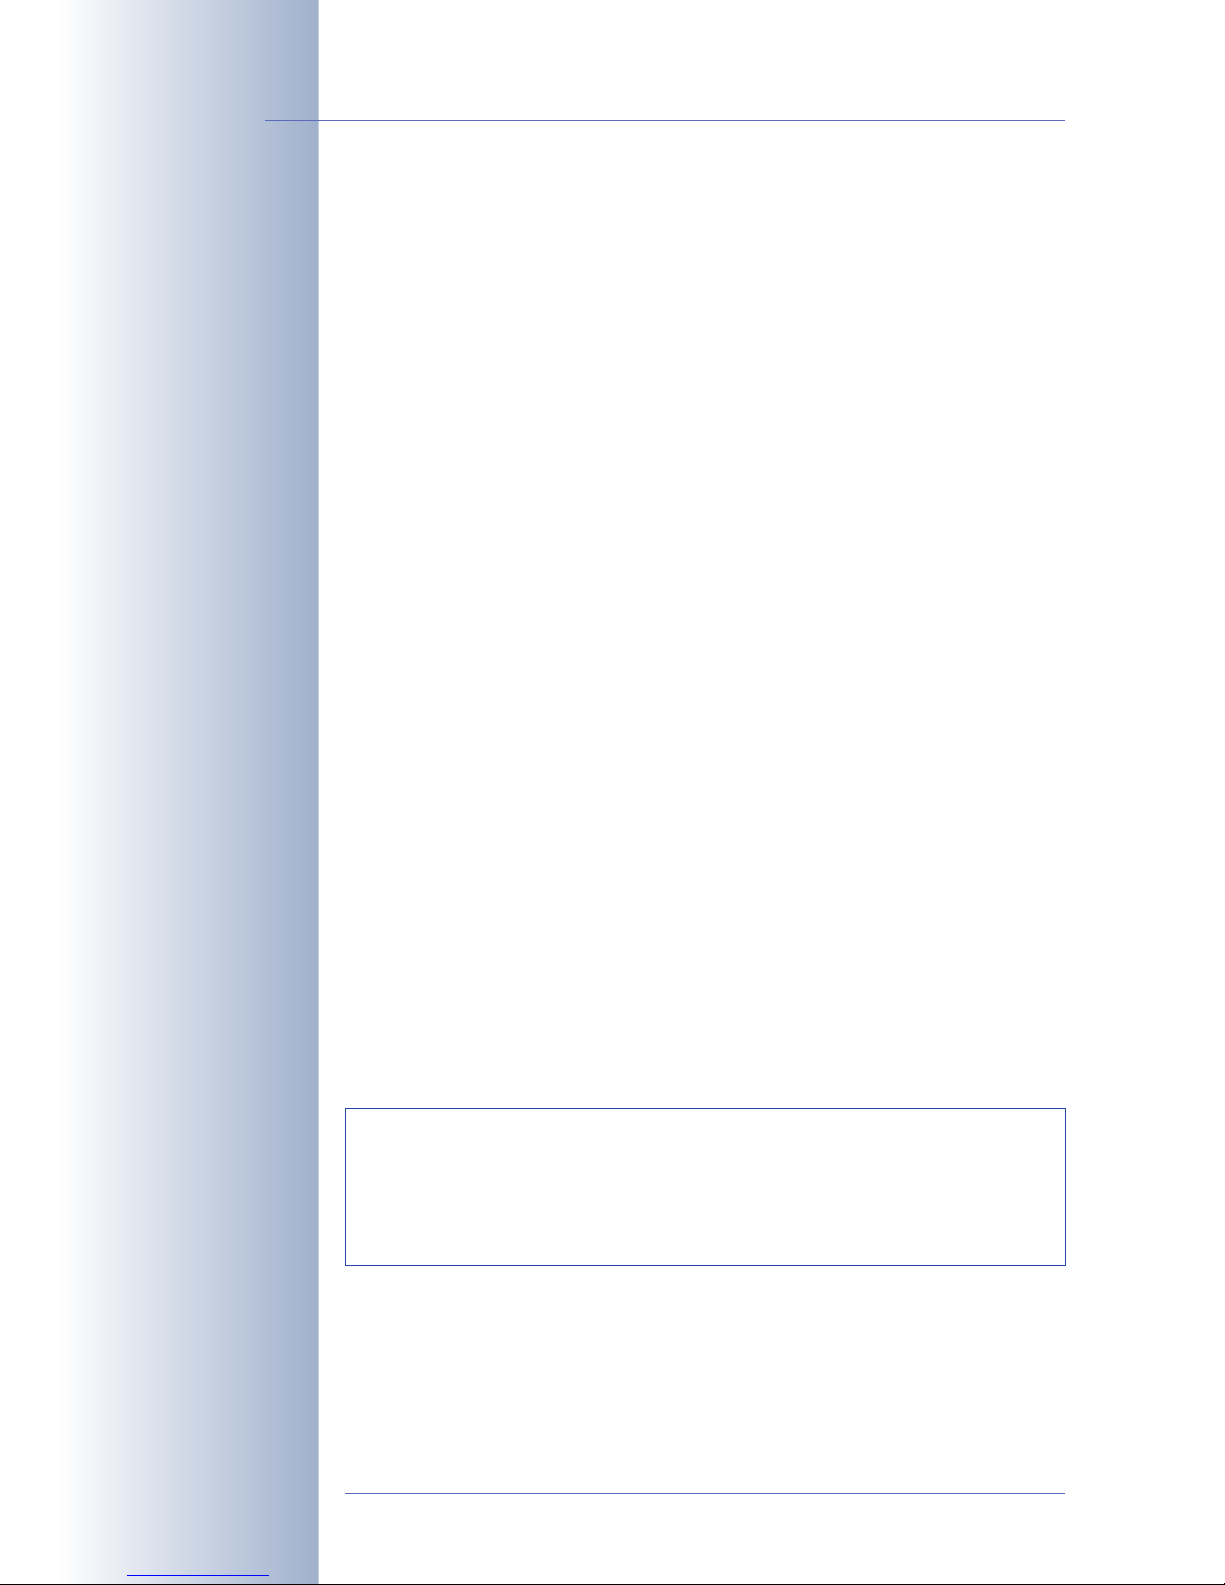
D22 Basic
D22 Secure
D22 with Vandalism Set
Page 3

D22M CAMERA MANUAL PART1
1 INTRODUCTION 6
1.1 MOBOTIX Cost Benefits 10
1.2 MOBOTIX Technical Advantages 11
1.3 MOBOTIX D22M Concept 12
1.4 Feature Overview of the MOBOTIX D22M 15
1.5 Lenses for the MOBOTIX D22M 18
1.6 Important Notes 20
1.6.1 Password for the Administration Menu 20
1.6.2 Irreversibly Deactivating the Microphone 20
1.6.3 Starting the Camera Using the Factory IP Address 21
1.6.4 Resetting the Camera to Factory Defaults 21
1.6.5 Activating Event Control for Security Applications 21
1.6.6 Deactivating Text and Logo Options 21
1.6.7 Deactivating the Automatic Daily Reboot of the Camera 22
1.6.8 Using Internet Browsers 22
1.6.9 Cleaning Instructions 22
1.6.10 Safety Notes for Operating MOBOTIX Cameras 22
1.6.11 Additional Information 23
2 MOUNTING THE CAMERA 24
2.1 Preparing the Installation 24
2.1.1 Mounting to a Ceiling or Wall 24
2.1.2 Additional Mounting Options for IT/Secure Models 25
2.1.3 Network Connection and Power Supply, UPS 26
2.1.4 Providing the Camera Connections, Wall Outlets 27
2.1.5 Directions for Mounting 28
2.2 D22-IT/Secure: Delivered Parts, Components and Dimensions 30
2.2.1 Delivered Parts and Camera Components 30
2.2.2 Camera Housing and Connectors 31
2.2.3 Dimensions 32
2.3 D22-Basic: Delivered Parts, Components and Dimensions 34
2.3.1 Delivered Parts and Camera Components 34
2.3.2 Camera Housing and Connectors 35
2.3.3 Dimensions 36
2.4 Camera Accessories: Delivered Parts, Components and Dimensions 38
2.4.1 D22 On-Wall Set 38
2.4.2 D22 In-Ceiling Set 40
2.4.3 D22 Vandalism Set 42
2.4.4 D22 Wall Mount 44
2.4.5 D22 Corner and Pole Mount 46
© MOBOTIX AG • Security-Vision-Systems • Made in Germany
www.mobotix.com • sales@mobotix.com
1/100
D22M Camera Manual Part 1
Page 4

2.5 Mounting the Camera 48
2.5.1 D22-IT/Secure 48
2.5.2 D22-Basic 49
2.5.3 Finishing the Installation 52
2.5.4 Notes on Mounting the Camera to a Wall Without the Wall Mount 54
2.6 Mounting the D22 to a Ceiling Using the On-Wall Set 56
2.7 Mounting the D22 to a Ceiling Using the In-Ceiling Set 58
2.8 Mounting the D22 Vandalism Set 60
2.9 Mounting the D22 to a Wall Using the Wall Mount 62
2.10 Notes 64
2.10.1 Cleaning Instructions 64
2.10.2Wiring, Fire Prevention, Lightning and Surge Protection 64
2.11 Camera Accessories 66
3 OPERATING THE CAMERA 70
3.1 General Procedure 70
3.1.1 Establishing the Power Supply to the Camera 70
3.1.2 Connecting the Camera 70
3.2 Overview of the Configuration Settings 72
3.3 Connecting the Camera to the Network and to the Power Supply 74
3.3.1 Notes on Cable Lengths and Power Supply 74
3.3.2 Camera Startup Sequence 75
3.3.3 Power Supply (MX PoE) Using a Switch 76
3.3.4 Power Supply (MX PoE) Directly Connected to a Computer 76
3.3.5 Power Supply (MX PoE) Using a Network Power Rack or Network
Power Box 77
3.3.6 Power Supply (PoE IEEE 802.3af) Using Power-over-Ethernet Products 77
3.4 The First Image from the Camera 78
3.4.1 Preparing the Ethernet Connection 78
3.4.2 The First Image in the Browser 80
3.4.3 Additional Information 81
3.4.4 Camera Screens in the Browser 82
3.4.5 Access Using Zeroconf/Bonjour 84
3.4.6 The First Image in MxControlCenter 88
3.5 Starting the Camera With an Automatic IP Address (DHCP) 94
3.6 Starting the Camera Using the Factory IP Address 95
© MOBOTIX AG • Security-Vision-Systems • Made in Germany
www.mobotix.com • sales@mobotix.com
2/100
D22M Camera Manual Part 1
Page 5

APPENDIX: HARDWARE AND SOFTWARE FEATURES
IP65 CERTIFICATE
DECLARATION OF CONFORMITY
DRILLING TEMPLATES (SCALE 1:1)
SOFTWARE MANUAL PART2
4 CAMERA USER INTERFACE
4.1 The First Image in the Browser
4.2 The First Image in MxControlCenter
4.3 The Live Screen in the Browser
4.4 The Playback Screen in the Browser
4.5 The MultiView Screen in the Browser
4.6 PDA Screen
4.7 Guest Screen
4.8 Browser Settings
4.9 Configuring the Softbuttons
4.10 Fast Video Streaming
4.11 Operating Multiple Cameras
5 GENERAL CAMERA CONFIGURATION
5.1 Overview
5.2 Quick Installation
5.3 Connection Test
5.4 Basic Settings
5.5 Image Controls
5.6 Logos
5.7 Exposure Settings
5.8 Day & Night Modes
5.9 Managing Settings
© MOBOTIX AG • Security-Vision-Systems • Made in Germany
www.mobotix.com • sales@mobotix.com
3/100
D22M Camera Manual Part 1
Download the latest ver-
sion of this document as a
PDF file from
www.mobotix.com,
Support> Manuals
Note
Chapters 4 and above are part of the Camera Software Manual (
Soft-
ware Manual
in short). The main headings are listed below to give you
an overview of the
Software Manual
contents.
Page 6

6 SOFTWARE UPDATES
6.1 Overview
6.2 Preparatory Steps
6.3 Updating the Camera Software
6.4 Update Checklist
7 EVENTS, ACTIONS AND MESSAGES
7.1 Overview
7.2 Functional Overview
7.3 General Procedure
7.4 Screen Display of Event Settings in Live Image
7.5 Arming
7.6 Events
7.7 Actions and Messaging, Action and Messaging Profiles
7.8 Working with Profiles
7.9 Time Tasks
8 RECORDING
8.1 Overview
8.2 Recording Modes
8.3 Recording Types
9 TELEPHONY FEATURES
9.1 Overview
9.2 VoIP Settings for IP Telephony
9.3 Camera Phone (Listen, Speak and Intercom Modes)
9.4 Phone Profiles: Outbound Phone Calls
9.5 Phone Call-In: Inbound Phone Calls
9.6 Remotely Controlling the Camera Using a Phone
9.7 Sample Configurations for IP Telephony via Internet
9.8 Sample Configurations for IP Telephony on a LAN
9.9 Video Telephony
© MOBOTIX AG • Security-Vision-Systems • Made in Germany
www.mobotix.com • sales@mobotix.com
4/100
D22M Camera Manual Part 1
Page 7

10 MOBOTIX CAMERAS ON THE WEB
10.1 Overview
10.2 Indirectly Accessing MOBOTIX Cameras via the Web
10.3 Directly Accessing MOBOTIX Cameras via the Web
10.4 Configuring the Router
10.5 DynDNS
11 SOFTWARE INTERFACES
11.1 Overview
11.2 Accessing the Camera's Live Image and the Event Images
11.3 Accessing the Camera's Live Image Using the Second Image Channel
11.4 Video Streaming
11.5 The HTTP API
12 TROUBLESHOOTING
12.1 Overview
12.2 Troubleshooting Checklist
12.3 Diagnostic Tools of the Camera
12.4 Monitoring Tools of the Camera
12.5 Potential Issues
12.6 Additional Information
12.7 Sending Back the Camera
12.8 Warranty
© MOBOTIX AG • Security-Vision-Systems • Made in Germany
www.mobotix.com • sales@mobotix.com
5/100
D22M Camera Manual Part 1
More information:
www.mobotix.com
Note
Download the latest version of this document as a PDF file from
www.mobotix.com, Support> Manuals.
Information subject to change without notice!
Copyright © 1999-2007 MOBOTIX AG, Kaiserslautern, Germany.
All rights reserved. MOBOTIX, MxPEG and MxControlCenter are worldwide
trademarks of MOBOTIX AG. Microsoft, Windows and Windows Server are registered trademarks of Microsoft Corporation. Apple, the Apple logo, Macintosh,
OSX and Bonjour are trademarks of Apple Inc. Linux is a trademark of Linus
Torvalds. All other marks and names mentioned herein may be trademarks or
registered trademarks of the respective owners.
Page 8
1 INTRODUCTION
The D22 cameras are powerful yet compact network cameras by MOBOTIX, which
are capable of creating high-resolution live video streams with high image rates.
When showing VGA video (640x480), the camera can deliver up to 30 fps. Even
Megapixel video (1280x960) will still generate up to 10fps. The camera transmits
lip-synchronous audio, both in the browser (ActiveX plug-in) and when using
McControlCenter (external speaker and microphone required; not available on
D22-Basic).
Like all other MOBOTIX cameras, D22 models
are more than "just a camera"; the integrated
software features include a multitude of functions, such as video motion detection, long-
term recording, alarm messaging and video
IP telephony. Unlike in camera systems from
other manufacturers, buying and installing additional software on the computer is thus unnecessary.
Because of the low power consumption of only
3Watts, the MOBOTIX D22 cameras feature the
highest operating temperature range available
from -30 to + 60°C (-20 to 140°F). Since MOBOTIX cameras neither fog up nor require hea-
ting, power can be supplied via the network
cabling using standard PoE products. D22 IT and Secure models are absolutely
dust-proof and resistant against water jets (IP65; D22-Basic: IP54). When mounted
to the D22 Wall Mount, the camera can be used in outdoor applications; the wall
mount perfectly covers wall outlets, thus providing completely concealed cabling.
D22 models
• D22-Basic: The D22-Basic, with a diameter of
only 12.9cm (5in) and a height of only 8.5cm
(3.3in) is the most compact and most discrete
MOBOTIX camera. The camera is
weatherproof (IP54) and thus suited for outdoor use.
© MOBOTIX AG • Security-Vision-Systems • Made in Germany
www.mobotix.com • sales@mobotix.com
6/100
D22 Camera Manual Part 1
30 frames per second!
Everything integrated!
D22-Basic
(IP54)
Note
The D22-Basic is the right choice for web cam applications and simple
monitoring tasks.
ø 129mm/5.1in
Page 9
• D22-IT/Secure: The D22 IT and Secure models feature additional functions
and security features. Among other things, you can connect an external speaker and microphone, store images and video sequences on an external file
server (including audio) and call the camera using SIP video*. MOBOTIX also
provides accessories for indoor and outdoor applications and vandalismprone areas. The camera is weatherproof
(IP65) and thus suited
for outdoor use.
Accessories for the MOBOTIX D22
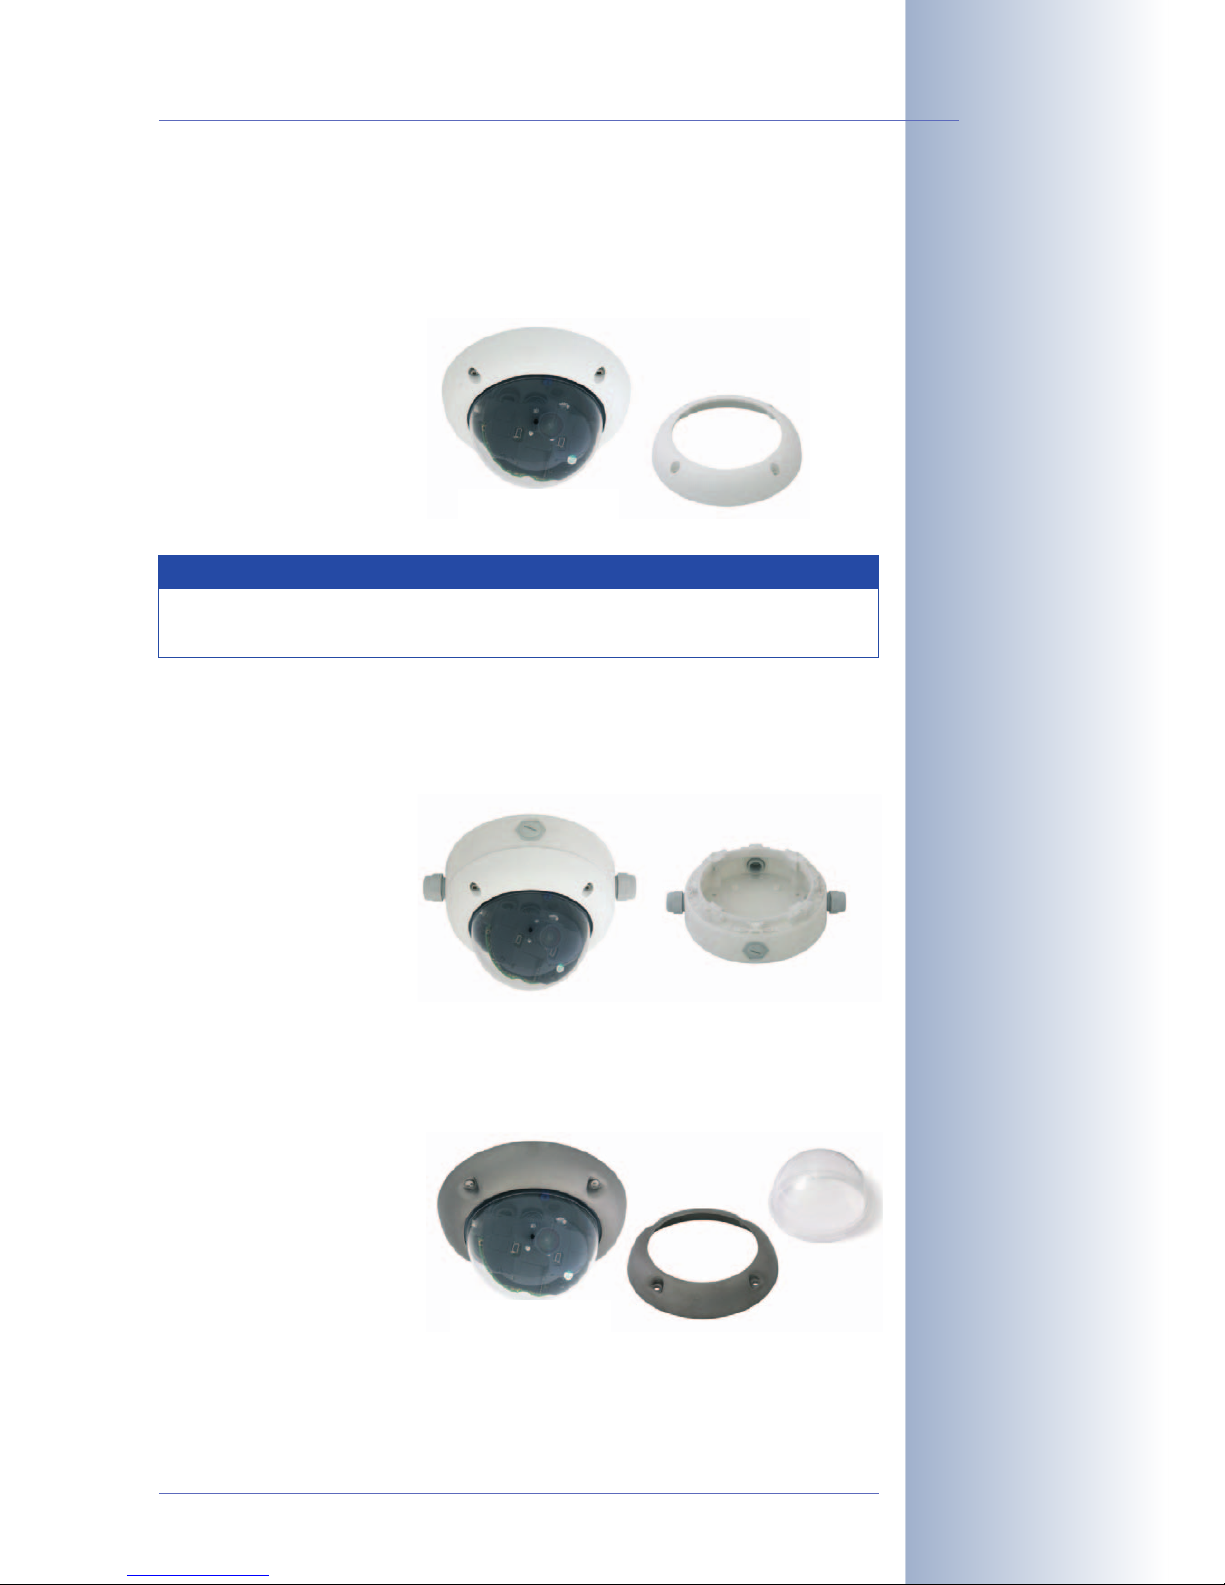
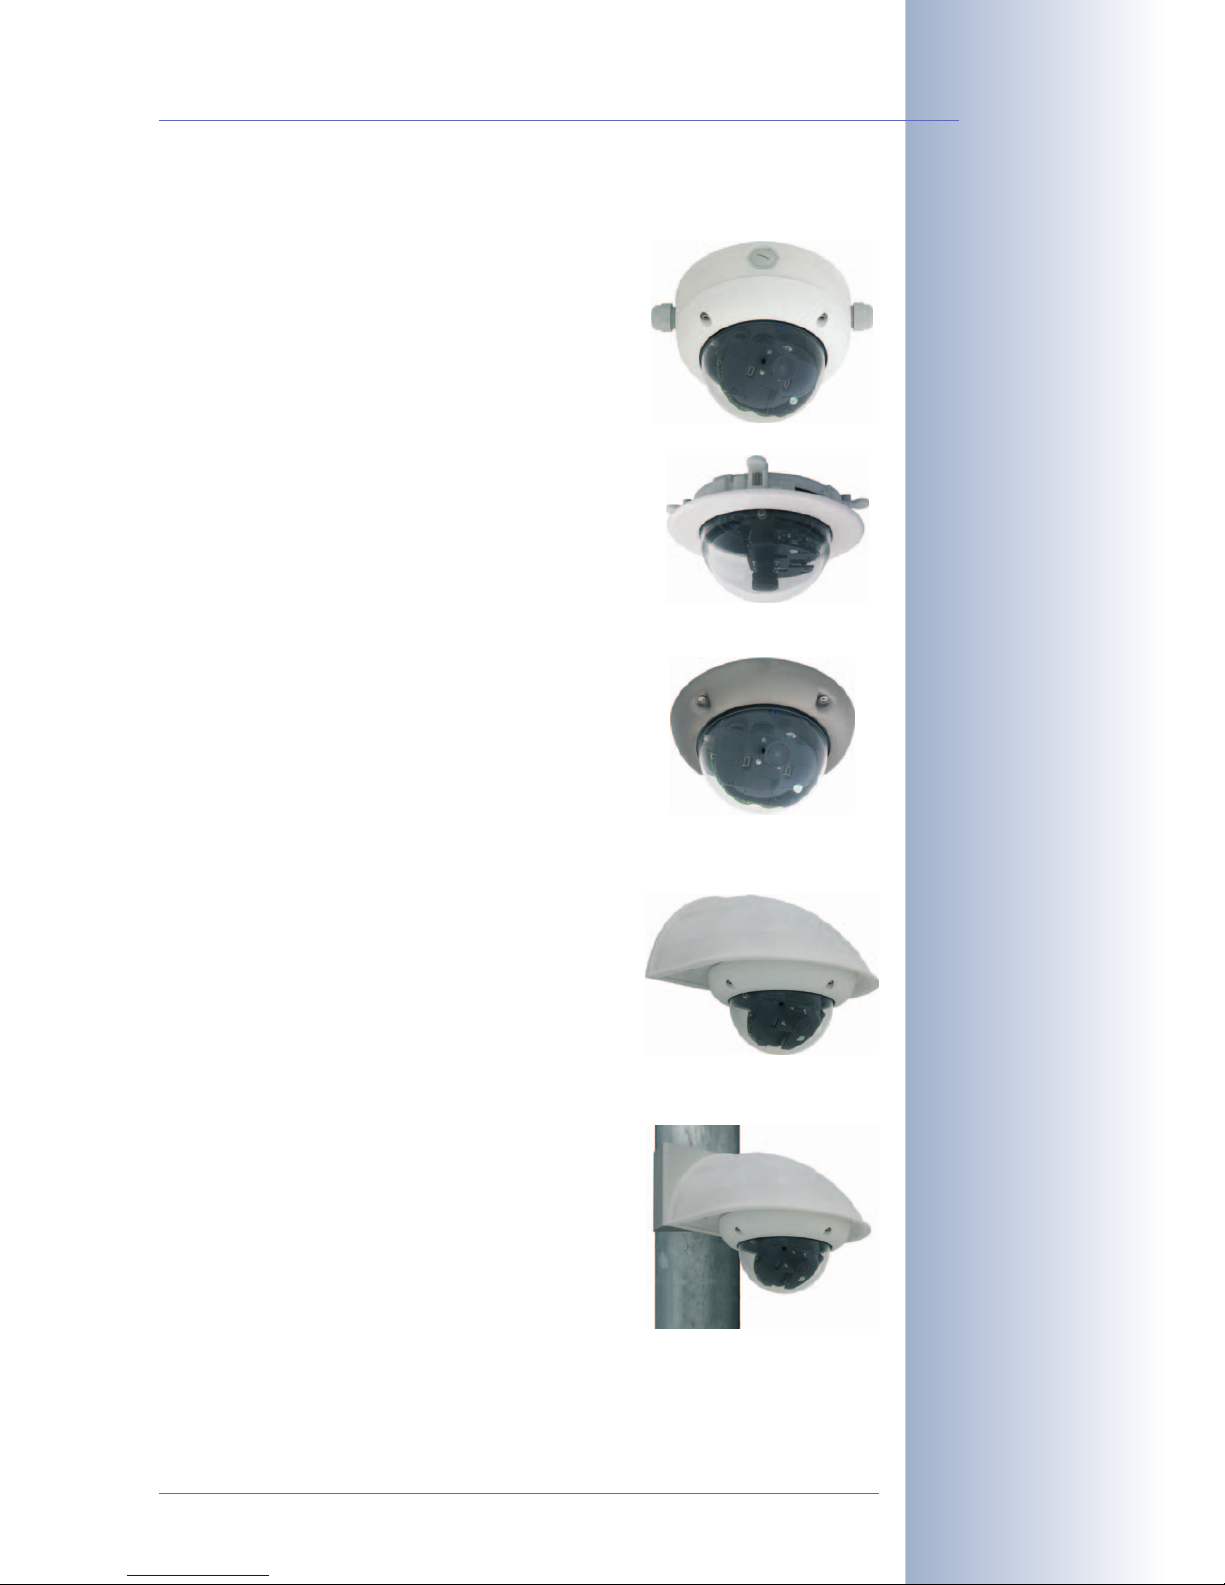
• D22 On-Wall Set: This set can reliably protect external cables if the cables
cannot be guided from below the housing but have to be led above the wall
for technical or legal reasons. In addition, the On-Wall mount provides ample
space for extra modules (batteries, WiFi, ...).
• D22 Vandalism Set: The D22 Vandalism Set provides added protection for
D22 cameras. The set consists of a robust camera ring made of stainless
steel and a reinforced dome made from 3mm thick polycarbonate. A
camera with vandalism set is perfectly
suited for applications
in demanding environments (such as prisons, social hot-spots,
train stations, etc.).
© MOBOTIX AG • Security-Vision-Systems • Made in Germany
www.mobotix.com • sales@mobotix.com
7/100
D22 Camera Manual Part 1
D22-IT and Secure
(IP65)
* Accessories required:
external microphone and
external speaker
D22 On-Wall Set
(IP65)
D22 Vandalism Set
(IP65)
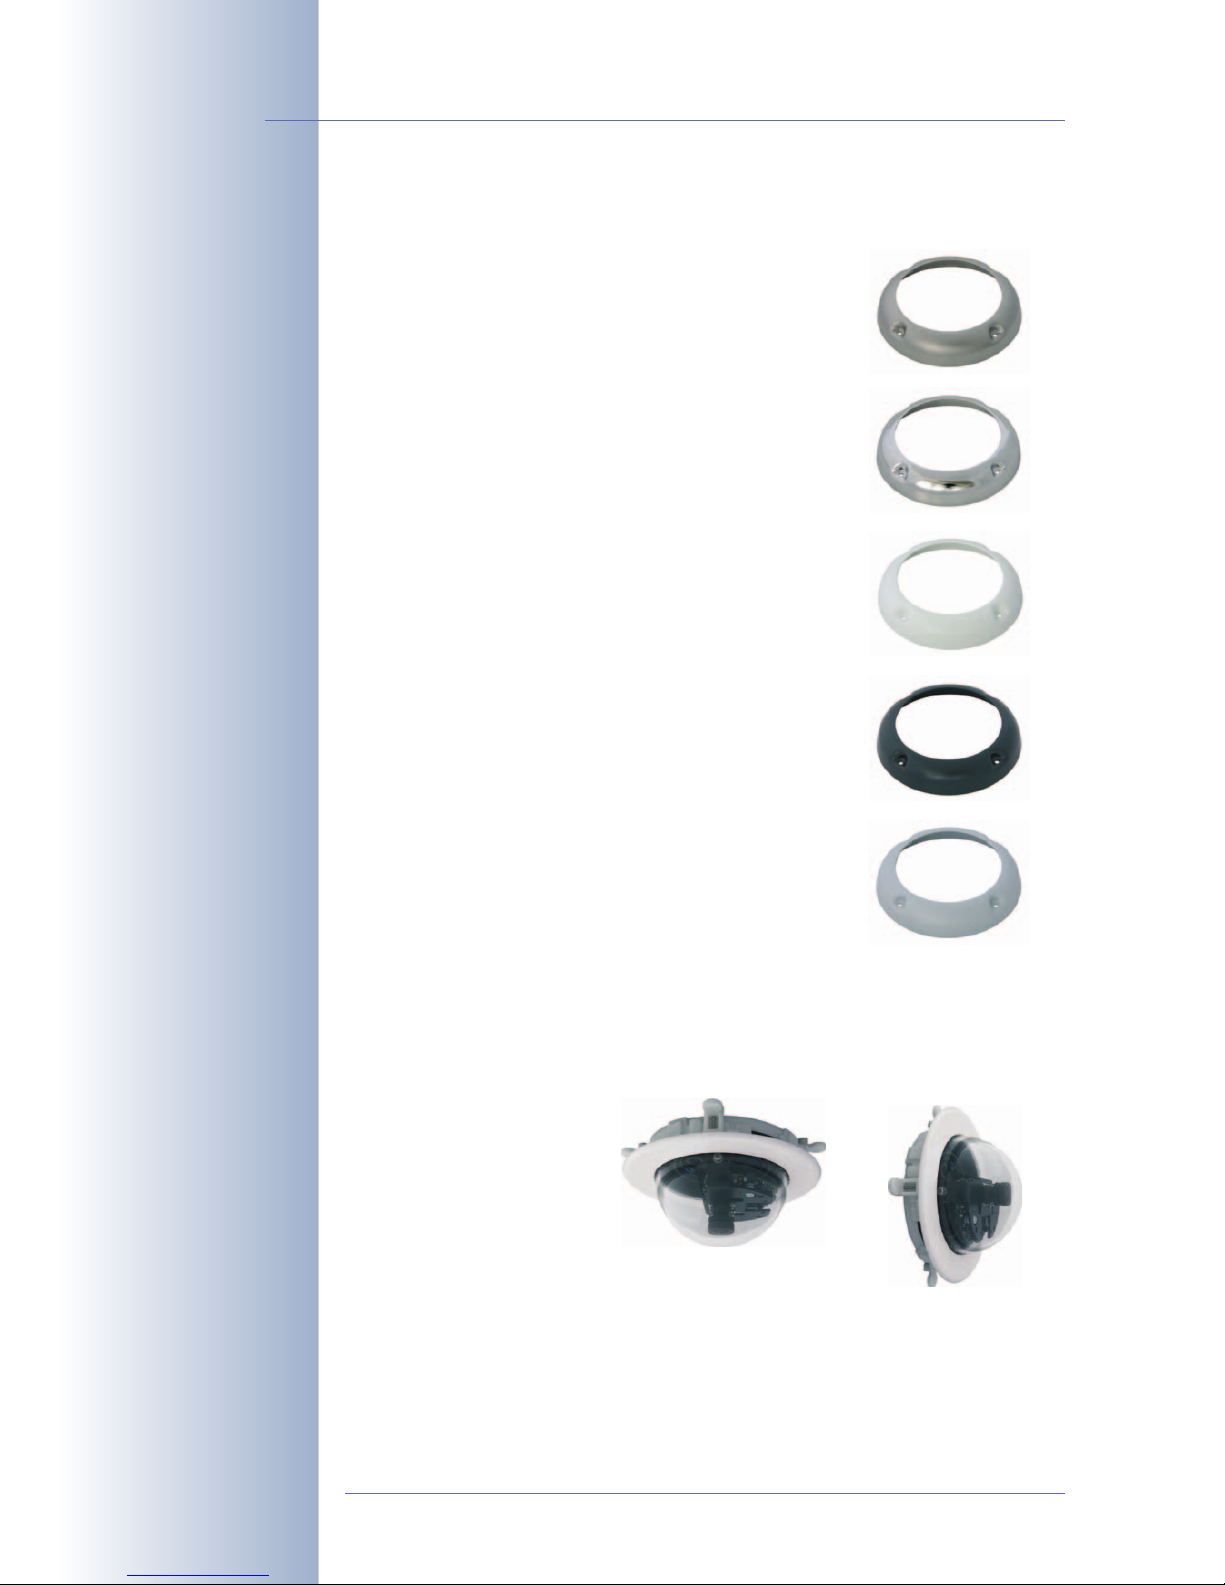
The stainless steel camera ring is available in five
versions:
- matt
- polished
- white powder-coated
- black powder-coated
- silver powder-coated
Note
D22 IT and Secure models are the right choice for more sophisticated
surveillance applications.
ø 160mm/6.3in
ø 160mm/6.3in
ø 165mm x 37mm
/6.5x 1.5 in
Page 10
In order to better adapt the camera to the surroundings, the Vadaism Set is
available in the following versions:
- Stainless steel, matt
- Stainless steel, polished
- Stainless steel, white powder-coated
- Stainless steel, black powder-coated
- Stainless steel, silver powder-coated
• D22 In-Ceiling Set: The D22 In-Ceiling Set allows mounting the D22 camera
in fake ceilings, for example. This type of installation provides optimum protection for the camera and reduces the visible profile to a minimum since
only the dome is visible.
© MOBOTIX AG • Security-Vision-Systems • Made in Germany
www.mobotix.com • sales@mobotix.com
8/100
D22 Camera Manual Part 1
D22 Vandalism Set in different material and color
versions
D22 In-Ceiling Set
Page 11
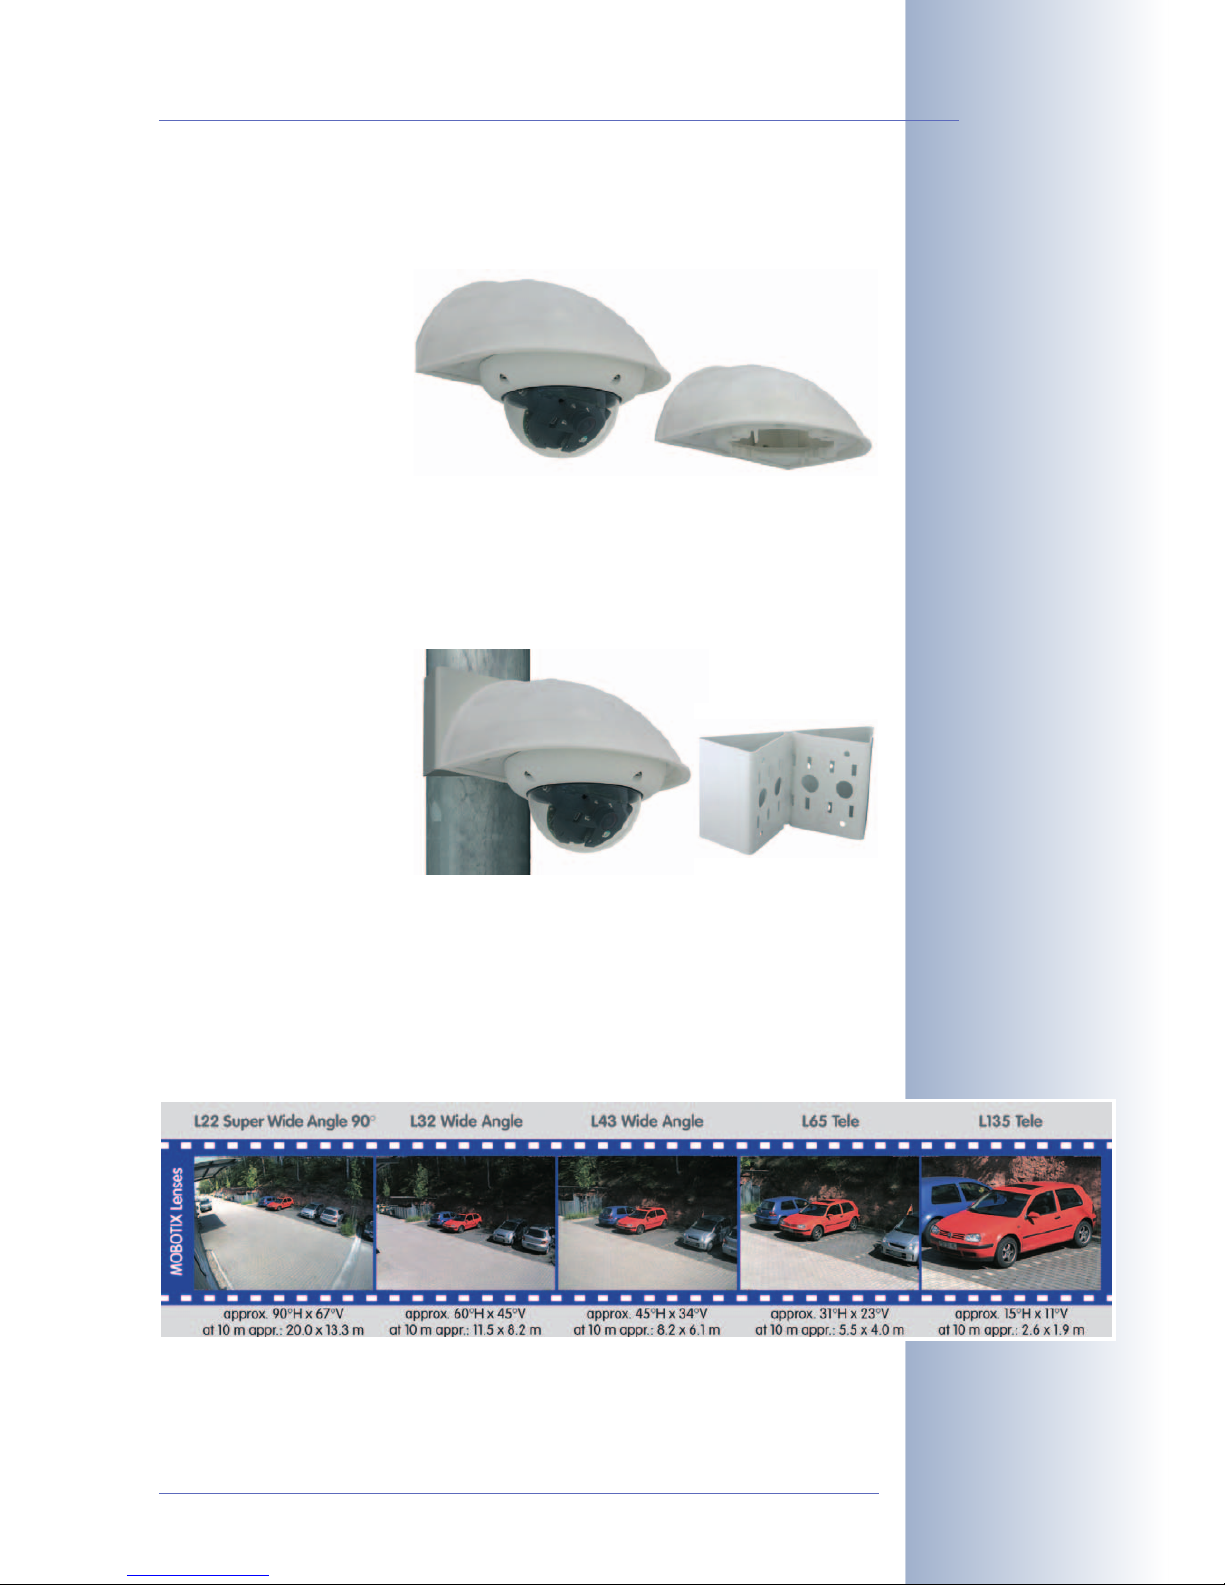
• D22 Wall Mount: The D22 Wall Mount is the ideal solution for mounting the
D22 to walls for indoor and outdoor applications. The camera is absolutely
dustproof and resistant against water jets (IP65). The wall mount also covers
RJ45 wall outlets and
also has ample space for additional
modules.
• D22 Corner and Pole Mount*: If you would like to mount the MOBOTIX D22
to the corner of a building or a pole, you should consider using the MOBOTIX
Corner and Pole Mount, which is used in combination with the wall mount.
The supplied stainless
steel straps allow fixing the mount to poles with diameters
between 60 and
180mm (2.4 to
7.1in).
• Lenses, sensors: You can choose between five different lenses for the MOBOTIX D22 (M14 thread). IT and Secure models can be ordered either with a
daylight image sensor (color) or a night image sensor (black and white).
© MOBOTIX AG • Security-Vision-Systems • Made in Germany
www.mobotix.com • sales@mobotix.com
9/100
D22 Camera Manual Part 1
D22 Outdoor Wall Mount
made from sturdy PBT
30GF
(IP65)
D22 Corner and Pole
Mount: Outdoor quality
made of 3mm stainless
steel
* The appearance and the
dimensions of the D22
Corner and Pole Mount
may change
Page 12
1.1 MOBOTIX Cost Benefits
© MOBOTIX AG • Security-Vision-Systems • Made in Germany
www.mobotix.com • sales@mobotix.com
10/100
D22 Camera Manual Part 1
Overview—MOBOTIX
Cost Benefits
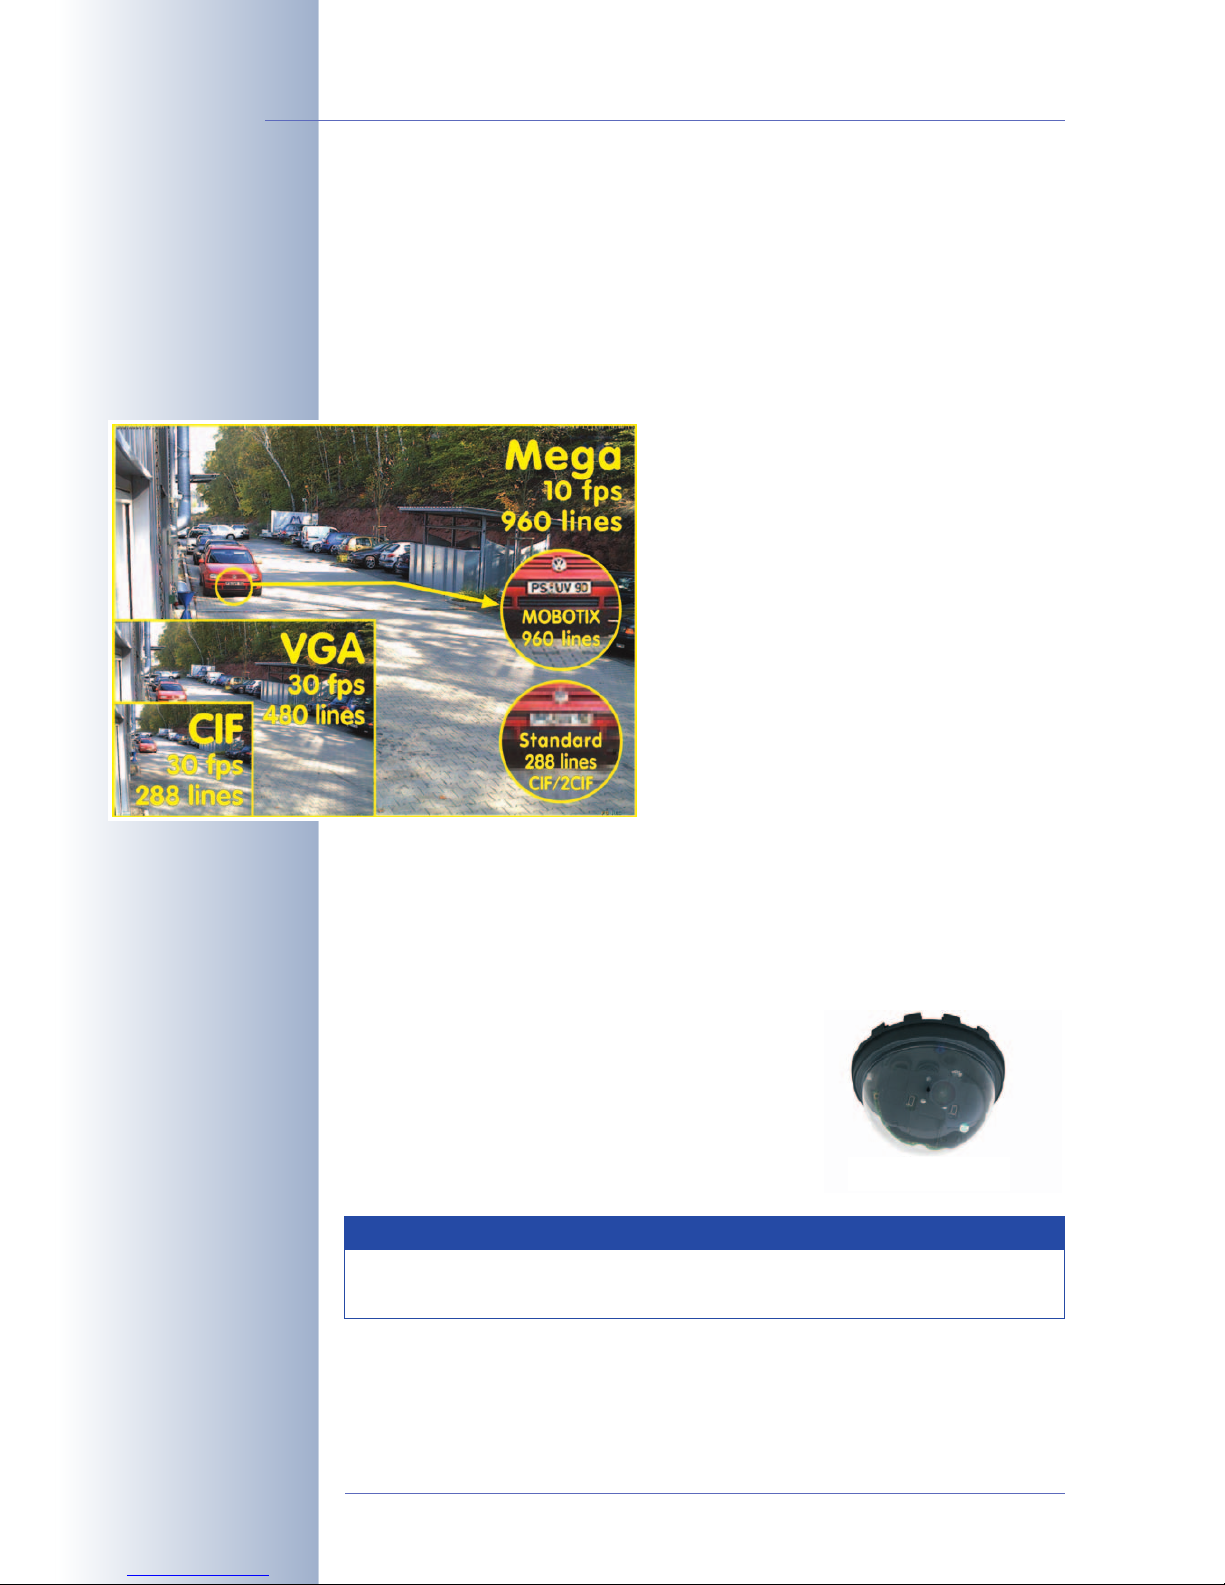
Increased resolution reduces amount of cameras
960-line, high-resolution sensors give a better overview and allow monitoring an entire room with just one camera from the corner
Reduced installation costs at any distance
Standard Ethernet connection enables the use of common network components such as fiber, copper and wireless (WiFi)
Intelligent recording technology reduces storage
Decentralized recording technology in the camera software puts less strain
on PCs and reduces the amount of storage PCs (DVRs) by 10 times
Event-controlled image rate minimizes storage cost
Event-driven, automatically adjusted recording frame rate based on event or
sensor action reduces amount of data and storage costs
No additional power and no heating required
Anti-fogging without heating allows usage of standard PoE technology to
power the system via network and saves costs of power cabling
Backup power requirement reduced by 8 times
Low power consumption, 3 Watt, enables year-round (no heating required)
PoE with one centralized UPS from installation room via network
Robust and practically maintenance free
Fiberglass-reinforced composite housing with built-in cable protection and
no mechanical moving parts (no autoiris) guarantees longevity
No software and no licence costs
Control and recording software is integrated in the camera and is free of
charge; new functions are available via free software downloads
Unlimited scalability and high return on investment
While in use, more cameras and storage can be added at any time; image
format, frame rate & recording parameters can be camera specific
Additional functions and other extras included
Audio support, lens, wall mount and weatherproof housing (-30° to +60°C,
-22° to +140°F) included; microphone & speaker available in certain models
Page 13
1.2 MOBOTIX Technical Advantages
© MOBOTIX AG • Security-Vision-Systems • Made in Germany
www.mobotix.com • sales@mobotix.com
11/100
D22 Camera Manual Part 1
Overview—MOBOTIX
Technical Advantages
Progressive-scan instead of half-frame blur
Megapixel sensor and image processing inside the camera with digital
white balance generates sharp and true color images at every scale
Sun and backlight compensation
CMOS sensor without auto iris, digital contrast enhancement and configurable exposure measurement zones guarantee optimum exposure control
Dual camera technology: 2-in-1
Two possible camera views with picture-in-picture technology or 180° panoramic view; one Dual-Fixdome camera with 2.5 megapixel is enough
Long-term, high-performance Terabyte recording incl.
Event detection and ring buffer recording by the camera itself allow recording of 40 smooth video streams on a single PC (1200 VGA images/s)
Simultaneous recording, event search and live viewing
Live video for multiple users, recording and event search simultaneously
possible in seconds from anywhere in the world via network
Very low network load
Efficient MxPEG video codec, motion detection based recording and video
buffering inside camera guarantee a very low network load
Bridging of recording during network failures
Internal camera ring buffer bridges network failures and bandwidth fluctuations of wireless links (WLAN/UMTS) for several minutes
Day & night maintenance free
Unique Day/Night camera technology without moving parts guarantees
extreme light sensitivity and ensures long-term reliability
Audio and SIP telephony
Lip-synchronized audio (live & recording); each camera is a video IP telephone based on SIP standard with automatic alarm call and remote control
MxControlCenter included
Dual screen technology with building plans, free camera positioning, event
search, image processing, lens distortion correction and PTZ support
Page 14
1.3 MOBOTIX D22 Concept
High-resolution live video with up to 30 frames/s at 640x480
The second generation of cameras from MOBOTIX delivers smooth live video display in VGA format with synchronous live audio, yet it keeps the network load to a
minimum (approx. 2Mbps)*. Live video display now matches the performance of
analog video systems. When recording, MOBOTIX systems easily outperform analog systems, since MOBOTIX cameras store the high live image resolution and
frame rate without compromising image quality. MOBOTIX technology thus al-
lows simultaneous recording of video from 30 cameras in continuous recording mode on one standard PC at 30fps each, including audio.
Low bandwidth requirements
MOBOTIX' patent pending MxPEG streaming format allows fast live video with audio at extremely low network load (1 to 2Mbps). Since the MOBOTIX camera itself
detects movements in the image (and not the computer), video is only transmitted if
movements occur, and when the video and audio data are being stored.
Voice over IP and ISDN (with accessories)
Moreover, MxPEG provides for lip-synchronized audio and two-way communication between the camera and your computer. Room surveillance with audio is possible* using Internet Explorer or MxControlCenter. Alarm notification on your mobile
or via Internet telephony is just as easy as event-controlled voice messages directly
from the camera (D22-IT/Secure require an external speaker and microphone).
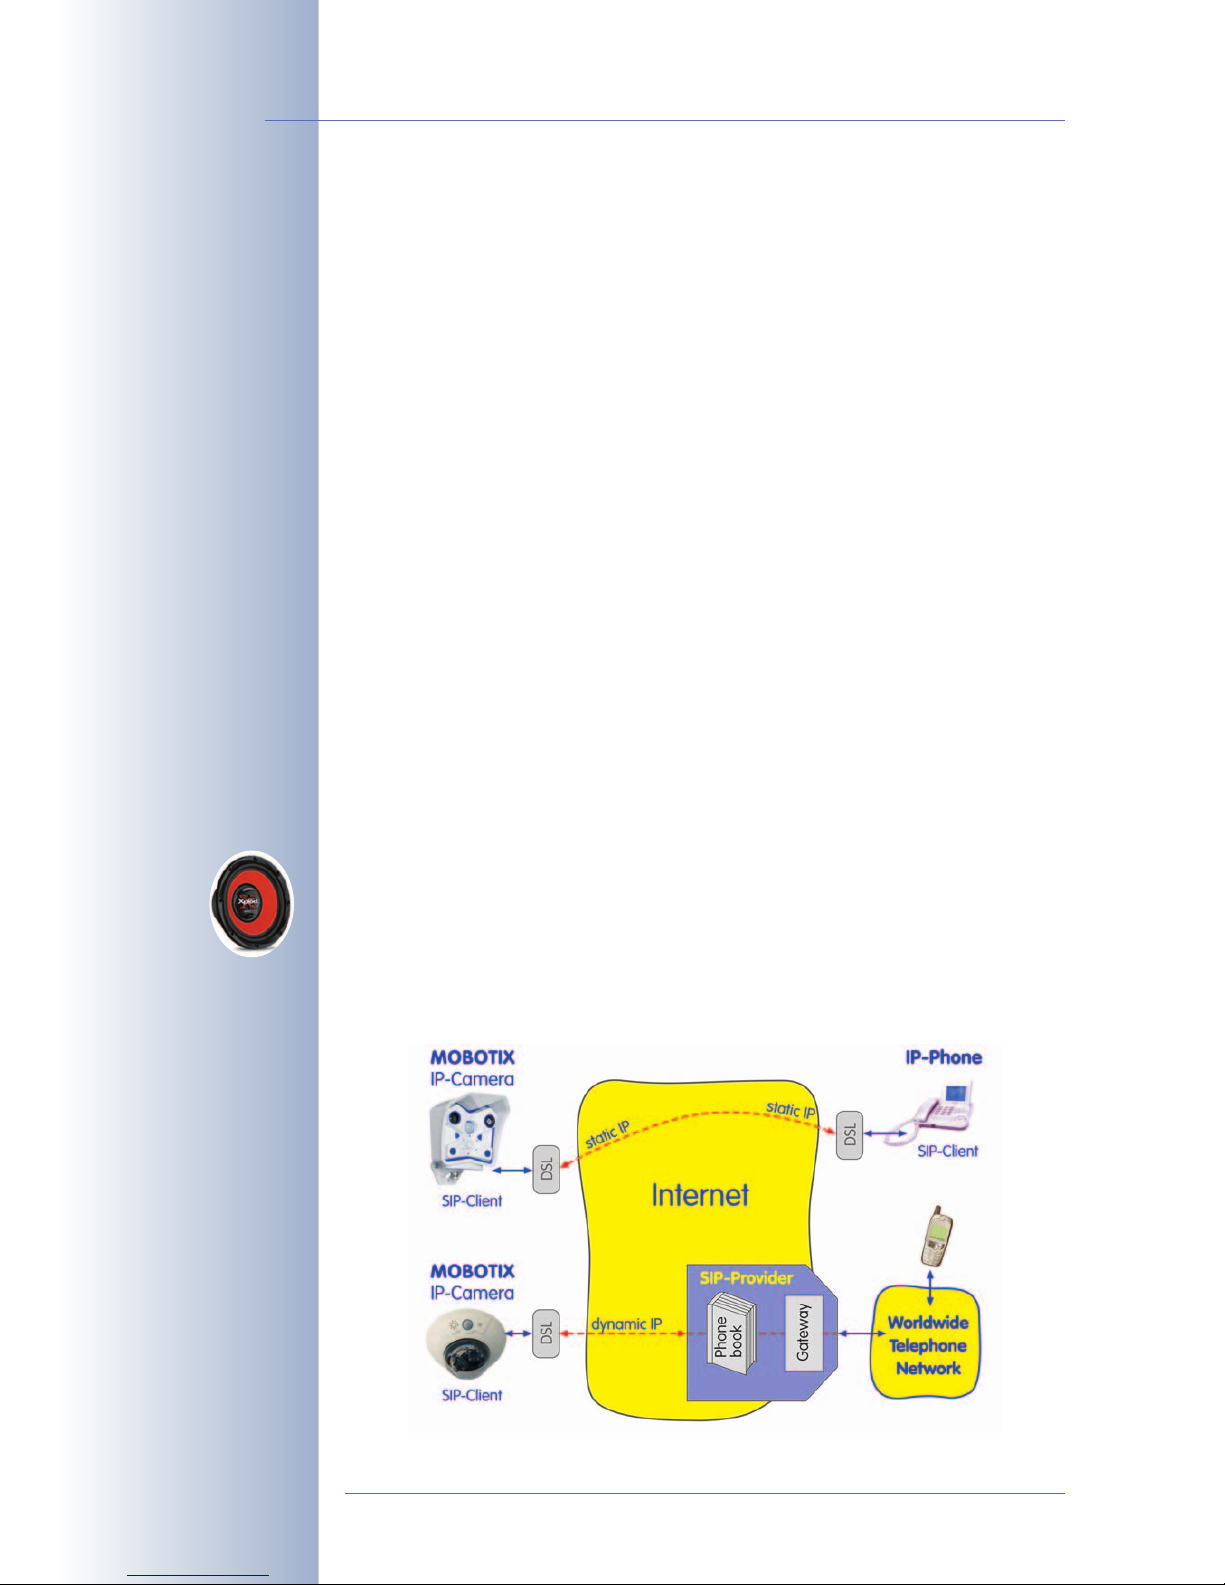
IP telephony and video SIP (with accessories)
All telephone features can be used via Internet telephony thanks to the integrated
SIP client. The SIP client allows remote-controlling the camera using the touchtone
keys and also makes the alarm calls of the camera. Video SIP allows establishing
audio/video connections to the camera using Windows Messenger or similar applications (e.g. CounterPath X-Lite, Eyebeam).
© MOBOTIX AG • Security-Vision-Systems • Made in Germany
www.mobotix.com • sales@mobotix.com
12/100
D22 Camera Manual Part 1
* Accessories required:
external microphone and
external speaker
*D22-IT and Secure
models also allow connecting an external speaker and microphone;
D22 cameras do not
have an integrated speaker or a microphone
IP Telephony!
In order to use VoIP and
Internet telephony with
the D22, you need an IT
or Secure model with an
attached external speaker
and microphone
Page 15
Long-term storage included
MOBOTIX cameras (IT and Secure models) feature an integrated long-term storage
system for Windows, Linux and Mac OS X computers. Every camera manages its
own ring buffer storage space on the shared folder. Thanks to this decentralized
technology, 30 live cameras can store images on a regular Pentium 4-class computer with 30fps each, including audio (depending on the operating system).
Event storage on SD card
An SD card can be inserted into the integrated slot to increase the internal memory
of MOBOTIX D22 IT and Secure models (SD cards will be supported in a future software release). A 2GB card can permanently store up to 65,000 images in CIF format, 40,000 images in VGA format or 13,000 Megapixel images, which are not lost
in the event of a power failure.
If long-term storage on a file server has been set up, the SD card adds yet another
layer of security against loss of data, since the SD card can easily bridge longer
network outages.
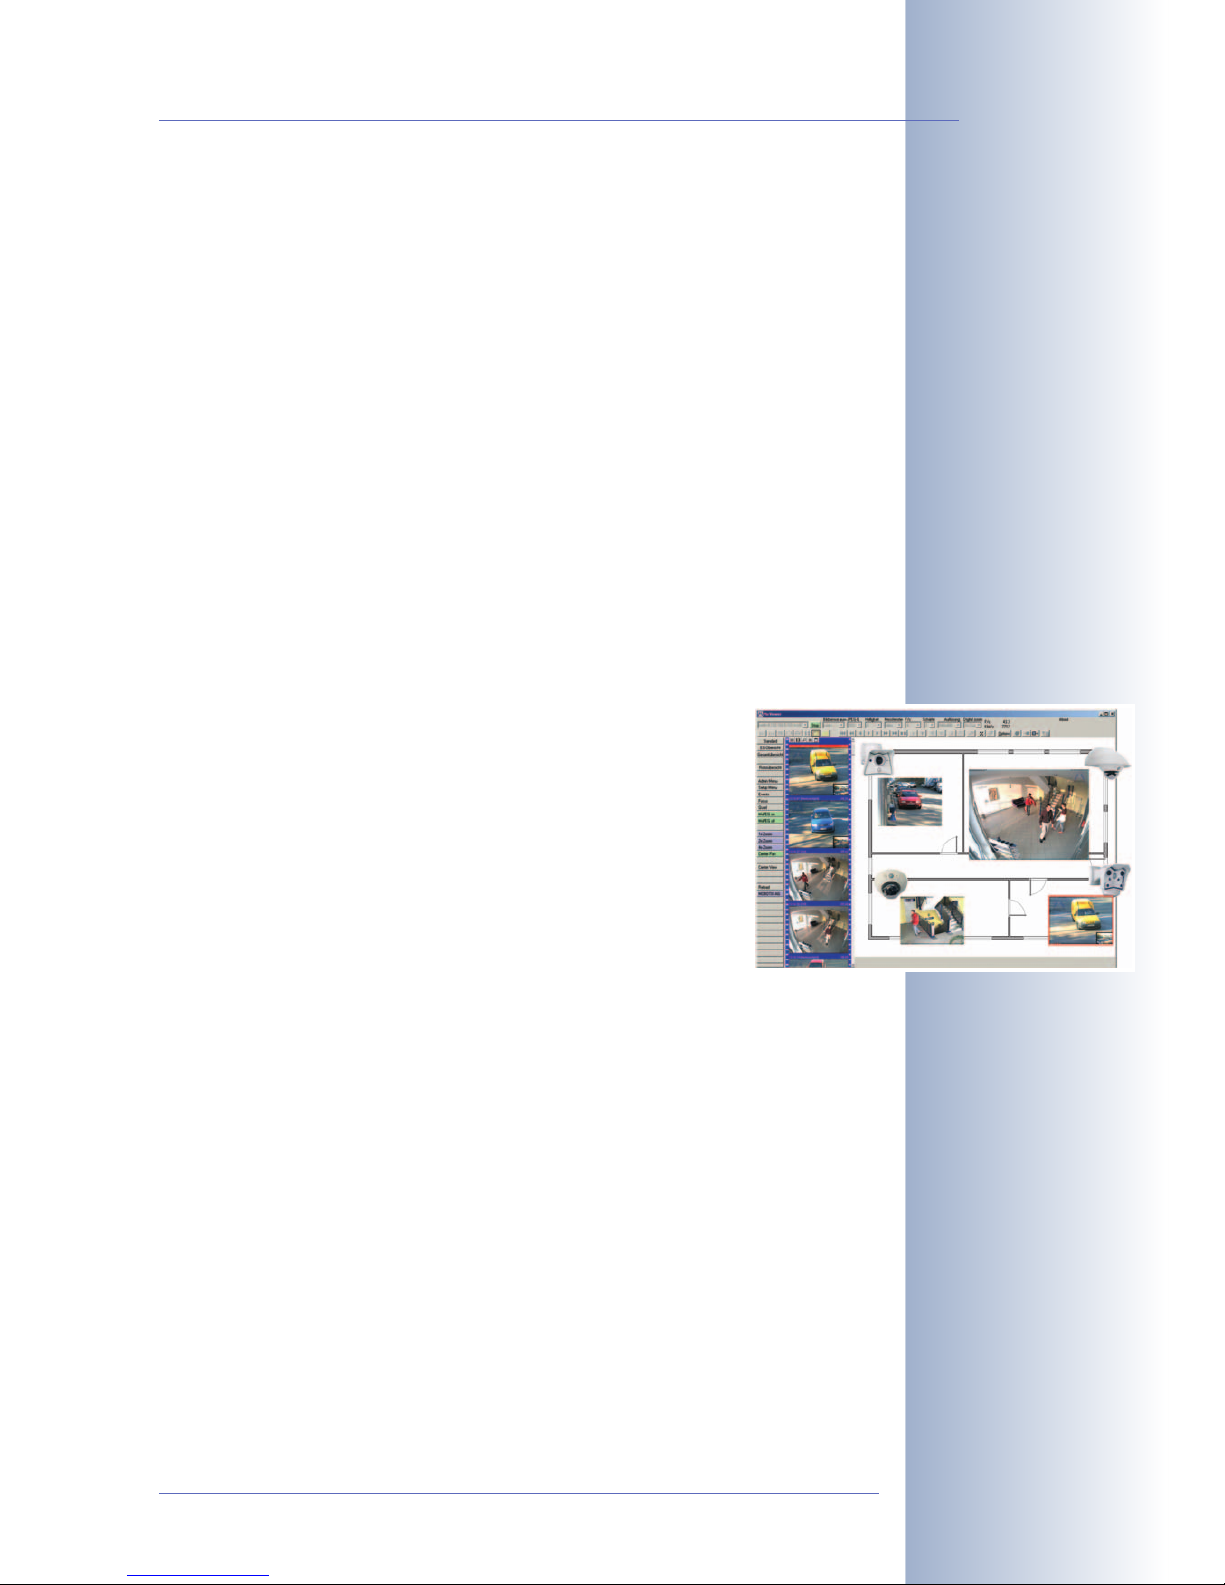
30 live cameras using MxControlCenter
Instead of using a web browser, you can also download the free
MxControlCenter for Windows from www.mobotix.com, which
allows displaying up to 30 MOBOTIX cameras on one monitor
(Linux and Mac OSX versions are currently being developed). In
addition, MxControlCenter can process incoming alarms from the
cameras and allows comfortably searching and evaluating the
alarm video clips (including audio*). The integrated Layout Editor of
MxControlCenter provides for quickly creating floor plans by simply
dragging/dropping the cameras onto a background image. Load a
floor plan as background image, drag&drop the cameras; done.
Event and Time-controlled
Just like event-controlled recording upon detecting movements in the image, the
camera can also record when the volume picked up by the microphone exceeds a
set trigger value (audio-capable models only*). Using scheduled recording that
takes into consideration vacation times and holidays, time tasks can start or stop
video recording, uploading of images to a web site or sending of e-mails with video/audio* clips.
Remote Alerting
In case of an alarm, MOBOTIX cameras automatically pop up windows or activate
other functions at a remote security control center. The cameras can use network/
wireless, GSM/GPRS/UMTS (3G) or Internet connections for this purpose (a GSM/
GPRS/UMTS modem can be connected to the serial interface of MOBOTIX M12/D12
models).
© MOBOTIX AG • Security-Vision-Systems • Made in Germany
www.mobotix.com • sales@mobotix.com
13/100
D22 Camera Manual Part 1
Download MxControlCenter free of charge from
www.mobotix.com
* Accessories required:
external microphone and
external speaker
Page 16

Day & Night
The Night version of the D22-Secure model delivers crisp and clear images of moving objects even at night since they use a special black and white image sensor.
Depending on the lighting conditions, you can use infrared light to enhance the
lighting, since the B/W sensor system is IR-sensitive (in contrast to the human eye).
Integrated Power over Ethernet
Power is supplied as Power-over Ethernet via the network cabling us-
ing the MOBOTIX power supply (in combination with the Network
Power Adapter), a MOBOTIX Network Power Rack (8 to 20 cameras) or a
Network Power Box (4 cameras), or by using a PoE-compatible switch (according
to PoE standard IEEE 802.3af).
Since the camera's plastic housing insulates well and is anti-fogging, no additional
heating or fans are necessary. This is why MOBOTIX, unlike other manufacturer's
cameras, have low power requirements (3Watts) and PoE can be used every day
of the year indoors as well as outdoors for supplying power.
Weatherproof
MOBOTIX D22 cameras are certified according to IP54 (Basic models) or IP65 (IT
and Secure models) and are designed for outdoor as well as indoor usage. As the
cameras do not have any moving parts, they are extremely robust and resistant
against heat or cold (-30 to +60°C; -20 to +140°F).
Logos, Animated or Freestyle
The logo generator of MOBOTIX cameras allows scheduled display of different
banners and graphics (or files loaded from any URL) into the current camera
images. MOBOTIX cameras are the only network IP cameras supporting animated
and transparent graphics.
© MOBOTIX AG • Security-Vision-Systems • Made in Germany
www.mobotix.com • sales@mobotix.com
14/100
D22 Camera Manual Part 1
No heating required—PoE
is no problem even in the
wintertime!
Page 17

1.4 Feature Overview of the MOBOTIX D22
The MOBOTIX D22 includes the following main features (some features are modeldependent):
• Live images of up to 1280x 960 pixels resolution via network and WiFi with
up to 30fps (at 640x 480 VGA resolution), also adapted for PDAs.
• Digital zoom with three stages (1x, 2x, 4x) and integrated panning (from 2x:
clicking in the browser image will move the zoomed image section in the corresponding direction).
• True software scaling using the proven and continuously improved MOBO-
TIX algorithms, which delivers brilliant images even with smaller image formats (e.g. 320 x 240/CIF).
• Audio video recording* with three different recording modes: Event recor-
ding with audio, continuous recording with variable frame rate and audio as
well as event-controlled Snap Shot recording of JPEG images.
• Telephony functions (SIP)* for Phone Call-In and remote-controlling from
touchtone phones as well as voice phone calls from the camera for alarm
messaging purposes.
• SIP Video* (Internet telephony) with support for e.g. Windows Messenger,
X–Lite/Eyebeam and video phones.
• File server tests can monitor a file server and use one or more of the defined
messaging options for error notification.
• Camera tests where several cameras monitor one another, with failure noti-
fication using the defined messaging options.
• Playback of recorded images/video sequences with audio in the integrated
video management system.
• MultiView screen for displaying multiple cameras or events in one browser
window.
• Event notification by e-mail, SMS (using a provider), voice notification (Phone
Call-Out), sounds and by visual means (e.g. red frame in Live image) using
two separate messaging paths.
• Object tracing for analyzing the paths of objects that are moving in the
image.
• Logo generator for displaying logos in the camera images with dialogs for
managing image files and defining image and logo profiles for controlling
logo display.
• Logos can have transparent areas and can be displayed partially transparent at the same time (creating a watermark effect), banner rotation and animations are also possible.
© MOBOTIX AG • Security-Vision-Systems • Made in Germany
www.mobotix.com • sales@mobotix.com
15/100
D22 Camera Manual Part 1
* In order to use the
audio recording and telephony features with the
D22, you need an IT or
Secure model with an attached external speaker
and microphone
Logo generator
Page 18
• Time Tables for handling customized days, e.g. for holidays and vacations.
The time tables are used to control the camera's arming, image recording,
action, messaging, logo, obscure image and other features.
• Remote signaling for master/slave cameras, with the master camera con-
trolling the arming status of the slave cameras. This allows arming, for
example, of all slave cameras by using a key switch that is connected to the
master camera.
• Transfer profiles for improved handling of FTP, E-Mail, phone calls, network
transmissions and messages.
• Speaker phone* for announcements via the camera speaker. listening into a
room and intercom mode using Internet telephony (SIP) and ISDN (D22 models require an external speaker and microphone).
• Phone Call-In* to remotely control the camera using a touchtone phone via
Internet telephony (retrieve camera information, establish Internet connection, announcement of retrieved IP address, intercom feature, etc.).
• MxPEG video compression using MxControlCenter for Windows (Linux and
Mac OSX versions are currently being developed). In addition, the ActiveX
plug-in for Windows Internet Explorer brings all advantages of MxPEG (including the audio stream to and from the camera*) to the browser-based user
interface.
• Routing allows using other network connections besides the standard route.
• DynDNS client for accessing the camera using a symbolic name (e.g.
mymobotixcam.dyndns.org) although the provider is assigning a new
dynamic IP address every time the camera connects to the Internet.
• Undeletable Backup operating system automatically takes over when rebooting the camera (e.g. when updating the system software has failed due
to a power failure), allowing you to restart the update process.
• Enhanced startup options for the camera (obtain IP address via DHCP, an-
nouncement of IP address and other network data*, reset to factory default
settings, etc.).
© MOBOTIX AG • Security-Vision-Systems • Made in Germany
www.mobotix.com • sales@mobotix.com
16/100
D22 Camera Manual Part 1
Speaker phone
Telephony features using
VoIP connections (Internet telephony)!
* Accessories required:
external microphone and
external speaker
* Accessories required:
external microphone and
external speaker
Free software updates
Software Updates
MOBOTIX provides free software updates on www.mobotix.com at
regular intervals that improve and expand the camera's functionality.
Chapter6,
Software Update
, in the
Software Manual
, provides detailed
information on the process.
Page 19
© MOBOTIX AG • Security-Vision-Systems • Made in Germany
www.mobotix.com • sales@mobotix.com
17/100
D22 Camera Manual Part 1
* D22 IT and Secure
models allow connecting
an external speaker and
microphone, however,
neither is factory-integrated.
* M12 models delivered
with L43 or L22
** M22 models in connection with Cam-IO
*** Not available for D22
models
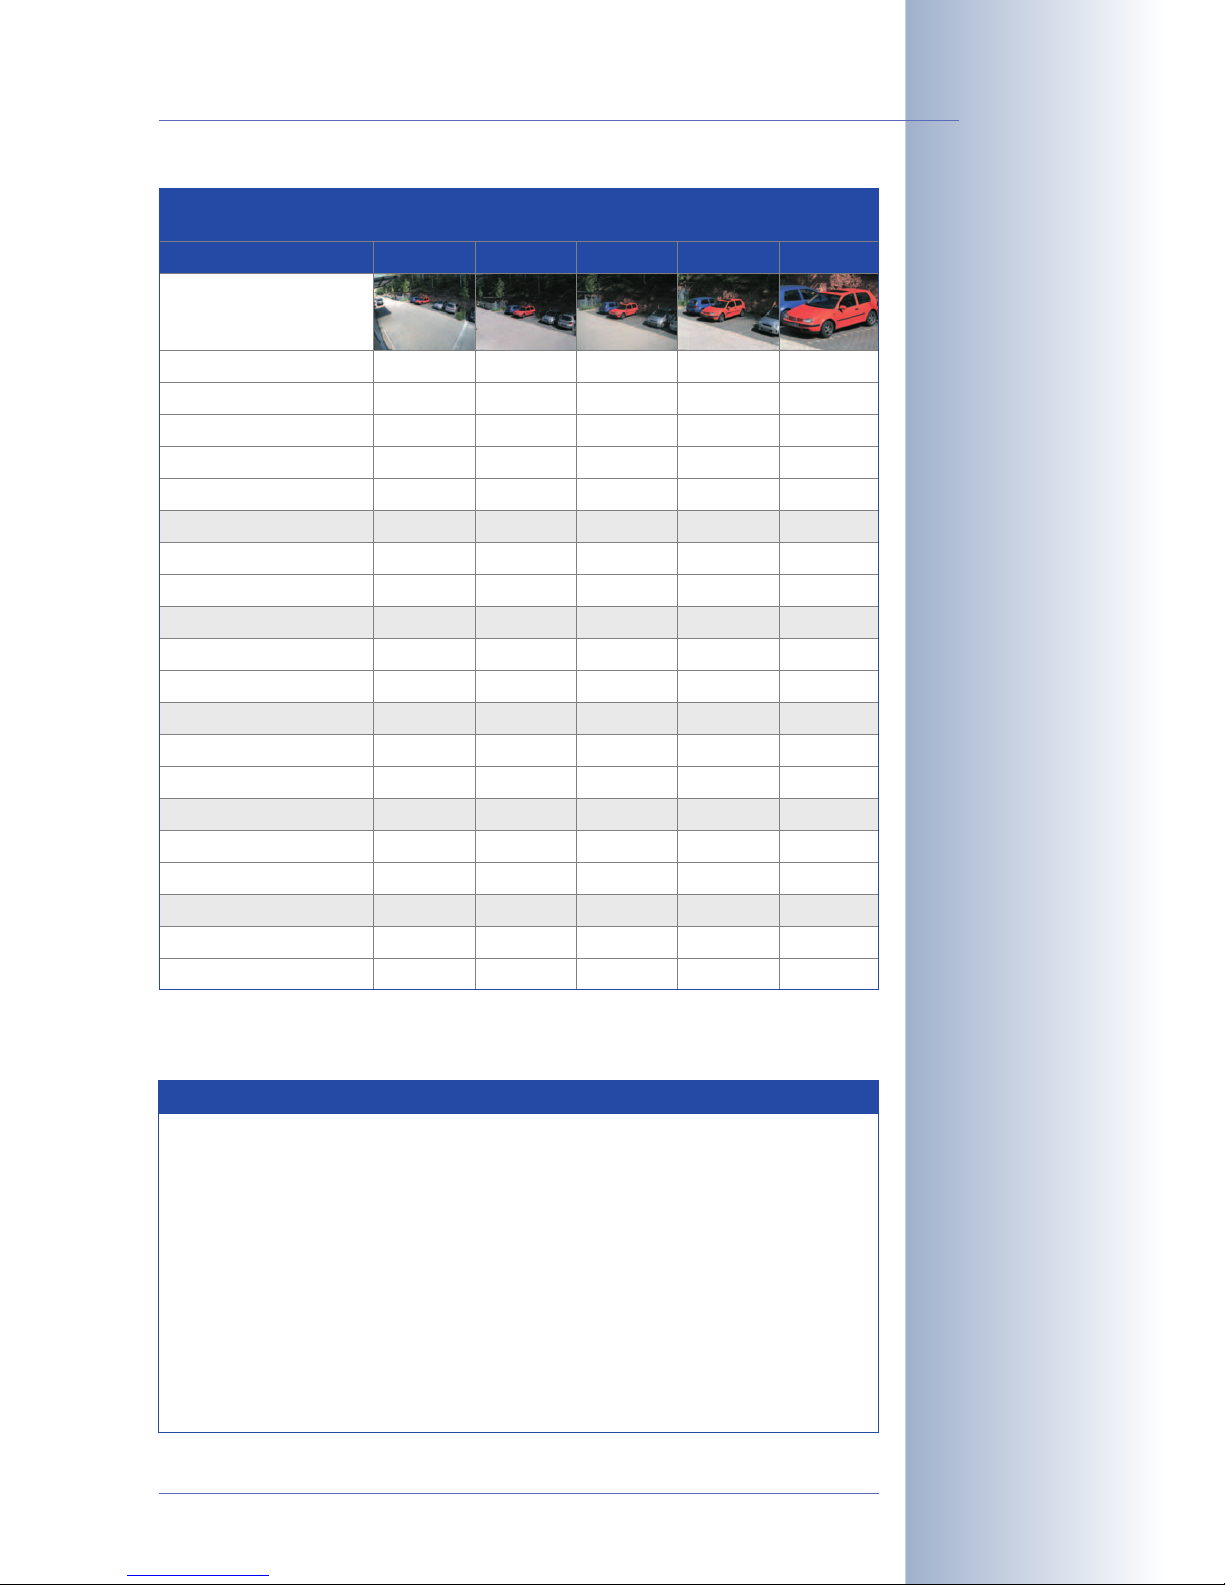
Basic Models
IT
Models
Secure
Models
Software Features (All Models)
Digital zoom (2x, 4x) with panning X
Motion JPEG/MxPEG video streaming
Custom exposure windows
Video Motion detection
Time and event control (FTP, email, logos)
X/X
X
X/X
X
X
X
X
X
X/X
X
X
X
Time tables with holidays
Web functionality (FTP, email)
Quad/MultiView in browser
Recording/Playback in browser
X
X
X
X
X
X
X
Logo generator, animations
Single image recording (pre-/post-alarm images)
Terabyte ring buffer (Win/Lin/Mac) via network
Continuous video/audio recording, 0.2 to 30 fps
3
X
10
X
X
X
X
X
X
X
50
X
X
Video/audio recording (event-triggered)
Event-controlled frame rate with continuous audio
Flexible event logic
Master/Slave arming by one camera
X
X
Scheduled privacy zones, several areas
Bidirectional audio (IP) from/to browser
Customized voice messages
VoIP telephony (Audio/Video, SIP)
X
X
X
X
X
X
X
X
X
X
X
Alarm calls to softphones (SIP) e.g. Xten
Remote alarm notification (via TCP/IP, IP Notify)
RS232 Data Logger/Terminal
Programming interface/HTTP API
X
X
X**/***
X
Model Limitations
Image size
Image sensor (color / BW)
VGA
Color
VGA
Color & BW
X
X
X**/***
X
Mega
Color & BW
Standard lens for software version
Audio support (Microphone/Speaker)
L22
-/-
L22*
M/S
L22*
M/S
M12
D12
M22M
D22M
Page 20
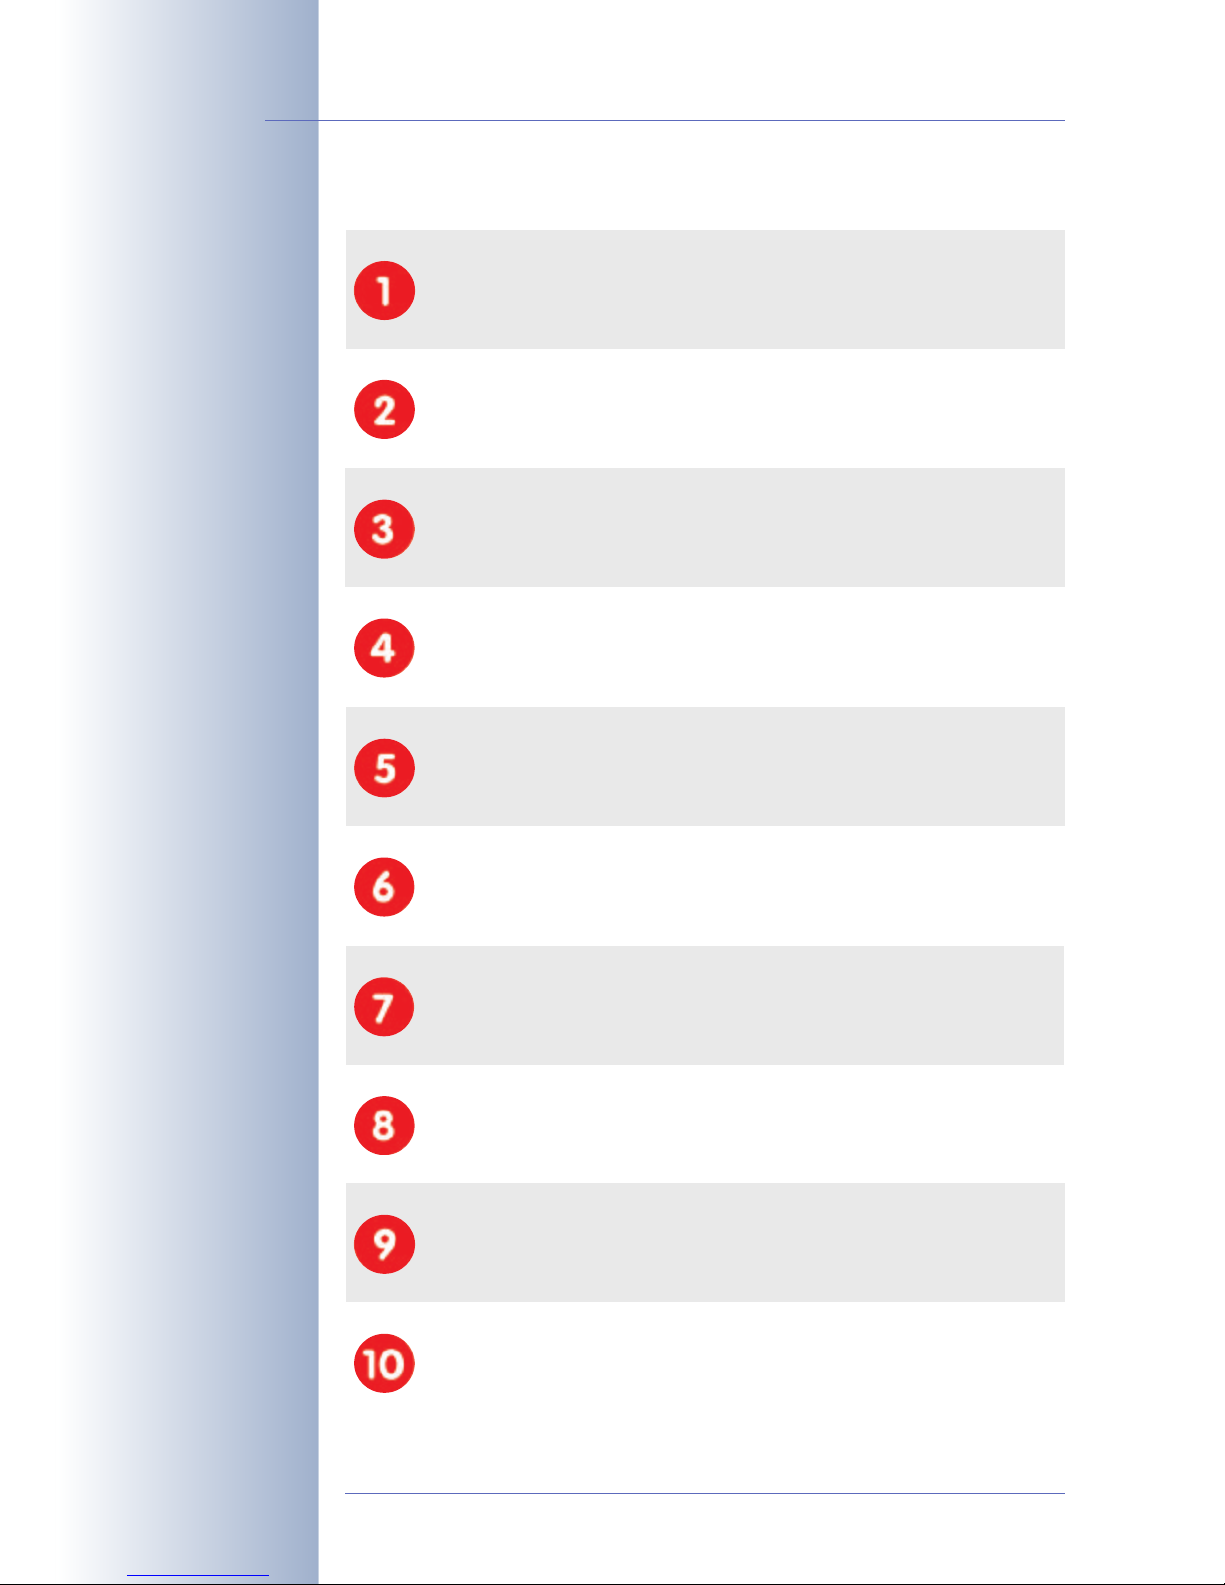
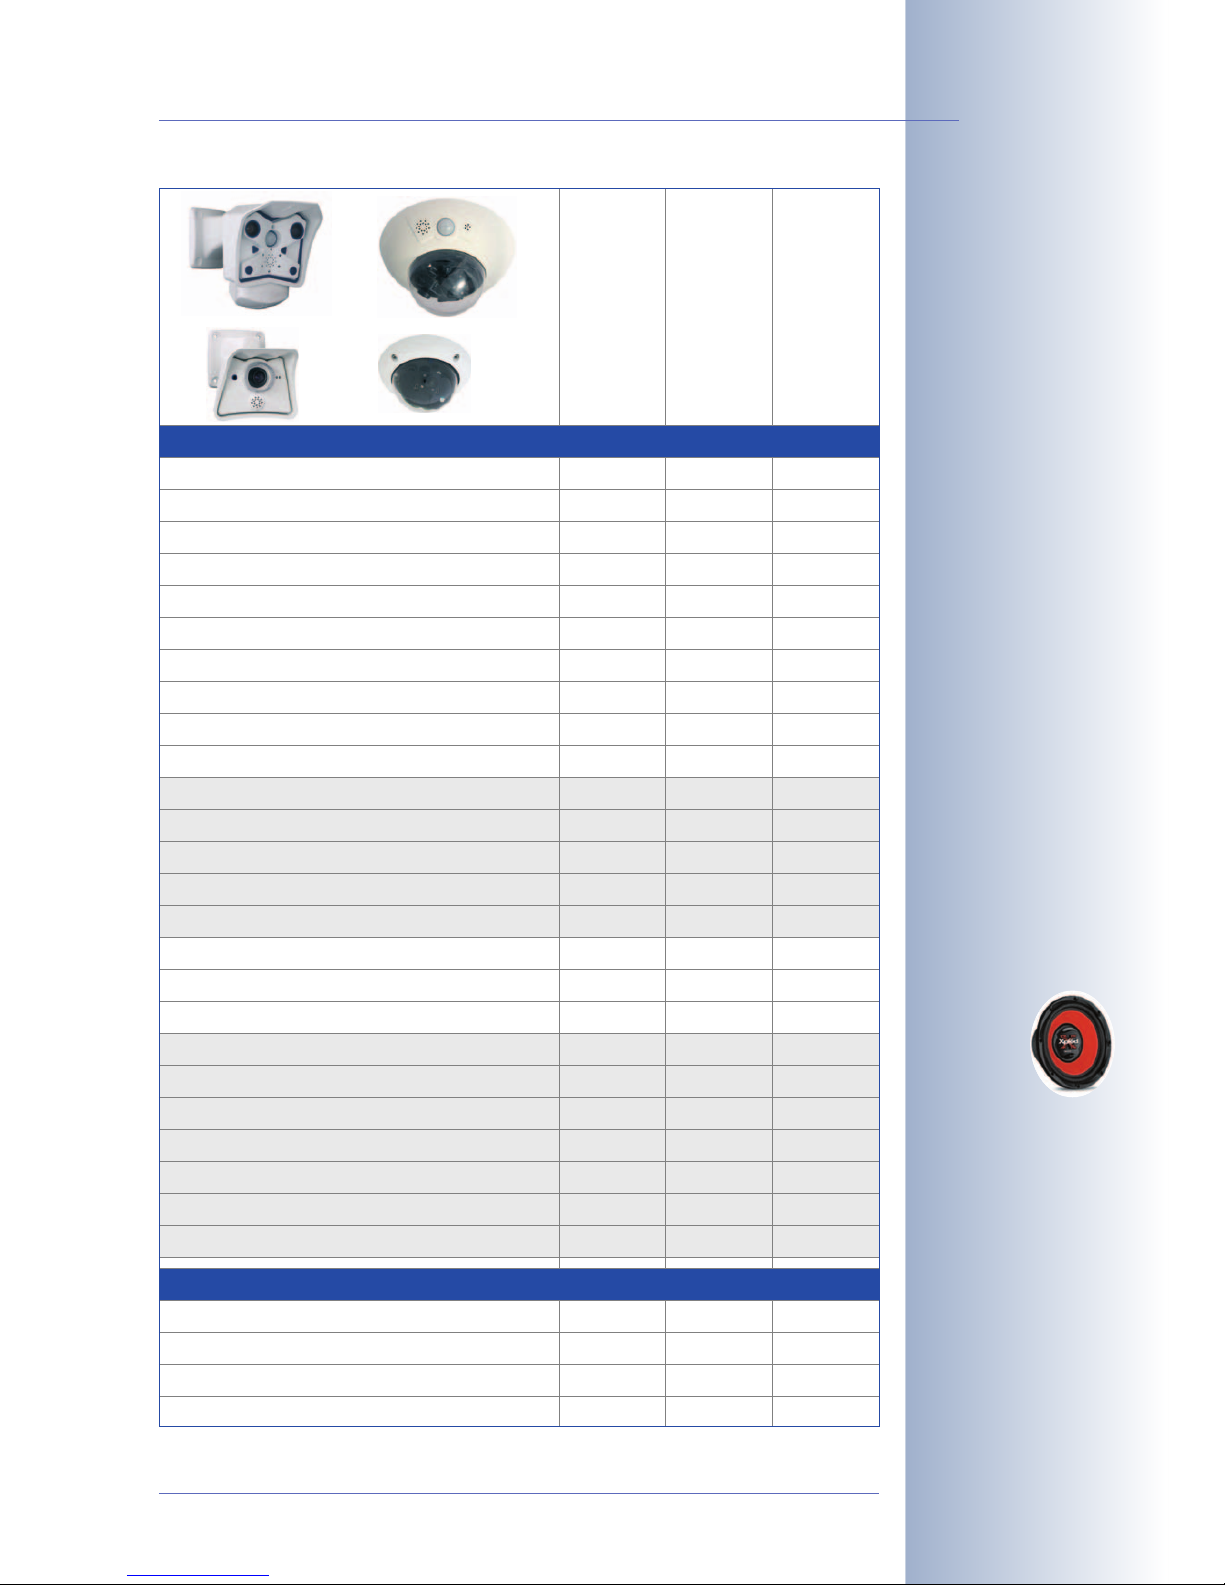
1.5 Lenses for the MOBOTIX D22
MOBOTIX currently offers five different lenses: from Super Wide-Angle L22 with
22mm focal length up to the tele lens L135 with 135mm focal length (equiv. to
35mm camera). Since MOBOTIX cameras are backlight-proof, they do not require
a mechanical auto iris. Without the iris as a mechanical component, all MOBOTIX
glass lenses are extremely robust and maintenance-free. You can choose between
the following lenses for the MOBOTIX D22 (M14 thread):
• L22 Super Wide-Angle 90° image angle (horizontally)
• L32 Wide angle 60° image angle (horizontally)
• L43 Wide angle 45° image angle (horizontally)
• L65 Tele 31° image angle (horizontally)
• L135 Tele 15° image angle (horizontally)
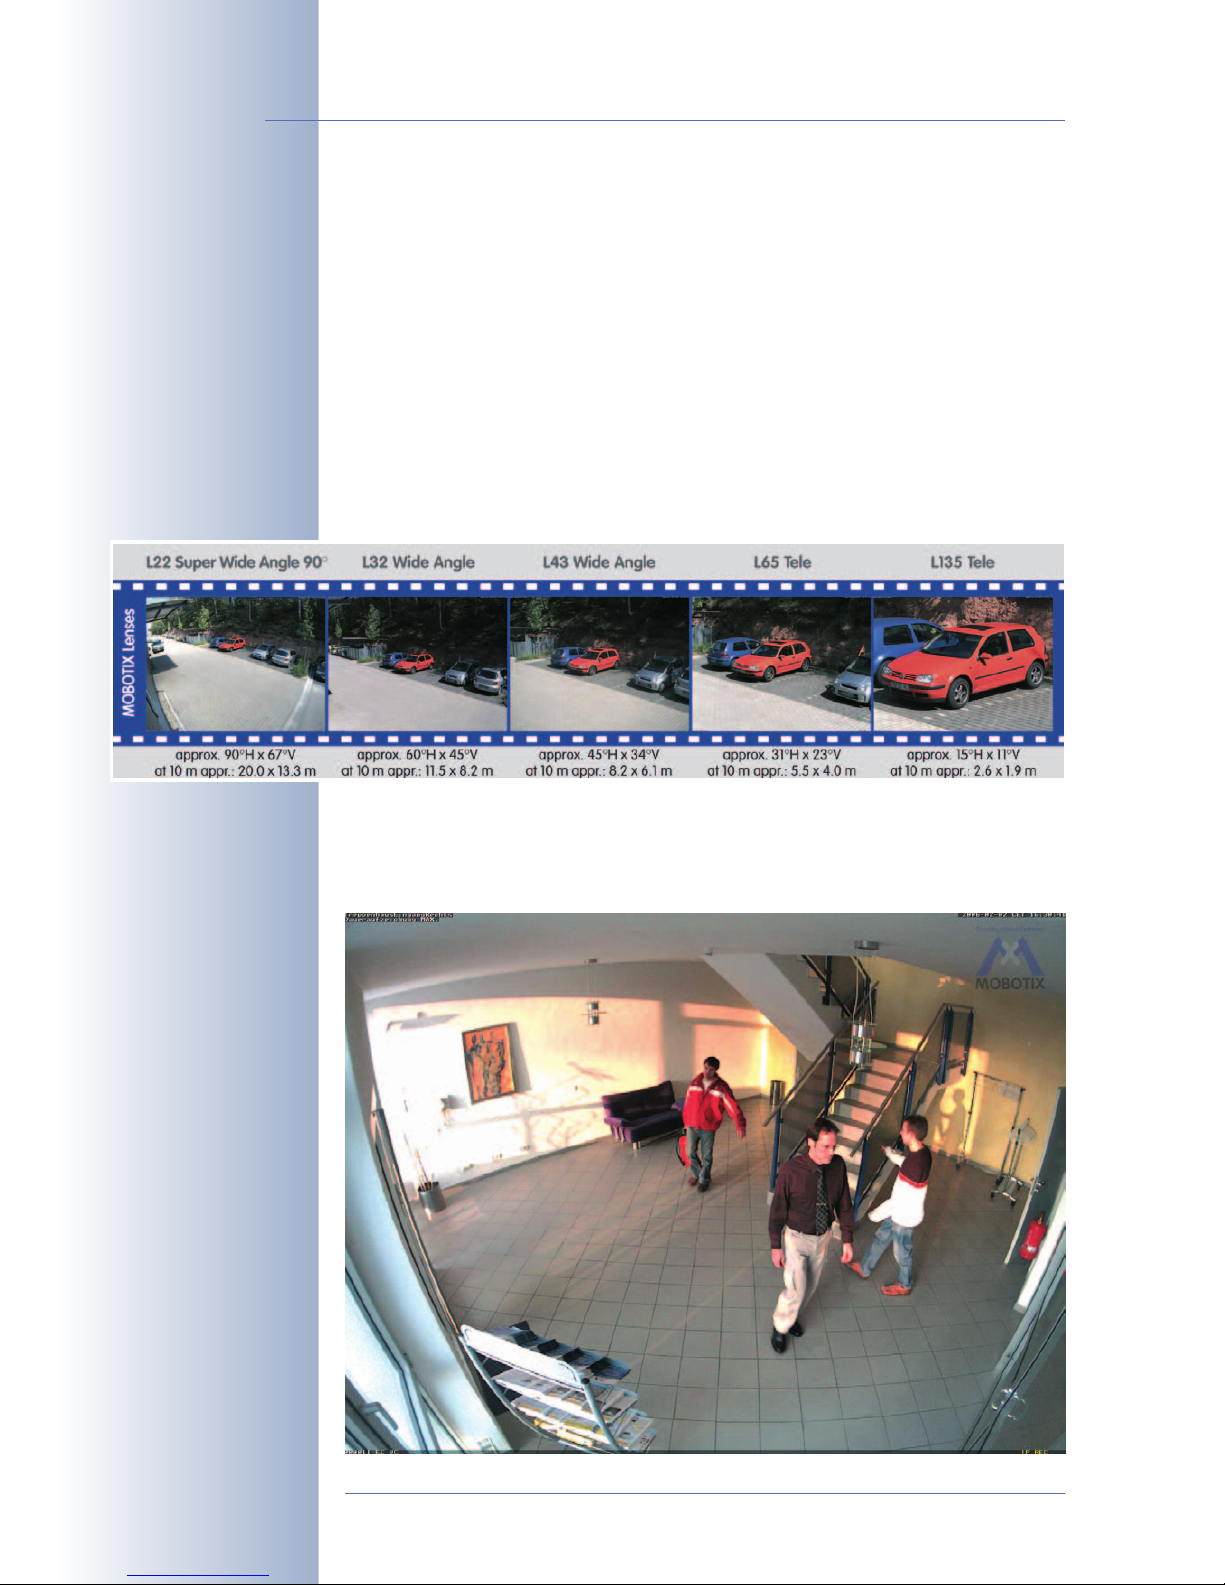
The L22 Super Wide-Angle 90° lens has very little distortion and excellent image
quality, even when using the 4x digital zoom of the D22. If a camera with a Super
Wide-Angle lens has been mounted in the corner of a room, the complete room is
visible on the image.
© MOBOTIX AG • Security-Vision-Systems • Made in Germany
www.mobotix.com • sales@mobotix.com
18/100
D22 Camera Manual Part 1
Available lenses!
L22 Super Wide-Angle 90°
Page 21
© MOBOTIX AG • Security-Vision-Systems • Made in Germany
www.mobotix.com • sales@mobotix.com
19/100
D22 Camera Manual Part 1
Focal lengths of
MOBOTIX lenses are
always given as compared
to a 35mm camera!
To determine the lens you
need, simply use a camera
with zoom lens to find a
matching MOBOTIX lens
Note
The focal lengths of MOBOTIX lenses do not reflect the actual focal
length of the lenses, but the focal length (
Lxx
mm) converted to 35mm
camera format. For example, the MOBOTIX Super Wide-Angle lens has
an actual focal length of 4mm. This would be the equivalent of 22mm
on a 35mm camera. This lens is thus called
L22
.
Since the image sensors in digital cameras have different sizes, converting to 35mm camera as a known format provides for better comparing the image formats and the fields of vision of the different lenses. Another benefit is that you can easily set a 35mm camera (analog or digital) to the same focal length (Lxx) to obtain the same field of
vision. This approach greatly facilitates lens selection.
Lens Table
Order name
Original image
L22 L32 L43 L65 L135
35mm equivalent
Focal length
Aperture
Image angle horizontally
22 mm
4 mm
32 mm
6 mm
2,0
90°
2,0
60°
43 mm
8 mm
65 mm
12 mm
2,0
45°
2,0
31°
135 mm
25 mm
2.5
15°
Image angle vertically
Distance 1 m
• Image width
• Image height
67°
m
45°
m
2,0
1.3
1.1
0.8
Distance 5 m
• Image width
• Image height
Distance 10 m
m
10.0
m
5.7
6.6
m
4.1
m
34°
m
23°
m
0.8
0.6
0.5
0.4
11°
m
0.3
0.2
m
4.1
m
2.7
3.0
m
2.0
m
m
1.3
1.0
m
• Image width
• Image height
Distance 20 m
• Image width
20.0
13.3
11.5
8.2
m
40.0
m
23.0
• Image height
Distance 50 m
• Image width
• Image height
26.6
m
16.4
m
100.0
66.0
57.5
41.0
8.2
6.1
5.5
4.0
m
16.4
m
11.0
2.6
1.9
m
5.2
12.2
m
8.0
m
41.0
30.5
27.5
20.0
3.8
m
13.0
9.5
Page 22
1.6 Important Notes
1.6.1 Password for the Administration Menu
The administration area of the camera (Admin Menu button) is protected by a user
name and password:
• User name is admin
• Password is meinsm
Enter the user name and password exactly as shown above. Note that both entries
are case-sensitive.
When accessing the administration menu for the first time, the Quick Installation
wizard will help you set the most important parameters that are relevant for your
requirements. For security reasons, it is highly recommended to change the ad-
minstrator password after the camera has been configured properly.
1.6.2 Irreversibly Deactivating the Microphone
Deactivating a camera's microphone may become necessary in order to protect
the privacy of people at a workplace or for other reasons. It is hence possible to ir-
reversibly deactivate the microphone. For additional information on this topic, see
section 5.4.5,
Microphone and Speaker
, in the
Software Manual
.
© MOBOTIX AG • Security-Vision-Systems • Made in Germany
www.mobotix.com • sales@mobotix.com
20/100
D22 Camera Manual Part 1
Administration menu:
User: admin
Password: meinsm
The microphone can be
irreversibly deactivated!
CAUTION: Make sure that you store information on user names
and passwords in a secure place. If you loose the administrator
password and cannot access the Admin menu, the password can
only be reset at the factory. This service is subject to a service
charge!
CAUTION: This deactivation is permanent and cannot be reversed
even by MOBOTIX engineers. Deactivating the microphone will
also deactivate all features that use the camera's microphone.
The D22 also allows connecting an external speaker and microphone.
Irreversibly deactivating the microphone will also disable the external
microphone features.
Note
Page 23

1.6.3 Starting the Camera Using the Factory IP Address
If the camera's IP address is not known, you can start the camera with its factory IP
address. Section 3.6,
Starting the Camera Using the Factory IP Address
, describes
this procedure in more detail.
1.6.4 Resetting the Camera to Factory Defaults
All settings of the MOBOTIX camera can be reset permanently to the factory default
settings. This makes sense if you have, for example, obtained a camera without
any information or you would like to reset all settings after testing the camera. In
order to perform this procedure, you need to have access to the administration
area of the camera (admins group). Open Admin Menu> Reset … to reset the
camera to factory defaults.
Note: All defined users will be deleted and the admin password will be reset to
the factory default when you reset the camera using Admin Menu> Reset …
Proceed according to section 3.6,
Starting the Camera Using the Factory IP
Address
, if you would like to maintain existing users.
1.6.5 Activating Event Control for Security Applications
In its default configuration, the camera's event control and video motion detec-
tion features are not enabled. In order to activate event control as a whole, open
Setup Menu> General Event Settings and activate the Arming switch. Click on the
Arm& Record softbutton of the user interface in the browser to enable the stan-
dard event features. The video motion detection window is visible in the live image
(dotted frame in the center) and the camera automatically stores images as soon
as the video motion window detects movements.
1.6.6 Deactivating Text and Logo Options
As the camera arming has been deactivated in its default configuration (see prece
ding section), the MOBOTIX camera only displays the Text WWW.MOBOTIX.COM,
the time stamp and the MOBOTIX logo at the top of the image. Once the camera
arming has been activated (see section1.7.5), the text at the bottom of the live
image (event, action and messaging symbols) will also appear.
You can deactivate the status text at the bottom and the text at the top left corner of
the live image by setting Text Display in the Setup Menu> Text & Display Settings
dialog to
Off
. Setting Text Display to
Date & Time
will only display the time stamp in
the live image.
In order to hide the logo in the live image, open Admin Menu> Logo Profiles and
set Logo Display to
Disable
.
© MOBOTIX AG • Security-Vision-Systems • Made in Germany
www.mobotix.com • sales@mobotix.com
21/100
D22 Camera Manual Part 1
The configuration can also
be reset partially
If the dotted rectangle in
the live image is visible,
the camera is armed
Text and logos can be also
deactivated or customized
to your liking
Page 24

1.6.7 Deactivating the Automatic Daily Reboot of the Camera
In its default configuration, the MOBOTIX camera automatically reboots every
morning at 3:36am. The reason for this is that external influences (e.g. radiation in
high locations) can lead to camera malfunctions. The automatic reboot will refresh
the camera's memory and will ensure proper operation without requiring any interaction on the part of the user.
Open Admin Menu> Time Tasks and deactivate or delete the
Reboot camera
task. This will prevent the camera from rebooting automatically.
1.6.8 Using Internet Browsers
Current Internet browsers (Internet Explorer, Netscape, Mozilla, Firefox, Safari, Konqueror, Opera, …) with enabled JavaScript can show the camera's live images
with their standard settings. Text-based browsers (e.g. lynx) cannot display the
user interface and are
not
suitable for operating the camera.
Section 4.8,
Browser Settings
, in the
Software Manual
contains more information on
browser compatibility. For additional information on troubleshooting the camera,
see chapter12,
Troubleshooting
.
1.6.9 Cleaning Instructions
If a lens is dirty (e.g. from the installation process), you can clean the lens using a
lint-free cotton cloth.
1.6.10 Safety Notes for Operating MOBOTIX Cameras
Electrical surges can be induced by other electrical appliances, improper wiring,
but also from the outside (e.g. lightning strikes to phone or power lines).
MOBOTIX cameras are protected against the effects of small electrical surges by
numerous measures. These measures, however, cannot prevent the camera from
being damaged when stronger electrical surges occur. Special care should be taken when installing the camera outside of buildings to ensure proper protection
against lightning, since this also protects the building and the whole network infrastructure.
MOBOTIX recommends having MOBOTIX cameras installed only by specialists accustomed to installing network devices and having proper respect for the pertinent
regulations regarding lightning protection and fire prevention as well as the current
technology for preventing damages from electrical surges.
Section 2.10.2,
Wiring, Fire Prevention, Lightning and Surge Protection
, contains
more information on these topics.
© MOBOTIX AG • Security-Vision-Systems • Made in Germany
www.mobotix.com • sales@mobotix.com
22/100
D22 Camera Manual Part 1
Deactivating the camera
reboot
Page 25
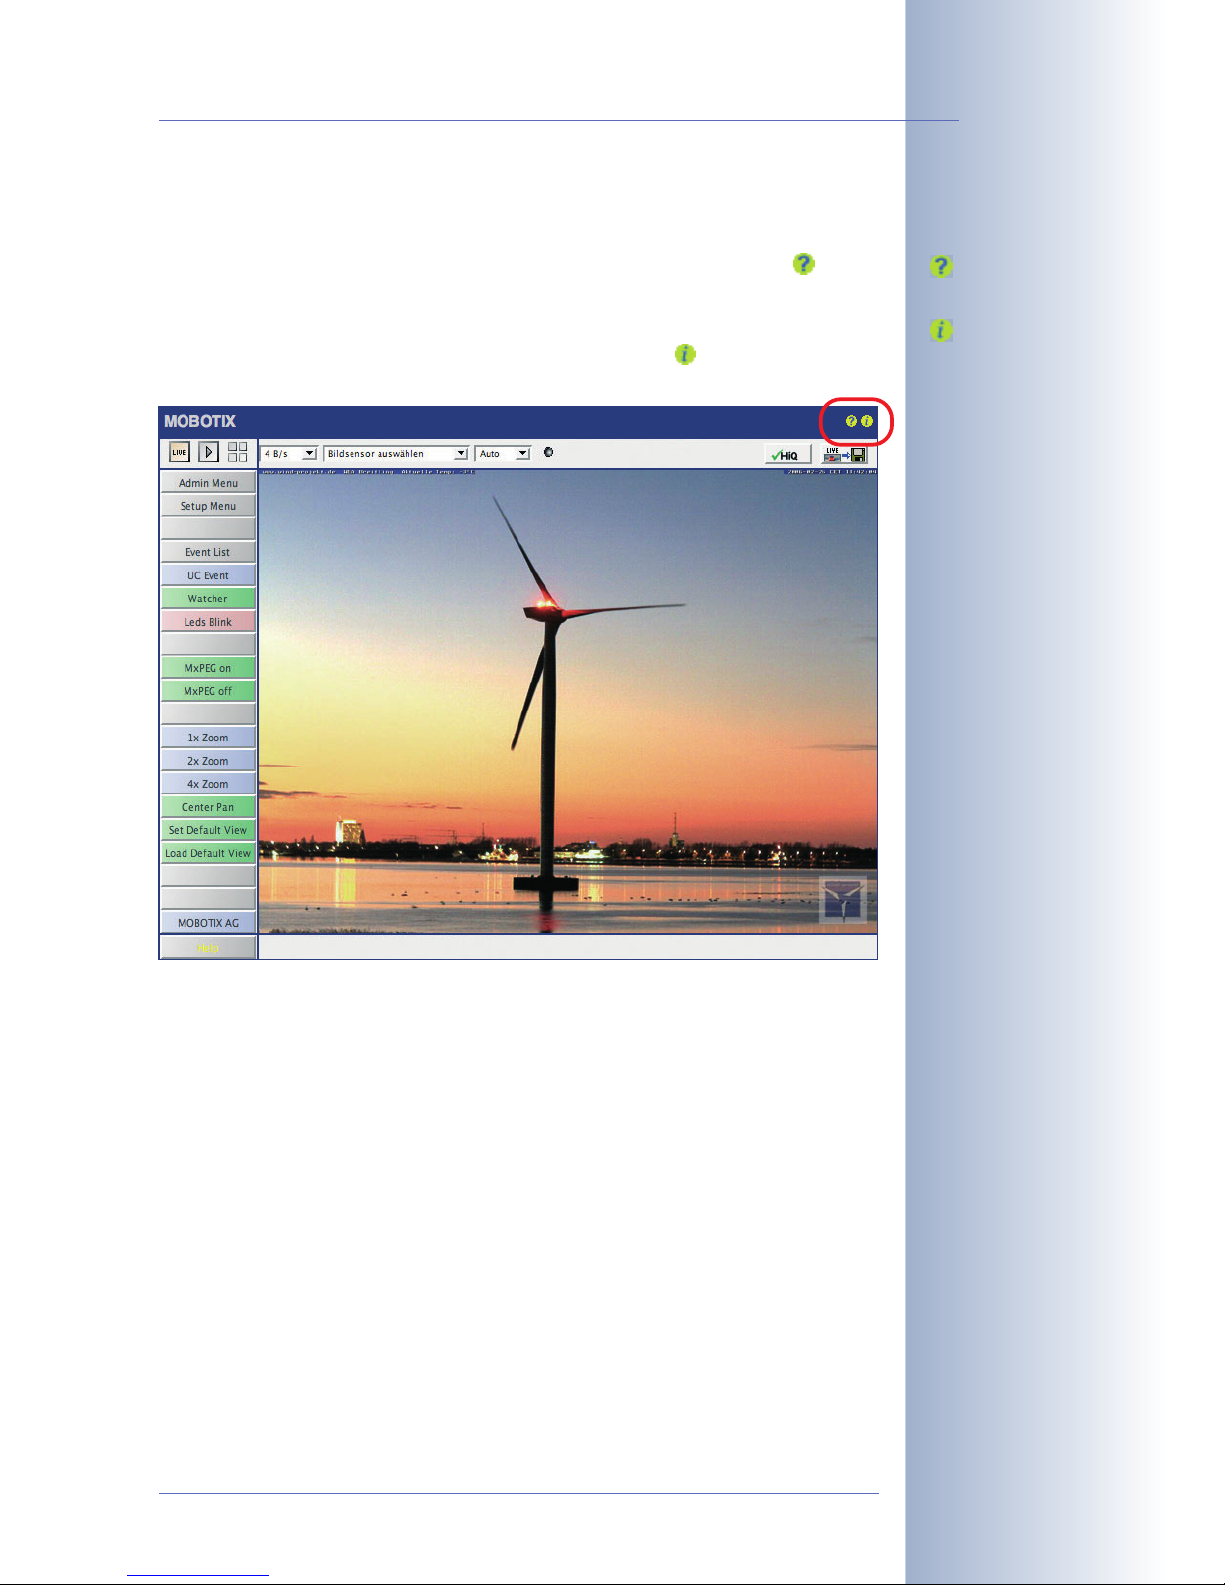
1.6.11 Additional Information
For more information on this topic, see the News and Functional Overview pages
in the online help of the camera's browser interface. Click on the yellow icon in
the top right corner to open the camera's online help.
In order to obtain more information on the camera and its current configuration,
open the Camera Status dialog by clicking on the yellow icon in the top right
corner of the camera's browser interface.
Another source of information on all dialogs and parameters of the MOBOTIX ca
mera is the Reference Manual that you can download from www.mobotix.com.
The Reference Manual consists of the MOBOTIX camera's online help in one PDF
file.
© MOBOTIX AG • Security-Vision-Systems • Made in Germany
www.mobotix.com • sales@mobotix.com
23/100
D22 Camera Manual Part 1
Camera Help
Camera status
Page 26
2 MOUNTING THE CAMERA
2.1 Preparing the Installation
Before mounting the MOBOTIX D22, the following questions should be solved:
1) Where will the camera be mounted?
Mounting the camera to a ceiling or wall,
section 2.1.1
2) Which other mounting options are available?
On-wall mounting, vandalism protection, wall mounting with Wall Mount,
Corner and Pole Mount, in-ceiling mounting,
section 2.1.2
3) How is the camera connected to the network and how is the power sup-
plied?
Network Power Adapter, Netpower Rack/ Netpower Box, MxPoE or PoE-compatible switch (IEEE 802.3af),
section 2.1.3
.
4) How are the connections furnished from the building?
Wall outlets,
section 2.1.4
5) Which sections of the Mounting Instructions should I read?
In order to mount the D22 with its optional accessories as quickly and efficiently as possible, you should consult the Directions for Mounting,
section
2.1.5
.
The following sections contain a brief overview for all of these questions as well as
references to the relevant sections in this manual, which contain more detailed information. For more information on the MOBOTIX D22 and the available accessories, please also refer to shop.mobotix.com.
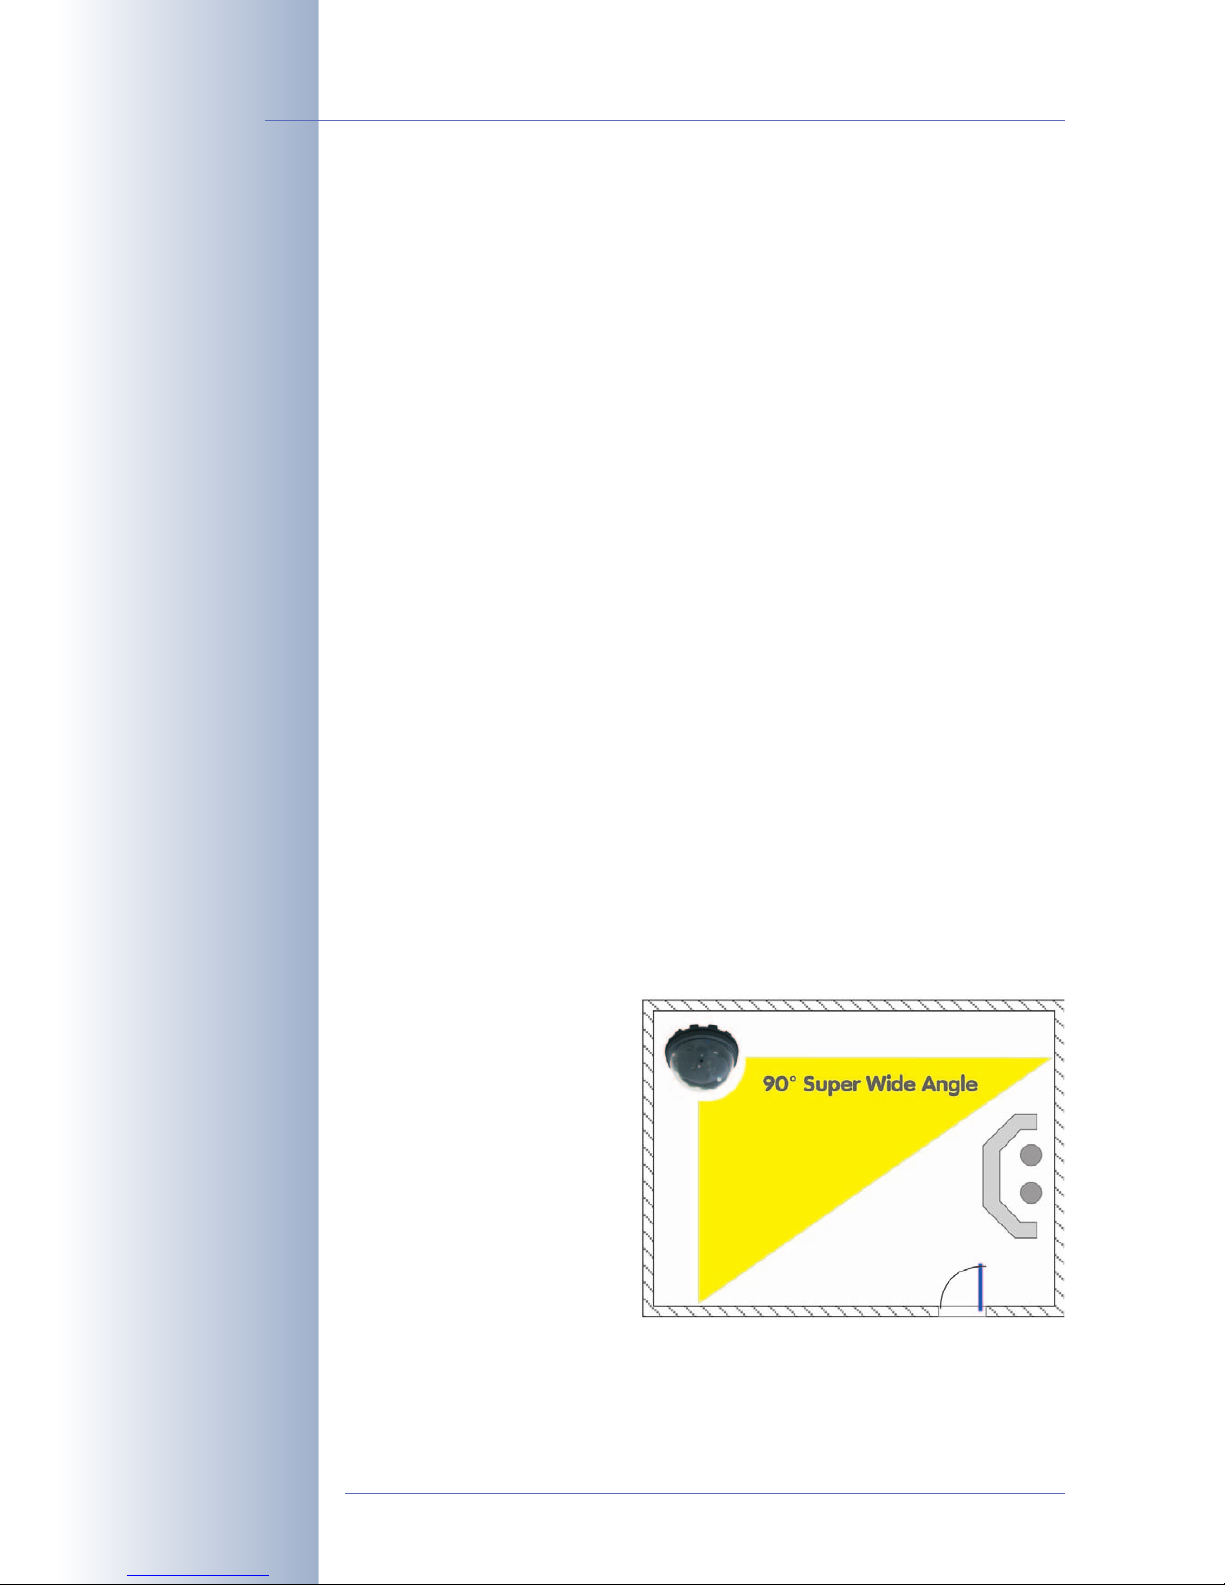
2.1.1 Mounting to a Ceiling or Wall
The MOBOTIX D22 has been designed to be mounted to either ceilings or to a
wall, when using the Wall Mount. The supplied L22 90° lens then allows monitor-
ing almost the entire room from
the walls to the ceiling.
It is also possible to mount the
D22 directly to a wall (without
using the Wall Mount), but doing
so will result in reduced flexibility
for positioning the lens. We
hence recommend using the
Wall Mount if you intend to
mount the camera to a wall.
The cable entry of the D22 is below the center of the camera's
housing. For more detailed information on mounting the camera, see sections 2.5
and above; the drilling templates are at the end of the manual.
© MOBOTIX AG • Security-Vision-Systems • Made in Germany
www.mobotix.com • sales@mobotix.com
24/100
D22 Camera Manual Part 1
Surveillance of a complete
room with only one camera
Page 27
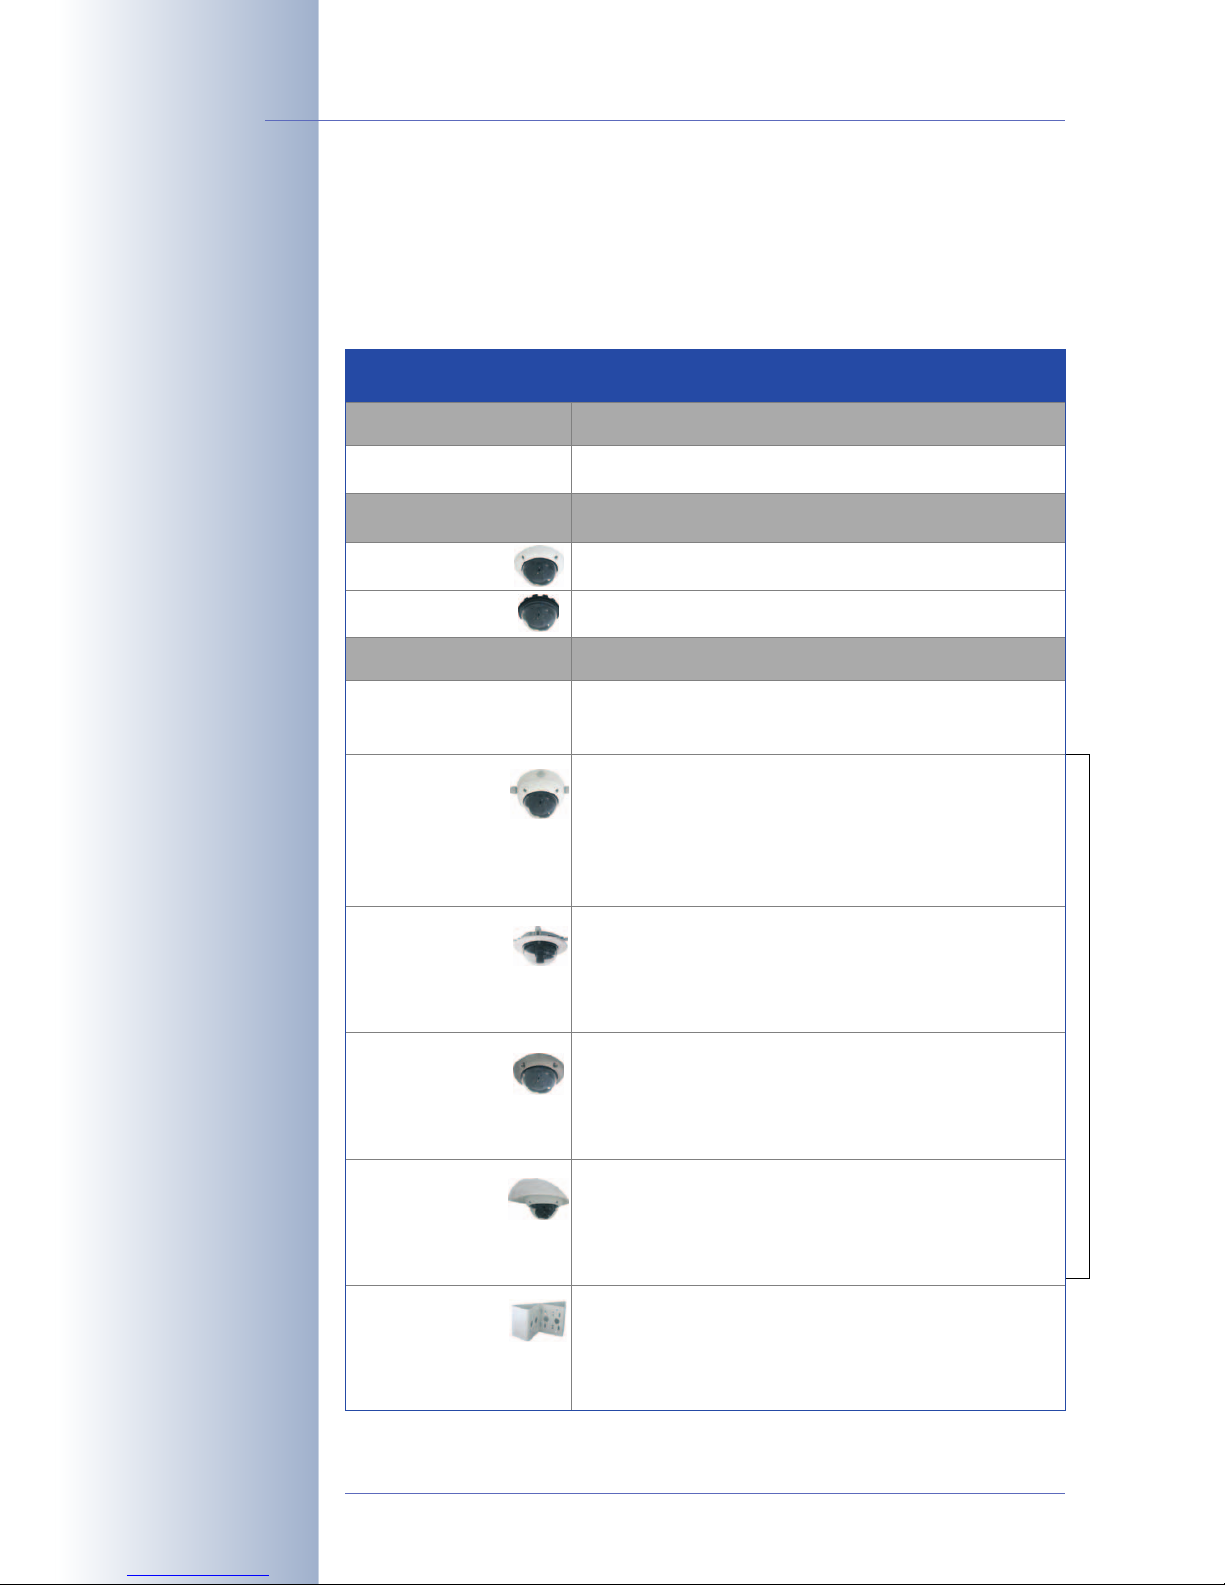
2.1.2 Additional Mounting Options for IT/Secure Models
On-Wall Mounting
The D22 On-Wall set can reliably protect external cables if the cables cannot be guided from below the
housing but have to be led above the wall. In addition,
the On-Wall mount provides ample space for extra
modules.
In-Ceiling Mounting
The D22 In-Ceiling Set allows mounting the D22 camera in fake ceilings, for example. This type of installation provides optimum protection for the camera and
reduces the visible profile to a minimum since only the
dome is visible.
Vandalism Protection
The D22 Vandalism Set provides added protection for
D22 cameras. The set consists of a robust camera ring
made from stainless steel and a reinforced dome
made from 3mm thick polycarbonate. A camera
equipped with the Vandalism Set is perfectly suited for
applications in demanding environments (such as prisons, social hot-spots, train stations, etc.).
Mounting to a Wall Using the Wall Mount
The D22 Wall Mount is the ideal solution for mounting
the D22 to walls for indoor and outdoor applications.
The camera is absolutely dustproof and resistant
against water jets (IP65). The wall mount also covers
RJ45 wall outlets and also has ample space for additional modules.
Mounting to a Pole
If you would like to mount the MOBOTIX D22 to a pole,
you should consider using the MOBOTIX Corner and
Pole Mount. This mount can only be used in conjunction with the wall mount. The supplied stainless steel
straps allow fixing the mount to poles with diameters
between 60 and 180mm (2.4 to 7.1in).
For more information on the D22 and the available accessories, please consult
section 2.11
and also refer to
shop.mobotix.com.
© MOBOTIX AG • Security-Vision-Systems • Made in Germany
www.mobotix.com • sales@mobotix.com
25/100
D22 Camera Manual Part 1
D22 On-Wall Set
(IP65, also for Outdoor
applications)
D22 In-Ceiling Set
D22 Vandalism set consists of stainless steel
ring (IP65, available polished, matt or powdercoated)
D22 Wall Mount made
from sturdy PBT 30GF
(IP65)
D22 Corner and Pole
Mount: Outdoor quality
made of 3mm stainless
steel (in conjunction with
Outdoor Wall Mount)
Page 28
2.1.3 Network Connection and Power Supply, UPS
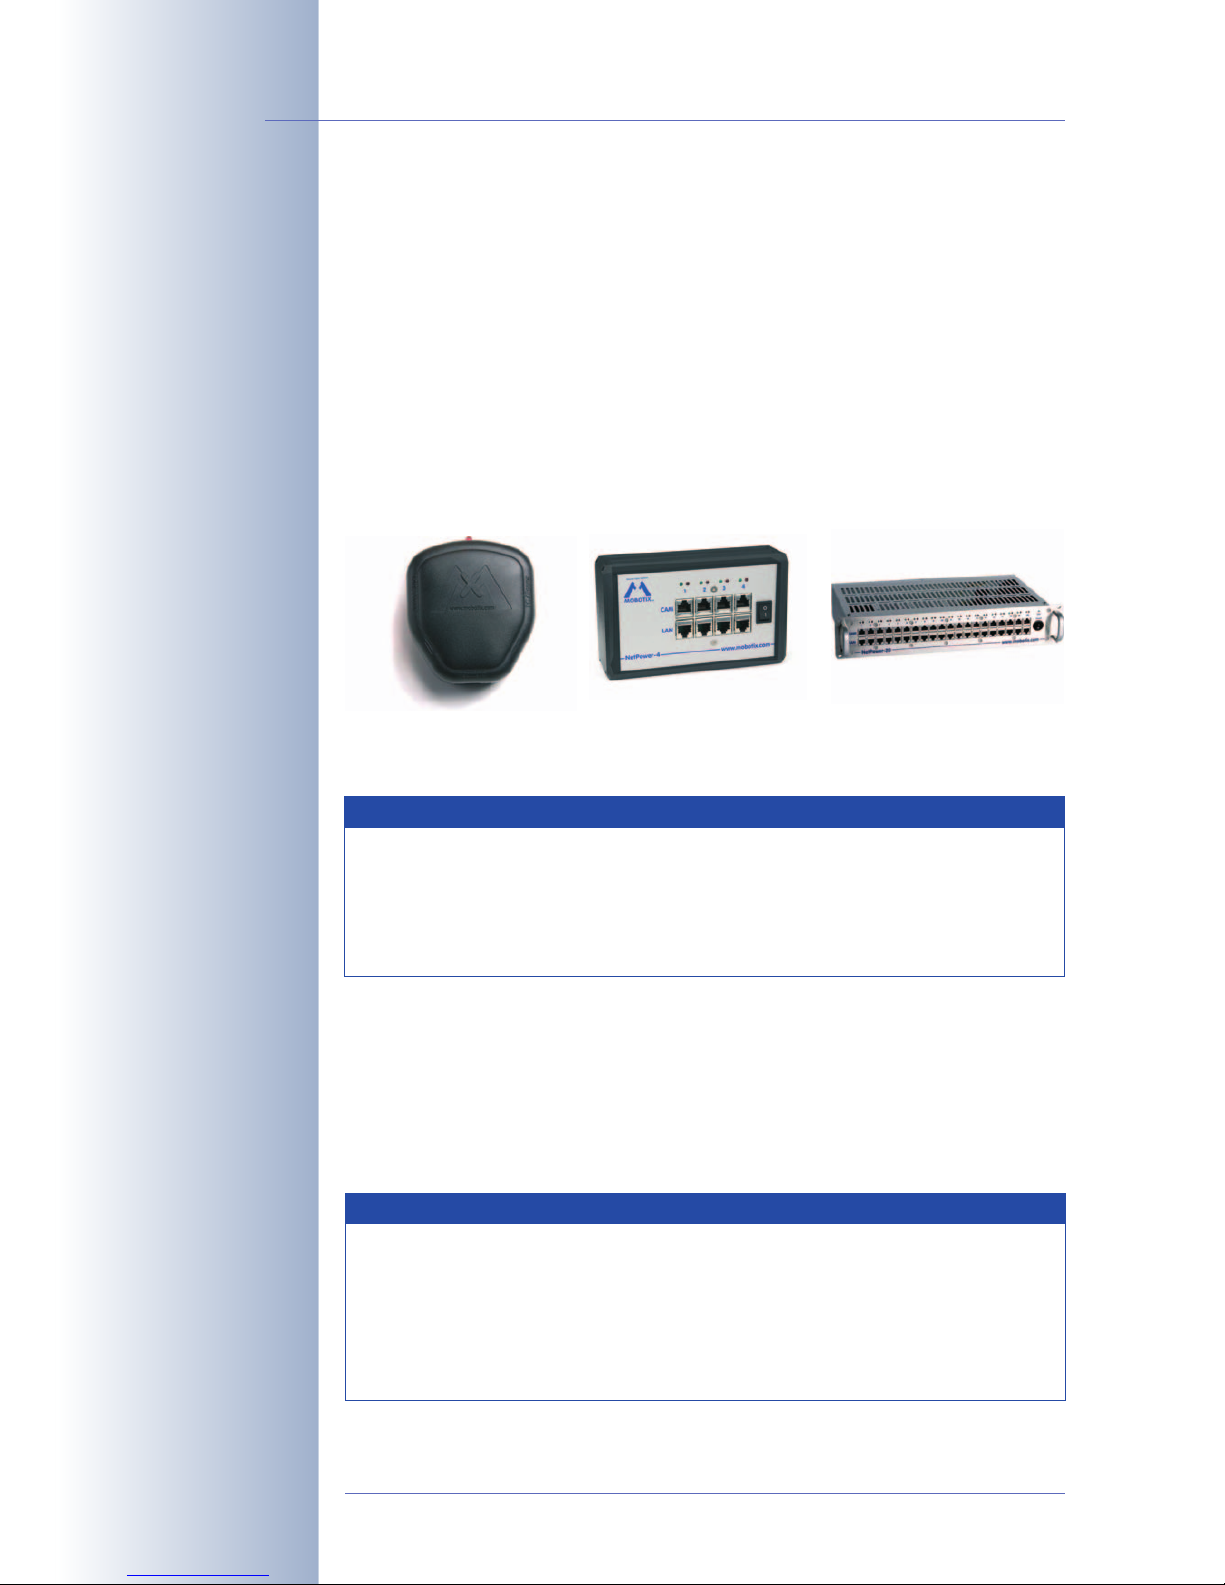
Power over Ethernet (MxPoE)
Power is supplied to all D22 models via the network cabling (MxPoE, Power-over-
Ethernet). For smaller installations, the universal power supply (
MX-SNT-E/U/GB/J/
AUS01-30-RJ
) with the MOBOTIX Network Power Adapter
MX-NPA-3-RJ
is sufficient. Larger installations would benefit from one or more MOBOTIX Network
Power Racks/Boxes that are available for supplying power to 4, 8 or 20 cameras
(
MX-NPR-4
, -8 or -20).
See section 2.10,
Camera Accessories
, for more information on these and other
items or open shop.mobotix.com (Products> Accessories section).
Power-over-Ethernet (PoE according to IEEE 802.3af)
Besides MOBOTIX MxPoE, the MOBOTIX D22 also supports the Power-over-Ether-
net standard IEEE 802.3af. You can hence use switches or routers that support the
PoE (Power-over-Ethernet) standard IEEE 802.3af.
Sections 3.3 ff
contain more information on the possible combinations of connect-
ing the D22 and power supply options.
© MOBOTIX AG • Security-Vision-Systems • Made in Germany
www.mobotix.com • sales@mobotix.com
26/100
D22 Camera Manual Part 1
MX-NPA-3-RJ: Easy installation for smaller systems
MX-NPR-4: For mounting
in wiring cupboards; includes DIN rail clip
MX-NPR-8/20: 19" rack
mount (2 rack units)
The D22 supports the
MOBOTIX PoE products
for power injection into
the network cabling
(MxPoE) and the Powerover-Ethernet standard
IEEE 802.3af (PoE)
PoE components without
fans increase overall reliability of the entire
system
Network Power Adapter
MX-NPA-3-RJ
Netpower Box
MX-NPR-4
Netpower Rack
MX-NPR-20
Advantages of MOBOTIX PoE Products
• Zero maintenance and reliable without fans.
• Higher reliability of the system as a whole, since standard
switches without PoE can be used (lower risk of failure).
• Easy installation on DIN rails using supplied adapter (
MX-NPR-4
)
or in 19" racks (
MX-NPR-8/20
).
Note
If you are using Power over Ethernet (IEEE 802.3af) network compo-
nents for supplying power to the MOBOTIX D22, make sure that these
components do not have a fan. Since the power consumption of MOBOTIX cameras is very low compared to other products, the reliability
of the entire system is increased and the life cycle of the PoE components is expanded.
Page 29
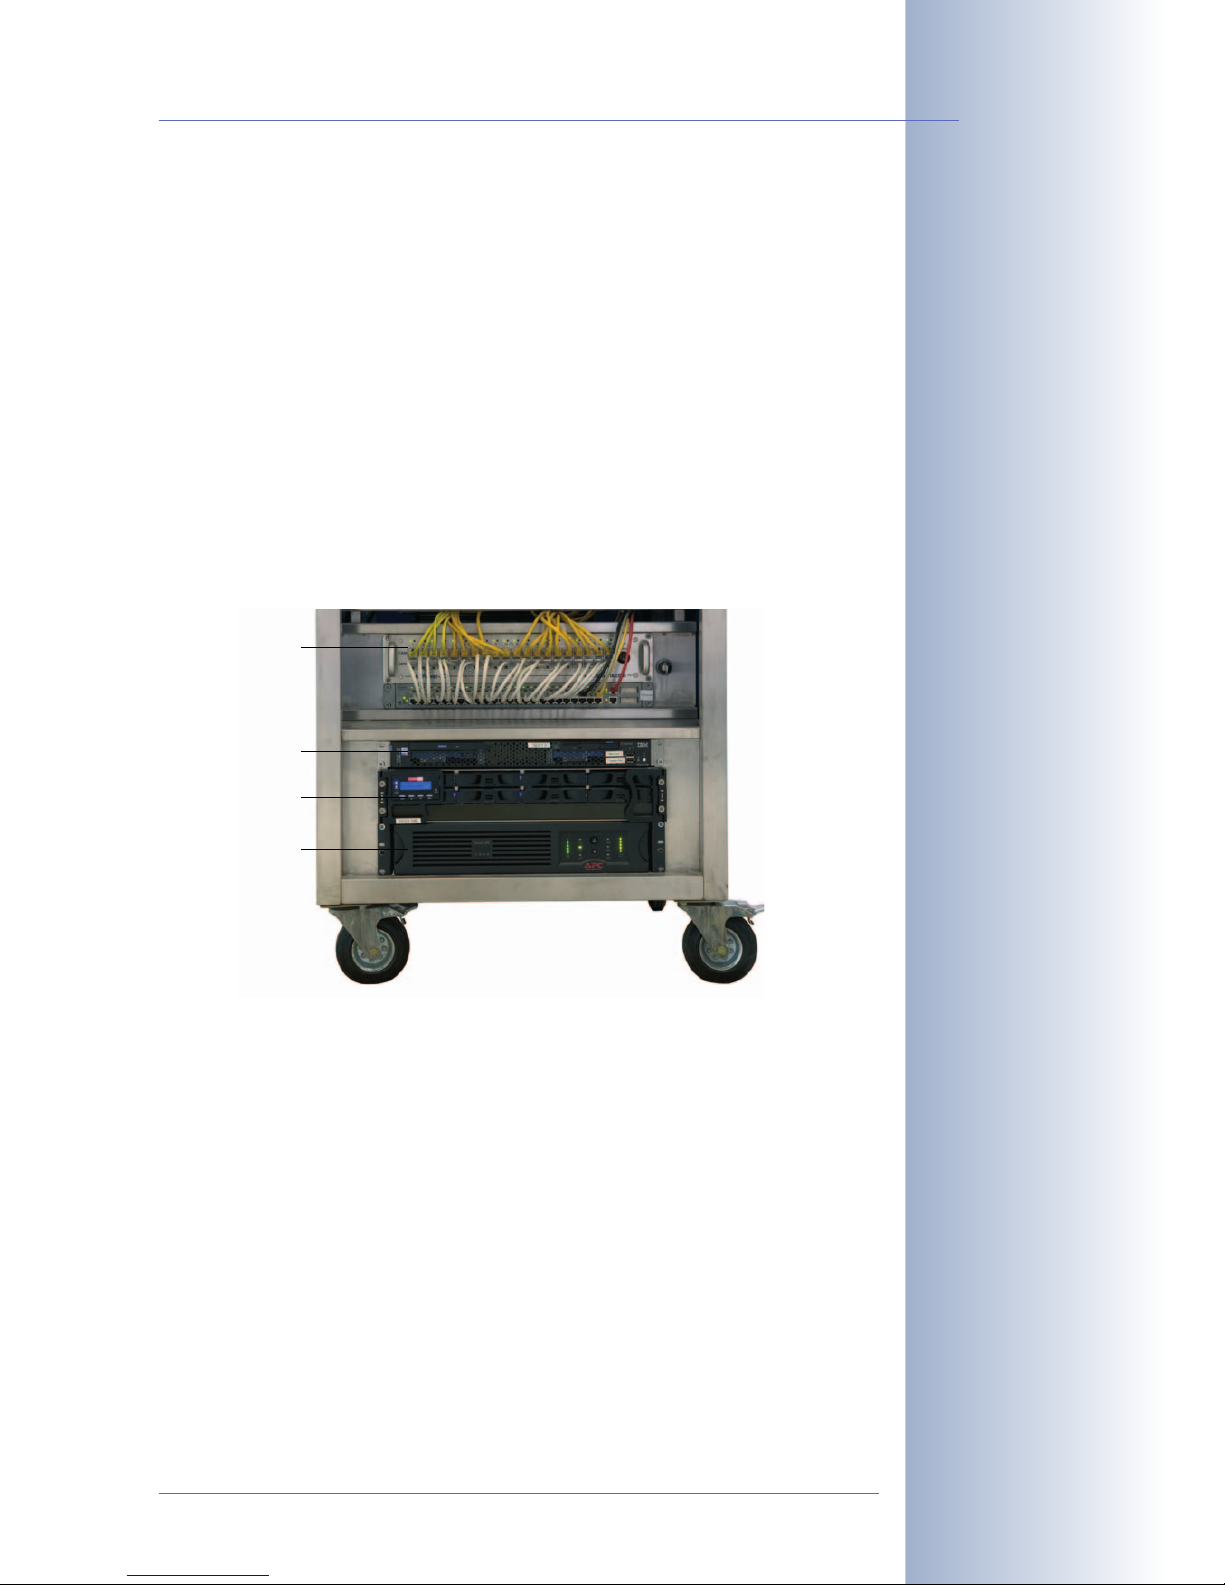
Using Uninterruptible Power Supplies (UPS)
In order to maintain a continuous power supply even when utility power fails, you
should install an uninterruptible power supply (UPS). These devices also provide
full protection against electrical surges and voltage fluctuations and thus enhance
the reliability of the system as a whole.
When using a more powerful 19" rack-mounted USP, you can also protect all other
network components (e.g. switches, routers, PoE switches, etc.).
Since MOBOTIX cameras do not require any heating even in the wintertime, the power consumption of 3W is very low. This in turn means that you can centralize the
USP-protected power supply by injecting power into the network cables (max.
100m/300ft). This kind of protected power supply can be used either with MOBOTIX MxPoE products (MX-NPA-3-RJ + external power supply or MX-NPR-4/8/20)
or with PoE-compliant switches according to IEEE 802.3af.
2.1.4 Providing the Camera Connections, Wall Outlets
Once the camera position, the position of the cable outlets, and the method of
power supply have been decided upon, the cabling should be installed. Before
mounting the MOBOTIX D22, you should make sure that the network connections
have been properly tested, so that the proper functioning of the camera is guaranteed.
If you would like to use an external audio connection, you will have to install an additional MOBOTIX D22 audio cable into the camera's housing. Please send an
email to intl-support@mobotix.com to get more information on this topic.
© MOBOTIX AG • Security-Vision-Systems • Made in Germany
www.mobotix.com • sales@mobotix.com
27/100
D22 Camera Manual Part 1
UPS not only protect the
camera against power failures, they also protect all
other connected network
devices against damage
from voltage peaks and
lows
Typical setup of a 19"
system with UPS
MOBOTIX NPR
or PoE switch
PC/server
Raid
USV
Page 30
2.1.5 Directions for Mounting
Once the type of installation, the camera connections and the method of power
supply have been decided upon, you should follow the directions listed below. This
will ensure that you will only have to read the relevant sections of this chapter,
which will speed up mounting the D22.
© MOBOTIX AG • Security-Vision-Systems • Made in Germany
www.mobotix.com • sales@mobotix.com
28/100
D22 Camera Manual Part 1
Directions for Mountin
g
Preparatory Tasks
A
ll camera versions
Sections
2.1 Preparing the Installation
Camera Version
D22-IT/Secure
D22-Basic
T
ype of Installation
Sections
2.2 Delivered Parts, Components and Dimensions
2.3 Delivered Parts, Components and Dimensions
Sections
Mounting to a Ceiling
Mounting to a
ceiling using the
On-Wall Set
Mounting to a
ceiling using the
In-Ceiling Set
Mounting the
V
andalism Set
2.5.1 D22-IT/Secure - Mounting the Camera
2.5.2 D22-Basic - Mounting the Camera
2.2 Delivered Parts, Components and Dimensions
D22
2.4.1 Delivered Parts, Components and Dimensions
2.5.1 D22-IT/Secure - Mounting the Camera
2.6 Mounting Using the On-Wall Set
2.2 Delivered Parts, Components and Dimensions
D22
2.4.2 Delivered Parts, Components and Dimensions
2.7 Mounting Using the In-Ceiling Set
2.2 Delivered Parts, Components and Dimensions
D22
2.4.3 Delivered Parts, Components and Dimensions
2.8 Mounting Using the Vandalism Set
Mounting to a
w
all using the
W
all Mount
Mounting to
poles
2.2 Delivered Parts, Components and Dimensions
D22
2.4.4 Delivered Parts, Components and Dimensions
2.9 Mounting Using the Wall Mount
2.4.5 Delivered Parts, Components and Dimensions
Corner and Pole Mount
2.4.4 Delivered Parts, Components and Dimensions
Wall Mount
Additional Mounting Options for D22 IT/Secure Models
Page 31

© MOBOTIX AG • Security-Vision-Systems • Made in Germany
www.mobotix.com • sales@mobotix.com
29/100
D22 Camera Manual Part 1
Notes:
Page 32

2.2 D22-IT/Secure: Delivered Parts, Components and Dimensions
2.2.1 Delivered Parts and Components D22-IT/Secure
© MOBOTIX AG • Security-Vision-Systems • Made in Germany
www.mobotix.com • sales@mobotix.com
30/100
D22 Camera Manual Part 1
Make sure to check the
delivered parts!
Item Count Part Name
1
2
1
1
Camera housing
Lens
3
4
5
6
1
1
Lock ring
1 transparent dome
1
1
Ethernet cable CAT5 0.5 m/20", installed
Allen wrench 3 mm
7
8
9
10
1
1
Toothed wrench
Outer shell
1
4
Mounting ring
Dowels 8 mm
11
12
13
14
4
4
Stainless steel washers Ø 5.3 mm
Stainless steel wood screws with Tox head 4.5x60 mm
1
4
Torx wrench TX20
Stainless steel Allen screws M4x16 mm
15 4 Stainless steel washers Ø 4.3 mm
Camera housing (item1) with mounting ring (item9)
4 wood screws 4.5x60mm (item12)
4 dowels 8mm (item10)
4 washers ø5.3mm (item11)
Dome (item4)
Allen wrench (item6)
Torx wrench (item13)
Toothed wrench (item7)
Ethernet cable (item5)
4 Allen screws M4x16mm (item14)
4 washers ø4.3mm (item15)
Outer shell (item8)
∅ 160 mm/6.3 in
Lens (item2)
Lock ring (item3)
Page 33

2.2.2 Camera Housing and Connections D22-IT/Secure
The MOBOTIX D22-IT/Secure consists of the camera housing (motherboard, lens,
dome), the outer shell and the mounting ring.
Connections
• NET (Ethernet network/power supply)
• External audio support (Microphone/Speaker)
• Mini MxB/MOBOTIX bus (for future extensions)
• Slot for SD card (usable
with a future software version)
© MOBOTIX AG • Security-Vision-Systems • Made in Germany
www.mobotix.com • sales@mobotix.com
31/100
D22 Camera Manual Part 1
SD cards will be supported in a future software
update
Slot for SD card
Outer shell
Dome
NET (back)
Mini MxB/MOBOTIX bus
Connections
Lens unit
31/96
Ext. audio (speaker/microphone)
LEDs (1 x green, 1 x red)
Page 34

2.2.3 Dimensions of the D22-IT/Secure
© MOBOTIX AG • Security-Vision-Systems • Made in Germany
www.mobotix.com • sales@mobotix.com
32/100
D22 Camera Manual Part 1
Freely positionable camera module
ø 160 mm/6.3 in
85 mm/3.3 in
Page 35

2.2.4 Drilling Template for the D22-IT/Secure Mounting Ring
© MOBOTIX AG • Security-Vision-Systems • Made in Germany
www.mobotix.com • sales@mobotix.com
33/100
D22 Camera Manual Part 1
Find the drilling templates
(scale 1:1) at the end of
the manual as a fold-out
Note
Find the folded drilling template at the end of the manual.
Make sure that the drilling template is not scaled nor adjusted to the
paper size when printing the PDF file. When printing the PDF file, you
should print two pages onto one using 100% scaling to obtain an
unscaled printout of the drilling templates.
100 mm/3.9 in
100 mm/3.9 in
5.5 mm/0.22 in
141.4 mm/5.6 in
Page 36

2.3 D22-Basic: Delivered Parts, Components and Dimensions
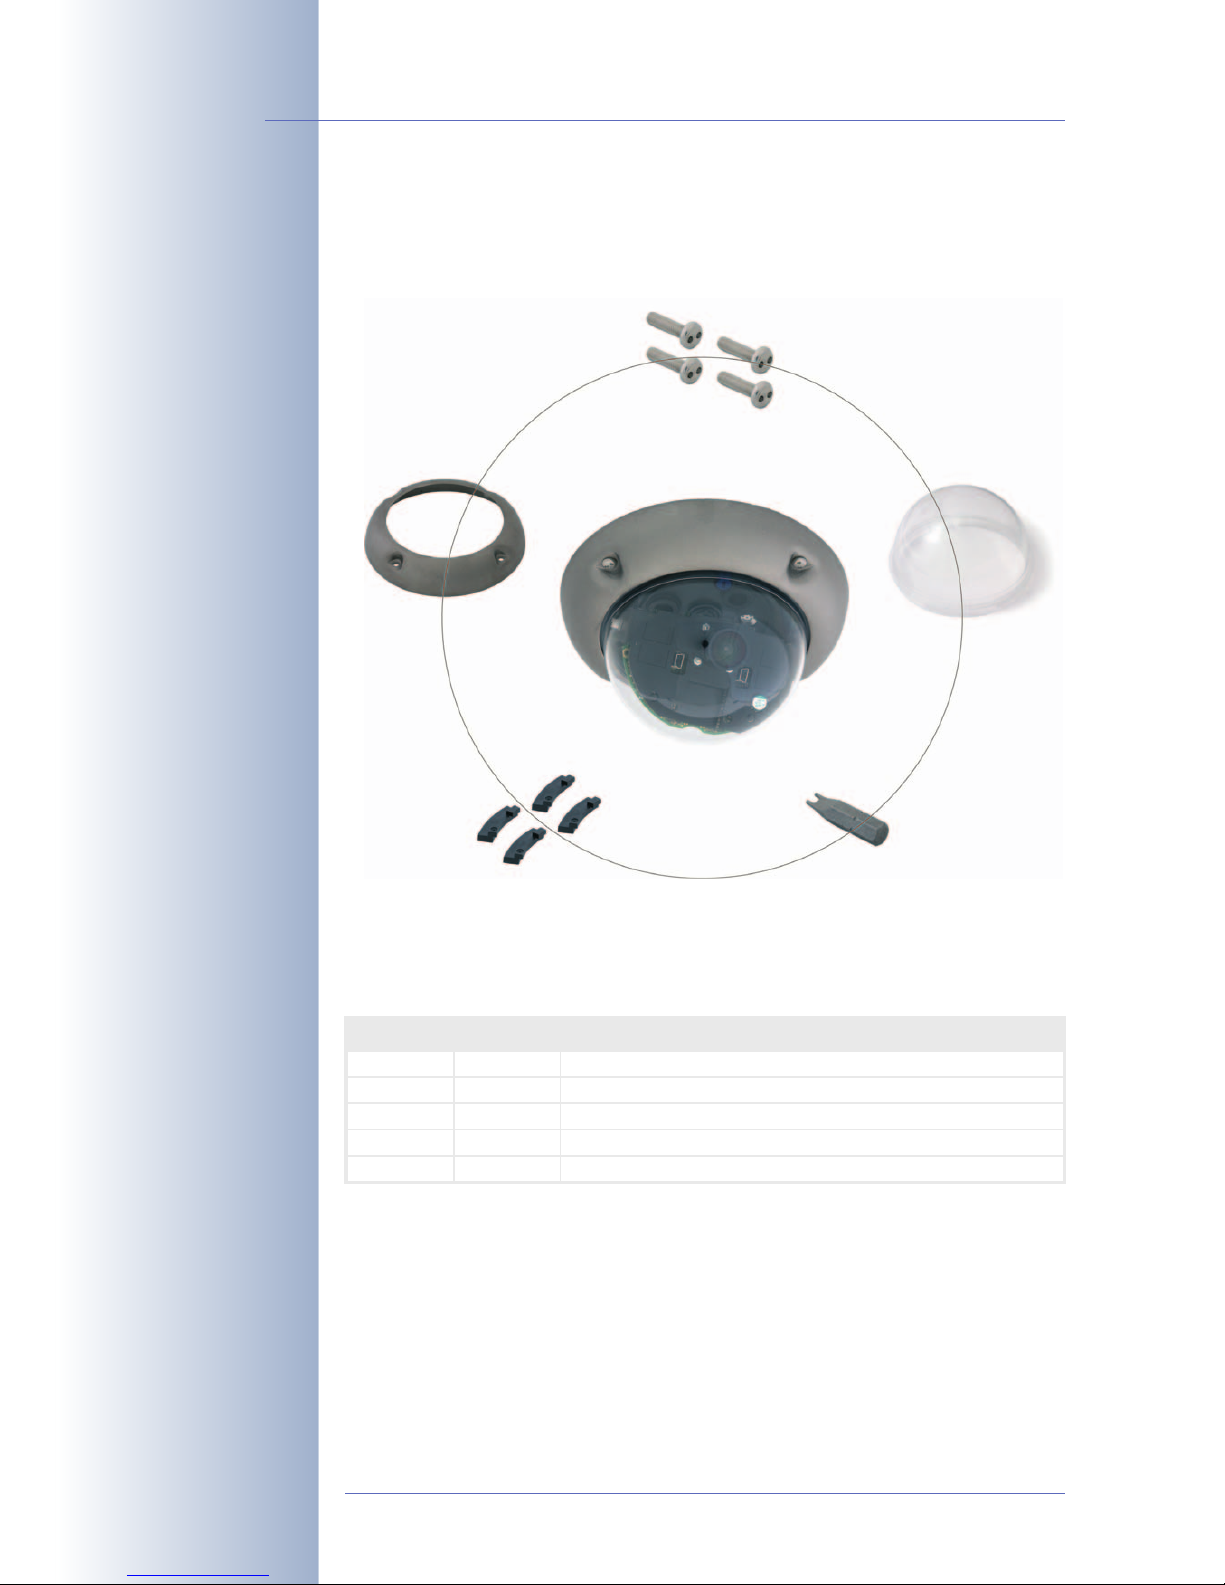
2.3.1 Delivered Parts and Components D22-Basic
© MOBOTIX AG • Security-Vision-Systems • Made in Germany
www.mobotix.com • sales@mobotix.com
34/100
D22 Camera Manual Part 1
Make sure to check the
delivered parts!
Item Count Part Name
1
2
1
1
Camera housing
Lens
3
4
5
6
1
1
Lock ring
1 transparent dome
1
1
Ethernet cable CAT5 0.5 m/20", installed
Allen wrench 3 mm
7
10
11
12
1
4
Toothed wrench
Dowels 8 mm
4
4
Stainless steel washers Ø 5.3 mm
Stainless steel wood screws with Tox head 4.5x60 mm
13
14
15
1
4
Torx wrench TX20
Stainless steel Allen screws M4x16 mm
4 Stainless steel washers Ø 4.3 mm
Camera housing (item1)
Dome (item4)
Ethernet cable (item5)
4 wood screws 4.5x60mm (item12)
4 dowels 8mm (item10)
4 washers ø5.3mm (item11)
Allen wrench (item6)
Torx wrench (item13)
4 Allen screws M4x16mm (item14)
4 washers ø4.3mm (item15)
Lens (item2)
Lock ring (item3)
Toothed wrench (item7)
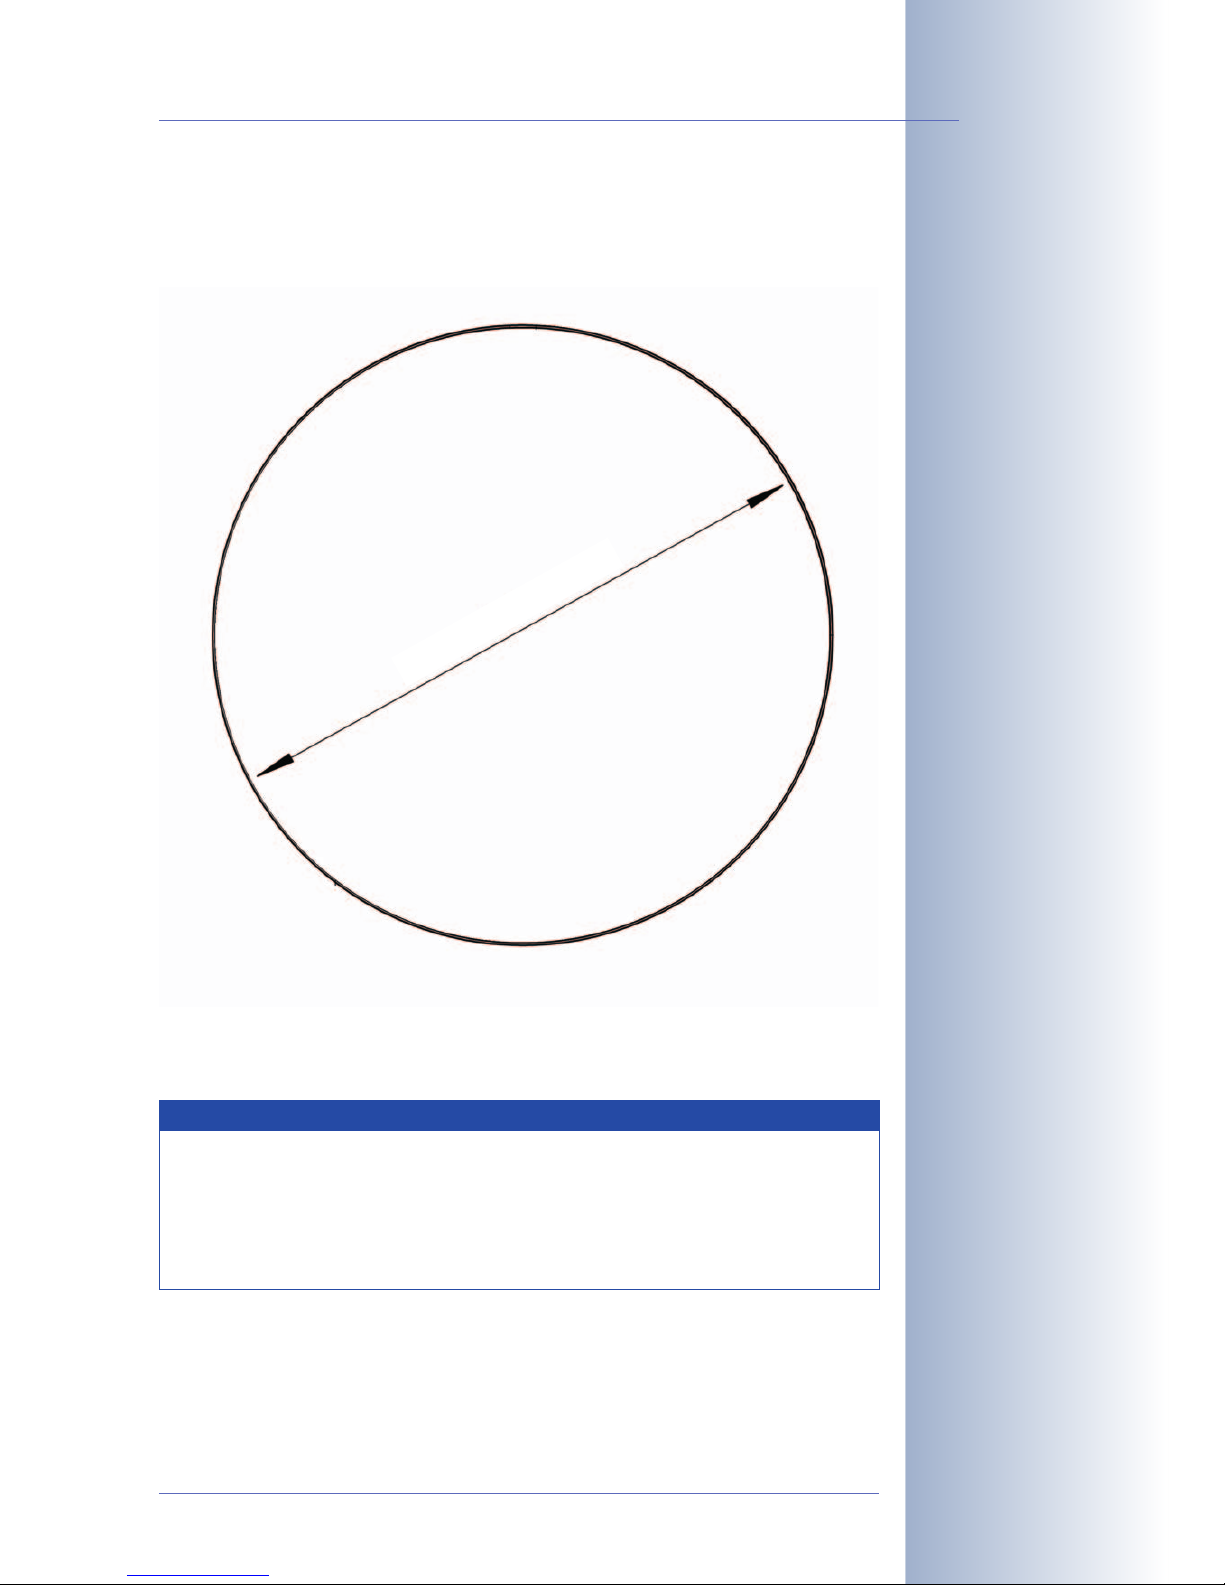
∅ 129 mm/5.1 in
Page 37

2.3.2 Camera Housing and Connectors D22-Basic
The MOBOTIX D22-Basic consists of the camera housing with the motherboard, the
lens and the dome.
Connections
• NET (Ethernet network/power supply)
• For external loudspeaker (Basic models only provide DHCP announcement)
© MOBOTIX AG • Security-Vision-Systems • Made in Germany
www.mobotix.com • sales@mobotix.com
35/100
D22 Camera Manual Part 1
The MOBOTIX bus
(MxB) and the SD card
slot can only be used in
D22-IT and Secure
models using a future
update of the camera
software
The external loudspeaker
of the D22-Basic can
only announce network
data obtained via DHCP
Dome
NET (back)
Mini MxB/MOBOTIX bus
Connections
Lens unit
Ext. speaker (DHCP
announcement only)
LEDs (1 x green, 1 x red)
Page 38

2.3.3 Dimensions of the D22-Basic
© MOBOTIX AG • Security-Vision-Systems • Made in Germany
www.mobotix.com • sales@mobotix.com
36/100
D22 Camera Manual Part 1
ø 129 mm/5.1 in
85 mm/3.3 in
Freely positionable camera module
Page 39

2.3.4 Drilling Template for the D22-Basic
© MOBOTIX AG • Security-Vision-Systems • Made in Germany
www.mobotix.com • sales@mobotix.com
37/100
D22 Camera Manual Part 1
Find the drilling templates
(scale 1:1) at the end of
the manual as a fold-out
Note
Find the folded drilling template at the end of the manual.
Make sure that the drilling template is not scaled nor adjusted to the
paper size when printing the PDF file. When printing the PDF file, you
should print two pages onto one using 100% scaling to obtain an
unscaled printout of the drilling templates.
100 mm/3.9 in
67.5 mm/2.7 in
78 mm/3.1 in
ø5.4 mm/0.21 in
45 mm/1.8 in
22.5 mm/
0.89 in
Page 40

2.4 Camera Accessories: Delivered Parts, Components and
Dimensions
2.4.1 D22 On-Wall Set
© MOBOTIX AG • Security-Vision-Systems • Made in Germany
www.mobotix.com • sales@mobotix.com
38/100
D22 Camera Manual Part 1
The D22 is not included in
the delivery of the OnWall Set!
Item Count Part Name
16
17
1
4
Mounting set for D22
Stainless steel Allen screws M4x35 mm
18 4 Stainless steel washers Ø 4.3 mm
Mounting set (item16)
4 Allen screws M4x35mm (item17)
4 washers ø4.3mm (item18)
∅ 165 mm/6.5 in
Page 41

Drilling Template for the D22 On-Wall Set
© MOBOTIX AG • Security-Vision-Systems • Made in Germany
www.mobotix.com • sales@mobotix.com
39/100
D22 Camera Manual Part 1
Find the drilling templates
(scale 1:1) at the end of
the manual as a fold-out
Note
Find the folded drilling template at the end of the manual.
Make sure that the drilling template is not scaled nor adjusted to the
paper size when printing the PDF file. When printing the PDF file, you
should print two pages onto one using 100% scaling to obtain an
unscaled printout of the drilling templates.
100 mm/3.9 in
60 mm/2.4 in
ø5.8 mm/2.3 in
Page 42

2.4.2 D22 In-Ceiling Set
© MOBOTIX AG • Security-Vision-Systems • Made in Germany
www.mobotix.com • sales@mobotix.com
40/100
D22 Camera Manual Part 1
The D22 is not included in
the delivery of the InCeiling Set!
Item Count Part Name
19
20
1
1
In-Ceiling Set for D22
Decoration ring
21
22
23
5
5
Winged cam
Clamps
2 Wrench for In-Ceiling mount
In-Ceiling mount (item19)
Decoration ring (item20)
∅ 150 mm/5.9 in diameter
Wrench for In-Ceiling
mount (item23)
5 winged cams (item21)
5 clamps (item22)
Page 43
Drilling Template for the D22 In-Ceiling Set
© MOBOTIX AG • Security-Vision-Systems • Made in Germany
www.mobotix.com • sales@mobotix.com
41/100
D22 Camera Manual Part 1
Find the drilling templates
(scale 1:1) at the end of
the manual as a fold-out
Note
Find the folded drilling template at the end of the manual.
Make sure that the drilling template is not scaled nor adjusted to the
paper size when printing the PDF file. When printing the PDF file, you
should print two pages onto one using 100% scaling to obtain an
unscaled printout of the drilling templates.
∅ 150 mm/5.9 in diameter
Page 44
2.4.3 D22 Vandalism Set
© MOBOTIX AG • Security-Vision-Systems • Made in Germany
www.mobotix.com • sales@mobotix.com
42/100
D22 Camera Manual Part 1
The D22 is not included in
the delivery of the InCeiling Set!
Available colors of the
D22 Vandalism Set
- Matt
- Polished
- Powder-coated (black,
white, silver)
Item Count Part Name
24
25
1
4
Vandalism ring 2 mm stainless steel for D22 cameras
Spacers for Vandalism ring
26
27
28
4
1
Security screws M4x16 mm
Driver bit for security screws
1 Reinforced dome 3mm polycarbonate
4 security screws (item26)
1 two-hole driver bit (item27)
1 Vandalism ring (item24)
1 reinforced dome (item28)
∅ 160mm/6.3 in
4 spacers (item25)
Page 45

Available Colors of the D22 Vandalism Ring
The D22 Vandalism Set provides added protection for D22 cameras. The set consists of a robust camera ring made of stainless steel and a reinforced dome made
of 3mm thick polycarbonate. A camera equipped with the Vandalism Set is perfectly suited for applications in demanding environments (such as prions, social
hot-spots, train stations, etc.).
Available Colors
© MOBOTIX AG • Security-Vision-Systems • Made in Germany
www.mobotix.com • sales@mobotix.com
43/100
D22 Camera Manual Part 1
Stainless steel, polished
Stainless steel, matt
Stainless steel, white powder-coated
Stainless steel, black powder-coated
Stainless steel, silver powder-coated
Page 46

2.4.4 D22 Wall Mount
© MOBOTIX AG • Security-Vision-Systems • Made in Germany
www.mobotix.com • sales@mobotix.com
44/100
D22 Camera Manual Part 1
Item Count Part Name
29
30
1
4
Wall Mount
Dowels 8 mm
31
32
33
34
4
4
Stainless steel washers Ø 6.4 mm
Stainless steel wood screws with hex head 6x50 mm
1
8
Wall sealing
Stainless steel Allen screws M4x16 mm
35
36
8
1
Stainless steel washers Ø 4.3 mm
Bottom plate
Depth: 201mm/7.9 in
Height: 125mm/4.9 in
Width: 216mm/8.5 in
Bottom plate (item36)
4 wood screws
6x50mm (item32)
Wall sealing (item33)
8 Allen screws M4x16mm
(item34)
8 washers Ø 4.3 mm (item35)
Wall mount (item29)
4 washers ø6.4mm (item31)
4 dowels 8mm (item30)
Page 47

Drilling Template for the D22 Wall Mount
© MOBOTIX AG • Security-Vision-Systems • Made in Germany
www.mobotix.com • sales@mobotix.com
45/100
D22 Camera Manual Part 1
Find the drilling templates
(scale 1:1) at the end of
the manual as a fold-out
Note
Find the folded drilling template at the end of the manual.
Make sure that the drilling template is not scaled nor adjusted to the
paper size when printing the PDF file. When printing the PDF file, you
should print two pages onto one using 100% scaling to obtain an
unscaled printout of the drilling templates.
75 mm/2.95 in
160 mm/6.3 in
15 mm/
0.59 in
Page 48

2.4.5 D22 Corner and Pole Mount
© MOBOTIX AG • Security-Vision-Systems • Made in Germany
www.mobotix.com • sales@mobotix.com
46/100
D22 Camera Manual Part 1
The Corner and Pole
mount can only be used
in conjunction with the
D22 Wall Mount
* The appearance and the
dimensions of the D22
Corner and Pole Mount
may change
Item Count Part Name
37
38
4
4
Stainless steel Allen screws M8x30 mm
Stainless steel washers Ø 9 mm
39
40
4
2
Stainless steel lock nuts M8
Stainless steel straps
2 steel straps (item40)
4 Allen screws
M8x30mm (item37)
4 lock nuts M8mm (item39)
4 washers Ø 9 mm
(item38)
Depth: 175mm/6.9 in *
Height: 125mm/4.9 in *
Width: 201mm/7.9 in *
Page 49

© MOBOTIX AG • Security-Vision-Systems • Made in Germany
www.mobotix.com • sales@mobotix.com
47/100
D22 Camera Manual Part 1
Notes:
Page 50

2.5 Mounting the Camera
2.5.1 D22-IT/Secure
Before mounting the MOBOTIX D22-IT/Secure, you need to prepare the network
connection and drill the holes for the fixtures:
• Network connection: The network cabling is supplied through the ceiling directly above the camera. The cabling is perfectly protected and cannot be
seen or damaged. When preparing the installation, you should make sure
that the cable runs at least 15cm (6in) within the camera housing (excluding
the connector itself). This will ensure that you can turn the lens unit freely later
on.
Note: When using a wall outlet (either flush-mounted or on-wall), the D22-IT/
Secure will have to be mounted using either the On-Wall set or the Outdoor
Wall Mount. The D22-IT/Secure models cannot be mounted directly on top of
wall outlets.
• Drilling the holes: Prepare the holes in the ceiling. Make sure that you have
the supplied dowels ready for this purpose. Use the supplied drilling template for the mounting ring of the D22-IT/Secure (fold-out at the end of this
manual) to mark the position for drilling the dowel holes and the holes
through which the cables will be led later on.
Procedure
• Use the delivered screws to affix the camera's mounting ring to the ceiling. The outer
shell will be used later in the mounting process.
• Continue with section 2.5.3,
Finishing the Mounting Process
.
© MOBOTIX AG • Security-Vision-Systems • Made in Germany
www.mobotix.com • sales@mobotix.com
48/100
D22 Camera Manual Part 1
Find the folded drilling
template for the mounting
ring of the D22-IT/Secure models at the end of
the manual!
Maximum torque for all
screws is 1 to 1.2Nm
(0.74lbf ft)
Caution
Only use the factory pre-installed network cable of the MOBOTIX
camera. It is very important that the rubber plug of the network
cable reliably protects the housing from moisture entering the camera. All openings of the camera housing need to be closed off
properly. This will ensure that the camera remains weatherproof.
Page 51

2.5.2 D22-Basic
Before mounting the MOBOTIX D22-Basic, you need to prepare the network connection and drill the holes for the fixtures:
• Network connection: The network cabling is supplied through the ceiling directly above the camera. The cabling is perfectly protected and cannot be
seen or damaged. When preparing the installation, you should make sure
that the cable runs at least 15cm (6in) within the camera housing (excluding
the connector itself). This will ensure that you can turn the lens unit freely later
on.
Note: As an alternative, you can also connect the camera above a wall outlet
(either flush-mounted or on-wall types). Note, that the cabling remains visible
in this case. The D22-Basic model cannot be mounted directly on top of wall
outlets.
• Drilling the holes: Prepare the holes in the ceiling. Make sure that you have
the supplied dowels ready for this purpose. Use the supplied drilling template for the D22-Basic (fold-out at the end of this manual) to mark the position for drilling the dowel holes and the holes through which the cables will
be led later on.
Procedure
• Remove the camera dome. Take the delivered plastic foil or a cotton cloth and remove
the dome by turning it in counter-clockwise
direction.
• Unplug the pre-installed network cable from
the network connector at the inside of the
camera. Make sure that you do not touch
any electronic parts insinde! Static electricity could destroy these parts when touching
them.
© MOBOTIX AG • Security-Vision-Systems • Made in Germany
www.mobotix.com • sales@mobotix.com
49/100
D22 Camera Manual Part 1
Find the folded drilling
template of the D22-Basic at the end of the manual!
Caution
Only use the factory pre-installed network cable of the MOBOTIX
camera. It is very important that the rubber plug of the network
cable reliably protects the housing from moisture entering the camera. All openings of the camera housing need to be closed off
properly. This will ensure that the camera remains weatherproof.
Page 52

• Release the internal part of the camera by
turning the ring inside in counter-clockwise
direction using the supplied toothed wrench.
While doing so, hold the camera at the lens
unit to prevent it from turning.
• Disengage the internal part of the camera
with the lens unit from the base of the housing.
• Position the base of the camera housing over
the drilled holes and the prepared cable exit
in the ceiling. If the holes in the base of the
housing are closed, push through the holes
using a suitable tool or use a suitable drill bit
to open the holes. Caution: These holes will
need to stay closed on D22-IT/Secure
models.
Make sure that the cable is at least 15cm (6in) long within the camera housing (excluding the connector itself), as in the factory-installed cable.
It is very important that the rubber plug of the network cable reliably protects the housing from moisture entering the camera. This will ensure that
the camera remains weatherproof.
• Use the delivered screws to mount the base
of the camera to the ceiling.
If the cabling from the ceiling is not directly
beneath the camera, make sure that the network cable is not damaged by one of the feet
of the camera base. When tightening the
screws of the camera base, the base will lock
the cable in place, thus securing the cable
against the ceiling. The cable is now firmly
installed and cannot be pulled out or repositioned.
© MOBOTIX AG • Security-Vision-Systems • Made in Germany
www.mobotix.com • sales@mobotix.com
50/100
D22 Camera Manual Part 1
Maximum torque for all
screws is 1 to 1.2Nm
(0.74lbf ft)
Page 53

• Insert the internal part of the camera with the
lens unit into the mounted base of the housing and secure it by turning the two blue
clamps in clockwise direction using the supplied toothed wrench or a screwdriver. This
will prevent the internal part of the camera to
accidentally fall out of the base before it has
been secured. Now secure the internal part
of the camera by turning the toothed ring by
hand in clockwise direction, as long as you
can still easily turn the internal part of the
camera.
• Connect the network cable to the network
connector of the camera. Make sure that the
cable loop is running properly as shown in
the figure.
• Position the camera by turning and tilting the
lens unit so that it points into the desired direction (Note: the SD card slot has to point
downwards for the camera's live image to
be correct). Never use force when adjusting
the direction of the camera, as this could
damage the camera beyond repair. The internal part of the camera with the lens unit
should turn and tilt easily, but it should not reposition itself. This could mean
that you have to loosen the Allen screws at both sides of the lens unit using
the supplied Allen wrench.
• Continue with section 2.5.3,
Finishing the Mounting Process
.
© MOBOTIX AG • Security-Vision-Systems • Made in Germany
www.mobotix.com • sales@mobotix.com
51/100
D22 Camera Manual Part 1
Maximum torque for all
screws is 1 to 1.2Nm
(0.74lbf ft)
Page 54

2.5.3 Finishing the Mounting Process
Establishing a Connection to the Camera
• Establish a connection to the camera as described in section 3.4,
Establi-
shing a Connection to the Camera
.
Adjusting the Lens, Visual Check
Make sure that you see the live image of the camera on the monitor of your computer or laptop. Now adjust the lens until you see the desired image area on your
monitor.
• Remove the camera dome. Take the deliv-
ered plastic foil or a cotton cloth and remove
the dome by turning it in counter-clockwise
direction. Make sure that you remove the
camera's outer shell on IT/Secure models before you attempt to do this.
• Slightly loosen the toothed ring inside by
turning it in counter-clockwise direction using
the supplied toothed wrench. Also slightly
loosen the two Allen screws at both sides of
the lens unit by turning them in counter-
clockwise direction using the supplied Allen
wrench.
Loosen the outer shell and the Allen screws
only slightly, so that you can turn the internal
part of the camera and tilt the lens unit without using excessive force. The internal part
and the lens unit should not reposition themselves.
• Fine-tune the image area that is displayed
on a computer monitor by turning and tilting
the lens unit accordingly. Never use force
when adjusting the direction of the camera,
as this could damage the camera beyond repair. The internal part of the camera with the
lens unit should turn and tilt easily, but it
should not reposition itself.
© MOBOTIX AG • Security-Vision-Systems • Made in Germany
www.mobotix.com • sales@mobotix.com
52/100
D22 Camera Manual Part 1
Page 55

• Once you are seeing the desired image area,
tighten the Allen screws at the sides of the
lens unit (in clockwise direction) and the toothed ring inside the camera. Do not use ex-
cessive force when doing so to avoid damaging the camera.
• Release the lens' lock ring and adjust the
image focus by turning the lens in its holder. Check the image on the computer monitor. Make sure that you tighten the lock ring again once you are finished. When tightening the lock ring, firmly hold the lens to prevent it from
losing the focus setting.
Mounting the Dome and the Camera's Outer Shell
• Mount the dome. Take the delivered plastic
foil or a cotton cloth, insert the dome into its
seat and turn it in clockwise direction. You
should once again control the sharpness of
the camera image on a computer monitor.
If required, clean the lens gently using a lintfree cotton cloth before installing the dome.
Do not apply excessive pressure onto the
glass surface when cleaning the lens!
• Mount the outer shell (IT/Secure Models
only). Use the delivered Allen screws (or the
security screws and the spacers when
mounting the outer shell of the Vandalism
Set).
© MOBOTIX AG • Security-Vision-Systems • Made in Germany
www.mobotix.com • sales@mobotix.com
53/100
D22 Camera Manual Part 1
Maximum torque for all
screws is 1 to 1.2Nm
(0.74lbf ft)
Lock ring: Secure the lens
against vibrations
Lenses are adjusted
manually
Maximum torque for all
screws is 1 to 1.2Nm
(0.74lbf ft)
Caution
Only use the factory pre-installed network cable of the MOBOTIX
camera. It is very important that the rubber plug of the network
cable reliably protects the housing from moisture entering the
camera. All openings of the camera housing need to be closed off
properly. This will ensure that the camera remains weatherproof.
Caution (only 135 mm Tele Lenses)
Image Focus: Due to the lens effect of the dome, the focus of the
135mm tele lens is shifting slightly once the dome has been mounted.
Before mounting the dome, the tele lens should be turned about 90°
in clockwise direction (as seen from the lens' front). Make sure that
you check the focus of the live image in your browser with the dome
installed and re-adjust the lens, if required.
Page 56
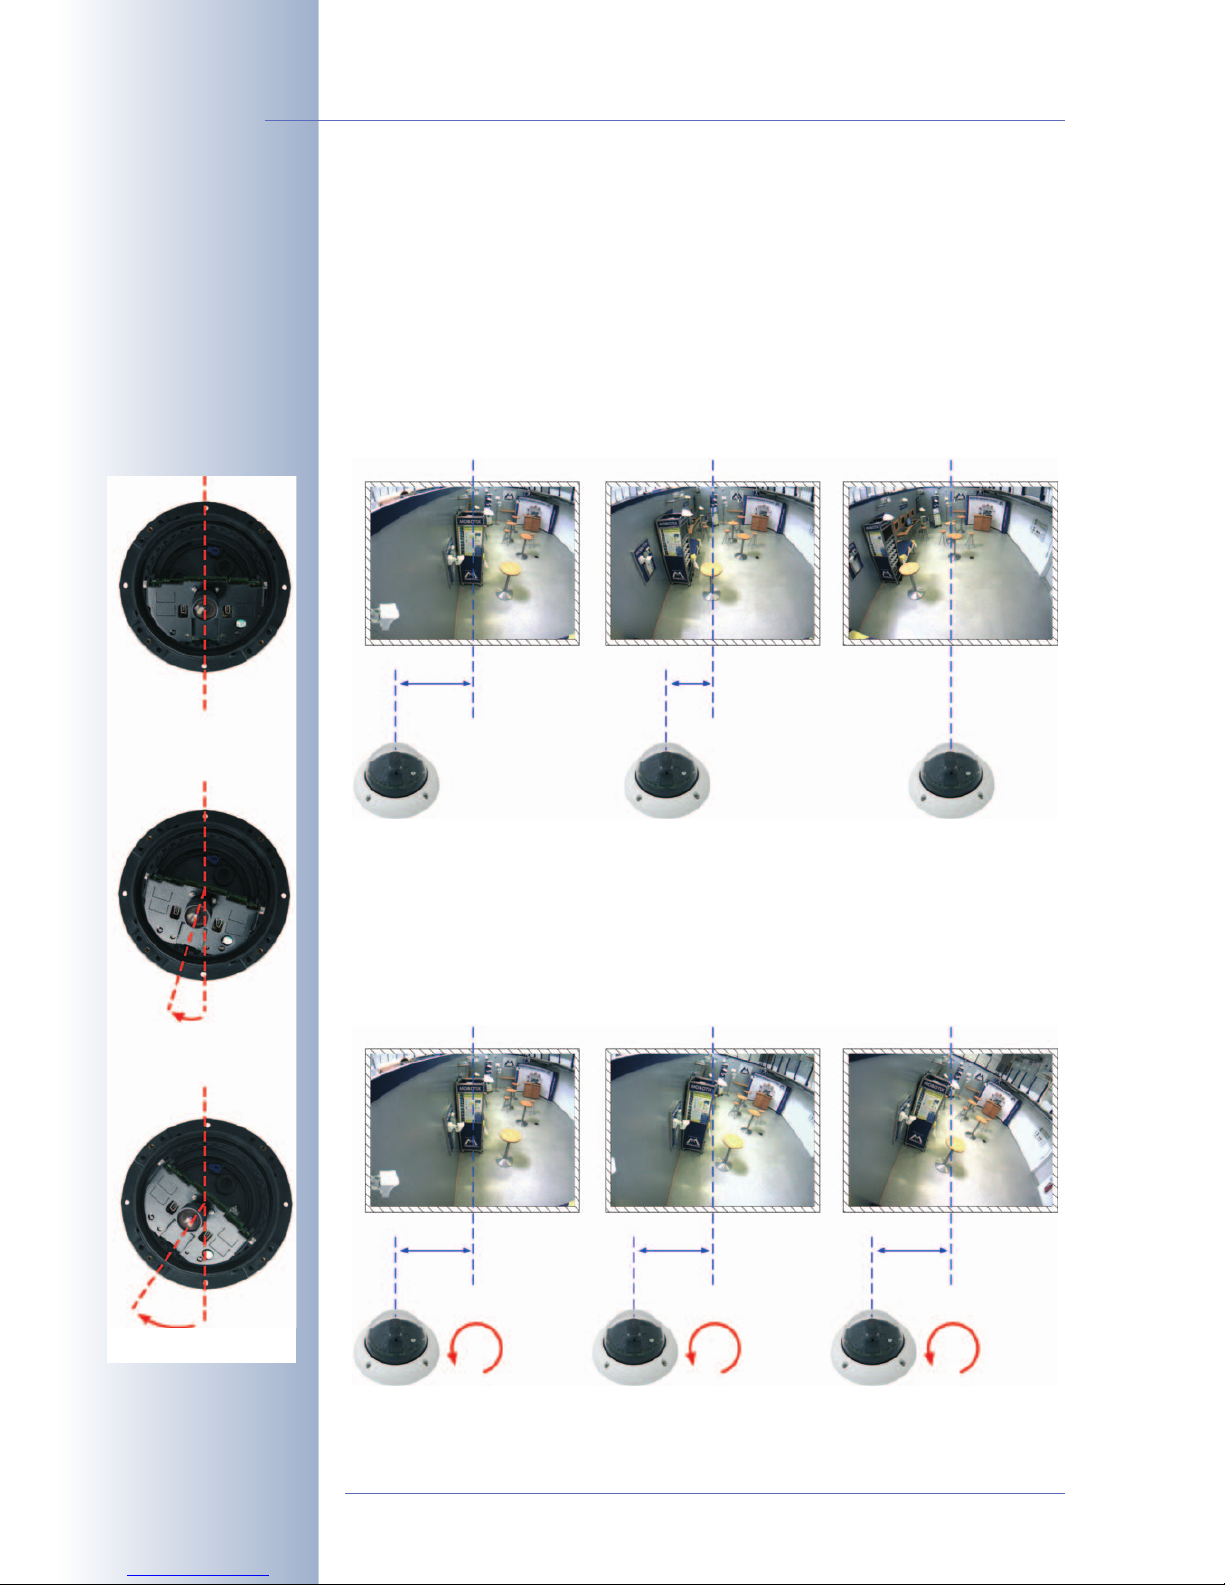
2.5.4 Notes on Mounting the Camera to a Wall Without the Wall Mount
The MOBOTIX D22 has been designed to be mounted to either ceilings or to a
wall, when using the Wall Mount. It is also possible to mount the D22 directly to a
wall (without using the Wall Mount), but doing so will result in reduced flexibility for
positioning the lens. The following section contains some hints on these restrictions
and tips for mounting the camera to a wall.
When mounting the camera onto a wall, the camera image will show more wall
area (and less room area), the more you move the position of the camera from the
center of the wall toward a corner.
In order to show a larger portion of the room (and less wall area) when using a
MOBOTIX D22 mounted to a Wall Mount, you can turn the base of the camera and
the lens unit around its vertical axis. The camera image always stays upright. When
mounting the D22 directly onto a wall, you can also turn the base of the camera
around its vertical axis to show more room area, but the image now appears
slightly tilted.
© MOBOTIX AG • Security-Vision-Systems • Made in Germany
www.mobotix.com • sales@mobotix.com
54/100
D22 Camera Manual Part 1
2m/6ft
Center of the room
0° 10° 30°
0°
ca. 10°
ca. 30°
2m/6ft 2m/6ft 2m/6ft
1m/3ft
Page 57

This effect also appears when mounting a D22 at the center of a wall and you are
turning the base of the camera. This will also allow to capture a larger area of the
room with the camera, but the image is again tilted.
© MOBOTIX AG • Security-Vision-Systems • Made in Germany
www.mobotix.com • sales@mobotix.com
55/100
D22 Camera Manual Part 1
Tilt the camera to see a
larger area of the room
(camera mounted 1m/3ft
to the left of the center)
Note
When mounting the D22 to a wall, you should always use the wall
mount.
When mounting the camera directly to the wall without using the
wall mount, you should mount the camera in the center of a wall, if
you would like to maximize the area monitored by the camera.
If you cannot install the D22 to the ceiling and using the D22 wall
mount is also not possible, you should consider using a MOBOTIX D12
instead. MOBOTIX D12 models are more flexible than the D22 when
positioning the camera modules thanks to the larger housing.
0° 10° 30°
0° 10° 30°
Center of the room
Center of the room
Center of the room
1m/3ft 1m/3ft 1m/3ft
Page 58

2.6 Mounting the D22 to a Ceiling Using the On-Wall Set
Before mounting the MOBOTIX D22-IT/Secure to an indoor or outdoor location
using the On-Wall Set, you need to prepare the network connection and drill the
holes for the fixtures:
• Network connection: You can use any one of the four openings in the OnWall mount to guide the cabling into the camera. When using the On-Wall
Set, you cannot mount the camera directly on top of the wall outlet (regardless whether it's a flush-mounted outlet or an above-the-wall model).
When preparing the installation, you should make sure that the cable is at
least 15cm (6in) long within the housing of the On-Wall Set (excluding the
connector itself). This will ensure that you can turn the lens unit freely later on.
Cable that is too long can be stored easily within the On-Wall mount.
• Drilling the holes: Prepare the holes in the ceiling. Make sure that you have
the supplied dowels ready for this purpose. Use the supplied drilling template for the D22 On-Wall Set (fold-out at the end of this manual) to mark the
position for drilling the dowel holes and the holes through which the cables
will be led later on.
Procedure
• Apply a sufficient amount of silicone around
the holes at the back of the housing to prevent water from entering. When doing so,
make sure that you do not block or seal
off the condensation vent!
• Use the delivered screws to mount the OnWall Set (without the camera) to the ceiling.
• If the cables are guided through one of the
openings in the On"Wall Set, insert the cables
into the On"Wall mount.
© MOBOTIX AG • Security-Vision-Systems • Made in Germany
www.mobotix.com • sales@mobotix.com
56/100
D22 Camera Manual Part 1
Find the folded drilling
template of the D22 OnWall Set at the end of
the manual!
Seal off the holes at
the back of the housing
using silicone sealant!
Do not seal off the condensation vent!
Maximum torque for all
screws is 1 to 1.2Nm
(0.74lbf ft)
Caution
Note that the On-Wall Set can also be used in outdoor applications (IP65). When doing so, make sure that you seal off the holes
at the back of the housing using good-quality silicone sealant.
Note
When mounting the MOBOTIX D22 to a wall, you should always use
the D22 wall mount instead of the On-Wall Set.
Do not seal
off vent!
Page 59

• Disengage the mounting ring from the housing of the D22-IT/Secure. This ring is not required when mounting the camera to the OnWall Set.
• Connect the network cable to the network cable of the camera using a patch cable connector. Make sure to leave enough unused
cable within the housing. This will ensure that
you can turn the lens unit freely later on. Cable that is too long can be stored easily within
the On-Wall mount.
• Now press the D22 into the guides of the OnWall mount. The tapered guides on the back
of the D22 housing fit exactly into the openings of the On-Wall mount.
• Continue with section 2.5.3,
Finishing the Mounting Process
.
© MOBOTIX AG • Security-Vision-Systems • Made in Germany
www.mobotix.com • sales@mobotix.com
57/100
D22 Camera Manual Part 1
Page 60

2.7 Mounting the D22 to a Ceiling Using the In-Ceiling Set
Before mounting the MOBOTIX D22-IT/Secure to an indoor location using the InCeiling Set, you need to prepare the network connection and drill the hole for the
camera:
• Network connection: The network cabling is supplied through the ceiling directly above the camera.
When preparing the installation, you should make sure that you have at least
15cm (6in) of unused cable.
• Hole for the camera: Prepare the hole for the camera. The hole should have
a diameter of 150mm (6in)!
Procedure
• Insert the camera into the In-Ceiling mount
without the outer shell and the mounting
ring. The tapered guides on the back of the
D22 housing fit exactly into the openings of
the In-Ceiling mount.
• Connect the network cable to the network
cable of the camera using a patch cable
connector.
© MOBOTIX AG • Security-Vision-Systems • Made in Germany
www.mobotix.com • sales@mobotix.com
58/100
D22 Camera Manual Part 1
Find the drilling template
at the end of the manual
Page 61

• Insert the In-Ceiling Set with the camera
into the hole in the ceiling. Tightening the in-
tegrated mounting screws will automatically
secure the In-Ceiling mount to the ceiling.
• Finally, press the decoration ring onto the
mount and lock in place by turning it in clockwise direction.
Dismounting
• Use the wrench for the In-Ceiling mount included in the delivery to dismount the decoration ring. Insert the wrench as shown in
the figure and turn the ring in counter-clockwise direction.
• Remove the camera.
• Loosen the screws of the In-Ceiling mount
(this will automatically retract the winged
cams). You can now remove the In-Ceiling
mount from the ceiling.
© MOBOTIX AG • Security-Vision-Systems • Made in Germany
www.mobotix.com • sales@mobotix.com
59/100
D22 Camera Manual Part 1
The winged cams automatically secure the InCeiling Set in the ceiling
when tightening the
screws (see detail pictures)
Wrench for In-Ceiling
mount
Winged cam
Page 62
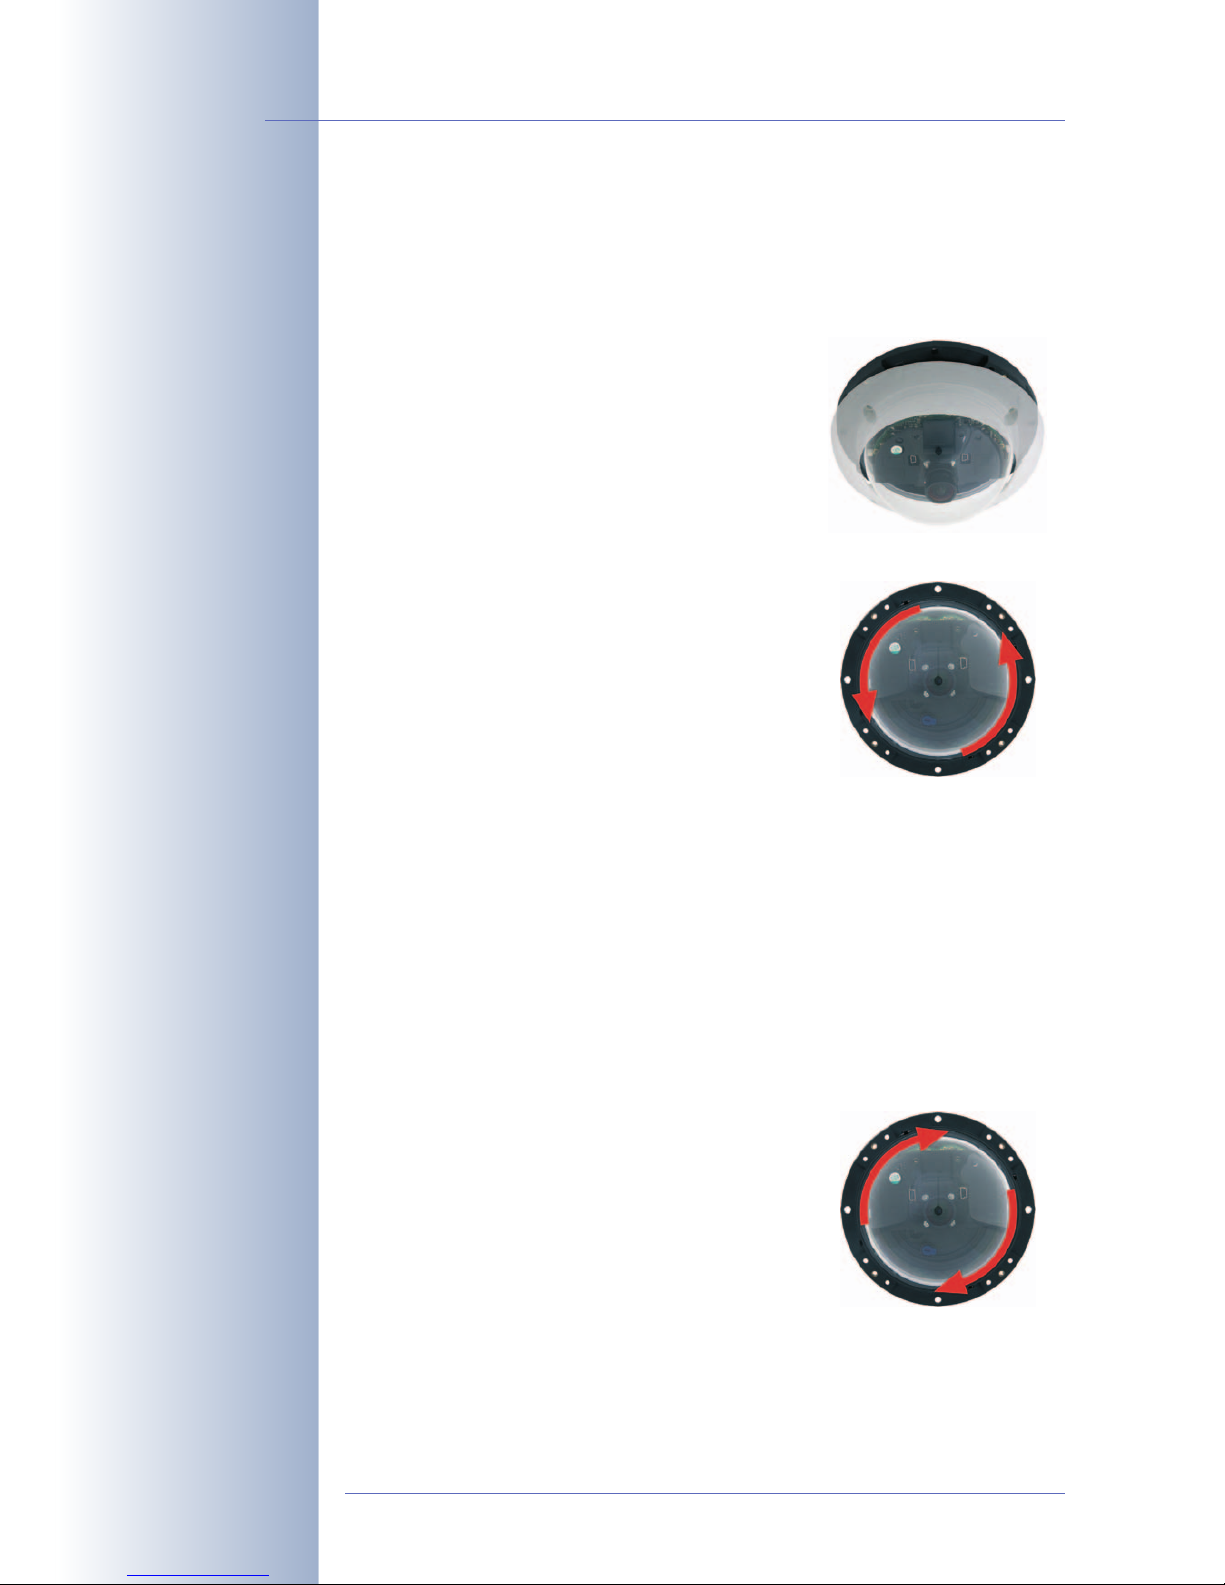
2.8 Mounting the D22 Vandalism Set
In order to install the Vandalism Set, replace the regular outer shell and the Allen
screws with the stainless steel shell, the security screws and the four spacers of the
Vandalism Set. Likewise, replace the dome of the D22-IT/Secure with the reinforced
dome of the Vandalism Set.
• Remove the outer shell. Remove all four Al-
len screws using the supplied Allen wrench.
Take off the outer shell.
• Remove the camera dome. Remove the
dome of the D22-IT/Secure (by turning it in
counter-clockwise direction), then package
and store the dome.
• If required, clean the lens gently using a lint-free cotton cloth. Do not apply
excessive pressure onto the glass surface when cleaning the lens! Make
sure that you do not change the lens focus or the lens unit when doing so.
You should once again control the sharpness of the camera images on a
computer monitor (see section 2.5.3).
• Mount the reinforced dome of the Vandal-
ism Set. Use a soft cotton cloth and mount
the reinforced dome by placing the dome into
its seat and turning it in clockwise direction. If
required, clean the dome gently using a lintfree cotton cloth before installing it. You
should once again control the sharpness of
the camera images on a computer monitor
(see section 2.5.3).
© MOBOTIX AG • Security-Vision-Systems • Made in Germany
www.mobotix.com • sales@mobotix.com
60/100
D22 Camera Manual Part 1
Page 63

• Mount the stainless steel shell of the Vandalism Set. Do not forget to insert the four
spacers of the Vandalism Set into their
seats in the camera housing!
• Mount the supplied stainless steel shell with
the security screws and use the supplied
two-hole driver bit to firmly tighten the
screws.
© MOBOTIX AG • Security-Vision-Systems • Made in Germany
www.mobotix.com • sales@mobotix.com
61/100
D22 Camera Manual Part 1
Spacers for Vandalism
Set
Security screws and twohole driver bit
Page 64

2.9 Mounting the D22 to a Wall Using the Wall Mount
Before mounting the MOBOTIX D22-IT/Secure with the Wall Mount you need to
prepare the network connection and drill the holes for the fixtures:
• Network connection: The network cabling is supplied through the opening in
the back of the wall mount. The cabling is perfectly protected by the mount
and cannot be seen or damaged. The wall mount can be mounted directly
on top of wall outlets (flush-mounted or above-the-wall types; maximum dimensions of the outlet: 88x 80mm (3.5x 3.2in) width x height).
Use the factory pre-installed network cable of the D22 (50cm (20in) length).
This will ensure that you can turn the lens unit of the D22 freely later on.
• Drilling the holes: Prepare the holes in the wall. Make sure that you have the
supplied dowels ready for this purpose. Use the supplied drilling template for
the D22 Wall Mount (fold-out at the end of this manual) to mark the position
for drilling the dowel holes and the holes through which the cables will be
led later on.
Procedure
• Disengage the mounting ring from the
housing of the D22-IT/Secure. This ring is not
required when mounting the camera to the
Wall Mount.
• Use the delivered screws to mount the Wall
Mount (without the camera) to the wall (directly on top of the cabling or the wall outlet).
© MOBOTIX AG • Security-Vision-Systems • Made in Germany
www.mobotix.com • sales@mobotix.com
62/100
D22 Camera Manual Part 1
Maximum torque for all
screws is 1 to 1.2Nm
(0.74lbf ft)
Caution
Only use the factory pre-installed network cable of the MOBOTIX
camera. It is very important that the rubber plug of the network
cable reliably protects the housing from moisture entering the
camera. All openings of the camera housing need to be closed off
properly. This will ensure that the camera remains weatherproof.
Page 65

• Connect the network cable to the network
cable of the camera using a patch cable
connector (or plug the cable directly into the
RJ45 wall outlet). Make sure to leave enough
unused cable within the housing. This will ensure that you can turn the lens unit freely
later on. Cable that is too long can be stored
easily within the housing.
• Now press the D22 into the guides of the
wall mount. The tapered guides on the back
of the D22 housing fit exactly into the openings of the On-Wall mount.
• Continue with section 2.5.3,
Finishing the Mounting Process
.
© MOBOTIX AG • Security-Vision-Systems • Made in Germany
www.mobotix.com • sales@mobotix.com
63/100
D22 Camera Manual Part 1
Page 66

2.10 Notes
2.10.1 Cleaning Instructions
Cleaning the Dome
• In order to protect the dome from being scratched and from getting dirty,
only handle the dome using a soft cotton cloth or the protective plastic of the
camera's shipping box.
• You should clean the dome at regular intervals. Always use a lint-free cotton
cloth for this purpose.
• If the dirt is more persistent, add a mild alcohol-free detergent without abrasive particles.
• Make sure you instruct cleaning personnel on how to clean the camera.
Cleaning the Lens
• If the lens is dirty from the installation process, clean the lens using a lint-free
cotton cloth. Make sure that the lens is still in focus after cleaning and adjust
the lens' focus if required.
2.10.2 Wiring, Fire Prevention, Lightning and Surge Protection
When installing the wiring in or out of buildings, make sure you always adhere to
the relevant regulations on wiring, fire prevention and protection against lightnings.
MOBOTIX recommends having MOBOTIX cameras installed only by certified specialists accustomed to installing network devices and having proper respect for the
applicable regulations regarding lightning protection and fire prevention as well as
the current technology for preventing damages from electrical surges.
Find more information on the subject at the International Electrotechnical Com-
mission (IEC, www.iec.ch) or at a manufacturer of protection devices against
lightning and electrical surges, such as Dehn (www.dehn.de).
Wiring
When installing the wiring, make sure you follow these guidelines:
• Data cable: Make sure you only use double-shielded
CAT 5/7 cable (S/STP) for Ethernet connections.
• Outdoors: Installing the camera outdoors requires special precautions and measures regarding the cables as
well as lightning and surge protection (see further below in this section).
• Wire lengths: The cable segments must not exceed
the maximum allowed cable lengths in order to ensure proper data transfer
(see section 3.3,
Connecting the Camera to the Network and to the Power
Supply
).
© MOBOTIX AG • Security-Vision-Systems • Made in Germany
www.mobotix.com • sales@mobotix.com
64/100
D22 Camera Manual Part 1
Page 67

• Avoid induction: When running data cables parallel to existing regular power lines or high-voltage wires, make sure you observe the minimum distances to the power cables.
Fire Prevention
When installing the power lines to the camera, make sure you always adhere to
the relevant regulations on wiring and fire prevention at the site of the installation.
Lightning and Surge Protection
To prevent damage from lightnings and surges, make sure you follow these guidelines:
• Lightning conductors: In areas exposed to lightning (e.g. on roofs), a distance holder (1m (3ft) higher, 1m (3ft) away from the camera) and proper
lightning conductors need to be installed in order to prevent lightning strikes
into the camera and to ensure that the energy of a lightning strike is properly
led to the ground.
• Surge protection: Make sure you have installed proper protection against
electrical surges in order to prevent damage to the camera, the building and
the network infrastructure. This includes surge protectors for 19" racks, adding an uninterruptible power supply (UPS) to the MOBOTIX camera, and installing surge arresters or similar for routers, switches, servers, etc.
© MOBOTIX AG • Security-Vision-Systems • Made in Germany
www.mobotix.com • sales@mobotix.com
65/100
D22 Camera Manual Part 1
Page 68

2.11 Camera Accessories
Power supply (MX-SNT-E/U/GB/J/AUS01-30-RJ)
The MOBOTIX power supply is required if you do not
use a Network Power Rack or Network Power Box,
or a PoE-compatible switch or router.
Network Power Adapter (MX-NPA-3-RJ)
The Network Power Adapter allows injecting the power supply for the MOBOTIX camera into the network cable. It thus allows using the network cable for connecting
to the camera and for remotely supplying power (up
to 100m (300ft)). The Network Power Adapter is required, if you are using the universal power supply,
and power is not supplied using a PoE switch/router
or a MOBOTIX Netpower Box/Rack.
Netpower Box for up to 4 Cameras (MX-NPR-4)
The MX-NPR-4 allows supplying power to up to four
MOBOTIX cameras via the network cable. The NPR-4
thus replaces four separate power supplies and four
Network Power Adapters. The Netpower Box delivery includes a (detachable) clip at the back, which
simply clicks onto DIN rails.
Netpower Rack for 8/20 Cameras (MX-NPR-8/20)
The MX-NPR-8/MX-NPR-20 allow supplying power
to up to 8/20 MOBOTIX cameras, respectively, via
the network cable. These NPRs thus replace 8/20
separate power supplies and the same number of
Network Power Adapters; they are easily mounted
in 19" racks (2 rack units).
© MOBOTIX AG • Security-Vision-Systems • Made in Germany
www.mobotix.com • sales@mobotix.com
66/100
D22 Camera Manual Part 1
Advantages of MOBOTIX PoE Products
• Zero maintenance and reliable without fans.
• Higher reliability of the system as a whole, since standard
switches without PoE can be used (lower risk of failure).
• Easy installation on DIN rails using supplied adapter (
MX-NPR-4
)
or in 19" racks (
MX-NPR-8/20
).
Page 69

On-Wall Set
The D22 On-Wall set can reliably protect external
cables if the cables cannot
be guided from below the
housing but have to be led
above the wall for technical
or legal reasons. In addition, the On-Wall mount provides ample space for extra modules.
In-Ceiling Set
The D22 In-Ceiling Set allows mounting the D22 camera in fake ceilings, for example. This type of installation provides optimum protection for the camera and
reduces the visible profile to
a minimum since only the
dome is visible.
Vandalism Set
The D22 Vandalism Set provides added protection for D22 cameras. The set consists of a robust camera ring made of stainless steel and a reinforced dome made
from 3mm thick polycarbonate. A camera with vandalism set is perfectly suited
for applications in demanding environments (such as
prisons, social hotspots,train stations, etc.).
Wall Mount
The D22 Wall Mount is the ideal solution for mounting the D22 to walls for indoor
and outdoor applications. The camera is absolutely dustproof and resistant against
water jets (IP65). The wall
mount also covers RJ45 wall
outlets and also has ample
space for additional modules.
© MOBOTIX AG • Security-Vision-Systems • Made in Germany
www.mobotix.com • sales@mobotix.com
67/100
D22 Camera Manual Part 1
The D22 is not included in
the delivery of the InCeiling Set!
(IP65)
The stainless steel camera ring is available in five
versions:
- matt
- polished
- white powder-coated
- black powder-coated
- silver powder-coated
ø 160mm/6.3in
ø 165mm x 37mm
/6.5x 1.5 in
Page 70

Corner and Pole Mount
If you would like to mount the MOBOTIX D22 to a
pole, you should consider using the MOBOTIX Corner and Pole Mount. The Corner and Pole mount
can only be used in conjunction with the Wall
Mount. The supplied stainless steel straps allow fixing the mount to poles with diameters between 60
and 180mm (2.4 to 7.1in).
By design, the Corner and Pole Mount does
not
allow using a wall outlet for the
camera cabling.
Like the Outdoor Wall Mount, the Corner and Pole Mount is made from weatherproof material and is just as robust and maintenance-free.
© MOBOTIX AG • Security-Vision-Systems • Made in Germany
www.mobotix.com • sales@mobotix.com
68/100
D22 Camera Manual Part 1
* The appearance and the
dimensions of the D22
Corner and Pole Mount
may change
Mounted to a corner *
Mounted to a pole *
Page 71

© MOBOTIX AG • Security-Vision-Systems • Made in Germany
www.mobotix.com • sales@mobotix.com
69/100
D22 Camera Manual Part 1
Notes:
Page 72

3 OPERATING THE CAMERA
3.1 General Procedure
The MOBOTIX camera does not require any software installation; all you need is
your preferred browser with JavaScript support to operate the camera. Thus, the
MOBOTIX camera is supported by all common operating systems (such as Win-
dows, Macintosh and Linux, ...).
3.1.1 Establishing the Power Supply to the Camera
You can choose between the following options:
• External power supply and Network Power Adapter (MX-NPA-3-RJ):
Power supply of one camera injected into the network cabling (max. length
100m (110yd)), from the NPA to the 10BaseT/NET connector of the camera
(see sections 3.3.3 and 3.3.4).
• Network Power Box/Rack (MX-NPR-4, or 8/20): Power supply of 4/8/20
cameras injected into the network cabling (max. length 100m (110yd)), from
the NPR to the 10BaseT/NET connector of the camera (see section 3.3.5).
• Power over Ethernet: Power supply using network components that are conforming to the PoE standard IEEE 802.3af (see section 3.3.6)
3.1.2 Connecting the Camera
• Ethernet interface of the camera (10/100 Mbps Ethernet): Connect directly
from a computer (using a crossover cable) or by using a Network Power
Adapter or a switch and a regular patch cable. Open a browser and enter
the IP address printed on the camera label (e.g. 10.1.0.99).
If your network does not support a Class
A network (i.e. 10.x.x.x), your PC or
laptop will have to be set temporarily to
such a network address. For operating
systems that allow multi-homing (Windows 2000, Windows XP, Linux, Mac OS
X), you can set a second IP address in
the 10.x.x.x network (see section
3.4.1,
Preparing the Ethernet Connec-
tion
).
Once a connection has been established, click on the Admin Menu button to start
configuring the camera. The Admin Menu controls all network settings (IP address,
netmask, DHCP, etc.) and other options.
© MOBOTIX AG • Security-Vision-Systems • Made in Germany
www.mobotix.com • sales@mobotix.com
70/100
D22M Camera Manual Part 1
MOBOTIX PoE products
do not require any fans
and are robust and reliable!
PoE components (IEEE
802.af) should not have
fans as this would decrea-
se the overall reliability
of the entire system
Computer settings:
• IP address: 10.1.0.11
• Netmask: 255.0.0.0
• Gateway: none
• DNS: none
Page 73

The configuration follows these steps:
1) Establish the first connection (via the Ethernet network).
2) Set the parameters for the desired connection type (Quick Installation).
3) Set the event control (see chapter 7,
Events, Actions and Messages
in the
Software Manual
).
4) Set the storage parameters (FTP, internal and external ring buffer storage).
5) Store the configuration in the camera's permanent storage (flash).
© MOBOTIX AG • Security-Vision-Systems • Made in Germany
www.mobotix.com • sales@mobotix.com
71/100
D22M Camera Manual Part 1
Always use Quick Instal-
lation for initial configu-
ration
Note
After first booting a new MOBOTIX camera or after resetting to factory
defaults, accessing the Administration menu (Admin Menu button) will
automatically start the Quick Installation wizard. This is where you
configure the most important camera parameters in a step-by-step
manner. If you have completed the Quick Installation wizard at least
once, the standard Administration menu will open when you click on
the Admin Menu button.
Live image: http://preparkcam.mobotixserver.de
Page 74

3.2 Overview of the Configuration Settings
Once the connection has been established, you can configure the camera by clicking on the Admin Menu button or the Setup Menu button.
Using the Quick Installation wizard
After first booting the camera or after resetting it to factory defaults, any access to
the administration menu (Admin Menu button) will start the Quick Installation.
The wizard will guide you through the most important settings of the camera (configuration of the network interface, image control, etc.) and can also be used to reset
the camera to its factory settings.
It is also recommended to use Admin Menu> Quick Installation later on as well,
e.g. if you would like to change connection parameters or add a new connection
type.
Administration and setup of the camera
Basic configuration tasks of the camera (e.g. passwords, interfaces, software updates) are carried out from the administration menu (Admin Menu button), which
requires the corresponding access rights (
admins
group, user name and pass-
word).
Open the Setup Menu (button) and find the dialogs for changing the image, event
and recording settings in the Image Control and Event Control sections. These options are also available for users belonging to the
users
group. Some of these settings can be changed using the corresponding pull-down menus above the image
on the Live screen.
The image settings are already optimized
The factory image settings of MOBOTIX cameras deliver excellent images for most
application scenarios and should not be changed. If you do wish to make changes,
your changes should be minor and gradual.
If you would like to reset changes without resetting the complete configuration to
factory defaults, you can use the Factory button at the bottom of the dialog to reset
only this dialog's settings. If you would like to reset all image settings, you may do
so using the Manage Settings> Restore Image Settings pull-down menu above
the image on the Live screen.
All changes are temporary
All changes to the configuration are only temporary and can thus be tested easily.
Restoring the previous configuration settings can be achieved using the Restore
button in most dialogs or by running Admin Menu> Restore last stored configu-
ration from flash (see also section 5.9,
Managing Settings
, in the
Software Man-
ual
).
© MOBOTIX AG • Security-Vision-Systems • Made in Germany
www.mobotix.com • sales@mobotix.com
72/100
D22M Camera Manual Part 1
Always use Quick Instal-
lation for initial configu-
ration!
Admin Menu
User: admin
Password: meinsm
Setup Menu
Recommendation: Always
use factory image settings!
Page 75

Once you have finished configuring the camera, you should always store the set-
tings in the camera's permanent memory. You can do so in each dialog (clicking
on Set at the bottom of each dialog will temporarily set the changes; clicking on
Close will ask you to store the complete configuration in the cameras permanent
memory) or in the Configuration section of the administration menu (Admin
Menu> Store current configuration into flash memory).
The Configuration section of the administration menu provides more functions for
storing, copying and managing camera settings. For additional information on this
topic, see chapter 5,
Basic Camera Configuration
, in the
Software Manual
.
A camera that keeps time
Apart from a multitude of possibilities for controlling the camera using time (time
tables, holiday and vacation, scheduled tasks, etc.), the camera can also synchro-
nize its internal clock. This allows you to keep the camera in synch manually with
a computer or fully automatic using a time server or another MOBOTIX camera.
The camera can use NTP time servers or time servers providing Time Protocol (RFC
868). For additional information on this topic, see section 5.4.2,
Date and Time /
Time Zones and Time Servers
, in the
Software Manual
.
MOBOTIX cameras can do "More"
In order to improve the readability of the camera dialogs, some of them hide lessoften used options when showing the dialog. These dialogs have a More button in
the bottom right corner; click on it to display the advanced options. If all options are
displayed, the Less button appears. Clicking this button will hide the advanced options.
© MOBOTIX AG • Security-Vision-Systems • Made in Germany
www.mobotix.com • sales@mobotix.com
73/100
D22M Camera Manual Part 1
Make sure to permanently
store changed parameters!
Automatic time synchronization using a time server
Click on the More/Less
buttons to show/hide the
advanced options
Page 76

3.3 Connecting the Camera to the Network and to the Power
Supply
3.3.1 Notes on Cable Lengths and Power Supply
• The power supply of the camera can only be established using the 10Ba-
seT/NET connector of the camera with the (pre-installed) network cable. In order to supply power via the network cabling we recommend the MOBOTIX
PoE products (MxPoE, see also section 2.11,
Camera Accessories
):
• for one camera using the Network Power Adapter (MX-NPA-3-RJ)
• for up to four cameras using the Network Power Box (MX-NPR-4)
• for up to 8 or 20 cameras using the Network Power Rack (MX-NPR-8/20)
• The maximum length of the network cable for remotely supplying power is
100m (300ft).
• Make sure that you only use switches or routers that support the 10/100
Mbps Ethernet interface of the camera. Check the LED activity of the corre-
sponding port at the switch or router. When operating many cameras,
please also see section 4.11,
Operating Many Cameras
, in the
Software Man-
ual
, for additional hints.
• It is highly recommended to use uninterruptible power supplies (UPS),
which also protect the cameras and the network components against electrical surges.
• Advantages of MOBOTIX PoE Products:
- Zero maintenance and reliable without fans.
- Higher reliability of the system as a whole, since standard routers/swit-
ches without PoE can be used (lower risk of failure).
- Easy installation in 19" racks (
MX-NPR-8/20
) or on DIN rails (
MX-NPR-4
).
• If you are using IEEE 802.3af Power over Ethernet network components for
supplying power to MOBOTIX cameras, make sure that these components
do not have a fan. Since the power consumption of MOBOTIX cameras is
very low compared to other products, the reliability of the entire system is increased and the life cycle of these components is expanded.
© MOBOTIX AG • Security-Vision-Systems • Made in Germany
www.mobotix.com • sales@mobotix.com
74/100
D22M Camera Manual Part 1
MOBOTIX PoE products
have zero maintenance
and are reliable as the
systems do not require
fans
PoE components without
fans increase overall reliability of the entire system
Page 77

3.3.2 Camera Startup Sequence
As soon as the power supply is established, the camera's LEDs will provide information on the startup sequence of the camera.
• Booting: Immediately after connecting the power supply, the red LED lights
up, blinks for two seconds, then stays on permanently. The camera's boot
loader checks the hardware, unpacks and starts the operating system. All
applications are verified using the checksums; in case of an error, the camera will start using the backup operating system.
• Waiting for key pressed: Both LEDs light up for four seconds. If you press the
"R" or "L" key of the camera during this time, the camera will execute the
corresponding function (see sections 3.5 and 3.6).
• Ready: Once the application software has been started, the green LED is on
permanently and the red LED blinks. You can now reach the camera via the
network using a browser. For additional information on this topic, see section
5.4.3,
LED Signals and LED Configuration
, in the
Software Manual
.
© MOBOTIX AG • Security-Vision-Systems • Made in Germany
www.mobotix.com • sales@mobotix.com
75/100
D22M Camera Manual Part 1
Start!
Key pressed?
Ready
Note
During the startup sequence of the camera, the LEDs will always light
up, even if they have been deactivated in Admin Menu> LED Setup.
LEDs (1 x green, 1 x red)
"R" key "L" key
Page 78

3.3.3 Power Supply (MxPoE) Using a Switch
• Connect the factory pre-installed cable of the camera to the Camera connector of the Network Power Adapter.
• Connect the LAN/Power connector of the Network Power Adapter to an Ethernet connector of the switch/router or the Ethernet wall outlet.
• Plug the RJ45 connector of the external power unit into the PC/Power connector of the Network Power Adapter.
3.3.4 Power Supply (MxPoE) When Connected Directly to a Computer
• Connect the factory pre-installed cable of the camera to the Camera connector of the Network Power Adapter.
• Connect the PC/Power connector of the Network Power Adapter to the Ethernet port of the computer.
• Plug the RJ45 connector of the external power unit into the LAN/Power connector of the Network Power Adapter.
© MOBOTIX AG • Security-Vision-Systems • Made in Germany
www.mobotix.com • sales@mobotix.com
76/100
D22M Camera Manual Part 1
MOBOTIX power supply
and Network Power
Adapter required
MOBOTIX power supply
and Network Power
Adapter required
The Network Power
Adapter replaces the
crossover cable when directly connecting to a
computer
Page 79

3.3.5 Power Supply (MxPoE) Using a Network Power Rack or Network Power
Box
• Connect the factory pre-installed cable of the camera to the CAM connector
of the Network Power Rack (MX-NPR-8/20) or the Network Power Box
(MX-NPR-4).
• Connect the LAN connector of the Network Power Rack or Network Power
Box to an Ethernet connector of the switch/router.
3.3.6 Power Supply (PoE IEEE 802.3af) Using Power-over-Ethernet Products
• Connect the factory pre-installed cable of the camera to the Ethernet connector of the PoE switch/router. The switch/router needs to support the PoE stan-
dard IEEE 802.3af.
© MOBOTIX AG • Security-Vision-Systems • Made in Germany
www.mobotix.com • sales@mobotix.com
77/100
D22M Camera Manual Part 1
MOBOTIX Network
Power Rack or Network
Power Box required
Use the 19" MOBOTIX
Netpower rack-mount
units to supply power to 8
or 20 cameras
Use the MOBOTIX Network Power Box for
smaller installations
Uninterruptible power
supply (UPS) should be installed
PoE switch/router according to IEEE 802.3af required
PoE IEEE 802.3af!
Page 80

3.4 The First Image from the Camera
Once the Ethernet connection has been established, you have the following possibilities to see the first image of the camera:
• Automatic camera search and configuration using MxControlCenter (free
Windows client for MOBOTIX cameras; section 3.4.6,
The First Image in
MxControlCenter
)
• Manual configuration (section 3.4.1,
Preparing the Ethernet Connection
)
Besides using MxControlCenter, you can also use a browser to access the camera
(section 3.4.2,
The First Image in the Browser
).
In order to finish the camera configuration, you can use either MxControlCenter or
the browser-based user interface of the camera (see section 4.3,
The Live Screen in
the Browser
, in the
Software Manual
).
3.4.1 Preparing the Ethernet Connection
For this example, we will use a camera with the factory IP address 10.1.0.99.
Replace this IP address with the IP address of your camera. You will find this ad-
dress on a small sticker on the camera. Accessing the camera is always the same
and is independent of the connection type: simply enter the camera's IP address in
the address field of the browser (see section 3.4.2,
The First Image in the Browser
).
Your computer has to have a network or a wireless interface, and it should be in
the same subnet as the camera. If your network also uses IP addresses of a class
A network (e.g. 10.x.x.x, network mask 255.0.0.0), you should be able to
access the camera directly (provided no other network device uses the same IP address).
Determine the IP address of your computer:
• Open a command shell
(Windows) or a terminal
(Linux/UNIX/OSX) and enter the following command:
Windows 2000/XP: ipconfig
Linux/UNIX/OSX: ifconfig
You will find the IP address of your Windows computer under IP address; for Linux/
UNIX/OS X computers, search for the inet address parameter of the eth0 device
(the first network interface). If your computer does not use an IP address in the
10.x.x.x range, you should change the network configuration of your computer
or add a new IP address (see below).
© MOBOTIX AG • Security-Vision-Systems • Made in Germany
www.mobotix.com • sales@mobotix.com
78/100
D22M Camera Manual Part 1
Working with the webbased user interface only
requires a web browser
with activated JavaScript!
Caution:
Netmask 255.0.0.0
Open a Command Prompt
(Windows):
Start> Run, enter "cmd",
then press [Return]
Note
Pressing the "R" key on the front of the camera will let the camera an-
nounce its current IP address, if an external speaker has been
attached.
Page 81

Make sure that no other network device uses the camera's IP address:
• Open a command shell (Windows) or a terminal (Linux/UNIX/OSX) and enter
the following command:
ping <factory IP address>
If you receive an answer from another network device although the camera is not
connected, you will have to remove that device until you have reset the MOBOTIX
camera to a free IP address. We recommend using the Quick Installation wizard for
assigning a new IP address to the camera.
If your computer does not use an IP address in the 10.0.0.0 network (e.g. a
192.168.x.x or 172.x.x.x network), you should temporarily set a new IP address
in the 10.x.x.x range:
Windows 2000/XP
(1) Open the Network Con-
nections and open the
Properties of LAN Connection.
(2) Double-click Internet
Protocol (TCP/IP).
(3) On the General tab, acti-
vate the Use the follo-
wing address option.
(4) Enter an IP address (e.g.
10.1.0.11) in the class
A network (10.x.x.x)
that is unique in your
network and that is not
the same as the camera's IP address.
(5) Close all dialogs by clik-
king on OK.
Linux/UNIX/OSX
(1) Open a terminal as root user and enter the following command (eth0 or
en0 is usually the first network interface):
Linux/UNIX: ifconfig eth0:1 10.1.0.11
OS X: ifconfig en0:1 10.1.0.11
The computer now has the additional IP address 10.1.0.11, allowing it to access
the camera with its factory IP address in the 10.x.x.x network (10.1.0.99 in
this example).
© MOBOTIX AG • Security-Vision-Systems • Made in Germany
www.mobotix.com • sales@mobotix.com
79/100
D22M Camera Manual Part 1
The factory IP address is
printed on the sticker on
the camera housing
Example: 10.1.0.99
Make sure that you use
the IP address of your
camera instead of
10.1.0.99!
Setting up a second IP address on Windows computers
Setting up a second IP address on Linux/UNIX
computers
Page 82

3.4.2 The First Image in the Browser
Now that you have successfully started the
camera for the first time, you can access
the camera using your preferred browser
to see the live video stream and the user
interface. Internet Explorer, Mozilla, Firefox,
Safari, Camino or any other graphical browser with activated JavaScript is suitable.
The operating system is of no importance, even PDAs can be used without any problems, provided a web browser is available on the device.
After entering the camera's IP address in the browser address bar (e.g. http://
10.1.0.99), you will see the Live screen of the MOBOTIX camera with its user in-
terface controls, such as softbuttons, buttons for the different camera screens,
pull-down menus (
Quick Controls
), icons for accessing the online help and the
camera status, as well as status information elements above and below the live
image.
© MOBOTIX AG • Security-Vision-Systems • Made in Germany
www.mobotix.com • sales@mobotix.com
80/100
D22M Camera Manual Part 1
Camera access:
http://10.1.0.99 (example
IP)
The factory IP address is
printed on the sticker on
the camera housing
Administration menu:
User Name: admin
Password: meinsm
User interface can be
customized
Softbuttons
Camera screens
Quick-Controls
Camera help,
camera status
Video motion windows
Logo within
the image
Page 83

If you have started the camera using DHCP or you have set the IP address manually, enter the new IP address in the browser address bar (e.g. 192.168.0.99)
instead of the factory IP address.
3.4.3 Additional Information
For more information on this topic, see the News and Functional Overview pages
in the online help of the camera's browser interface. Click on the yellow
icon in
the top right corner to open the camera's online help.
In order to obtain more information on the camera and its current configuration,
open the Camera Status dialog by clicking on the yellow
icon in the top right
corner of the camera's browser interface.
Another source of information on all dialogs and parameters of the MOBOTIX ca%
mera is the Reference Manual that you can download from www.mobotix.com.
The Reference Manual consists of the MOBOTIX camera's online help in one PDF
file.
© MOBOTIX AG • Security-Vision-Systems • Made in Germany
www.mobotix.com • sales@mobotix.com
81/100
D22M Camera Manual Part 1
Changing the factory IP
address: Always use Admin Menu> Quick Installation
Not available on Basic
models, on D22 IT/Secure models only with
external speaker!
Camera Help
Camera status
Note
The MOBOTIX camera can announce its current IP address over the
speaker. For additional information on this topic, see section 3.6,
Start-
ing the Camera With an Automatic IP Address (DHCP)
.
MxControlCenter: In order to see the live image of the camera, you
can also use other applications or the integrated programming interface of the MOBOTIX camera. MxControlCenter for Windows is such
an application and is provided free of charge by MOBOTIX (see section 3.4.6,
The First Image in MxControlCenter
). Besides its ability to
display fast live video of up to 30 cameras simultaneously at 30fps
each on one PC, MxControlCenter also allows recording and playing
back video clips with lip-synchronous audio via the network and can
control pan/tilt heads using a joystick or the mouse. Download the
newest version of MxControlCenter from the MOBOTIX website. The
website contains more information on MOBOTIX systems as well as
the MxControlCenter User Manual.
From camera software version 3.0.3.37, MOBOTIX cameras automatically offer their web service within the network (see section 3.4.5,
Ac-
cess Using Zeroconf/Bonjour
). This means that the cameras will announce themselves automatically in a Bonjour list in the web browser
and in MxControlCenter. Selecting one of the listed MOBOTIX cameras
will automatically display the camera's user interface in the browser
window or in MxControlCenter.
Page 84

3.4.4 Camera Screens in the Browser
Per factory default, the MOBOTIX camera first shows the Live screen. You can set a
different start page in order to prevent others from changing the settings. In addition to this, you can assign user names and passwords to prevent unauthorized access or you can restrict access to the current live image only by setting the Guest
screen as the start page.
The following screens are available:
• Guest screen: Only shows the current live image with reduced frame rate
(see section 4.7,
Guest Screen
, in the
Software Manual
).
• Live screen: Shows the current live image and allows changing the
image and event settings of the camera (see section 4.3,
The Live Scre-
en in the Browser
, in the
Software Manual
).
• Playback screen: Shows all recorded images or video clips with exten-
ded functions for searching and downloading images, regardless of
where the images are stored (in the internal or the external ring buffer on a
file server or PC; see section 4.4,
The Playback Screen in the Browser
, in the
Software Manual
).
• MultiView screen: Shows multiple cameras or the last events in a freely
definable layout (see section 4.5,
The MultiView Screen in the Browser
,
in the
Software Manual
).
• PDA screen and PDA Event List: Both screens are optimized for PDAs with a
focus on fast data transmission with low bandwidth requirements (GSM,
GPRS) on devices with small displays (PDAs, mobile phones, sub notebooks).
The PDA Event List in particular gives a quick overview over the last events
since the live image is not transferred (see section 4.6,
The PDA Screen
, in the
Software Manual
).
For more information on camera screens, see the online help of the camera's
browser interface. Click on the yellow
icon in the top right corner of the Live
screen to open the corresponding page of the online help.
© MOBOTIX AG • Security-Vision-Systems • Made in Germany
www.mobotix.com • sales@mobotix.com
82/100
D22M Camera Manual Part 1
Use the Administration
menu to set the camera
screen that should appear
initially when accessing
the camera IP address
http://10.1.0.99/pda
opens the PDA screen
Live/Playback/MultiView:
Click on to open the
online help pages for the
camera screens
Note
Open Admin Menu> Language and Entry Page to set a different
start page when accessing the camera.
Open Admin Menu> Users and Passwords and Admin Menu>
Group Access Control Lists
to set user rights and to prevent unauthor-
ized access to specific screens and functions of the camera (see section 5.4.1,
Passwords
, in the
Software Manual
).
Page 85

© MOBOTIX AG • Security-Vision-Systems • Made in Germany
www.mobotix.com • sales@mobotix.com
83/100
D22M Camera Manual Part 1
Notes:
Page 86

3.4.5 Access Using Zeroconf/Bonjour
Zeroconf (short for
Zero Configuration Networking
) describes the networking method of automatically establishing an IP-based network without the help of servers
and without changing any settings. Zeroconf-capable devices automatically announce their name and the service they are providing (printer, email server, etc.) in
the network. As a basic technology, Zeroconf is part of the current Windows, Linux
and Mac OSX operating systems.
Bonjour is the implementation of this service in Apple Mac
OSX from version 10.4; in Mac OSX 10.2 and 10.3, this service is called Rendezvous.
Bonjour is available free of charge for Windows computers
from the Apple web site www.apple.com/bonjour.
For Linux and Unix, Avahi provides the corresponding functionality.
For further information on Bonjour and Zeroconf, please consult
www.apple.com/macosx/features/bonjour and the Zeroconf web site
www.zeroconf.org.
From software version 3.0.3.37, MOBOTIX cameras automatically offer their web
service via Zeroconf/Bonjour. This means that the cameras will announce themselves automatically in a Bonjour list in the web browser and in MxControlCenter. Selecting a MOBOTIX camera in the browser will display the camera's user interface
in the browser window; likewise, MxControlCenter will be able to find the camera.
© MOBOTIX AG • Security-Vision-Systems • Made in Germany
www.mobotix.com • sales@mobotix.com
84/100
D22M Camera Manual Part 1
Automatic network configuration for MOBOTIX
cameras using Zeroconf/
Bonjour
MOBOTIX cameras support Bonjour by default
from software version
3.0.3.37!
Note
A major advantage of Zeroconf/Bonjour is that you do not need to
know the IP address or the name of the MOBOTIX camera in order
to access it.
Another advantage of Bonjour is that all cameras will be found
regardless if they are in the same subnet or in other subnets as
long as they are in the same physical network as the computer. If
the cameras are not in the same subnet, actually connecting to them
is not as easy. The name of the camera is listed in the web browser,
but connecting via HTTP will not work, however. Using MxControlCen-
ter allows reconfiguring the camera automatically for the subnet
of the computer. You can now easily reach the camera in a web
browser and MxControlCenter.
Apple Bonjour
Caution
When using the camera in a network with managed switches or internal filewalls, make sure that port 5353 (UDP) is not blocked or else
Zeroconf/Bonjour will not work.
Page 87

Prerequisites for using Zeroconf/Bonjour
MOBOTIX camera:
• Zeroconf has to be activated (Admin Menu> Ethernet Interface). This is the
factory default for MOBOTIX cameras from software version 3.0.3.37.
• The camera needs to be in the same physical subnet as the computer (Admin Menu> Ethernet Interface).
Operating system:
• Microsoft Windows (2000, XP, 2003,
Vista): Bonjour for Windows has to be in-
stalled (www.apple.com/bonjour).
The application also configures the Windows firewall, installs an add-on for Internet Explorer and the Java Bonjour libraries. The list of Bonjour-enabled network
devices is shown in Internet Explorer once
the Bonjour add-on has been activated
in the main toolbar of Internet Explorer.
© MOBOTIX AG • Security-Vision-Systems • Made in Germany
www.mobotix.com • sales@mobotix.com
85/100
D22M Camera Manual Part 1
Internet Explorer (Windows): Activate Bonjour
add-On
Internet Explorer with
activated Bonjour sidebar
Page 88

• Macintosh OS X (10.2 or higher): Bonjour is included in the Apple operating
system. There is no other configuration required. The list of Bonjour-enabled
network devices is displayed in Safari after clicking on the Bonjour button.
• Linux: Zeroconf is included in KDE from version 3.4 and in Gnome from version 2.8. The list of Bonjour-enabled network devices is displayed after entering zeroconf:/ in the Konqueror address bar. The displayed list contains
all Zeroconf-enabled network services (see figure below). Clicking on /WWW
servers displays the list of all available MOBOTIX cameras (and all other
Bonjour-enabled devices). Linux users can also use the mdns-scan application in a terminal to search for Bonjour-enabled devices on the network.
© MOBOTIX AG • Security-Vision-Systems • Made in Germany
www.mobotix.com • sales@mobotix.com
86/100
D22M Camera Manual Part 1
Bonjour is enabled by
default in Safari (Mac OS
X)
Konqueror on SuSE
1
2
Page 89

© MOBOTIX AG • Security-Vision-Systems • Made in Germany
www.mobotix.com • sales@mobotix.com
87/100
D22M Camera Manual Part 1
Caution: Proxy servers
may cause errors when
trying to establish a connection
Note
If a proxy server is used in your network, you may get an error message when trying to access a MOBOTIX camera in the web browser.
Make sure that the list of proxy exceptions in your browser contains
the following entry:
*.local (Windows)
*.local. (Mac OS X)
.local. (Linux)
To find the proxy exceptions in Internet Explorer for Windows, open
Tools> Connections> LAN Settings> Settings> Proxy server> Advanced and add the entry in the Exceptions text field.
To find the proxy exceptions in Mac OSX, open System Prefencenes> Network> Proxies and add the entry in the Bypass proxy settings for these Hosts and Domains text field.
As an alternative, your network administrator can reconfigure the
proxy server so that it does not block .local addresses.
Page 90

3.4.6 The First Image in MxControlCenter
MOBOTIX MxControlCenter is a free Windows application that allows displaying
multiple MOBOTIX cameras on one computer and provides alarm management
functions. It can easily handle displaying 30 cameras with CIF resolution simulta-
neously at 30fps each in MxPEG format on one standard PC with Intel Pentium4
and 3GHz.
MxControlCenter can do quite a bit more than simply display the video and audio
data from MOBOTIX cameras. The unique features of MxControlCenter in combination with the MOBOTIX cameras create a full-featured security system: intelligent
alarm handling, various ways of arranging the camera views on different layouts
(MultiView screens), ability to display cameras that are sending alarm notifications,
the integrated camera management functions, and an array of other interesting
features.
Further Information on MxControlCenter
For further information on MxControlCenter, download the
MxControlCenter User
Manual
from www.mobotix.com:
• Saving and loading MxPEG video clips
• Creating and editing layouts using the Layout Editor
Further Information in the Software Manual
• Section 4.3.5:
JPEG, MxPEG and Audio
• Section 4.3.6:
Background Information on JPEG, MxPEG and Audio
• Section 4.10:
Fast Video Streaming
© MOBOTIX AG • Security-Vision-Systems • Made in Germany
www.mobotix.com • sales@mobotix.com
88/100
D22M Camera Manual Part 1
Download MxControlCenter free of charge from
www.mobotix.com
MxControlCenter Windows client with alarm
list, background image and
freely positioned cameras
Page 91

Installing MxControlCenter
If you have an MxControlCenter installation CD, insert it into your computer drive.
If this is not the case or if you would like to update an older version, you
can download the latest Windows installer (MSI file) from the MOBOTIX
website and then manually install the current version. The latest version is
available at www.mobotix.com> Support> Software-Downloads in the
MxControlCenter section.
If you are using the installation CD, the installation process starts automatically and
leads you through the necessary steps. If you have downloaded the Installer, simply double-click the MSI file to begin the installation process.
The installer automatically creates the shortcuts selected in the installation process
(desktop, start menu, etc.).
© MOBOTIX AG • Security-Vision-Systems • Made in Germany
www.mobotix.com • sales@mobotix.com
89/100
D22M Camera Manual Part 1
Automatic installation of
MxControlCenter with
Windows Installer (MSI)
Page 92

Using MxControlCenter for the First Time
Double-click the shortcut created by the installer (see
Installing MxControlCenter
) or
the program file itself to start MxControlCenter.
Automated Search for MOBOTIX Cameras
If you start MxControlCenter for the first time or if you have not yet stored a start
layout with the desired video sources (i.e. MOBOTIX cameras), the Open Video
Sources dialog will open and automatically starts scanning the network.
After all MOBOTIX cameras have been identified, MxControlCenter performs an
operational test on the cameras to determine their status and then lists them according to the legend.
Next, MxControlCenter automatically selects all cameras.
© MOBOTIX AG • Security-Vision-Systems • Made in Germany
www.mobotix.com • sales@mobotix.com
90/100
D22M Camera Manual Part 1
Automatic search for
MOBOTIX cameras!
Legend Camera previewVideo sources
Page 93

Click on OK to add the selected cameras to the Open Video Sources dialog.
Anytime you connect a new camera to the local network, you can initiate the search in the Open Video Sources dialog again by pushing the
button.
If the desired MOBOTIX cameras are highlighted in the video source list, proceed to
Selecting Video Sources
.
Configuring MOBOTIX Cameras for a Different Network
Using Bonjour, MxControlCenter finds not only cameras on the same subnet (network range) but also MOBOTIX cameras located in other subnets (status:
Diffe-
rent subnet
). Normally, you would not be able to establish any connection to cameras in a different network or subnet (without going into much further detail about
the complicated details of TCP/IP network configurations). This is possible, for
example, when a camera with a factory IP address is connected to a network in
which a DHCP server automatically assigns the IP addresses.
Click on
Configure network
in the context menu and MxControlCenter will auto-
matically reconfigure this camera so that it is "integrated" into your existing subnet. However, MxControlCenter first needs some information about the subnet into
which the camera will be integrated. You can enter this information in the Confi-
gure Cameras dialog that opens automatically.
If your computer gets its IP
address automatically from a
DHCP server, then this is certainly the best choice for the new
camera and most likely for all
other cameras which have been
found in a different subnet
(Apply to all inaccessible ca-
meras checkbox).
If you have assigned a fixed IP
address to your computer, you
will certainly prefer to assign fixed IP addresses (issued by your system administrator) to every camera. In most
cases, you should enter a similar configuration as the one found for your computer's Network Connections in the Properties of Internet protocol (TCP/IP) dialog.
© MOBOTIX AG • Security-Vision-Systems • Made in Germany
www.mobotix.com • sales@mobotix.com
91/100
D22M Camera Manual Part 1
Automatic camera configuration by MxControlCenter
Page 94

MxControlCenter changes the network configuration of the current camera and, after a short time, the camera also appears in the list with a new IP address and in
the same subnet as your computer.
Make sure that the Save camera configuration permanently checkbox is activated so that the new network settings will be used from now on and not just until the
camera's next reboot
.
Defining Additional Video Sources
Besides automatically detecting MOBOTIX cameras, you can also manually add
other video sources to the list of available video sources in MxControlCenter.
• Automatic search: Scans the (physical)
network. This scan will find all MOBOTIX
cameras, regardless of whether they are
in the same subnet as the computer or in
a different one.
• Add camera manually: Enter a known IP
address or the DNS name of a MOBOTIX
camera if this camera had not been detected during the automatic search in the first
place.
• Add MxPEG clip: Adds an MxPEG video clip previously recorded by a MOBO-
TIX camera as a video source.
• Add file server path: Adds the alarm images previously stored by a MOBO-
TIX camera on an external file server as a video source.
Selecting Video Sources
Highlight the desired video sources you would like to manage and display in
MxControlCenter.
Camera preview
If you select a camera with a status of
OK
,
MxControlCenter automatically displays the live
images from the camera in the preview window. If you are using [Ctrl]-click to select several
cameras, the image from the camera selected
last is shown in the preview window. This feature
facilitates identifying the cameras you would like
to use.
© MOBOTIX AG • Security-Vision-Systems • Made in Germany
www.mobotix.com • sales@mobotix.com
92/100
D22M Camera Manual Part 1
Note
If you have set a different user name and password for administration
than the factory-preset ones (admin, meinsm), you will need to have
these user credentials available and enter them in the appropriate dialog. To open the dialog, click on the
Enter password
context menu
entry.
Page 95

Editing the video source list
This list provides a popup menu (right mouse key),
allowing you to select/deselect all video sources at
once. Similarly, you can highlight some or all of the
listed video sources and remove them from the list if
they are not to be displayed or managed in MxControlCenter.
If you interrupt the discovery process (section
Config-
uring MOBOTIX Cameras for a Different Subnet
) or
require a password that is different from the factory preset one, you can always relaunch the configuration process from the popup menu at a later time and enter
the appropriate user name and password.
Using the selected video sources
Clicking on OK instructs MxControlCenter to use the highlighted cameras. Activate
the Show selected video sources in new standard layout checkbox and MxCon-
trolCenter automatically generates a layout with the live images of all highlighted
cameras.
© MOBOTIX AG • Security-Vision-Systems • Made in Germany
www.mobotix.com • sales@mobotix.com
93/100
D22M Camera Manual Part 1
Page 96

3.5 Starting the Camera With an Automatic IP Address (DHCP)
If your network has a DHCP server, you can start the camera with DHCP support. In
this case, the DHCP server automatically assigns an IP address.
As soon as startup has been completed, the camera automatically announces its
IP address, its network mask and its MAC address (note that this feature requires
an external speaker). Note that this announcement function can be deactivated
(Admin Menu> Loudspeaker and Microphone).
Proceed as follows to start the camera using DHCP:
• If the camera is powered on, disconnect the power supply of the camera by
unplugging the corresponding cable.
• Reconnect power to the camera and observe the LEDs.
• Wait until both LEDs are lighting up simultaneously for the first time.
• Press the "R" key on the camera within four seconds.
• After about two more seconds, the camera plays a sound twice ("Boing, Boing"), if an external speaker has been connected.
• After about another 15 seconds, the camera will announce its network data,
provided it has audio functionality.
You can now access the camera using the IP address it just announced and via
the list of Bonjour-enabled devices.
© MOBOTIX AG • Security-Vision-Systems • Made in Germany
www.mobotix.com • sales@mobotix.com
94/100
D22M Camera Manual Part 1
Connect and activate the
external speaker of the
camera!
The D22 also allows connecting an external speaker and microphone.
The D22 does not have a
built-in speaker or
microphone.
Announce IP address:
Press "R" key
In case of an error, the
camera uses its last IP
address
Note
If you would like to have a running camera repeat its network settings,
simply press the "R" key once. For D22 models, make sure that an
external speaker has been connected to hear the announcement.
Caution
When starting the camera with DHCP support, make sure that the network has a properly functioning DHCP server. If this is not the case,
the camera cannot obtain a valid IP address and will fall back to its last
known IP address.
You should also make sure that the DHCP server always assigns the
same IP addresses to the cameras by reserving the desired IP
address for the MAC address of every camera.
Press "R" key
Page 97

3.6 Starting the Camera Using the Factory IP Address
In certain situations, it may become necessary to start the camera with its factory IP
address. This could be the case, for example, if the IP address has been lost or the
camera does not react to the last known IP address.
Proceed as follows to start the camera using its factory IP address:
• If the camera is powered on, disconnect the power supply of the camera by
unplugging the corresponding cable.
• Reconnect power to the camera and observe the LEDs.
• Wait until both LEDs are lighting up simultaneously for the first time.
• Press the "L" key on the camera within four seconds.
• After about two more seconds, the camera plays a single sound ("Boing"), if
an external speaker has been connected.
The camera is now accessible again using its factory IP address (see label on
the camera housing).
© MOBOTIX AG • Security-Vision-Systems • Made in Germany
www.mobotix.com • sales@mobotix.com
95/100
D22M Camera Manual Part 1
Passwords and camera
settings will not be changed!
The D22 also allows connecting an external speaker and microphone.
The D22 does not have a
built-in speaker or
microphone.
Make sure you store the
factory network configuration to the permanent
flash memory
Users and passwords will
not be changed!
Note
If you use the camera's "L" key to load the factory network configuration, this configuration is not automatically saved to flash memory.
Upon restarting the camera the next time without using the camera's
"L" key, the
last stored network configuration
will be used. To permanently store the new network configuration in the camera's flash memory, open Admin Menu> Store ...
Caution
As opposed to resetting the camera using
Admin Menu> Reset
configuration to factory defaults
, the user information will
not
be re-
set if the camera is booted using the factory IP address.
Press "L" key
Page 98

© MOBOTIX AG • Security-Vision-Systems • Made in Germany
www.mobotix.com • sales@mobotix.com
96/100
D22M Camera Manual Part 1
D22M-Basic
Mx-D22M-Basic-D22
D22M-IT
Mx-D22M-IT-D22
D22M-Sec
Mx-D22M-Sec-D22
D22M-Sec-Night
Mx-D22M-Sec-Night-N22
D22 Hardware Features
Outdoor weatherproof (IP54/IP65
)
IP54 IP65 IP65 IP65
Mono (M) / Dual (D)
Image sensor
Resolution
Resolution horizontal x vertical
M
Color
M
Color
VGA
640x480
VGA
640x480
M
Color
M
B/W
Mega
1280x960
Mega
1280x960
Max. frame rate CIF/VGA/Mega
Sensitivity at 1/60 second (Lux)
Sensitivity at 1 second (Lux)
Automatic night lens switch
16/16/-
1
30/30/-
1
0.05
-
0.05
-
Standard lens
Storage (MB)
Video ring buffer (MB)
CIF images approx.
L22
64
L22
64
2
100
32
2,000
30/30/10
1
30/30/10
0.1
0.05
-
0.005
-
L22
128
L22
128
64
4,000
64
4,000
VGA images approx.
Mega images approx.
Ethernet, ISDN, MxB, RS232
SD slots (MOBOTIX extensions)
50
-
1,250
-
E /- / - /-
-
E /- / M /-
1
Integrated microphone/speaker
Ext. audio (speaker/microphone)
Signal Input
Signal Output
-/-
-
-/-
X
-
-
-
-
2,500
800
2,500
800
E /- / M /-
1
E /- / M /-
1
-/-
X
-/-
X
-
-
-
-
Concealed cabling
In stock
X
Yes
X
Yes
X
Yes
X
Yes
Page 99

© MOBOTIX AG • Security-Vision-Systems • Made in Germany
www.mobotix.com • sales@mobotix.com
97/100
D22M Camera Manual Part 1
The Web version is
available only as M12
model
The Basic version is
available only as D22M
model
* The D22 also allows
connecting an external
speaker and microphone.
The D22 does not have a
built-in speaker or
microphone.
* M12 models are delivered with L43 lens
** M22M models require
the Cam-IO for this feature
*** Not available for
D22M models
Basic Models
eb Models
IT
Models
Secure
Models
Software Features (All Models)
Digital zoom (2x, 4x) with panning X X
Motion JPEG/MxPEG video streaming
Custom exposure windows
Video Motion detection
Time and event control (FTP, email, logos)
X/X
X
X/X
X
X
X
X
X
X/X
X
X/X
X
X
X
X
X
Time tables with holidays
Web functionality (FTP, email)
Quad/MultiView in browser
Recording/Playback in browser
X
X
X
X
X
X
X
Logo generator, animations
Single image recording (pre-/post-alarm images)
Terabyte ring buffer (Win/Lin/Mac) via network
Continuous video/audio recording, 0.2 to 30 fps
3
X
3
X
X
X
X
X
X
X
X
X
10
X
50
X
X
X
X
Video/audio recording (event-triggered)
Event-controlled frame rate with continuous audio
Flexible event logic
Master/Slave arming by one camera
Scheduled privacy zones, several areas
Bidirectional audio (IP) from/to browser
Customized voice messages
VoIP telephony (Audio/Video, SIP)
X
X
X
X
X
X
X
X
X
X
X
X
X
Alarm calls to softphones (SIP) e.g. Xten
Remote alarm notification (via TCP/IP, IP Notify)
RS232 Data Logger/Terminal
Programming interface/HTTP API
Model Limitations
Image size
Image sensor (color / BW)
VGA
Color
Mega
Color
X
X
X
X
X**/***X X**/***
X
VGA
Color & BW
Mega
Color & BW
Standard lens for software version
Audio support (Microphone/Speaker)
L22
-/-
L22*
-/-
L22*
M/S
L22*
M/S
M12
D12
M22M
D22M
Page 100

Declaration of Conformity
© MOBOTIX AG • Security-Vision-Systems • Made in Germany
www.mobotix.com • sales@mobotix.com
98/100
D22M Camera Manual Part 1
 Loading...