

Page 1
User Guide for the Mobius Mini ActionCam
Preliminary version
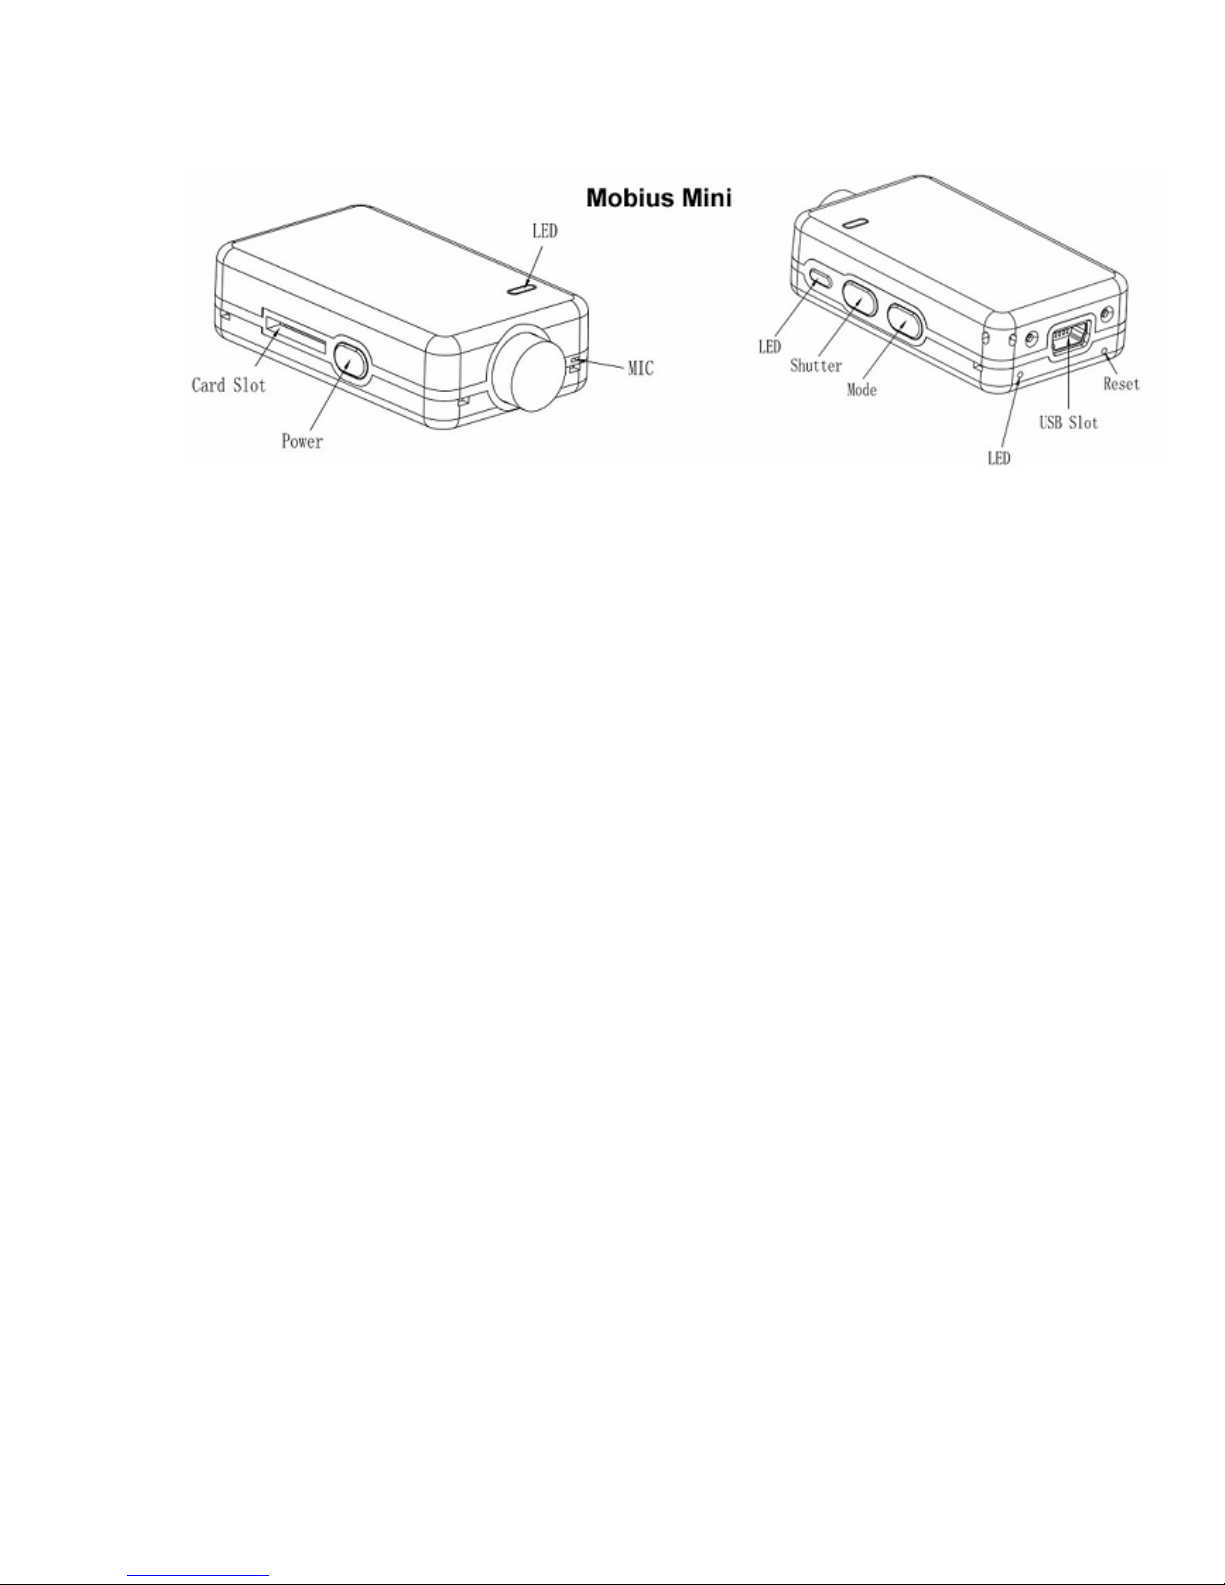
Description
The above picture shows the arrangement of the user operating features.
►This manual does not cover replacing the internal battery or lens.
►This manual assumes the camera is loaded with the latest firmware available at the
time of writing. Functionality may vary with earlier or later firmware versions.
Cards
You should always use micro SDHC or Micro SDXC cards with a class rating of 10 or
above. The cards may either be formatted as FAT32 or exFAT. Cards with a capacity of
200GB have been tested.
USB connector
The M2 uses a 10 pin Mini USB connector. The connector is compatible with all
standard mini USB cables for USB data transfer and charging.
Cables
The camera requires a standard (5-pin) USB cable for charging or connecting to
external battery packs for continuous recording. A standard USB cable is also used to
connect the camera to the PC in order to set the parameters or to access the camera as
an external disk.
A special 10-pin USB cable is required for A/V out (TV-Out, Video-Out)
You must under no circumstances use any other "special" cable, especially the "special"
cable supplied with the old #11 808 camera. Doing so will destroy your camera beyond
repair. So, do not use a #11 "special" cable under any circumstances.
►Always use HIGH QUALITY USB cables. Cheap cables may lead to all sorts of
problems. If possible, keep the cable as short as possible.
Before you start
Before using the camera for the first time, ensure the internal battery is fully charged.
See below under "Charging".
Page 2

The Reset button
The reset button is in the small hole located below and to the right of the USB Socket
(looking at the camera from the rear). It can be pressed by carefully inserting a bent
paper clip or similar instrument. The Reset button should only be pressed in case the
camera no longer reacts to button presses. Pressing the Reset button will force the
processor to restart. No parameter settings will be lost and the RTC (Real Time Clock)
will not be interrupted. Do not confuse the reset button with the rear LED below and to
the left of the USB socket (looking at the camera from the rear).
The Power button
Press the power button until the LEDs start to blink. After a short while a steady yellow
LED is shown. The camera is now ready for use (standby).
•
To turn off the camera, first stop any recordings that may be running by pressing
the shutter button and then press the power button for about 2 seconds until the
camera turns off.
The Mode button
The Mode button enables the camera to be sequentially switched between 3 (4)
different modes. Each button press advances to the next mode indicated by the LED
color.
•
Video Mode 1 (yellow LED). The frame rate and resolution can be individually
configured.
•
Video Mode 2 (blue LED). The frame rate and resolution can be individually
configured.
•
Photo Mode (red LED) which also includes Time-Lapse photos.
•
Playback Mode (blue LED) only when external monitor (Video-Out/TV-Out)
connected.
The Shutter button
Press the shutter button to start or end a video recording or to take a picture.
LED status indicators
The following LED states are for a camera not connected to the PC.
•
Steady Yellow - The camera is in Video Mode 1 and is on standby.
•
Slowly flashing Yellow (1 sec. On, 1 sec. Off) - The camera is in Video Mode 1
and is recording video. The Video Recording indicator (see configuration) must
be ON for this to work.
•
Steady Blue - The camera is in Video Mode 2 or Playback Mode (if an A/V cable
is connected) and is on standby..
•
Slowly flashing Blue (1 sec. On, 1 sec. Off) - The camera is in Video Mode 2 and
is recording video. The Video Recording indicator (see configuration) must be
ON for this to work.
•
Steady Red - The Camera is in Photo Mode.
•
One Red/Yellow flash - The camera has taken a picture.
•
Steady Green - The battery is charging.
The rear LED
If the camera is configured to show the Recording Indicator, then the rear LED will
normally blink in sequence with the main LED while recording or in standby mode.
Page 3

Connecting the camera to the PC
Make sure a card is inserted and the camera is turned OFF if you want to access the
camera as an external device (disk drive, setup). Always connect the camera directly to
the PC. Do not use a USB hub.
► You cannot record video or photos if the camera is connected to the PC as an
external drive.
Charging
•
Connect one end of the supplied standard USB cable to the camera.
•
Connect the other end to a USB, 5V DC power source (wall charger, PC or
external battery).
•
When the yellow LED turns on, press the Power button for about two seconds
to turn the camera OFF.
When charging, the green LED will be on. It will turn off when the battery is fully
charged.
Charging takes about 2 hours for a fully discharged battery with the camera turned off
and connected to an external USB Charger. Batteries are not covered under warranty. If
charged with under-rated chargers or by using a USB hub without an additional power
supply, expect longer charging times. For optimum results, the charging voltage should
be +5V under load. Only use quality chargers capable of supplying 1000mA (1A) and a
stable voltage of at least 5V. Low quality chargers may not be able to supply enough
current and can lead to premature battery failure or, in the worst case, even destroy the
camera.
A new and fully charged battery will record about 30 minutes of 1080p 60fps videos.
Automatic Power Off from Standby mode
If the camera is in standby mode you must take a picture(s) or start a video recording
within *30 seconds. The camera will automatically turn off after *30 seconds of no
activity.
*This value can be set using the setup program. Automatic Power Off can also disabled.
When the special A/V cable is connected, automatic power-off will be disabled. This
prevents signal loss during fpv use when the standby time times out.
Turn on Camera
Press the Power button until the LEDs begin to blink. The camera is ready for use once
the Yellow LED turns on. .
Turn off Camera
Press and hold the Power Button for about 3 seconds until the LEDs start to flash. The
camera will then turn off.
Switching between modes
The camera can be switched between the different modes by pressing the Mode button.
Each button click advances the camera to the next mode. Video Mode1 - Video Mode2 Photo Mode - (*Playback Mode) - Video Mode1 etc.
► *If the camera is connected to an external Monitor/TV the camera will enter Playback
mode (blue LED) after pressing the Mode button when in Photo mode. See OSD (On
Screen Display) Menu below.
Page 4

Recording Video Mode 1 or 2 (yellow or blue LED)
Start video recording.
•
Briefly press the shutter button.
•
► If the recording LED has been disabled, the yellow or blue LED will slowly
blink 3 times and then turn off, indicating that recording has started.
•
► If the recording LED has been enabled, the yellow or blue LED will slowly
flash at 2 second intervals indicating that the camera is recording.
Stop video recording.
•
Briefly press the shutter button. The camera will return to the standby mode from
which the video was started.
Taking a Photo (red LED)
•
Briefly press the shutter button. The red LED will flash indicating that a picture
was taken.
Removable Disk Mode
•
Make sure the camera is turned off and a memory card is inserted.
•
Connect the camera to the PC using a standard USB cable. The green LED may
turn on at the same time indicating that the battery is charging.
•
► If this is the first time you are connecting the camera to the PC the operating
system will attempt to install the iCatch drivers. This may take a few minutes.
•
The LEDs will blink and after a short while the red LED will turn on.
•
The camera is now in Disk Mode and a new removable drive should be available
on your computer. The above procedure may take up to 30 seconds.
•
► You cannot record video or photos if the camera is connected to the PC in
Removable Disk Mode.
Webcam Mode
There are two ways in which you can enter webcam mode.
Method 1:
•
Remove the SD card and connect the camera to the PC.
•
The camera will connect in webcam mode.
•
► If this is the first time you are connecting the camera to the PC the operating
system will attempt to install the iCatch drivers. This may take a few minutes.
•
If the drivers were installed correctly the camera should now be in USB camera
mode.
Method 2:
•
Connect the camera to the PC until it is in Removable Disk Mode. See above.
•
Very briefly press the Shutter button. The camera will exit Removable Disk Mode.
•
► If this is the first time you are connecting the camera to the PC the operating
system will attempt to install the iCatch drivers. This may take a few minutes.
•
If the drivers were installed correctly the camera should now be in webcam
mode.
►Note: Windows XP has an integrated WebCam viewer. Your Mobius should be visible
in Explorer (My Computer) as a "USB Video Device". This functionality does not exist in
Windows 7.
Page 5

Camera Setup (Configuration)
GUI (Graphical User Interface) configuration - recommended method
On Windows it is recommended to always use the program mSetup.exe to modify the
camera's configuration. mSetup communicates directly with the camera and makes
configuring the camera a very simple task.
The camera must be in Webcam mode in order to set the parameters. See Webcam
Mode, above.
Manual configuration
It is also possible to manually change the configuration settings by using the On
Screen Display (OSD) by connecting the camera to an external Monitor/TV. This
requires a special cable.
1. Disconnect the camera from the PC and turn it off.
2. Connect the camera to an external monitor/TV using the special cable.
3. Optional. You may also connect the USB plug to a power source. The camera
will automatically turn on.
4. Turn on the camera by pressing the Power button until the LEDs begin to blink.
5. Long-press the Shutter button to enter OSD Menu Mode.
6. Briefly press the Shutter button to switch between Recording settings and Basic
settings. Ensure that no parameters are highlighted.
7. Briefly press the Mode button to move down the list or the Power button to move
up the list.
8. Briefly press the Shutter button to change a parameter value.
9. Use the Mode button or the Power button to move down or up the list (see
above).
10. Briefly press the Shutter button to select the value.
11. Long-press the Shutter button to exit OSD Menu Mode and return to Standby
Mode.
► The meaning of the different buttons are shown on the OSD. Up, Down, Enter
► In order to switch between Recording settings and Basic settings make sure no
parameters are selected. Use the appropriate buttons to move the selection up or
down to the top or the bottom of the list.
► Also see OSD (On Screen Display) Menu, below.
Using Software to configure the camera
The Windows program mSetup.exe will automatically configure the camera with the
parameters you require (see above). Detailed instructions can be found in the program
by clicking the "Help" button. The program is also used to synchronize the camera's
internal clock with the computer's date and time.
Page 6

OSD (On Screen Display) Menu
Connect the camera to a monitor or TV and then turn it on.
► Long Press the Shutter button to enter Setup Mode. See above (Camera Setup Manual configuration).
► To enter Playback Mode, press the Mode button to cycle from Video Mode1 -> Video
Mode2 -> Photo Mode -> Playback Mode.
► When in Video Mode1, Video Mode2 or Photo Mode double-click the Shutter button
to turn the OSD overlay (text/icons) off or on.
► When in Video Mode1 or Video Mode2 double-click the Mode button to turn the
microphone on or off.
► Playback Mode. Double-click the Mode button to cycle between the Video, Photo and
Locked folders
•
Double-click the Mode button to cycle between the Video, Photo and Locked
folders
•
Use the Mode (Down) or Power (Up) buttons to select the file to play.
•
In Video Mode, briefly press the Shutter button to play the video. See below
(Playback Mode -> Video playback)
•
In Photo Mode, double-click the Shutter button to exit Playback mode and return
to Video Mode1.
•
Double-click the Shutter button to exit Playback mode and return to Video
Mode1.
► Playback Mode -> Video playback
•
Press the Shutter button to pause/play the video.
•
Press the Power button to fast forward the video.
•
Press the Mode button to reverse the video.
•
Long-press the Shutter button to exit Video playback Mode.
► Also see Manual configuration under Camera Setup (Configuration), above
Firmware Update
New firmware versions usually correct issues found in previous versions but often
provide new functionality which was not previously available.
Use mSetup (Tools) to automatically update the firmware. This is by far the easiest
method.
Manual Firmware Update
DO NOT PRESS ANY BUTTONS during the firmware update process.
There are two methods with which you can update the firmware.
Method 1 without pressing any buttons (recommended method):
•
Turn off the camera.
•
Connect the camera to the computer and wait until the card is recognized as a
Removable Drive.
•
Copy the new firmware files into the camera's flash card root folder.
•
Disconnect the camera from the computer and wait until it turns off.
•
Wait until all the LEDs are turned off.
•
Connect the camera to the PC. The green LED, indicating the battery is charging,
may turn on. WAIT.
•
The LEDs will blink rapidly indicating the firmware is being updated. WAIT
•
The firmware will be updated when the LEDs stop flashing and the camera is
recognized as a Removable Drive.
•
The firmware file will have been automatically deleted.
Page 7

Method 2 by pressing the power button :
•
Turn off the camera.
•
Connect the camera to the computer and wait until the card is recognized as a
Removable Drive.
•
Copy the new firmware files into the camera's flash card root folder.
•
Disconnect the camera from the computer and wait until it turns off.
•
Wait until all the LEDs are turned off.
•
Turn on the camera and WAIT.
•
The LEDs will blink rapidly indicating the firmware is being updated. WAIT
•
The firmware will be updated when the LEDs stop flashing.
•
The firmware file will have been automatically deleted.
•
The camera is now ready for use.
Recording using an external power supply
With the Mobius Mini, it is possible to charge the battery and record at the same time
using a standard external USB 5V DC power supply. The power supply may be mains
driven (normal household wall plug), or run off batteries, including the car charger USB
plug (optional accessory) and cable supplied with the camera.
External USB power supplies usually only use the +5V and the - (Ground) wires. The 2
data wires are normally not used. However, some USB power supplies designed for a
specific USB device may use different wiring schemes and thus may not work with this
camera. To avoid possible problems, always use a generic power supply.
For recording video or taking pictures using a standard external power supply
connection, the USB power supply can be connected at any time, i.e. before the camera
is turned on, before the recording is started, or after the recording has been started.
►Only use a quality chargers capable of supplying 1000mA (1A) and a stable voltage
of at least 5V. Low quality chargers may not be able to supply enough current and can
lead to premature battery failure or, in the worst case, even destroy the camera.
Additional information
The following functions/parameters need additional explanation:
Loop Recording
Loop recording can be enabled or disabled by software or by using the camera's OSD
menu.
By default, Loop Recording is disabled meaning the camera will record clips until the
card is full. The camera will then stop recording and enter standby mode.
If Loop Recording is enabled, the oldest clips will be overwritten when the card is full. As
such, the camera will never stop recording and only the most recent clips will be
available on the card.
Page 8

Trouble shooting
Q. When I press the Power button, nothing happens.
A. The battery is flat or defective. Replace or charge the battery. Use a paper clip or
similar object to press the Reset button.
Q. When I turn on the camera the yellow and blue LEDs blink rapidly about 16 times.
The camera then turns off.
A. There is no SD card inserted or the SD card is not making proper contact. Insert the
card and/or clean the contacts.
Q. When I try to record a video or photo the yellow and blue LEDs blink slowly about 4
times. The blinking rate then increases and the camera turns off after a few seconds.
A. There is a problem with the SD card.
•
The card is full. Format the card using SDFormatter, if possible.
•
The card is not formatted correctly. Format the card using SDFormatter, if
possible.
Q. The camera functions normally but only records very short clips and may turn off.
A. This can be caused by the following:
•
The battery may not be charged. Charge the battery for about 2 hours until the
green LED turns off.
•
The battery is too cold to provide the power needed to record video. Keep the
battery warm before using the camera in cold temperatures (around freezing and
below).
•
Check the integrity of your card by using the program h2testw to make sure your
card is genuine and not a fake card that has been up-rated.
•
The card used is not compatible with the camera. Use class 10 cards for best
results.
Q. The camera does not react.
A. The firmware may have entered a continuous loop, or the battery may be discharged.
•
Make sure the battery is fully charged.
•
Use a paper clip or similar object to press the Reset button. This should force the
camera to be turned off.
•
Wait a couple of seconds.
•
Turn on the camera if it does not turn on automatically.
•
As a last resort, disconnect the battery and reconnect again after waiting 30
seconds.
Page 9

Q. The camera is not recognized as a removable disk.
A. The operating system must be XP or greater. The camera must be connected using
a standard USB cable. Confirm the cable is not defective by attaching another USB
device using the same cable. Do not use a USB hub. Try using another USB port.
Defective cables are the most common problems when the camera is not correctly
recognized by the PC.
The iCatch drivers may not be installed correctly. Disconnect the camera from the PC,
power down the PC and start over. An Internet connection is required in order to
download the drivers.
Q. The camera is not recognized by mSetup or Webcam programs.
A. The camera must be in Webcam mode, not Removable Disk mode. The camera
must be connected using a standard USB cable. Confirm the cable is not defective by
attaching another USB device using the same cable. Do not use a USB hub. Try using
another USB port. Defective cables are the most common problems when the camera is
not correctly recognized by the PC.
The iCatch drivers may not be installed correctly. Disconnect the camera from the PC,
power down the PC and start over. An Internet connection is required in order to
download the drivers.
Q. An SD card is installed, but the camera is not recognized as a removable disk.
A. If you are sure your USB cable is not defective, then it's possible that the PC USB
drivers are not working properly. DriveCleanup.exe (freeware) may be able to fix USB
corruption problems.
Q. When the camera is connected as an external disk all the files on the SD card
appear as corrupt.
A. There is a problem with your cable or the PC USB drivers are corrupt.
DriveCleanup.exe (freeware) may be able to fix USB corruption problems.
Q. The camera does not charge or does not automatically start recording when external
power is connected and the 'Auto Record External Power' parameter is set
appropriately.
A. External USB power exceeds ~5.25V or is under-powered.
Q. Playback is erratic or stutters or the playback colors are psychedelic or the video
flashes, has corrupted blocks etc.
A. Always first copy the video file from the memory card to your hard drive.
•
Your PC or graphics card may not be powerful enough to playback the video
stream.
•
You may not have enough memory installed in your PC.
•
Use VLC Media Player or MPC-HC (Media Player Classic - Home Cinema).
Windows Media Player often chokes on underpowered machines.
•
Psychedelic colors may also indicate problems with the CMOS lens module.
Make sure the CMOS lens cable is correctly seated and not cracked. The lens
cable is very fragile.
Page 10

Q. The camera functions normally but the video is completely black.
A. Make sure the lens cap is removed.
Q. There is a distinctive buzzing or clicking noise when videos are played back.
A. Only use quality micro SD cards with a class rating of 10. Low quality cards can draw
excessive current which may result in electrical noise in the recording.
This manual was last updated on 18 August 2016
 Loading...