

Page 1

FCC Compliance and Advisory Statement.
LABELLING REQUIREMENTS (Part15,Section15.19(a)(3))
This device complies with Part 15 of the FCC Rules. Operation is subject to the following two
conditions : (1)this device may not cause harmful interference, and(2)this device must accept
any interference received, including interference that may cause undesired operations
.
INFORMATION TO THE USER (Part 15. Section15.105(b))
INFORMA TION T O THE USER
This equipment has been tested and found to comply with the limits for a Class B digital device,
pursuant to part 15 of the FCC Rules. These limits are designed to provide reasonable
protection against harmful interference in a residential installation. This equipment generates,
uses and can radiate radio frequency energy and, if not installed and used in accordance with
the instructions, may cause harmful interference to radio communications. However, there is no
guarantee that interference will not occur in a particular installation. If this equipment does
cause harmful interference to radio or television reception, which can be determined by turning
the equipment off and on, the user is encouraged to try to correct the interference by one more
of the following measures:
1) Reorient or relocate the receiving antenna.
2) Increase the separation between the equipment and the receiver.
3) Connect the equipment to an outlet on a circuit different from that to which
the receiver is connected.
4) Consult the dealer or an experienced radio/TV technician for help.
WARNING(Part 15, Section 15.21)
Any changes or modifications not expressly approved by the Jun telecom Inc. could void the
user`s authority to operate the equipment.
Where shielded interface cables have been provided with the product or specified additional
components or accessories elsewhere defined to be used with the installation of the product,
they must be used in order to ensure compliance with FCC regulations
.
Canadian DOC Statement.
Suggested text for the notice indicating compliance with this Standard:
This Class B digital apparatus complies with Canadian ICES-003.
Cet appareil numerique de la classe B est conforme a la norme NMB-003 du Canada
.
1
Page 2

DECLARATION OF CONFORMITY
Manufacturer`s Name MOBITECHPLUS INC.
Manufacturer`s Address 32-5 Songwol-Dong Jongno-Gu, Seoul 110-101, Korea
Declares, that the product
Product Name USB PC CAMERA
Model Name(Number) MW-200
Confirms to the following harmonized European standards have been applied:
EMC : EN55022 : 1998 + A1: 2000 (Class B)
EN55024 : 1998 + A1: 2001 / EN61000-4-2:2001
EN61000-4-2:2001
EN61000-4-3:2001
EN61000-4-4:2001
EN61000-4-5:2001
EN61000-4-6:2001
EN61000-4-11:2001
The product herewith complies with the technical regulations within the scope of
Council Directives, 89/336/EEC and 99/5/EC carries the “CE” mark accordingly.
June ??, 2004 Seoul, Korea
European Contact :
Remark : The EC declaration of conformity similar to above statements shall be provided in
the accompanying instruction manual.
2
Page 3

INDEX
1. Product introduction 2
1.1 Description 2
1.2 Required system conditions 2
1.3 Components 3
2. Precautions 4
2.1 Warnings at installation 4
2.2 safety instruction 4
3. CD Installation introduction 5
3.1 CD S/W Installation 5
3.2 Driver recognition on Windows 2000/XP 10
3.3 Driver recognition on Windows 98/98SE/ME 13
3.4 Remove software and driver 14
4. WebCAMeye Light Usage 15
4.1 Name 15
4.2 Focus adjustment 16
4.3 Adhesion of the magnetic panel 17
4.4 Set up the options 18
5. WebCAMeye Light S/W Usage 19
5.1 WebCAMeye Usage instruction 19
5.2 EyeImage Usage instruction 26
5.3 EyeChat Usage instruction 27
6. FAQ
31
3
Page 4

1. Product introduction
1.1 Description
Item Description Remark
Sensor
Pixels 320,000
Minimum
illumination
View angle 53°
Focal range
Window size
Format RGB24, I420
Frame per second
Signal/Noise rate
Dynamic range
Compress format ISO/IEC 10918-1(JPEG)
Automatic Control
Interface USB 1.1
1.2 Required system conditions
Item Required System conditions Remark
Windows 98, Windows 98SE, Windows ME, Windows 2000,
O/S
Windows XP
Above the Pentium II 250㎒
CPU
MEMORY Above 128M
HDD 100M space (in case of installing the software)
Above the 800ⅹ600ⅹ24bit
VGA
USB IBM PC or compatible with USB port
VGA(640ⅹ480) 1/4 inche CMOS Sensor
1.9Lux
F=2.8㎜, f=4.5㎜, 4 element
Lens
2㎝ ~ ∞
VGA(640ⅹ480),CIF(352ⅹ288),
SIF(320ⅹ240),QCIF(176ⅹ144), QSIF(160ⅹ120)
30FPS(QSIF), 30FPS(QCIF), 30FPS(SIF),
30FPS(CIF), 15FPS(VGA)
>45㏈
60㏈
Automatic Exposure, Auto White balance, Auto COMS
reset level control, Automatic Gain Control and
auto/manual Histogram Equalization
4
Page 5
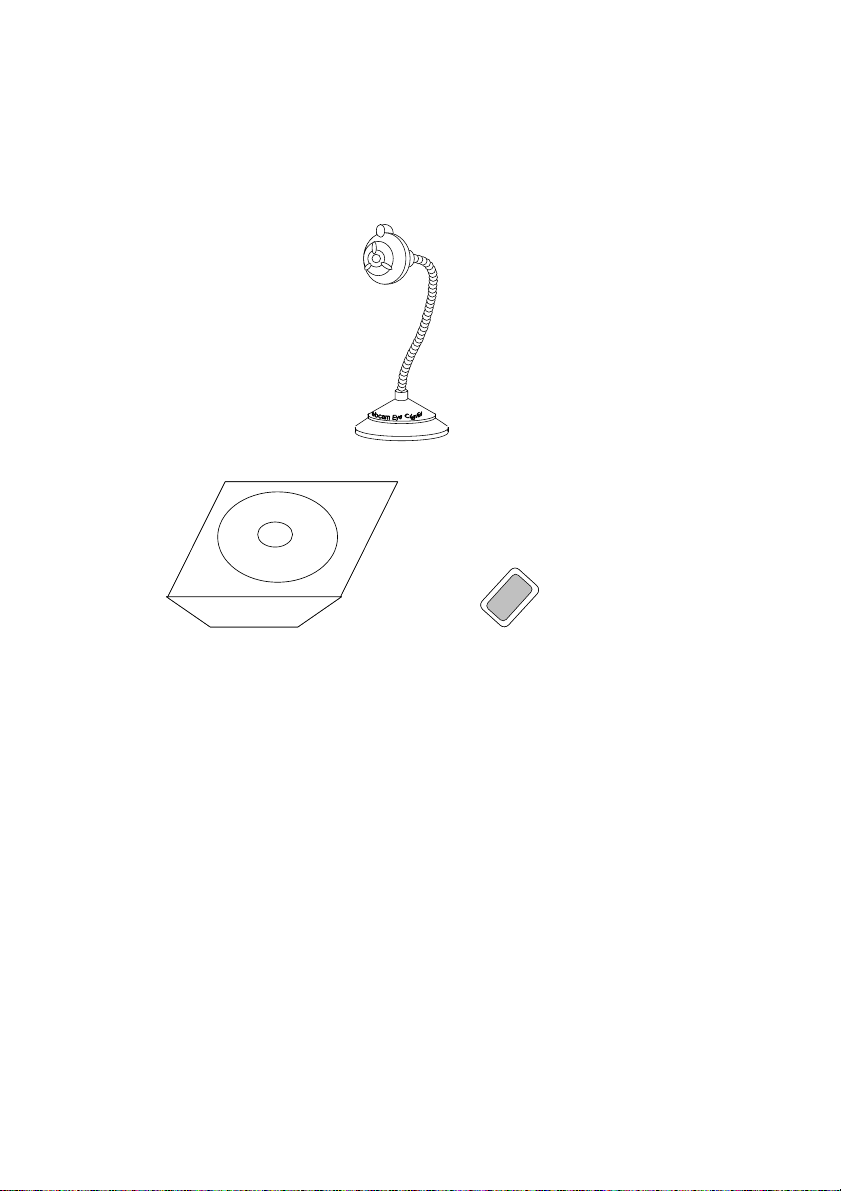
1.3 Components
A
B C
A. WebCAMeye Light Main Body 1 ea
B. Installation CD 1 ea
C. Magnetic panel for adhesion 1 ea
5
Page 6

2. Precautions
2.1 Warning on installation
• Must install the driver of CD before you
connect the PC camera to the computer.
• Must install the PC camera on the plain surface
firmly with magnetic panel in order for the
camera not to be come off.
• Must get rid of dust and humidity on the
surface which you install the PC camera.
• The problem can be caused if you use expended
USB cable to connect PC & PC camera.
Please be careful not to pull excessively the
•
USB cable of PC camera since it can damage (the
cable).
• Please don ’t turn flexible wire of PC camera
2.2 Safty instructions
• Please install the PC camera away from
children’s hands.
• Please tie up the connecting cable of PC and PC
camera short to prevent anyone being entangled by
the cable.
• Please disconnect the PC camera in case of long
term disuse of camera.
• Please not turn iris too much since it can
damage lens or takes the lens out of the body.
• Please use soft cloth when you clean up the
camera.
• Please don’t disassemble the camera.
• Please contact with MTP for A/S or for any
further information.
6
Page 7
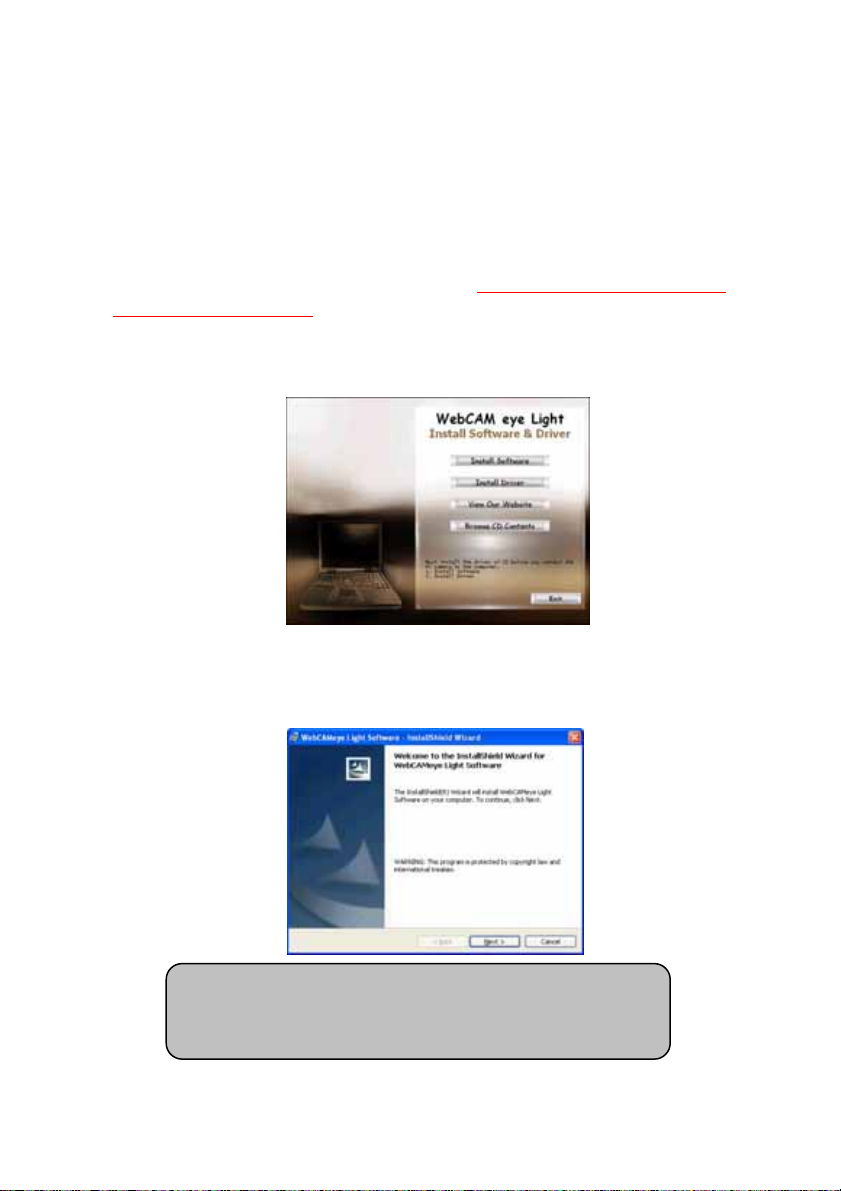
3. CD Installation instructions
3.1 CD S/W installation
You should install the software of CD before you connect WebCAMeye
Light to your computer.
1. The bottom menu will appear automatically when you insert the
CD. ( In case that it does not appear automatically, you should
operate Setup.exe on CD.)
2. The install program will be executed when you click “Software
Install” button. (You may also execute the program operating Setup.exe
inside of software folder of CD.)
• In case that you have used other PC camera,
you should get rid of its driver before you
install WebCAMeye Light PC camera driver.
7
Page 8
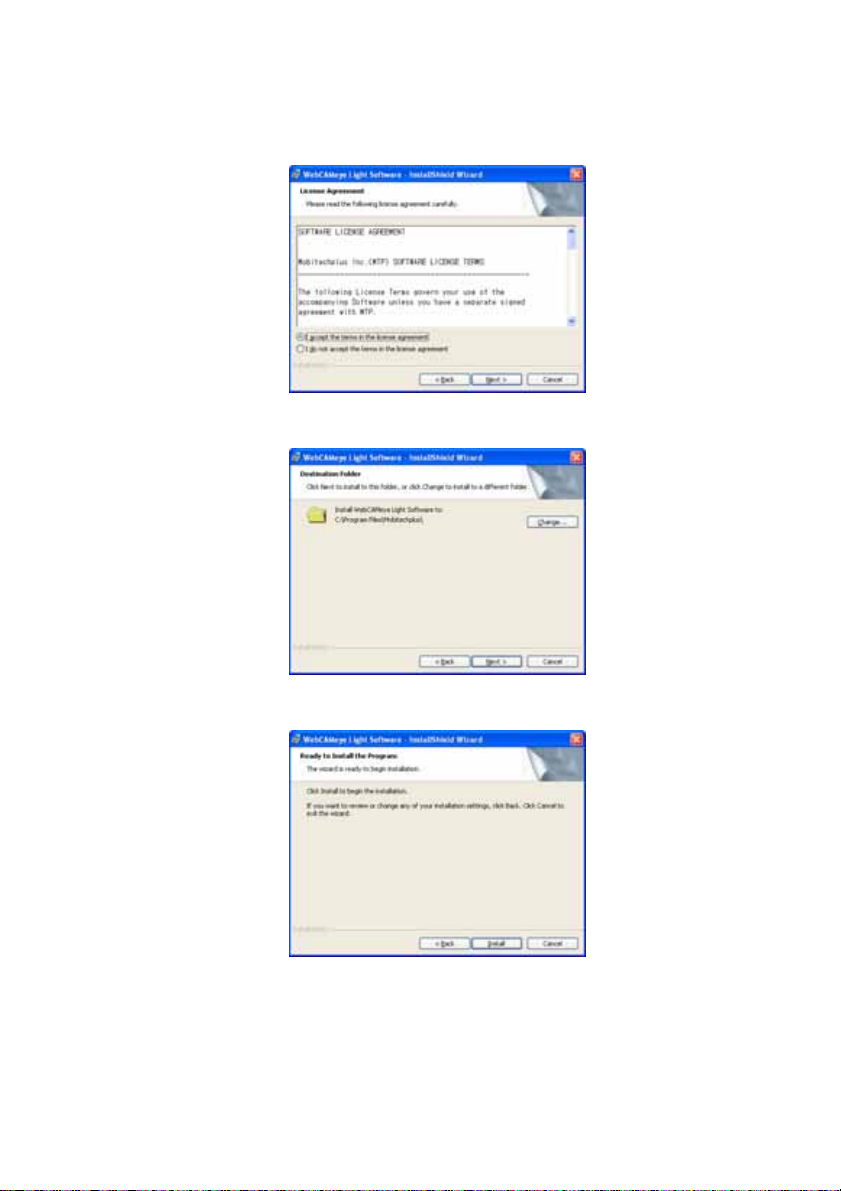
3. Please click the “Next” button.
4. Please accept the use contract and click the “Next” button.
5. Please set up installation folder and click the “Next” button.
8
Page 9
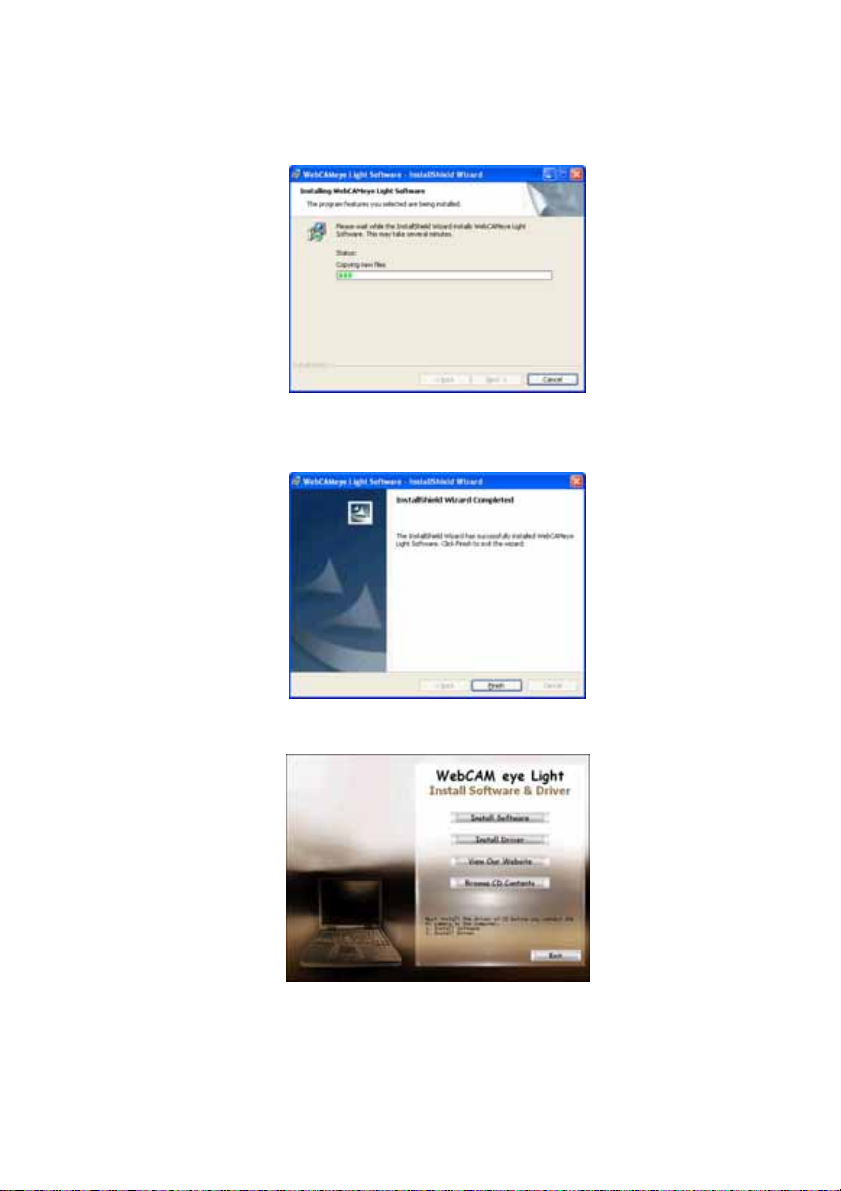
6. Please click the “Install” button.
7. Please click the “Finish” button when the installation is
completed and appear the bottom page.
8. Then the first page will be appeared as bottom.
9
Page 10
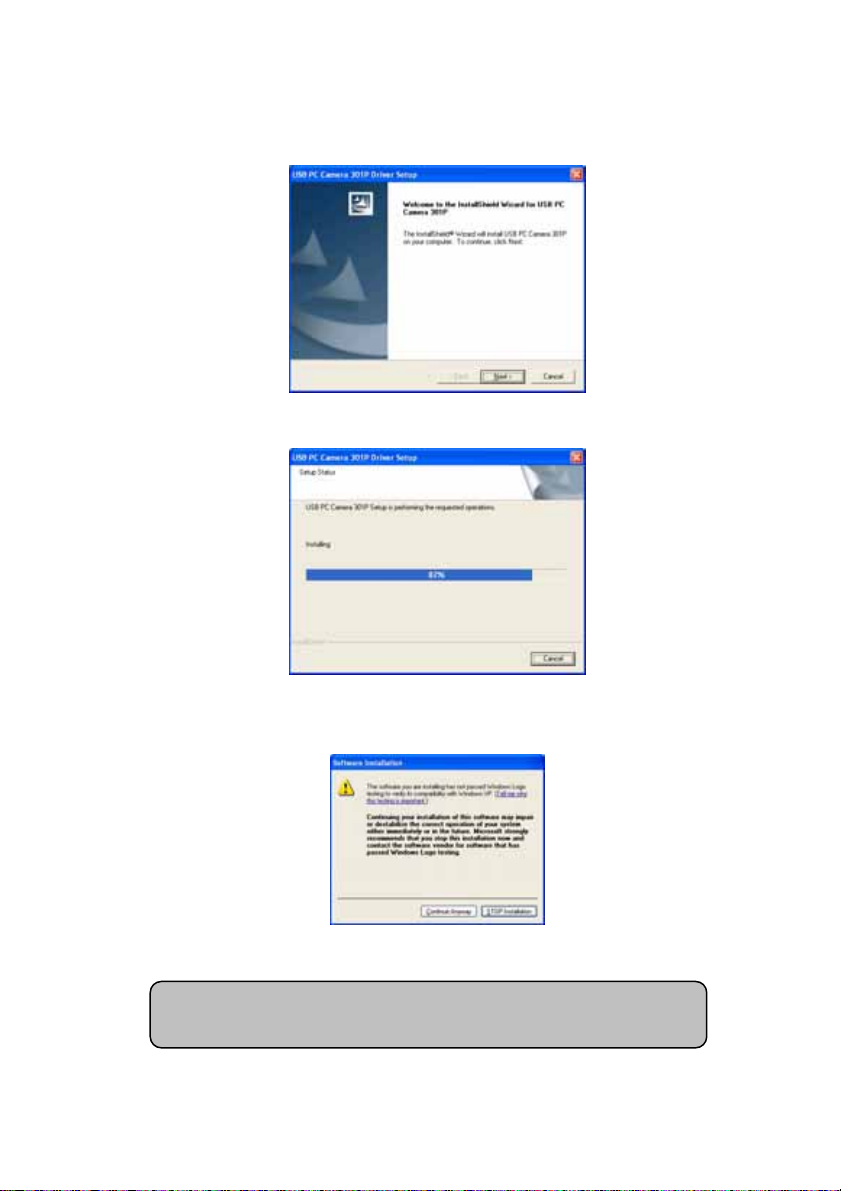
9. Please click the “Driver Install” button.
10. Please click the “Next” button.
11. Please click the “Continue Anyway” button when the buttom page appear
while installation. (it will not always appear depending on the OS.)
• Above “Windows logo test” warning normally appear
when they didn’t request certifying to Microsoft but
it has no relation to using our product.
10
Page 11
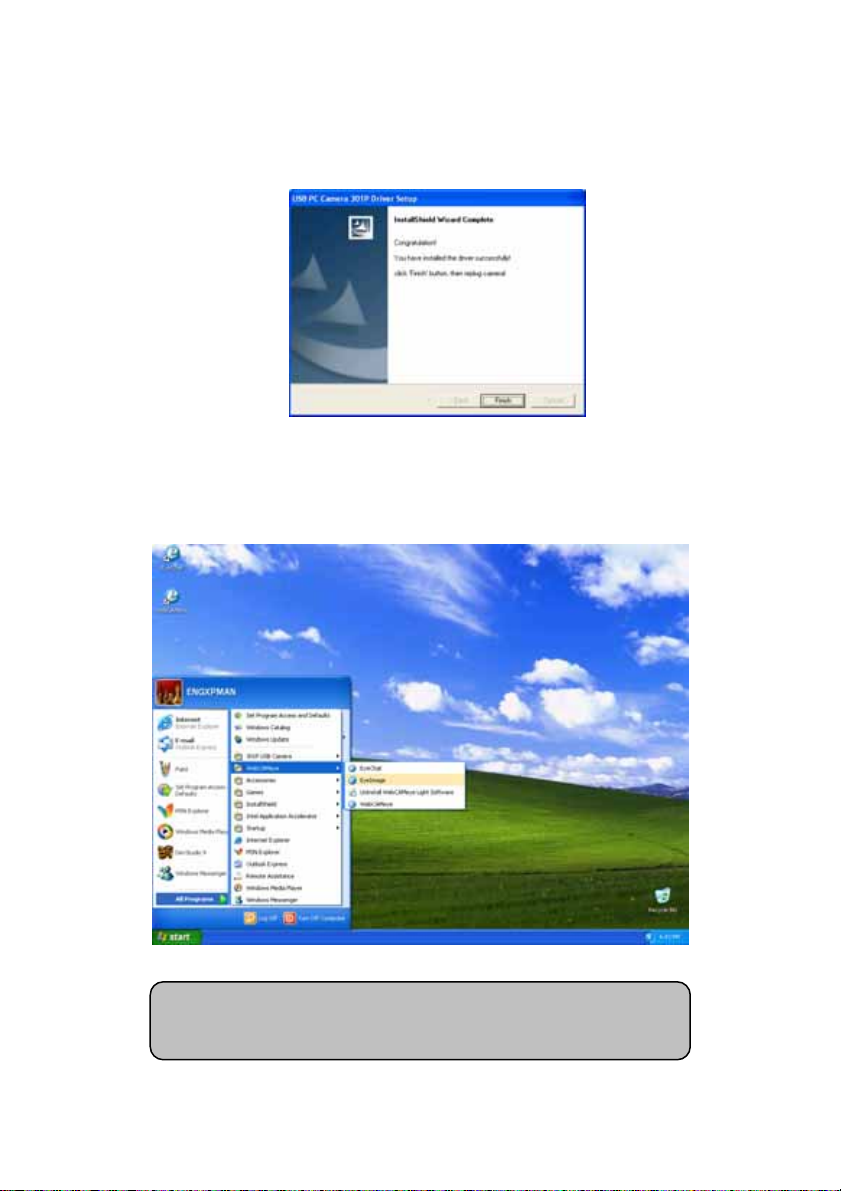
12. The bottom page will appear when the installation is fully
completed. Please click the “Finish” to reboot.
13. You will find that the program is installed on Start Menu and
on Desktop after rebooting. (WebCAMeye and 301P USB Camera will be
added on Start Menu)
• All the introduction pages has been standardized
to Window XP but it is compatible for other OS
following same procedure.
11
Page 12
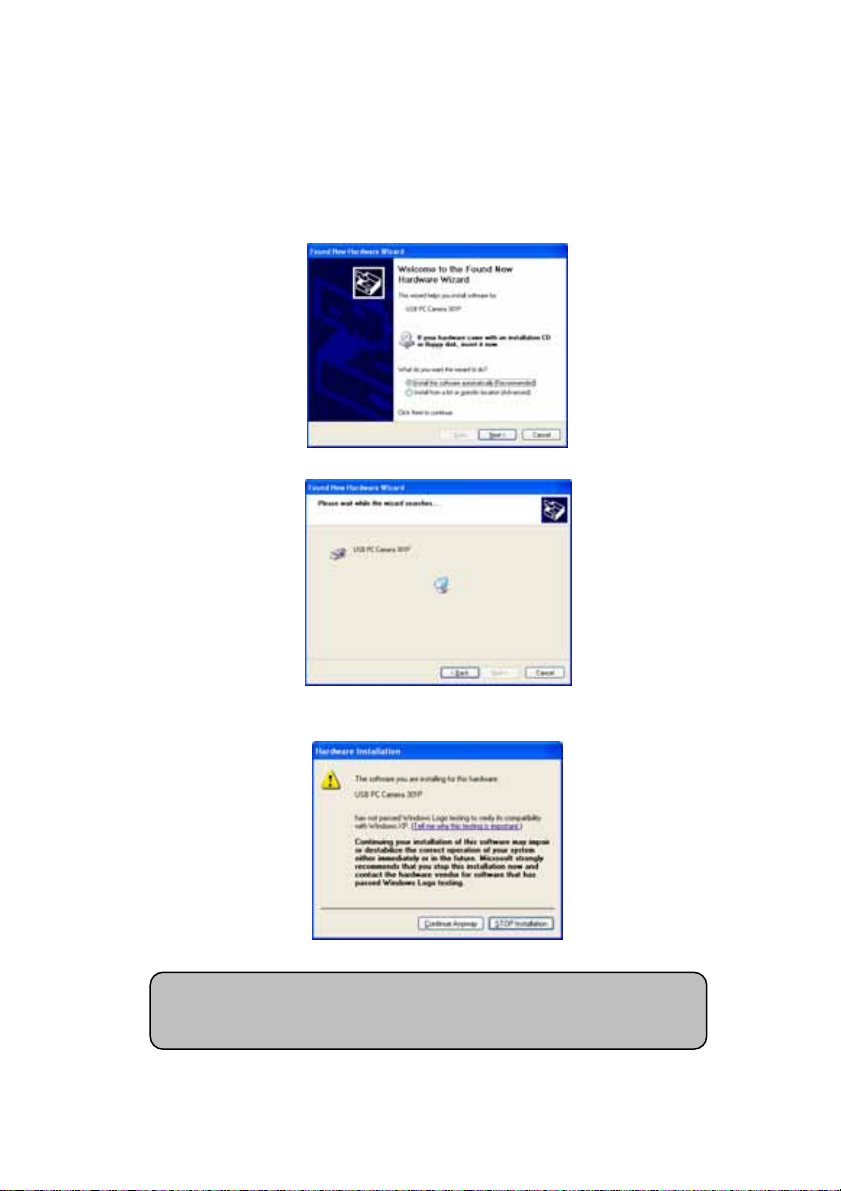
3.2 Driver recognition on Windows 2000/XP
1. Connect the WebCAMeye Light to spare USB port of PC. The bottom
page will appear on the recognition procedure.
2. Please install and click “Next” button.
3. In case that the bottom page can appear while installing,
please click “Continue Anyway” button.
• Above “Windows logo test” warning normally appear
when they didn’t request certifying to Microsoft but
it has no relation to using our product.
12
Page 13
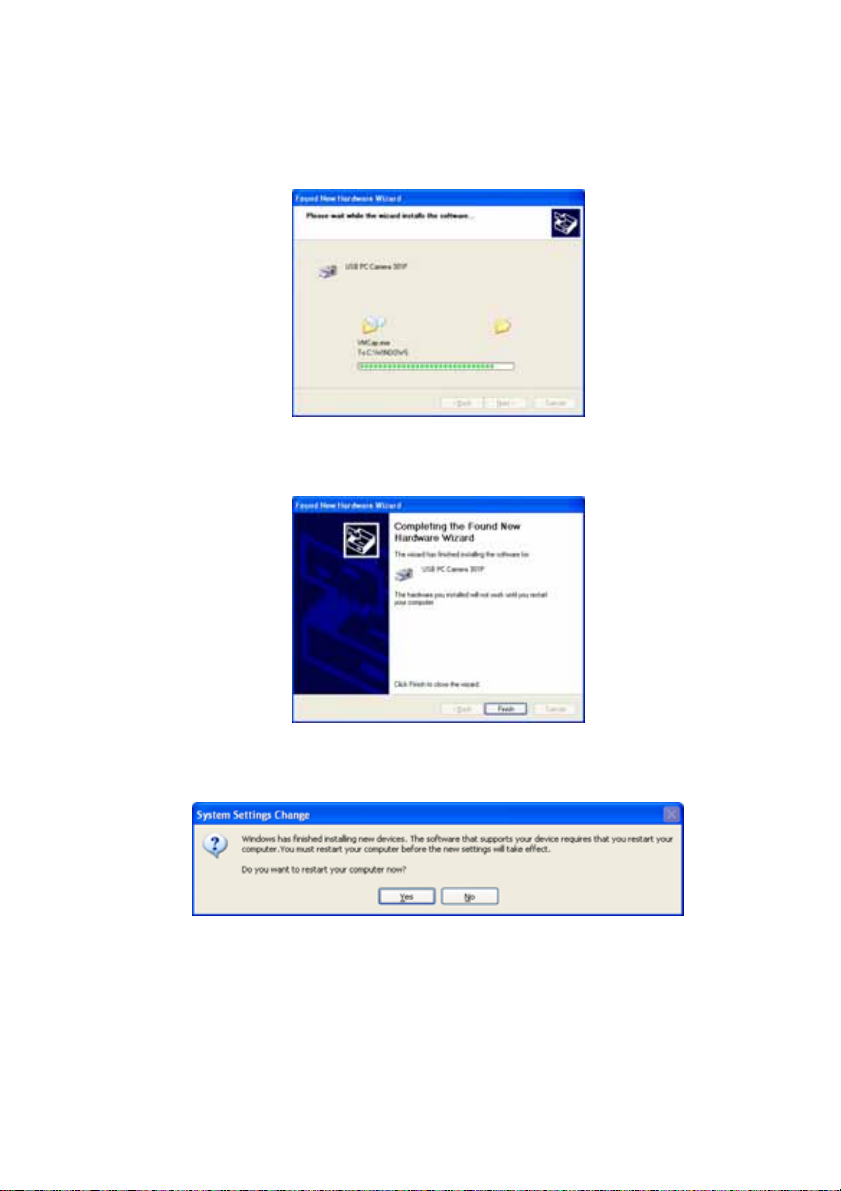
4. It will install continuously.
5. The bottom page will appear after the installation is completed.
6. Please click the “Finish” button.
7. When the above page is appear, please click “Yes” and reboot.
13
Page 14
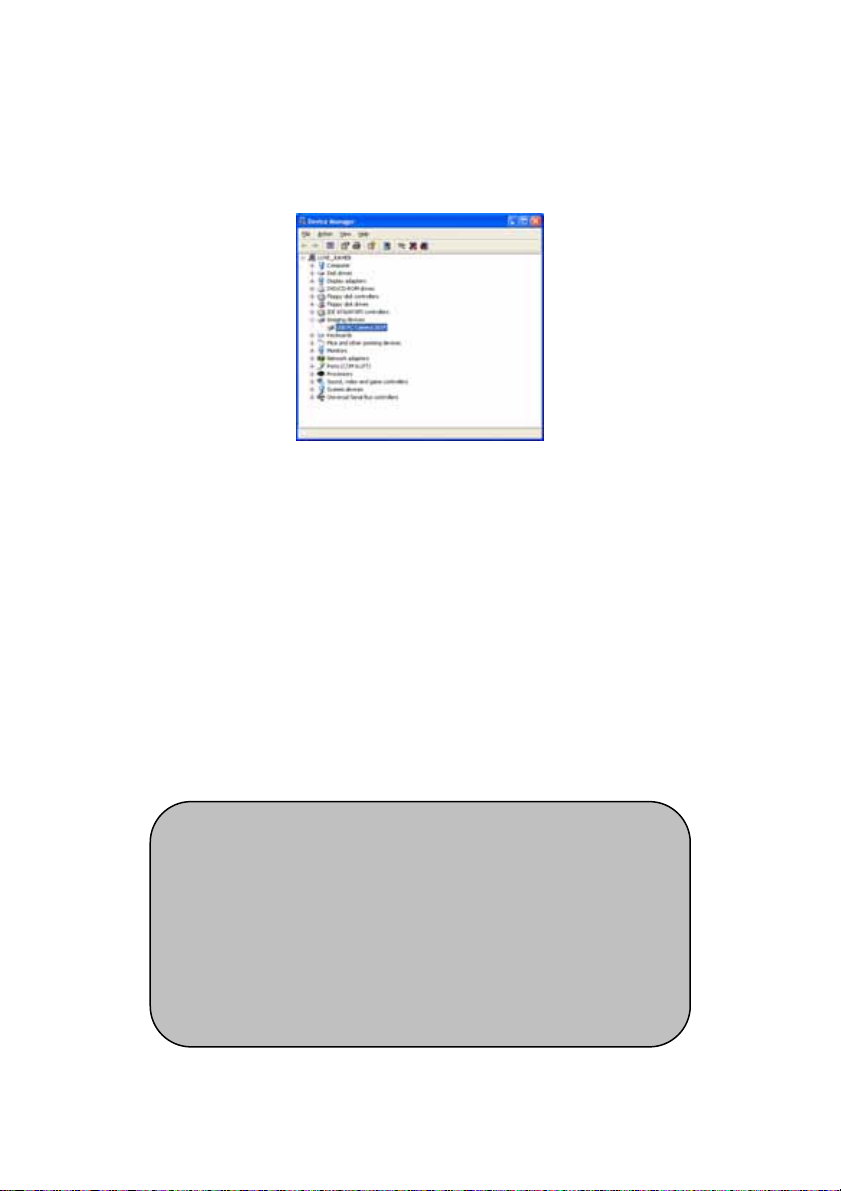
8. Please check if the PC camera is recognized on Imaging Devices
of Device Manager.
• Introduction pages are all of Window XP but it
will be installed in the same procedure on Window
2000
• Method of open Device Manager for Windows XP:
Start Menu ⇒ Control Panel ⇒ Switch to Classic
View ⇒ System ⇒ Hardware ⇒ Device Manager
• Method of open Device Manager for Windows 2000:
Start Menu ⇒ Settings ⇒ Control Panel ⇒ System
⇒ Hardware ⇒ Device Manager
14
Page 15
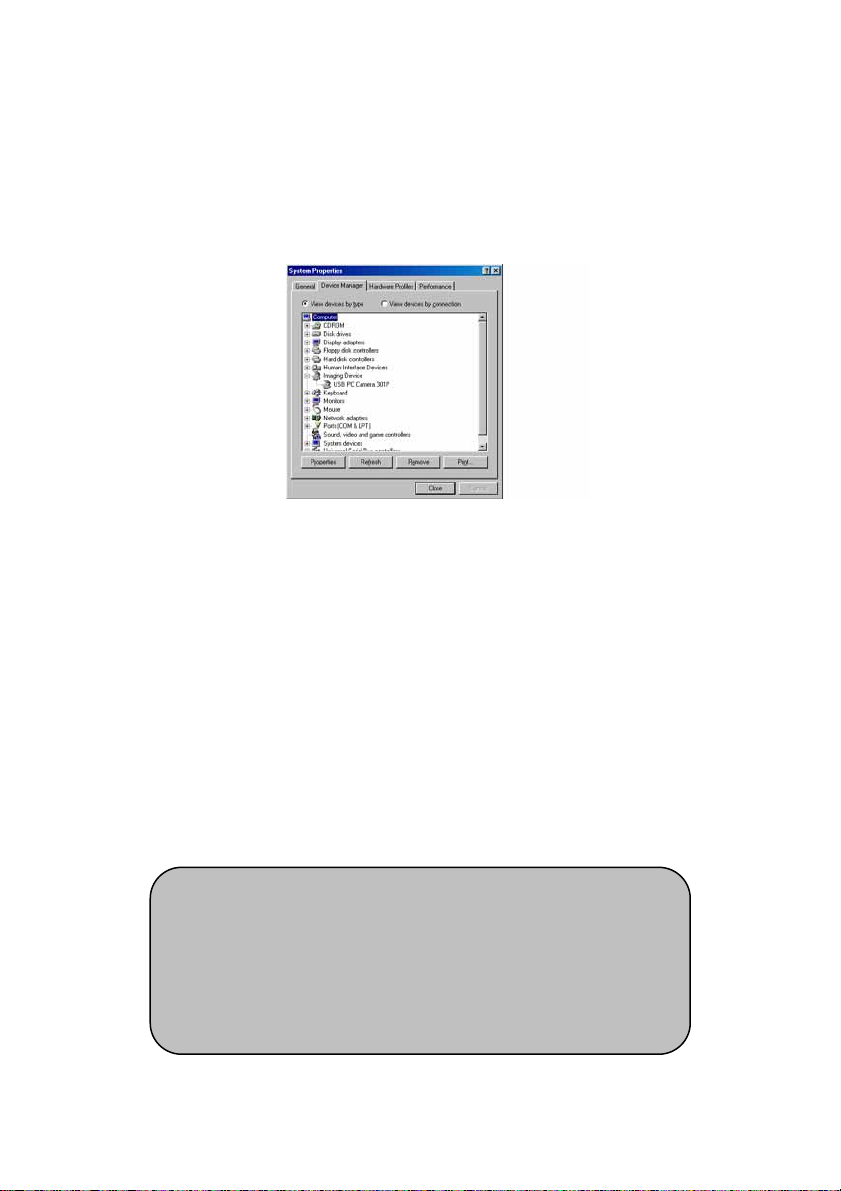
3.3 Driver recognition on Windows 98/98SE/ME
1. Connect the WebCAMeye Light to spare USB port of PC.
Recognition procedure will be completed automatically.
2. Please check if the PC camera is recognized on Imaging Device
of Device Manager.
• Introduction pages are all of Window ME but it
will be installed in the same procedure on Window
98/98SE
• Method of open Device Manager for Windows
98/98SE/ME:
Start Menu ⇒ Settings ⇒ Control Panel ⇒ System
⇒ Device Manage
15
Page 16
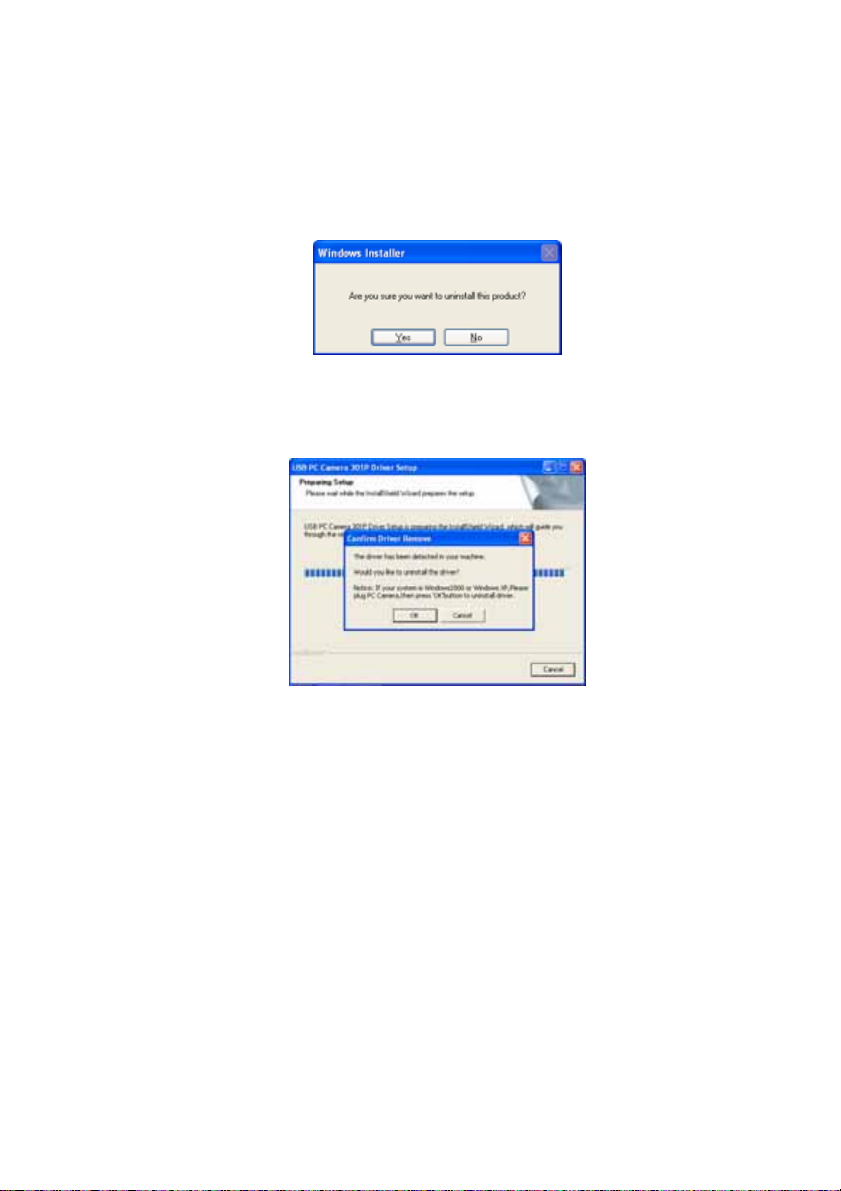
3.4 Remove software and Driver.
1. If you want to remove the software, select “Uninstall WebCAMeye
Light Software” of WebCAMeye on Start Menu and click “Yes” button.
2. If you want to remove the driver, select “Uninstall” of 301P
USB Camera on the Starting Menu and click “YES” button.
16
Page 17
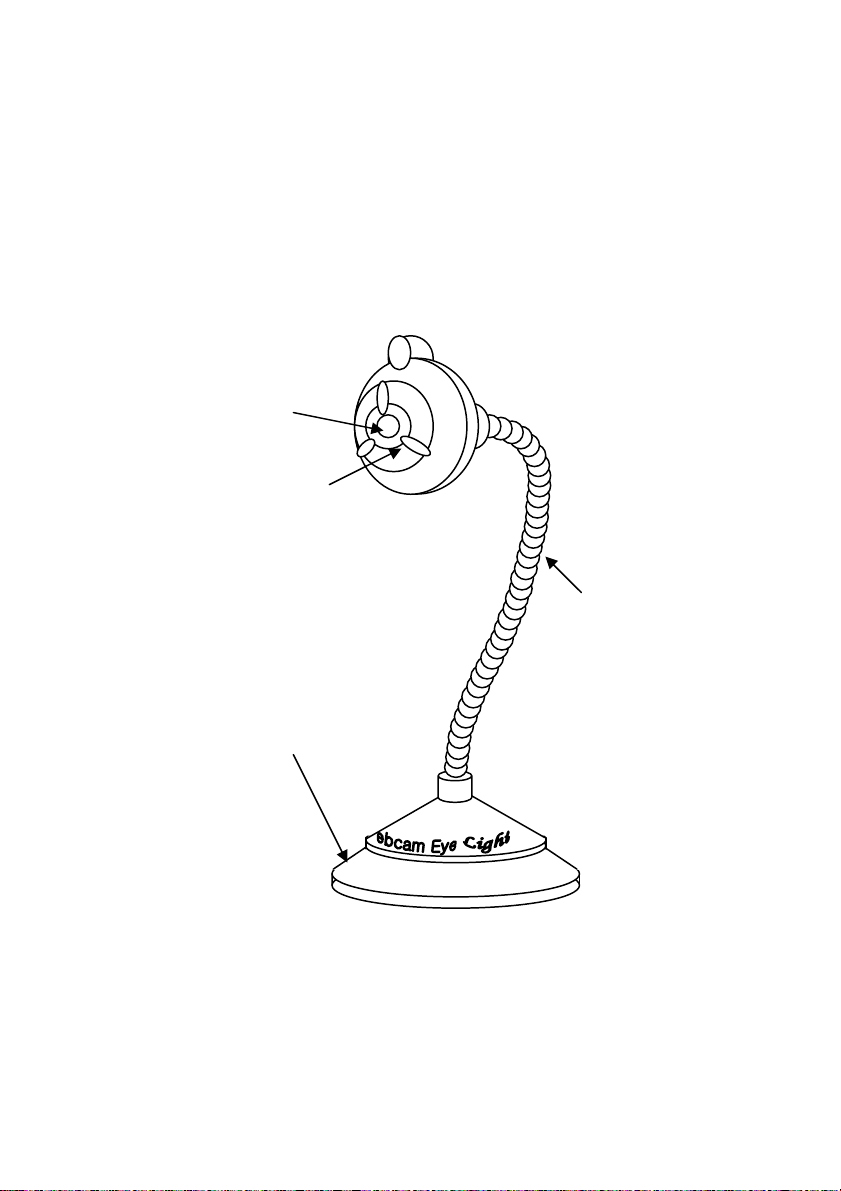
4. WebCAMeye Light usage
4.1 Name
Camera lens
Iris
Flexible wire
(Free direction)
Magnetic stand
(Main body has magnetic built-in.)
17
Page 18
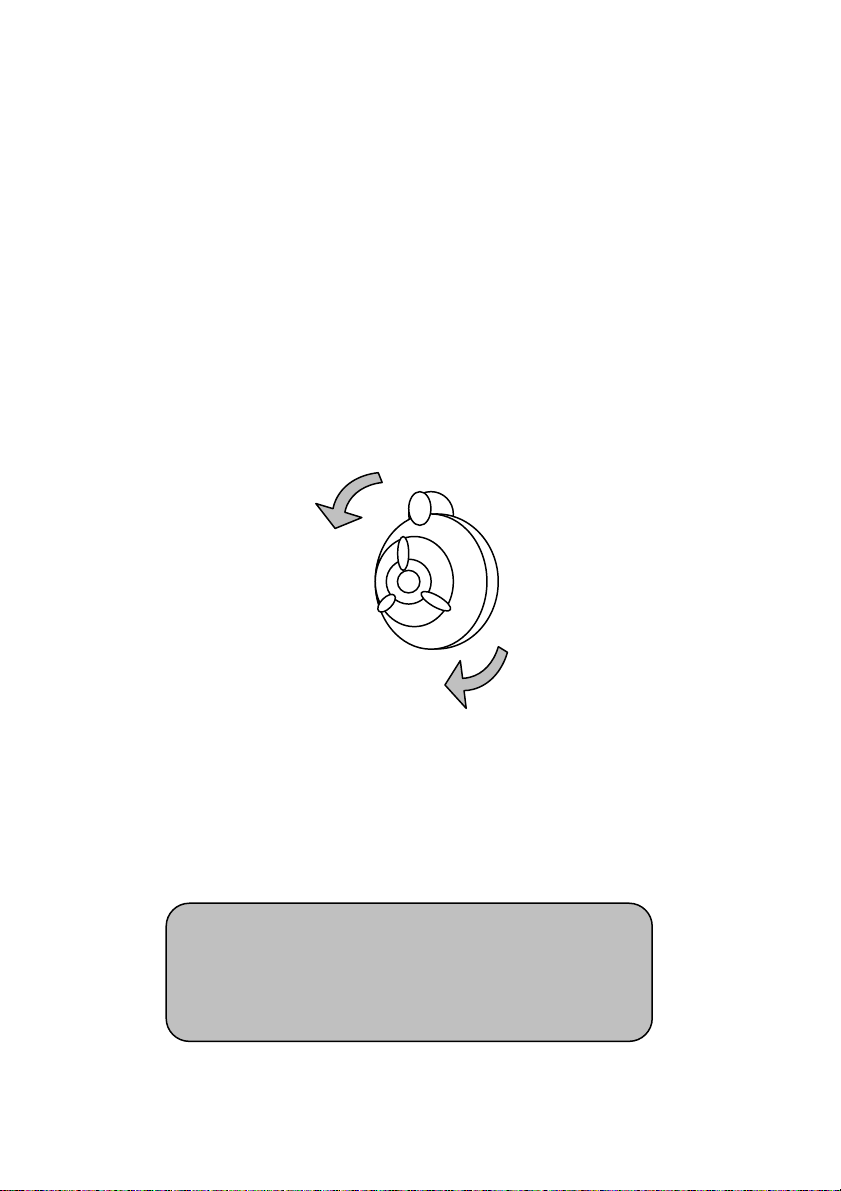
4.2 Focus adjustment.
The image should be focused adjusting the Iris by hand for
WebCAMeye Light. So the image can be out of focus because of the PC
camera location. In that case, please adjust the focus as following
instructions;
A . Turn the iris to the right: Focusing the image of long distance.
B . Turn the iris to the left: Focusing the image of short distance.
Focusing short distance
Focusing long distance
※
※ You should be careful not to turn the iris
too much, which can cause the extracting the
lens from the body. In case that the lens is
taken out, dirt can enter between sensor and
Lens so you should insert lens turning it to
the opposite direction.
18
Page 19
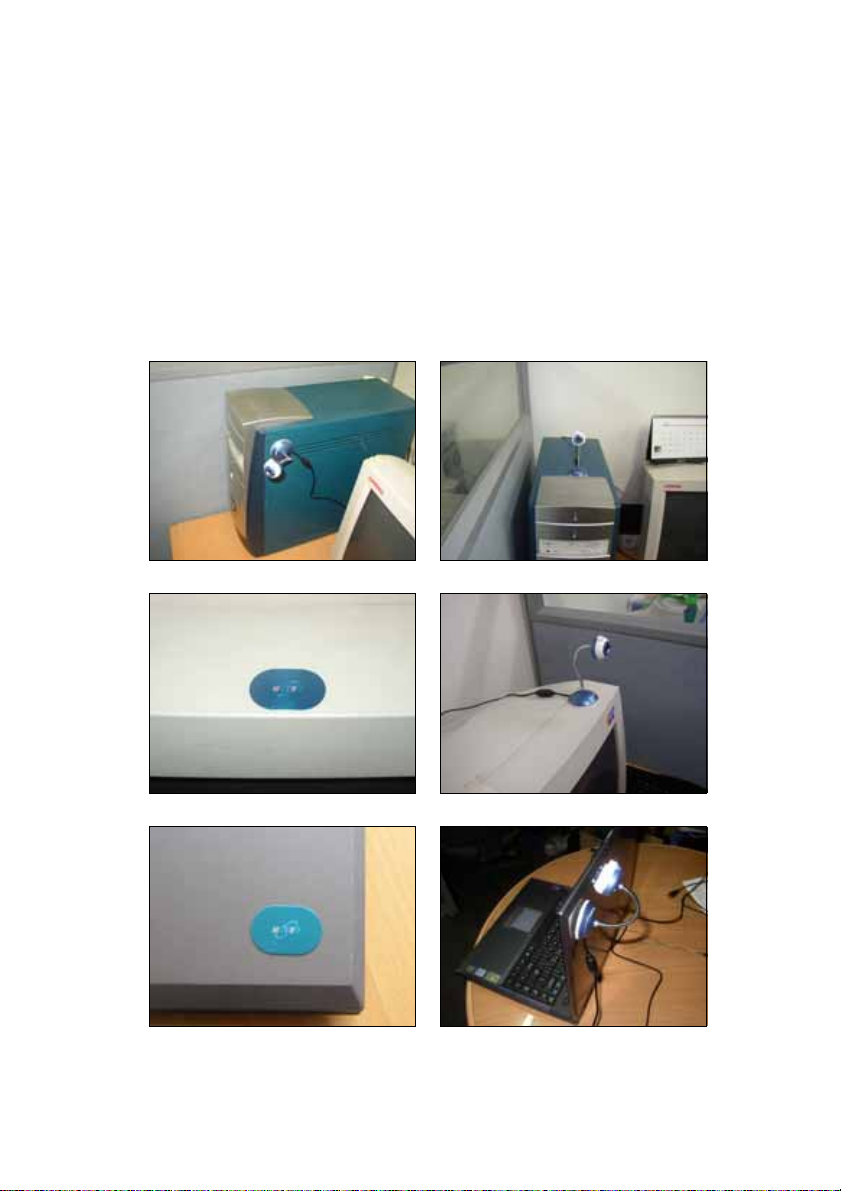
4.3 Adhesion of the magnetic panel.
WebCAMeye Light has magnetic panel built-in on its bottom. So you
are supposed to place the WebCAMeye Light on normal computer metal
case or place it on the enclosed magnetic panel that is placed at the
desired spot.
The followings are some examples of adhering the magnetic panel;
A. Place it on the metal case of computer.
B. Place it on the monitor
C. Place it on the lap top
19
Page 20
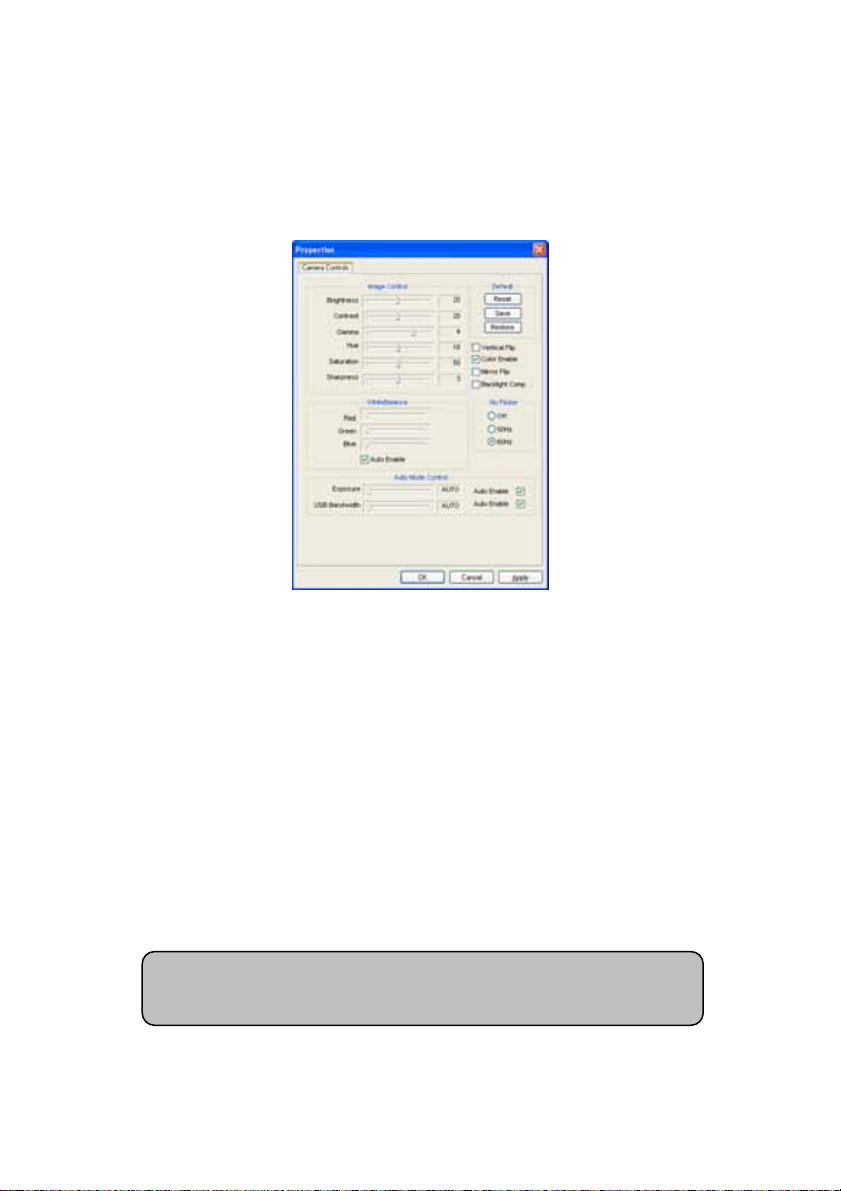
4.4 Set up the options
WebCAMeye Light setup page is as bottom;
(Example : Camera Setup menu of WebCAMeye S/W setup button.)
• Brightness Adjust Brightness. ( 1 ~ 40 Default : 20)
• Contrast Adjust Contrast. ( 1 ~ 40 Default : 20)
• Gamma Adjust Gamma. ( 1 ~ 5 Default : 4)
• Hue Adjust Hue. ( 1 ~ 36 Default : 18)
• Saturation Adjust Saturation. ( 1 ~ 100 Default : 50)
• Sharpness Adjust Sharpness. ( 1 ~ 5 Default : 3)
• Red Adjust Red color grade. (Manual/Auto Default : Auto)
• Green Adjust Green color grade. (Manual/Auto Default : Auto)
• Blue Adjust Blue color grade. (Manual/Auto Default : Auto)
• Exposure Adjust Exposure. (Manual/Auto Default : Auto)
• USB Bandwidth Adjust USB Bandwidth. (Manual/Auto Default : Auto)
• Vertical Flip Display vertical symmetry video (Check/Uncheck : Unchecked)
• Color Enable Display color video. (Check/Uncheck : Checked)
• Mirror Flip Display horizontal symmetry Video(Check/Uncheck : Unchecked)
• Backlight Comp Make the video brighten at darkness
• Flicker Off Don’t remove AC frequency of the electric light
• Flicker 50Hz Remove the 50Hz Ac frequency of Europe or Japan.
• Flicker 60Hz Remove the 60Hz AC frequency of Korea or USA.
• Reset Restore the factory value.
• Save Save the user’s setting value.
• Restore Restore the user’s setting value.
※
(Check/Uncheck : Unchecked)
※ If the back light Comp is selected, the image
printing speed will be reduced.
20
Page 21
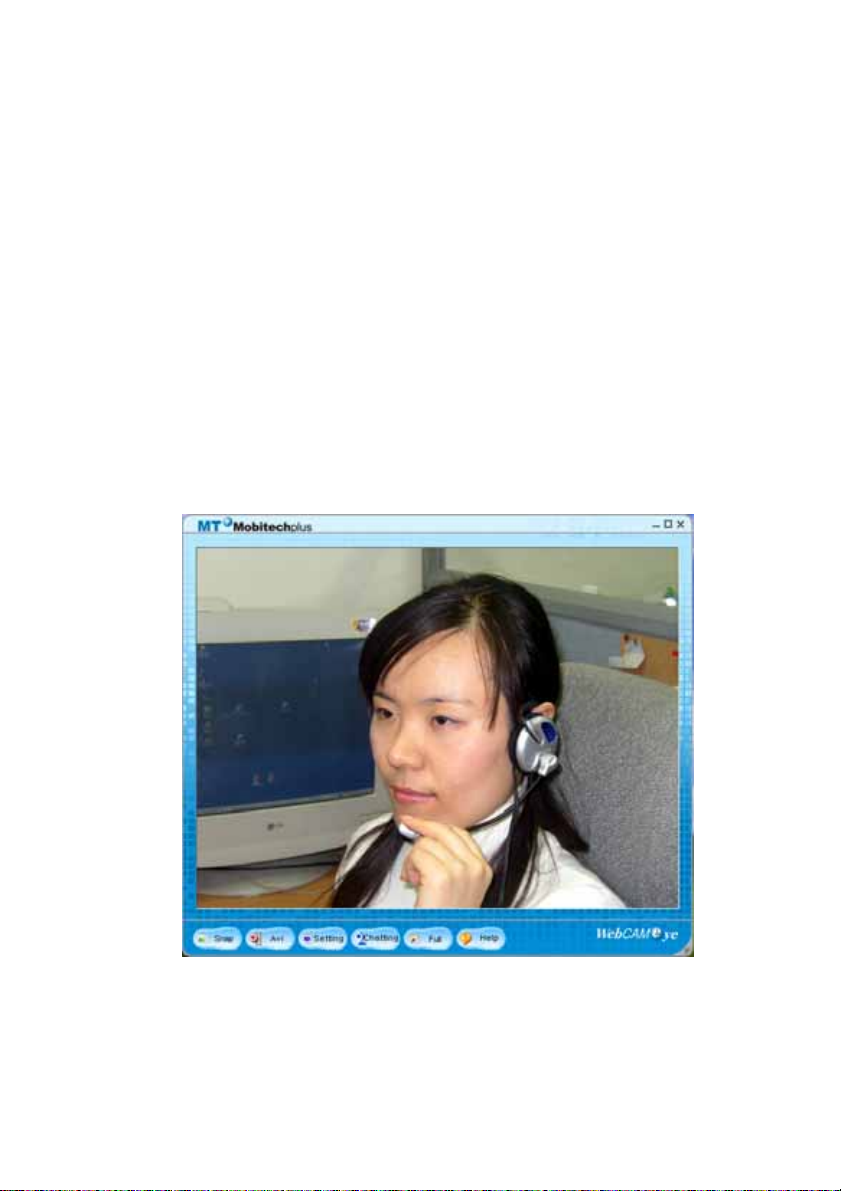
5. WebCAMeye Light S/W Usage
5.1 WebCAMeye Usage instruction
This software is developed mainly for PC camera and is valid for
showing the present image taken by PC camera, saving function of the
photos and the video image as well as sending the photos by e-mail and
connecting the EyeImage and Eyechat.
A. Viewer function.
Show the present image on the screen and adjust the resolution and
set up the camera.
WebCAMeye
21
Page 22
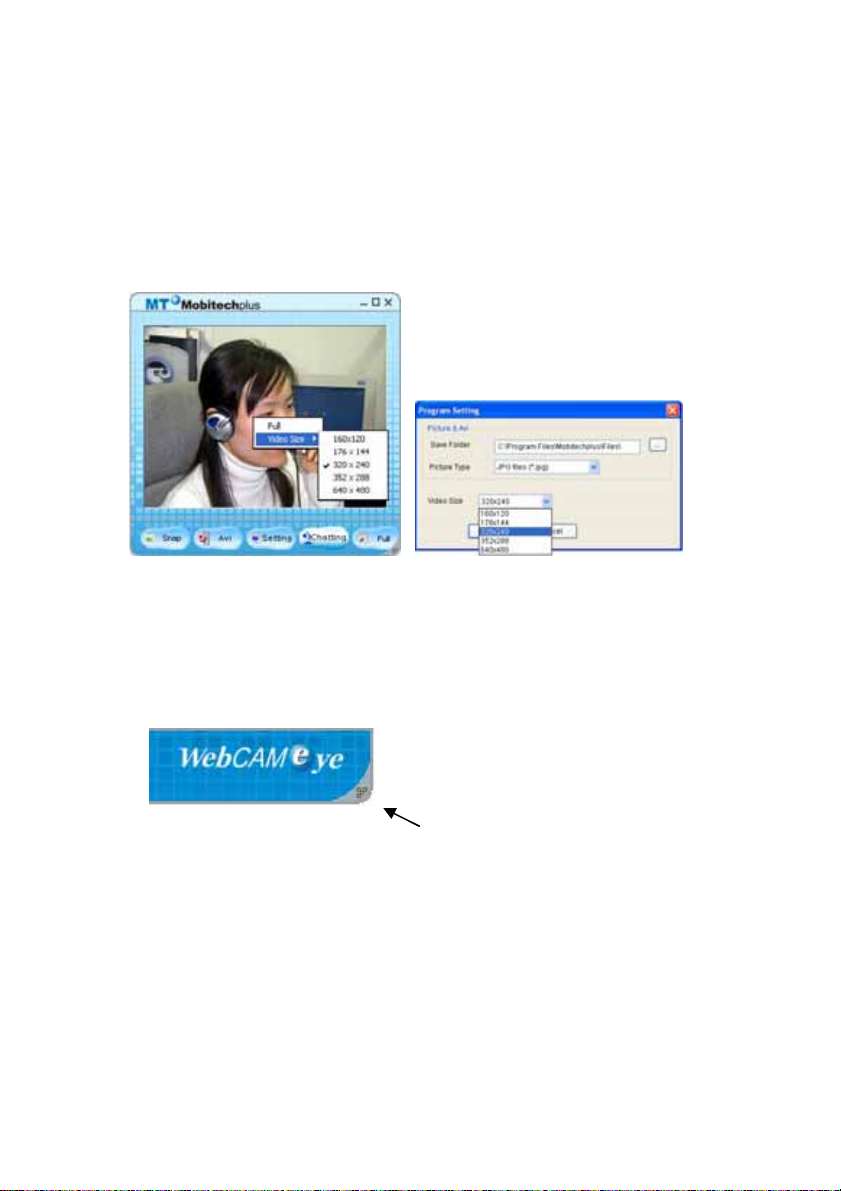
•
Adjust the resolution.
There are two ways to adjust the resolution. One is to press the
right button of mouse placed on the screen and the other is to
adjust it in the program setup dialog of set up button.
• Adjust screen size freely.
Except the resolution adjustment, window size is supposed to be
adjusted by pulling the corner of screen to ideal size.
Size adjustment corner.
22
Page 23
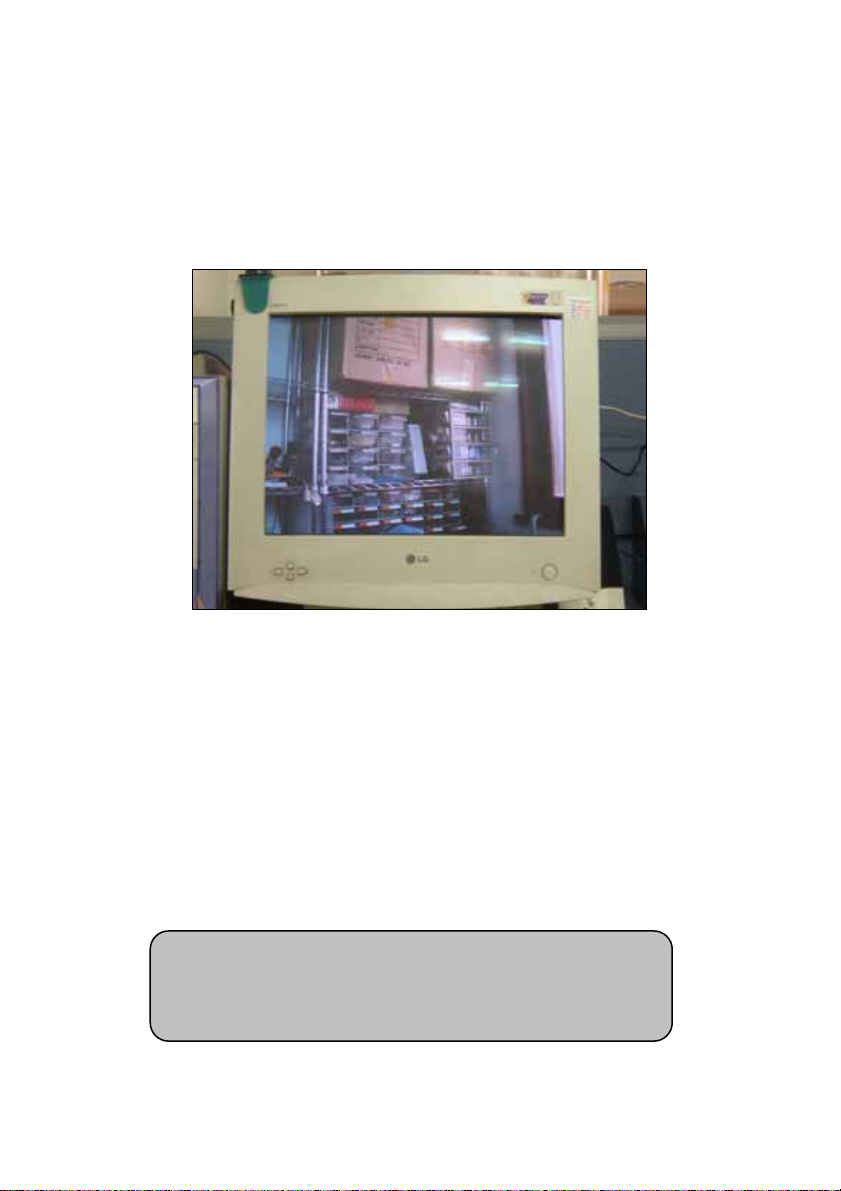
•
Full screen display.
You can display the image data to through the full screen. It is
useful to enlarge images or for surveillance monitor.
• The full screen image will be quite unnatural at
low resolution.
• The image speed can be slow down since the full
screen image requires higher system capacity.
23
Page 24
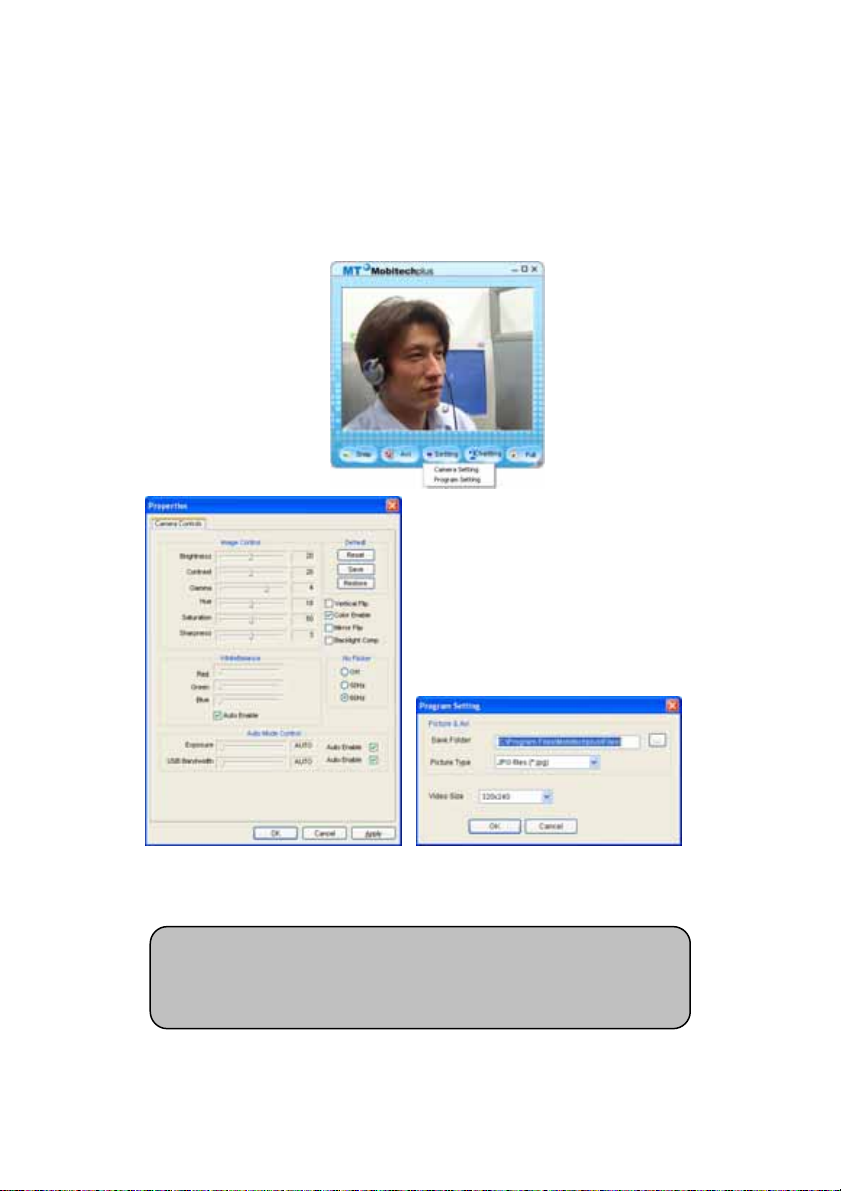
• Camera setup and Program environment setup.
If you press “Setup” button, there are two menus; Camera setup and
Program Setup.
Camera setup Program setup
• Please refer to the index 4.4 set up the options
to set up the camera.
•
You can setup the saving folder, setup the image
format and setup the resolution.
24
Page 25
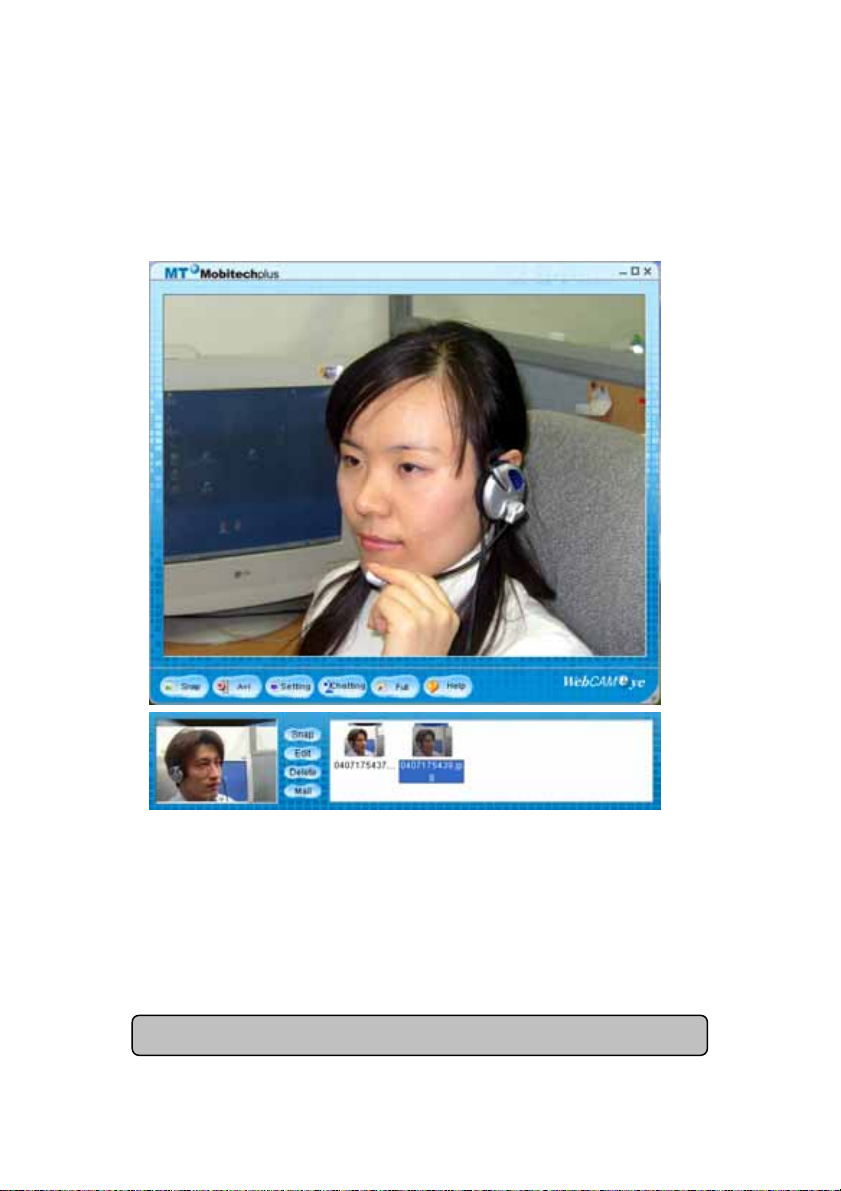
B. Photographing function.
If you press “Photo” button on WebCAMeye, small sub-window will
appear as follows.
• Photo: You can save the photo to BMP or JPG file.
(It is possible to select at the program set up box.)
• Edit: Connect the selected photo to the imaging program.
(BMP file will be operated by EyeImage and JPG file follows
the ordinary windows image program.)
• Delete: Send the selected photo to the recycle bin.
• Mail: Attach the selected photo to the e-mail.
※ You must setup mail program to send it by e- mail.
※
25
Page 26
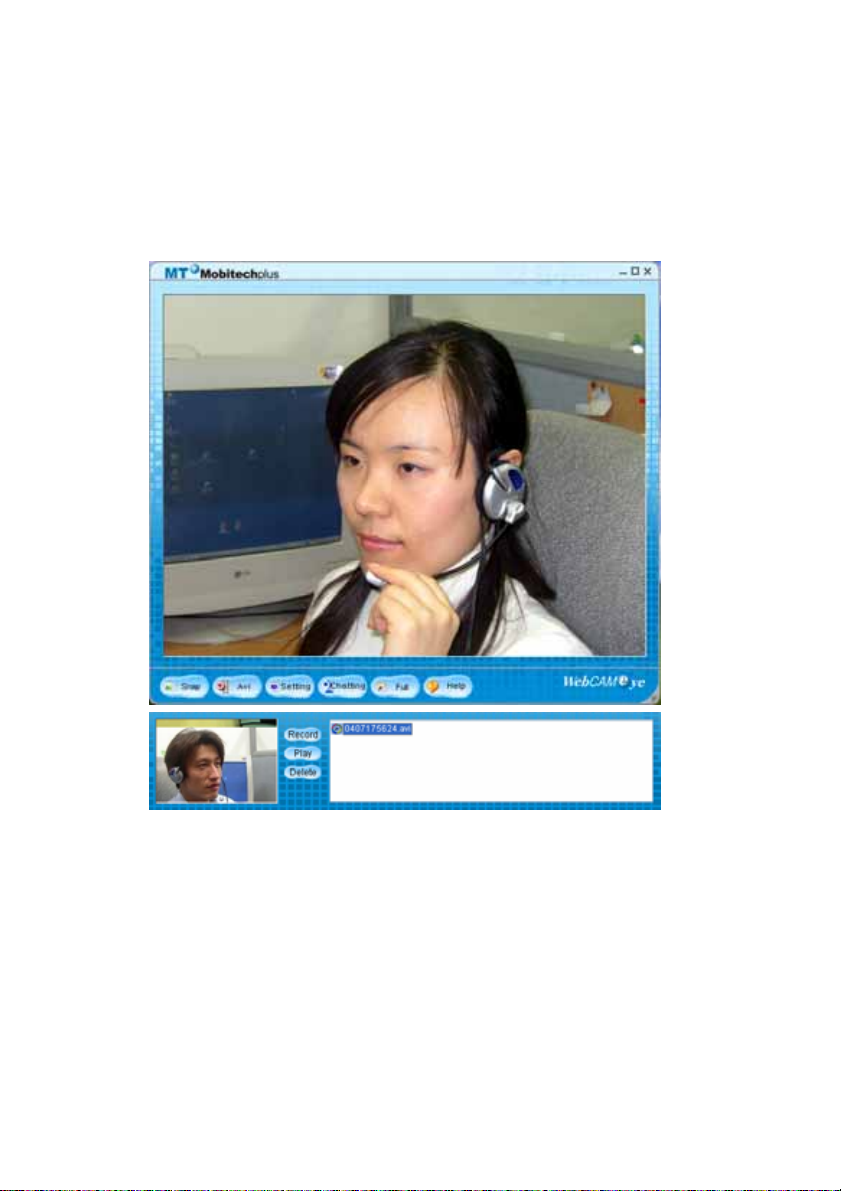
C. AVI file function.
If you press “AVI” button on WebCAMeye, small sub-window will be
appear.
• Record: Save the video by AVI file.
(If you want to stop the recording, press “Save” button.)
• Play: Play the selected AVI file.
• Delete: Send the selected AVI file to the recycle bin.
26
Page 27

D. Connecting related programs
•
Chat
You can chat person-to-person operating the EyeChat program
without opening the start menu.
• Connect to EyeImage program
You should click “Edit” button after you select thumb nail on
photo sub-window or you should do double clicks the selected thumb
nail.
※
※ EyeImage does not support JPG file.
Please be noted that the ordinary window image
program will be operated when you press “Edit”
button after select JPG file or do the double click
on JPG file. (ex : MS Paint)
• You can find all the necessary information of
usage of all the programs in WebCAMeye software.
Please refer to the information when you use the
programs.
27
Page 28
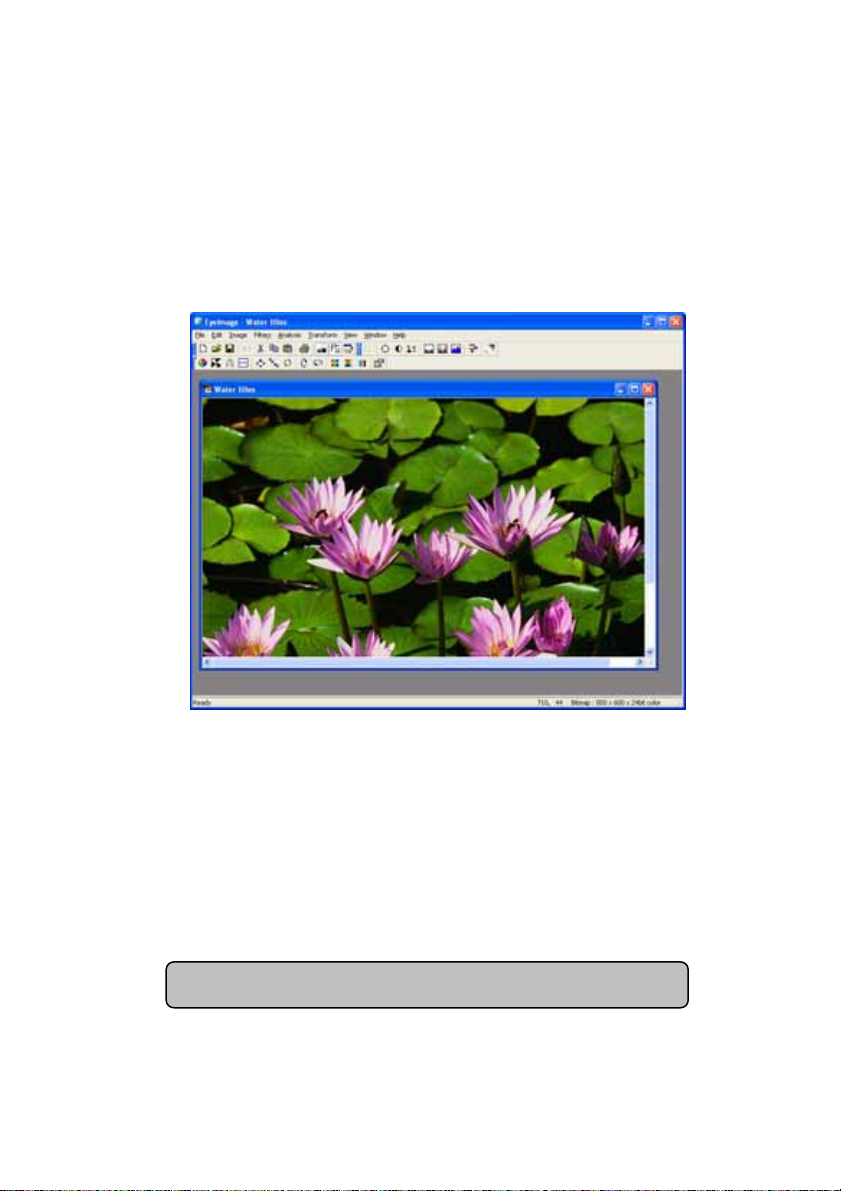
5.2 EyeImage Usage instruction
EyeImage is an image processing base tool. It’s function is
similar to filter function of the Photoshop. It provides various
functions like reversing images, adjusting image size and distorting
colors.
A. Applied functions.
• RGB, HSI, YIQ, CMYK and etc. Conversion
• Wavelet Transform (Walsh, Haar 2, Daubechies 4)
• Fast DCT (Zonal Coding)
• Arithmetic Operation(+,-,/,*,Darkest,Lightest,Average,Difference,OR)
• Geometric Operation (Translation, Rotation, Scaling, Mirror, Flip)
• Morphological Operation (Erosion, Dilation, Opening, Closing)
• Analysis (Sum, MSE, RMSE, PSNR, Std Dev., Min/Max, SSD, SAD, MAD, …)
• Blur, Sharpen, Emboss, Edge Detect Filter
• Variable Histogram (Equalize, Stretch, Color)
• Image Information (File name, size, using color, Bitmap header info.)
• 3 image format (BMP, RAW, PGM)
※
※ EyeImage does not support JPG file.
28
Page 29
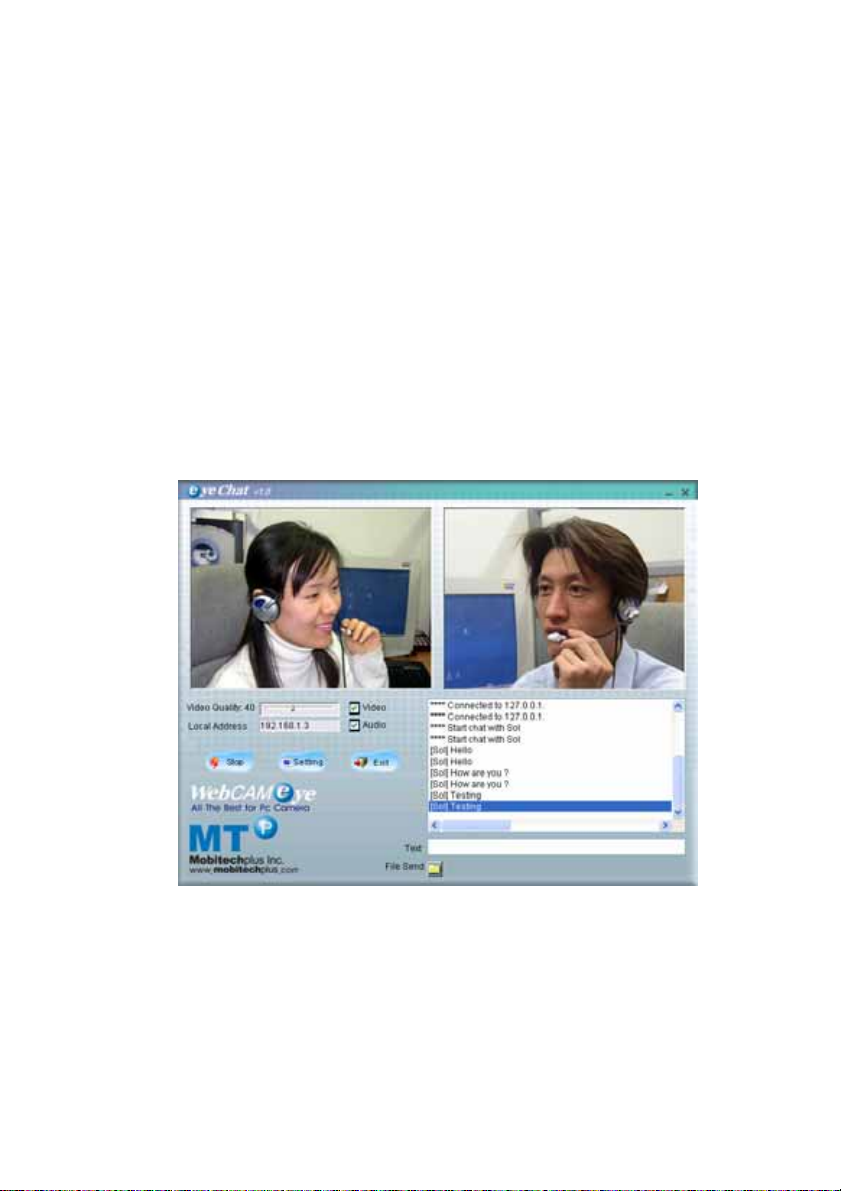
5.3 EyeChat Usage instruction
Eyechat program that is developed for P2P video chatting is a
chatting program for chatters to communicate watching each other using
PC camera. It is regarded as total chatting software providing Text
and file exchanges and vocal conversation at the same time.
A. Remote connection
They can connect each other pressing connect button If they know IP
address of each other. It will be easier to connect each other if they
save their IP address at the connecting dialog to connect.
The below window is the connected EyeChat screen.
EyeChat
29
Page 30
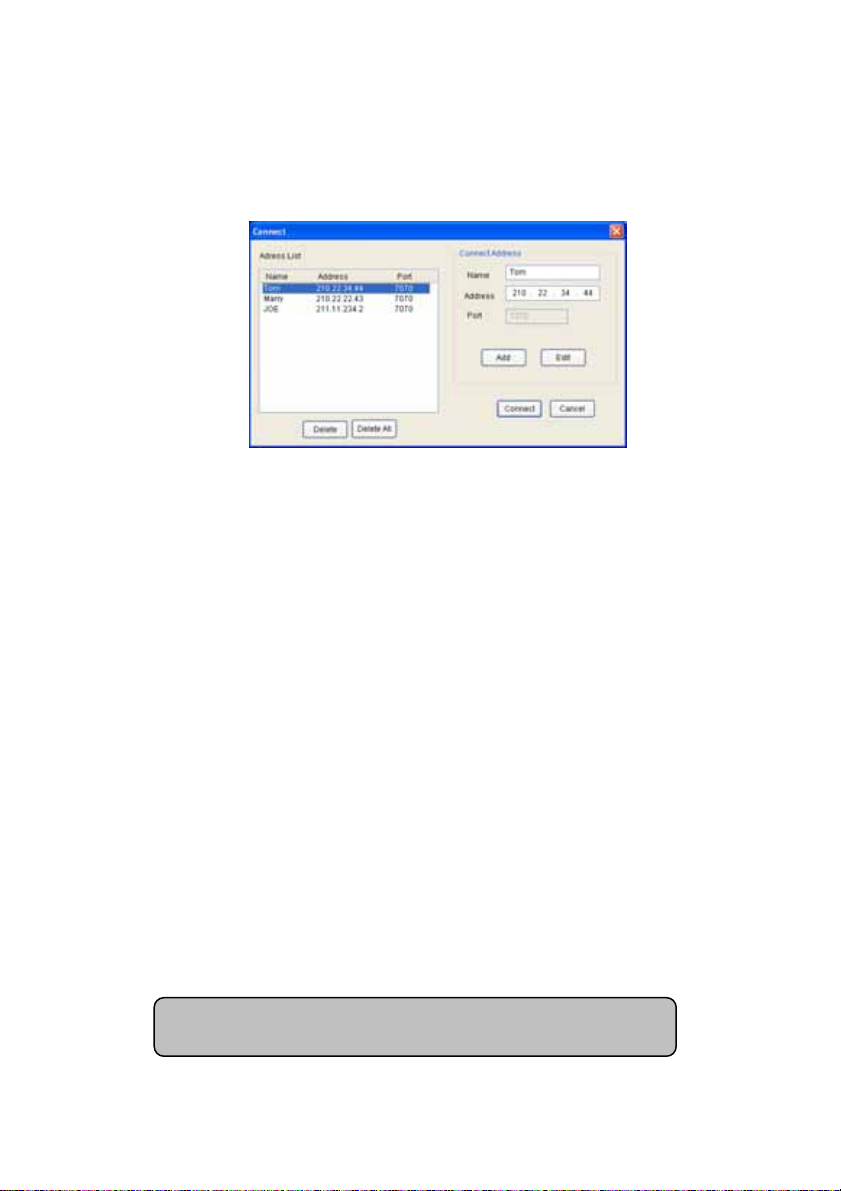
•
Add new name on the list
If you press “Connect” button on EyeChat, the below page will
appear.
a. Please enter conversation partner at Connect information.
Name : Partner’s name
IP address : Computer network parter’s IP address
Port No. : Port Number of the partner
b. Partner’s data will be registered to the Connect List
when you press “Add” button.
•
Amend the Connect List.
a. Please click the name of Connect list.
b. Then revise necessary part of the connect information
c. It will be revised when you press “Amend” button
•
Delete partner of the Connecting List
a. Please select a name of connect list to delete.
b. Then the name will be removed when you press ”Delete” button.
• Delete all
a. Please press ”Delete all” to delete all.
※
•
Connecting.
It will be connected when you press “Connect” button after
selecting the desired name of the Connect list. However it will be
connected only when the desired person is also operating EyeChat.
※Port number is always 7070. Please don’t use
7070 port at other software.
30
Page 31
B. Data Sending
• Video and audio
Video and audio check boxes should be checked to send your picture
and vocal data. Likewise your conversation partner’s ones also
should be checked for you to receive his picture and voice.
• Text Sending
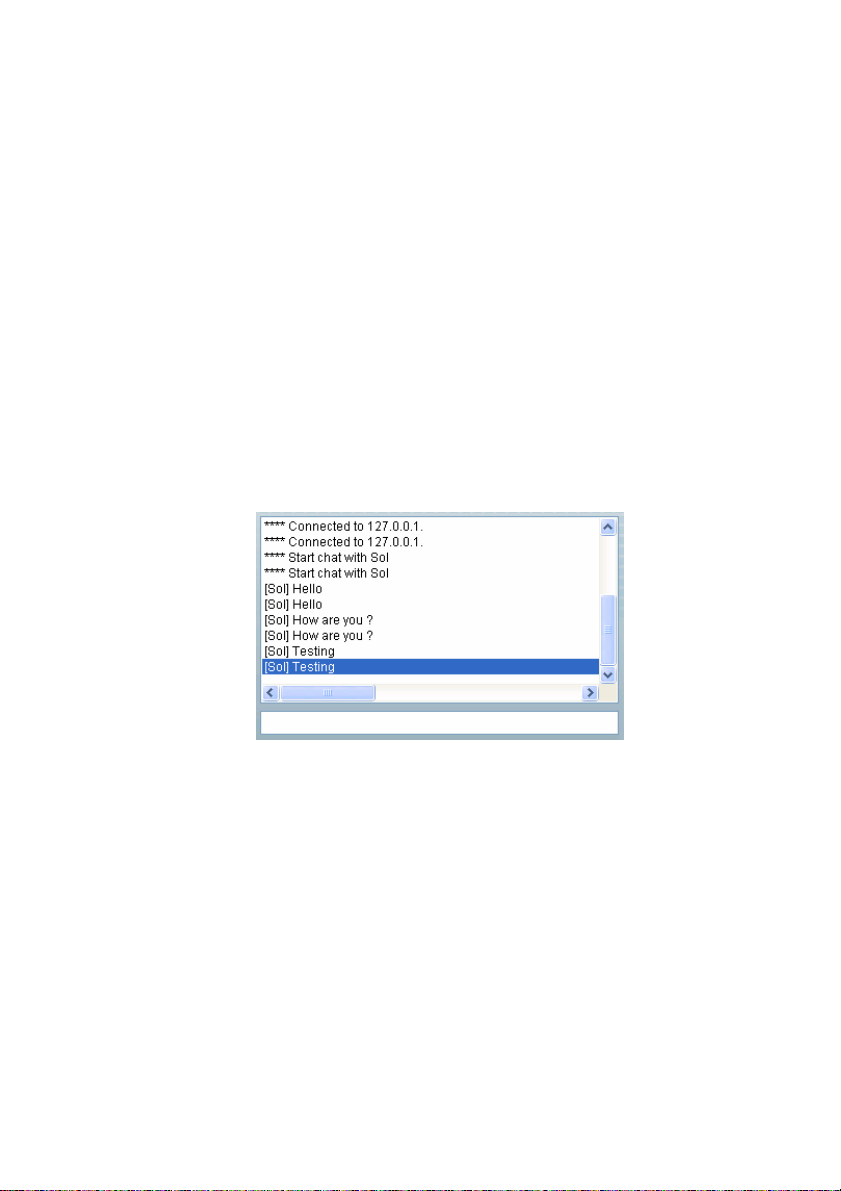
You should write text on the text control and press “Enter” then
your text with your ID will appear on the conversation control of
your partner. Likewise the text of your partner will appear on
your conversation control.
※
Sending
31
Page 32
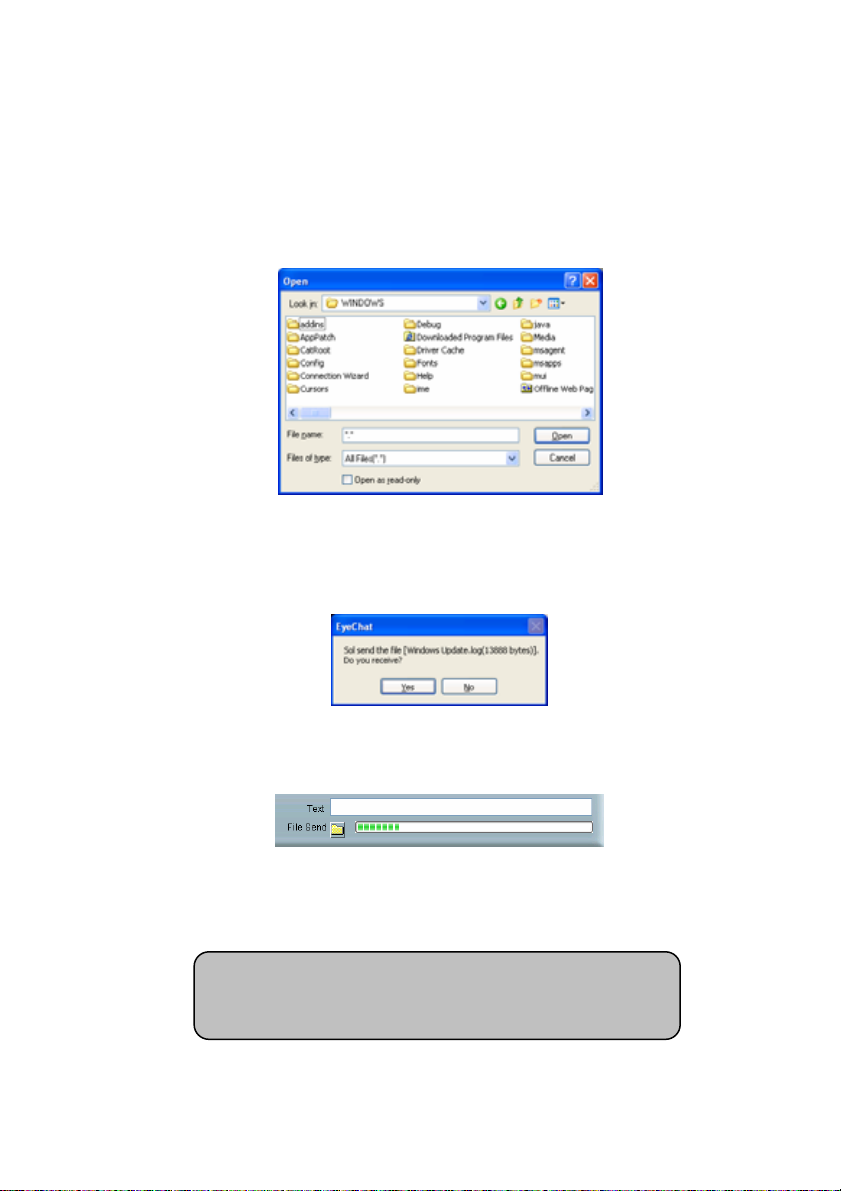
• File Sending
If you press “File Send” button, the below window will appear to
select the file to send.
When you select the file, the below window will appear on your
partner’s side.
The partner should press “Yes” button to receive the file
• It is possible to enjoy video chatting while
sending files.
• Please refrain from sending files over 60M.
32
.
Page 33
FAQ
Q
What can I do if I don’t have Window CD even though it requires
to insert window CD.
A
Window CD is necessary. You should prepare installed window CD
like Windows 98, Windows 98SE or Windows ME to complete the
installation properly.
Q
The Hardware certificate warning dialog appears at installing on
Window 2000 and Window XP
A
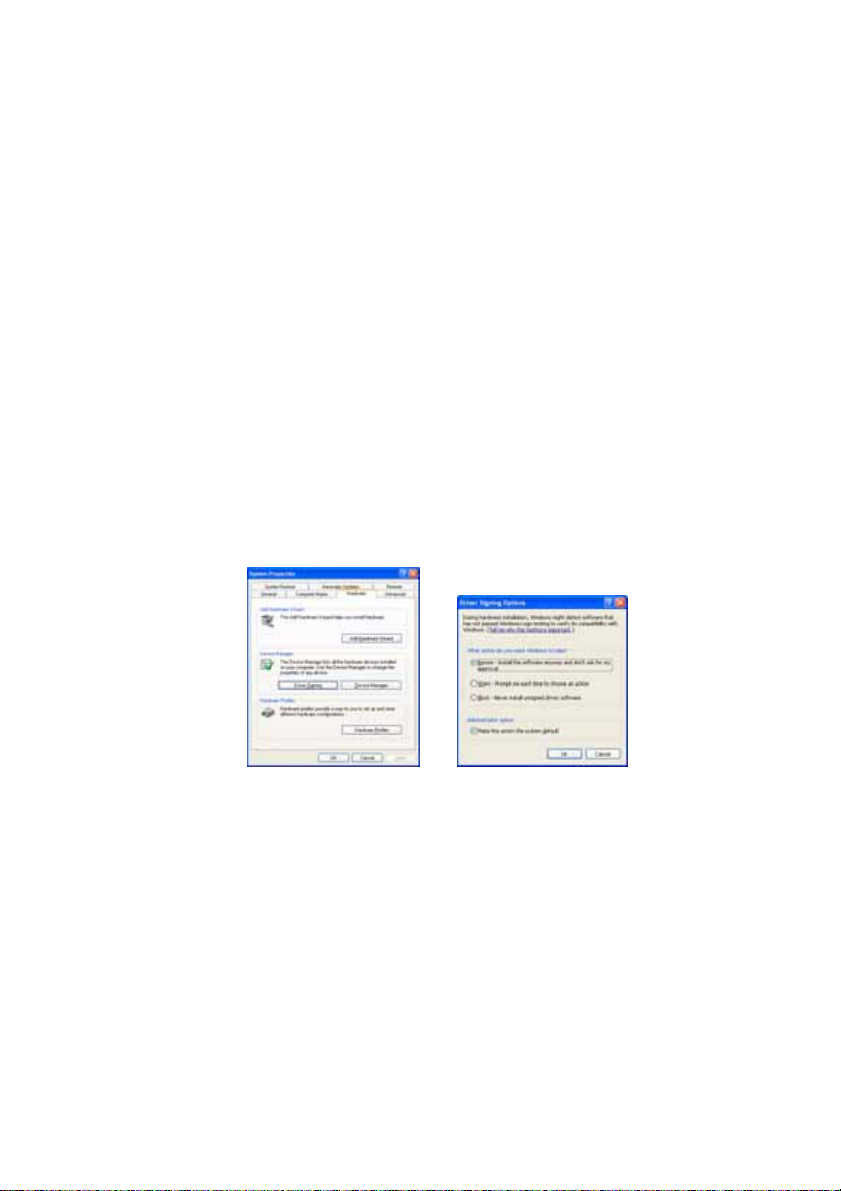
When you install it on Window 2000 or on XP the warning message
“windows logo test“ can appear. It is recommended to ignore it
and continue to complete the installation. In case that you
don’t want to see this message, please follow as the below
screen.
Q
Can not see the screen at video chatting site.
A
Please check the setup conditions of Camera and resolution menu.
You should check the camera wheather it recognizes image without
problem and adjust the resolution properly.
Automatic connection will be failed if there is any error
caused at the automatic installation. In this case, you are
required to do download and install the chatting program of the
site manually.
33
Page 34

Q
The screen is invisible.
A
First of all, you should check if the PC camera is properly
connected to PC through USB port. If everything is ok, please
refer to the below mentioned procedure;
Windows98/98SE/ME Start
Windows2000 Start
WindowsXP Start
1. In case that driver is installed at the imaging device.
a. You should open the imaging device to check if the camera
name is properly displayed.
b. Please check if there is yellow exclamation mark.
c. If there is yellow exclamation mark, please remove the
driver and reinstall it.
2. In case that driver is not installed at the imaging device and
other unknown device is installed
a. Please remove the unknown device or others.
b. Then remove the driver and reinstall it.
3. In case that imaging device is not displayed.
a. Please Check if Universal Serial Controller is at Device
Manager.
b. In case that it is not installed.
You should turn on USB device at BIOS.
c. In case that it is installed, Please try to use another
port.
If it still doesn’t work even though you try above
mentioned instructions, PC camera may be out of order. Please
contact with the distributor or head office of MTP
⇒
Settings ⇒ Control Panel ⇒ System ⇒ Device Manger
⇒
Settings ⇒ Control Panel ⇒ System ⇒ Hardware ⇒ Device Manager
⇒
Control Panel ⇒ Switch to Classic View ⇒ System ⇒ Hardware ⇒ Device Manager
• In case that you have used other PC
camera, you should get rid of its driver
before you install WebCAMeye Light PC
camera driver.
• A/S
Company : Mobitechplus Inc.
Address : #203, 32-5, Songwol-Dong, Jongno-
Gu, Seoul, Korea
Tel. : 82-2-730–3722
Fax. : 82-2-730-3726
34
 Loading...