

Page 1
1
Page 2
2
Welcome to use U11
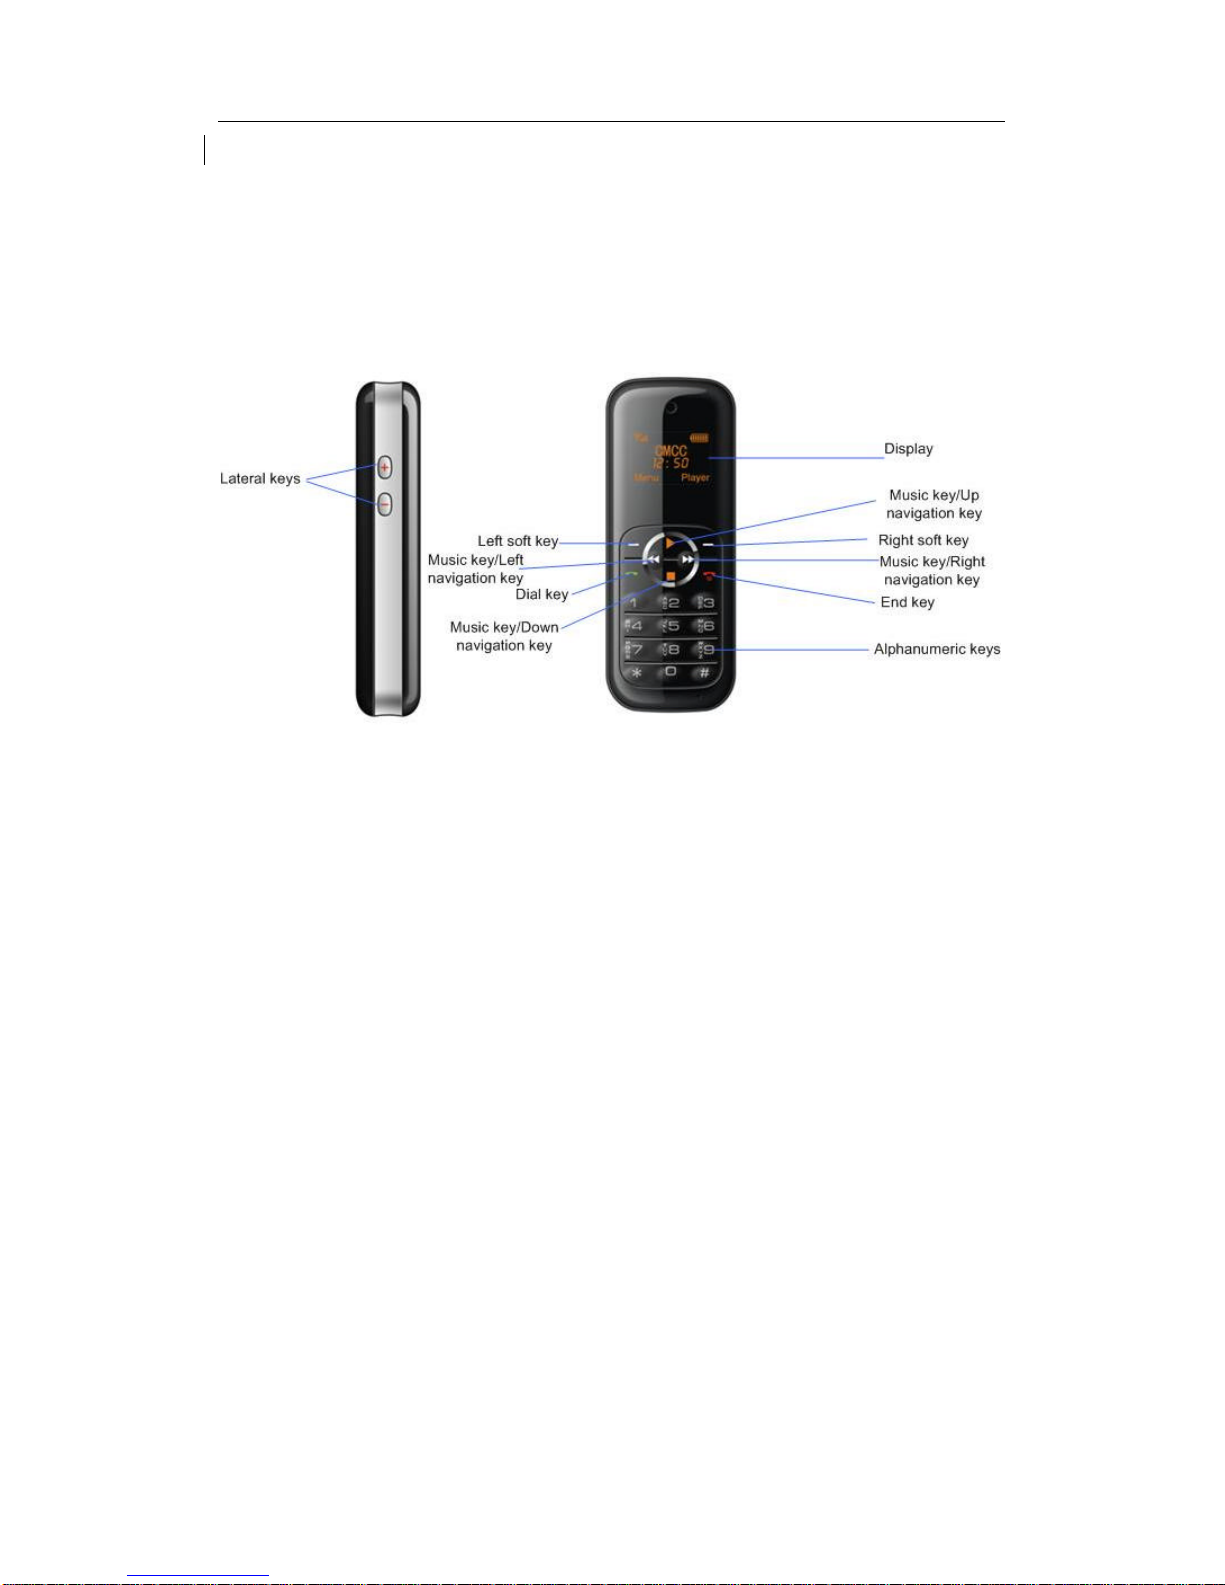
Discover Your Phone
How To...
Switch the phone On/Off Long press the End key
Make a call Enter the phone number using the alphanumeric keypad and press the
dial key or choose Options to open the menu.
Make a long distance call short press * key twice to enter the "+" sign, and then enter the
country code, area code and phone number
End a call Press right soft key or end key to end the call
Answer a call When somebody is calling you, press Answer to pick up the call
Reject a call When somebody is calling you, press right soft key or end key to reject
the call
Call hands-free You may select speaker according to the instructions on the phone
screen
Page 3
3
Lock/Unlock : Press the Left Soft key and then the * key to lock the keypad; When the
phone is locked, press the Left Soft key and then the * key to unlock the keypad
Access to Main Menu Press Left Soft key in idle mode
Access to Media player Press Right Soft key in idle mode
Introduction to shortcut keys
In idle mode:
Press and hold Numeric key [1] to call the voice mailbox.
Press and hold [#] to switch between Normal mode and Silent mode.
Please refer to Speed Dial to assign a key (numeric key [2] to [9]) to a phone number.
Then long press the key assigned to the phon e number in idle mode to dial the number.
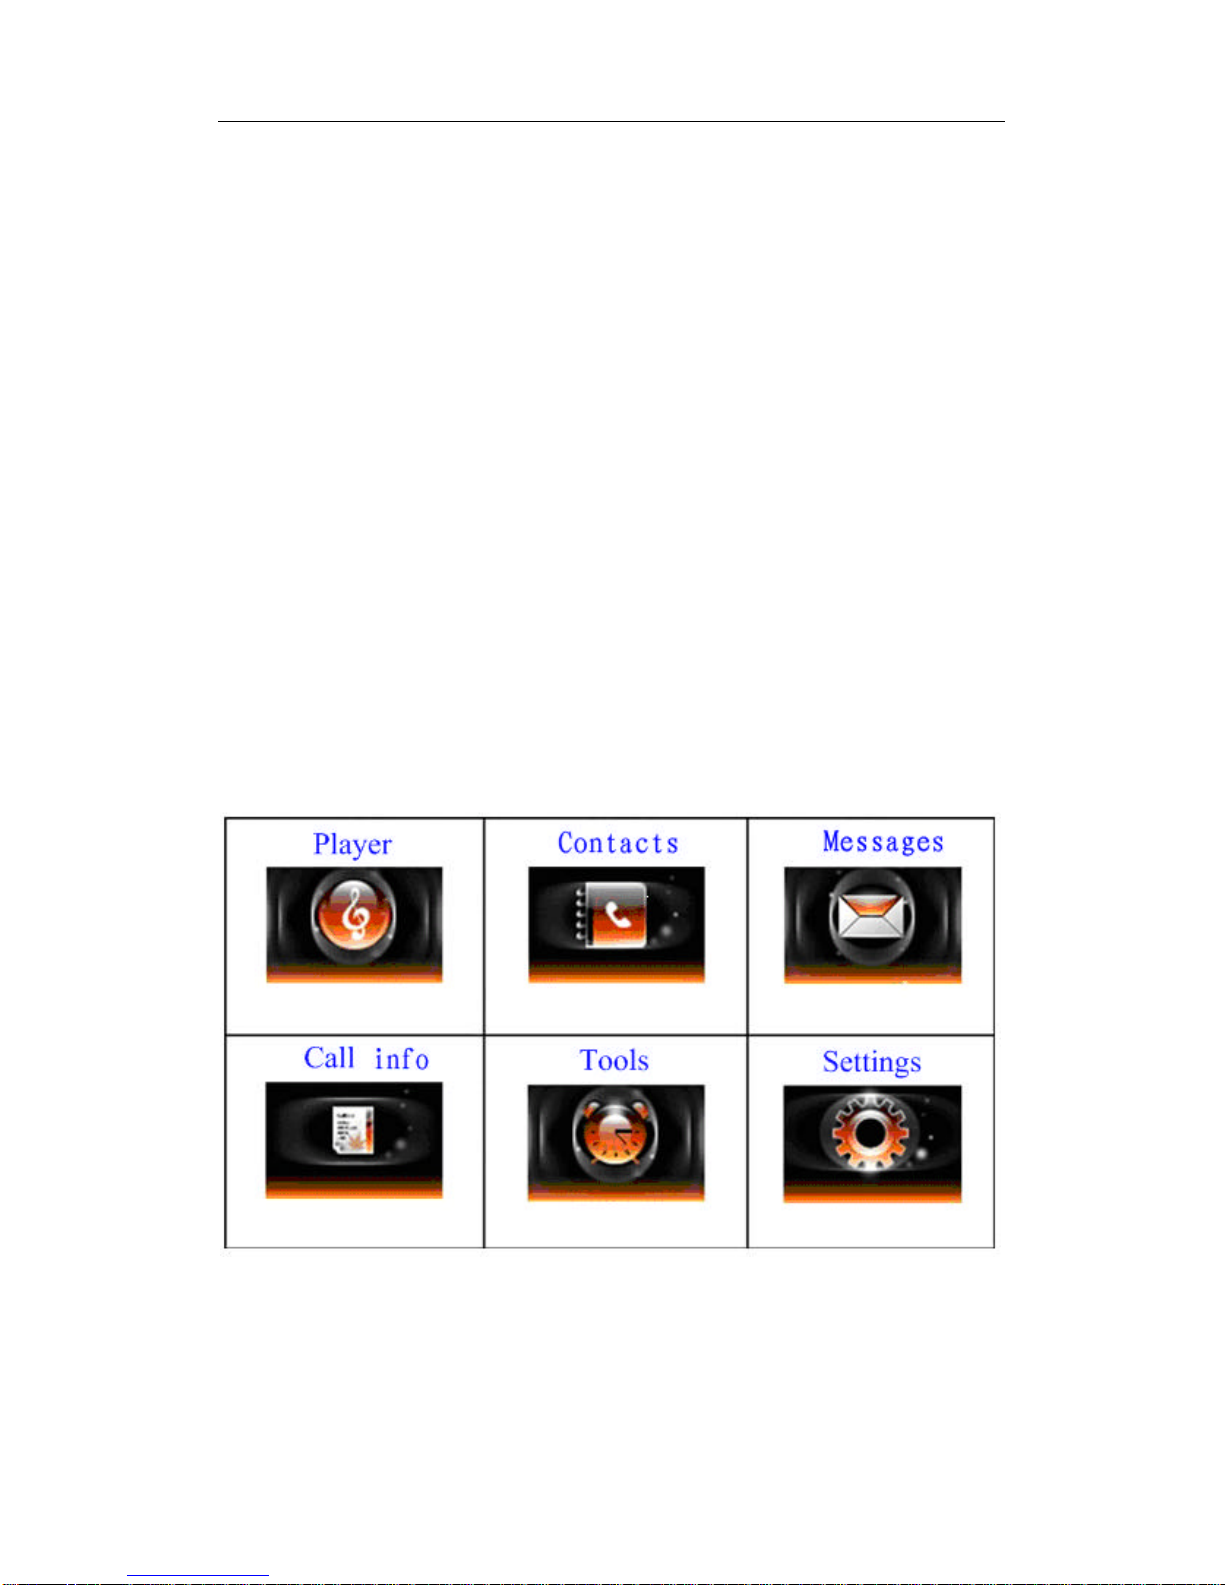
Main menu
You can access different features of your mobile phone from the Main menu.
In idle mode, press the Left Soft key to access the Main menu, select the needed function
using navigational keys, and press the Left Soft key again to confirm your selection.
Page 4

4
How to use this manual
This user manual strives to provide you with concise and complete information regarding
your U11.
Discover Your Phone The current section presents an overview of your mobile phone
and information on the most commonly used features.
Chapter 1: Information on how to set up your mobile phone for the first time:
installation of the USIM card, battery, etc.
Chapter 2: How to make and answer calls, as well as some frequently used call
functions.
Chapter 3: How to enter text using a keypad.
Chapter 4 to 10: Description of the main features of this phone.
Other sections Icons & Symbols, Precautions, Troubleshooting and Authentic
Accessories.
1. Getting started
Please read the safety instructions in the Precautions section before use. Before you start
using your phone, you must insert a valid USIM card supplied by your GSM operator or
retailer. The USIM card contains your subscription information, your mobile phone number,
and a small quantity of memory in which you can store phone numbers and messages.
Inserting the USIM card and battery
Make sure to keep your USIM card out of the reach of Children.
Consult with your USIM card dealer about the availability of USIM card service and other
uses. The USIM card dealer can be either service provider, network operator or other
dealers.
Make sure your mobile phone have been switched off and disconnected with the battery
charger before removing the battery.
Note: Switch off your phone, disconnect the charger and links with any other
devices, before removing the phone cover. When replacing the cover, be careful not to
touch electronic components. Make sure the cover is in place when your phone is being
used or ready to use.
Page 5
5
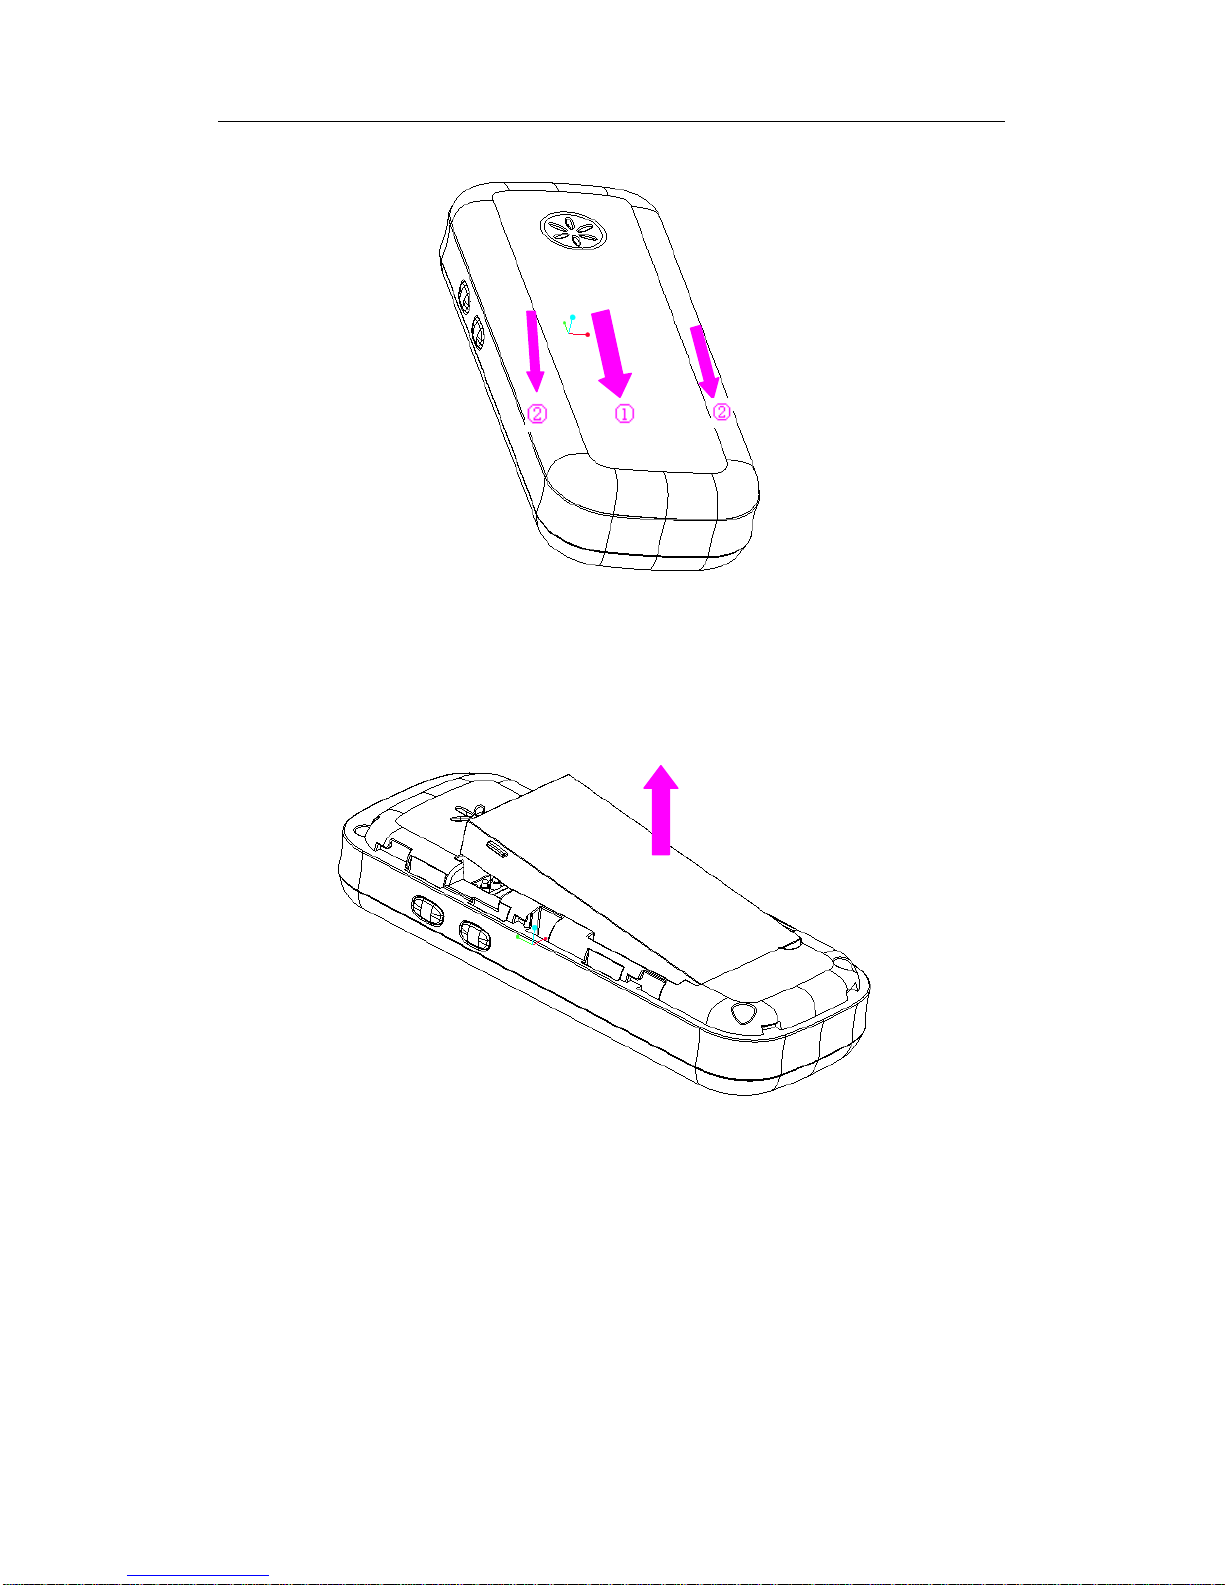
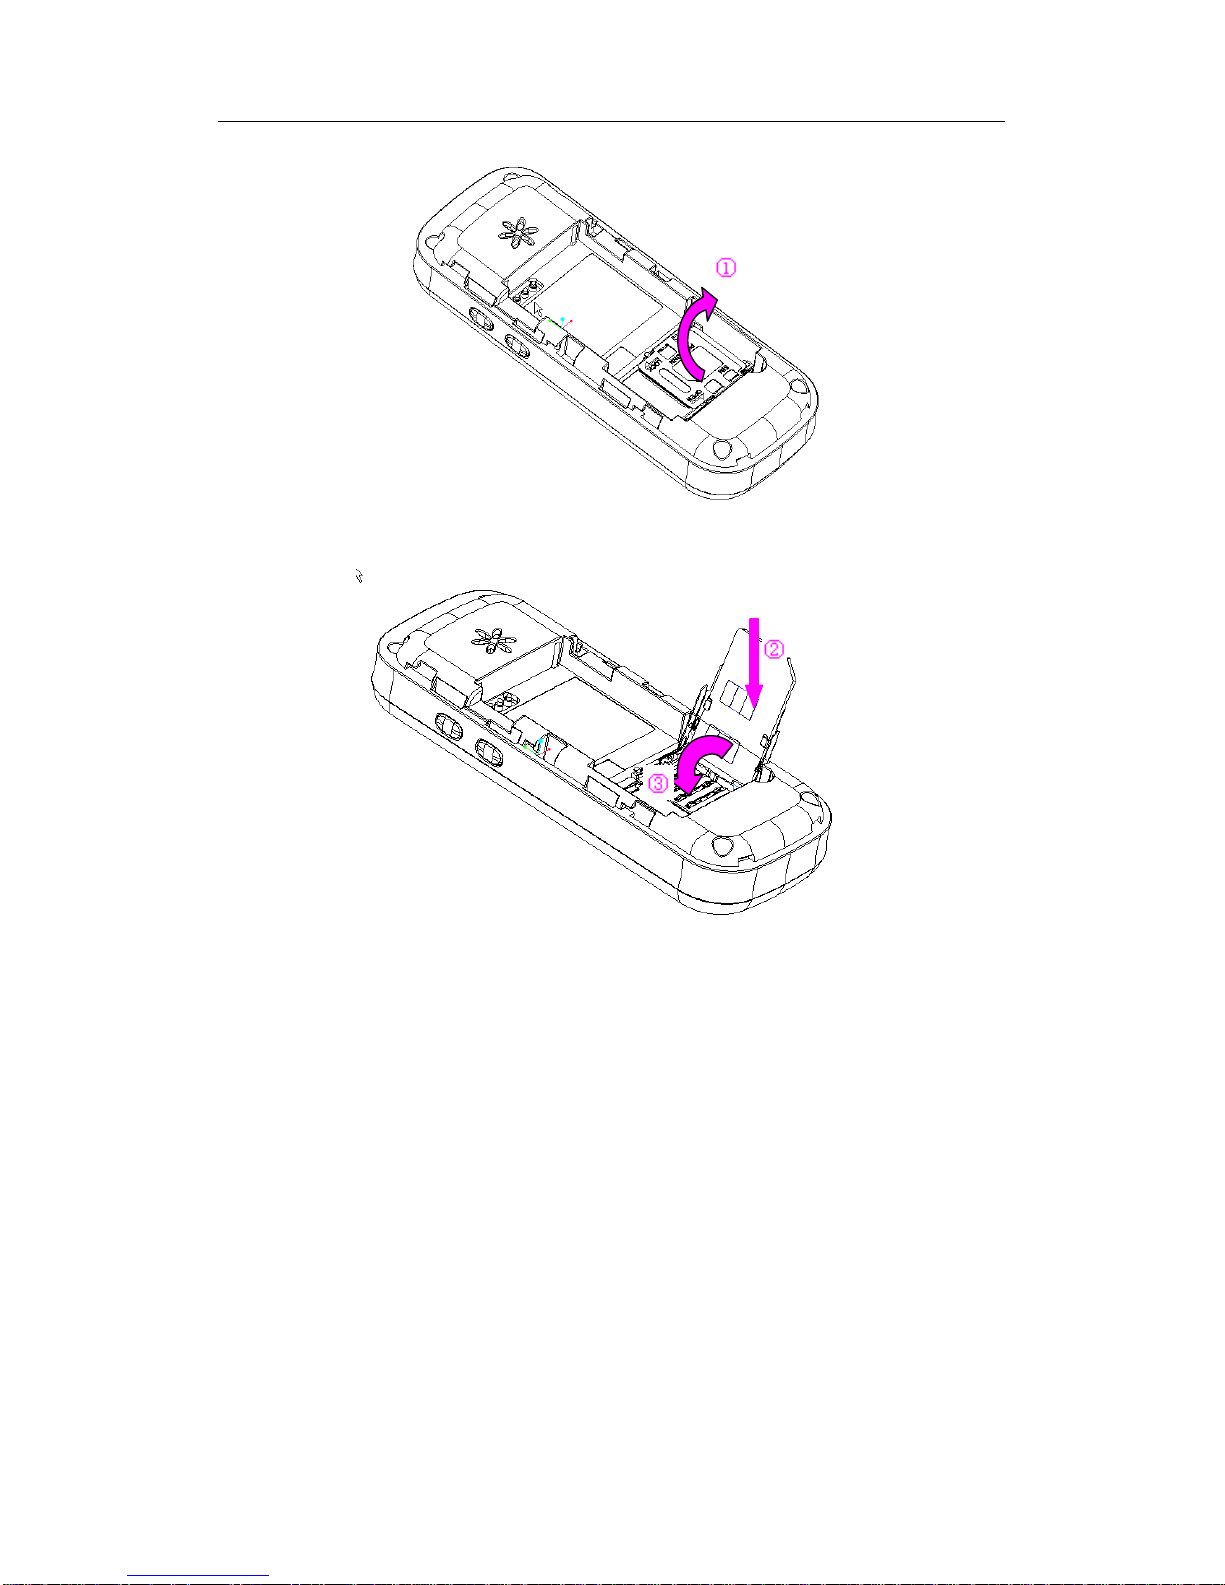
Remove the back cover
Hold the phone with the back facing upward as illustrated. Push forward the back cover
lock with one hand and remove the back cover in the direction as shown with the other
hand.
Lift up the battery and remove it from its slot.
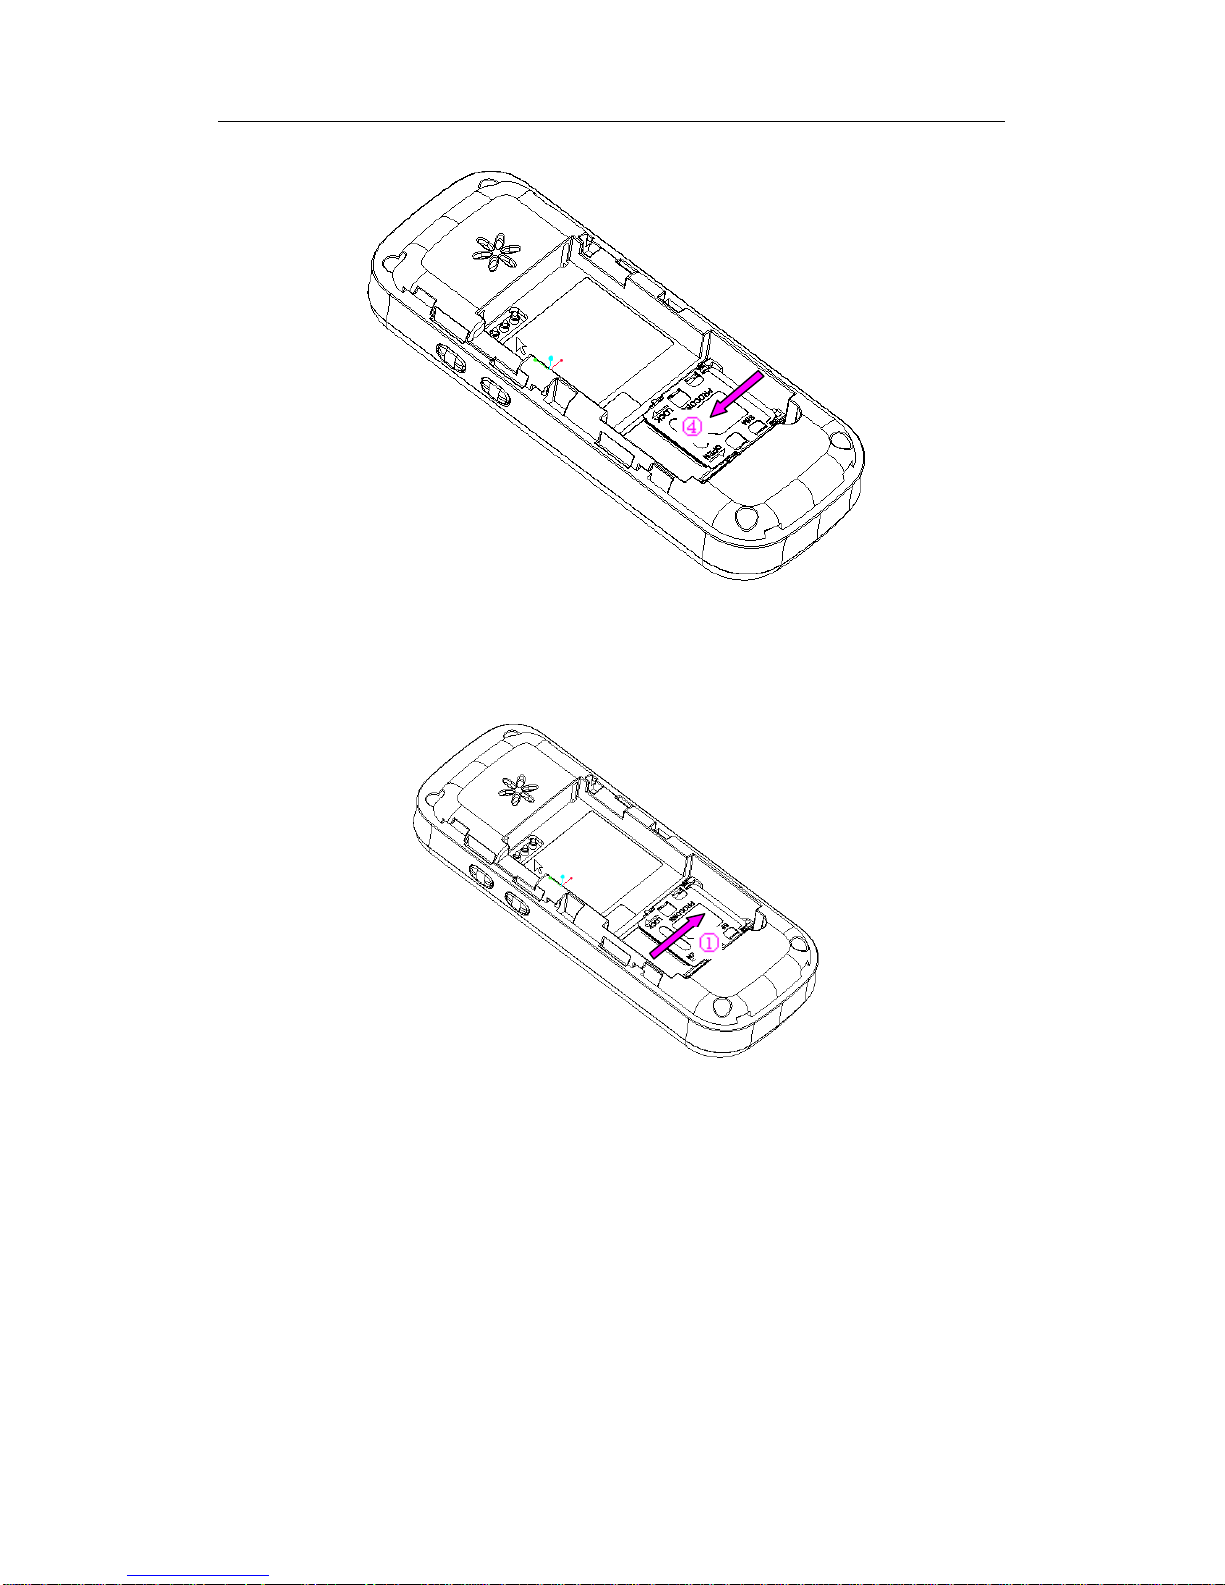
Make sure that the clipped corner of the USIM card is facing the correct direction (as
shown) and the metallic contacts are facing downwards. Slide the USIM card into the card
slot until it stops.
Page 6
6
Page 7
7
To remove your USIM card, open the card slot and push the card out as directed by the
arrow.
Page 8
8
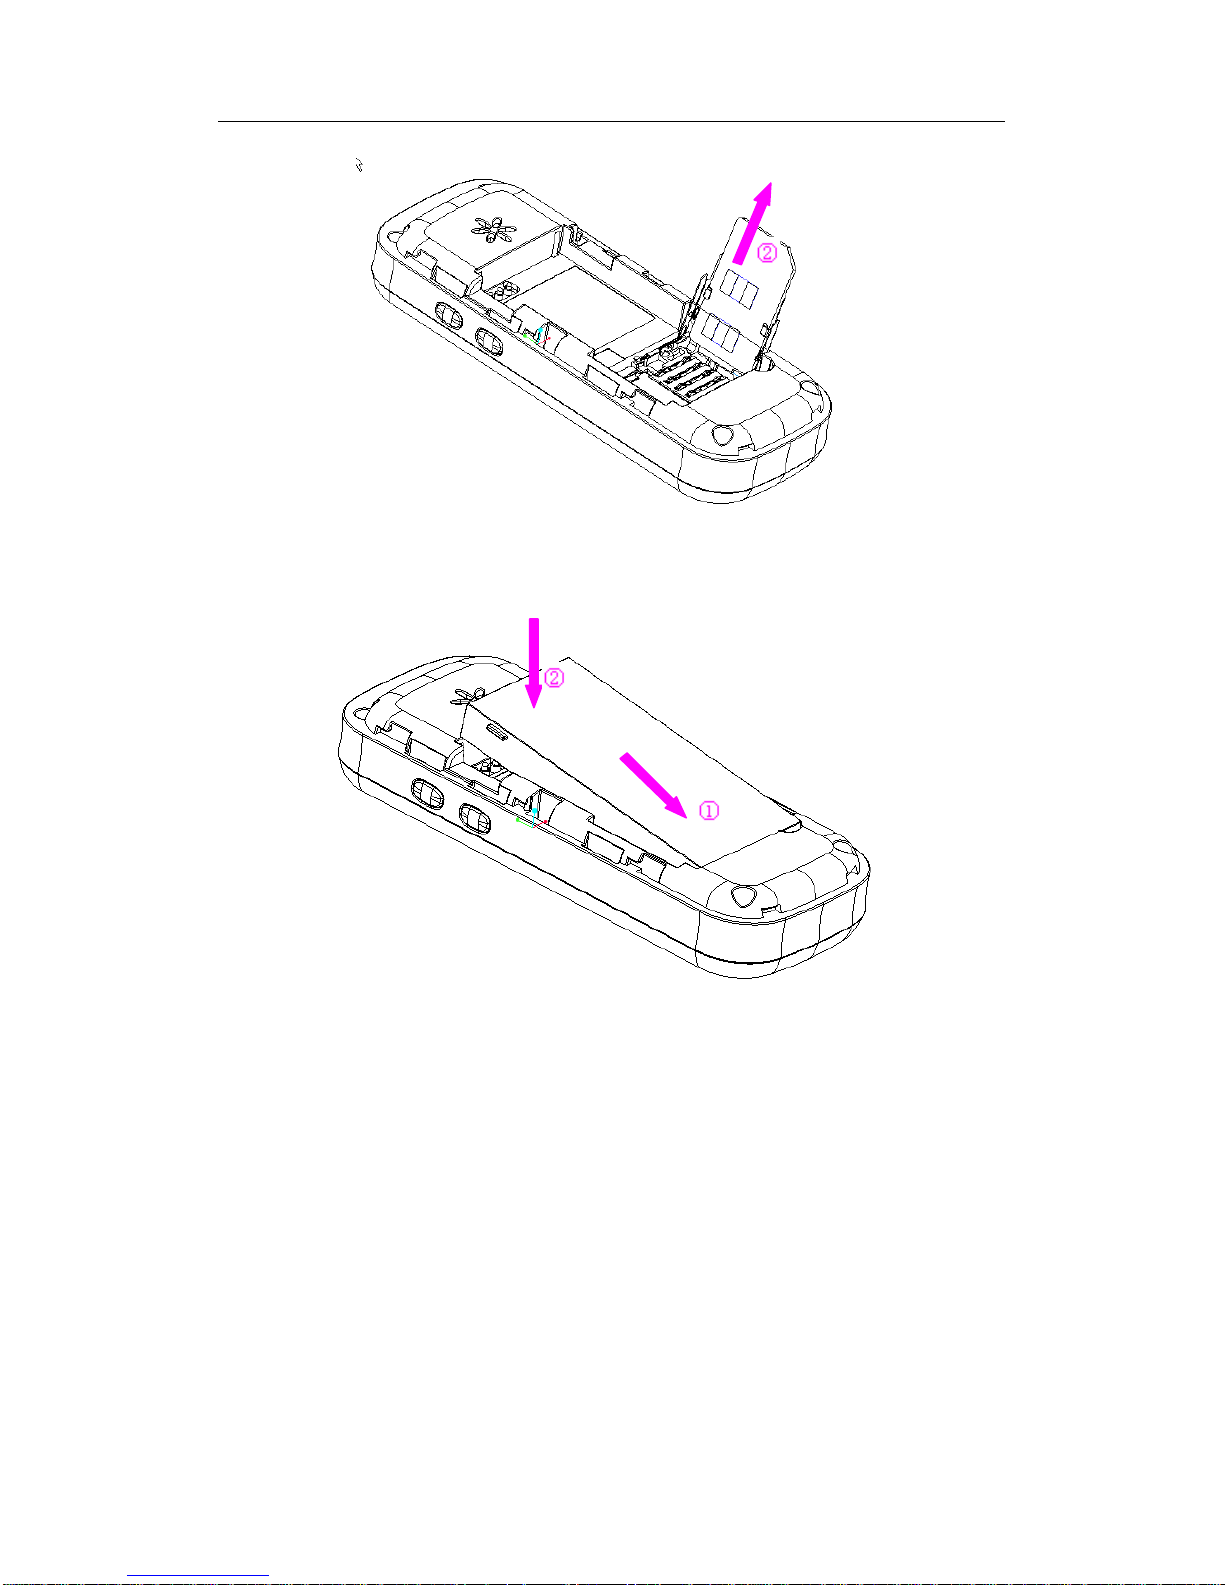
Insert the battery into the slot as shown.
Slide the back cover into its slot until it locks into place.
Page 9
9
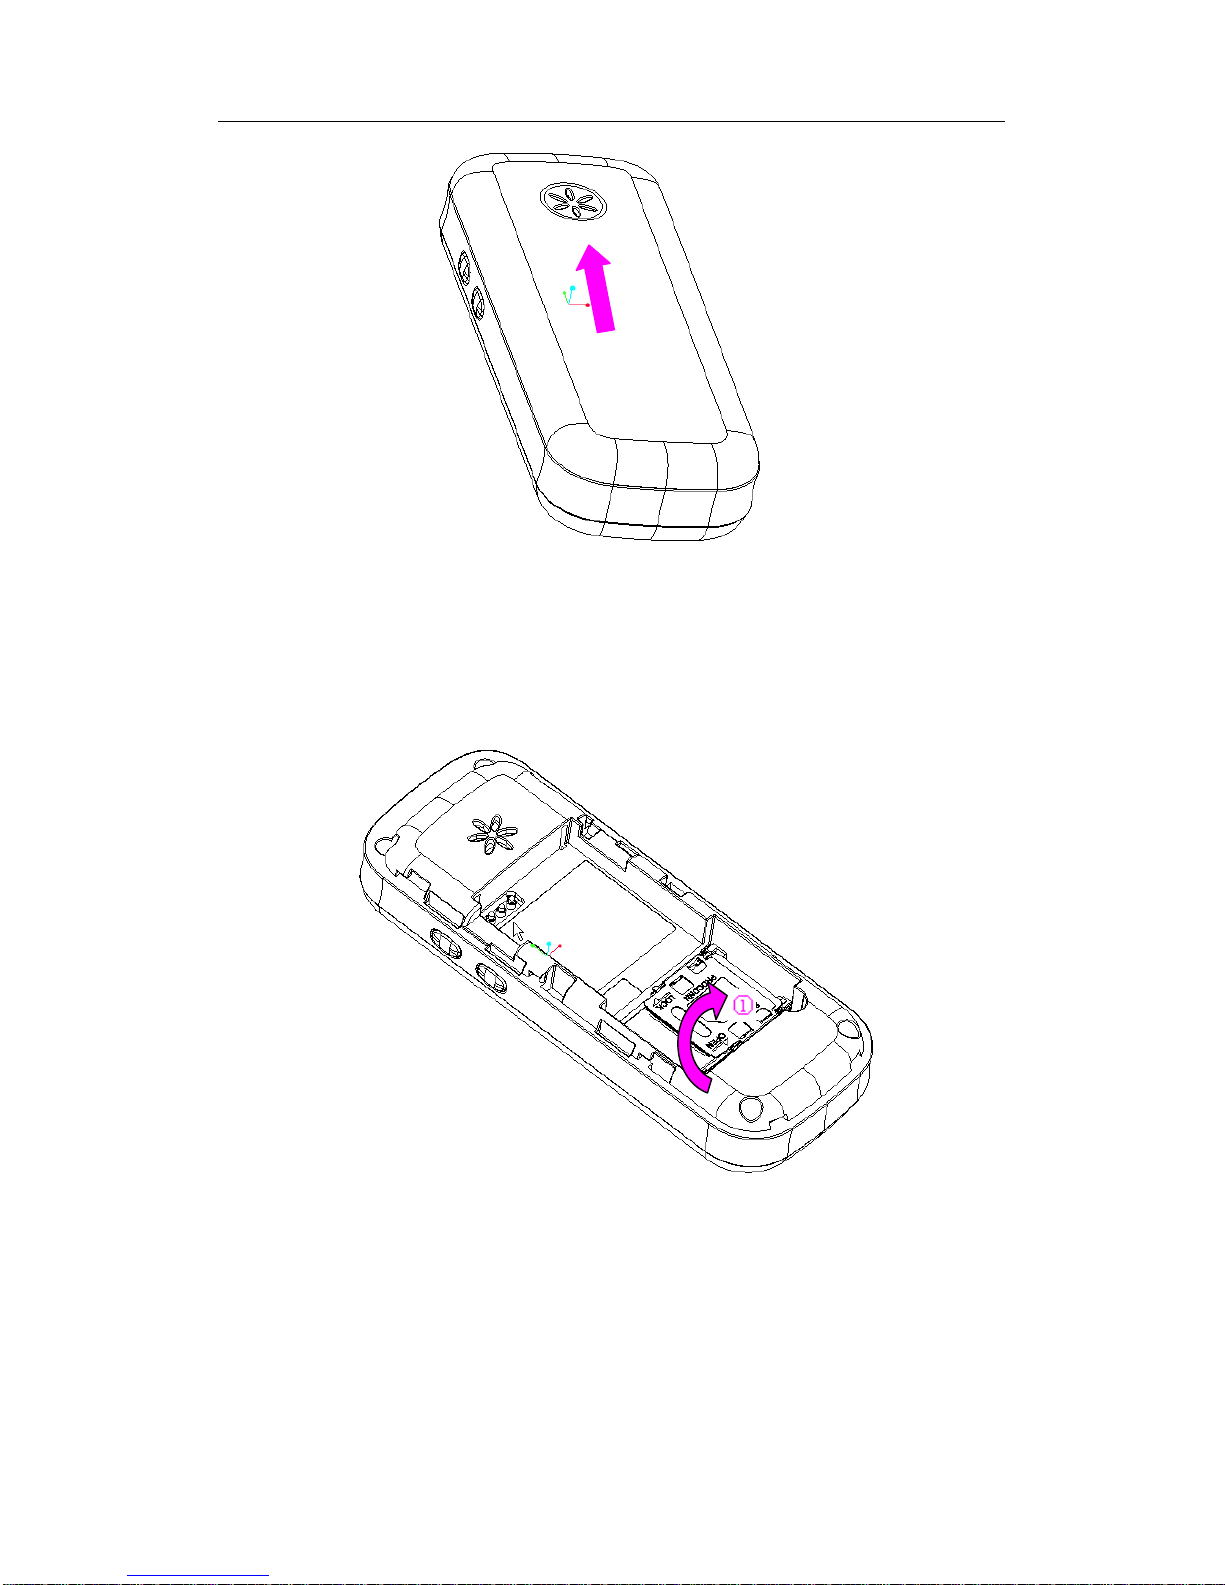
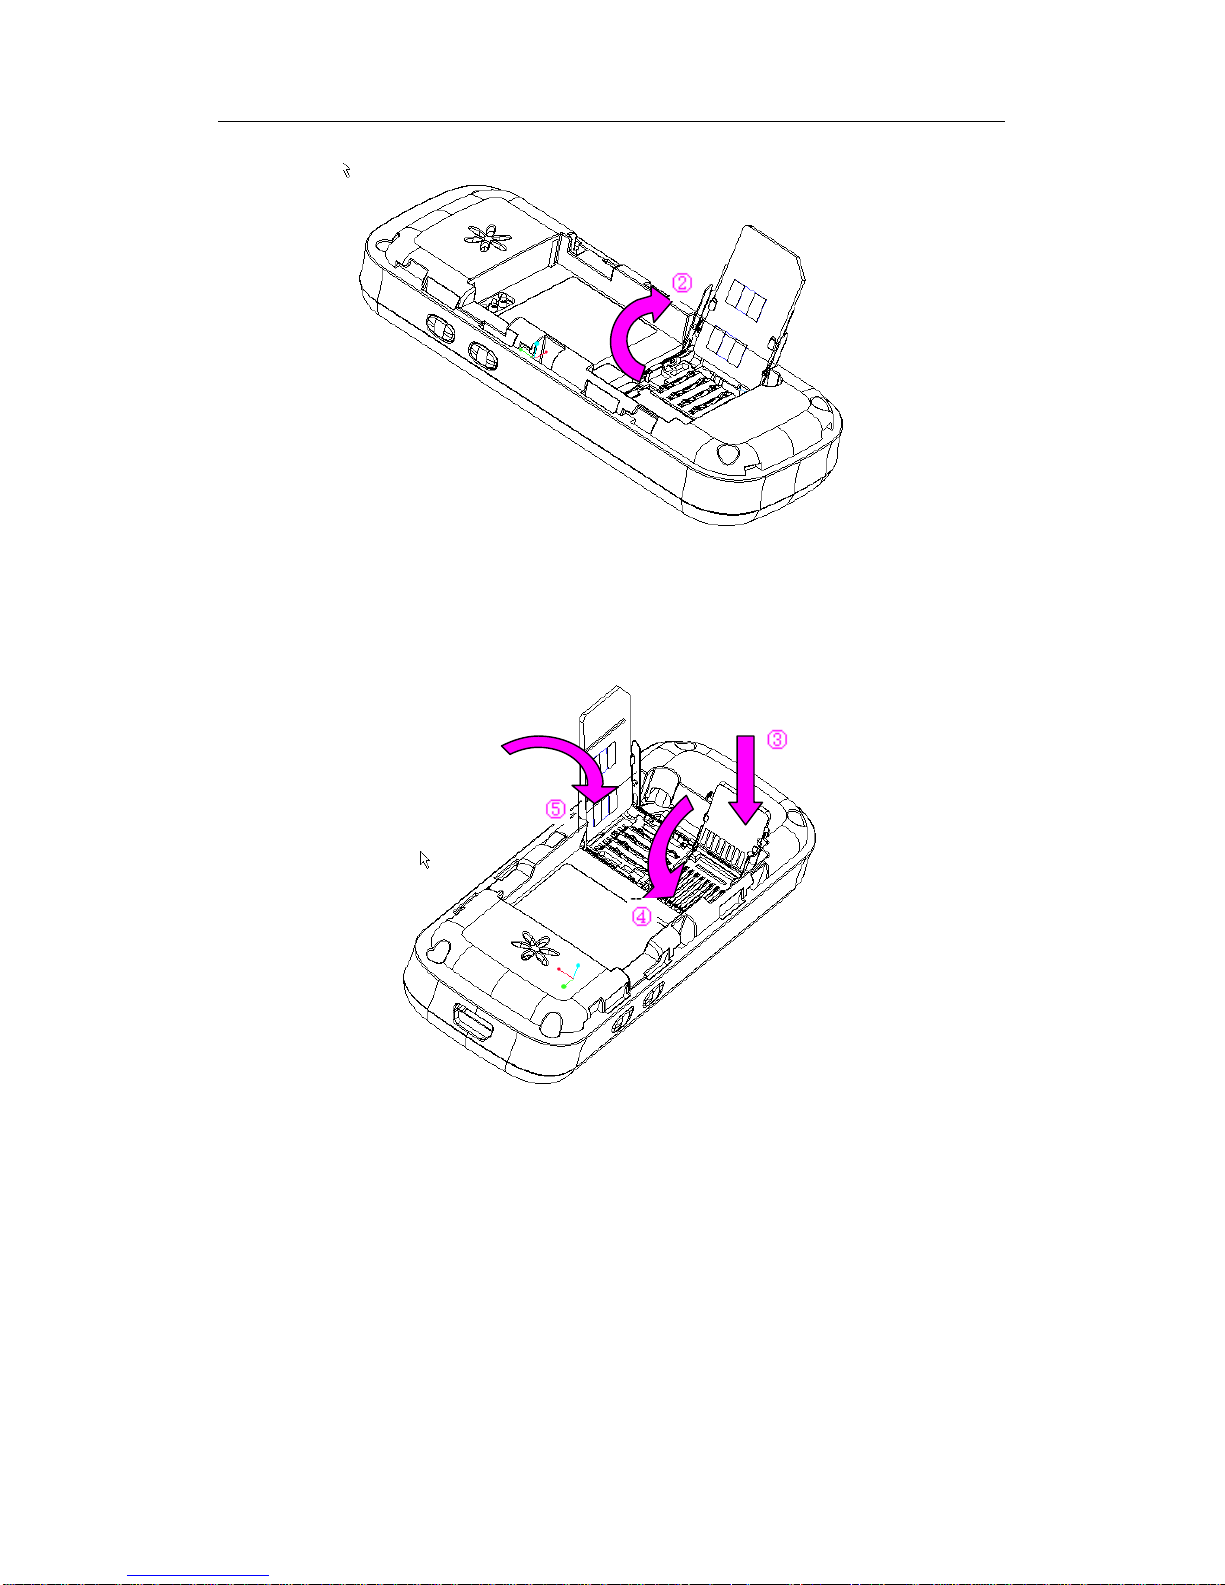
Insert the memory card
When you insert the memory card, push the card slot cover with your finger as illustrated.
Lift the card slot cover up.
Page 10
10
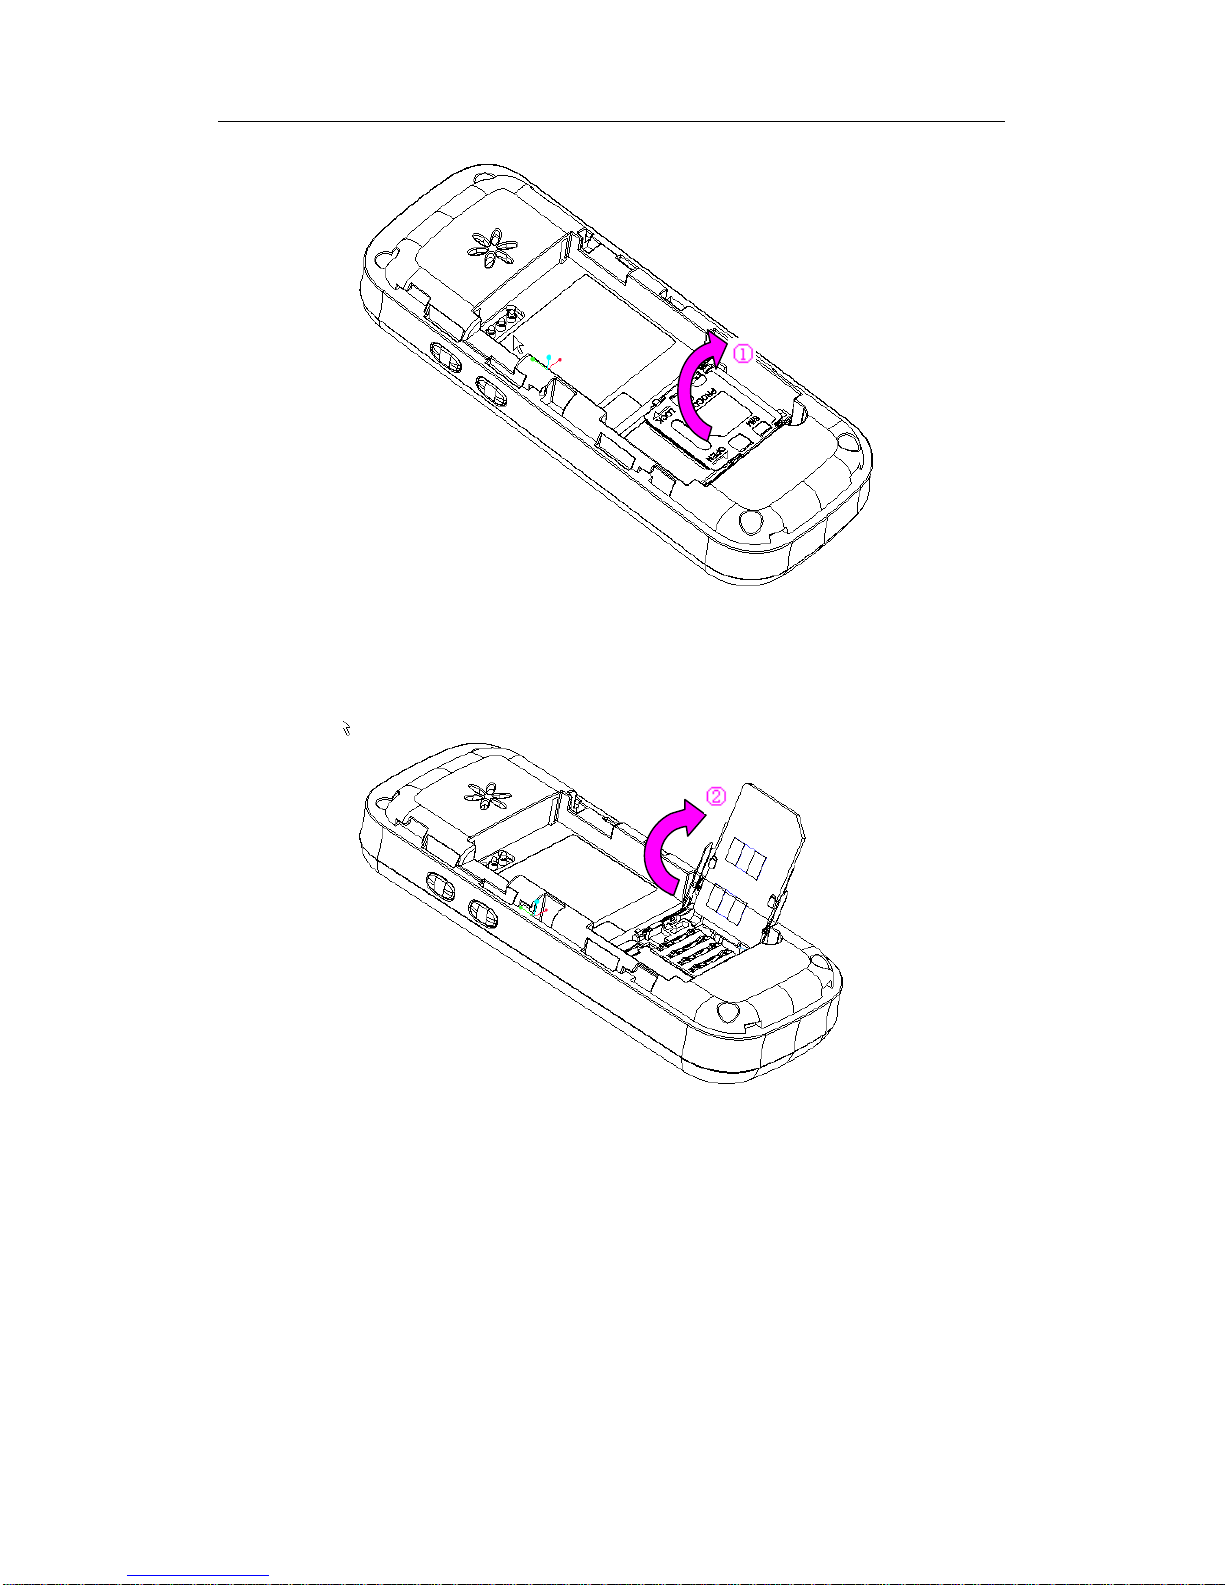
Place the memory card into the slot. Close the card slot cover, lock the memory card.
To remove your memory card, push the card slot cover as illustrated.
Page 11
11
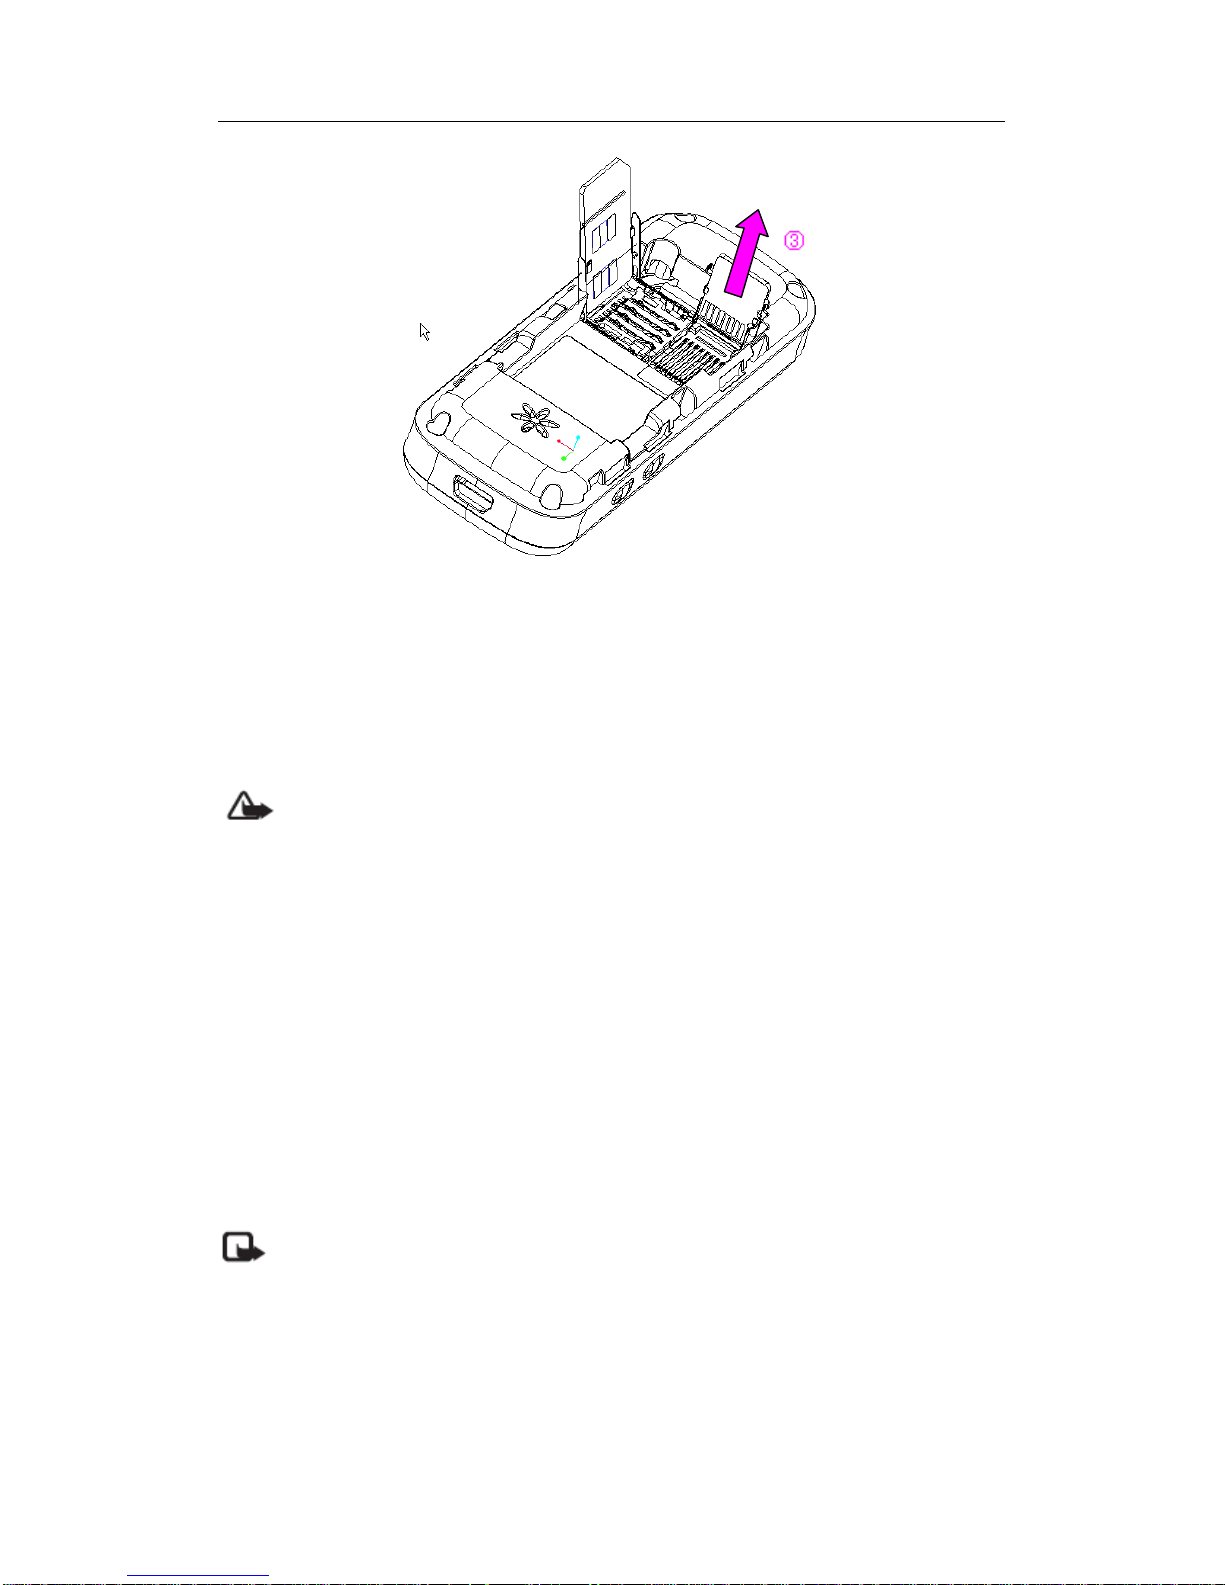
Lift the card slot cover up.
Take out the memory card.
Page 12
12
Charging the battery
Warning: Only batteries, battery chargers or accessories designed for this specific
model can be used. Using other batteries, battery chargers or accessories may make the
phone authentication or warranty clauses null or valid, and even result in dangerous
situations.
Before you charge the battery for your phone, check the model of the battery charger at
first!
Plug the battery charger into a standard AC power socket.
Then insert the connector plug of the battery charger into the slot at the bottom of your
phone.
As it is required that the battery should be properly treated and may need to be recycled,
please check the battery type as indicated on the label. Consult with your local recovery
center to know the correct approach to disassemble. Do not disassemble the battery near
the fire in order to avoid explosion.
Note: Charging time depends on the charger and battery used.
Contact your dealer for availability of the authentic accessories. When you disconnect any
accessories with their power supplies, the correct operation is to hold and pull out the plug
instead of tug the power cable.
Page 13

13
Switch on/off the phone
Warning: Do not open your phone wherever the mobile phone is prohibited, or the
operation may result in interference or cause danger.
Long press the End key to switch on or off the phone.
In order to prevent unauthorized access to your USIM card, you may configure a
USIM card lock, which is provided with the USIM card. Once configured, you will be asked
to enter PIN code when you switch on the phone. See “Security” for more information.
Note:
Do not switch on your phone where mobile phones are not allowed.
If you enter incorrect PIN codes 3 times in succession, your USIM card will be
blocked. To unblock it, you must obtain the PUK code from your network operator.
2. Calling
2.1 Make a call
In the idle mode, enter the phone number. If you make a mistake, press the Right
Soft key to clear.
Once finished, press Dial key to make a call, or Options to enter the menu.
Press right soft key or end key to end the call
Remarks:
For an international call, short press * key twice to enter the "+” sign, and then enter
the country code, area code and phone number.
To dial a number that has already been stored in the phonebook, you may use the
phonebook to make a call.
Make a second call (Network dependent)
During a call with Party A, you can enter and dial Party B’s number in the way as
usual. Once connected, Party A will be put on hold automatically. In this mode, you may
switch between the 2 calls through the indication in the screen.
Page 14

14
Call Voice Mailbox (network dependent)
In the idle mode, long press numeric key [1] to call your current voice mailbox. To
edit the number of your mailbox, refer to “Voice Mailbox”.
2.2 Answer or reject a call
When somebody is calling you, press Answer to pick up the call
If it’s an unwanted call, press right soft key or end key to reject.
Answer a second call (Network dependent)
If the network supports this service, you may answer a second call during the
current call. The current call will be put on hold automatically.
2.3 Adjust earpiece volume during a call
Use lateral keys or the left/right navigation key to adjust earpiece volume during a
call.
3. Text entry
3.1 Icons for input methods
The icons for input methods that are currently available will be displayed at the top of
the screen. The following are the names and icons of those input methods.
IMe English
IMe abc
IMe ABC
IMe123
IMe Italian
IMe German
Note: Not all the input methods can be available at all times. Refer to the icons on the
screen to check the input method available at present.
Page 15

15
3.2 Switch input mode
During text editing, you can short press # to switch input mode until the icon for
your desired input method appears at the top portion of the screen.
Press * key to switch to symbol list input.
IMe English
You can key in any letter with a single key press using the predictive text input.
Press key 2 to 9 to input a word. Each letter’s input only needs one press. Words change
with each press. For example, press [4], [3], [5], [5] and [6] to write hello.
Press [0] to insert a space. Press [1] to input the most common punctuation marks and
special characters. Press * key to select more special characters and punctuation marks.
Press Clear to delete letters one by one. Press and hold Clear to delete all inputted
letters.
IMe ABC or IMe abc
Press a number key [1] to [9] repeatedly until the desired character appears.
Note that there are more characters available for a number key than are printed on the
key. If the next letter is located on the same key as the present one, wait until the cursor
appears. Or, press the Navigation key to confirm the letter input and then continue to input
the next letter.
Press [0] to insert 0 or a space. Press [1] to input the most common punctuation
marks and special characters. Press * key to select more special characters and
punctuation marks.
Press Clear to delete letters one by one. Press and hold Clear to delete all inputted
letters.
IMe 123
Number input mode. To insert a number, press the key corresponding to the desired
number.
Page 16

16
IMe Italian
Press key 2 to 9 to input a word. Each letter’s input only needs one press. Words
change with each press.
Press [0] to insert a space. Press [1] to input the most common punctuation marks
and special characters. Press * key to select more special characters and punctuation
marks.
Press Clear to delete letters one by one. Press and hold Clear to delete all inputted
letters.
IMe German
Press key 2 to 9 to input a word. Each letter’s input only needs one press. Words
change with each press.
Press [0] to insert a space. Press [1] to input the most common punctuation marks and
special characters. Press * key to select more special characters and punctuation marks.
Press Clear to delete letters one by one. Press and hold Clear to delete all inputted
letters.
4.Player
This option allows you to enjoy the music you have stored in the phone or the
memory card.
You can play an audio file with the player or set up a play list. The player supports
mp3,midi,amr,wav, acc,mmf, imy . Background playing is supported.
4.1 Playlist
To select a track, select Playlist. The playlist will list all of the tracks.
Playlist Options:
Page 17

17
Open: open the playlist to check the tracks.
Play: play the tracks listed in the playlist.
Delete: delete the playlist.
Rename: rename the playlist.
New playlist: set up a new playlist.
Refresh playlist: update the tracks listed in the playlist.
4.2 Enter the playlist
After opening the playlist, you may check the tracks listed in the playlist. Use Option to
activate the following options:
Play: play the tracks listed in the playlist.
Add music: select audio files to add into the playlist.
Delete from list: delete the selected track from the playlist.
View details: check the details about the tracks.
4.3 Library
Enter the media library. You may choose different types to listen to all the music, all
albums or all artist, and the tracks listed in the playlist will be arranged according to the
types.
During the first time of opening the media library, you may choose to update the
library to locate the audio files in the phone or memory card. This may take a while,
especially when you have mass audio files.
4.4 Settings
The music playing settings can be changed.
Play mode: the available modes are Normal, Repeat all, Repeat single file, Play all list,
Repeat all list.
Random: music will be played at random.
Equalizer: the available equalize rs are Normal, Rock, R&B, Pop, Hip-hop.
4.5 Use the Media Player
In the media player interface, the following shortcut keys are available:
Page 18

18
Up: play or pause the playing.
Down: stop playing.
Left: short press to play the previous one; press and hold to fast backward.
Right: short press to play the next one; press and hold for fast forward.
Lateral keys: short press to adjust the volume.
In the media player interface, select Option to activate the following menus:
Volume: enter to volume adjust interface to adjust volume.
Add music: select audio files to add into the playlist.
Delete from list: delete the track from the playlist.
Playlist: select the playlist.
Library: enter to the media library interface.
Minimize: hide the media player and enter into the background playing status.
Settings: enter into the player settings.
5. Contacts
This menu allows you to manage the names and telephone numbers of your friends,
family and colleagues. Your mobile phone has two storage areas for your contacts: the
USIM phonebook and the onboard phonebook. Your phone can store up to 500 contacts.
5.1 Contact list
This option allows you to view the list of your contacts in the phonebook.
Select Details to view the details about the contact. Select Options in details interface to
activate the following functions:
Edit: edit the details of the contact.
Copy: copy the contacts to the phone or USIM card.
IP call: make an IP call.
Edit before dial: the contact’s number can be edited before calling.
Send card: send the contact’s information in the form of a name card.
Send a SMS: send a message to the contact (SMS).
Delete: delete the records of the selected contact.
Page 19

19
5.2 Search
You may use this option to search a contact from the phonebook.
Input the target contact, select search, the phone will display the results.
5.3 Add Contact
You may use this option to add a new contact into the phonebook.
Select phone or USIM card.
Input the name and number of the contact.
The contact information will be stored in the contact list after the input.
5.4 Copy
You may choose to copy contacts from: USIM to phone or Phone to USIM. You may
choose to copy the contact information one by one or all in once.
5.5 Delete
This feature allows you to delete all contacts and their details from the phone or the
USIM card.
The available deleting methods are delete one and delete all.
5.6 Speed dial
Select Settings>Speed Dial. This feature allows you to assign the numeric keys ([2]
to [9]) to your 8 most frequently dialed numbers.
Choose from the keys [2] – [9]. Dialing the key [1] will call the voice mailbox.
From the contacts list, select the contact you need, or enter a new number for the
contact.
In idle mode, long press the numeric key as specified to start dialing.
Page 20

20
5.7 Sort
Select Settings>Sort, this feature allows you to set the sort of the contact list.
The sort consists of:
All: your contacts list will display all contacts you have stored in the phone and the USIM
card.
Only phone: your contacts list will only show the contacts yo u have stored in the phone.
Only USIM card: your contacts list will only show the contacts you have stored in the
USIM.
5.8 Memory status
With this feature, you can check the number of your contacts in your phone and the
USIM card.
5.9 My Name Card
This feature allows you to create your name card and send it to others.
The creating steps are the same as adding a new contact to the phone’s memory.
Select Option after saving to use the following options:
Edit: edit the information of the name card.
Send: send the name card via SMS or Bluetooth.
Delete: delete the name card.
5.10 IP number
With this feature, you can edit and store your IP numbers.
5.11 FDN
This option will show a list of contacts that have been specified with the fixed dial
number (FDN). To turn on the settings, you will be asked to input PIN2 code.
In FDN, your phone can only dial the specified telephone number.
Page 21

21
5.12 SDN
This option shows a list of special dialing numbers (SDN) provided by your service
provider. This option is available only when your USIM card supports SDN.
6. Messages
SMS (Short Message Service) lets you send or receive text messages. Voice mailbox
and Cell broadcast features are also available.
Note: If the delivery report in the SMS settings is activate d, after the message being
sent, a report might be display on the screen. This indicates that the message has been
sent to the message center number pre -set in your phone. But it does not mean the
recipient has received the message. For more details about the SMS, consult with your
service provider.
6.1 Create, edit and send SMS
The maximum number of characters in a text message varies from vendors to
vendors. If a message exceeds the specified maximum number, it will be split and sent for
more than once .
Select Messages > SMS > Write SMS.
Enter the SMS content. You can select Option/Insert template to insert a template
into your text message.
To send the SMS, you man choose to send.
If Save to draft is selected, the SMS will be saved into the Drafts folder.
6.2 Read and reply SMS
When a message arrives, the screen will flash an icon and new event reminder.
If the icon , or appears, this me ans the storage space in the phone or the
Page 22

22
USIM card or phone and USIM card has been used up. You need to delete some
messages in order to receive new ones.
Select Read to read the message, or Back to read it later. The SMS will be stored
in the Inbox.
When you have read your SMS, you can select Option to reply, forward, call back,
retrieve number, copy to phone/USIM card or delete the SMS.
When you reply a SMS, you will enter the message editor to write the content.
6.3 Sent and Unsent SMS
Sent SMS will be stored in the Sentbox. To read sent information, select Options
to choose forward or delete.
The messages that you have sent unsuccessfully will be stored in Unsentbox. To
read unsent information, select Option to choose send again, forward or delete.
6.4 Draft
Draft message will be stored in the Drafts. You can edit or delete the draft
message.
6.5 Template
You can use the commonly-used sentences as the text message templates. When
editing a text message, you can insert the template.
The existing templates can be reedited or deleted.
6.6 Delete all
This feature allows you to delete read SMS, sent and unsent SMS, and SMS in the
inbox or drafts.
6.7 Memory status
This menu displays the full memory capacity and the amount used in the phone or
Page 23

23
the USIM card.
6.8 SMS settings
This menu allows you to make various settings for the SMS.
Reply path: set the reply path is activated/deactivated.
Receive report (Delivery report): your mobile will get information when the message is
delivered.
Expiration: allows you to select the duration by which your messages will be stored in the
message center.
Select memory: to select whether you want to store your images in the phone memory or
the USIM card.
Service center: the SMS service center number can be edited.
6.9 Broadcast (network dependent)
Using the network service of cell broadcast, you might be able to receive text messages of
various contents. For details, refer to your service provider.
6.10 Voice mail (Network dependent)
The voice mailbox is a service that requires network support and prior application. For
more details and the voice mailbox number, consult with your service provider.
To call your voice mailbox, select Listen. To modify your voice mailbox number,
select Edit.
If you have set the voice mailbox number in the phone, long press the
numeric key [1] to call your voice mailbox.
Page 24

24
7. Call info
7.1 All calls
This feature will display the received calls, missed calls and outgoing calls.
Access the call info
Press the Left key or the Right key to switch the bookmarks, and select the call
information type.
Using call info options
When you have entered Call info, after select a number, then you can select the Option
and you can make the following operations:
Call: dial the selected number.
Save number: save the selected number.
Edit before dial: the number can be edited before calling.
Send SMS: send a message(SMS) to the selected contact.
Delete: delete the selected number from the list.
7.2 Missed calls
This feature will display the calls you have missed recently.
7.3 Received calls
This feature will display the calls you have answered recently.
7.4 Dialed calls
This feature will display the calls you have dialed recently.
Page 25

25
7.5 Delete recent
This menu allows you to clear the call history in Dialed/Received/Missed/Delete all.
7.6 Call time
This function will display the duration of last call, total calls, the dialed and the
received.
The time may vary with the actual call time, based on which the service provider
charge their services.
Select reset to reset the call timer to zero.
7.7 Call costs
This network feature displays the cost of the calls. However, it is available only when
the charge information is included in your USIM card.
Some options require the PIN2 code to set.
Reset cost: to clear the counter.
Set limit: set the highest cost. You cannot make calls if the restriction amount is exceeded.
Set cost rate: set a rate to calculate your calling cost.
8. Tools
This feature provides easy, simple applets, such as Alarm, Radio and Calculator.
To use this feature, select Tools and then your desired applet.
8.1 My documents
This function allows you to easily check the images and audio files in the phone memory
or memory card.
Page 26

26
8.1.1 Pictures Browse
This function allows you to browse the images stored in the phone memory or memory
card.
Use image options when browsing the images:
Set as wallpaper: set the image as wallpaper.
Send by Bluetooth: send the images to other Bluetooth devices.
Zoom in: zoom in the image to browse.
Rename: to change the file name.
Delete: delete the file.
Details: to view the details of the file.
8.1.2 Music Browse
This function allows you to browse the music stored in the phone memory or memory
card.
Use musics options when brows ing the playlist:
Play: to play the music.
Set as: set the music as incoming call ringtone or message ringtone.
Send by Bluetooth: send the music to other Bluetooth devices.
Add into playlist: add files into the playlist.
Delete: delete the file.
Details: to view the details of the file.
8.1.3 Memory status
This menu displays the full memory capacity and the amount used in the phone or the
memory card.
Page 27

27
8.1.4 Format memory card
This menu allows you to format your memory card. Note that, formatting will erase all
your information in the memory card.
8.2 Bluetooth
This option allows you to activate the Bluetooth feature.
With the Bluetooth feature, you can attach your phone to other Bluetooth devices and
exchange data with them or make hands-free call.
The Bluetooth technology enables your phone to achieve easy wireless access to
Bluetooth-compliant devices within 10 meters without obstructions. The working distance
might vary depending on different Bluetooth devices. Because the technology takes
advantage of the radio waves to function, the devices do not have to be within each
other’s eyesight. But if there are obstructions between devices, the working distance
might be shorter.
Note: Some devices may be incompatible with your mobile.
8.2.1 Set up Bluetooth
The Bluetooth feature provides the following options:
Activation: To enable or disable the Bluetooth function.
My devices: search and display all Bluetooth devices that can be connected.
My device’s name: assign a name to the Bluetooth device in your phone. The name will be
displayed in other devices.
Visibility: allow other Bluetooth devices to search for your phone.
Secure mode: if this option is switched on, you will be asked to confirm when other
devices attach to your phone.
Page 28

28
8.2.2 Search for/attach to Bluetooth devices
From a list of Bluetooth features, select My devices.
Select Search new . Once the search operation finishes, a list of available devices will
be displayed.
Choose the device you want to attach to.
Enter the pairing code and press OK.
8.2.3 Using devices options
In the list of Bluetooth devices, you can perform the following operations:
Browse files: browse the files in the other’s device.
Service list: obtain Bluetooth service list.
Authorize device: authorize the Bluetooth device.
Delete: delete the selected Bluetooth device or all devices.
8.2.4 Data transfer via Bluetooth
Turn Bluetooth feature on.
To choose an item that you want to transport, select Option.
Select Send by Bluetooth. The phone will search for devices and present you with a
list of Bluetooth-enabled devices.
Select the device. Enter the pairing code when required, and press OK.
8.2.5 Receiving Data via Bluetooth
To receive data via Bluetooth, you have to turn on the Bluetooth feature.
If the Secure mode has been activated, press OK when your phone prompts you to start
receiving data.
Page 29

29
8.3 Alarm
Using this option, you may set the alarm to ring at a specified time.
8.3.1 Set alarm
Select alarm type; available type are workday, once and everyday alarm.
Enter the alarm time, turn the alarm on.
Set alarm ring, volume and delay reminder.
8.3.2 Alarm time
Even if you have switched off the phone, it still will alarm and prompt you on the
screen.
Select Delay to remind later according to the delay reminder settings. Choose Ignore
to end alarm.
8.4 Radio
You can insert the original headset into the headset hole to play the radio.
Radio Shortcut Key:
Up/Down key: automatically search for channels.
Left/Right key: choose the previous or next stored channel.
Lateal keys: adjust the volume of Radio
Use Options of the Radio:
Volume: set the volume of radio.
Save station: store current channel.
Station list: enter into the channel list, and choose listen, edit or delete.
Manual tuning: Input the frequen cy, and manually search for the channel.
Minimize:hide the radio and enter into the background playing status.
Page 30

30
8.5 Recorder
This function allows you to record voice, and play.
8.5.1 Voice Record
Select Record to start the recording. The voice record will be stored in the address
as stipulated in the settings.
Speak to the microphone. Press left soft key to pause or record.
Once finished, select Stop to save your record.
After saving, select Play to play current voice record, you may also Set as ringtone,
Send by bluetooth or Delete. Select New record to start new recording.
8.5.2 Play sound track
In the recorder screen, select Option > Open my recorder to display the records in
your phone or the memory card.
8.6 Calculator
This option allows you to make basic arithmetic operations, such as addition,
subtraction, multiplication and division.
Use navigation key to choose plus, minus, multiply, divide and equal. Press # key to
switch between + and -.
For addition, subtraction, multiplication, and division operation, enter a second
number.
To obtain the result, choose “=” and press Select.
To make another operation, clear the previous result first.
Page 31

31
8.7 STK
This value-added service is network dependent. For more details, refer to your
network service provider to obtain the STK features available in your USIM card.
9. Settings
This feature provides a wide range of setting options. You can use them to configure
your mobile phone so as to best suit your usage preference. You may also restore the
factory settings for your phone.
To use this feature, select Settings and then your desired list.
9.1 Phone settings
9.1.1 Phone profiles
Your mobile phone has been preconfigured with several modes to serve different
events and surroundings.
You may personalize your profiles to better suit your usage preference. You may also
edit and then activate your profiles.
Available profiles include Normal, Silent, Car, Meeting, Outdoor and Offline.
To enable the selected profile, select Option > Start up.
To personalize the profile, select Option > Edit. Select the setting you want to
change and make the change happen.
9.1.2 Language
Choose and set the display language for your phone.
Page 32

32
9.1.3 Time and Date
Time: you can enter the current time.
Date: you can enter the current date.
Date format: There are 3 date formats available, YYYY-MM-DD, MM-DD-YYYY, and
DD-MM-YYYY.
9.1.4 Auto Key Lock
Use this option to set your mobile phone to lock the keypad automatically in idle mode.
The settings include 15 sec., 30 sec., and never.
9.2 Display settings
9.2.1 Idle display
To set the wallpaper for idle screen, access the Image list, select a preferred photo
and save it as wallpaper.
9.2.2 Brightness
You may adjust the brightness of the display according to different lighting conditions.
Page 33

33
9.2.3 Backlight
Select the backlight duration according to individual requirements. There are four
settings, including 15 sec., 30 sec., 60 sec., and 90 sec.
9.3 Call settings
9.3.1 Caller ID
Set the show format of caller ID, Network default, display ID or hide ID are available.
9.3.2 Call divert
This network service will divert the incoming calls to a pre-set number. You may divert
them to a phone number or a voice mailbox.
The call diverts options include:
Always: When this option is on, all incoming calls will be diverted.
If busy: Calls will be diverted if the user is already online.
If no reply: Incoming calls will be diverted if the user does not answer.
If unreachable: Incoming calls will be diverted when the user is not connected to the
networks or the phone has been switched off.
Cancel all: cancel all call divert.
9.3.3 Call barring
This network service allows you to limit the use of you phone.
The call barring options includes:
All outgoing calls: all outgoing calls are prohibited.
Page 34

34
International calls: international calls are prohibited.
International call (bar int exc home ): only home calls are allowed, that is, the country
where the network service provider is incorporated.
All incoming calls: answering all incoming calls is prohibited.
Bar roaming inc: all incoming calls are barred if you are out of the home service.
Cancel all: cancel all calling restrictions.
9.3.4 Call waiting
When you are online with Party A, if Party B calls you, this feature will remind you.
You may choose to activate or deactivate the call waiting feature.
9.3.5 Auto redial
Turn Auto redial on/off.
Once this option is activated, when a call is unsuccessful, the phone will automatically
redial the number.
9.3.6 Auto answer
Turn Auto answer on/off.
When this function is on, the incoming call will be answered automatically.
9.4 Network settings
9.4.1 Select a network
the network list is displayed and user can select a network from the network list. The
Page 35

35
selected network must have a roaming agreement with your domestic network.
9.4.2 Network mode
You can select GSM, WCDMA or auto as the network mode.
9.4.3 Dial Up setting
This function enables you to set the details of connecting your phone to the network.
Note: Exact parameters should be provided by your network operator. All options
depend on the service provider and the services you subscribed. The error message
occurred during network access primarily can be attributed to wrong parameters setting.
At the first time , contact your network service provider to obtain detail information. Some
service providers may send the network access parameter via SMS. Some pre-configured
modes may be blocked so as to refuse resetting and renaming.
9.5 Security settings
9.5.1 Phone lock
Select On or Off.
When you select On, your mobile phone will be secured from unauthorized use. The
default password is “0000”. If you forget this code, consult with your service provider.
To modify the mobile phone lock password, you can use the Edit password function.
Page 36

36
9.5.2 USIM card lock
Select On or Off. When you select On, you need to enter the PIN code when you
switch on the phone. Some USIM cards do not permit the lock to be disabled.
Modify PIN code: If your USIM card supports this feature, you may modify the current PIN
code.
Modify PIN2 code: If your USIM card supports this feature, you may modify the
current PIN2 code.
9.5.3 Modify the call barring password.
The function can be used to change the call restriction password that the vendor
delivers.
9.6 Factory settings
This option allows you to restore the factory settings for your phone. The default
settings password is 0000.
10. USB operation mode
Set up the mode when connecting to USB. The available settings are : Modem mode,
U disk mode.
In data transfer mode, the device can be used as a mass storage. You can see that it
becomes a detachable hardware kit in the PC. Disconnecting it from the PC side, for
example, safely remove the hardware from Windows, can avoid memory card damage.
Once disconnected, the device will restore the original operation mode used prior to data
transfer.
Before using it as a Modem, You need to subscribe corresponding network services
Page 37
37
with your service provider or Internet service provider.
Note: When the device is used as a Modem, some call functions might not be
accessible.
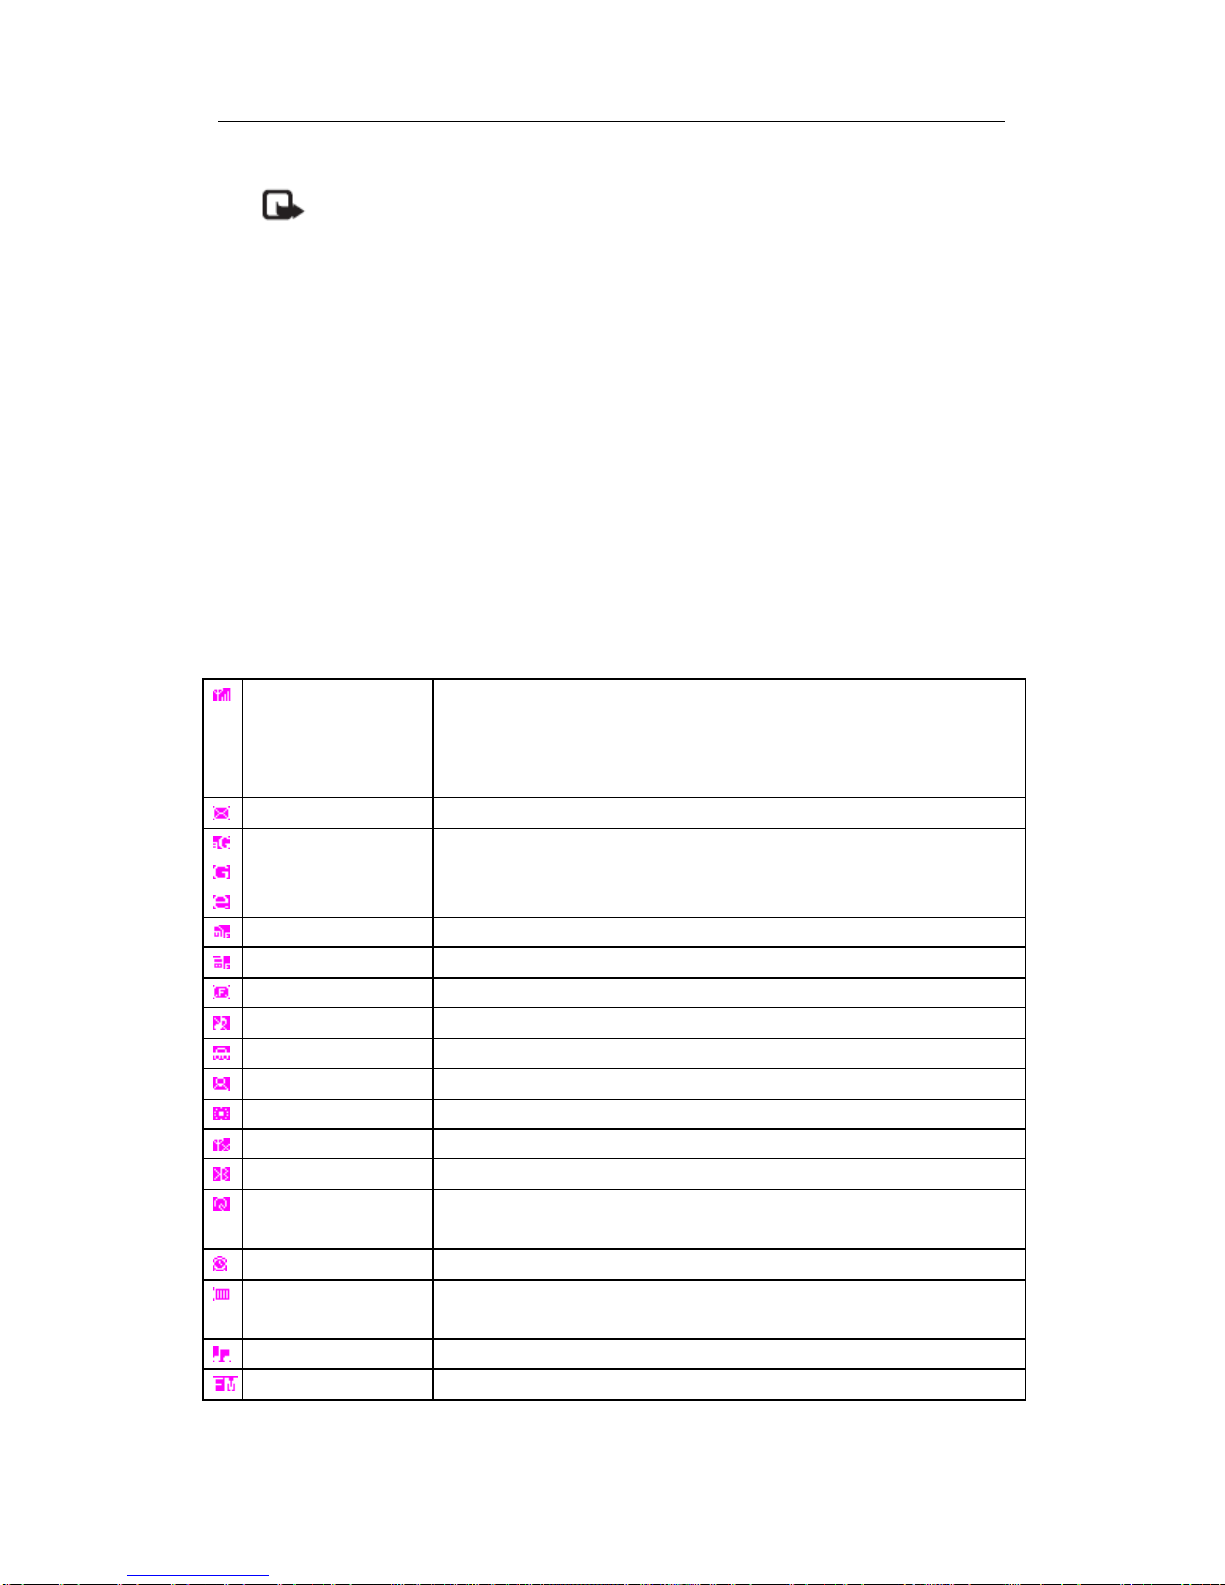
Icons & Symbols
In idle mode, several icons and symbols can be displayed in the screen. The status,
network and battery icons are displayed all the time. The rest of the icons are displayed if
the feature is available, and not displayed if the feature is unavailable.
If the network symbol is not displayed, it implies that the network is currently
unavailable.
Network Network icon comprises of 2 portions. The left portion indicates
whether or not your phone is already registered with a network,
and the right portion indicates signal strength in 4 levels (from no
signal to strongest).
SMS Indicates that you have new or unread SMS.
Network Status 3G
GPRS
EDGE
USIM card full Indicates the storage capacity of your USIM card has been full.
Phone full Indicates the storage capacity of your phone has been full.
SMS full Indicates the storage for your SMS has been full.
Silent mode Indicates the Silent mode has been activated
Car mode Indicates the Car mode has been activated.
Meeting mode Indicates the Meeting mode has been activated.
Outdoor mode Indicates the Outdoor mode has been activated.
Offline mode Indicates the Offline mode has been activated.
Bluetooth Feature is activated.
Bluetooth car kit or
headset
The Bluetooth kit or headset is activated.
Alarm The Alarm is activated.
Battery Indicates battery level with 4 battery level indicator bars. When
charging, a scrolling icon will be displayed
Music Player Indicates the music is playing in backgroud
FM radio Indicates the FM radio is playing in backgroud
Page 38
38
Precautions
Read the following security rules which are important. Not following them may be
dangerous or illegal. Further information regarding safety issues can be found in this User
Guide.
SWITCH ON SAFELY
Don’t switch on the phone when its use is prohibited to or may cause
interference or danger.
ROAD SAFETY COMES FIRST
Please comply with local traffic laws and regulations. Always keep your
hands free to operate the vehicle while driving. Stop the vehicle before making or
answering a call.
INTERFERENCE
All wireless phones may be subject to interference, which could affect
performance.
SWITCH OFF IN HOSPITALS
Follow relevant restrictions, if any. Switch the device off near medical
equipment.
SWITCH OFF IN AIRCRAFT
Page 39
39
Follow relevant restrictions, if any. Wireless devices can cause interference in
aircraft.
SWITCH OFF WHEN REFUELING
Do not use your phone at a refueling point. Don't use near fuel or chemicals.
SWITCH OFF NEAR BLASTING
Follow relevant restrictions, if any. Don't use the device where blasting is in
progress
USE SENSIBLY
Use only in the normal position (beside the ear) as explained in the product
documentation. Don’t touch the antenna unnecessarily.
QUALIFIED SERVICE
Only qualified personnel may install or repair this product.
ENHANCEMENTS AND BATTERIES
Use only approved enhancements and batteries. Do not connect incompatible
products.
WATER-RESISTANCE
Your device is not water-resistant. Keep it dry.
Page 40
40
BACKUP COPIES
Remember to make back-up copies or keep a written record of all important
information.
CONNECTING TO OTHER DEVICES
When connecting to any other device, read its user guide for detailed safety
instructions. Do not connect incompatible products.
Emergency Calls
Key in the local emergency number and press the Dial key.
Troubleshooting
Troubles Potential causes
The phone
does not switch
on
1. Check that the ba ttery is charged completely.
2. Check that the battery is installed properly.
The battery
cannot be
charged
Check whether the battery charger and the battery are well
connected.
Is the battery still usable? If the battery has been operating for several
years, its performance will be degraded.
Is the battery over-discharged? It will function after being connected
with the charger for some time.
The phone
cannot be
registered into
the network
The signal is too weak or there is radio interference around. Check
the signal strength bar on the screen to see whether there are bars
displayed.
Is the USIM card properly installed and connected, or damaged? If
damaged, contact the network service operator to replace it.
Page 41
41
The phone
cannot make a
call
Is the phone registered to the network? Check whether there is the
name of your network service provider on the screen.
Is any call barring function configured?
Is the phone barred to make a call because the service is not paid?
Is there FDN configured?
The phone
cannot receive
an incoming
call
Has the phone been registered into the network?
Is the phone barred to receive an incoming call because the service is
not paid?
Is any call divert function configured?
Is the incoming call barring function configured?
No functions
can be
configured
The network service operator does not support your operation or you
are required to register the service. Contact your network service
provider.
The PIN has
been locked
Enter the PUK code provided by your service provider to unlock PIN,
or consult your service provider.
The PIN2 has
been locked
Enter the PUK2 code provided by your service provider to unlock
PIN2, or consult your service provider.
Cost counter
does not work
There is no charging pulse. Consult your network service provider.
USIM card is
wrong
1. The USIM card is dirty. Please clean the card.
2. Re-install the USIM card.
3. The USIM card is damaged. Please replace the card.
The phone
cannot play
songs
Have the songs in My files been deleted or renamed while the original
names are still remained in the play list. You need to update the
playlist.
The phone
react too slow
Presumably you have set a large gif file as the wallpaper. Because gif
files need large memory to decode, the large gif-formatted file will
slow down the operation. Try to downsize the gif picture and reduce
its frames. The jpg picture wallpaper is recommended.
Authentic Accessories
There are a variety of new accessories available to your phone. You may purchase
those accessories according to your requirements.
The following are the details of some accessories.
Contact your local dealer for the availability of relevant accessories.
Precautions when using accessories
Page 42

42
Make sure to keep the accessories out of small children’s reach.
When you disconnect any accessories with their power supplies, the correct
operation is to hold and pull out the plug instead of tug the power cable.
Check whether all car fittings have been installed and function well on regular basis.
Only qualified technicians are allowed to install the complex car fittings.
Only use batteries, battery chargers or accessories designed for your phone. Using
other batteries, battery chargers or accessories may make the phone authentication or
warranty clauses null or valid, and even result in dangerous situations.
The times specified in the table can only be achieved when the phone operates under
optimized network environment. Actual times may vary depending on the USIM card,
network, phone settings, uses and operating environment. Using the in-built hands-free
feature may also affect the call time and readiness time.
Standard battery charger
A small, portable and robust battery charger is the quick and efficient way to charge a
phone. It can be easily connected to your phone or the charger dock.
Note: The socket type is different in different country.
Data connect kit
Provide easy data connection to your mobile phone. The USB cable enables
high-speed communication between your phone and your computer.
Work temperature
The U11 should be worked in the temperature: “- 10?” to “+60?”.
 Loading...