

Page 1
MOBISAT® - Mario - User Manual - V1.4 - Page 1 of 11
USER MANUAL
MOBISAT®
Thank you
for choosing us
Page 2
MOBISAT® - Mario - User Manual - V1.4 - Page 2 of 11
WHAT IS IT?
MARIO is a protection/ satellite tracking system that can determine the GPS coordinates of your location and send them via the
GSM network and GPRS.
APPLICATIONS
Safety Locator
Anti-theft for valuable equipment
Tracking of valuable shipments
Sports
Vehicle anti-theft
Fleet management
Localization of Groups of People
Applied to animals
Professional or personal investigation
FUNCTIONS
LOCATION SERVICE FOR PC AND SMARTPHONE APP
SATELLITE ALARM
GEOGRAPHIC FENCING
SPEED ALARM
LOW BATTERY ALARM
SMART SLEEP
SOS BUTTON
ANTISHOCK SENSOR
AUTHORISED NUMBERS
AUTOTRACKING
ENVIRONMENTAL LISTENING
Page 3

MOBISAT® - Mario - User Manual - V1.4 - Page 3 of 11
TECHNICAL SPECIFICATIONS
Dimensions: 50mm x 50mm x 20mm
Weight: 50g
Connectivity: GSM / GPRS 850/900/1800 / 1900Mhz
GPS chip: uBlox (latest generation high precision module)
GPS sensitivity: -159dBm
GPS accuracy: 5m
Response Times
HOT: 1 sec "Time To First Fix '(TTFF)
WARM: 35sec TTFF
COLD: 35-80sec TTFF
GSM and GPRS Internal Antenna
Internal active GPS antenna
Battery: 3.7V 1000mAh Li-ion rechargeable battery
Max battery life: up to 10 days standby
Shake Sensor
Battery charge from the mains: Input 110 / 220V, Output 5v
optimum temperature: -20° C 55° C
Optimum temperature: -20° C +55° C
Humidity: 5% - 95% non-condensing
USE
LITHIUM BATTERY, CHARGE THE BATTERY
On first use, charge the Lithium battery for 8-12 hours. Use the charger and cable included in the package.
WORK TOOLS.
A phone SIM card
A mobile phone (any phone company)
A small Phillips screwdriver (use the one in the product box)
THE SIM CARD
MARIO needs a SIM card to send the geographical coordinates.
Costs generated by the phone card are borne by the user.
Ordinary phone SIM cards work well:
Voice SIM cards
Data SIM cards
MARIO can send your position in two ways:
SMS to a mobile phone (cost of 1 SMS)
GPRS to Mobisat Online service (the positions are posted on the Internet, one location = 1KB)
Page 4
MOBISAT® - Mario - User Manual - V1.4 - Page 4 of 11
INSTALL THE SIM CARD
Remove the PIN set for the SIM card, (insert your SIM card in any cell phone and remove the card's PIN from the phone
settings)
Remove the 'call transfer' service (if set)
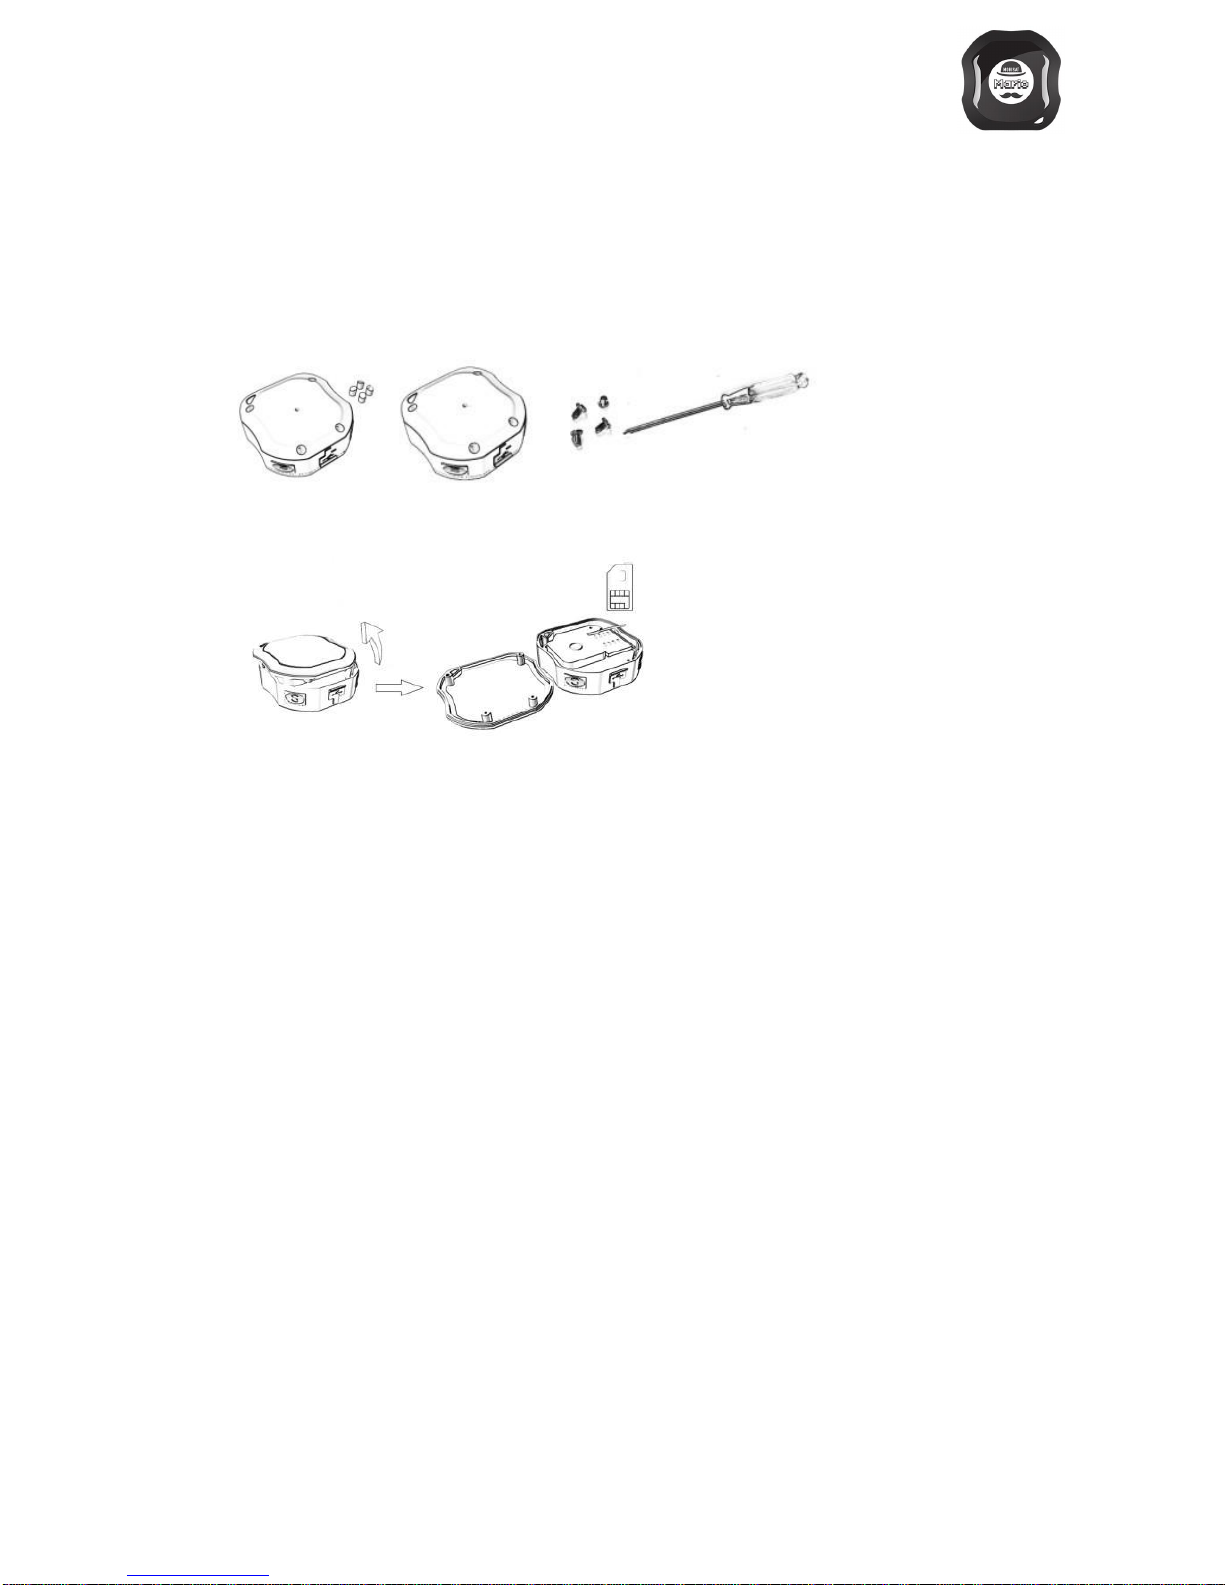
Lift the cover from the back of the device, unscrew the 4 screws at the edges
Insert the SIM card into the metal panel and close it; a "click" will indicate that it was closed properly
STARTING THE DEVICE
Press the green on / off button for about 3 seconds to start or stop MARIO.
BEHAVIOUR OF LED
Interpreting the green led (modem status):
Blinking slowly (every 2 seconds): GSM or GPRS connection is active
Constantly lit: GSM or GPRS connection is not established
Constantly switched off: MARIO is in sleep mode, or failure
Interpret the blue LED (GPS):
Blinking slowly (every 2 seconds): GSM or GPRS connection is active
Constantly lit: Search for GPS signal
Costantly off: ">MARIO is in sleep mode, or failure
Interpreting the red LED (power and battery status):
Blinking slowly: the battery is low or empty
Constantly lit: charging
Constantly switched off: the battery is fully charged
For its first use MARIO must be positioned outdoors: on the dashboard, on the terrace, in the street, etc. Windowsills, balconies
and windows of high-rise buildings or enclosed places are not appropriate.
Page 5

MOBISAT® - Mario - User Manual - V1.4 - Page 5 of 11
Position MARIO horizontally with the logo facing up (The GPS antenna is located just below the logo).
After about 2 minutes, use your own phone to call the number of the SIM card you have installed in the product. If the procedure
was successful, MARIO will end the call and respond by sending your phone a text message.
SMS POSITION
You have just received an SMS message like this:
http://maps.google.com/maps?q=45.44324%2c009.17876 V: A, S 11/10/2014 10:36:08: 000km / h, B: 3.4109106825, S17G05; p:
22201, l: 149, c: 6418
When you open the link, the browser on your device will display the current position of Mario on Google Maps.
INTERPRETING THE SMS MESSAGE
http://maps.google.com/maps?q=45.44333%2c009.17845: Link to Google Maps
45.44324: latitude
009.17876: longitudine
V: A: the GPS signal is strong (V: V = weak GPS connection or not present)
10.11.2014 10:36:08: the date and time when the point was detected
S: 000km / h: speed shown by GPS
B: 3: is the level of battery charge (values from 1 = low to 6 = charge)
4109106825: is the IMEI number of MARIO (identifier of the modem serial number)
S17G05: This data is very important and indicates:
S17 = GSM signal (usually over 15 the signal is strong, under 15 the signal is weak)
G05 = the number of satellites in view. Any value above 4 satellites indicates a good signal and then
a trusted location. If satellites are found less than 4, it means that the GPS signal is very weak and
therefore the received position could have a high margin of error
p: 22201: is the telephone operator code (PLMN: Public Land Mobile Network)
l: 149: LAC (Location area code)
c: 6418: Cell ID, or the GSM cell with which the modem is connected Mario
Page 6
MOBISAT® - Mario - User Manual - V1.4 - Page 6 of 11
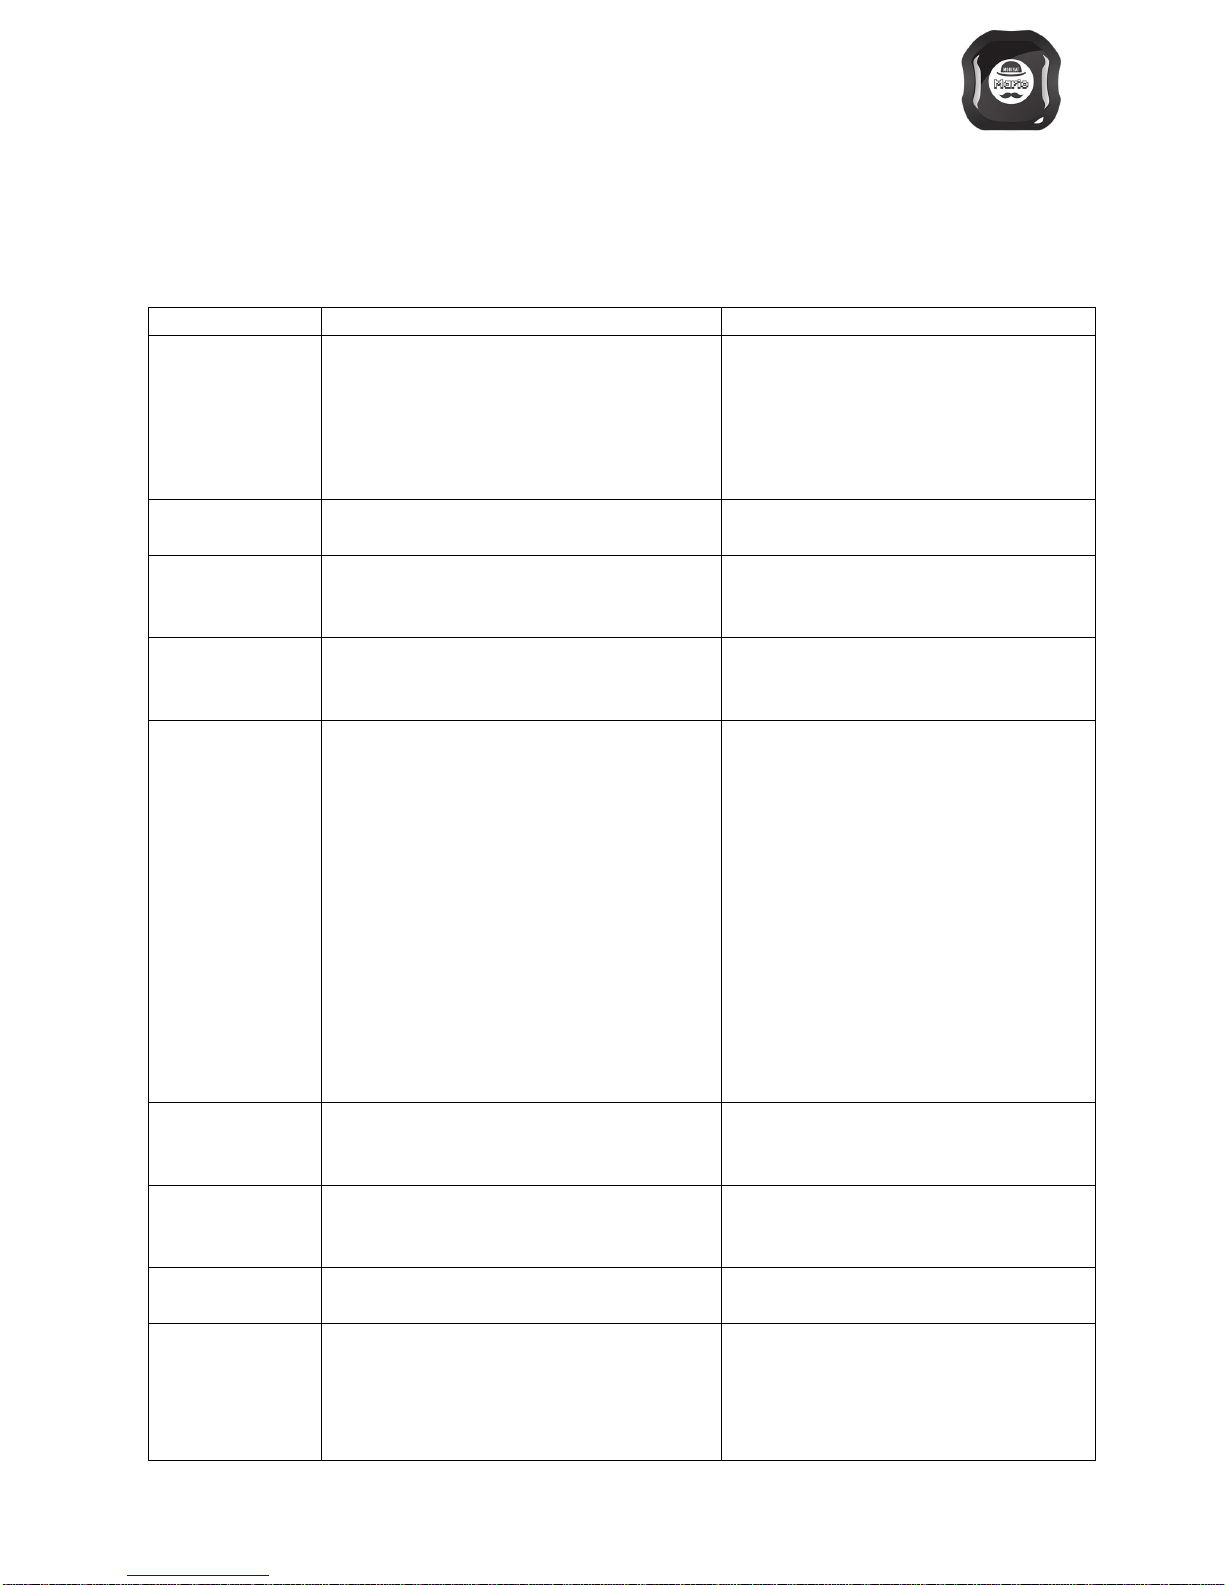
SMS COMMANDS
Caution: In each command (when indicated) replace the string (space) by pressing on the space bar on the keyboard of your
mobile phone.
FUNCTION
DESCRIPTION
COMMAND
Record Admin. no.
Registering 1 administrator is essential to send any
other command.
NB: The Administrator number must be entered with
the country code in front of the no. in the form: 39,
41, etc. (0039 = error, 0041 = error, etc.).
admin123456(space) 39333001122
(Replace 39333001122 with your Cell phone no.)
Answer: admin ok
Eliminate the Admin.
no.
Only the administrator can send this command.
noadmin123456
Answer: admin ok
Set the time zone
It allows you to adjust the time shown in the SMS
messages with your time zone.
time(space)zone123456(space)3
(Replace 3 with your time zone)
Answer: time zone ok
Change my password
It allows you to change your password. The default
password is 123456.
password123456(space)111111
(Replace 111111 with the desired password)
Answer: password ok
Autotracking
It allows you to obtain the Mario position at regular
intervals.
t030s005n123456
A message in this form tells Mario to send its
position 5 times every 30 seconds.
030S = 30 seconds. Mario will send its
position every 30 seconds. Replace 030S
with 030m or 030h to indicate minutes or
hours.
005n = 5 positions. Replace 005 with
*** to indicate an infinite number of
times.
Time (030S) and Number of Positions
(005) They can have a minimum value of
0 and a maximum of 255.
Answer: t030s005n ok
Disable autotracking
Stops the automatic transmission positions.
notn123456
Answer: notn ok
Environment listen
mode
Calling the SIM no. inserted in the device, it enables
listening to the local environment. Listening is not
possible if you use a data only SIM card (M2M).
monitor123456
Answer: monitor ok
Tracker mode
Calling the no. SIM inserted in the device, Mario befall
the call and respond with one sms stating its position.
tracker123456
Answer: tracker ok
Circular geographical
fence - Motion Alarm
MARIO will send an alarm when it moves from a given
position. The command must be sent when Mario is
not moving and is located outdoors.
move123456(space)300
300 is the distance in metres from the virtual
geographic fence beam. The value can be
changed at will.
Answer: move ok
Page 7
MOBISAT® - Mario - User Manual - V1.4 - Page 7 of 11
Turn off the motion
alarm
nomove123456
Answer: nomove ok
Speed alert
MARIO sends an alarm every time you exceed the
given speed limit.
speed123456(space)100
100 is the speed limit that can be changed at will.
Answer: speed ok
Disable the speed
alarm
nospeed123456
Answer: nospeed ok
Dead battery
In each message MARIO indicates the battery level.
This can be:
maximum charge: B: 6
discharged: B: 1.
bat: low geographic coordinates
SOS
Pressing the SOS button for 3 seconds, MARIO will
send an SOS alarm at the number provided (or
numbers indicated, max: 2) to receive the SOS alarm.
NB The number on which to transmit the alarm SOS
is inserted with the country code in front of the no. In
the form: 39, 41, etc. (0039 = Error, 0041 = Error,
etc.).
To record the first SOS number:
sos123456 (space) 39333001122
To record numbers 2 SOS:
sos123456 (space) 39333001122,
39333002233
(Replace 39333001122 and 39333002233 with no.
Of phone enabled to receive the SOS alarm)
Answer: sos number ok
Activate the SOS
function
sos123456
Answer: sos number ok
Disable the SOS
function
nosos123456
Answer: nosos number ok
SOS call
Mario can make a voice call to the numbers used for
the reception of SOS alarms.
soscall123456
Answer: soscall ok
SMS SOS
If the SOS call has been activated, you can switch to
SOS mode with SMS by sending the command to the
side.
nososcall123456
Answer: no soscall ok
Shock alarm
MARIO has a "Shake Sensor" that makes it possible to
receive an alarm in case of "shock."
shock123456
Answer: ok shock
Deactivate shock
alarm
noshock123456
Answer: no shock ok
Sleep Mode Time
Thanks to this feature Mario goes into power-saving
mode (the GPS chip is turned off) after 5 minutes
since the last time it was interrogated.
sleep123456(space)time
Answer: sleep time ok
Sleep Mode shock
Thanks to this feature Mario goes into power-saving
mode (turns off the GPS chip) after 5 minutes since
the last time motion is detected.
sleep123456 (space) shock
Answer: sleep ok shock
Turn off sleep mode
nosleep123456
Answer: no sleep ok
Page 8
MOBISAT® - Mario - User Manual - V1.4 - Page 8 of 11
SMS position
You can ask the MARIO position by sending an SMS
command.
g123456
Reset the device
All those who know the password can reset Mario.
These values are reset:
Administrators and SOS no.
Alert settings
Password
Timezone Settings
NB: You can reset the device by pressing the pin at
the side for 3 seconds (to the right of the product’s ON
/ OFF) button.
begin123456
Answer: begin ok
GREENBOX
GREENBOX is an App for both smartphones and PCs with which you can manage all Mobisat devices©. easily and quickly
For more information on Greenbox APP: http://www.mobisat.eu/greenbox/
Page 9

MOBISAT® - Mario - User Manual - V1.4 - Page 9 of 11
CONNECTING TO MARIO GREENBOX
To connect to the MARIO Mobisat Greenbox service you must perform a procedure that involves sending 3 SMS messages:
SMS 1 - The IP address
Send the following SMS message:
adminip123456
(space)
185.56.8.99
(space)
9850
Answer: adminip ok
To disable this feature send the following SMS message:
noadminip123456
Answer: no adminip ok
SMS 2 - APN (Access Point Name)
To open the GPRS connection you must specify the service provider's APN that provides the SIM card inserted into MARIO. Contact
your service provider to get the APN used by your operator. Send the following SMS message:
Eg: apn123456
(space)
ibox.tim.it
Answer : apn ok
NB:
For some operators you may also need to set the values:
APN user name
APN Password
In this case, use the following SMS commands to set these values:
APN USER NAME: apnuser123456
(space)
apn_user
APN PASSWORD: apnpasswd123456
(space)
apn_password
SMS 3 - SEND THE POSITIONS TO THE INTERNET
If you want, for example, to receive 1 position every 30 seconds, send the following SMS message:
upload123456
(space)
30
Answer: upload ok
You can change the reception range at will by sending the same command by changing the value 30 to the desired value (in
seconds).
Page 10

MOBISAT® - Mario - User Manual - V1.4 - Page 10 of 11
TURN THE GPRS ON AND OFF
To start and stop the GPRS connection send the following commands:
GPRS OFF
nogprs123456
Answer: nogprs ok
GPRS ON (Default)
gprs123456
Answer: gprs ok
PRECAUTIONS:
Keep the device dry to avoid damaging the internal circuits
Do not use and/or store the unit in dusty environments
Do not expose MARIO to extreme temperatures higher or lower than those recommended in the technical specifications
Handle with care, avoid shocks and violent swings
Do not use detergents to clean MARIO. Instead, use a dry cloth
Do not paint, colour or modify the device in any way (the warranty is void in the event of tampering)
Do not use batteries and chargers other than those included in the product box
Do not disassemble, replace or change the antenna. Perfect reception of GSM and GPS signals is guaranteed only with
the original aerial
SERVICE AND WARRANTY
MARIO is under 2 years warranty.
For technical support on the product visit: http://www.mobisat.eu/support
The warranty conditions and the rules for replacement are indicated on the website:
www.mobisat.eu
ACCESSORIES IN THE PACKAGE
Mains charger
Power cord
Screwdriver to insert SIM
Short guide
Page 11
MOBISAT® - Mario - User Manual - V1.4 - Page 11 of 11
INSTRUCTIONS FOR USE AND DISPOSAL
Do not expose the product to rain or moisture
Do not expose the product to heat sources
The product should not be left within reach of children without supervision or with different disabilities such as the
ability to comply with safety regulations is prevented
Do not try to open the product. If the product does have suffered damage to immediately contact a specialist
Do not leave the appliance connected to the power source when not in use
Do not use extension cords or other accessories other than those expressly recommended by the manufacturer to avoid
fire or electric shock
*The symbol on the accessories means that the batteries in this product should not be disposed of with other household
waste at the end of the life cycle. To protect natural resources and to promote material reuse, please separate batteries from
other types of waste using the free return system envisaged in their area of residence.
DECLARATION OF CONFORMITY
Comepsa Ltd declares that the product Mobisat MARIO complies with the essential requirements and other relevant provisions of
Directive 1999/5 / EC.
About this document
Current version of manual: V.1.4
Release date: 03.26.2016 (revisions of the content and minor fixes to layout)
Current firmware version: LY102B_TQ_JX_60_TEST2014 / 01/18
CONTACT US
MOBISAT® - Comepsa Ltd
Park House, 26 North End Road
London NW11 7PT - UK
VAT No. GB 610.1181.07
www.mobisat.eu
 Loading...