

Page 1

MPC-100
USER GUIDE
Version 1.0.0
Page 2
REGULATORY NOTICES
Federal Communications Commission Notice
This equipment has been tested and found to comply with the limits for a Class B digital
devices, pursuant to Part 15 of the FCC Rules. These limits are designed to provide
reasonable protection against harmful interference in a residential installation. This
equipment generates, uses, and radiates radio frequency energy and, if not installed and
used in accordance with the instructions, may cause harmful interference to radio
communications. However, there is no guarantee that interference will not occur in a
particular installation.
CAUTION!
CAUTION! Danger of explosion if an improper battery is substituted. If a
replacement is needed, only replace with a manufacturer issued battery pack.
Do not dispose of the battery pack in a fire. They may explode. Check with local
authorities for proper disposal instructions.
ESD WARNING!
The USB function may break down during electrostatic discharge interference. Please suspend or
reset the system to enable the USB function.
2
Page 3

TABLE OF CONTENTS
1. Getting Started
1.1 Welcome
1.2 Safety Instructions and Care of your MobiPanel
1.3 Checklist
1.4 Getting to Know Your MobiPanel
1.5 The Battery and AC Adapter
1.5.1 The Battery Swap
1.6 The Stylus
1.7 Using the PCMCIA Slot and CompactFlash Cards
1.8 MobiPanel Buttons
1.9 Function Key Definition
1.10 RS232/422/485 Setting
1.11 Display Properties
1.12 The Cradle (Optional)
1.13 The Carry Case (Optional)
1.14 The Auto Adapter (Optional)
1.15 The Vehicle Mount (Optional)
1.16 The Mini VGA cable (Optional)
1.17 The Standard Battery Pack (Optional)
1.18 The 3 in 1 Charging Station (Optional)
1.19 The Stylus (Optional)
2. Managing Your Information
2.1 Data Input
2.2 Data Synchronization
2.3 Applications
3.Connecting Other Devices
3.1 USB Keyboard and Mouse
3.2 External Microphone
3.3 External Speakers
3.4 External Display (Optional)
4.Getting Online
4.1 Establishing a Dial-up Connection
4.2 Connecting to Your Network
4.3 Ending a Connection
4.4 Setting up Your Email
5.Troubleshooting
5.1 Common Problems / Frequently Asked Questions
5.2 Handwriting Recognition
3
Page 4

USER GUIDE
1. Getting Started
1.1 Welcome
Congratulations! With your new MobiPanel you will be able to create, manage and
share information, send and receive email, and carry out research from virtually
anywhere! Your MobiPanel gives you freedom; easy access to the Internet, and the
800 x 600 SVGA screen offers high resolution for all your Tablet uses.
This manual will guide you through the Tablet’s simple set-up, introduce you to its
range of features and help you source extra information.
1.2 Safety Instructions and Care of your MobiPanel
CAUTION! Danger of explosion if an improper battery is substituted. If a
replacement is needed, only replace with a manufacturer issued battery pack.
• During normal usage and charging, the battery pack heats up. This is caused
by energy that has been generated and a chemical charge that has occurred
inside the battery pack. This is normal and not a cause for concern.
• You should charge batteries at temperatures from 10°C to 30°C (from 50 °F to
85 °F). Lower temperatures require a longer charging time.
• Do not carry a battery in your pocket, purse, or other container where metal
objects could short-circuit the battery pack. The resulting excessive current
flow can cause extremely high temperatures and may result in damage from
burns.
• Do not use your MobiPanel in a wet environment, for instance, near a bathtub,
sink, or any other place where there is risk of moisture.
• To help prevent electric shock, plug the AC adapter into a three prong,
grounded power source. If a two-prong extension plug is absolutely needed,
use a 3-wire cable with properly grounded plugs.
• If your MobiPanel includes a modem PC Card, disconnect the modem cable
during electrical storms to avoid the remote risk of electrical shock from
lightning via the telephone line.
• PC Cards may increase in temperature over an extended period of use. Use
care in handling these cards.
Do not dispose of the battery pack in a fire. They may explode. Check with
local authorities for proper disposal instructions.
• When traveling, never check your MobiPanel as baggage. You can put your
MobiPanel through an x-ray security machine, but never put your MobiPanel
through a metal detector. Have a charged battery with you in case you are
asked to turn on the Tablet.
4
Page 5

• When traveling, do not place the MobiPanel in an overhead compartment
where it can slide around. Do not drop your MobiPanel or subject it to
mechanical shocks.
• Protect your MobiPanel from environmental hazards such as dirt, dust, food,
liquids, temperature extremes, and over exposure to sunlight.
• When you change environments rapidly, in respect to temperature and
humidity, with your MobiPanel, condensation may form on or within the
Tablet. To avoid potential damage to your MobiPanel, allow sufficient time
for the moisture to evaporate before using.
• When disconnecting cables from your MobiPanel, be sure to pull on the
connector or the strain relief loop, not on the cable itself. As you pull, keep it
evenly aligned to avoid bending the connector pins. Never force a connector
into a port. Make sure the connector and port are aligned correctly.
• Before you clean your MobiPanel, turn it off, remove the battery, and unplug
the power source.
• Clean your computer with a soft cloth dampened with water rather than with
liquid or aerosol cleaners.
• Clean the screen with a soft, clean cloth and commercial window cleaner that
does not contain wax or abrasives. Always apply the cleaner to the cloth, not
the screen. If the display contains grease or some other contaminant, use
isopropyl alcohol instead of commercial cleaner.
1.3 Checklist
Check to see that the package your MobiPanel came in includes these items:
• MobiPanel
Accessory box contains,
• Battery Pack
• Stylus x 2
• Synchronization Cable
• AC Adapter
• Power Cord
5
Page 6
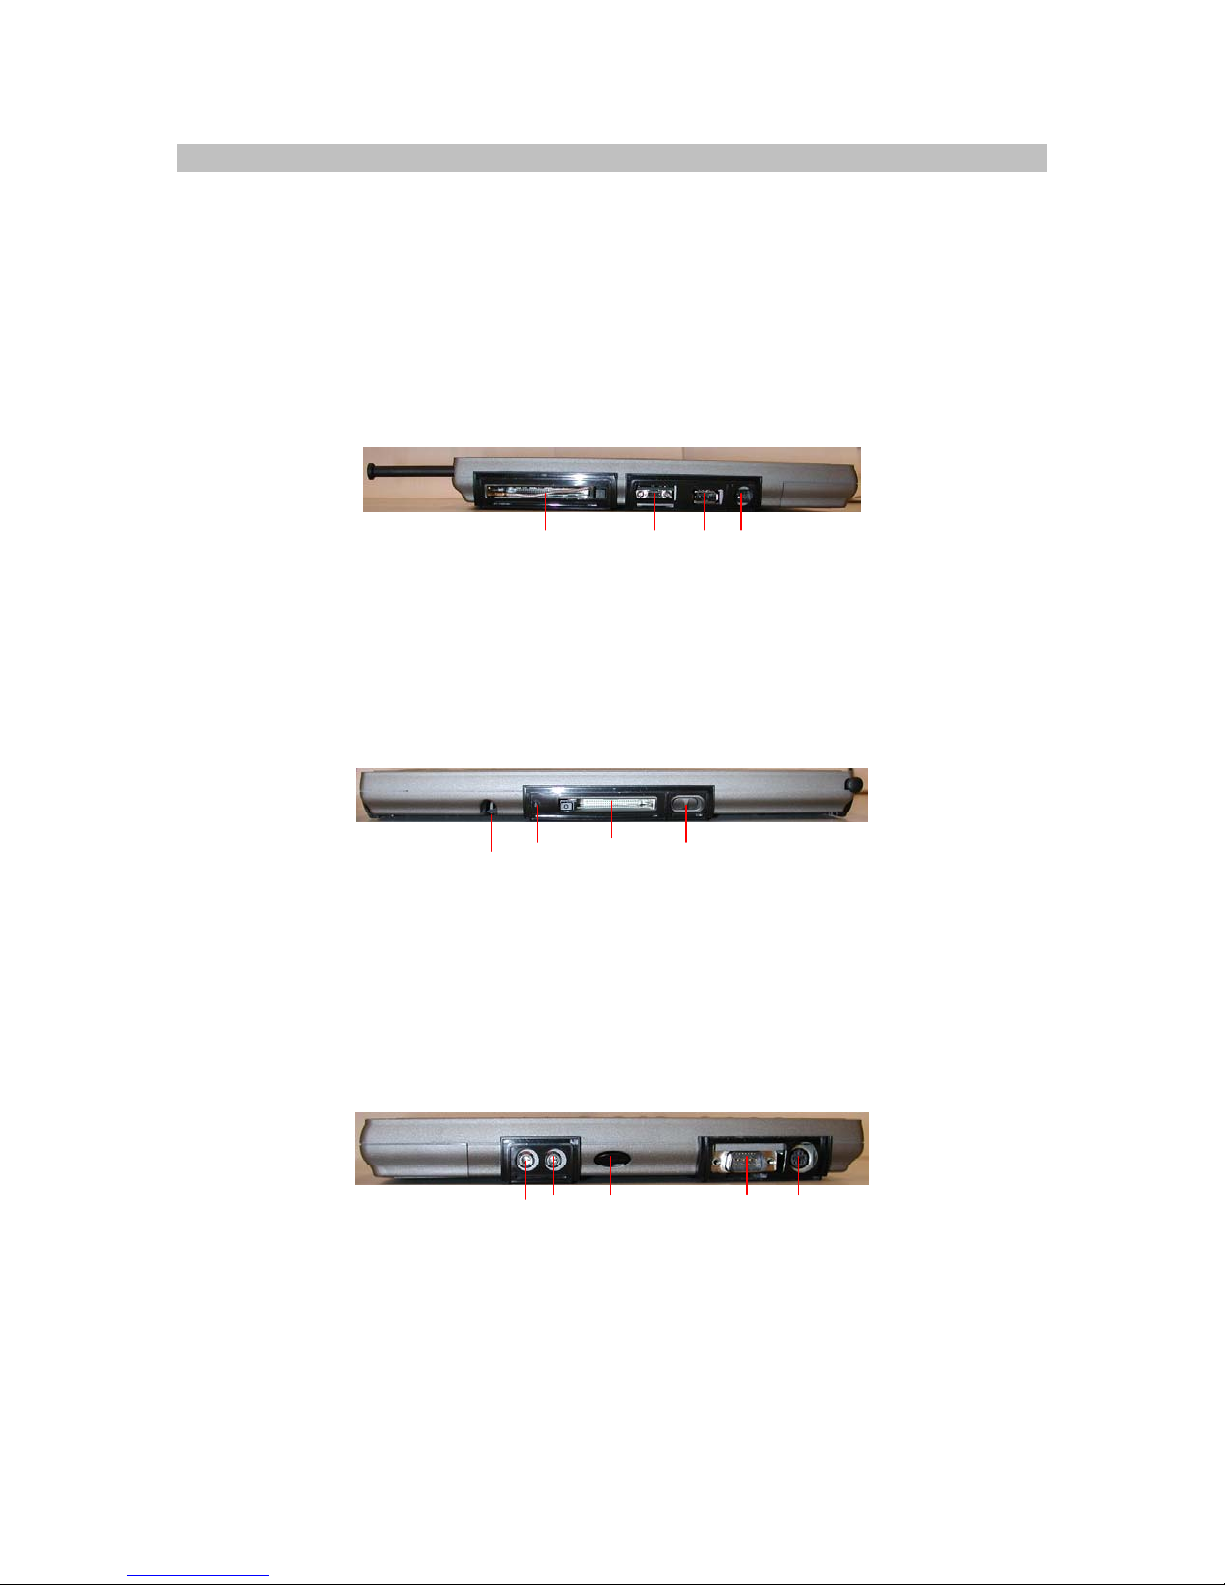
1.4 Getting to Know Your MobiPanel
Your MobiPanel features powerful functions and connectivity choices for you to
create, manage and transfer your information, send and receive email and explore the
World Wide Web. This section outlines your MobiPanel’s components.
Left Side
1. PCMCIA Slot
2. Mini-VGA Connector
3. USB Connector
4. DC-In Port
1432
Top Side
1. Suspend Switch
2. CompactFlash™ Card / IBM Microdrive Slot
3. Software Reset Button
4. Stylus Storage
3
4
Right Side
1. External Microphone Jack
2. External Speaker Jack
3. Infrared Port (IrDA)
4. RS232/422/485 (By DIP switch setting)
5. PS2 port
2
1
1
432
5
6
Page 7
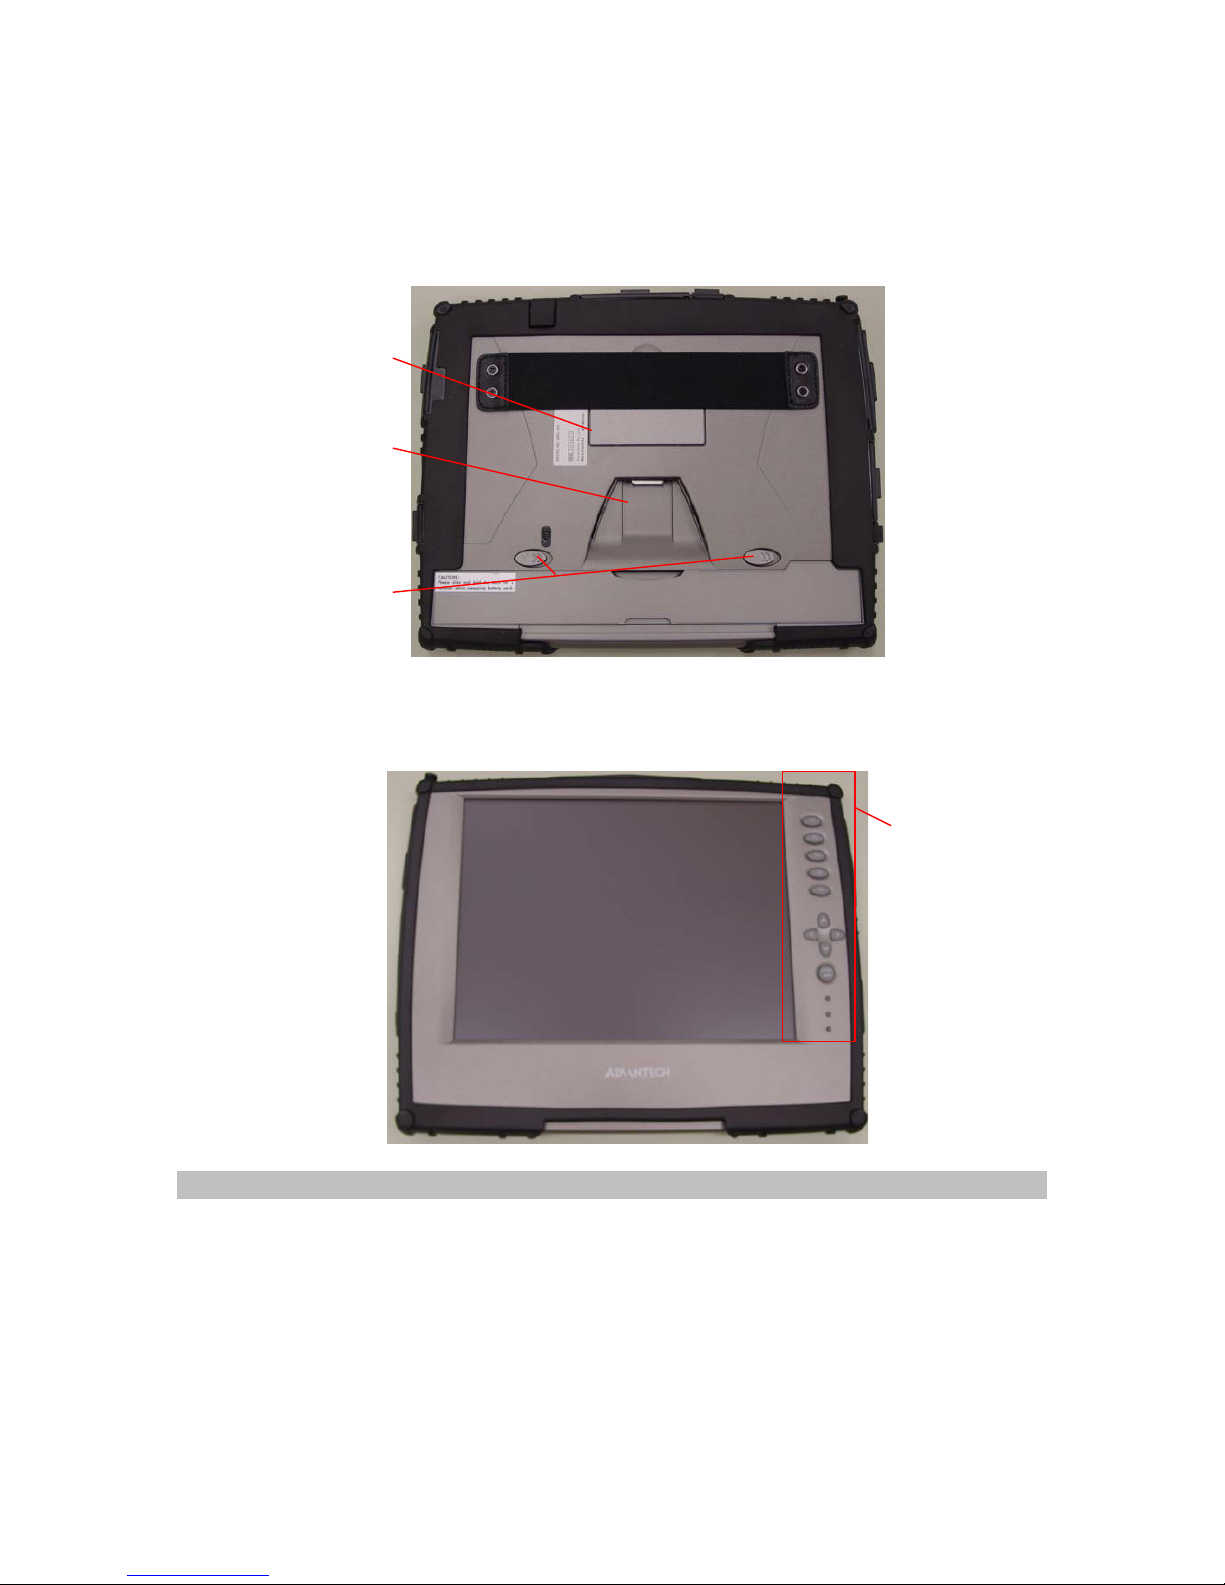
Back
1. Cover to Hardware Reset Button
2. Cradle Dock / Synchronize Cable Port
3. Battery Latches
1
2
3
Front
1. Function Keys Area (Please refer to Section 1.8 for detail)
1
1.5 Battery and AC Adapter
Your MobiPanel has two power sources, battery and AC. To run your MobiPanel
from the wall, use the supplied AC adapter cable only. The battery offers you
unplugged convenience, with as much as 5 hours of battery life. The battery charges
when the Tablet is connected to the AC power. The orange indicator on the front of
your MobiPanel indicates the battery’s status.
Charging Time with standard battery pack:
2 hours fast charge mode (system off)
2.8 hours normal charge mode (system on)
7
Page 8
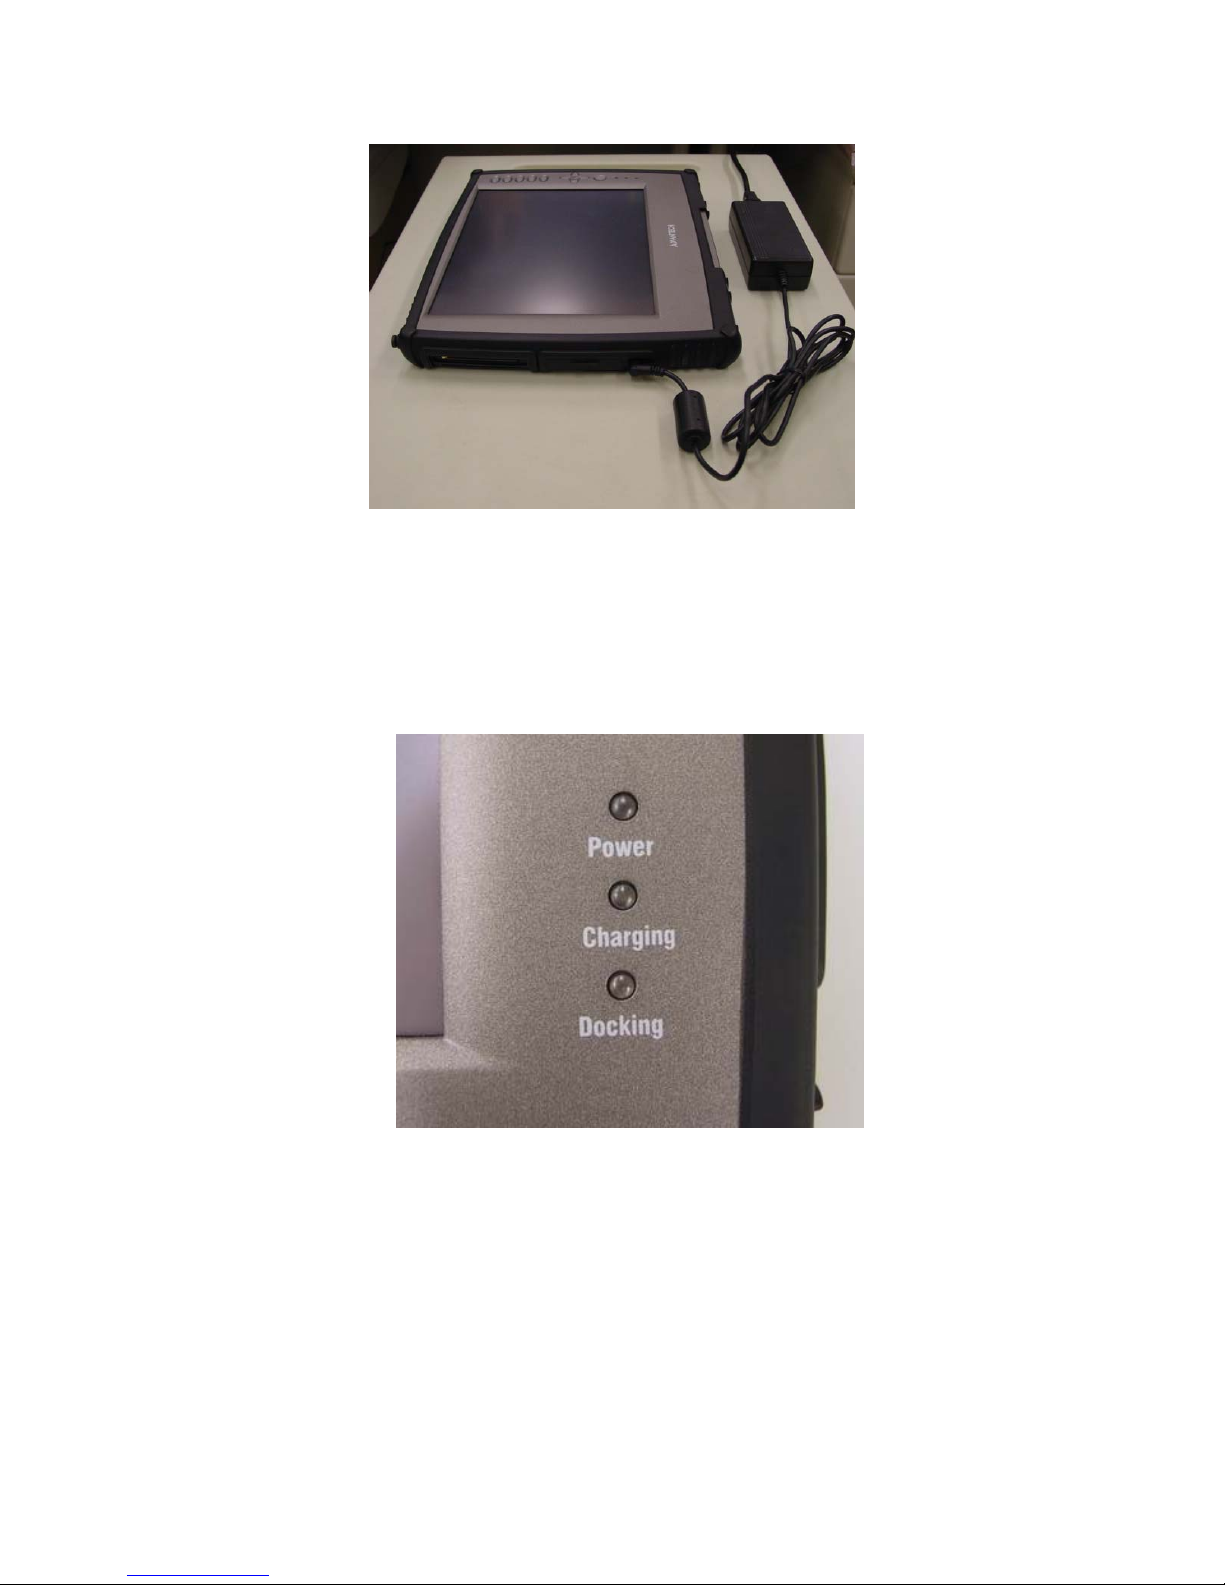
• Indicator A; On: Operating mode, Off: Suspend mode
• Indicator B; On: Charging, Off: Fully charged or not charging
Blinking: Low Battery (Less than 6% charge remaining)
• Indicator C; On: On the Cradle (Docked)
A
B
C
When fully charged and not in use, your MobiPanel battery has a one week life.
When turning on your MobiPanel and it goes to suspend immediately, that means the
battery volume is 0%. Please charge your Tablet within one day, or you will lose all
data in memory.
8
Page 9
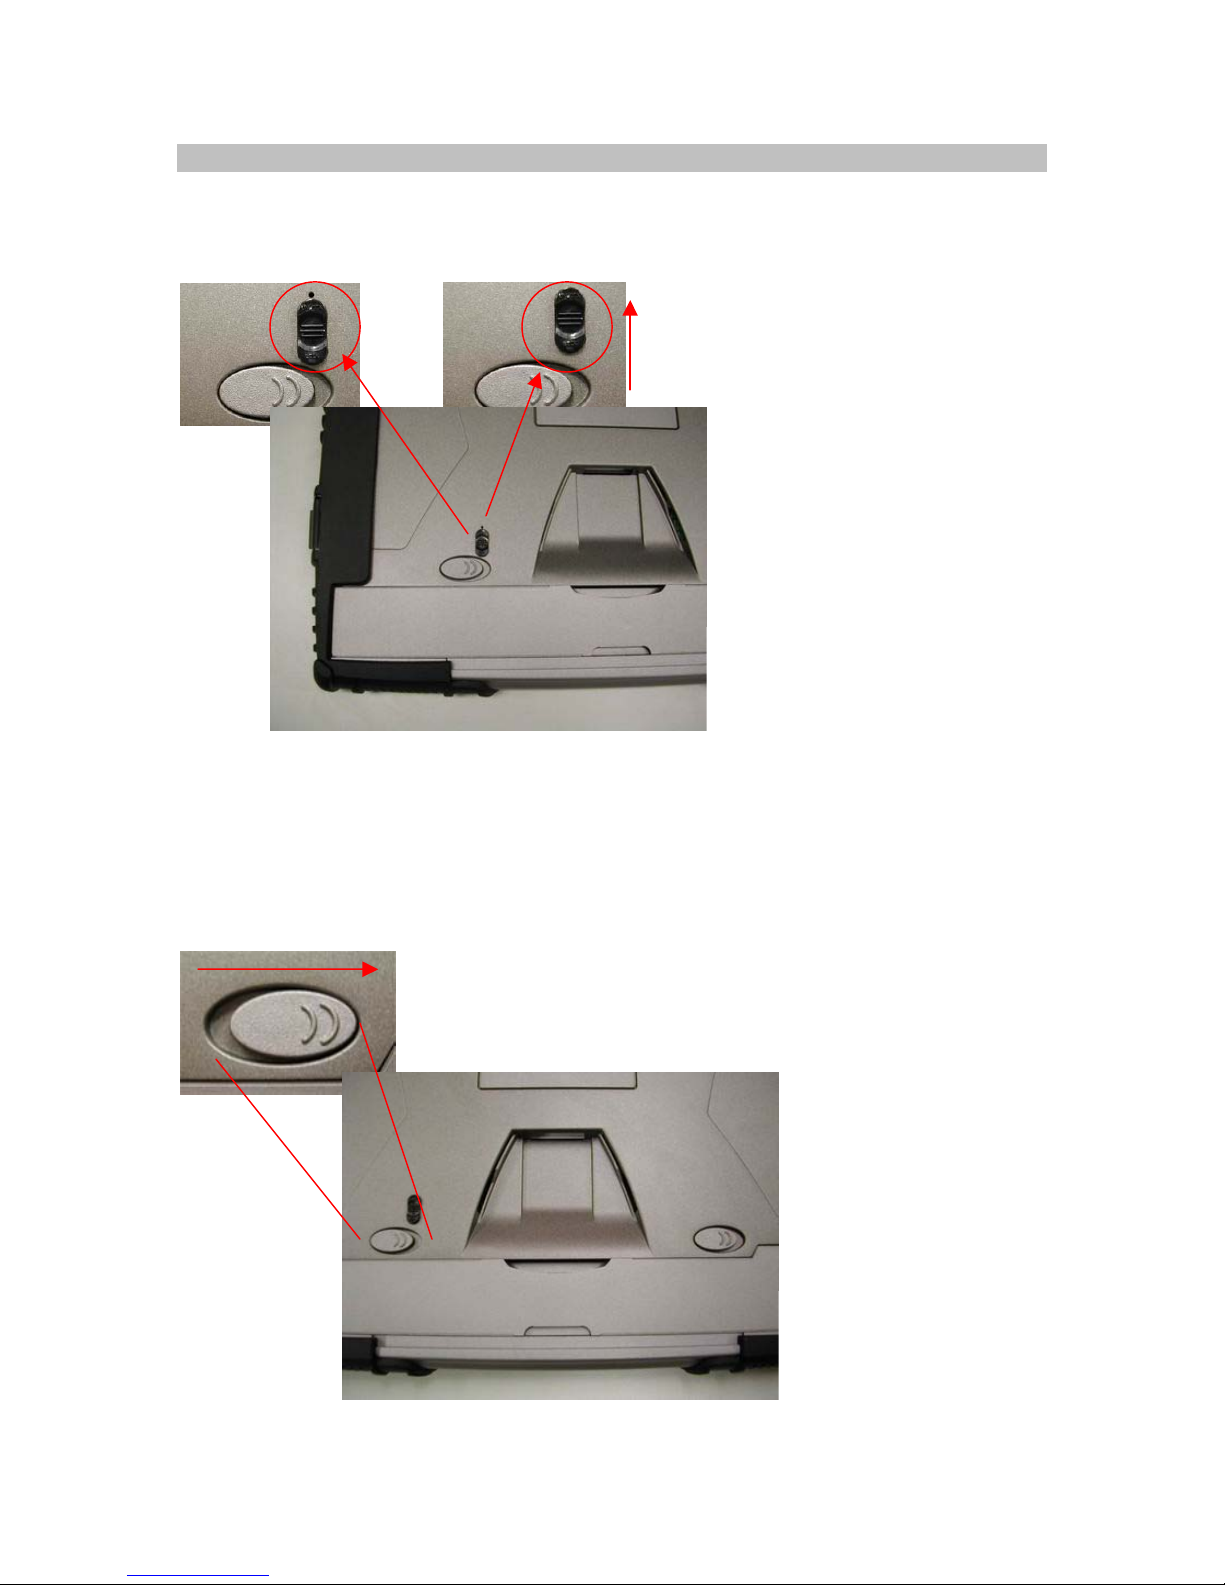
1.5.1 Battery Swap
If you want to swap the battery pack, please follow the steps below.
1.Unlock the battery lock button.
Unlock
2.Push the battery latch to the unlock mode, the MobiPanel will suspend after 3
seconds. (Note: please keep suspend period for 3 seconds to ensure the data safety)
Unlock
9
Page 10
3. Users can then remove or change the battery pack and plug back in a charged
battery within 5 minutes, or all data in memory will be lost.
To check battery level or adjust the time before your battery switches off after the
Tablet is continuously idle, go to Start→Settings→Control Panel→Power.
For further tips on optimizing your battery, go to Start→Help→Settings→Power.
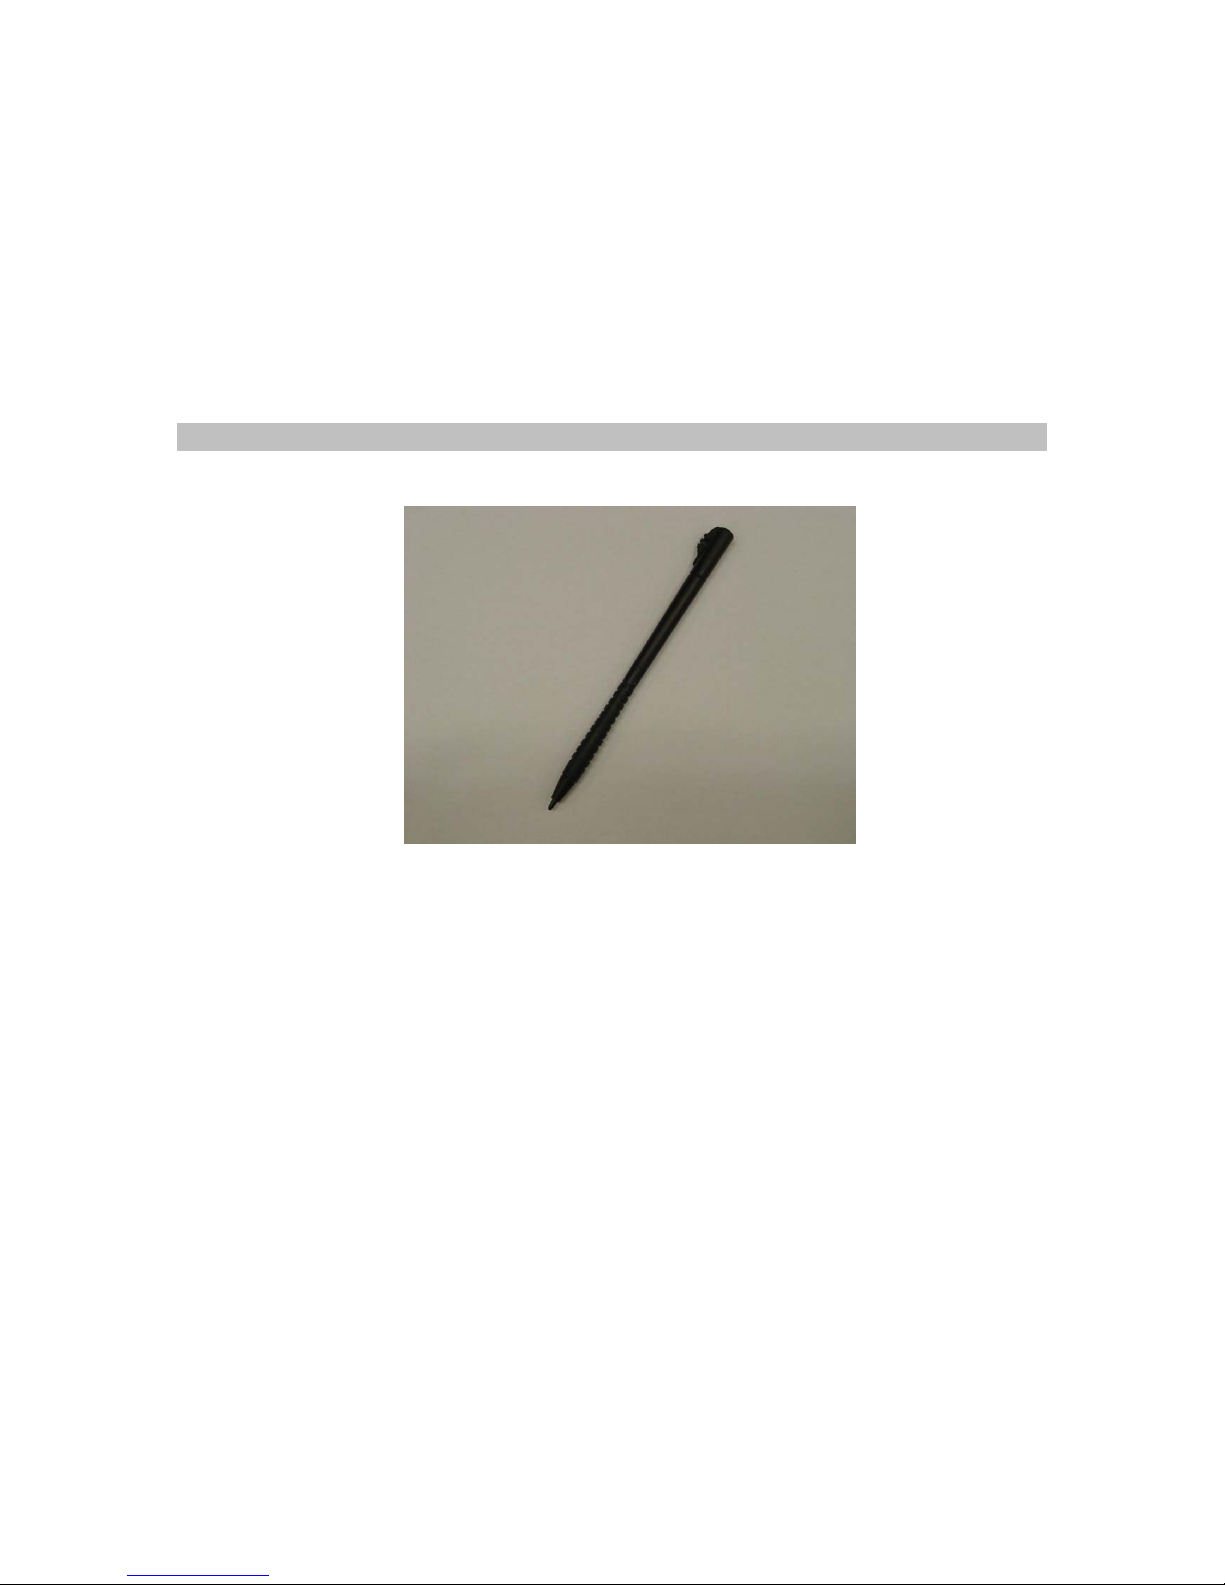
1.6 The Stylus
The Stylus has been specially designed for use with your MobiPanel.
IMPORTANT: It is strongly recommended that you use the provided stylus at all
times; fingers or other instruments may damage your screen.
If you find that your MobiPanel is not responding properly to your taps, you may
need to recalibrate your screen. To do this, go to Start→Settings→Control
Panel→Stylus. Once there, go to the calibration tab and follow the instructions.
Your stylus can be conveniently stored in the side of your MobiPanel.
10
Page 11
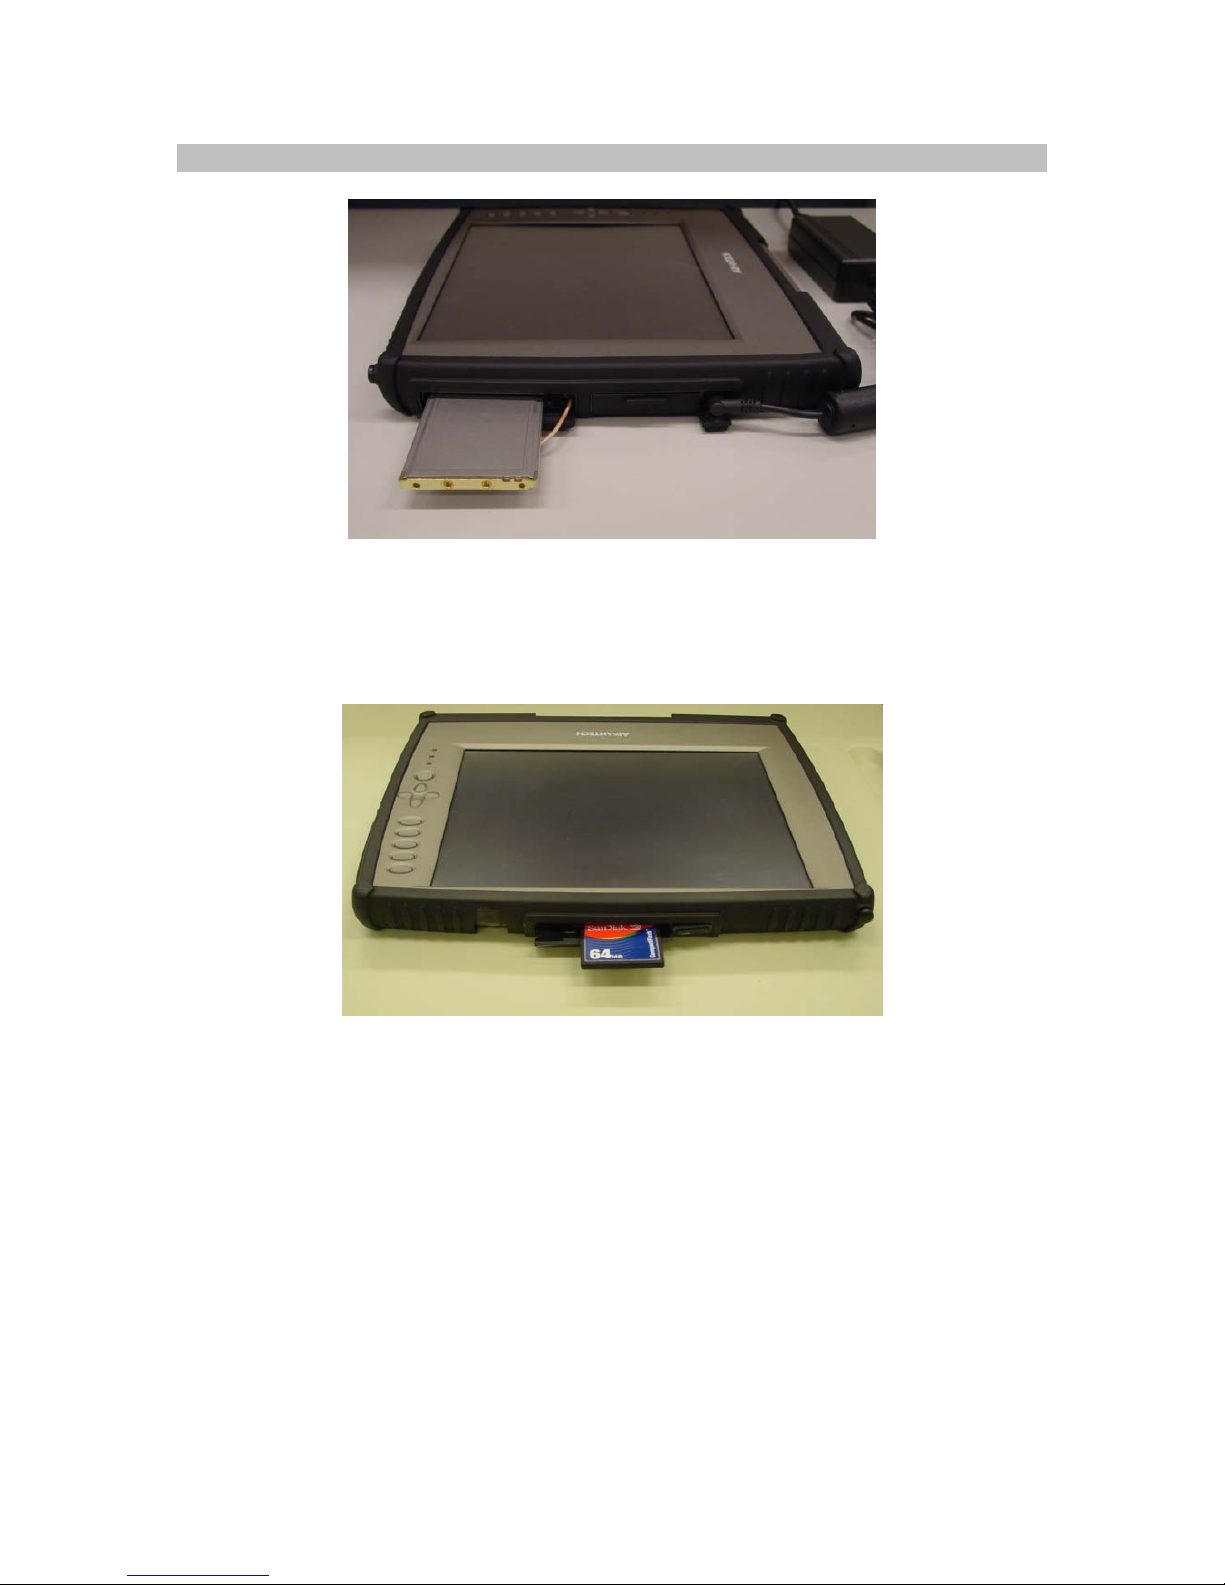
1.7 Using the PCMCIA Slot and CompactFlash Cards
The PCMCIA slot is a universal interface for many different hardware peripherals.
This slot can accommodate any PC Card that is supported by Windows CE 3.0. One
of the key uses for this slot is the wireless lan card, which will be discussed further in
this document.
The CompactFlash slot, shown above, is a Type II slot that can accommodate any
IBM Microdrive and Type I and Type II CompactFlash card that is supported by
Windows CE 3.0.
11
Page 12
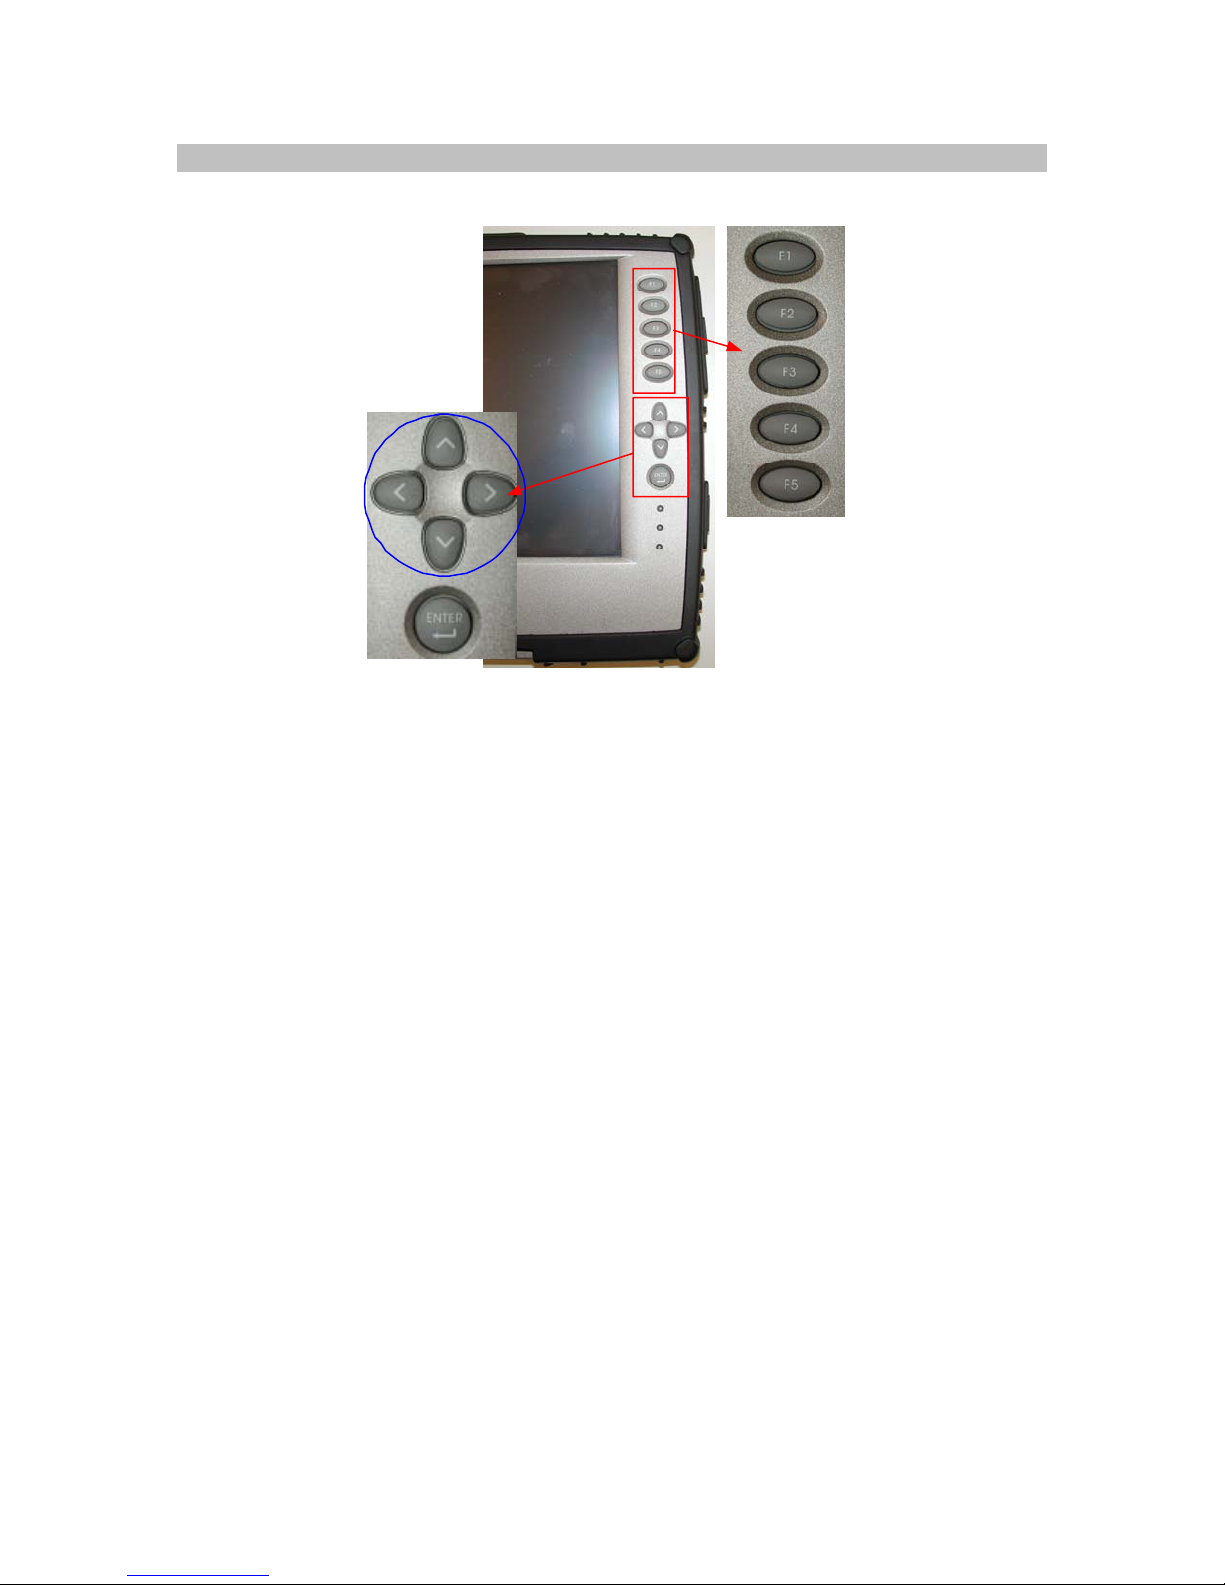
1.8 MobiPanel Buttons
The buttons on the front of your MobiPanel give you greater navigational control.
A
C
B
The A group buttons function as arrow keys, but can also be used as a mouse. These
keys as well as the B key will wake up the MobiPanel from the ‘suspend’ mode.
A – Arrow key functionality and mouse functionality
B – Enter key and Launch Dial Button – opens the launch dial program.
C – Function key (from F1 to F5, refer to Section 1.9 for definition)
The ON/OFF switch on the side of your MobiPanel, when in the OFF position,
ensures that the Tablet isn’t accidentally turned on. Sliding the switch to the ON
position allows the Tablet to resume operation.
12
Page 13
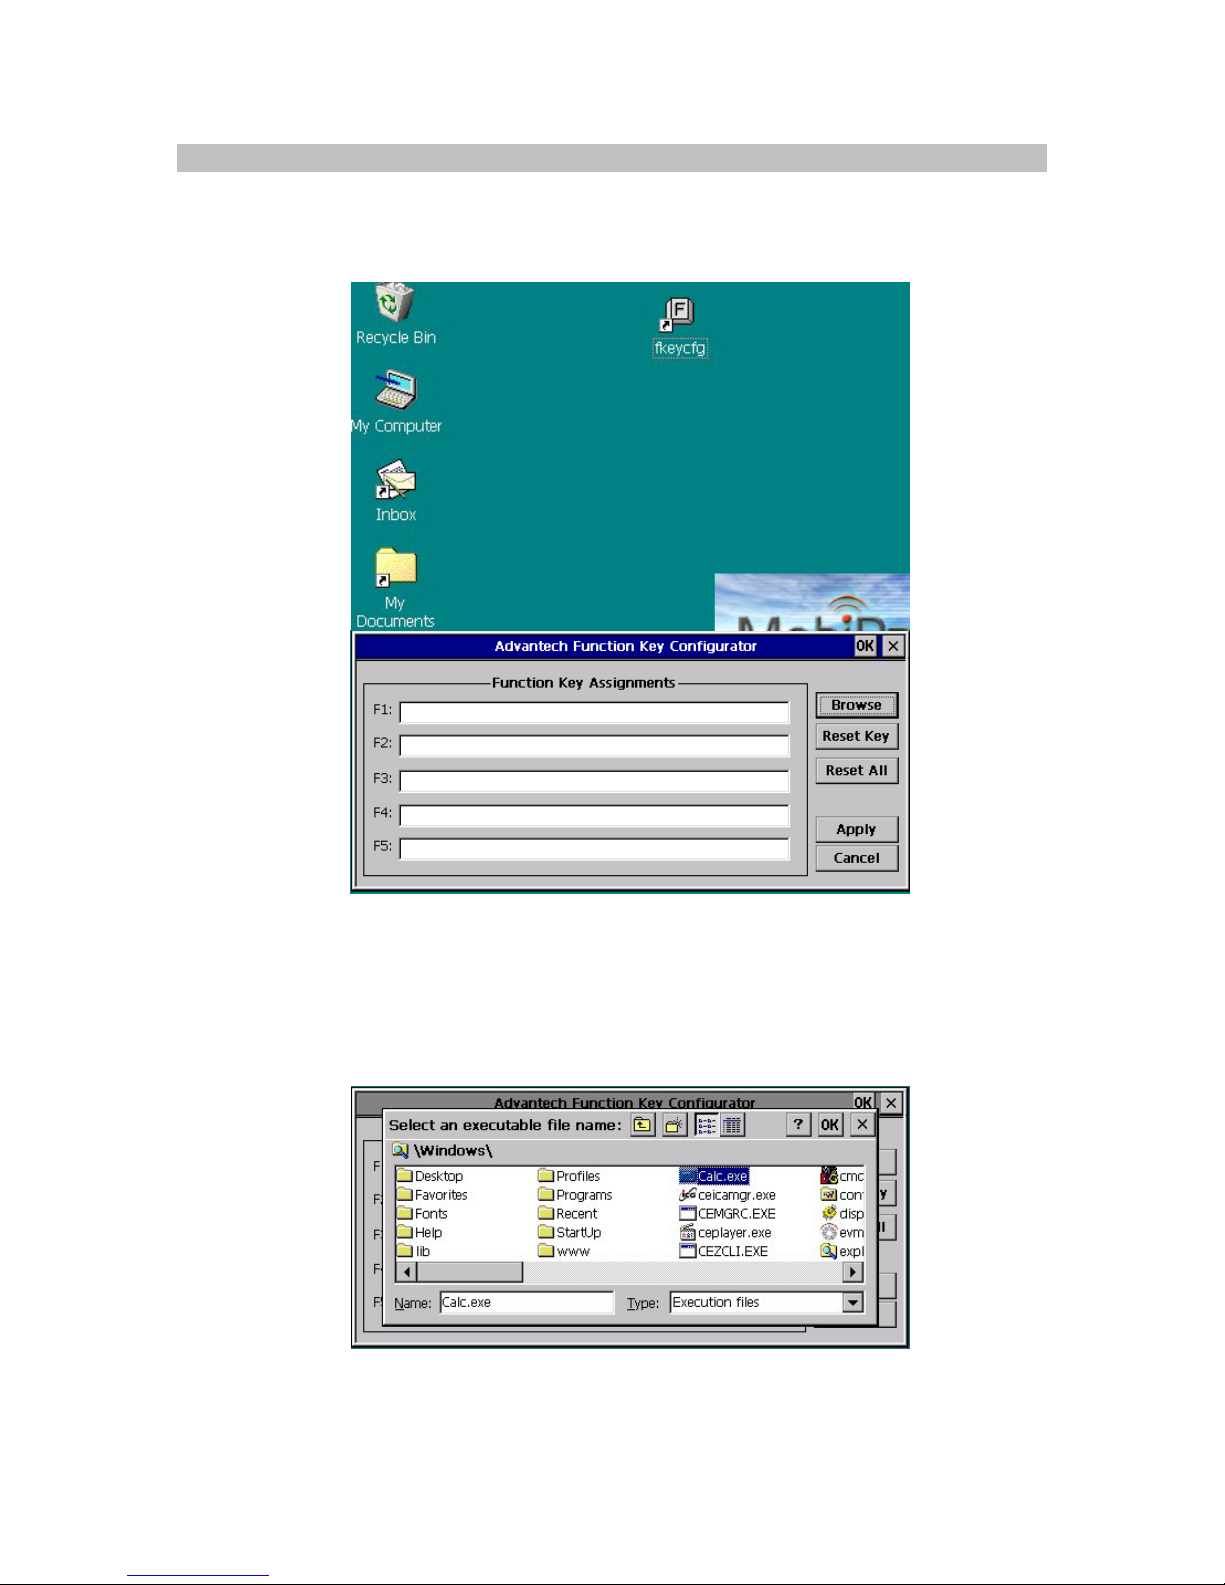
1.9 Function Key Definitions
The MobiPanel has a built-in function key utility for function key definitions. Users
can double-click the icon – fkeycgf, or just press any one of the undefined function
keys for configuration.
Users can choose the icon Browse to select the target application (eg. Calc.exe), or
just type the full path of the application in the text column. The icon Reset Key is
reset to one of the function key definitions where the cursor is located, and the icon
Reset All clears all of the function keys. (Advantech also can provide the service to
pre-define the function keys customers specify, before shipping.)
13
Page 14
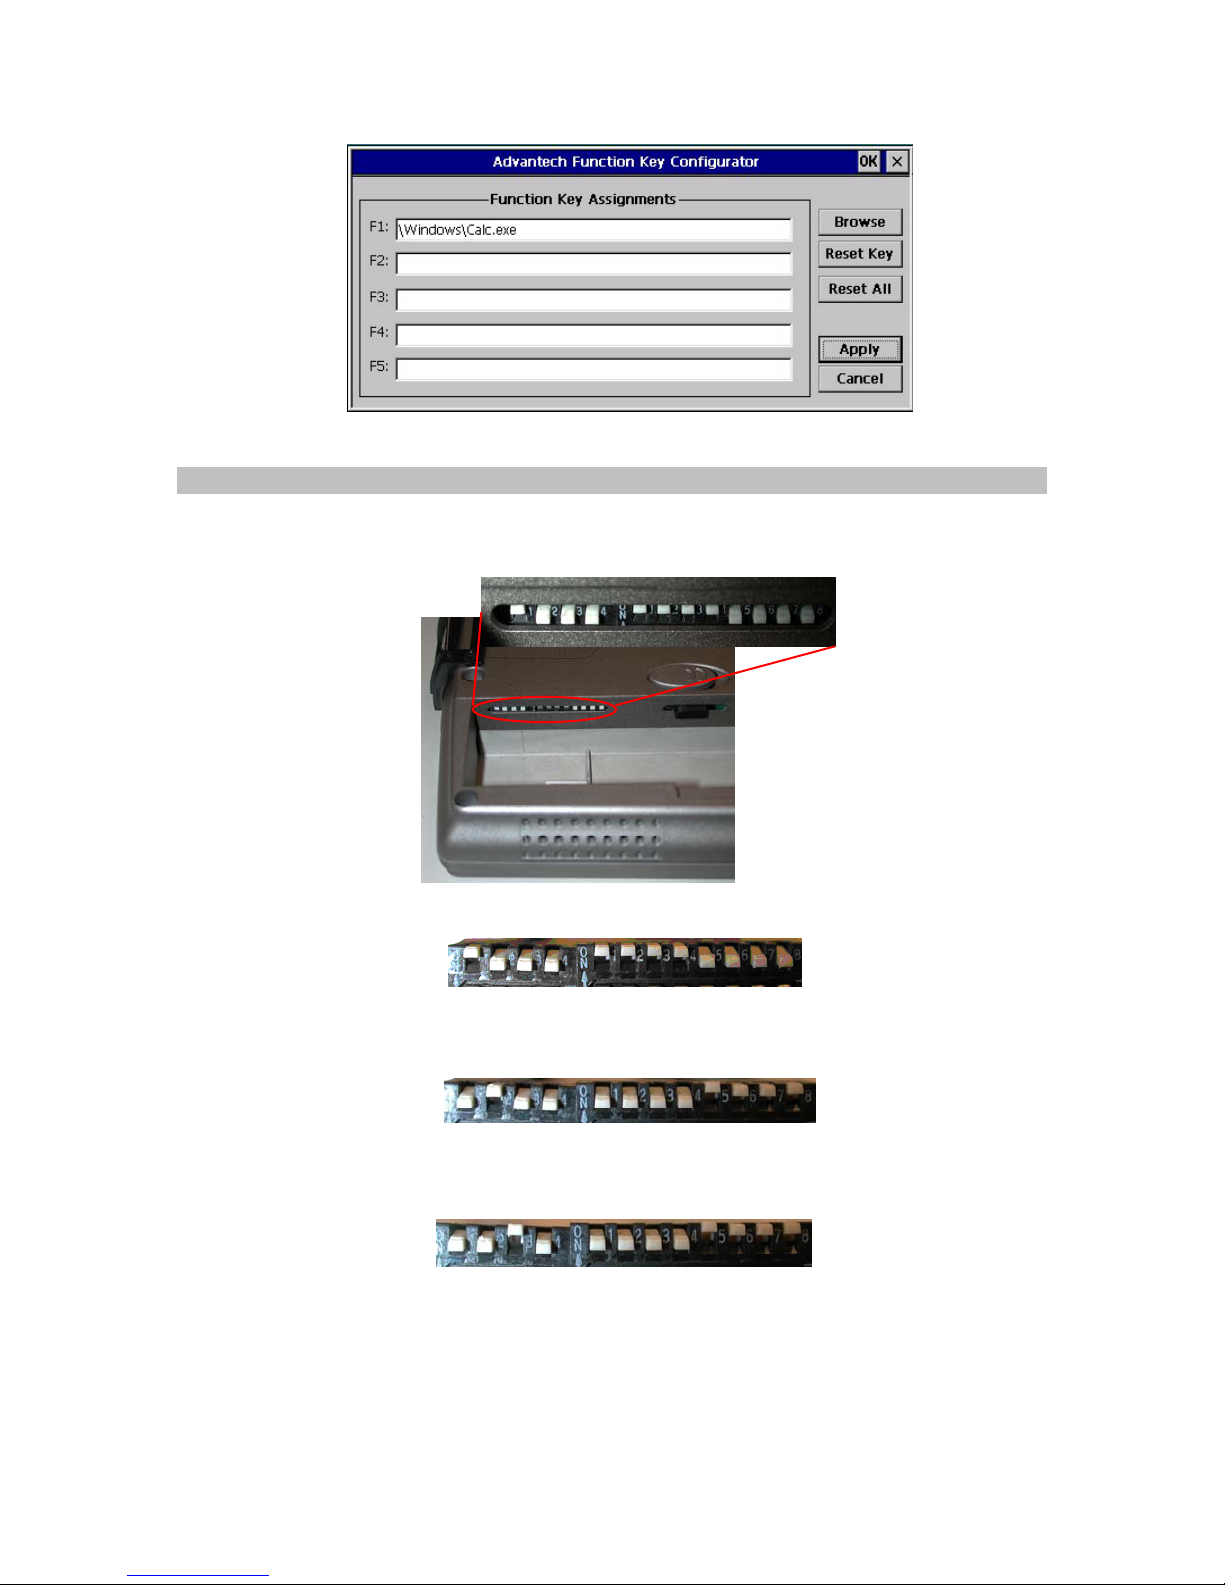
1.10 RS232/422/485 Setting
The RS232/422/485 setting is controlled by a set of dip switches, the dip switch can
by seen after removing the battery pack as shown in the figure below.
RS232
:
RS422
RS485
1 0 0 0 1 1 1 1 0 0 0 0
0 1 0 0 0 0 0 0 1 1 1 1
0 0 1 0 0 0 0 0 1 1 1 1
14
Page 15

1.11 Display Properties
This function allows you to set the background on your desktop, and the colors
displayed on your interface. To access these functions, go to
Start→Settings→Control Panel→Display→Background
15
Page 16
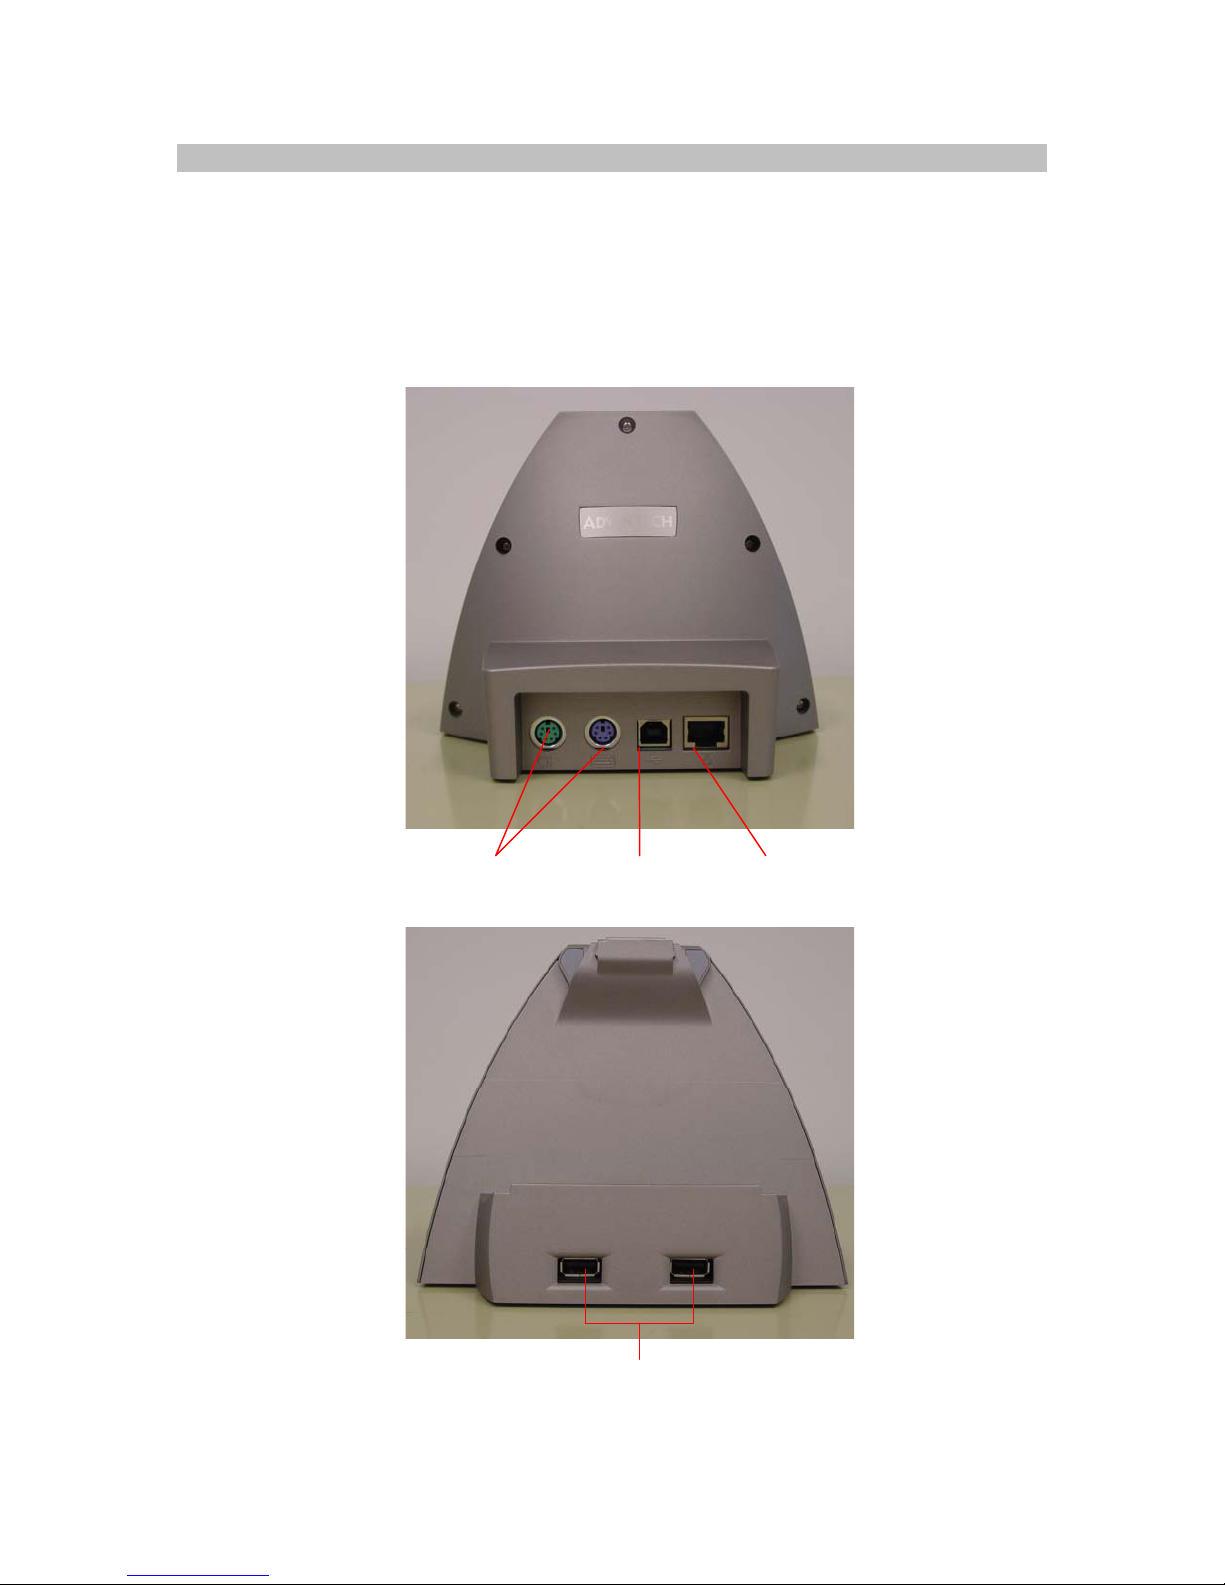
1.12 Cradle (Optional)
The cradle lets you ‘dock’ your MobiPanel, making it easy to use at your desk, to
read information, or to add peripherals such as a keyboard or a mouse.
I/O Ports:
USB host controller supports 2 USB ports
RJ-45 for Ethernet port
2 x PS/2 connector
1 x USB Type A connector to synchronize with PC
1 x DC-in jack
PS/2 USB B Type
USB
RJ-45
16
Page 17
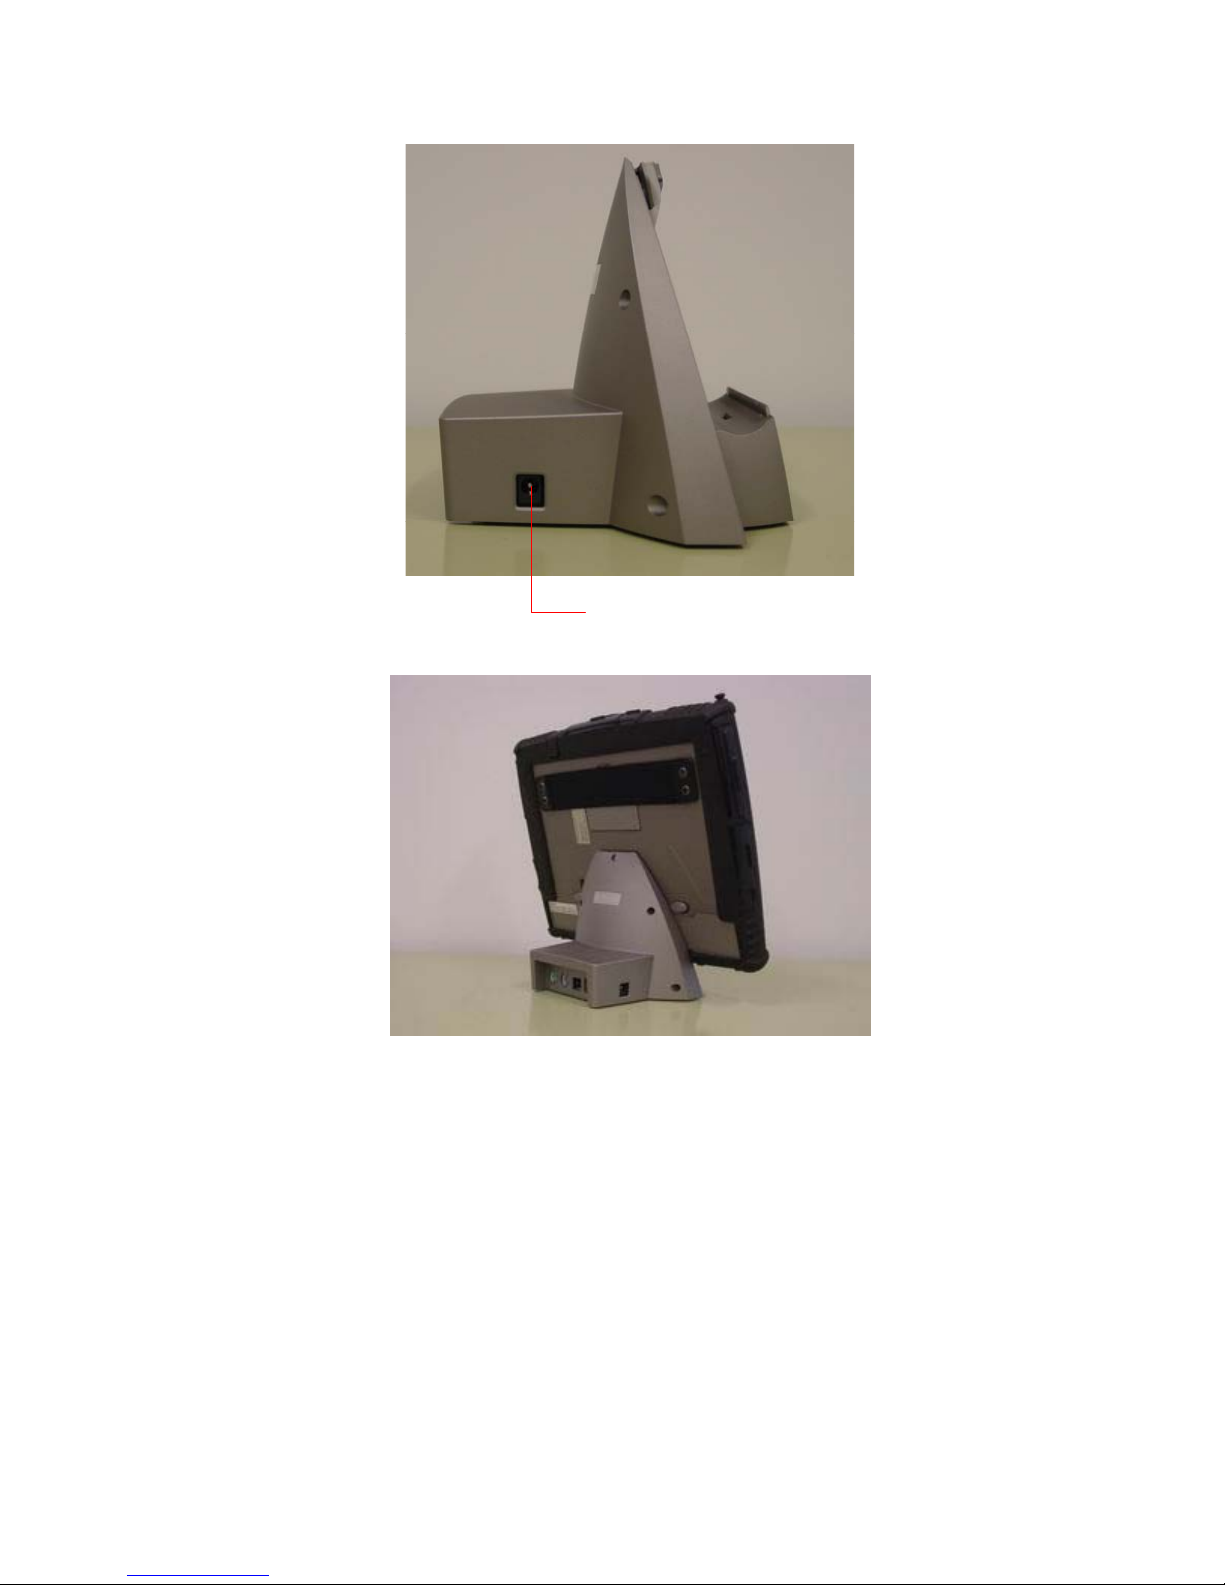
DC in
In addition, the cradle increases your connectivity, with USB Type A and B (for
synchronization with your PC) ports [4 A-Type and 1 B-Type] as well as PS/2
support for a keyboard and mouse. By removing the insert in the cradle’s pocket (by
sliding the insert to the right and lifting it up), the cradle can accommodate
MobiPanels with the extended battery.
17
Page 18
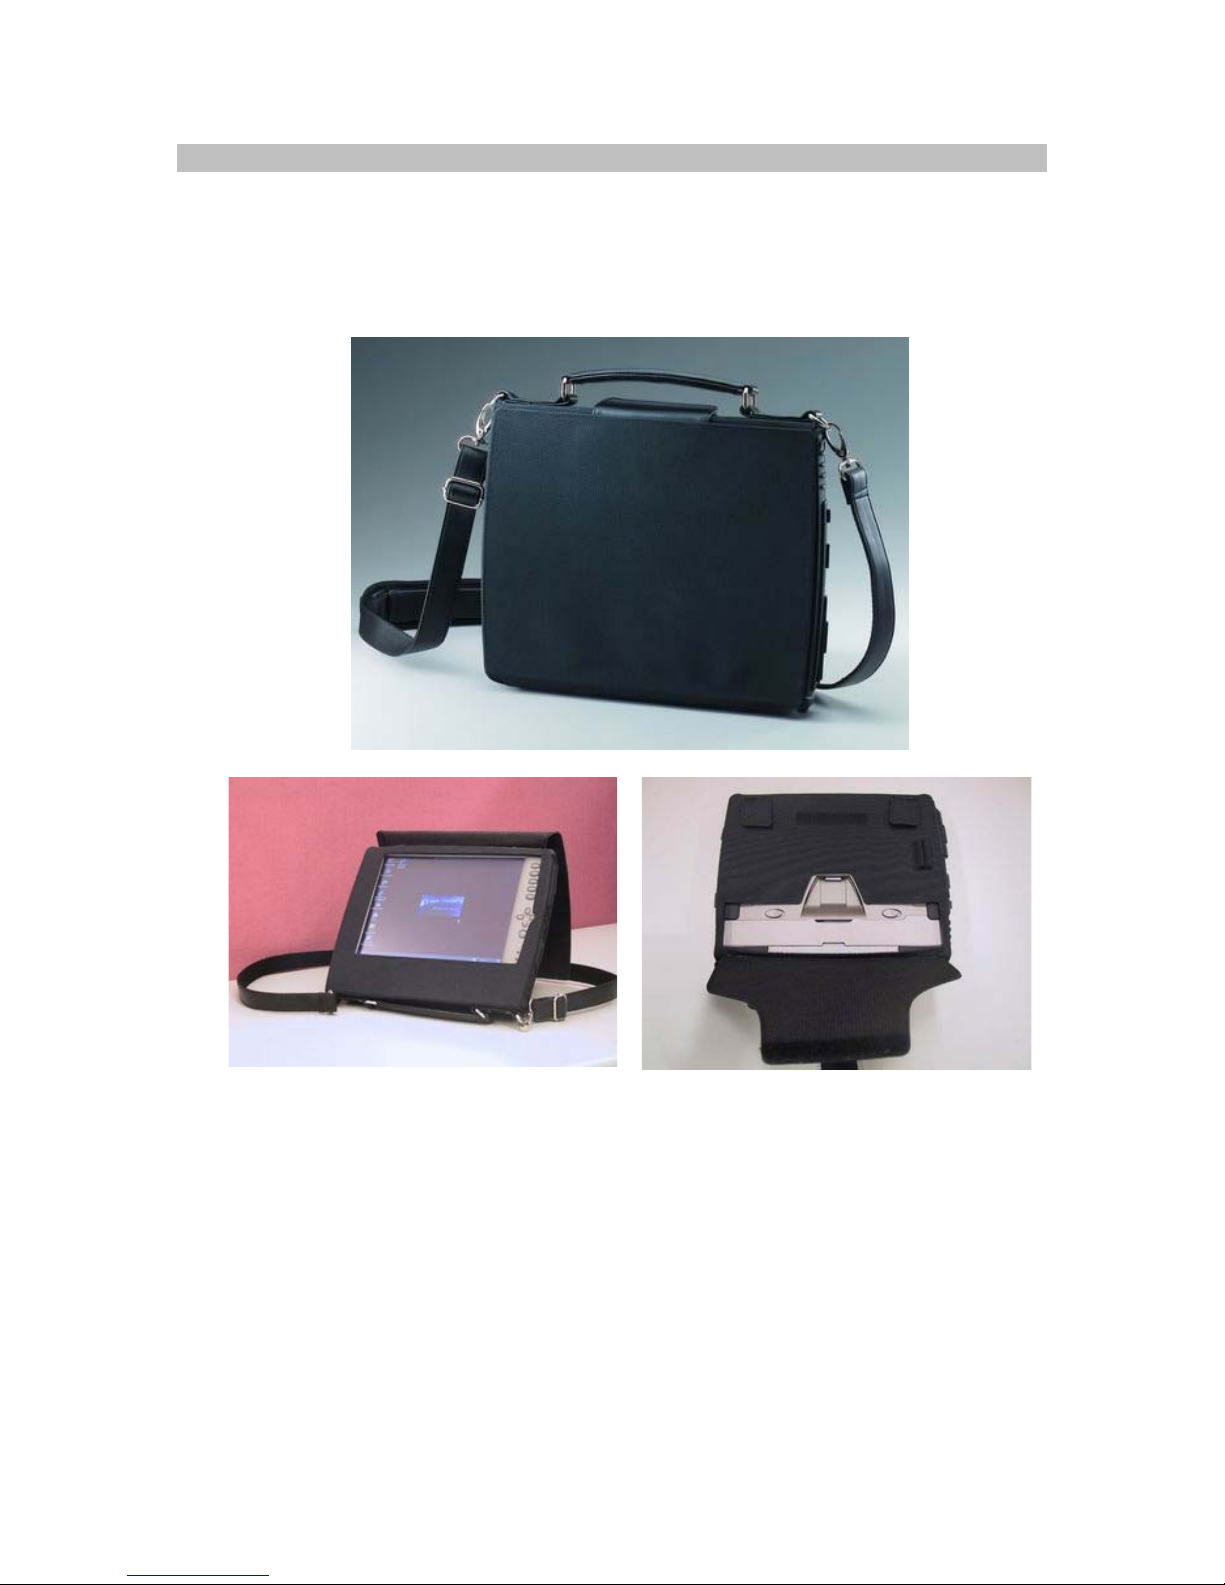
1.13 Carrying Case (Optional)
The Carrying Case is designed for easy carrying and spill & dust resistance. This
carrying case includes hand strap, detachable shoulder strap, carry handle, and
penholder. Users can easily view and touch the monitor, press 5 function keys, and
swap the battery pack even when the web tablet is put in the case. In addition, the
carry case can be stand on a desk.
A Stand
Battery Swap
18
Page 19
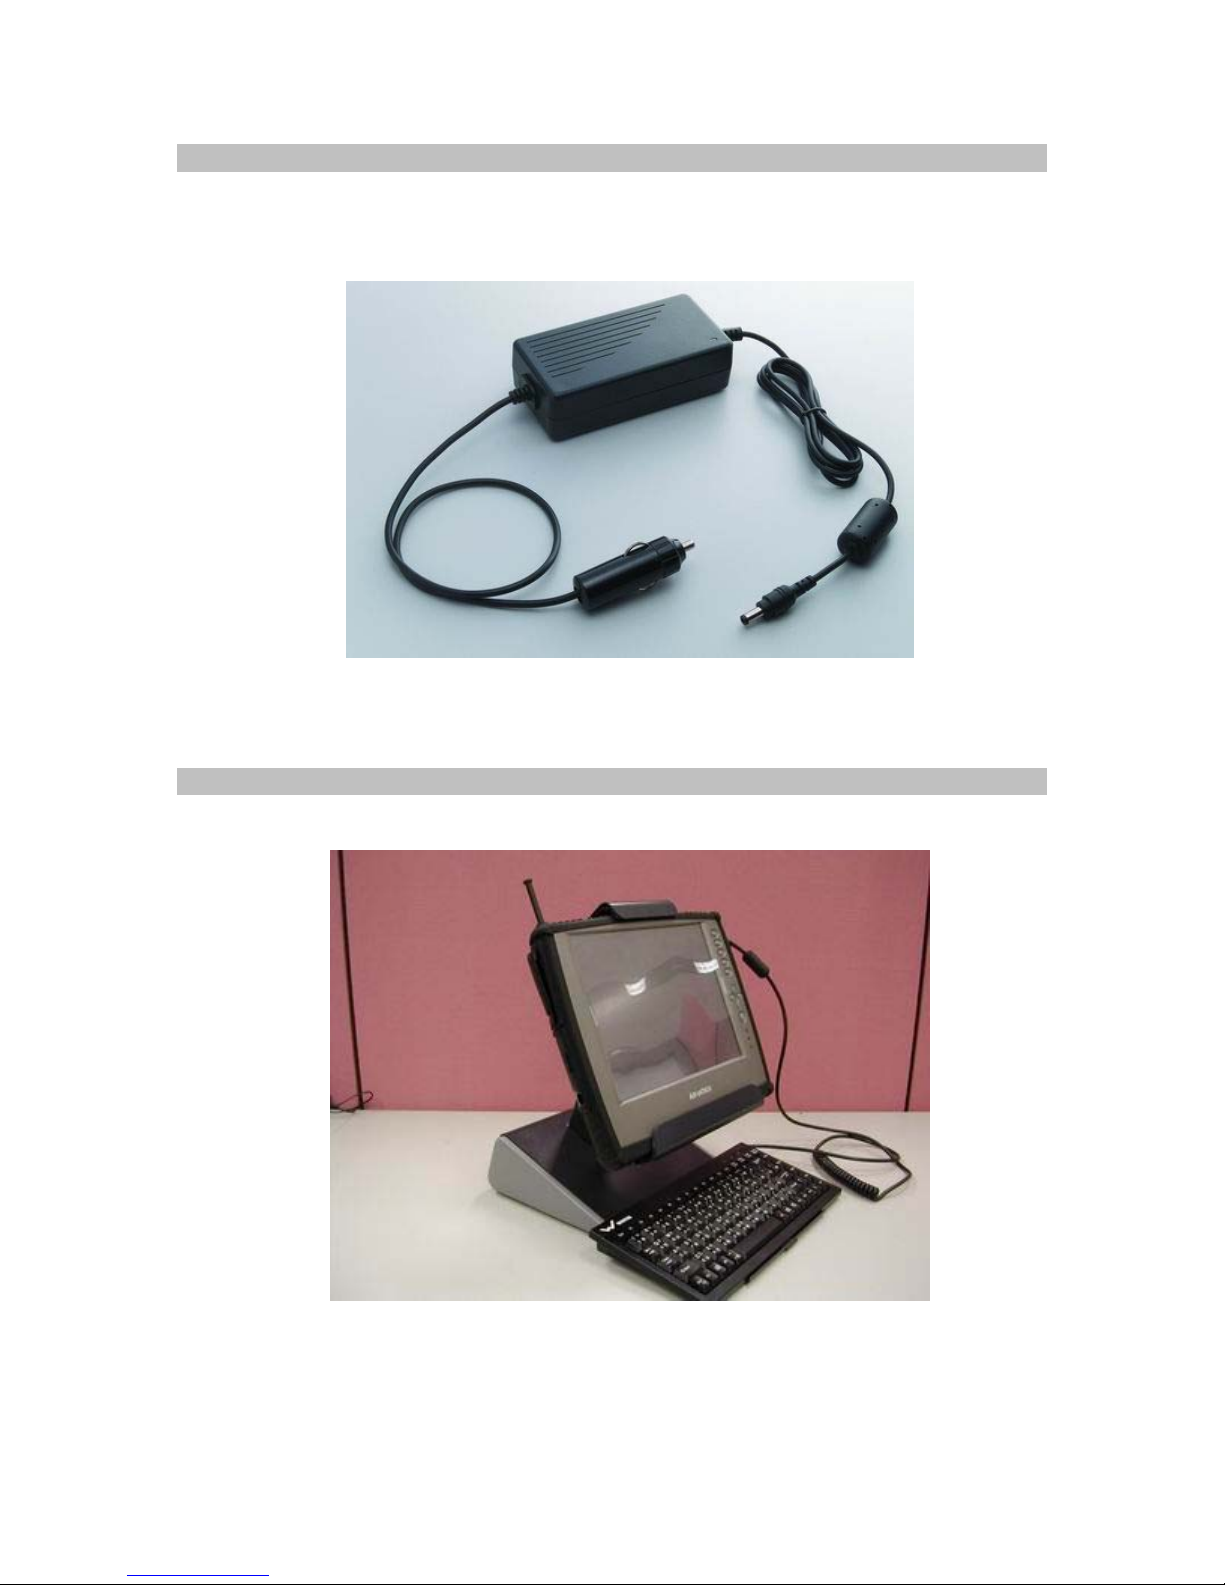
1.14 Auto Adapter (Optional)
The Auto Charger provides an in-vehicle power charger for the MobiPanel.
Input: DC 12 V/24 V
Output: 60 W
1.15 Vehicle Mount (Optional)
Besides indoor use and in-field use, you can use the MobiPanel in a vehicle for
logistics, transportation, dispatching and so on. The vehicle mount provides industrial
strength protection against shock, impact, and vibration from the vehicle.
19
Page 20
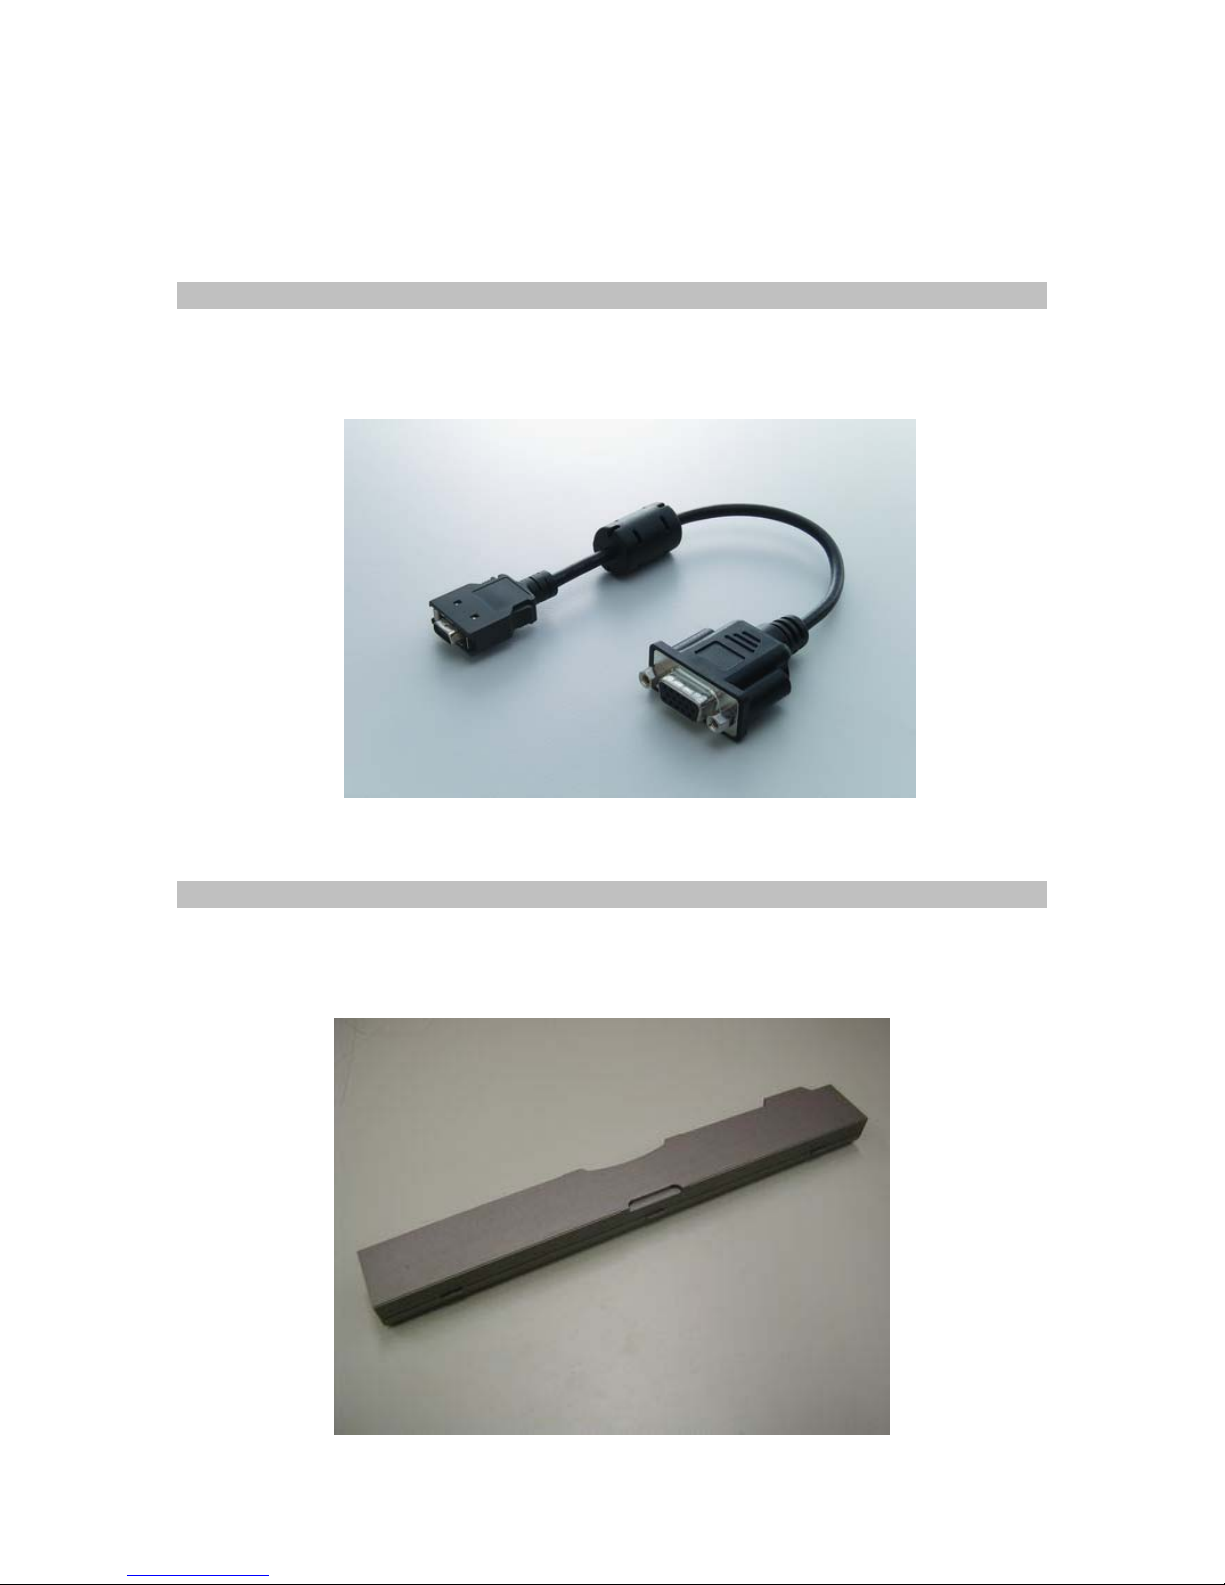
You can adjust the viewing angle of the MobiPanel in the horizontal and vertical
direction to fit different needs. MobiPanel can hold the desired viewing angle when
the vehicle is on road because of the robust design. The keyboard plate allows you to
use keyboard in the vehicle.
1.16 Mini VGA cable (Optional)
You can use this cable to connect devices with a standard VGA port, such as a
monitor or projector, to the mini-VGA port on your MobiPanel. Users can then
operate and use the MobiPanel with other display devices.
1.17 Standard Battery Pack (Optional)
Allows you to swap the battery during suspend mode. It will increase the usage time
of the MobiPanel on site.
20
Page 21
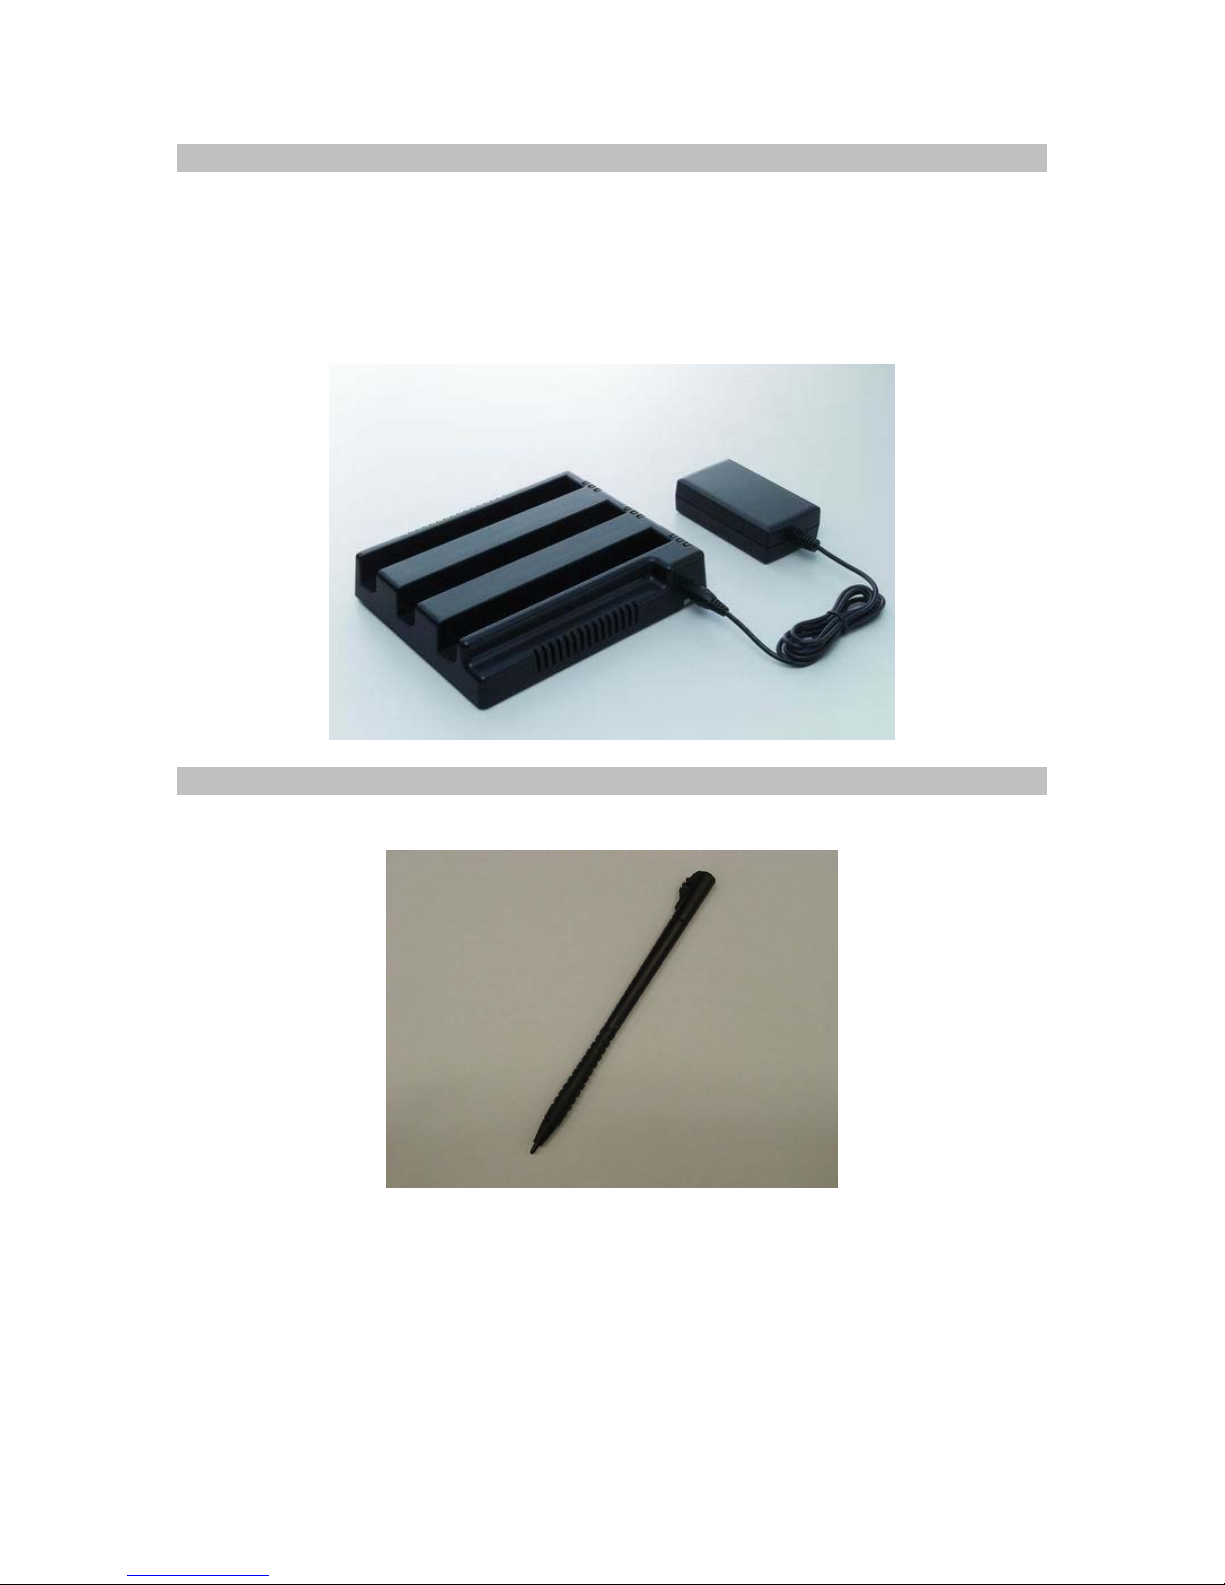
1.18 3 in 1 Charging Station (Optional)
The 3 in 1 Charging Station can charge three standard battery packs at the same time.
The standard battery charging time is 3.5 hours for either one or three battery packs.
The 3 in 1 charging station requires the power adapter in the accessory box of the
MobiPanel.
1.19 Stylus (Optional)
The Stylus has been specially designed for use with the MobiPanel.
21
Page 22

2. Managing Information Data Input
2.1 Data Input
Your MobiPanel features a variety of data input methods, so users can choose, and
change, according to their needs:
• Handwriting Recognition.
• A Software Keyboard.
• An External Keyboard.
Software Keyboard
To access the Software Keyboard, click the handwriting recognition icon on the
taskbar. Once this application comes up, click the keyboard icon in the top left corner
of the frame.
The Software Keyboard functions like a real keyboard. The ‘CAP’ key locks the keys
to uppercase; the ‘Shift’ key switches the keys to uppercase with one click only;
shortcut keys, such as ‘Copy’ (Ctl+C) are controlled by touching the ‘Ctl’, then the
relevant key.
Once finished with the keyboard, click the ‘Close’ icon in the top right corner of the
keyboard window.
External Keyboard
Attaching an external keyboard via the USB or PS/2 port of the Tablet, or through the
cradle, overrides any other input selection. Make sure the keyboard is supported by
Windows CE 3.0 or comes with Windows CE 3.0 drivers. See
2.2 Data Synchronization
To share information between your MobiPanel and your PC/Laptop, you need to
establish a direct PC Connection. There are two ways to make direct connection. The
default way is through a USB interface.
The installation procedure is:
1. To make the connection, you will need to install ActiveSync 3.1 (or higher)
software to your PC/Laptop. To download this freeware, go to
http://www.microsoft.com/mobile/downloads/activesync.asp
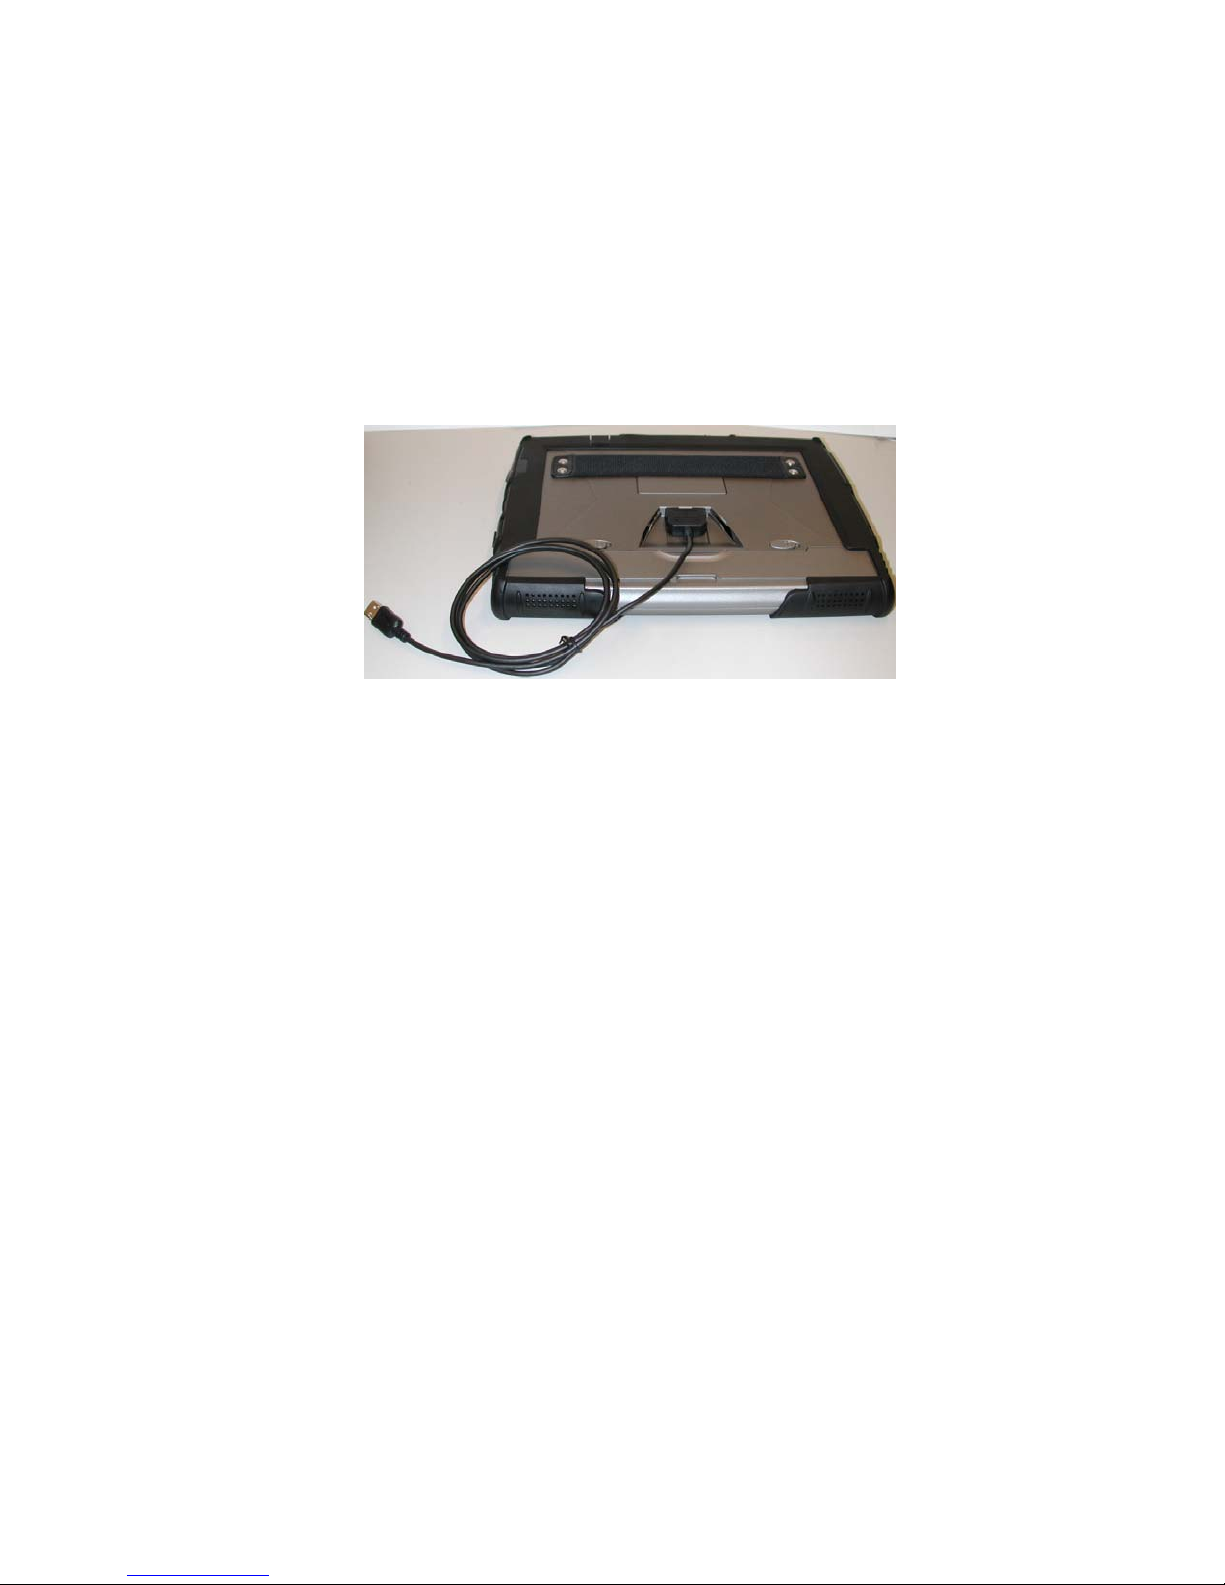
2. Use the synchronization cable to connect the PC/Laptop and Tablet. Both
PC/Laptop and Tablet will detect the connection and launch the counterpart software
to make the connection.
Section 3.1.
22
Page 23
3. When initiating the connection, there will be a pop-up windows showing: ”Set Up
a Partnership”. Please select “No” and “next”. Now you have established the
connection successfully.
The other way to make the connection is through IrDA. To switch between
connection interfaces, go to
→PC Connection
, and follow the instructions. Place your Tablet and the target
Start→Settings→Control Panel → Communication
device in line of sight of each other and within 1 meter apart. Then go to
Start→Programs→Communication→IR Sync to make the connection.
23
Page 24
2.3 Applications
Microsoft RDP
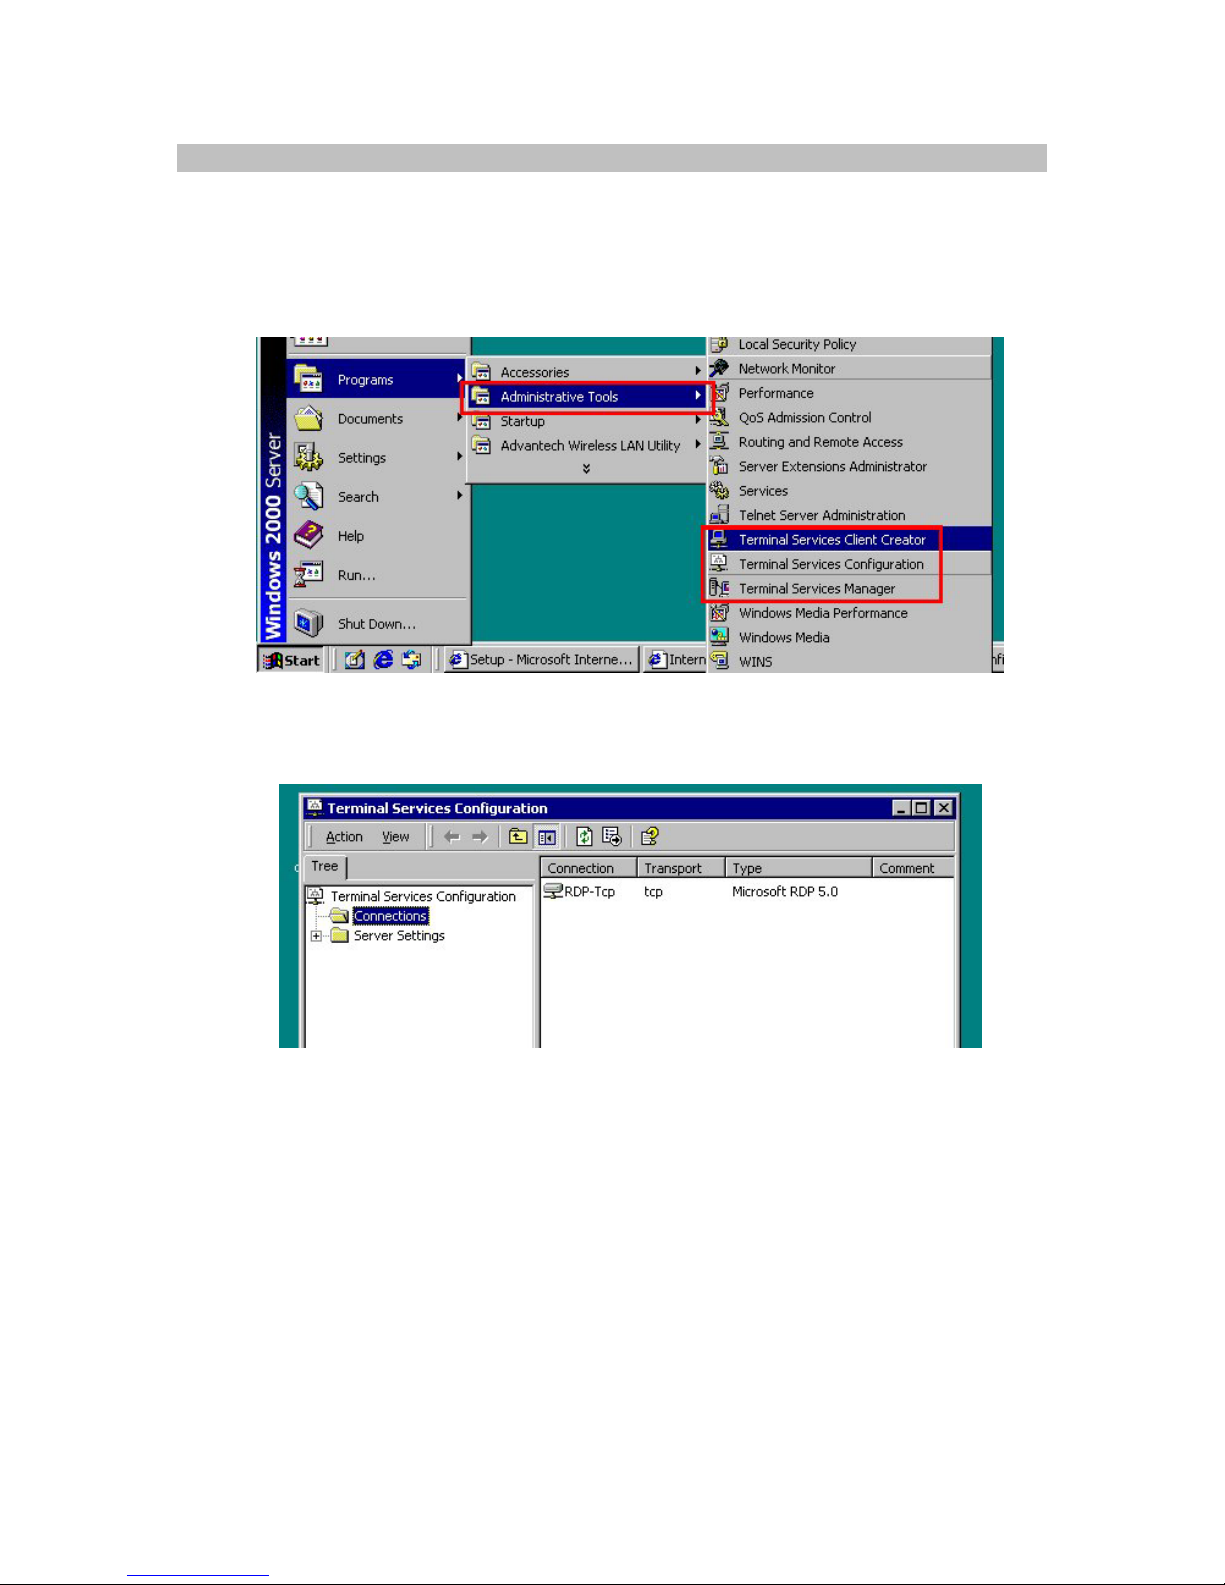
Make sure you have Windows NT terminal server / Windows 2000 server which can
support the Terminal Service on the server. Please also make sure that the server and
MobiPanel can both connect to the access point.
Execute
Programs→Adminstrative Tools→Terminal Services Configuration at
Server side
Execute
Programs→Communication→Microsoft RDP at Client (Window CE) side,
and input the Server IP in the
Go through the formal login process, the window will be shown exactly like in the
server screen.
Terminal Server Client window, then press connect.
24
Page 25
Advantech Autorun application
AutoRun.exe is an auto launch program used to launch applications after system
reboot.
The user interface program AutorunUI.exe can be used by the reseller / end user to
configure auto launch programs. The method to use AutorunUI.exe is described as
below :
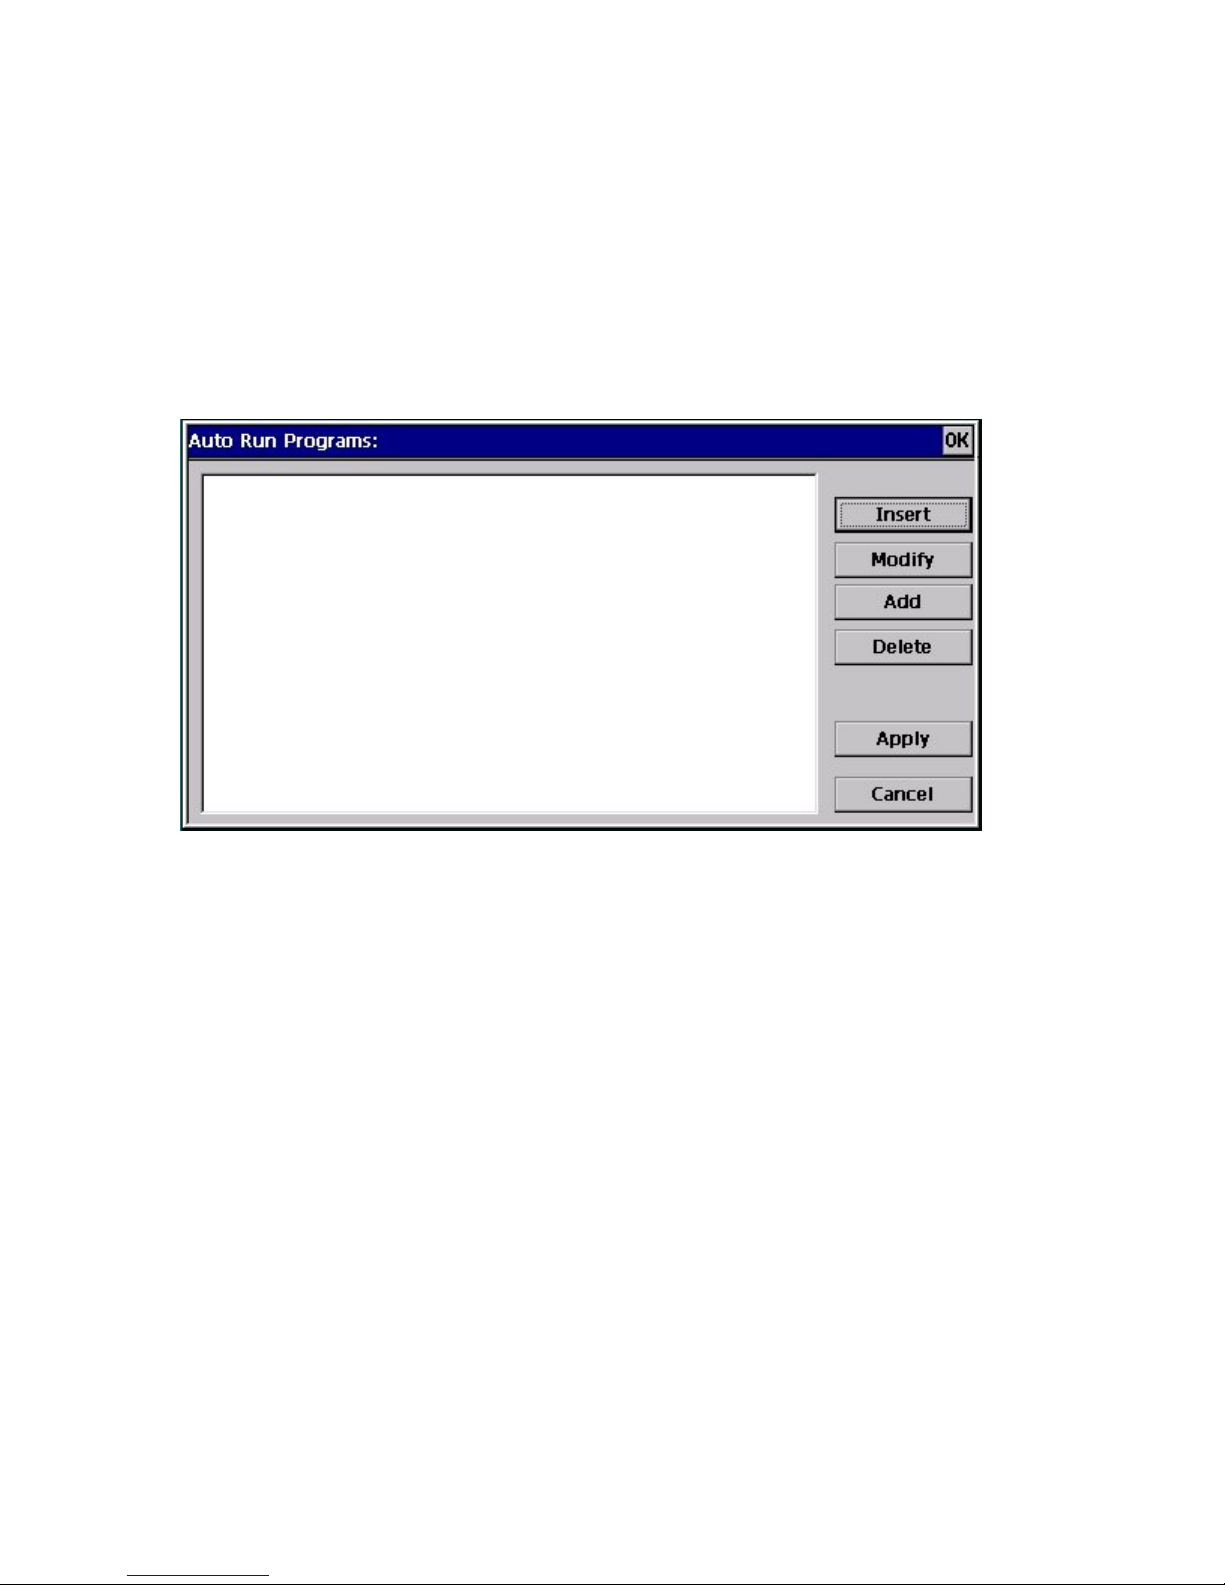
1. Double click the icon of AutoRunUI.exe on the desktop to launch the program.
There are six buttons on the right of the dialog. “Insert” and “Add” are used to add
items in the list box. “Modify” and “Delete” are used to modify and delete the
existing items in the list respectively.
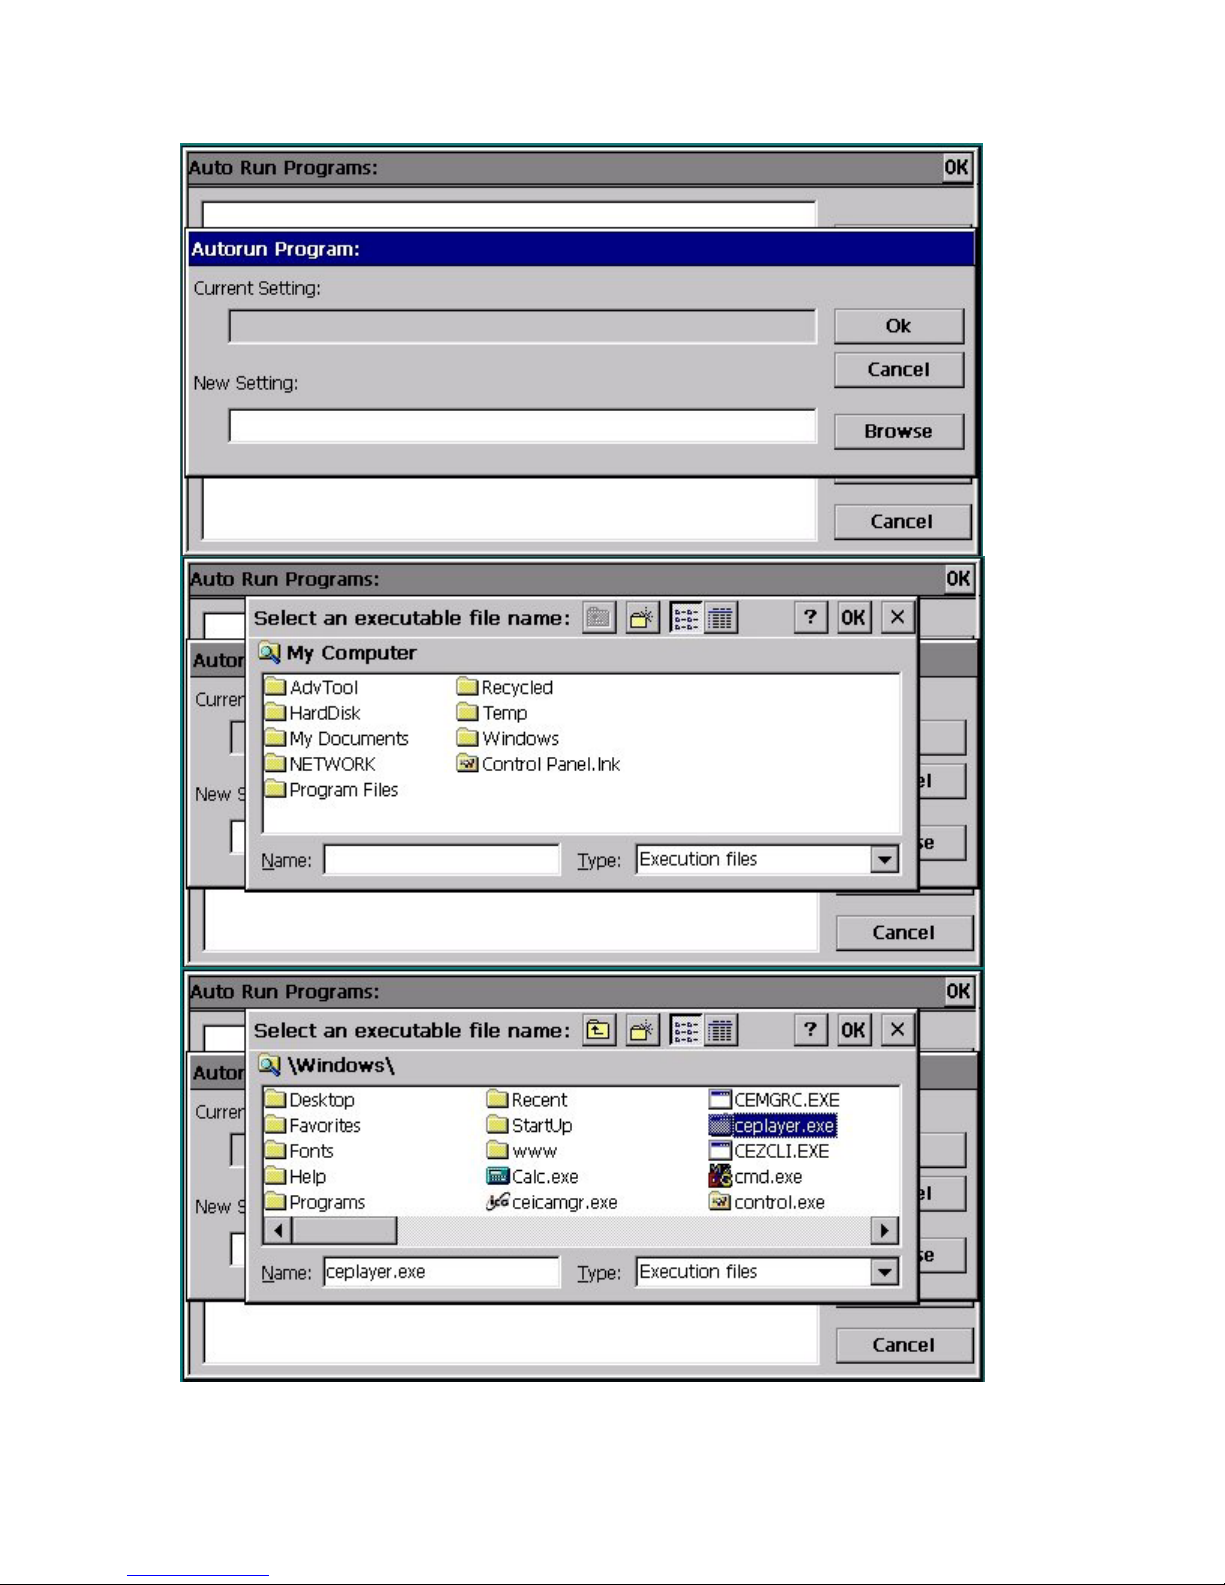
2. When the user presses “Add”, the Autorun Program dialog appears. Users can type
in the path of the program you want to launch in the “New Settings” edit box.
Alternatively, the user can press the browse button to specify the program.
25
Page 26
26
Page 27
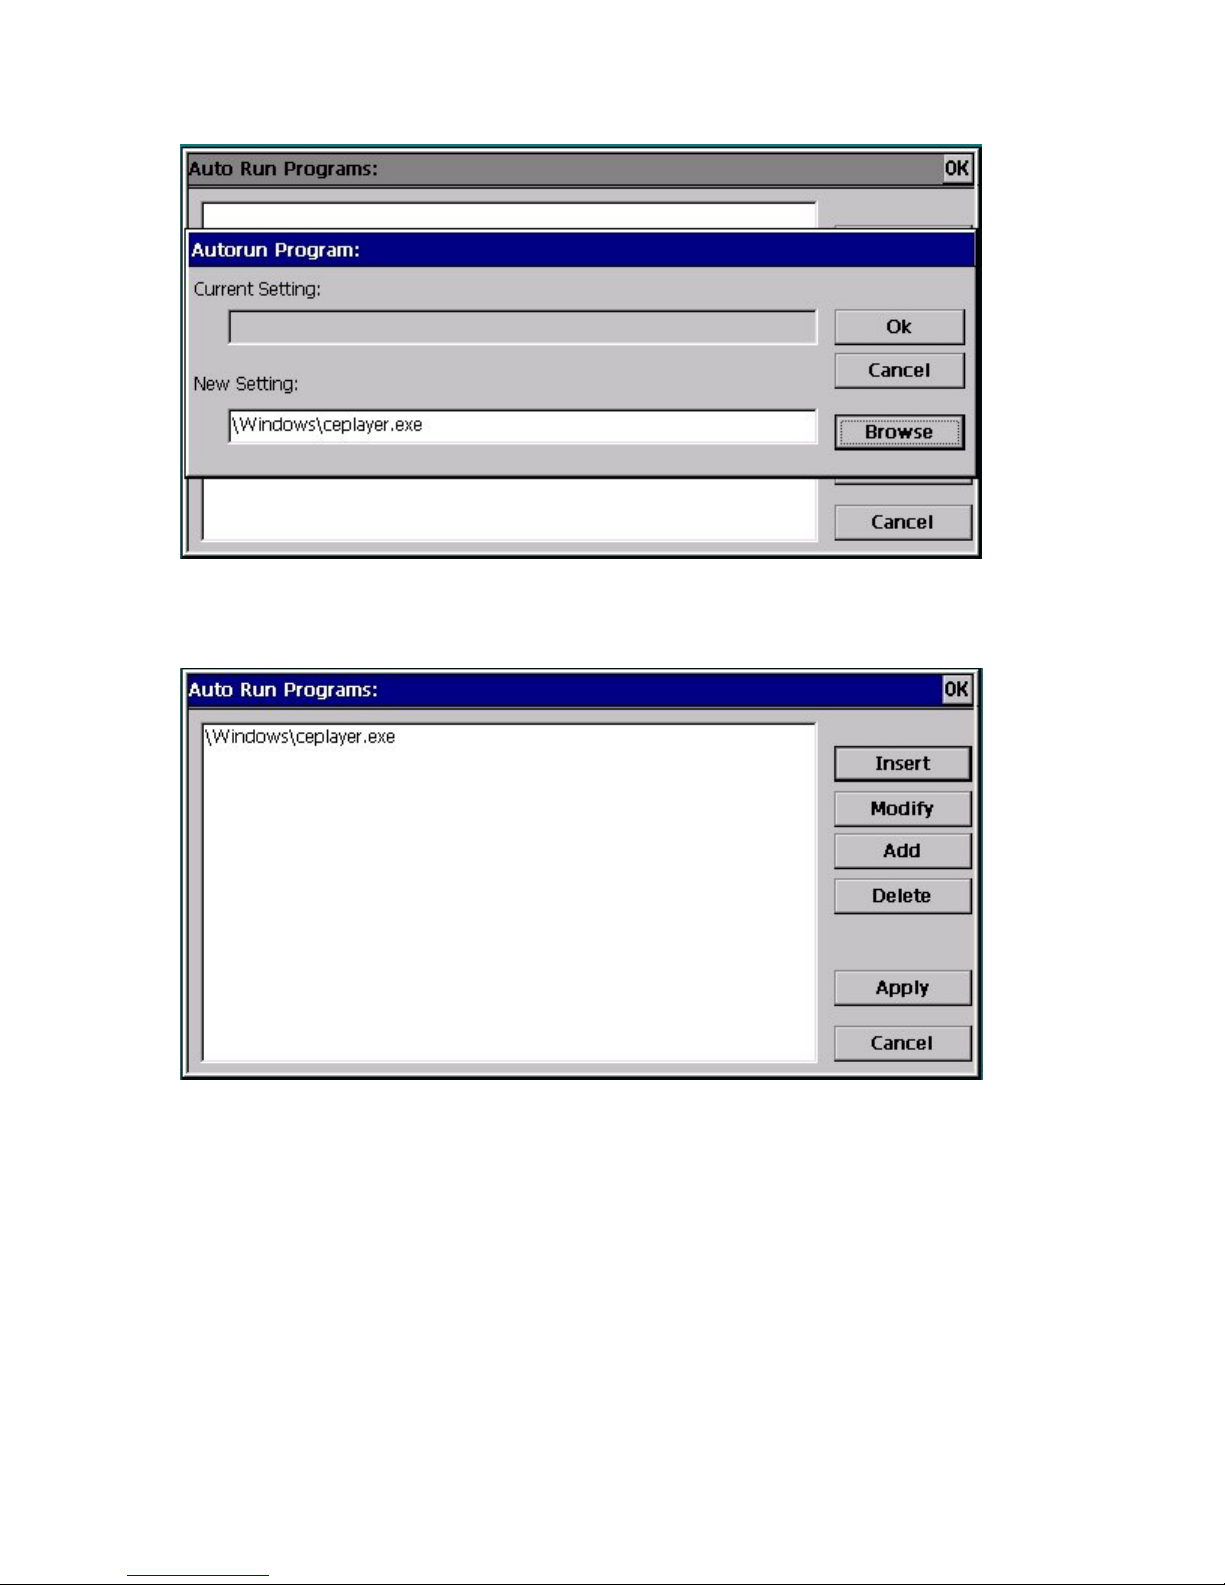
After pressing “Ok” in the Autorun Program dialog, the item you specified in the edit
box will appear in the list box of the Autorun programs dialog as shown in the
following figure.
The difference between “Insert” and the “Add” button is: “Insert” button can be used
to insert items between existing items in the list box, whereas “Add” button is used to
add items in the rear of the list.
3. The “Modify” button is used to modify the existing items in the list box as shown
below. Users can choose an item in the list box, and press “Modify”.
27
Page 28
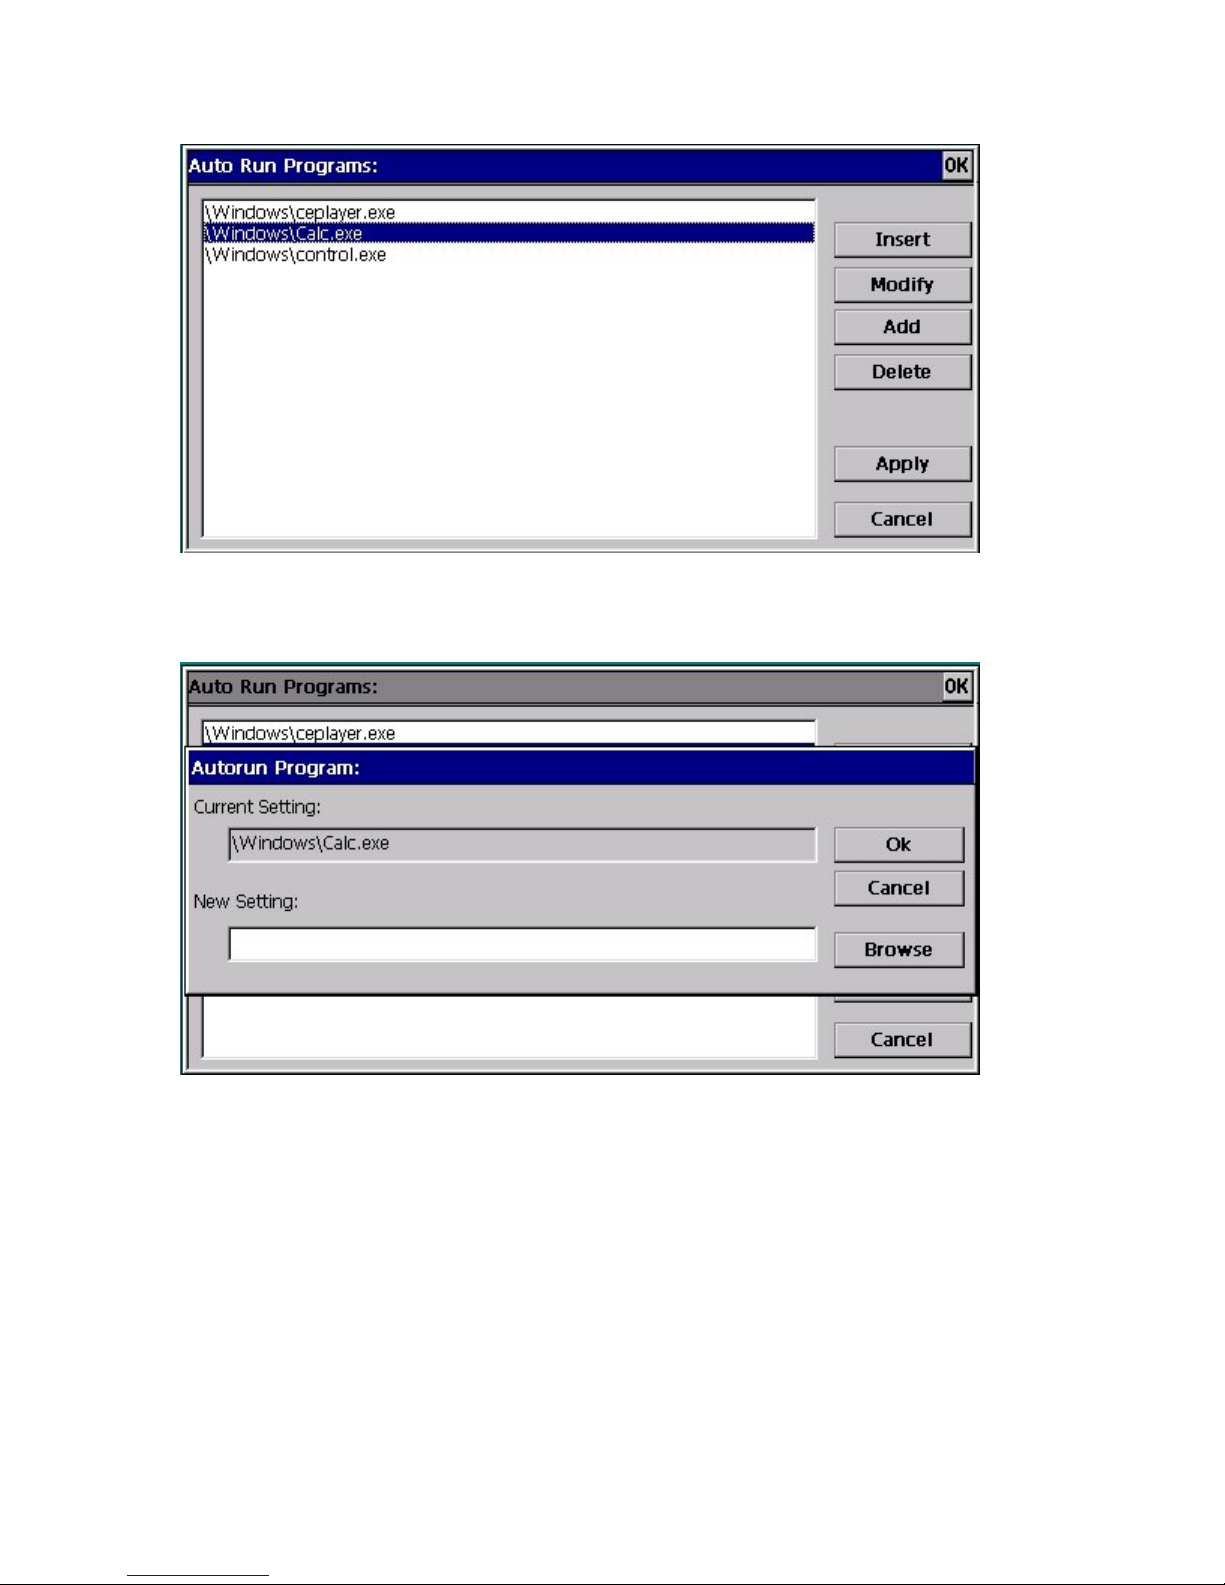
The Autorun Program dialog will then appear, users can type in the path of the
program they want to replace the existing item in the exit box, or press “Browse” to
specify it.
28
Page 29
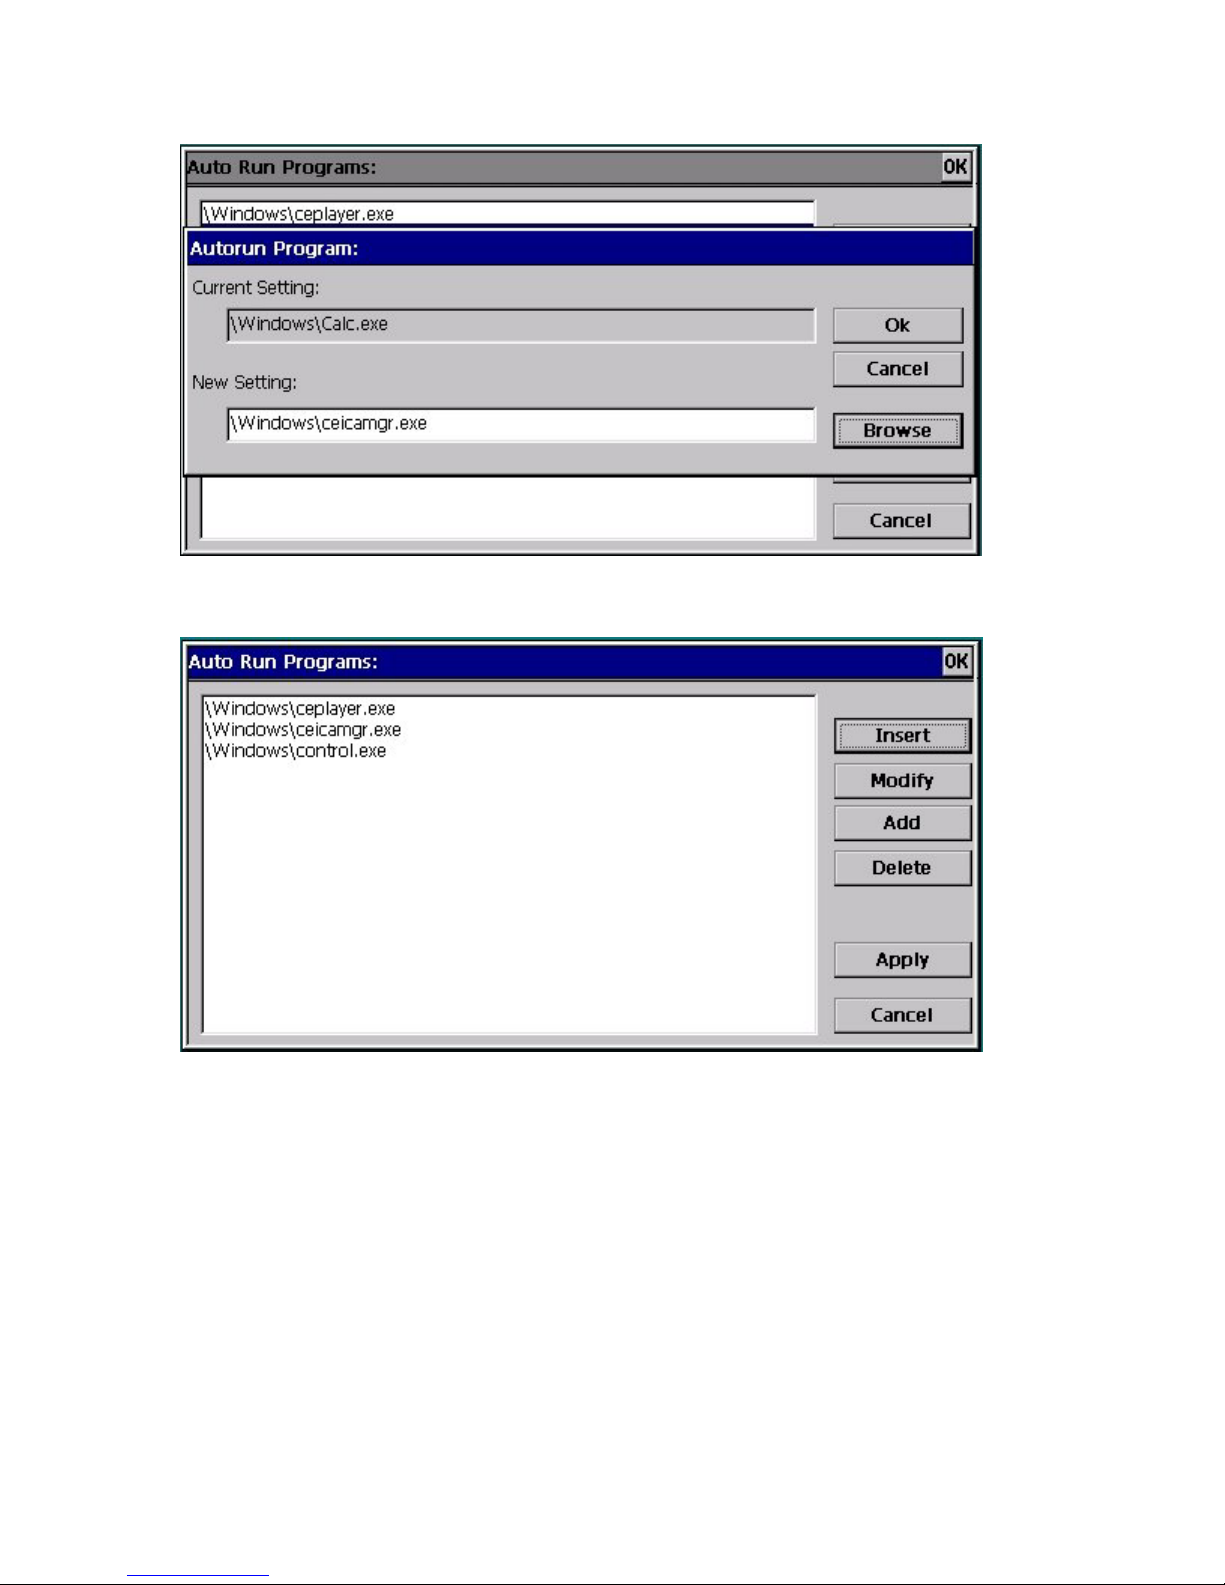
After pressing “OK”, the item “\Windows\Calc.exe” is replaced by
“\Windows\ceicamgr.exe”.
4. After specifying all the items, press “Apply” to save the setting or press “Cancel”
to discard the setting.
Registry Backup
RegBackupRestore is an utility used to backup and restore system registry.
(1) Steps to Backup registry:
1. Double click “RegBackupRestore” Icon on the desktop.
29
Page 30
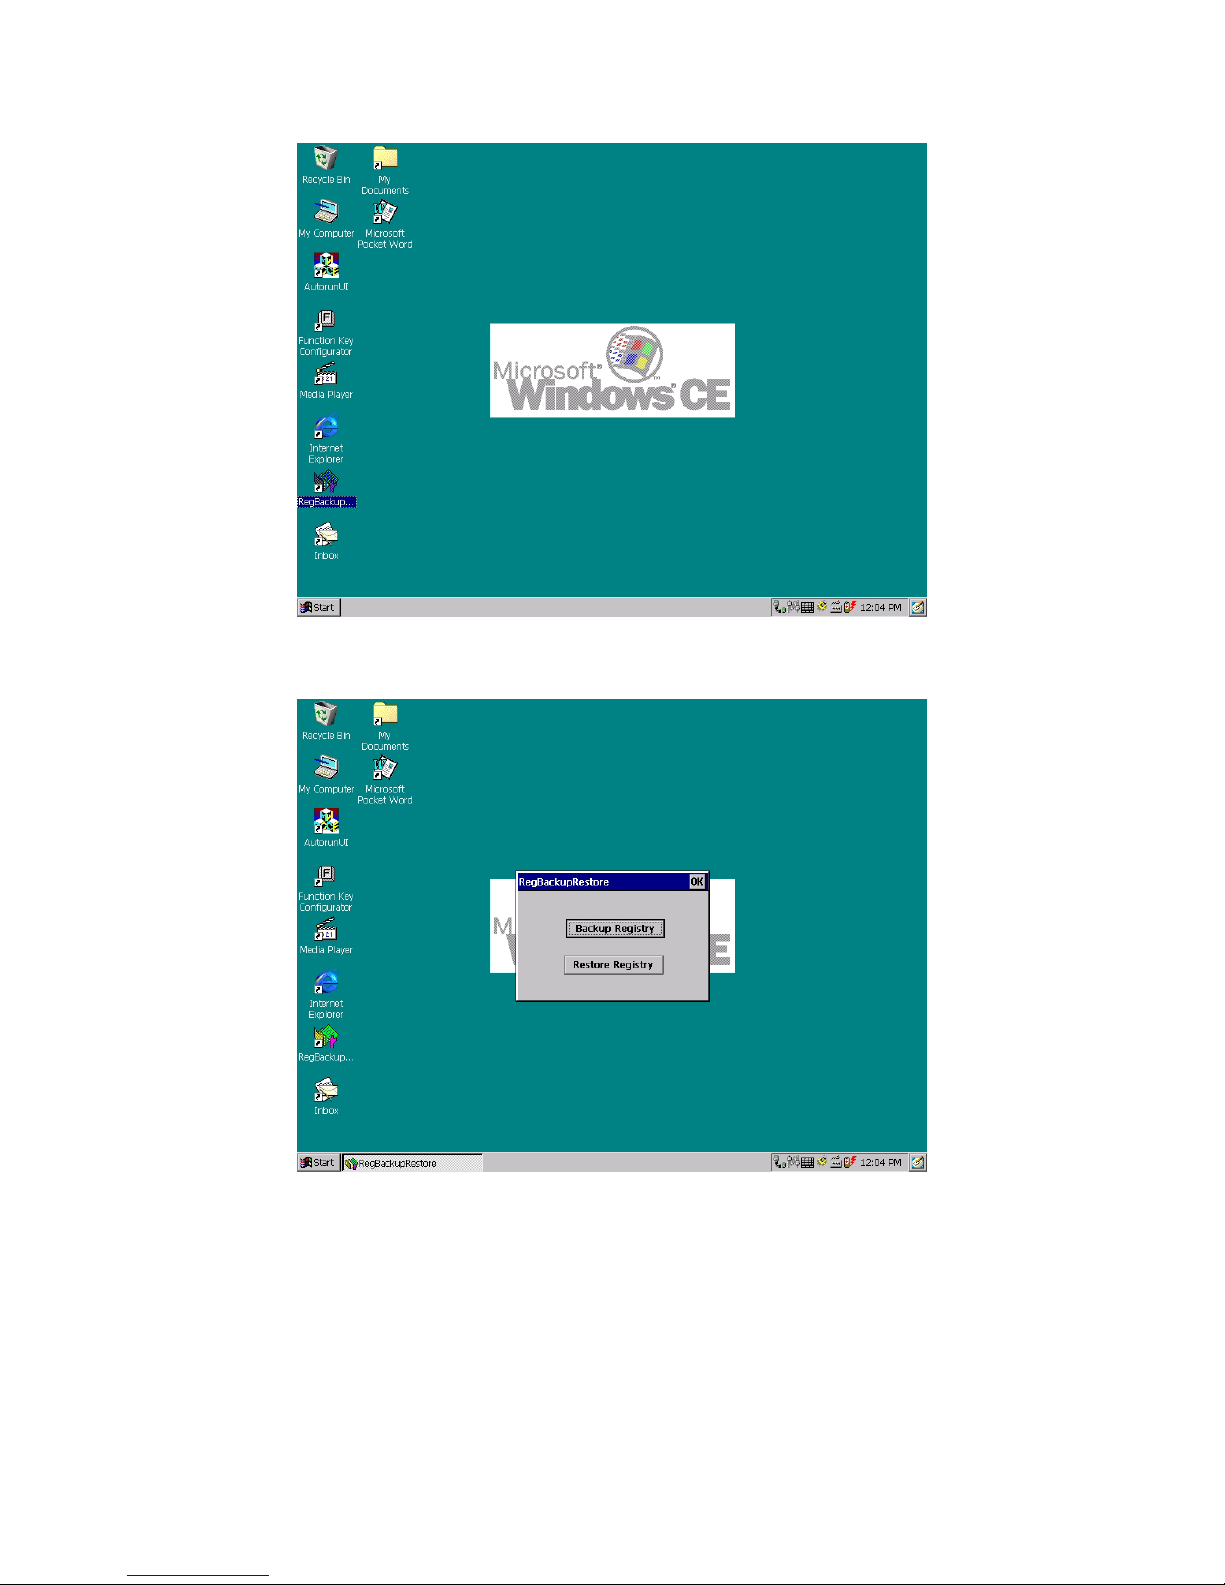
2.Press “Backup Registry” button.
3.If you want to use the default registry file name, press “Yes”.
30
Page 31
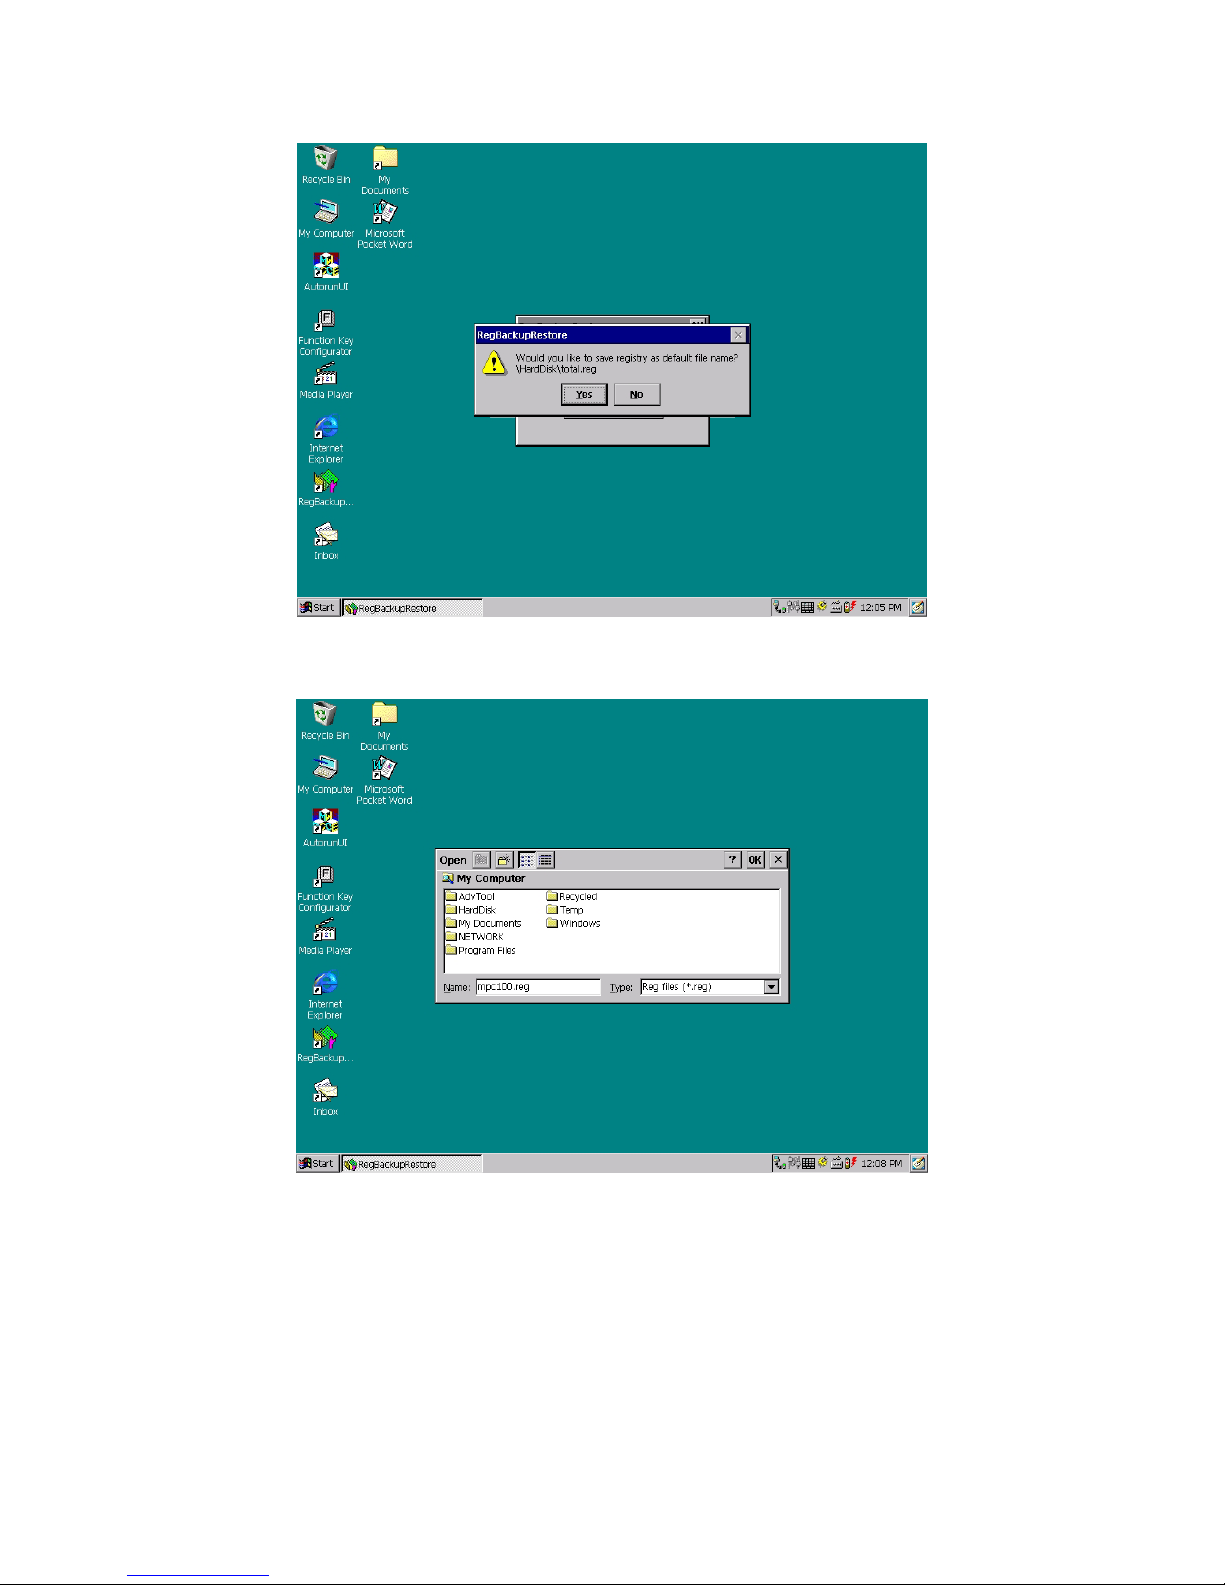
Or press “No”, and specify the registry file name which you want.
Then the MPC100 starts to backup the system registry into a file.
31
Page 32
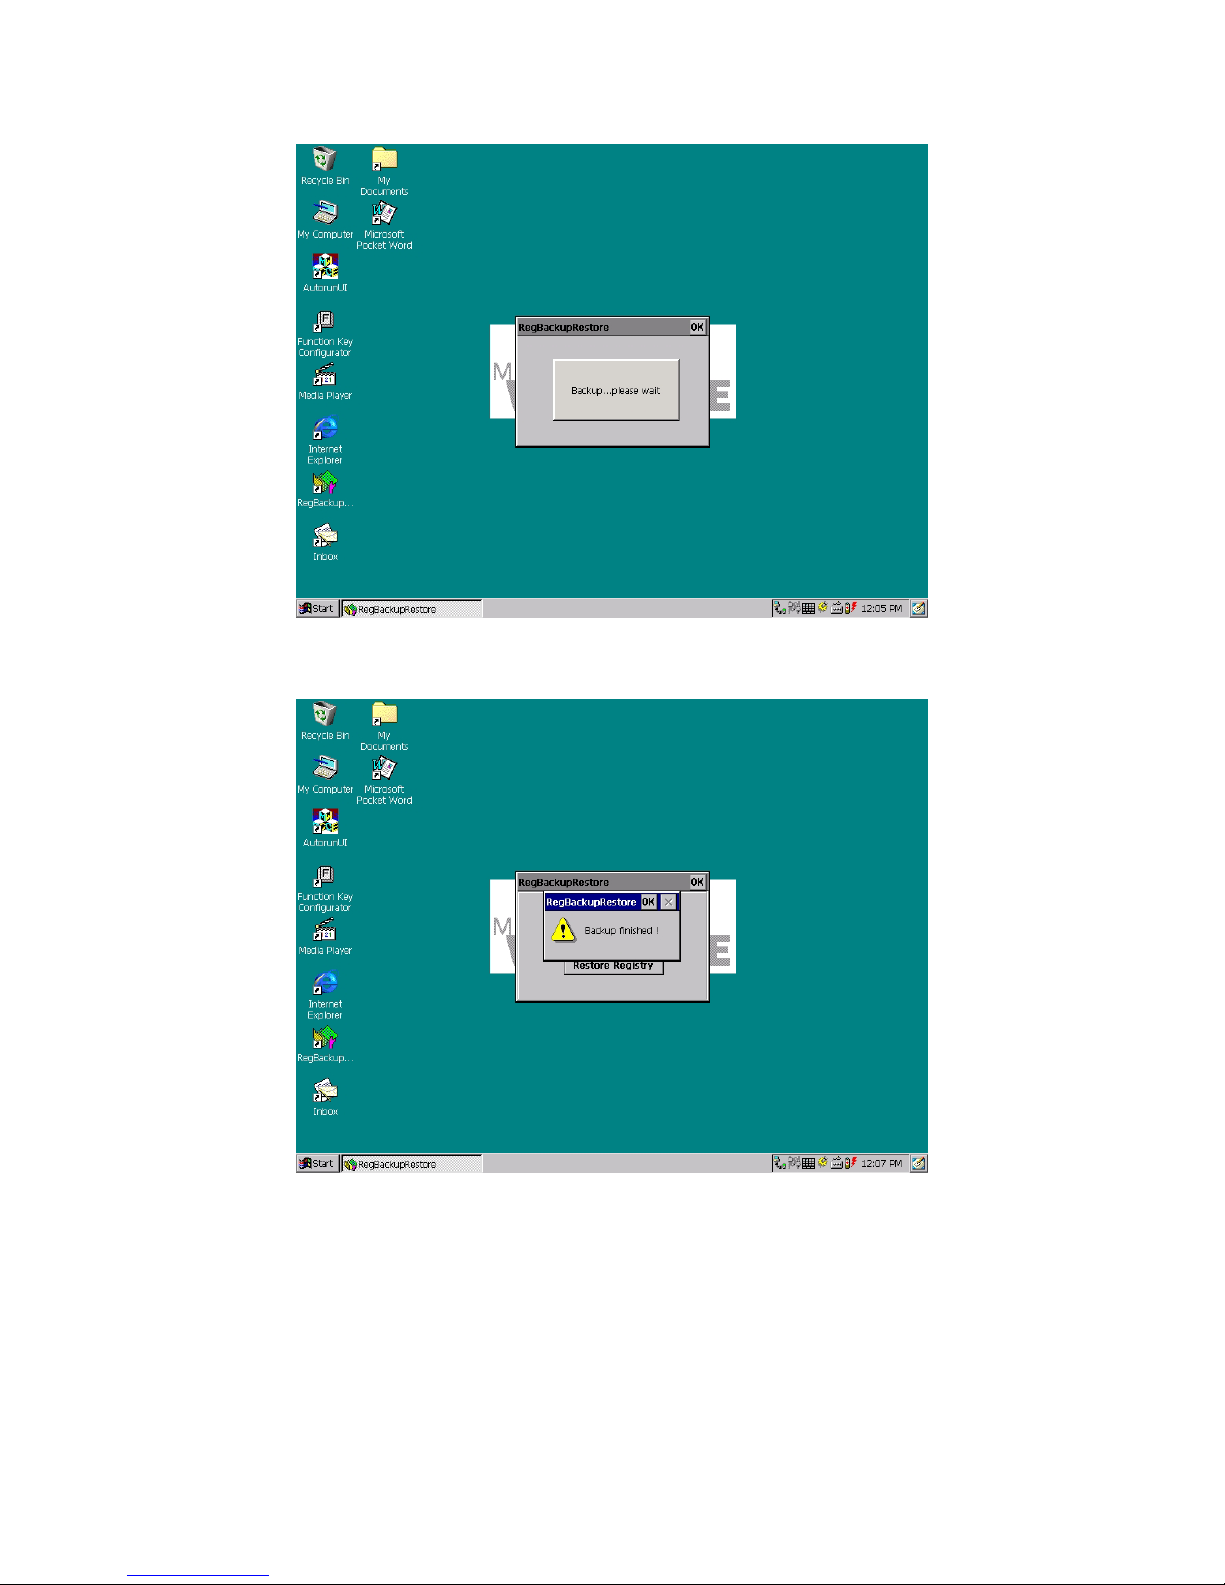
At the end of the process, the “Backup finished” will appear.
(2) Steps to Restore registry:
1.Press the “Restore Registry” button.
32
Page 33
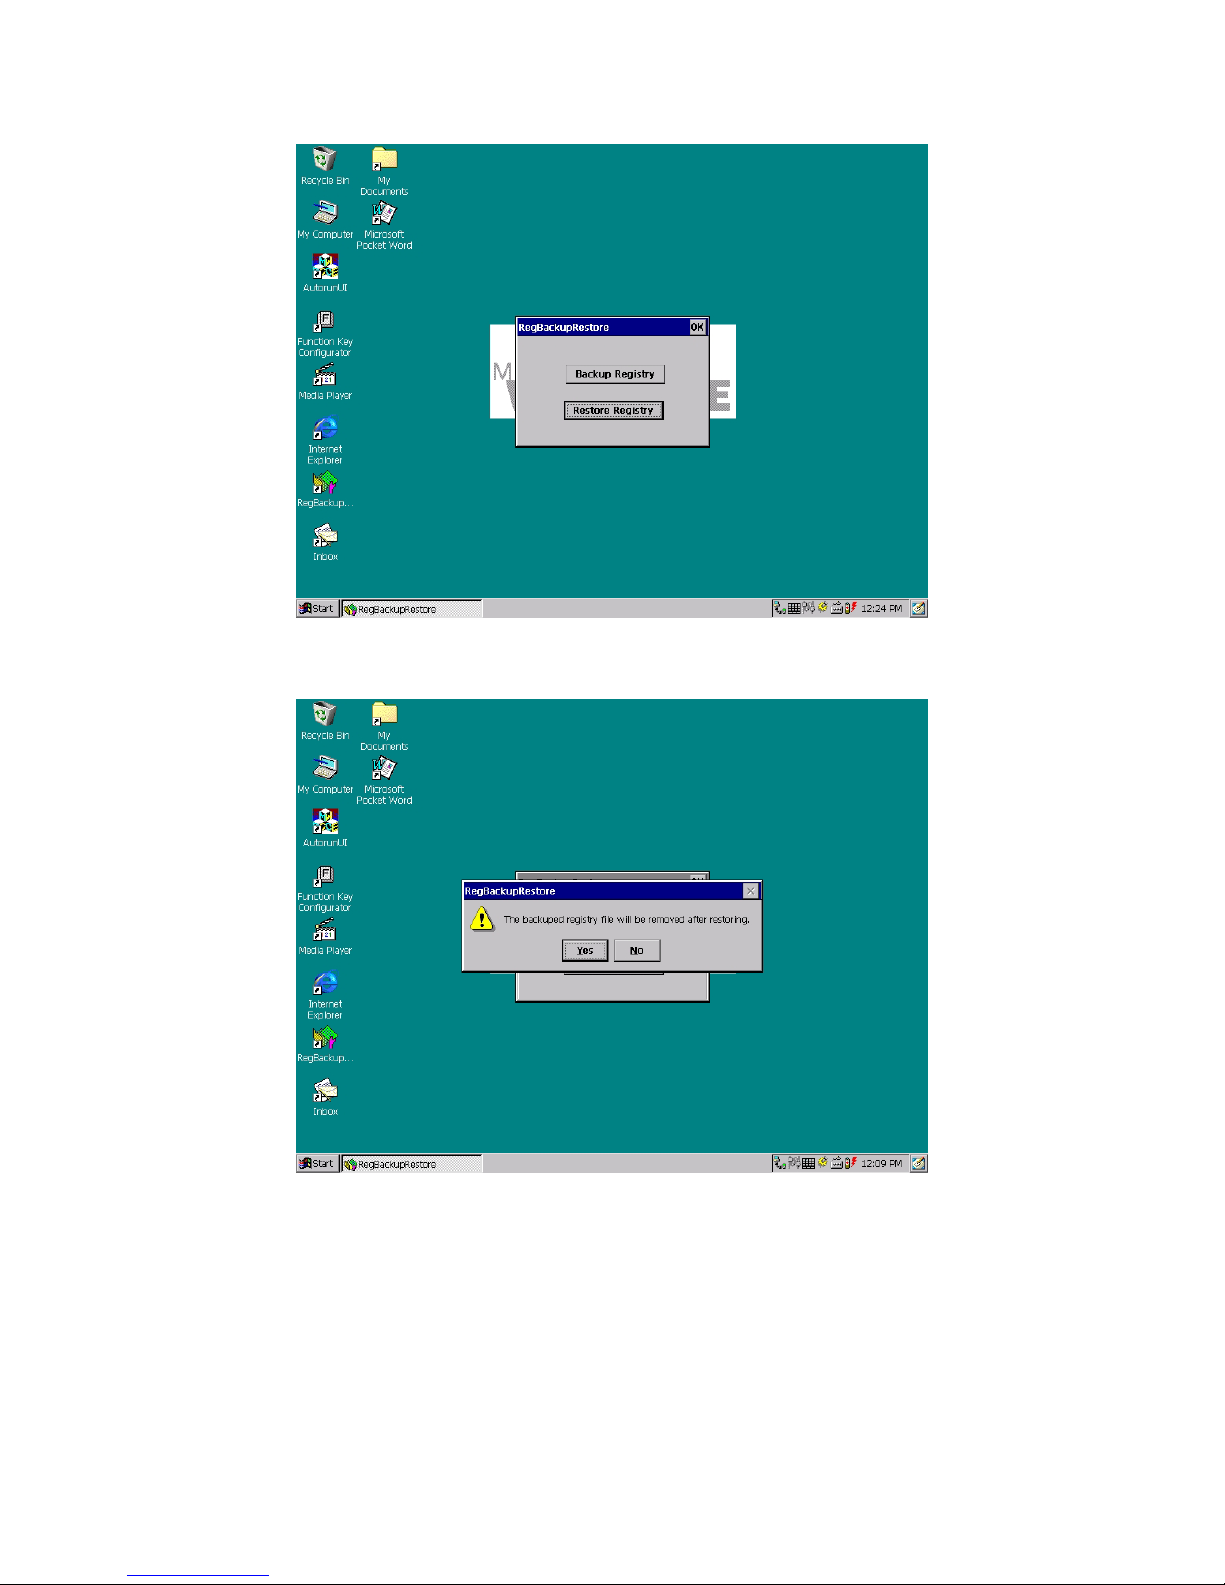
The registry file is removed after restoring the system registry.
After the registry backup is finished, the system will automatically reboot.
33
Page 34
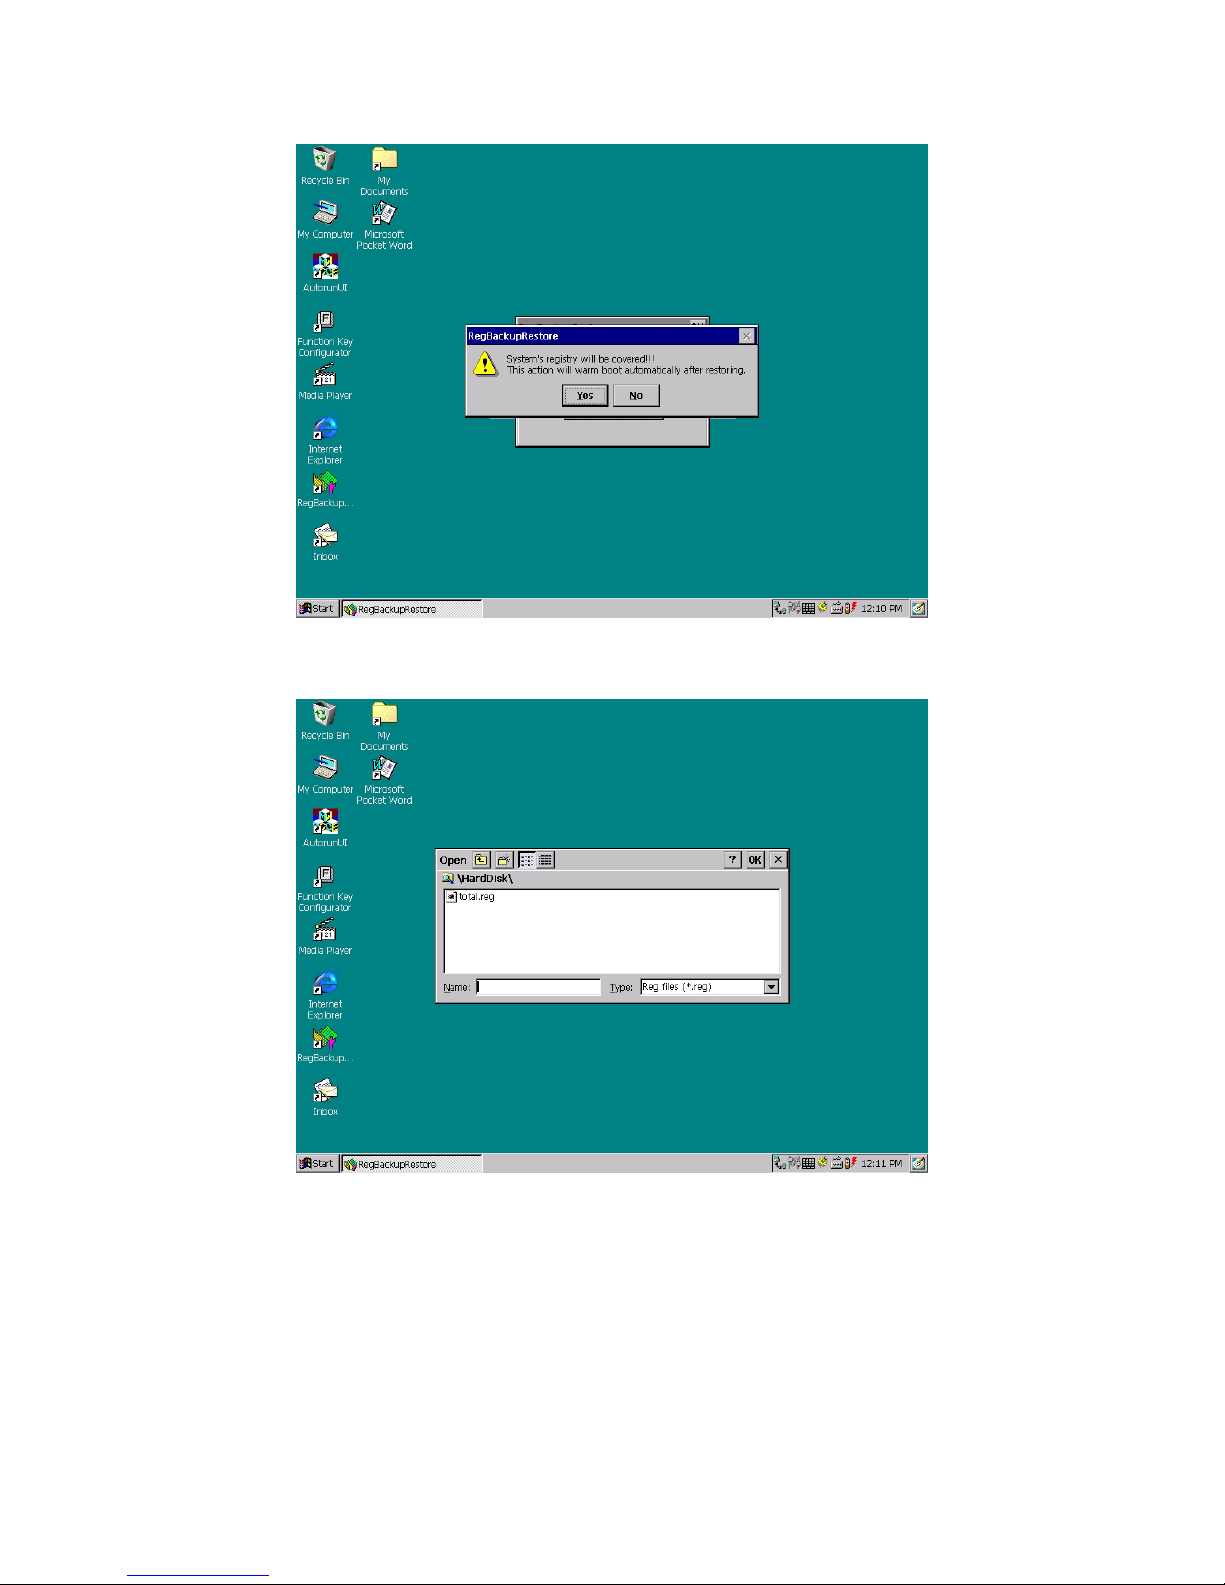
Specify the registry file you want to restore to the system.
After restoring, the system will reboot, and the registry will take effect.
34
Page 35

3. Connecting Other Devices
Your MobiPanel is designed to support a number of external devices. As stated earlier,
the devices need to be compatible with the Windows CE 3.0 operating system. A list
of drivers included within Windows CE 3.0 can be viewed on the Windows CE web
site: http://www.microsoft.com/windows/embedded/ce/tools/hardware/drivers.asp
If drivers are not included for the device being connected, the device manufacturer
needs to provide their own Windows CE 3.0 driver.
3.1 USB Keyboard and Mouse
Your MobiPanel can support a USB keyboard and mouse. Below is a list of some
keyboards and Mice that work with the MobiPanel:
Keyboard
Manufacturer Part Number Interface Name
Acer 6511-HA USB Aspire Keyboard
BTC BTC-5122U USB BTC Keyboard
Chicony KU-9985 USB Chicony Keyboard
Chicony ACK-600HM USB Chicony Keyboard
Microsoft USB Microsoft Natural Keyboard
Mouse
Genius Niche USB Genius Mouse
Logitech M-CA848A USB Logitech Wheel Mouse
Logitech USB Logitech Wheel Mouse, Optical
Logitech M-UB48 USB Logitech Mouse
Microsoft USB Wheel Mouse, Optical
Microsoft USB Microsoft IntelliMouse
For information on using other USB devices, contact the peripheral vendor.
3.2 External Microphone
You can use an external microphone to improve the quality of your voice recording or
transmissions.
3.3 External Speakers
The experience of visiting websites, playing games or MP3 can be enriched through
using external speakers.
35
Page 36
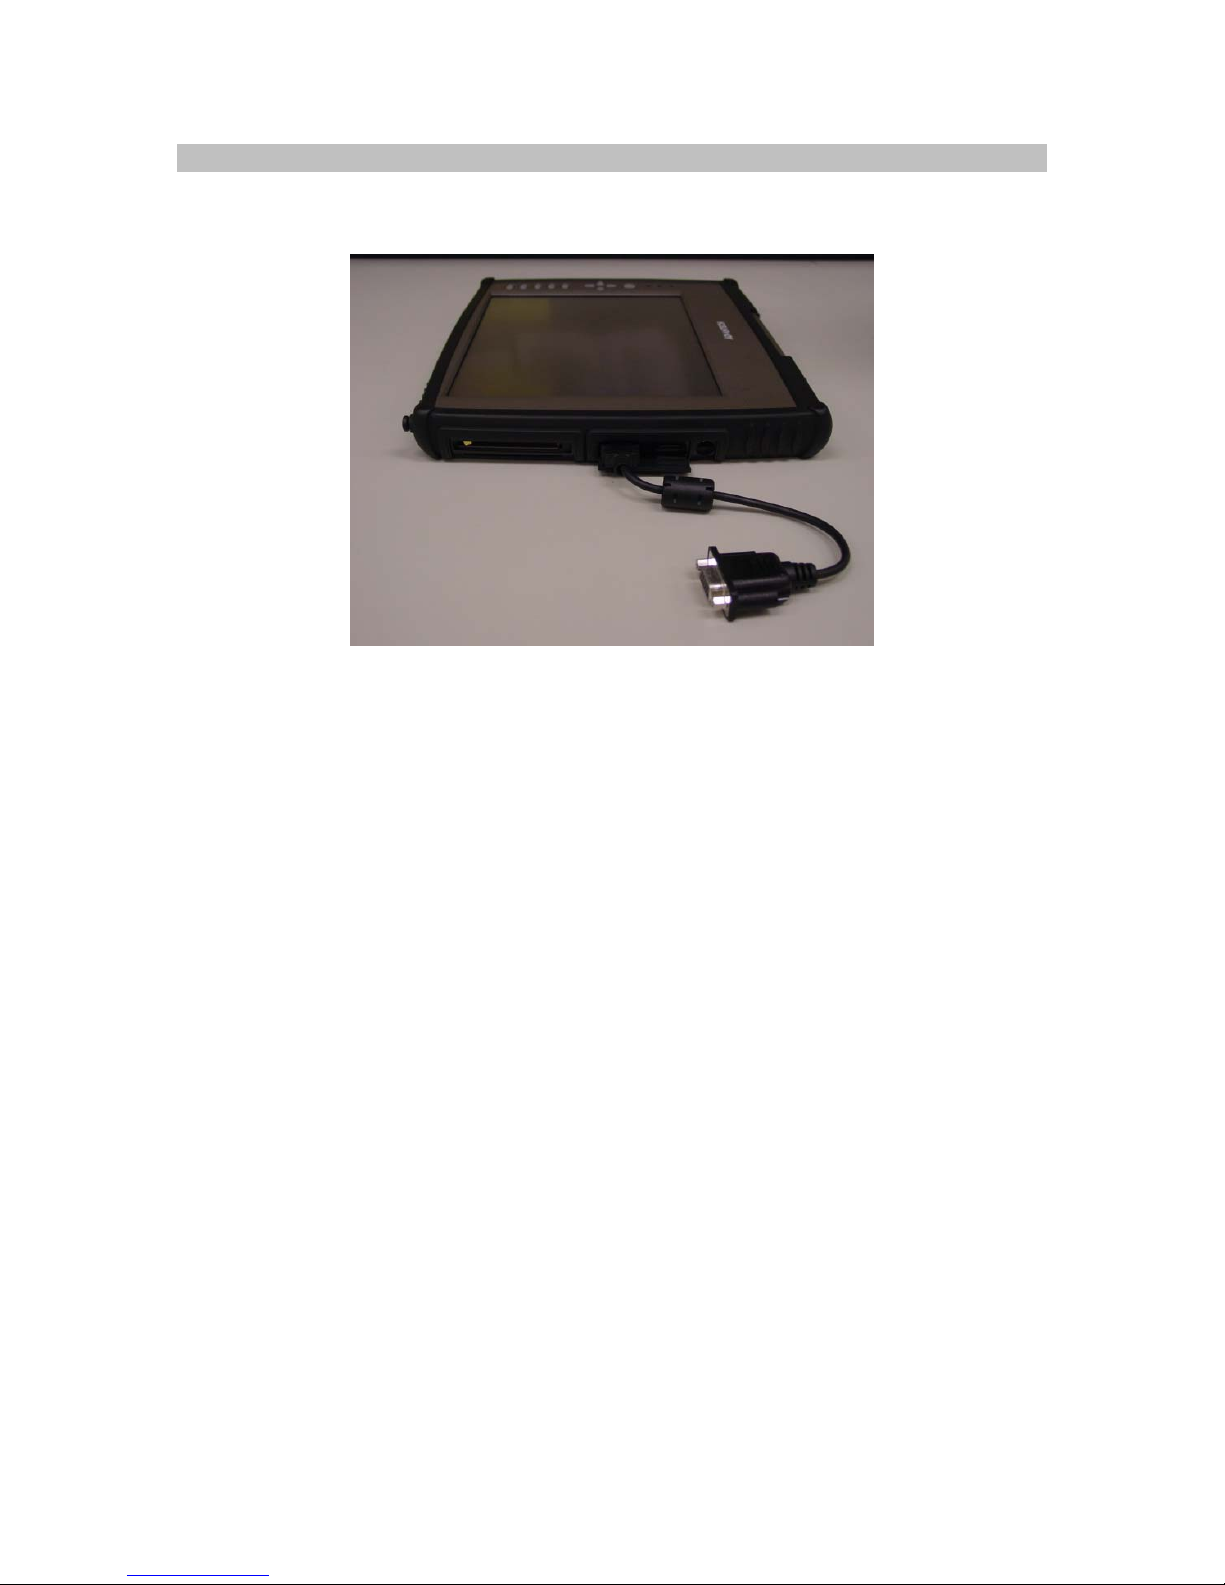
3.4 External Display (Optional)
For presentations or lectures, you can connect a CRT (Cathode Ray Tube Monitor) or
projector via the supplied Mini-VGA cable and Port.
36
Page 37

4. Getting Online
4.1 Establishing a Dial-up Connection
Using an ISP (Internet Service Provider), users will be provided with information
needed to quickly connect to the Internet.
Place either a Fax/Modem PCMCIA or CompactFlash card in the appropriate slot and
connect the cable to the phone connection. Go to
Start→Programs→Communication→Remote Networking→Make a New
Connection
4.2 Connecting to Your Network
In the office, you can connect to your network to go online. When you place your
LAN card in the appropriate slot, a dialogue box appears, asking for IP information.
Your network system administrator will need to supply this information and you will
need to carefully follow their directions.
To check what network drivers are installed on your MobiPanel, go to
Start→Settings→Control Panel→Network. At this point, you can also edit IP
information if necessary, by highlighting the relevant network driver and then
clicking on the properties.
4.3 Ending a Connection
To end a connection, go to the icon in the lower left of your taskbar, double click and
choose ‘
, and fill in the information as supplied by your ISP.
Disconnect’.
37
Page 38
5. Troubleshooting
For problems with your MobiPanel, go to
guide to reference. Most questions will be abled to be answered from this resource.
5.1 Common Problems / Frequently Asked Questions
The MobiPanel will not turn on!
• Make sure the ON/OFF switch is set to ‘ON’
• Press one of the buttons on the front (either button A group, or B denoted
in Section 1.7
• If device does not power on, use the AC Adapter to plug the Tablet into
the wall.
• If this does not turn the Tablet on, push the software reset button located
next to the CompactFlash Slot
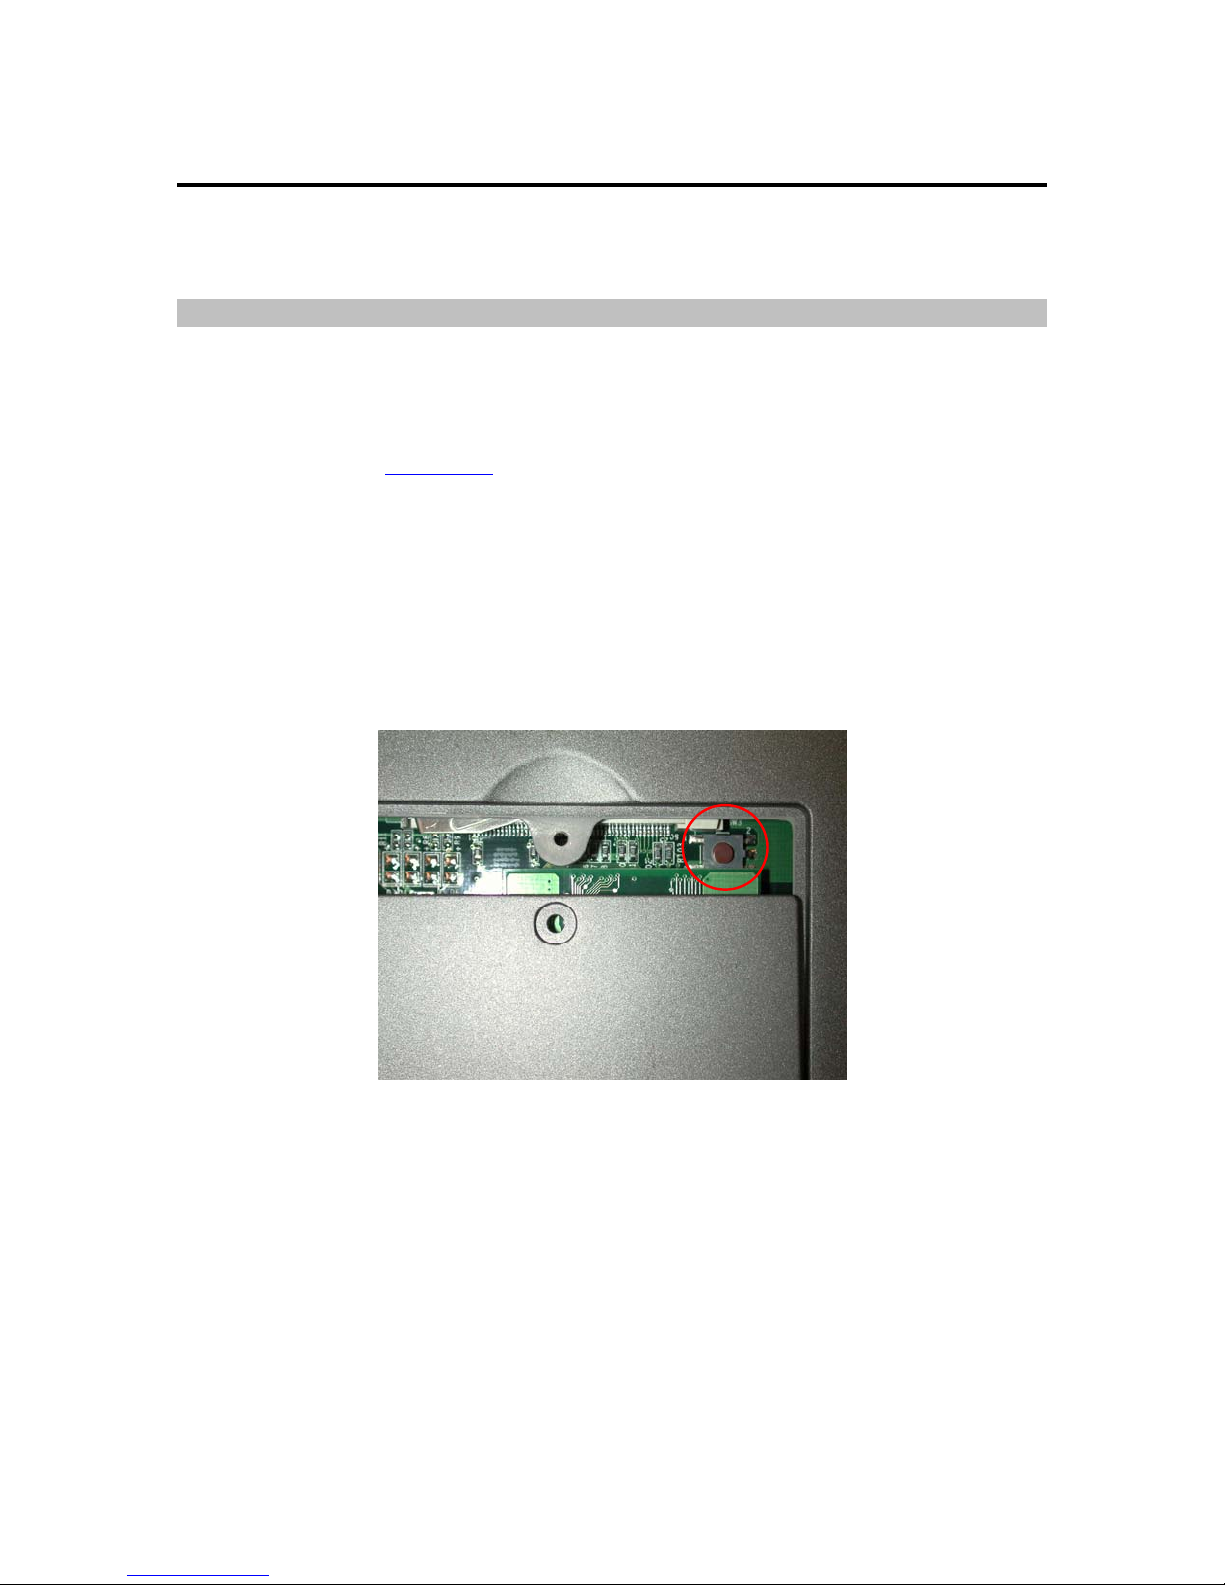
• A last resort will be, you will need to use the hardware reset button,
marked on the diagram below. Use a small Philips head screw driver
and remove the screws. Lift the cover and press the reset button.This
will wipe all memory from your MobiPanel.
)
Start→Help. This brings up a general user
I touch the screen with my stylus, and the mouse arrow is in
an entirely different place!
•
This is a sure sign that you need to re-calibrate your touchscreen.
• Use the arrow keys and navigate the mouse arrow.
• Go to Start→Settings→Control Panel→Stylus
• Click the calibration tab.
• Click recalibrate and follow the instructions.
1
38
Page 39

How do I turn off my MobiPanel?
•
You can turn off your MobiPanel by simply going to the Start Menu and
choosing ‘
long as the battery is still charged, no data will be lost.
How do I restart my MobiPanel? (If it freezes / hangs up, or
I just loaded new software)
•
If you need to restart you MobiPanel, unscrew your stylus and hit the
software-reset button on the side of the Tablet. If your MobiPanel is
not responding to any commands (that is, it is frozen) you can use this
same reset button. The software-reset button will not affect data in
your MobiPanel system.
• If your system freezes or hangs, and does not respond, even after you hit
the software reset button, first remove the battery then restart the
system. If this does not remedy the situation, you will need to use the
hardware reset button, marked on the diagram below. Use a small
Philips head screw driver and remove the screws on the cover shown.
Lift the cover and press the reset button. This will wipe all memory on
your MobiPanel.
Suspend’. This will put the device into standby mode. As
My screen is dirty, how can I clean it without harming the
screen?
•
Clean the screen with a soft, clean cloth and commercial window cleaner
that does not contain wax or abrasives. Always apply the cleaner to
the cloth, not the screen. If the display contains grease or some other
contaminant, use isopropyl alcohol instead of commercial cleaner.
Note: paper toweling and other paper products are abrasive. Be sure to
use a clean cloth when wiping the screen.
Can I protect my MobiPanel with password access?
• Yes, to protect your valuable information, you may want to set up a
password for your MobiPanel. Go to
Panel→Password
.
Start→Control
If the external Keyboard/Mouse can’t work while connected
• Please switch ON/OFF button one time after the external
keyboard/mouse is connected
39
Page 40
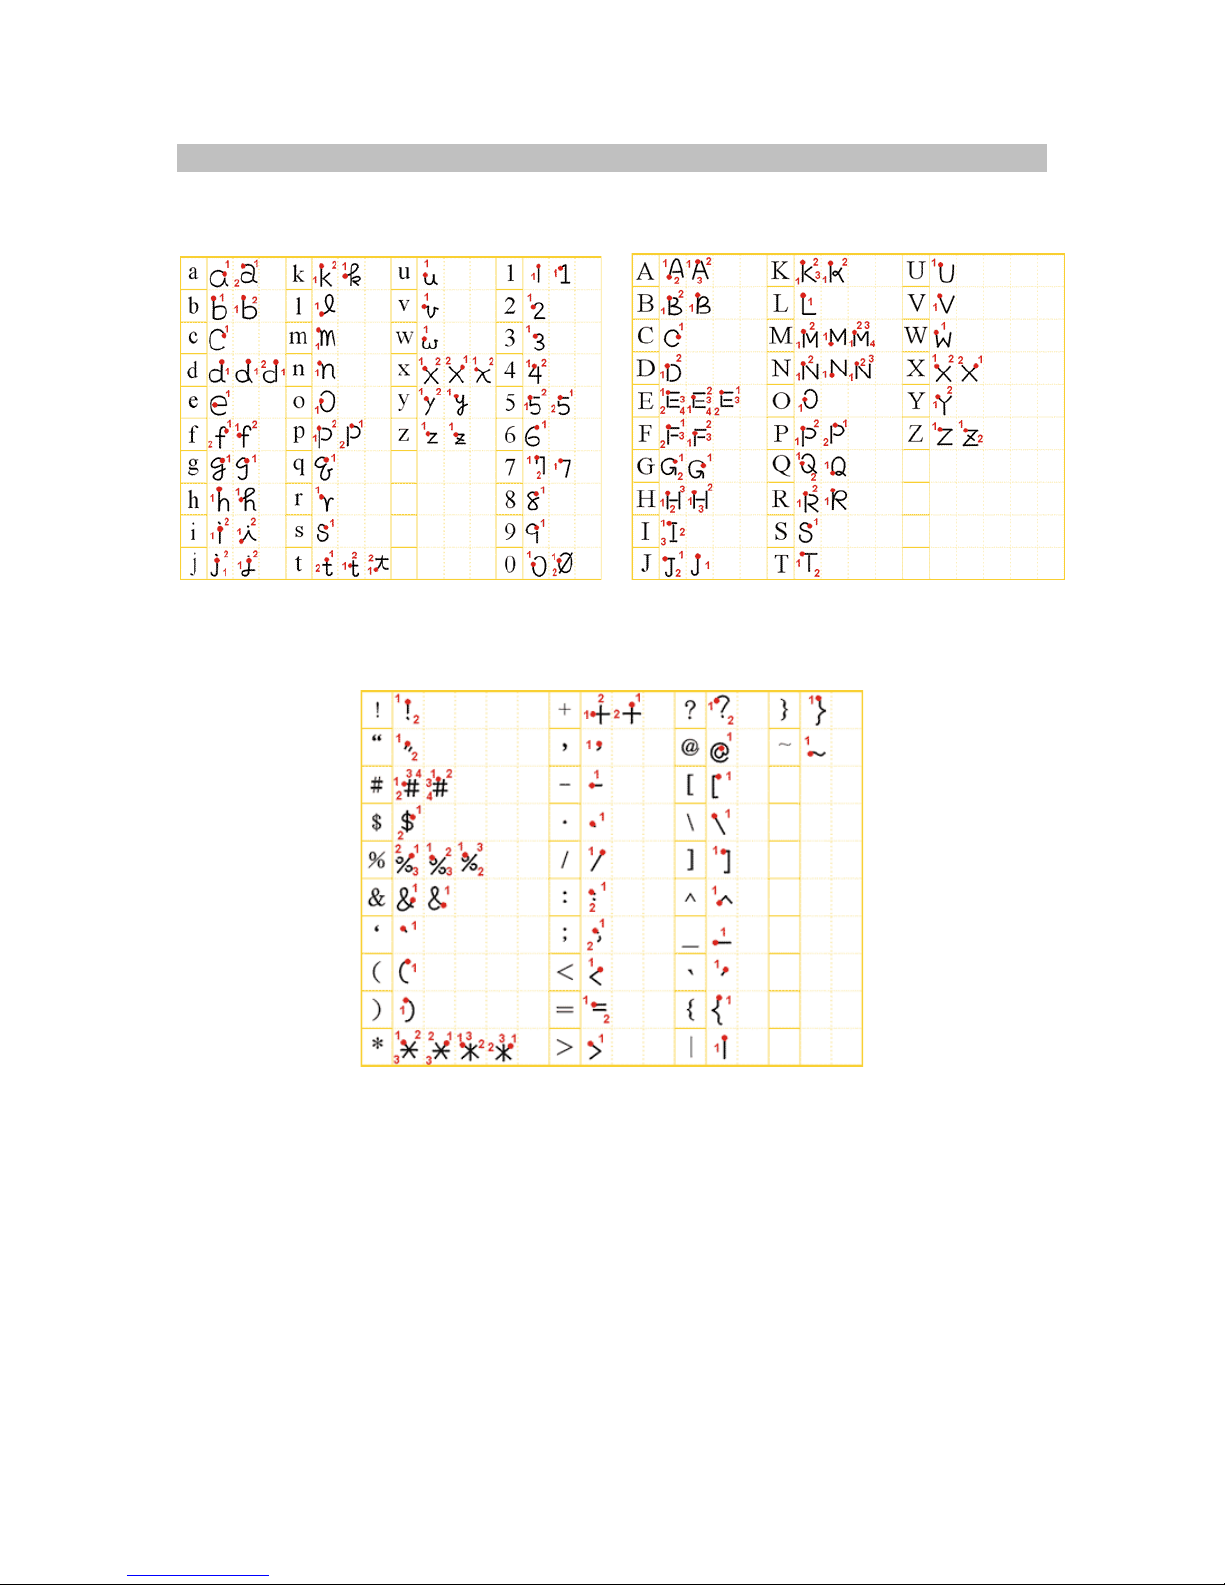
5.2 Handwriting Recognition
Lower Case
Upper Case
Symbol
40
Page 41
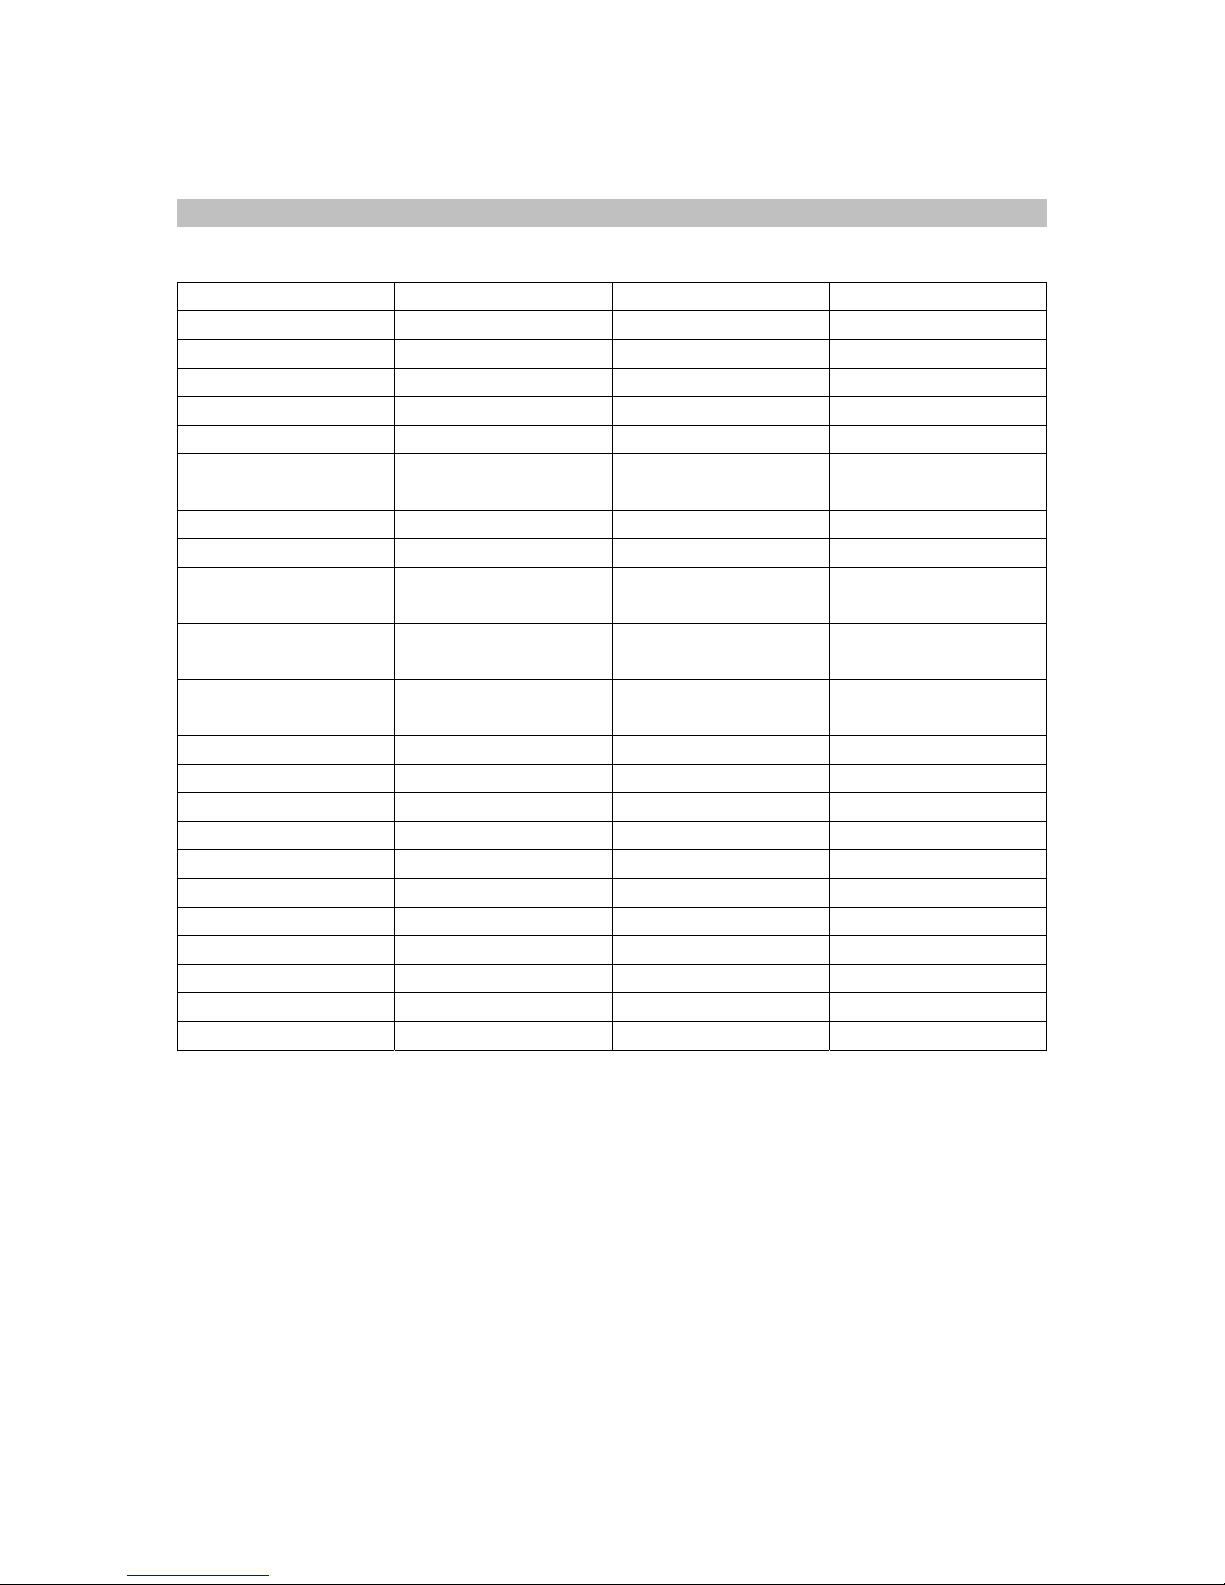
Appendix A: Windows CE 3.0 image pack content of list
English Version Japanese Version Chinese Version
Ink Memo
Calculator
Voice Recorder
RegBackup Restore
Citrix ICA Manager
Handwriting
Y Y Y
Y Y Y
Y
Y Y Y
Y Y Y
Y Y Y
Recognition
Primer PDF Reader
IA Album
Advantech Function
Y
Y Y Y
Y Y Y
Key App
Advantech Numerical
Y Y Y
Key Pad
Advantech AutoRun
Y Y Y
Manager
Microsoft RDP
Java
Java Script
DIRECTX
VB Run-Time
VB Script
Media Player
Inbox
Pocket Word
IPSM
IE Sample
Y Y Y
Y Y Y
Y Y Y
Y Y Y
Y Y Y
Y Y Y
Y Y Y
Y Y Y
Y Y Y
Y Y Y
Y Y Y
41
Page 42
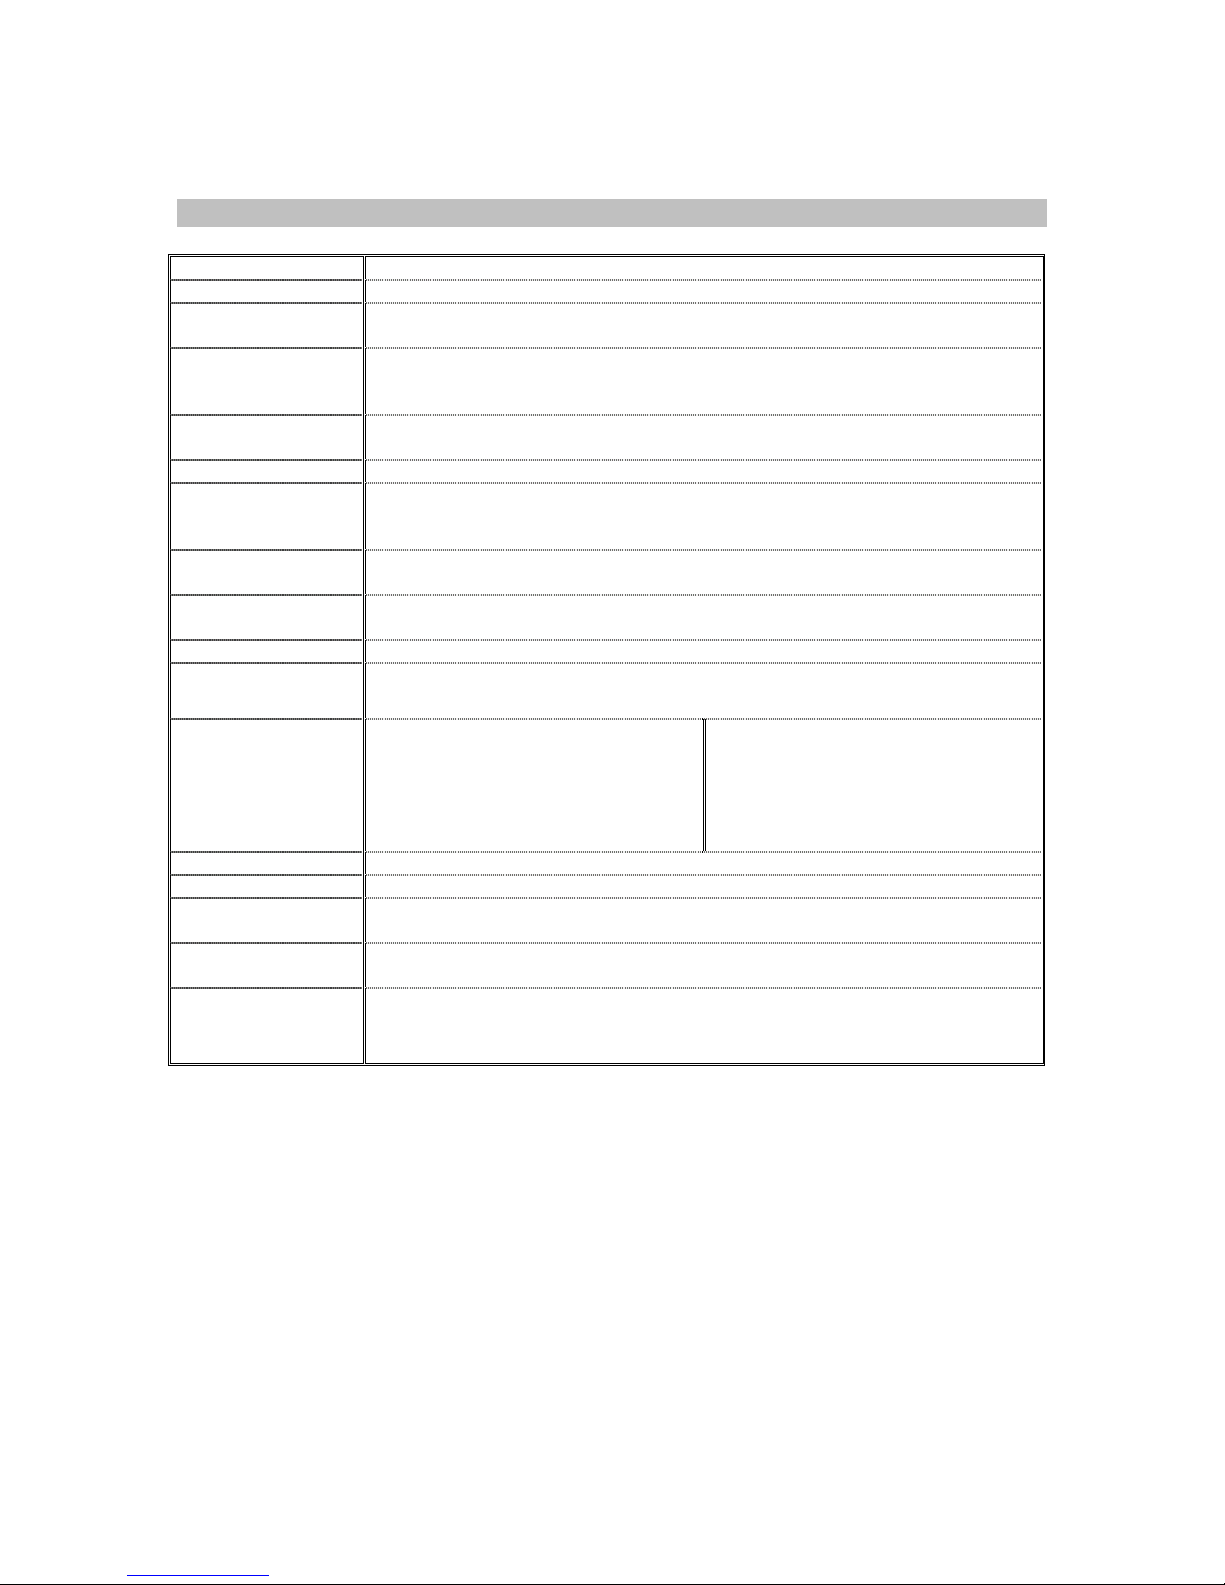
Appendix B: Specifications
Processor Intel StrongARM 1110 206 MHz and companion chip SA1111
Operating System Windows CE 3.0
Memory 128 MB SDRAM on board
32 MB Flash ROM on board
Display 10.4” TFT 250 nits High brightness LCD; 10.4” TFT Transflective LCD, Sunlight Readable (Optional)
800 x 600 SVGA
Display mode for portrait/landscape
Audio System AC-Link Audio
2 x internal speakers
External Keyboard USB or PS/2, IR Keyboard interface support
Application Button 5 x customer-defined hot keys for application selection
1 x Power lock switch (Suspend switch)
1 x Software reset switch
Pointing Device Built-in resistive touch panel
4 direction keys with one enter key
Battery Primary battery pack (4-cell) with smart Li-ion battery, Typical use(Suspend/Full-run mixed) more than
8 hours
Power Adapter Universal AC 90V ~ 265 V, 47 ~ 63 Hz input, 19 V.5 DC, 60 W
LED Status Indicator
I/O Port
Network Communication 802.11b Wireless LAN build-in option, 10/100T Base Ethernet through PCMCIA card
Major Application Web application; Thin Client application; Offline data management application
Application Software IE, RDP, Citrix ICA, Hand writing recognition, On screen K/B, PDF viewer, Picture viewer, JVM,
Physical 290(W)*213(D)*23.5(H) mm (Min-height)
Environment Operating Temperature:5℃ ~ 40℃
Power LED, power on: green; power off: dark
Charging LED, charging: orange, blinking when battery low.
Docking LED, docking: green
1 x PCMCIA Type II slot
1 x Compact flash Type II card socket support
1 x RS-232/422/485 (select by jumper setup)
1 x IrDA interface
1 x mini-VGA connector
1 x PS/2 connector
Voice recorder (Optional depended)
1.3 Kg (with primary battery pack & 10.4” Panel)
Storage Temperature:-20℃ ~ 60℃
Operating Humidity:20% ~ 80%
1 x USB Type A connector
1 x DC-in jack
1 x audio jack for external headphone
1 x audio jack for external Microphone
1 x cradle connector
42
 Loading...