

Page 1
Picking the best spot for installation
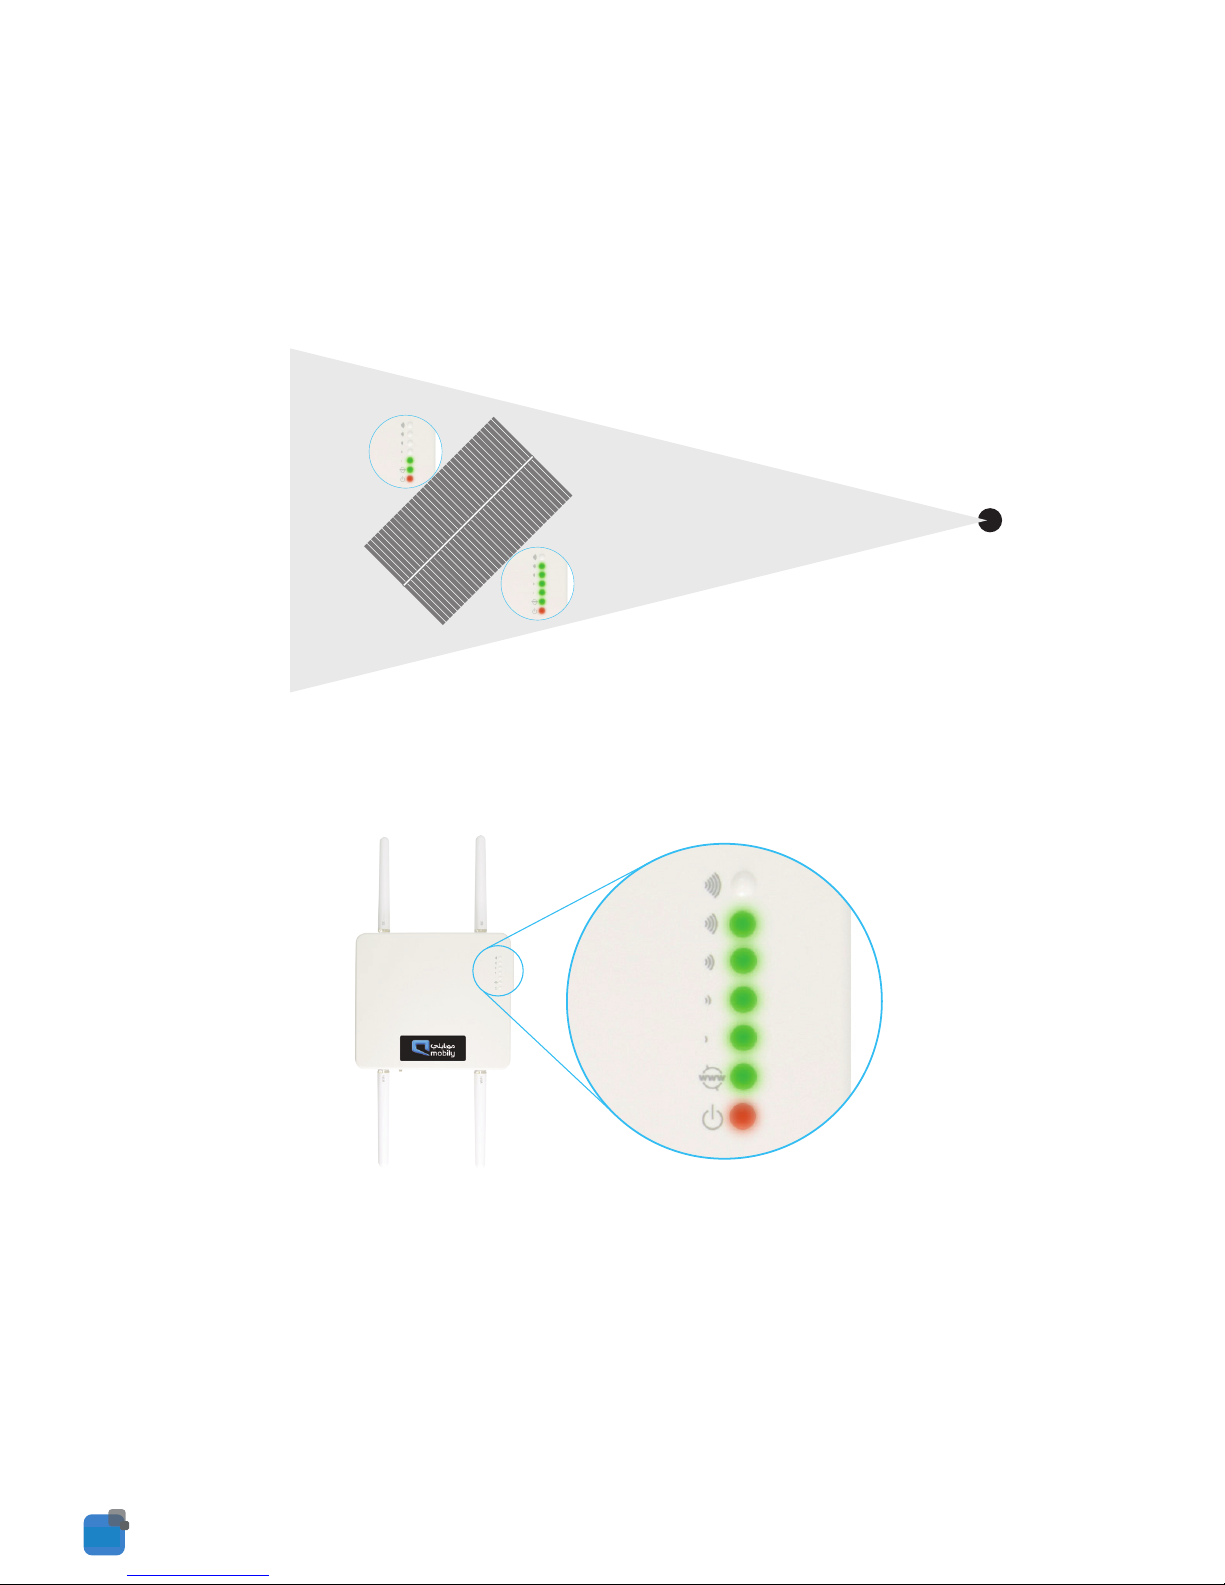
1. At this point your Outdoor Industrial Router is ready to be installed on the outside of your
property, however before doing so, you will need to find the best location.
2. To get the strongest signal your Outdoor Industrial Router should ideally be placed towards
your nearest 3G tower.
3. If you are unsure where your nearest 3G tower is, you can simply unplug and reconnect your
Outdoor Industrial Router at different spots on property to see where you get the strongest signal.
4. Find the area of your property where the most indicators light up, this is where you have the
best signal strength and should install your Outdoor Industrial Router.
04
1
www.linkedin.com/company/mobily
:ﻰﻠﻋ ﺎﻧﻮﻌﺑﺎﺗ
BB@work
Industrial Router
Business
Installation Guide
NTC-30 Series - Outdoor Industrial Router
Page 2

BB@work
Industrial Router
Business
Installation Guide
NTC-30 Series - Outdoor Industrial Router
Page 3

Contents
Package Contents 01
Let’s get started 02
Powering your Router 04
Picking the best spot for Installation 05
Connecting via Ethernet 06
Congure the Router 10
Connecting Wirelessly 13
Wall mounting your Outdoor Industrial Router 14
Pole mounting your Outdoor Industrial Router 16
Get to know your Outdoor Industrial Router better 18
What it all means 20
Powering your Router (PoE) 21
Page 4
Powering your Router
The outdoor router can be powered via DC power supply or Power over Ethernet (PoE).
DC power option
Your router is provided with a waterproof DC jack allowing it to be powered by a 9~28V DC power
supply.
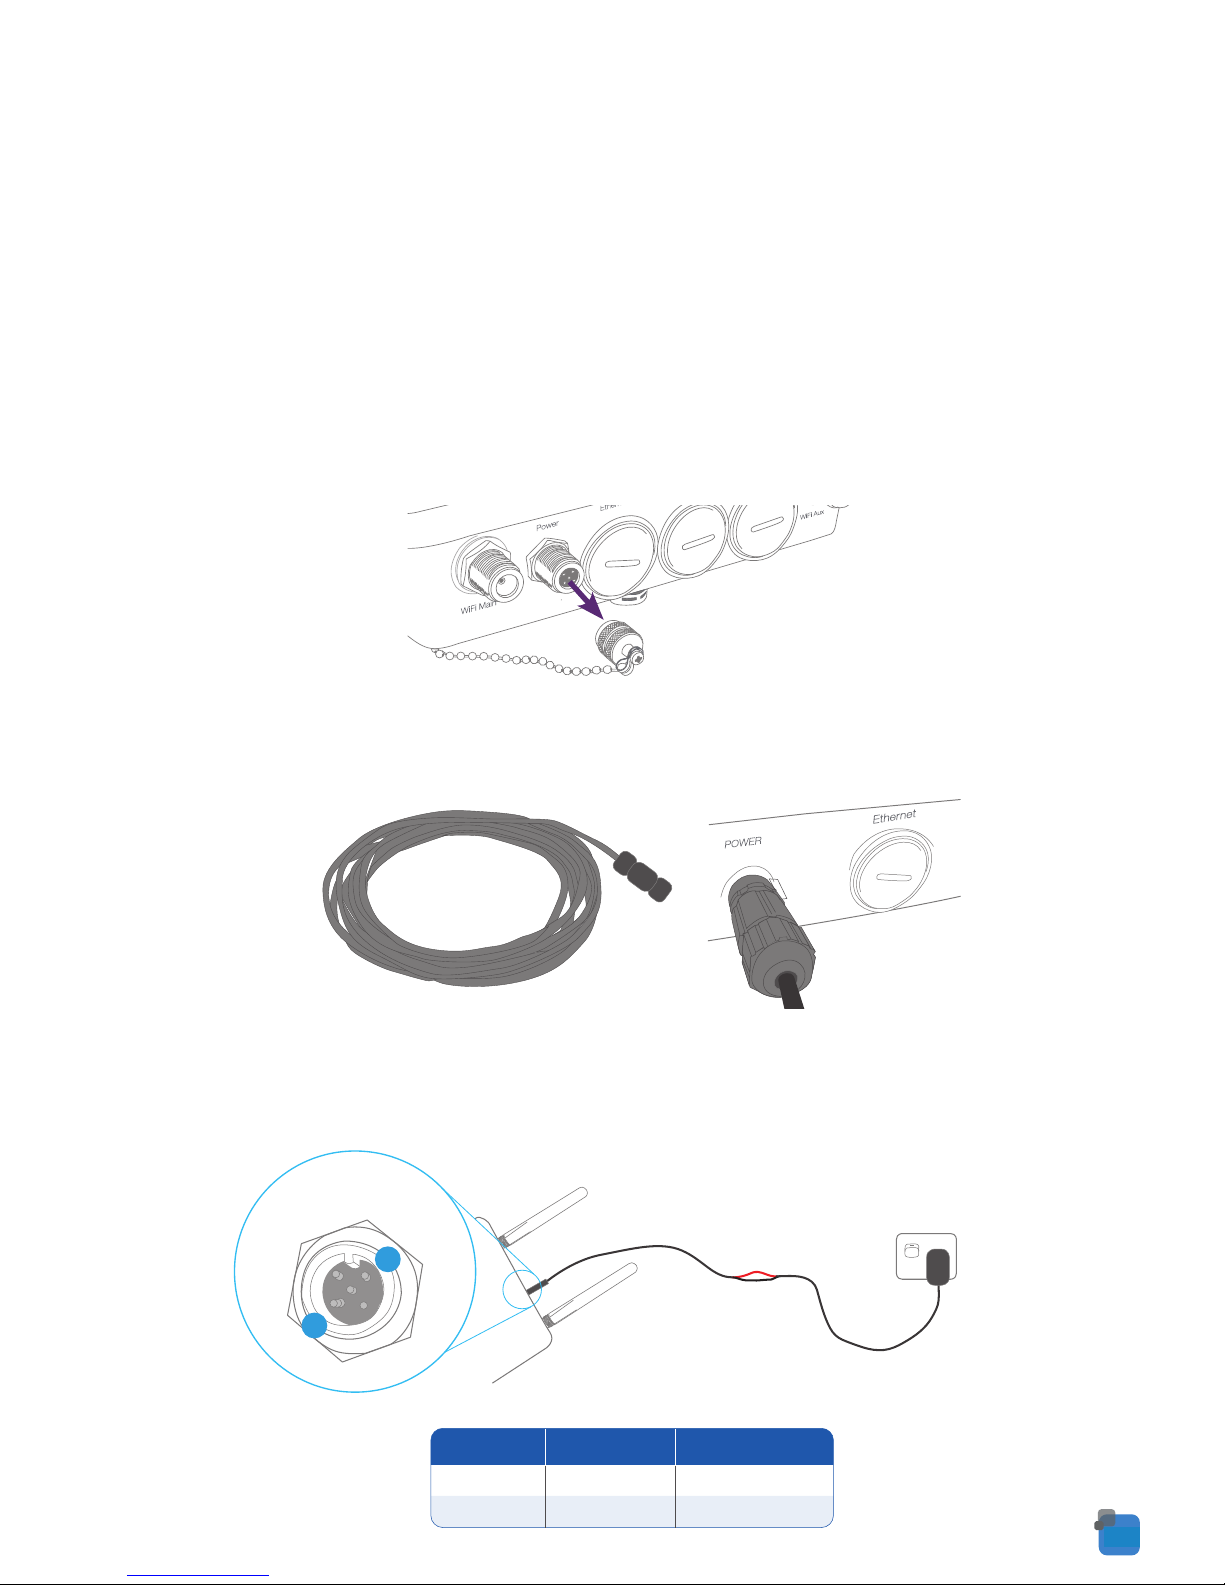
1. On the bottom interface panel of the router, locate the DC power port and unscrew the
protective cap to expose the connection pins.
2. Connect the DC power jack as shown below to the DC power port of the router and turn the
metal securing ring clockwise while pushing the conector in to secure the DC jack in position.
3. At the other end of the cable, wire the red (positive +) and black (grounding) wires to your
9~28V DC power supply source.
Power
1
2
V+
GND
1
2
Voltage+
Ground
Pin Signal Description
04
1
Get to know your Outdoor
Industrial Router better
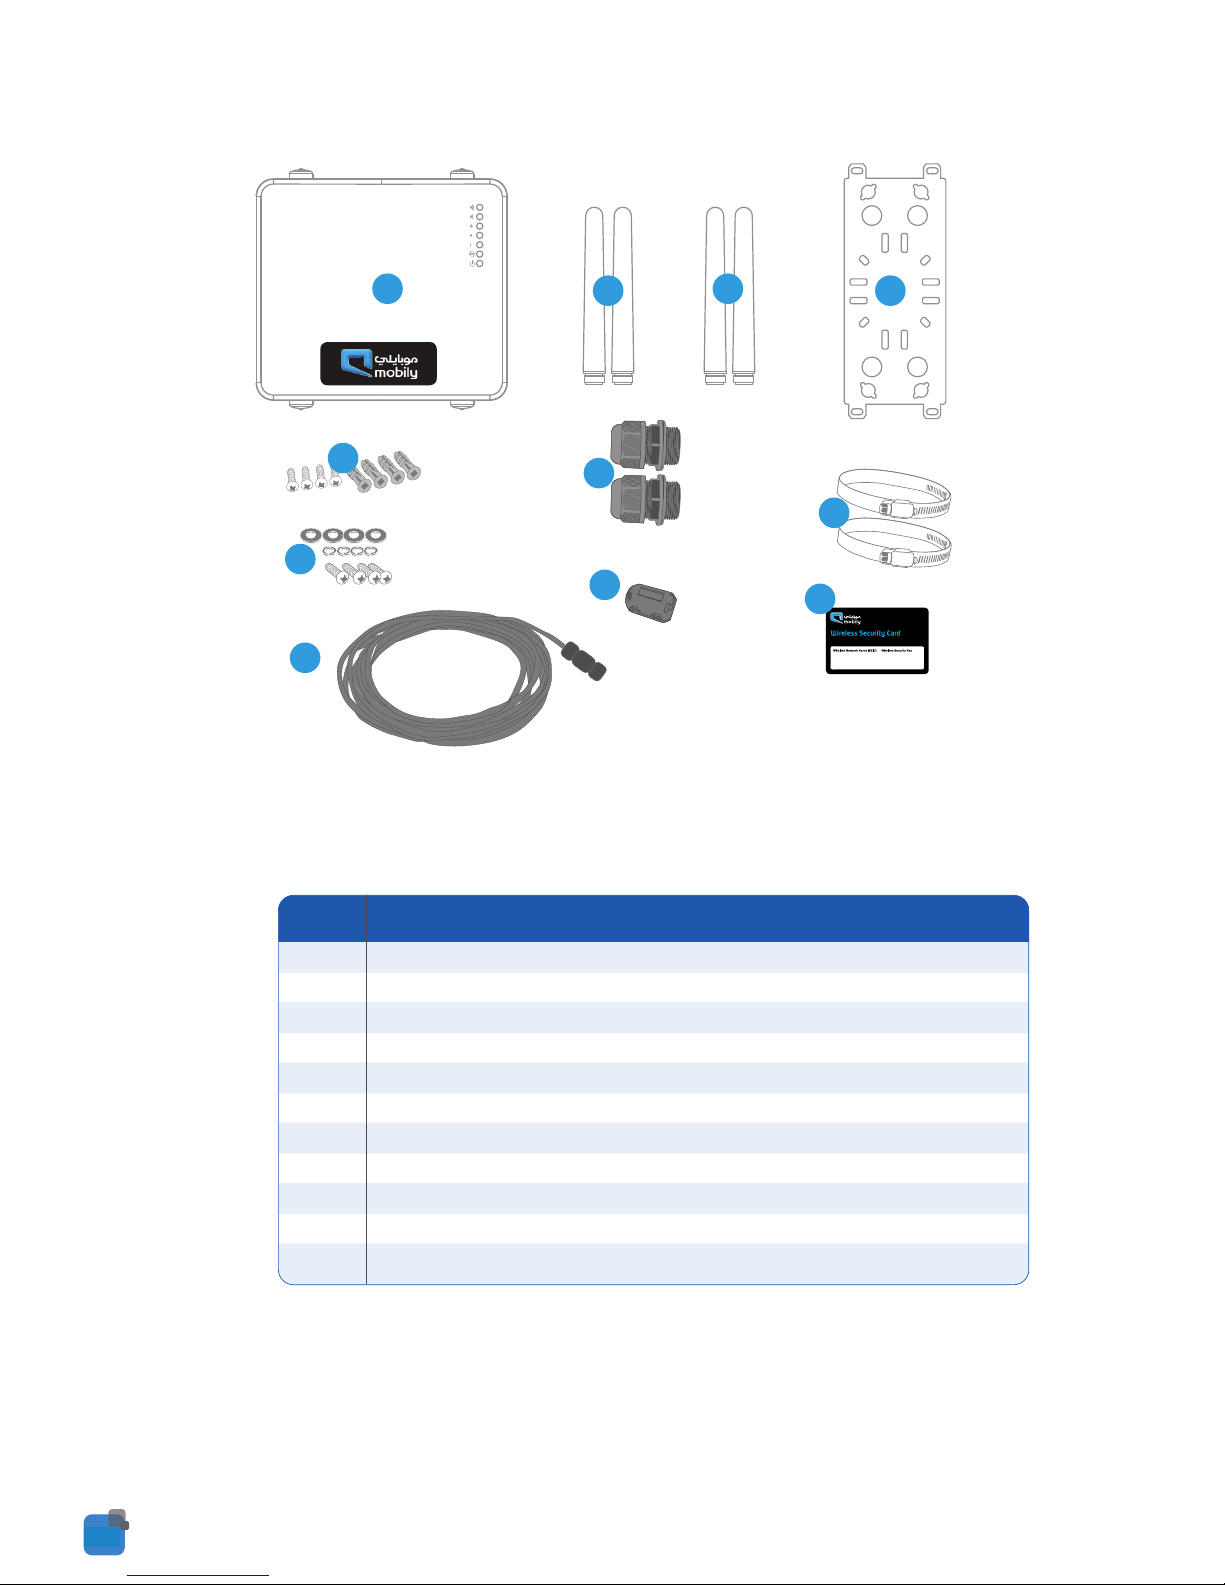
Package Contents
Outdoor Industrial Router
ITEM
Router
WiFi Antennas
3G Antennas
Mounting Bracket
Set of wall mounting screws
Set of mounting screws
Cable Glands
Ferrite Core
Hose clamp for pole mounting
Wireless Security Card
Power DC cable 10m (open ended)
1
2
3
4
5
6
7
8
9
10
11
INTERFACE
1
1
2
3
4
5
6
9
10
11
8
7
Page 5
Picking the best spot for installation
1. At this point your Outdoor Industrial Router is ready to be installed on the outside of your
property, however before doing so, you will need to find the best location.
2. To get the strongest signal your Outdoor Industrial Router should ideally be placed towards
your nearest 3G tower.
3. If you are unsure where your nearest 3G tower is, you can simply unplug and reconnect your
Outdoor Industrial Router at different spots on property to see where you get the strongest signal.
4. Find the area of your property where the most indicators light up, this is where you have the
best signal strength and should install your Outdoor Industrial Router.
04
2
Let’s get Started
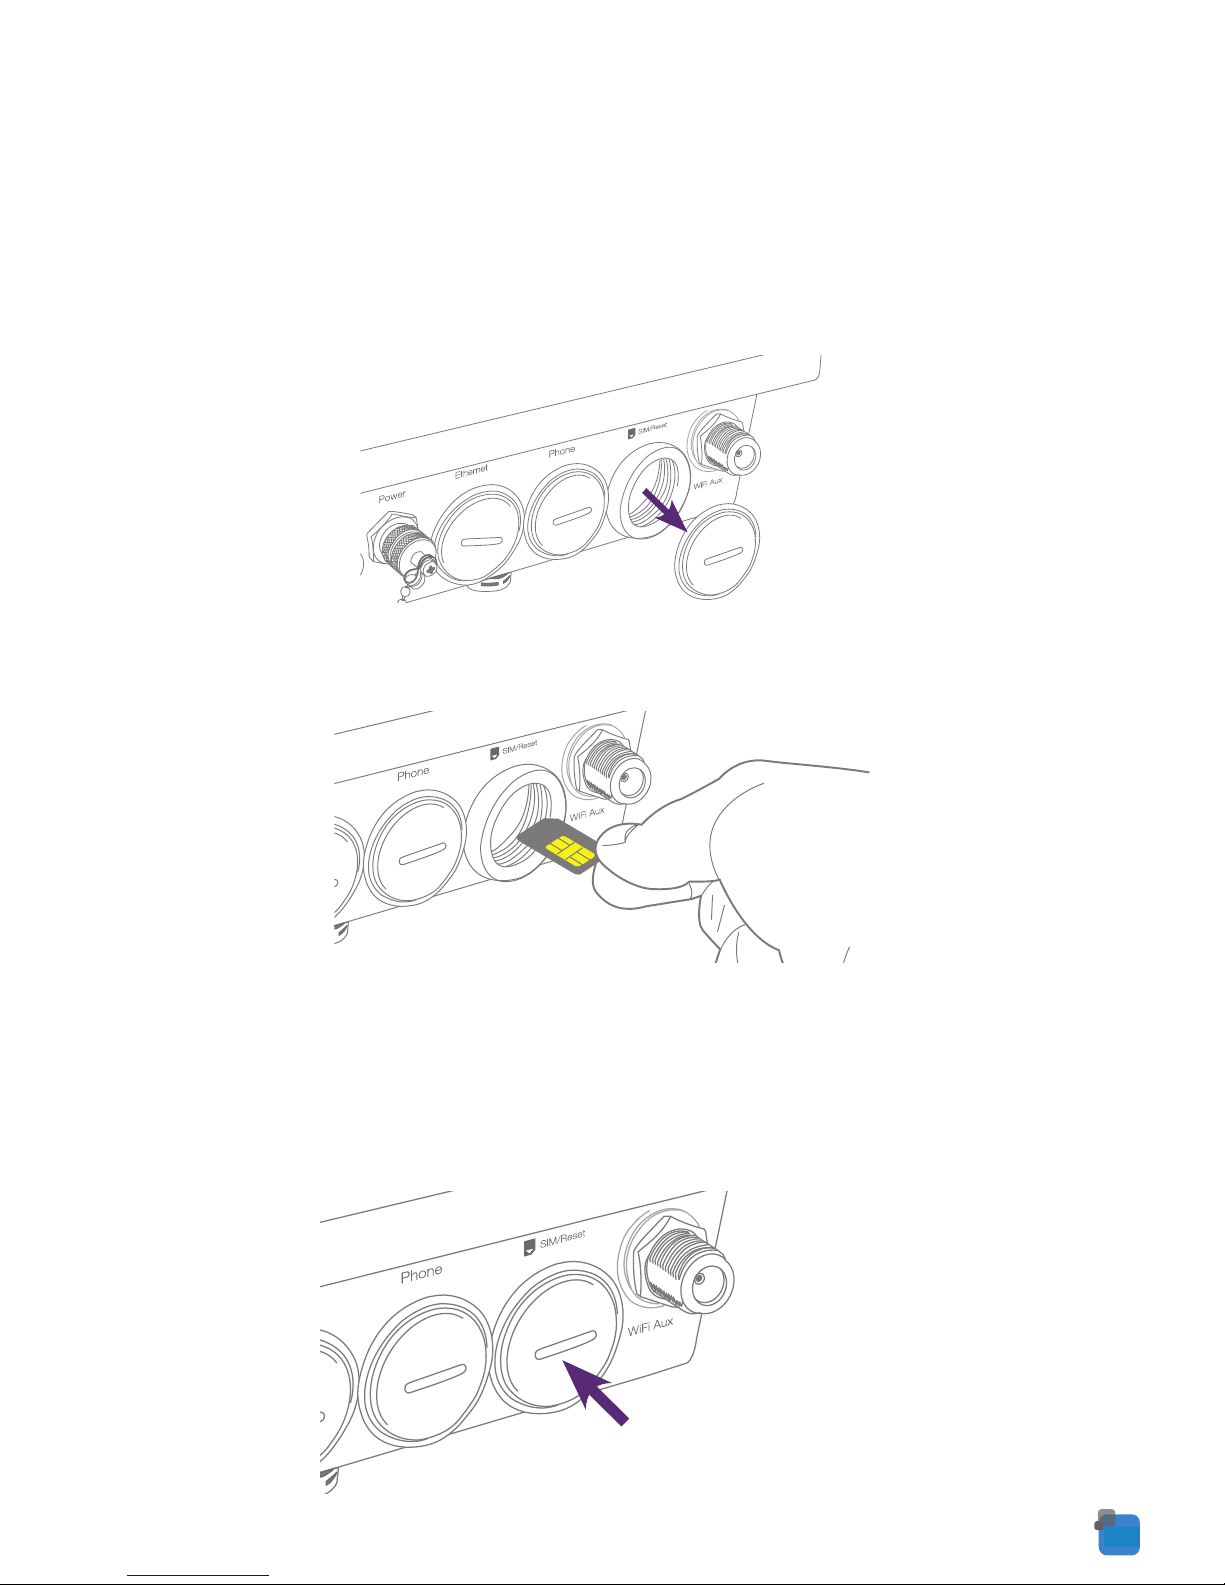
SIM Card Installation
1. Remove the protective cap labelled SIM/Reset with a flathead screwdriver.
NOTE: �If you don’t have a flathead screwdriver or you’re having problems, a small coin will do the
trick.
2. Place an activated SIM card into SIM card reader with the metallic part of the SIM card facing up.
3. Push the SIM card in until the spring latches the SIM card in place. You should hear a click. If
you need to remove the SIM card push inward again and the SIM will pop out.
4. Place the protective cap back on securely to ensure it is protected from water and dust
(ensure IP-67 rating).
Page 6
Powering your Router
The outdoor router can be powered via DC power supply or Power over Ethernet (PoE).
DC power option
Your router is provided with a waterproof DC jack allowing it to be powered by a 9~28V DC power
supply.
1. On the bottom interface panel of the router, locate the DC power port and unscrew the
protective cap to expose the connection pins.
2. Connect the DC power jack as shown below to the DC power port of the router and turn the
metal securing ring clockwise while pushing the conector in to secure the DC jack in position.
3. At the other end of the cable, wire the red (positive +) and black (grounding) wires to your
9~28V DC power supply source.
Power
1
2
V+
GND
1
2
Voltage+
Ground
Pin Signal Description
04
3
Pole Mounting Your Outdoor Industrial Router
Make sure you have your included mounting bracket, mounting bracket screws and hose clamps.
1. Before you start make sure all cables have been disconnected from your Outdoor Industrial
Router and that your antenna have been attached and your SIM card is inserted.
2. Mount the mounting bracket vertically to the back of the Outdoor Industrial Router with the
mounting bracket screws.
3. Open the hose clamps by turning the locking mechanism counter-clockwise.
NOTE: You can loosen it by hand or use a flathead screwdriver.
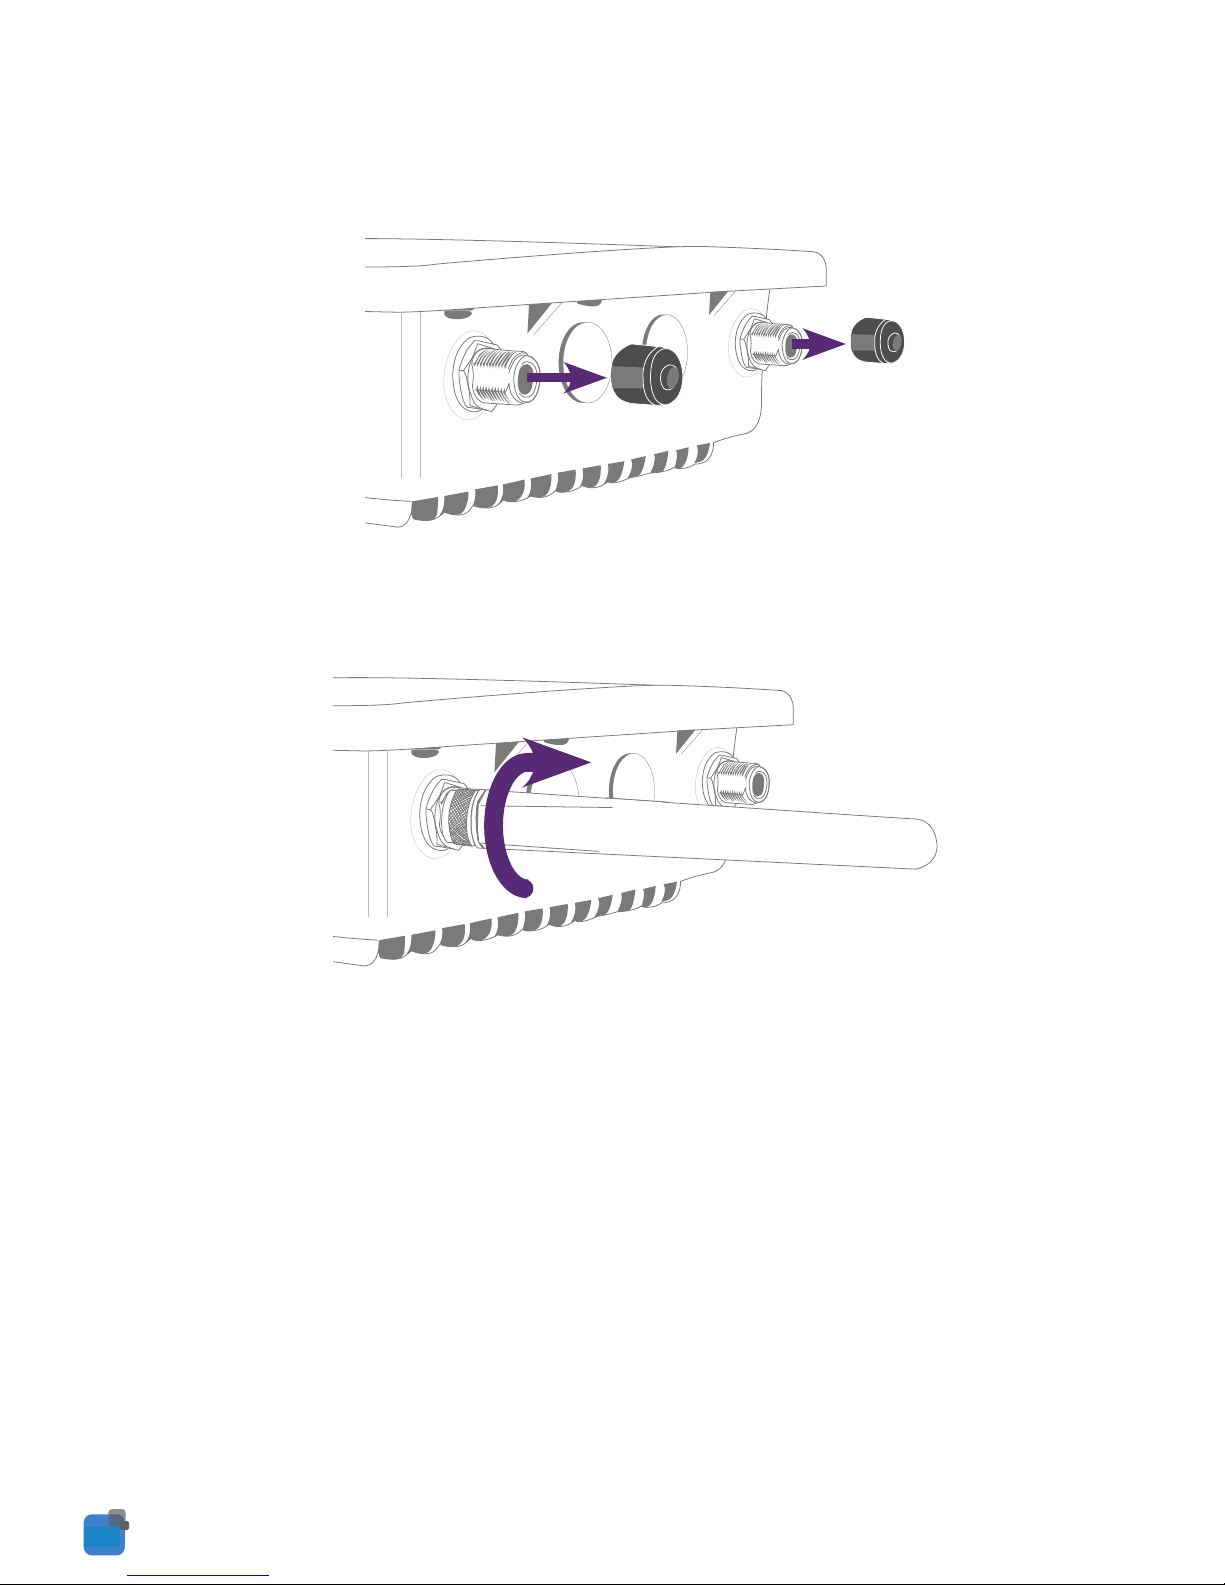
Installing the Antenna
1. Remove the black protective caps from the Wi-Fi and 3G connectors.
2. Each of the antennas are labelled 3G and Wi-Fi for easy installation. Connect the
corresponding antenna to the antenna connectors by holding onto the metal part of the
antenna and rotating it clockwise.
NOTE: �There will be a small gap when you tighten the antenna, when you meet sufficient
resistance the antenna is connected. Take care not to overtighten the antenna or use the
plastic part of the antenna to tighten as this could damage the antenna.
Page 7
Powering your Router
The outdoor router can be powered via DC power supply or Power over Ethernet (PoE).
DC power option
Your router is provided with a waterproof DC jack allowing it to be powered by a 9~28V DC power
supply.
1. On the bottom interface panel of the router, locate the DC power port and unscrew the
protective cap to expose the connection pins.
2. Connect the DC power jack as shown below to the DC power port of the router and turn the
metal securing ring clockwise while pushing the conector in to secure the DC jack in position.
3. At the other end of the cable, wire the red (positive +) and black (grounding) wires to your
9~28V DC power supply source.
Power
1
2
V+
GND
1
2
Voltage+
Ground
Pin Signal Description
04
Pole Mounting Your Outdoor Industrial Router
Make sure you have your included mounting bracket, mounting bracket screws and hose clamps.
1. Before you start make sure all cables have been disconnected from your Outdoor Industrial
Router and that your antenna have been attached and your SIM card is inserted.
2. Mount the mounting bracket vertically to the back of the Outdoor Industrial Router with the
mounting bracket screws.
3. Open the hose clamps by turning the locking mechanism counter-clockwise.
NOTE: You can loosen it by hand or use a flathead screwdriver.
Picking the best spot for installation
1. At this point your Outdoor Industrial Router is ready to be installed on the outside of your
property, however before doing so, you will need to find the best location.
2. To get the strongest signal your Outdoor Industrial Router should ideally be placed towards
your nearest 3G tower.
3. If you are unsure where your nearest 3G tower is, you can simply unplug and reconnect your
Outdoor Industrial Router at different spots on property to see where you get the strongest signal.
4. Find the area of your property where the most indicators light up, this is where you have the
best signal strength and should install your Outdoor Industrial Router.
04
4
Page 8
Powering your Router
The outdoor router can be powered via DC power supply or Power over Ethernet (PoE).
DC power option
Your router is provided with a waterproof DC jack allowing it to be powered by a 9~28V DC power
supply.
1. On the bottom interface panel of the router, locate the DC power port and unscrew the
protective cap to expose the connection pins.
2. Connect the DC power jack as shown below to the DC power port of the router and turn the
metal securing ring clockwise while pushing the conector in to secure the DC jack in position.
3. At the other end of the cable, wire the red (positive +) and black (grounding) wires to your
9~28V DC power supply source.
Power
1
2
V+
GND
1
2
Voltage+
Ground
Pin Signal Description
04
5
Wall Mounting Your
Outdoor Industrial Router
Locate your mounting bracket, mounting bracket screws, wall mount screws, and grey wall plugs.
1. Before you start make sure all cables have been disconnected from your Outdoor Industrial
Router and that your antennas have been attached and your SIM card is inserted.
2. Align the mounting bracket horizontally to the desired position on the wall.
3. Make sure you have at least 60 cm clear space around the centre of the mounting bracket
4. Use a pencil or piece of chalk to mark the holes on the wall
5. Remove the mounting bracket from the wall
6. Using your drill and a 6 mm drill bit to drill the holes in the wall where you marked previously.
NOTE: Before drilling into your walls ensure you are not drilling into an area with electrical wiring,
a circuit or wire tracer can help you find these. If you are unsure consult a professional
installer.
Picking the best spot for installation
1. At this point your Outdoor Industrial Router is ready to be installed on the outside of your
property, however before doing so, you will need to find the best location.
2. To get the strongest signal your Outdoor Industrial Router should ideally be placed towards
your nearest 3G tower.
3. If you are unsure where your nearest 3G tower is, you can simply unplug and reconnect your
Outdoor Industrial Router at different spots on property to see where you get the strongest signal.
4. Find the area of your property where the most indicators light up, this is where you have the
best signal strength and should install your Outdoor Industrial Router.
3G tower
Page 9
Picking the best spot for installation
1. At this point your Outdoor Industrial Router is ready to be installed on the outside of your
property, however before doing so, you will need to find the best location.
2. To get the strongest signal your Outdoor Industrial Router should ideally be placed towards
your nearest 3G tower.
3. If you are unsure where your nearest 3G tower is, you can simply unplug and reconnect your
Outdoor Industrial Router at different spots on property to see where you get the strongest signal.
4. Find the area of your property where the most indicators light up, this is where you have the
best signal strength and should install your Outdoor Industrial Router.
04
6
Installing Your Router Outside
Your Outdoor Industrial Router can be mounted directly onto a wall or a pole. For wall mounting
instructions see page 15, for pole mounting instructions see page 17.
Connecting Via Ethernet
NOTE: �The Outdoor Ethernet cable is not included in the package contents, however can be
bought as an accessory
Before connecting the Ethernet cable (not supplied) you must first connect the Ferrite Core and
cable gland.
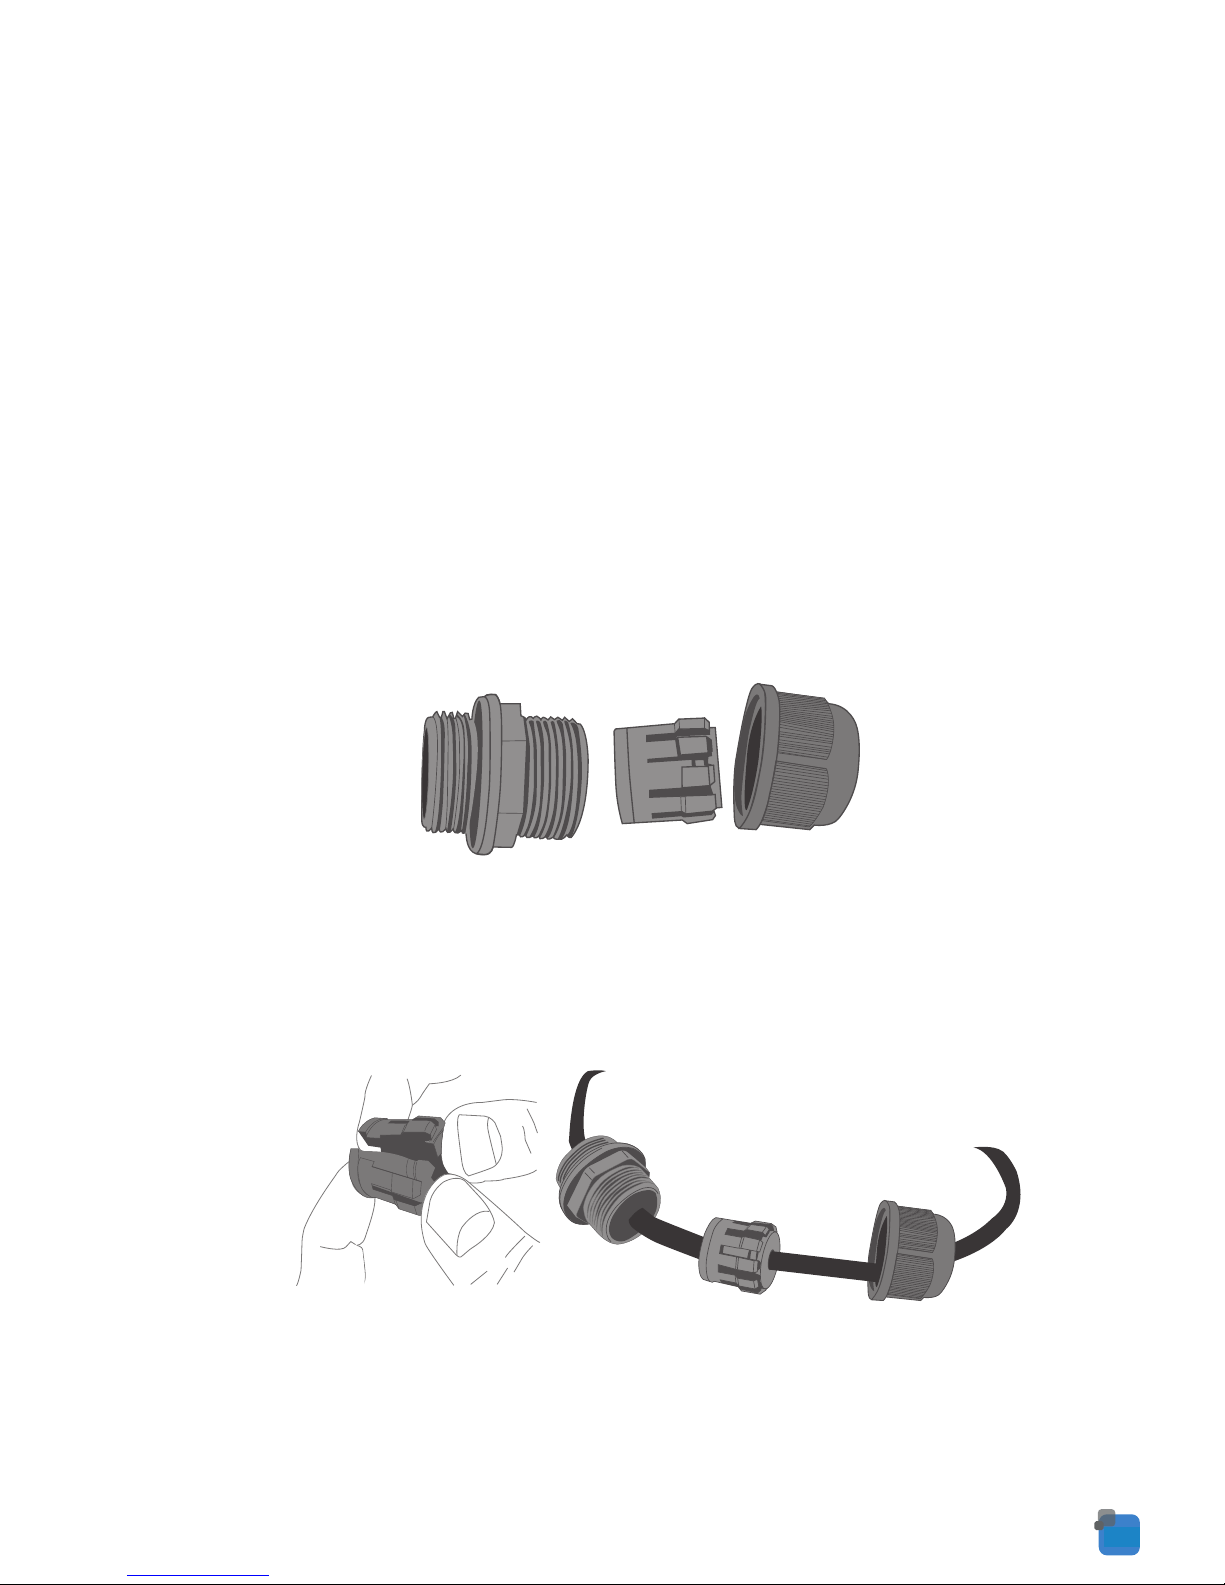
Connecting the Cable Gland
1. Take a cable gland, unscrew the thread lock sealing nut, and remove the inner seal as shown
below.
2. Thread the Ethernet cable through the thread lock sealing nut. Open the claw and the seal to
place the cable through it and then pass cable through the body of the cable gland. Align the
gland segments in the orientation as shown below. Plug the seal through the body and tighten
the nut.
Page 10
Powering your Router
The outdoor router can be powered via DC power supply or Power over Ethernet (PoE).
DC power option
Your router is provided with a waterproof DC jack allowing it to be powered by a 9~28V DC power
supply.
1. On the bottom interface panel of the router, locate the DC power port and unscrew the
protective cap to expose the connection pins.
2. Connect the DC power jack as shown below to the DC power port of the router and turn the
metal securing ring clockwise while pushing the conector in to secure the DC jack in position.
3. At the other end of the cable, wire the red (positive +) and black (grounding) wires to your
9~28V DC power supply source.
Power
1
2
V+
GND
1
2
Voltage+
Ground
Pin Signal Description
04
7
3. Plug the Ethernet cable into the RJ-45 connector and tighten the cable gland to ensure the
seal is adequate. Use a shifter or spanner to ensure IP67 rating.
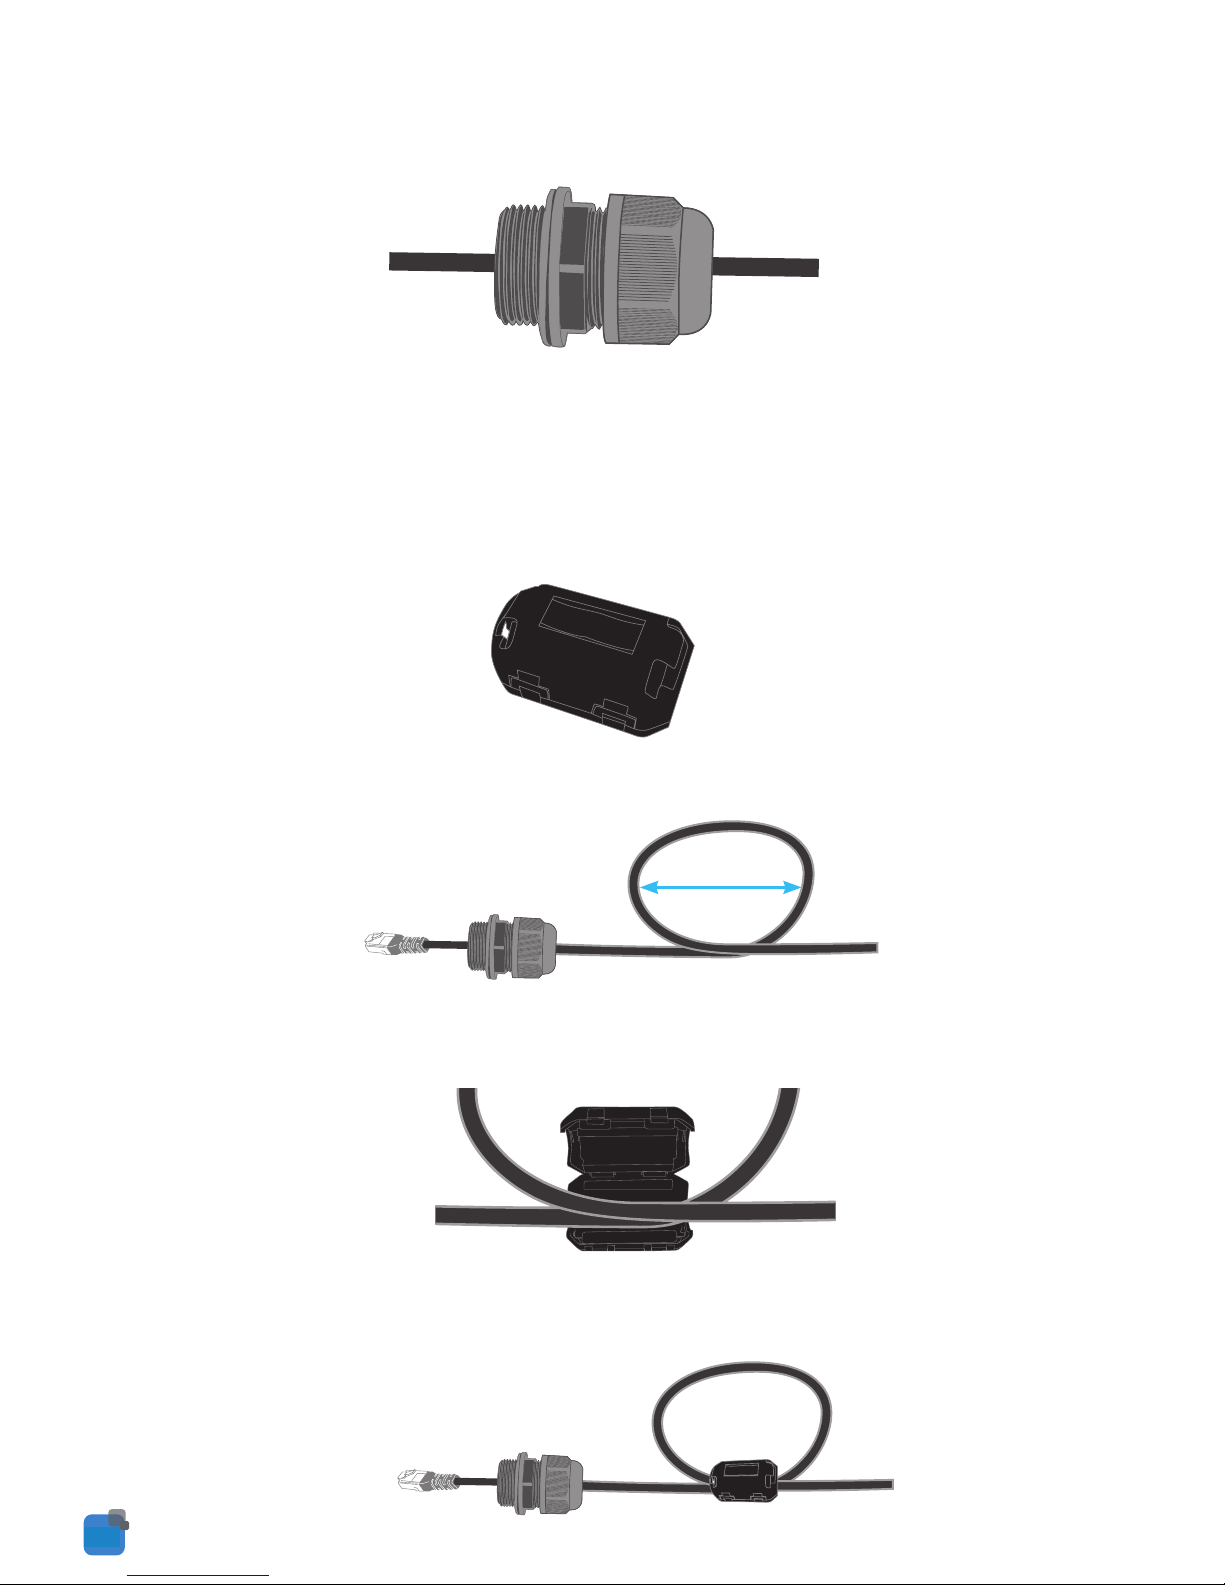
Connecting the Ferrite Core
1. After connecting the Cable Gland you now have to connect the Ferrite Core.
2. Locate the end of the black Ethernet cable with the cable gland and make a loop in the cable,
approximately 8 cm in diameter.
3. Open the Ferrite Core and place the part of the cable that overlaps into the centre.
4. Close the Ferrite Core and ensure that the clips click together to hold the Ferrite Core closed.
8 cm
Step 3: Connect to Internet
Your router should automatically connect to the Internet if the SIM status reads SIM OK. If it does
not, follow the steps listed below to setup the Mobile Broadband connection.
By default, the router is set to automatically configure the mobile broadband connection. It tries to
detect the correct APN and connection details in order to connect to your mobile broadband
service.
If the auto-configuration is unsuccessful, you will need to enter the connection details as follows:
1. From the menu, select Internet Settings -> Mobile Broadband -> Connection.
2. Unselect the Automatically configure my mobile broadband box and click Save.
3. Select a profile name from the pull down menu to save the profile settings. You can configure
and save the mobile broadband settings the router will use to connect to a particular network.
4. Enter the connection details (APN Name) provided by your mobile broadband service provider.
You may need to enter Username and Password provided by your mobile broadband service
provider.
5. Ensure the Mobile Broadband Connection radio button is on Enable.
6. Click Save.
Page 11
Picking the best spot for installation
1. At this point your Outdoor Industrial Router is ready to be installed on the outside of your
property, however before doing so, you will need to find the best location.
2. To get the strongest signal your Outdoor Industrial Router should ideally be placed towards
your nearest 3G tower.
3. If you are unsure where your nearest 3G tower is, you can simply unplug and reconnect your
Outdoor Industrial Router at different spots on property to see where you get the strongest signal.
4. Find the area of your property where the most indicators light up, this is where you have the
best signal strength and should install your Outdoor Industrial Router.
04
8
Connecting the Ethernet Cable
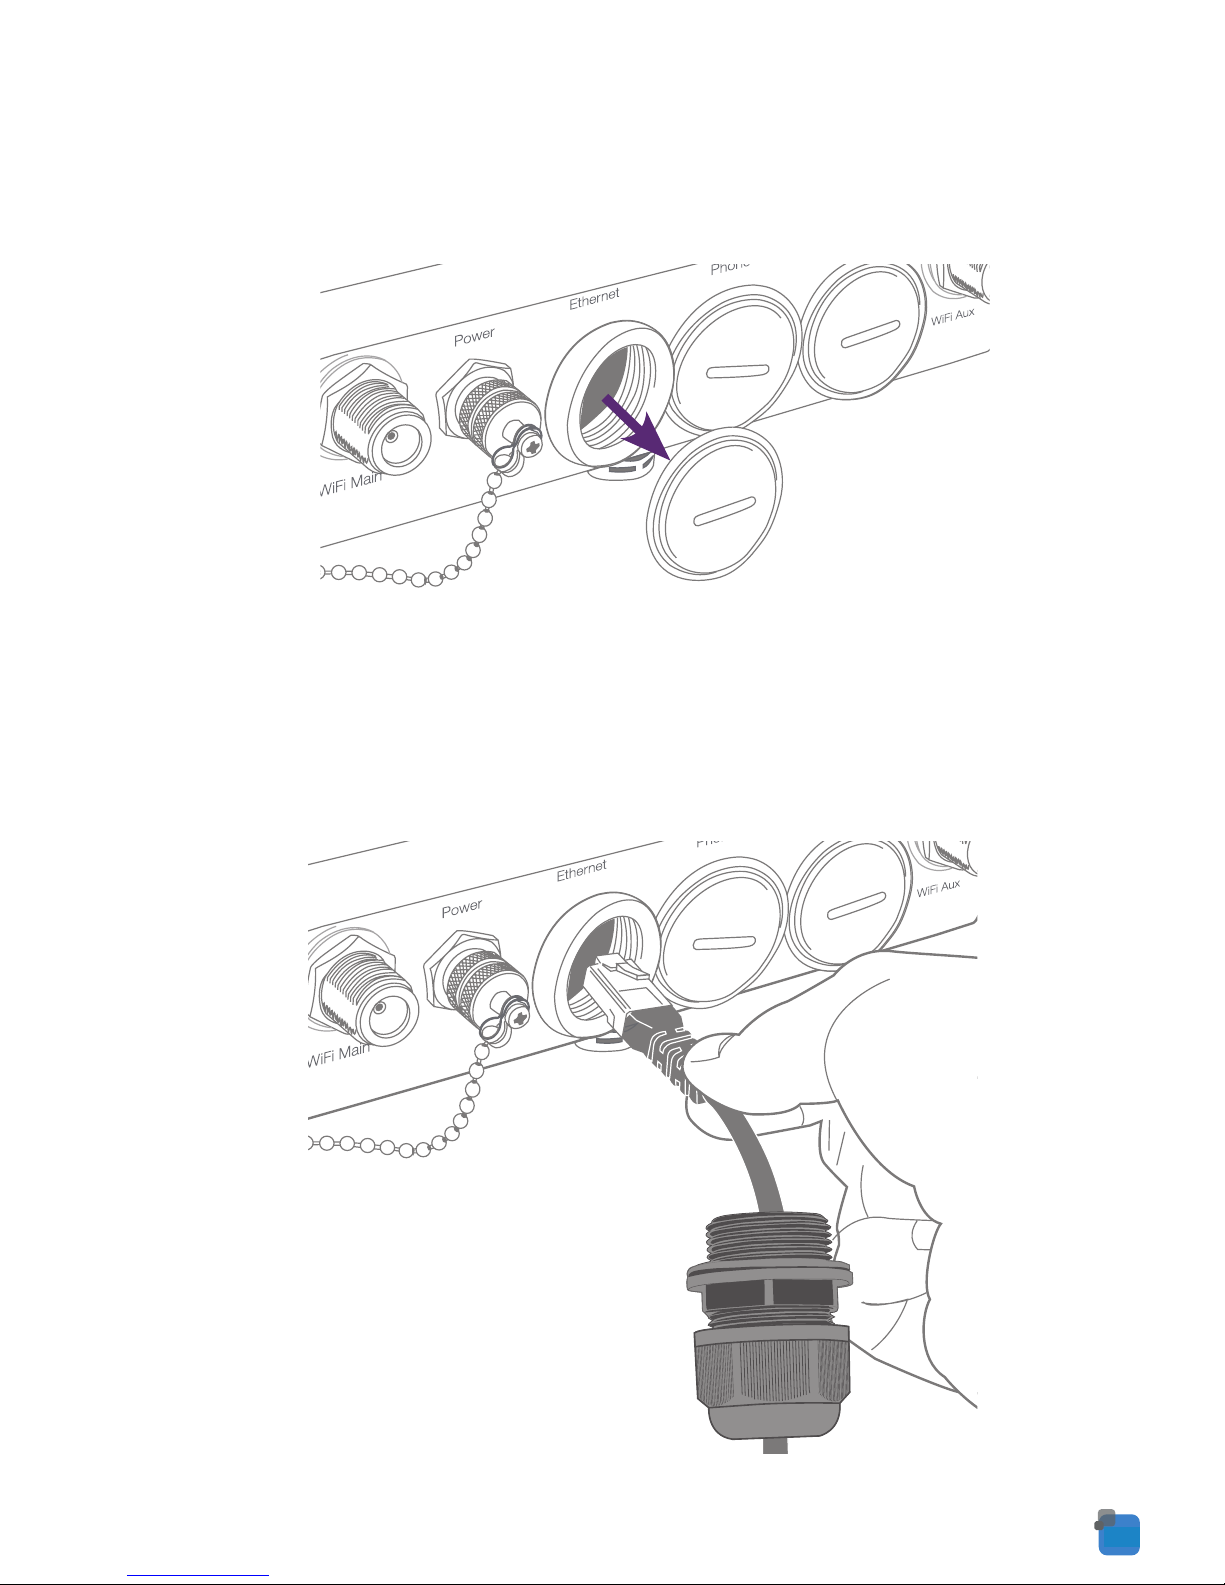
1. Remove the protective cap labelled Ethernet with a flathead screwdriver or a small coin.
2. Connect the Ethernet cable to the Outdoor Industrial Router’s Ethernet port. The end with the
black cable gland is the end for use with the Outdoor Industrial Router.
Page 12
Powering your Router
The outdoor router can be powered via DC power supply or Power over Ethernet (PoE).
DC power option
Your router is provided with a waterproof DC jack allowing it to be powered by a 9~28V DC power
supply.
1. On the bottom interface panel of the router, locate the DC power port and unscrew the
protective cap to expose the connection pins.
2. Connect the DC power jack as shown below to the DC power port of the router and turn the
metal securing ring clockwise while pushing the conector in to secure the DC jack in position.
3. At the other end of the cable, wire the red (positive +) and black (grounding) wires to your
9~28V DC power supply source.
Power
1
2
V+
GND
1
2
Voltage+
Ground
Pin Signal Description
04
9
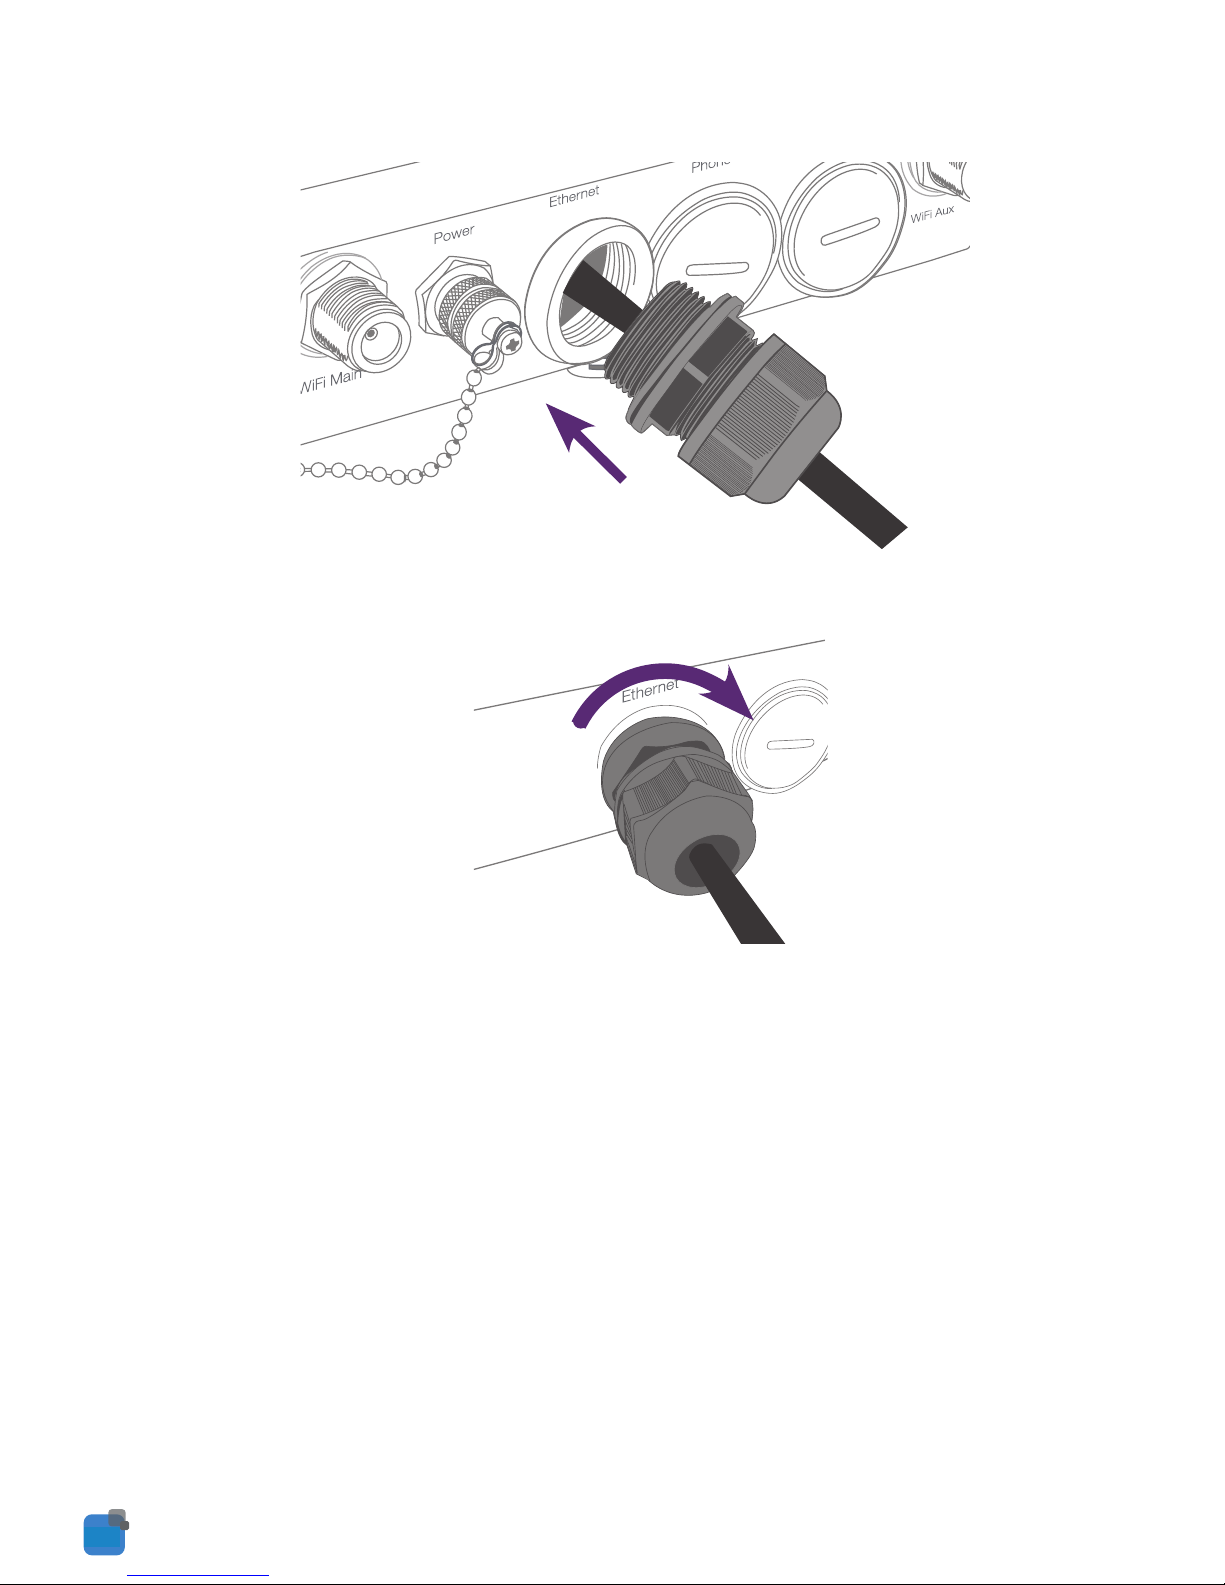
3. Slide the cable gland towards the Ethernet port. You may need to loosen the bottom part of
the cable gland so you can move it.
4. Tighten the water-proof thread lock sealing nut to ensure the seal is adequate.
NOTE: If you loosened the bottom part of the cable gland you must retighten to ensure your
router is waterpoof. Use a shifter or spanner to ensure the water-proof Ethernet plug is
sufficiently secure.
Connecting the Phone Cable
The steps for connecting your phone cable are the same as the above steps for your Ethernet
cable, please ensure you use a cable gland as directed to ensure your device is waterproof.
Configure the Router
Step 1: Access Router’s Homepage
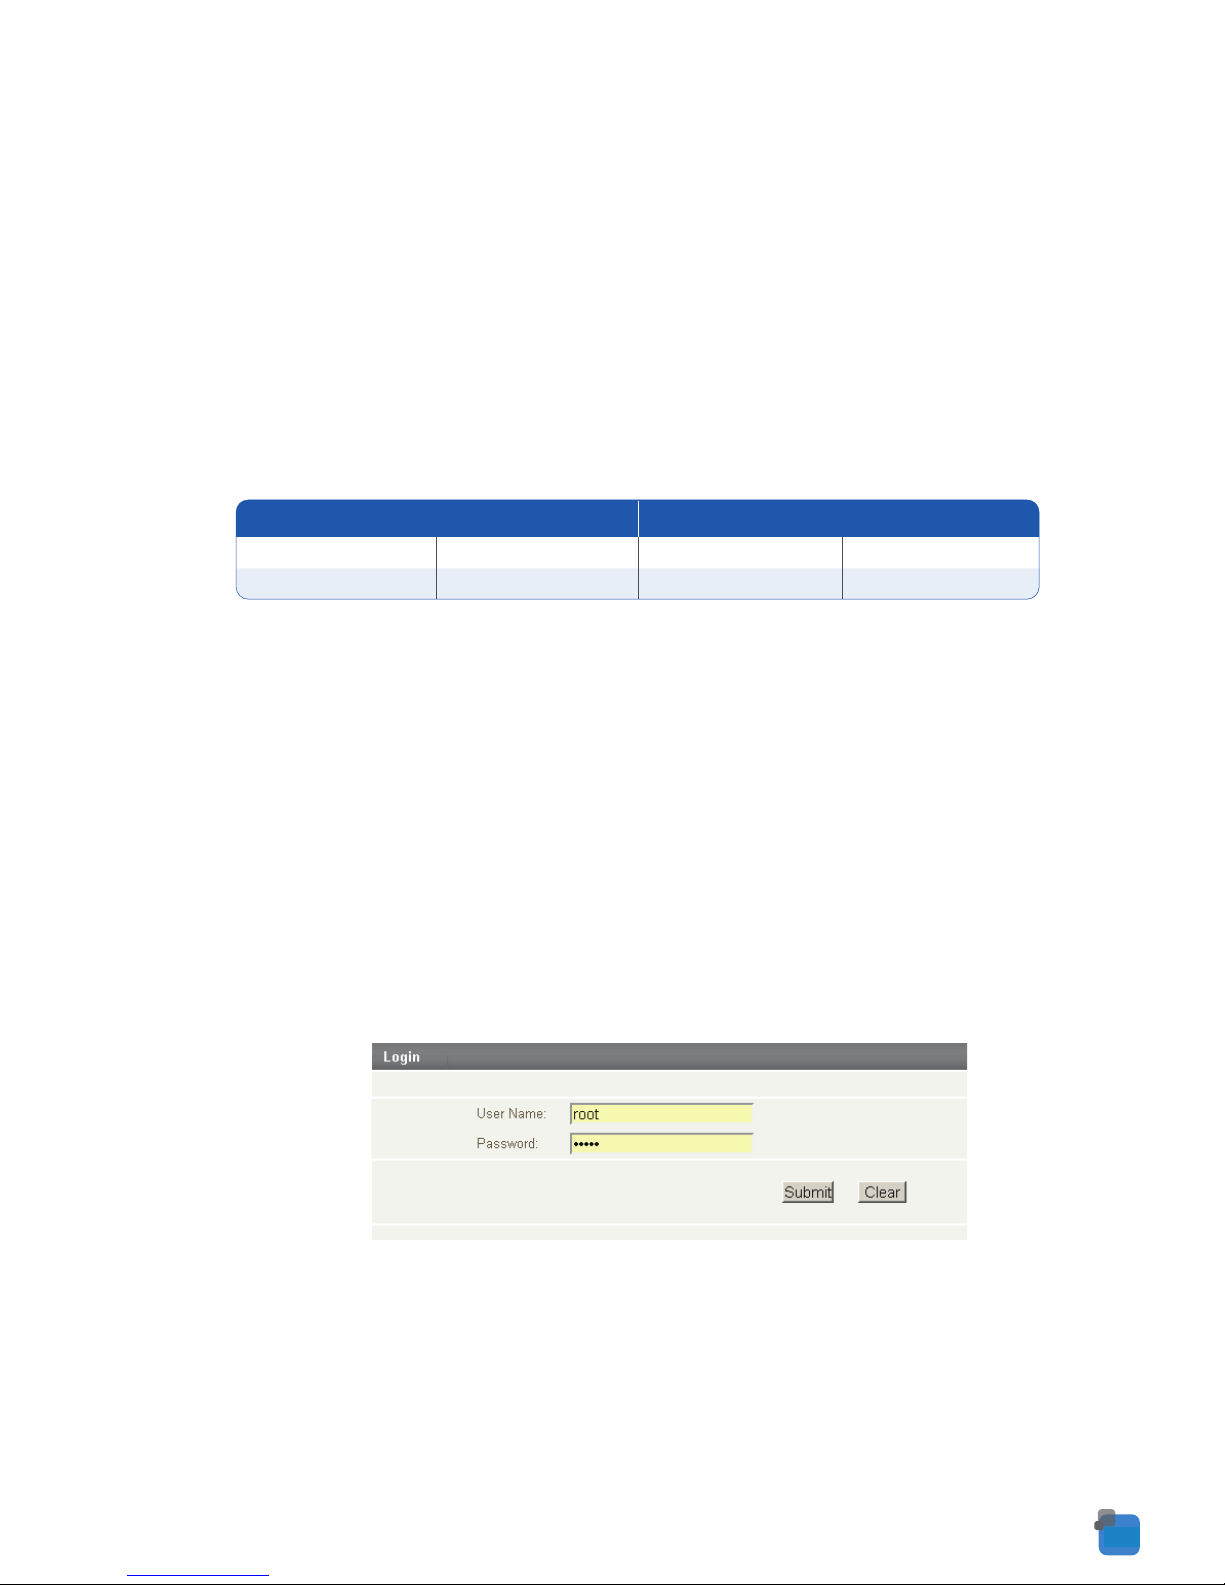
Your outdoor router’s homepage can be accessed by using the web address via default IP
address http://192.168.1.1 or alternatively via URL http://my.router.
This URL opens the management console, where you can
• View the status of your router.
• Make changes to the routers configurations.
The admin manager account allows user to manage all settings of the router except functions
such as Firmware Upgrade, Device Configuration Backup and Restore, Mobile Broadband
Settings and Reset to Factory Default Settings, which are privileged only to the root manager
account.
To access the homepage:
1. Open your web browser and enter the IP address http://192.168.1.1 or http://my.router.
2. Click Login and type the username/password for the Admin manager account or Root
manager account.
3. Then click on Submit.
Page 13
Picking the best spot for installation
1. At this point your Outdoor Industrial Router is ready to be installed on the outside of your
property, however before doing so, you will need to find the best location.
2. To get the strongest signal your Outdoor Industrial Router should ideally be placed towards
your nearest 3G tower.
3. If you are unsure where your nearest 3G tower is, you can simply unplug and reconnect your
Outdoor Industrial Router at different spots on property to see where you get the strongest signal.
4. Find the area of your property where the most indicators light up, this is where you have the
best signal strength and should install your Outdoor Industrial Router.
04
10
Configure the Router
Step 1: Access Router’s Homepage
Your outdoor router’s homepage can be accessed by using the web address via default IP
address http://192.168.1.1 or alternatively via URL http://my.router.
This URL opens the management console, where you can
• View the status of your router.
• Make changes to the routers configurations.
The admin manager account allows user to manage all settings of the router except functions
such as Firmware Upgrade, Device Configuration Backup and Restore, Mobile Broadband
Settings and Reset to Factory Default Settings, which are privileged only to the root manager
account.
To access the homepage:
1. Open your web browser and enter the IP address http://192.168.1.1 or http://my.router.
2. Click Login and type the username/password for the Admin manager account or Root
manager account.
3. Then click on Submit.
NOTE: First time users should use Root Manager account to configure Mobile Broadband
settings.
Admin
Admin
Username
Password
Username
Password
Root
Admin
Admin manager account Root manager account
Page 14
Powering your Router
The outdoor router can be powered via DC power supply or Power over Ethernet (PoE).
DC power option
Your router is provided with a waterproof DC jack allowing it to be powered by a 9~28V DC power
supply.
1. On the bottom interface panel of the router, locate the DC power port and unscrew the
protective cap to expose the connection pins.
2. Connect the DC power jack as shown below to the DC power port of the router and turn the
metal securing ring clockwise while pushing the conector in to secure the DC jack in position.
3. At the other end of the cable, wire the red (positive +) and black (grounding) wires to your
9~28V DC power supply source.
Power
1
2
V+
GND
1
2
Voltage+
Ground
Pin Signal Description
04
11
Connecting the Ethernet Cable
1. Remove the protective cap labelled Ethernet with a flathead screwdriver or a small coin.
2. Connect the Ethernet cable to the Outdoor Industrial Router’s Ethernet port. The end with the
black cable gland is the end for use with the Outdoor Industrial Router.
Step 2: Unlock the SIM
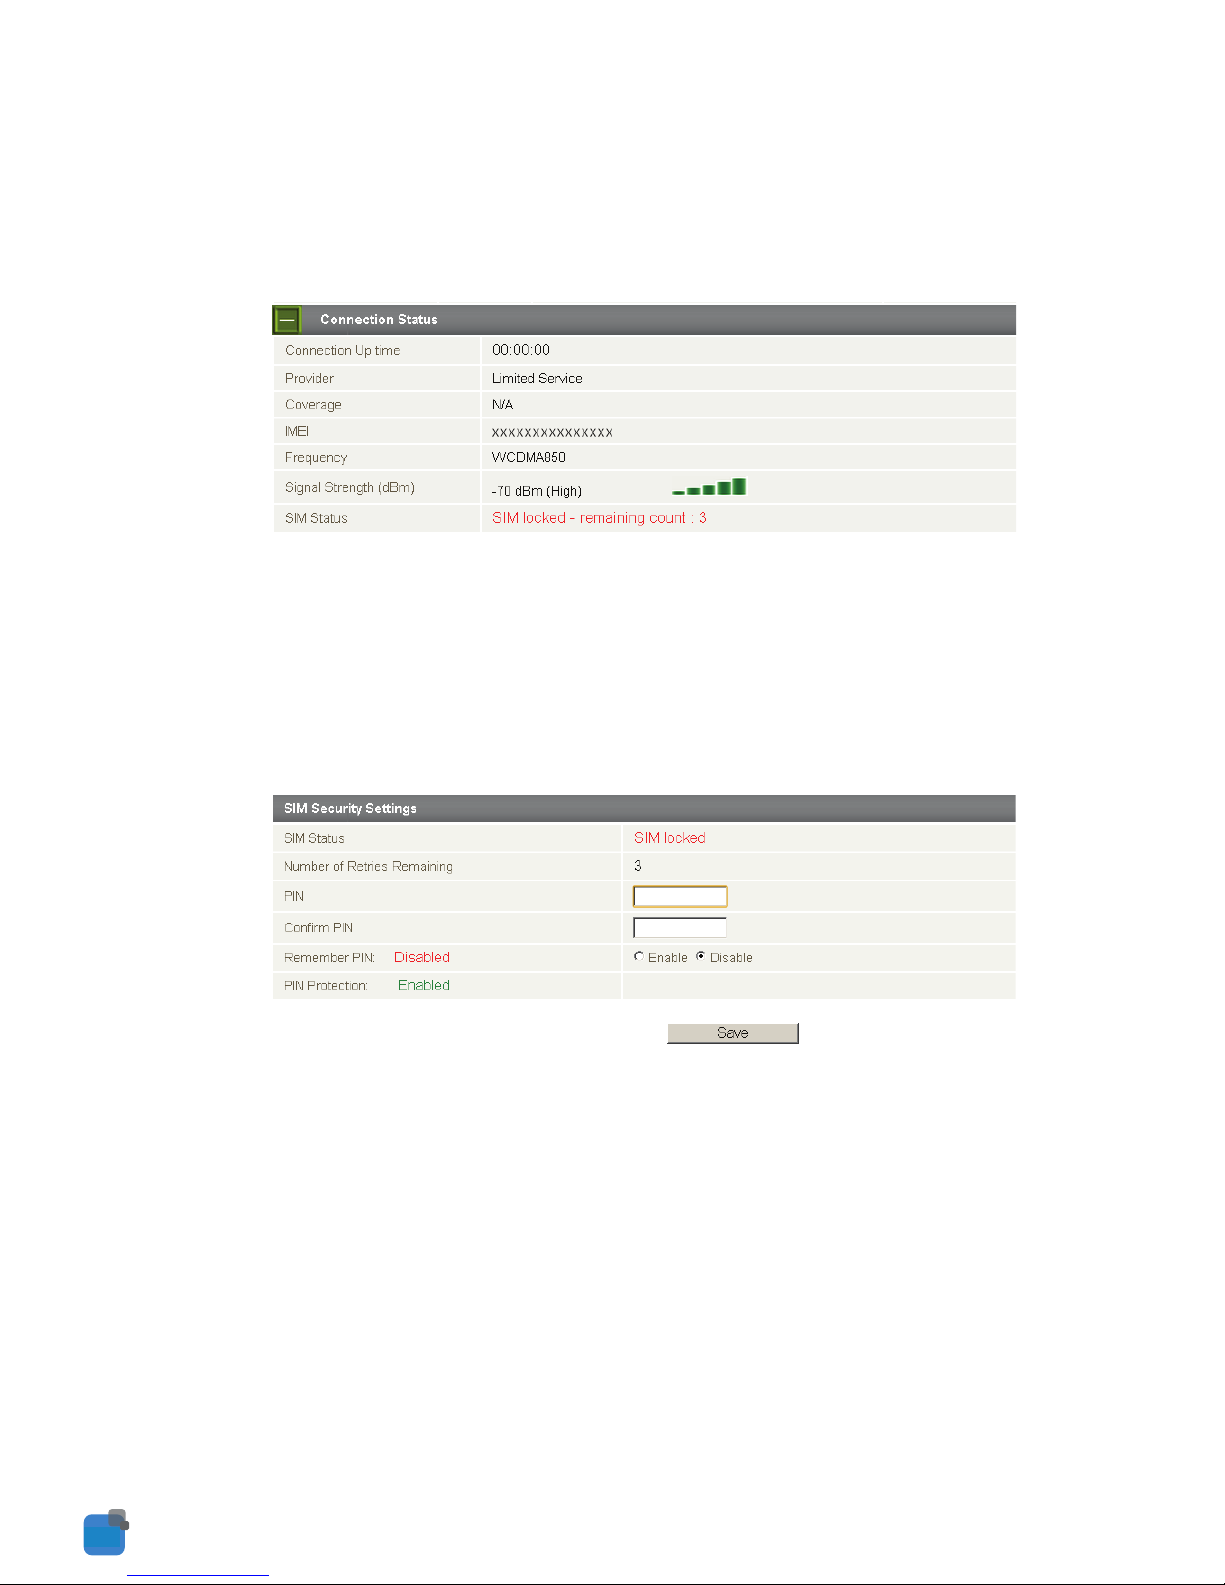
If the SIM card is locked you will need to unlock it with the appropriate PIN code.
You can find out if the SIM is locked by viewing the SIM Status at the bottom of the
Status page.
If the SIM Status is SIM PIN Required or SIM Locked then follow the following steps to
unlock the SIM card:
1. From the menu, select Internet Settings -> Mobile Broadband -> SIM Security.
This will open up the page displaying SIM Security Settings as shown below:
2. Enter the PIN code in the PIN field and then enter it again in the Confirm PIN.
It is highly recommended that you select Remember PIN so that you will not have to
enter the PIN code each time the SIM is inserted. Alternatively you can also disable SIM
PIN protection by selecting Disable PIN from the PIN Protection drop down menu.
3. Click Save.
4. Wait for a few seconds and verify that the SIM Status reads SIM OK.
Page 15
Picking the best spot for installation
1. At this point your Outdoor Industrial Router is ready to be installed on the outside of your
property, however before doing so, you will need to find the best location.
2. To get the strongest signal your Outdoor Industrial Router should ideally be placed towards
your nearest 3G tower.
3. If you are unsure where your nearest 3G tower is, you can simply unplug and reconnect your
Outdoor Industrial Router at different spots on property to see where you get the strongest signal.
4. Find the area of your property where the most indicators light up, this is where you have the
best signal strength and should install your Outdoor Industrial Router.
04
12
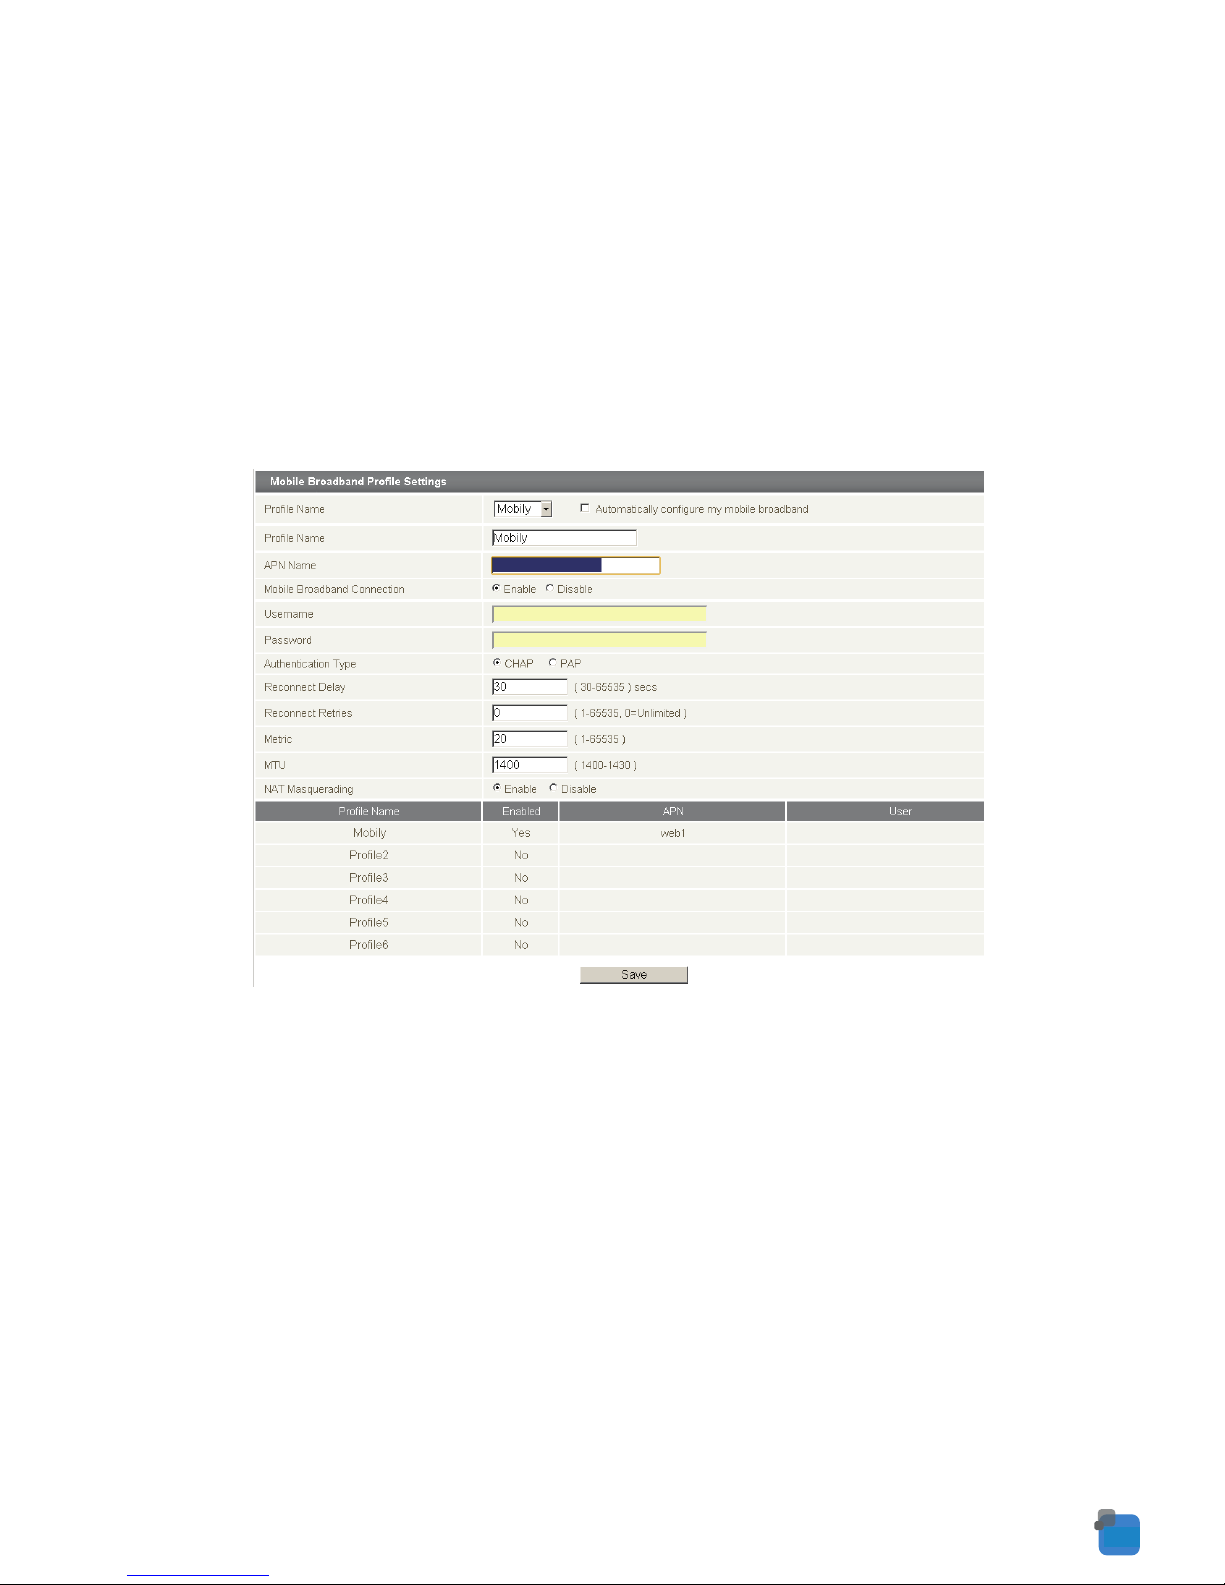
Step 3: Connect to Internet
Your router should automatically connect to the Internet if the SIM status reads SIM OK. If it does
not, follow the steps listed below to setup the Mobile Broadband connection.
By default, the router is set to automatically configure the mobile broadband connection. It tries to
detect the correct APN and connection details in order to connect to your mobile broadband
service.
If the auto-configuration is unsuccessful, you will need to ente
r the connection details as follows:
1. From the menu, select Internet Settings -> Mobile Broadband -> Connection.
2. Unselect the Automatically configure my mobile broadband box and click Save.
3. Select a profile name from the pull down menu to save the profile settings. You can configure
and save the mobile broadband settings the router will use to connect to a particular network.
4. Enter the connection details (APN Name) provided by your mobile broadband service provider.
You may need to enter Username and Password provided by your mobile broadband service
provider.
5. Ensure the Mobile Broadband Connection radio button is on Enable.
6. Click Save.
Page 16
Powering your Router
The outdoor router can be powered via DC power supply or Power over Ethernet (PoE).
DC power option
Your router is provided with a waterproof DC jack allowing it to be powered by a 9~28V DC power
supply.
1. On the bottom interface panel of the router, locate the DC power port and unscrew the
protective cap to expose the connection pins.
2. Connect the DC power jack as shown below to the DC power port of the router and turn the
metal securing ring clockwise while pushing the conector in to secure the DC jack in position.
3. At the other end of the cable, wire the red (positive +) and black (grounding) wires to your
9~28V DC power supply source.
Power
1
2
V+
GND
1
2
Voltage+
Ground
Pin Signal Description
04
13
Installing Your Router Outside
Your Outdoor Industrial Router can be mounted directly onto a wall or a pole. For wall mounting
instructions see page 15, for pole mounting instructions see page 17.
Connecting Via Ethernet
NOTE: �The Outdoor Ethernet cable is not included in the package contents, however can be
bought as an accessory
Before connecting the Ethernet cable (not supplied) you must first connect the Ferrite Core and
cable gland.
Connecting the Cable Gland
1. Take a cable gland, unscrew the thread lock sealing nut, and remove the inner seal as shown
below.
2. Thread the Ethernet cable through the thread lock sealing nut. Open the claw and the seal to
place the cable through it and then pass cable through the body of the cable gland. Align the
gland segments in the orientation as shown below. Plug the seal through the body and tighten
the nut.
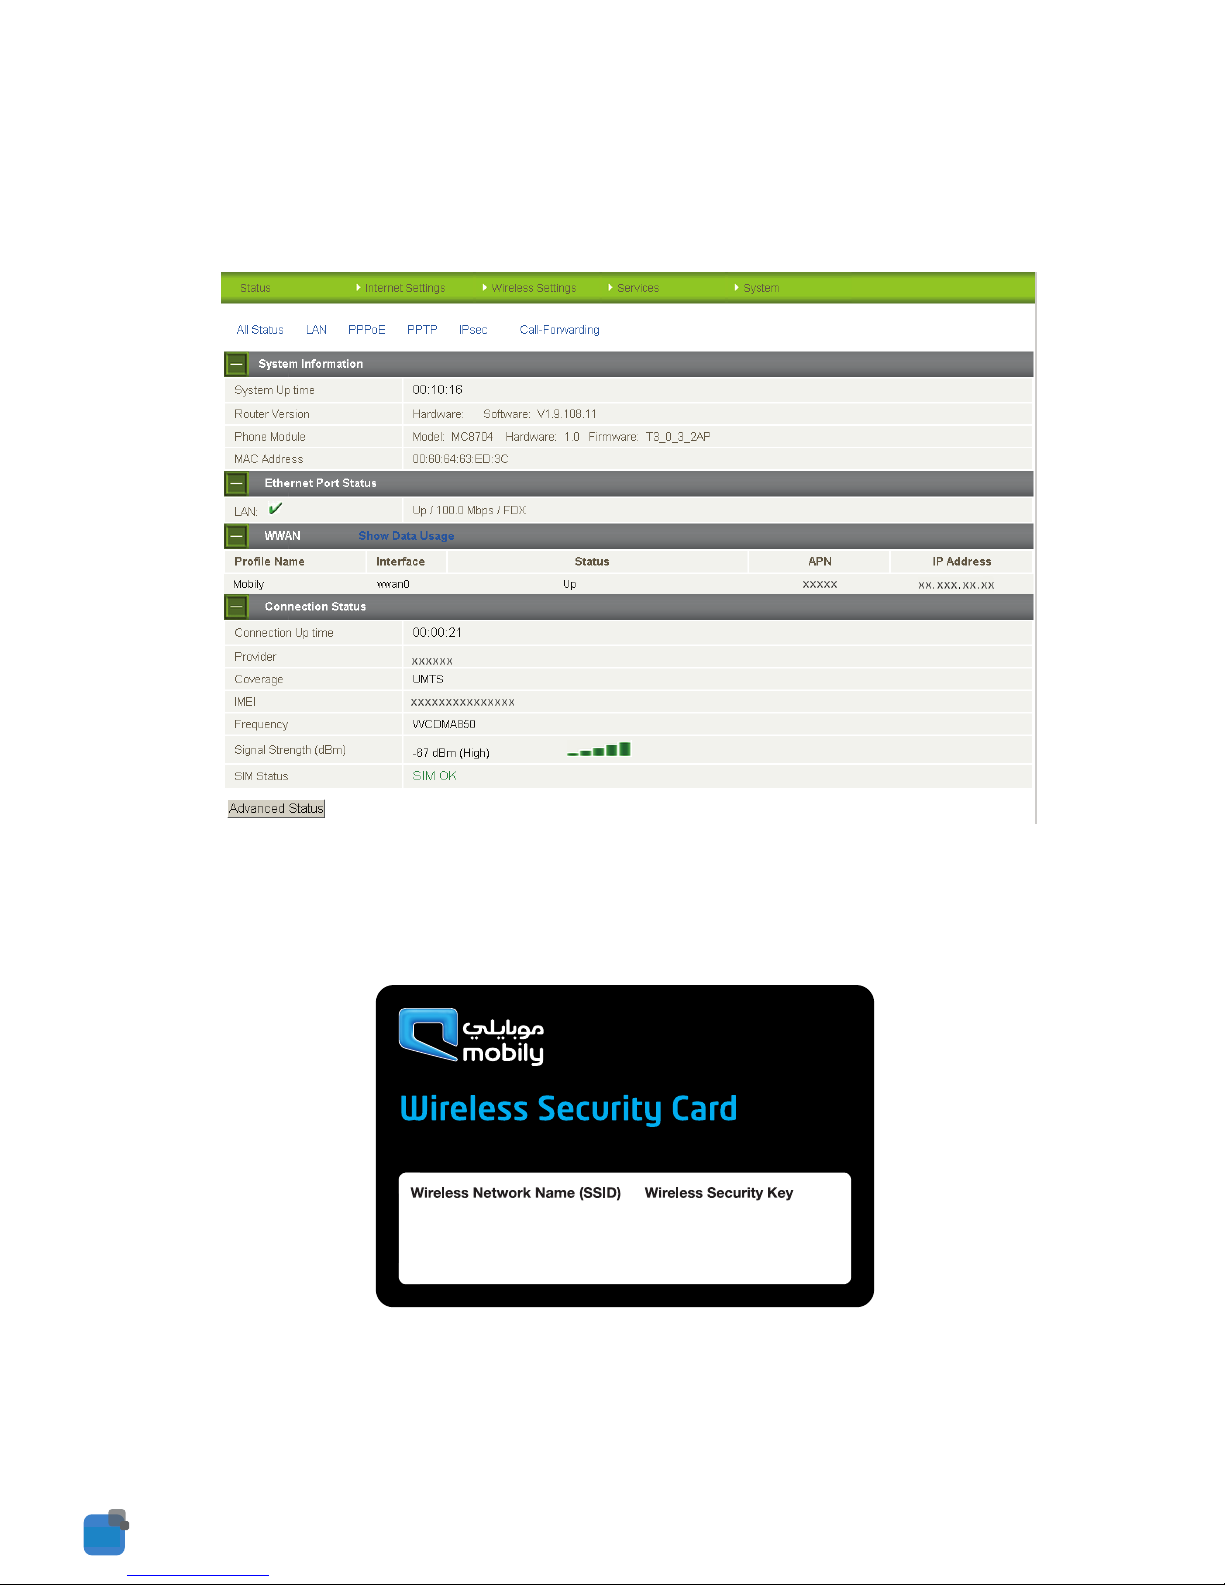
Verify Connection Status
Click on the Status link to return to the status page.
The WWAN Status should be Up. The IP Address field shows the current IP address that the
network has allocated for the router.
Connecting Wirelessly
1. Using your wireless device e.g. notebook, tablet or smart phone, scan for your Outdoor
Wireless network as displayed on your wireless security card.
2. Enter your password (or Wireless Security Key) displayed on your security card .
3. Wait approximately 30 seconds for the connection to be established.
Page 17
Picking the best spot for installation
1. At this point your Outdoor Industrial Router is ready to be installed on the outside of your
property, however before doing so, you will need to find the best location.
2. To get the strongest signal your Outdoor Industrial Router should ideally be placed towards
your nearest 3G tower.
3. If you are unsure where your nearest 3G tower is, you can simply unplug and reconnect your
Outdoor Industrial Router at different spots on property to see where you get the strongest signal.
4. Find the area of your property where the most indicators light up, this is where you have the
best signal strength and should install your Outdoor Industrial Router.
04
14
Wall Mounting Your
Outdoor Industrial Router
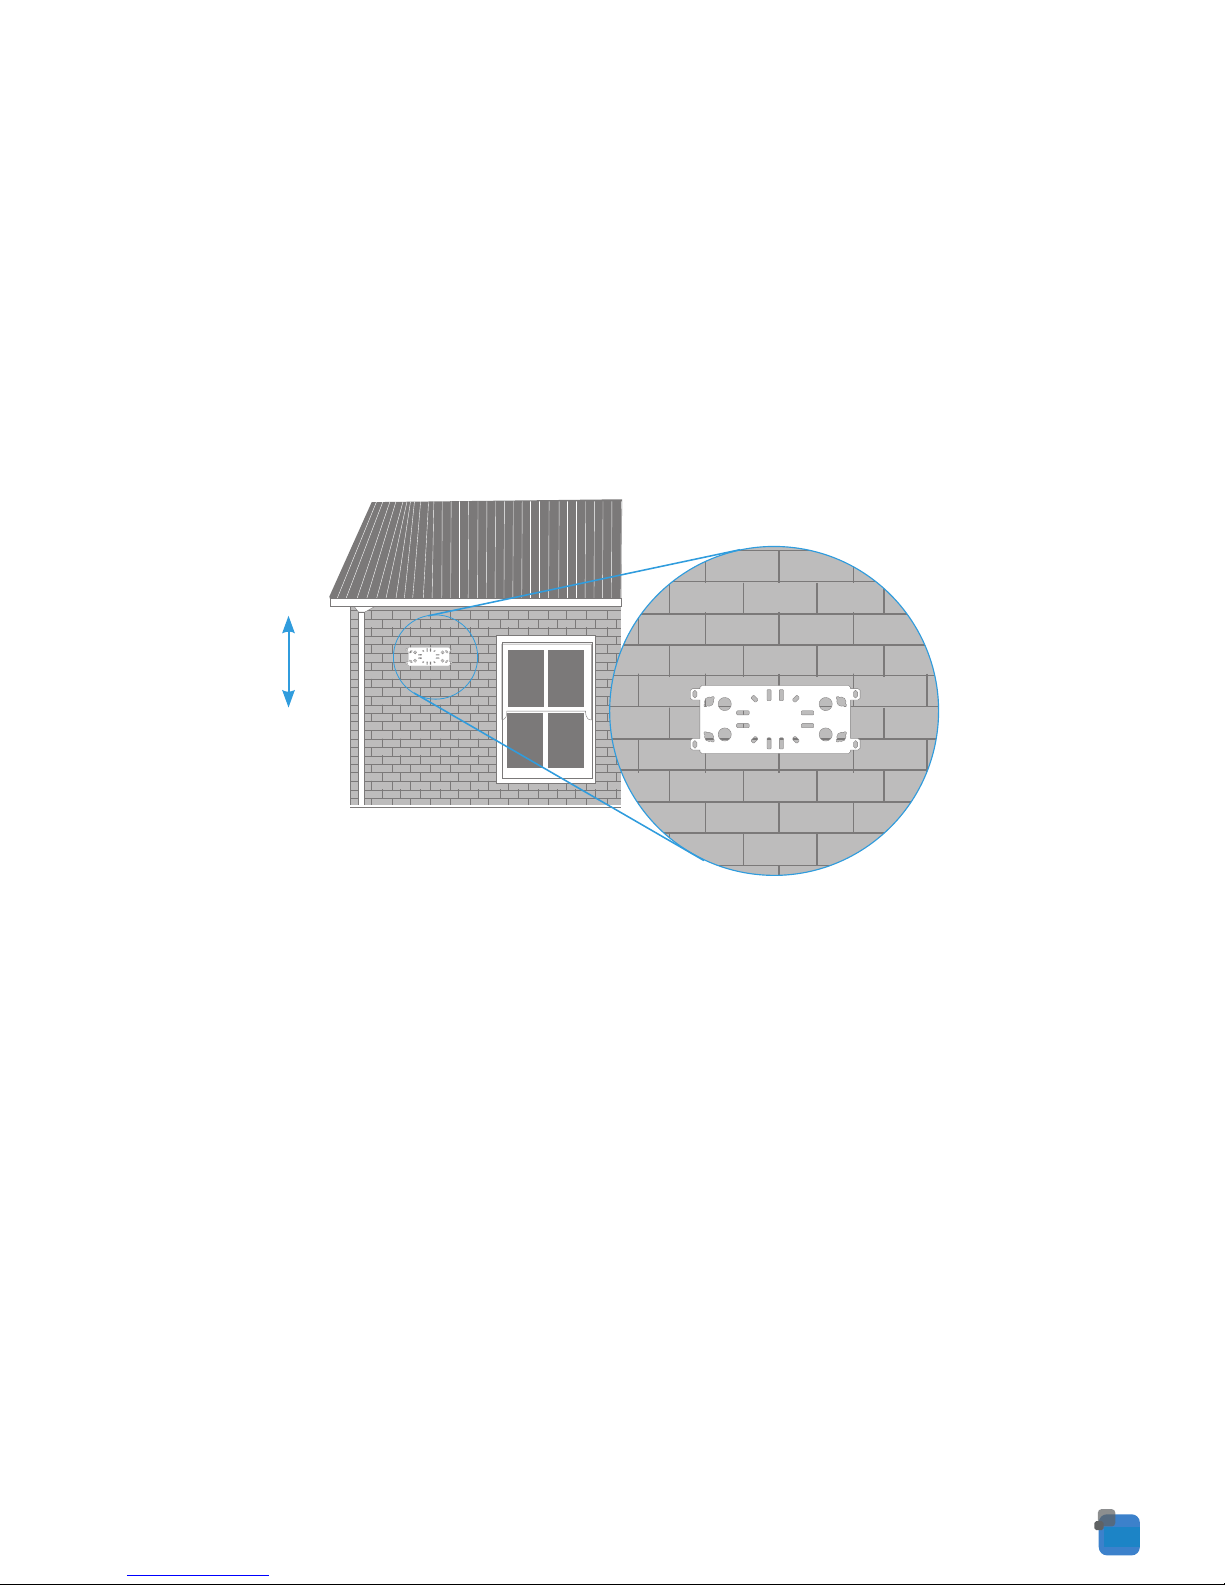
Locate your mounting bracket, mounting bracket screws, wall mount screws, and grey wall plugs.
1. Before you start make sure all cables have been disconnected from your Outdoor Industrial
Router and that your antennas have been attached and your SIM card is inserted.
2. Align the mounting bracket horizontally to the desired position on the wall.
3. Make sure you have at least 60 cm clear space around the centre of the mounting bracket
4. Use a pencil or piece of chalk to mark the holes on the wall
5. Remove the mounting bracket from the wall
6. Using your drill and a 6 mm drill bit to drill the holes in the wall where you marked previously.
NOTE: Before drilling into your walls ensure you are not drilling into an area with electrical wiring,
a circuit or wire tracer can help you find these. If you are unsure consult a professional
installer.
60cm
Page 18
Powering your Router
The outdoor router can be powered via DC power supply or Power over Ethernet (PoE).
DC power option
Your router is provided with a waterproof DC jack allowing it to be powered by a 9~28V DC power
supply.
1. On the bottom interface panel of the router, locate the DC power port and unscrew the
protective cap to expose the connection pins.
2. Connect the DC power jack as shown below to the DC power port of the router and turn the
metal securing ring clockwise while pushing the conector in to secure the DC jack in position.
3. At the other end of the cable, wire the red (positive +) and black (grounding) wires to your
9~28V DC power supply source.
Power
1
2
V+
GND
1
2
Voltage+
Ground
Pin Signal Description
04
15
Powering your Router
The outdoor router can be powered via DC power supply or Power over Ethernet (PoE).
DC power option
Your router is provided with a waterproof DC jack allowing it to be powered by a 9~28V DC power
supply.
1. On the bottom interface panel of the router, locate the DC power port and unscrew the
protective cap to expose the connection pins.
2. Connect the DC power jack as shown below to the DC power port of the router and turn the
metal securing ring clockwise while pushing the conector in to secure the DC jack in position.
3. At the other end of the cable, wire the red (positive +) and black (grounding) wires to your
9~28V DC power supply source.
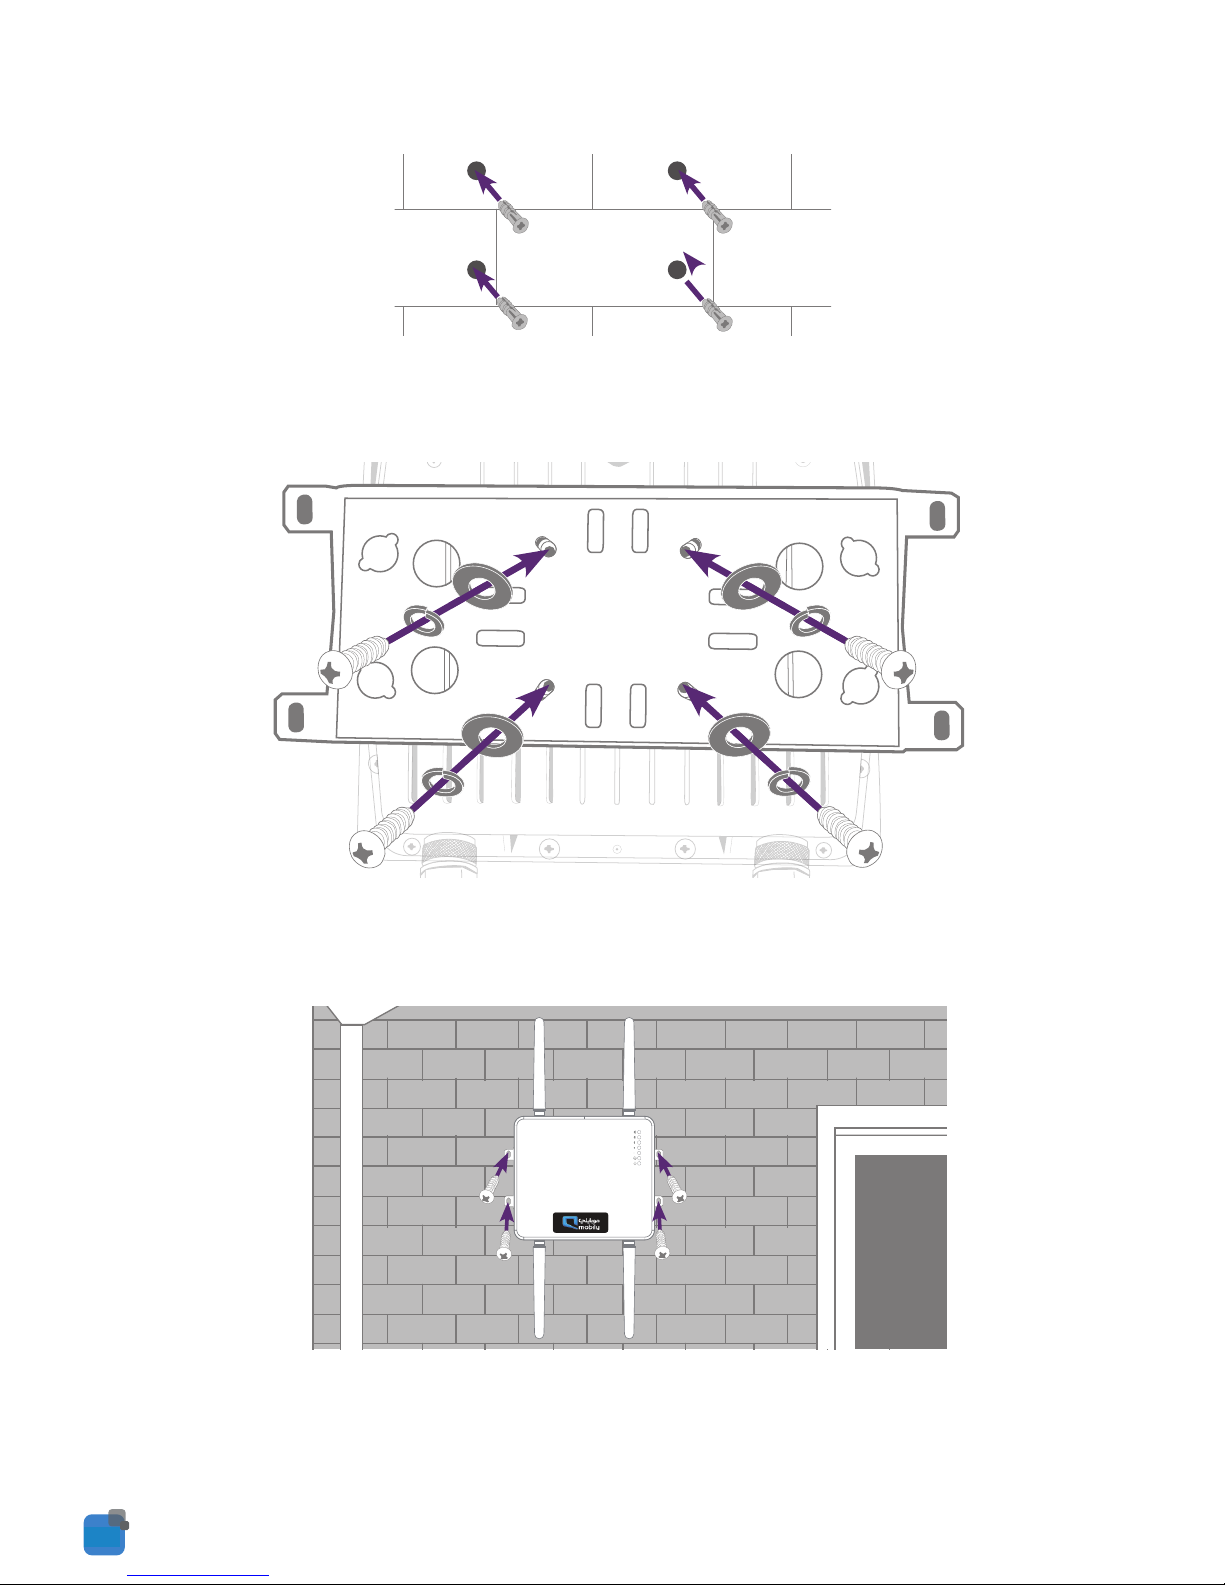
7. Insert the 4 grey wall plugs into the wall.
8. Mount the mounting bracket horizontally to the back of the Outdoor Industrial Router with the
mounting bracket screws.
9. Secure the mounting bracket to the wall by inserting the wall mount screws into the grey wall
plugs
10. You can now reconnect the cables to your Outdoor Industrial Router.
Page 19
Picking the best spot for installation
1. At this point your Outdoor Industrial Router is ready to be installed on the outside of your
property, however before doing so, you will need to find the best location.
2. To get the strongest signal your Outdoor Industrial Router should ideally be placed towards
your nearest 3G tower.
3. If you are unsure where your nearest 3G tower is, you can simply unplug and reconnect your
Outdoor Industrial Router at different spots on property to see where you get the strongest signal.
4. Find the area of your property where the most indicators light up, this is where you have the
best signal strength and should install your Outdoor Industrial Router.
04
16
Pole Mounting Your Outdoor Industrial Router
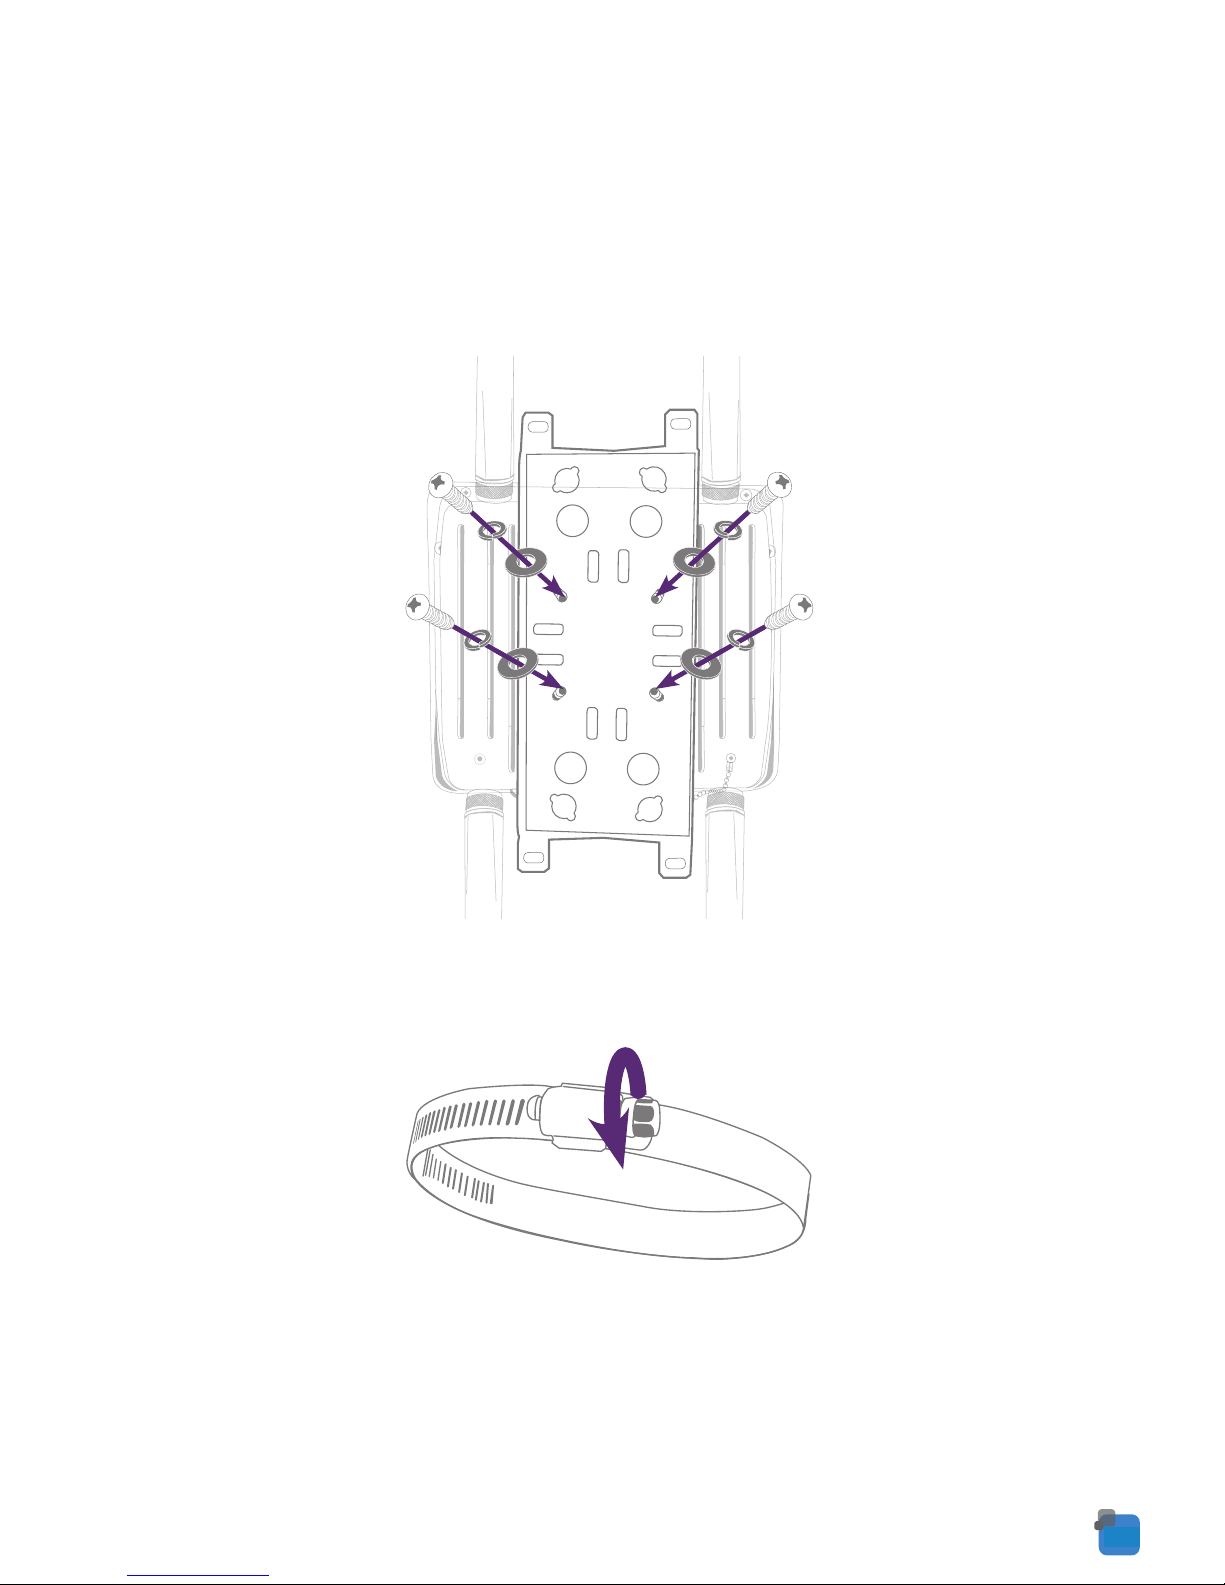
Make sure you have your included mounting bracket, mounting bracket screws and hose clamps.
1. Before you start make sure all cables have been disconnected from your Outdoor Industrial
Router and that your antenna have been attached and your SIM card is inserted.
2. Mount the mounting bracket vertically to the back of the Outdoor Industrial Router with the
mounting bracket screws.
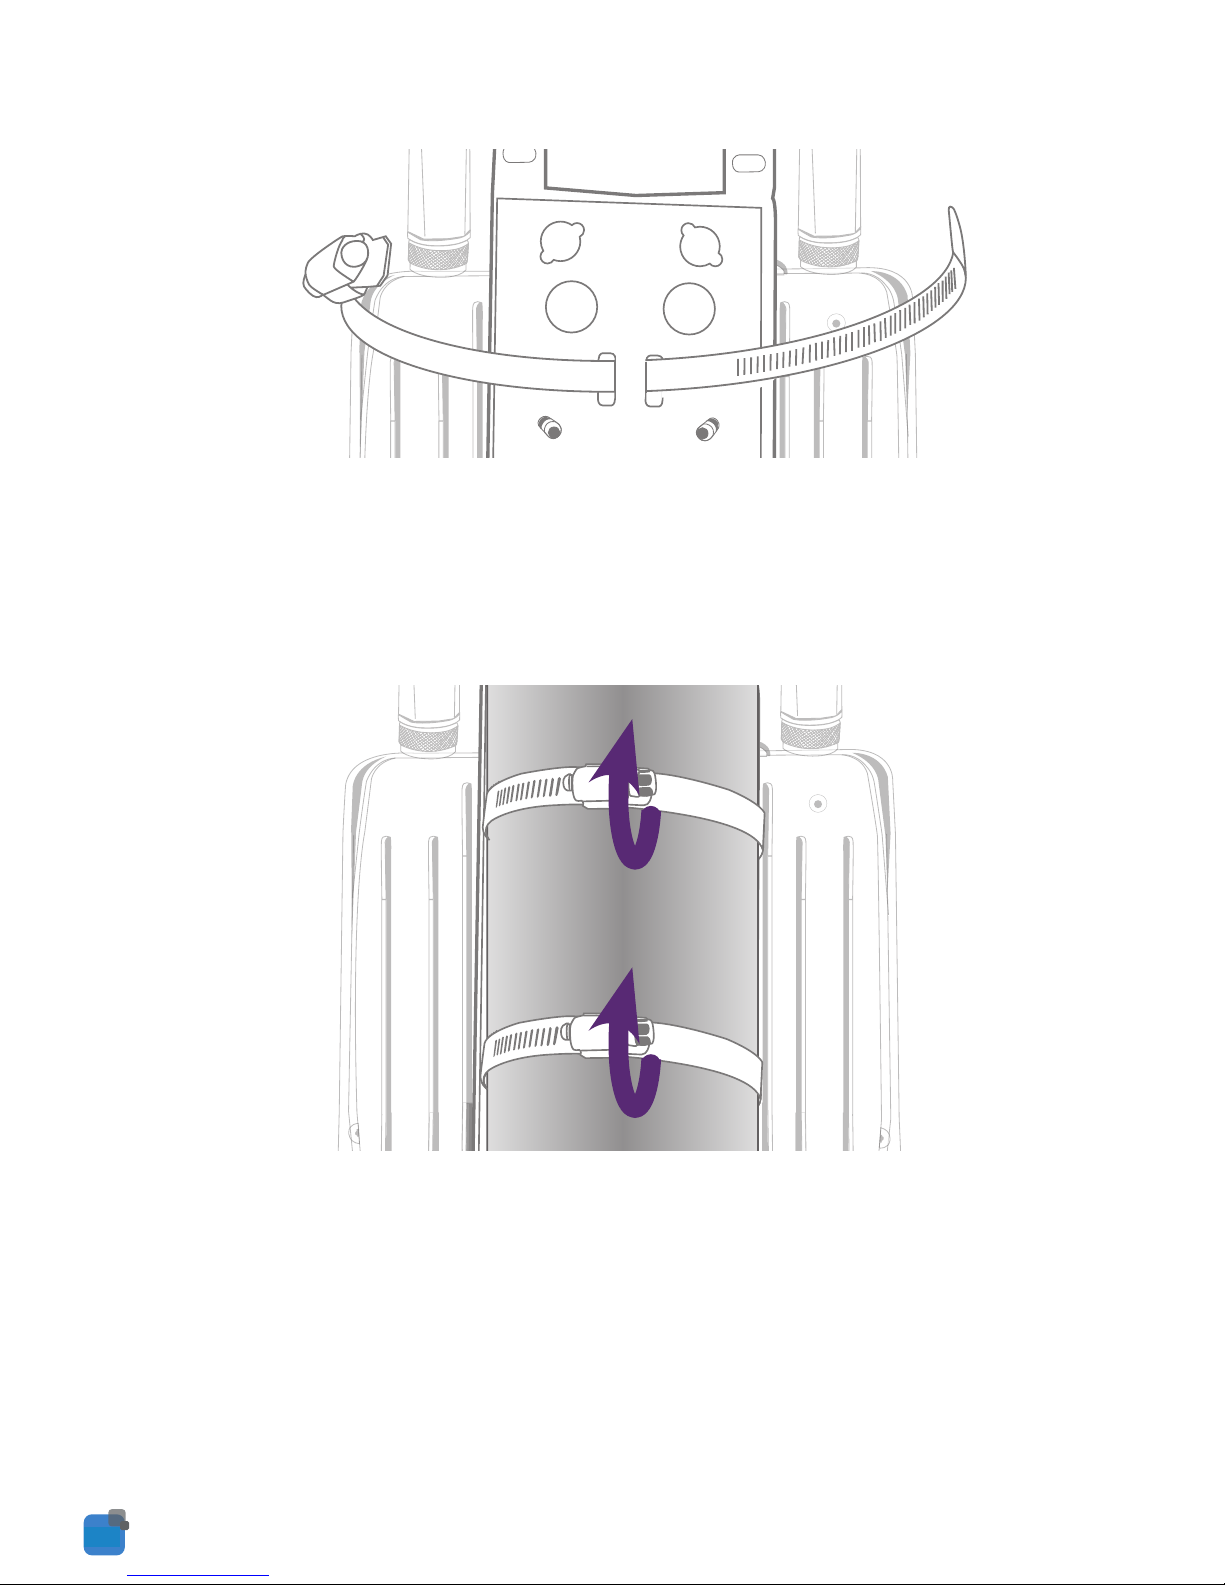
3. Open the hose clamps by turning the locking mechanism counter-clockwise.
NOTE: You can loosen it by hand or use a flathead screwdriver.
Page 20
Powering your Router
The outdoor router can be powered via DC power supply or Power over Ethernet (PoE).
DC power option
Your router is provided with a waterproof DC jack allowing it to be powered by a 9~28V DC power
supply.
1. On the bottom interface panel of the router, locate the DC power port and unscrew the
protective cap to expose the connection pins.
2. Connect the DC power jack as shown below to the DC power port of the router and turn the
metal securing ring clockwise while pushing the conector in to secure the DC jack in position.
3. At the other end of the cable, wire the red (positive +) and black (grounding) wires to your
9~28V DC power supply source.
Power
1
2
V+
GND
1
2
Voltage+
Ground
Pin Signal Description
04
17
Let’s get Started
SIM Card Installation
1. Remove the protective cap labelled SIM/Reset with a flathead screwdriver.
NOTE: �If you don’t have a flathead screwdriver or you’re having problems, a small coin will do the
trick.
2. Place an activated SIM card into SIM card reader with the metallic part of the SIM card facing up.
3. Push the SIM card in until the spring latches the SIM card in place. You should hear a click. If
you need to remove the SIM card push inward again and the SIM will pop out.
4. Place the protective cap back on securely to ensure it is protected from water and dust
(ensure IP-67 rating).
4. Straighten out the end of the hose clamps and slide them through the rectangular holes in the
mounting bracket.
5. Wrap the metal strap around the pole.
6. Use a flathead screwdriver to tighten the locking mechanism by turning it clockwise.
7. You can now reconnect the cables to your Outdoor Industrial Router
Page 21
Picking the best spot for installation
1. At this point your Outdoor Industrial Router is ready to be installed on the outside of your
property, however before doing so, you will need to find the best location.
2. To get the strongest signal your Outdoor Industrial Router should ideally be placed towards
your nearest 3G tower.
3. If you are unsure where your nearest 3G tower is, you can simply unplug and reconnect your
Outdoor Industrial Router at different spots on property to see where you get the strongest signal.
4. Find the area of your property where the most indicators light up, this is where you have the
best signal strength and should install your Outdoor Industrial Router.
04
18
Get to know your Outdoor
Industrial Router better
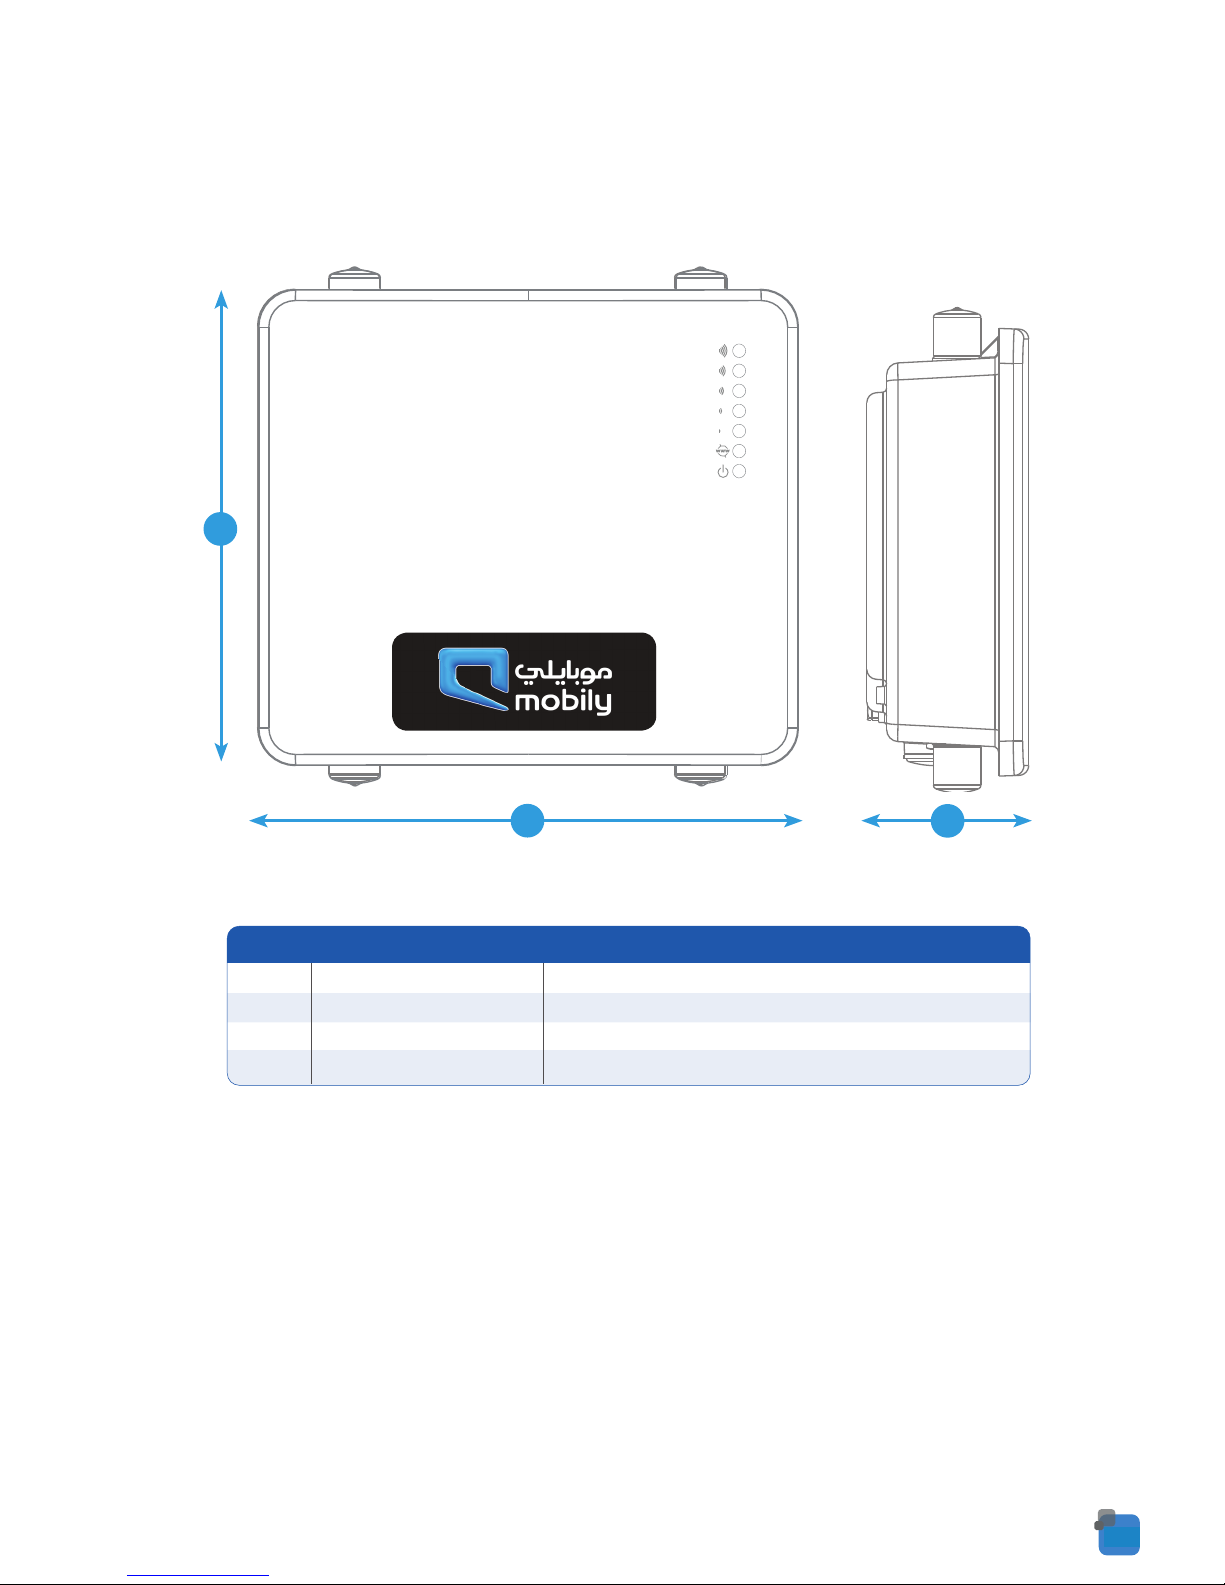
Height
Length
Depth
Weight
1
2
3
4
240 mm
255 mm
80 mm
1750 g (without mounting bracket and antennas)
Outdoor Industrial Router
1
2
3
Page 22
Powering your Router
The outdoor router can be powered via DC power supply or Power over Ethernet (PoE).
DC power option
Your router is provided with a waterproof DC jack allowing it to be powered by a 9~28V DC power
supply.
1. On the bottom interface panel of the router, locate the DC power port and unscrew the
protective cap to expose the connection pins.
2. Connect the DC power jack as shown below to the DC power port of the router and turn the
metal securing ring clockwise while pushing the conector in to secure the DC jack in position.
3. At the other end of the cable, wire the red (positive +) and black (grounding) wires to your
9~28V DC power supply source.
Power
1
2
V+
GND
1
2
Voltage+
Ground
Pin Signal Description
04
19
Contents
Package Contents 01
Let’s get started 02
Powering your Router 04
Picking the best spot for Installation 05
Connecting via Ethernet 06
Configure the Router 10
Connecting Wirelessly 13
Wall mounting your Outdoor Industrial Router 14
Pole mounting your Outdoor Industrial Router 16
Get to know your Outdoor Industrial Router better 18
1
2
1
2
3
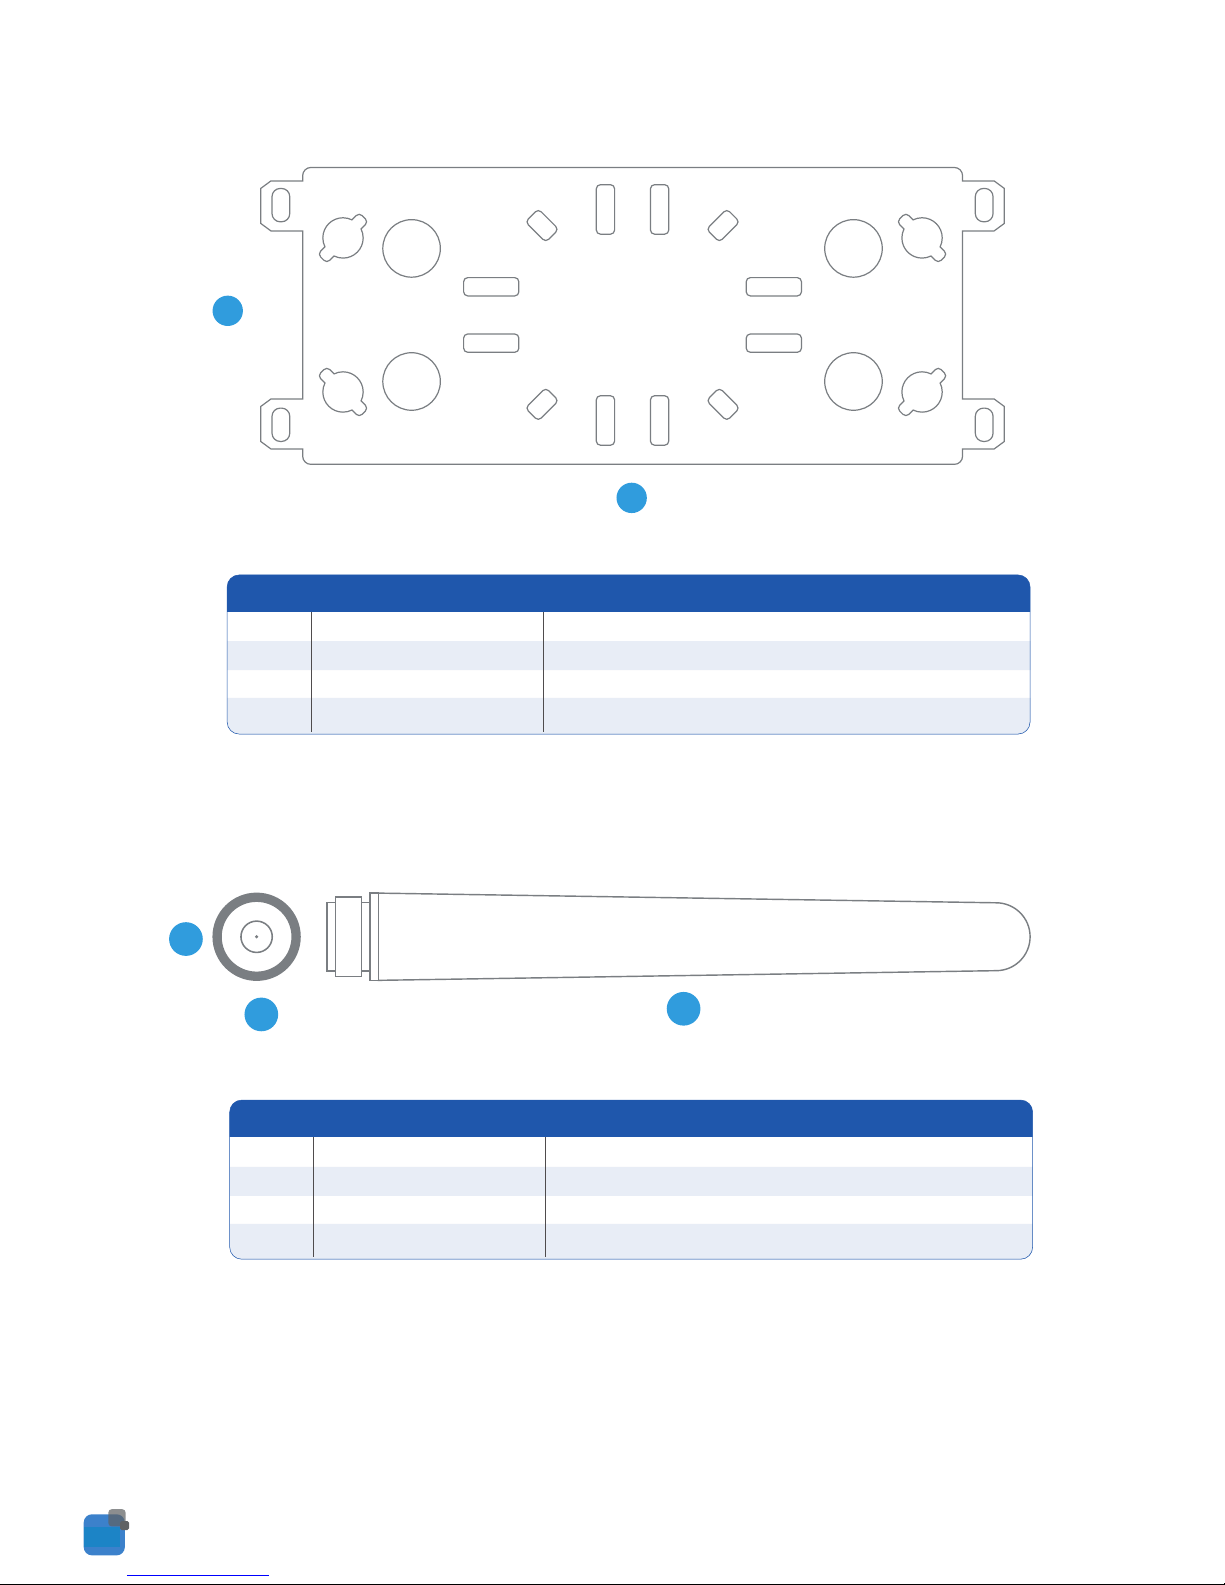
Height
Length
Depth
Weight
1
2
3
4
20 mm
20 mm
180 mm
60 g
3G AND WiFi
Height
Length
Depth
Weight
1
2
3
4
290 mm
110 mm
12 mm
410 g
Mounting Bracket
Page 23
Picking the best spot for installation
1. At this point your Outdoor Industrial Router is ready to be installed on the outside of your
property, however before doing so, you will need to find the best location.
2. To get the strongest signal your Outdoor Industrial Router should ideally be placed towards
your nearest 3G tower.
3. If you are unsure where your nearest 3G tower is, you can simply unplug and reconnect your
Outdoor Industrial Router at different spots on property to see where you get the strongest signal.
4. Find the area of your property where the most indicators light up, this is where you have the
best signal strength and should install your Outdoor Industrial Router.
04
20
What it all means
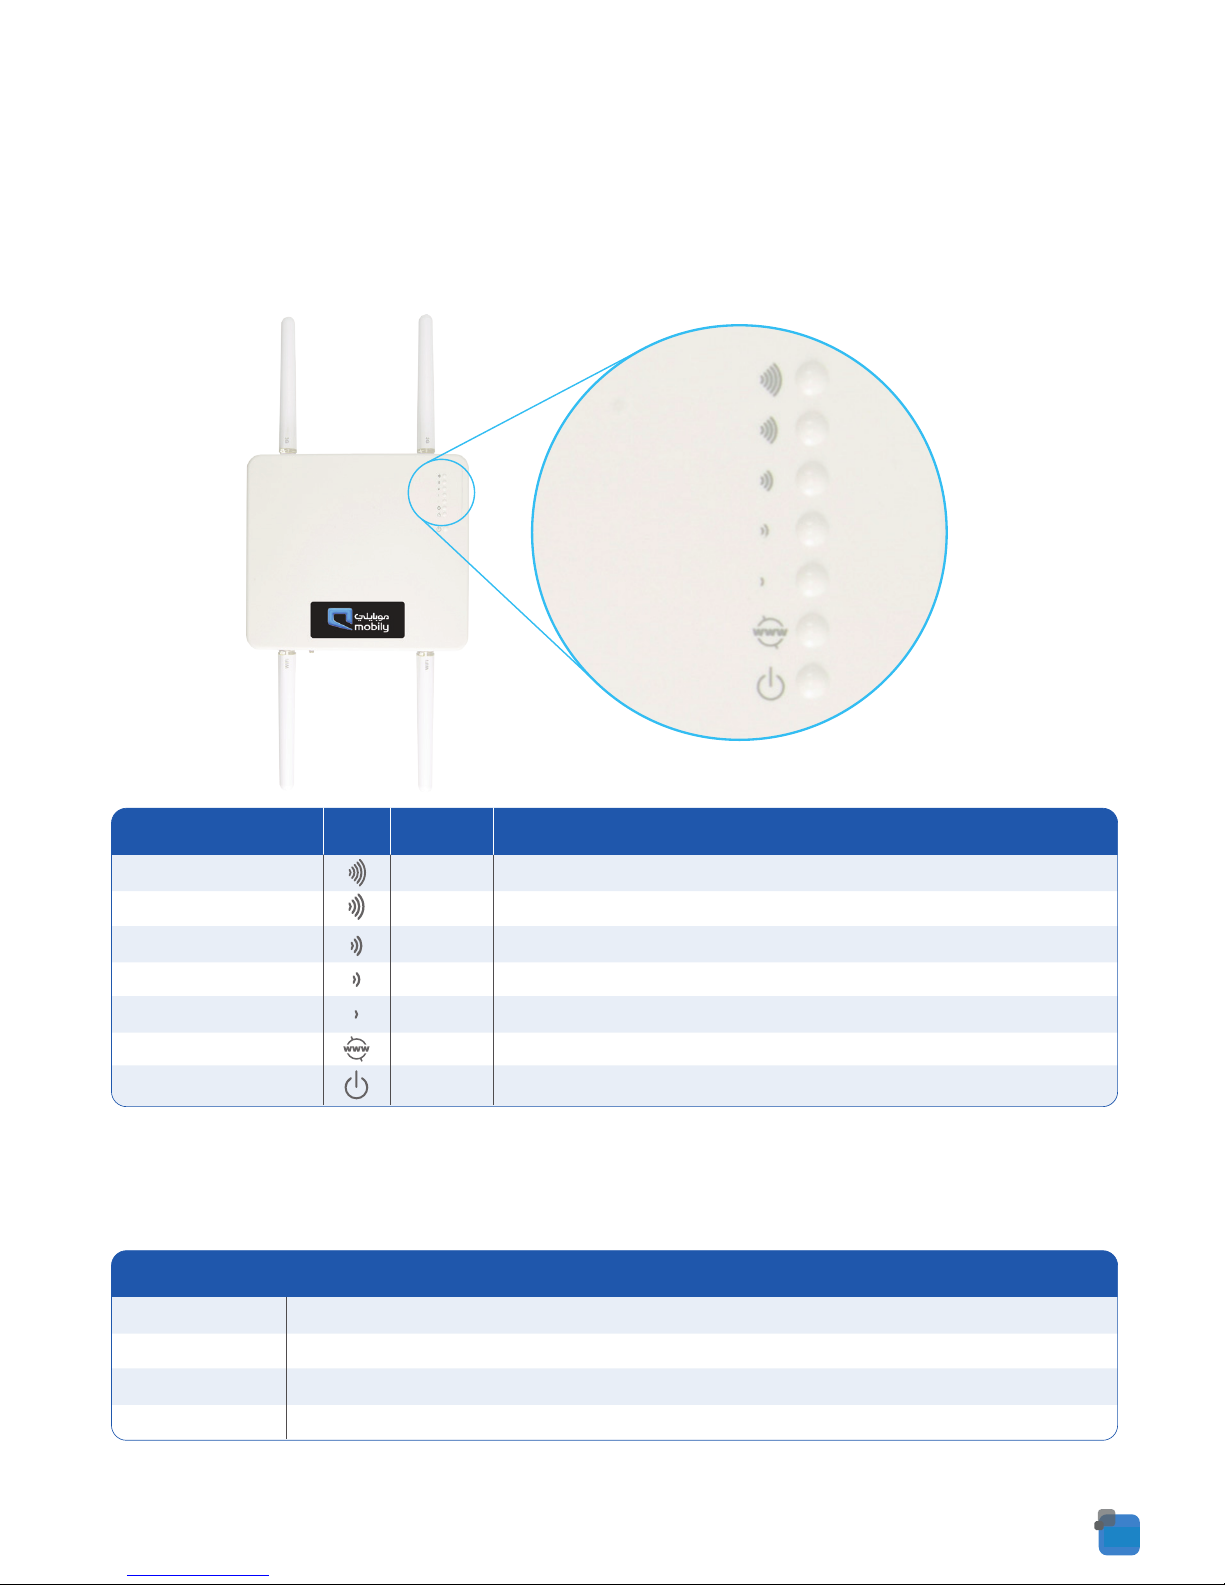
The Outdoor Industrial Router has 7 LEDs to display the current system and
connection status.
The 5 signal LEDs also indicate if the device is MEP locked, SIM is not inserted,
and if the SIM is PIN or PUK locked by flashing in certain patterns.
SIM Not Inserted
MEP Lock
PIN Lock
PUK Lock
All signal LEDs flash ON and OFF every 2 seconds
The signal LEDs flash in a pattern with one, three and 5 LEDs flashing in a sequence.
The signal LEDs flash in a sequential order starting with the Low signal LED to the High signal LED.
The signal LEDs flash in a sequential order starting with the High signal LED to the Low signal LED.
LED PATTERN
LED INDICATOR
Green
Green
Green
Green
Green
Green
Orange
High Signal
Medium to High Signal
Medium Signal
Low to Medium Signal
Low Signal
Internet
Power
COLOURICON
High 3G signal strength available (-47 dBm to -77 dBm).
Medium to High 3G signal strength available (-78 dBm to -85 dBm).
Medium 3G signal strength available (-86 dBm to -91 dBm).
Low to Medium 3G signal strength available (-92 dBm to -101 dBm).
Low 3G signal strength available (-102 dBm to -109 dBm).
The router is currently connected to the Internet.
The unit is powered on.
DEFINITION
Page 24
Powering your Router
The outdoor router can be powered via DC power supply or Power over Ethernet (PoE).
DC power option
Your router is provided with a waterproof DC jack allowing it to be powered by a 9~28V DC power
supply.
1. On the bottom interface panel of the router, locate the DC power port and unscrew the
protective cap to expose the connection pins.
2. Connect the DC power jack as shown below to the DC power port of the router and turn the
metal securing ring clockwise while pushing the conector in to secure the DC jack in position.
3. At the other end of the cable, wire the red (positive +) and black (grounding) wires to your
9~28V DC power supply source.
Power
1
2
V+
GND
1
2
Voltage+
Ground
Pin Signal Description
04
21
Powering your Router
Power Over Ethernet option
Please Note: If you choose to use PoE to power your router, we recommend you purchase an
outdoor rated RJ45 Ethernet cable
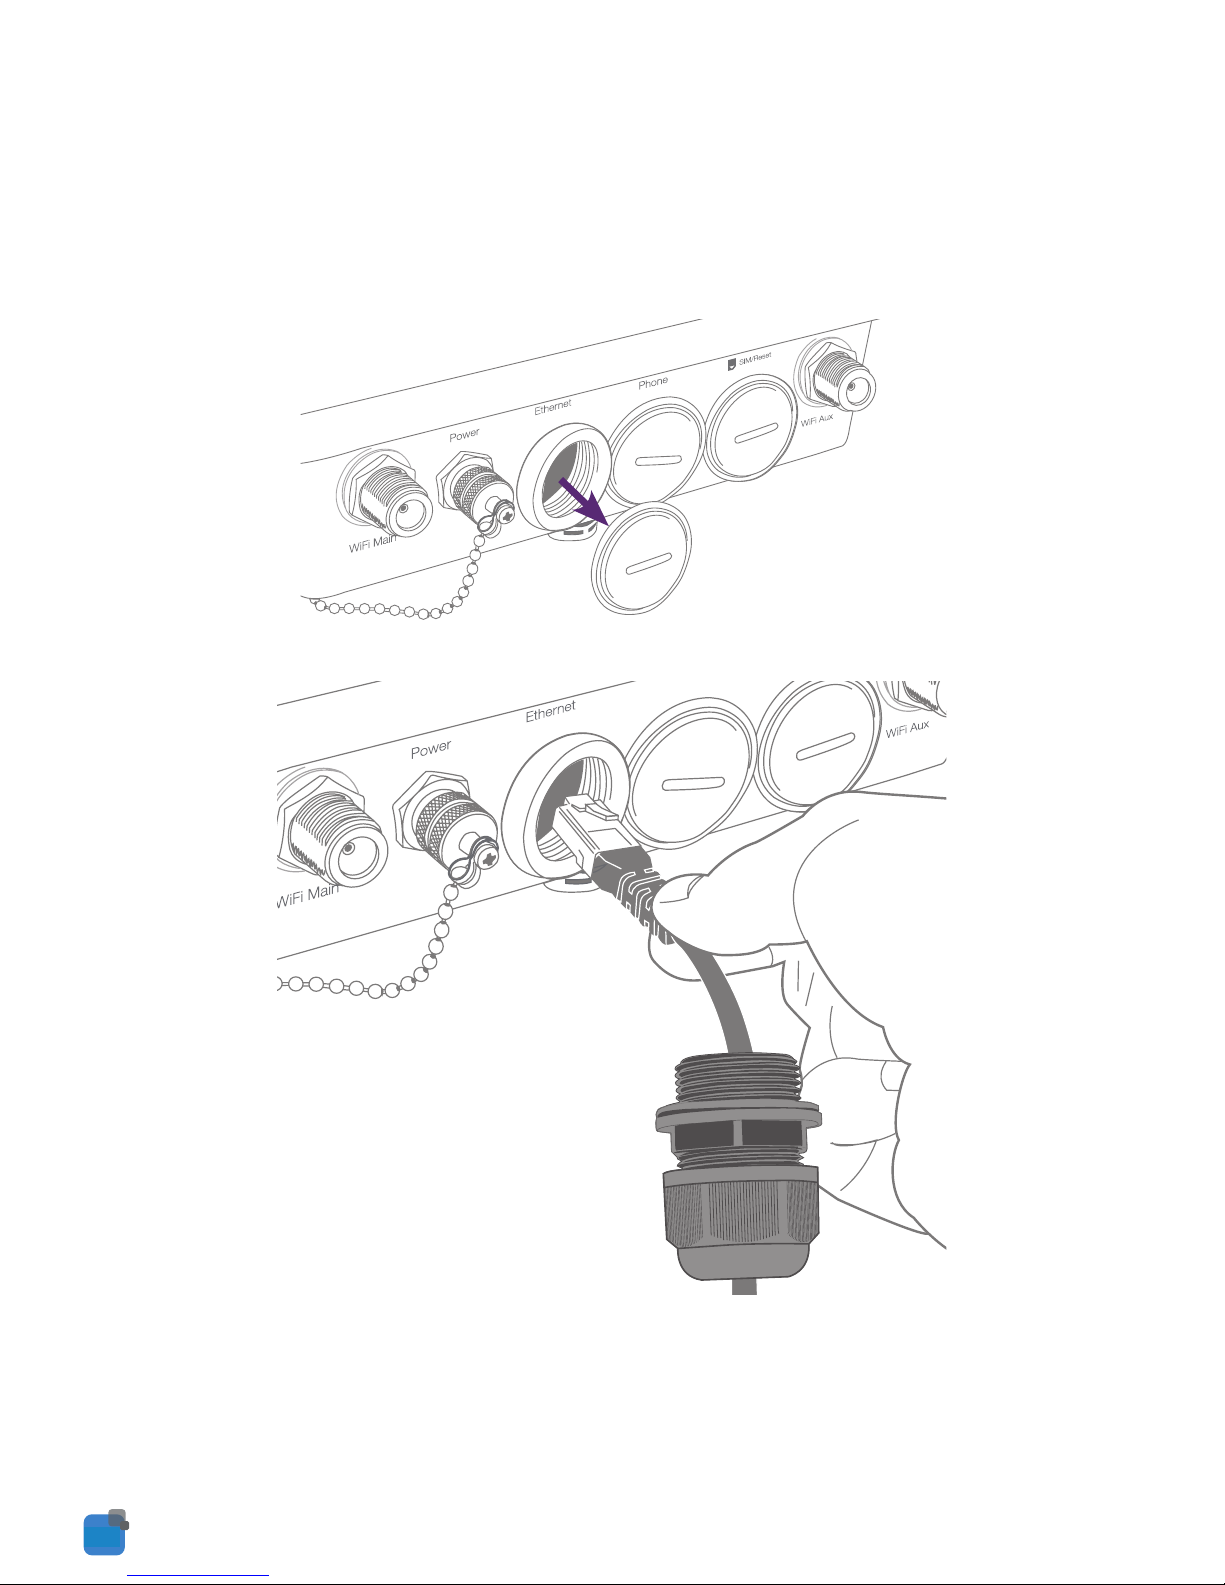
Remove the protective cap labelled Ethernet with a athead screwdriver or coin.
Connect the RJ45 Ethernet cable to the Ethernet port
Page 25
Picking the best spot for installation
1. At this point your Outdoor Industrial Router is ready to be installed on the outside of your
property, however before doing so, you will need to find the best location.
2. To get the strongest signal your Outdoor Industrial Router should ideally be placed towards
your nearest 3G tower.
3. If you are unsure where your nearest 3G tower is, you can simply unplug and reconnect your
Outdoor Industrial Router at different spots on property to see where you get the strongest signal.
4. Find the area of your property where the most indicators light up, this is where you have the
best signal strength and should install your Outdoor Industrial Router.
04
22
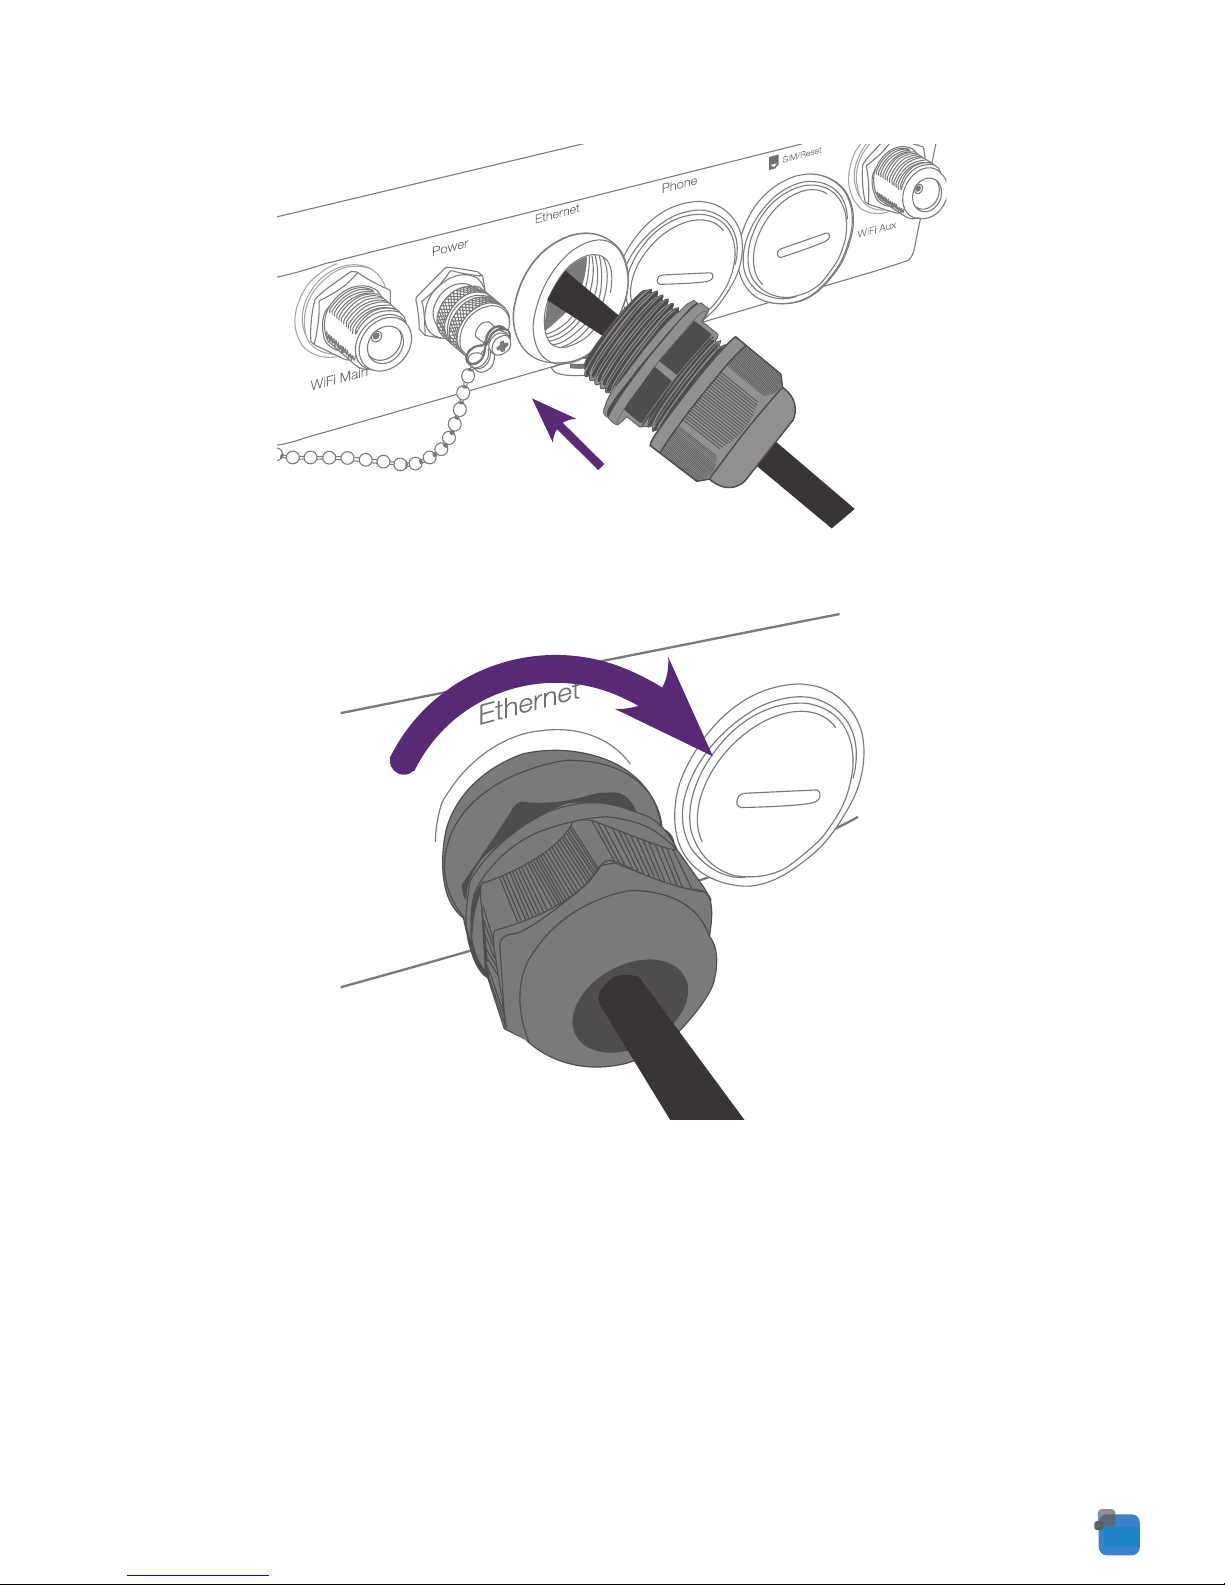
Slide the cable gland towards the Ethernet port. You may need to loosen the bottom part of the
cable gland so you can move it.
Tighten the water-proof Ethernet plug to ensure the seal is adequate.
Please Note: If you loosened the bottom part of the cable gland you must retighten to ensure your
Router is waterpoof. Use a shifter or spanner to ensure the water-proof Ethernet
plug is sufficiently secure.
Page 26
Powering your Router
The outdoor router can be powered via DC power supply or Power over Ethernet (PoE).
DC power option
Your router is provided with a waterproof DC jack allowing it to be powered by a 9~28V DC power
supply.
1. On the bottom interface panel of the router, locate the DC power port and unscrew the
protective cap to expose the connection pins.
2. Connect the DC power jack as shown below to the DC power port of the router and turn the
metal securing ring clockwise while pushing the conector in to secure the DC jack in position.
3. At the other end of the cable, wire the red (positive +) and black (grounding) wires to your
9~28V DC power supply source.
Power
1
2
V+
GND
1
2
Voltage+
Ground
Pin Signal Description
04
23
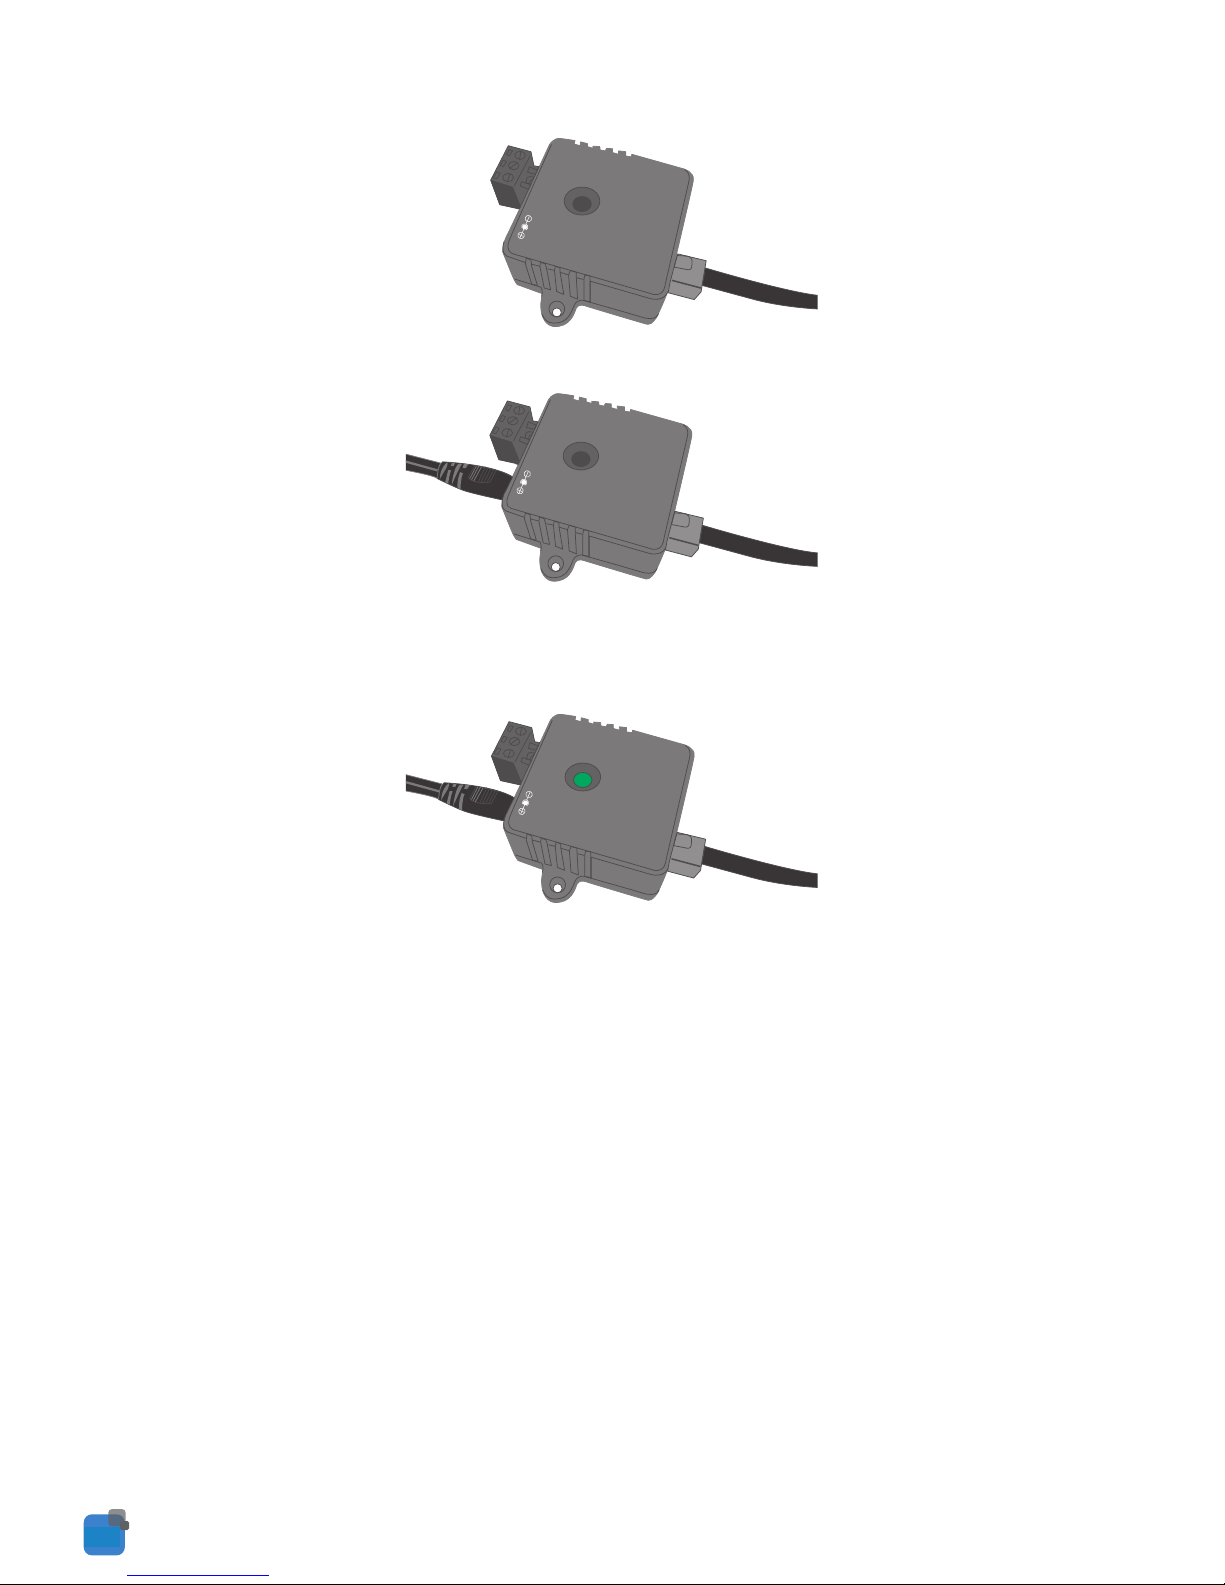
Connect the other end of the cable to the PWR + DATA OUT Port on the Power over
Ethernet adaptor.
PWR + DATA
DATA
IN
OUT
DC IN
Connect the power adaptor to the DC IN Power port on the Power over Ethernet Adaptor.
PWR + DATA
DATA
IN
OUT
PWR + DATA
DATA
IN
OUT
PWR + DATA
PWR + DATA
DATA
DATA
IN
IN
OUT
OUT
PWR + DATA
DATA
IN
OUT
DATA
IN
DC IN
DC IN
Connect the power cable to the power adaptor and plug the end of the power cord to a
power outlet.
The Green LED on the Power over Ethernet Adaptor should now be on.
PWR + DATA
DATA
IN
OUT
PWR + DATA
DATA
IN
OUT
DC IN
DC IN
At this stage the LEDs on the front of your Router will be flashing. After 30 seconds the Power
LED on your Router should also light up.
If you’re receiving a 3G signal and are connecting to the network the Internet icon and signal
strength LEDs will also light up.
Page 27

Picking the best spot for installation
1. At this point your Outdoor Industrial Router is ready to be installed on the outside of your
property, however before doing so, you will need to find the best location.
2. To get the strongest signal your Outdoor Industrial Router should ideally be placed towards
your nearest 3G tower.
3. If you are unsure where your nearest 3G tower is, you can simply unplug and reconnect your
Outdoor Industrial Router at different spots on property to see where you get the strongest signal.
4. Find the area of your property where the most indicators light up, this is where you have the
best signal strength and should install your Outdoor Industrial Router.
04
24
Page 28

BB@work
Industrial Router
Business
Installation Guide
NTC-30 Series - Outdoor Industrial Router
 Loading...