

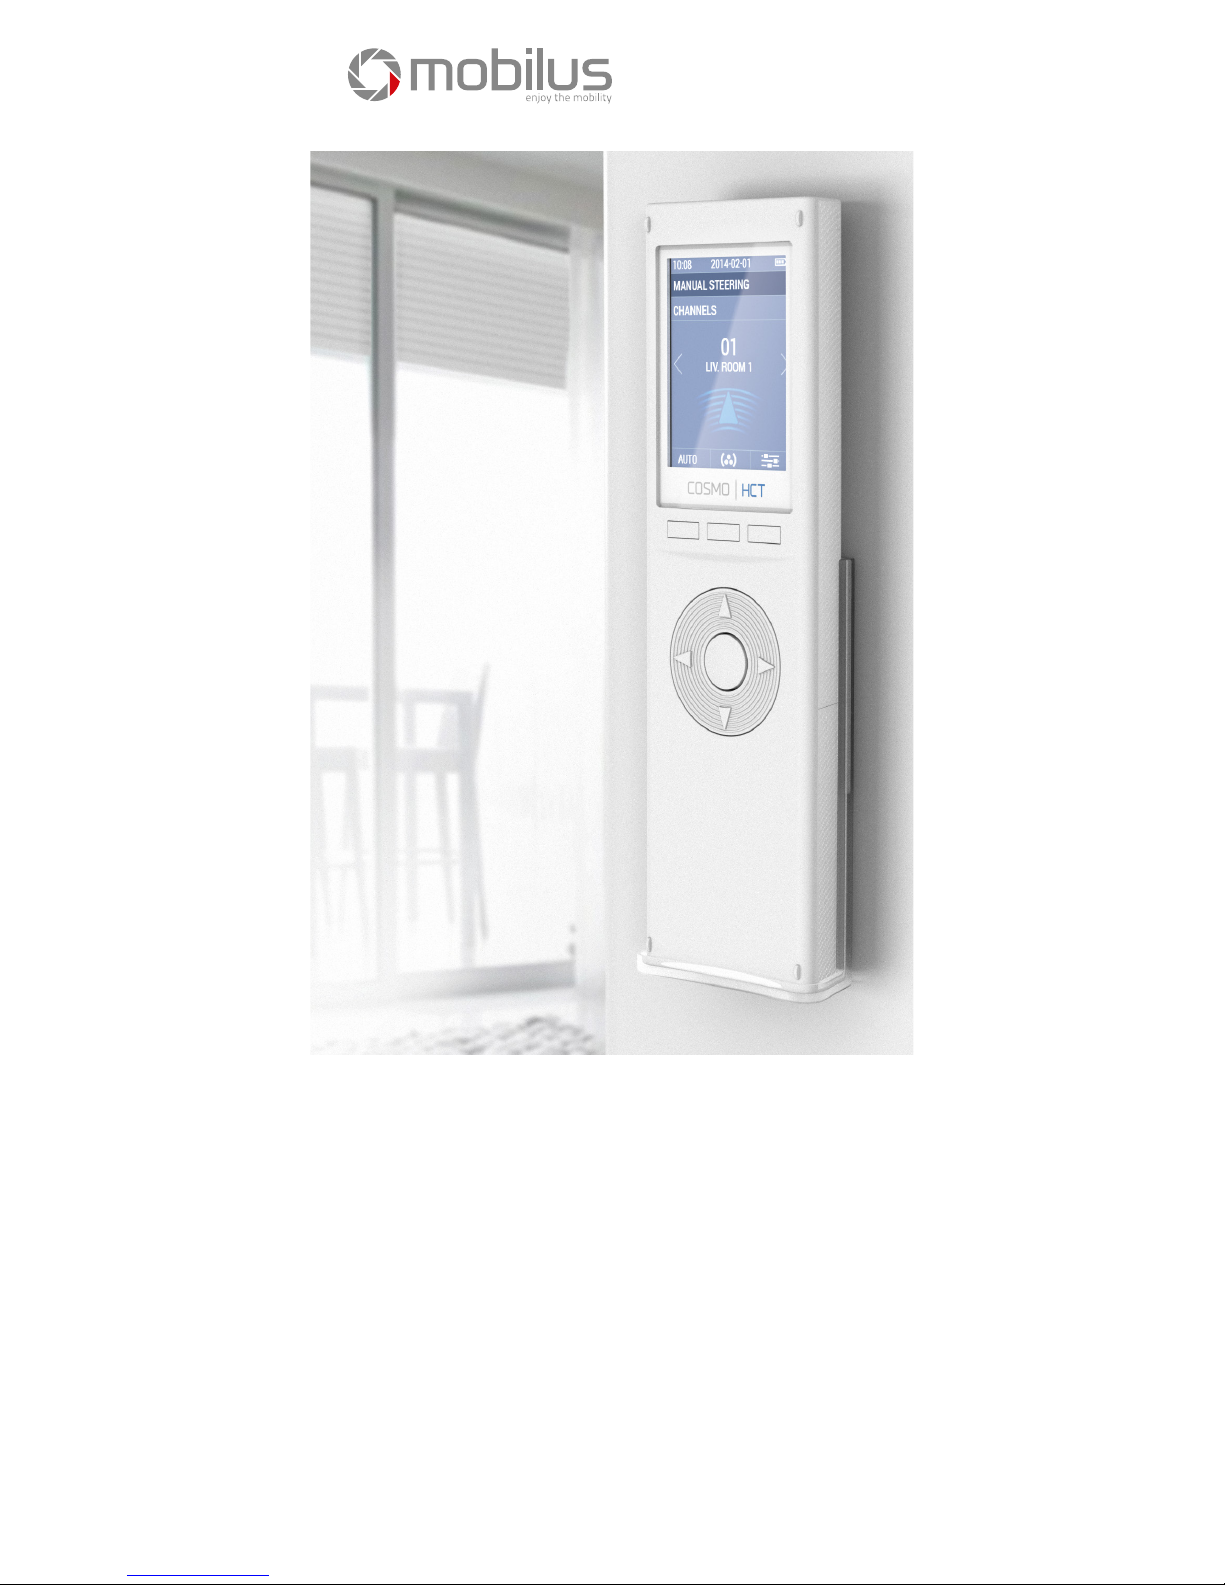
COSMO HCT REMOTE CONTROL
INSTRUCTION MANUAL
MOBILUS MOTOR Spółka z o.o.
ul. Miętowa 37, 61-680 Poznań, PL
tel. +48 61 825 81 11, fax +48 61 825 80 52
VAT NO. PL9721078008
www.mobilus.pl
GENERAL INFORMATIONz
Remote controller COSMO| HCT v2014 is a 24-channel remote controller designed to
remote control of MOBILUS receivers in the field of construction technologies (to control
electrically operated blinds, awnings, shutters and ON / OFF connectors). The user bears
the only responsibility for any damages resulted from improper use, misuse or abuse of a
product. The manufacturer is not liable for any damage or injury caused by improper use,
maintenance and commissioning. Please refer to the instruction manual that informs how to
use the device safely.• Supports up to 24 channels.
• Supports 12 channel groups.
• Free edition of channel and group names.
• Two-way communication.
• Receivers’ control- report of correctness for channel operation
(for receivers with two-way communication).
• Manual and/or auto control.
• Daily and weekly mode.
• ASTRO mode- adjust blinds according to sunrise and sunset.
• The intuitive user interface allows easy navigation as well as remote control functions
management.
• 8 language versions of remote control interface.
• *Firmware update from a PC.
• *Remote control configuration backup on a PC.
• *Configuration of remote control parameters from a firmware on a PC.
*Function available after installation of dedicated firmware- from September 2014.
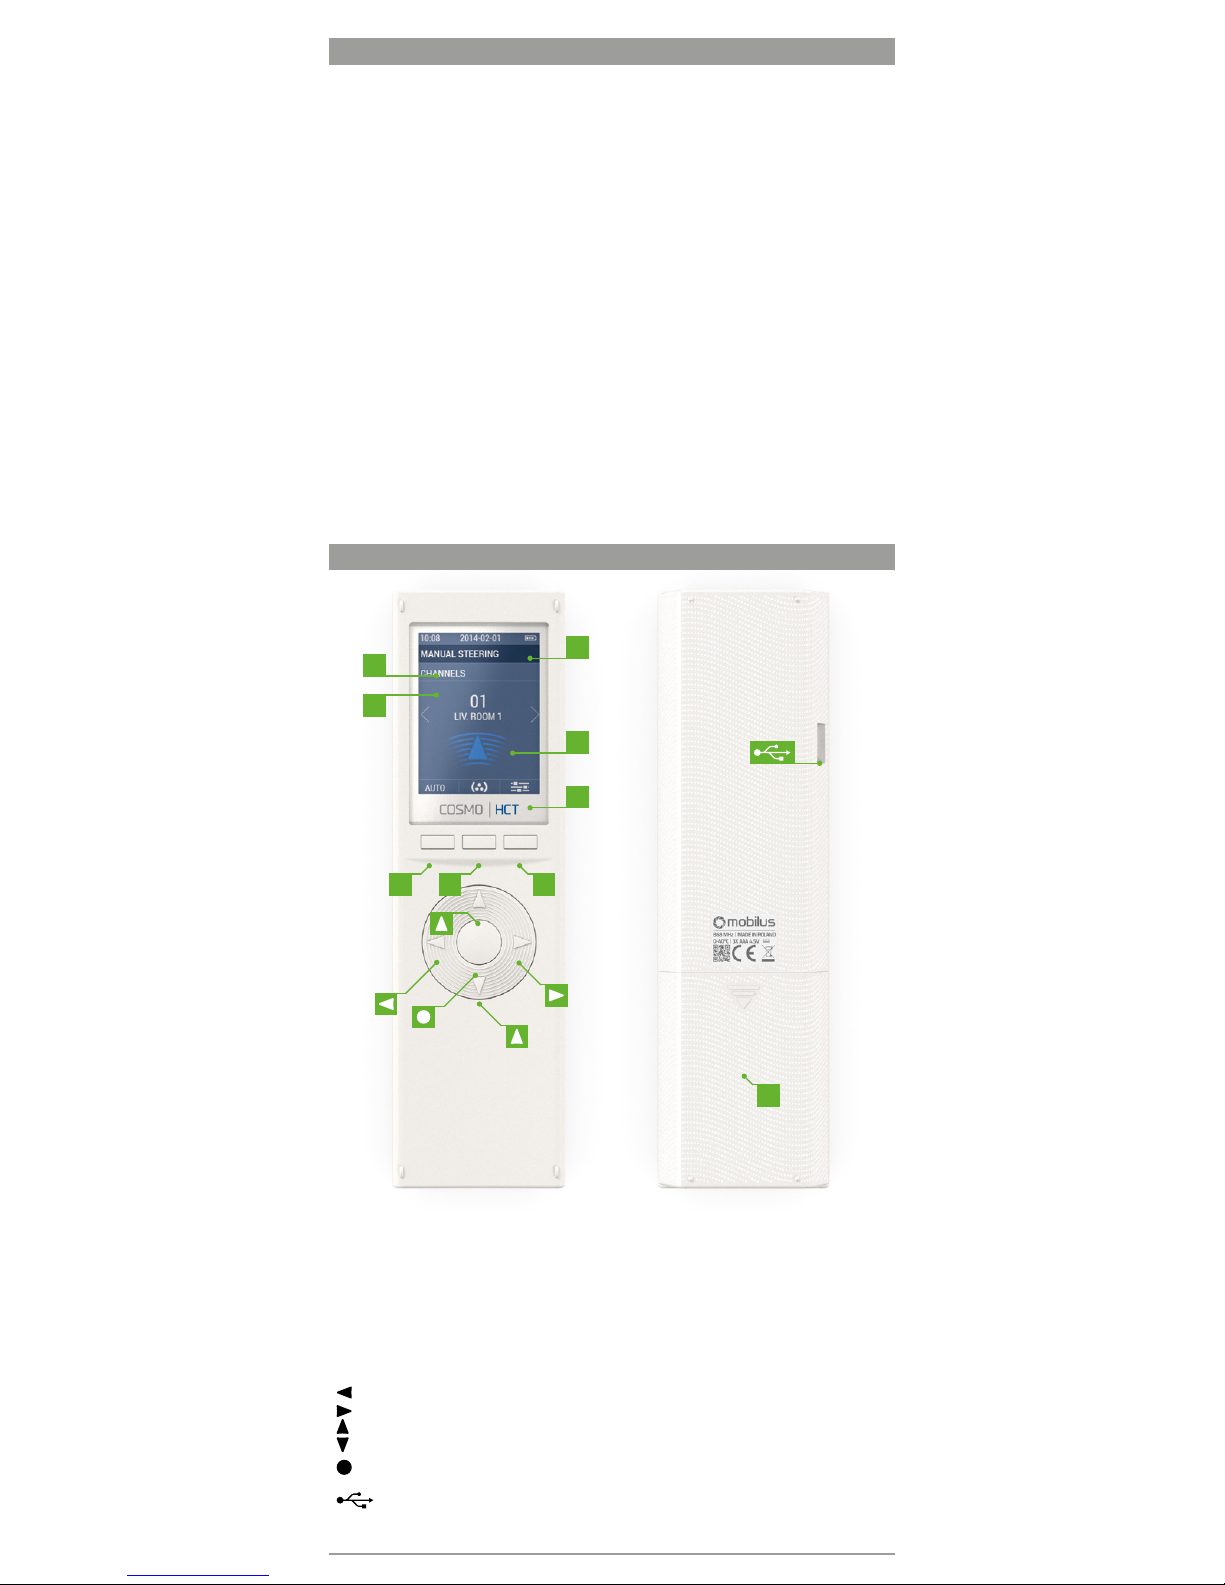
DESCRIPTION OF REMOTE CONTROL COMPONENTS
H1 Headline 1- date, time and battery charge level.
H2 Headline 2- operation mode info, location in menu.
H3 Headline 2- additional info, location in menu.
W Area of operation- information about current operation or settings mode.
HF Function keys- icons corresponding to the functions assigned
to function key F1, F2, F3.
F1 Function key 1- function dependent on the position in the menu structure.
F2 Function key 2- function dependent on the position in the menu structure.
F3 Function key 3- function dependent on the position in the menu structure.
Left arrow key (navigation on the display, value change).
Right arrow key (navigation on the display, value change).
Up arrow key (navigation on the display, shutter rising).
Down arrow key (navigation on the display, shutter lowering).
Middle key (navigation, value change, activation).
K AAA battery slot protecting flap.
Micro USB port.
F1 F2
HF
H1
H2
H3
W
K
F3
2

PACKAGE CONTENTS
The package contains the following items:
• COSMO | HCT remote control
• USB cable - micro USB,
• 3 AAA batteries in the remote control protected with a seal from discharging,
• user manual,
• Wall bracket with a magnet and fixing pins (2 pcs.)
SPECIFICATIONS
• Supports up to 24 channels.
• Supports 12 channel groups.
• Supply voltage 4.5 V DC.
.•
• Power source: 3 x AAA LR03 or 3 x AAA batteries.
• Operating temperature [° C]: 40° C.
• Display: colour LCD screen with a resolution of 240 x 320 px.
• Communication band: [MHz] - 868 MHz..
• Communication range [m] - open space: 100m for interiors: 25 m
• [measurement through 2 walls; the presence of electromagnetic interference, the
presence of other radio equipment, installation on metal and low battery level can
significantly reduce the communication range].
• Weight of remote control with batteries [g] - 128 g
• Remote control dimensions (without bracket): 52 x 20 x 180 mm.
BRACKET INSTALLATION
Elements of wall bracket:
• Transparent bracket- A,
• Cap for mounting screws -B,
• Studs with screws - C.
1. Chose a place on the wall, where the bracket will
be located (easy access, lack of running power
cables, pipes, reinforcement of walls, etc.).
2. Mark a points on the wall so that the bracket
after installation will touch the wall and will be
perpendicular to the wall surface.
3. Drill holes and insert studs (distance between the
holes 20 mm, diameter 4 mm).
4. Place the bracket and tighten to the wall.
5. Put masking cover on.
POWER SUPPLY
The device is powered by three AAA batteries or three
AAA rechargeable batteries. The device automatically
switches off the display to save the power. The icon in
the top of the display indicates low battery level.
When charging the battery icon changes colour
periodically [green, grey]. The remote control has a
built-in protection and prevents charging of nonrechargeable batteries.
- Fully charged battery.
- Low battery. Replace with new batteries or
when supplied with rechargeable batteries- connect
remote control to the USB port (charger, computer,
etc.) to charge the device.
INITIAL START-UP
1. Open the battery cap.
2. Remove the „P” seal that protects batteries from
discharging (marked with green).
3. Remote control display will start.
4. SETUP WIZARD starts - configure additional
parameters necessary for proper operation of
remote control.
B
A
+ - +
C
P
3
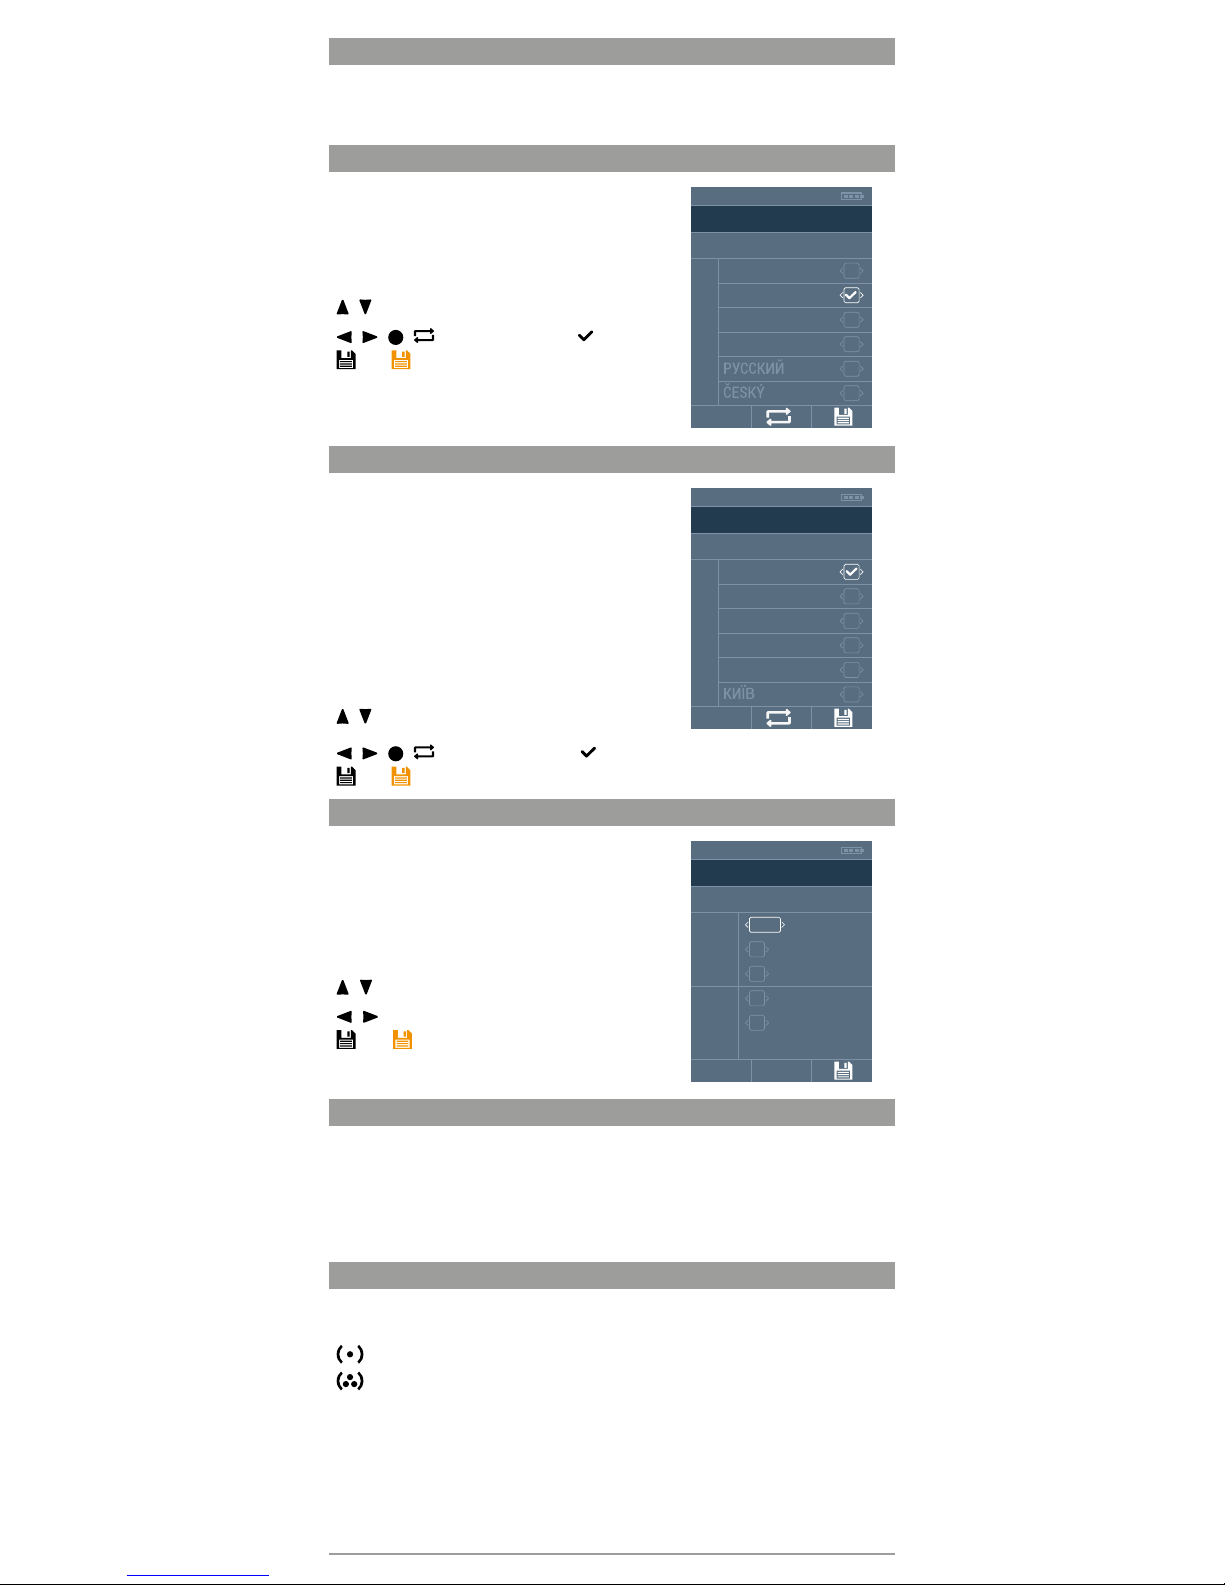
1.1 SETUP WIZARD (RESTORE TO FACTORY SETTINGS)
SETUP WIZARD will appear due to starting COSMO | HCT remote control for the first time
or carrying out the SETTING RESET operation. Following operation parameters should be
configured: LANGUAGE, CITY, DATE/TIME.
1.1.1. SETUP WIZARD > LANGUAGE
Select the language of user’s interface.
Default language: ENGLISH
Display 1/2: PL POLSKI, EN ENGLISH, DE DEUTSCH,
FR FRANÇAIS, RU PУССКИЙ, CZ ČESKÝ.
Display 2/2: NL NEDERLANDS.
/ - switch between fields.
/ / / (F2) - select; active field- [ ].
(F3) - orange- save changes; change saving-
switching to the next display.
Further communications will be displayed in the selected
language.
SETTINGS WIZARD
LANGUAGE 1/2
POLSKIPL
ENDEENGLISH
DEUTSCH
FR FRANÇAIS
RU
CZ
05:15 2014-01-10
1.1.2. SETUP WIZARD > CITY
Please select the nearest city in order to determine the user’s
location. Required for proper operation AUTOMATIC OPERA-
TION MODE of COSMO remote control | HCT.
Default city: NL AMSTERDAM.
Display 1/3: NL AMSTERDAM, DE BERLIN, BE BRUXELLES,
HU BUDAPEST, IR DUBLIN, UA КИЇВ.
Display 2/3: GB LONDON, ES MADRID, RU MOCKBA,
FR PARIS, CZ PRAHA, IS REYKJAVIK.
Display 3/3: IT ROMA, SE STOCKHOLM,
PL WARSZAWA, AT WIEN.
/ - switch between fields.
SETTINGS WIZARD
CITY 1/3
AMSTERDAMNL
DEBEBERLIN
BRUXELLES
HU BUDAPEST
IR DUBLIN
UA
05:15 2014-01-10
/ / / (F2) - select; active field - [ ].
(F3) - orange- save changes; change saving- switching to the next display.
1.1.3. SETUP WIZARD > DATE/TIME
Set the correct date and time. Required for proper
operation AUTOMATIC OPERATION MODE of COSMO
remote control | HCT.
Default date: 2014-01-01; hour: 12:15.
YYYY/MM/DD- year, month, day.
HH/MM- hour, minute.
/ - switch between fields.
/ - change of the field value.
(F3) - - orange- save changes; saving changes-
exit SETUP WIZARD mode- switch to STEERING
display.
SETTINGS WIZARD
DATE/TIME
YYYY
MM
DD
01
2014
08
HH
10
MM 18
05:15 2014-01-10
2 STEERING WITH COSMO REMOTE CONTROL|HCT
Exit SETUP WIZARD moves you to the main display of COSMO remote control steering|
HCT. User can individually control the receivers- MANUAL STEERING or start the AUTO
STEERING- remote control controls the receivers in accordance with tasks defined by the
user.
MAN(F1) or AUTO(F1)- switching between MANUAL STEERING/ AUTO STEERING
displays.
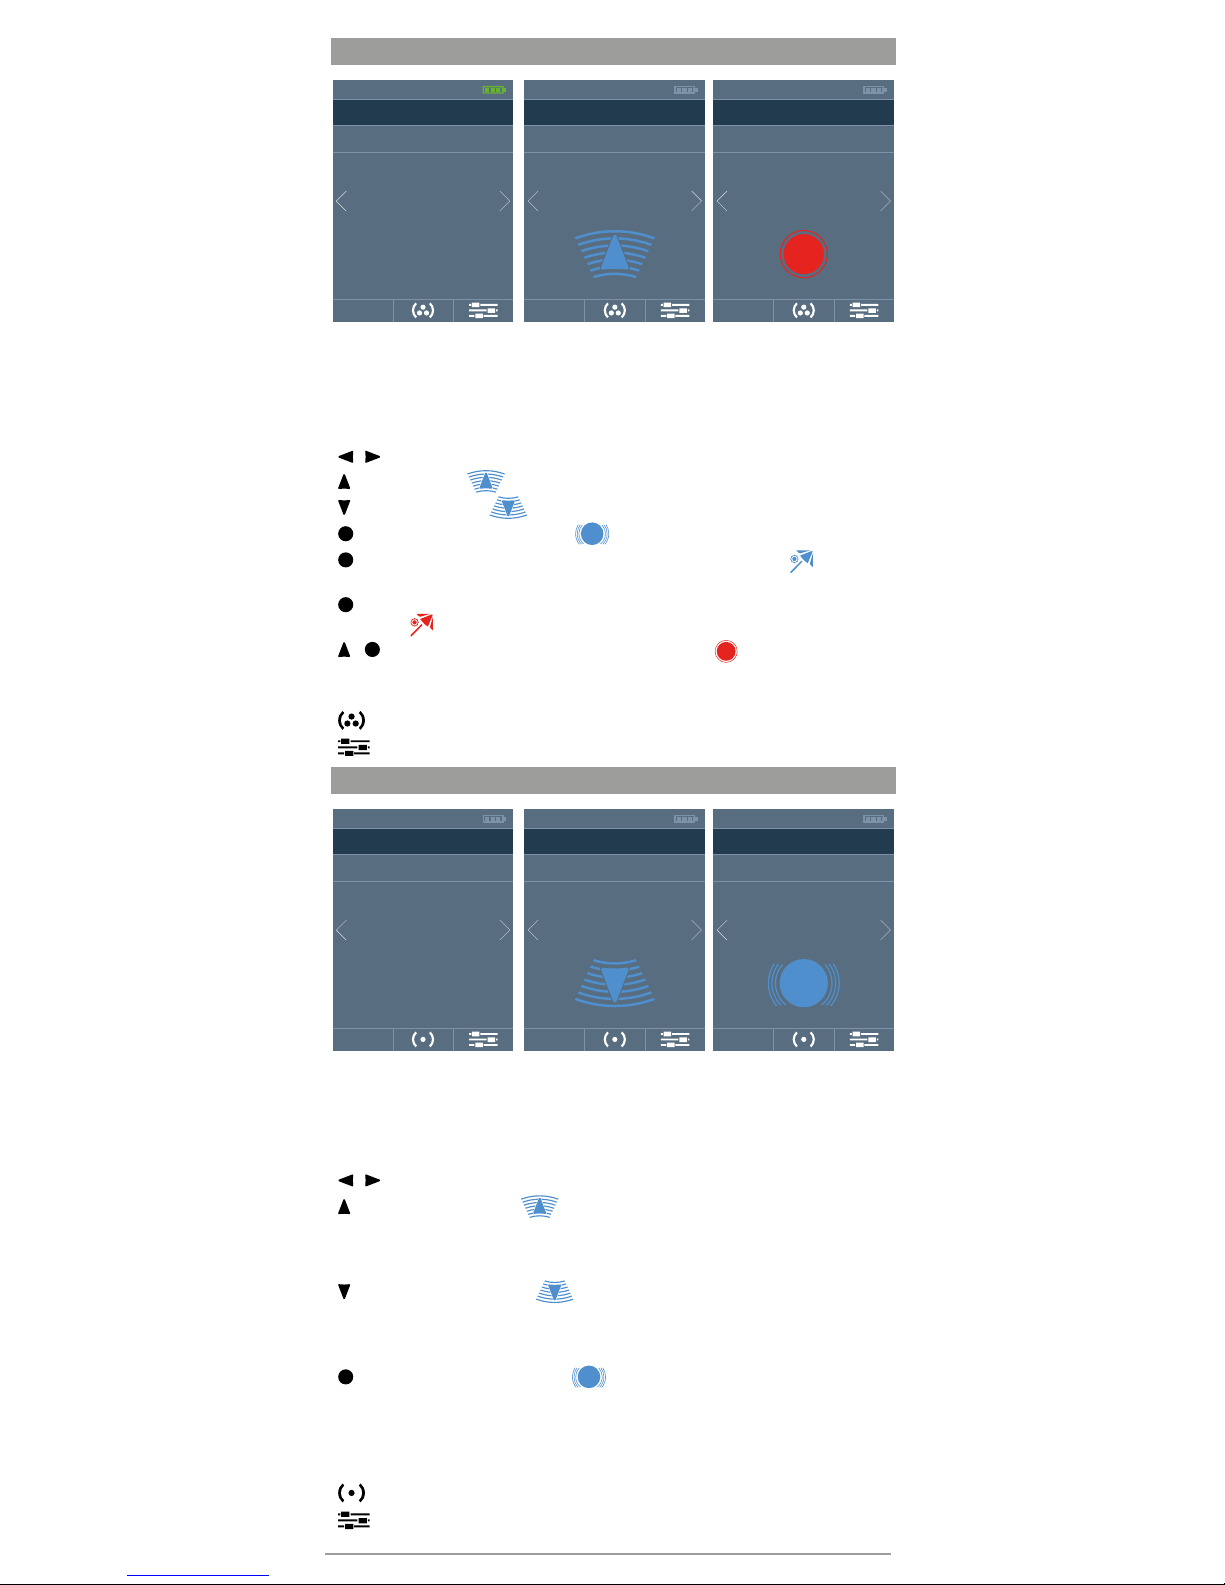
2.1 MANUAL STEERING
Manual steering is carried out for individual channels or groups of channels. The selection is
made with the (F2) key.
(F2)- MANUAL STEERING display> CHANNELS.
(F2)- MANUAL STEERING display> GROUPS.
CHANNELS (MANUAL STEERING OF CHANNELS) line informs about active mode (H3), or
GROUPS (MANUAL STEERING OF GROUPS) (H3).
If the information about the two-way communication with receivers for MANUAL STEERING is enabled, the remote control will check the status of this operation each time after
you send the command to such receiver. Remote control will beep and display the report
after receiving the information on the problem with command execution.
4
2.1.1.MANUAL STEERING > CHANNELS
MANUAL STEERING
CHANELS
01
LIV. ROOM 1
17:50
AUTO
2014-01-08
MANUAL STEERING
CHANELS
01
LIV. ROOM 1
17:50
AUTO
2014-01-08
MANUAL STEERING
CHANELS
01
LIV. ROOM 1
17:50
AUTO
2014-01-08
MANUAL STEERING (H2)- steering mode.
CHANNELS (H3)- single channel steering.
01 - number of current channel.
SALON 1 - number of current channel.
/ - channel change from 01 up to 24.
- rising the blinds - - icon changing the colour [blue/grey].
- lowering the blinds - - icon changing the colour [blue/grey].
- STOP- pause of current operation - - icon changing the colour [blue/grey].
- COMFORT mode for current channel- press the key for min. 3 seconds - - the icon
changing colour [blue/grey] will be displayed.
- start programming of the COMFORT mode for current channel- press the key for min.
15 seconds
- the icon changing colour [blue/grey] will be displayed.
+ - start programming of the receiver for current channel- the icon changing colour
[red/grey] will be displayed.
AUTO (F1) - AUTO STEERING display.
(F2) - SETUP display- press the key for min. 3 seconds.
(F3) - SETUP display- press the key for min. 3 seconds.
2.1.2. MANUAL STEERING > GROUPS
MANUAL STEERING
GROUPS
01
ALL
17:50
AUTO
2014-01-08
MANUAL STEERING
GROUPS
01
ALL
17:50
AUTO
2014-01-08
MANUAL STEERING
GROUPS
01
ALL
17:50
AUTO
2014-01-08
MANUAL STEERING (H2)- steering mode.
GROUPS (H3)- channel groups steering.
01 - number of current group.
EVERYTHING- name of current group.
/ - group change from 01 up to 12.
- raising the group of blinds- the icon changing colour [blue, grey]- icon remains on
the display while sending commands to all the channels in the group. The more channels in
the group, the longer the display lock time (up to 10 seconds for 24-channel group) Remote
control activates no action for empty group.
- lowering the group of blinds- the icon changing colour [blue, grey]- icon remains
on the display while sending commands to all the channels in the group. The more channels
in the group, the longer the display lock time (up to 10 seconds for 24-channel group)
Remote control activates no action for empty group.
- STOP- pause of current operation- the icon changing colour [blue, grey]- icon
remains on the display while sending commands to all the channels in the group. The more
channels in the group, the longer the display lock time (up to 10 seconds for 24-channel
group) Remote control activates no action for empty group.
AUTO (F1) - AUTO STEERING display.
(F2) - MANUAL STEERING display> CHANNELS.
(F3) - SETUP display- press the key for min. 3 seconds.
5

2.2 AUTO STEERING
In auto mode, the remote control controls the groups according to the defined settings-on
this display user can activate individual modes of AUTO STEERING.
AUTO- starting AUTO STEERING for
channel groups configured in SETTINGS>
FUNCTIONS>AUTO. Groups of shutters
automatically raise and low for particular days
of week, in user-specified time.
ASTRO- starting AUTO STEERING based on
ASTRO functions for channel groups configured
in SETTINGS> FUNCTIONS>ASTRO. Groups
of shutters automatically raise and low for
particular days of week, in time calculated on
the basis of the user’s geographical position.
AUTO STEERING
FUNCTIONS
AUTO
ASTRO
RANDOM
17:50
MAN
2014-01-08
RANDOM- when the mode simulating the presence of people at home is on, then
the values defined by the user (AUTO STEERING>AUTO) or calculated from the
ASTRO function time value (AUTO STEERING>ASTRO) will be adjusted each time
by a random value from that specified in the range.
Simultaneous operation of AUTO and ASTRO mode:
• SHUTTERS RISING [SUNRISE]- in such a case this auto mode has higher priority,
which will later rise the shutters.
• SHUTTERS LOWERING [SUNSET]- in such a case this auto mode has higher priority,
which will earlier low the shutters.
Activation of particular auto modes- AUTO, ASTRO enables switch to MANUAL MODE and
further control of channels or groups - AUTO, ASTRO modes run in the background.
/ - switch between fields.
/ / / (F2) - select; active field - [ ].
MAN (F1) - MANUAL STEERING display.
(F3) - SETUP display- press the key for min. 3 seconds.
3 SETTINGS
Activation of SETTINGS display- in the main screen of COSMO | HCT remote control press
the key
(F3) for min. 3 seconds.
DATE/TIME- time and date settings.
MANAGEMENT:
• CHANNELS - channel naming/ renaming, bidirectio-
nal, channel programming, programming position
of comfort, change of direction of the shutter
operation.
• GROUPS - channel groups naming/ renaming
groups, choice of channels included in the group.
FUNCTIONS:
• AUTO - setting the auto time for lowering and rising
of the shutter for particular channel groups in daily
and weekly mode.
SETTINGS
MAIN MENU
DATE/TIME
MANAGE
FUNCTIONS
OTHERS
REPORT
05:15 2014-01-10
• ASTRO - setting the parameters for shutter automatic raising and lowering for different
groups of channels based on the geographical location, the selection of the nearest city,
enter coordinates, correction astro.
• RANDOM - determination of the range, from which is randomly selected a value that
specifies correction of shutter lowering time in ASTRO / AUTO mode (in minutes).
OTHERS:
• LANGUAGE- change of user interface language.
• BRIGHTNESS- setting of display brightness level.
• REPORT- activation error reporting function for automatic and / or manual, for
receivers with bi-directional communication.
• SETTINGS RESET- restore to factory settings.
• FIRMWARE VERSION- information about firmware version preloaded into remote
control memory.
REPORT - displays a report on the state of the channel.
/ - switch between fields.
(F1) - back to the previous screen.
/ (F2)- screen connected to the selected field.
6

3.1 SETTINGS> DATE/TIME
YYYY/MM/DD- year, month, day.
HH/MM
/ - switch between fields.
/ - change of the field value.
(F1) - back to the previous screen.
(F3) - - orange- save changes
- green- changes saved;
SETTINGS
DATE/TIME
YYYY
MM
DD
01
2014
08
HH
10
MM 18
05:15 2014-01-10
3.2 SETTINGS>MANAGEMENT
CHANNELS- channel settings management
display.
GROUPS - channel group settings manage-
ment display.
/ - switch between fields.
/ - change of the field value.
(F1) - back to the previous screen.
(F2) - screen connected to the selected field.
SETTINGS
MANAGE
CHANNELS
GROUPS
05:15 2014-01-10
3.2.1. SETTINGS>MANAGEMENT>CHANNELS
Display with the list of 24 channels divided into 4 views
(6 groups per view). Channels have the names initially
assigned by the manufacturer.
Display 1/4: channels from 01 up to 06
Display 2/4: channels from 07 up to 12.
Display 3/4: channels from 13 up to 18.
Display 4/4: channels from 19 up to 24.
- Channel with bi-directional communication
(parameter change on the screen - SPECIFIC
SETTINGS of SELECTED CHANNEL).
- Channel with one-directional communication
(parameter change on the screen - SPECIFIC
SETTINGS of SELECTED CHANNEL).
MANAGE
CHANNELS
LIV. ROOM 1
LIV. ROOM 2
LIV. ROOM 3
LIV. ROOM 4
LIV. ROOM 5
KITCHEN 1
RENAME
/ - switch between fields.
(F1) - back to the previous screen.
GIVE THE NAME(F2) - edition screen of the name of selected group.
(F3) - screen of particular settings of selected channel.
3.2.1.1. SETTINGS>MANAGEMENT>CHANNELS>NAME
Screen of edition of the selected channel with display
keyboard. Max. amount of characters: 12.
LIVINGROOM 1_ -edit name field.
/ / / - switch between characters.
- enter of selected character to the edit name field.
(F1) - back to the previous screen.
(F2) - delete of last character in the edit name
field.
(F3) - - orange- save changes
- green- changes saved;
CHANNEL
RENAME
05:15 2014-01-10
BEDROOM 3_
7

3.2.1.2. MANAGEMENT> CHANNELS> [DETAILED CHANNEL SETTINGS]
BI-DIRECTION. - turning on or off of bi-directional
communication for current channel. Activation
, causes that on the channel list will be
displayed a message informing that the channel is
bidirectional . Since that time, the motor will
collect feedback from the receiver and generate
a report.*
/ / / (F2) - select; active field- [ ].
PROGRAMMING - programming of selected
channel- icon changing the colour [blue/grey].
More details in PROGRAMMING chapter.
CHANNEL:123
SETTINGS
TWO WAY
PROGRAMMING
COMFORT POSITION
SWITCH DIRECTION
17:50 2014-01-08
COMFORTABLE POSITION - programming of comfort position for selected channel-
icon changing the colour [blue/grey]. More details in PROGRAMMING chapter.
CHANGE DIRECTION - switching off of that function will change the direction of motor
operation- the icon changing colours [blue,grey]. For motors with electronic limit
switches - ERS SENSO - change direction will be possible only before setting the end
position.
/ - switch between fields.
/ (F2) - holding activates the function- for item from the list: , , .
(F1) - back to the previous screen.
(F3) - - orange- save changes - green- changes saved;
*Fuction available for receivers with bi-directional communication.
3.2.2. SETTINGS>MANAGEMENT>CHANNELS
Display with the list of 12 channel groups divided into
2 views (6 groups per view). Groups have the names
initially assigned by the manufacturer.
Display 1/2: groups from 01 up to 06.
Display 2/2: groups from 07 up to 12.
/ - switch between fields.
(F1) - back to the previous screen.
/GIVE THE NAME (F2) - edition of the name of
selected group.
(F3) - display of adding channels to the selected
group.
MANAGE
GROUPS 1/2
ALL01
0203LIV. ROOM 1
LIV. ROOM 2
04 LIV. ROOM 3
05 KITCHEN 1
06 KITCHEN 2
05:15
RENAME
2014-01-10
3.2.2.1. SETTINGS>MANAGEMENT>CHANNELS>GIVE THE NAME
Display of edition of the selected group with display
keyboard. Max. amount of characters: 12.
BEDROOM 3_ -edit name field.
/ / / - switch between characters.
- enter of selected character to the edit name field.
(F1) - back to the previous screen.
(F2) - delete of last character in the edit name
field.
(F3) - - orange- save changes;
- green- changes saved;
GROUPS
RENAME
05:15 2014-01-10
BEDROOM 3_
3.2.2.2. SETTINGS>MANAGEMENT>GROUPS>CHANNELS
The screen for selecting channels in the group. 24
square corresponding to 24 channels. The channel may
be connected to many different groups at a time.
- channel not allocated to the selected group.
-channel allocated to the selected group.
SALON 3 - nazwa aktywnego kanału.
/ / / - number of active channel.
(F1) - back to the previous screen.
/ (F2) - adding or deleting of the channel to/
from the group.
GROUPS: STUDY 1
SELECT CHANNELS
LIV. ROOM 4
17:50 2014-01-08
01 02 03 04 05 06
07 08 09 10 11 12
13 14 15 16 17 18
19 20 21 22 23 24
(F3) - kolor pomarańczowy - zapisz zmiany; kolor zielony - zmiany zapisane;
8

3.3 SETTINGS>FUNCTIONS
AUTO - time automatic.
ASTRO- automation based on the ASTRO
functions.
RANDOM - random correction of time value for
the AUTO and ASTRO (simulating the presence of
residents at home).
/ - switch between fields.
(F1) - back to the previous screen.
/ (F2) - screen connected to the selected field.
SETTINGS
FUNCTIONS
AUTO
ASTRO
RANDOM
17:50 2014-01-08
3.3.1. SETTINGS>FUNCTIONS>AUTO
Screen for selecting groups for which the AUTOMATIC
STEERING MODE is on.
Proper operation of AUTO mode requires:
• Proper setting of TIME and DATE.
• Assignment of channels to the groups which will be
controlled automatically.
Display 1/2: groups from 01 up to 06.
Display 2/2: grroups from 07 up to 12.
/ - switch between fields.
/ / - select; active field- [ ].
(F1) - back to the previous screen.
AUTO
GROUPS 1/2
ALL01
0203LIV. ROOM 1
LIV. ROOM 2
04 LIV. ROOM 3
05 KITCHEN 1
06 KITCHEN 2
05:15 2014-01-10
/ (F2) - activation screen for selected group
(F3) - - orange- save changes - green- changes saved;
3.3.1.1. SETTINGS>FUNCTIONS>AUTO>MODE
DAILY or WEEKLY MODE activation screen for
selected group.
DAILY-daily mode.
WEEKLY- weekly mode.
/ - switch between fields.
/ / - select; active field-[ ].
(F1) - back to the previous screen.
/ (F2) - activation screen for selected group.
.
GROUPS: LIV. ROOM 1
MODE
DAILY
WEEKLY
17:50 2014-01-08
(F3) - - orange- save changes - green- changes saved;
3.3.1.1.1. SETTINGS>FUNCTIONS>AUTO>MODE>DAILY
Setting screen for shutter auto raising and lowering
from selected group. Repeat cycle- 24 hours
RAISING- HH hour and MM minute setting, when
the shutter is to be raised.
LOWERING- HH hour and MM minute setting,
when the shutter is to be lowered.
/ - switch between fields.
/ - select; active field.
(F1) - back to the previous screen.
MODE
DAILY
RAISING
LOWERING
GG
MM
08
30
GG
16
05:15 2014-01-10
MM
30
(F3) - - orange- save changes - green- changes saved;
9

3.3.1.1.2. SETTINGS>FUNCTIONS>AUTO>MODE>WEEKLY
Selection screen of days for which shutter automatic
control from the group will be turned on.
Repeat cycle- 7 days.
Display 1/2: MONDAY-SATURDAY.
Display 2/2: SUNDAY.
/ - switch between fields.
/ / -select; active field.- [ ].
(F1) - back to the previous screen.
/ (F2) - settings screen time of shutter raising and
lowering for the selected day.
MODE
WEEKLY 1/2
MONDAY01
0203TUESDAY
WEDNSDAY
04 THURSDAY
05 SATURDAY
06 SUNDAY
05:15 2014-01-10
(F3) - - orange- save changes - green- changes saved;
3.3.1.1.2.1 SETTINGS>FUNCTIONS>AUTO>MODE>WEEKLY>[DAY]
Setting screen for shutter auto raising and lowering from selected group and selected day. Repeat
cycle - 7 days.
RAISING - HH hour and MM minute setting, when
the shutter is to be raised.
LOWERING - HH hour and MM minute setting,
when the shutter is to be lowered.
/ - switch between fields.
/ - change of the field value.
(F1) - back to the previous screen.
(F3) - - orange- save changes
- green- changes saved;
WEEKLY
MONDAY
RAISING
LOWERING
GG
MM
08
30
GG
16
05:15 2014-01-10
MM
30
3.3.2.SETTINGS>FUNCTIONS>ASTRO
Pilot COSMO | HCT enables automatic control of receivers based on geographical location.
This means that it performs the calculation of shutter raising and lowering time for every day
of the year based on the time of sunrise or sunset for a particular geographical position.
Proper operation of ASTRO mode requires:
• Proper setting of time and date.
• Assignment of channels to the groups which will be controlled automatically.
• Definition of general and / or precise geographic position.
• Determination of time zone for user’s position.
• Settings at a given time - SUMMER / WINTER.
CITY- the nearest city.
COORDINATES- determination of geographic
coordinates.
ASTRO GROUP - selection of channel groups to
be controlled by the ASTRO functions.
ASTRO CORRECTION - - minute correction of
values calculated by ASTRO functions.
SUMMER/WINTER TIME- SUMMER/WINTER
-season determination.
/ - switch between fields.
(F1)- back to the previous screen.
FUNCTIONS
ASTRO
CITY
COORDINATES
ASTRO GROUPS
ASTRO ADJUSTMENT
STANDARD TIME/DST
17:50 2014-01-08
/ (F2) - screen connected to the selected field.
10

3.3.2.1.SETTINGS>FUNCTIONS>ASTRO>CITY
The selection screen of the nearest city in order to determine the location of the seat of the
user’s residence. The position values of the selected city (approximate) will be copied to
SETUP> FUNCTIONS> ASTRO> COORDINATES.
Display 1/3: NL AMSTERDAM, DE BERLIN,
BE BRUXELLES, HU BUDAPEST,
IR DUBLIN, UA КИЇВ.
Display 2/3: GB LONDON, ES MADRID, RU MOCKBA,
FR PARIS, CZ PRAHA, IS REYKJAVIK.
Display 3/3: IT ROMA, SE STOCKHOLM,
PL WARSZAWA, AT WIEN.
/ - switch between fields.
/ / / (F2) - select; active field - [ ].
(F3) - - orange- save changes;
- green- changes saved;
SETTINGS WIZARD
CITY 1/3
AMSTERDAMNL
DEBEBERLIN
BRUXELLES
HU BUDAPEST
IR DUBLIN
UA
05:15 2014-01-10
3.3.2.2. SETTINGS>FUNCTIONS>ASTRO>CITY>COORDINATES
Settings screen coordinates of user’s residence on which are calculated sunrise and sunset
times. The default values are the geographical coordinates of the city, selected in the setup
wizard or from the FUNCTIONS> ASTRO> CITY.
S / N LATITUDE- latitude.
E / W LONGITUDE- longitude.
TIME ZONE- time zone with location of user’s
residence.
/ - switch between fields.
/ - change of the field value.
(F1) - back to the previous screen.
(F3) - - orange- save changes
- green- changes saved;
COORDINATES
LATITUDE
LONGITUDE
TIME ZONE
TIME
3.3.2.3.SETTINGS>FUNCTIONS>ASTRO>ASTRO GROUPS
The screen for selecting groups of channels that are automatically controlled according to the
calculations of the function ASTRO.
Display 1/2: channel groups from 01 up to 06.
Display 2/2: channel groups from 07 up to 12.
/ - switch between fields.
/ / / (F2) - select; active field - [ ].
(F1) - back to the previous screen.
(F3) - - orange- save changes
- green- changes saved;
LIV. ROOM 1
LIV. ROOM 2
LIV. ROOM 3
KITCHEN 1
KITCHEN 2
GROUPS
ALL
3.3.2.4.SETTINGS>FUNCTIONS>ASTRO>STANDARD TIME/DST
Settings screen of the local time for the location of user’s residence. The setting has an
effect on the correct calculation of ASTRO function - the function does not change the time
displayed on the screen!
- DST;
-standard time;
/ - switch between fields.
/ / / (F2) - select; active field - [ ].
(F1) - back to the previous screen.
(F3) - - orange- save changes
- green- changes saved;
ASTRO
STANDARD TIME/DST
DST
STANDARD
17:50 2014-01-08
11

3.3.3. SETTINGS> FUNCTIONS> RANDOM (THEFT MODE)
time selection screen, from which will be randomly selected the value by which the COSMO
| HCT remote control corrects the time to low or raise the shutters, due to the setting AUTO
MODE or calculated for ASTRO MODE. This feature allows simulating the presence of a
resident in the house /apartment.
The draw values in the range:
05 +/- 5 MIN - from” up to „+5” minutes
15 +/- 15 MIN - from” up to „+15” minutes
30 +/- 30 MIN - from” up to „+30” minutes
45 +/- 45 MIN- -from” up to „+45” minutes
/ - switch between fields.
/ / / (F2) - select; active field -[ ].
(F1) - back to the previous screen.
(F3) - - orange- save changes.
- green- changes saved;
FUNCTIONS
RANDOM
+/- 5 MIN05
1530+/- 15 MIN
+/- 30 MIN
45 +/- 45 MIN
05:15 2014-01-10
3.4 OTHERS:
LANGUAGE- settings of user interface
language.
BRIGHTNESS- Display brightness settings.
REPORT- activation of report function.
SETTINGS RESET- restore COSMO|HCT remote
control to factory settings.
SOFTWARE VERSION- information on
software version.
/ - switch between fields.
(F1) - back to the previous screen.
SETTINGS
OTHERS
LANGUAGE
STANDARD TIME/DST
BRIGHTNESS
REPORT
FACTORY SETTINGS
SOFTWARE SETTINGS
05:15 2014-01-10
/ (F2) - screen connected to the selected field.
3.4.1.SETTINGS>OTHERS>LANGUAGE
Language selection screen in which information is displayed on the screen.
Display 1/2: PL POLSKI, EN ENGLISH, DE DEUTSCH,
FR FRANÇAIS, RU PУССКИЙ, CZ ČESKÝ.
Display 2/2: NL NEDERLANDS, IT ITALIANO
/ - switch between fields.
/ / / (F2) - wybór; pole aktywne - [ ].
(F1) - back to the previous screen.
(F3) - - orange- save changes.
- green- changes saved;
OTHERS
LANGUAGE 1/2
POLSKIPL
ENDEENGLISH
DEUTSCH
FR FRANÇAIS
RU
CZ
05:15 2014-01-10
3.4.2.SETTINGS>OTHERS>BRIGHTNESS
Optimal brightness of LCD setting screen.
% - LCD brightness -range 10-100%.
/ - change of the field value.
(F1) - back to the previous screen.
(F3) - - orange- save changes.
- green- changes saved;
OTHERS
BRIGHTNESS
BRIGHTNESS
%
100
05:15 2014-01-10
12

3.4.4. SETTINGS>OTHERS>REPORT
Activation screen of failure reports for AUTO and MANUAL MODE. In case of failure while
normal or auto operation appears the screen with a list of channels for which the failure
occurred.
AUTO - activation report with errors in automatic
mode (AUTO, ASTRO).
MANUAL - activation report with errors in manual
mode (AUTO, ASTRO).
/ - switch between fields.
/ / / (F2)- select; active field - [ ].
(F1) - back to the previous screen.
(F3) - - orange- save changes.
- green- changes saved;
OTHERS
REPORT
AUTO
MANUAL
17:50 2014-01-08
3.4.5. SETTINGS>OTHERS>SETTING RESET
FACTORY SETTINGS restore screen. The operation
should be confirmed with YES button (F3). Remote
control displays the startup screen with running
SETTUP WIZARD.
(F1) - back to the previous screen.
TAK (F3)- restore to factory settings.
ARE YOU SURE YOU
WANT TO RESET ALL
SETTINGS TO FACTORY
STATE?
OTHERS
FACTORY SETTINGS
YES
3.4.6. SETTINGS>OTHERS>SOFTWARE VERSION
Information screen about the current version of
software preloaded on the COSMO | HCT remote
control memory.
(F1) - back to the previous screen.
OTHERS
SOFTWARE VERSION
SOFTWARE VERSION 1.0.
17:50 2014-01-08
13

3.5 SETTINGS>REPORT
Report screen about the state of receivers with bidirectional communication.
Display 1/4: channels from 01 up to 06.
Display 2/4: channels from 07 up to 12.
Display 4/4: channels from 13 up to 18.
Display 4/4: channels from 19 up to 24.
/ / / - switch between screens.
(F1) - back to the previous screen.
REPORT
CHANNELS
LIV. ROOM 1
LIV. ROOM 2
LIV. ROOM 3
LIV. ROOM 4
LIV. ROOM 5
KITCHEN 1
BI-DIRECTIONAL CHANNEL- WAITING FOR REPLY- NAVY BLUE- remote control
has sent a command to the receiver and is waiting for reply.
BI-DIRECTIONAL CHANNEL- REPLY RECEIVED- SHUTTER RAISING/
LOWERING- GREEN- receiver has executed the operation properly;
BI-DIRECTIONAL CHANNEL- REPLY RECEIVED- COMFORT POSITION/STOP
OPERATION- GREEN- receiver has executed the operation properly;
BI- DIRECTIONAL CHANNEL- NO REPLY- YELLOW- remote control has not
received a reply from the channel - soft error - receiver beyond the reach of the
remote control;
BI-DIRECTIONAL CHANNEL- REPLY RECEIVED- RED- incorrect execution of
operations by the receiver - check the reason (shutter jam, obstacle, shutter is
frozen);
UNIDIRECTIONAL CHANNEL- GRAPHITE- remote control does not check the
state of the channel.
4. BI-DIRECTION.
COSMO | HCT remote control is an emitter that can communicate bidirectionally with
the receivers- that is, that can send and receive messages from them. This function
allows you to control the state of shutters- whether they have been lowered or raised
properly- whether there is damage to be checked (eg, third-party action).
Proper operation of bi-directional communication requires:
• (for receivers with two-way communication).
• proper channel configuration- set the bi- directional communication for each channel;
• programming one channel for one receiver;
• providing seamless communications of remote control with receivers;
Receivers that allow bi-directional communication: M35 ERS, M45 ERS
5.CHANNEL PROGRAMMING
Proper operation of the COSMO | HCT remote control, especially in the case of bi-directional
receivers, requires that one channel on the remote control correspond exactly to one receiver. The
remote control can simultaneously control many channels by combining them into groups.
In order to program / assignment of the receiver to the channel, select one of the two variants of
this operation: OPTION A or OPTION B.
5.1. CHANNEL PROGRAMMING- OPTION A
1. Enter the SETTING mode - press the key for about 5 seconds
(F3) .
2. Then move to SETTINGS>MANAGEMENT>CHANNELS.
3. Select from the list the channel you want to program (keys
/ ) ,then the key (F3) .
4. MOBILUS ERS MOTOR: enter the motor into MASTER PILOT PROGRAM MODE. Press in
motor the PROGRAMMING key for 5 seconds or turn on and off twice the motor power
supply or reset motor to the factory settings.
ER MOTOR: enter the motor into MASTER PILOT PROGRAM MODE by turning on and
off twice the power supply.
5. In remote control select for each channel the position
from the list of settings:
PROGRAMMING.
6. Activate programming function by holding the one of
keys of remote control:
/ (F2). The icon changes
the colour when operation is active [blue, grey].
7. MOBILUS ERS remote control will register the emitter
as MASTER, perform soft move UP/DOWN, greed
LED in the key turns off and the motor switches into
OPERATION MODE.
CHANNEL: BEDROOM 2
SETTINGS
TWO WAY
PROGRAMMING
COMFORT POSITION
SWITCH DIRECTION
17:50 2014-01-08
MOBILUS ER remote control will register the emitter as
MASTER, perform soft move UP/DOWN, and the motor
switches into OPERATION MODE.

5.2. CHANNEL ROGRAMMING- OPTION B
1. In standard operation mode of remote control, on the MANUAL SCREEN CHANNELS screen,
select the channel (keys
/ ), that you want to programme. Then move to SETTINGS>MA-
NAGEMENT>CHANNELS.
2. MOBILUS ERS MOTOR: enter the motor into
MASTER PILOT PROGRAM MODE. Press in motor
the PROGRAMMING key for 5 seconds or turn
on and off twice the motor power supply or reset
motor to the factory settings.
ER MOTOR: enter the motor into MASTER PILOT
PROGRAM MODE by turning on and off twice the
power supply.
3. Press
and buttons. Icon changing colour [red/grey]- symbolizing start of programming process
will appear on the screen.
MANUAL STEERING
CHANELS
01
LIV. ROOM 1
17:50
AUTO
2014-01-08
4. MOBILUS ERS remote control will register the emitter as MASTER, perform soft move UP/
DOWN, greed LED in the key turns off and the motor switches into OPERATION MODE.
MOBILUS ER remote control will register the emitter as MASTER, perform soft move UP/
DOWN, and the motor switches into OPERATION MODE.
5.3. COMFORT POSITION- PROGRAMMING- OPTION B
Programming of comfort position for currently offered
Mobilus motors.
1. In standard operation mode of remote control, on the
MANUAL SCREEN CHANNELS screen, select the
channel (keys:
/ ), that you want to programme.
2. Adjust the position of the shutters, which will be saved
as COMFORT POSITION.
3. Press the
key for15 sekonds.
4. Icon changing colour
[red/grey]- symbolizing start
of programming process will appear on the screen.
MANUAL STEERING
CHANELS
01
LIV. ROOM 1
17:50
AUTO
2014-01-08
5.4. COMFORT POSITION- PROGRAMMING-OPTION B
Programming of comfort position for Mobilus motors (offer valid from September 2014)
1. In standard operation mode of remote control, on the MANUAL SCREEN CHANNELS screen,
select the channel (keys
/ ) that you want to programme.
2. Adjust the position of the shutters, which will be saved as COMFORT POSITION.
3. Enter the SETTING mode - press the key for about 5
seconds.
(F3) .
4. Then move to SETTINGS>MANAGEMENT>CHA-
NELS.
5. From the list select again the channel, for which you
want to save the comfort position (keys
/ ),, then
press (F3) key.
6. In settings please select the POZ. position
for the
channel COMFORT.
7. Activate programming function by holding the one of
keys of remote control:
/ (F2). The icon changes
the colour when operation is active [blue, grey].
CHANNEL: LIV. ROOM 1
SETTINGS
TWO WAY
PROGRAMMING
COMFORT POSITION
SWITCH DIRECTION
17:50 2014-01-08
5.5. COMFORT POSITION- CALL
1. In standard operation mode of remote control, on the
MANUAL SCREEN CHANNELS screen, select the
channel (keys
/ ), for which you want to program-
me the COMFORT POSITION.
2. Press the
key for min. 3 seconds..
3. The icon
- chang ing colour [blue/grey] appears
on the display.
4. Shutter comes out to the programmed position.
MANUAL STEERING
CHANELS
01
LIV. ROOM 1
17:50
AUTO
2014-01-08
15

6. MAINTANANCE
1. For cleaning, use a soft cloth (such as microfiber), moistened with water. Then wipe dry.
2. Do not use chemicals.
3. Avoid using in dusty rooms.
4. Do not use the device at temperatures greater or less than declared range.
5. Do not open the device-on pain of losing the warranty.
6. The device sensitive to dropping, throwing.
7. REPAIR
If you have any questions, please contact the seller.
Please provide the following information: Incident description, error, failure conditions.
8. OCHRONA ŚRODOWISKA
Niniejsze urządzenie zostało oznakowane zgodnie z Dyrektywą WEEE (2002/96/EC),
dotyczącą zużytego sprzętu elektrycznego i elektronicznego. Zapewniając prawidłowe
złomowanie przyczyniają się Państwo do ograniczenia ryzyka wystąpienia negatywnego
wpływu produktu na środowisko i zdrowie ludzi, które mogłoby zaistnieć w przypadku
niewłaściwej utylizacji urządzenia.
Symbol umieszczony na produkcie lub dołączonych do niego dokumentach
oznacza, że niniejszy produkt nie jest klasyfikowany jako odpad z gospodarstwa
domowego. Urządzenie należy oddać do odpowiedniego punktu utylizacji odpadów w celu recyklingu. Aby uzyskać dodatkowe informacje dotyczące recyklingu
niniejszego produktu należy skontaktować się z przedstawicielem władz lokalnych, dostawcą usług utylizacji odpadów lub sklepem, gdzie nabyto produkt.
Wersja 1.4NCE, 2014-07-17
16
 Loading...