

Page 1

1
MX-LOCare
BR1
MobilMAX
USER MANUAL
Thank you for purchasing the MX-LOCare® BR1 Bracelet
GPS Locator and/or MX-Beacon1. This manual shows how
to operate the device correctly. Make sure to read this
manual carefully before using this product. Please note
that specification and information are subject to change
without prior notice. Any change will be integrated in the
latest release. The manufacturer assumes no responsibility
for any errors and omissions in this document.
The content of your package includes:
Page 2

2
- 1. MX-LOCare® BR1
- 2. MX-PowerEXT®
- 3. MX-Beacon®
- 4. USB cable
- 5. Charger
- 6. Warranty cards (for MX-LOCare® BR1Bracelet and
MX-Beacon® each): Bracelet ID, Telephone number for
bracelet, beacon ID and beacon serial number.
- 7. SIM card has been pre-installed
- 8. MX-LOCare® BR1 Torx Screw driver
Page 3

3
Contents
1. GENERAL INFORMATION ...................................5
1.1 HARDWARE DESCRIPTION ..................................5
1.2 LED LIGHT DEFINITION .......................................7
2. GETTING STARTED...........................................10
2.1 FUNCTIONS.....................................................10
2.2 BATTERY AND CHARGER...................................10
3. STARTUP.........................................................12
4. MX-CLOUD® SERVER AND WEB ........................13
4.1 Registration and Login ............................. 13
4.2 Locator Management............................... 15
4.3 MX-Beacon® Management......................19
4.4 Real-time Tracking ................................... 20
4.5 History ..................................................... 21
4.6 Cursers and icons ..................................... 23
4.7 Member Center .......................................24
5. MX-LOCATE® APP ............................................26
5.1 Registration and Log In ............................ 26
5.2 Add New Locators.................................... 28
5.3 MX-Beacon® and System Configure......... 29
5.4 Overview of Locator.................................31
5.5 History ..................................................... 36
6. HOW TO USE GPS LOCATOR DEVICE .................38
7. SAFETY INFORMATION ....................................38
Page 4

4
8. CARE AND MAINTENANCE...............................41
Page 5
5
1. General Information
The Bracelet works on existing GSM/GPRS network and
satellites. This product can locate and monitor any wearer
by SMS or GPRS.
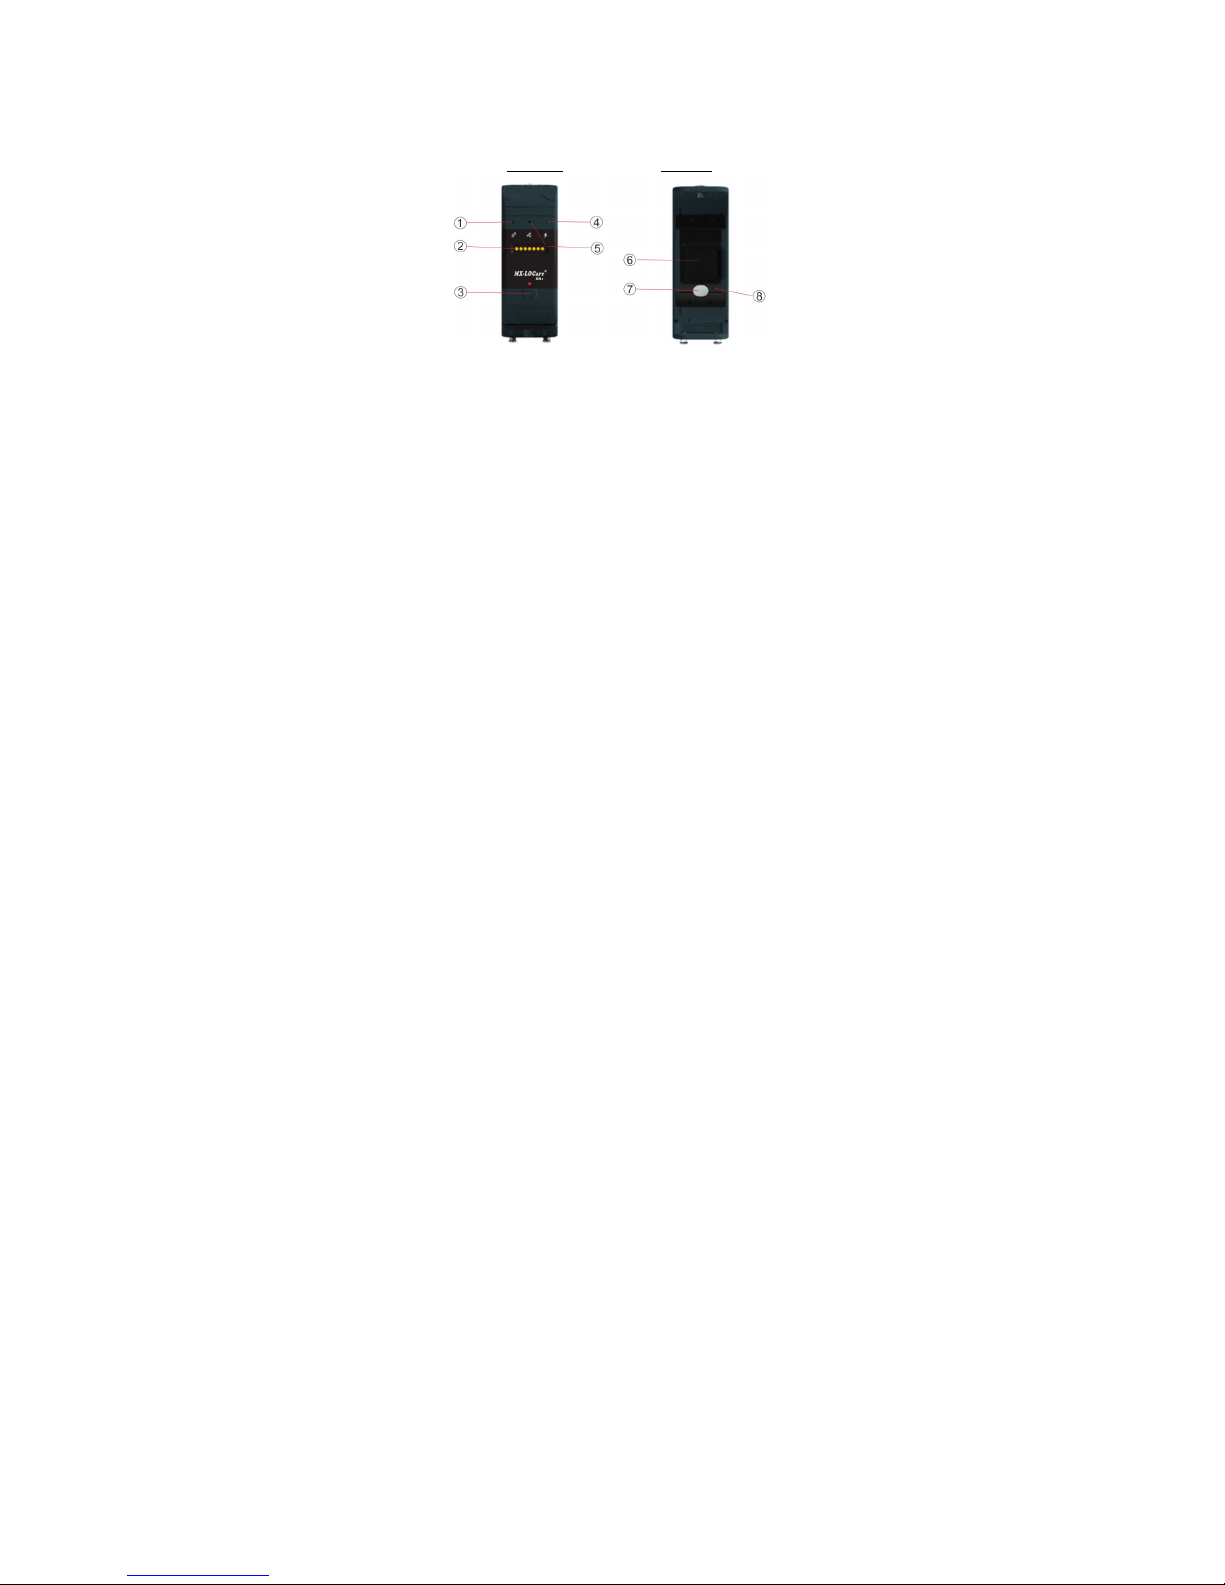
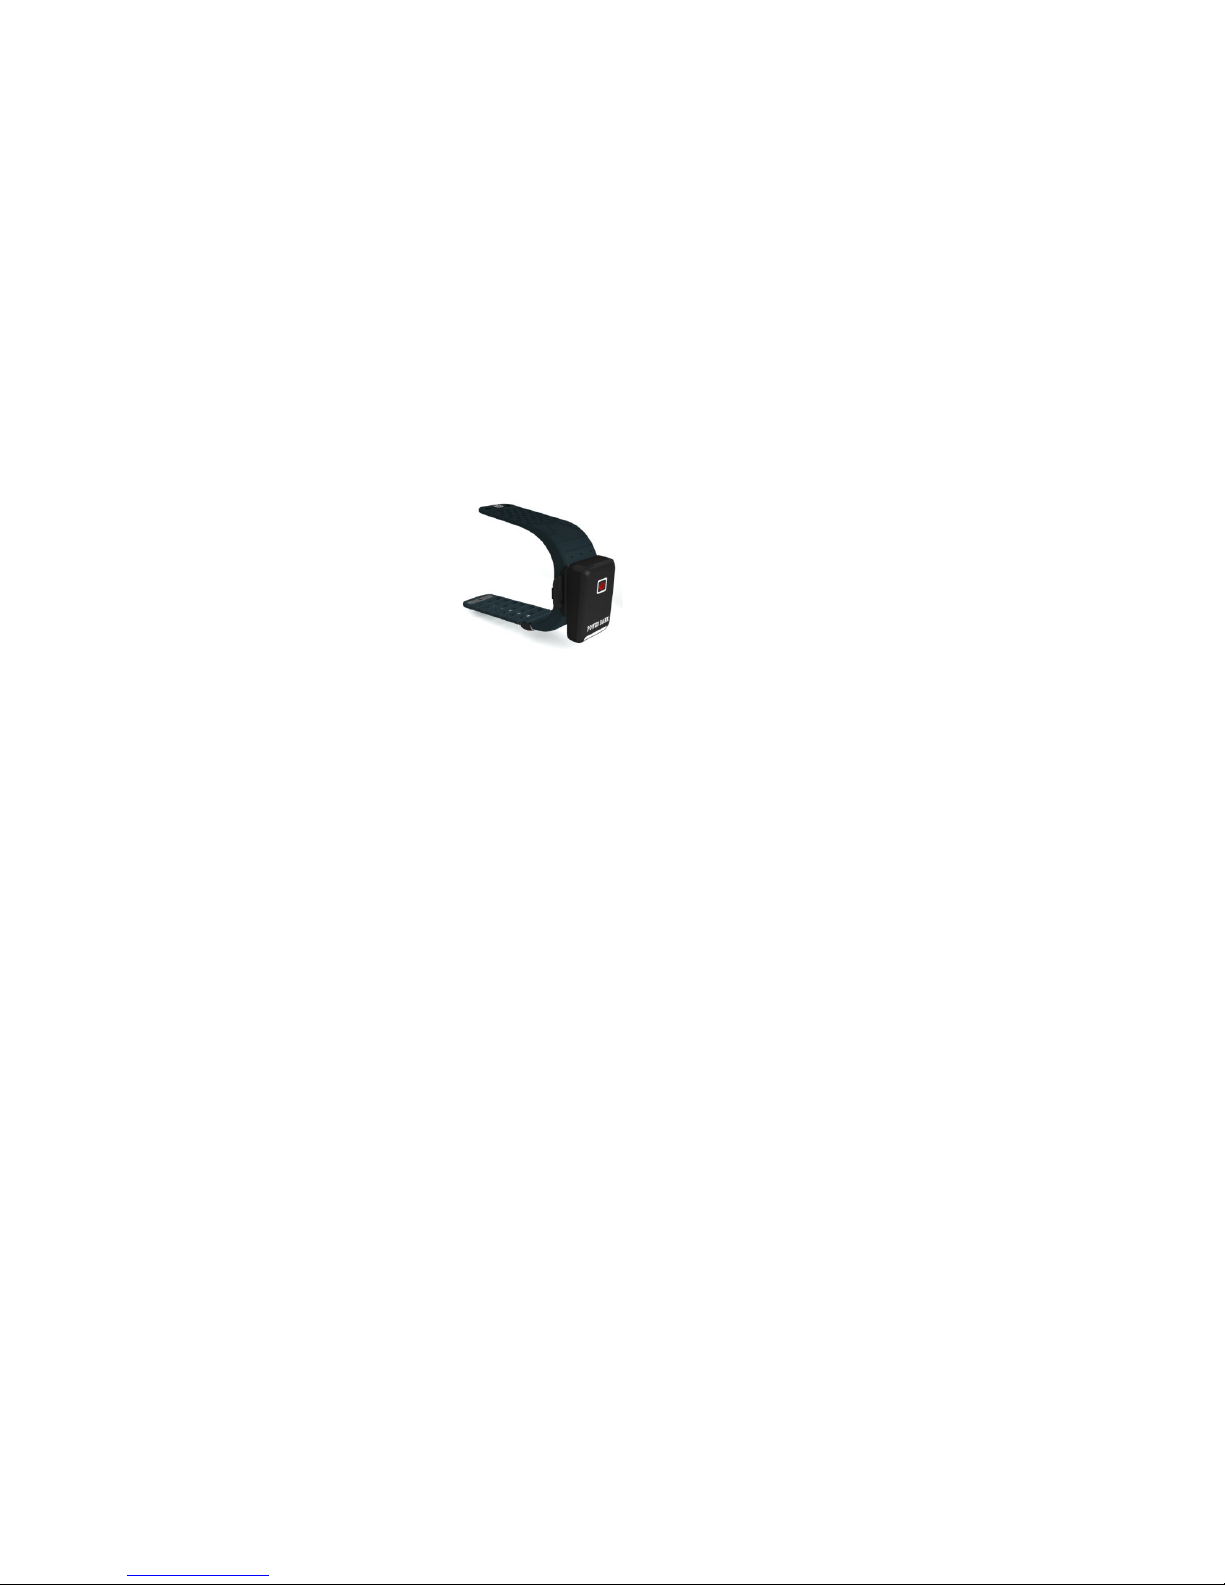
1.1 Hardware Description
Front Face Back Side
MX-LOCare® Locator Description
1. Link LED Light (Blue)
2. MXConn® connector
3. SOS/ON Button
4. Power LED Light (Red)
5. GPS LED Light (Green)
6. Back Cover (SIM Cover)
7. Proximity Sensor
8. PowerOff Button
Page 6
6
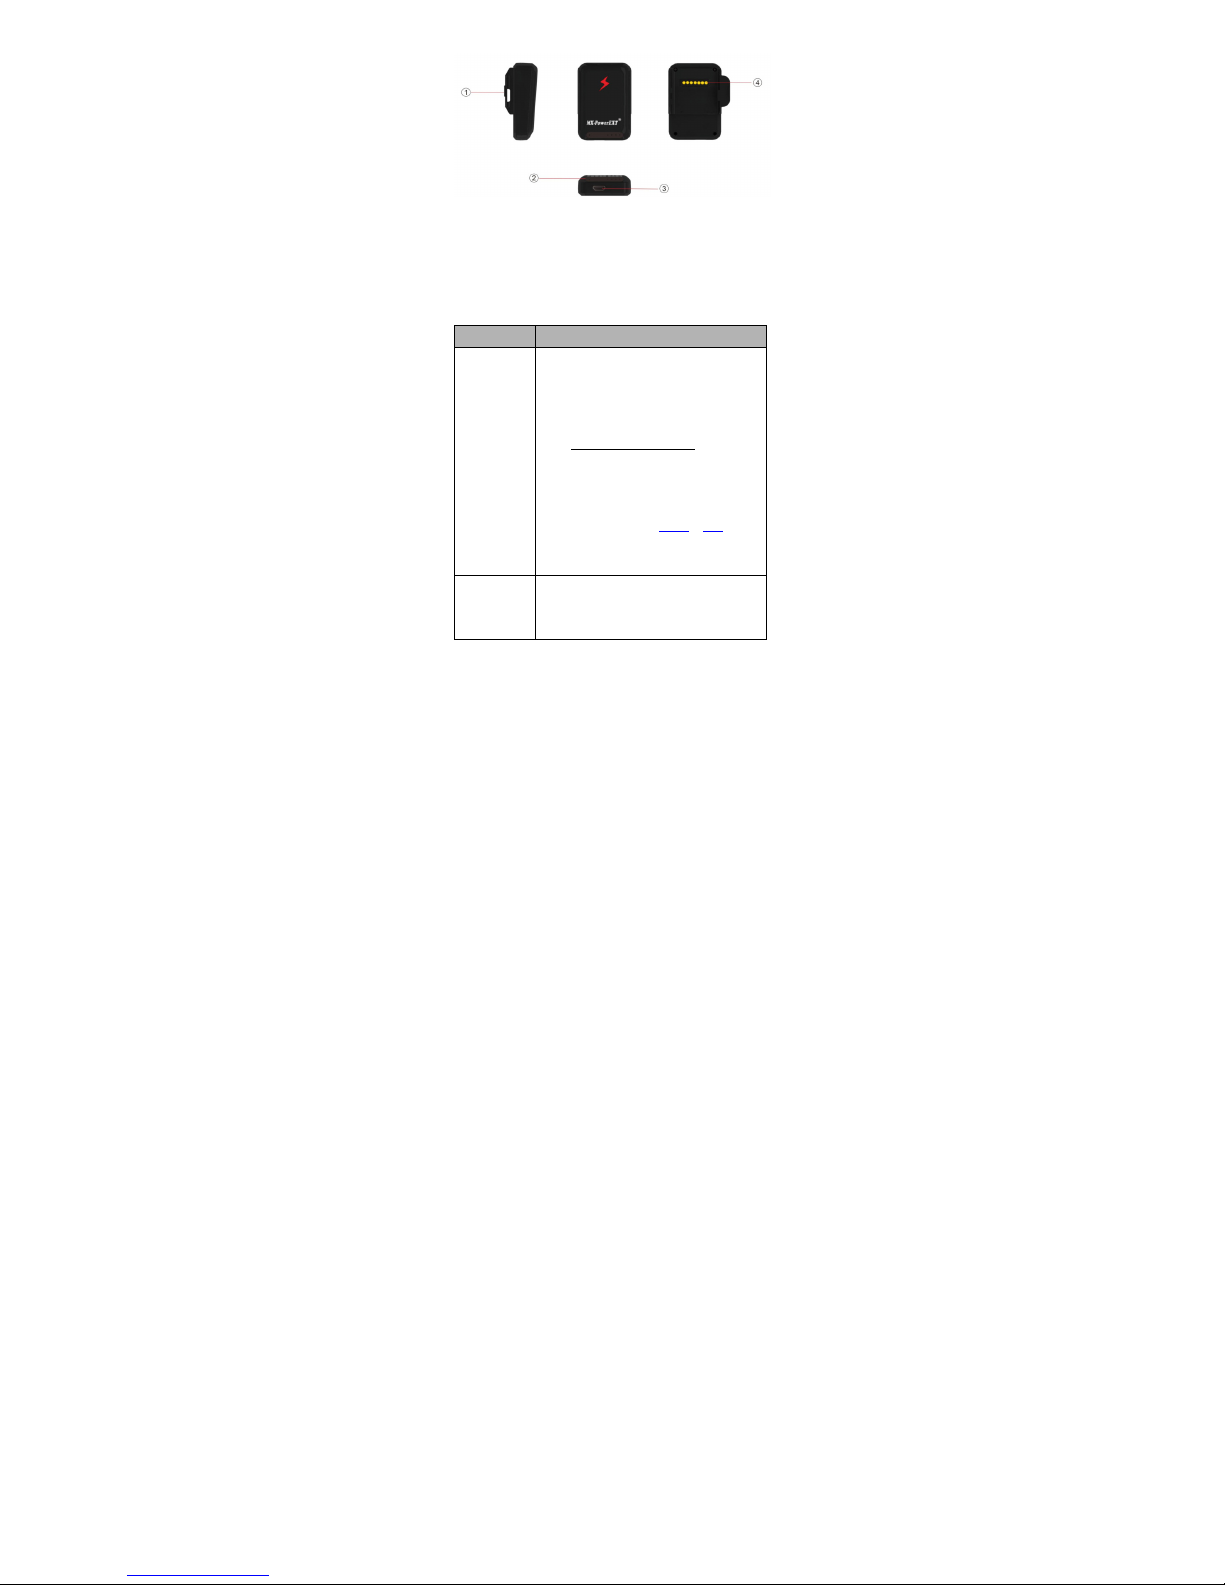
MX-PowerEXT® Description
1. Hook structure (to connect to the locator)
2. LED indicators
3. USB Connector
4. MXConn® Connector
Power Button Definition
Function Description
1. SOS/ON
Button
- Power On: Press 3 seconds to Power On
the device (The LED light “Red”, “Green”
and “Blue” will flash sequentially twice)
- SOS: Under Power On status, hold down
the button 3 seconds, all three LED lights
will flash until the locator sends out the
SOS Warning.
(Please refer to section 4.1.1 or 5.1 to
register from a web browser or
MX-Locate® APP respectively.)
2. Power Off
Button
The PowerOff button is a hole located in
the back of the Bracelet. Insert a small
paperclip in the hole in order to power off
Page 7
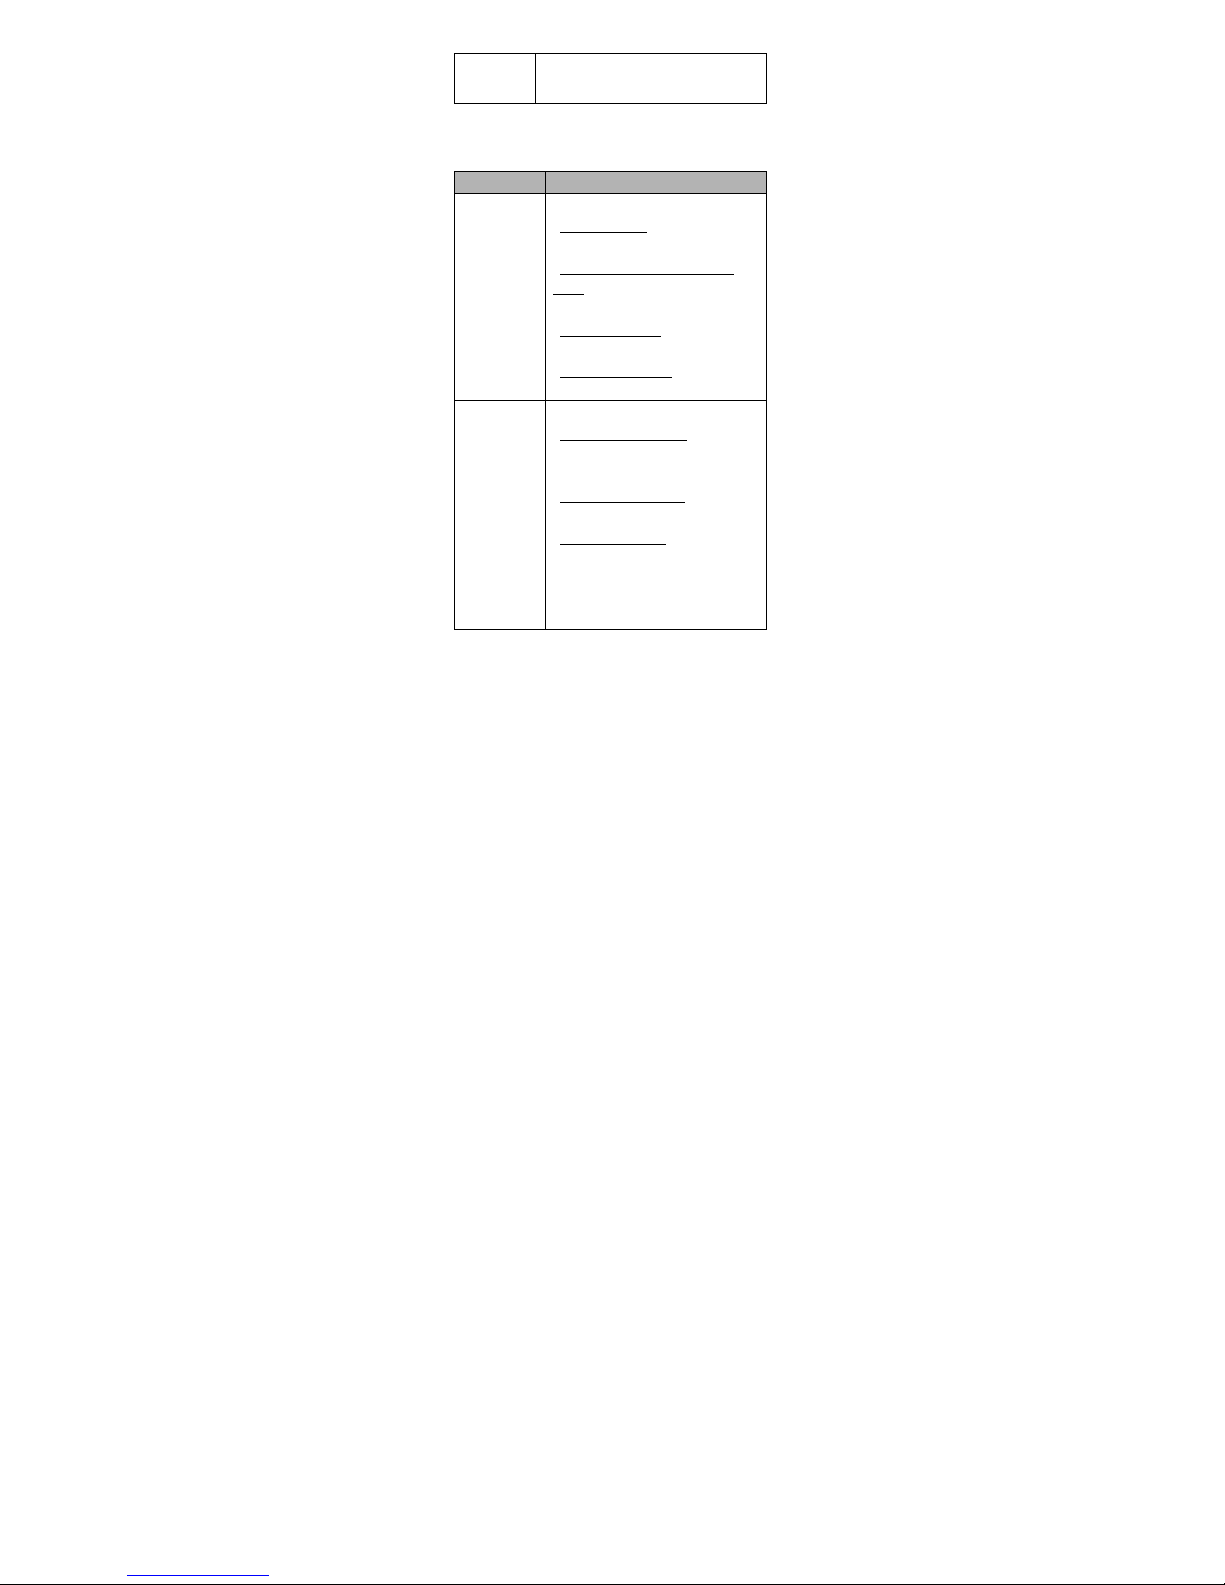
7
the locator
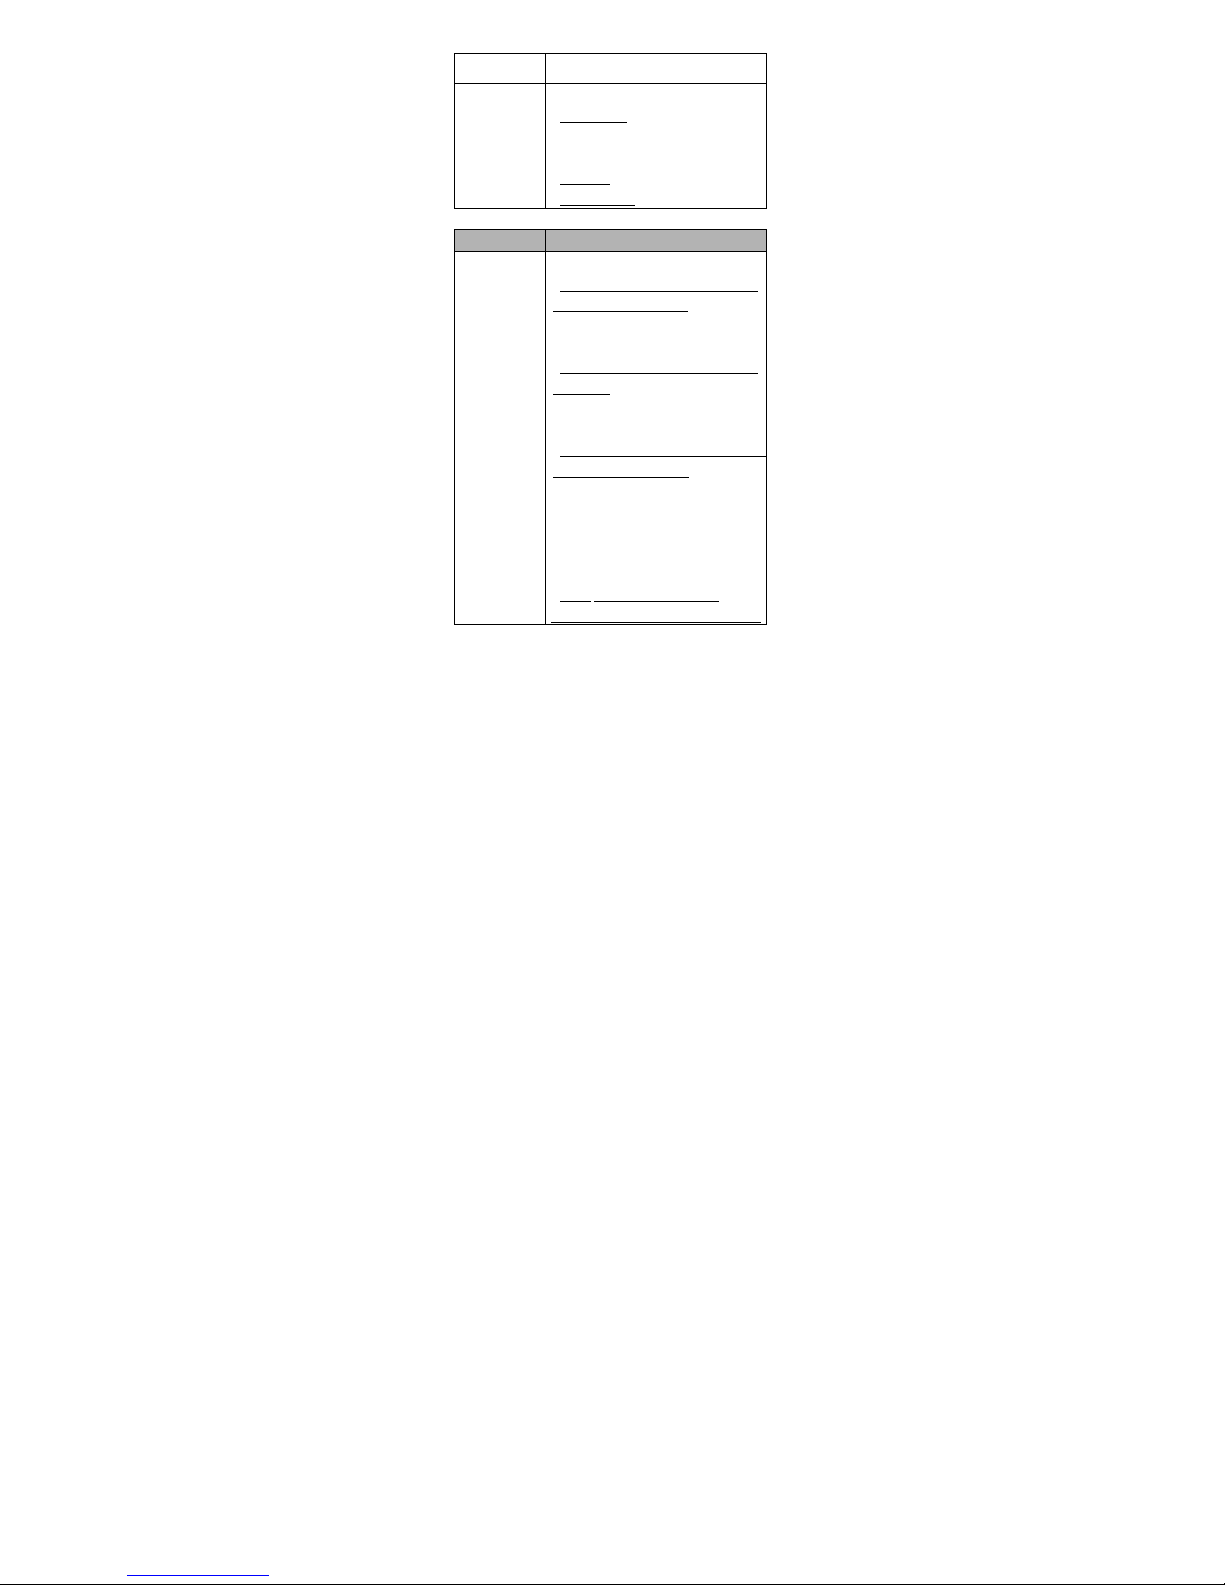
1.2 LED Light Definition
1.2.1 Locator LED
LED Light Status definition
1. Link LED Light
(Blue)
Link status:
- Network Linked: light “ON” for 2
seconds and shuts “OFF” in 10 seconds.
- SIM Card Error or GSM Network
Failed: light flashes 3 times and shuts
“OFF” in 2 seconds.
- Network Searching: light “ON” in 0.5
seconds and shuts “OFF” in 2 seconds.
- Data Network Failed: light flashes 2
times and shuts “OFF” in 2 seconds.
2. GPS/Beacon
LED Light
(Green)
GPS status:
- Searching GPS Satellites: light “ON” in
0.5 seconds and shuts “OFF” in 2
seconds.
- Beacon Search Succeed
: light flashes 3
times and shuts “OFF” in 2 seconds.
- Positioning Succeed: light will turn
“ON” in 5 seconds after positioning
success and will keep flashing for 2
seconds and then will shut “OFF” in 10
seconds.
Page 8
8
3. Power LED
Light (Red)
Battery status:
- Low Battery: light turns “ON” for 2
seconds and then shuts “OFF” for 10
seconds
- Charging: light flashes every 1 second.
- Fully Charged: light shows “ON”.
1.2.2 MX-PowerEXT® LED
LED Light Status definition
1. Charge LED
Light (White)
USB connected:
- When the battery of MX-PowerEXT®
itself is NOT fully charged: the 4 white
LEDs will flash sequentially from right
to left.
- When the battery of MX-PowerEXT®
itself is full: all the 4 white LEDs will be
on constantly.
USB NOT connected:
- When MX-PowerEXT® is connected to
the MX-LOCare® Bracelet: light will be
“ON” constantly, NOT all the 4 white
LEDs are “ON” the same time. The
number of LED’s on will indicate the
battery level remaining in the
MX-PowerEXT®.
- When MX-PowerEXT® is NOT
connected to the MX-LOCare® Bracelet
:
Page 9
9
4 white LEDs are “OFF".
2. Discharge
LED Light (Red)
When the MX-PowerEXT is Connected
to MX-LOCare® Bracelet:
- When the battery level of
MX-LOCare® Bracelet is Not fully
charged: the Red LED will be “ON”.
- When the battery level of
MX-LOCare® Bracelet is full: the Red
LED will be “OFF”
*Important - Please note that although
the Bracelet is IP-67 waterproof rated
the charging bank is not. At no time
should the MX-PowerEXT® be exposed
to any water or an
y liquid will void the
warranty.
When the MX-PowerEXT is NOT
connected to MX-LOCare® Bracelet:
the Red LED on the power pack will be
“OFF”
Page 10
10
2. Getting started
2.1 Functions
Periodic reporting or real time tracking functions are
generated from web or MX-Locate® downloadable
APP.
Location and activity history is easily accessed and
stored to check past records.
SOS Button sends out an emergency signal.
Up to 10 inbound/outbound GeoFences. Can be in
forms of circle, rectangle and polygon.
Detach alert using light laser when detached from
user.
G-sensor alert for impact and fall incidents
Indoor location aware technology with the aid of
MX-Beacon®
Safe zone boundaries further defined with the aid of
MX-Beacon®
MX-PowerEXT® (800mAh) extends the standby mode
and recharges the Bracelet easily without taking it off
the wearer
IP-67 waterproof design
2.2 Battery and Charger
For initial use charge the MX-PowerEXT® and the Bracelet
for 2 hours. To charge
the Bracelet, use the
charger and
MX-PowerEXT® at the
same time. Plug in the
power cable to the
MX-PowerEXT® and
Page 11

11
lock the MX-PowerEXT® to the Bracelet tightly and the
charging will start.
After the initial charge remove the MX-PowerEXT® from
the Bracelet. When the Bracelet power gets low, snap the
MX-PowerEXT® back onto the Bracelet to recharge. When
not using the MX-PowerEXT®, plug it into the charger to
keep it charged for next use. (Please note- additional
MX-PowerEXT® are sold separately if a spare charged unit
is required.)
Remember in low battery mode, the power LED light (Red)
will flash “ON” for 0.5 second and then “OFF” for 0.5
second intermittently until either a charge is connected or
the battery completely is depleted.
There is also a power safe feature which preserves enough
battery life to allow for an emergency connection if the
battery is in a critical state.
Important: Please use the MX-PowerEXT® and charger
provided by the manufacturer.
NOTE:
- The Li-ion battery contains harmful chemicals and may
burst. Avoid bumping or puncturing the battery and
keep it away from fire.
- Always charge the battery timely to keep it working
properly.
Page 12

12
3. Startup
Press “SOS/ON” button.
In approximately 40 seconds or less, the Bracelet will
start working and acquire the GSM signal as well as
the GPS signals. It is suggested users go outside
where the sky can be seen to get the GPS signal.
(Please refer to 1.2 for detail.)
Page 13

13
4. MX-Cloud® Server and Web
The MX-Cloud® server controls and records the actions of
the Bracelets. The server can be accessed by using a
computer, tablet, smartphone’s web browser or the
downloaded APP for Android or iOS Smartphones known
as MX-Locate®.
Use MX-Locate® as the interface to communicate with the
MX-Cloud® server. This will allow the user to control and
monitor the Bracelet(s).
The link to access and control the Bracelet is as follows:
http://MXLocate.mobilmax.com/
4.1 Registration and Login
4.1.1 Registration
The distributor/dealer you purchased your product from
will provide your login credentials and temporary
password.
4.1.2 Login
Validate your account
- Registration is now completed and verified.
- Check your email and click on the link in the “MX
Locate Confirmation email”.
Page 14

14
Login
- Please fill in the User ID and password then press
“Login” button. Enter the Captcha Code.
- If the account is not verified, the message “This
account is not verified yet” will appear. Please go
to the email mailbox that was used to register the
Bracelet and verify it so it will appear. Please
press “Authentication again” to complete the
process.
Authentication again
- If you did not receive the confirmation email, click
on the Authentication Again” on the upper right
corner shown in below image.
Page 15

15
Forgot Password
- Click on “Forgot Password?” and enter the user
name and email address to obtain a new
password.
- The password will be sent out to the email account
that was used to register the device. Please reset
the password and write it down.
4.2 Locator Management
To manage the Locator/Locators, please go to the “Locator
Management” page and fill in all the necessary relative
information as outlined below.
4.2.1 Set Up
To add or delete a Bracelet, or to discontinue services,
contact the dealer/distributor where the device was
initially purchased.
To modify the data settings of the Bracelet, go to the
“Locator Management” Setup page and if necessary,
choose the appropriate Bracelet from the list on the left
column of the dashboard. Please see below:
Page 16

16
- To Change the portrait of the Bracelet, click on the
portrait of the Bracelet on the page, as in the red circle
in above figure, and choose a new image from a
computer file and replace it.
- For Tracking Mode, this section defines the frequency
of how often Bracelet is to report location:
High: reports every 30 minutes periodically
Regular: reports every 60 minutes
periodically
Warning only: reports only when warning
alert occurs.
- Fill in ALL the information and make sure you choose
what options you want and then press “Submit”. This
will then save the information to the Server.
- Four extra SMS (text message) numbers and emails are
used to inform additional caregivers when alerts occur.
- Once all of the setup information is submitted, the
words “Configuring On Going …” may be seen under
the portrait of the Bracelet. If the Bracelet stays on the
“Configuring On Going …” message, please check to
see that the Locator has been charged and has the
power light “ON”.
Page 17

17
4.2.2 Geofence
Now it is time to create safe zone boundaries known as
Geofences. You can use different shapes and sizes such as
a rectangle, circle and/or polygon. The size and shape of
the Geofences can also can be rotated to be a better
conform to the specific geographic safe zone area needed.
Up to ten (10) Geofences can be set up and selected.
To set the Geofence settings, go to Locator page and click
on “Geofence”:
1) Press “location” in the popup box and input the
address for the Geofence. This will move the
map to the area where the Geofence will be
set.
2) Click on the map the shape and size of the
Geofence desired. Also select Alert Types,
Exiting and/or Entering when the Bracelet
crosses the safe zone boundary.
3) Choose Always On/Always Off/Period to start/stop
Geofence activity.
Please note - when leaving the GeoFence, the Bracelet will
send an alert to the caregiver/caregiver’s with the time
and location report. The system allows more than one
GeoFence active at the same time.
Page 18

18
4.2.3 MX-Beacon®
This System allows the user to apply indoor location aware
notification beacons, known as the MX-Beacon®. These
devices are used for indoor locations or the creation of
other types of safe zones.
On the dashboard, please go to the page called Beacon
Management as indicated in the diagram below. In this
section the user will create/setup one or all the Beacons
required. These Beacons wil l be defined for each Locator.
Beacon Function
In Safe Beacon mode, the Bracelet will NOT report as it is
within the Safe Beacon zone.
In the Location mode, the Bracelet will report the location.
Please note that this will be the default option.
Page 19

19
Reference the next section for more details and setting
up multi-Beacon safe zones.
4.3 MX-Beacon® Management
This section is used to allow the user to create a list of
Beacons that are desired to create a safe boundary for the
wearer/wearers of the Bracelet(s). The user can decide
to use his/her own MX-Beacon or connect to another
person’s MX- Beacon that would extend the safety areas.
Setting up multiple Beacons:
Please go to the MX-Beacon Management Tab of
dashboard. It will give a list of registered MX-Beacon’s
being used.
Press the “ ” icon to add a new Beacon.
Input the Beacon-ID, which is indicated on the product
label of the Beacon or on the box of that Beacon, and the
password, which is defaulted as 12345.
Give a nickname to the Beacon, such as “Living Room”, and
tell the system it’s your “Own Beacon”. We called it
“Own Beacon” if it is initial Beacon or an extra Beacon you
purchase from your distributor/dealer, otherwise
“Reference Beacon”.
To delete a Beacon. Check the appropriate Beacon from
the list and press the “ ” to delete that beacon.
If it is the user’s own beacon, click on the beacon and it ’ll
pop up a window with map as following. The nickname or
Page 20

20
address can be changed to define the location of that
Beacon. The cursor on the map can be moved to do the
same thing.
4.4 Real-time Tracking
On the dashboard, please go to “Real-time Tracking”.
If there are multiple Bracelets that are being monitored,
please select the Bracelt that the user wants to locate on
the left bar of the dashboard. The system will then
automatically display the latest location record of the
Bracelet.
The user can also click on the corresponding “Current
Location” button, as indicated in the red circle in the
Page 21

21
following figure, to trigger the Bracelet to report its
current location. After the “Current Location” button is
pressed, the button will turn into a timer bar. If the timer
bar runs to the end and times out, it will pop up a window
with message “(Bracelet name) Get current location time
out”. There are a few reasons why the system times out
and they are as follows:
The Bracelet was out of the GSM cellular
service area, such as in a basement,
underground garage or subway; or
The Bracelet did not receive the GPS signal
due to limited or very low battery life.
4.5 History
On the dashboard, please go to “History”. Click on the
Bracelet from the list on the left. The user will be able to
see the Bracelet’s history locations including a breadcrumb
trail as well as the warning history on the specific date
selected from the calendar displayed.
Page 22

22
To drill down reports even further, the user can click on
the bar as indicated in the red circle above and get a
pop-up window with the record list of the Bracelet chosen
on that date, as shown in this format:
The user can also click on the items to further drill down
the record desired in the following formats:
- All: list all the reported records
- Alert: list only the reported records with alerts
- No Alert: list only the reported records without alerts
- Unread Alert: list with alerts that have not been read
or cleared. The “Read All” button can be clicked onto
clear them at one time.
There are also three buttons on this window:
- Read All: as described above, to clear all the unread
alerts on that day.
- Play: play back the trace by sequence only on the
selected date you chose.
- Export: allows the user to output the history data to an
excel file. When selecting output, the system allows
Page 23

23
you to input time range and choose “All”, “Alert” or
“No Alert” for screening.
Please note that this data is saved on for up to six
months.
4.6 Cursers and icons
Different type of Cursors or Icons are displayed on the map
of Real-Time Location or History page. These Cursors
and/or Icons mean different location results as following:
Curser/Icon Locations
Showed Blue Cursor with globe when
Bracelet located from GPS
Showed Pink curser when Bracelet
located by MX-Beacon®
Showed Red Cursor when Bracelet’s
location came with an unread alert
Showed Blue Icon for the Real-Time
Location or the last location history when
Bracelet located from GPS
Showed Pink icon for the Real-Time
Location or the last location of history
when Bracelet located by MX-Beacon®
Page 24

24
4.7 Member Center
4.7.1 My Account
On the dashboard, please go to “Member Center” and
then “My Account”. This is where “Nickname”, “Mobile
Phone”, and “Address” can be edited.
Once additions or changes are made, press the “Renew”
button to save the record.
4.7.2 Change Password
On the dashboard, please go to “Member Center” and
then “Change Password. This is where the Password can
be changed. Press “Renew” button to save the record.
The message “Success” will appear.
4.7.3 Change Email
On the dashboard, please go to “Member Center” and
then “Change Email. This is where the email address can
be edited. Press the “Renew” button to save the record.
Page 25

25
The message “Success” will appear.
4.7.4 Setting
On the dashboard, please go to “Member Center” and
then “Setting”. This is the alert sound for your sound
notification acknowledgment is configured by turning it
on/off. T he alert sound will stay on after triggered by
the alert events until the alert is read.
Page 26

26
5. MX-Locate® APP
To use an Android Phone, go to
“Google Play” to download and install
the APP “MX-Locate®”. To use an iPhone,
go to the iTunes Store download and
install the “MX-Locate®” APP, The app
allows the user to do this the same
functions as on a computer.
5.1 Registration and Log In
Use the same login and password that was provided at
time of purchase.
Once the MX-Locate® APP is opened, the user will see the
page as follows. Input the user ID and password to login to
the APP as directed.
Page 27

27
After a successful login, the page below will be shown:
The Icons shown below represent the tabs for the
functions able to be accessed from the APP:
New Message
Log Out Button
Save / Update Button
Member information
MX-Beacon® setup
System setup
The user can click on the Member Information
button to view the member information. If changes need
to be made, click on the field that needs to be edited.
Page 28

28
5.2 Add New Bracelets
To add or delete a Bracelet, or to discontinue services,
contact the dealer/distributor where the device was
initially purchased.
“My Locator Tab” shows how many Bracelets are on the
account. On the “My Locator” tab note the color coded
status lights of each Bracelet.
The color lights denote the following:
Green- On/off status of the Bracelet. Power on and in sync
mode.
Red – Power off mode.
Yellow – Bracelet is not syncing with the servers.
Member
Info Button
Page 29

29
5.3 MX-Beacon® and System Configure
5.3.1 System Configure
After logging in to the MX-Locate® APP, the following icon
“ ” will be seen. Press this icon to configure the page
for the alert sound and the alert vibration notice.
5.3.2 MX-Beacon® Configure
After logging in to the MX-Locate®, the following icon
“ ” will be seen. Press this icon to configure a beacon.
Page 30

30
Please note the Green and Blue Icons as shown on the left
and right headers above.
When pressing the Green Icon, the user will be able to add
a MX- Beacon that’s from others (not your “Own” or
“Original” Beacon that came with the Bracelet). They are
referred to as “Reference Beacons”. In order to add the
Reference Beacons you need to know the Beacon ID first
and then it be given a nickname (i.e. - living room) to add
it to the list for creating safer boundaries.
When you press the Blue Icon, the user can add the “Own”
or Original” Beacon or the Beacon that came with Bracelet.
The Beacon ID and password which was provided at time
of purchase will need to be entered.
Remember if the Login has been forgotten or there is
logging on to the portal, please check with the authorized
Page 31

31
distributor/dealer for the Login information or to reset the
password.
After adding the Beacon, “Own” or “Reference”, the
Beacon will be shown on the list with an icon to indicate
it’s the “Own” or “Reference” Beacon. Pressing the
Beacon on the list will lead to a page as seen below:
It is here where the “Beacon Name” is pressed to setup
the nickname use for the Beacon. An “Address” also
needs to be setup where the Beacon is to be placed. The
cursor on the map can be pressed to automatically move
to the location for the Beacon. After the Beacon is set up,
press the “ ” icon to save the settings.
5.4 Overview of Locator
Page 32

32
Tap the Locator that was added to the MX-Locate® APP, in
order to view the basic information of the Locator, Locator
status, and any additional information as shown below:
5.4.1 Status
The latest location can be viewed here. If the GPS
Locator/Locators have not been charged and turned on,
there will be no records and the columns will appear
empty.
However if the Locator(s) appear, the icon can be
pressed and it will initiate the Locator to report its current
location.
Page 33

33
5.4.2 Basic Functions
Basic personal information can be viewed and set here:
Page 34

34
Press each item to fill in the information needed and press
button to save it.
For some items, tap button to activate the function.
To configure the beacon type (SafeBeacon or
LocateBeacon) used for this locator, press the button,
and a list of beacons will be seen:
If the Beacon Button is held down for a few seconds, a
popup window will be seen which shows the following:
Page 35

35
Press on which item designated to define the relation
between the Locator and the Beacon selected.
You can also tap the button to wake up the Locator
remotely.
Tap the button to delete this locator.
5.4.3
Geofence
You can set the range by tapping or button
Page 36

36
5.5 History
- Tap the specific locator for route or alert history.
- Check the tracking and alert history by tapping on the
date marked with circle
- The location history will appear on the map.
- By pressing on an icon, specific locations on the map
Locator1
Locator3
Page 37

37
can be checked.
Page 38

38
6. How to use GPS Locator
Bracelet
After all setup and configuration is completed, your
MX-LOCare®
BR1
is ready to use. A person who is wearing a locator device or is
responsible for the person wearing the locating device must be
aware of the use of that device.
Please note the following points to use the Bracelet:
For Power On -
- Press SOS/ON button to power on the Bracelet.
Once powered on, it will always stay on unless the battery
is completely depleted.
SOS key
- Press SOS/ON key for 3 seconds. An SOS message
will be sent as an alert to a defined SOS phone
number that was designated in the setup.
7. Safety information
SOS/ON
Page 39

39
Battery information
This device is powered by a rechargeable battery and
care and protection is required by the user. For long
term device preservation and peak performance, it is
recommend the Bracelet be charged with the same
care and maintenance as any other expensive cellular
device.
Use only the approved charger to recharge the battery.
Unplug the charger from the electrical plug and the
device when not in use. Do not leave the battery
connected to a charger. Overcharging may shorten its
lifetime.
Operating Environment
Remember to follow special regulations in any area and
always power off the device when its use is prohibited
or when it may cause interference or danger. Please
reference section 1.1 for the operation. Use the device
only in normal operating conditions. Do not keep the
device near credit cards and other magnetized products
or media, as some cellular devices and/or accessories
can demagnetize the products or media and have been
known to possibly delete the data.
Pacemaker manufacturers recommend that a minimum
separation of 6 inches (20cm) should be maintained
between a wireless device and a pacemaker to avoid
potential interference with the pacemaker. These
recommendations are consistent with the independent
Page 40

40
research by and recommendations of Wireless
Technology Research (WTR), L.L.C ‘s public health
program. To minimize the potential interference,
persons with pacemakers should do as below:
Always keep the device more than 6 in (20 cm) from the
pacemaker when the device is switched on.
Do not carry the device in a breast pocket. If necessary
to do so, carry the device in the breast pocket across
from the pacemaker.
If there is any reason to suspect that interference is
taking place, switch off the device immediately.
Hearing aids
Some digital wireless devices such as the MX-LOCare®
Bracelet may interfere with some hearing aids.
Small children
Although the MX-LOCare® Bracelet can fit on a toddler’s
wrist, please note that its enhancements may contain
small parts. Keep out of the reach of small children.
Other medical devices
Operation of any radio transmitting equipment, including
wireless phones, may interfere with the functionality of
inadequately protected medical devices. Power off the
device in health care facilities when any regulations are
posted in these areas instructing the user to do so. Please
reference section 1.1 for the operation.
Page 41

41
Regulatory Agency Identifications
The following regulatory body identification numbers have
been assigned to the BR1 and its peripheral MX-Beacon1 :
FCC ID for BR1: 2AAYELOCAREBR1
FCC ID for MX-Beacon1: 2AAYEBEACON1
This device complies with part 15 of the FCC Rules.
Operation is subject to the following two conditions: (1)
This device may not cause harmful interference, and (2)
this device must accept any interference received,
including interference that may cause undesired
operation.
8. Care and maintenance
The Bracelet is a product of high quality design and
craftsmanship and it is recommended following the listed
suggestions to help protect the Locator and maintain the
one year warranty coverage.
Although the Bracelet is IP-67 waterproof, it is
recommended the user keep the device dry. The device
can be immersed for short periods of time. It is not
recommended for swimmers. It is recommended that
once the device is wet that the Bracelet is dried using a
clean cloth making sure to keep the contact points
clean.
Do not store the device in hot areas or directly in the
sun. High temperatures can shorten the life of
electronic devices, damage batteries, and warp or melt
Page 42

42
certain plastics.
Do not store the device in cold areas. When the device
returns to its normal temperature, moisture can form
inside the device and damage electronic circuit boards.
Do not attempt to open the device as this will certainly
void the warranty and ruin the waterproof seal.
Do not drop, bang, or shake the device. Rough handling
can possibly break internal circuit boards and breach
the warranty.
Do not use harsh chemicals, cleaning solvents, or strong
detergents to clean the device.
Do not paint the device. Paint can clog the moving parts
and prevent proper operation.
Use a soft, clean, dry cloth to clean any lenses, such as
proximity sensor and light sensor lens.
Always keep a log of passwords and login credentials
GPS drift is common with GPS devices. Efforts have been
made to eliminate as much drift as possible when the
Bracelet is outside. There are various factors that can
produce drift such as being in a covered area, solar storms
and other factors which may distort the GPS signal. By
using the MX-Beacon, the device will use the beacon’s
location and will not rely on GPS thus reducing the chance
of GPS drift which can trigger alerts.
As with all GPS products, they must be charged to work
properly. MobilMAX is not responsible if device is not
Page 43

43
charged.
 Loading...