

Mobility Designed MD10013 M+D Crutch, MD10015 M+D Crutch, MD10016 M+D Crutch, MD10018 M+D Crutch, MD10017 M+DCrutch User Manual
...Page 1
1
Instructions For Use
TM
L10003 Rev 2 (9/29/17)
Page 2

2
Thank you for your purchase of the M+D Crutch™!
At Mobility Designed, we believe mobility should
be as painless as possible. The M+D Crutch™ was
born out of personal inspiration to make life better
for someone we love. It is our sincere hope that
the M+D Crutch™ will assist you with your mobility
in ways that you never thought possible.
Please read this booklet in its entirety; this crutch
is unlike anything you have used before and we
want to make sure you are familiar with all of the
features and proper use before using it. If you
have any questions about your ability to use this
mobility device, please consult your physician.
We are excited to have you on this journey with us
as we step into the future of mobility!
Sincerely,
M+D Team
Page 3

3
Setup:
4. Height and weight range
5. Intended Use
6. Product Structures and features
7. Inserting foot
8. Inserting leg/height adjustment
9. Tightening leg tension adjustment screw
10-12. Adjusting handle for arm length
13-17. Adjusting arm bands
General use:
18-19. How to use the M+D Crutches- ABC’s of M+D
20. Locking and unlocking the cradle
21. Using unlocked cradle
22. Rotating handle
23. Caution when using unlocked cradle
Help, Contact Info, FAQ
24. Warranty
25. FAQ
26. Replacement parts/Maintenance and Cleaning
27. Contact Info
Contact info, FAQ, & tutorial videos found at:
www.mobilitydesigned.com
INDEX
Page 4

4
M+D Crutches Models
MD10013 M+D Crutch Pair - White
MD10014 M+D Crutch Pair - Black
MD10015 M+D Crutch Left - White
MD10016 M+D Crutch Right - White
MD10017 M+D Crutch Left - Black
MD10018 M+D Crutch Right -Black
MD10008 SKU Package, Replacement Feet
MD10009 SKU Package, Replacement Cradle Pad
Height and weight range
This device is suitable for users
4 ft 11 inches to 6 ft 8 inches in height
(1.5 m to 2.03 m)
Maximum weight:
300 lb
136 kgs
Page 5

5
Intended Use
English- Intended Use
The M+D Crutch™ is to be used as a walking aid for
patients who are non-weight bearing on a single lower
extremity, or for users who require additional support
when walking.
Nederlands- Beoogd gebruik
De M+D Crutch™ wordt gebruikt als loophulpmiddel
voor patiënten die niet-gewichtsbelasting op één van
de onderste ledematen, of voor gebruikers die behoefte hebben aan extra ondersteuning bijhet lopen.
Français - Utilisation prévue
La M+D Crutch™ doit être utilisée comme aide à la
marche pour les patients qui ne portent pas de poids sur
une seule extrémité inférieure ou pour les utilisateurs qui
ont besoin de soutien supplémentaire lors de la marche.
Español- Uso previsto
La muleta M+D Crutch™ debe utilizarse como ayuda
para caminar en pacientes que no soportan peso en
una sola extremidad inferior, o para usuarios que requieren apoyo adicional al caminar.
Page 6
6
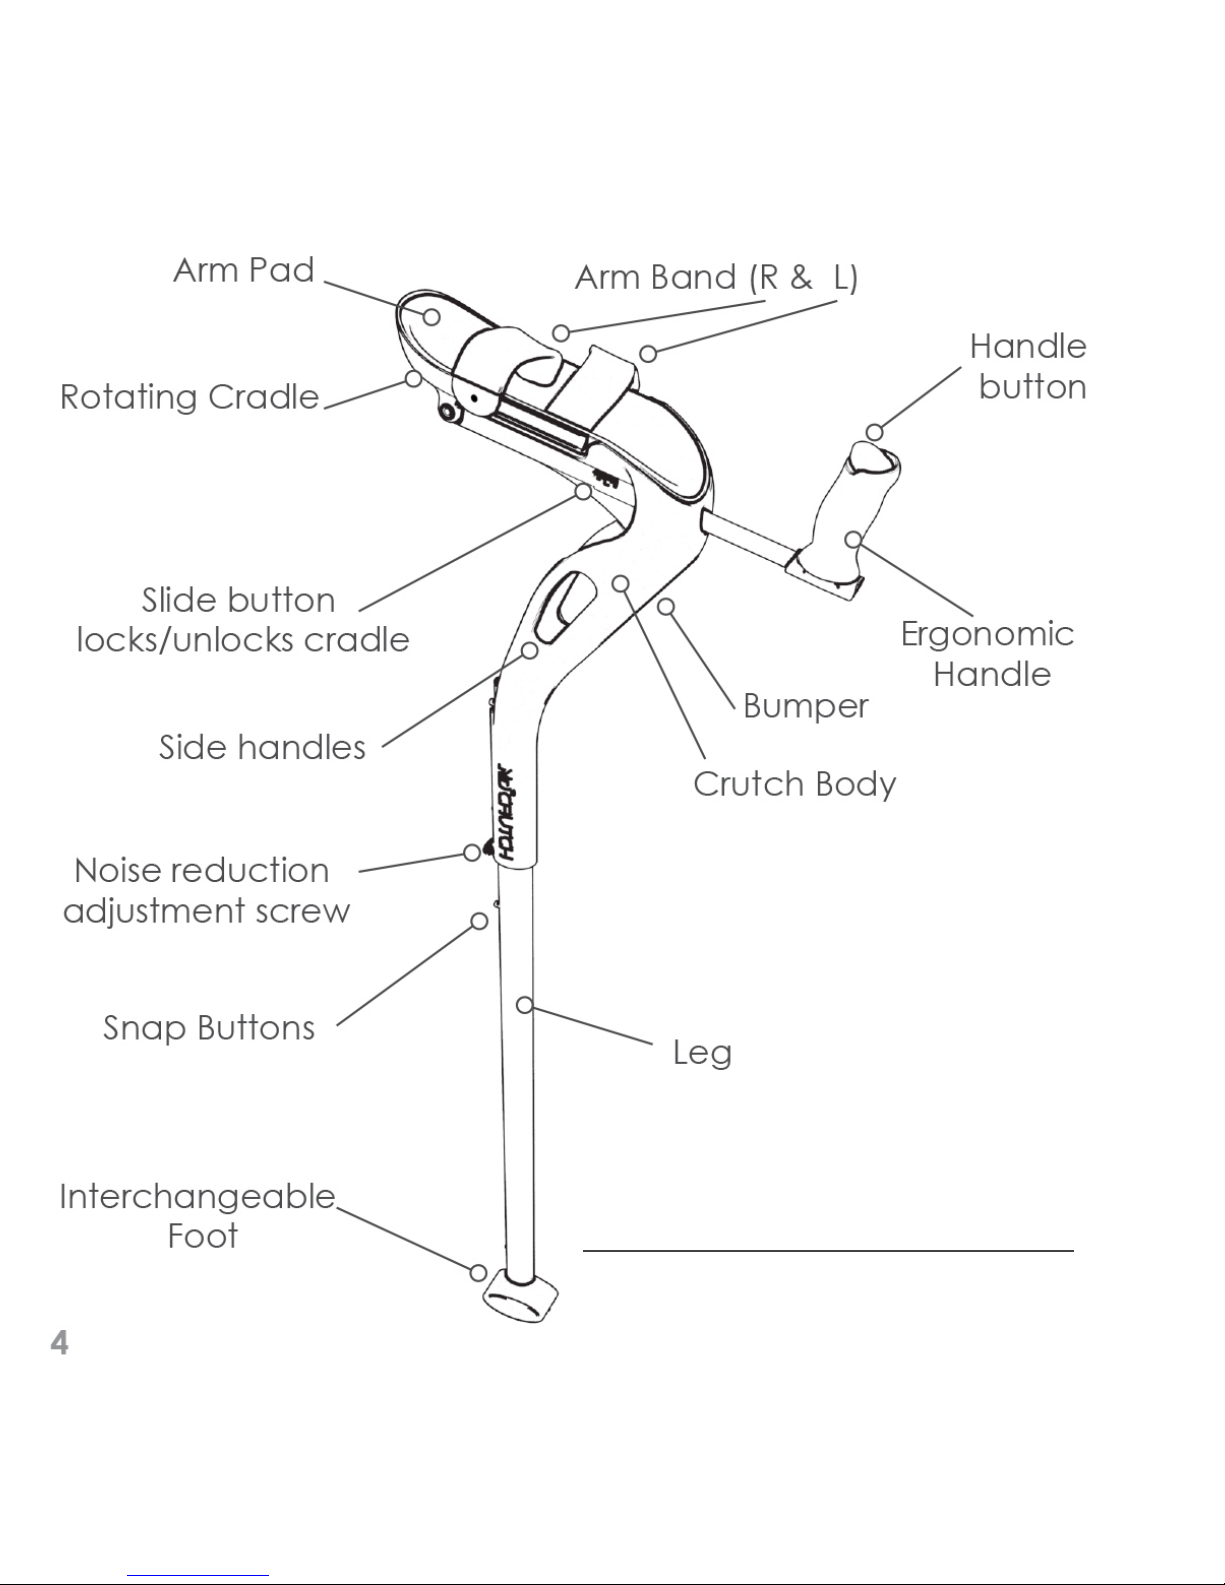
Structures and Features
Page 7
7
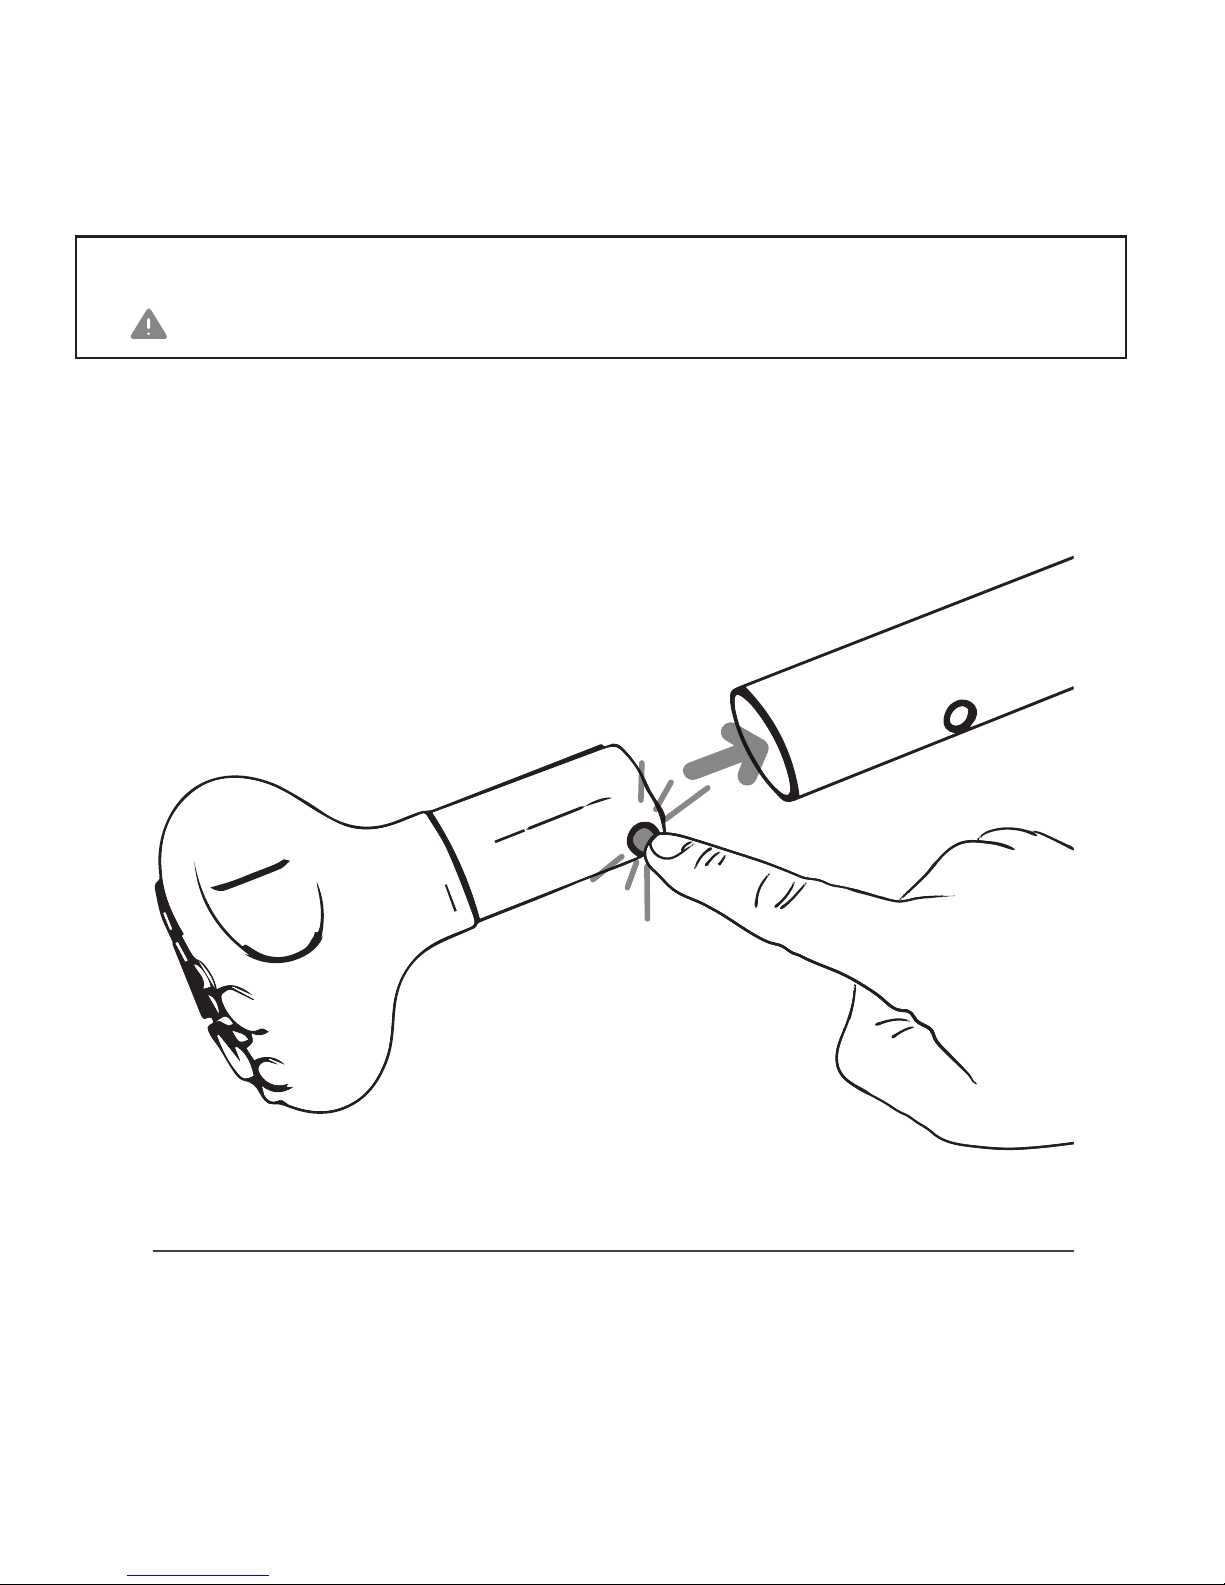
Inserting foot: Depress snap button, insert foot-
stem into leg tube aligning with hole in leg.
*Tip: feet are designed for easy
removal and are snug to reduce
noise. If you nd removing foot is
tight, push snap button and apply
pressure on the top of the foot to
hold in place while pulling on leg
tube until released.
*Tip- Recommendations from the manufacturer.
Caution- User should take particular care to review.
Page 8
8
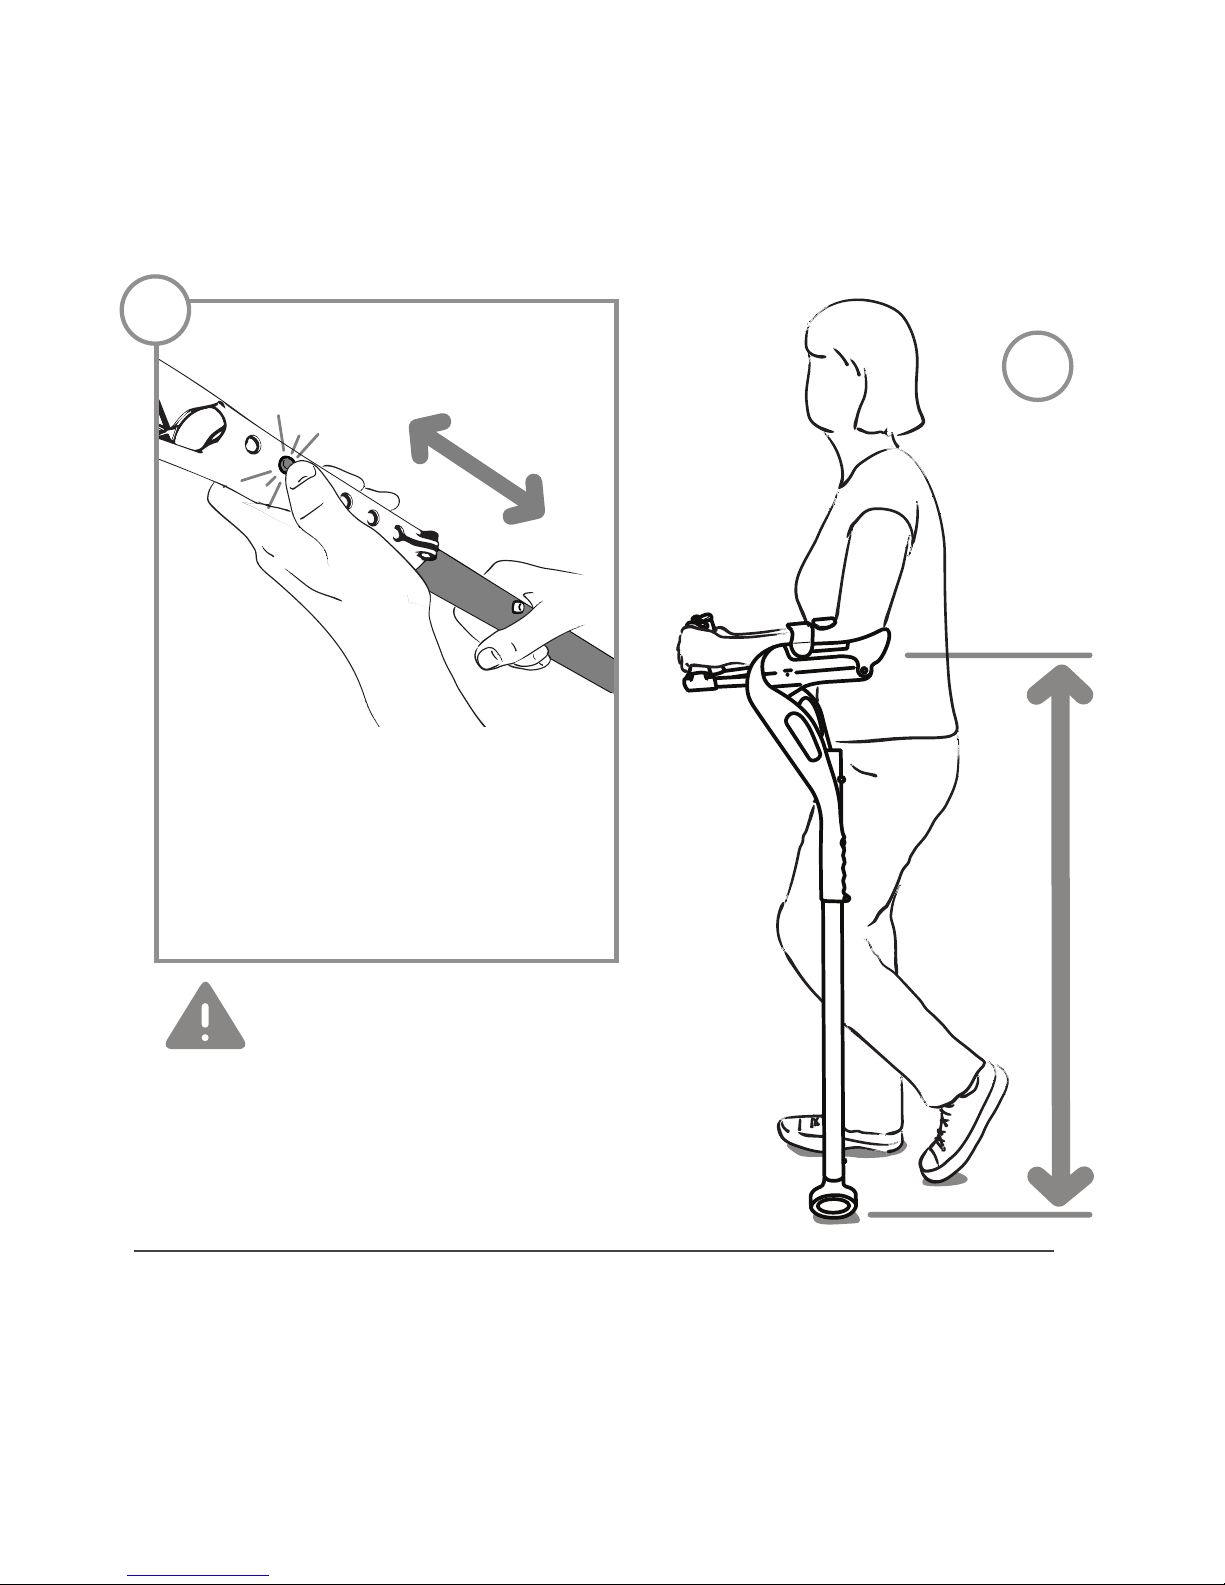
2. Height adjustment: Standing upright, elbow
should be rmly supported without lifting shoulders.
2
1
Audible “click”
to secure leg.
*Caution: If snap-button
pushes too far inside leg: stop use
of crutch, use at-head screwdriver to pop back out.
If unsuccessful call us for support.
1. Insert leg:
Depress snap-button in
leg to insert leg tube into
body of M+D Crutch™.
height.
Page 9
9
L
o
o
s
e
n
T
i
g
h
t
e
n
3
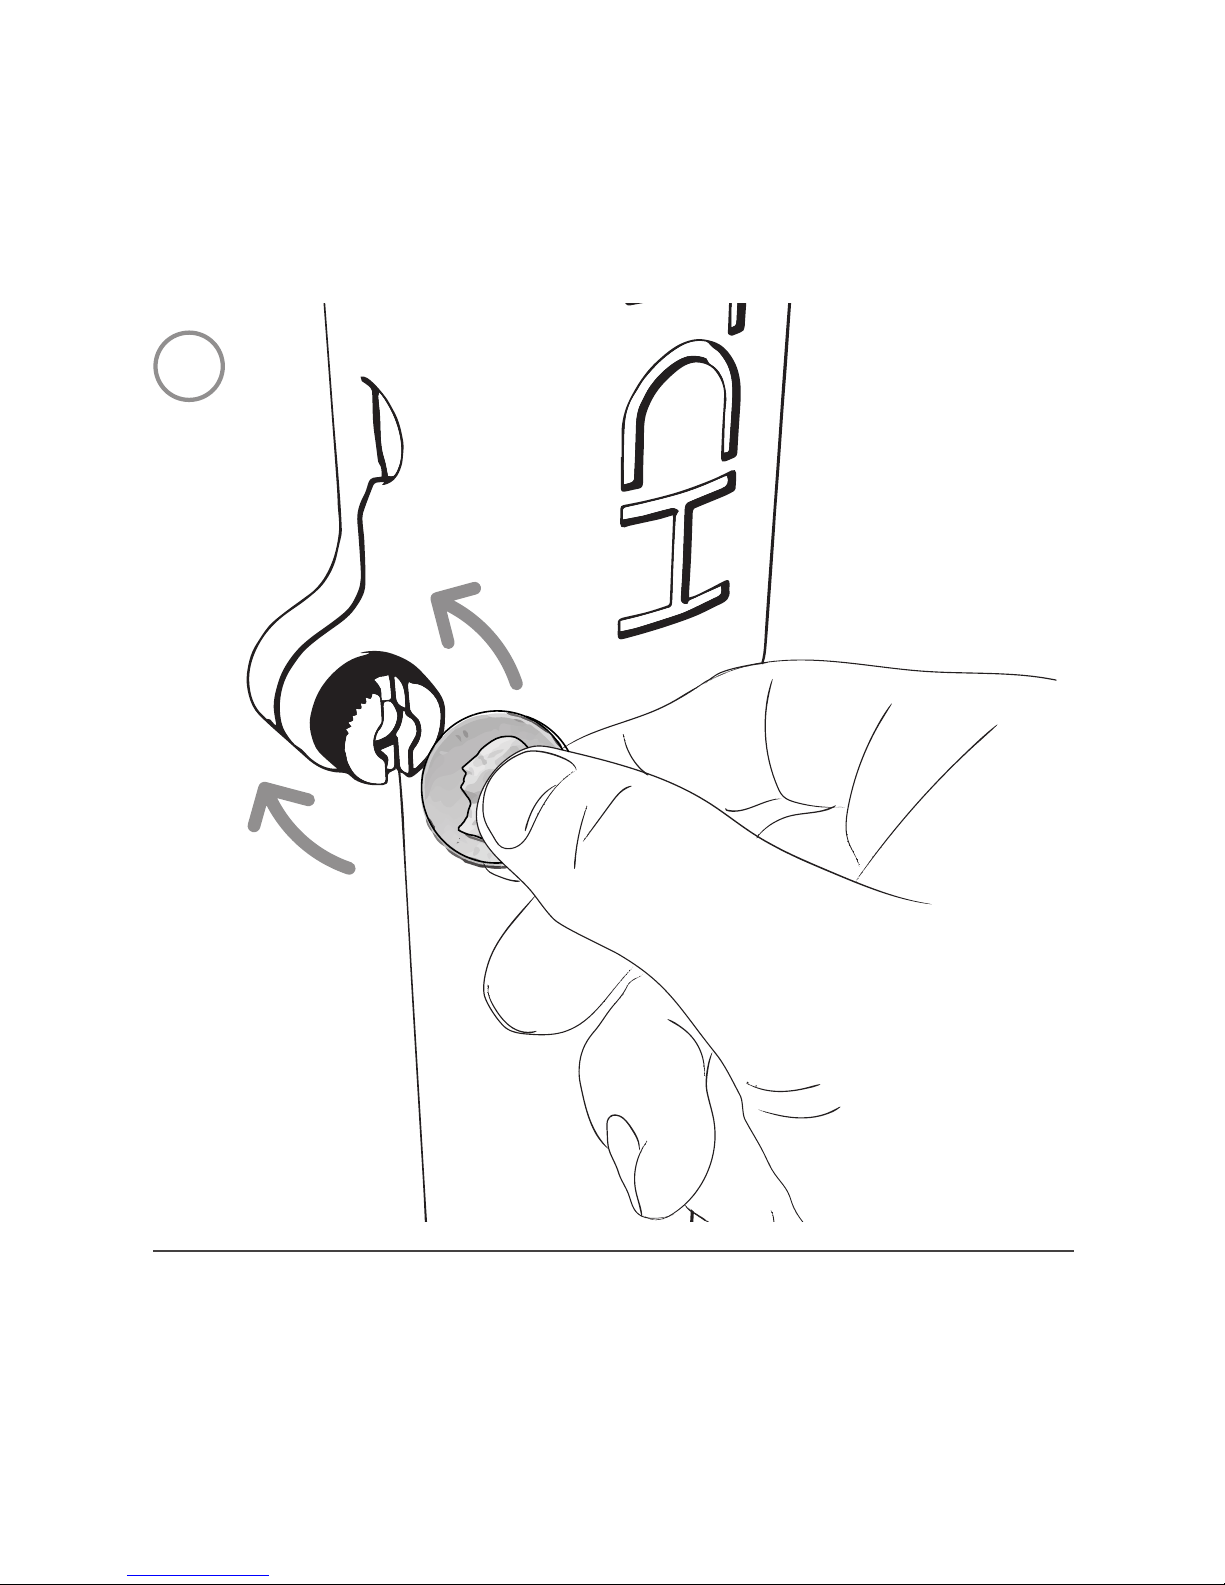
3. Finger tighten noise reduction screw until nger tight.
Snug up with screwdriver or coin to eliminate leg rattle.
Page 10
10
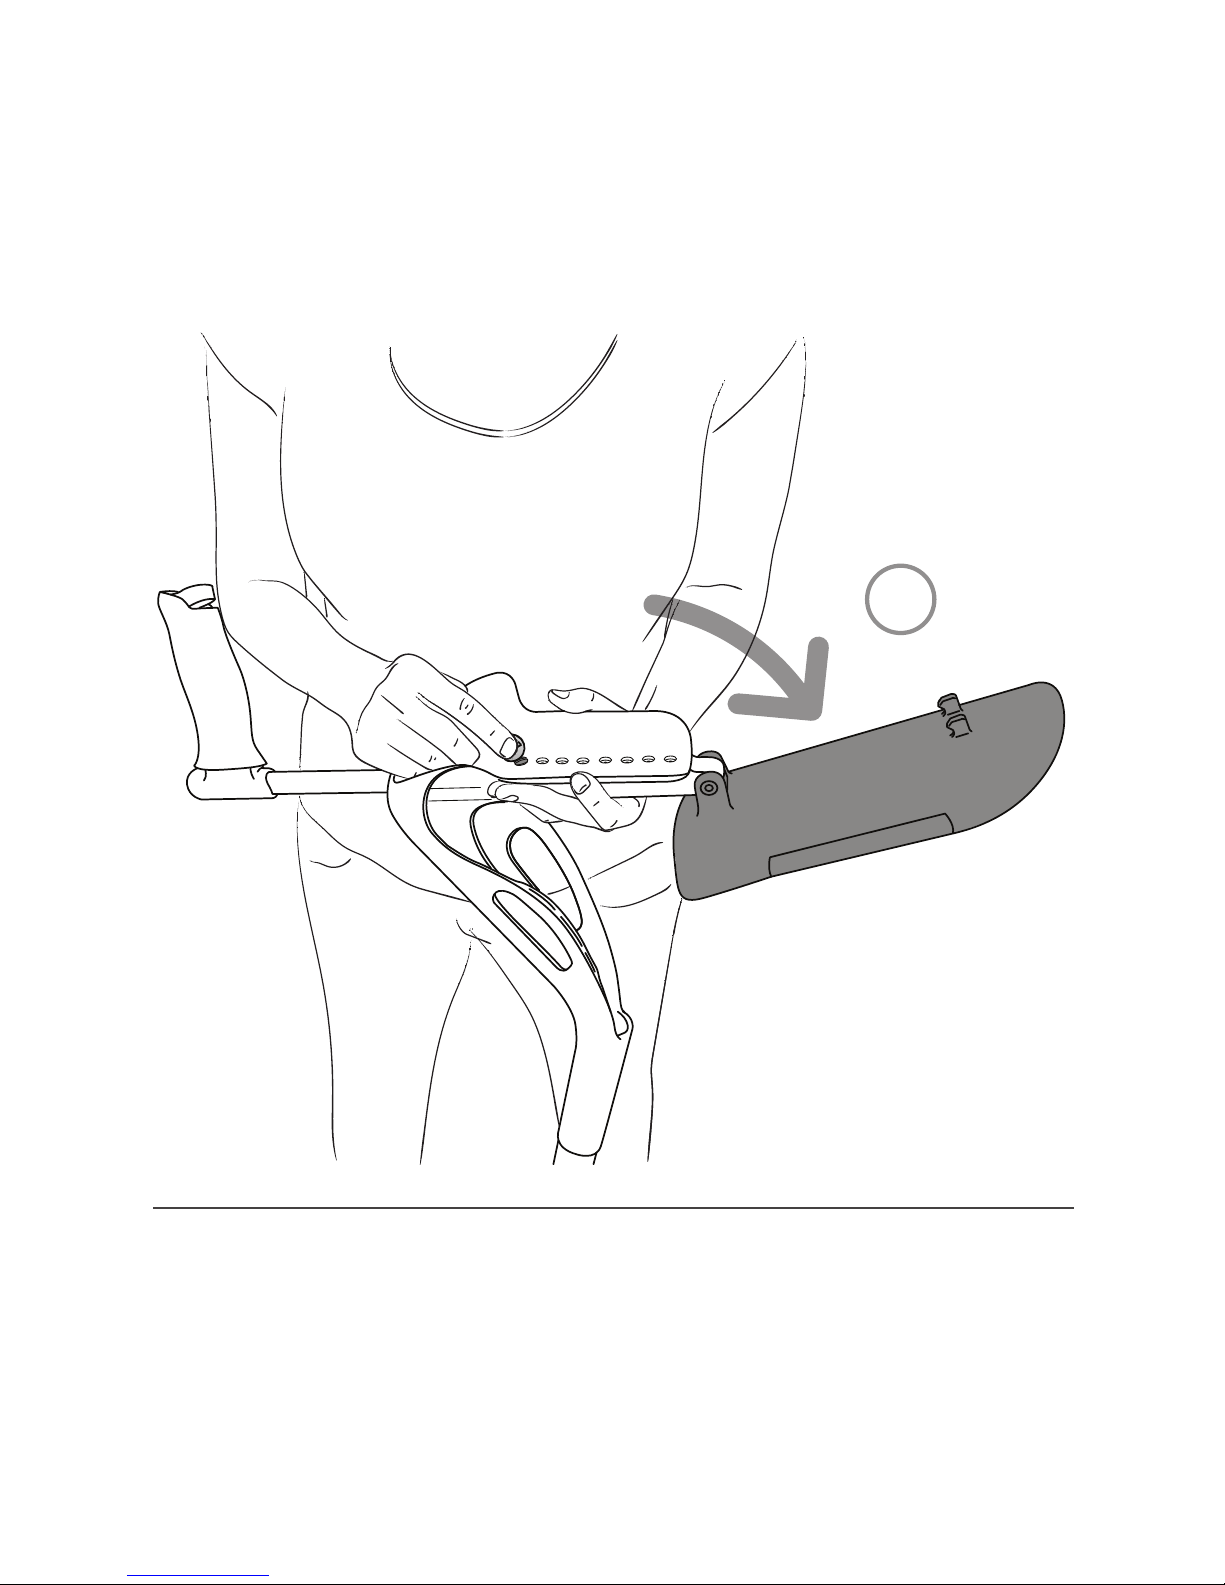
Adjusting handle length (step 1 of 4):
Press slide button to unlock the cradle. Raise cradle up
and out of the way.
1
Page 11
11
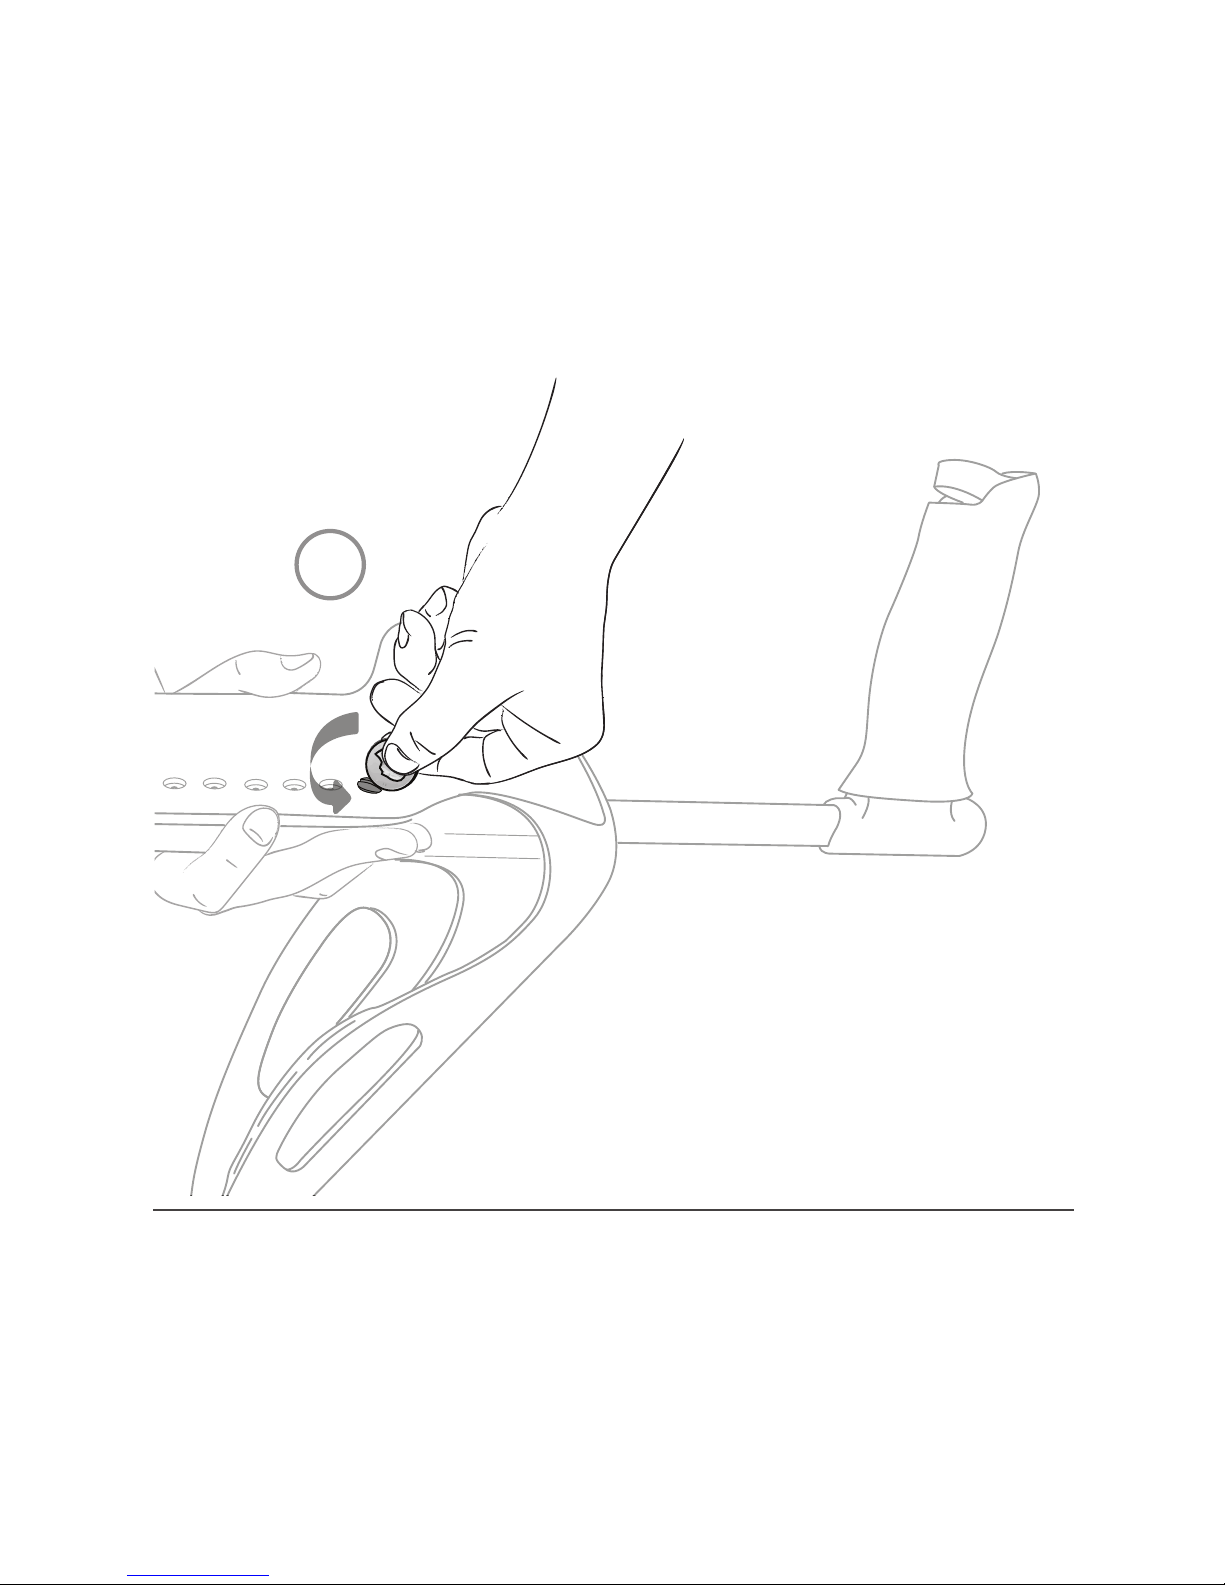
Adjusting handle length (step 2 of 4):
Use coin or screwdriver to loosen screw.
2
Tip: For best t, elbow should be snug at back of cradle
with no pressure on palm of hand while gripping handle.
*Reference chart on packaging for easy sizing
Page 12
12
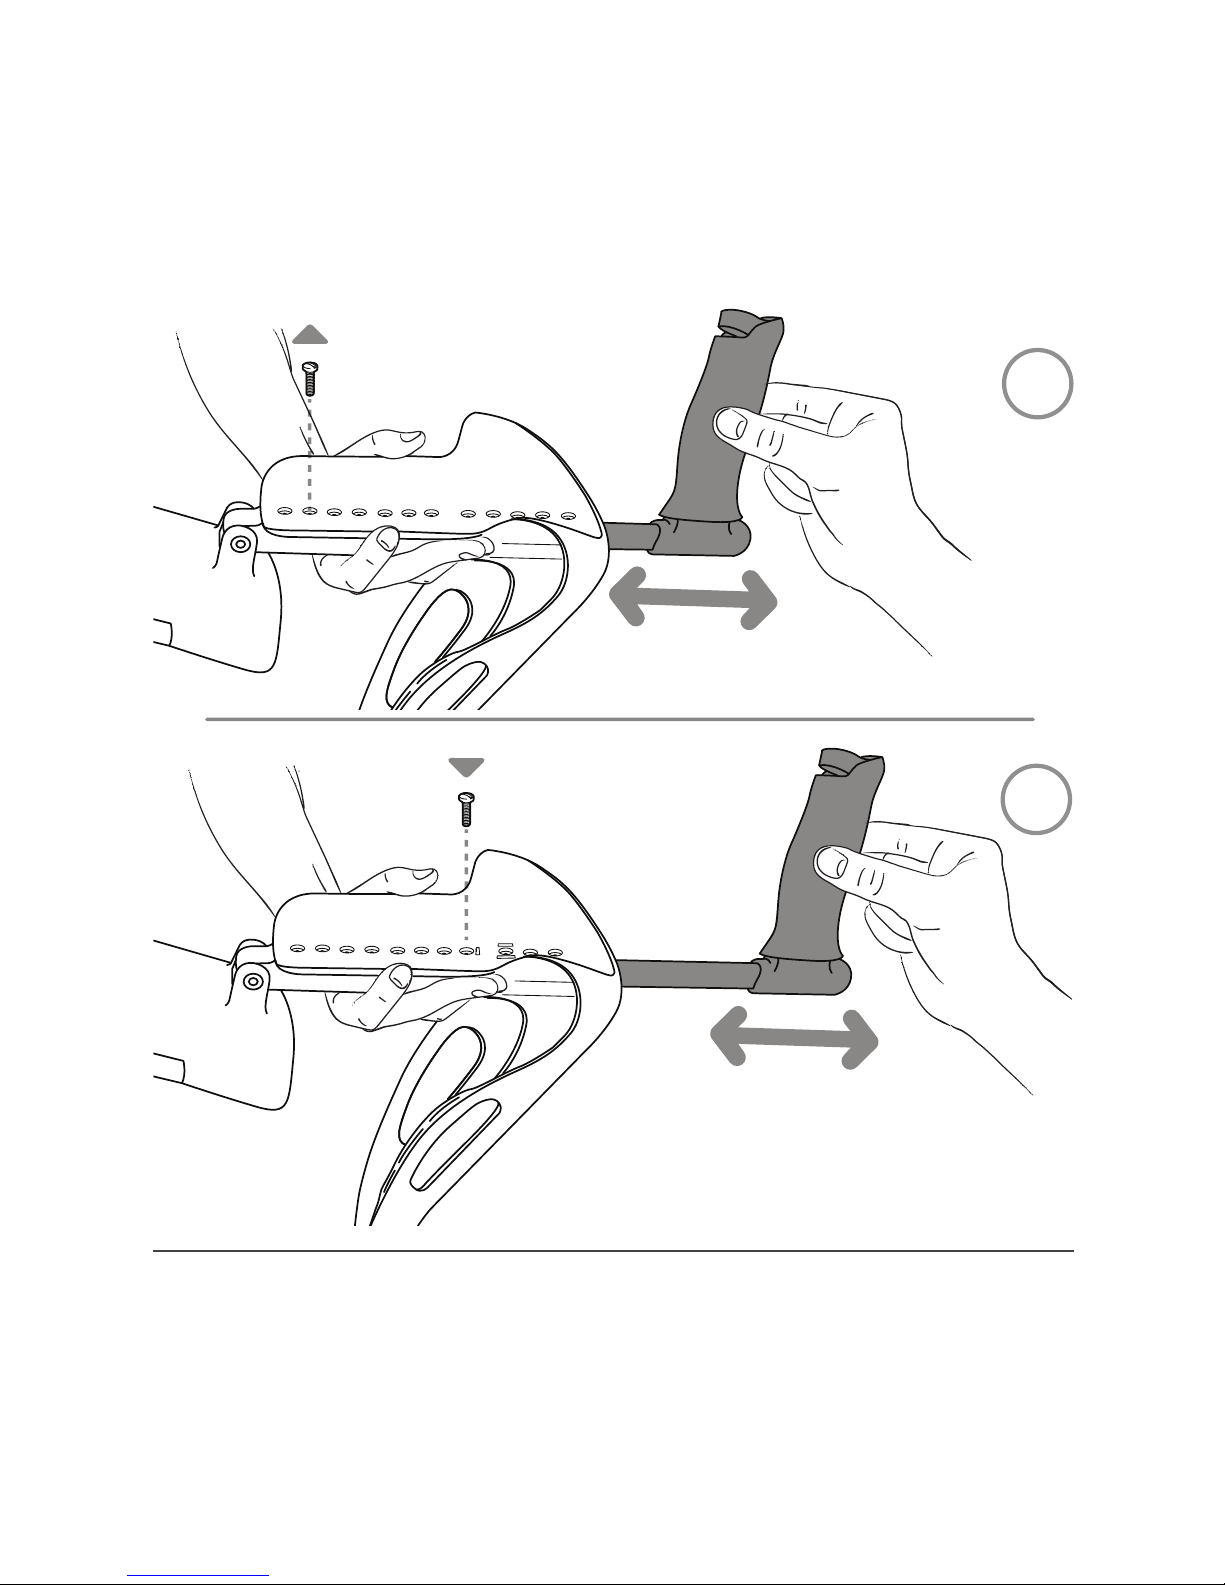
Adjusting handle length (step 3 & 4 of 4):
Step 3 : Remove screw and adjust handle length.
Step 4: Insert screw in handle tube, and tighten.
3
4
Tip: For securing screw, Either hole in handle tube is usable.
Thread and tighten securely with tool or coin.
Page 13
13
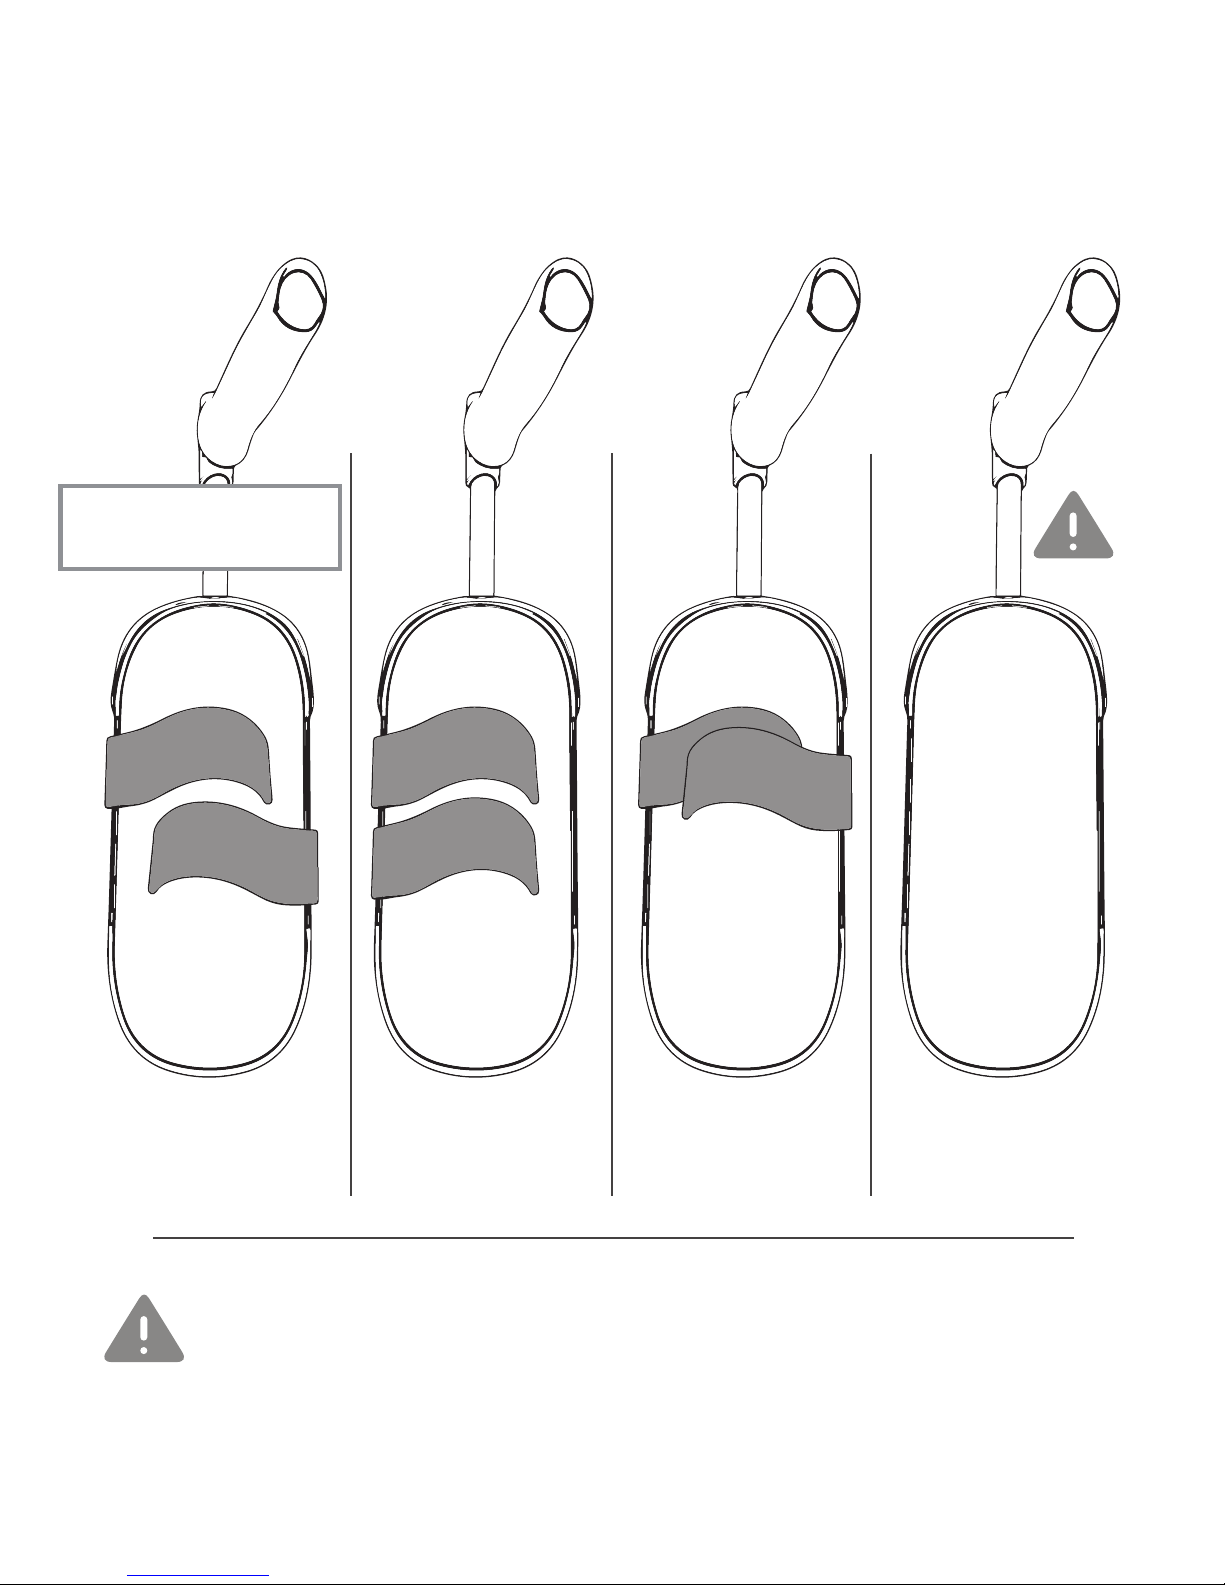
Arm Band Placement options
*Caution, do not use Hands Free without arm bands.
Only use this without armbands if fully comfortable
Gives good
balance of
hold & in/out
Lets user get
in from one
side
Overlapped
for more
hold
Default arm band
position
*No armbands
for easy in/out
on & off
Page 14
14
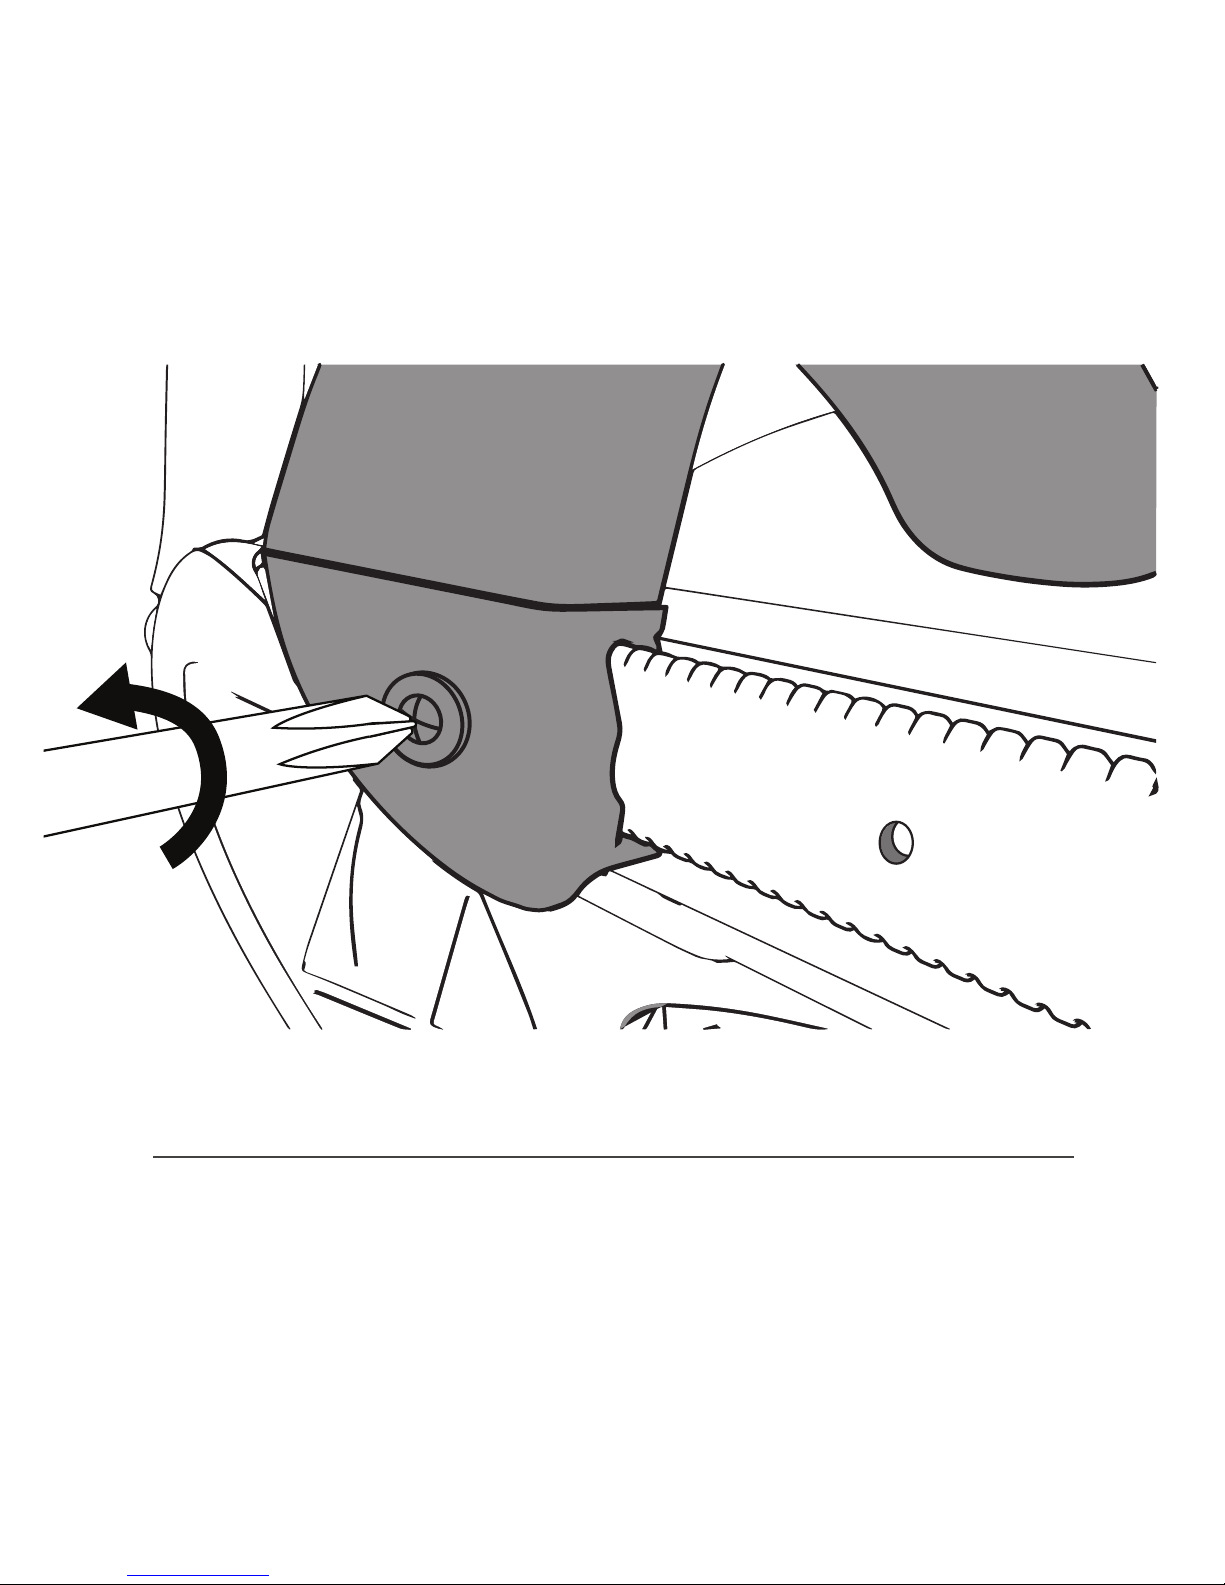
Step 1. To change the arm band placement remove
screw using a screwdriver.
Page 15
15
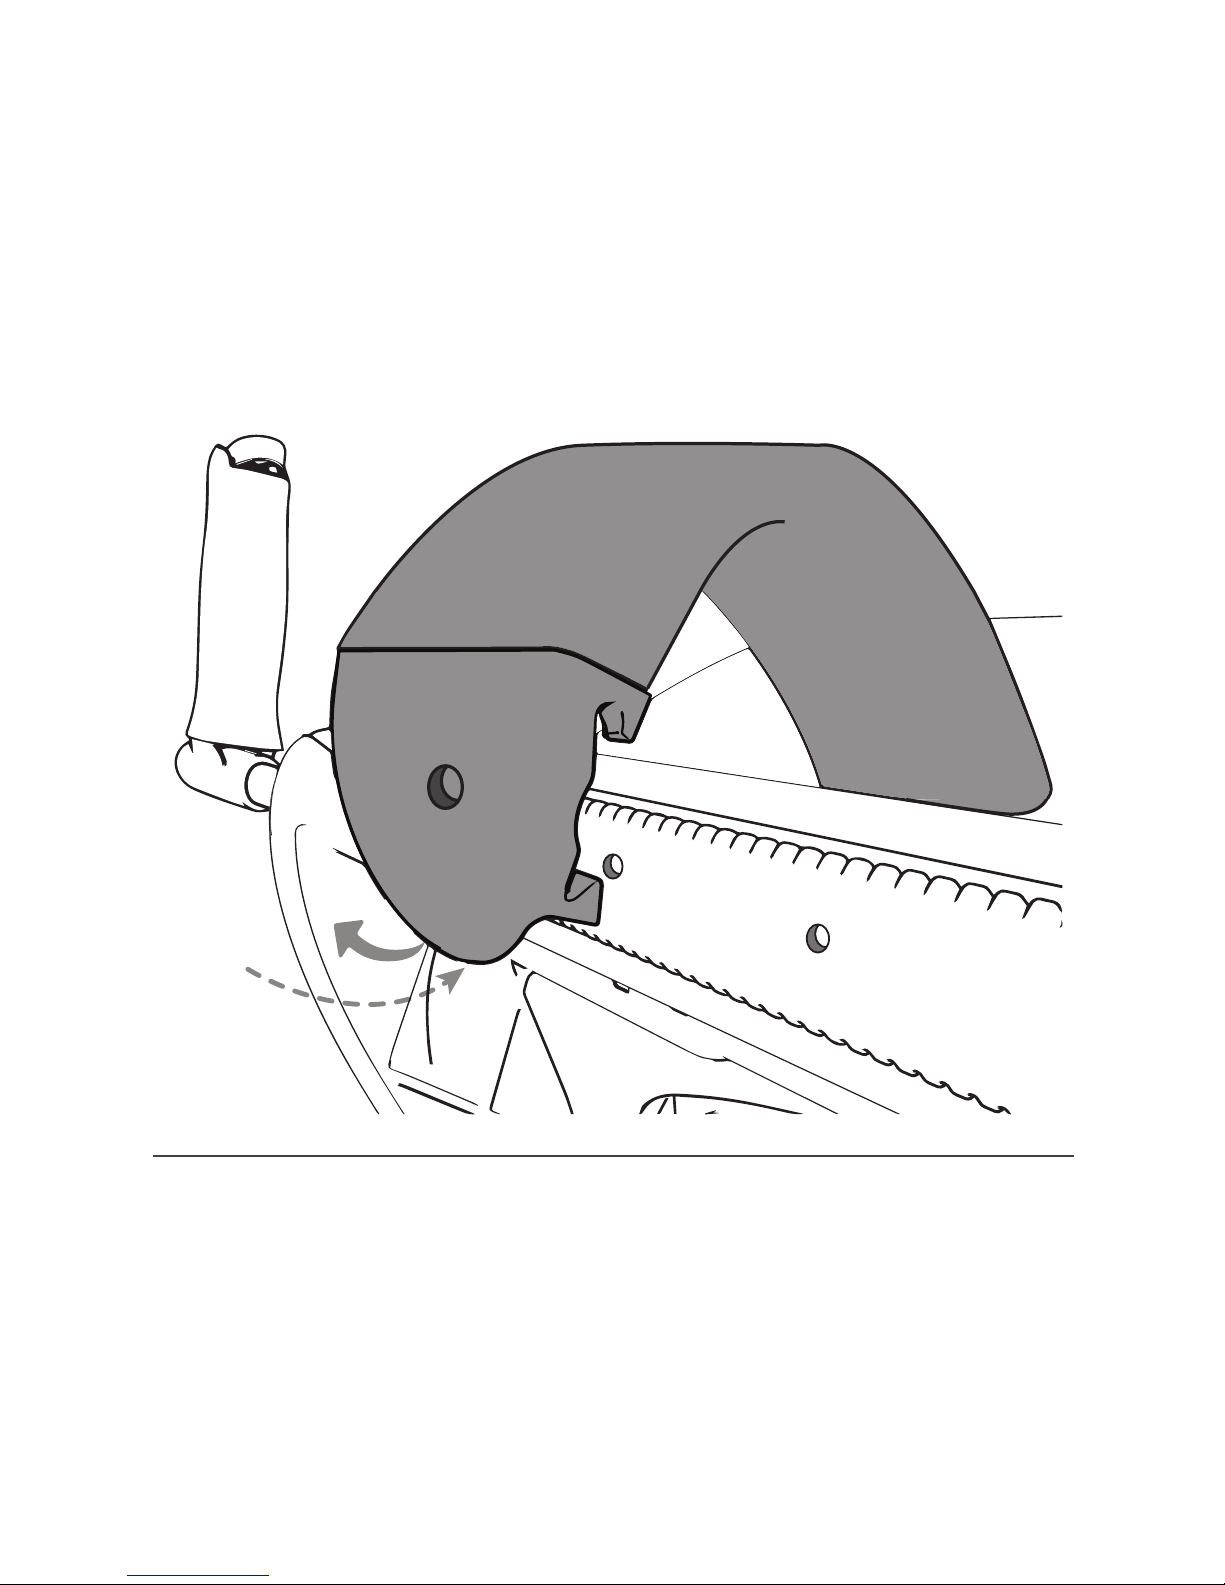
Pull here
to remove
from cradle
Step 2. Pull up on bottom hard plastic arm band clip
to pop off side rail.
Page 16
16
2
1
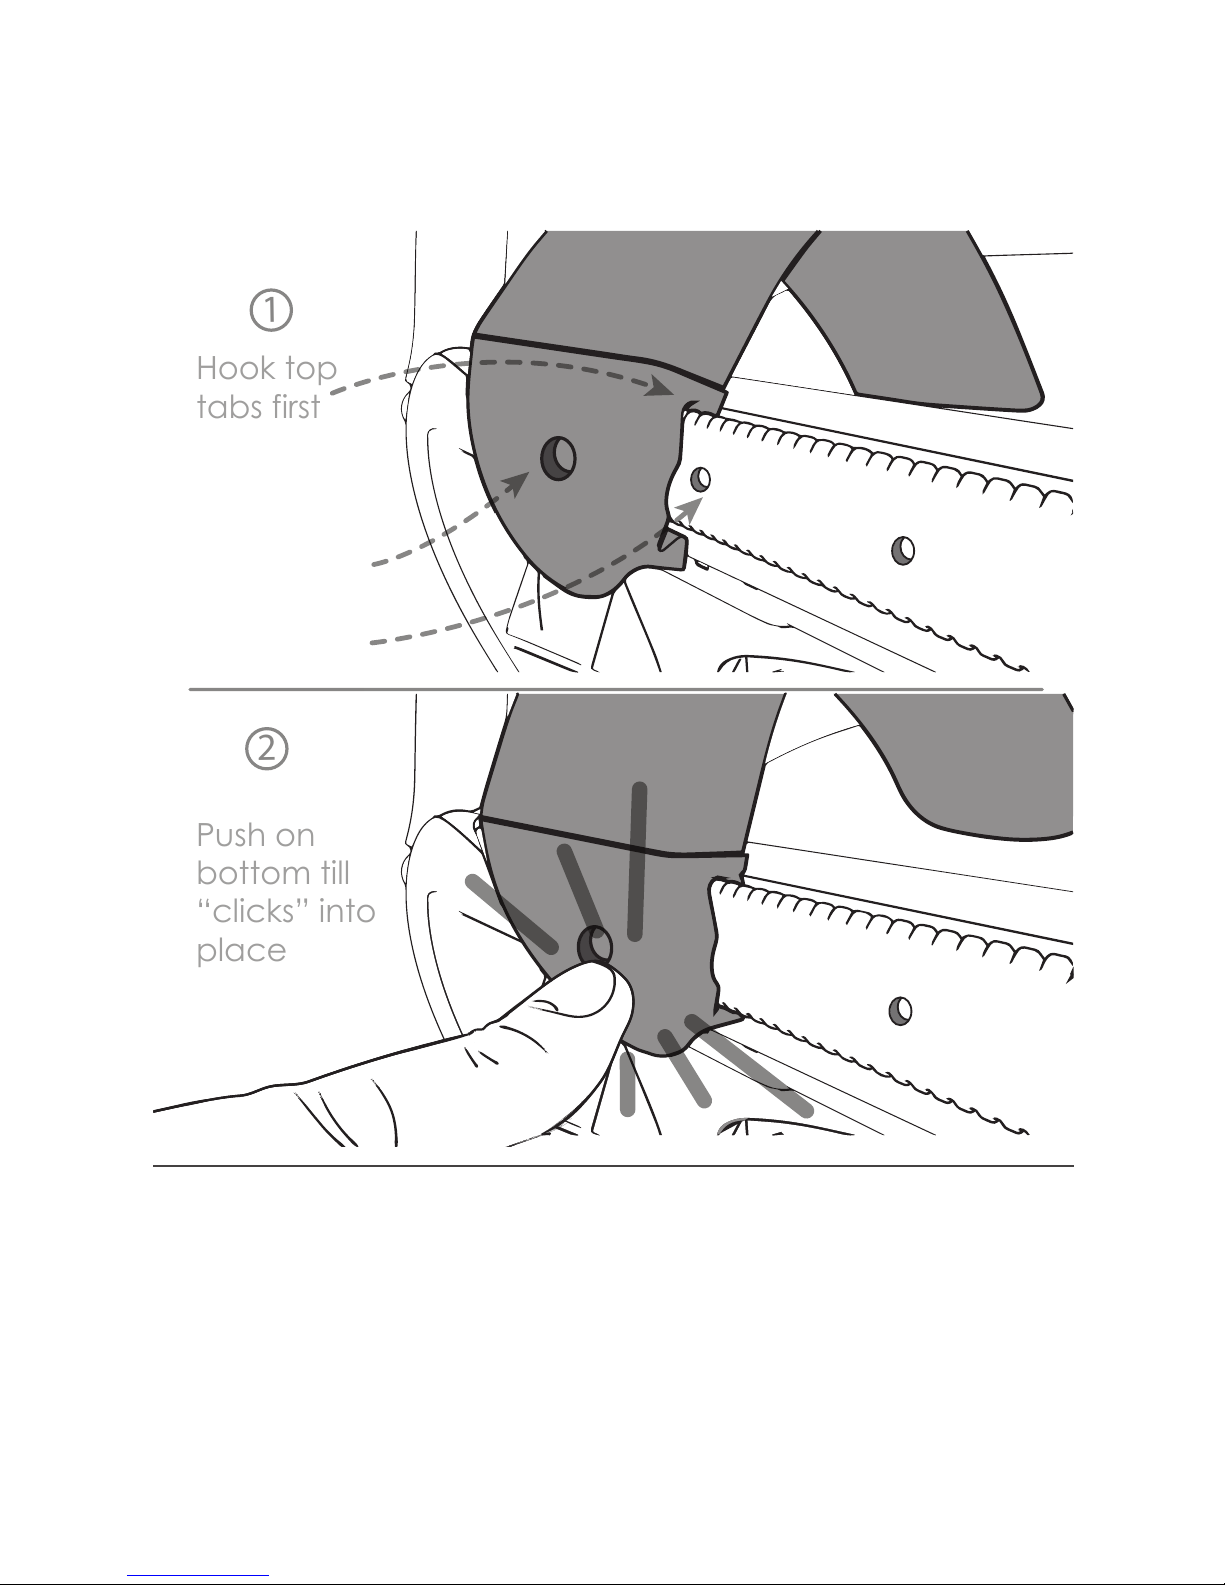
Hook top
tabs first
Push on
bottom till
“clicks” into
place
Align hole on
arm band clip
to hole
on cradle rail.
To place arm bands back on cradle align top of
arm band clip to lip of cradle rail. Press rmly to hook
top tabs to rail. Ensure top and bottom tabs of arm
band clip are on engaged to rail.
Page 17
17
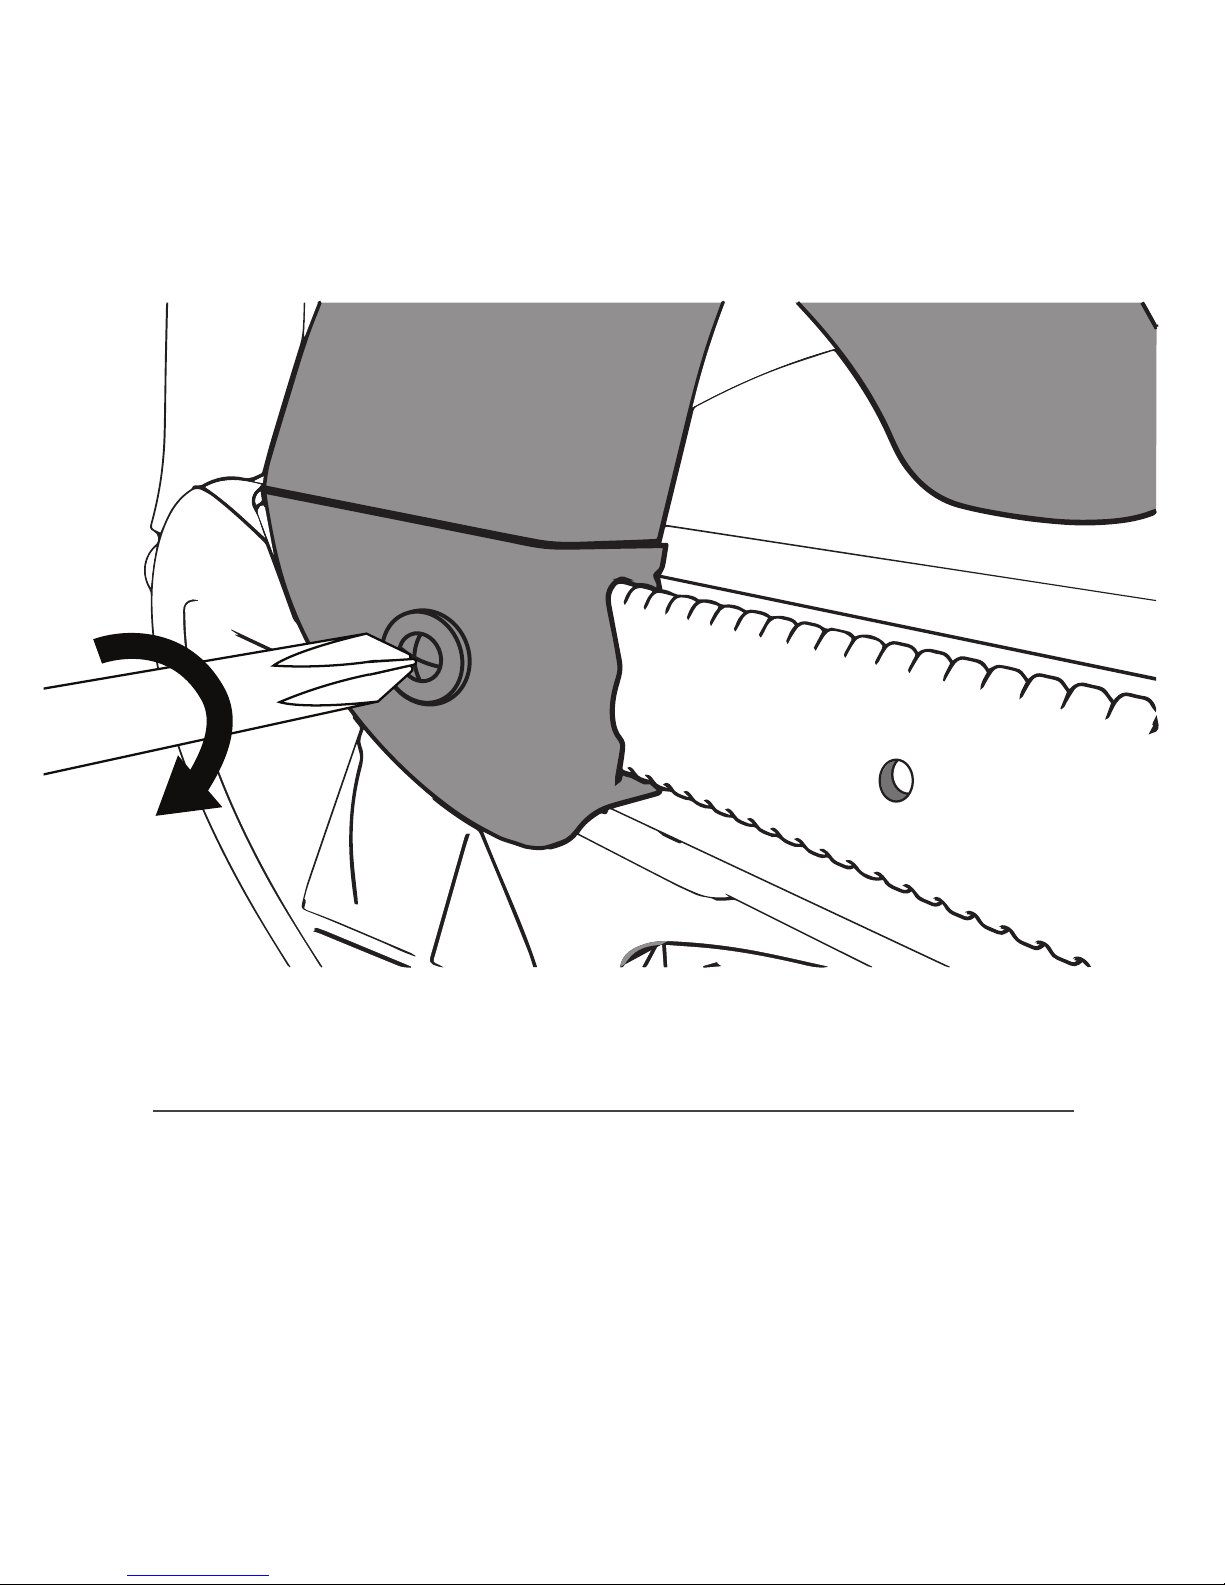
Make sure both top and bottom tabs of arm band
clip are securely snapped to rail, then place washer
and screw in arm band clip and tighten screw using
a screwdriver.
Page 18
18
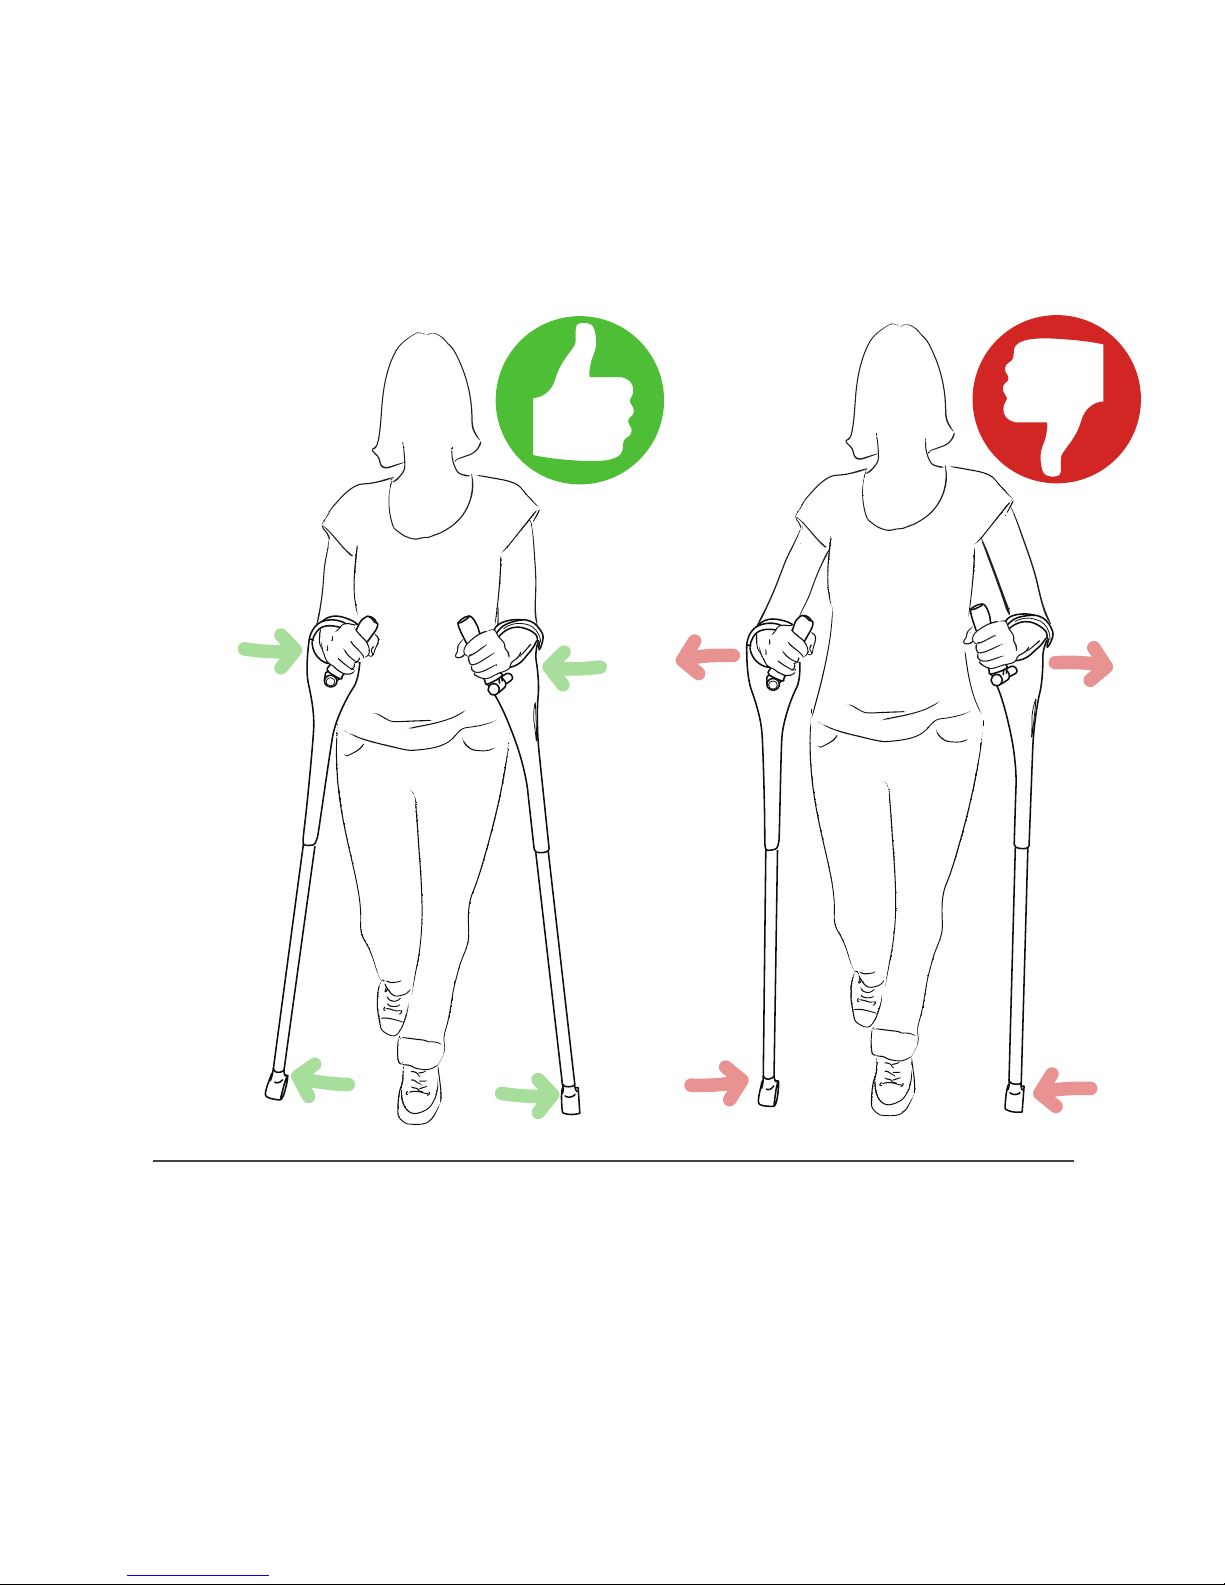
Make an A-FRAME with your crutches by keeping your
ELBOWS IN tight to your sides and placing your crutch
feet out to give your A-frame a WIDE BASE
Elbows
tight to
your
sides
Crutch feet
wider than
shoulder
width
A
(A-Frame)
The ABC’s of the M+D Crutch are the key to maintaining
good stability.
Page 19
19
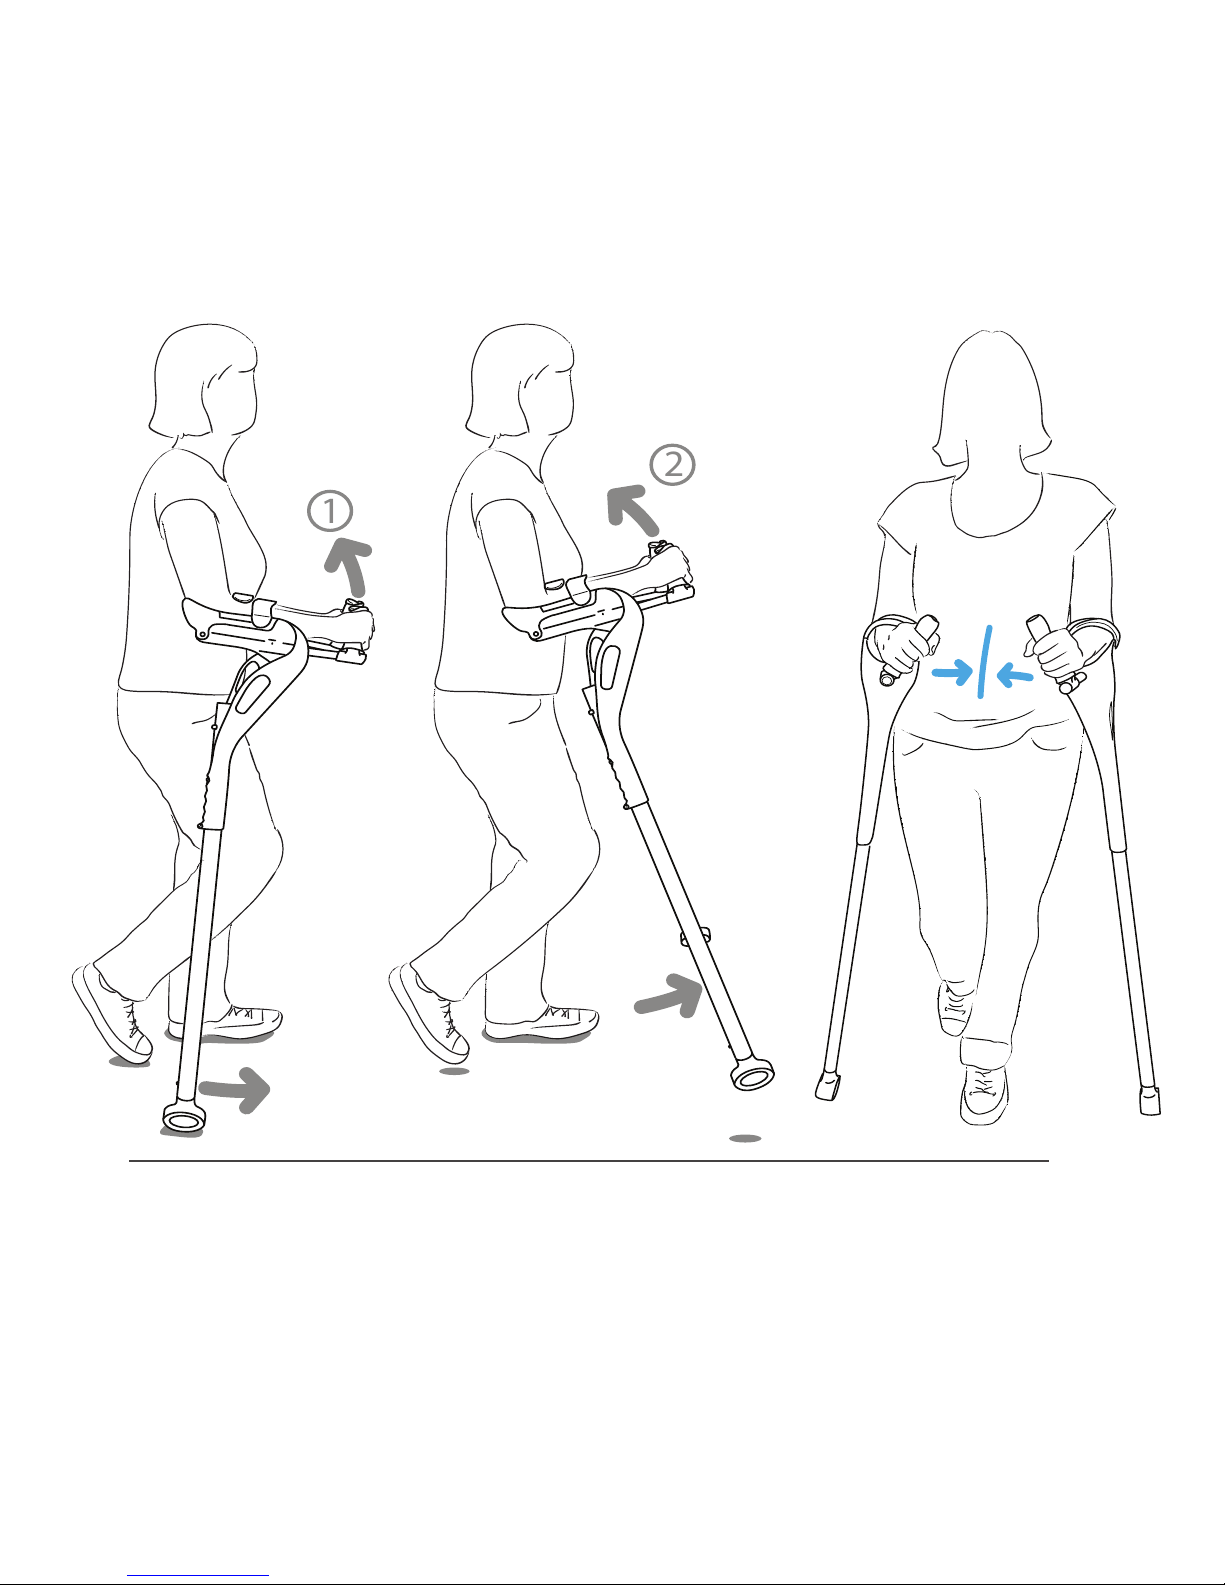
Keeping your elbows tight to your sides move crutch feet
forward doing a small BICEP CURL.
Keep your elbows in, CORE ENGAGED and back straight.
1
2
C (Core engaged)B (Bicep curl)
Page 20
20
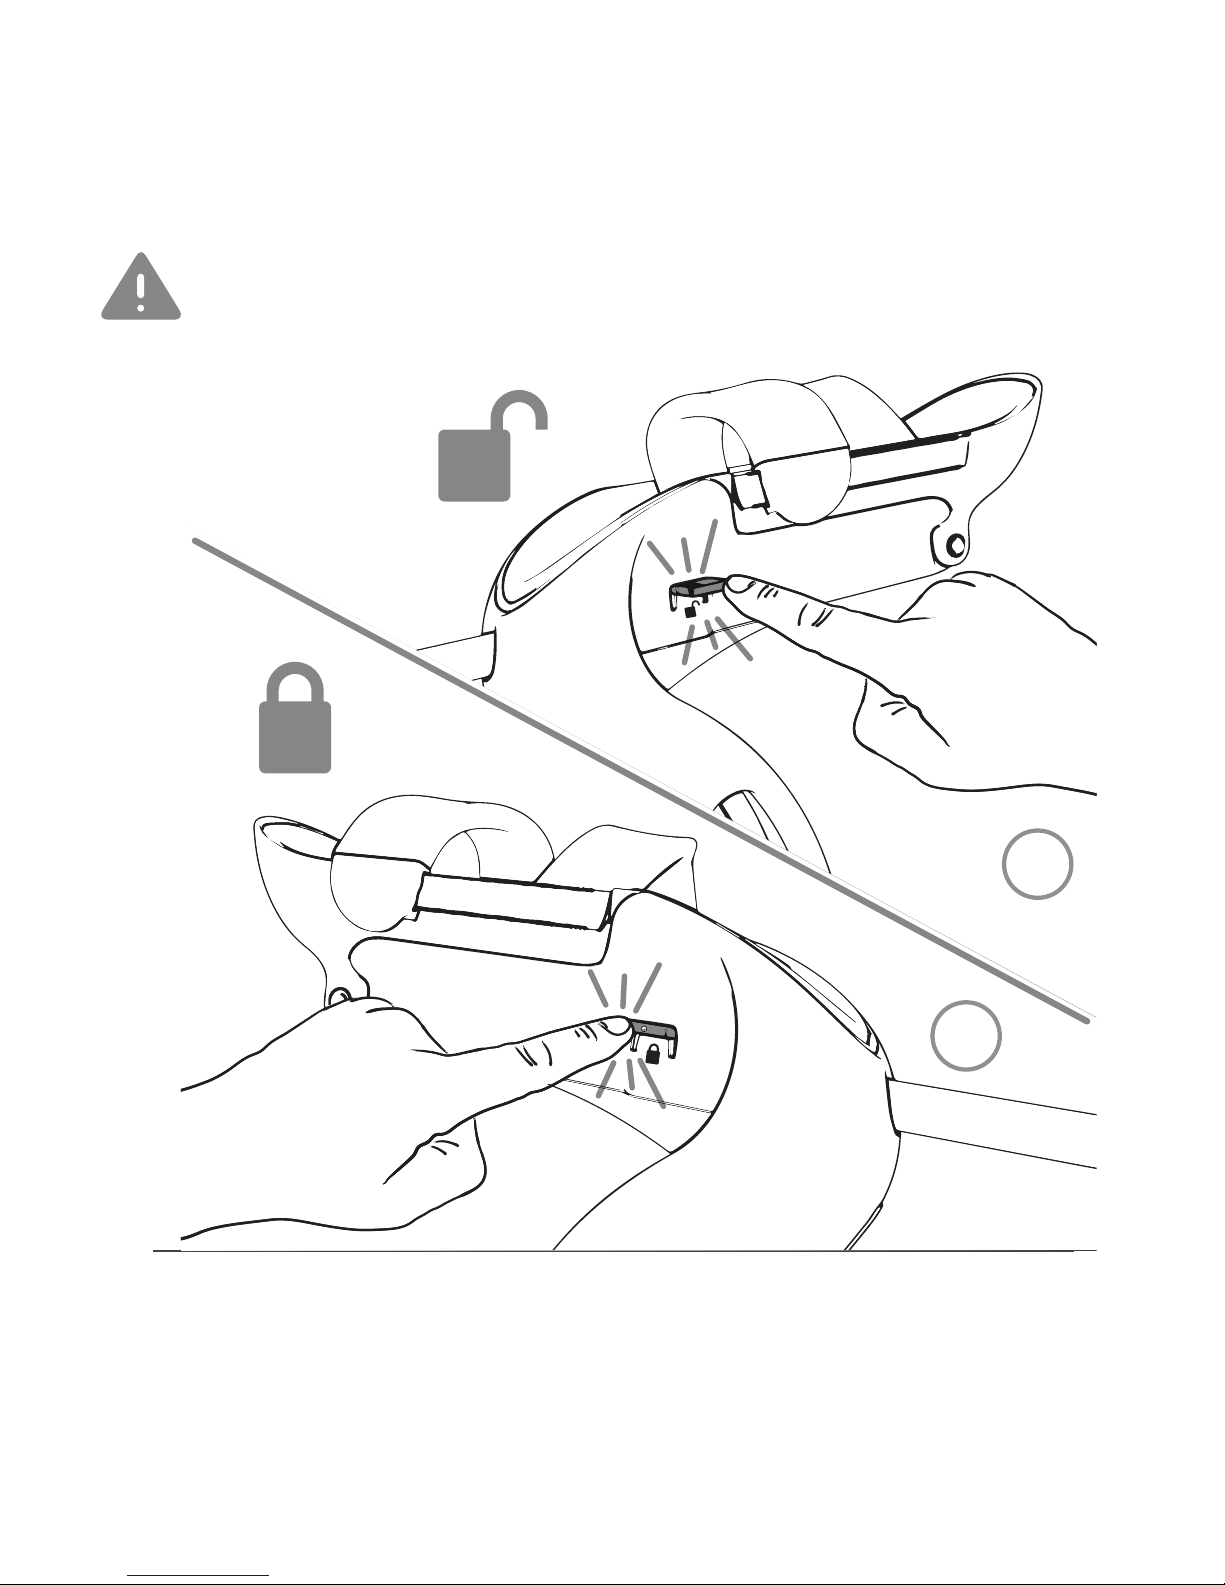
1. Unlocking cradle: push button ush to body.
2. Locking Cradle: push button (with braille dot) ush.
1
2
Tip: To
easily
feel which
side of
button is
used to
lock cradle, note
there is a
braille dot
on only the
locking side.
Caution: Unlocking cradle allows freedom of
motion. Become comfortable using crutch
before attempting
Page 21
21
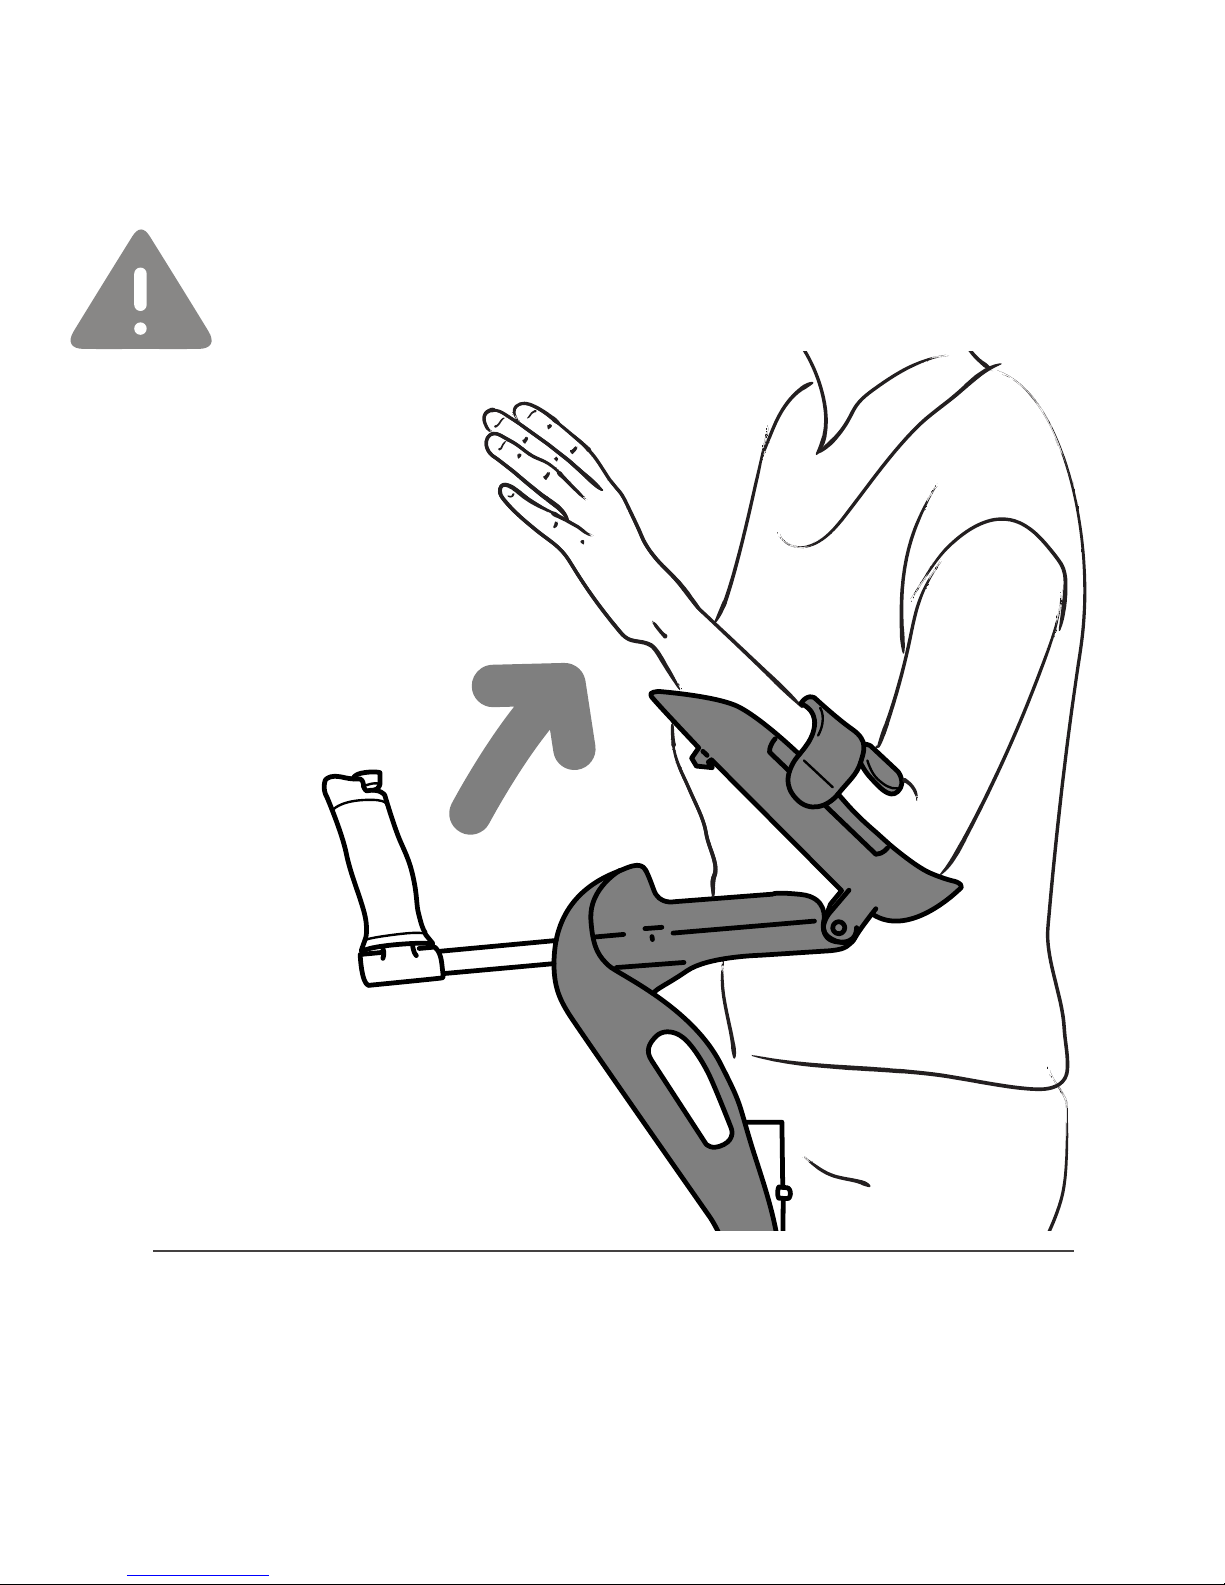
Using unlocked cradle: allows user to click in and out for
freedom of movement without taking crutches off.
*Caution: When
reaching up, user can
become unbalanced
if crutch leaves
ground. Crutch can
move in unexpected
ways, take caution,
it could inadvertently
hit something or trip
someone.
Page 22
22
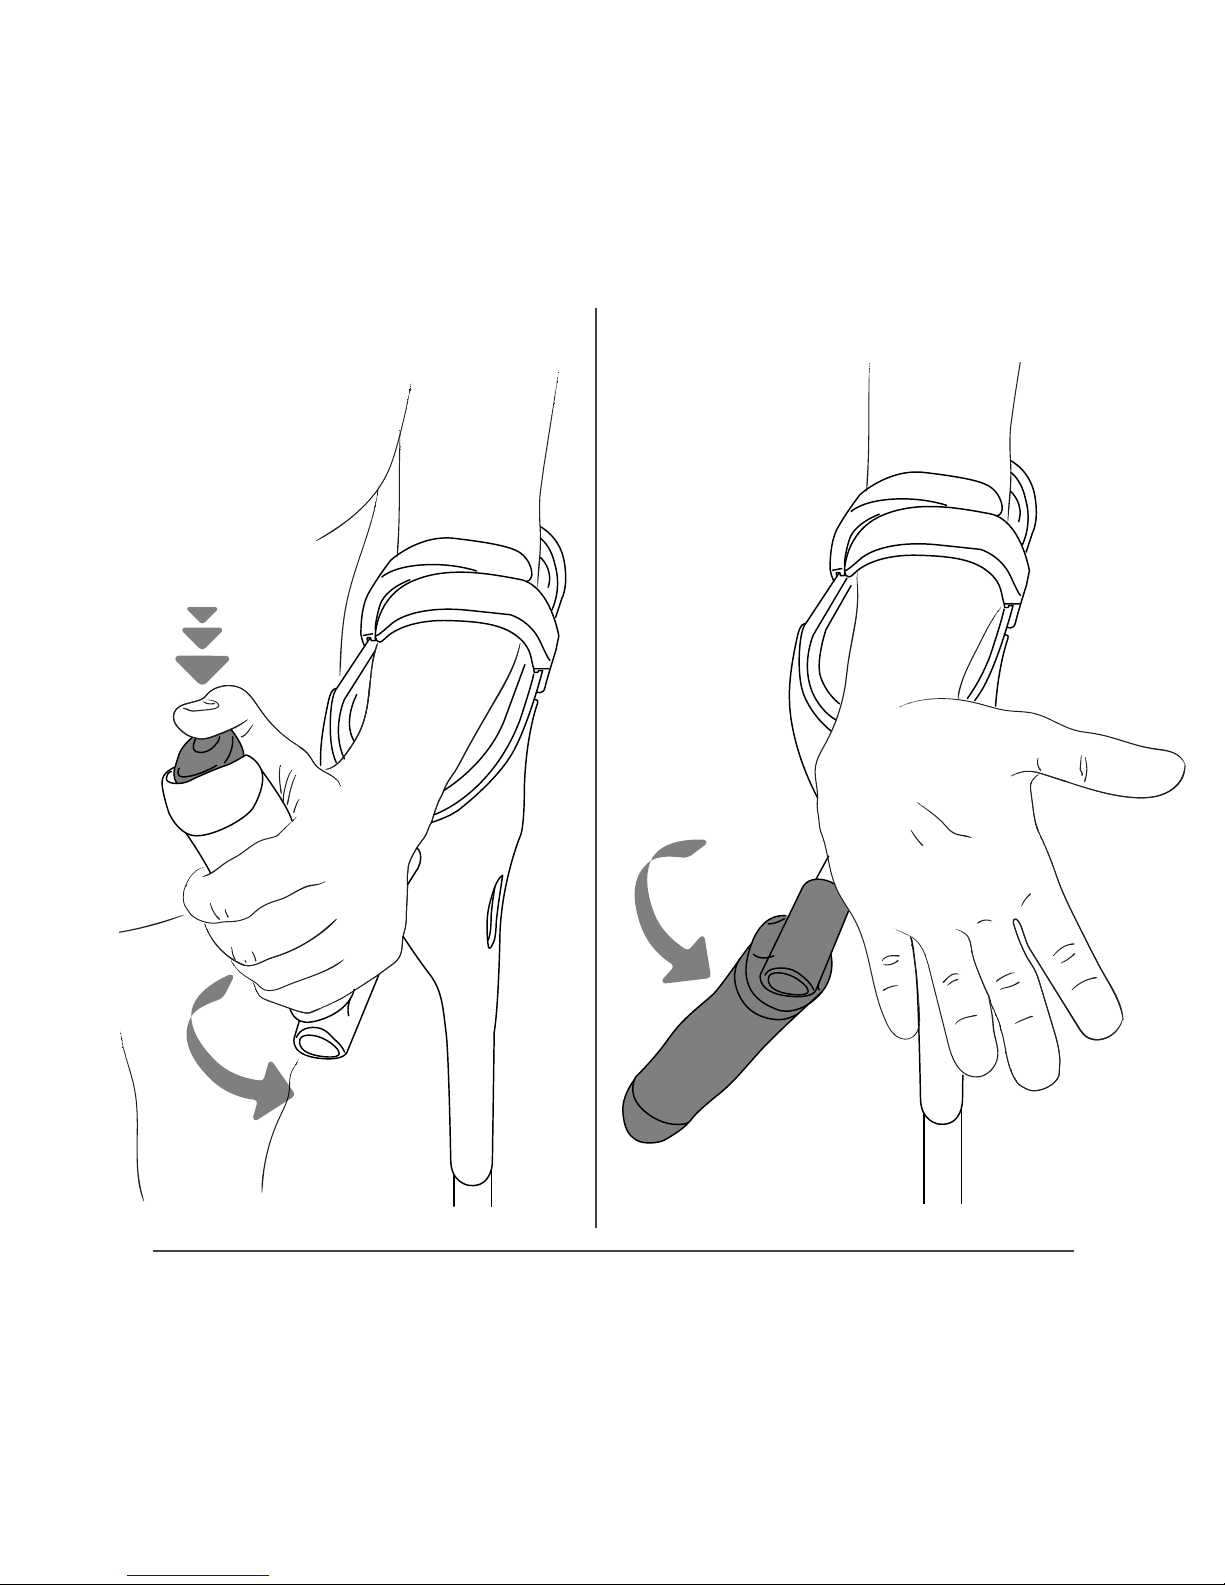
Rotating Handle: Push button and rotate handle
out of the way.
Tip: Handles are
hand specic
and angle inward
toward body.
Only the right
handle button is
blue and has a
braille dot on
the button
Page 23
23
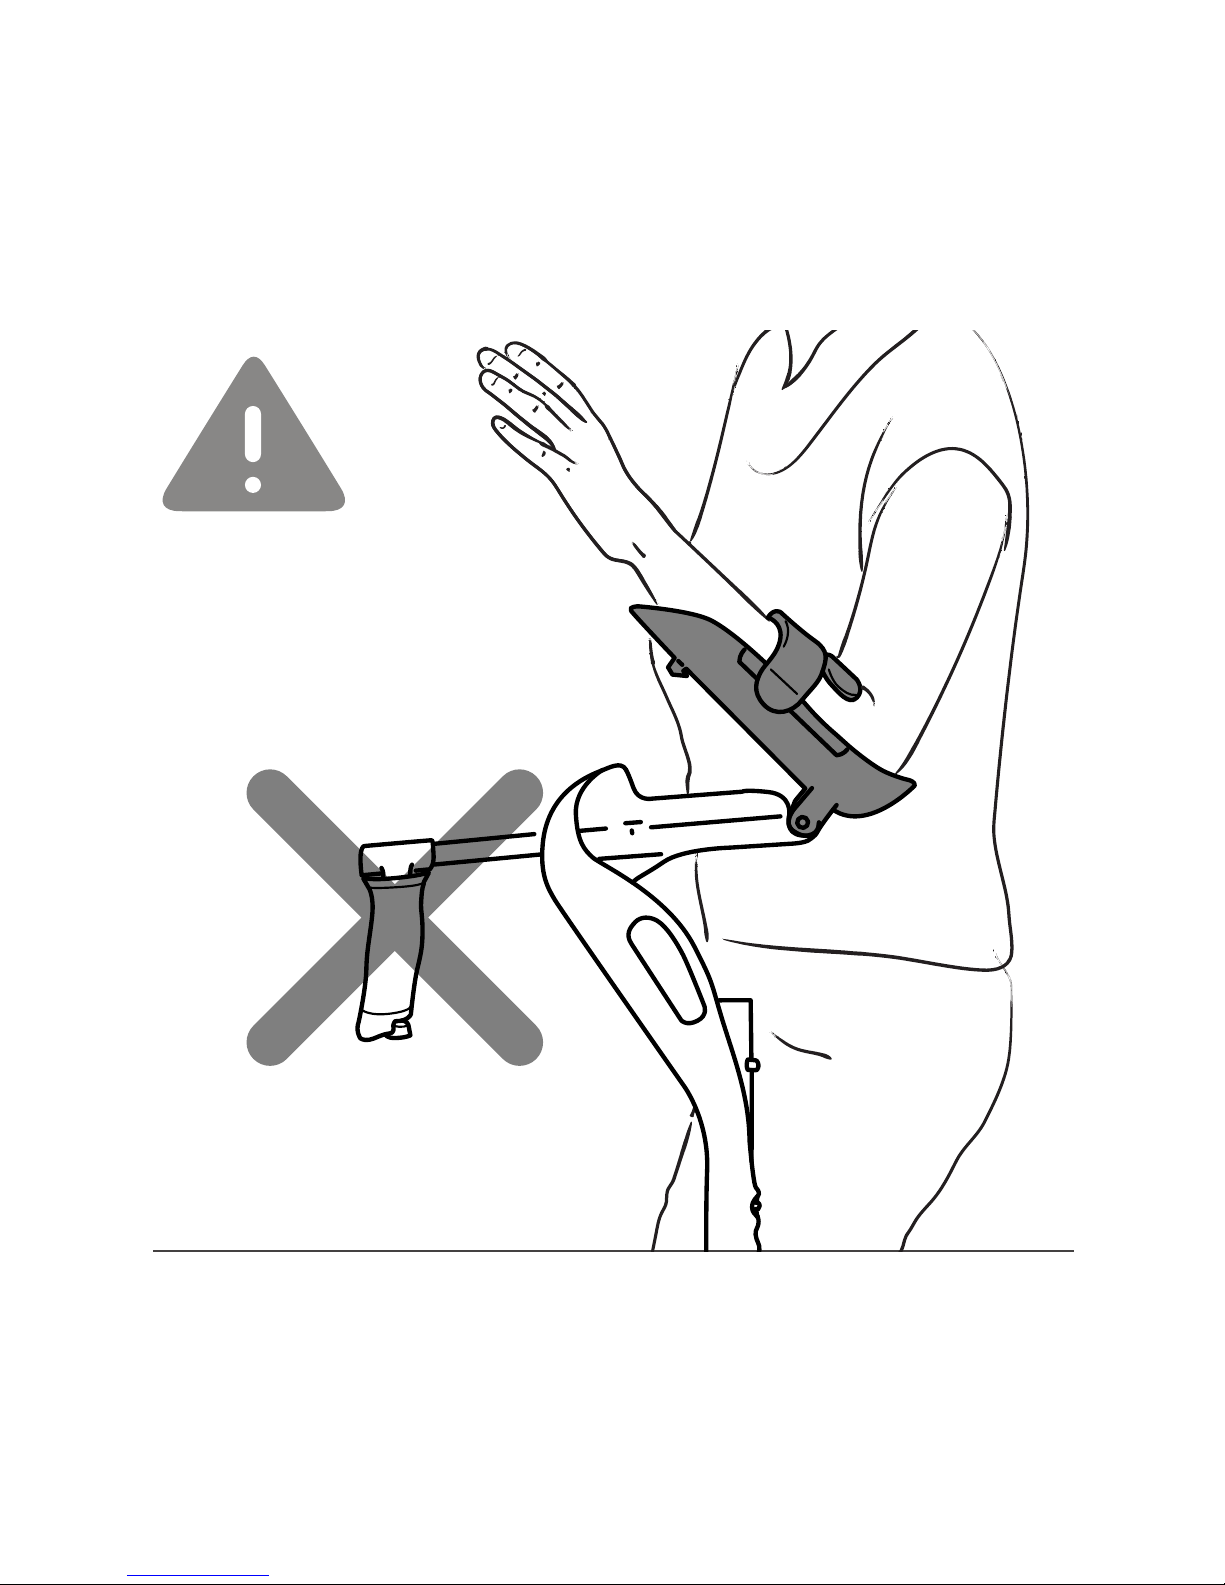
Caution: Using unlocked cradle with hands free
could cause user to become unstable.
Caution: DO NOT USE
hands free when
cradle is unlocked.
Page 24

24
Replacement Parts
Replacement feet and arm pads can be purchased at
www.mobilitydesigned.com
Maintenance and Cleaning
Dust and dirt should be brushed or wiped with a cloth or
disposable towel. If the rubber feet have gotten very
dirty, they should be removed and washed in soapy
water, then dried carefully with a cloth before being
replaced on the crutch. It is important to watch for
damage to the rubber feet. If the rubber feet have serious splits or damage, they should be replacement.
Page 25

25
FAQ
1. What do i do if the snap button gets stuck inside leg?
Do not use if stuck inside leg. Use thin at-head screw driver
to pop back out. If unsuccessful, call us for support.
2. How long does the foot last before it wears out? Crutch
feet wear differently for each person depending on the
amount of use, surfaces used on, etc. The foot should be replaced if the tread pattern is worn smooth. If there is noticeable cracking or damage is visible, or if there is de-laminating
from hard plastic foot stem; please call for a replacement
and/or warranty if applicable.
3. Are there training videos for the M+D Crutch™? There are
training videos available at mobilitydesigned.com to show
you the basic techniques for using the M+D Crutch™. Please
consult your Physical Therapist or Occupational Therapist for
additional tips and training based your specic needs.
4. How long will it take me to learn how to use them?
Whenever you are learning to use a new Personal Assistive
Device, there is a learning curve. The time varies for each
individual based upon your personal experience, physical
condition and comfort level. Most users tell us it took them
from a few hours to a few days to be comfortable using the
M+D Crutch™.
5. How do i clean my M+D Crutch™? Use water and a paper
towel or rag for cleaning.
Page 26

26
Product Warranty
M+D Crutch™ Warranty
The M+D Limited Warranty covers your M+D Crutch™
and M+D branded accessories against manufacturing
defects for one year from the date you received your
product. Our warranty is in addition to rights provided
by consumer law.
Our warranty doesn’t cover damage caused by acci-
dents or unauthorized modications. See the warranty
for complete details at www.mobilitydesigned.com
Page 27

27
Contact info:
Mobility Designed, LLC
1.844.637.STEP (7837)
816.945.STEP (7837)
1427 West 9th ST, SUITE 503
Kansas City, MO. 64101
844.637.7837
www.mobilitydesigned.com
FDA Registration Number: 3012093174
© 2016 Mobility Designed, LLC
Page 28

TM
 Loading...