


User’s Manual for Totem

1
Introduction to Manual
This manual provides operation guideline information for you. Please refer
to Guideline for Quick Use if necessary to grasp the basic functions fast.
Introduction to Operation Procedures
The following ways are used in the User’s Manual in order to search the
functional menu:
Operation path: Main menu > Messages.
The case indicates: click the[Central Key] from standby menu, the phone
displays the main menu and click the message functio nal menu.
Introduction to Phone Windows
The following presentation ways are used in the User’s Manual to illustrate
the phone window:
<> Main function menu window display.
[] Name of keys. For example: [Cen tral Key](indicating that
the key lays amid the navigation key and its corresponding
icon indication on the screen).
“ “ Different functional indications are on every screen. For
example: “Select” (indicating the selection function).
‘’ Window prompt.
Introduction to Manual Icon
The following icons are used for indication in order to set forth the special
Message:
Message prompt.
A service or function requires the support of network or preset service.
For more details, please consult the network ser vice supplier.

2
Table of Contents
Comprehend Your Phone...................................................................................4
Front View............................................................................................... 4
Side View ................................................................................................ 5
Back View...............................................................................................6
Begin to Use......................................................................................................... 7
(U)SIM Card and Battery........................................................................ 7
Start up and Close the Phone .................................................................. 8
Display Screen....................................................................................... 10
Keys and Touch Screen..........................................................................11
Input Way..............................................................................................12
Main Function Menu............................................................................. 14
Set up Your Phone.................................................................................16
Guideline for Quick Use................................................................................... 19
Call Function.........................................................................................19
Message Function.................................................................................. 25
Contacts Function.................................................................................. 27
Video Function...................................................................................... 28
Media Player ......................................................................................... 29
Stuff Management.................................................................................30
Browse Internet.....................................................................................31
Link Function........................................................................................32

3
Function Menu.................................................................................................. 35
SAT........................................................................................................ 35
Browser ................................................................................................. 36
Entertainment ........................................................................................ 41
Camera................................................................................................... 43
Messages ............................................................................................... 48
Contacts.................................................................................................61
Tools...................................................................................................... 66
Multimedia............................................................................................70
My stuff.................................................................................................72
Calendar................................................................................................. 76
Call Log................................................................................................. 78
Settings..................................................................................................80
FAQs and Troubleshooting Solution...............................................................87
Health & Safety Information...........................................................................91

4
Comprehend Your Phone
Front View
Central Key
Navigation Key
LSK
Go to browser
Special Function Key
Call Key
RSK
Delete Key
On/Off Key
Numeric Key
Go to home
Go to SMS

5
Side View
Volume-adjusting key
Snap Key
USB socket
6
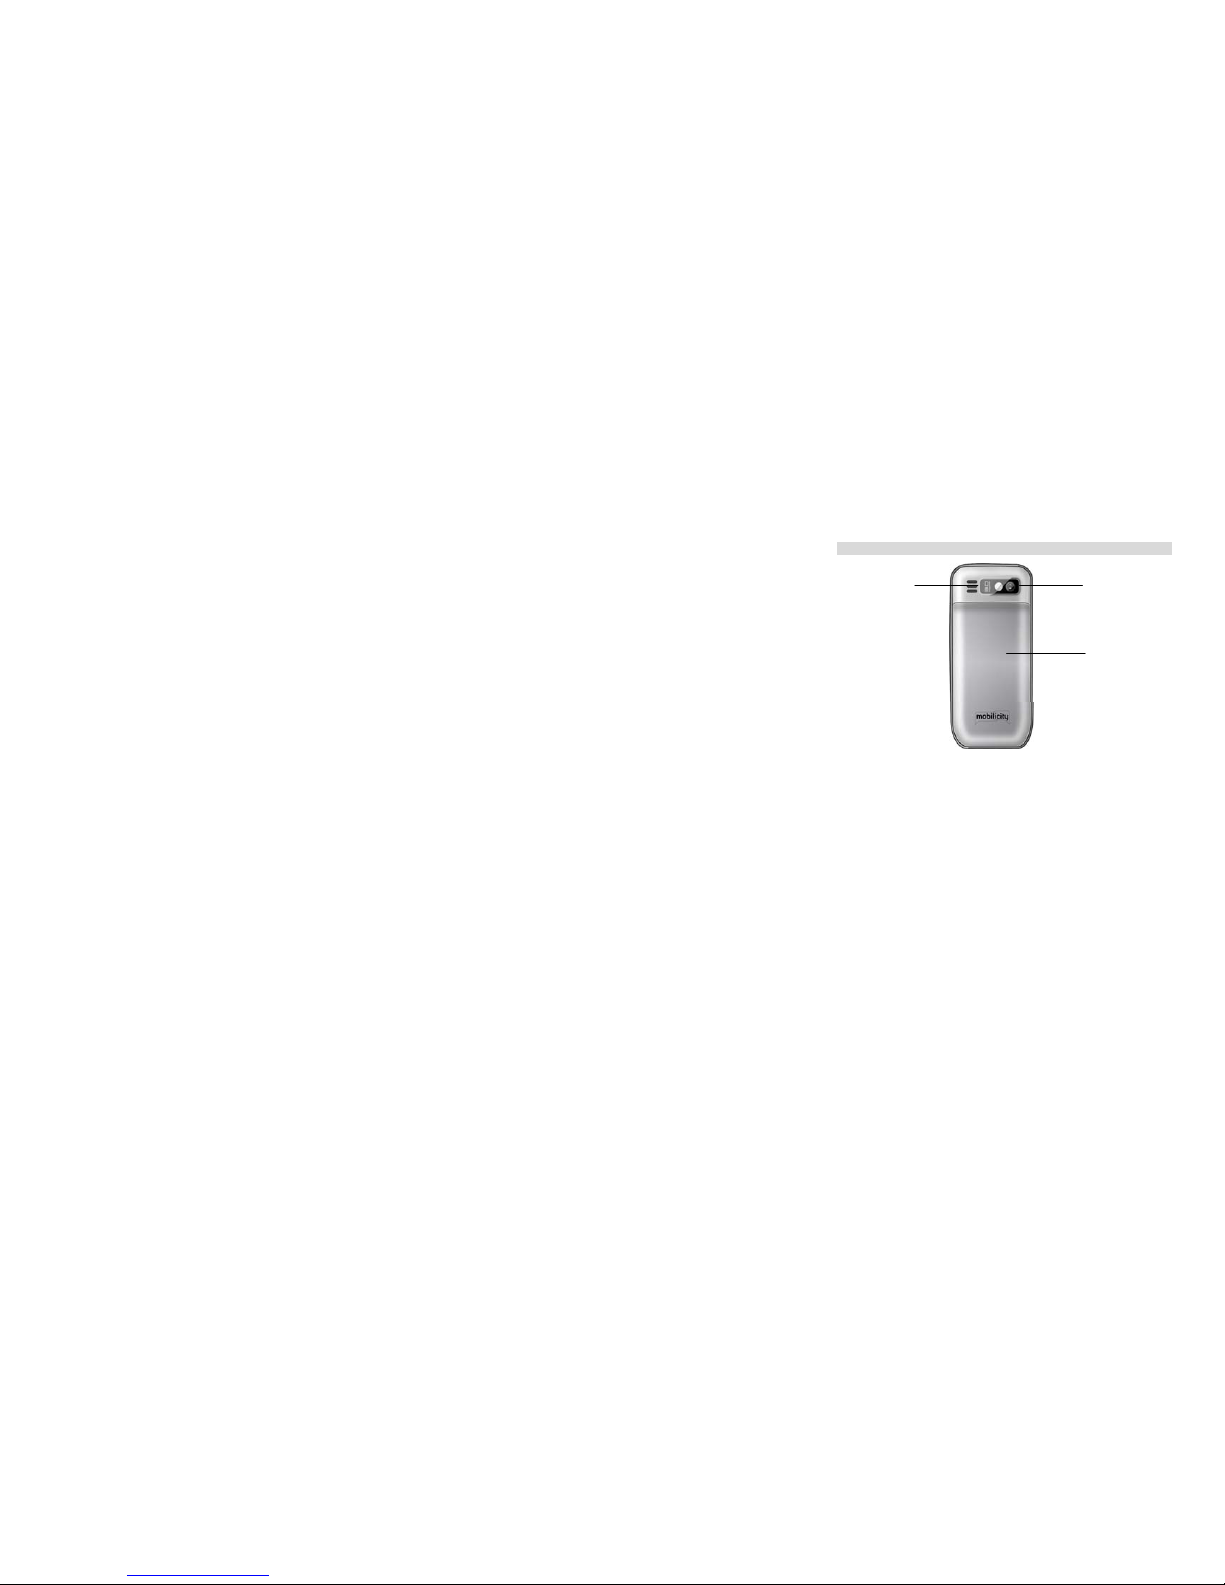
Back View
Important notes: you can only use the touch pen whic h is applicable for this
kind of device. Using other touch pen may violate the maintenance clause of
the device and even damage the touch screen. You should avoid to scraping the
touch screen. Please do not write with commonly-used pen, pencil or other
sharp instruments on the touch screen.
Loudspeaker
Camera
Battery Cover
7
Begin to Use
(U)SIM Card and Battery
When you reserve to access to the communication network services, you
will receive a phone-inserted subscriber identity module (abbreviated as
(U)SIM card), which contains the information of the network services
booked by you, your personal identity number (PIN) and the available
network service info.
Please consult with your SIM card provider, network service provider or
network operator to obtain and use SIM-based information.
You can purchase and use the universal subscriber identity module (referred
to as USIM card) if desired to obtain more 3G network service.
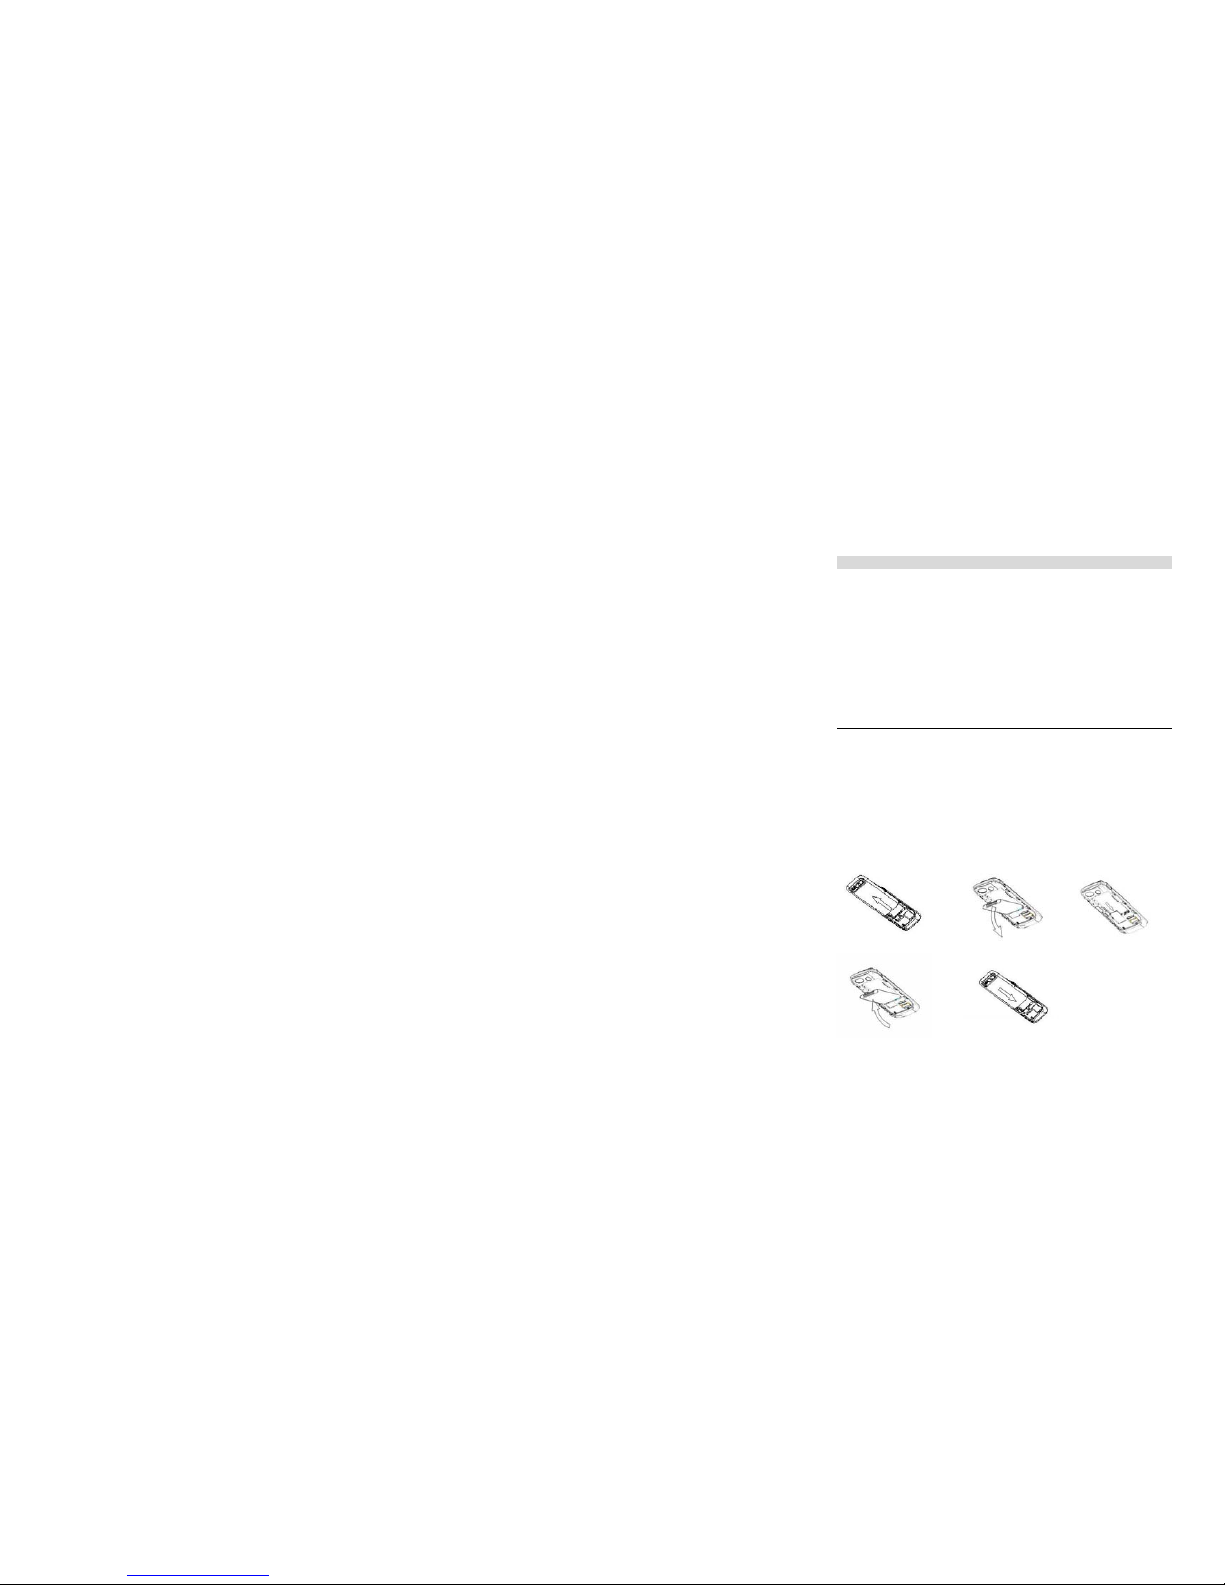
Insert (U)SIM Card and Battery
Please power off the phone in order and ensure the adapter disconnected
with the phone before remove the battery.
1. With the phone back upward, slightly press and push the rear cover
toward the phone bottom till the cover is removed.
2. Remove the battery according to the figure indication.
3. Push away the (U)SIM card in socket with golden wafer downw ards.
4. Install the battery according to the figure indication.
5. Push the back cover back to th e origin al place acco rding to the fi gure
indication.
1 2 3
4 5

8
Recharge Battery
When the battery capacity is low, the phone will send out the low power
information and the flickering icon of empty battery appears as well. Under
this case, you are supposed not to use some functions of the phone.
When the power is lower than the threshold value, the phone will be power
off automatically. Please recharge the battery.
When the phone is power-on and being charged, the flickering battey icon is
displayed on the top-right corner of the screen. After charging finished, the
prompt of charge finished is displayed on the top-right corner of the screen.
When the phone is power-off and being charged, the charging status picture
is displayed on the screen; after charging finsihed, the prompt of charge
finished is displayed on the screen.It takes about 2.5 hours to charge the
battery.
1. Move the protective cover of interface aside.
2. Insert charge connector into the phone.
3. Draw out the charge connector after charge finished.
4. Close the protective cover of interface.
Start up and Close the Phone
Before the phone is started up, please firstly reaffirm that the phone is
charged and the (U)SIM card is inserted in the phone.
When the phone is started up without (U)SIM card inserted, the window will
display the information of inserting the (U)SIM card. The phone only
supports the function of emergent call under this status. You can input the
emergent phone number and dial out by clicking [Call Key].
The phone supports the startup function under charge status. It can be
activated when the phone displays power-on info.
After the phone power-off automatically due to low power, the power-on
info may display until charging with 30 minutes.
Start up the Phone
1. Press and hold[On/Off Key]continuously.
2. Please input the phone lock password/PIN lock password if an inquiry
about password is displayed on the screen, and then click[Central Key]to
confirm.
3. If you use the phone for the first time, the screen displays the default

9
standby menu while leaving the factory, and the screen will display your
recently standby menu if you use at the second time.
4. If desired to set up the phone, please consult <Begin to Use-Set up
Your Phone > for more details.
After the phone is launched, it will identify the (U)SIM card supplier
automatically, and finish setting up the SMS and wireless network
parameters. If the phone does not configure the correlative parameters
automatically, plea se consult the service supplier for the correct parameters
and finish the setting.
Close Phone
1. Press and hold[On/Off Key]last for 4 seconds.
2. Enter into the close status after the powering-off animation is
displayed on the screen.
Other functions are disabled except for alarm after the phone powered
off.
10
Display Screen
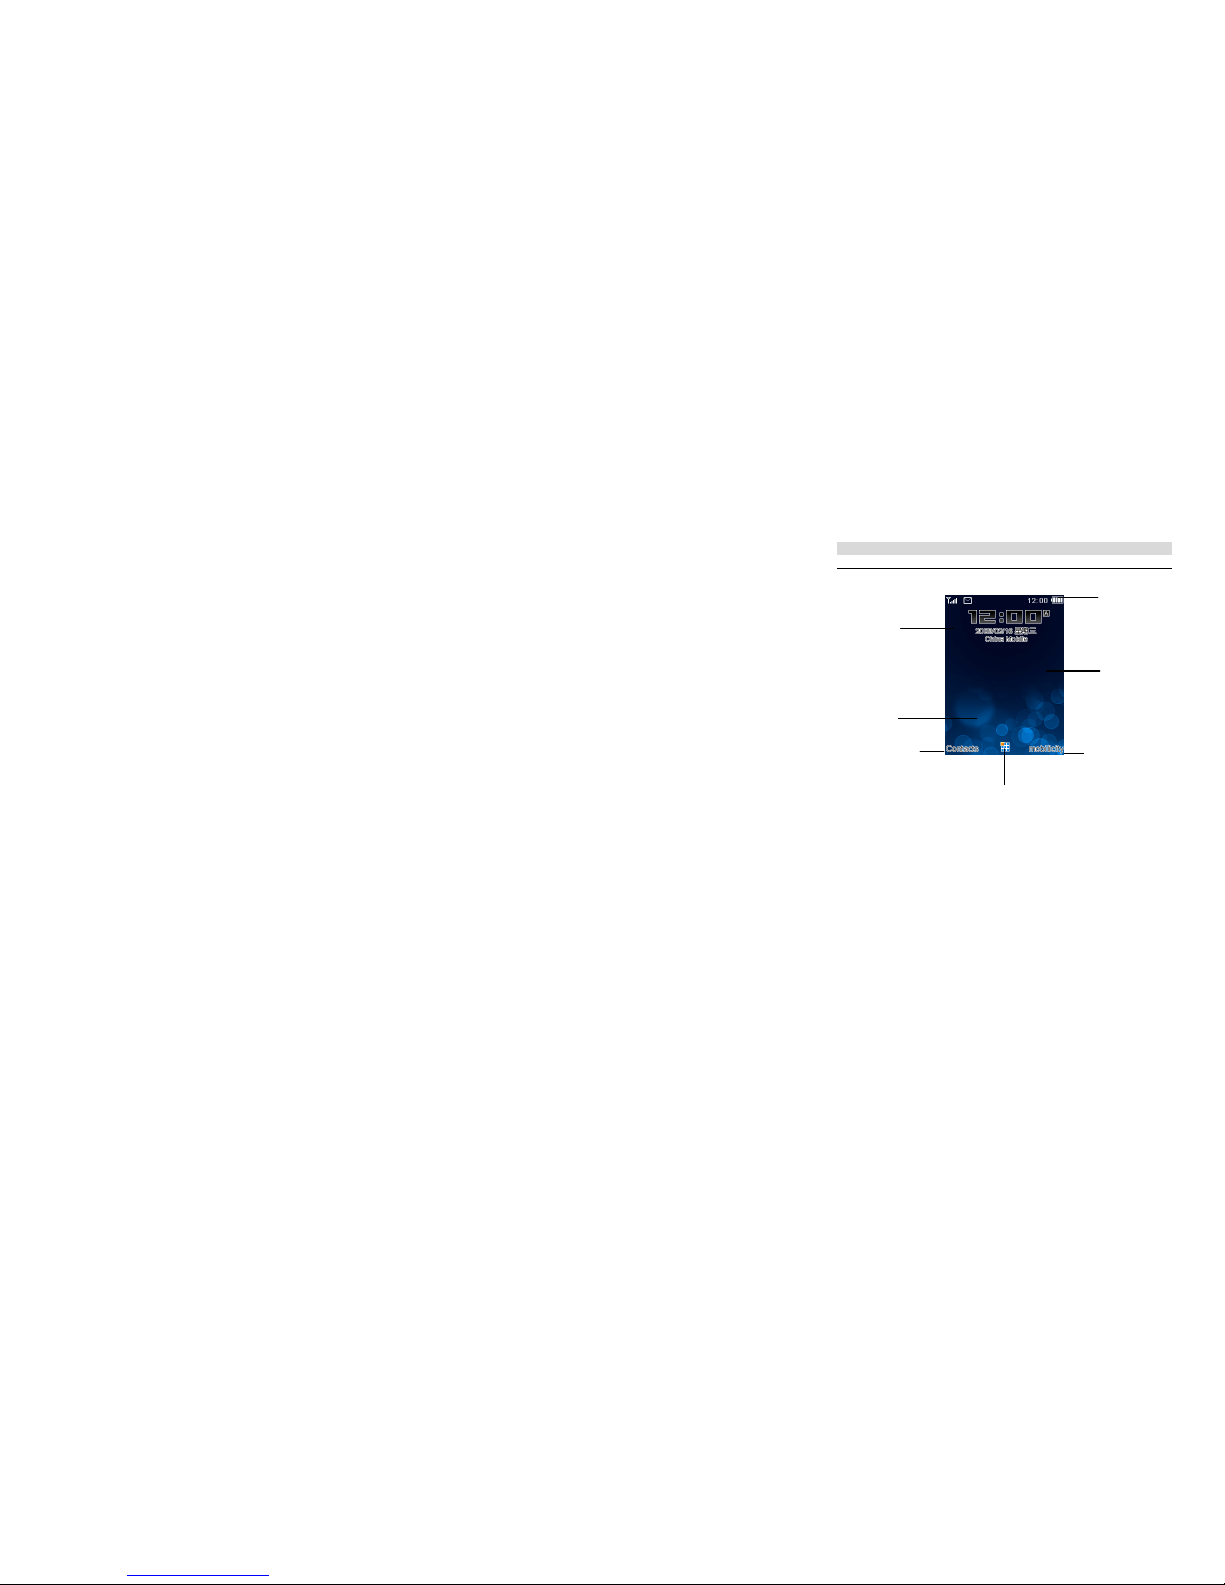
Display Screen
z Status Indication: signal status, battery status, message status,
incoming call status, user’s profile status, function launch status and
insert status of external device etc.
z Standby Message: name of operator, date, week message, time, Am.&
Pm. prompt (12 hours).
z Wallpaper: background image under standby status.
z Shortcut Key: setting when leaving factory: Up Navigation
Key->Media Player, Down Navigation Key-> My stuff, Left
Navigation Key-> Messages, Right Navigation Key-> Profile.
z Soft Key Function Indication: setting when leaving factory: LSK->
Contacts, Central Key->Main Function Menu, RSK->Mobilicity
Standby Message
Status Indication
LSK Function Indication
Shortcut Key
Wallpaper
Central Key Function Indication
RSK Function Indication

11
Keys and Touch Screen
Keys
Central Key Enter into main function menu or confirm selected
entries.
Navigation Key Move the selected frame amid menus of every level and
entries.
Left soft key go to contacts
Right soft key go to SAT
go to home
go to browser
go to SMS
Call key Launch call.
End key After ending the call, power on/off or return to the
standby status.
Clear key Delete entries or clear away input.
“1” key Press and hold to dial voice mailbox service.
“2”-“9”key Press and hold to call the contact that has been set as
quick dial.
“1”-“9”key Quickly enter into the menu or edit input.
It will be space bar when inputting the letters.
“*” key Dial to input */+/p, input punctuation or lock/unlock
the keyboard.
“#” key Set up the phone in mute mode or cycle switch input
method.
Side key Adjust the volume when calling or playing media.
Camera key Snap function of Camera/Vidicon
Touch Screen
It owns touch screen and keyboard with dual-orie ntation operational function,
you can use handwriting pen to perform on the screen with the same function
operational keys.
Select
If you are desired to launch the application proc edures or other elements on the
screen, you just click the required contents.

12
View and Setting
z If you are desired to view the conte nt list or option details, you can
click to select the entry under the current screen displa y, and the screen
will display the details of the entry. For example: Main menu >
Contacts, click the contact you are desired to view and the screen will
display the details of the contact. Click the entry to enter into the e diting
status of the option and you can modify the entry a s well.
z You can click the entry which you want to modify un der this setting
condition. The screen will pop up the option list or enter into the input
mode with full screen. You can click “Save” or “Ok” option to modify
your setting and save setting. For example: Main menu> Settings >
Phone settings>Time and date. If it has “Time Display Setting” option,
you can click this option, and then it will pop up selection list, you can
select your setting and save.
Input Way
The phone supports keys, screen mini-key board input mode.
Touch Screen Input
Mini-keyboard
Icon Indication of Mini-keyboard:
Input switch for Capital and small-case letters.
Input switch for Numbers.
Input switch for Special symbol.
Input switch for handwriting.
Space character input.
Enter key.
Backspace key.
Mini-keyboard Input:
Mini-keyboard supports number, letter input, you can click blank area of
screen or the icon , and then the screen will pop up the Mini-keyboard.
1. Place at input status, for example: Main me nu > Messages > Text messa ge

13
> New.
2. You can click the icon on the top right corner or blank area of the
screen to display the Mini-keyboard. Click the icon on the Mini-keyboard to
input your required number, special symbol, space etc. click “Option” to
switch input method. Select letter with handwriting pen and match input
method to get the expected input letter. You can input it to the editing
window by clicking it.
3. If you do not want to use Mini-keyboard, you can click the icon , the
Mini-keyboard will retract.
Physical Keyboard Input
You can set up the parameter of input method under editing status, by setting
option > input settings to select switchable input mode during the input
method filtrating. By clicking the icon , you can switch the filtrated input
mode circularly. Click [Delete Key] or “clear” to delete one word prior to
cursor.
Letter Input
The letter input method supports multi-pressing and T9 input modes.
Input with Multi-pressing Input Mode:
1. Locate at character input status, for example: Main menu > Messages
> Text messa ge > New.
2. The cursor keeps 0.5 second at the same position, before moving the
cursor, repeatedly press the icons - till the required character appears.
3. Click Mini-keyboard input method to directly write the letter.
4. If desired to switch capital and small-case letters, you can click
“Option” to select “Input mode”, and then select “ABC/abc” of letter input
mode and click “Ok”.
5. If desired to input numbers, you can click “Option” to select “Input
mode”, and then select “123” and click “Ok”.
6. If desired to input symbol, you can click to select symbol.
Input with T9 Input Mode:
14
The T9 input method distinguishes the most frequently used characters
under each key sequence with the uses built-in dictionary. Thereby, no
matter where is the position of the key corresponding to the letter you are
eager for, you just click the key corresponding to the letter once.
7. Locate at the character input status, for example, Main menu >
Messages> Text message > New.
8. Providing that you are desired to input a word of “Phone”, you can
click , , , , in sequence.
9. If the screen displays the word you required, you can click[Central
Key] to confirm, if the screen does not display the words you
required, you can repeatedly click[Down navigation key]to view
other characters till searching th e required characters, and then cli ck
[Central key].
10. If desired to switch capital and small-case letters, you can click
“Option” to select “Input mode”, and then sel ect “ pr eabc/ abc/ ABC” o f
letter input mode and click “Ok”.
11. If desired to input numbers, you can click “Option” to select “Switch
input mode”, and then select “123” and click “Ok”.
12. If desired to input symbol, you can click to select symbol.
Main Function Menu
You ca n click[Central Key]to enter the main function menu under standby
status.
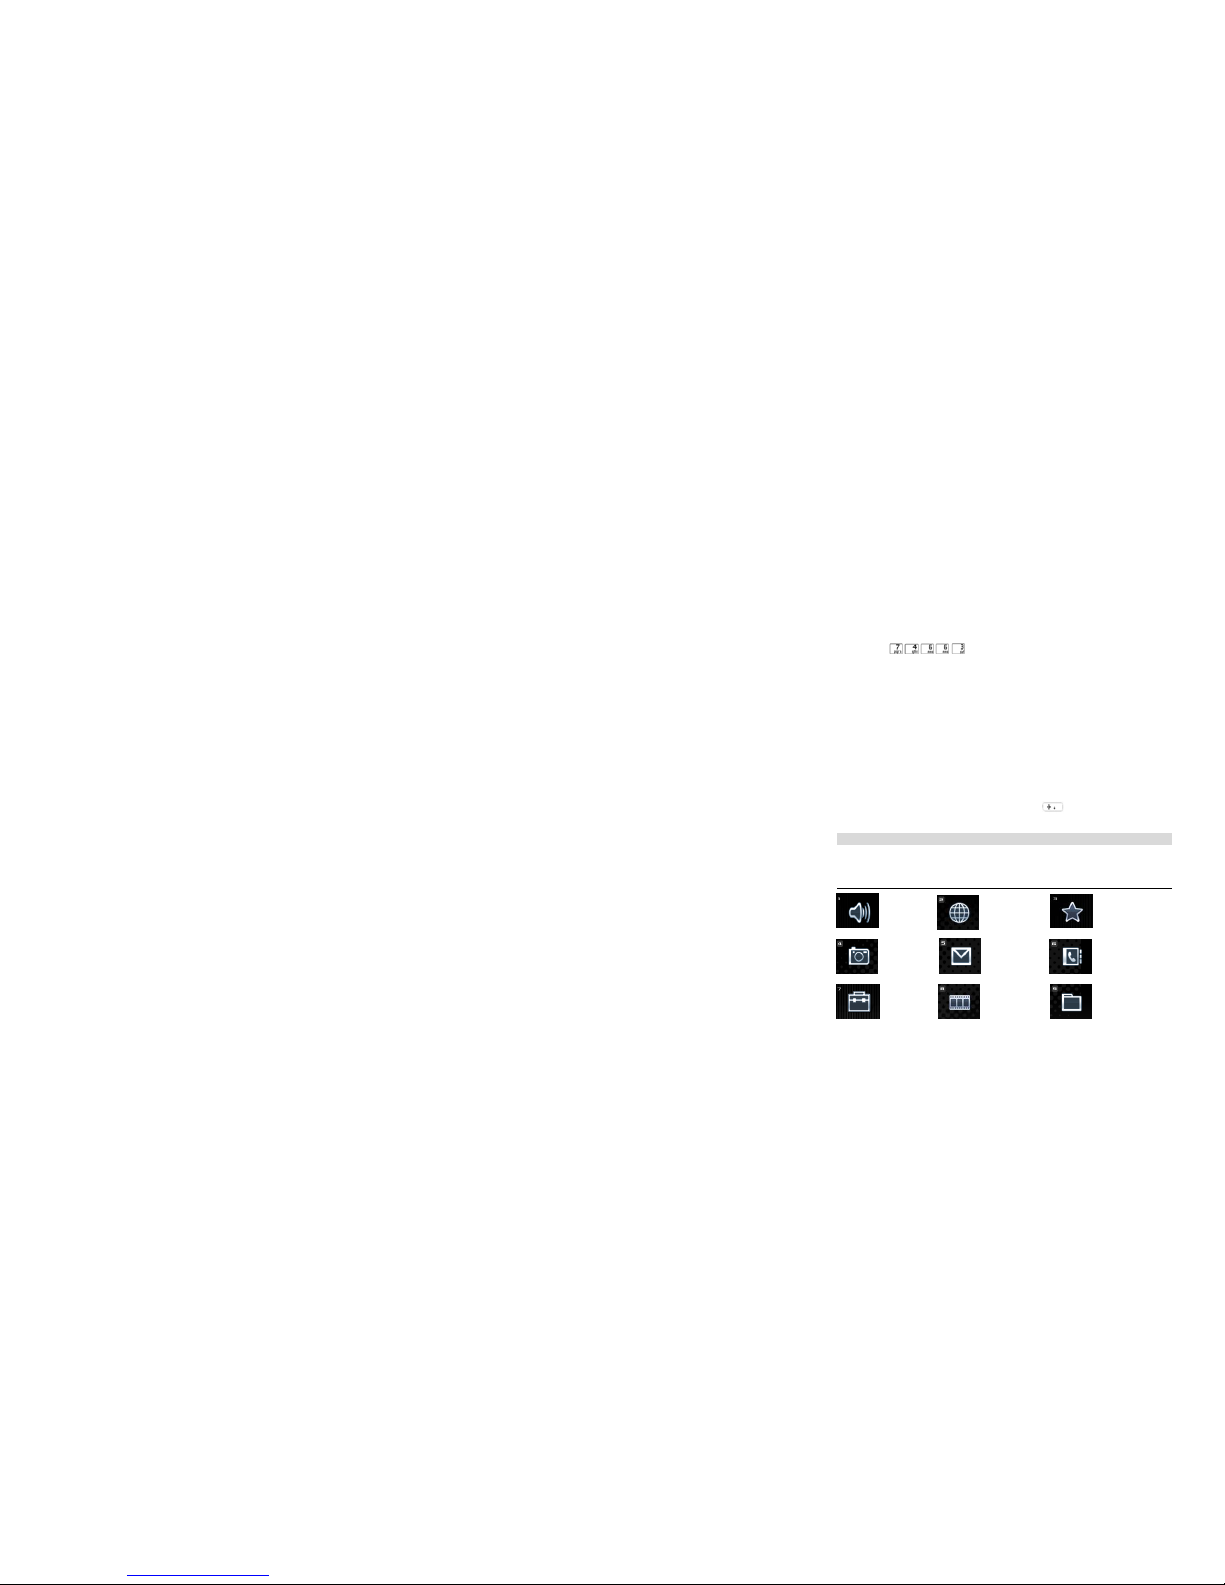
Main Function Menu
Profile Browser Entertainment
Camera Messages Contacts
Tools Multimedia My stuff

15
Calendar Call log Settings
Menu Catalog
Profile
Browser Go to homepage
Enter URL
Bookmark
History
Push message box
Saved pages
Browser settings
Network settings
Entertainment
Camera
Messages SMS
MMS
Email
Contacts All/Phone/USIM card
Group
Tools Alarm
Calculator
Recorder
World time
Multimedia Media player
Radio
My stuff Images
Video
Sounds
Others
Calendar
Call Log Missed calls

16
Outgoing calls
Incoming calls
All Calls
Data Transmission
Call duration
Call cost
Settings Display Settings
Phone Settings
Call Settings
Network Settings
Security Settings
Connection Settings
Reset Settings
Set up Your Phone
Set up your phone personally, including display Settings, ringtone Setting,
language Setting, time and date Setting, shortcut Setting and phone lock
Setting.
Display Settings
Operation path: Main menu> Settings > Display Settings
Select Wallpaper
Operation path: Main menu > Display Settings > Idle screen.
Select the entry of “Wallpaper” and click [Central Key]to enter into the My
stuff, select the file which required to be loaded as wallpaper and click to
“Save”.
Display the Time and Date on the Screen
Operation path: Main menu> Settings > Display settings > Idle screen.
Select the entries of Clock Display or Date Display and select turn-on/off
status and then to click “Save” to save the settings.

17
Adjusting Backlight time
Operation path: Main menu> Settings > Display Settings > Backlight tim e.
Select screen light to maintain the working time without operation, click
“Ok” to save the Settings.
Adjusting the Brightness of Screen Di splay
Operation path: Main menu> Settings > Display Settings > Brightness.
Select the brightness of display screen, click “Save” to save the Settings.
Ringtone Settings
Select Profile and Rigntone
Operation path: Main menu> Settings > Profile.
Select the applicable Profile to set up. The setting of Profile includes various
kinds of entries: voice call ringtone, ringtone, volume, message alert, email
alert, vibrating alert, key tone and warning tone.
Select setting entries under option setting window. For the ringtone setting,
you can click[Central Key]to enter My stuff, select the required ringtone
files. Select on/off status. After finishing setting, click “Save”. And the
phone will return back to the list of Profile and launch the selected scene.
Language Setting
Select the Phone Display Language
Operation path: Main menu > Settings > Phone Settings > Language.
Select your required language type, and clic k “Ok” to save the Settings.
Time and date Setting
Set up Time and date
Operation path: Main menu > Settings > Phone Settings > Time and date.
Select setting option entries, and then input time and date in succession. Set
up the time display format, date display format and summer time. After
finished the Settings, click “Save” to save the Settings.
Shortcut Key Setting

18
Set up Shortcut Key
Operation path: Main menu > Settings > Phone Settings > Shortcuts >
Shortcut settings.
Select the shortcut key you required to set up, clic k[Central Key]to activate
the waiting function menu of shortcut key, and then select shortcut key
function and click “OK”. You can save all shortcut settings after finished all
shortcut key settings.
Display Shortcut Key
Operation path: Main menu > Settings > Phone Settings > Shortcuts >
Shortcut display.
Select “Display” or “Hide” and click “Ok” to save the settings.
Phone Lock Setting
You can launch the phone lock function in order to prevent others using your
phone without any permission. You can activate or unlock the phone lock to
input the required password. The default password of the phone when
leaving the factory is 0000.
Modify the Phone Password
Operation path: Main menu > Settings > Security Settings > Change phone
code.
Select the input entries in succession, old password or new password, and
then confirm the password and select to input, click “Ok” to save and
modify the password setting.
Unlock the Phone Lock
Operation path: Main menu > Settings > Security Settings >Phone lock
You can select “On” and then click “Ok”. You can input the password when
inquiring about the password and then click “Ok” .
You can input the default password of 0000 when you unlock the phone lock
function for the first time or do not modify the phone password all along.

19
Guideline for Quick Use
Call Function
After launching the phone, if it locates inside the network, the phone will
select automatically to connect the main network. If it is not inside the
network, the phone can use other network upon permited by network
operator, and called as Roam ing.
When the mark of network supplier comes forth on the display screen, you
can dial or answer the phone.
The signal icon of the display screen at top left corner displays the current
signal strength of network, when the signal is weak, the call quality will be
affected.
The quality of the call will be affected bigger relatively from the barrier,
therefore, moving at a short distance can improve the signal strength and call
quality effectively.
Dial Phone
Normal Phone Dialing
1. Click the number of physical keyboard under the standby status, it

20
will pop up the dummy keyboard at once. You can input the phone number
with physical keyboard or dummy keyboard.
2. Click the[Call Key]or[Central Key]to launch the calling.
3. If desired to end the call or cancel the call, please click[On/Off Key].
When you are desired to dial the international call, you can click the icon
continuously for many times, input + to replace the international
connecting number, and then input national code, regional code and phone
number. If you input the number wrongly, please click[Delete Key]to
delete.
When you dial the extension transfer, you can input the number of phone
exchange and click the icon continuously for many times, input P, and
then input extension number. If you input the number wrongly, please click
[Delete Key]to delete.
To dial Through Latest Phone Records
1. Click [Call Key]to open the call log under the standby status. Or by
the path: Main menu > Call log > Missed calls/Outgoing calls/ Incoming
calls/All calls.
2. Select the number of contacts. Click[Call Key]or[Central Key]to
activate the call.
To dial Through the Contacts
1. Click “Contacts” to open the Contacts under the standby mode. Or by
the path: Main menu > Contacts.
2. Select the number of contacts. Or input the name’s letter of the
contact to search him/her quickly.
3. Click[Call Key]or[Central Key]to activate the call.
To dial Through Shortcut Key
You should firstly set up the shortcut key of contacts when you use shortcut
key to dial.
1. Main menu > Contacts > Option > Settings > Speed dial.

21
2. Select shortcut key, click “Set” to input the corresponding number of
shortcut key or click “Search” to select the number of contacts in the
Contacts.
3. Click “OK” to save the settings.
4. Press and hold the corresponding shortcut keys - under the
standby status to launch the call.
Fixed Dial
Set up the number which is allowed to launch the call.
1. Operation path: Main menu > Contacts > Settings > Fixed dial
2. Click “Option” to select “New Contacts”.
3. You should input PIN2 when PIN2 is required, and then click “Ok”.
4. Input the name and phone number of the contacts who is set as fixed
dial, and click “Ok” to save the input.
5. If desired to delete the fixed dial, click “Option” to select “Delete”.
6. If desired to launch fixed dial function, you can click “Option” to
select “Enable”.
After the phone activates the fixed dial function, it is still supporting
emergent number calling.
The phone supports inputting partial fixed numbers. For example, if you
input the fixed number 1234, you can dial out all numbers with 1234 at the
beginning.
Call Restriction
Restrict some certain kinds of calls.
1. Operation path: Main menu > Settings > Call settings >Call barring
2. Select the restricting types, you can click “Option” to select “On”.
3. Input restriction password. For more information related password,
please consult the network service supplier.
4. Click “OK” to save the settings.
The function requires supports from network, please consult the
network service supplier.
Dial the Emergency Phone

22
The phone supports to dial the international number, for example: 112 and
911 etc. when the phone locates at network coverage of WCDMA or GSM,
whether you insert the (U)SIM card or not, you can dial out the emergency
call in any countries and regions. You just require inputting the emergency
number, click[Call Key]or[Central Key] to launch the call.
Some countries or regions may set up other emergency numbers.
Therefore, the network service supplier may store emergency numbers of
other countries or regions in SIM card.
Answer the Call
Set up the Answer Mode
1. Use path: Main menu > Settings > Call settings > Answer mode > Any
key/Send key
2. Select setting, click “Ok” to save the settings.
Normal Answer
When your phone has incoming call, the ringtone will pop up or vibrate, and
the display screen will display incoming call icon.
1. Click “Answer” or[Call Key]to receive the incoming call.
2. If desired to end the call or reject to answer the incoming call, you can
click[On/Off Key].
3. If the phone is inserted the earphone or Bluetooth earphone, you can
answer the call by the earphone.
4. You can click[Central Key]to switch phone receiver a nd loudspeaker
during the call.
5. You can adjust the volume by Up/Down key of side key during the
call.
When you use the loundspeaker, please do not press the phone close to
your ears that may be harmful to your hearing.
Missed calls
1. The phone will display the missed calls on the standby window when the

23
incoming call fails to be received.
2. Click “View” to view the record of missed calls, you can dial to call the
missed call number by clicking[Call Key]or[Central Key].
3. Through call log to view the missed calls information, please use the
operation path: Main menu > Call log > Missed calls.
4. You can dial to call the missed call number by clicking[Call Key]or
[Central Key].
Transfer to receive the Incoming Call
1. Operation path: Mian menu > Settings > Call settings > Call divert
2. Select transfer condition: All calls /If busy/If not answered/If not
available.
3. Click “Option” to select “On”, select “To voicemail” or “To another”.
4. If you select “To another”, you can directly input the transfer number
or click [Central Key]to select the number of contacts from the Contacts.
5. Click “Ok” to save the settings.
6. If desired to cancel all transfers, please use Main menu > Settings >
Call settings > Call divert > Cancel all.
The function requires the supports from network, please consult the
network service supplier.
Incoming Call Rejection
1. Operation path: Main menu > Contacts > Settings > Reject call.
2. Click “New” and input the number to be filtered, or click “Search”to
enter into the Contacts to select the filter numbers.
3. Click “OK” to save the settings.
Call Waiting
The call waiting requires the supports from network, please preset the
network service firstly.
1. Operation path: Main menu > Settings > Call settings > Call waiting >
On.
2. After activating the call waiting, if there has new incoming call during
calling, the phone will display the call waiting window and the message

24
prompt.
The function requires the supports from network, please consult the
network service supplier.
Multi-calls
This function requires the supports from network, please preset the network
service. For relevant information, please consult the network service
provider.
Call during Calling
1. During calling, click “Option” to select “New call”, input the number
of new contact and make a call, or input the number of contact directly and
click[Call Key]to make a new call.
2. If desired to switch amid two calls, please select “Switch”.
3. If desired to end the call, you can click[On/Off Key].
Answer during Calling
1. If desired to answer the new incoming call during calling, you can
click[Call Key]to answer the incoming call, and the first call will be
reserved.
2. If desired to switch amid two calls, please select “Switch”.
3. If desired to end the call, you can click[On/Off Key].
Phone Meeting
You can launch the phone meeting function through receiving the current
call and maintaining the call. You can dial out and add at most six
participators when the phone locates at holding state.
1. You can click “Option” to select “Call Meeting” under the status of
more than two calls.
2. If desired to end the phone meeting, you can click “Option” to select
“End call meeting”.
3. If desired to cancel phone meeting to make a single call, you can click
“Option” to select “Split”.
4. If desired to terminate a call of one party, you can click “Option” to
select “Hangup one” and select the hung-up number, and then click

25
“Hangup”.
The extra frees will be charged if you dial in multi-calls. For more
details please contact network service supplier.
Message Function
The phone supports many kinds of message services. You can book or
consult the service supplier for the service which can be used by you.
Text message
The Text message may contain simple text message.
You can click “Option” to insert the message of contacts, commonly-used
message edited in advance or the website of the bookmark in the Contacts
when you edit the Text message.
If you set up relevant parameter of Text message, please by the path: Main
menu > Messages> T ext message > Settings.
The Text message center number and valid date will be provided by the
service supplier, and usually set inside the (U)SIM card and will display on
the settings window automatically. Please manually input the Text message
center number if there is no number displays.
Multimedia
The Multimedia requires the network support and your contacts and you
need to reserve the multimedia message service.
The Multimedia may encompass the file types such as text, picture, photo,
audio and video and so on.
If desired to set up MMS-based parameters, please use the path: Main menu
> Messages > Multimedia >Settings.
Set the related parameters according to the service supplier presented
information and personal demand, including MMS center life time, priority,

26
report allowed, delivery report, read report, admit anonymity, fetch mode,
delivery size limit, reception size limit and profile settings.
Email
The network support is needed to receive, view or edit and send E-mail with
the phone. Please firstly reserve the E-mail service.
You can add file in types such as pictures, photos, audios and videos and so
on in the E-mail.
If desired to set the E-mail-related parameters, please use the path: Main
menu > Messages > Email > Settings.
If required using the same phone E-mail address as in the computers, you
may consult the E-mail service supplier for related parameter settings or
search the related message in the E-mail procedures settings of the computer.
The settings of Email account includes: Account name, my address, Save
copy, User name, Password, Receive server, Send
server, Receive port, Send port, Auth.type, SMTP authentication, Use SSL
and Data account. Moreover, you can perform the basic settings according to
requirement, including each mail sending, each mail receiving, only mail
title receiving, receiving automatically and timing rec eiving automatically.
Receive and View Message
When your phone receives the message, the prompt ringtone will pop up or
vibrate, the message icon will display in the screen.
1. View the new message, you can click “View” to view the message
when the new message prompt displays in the screen.
2. Through Inbox to view the message, please use the operation path:
Main menu > Messages > Text message/Multimedia/E-mail > Inbox.
3. Select message entries, you can click[Central Key]to view the
message.
4. If desired to delete the message, you can click “Option” to select
“Delete” under the status of viewing message, or click[Delete Key]to
delete.
Edit and Send Message
1. Operation path: Main menu > Messages > Text message

27
/Multimedia/Email > New.
2. Input the message contents under the editing window.
3. After finished editing, you can click “Option” to select “Send” and
input the number of addressee. You can select “Edit number/Contacts/Recent
receiver” to input the address when you send the mail. You can shortly press
the “Edit number” to input the numbers and press and hold to input the
letters.
4. If desired to send to many contacts, you just move the message to the
related entries and input other phone numbers.
5. If desired to select a receiver from the contacts, click the [Central
Key] or “Option” to select addressee from contacts. The modes can be the
phone number or e-mail address when you send the mail.
6. If desired to select a Text message addressee from the latest contact list,
click “Option” to select “Recent receiver” and select the number of
addressee.
Contacts Function
You can save and search the contact data with the contacts or (U)SIM card
contacts. The contacts can store many entries of contact info. The (U)SIM
card contacts can save the names and numbers.
Select the contacts type with the path: Option > Contacts display >
Phone/USIM card/All.
The contacts supports saving the local contact information in business card
format.
Create Contact
Create Contact
1. Operation path: Main menu > Contacts > New.
2. Select store address: Phone/USIM card. Select message entries and
input the required message.
3. After finished all message input, click “Save” to save the contacts.
Search Contact Info
Search Contact Info

28
1. Operation path: Main menu > Contacts.
2. Search a contact and phone number by the alphabetic sequence.
3. If desired to search the message entries by the group, you can click
[Right Navigation Key]to open group folder. Select group type, click
[Central Key]to open the contact’s list under the group, and then search
the sequence.
4. If desired to search the contacts quickly, please input several previous
letters of the name.
Edit My business card
Edit v-Card
1. Operation path: Main menu > Contacts.
2. Click “Option” to select “Settings”, and open setting list to select “My
business card”.
3. Select name entry and click it to enter into the editing window, you can
input name and click[Central Key]to save.
4. Select data entry and input the required message.
5. After finished all message input, you can click “Save” to reserve the
business card settings.
Video Function
With this function, you can shoot the photo or record the video. And you can
store, view or send the video files with this function.
Camera Function
Camera
1. Operation path: Main menu >Camera.
2. You can click the icon or[Central Key]when fixing on a view, and
the phone will generate the picture and display in the scree n.
3. If you want to delete the picture, you can click “Option” to select
“Delete” under the preview status.
4. Click [Central Key]to return back the status of view-selecting, th e
phone will save the snapped pictures into the My stuff automatically.
5. If you want to view the pictures, you can click “Option” to select “Photo
29
Album”, and then click[Central Key]to open the pictures.
6. If you want to quit out the camera function, you can click “Back” to
back to the function menu.
Image Pick-up Function
Image Pick-up
1. Operation path: Main menu > Camera.
2. Click “Option” to select “To camcorder” and open t he camera window.
3. Click the icon or[Central Key]to start the video.
4. You can click[Central Key]to pause the video under the video status ,
and click[Central Key]again to continue the video.
5. You can click[Down Navigation Key]to end the video. The phone will
save the snapped image into the My stuff and return back to the video
standby status.
6. If desired to view video, you can click “Option” under the camera status
and select “Video album ”, click[Central Key]to open the video.
7. If desired to quit out the video function, you can click “Back” to back to
the function menu.
The screen may be displayed in black if you put the camera under the
strong light, and the image may be distortion.
Media Player
Your media player supports playing audio and video files, specifically
including AMR, AAC, MP3, WAV, IMY, MID, MIDI, MMF, 3GP, 3G2,
3GPP and MP4 formats. The player and navigation key which is opposite to
indication key of player function will be displayed in the screen when you
enter <Multimedia> and click “Media Player”.
Edit Play List
Edit Play List
1. Operation path: Main menu > Multimedia > Media player.
2. Click “Option” to select “Play List”, and then open play list. You can
click “New” to create the play list when playing the list.
3. Click “Option” to select “View”, and then click “Add” and open the

30
My stuff.
4. Select the media folder/file which you required playing, click[Central
Key]to finish the adding of play list.
Play Media File
Play Media File
1. Operation path: Main menu > Multimedia > Media player
2. Under the status of media player, you can click key to play in order
when the play list is not empty.
3. You can play previous or next file in the play list under the status of
media player playing.
4. You can click key to pause the play under the status of media
player playing, and then click key to stop playing, press and hold
or key to forward or backward the playing file.
5. You can click key to open play list under the status of media
player.
6. Under the status of play list, you can click[Central Key]to play the
selected files when the play list is not empty.
7. If desired to set up cycle play, you can click “Option” under the status
of media player, and then enter into the settings window. Select entries
to set up parameters. You can save the settings after finishing it.
Stuff Management
You can use My stuff to process the files which saved in the phone or
external storage card, for example: picture, photo, video, music, ringtone,
game and application software etc.
You can set up, move, copy folder or manage files.
You can view the detailed information of the file and the occupied status of
memorizer.
If all storage spaces are occupied totally, the phone can not continue to store
any file untill some files are deleted.
View Files
1. Operation path: Main menu >My stuff.

31
2. Select a folder including: images, sounds, videos, applications and others.
You ca n click[Central Key]to open the folder list under this folder .
3. After select and open the folder, you can click[Central Key]to inquire
about the file list.
4. If desired to view the storage status of the folder, please use the path
under the status of type folder: Option > Memory status.
Create Folder
1. Operation path: Main menu > My stuff.
2. Select a folder including: images, sounds, videos, applications and
others. Y ou can click[Central Key]to open the folder list under this folder.
3. Click “Option” to select “New folder”, input the name of new folder
and click[Central Key]to save.
Move, Copy and Delete the Files
1. Operation path: Main menu > My stuff.
2. Select a folder including: images, sounds, videos, applications and
others. You can open the folder list under this folder.
3. After select and open the folder, you can select the files you required.
4. Click “Option” to select “Move/Copy/Delete”, select specific
operational modes: “Move/Batch to move”, “Copy/Batch to copy”,
“Delete/Batch to delete”.
5. For batch operation, you can use[Central Key]to select the required
file, click “Option” to select specific operation.
Browse Internet
With this function, you can browse news, search network resource and
obtain network recreation services etc.
Before using the browser, you can set up according to the data account and
network configuration. For relevant parameters please consult network
service supplier.
Set up Internet Connection Parameters
Data Account Settings

32
1. Use path: Main menu > Settings > Connection Settings > Data account.
2. Click “Option” to select “New”.
3. Input account name, APN, authentification type, user name and
password, click “Save” to save the account settings.
Network Settings
1. Use path: Main menu > Browser > Network settings
2. Open network settings list to select setting entries.
3. Click “Ok” to save the settings.
Browse Internet
Browse
1. Use path: Main menu > Browser.
2. Select “Go to homepage” and then click the[Central Key]to access to
the homepage of operator.
3. If desired to access to other webpage, you can select “Enter URL” to
input the website, click “Option” and select “Ok”.
4. After the webpage is uplinked, the linkable items will be highlighted.
Click the central key to open the selected link. If select the phone
number of webpage, you can click[Central Key]to dial out the phone
number.
5. When browsing the webpage, click the “Option” to select “Tools” and
perform the related operations including: send link, mark page, save
page and saving item.
6. If desired to view other windows, you can click “Option” to select “Go
to” and select homepage, enter URL, bookmark, history and push
message box.
7. If desired to renew the window, you can click “Option” to select
“Refresh” when browsing the webpage.
Link Function
The phone can be connected to other devices via the Bluetooth & wireless
technology and USB transmission line.
The message received from an uncertain source in any way will be harmful

33
to your phone or PC.
In order to secure the phone, please: close the Bluetooth function at ordinary
time; be vigilant against receiving undiscerned Bluetooth files or MMS; do
not install the undiscerned equipment program; and download the ringtone
or games from the reliable websites.
Bluetooth & Wireless Link
You can link to other compatible devices wirelessly with the Bluetooth &
wireless technology. The compatible devices include possibly the handsets,
PC, and earphones and so on.
Please confirm whether the Bluetooth & wireless technology are permitted
to use according to local regulations or laws. If not allow to use the
Bluetooth technology, please turn off the Bluetooth function.
It is suggested that the device to be linked is beside of a 10m range without
any barrier of solid objects.
The maximum tolerable number of Bluetooth devices for the phone will be
adjusted according to the local regulations automatically. Thus the upper
limit of the clearance for the Bluetooth device will be deviated from each
other probably.
Bluetooth Link
1. Main menu >Settings > Connection Settings > Bluetooth.
2. Select “Turn on” to activate the Bluetooth function.
3. Select “Settings” to open the Bluetooth entry list.
4. Switch to set up the visibility of local phone and dial up to get on line,
and input the name of local phone, click “Save” to reserve the
Bluetooth settings.
5. Select device list, you can[Central Key]to open the device list.
6. Click “Search” under the void list to search Bluetooth device, the phone
will search other Bluetooth device inside the effective area and display
in the device list of the screen, you can click “Option” to select
“Search” to search the list when having device list.
7. Select the Bluetooth device you required when at inquiry about the
matched password, input the matched password value.

34
8. If the input password is matched to that of the Bluetooth device to be
linked, the phone will link to the Bluetooth device.
Transmit Data via Bluetooth
1. Open an application program storing the files, for example, opens My
stuff if desired to send pictures to an object device, select the file you
required to send.
2. Click “Option” to select “Send” and select “Via Bluetooth”.
3. The phone will display the device list, you can click Bluetooth device
which required to be connected.
4. If the object device demands a matched password, the phone will prompt
to input the matched password. Please input it.
5. After linked, the phone will display a prompt of Sending File.
Match to Device
The requirement for matching signifies the identity authentification. In order
to achieve the matching requirement , the s ub scri ber s of bo th phon es b ackin g
the Bluetooth& wireless technology must agree upon a co-used password
and input an identical password on both device s.
1. Before matching, please create your own password (1 to 6 digits) and
negotiate to use an identical password with the object device.
2. The device will display in the screen within the effective scope by
using “Search”, select a device to be linked and input a matched
password. If the password is matched successfully, the device will be
recorded in the device list.
3. You can set up the successfully matched device as authorized device.
Therefore, the phone will connect the device automatically.
USB Connection
Your phone can connect to the PC through USB transmission line and you
can transmit the data.
Please do not remove the USB transmission line from the phone or PC when
transmitting the data, because that may damage the memory card.

35
USB Connection
1. Main menu > Settings > Connection settings > USB.
2. Select connection type including USB.
USB
You can communicate with the PC or internet in different application
procedures synchronously by USB transmission line or internet service.
Use the phone operation path: Main menu > Settings > Connection settings
> USB >USB.
Function Menu
SAT
You should use the applied toolkit of (U)SIM card to support before using

36
the SAT function and provide the additional service of (U)SIM card. Your
service provider will provide different additional services, for example,
entertainment, mobile chat and weather etc.
If desired to enter SAT menu, please Press[RSK]under the standby.
Browser
The wireless application protocol (WAP) browser supports you connect with
the wireless network. You can view the latest information and download
abundant media contents with the network browser, such as wallpaper,
ringtone and music.
If desired to enter into to the browser menu, please click [Central Key]
under the standby mode and select <Browser> in the main function menu.
You ca n only use the services trusted by you. The servic e supplier can provide
essential security protection against the attack by the virus softwa re.
You can download files that cannot be displayed on the webpage, such as
ringtone, image, network symbol, subject mode and video segments. If
desired to download the contents, move the cursor to a required link, and
then click the [Central Key]. The downloaded conten ts are respectively
saved in the application programs in the phone. Please read the included
information carefully; if desired to download continually, select Accept; if
desired to abort downloading, select “Abort”. You may not copy, revise,
send or forward some copyright-protected images, music (including
ringtones) and other multimedia contents possibly.
Prior to access to the network, please confirm that you have operated the

37
following procedures:
1. Insert SIM/USIM card.
2. Located inside of a service area of wireless network, which supports
the network function.
3. Set a data account.
4. Set network configuration.
Browse Webpage
Go to homepage
The default homepage is the network operator’s homepage. You can link to
the homepage URL with the main menu.
1. Operation path: Main menu > Browser> Go to homepage.
2. Select webpage linkage, click “Back” and quit out the current page.
3. Click “Option” and select “Exit” to withdraw browser.
Enter URL
Access to Webpage
Manually input the URL to access the related we bpage.
1. Operation path: Main menu >Browser> Enter URL.
2. After the URL input, click “Option” to select “Ok”.
Clear up the relevant records on Internet
1. Operation path: Main menu > Browser > Browser settings > Clear.
2. Select cleared contents: history, cache, cookies, login info.
Save Webpage Message
1. You can through the path: Option >Tools > Save webpage under the
status of webpage browser.
2. The phone will display the webpage message which is able to
download. You can download the content and click [Central Key] to
save.
Bookmark
With the bookmark, you can access to the saved webpage URLs quickly.
Add Bookmark

38
You can set the current webpage as a bookmark or create a bookmark
through the functional menu when you are browsi ng a webpage.
1. Under the webpage-browsing status, via path: Option> Tool> Mark
page.
2. Create a bookmark with functional menu, via path: Main menu>
Browser>Bookmark.
3. You can click “New” when there is no bookmark. If there has bookmark,
you can click “Option” to select “New”.
4. Input bookmark name and URL and click the “Save” to save the
bookmark.
Open Bookmark
1. Operation path: Main menu >Browser > Bookmark.
2. Search the bookmark you required, and then click the [Central Key] to
link and access to the bookmark.
Option Menu of Bookmark:
z New: create a new bookmark.
z Edit: re-edit the bookmark name and URL.
z Delete: delete the current one.
z Delete All: delete all.
z Detaileds: view the name of bookmark and address.
z Send Link: send the network linkage by Text message, MMS
and Bluetooth.
z Move: move a selected bookmark to a previous position, or to
a next position, or to the list top or bottom.
History
With the historic log, you can view the latest-browsed webpage, select Link
to URL in historic log, and acce ss to the webpage.
Access to Latest Browsed Webpage
1. Operation path: Main menu >Browser > History.
2. Click the [Central Key] to link and access to the webpage.

39
Option Menu of Browsing Log:
z Delete: delete a current browsing log.
z Delete All: clear away all the browsing logs.
z Show title: display message title.
Push message box
View Push Message
1. Operation path: Main menu > Browser >Push message box.
2. You can select message list when there has Push message, and then
click “Option” to select “Details”.
Saved pages
Save Webpage
When browsing a webpage, click “Option”to select “Tools”, and then select
“Save page”. The phone will save the current webpage to a folder of “Saved
pages”.
Browse Saved pages
1. Operation path: Main menu > Browser > Saved pages.
2. Select webpage list and click the[Central Key]to view the webpage.
3. When viewing the Saved pages, select a linkable item in the webpage
and click the[Central Key]. The browser will automatically link to the
network source and open the linked webpage online.
Set up Webpage List D isplay Mode
1. Operation path: Main menu > Browser > Saved pages.
2. Select to display webpage name, time and URL.
Option Menu of Saved pages:
z Delete: delete a currently-saved pages.
z Delete All: clear up all Saved pages.
z Show title/ Show date/ Show URL:display according to title,
date and URL.
z Sort by title / Sort by date: classified by webpage title or date.
Browser Settings

40
The settings of browser includes browser clearance, security settings,
appearance and concerning browser.
Clear Browse Message
1. Path: Main menu > Browser > Browser settings > Clear.
2. Select clear type including clear history, cache, cookies and login i nfo.
3. You can clear away the message by clicking the clear type.
Set up Security Parameter
1. Operation path: Main menu > Browser > Browser Settings > Security
setting.
2. Select Setting type, and click “Ok” to open the parameter choice
window.
3. Select a concrete security characteristic status to select and save the
setting by clicking “Ok”.
Set up Browser Display Characteristics
1. Operation path: Main menu > Browser > Browser Settings> Look and
feel.
2. Select Setting type, and click “Ok” to open the parameter choice
window.
3. Select the concrete display character parameter to select and save the
setting by clicking “Ok”.
View Browser Message
1. Operation path: Main menu > Browser > Browser Settings>About
browser.
2. View the detailed message of browser.
Some internet service demands saving certificates in the phone, such as
online bank. The phone may preset some certificates when leaving the
factory, or you man download updated certificates.
Network Settings
Set up network connection parameters.
Operation path: Main menu > Browser > Network Settings.

41
Create Network Settings
1. Operation path: Main menu > Browser > Network settings.
2. Click “Option” to select “New”, click “Ok” to open the setting page of
new network configuration.
3. Input network parameter including profile name, homepage,
connection mode and data account.
4. After finishing the input, click “Save” to reserve network
configuration.
Set up Default Network Configuration
1. Path: Main menu > Browser > Network settings.
2. Select the network entry, click the “Central Key” to select Network
Configuration. The phone will save the network configura tion settings.
3. When the browser is launched, the phone will automatically connect to
the network with the latest set network configuration.
Option Menu of Network Configuration:
z Create: create a new network connection.
z View : view parameters of a selected network configuration.
z Edit: edit parameters of a selected network confi guration.
z Delete: delete a network configurat ion entry.
Entertainment
The phone supports various functions of JAVA application. You can
download the games from the wetwork and install in the phone for use.
If desired to use the online application by downloading from the network,
you can concult the network service supplier for relevant information.
If desired to enter the entertainment menu, you can click Central Key under

42
the standby status, and then enter into main functional menu to select
[Entertainment].
Please install and use those reliably-originated application programs and
software. The software developer must be capable of providing essential
security protection against the attack of the virus software.
Download Application Software
Download Application Software
1. Operation path: Main menu > Entertainment.
2. Click “Option” to select “Download”, and then click “Ok”.
3. Input a URL of the application software to be downloaded and click the
[Central Key]. The device will link to the webpage of the URL and
download and processing in the webpage.
4. After finishing download, the phone will display an enquiry about
installation. Click “Yes”. The phone will begin to install the application
software.
5. If failed in downloading, the phone will display causal information, the
cause may be: memory shortage, user interruption, interruption for
network switch and no electricity.
Install Application Software
Install Application Software
1. Operation path: Main menu > Entertainment.
2. Click “Option” to select “Go to Java”, and then click “Ok”.
3. Select the application software you required to install, Click [Central
Key]to select “Yes”, the phone will begin to install the application
software.
4. The screen will display the installation progress when the phone
installs software. If the phone installs the games with same version,
the phone will display to confirm the installation prompt.
5. After finishing the installation, the screen will display operation
enquiry, you can click “Yes”, the phone will operate this software
immediately.
6. If desired to delete the application software, you can click “Option” to

43
select “Delete”, and then click “Ok”.
7. If desired to comprehend relevant information of application software,
you can click “Option” to select “Details” and then click “Ok”.
Run Application Software
Run Application Software
1. Operation path: Main menu > Entertainment.
2. If desired to run the application software, you can click[Central Key]
to run the software.
3. Quit out the current application and return back the entertainment
menu.
Option Menu of JAVA Application List:
z Download: input the download URL. The phone will link to
the URL.
z Go to Java: open the My stuff to view the download
software list saved in the phone.
z Delete: delete the application software.
z Access Point: set up the network configura tion.
z Details: view the application software data.
Camera
You can snap the photo and record a video by using the camera function in
the phone.
If desired to enter the camera menu, please click[Central Key]under the
standby status, and then enter into the main functional menu and
select<Camera>.
Do not snap or take a video record without the permission of the party or
when concerning other person’s privacy.
Do not use snap or video function when you are locating at the
photo-prohibited areas.
The photos and films which generated by the camera will be saved in the
phone by JPG format, 3GP forma t , MP4 and 3G2 format.

44
Photo Snapping
Photo Snapping
1. Operation path: Main menu > Camera.
2. You can set the phone screen as view-selecting frame, then click side
key, camera key or [Central Key] to snap what you need, the phone will
generate the picture and display in the screen, and save to My Album
automatically.
3. If desired to continue to snap, you can click [Central Key] to back to
the view-selecting status.
4. If you desired to browse or operate the saved photo, please use
operation path under the photo generating or camera status: Option >
Photo album.
5. If you do not desire to save the picture, you can use operation path
under picture preview status: Option > Delete, and you can operate in
My Album: Option > Delete.
6. If you are desired to self-snapping, you can use operation path under
the view-selecting status of the camera: Option > Sub se nsor.
7. If you required to timing snap, you can use operation path under
view-selecting status of the camera: Option > Countdown >Close/3
sec./5 sec./10 sec..
8. If you want to set the special effect of the picture, you can use
operation path under view-selecting status of the camera: Option >
Effect > Close/Black and white/Negative/Sepia/Aqua.
9. If you want to set the parameter of the camera, for example Shutter
tone, Resolution, White balance, Flicker frequency adjustment, Night
mode and Initial filename of picture, please use operation path under
view-selecting status of the camera: Option >Settings.
Open Option Menu by Clicking “Option” under View-selecting Status
of Camera:

45
z To c amcorder: switch the video camera to snap mode.
z Photo album: switch to My Album of My stuff. My Album is
as a folder for storing the default picture.
z Countdown: the function of self-timer includes Close/3
seconds/5 seconds/10 seconds, self-timer close is set in
default.
z Effect: Close/Black and white/Negative/Brown/Reseda,
special effect close is set in default.
z Frame mode: you can select different frames to screen.
z Settings: you can set up the Shutter sound, Quality, Image size,
White balance, Anti-Banding, Night mode and Photo default
name.
9 Shutter sound: Sound1/ Sound2/ Sound3, “Sound1” is
set in default.
9 Quality: Middle, Low, High, Middle is set in default.
9 Image size: many kinds of Resolution to choose,
240X320 is set in default.
9 White balance: Auto, Tungsten, Fluorescence, Daylight,
Cloudy, Auto is set in default.
9 Anti-Banding: 50Hz/60Hz, 50Hz is set in default.
9 Night mode: Open/Close, C lose is set in default.
9 Photo default name of picture: Image.
z Save location: the storage position for screened photos. The
option is phone/Memory card. The phone is set in default.
z Memory status: display the current memorizer and usage
status. The display contents are u sed space/ total space and
classified as phone and external memorizer display.
Open Option Menu by Clicking “Option” under Preview Status after
Screening:
9 Photo Album: switch to My Album of My stuff. My
Album is as a folder for storing the default picture.

46
9 Send: send the picture by MMS/E-mail/Buletooth.
9 Set as: set up the picture as wallpaper/image of
contacts.
9 Delete: delete the picture .
9 Rename: re-nam e the picture.
9 Details: view the detailed information of the file,
including name, format, type, creation date, size,
resolution, position and file protection.
Screening Video
Screening Video
1. Operation path: Main menu > Camera.
2. Click “Option” to select “To camcorder” and click “Ok”.
3. You can set the phone screen as view-selecting frame, then click side
key, Camera key or [Central Key] to snap aiming at your required
object, you can pause the screening by re-clicking side key or the
[Central Key] , click “Stop” to end the screening.
4. If you are desired to browse or operate the saved video, please use
operation path under the video camera status: Option > Video album,
and then use operation path in folder of my video: Option
>Delete/Rename/Details.
5. If you are desired to self-snapping, please use operation path under the
video camera status: Option >Sub sensor.
6. If you are desired to set up the video color, please use operation path
under the video camera status: Option >Effect >Close/Black and
white/Negative/Sepia/Aqua.
7. If you want to set up the parameter of the camera, for example Quality,
Resolution, White balance, Voice switch record, Video format, Record
time restriction, Flicker frequency adjustment, Night mode and Initial
filename of picture, please use the operation path under video camera
status: Option >Settings.
Open Option Menu by Clicking “Option” under View-selecting and
Screening Status:
z To came ra: switch to the screening mode of camera.
z Video album: switch to “video” in My stuff, the storage folder

47
for screening film will be defaulted as “video”.
z Effect: Close/Black and white/Negative/Sepia/Aqura, Close is
set in default.
z Settings: Quality, Image size, White balance, Record sound,
Video type, Record time limit, Anti-banding, Night mode and
Video default name .
9 Quality: Middle, Low, High, Middle is set in default.
9 Image size: 176X144 and 128X96, 176X144 is set in
default.
9 White balance: Auto, Tungsten, Fluorescence, daylight,
Cloudy, Auto is set in default.
9 Record sound: Close /Open, Open is set in default.
9 Video type: 3GP, MP4 and 3G2, MP4 is set in default.
9 Record time limit: 1minute/5 minutes/15 minutes/60
minutes, 60 minutes are set in default.
9 Anti-banding: 50Hz/60Hz, 50Hz is set in default.
9 Night mode: Close/Open, Close is set in default.
9 Video type: Video.
z Save location: the storage position for screened photos. The
option is phone/memory card. The phone is set in default.
z Memory status: display the status of currently used storage
space and total storage space and classified as phone and
storage card display.
Send Picture and Video
Send Picture Through MMS or E-mail
1. Operation path: Main menu >Messages >Multimedia/Email >New.
2. Select to add entry and click[Central Key]to open My stuff.
3. You can select the required pictures in the My stuff and click[Central
Key]to confirm the addition.
4. You can click “Option” to select “Send” when the phone returns back
the editing window of MMS or E-mail.
5. You can input the message of addressee and click[Central Key]to
confirm the sending under the editing window of add ressee.

48
Send Video Through MMS or E-mail
1. Operation path: Main menu >Messages >Multimedia/Email >New.
2. Select to add entry and click[Central Key]to open My stuff.
3. You can select the required video in the My stuff and click “Ok”.
4. You can click “Option” to select “Send” when the phone returns back
the editing window of MMS or E-mail.
5. You can input the message of addressee and click[Central Key]to
confirm the sending under the editing window of add ressee.
Set up Storage Position
Set up Storage Position of Pictures
1. Operation path: Main menu >Camera.
2. Click “Option” to select “Save location”, and then select “Phone” or
“Memory card”.
Set up Storage Position of Videos
1. Operation path: Main menu >Camera.
2. Click “Option” to select “To camcorder”, and then select “Ok”.
3. Click “Option” to select “Save location” under video window, and then
select “Phone” or “Memory card”.
View Storage Message
View Storage Me ssage
1. If you are desired to view the memorizer status, please use the
operation path: Main menu >Camera.
2. Click “Option” to select “Memory status”, and then select “Ok”.
Messages
You can use the messages menu to send and receive text message,
multimedia message and E-mail.
If desired to enter the messages menu, please click[Central Key]under the
standby status, and then enter into main function menu to select
<Messages>.

49
Please confirm the following procedures you have operated before sending
and receiving message:
1. Insert (U)SIM card.
2. Locate inside the wireless network service area and the network
supports the message function.
3. Set up network access point.
4. Set up parameters for text message.
5. Set up parameters for multimedia message.
6. Set up parameters for Email.
The phone can identify the supplier of (U)SIM card and can set up message
parameters automatically as well. You can set up the parameters manually if
the phone has not set up the message parameters automatically. For relevant
parameter questions, please consult the provider or network operator.
The messages menu will display different folders, please refer to the folders
as follows:
Text message: Create, Edit and Save text message.
Multimedia: Create, Edit and Save multimedia message.
Email: Create, Edit and Save Email.
Text message
Create and Send Message
1. Operation path: Main menu >Messages > Text message >New.
2. Input content in the editing window.
3. If you are desired to add the message of contacts, commonly-used Text
message or website message in message, please use the operation path:
Option >Insert >Contacts/SMS templates/URL.
4. After finishing editing, you can click “Option” to select “Send”, and
then enter into the Send window, input the number of addressee manually, or
by clicking “Option” to select addressee’s number from “Recent
receiver/Contacts” and click[Central Key]to send the message.
5. If you are desired to save the edited message into draft mailbox, please
use the operation path: Option >Save to the draft.

50
Option Menu of Editing Text message:
z Send: send the well-finished Text message contents and jump
to the addressee editing window.
z Insert: you can insert the message, commonly-used phrase and
website of the contacts when editing the current Text message.
z Save to draft: save the currently edited Text message into draft
box and as draft.
z Input mode: select to alter the input mode.
z Input settings: set up the electable option of input mode.
View Received Message
1. Operation path: Main menu > Messages > Text message > Inbox.
2. Arrange message by time sequence to search the contents to be viewed.
Under the message list status, you can view the detailed message
content by clicking “Option” and selecting “De tails”.
Option Menu after Selecting Inbox:
z Reply: reply the current Text message by Text message /MMS.
z Forward: forward the current Text message to operation
window of editing Text message which contained original Text
message contents.
z Delete: delete the current Text message or selected Text
message.
z Delete all: clear up the Text message in inbox.
z Call: use voice or video to call the number of current message
addresser.
z Save number: newly-built or renew the number of current
contacts.
z View mode: display the message in the message-receiving list
by date and subject.
z Details: display the attribute information of the current
message.
Option Menu of Viewing Text message Contents:
9 Reply: reply the current SMS by SMS/MMS.

51
9 Forward: forward the current SMS to operation
window of editing SMS which contained original SMS
contents.
9 Delete: delete SMS.
9 Call: use audio or video to call the number of current
message addresser.
9 Exstract: abstract the phone number/URL/E-mail in the
message contents.
9 Move to USIM card: move the SMS to the
phone/USIM card.
View Message Failed in Sending
1. Operation path: Main menu >Messages>Text message>Outbox.
2. Arrange message by time sequence to search the SMS to be viewed,
click[Central Key]to view SMS in details.
Option Menu of Outbox Message
z Resend: resend a selected message.
z Delete: delete or delete a batch the selected SMS.
z Delete all: clear up the current outbox.
z View mode: display the message in the message-sending list
by date and subject.
z Details: addressee, time and type.
Option Menu of Viewing Unsent Message:
9 Resend: resend a selected message.
9 Delete: delete the selecte d SMS.
9 Call: call the current message sender by audio/video.
9 Exstract: phone num ber, website and E-mail.
View Sent Message
1. Operation path: Main menu >Messages >Text message >Sentbox.
2. Arrange message by time sequence to search the SMS to be viewed,
click[Central Key]to view SMS in details.

52
Option Menu of Sent Message:
z Forward: forward the current successfully-sent message to
other person.
z Delete: delete the current selected message or the whole
message list.
z Delete all: clear up the currently sent mailbox.
z Call: use audio or video to call the number of current message
addresser.
z View mode: display the message in the sent message list by
date and subject.
z Details: addressee, time and type.
View/Edit Draft Message
1. Operation path: Main menu >Messages > Text message >Draftbox.
2. Arrange message by time sequence and search required information.
3. If you are desired to continue to edit the draft message, select a draft
entry to redact it.
4. After finishing editing, you can click “Option” to select “Send”, and
then enter into the send window, input the number of addressee, or by
selecting addressee’s number from “Recent receiver/Contacts” and
click[Central Key]to send the message.
Option Menu after Selecting Draft Box:
z Send: send the content of draft box to the contacts, if there is
no addressee, you can jump to the address editing window of
addressee.
z Insert: you can insert the message, commonly-used phrase and
website of the contacts when editing the current Text message.
z Delete: delete the current selected message or the whole
message list.
z Delete all: clear up the current draft box.
z View mode: display the message in the draft list by date and
subject.

53
z Message details: addressee, time and type.
Cell Broadcast
After you launch “Cell Broadcast” service, the message will be sent
according the local area’s conditions. The “Cell Broadcast” does not aim to
the phone number to send the message, but in accordance with the
geography region. You will feel that all messages are together with you
when you receive the “Cell Broadcast” service.
Message Tem plates
Edit the commonly-used text message templates in advance in order to
provide a convenience for message editing.
The phone can store more than 10 text templates.
1. Operation path: Main menu >Messages >Text message>Templates.
2. If you are desired to reedit the saved commonly-used templates, you
should edit the required templates entry, then click[Central Key]to edit.
3. If you are desired to create the new commonly-used templates, you can
click “Option” to select “New”, and then input the content of message
templates and click[Central Key]to reserve the preset setting.
Option Menu when the Preset Message Templates Entry is not full:
z Send: send the preset commonly-use d SMS to the contacts.
z New: create the commomly-used SMS.
z Delete: delete or delete a batch the selected commonly-used
SMS.
z Delete all: clear up the SMS templates.
Option Menu when the Preset Message Templates Entry is full:
z Send: send the preset commonly-use d SMS to the contacts.
z Delete: delete or delete a batch the selected commonly-used
SMS.
z Delete all: clear up all commonly-used SMS.
Text message Settings

54
1. Operation path: Main menu > Messages > Text message >Settings
>Setting/Send setting/Default storage/Memory status.
2. Select setting entry and input the relevant parameters of SMS account,
and send relevant parameters and default memorizer.
Multimedia
Create and Send Multimedia
1. Operation path: Main menu > Messages > Multimedia > New.
2. Select the subject and click[Central Key]to input the subject under
MMS editting status.
3. Select the text and click[Central Key]to input the MMS contents
under MMS editting status.
4. Select image or video and click[Central Key]to open the My stuff, and
then select the required image or video files, click[Central Key]to add
the file into the MMS under MMS editting status.
5. Select audio and click[Central Key]to open the My stuff, and then
select the required audio files, click[Central Key]to add the file into
the MMS under MMS editting status.
6. Select other attachment and click[Central Key]to open the My stuff,
and then select the required files, click[Central Key]to add the file
into the MMS under MMS editting status.
7. If you are desired to increase the MMS contents, please use the
operation path: Option > Add page.
8. If you are desired to preview the MMS effect, please use the operation
path: Option > Preview.
9. If you are desired to save the edited MMS as MMS templates, please
use the operation path: Option > Save as MMS template.
10. If you are desired to save the edited MMS to draft box, please use the
operation path: Option > Save to draft.
11. After finishing the editing, please use the operation path: Option
>Send.
12. Input the number of the contacts or click[Central Key]to select the
number of the contacts from the contacts, you can select “Add
Contact” if required to send to many people.

55
13. If required to alter the sending mode, please use the operation path:
Option >Change send mode>To/CC/BCC.
14. Click[Central Key]to send MMS after finishing the setting of contacts
and sending mode.
Option Menu of Editing Multimedia:
z Send: send the well-finished MMS contents and jump to the
addressee editing window.
z Preview: preview the edited MMS.
z Slide time: set up the interval of slide playing time.
z Add page: add an edited page in the M MS.
z Save to draft: save the well-edited MMS to the draft.
z Save as MMS template: save the well-edited MMS into the
phone as MMS template.
View Multimedia
1. Operation path: Main menu>Messages>Multimedia>Inbox.
2. Arrange message by time sequence to search the MMS to be viewed,
click[Central Key]to view MMS in details.
3. Through setting up the reception mode of MMS, the MMS in the inbox
will be received immediately, sluggish reception will be received
immediately when roaming.
Option Menu of Viewing Missed MMS:
9 Retrieve: download integral MMS contents.
9 Delete: delete or delete a batch the selected MMS.
9 Delete all: clear up the MMS in in box.
9 View type: arrange the MMS sequence by date/subject.
9 Details: display the current attribute information of the
current MMS, including sender, date, time and type.
Option Menu of Viewing Received MMS:
9 Open: open image and install JAD to play the video.
9 Reply: reply the current sender of MMS.
9 Forward: forward the current MMS to other contacts.

56
9 Call: call the current MMS sender by audio/video.
9 Save file: save the video, audio and image to the folder.
9 Exstract: abstract the phone number, website and
image.
9 Delete: delete or delete a batch the selected MMS.
9 Details: display the current attribute information of the
current MMS, including sender, da te, time and type.
View the unsuccessfully-sent Multimedia:
1. Operation path: Main menu>Messages>Multimedia>Outbox.
2. Arrange message by time sequence to search the MMS to be viewed,
click[Central Key]to view MMS in details.
Option Menu of Outbox Message:
z Resend: resend the selected MM S.
z Delete: delete or delete a batch the selected MMS.
z Delete all: clear up the current outbox.
z View type: display the MMS in the message-sending list by
date and subject.
z Details: addressee, time and type.
Option Menu of viewing Unsend Multimedia:
9 Resend: resend the selected MMS.
9 Delete: delete or delete a batch the selected MMS.
9 Details: view addre ssee, time and type of MMS.
View Sent Multimedia
1. Operation path: Main menu >Messages >Multimedia>Sent Mailbox.
2. Arrange message by time sequence to search the MMS to be viewed,
click[Central Key]to view MMS in details.
Option Menu of Sent MMS:
z Forward: forward the current sent MM S to other contacts.
z Delete: select to delete the current selected MMS or the whole
MMS list

57
z Delete all: clear up the current sent mailbox.
z Call: call the current SMS sender number by audio/video.
z View type: display the sent list of MMS by date and subject.
z Details: addressee, time and type.
View/Edit Draft
1. Operation path: Main menu >Messages >Multimedia>Draft box.
2. Arrange MMS by time sequence to search the MMS to be viewed, if
you are desired to continue to edit message in draft box, you can select draft
entry and click[Central Key]to enter into the editing window.
3. After selecting the editing entry and finishing the editing, you can click
“Option” to select “Send”, and then input the number of addressee, or by
selecting addressee’s number from “Recent receiver/Contacts” and click
[Central Key]to send the message.
Option Menu after Selecting Draft Box:
z Send: if there is no addressee, you can jump to the address
editing window of addressee; if the content of MMS is empty,
it will prompt whether to continue to send.
z Delete: select to delete the current selected MMS or the whole
MMS list
z Delete all: clear up the current draft box.
z View type: display the message of draft list by date and
subject.
z Details: addressee, time and type.
MMS Template
Edit the commonly-used templates in advance in order to provide
convenience for MMS editing.
1. Operation path: Main menu >Messages >MMS>Templates.
2. Select the MMS entry which required editing, and click[Central Key]
to edit.

58
Option Menu of Multimedia Templates Entry:
z Send: send the MMS templates to the contacts.
z Delete: delete or delete a batch the selected MMS templates.
z Delete all: clear up MMS templates.
Multimedia Setting
1. Operation path: Main menu >Messages >Multimedia> Setting.
2. You can select the setting entry and input the MMS parameters in
order: MMS center life time, priority, report allowed, delivery report,
read report, admit anonymity, fetch mode, delivery size limit,
reception size limit and profile settings.
Email
Create and Send Email
1. Operation path: Main menu >Messages >Email>New.
2. Select the subject and click to input the subject under E-mail editing
status.
3. Select text and click to input the subject under E-mail editing status.
4. Select attachment and click to open the My stuff under E-mail editing
status, and then select the file which required to be added in the
attachment and click it to add into the E-mail.
5. If you required adding attachment of E-mail, please use the operation
path: Option >Add attachment.
6. If you required inserting the message of contacts into the E-mail
attachment, please use the operation path: Option > Add vCard.
7. If you required saving the edited E-mail into the draft box, please use
the operation path: Option >Save to draft.
8. After finished editing, please use the operation path: Option >Send.
9. You can input the address of contacts or select the address of contacts
from the Contacts.
10. If you required altering the sending mode, please use the opration path:
Option >Change send mode >To/CC/BCC.
11. You can click to send the E-mail after finishing selecting contacts and
sending mode.

59
Option Menu of Editing Email:
z Send: send the well-finished E-mail contents and jump to the
addressee editing window.
z Add attachment: select the Add File from the My stuff.
z Add vCard: select and add contact info from the Contacts.
z Save to draft: save the well-redacted E-mail in the draft.
View Received Email
1. Operation path: Main menu >Messages >Email>Inbox.
2. Arrange E-mail by time sequence to search a required E-mail.
3. Under the E-mail list status, click the [Central Key] to view the
E-mail contents.
4. With the set E-mail receiving mode, the E-mails in the inbox may be a
themed one or an integral one.
Option Menu of Viewing Email List:
9 Reply: reply to sender of the current E-mail.
9 Reply All: reply to all senders and copy-to persons of
the current E-mail.
9 Forward: forward the current E-mail to other contact.
9 Retreive body: download an integral E-mail content.
(Themed Type Email)
9 Mark as unread/read: mark the E-mail as
read/unread.(downloaded E-mail)
9 Retreive new: view and receive the new E-mail.
9 Delete: delete or delete a batch the selected E-mail.
9 Delete all: clear up the E-ma ils.
9 View mode: display the mail of mail list by date and
subject.
9 Details: display the mail data.
View unsuccessfully-sent Email
1. Operation path: Main menu >Email > Outbox.
2. Arrange E-mail by time sequence to search a required E-mail.

60
3. Click the[Central Key ]to view the detailed E-mail contents.
Option Menu of Outbox Message:
z Resend: resend the selected mail.
z Delete: delete or delete a batch the selected E-mail.
z Delete all: clear up the current outbox.
z View mode: display the mail of mail-sending list by date and
subject.
z Details: from,subject,time,size,to,priority,attachment.
Option Menu of Viewing unsent E-mail:
9 Resend: resend the selected mail.
9 Delete: delete or delete a batch the selected E-mail.
9 Extract: extract number, URL, mail address from the
content.
View Sent E-mail
1. Operation path: Main menu >Messages >Email>Sentbox.
2. Arrange E-mail by time sequence to search a required E-mail.
3. Click the[Central Key]to view the detailed E-mail contents.
Option Menu of Sent E-mail:
z Forward: forward the current successfully-sent E-mail to other
contact.
z Delete: delete or delete a batch the selected E-mail.
z Delete all: clear up the current sent mail.
z View mode: display the mail of mail-sending list by date and
subject.
z Details: from,subject,time,size,to,priority,attachment.
Option Menu of Viewing Sent Em ail:
9 Forward: forward the current successfully-sent E-mail
to other contact.
9 Delete: delete or delete a batch the selected E-mail.
9 Attachment list: view the deta iled list in attachment.
9 Extract: extract number, URL, mail address from the

61
content.
9 Details: from,subject,time,size,to,priority,attachment.
View/Edit Draft
1. Operation path: Main menu >Messages >Email>Draft box.
2. Arrange E-mail by time sequence to search a required E-mail.
3. If you are desired to continue to edit message in draft box, you can
select draft entry and click[Central Key]to edit, and click “Option” to
select “Send” to send the mail.
Option Menu after Selecting Draft Box:
z Send: if there is no addressee, you can jump to the address
editing window of addressee; if the content of mail is empty, it
will prompt whether to continue to send.
z Delete: delete the current selected mail or the whole mail list.
z Delete all: clear up the current draft box.
z View mode: display the draft list by date and subject.
z Details: from,subject,time,size,to,priority,attachment.
Email Setting
1. Operation path: Main menu >Messages >Email >Settings >Email
accounts.
2. Click “Option” to select “New”.
3. You can select the setting entry and input the MMS parameters in
order: account name, my address, save copy, user name, password,
receive server, send server, receive port, send port, auth. type, SMTP
authentication, use SSL and data account.
Contacts
With the contacts, you can manage the information, such as contact phone
number and address etc., and you can set up the personal ringtone and
incoming call image or send the v-Card to the contacts.
If desired to enter into the contacts menu, please select [Central Key] under

62
the standby status, enter into the main function me nu and select <Contacts>.
Set up Current Contacts Display
Set up Current Contacts Display
1. Operation path: Main menu > Contacts.
2. Click the “Option” to select “Contacts Display”, click “Ok” to select
Phone /USIM Card/All.
OperateContact Data
New Contact
1. Operation path: Main menu >Contacts.
2. Click “Option” to select “New”.
3. Select the setting entries and input the data of contacts in order. If the
data saves in the phone, the data contents include: name, mobile
number, video number, number, number type, group, E-mail, URL,
birthday, ringtone, image and notes. If the data of contacts save in
USIM card, the data contents include: name and number.
Option Menu when at Newly-added Status:
9 Save: save the currently-set message of a new contact.
9 Add number: add the option for a couple of numbers
including phone number editing and phone number
type selecting.
9 Add company: add the company name item which can
be edited.
9 Add job title: add the post item which can be edited.
Search Contact
The phone supports the following search m odes for contacts:
z English: search according to the alphabetic order.
The contacts entry of the phone will order according to the initial letter order
under default status.
1. Operation path: Main menu >Contacts.
2. You can input the initial letter of the contact’s name when you search
English name and search the required inquiring about the name and

63
phone number of the contacts.
Option Menu under Contacts Status:
z Call: call the selected contact by voice call.
z Send message: edit Text message or MMS.
z New: create the message of contact in contacts.
z Edit: edit the message of the current contact in contac ts.
z Delete: delete the current selected contacts or delete a batch
the selected contacts.
z Copy to USIM/mobile: support the copy between USIM card
and phone mutually, copy the curremt record/copy a batch
selected records.
z Add to group: add the contact into a certain group.
z Contacts display: select the contacts to display phone/USIM
card/All.
z Send: send the data of current contact by
SMS/MMS/E-mail/Buletooth.
z Memory status: display USIM card and the contacts volume of
the phone.
z Settings: set up my business card/Speed dial/Reject call/Fixed
dial.
9 My business card: preset to edit the self-message.
9 Speed dial: support to set up the numeric key of
keyboard to Quick Dial Key of contact number in
contacts. Under the standby status, press and hold the
numeric key 1 is dialing the voice mailbox, press and
hold other numeric keys is calling the contact’s number.
9 Reject call: save the contact’s number of phone into
incoming call filter list, the phone will refuse the
incoming call of this contact.
9 Fixed dial: set up the contact’s number as fixed number
and after through confirming of PIN and launching, the
phone just supports to dial the numbers in fixed dial
list.

64
Edit Contact
Reedit the possessed data of contacts.
1. Operation path: Main menu > Contacts.
2. Select the contact entry, click “Option” to select “Edit”, and then click
“Ok”.
3. If the data of contact save in the phone, the contents which can be edited
include: name, mobile number, video number, number, number type, group,
E-mail, URL, birthday, ringtone, image and notes. If the data of contacts
save in USIM card, the contents which can be edited: name and number.
Delete Contact
Delete the data of contacts one by one or in a batch.
1. Operation path: Main menu >Contacts.
2. Select the contact entry, click “Option” to select “Delete”, and then
select the deletion mode and click “Ok”.
3. If selecting the mode “batch to delete”, you can use[Central Key]to
select deletion items, and click “Option” to select “Delete” and click
“Ok”.
Manage Group
Organize and classify the contact data according to the type of the contact.
Manage Group
1. Operation path: Main menu >Contacts.
2. Switch to the group by clicking [Right Navigation Key].
3. Select group name, click[Central Key]to enter into the call entry list
under the current group.
4. The group contacts entry will order according to initial letter order
under the default status. You can quickly search the required contact’s
name and phone number by inputting quick sea r ch of contact’s name.
Option Menu of Predefining Group:
z Edit: edit relevant data for current group, including group
name, group ringtone and group image.

65
z New: create the group.
Option Menu of Customizing Group:
z Edit: edit relevant data for current group, including group
name, group ringtone and group image.
z New: create the group.
z Delete: delete a currently-selected group .
Contacts-associated Function
Set up the Ringtone and Image for Contac t
The phone only supports to set up the special ringtone and image for the
contacts in Contacts.
1. Operation path: Main menu >Contacts.
2. Select a contact , click “Option” to select “Edit” and click “Save”.
3. Select ringtone or image, and then click[Central Key]to open the
folder, select to add the required files.
Dial the Contact
1. Operation path: Main menu >Contacts.
2. Select a contact, click[Call Key]to call the contact or click “Option”
to select “Call”, and then select the call mode and click “Ok”.
Use business card
Create business card
1. Operation path: Main menu >Contacts.
2. Click “Option” to select “Settings”.
3. Select “My business card” and click[Central Key]to open the business
card setting window.
4. Select the input entries and input the personal information in order,
including name, mobile number, video number, number, number type,
group, E-mail, URL, birthday, ringtone, image and notes.
Send My business card through Contacts
1. Operation path: Main menu >Contacts.

66
2. Click “Option” to select “Settings”.
3. Select “My business card” and click[Central Key]to open the business
card message window.
4. Click “Send” to select the sending mode and click “Ok”.
5. The phone will open the message editing window and add business card
in message.
6. After finishing message editing, you can click “Option” to select “Send”,
click “Ok”. Input the message of addressee and click[Central Key]to
send.
Memory Status
View Memory Status
1. Operation path: Main menu >Contacts.
2. Click the “Option” to select “Memory Status”.
3. Memory status exits in two places, they are phone and USIM card which
display the use space/total space.
Tools
The tools module includes Alarm clock, Calculator, Recorder and World
time; if desired to enter into the tool menu, please enter into the main
function menu and select [Tools] under the standby status.
Alarm Clock
You can set up alarm clock for special time, and can activate alarm clock
circularly with special date. The tone function of alarm clock still works
when you set the phone at mute or close status.
Activate Alarm Clock
1. Operation path: Main menu >Tools >Alarm
2. The phone supports three alarm clocks setting respectively, you can
select the required setting alarm clock, and then click “Central Key” to
enter into the setting page of alarm clock.
3. Input the parameters of alarm clock in order, and click “Save” to save

67
the setting of alarm clock.
4. If you are desired to activate the closed alarm clock, please click “On”
to open the selected alarm clock under the list window.
Calculator
The phone supports the simple calculator function, including addition,
subtraction, multiplication and division operations, radical sign operation,
storage operation and operation number reverse. The calculator also includes
radix point, operation number and operation results, and supporting within
8-digit input space.
Calculator Usage
1. Operation path: Main menu > Tools > Calculator.
2. For the simple operation, you can input in sequence: Left operation
number >Operation sign (addition, subtraction, multiplication and
division) >Right operation number >Equal sign.
3. For operation in succession, the operation number will be regarded as
first one after using equal sign and get the results, successively input
the operation sign and the second operation number.
4. The calculator will operate according to the input order. And the result
will display in the input area.
Option Menu under Calculator Status:
z Radical sign: this function can fulfill the operation of radical
sign, and the operation will be performed based on the
currently input number or for the operation results. The sign is
as the unit operation and the priority is higher than addition,
subtraction, multiplication and division. The operation will
finish after inputting operation sign and the operation results
will replace the original operation number or operation results
and display in the designated position. Note: the calculator
does not support the imaginary number’s operation, therefore,
it can not be negative, if the current number is negative, the
radical sign will conceal.

68
z MS: this operation sign and MR MC are the stored operation
signs. The operation sign is stored order, namely, the current
operation number and operation results will be stored in EMS
memory. But it has no operation function and can not fulfill
any operation, therefore, it will not breach the curren t display
contents. Note: it can not store multiple data, and the re-saved
data will replace last stored data. The same data can be used
for many times.
z MR: the MR function will be displayed when the data is as
stored type. This operation sign and MS MC are the stored
operation signs. The operation sign is output order, namely, the
data in EMS memory will be exsufflated from it and display in
the designated position, namely, the operation number locates
at input status. After exsufflating, the data in EMS memory
will not change. However, you need to continue to edit the
operation number after exsufflating, the input content will
place the original data.
z MC: the MC function will be displayed when the data is as
stored type. This operation sign and MS MR are the stored
operation signs. The operation sign is clear order, namely, the
data in EMS memory will be cleared away from it.
Recorder
The phone supports record and play functions.
Recorder Usage
1. Operation path: Main menu > Tools > Recorder.
2. If desired to activate the recorder, you can click [Central Key]under the
recorder status to activate recor der fu nctio n, cl ick [ Central Key]to pause
the record.
3. If desirded to end the record, you can click [Down Navig ation Key]to
stop recording, the phone will store the record file into My stuff
automatically.
4. After finishing the record, you can use[Up Navigation Key]to play the
currently recorded file.

69
Option Menu under Recorder Status:
z Record folder: turn to the page of record folder to play or view
the specific message of record folder.
z Setting: set up the storage position of record file, name of file
is set in default and the record time is limited.
World Time
The phone supports displaying time of cities in different time zones.
Search City Info via Focusing on Map
1. Operation path: Main menu > Tools >World Time.
2. Search city info via the [Navigation Keys]amid different time zones.
3. The city name, map position, local city time, time zone and day & night
status will be displayed on the window.
Quickly Search City via City Name
1. Operation path: Main menu > Tools > World Time.
2. Click the [Central Key]to open a quickly searching window or use:
Option> Quick search.
3. Input the initial letter of the City, use[Up/Down Navigation Key] to
scroll the list and search the city.
4. Click “Ok” to decide the selected city.
5. The phone will display the city position in the map, local date, time,
time zone and day &night status.
Set Locate Zone
1. Operation path: Main menu > Tools >World Time.
2. Select a required city via focusing on map or in quick search way.
3. Click “Option” to select “Set locate zone” and click “Ok”.
4. The phone will set up the selected city time as local city time.
Set Summer Time
1. Operation path: Main menu > Tools > World Time.
2. Select a required city in map bearings or quick search way.

70
3. Click “Option” to select “Summer Time” and click “Ok”.
4. Select a summer time status and click “Ok”.
Option Menu of Time Zone Display:
z Quick search: you can quickly search the required city by
inputting initial letter of the name of city.
z Summer time: launch or close summer time.
z Set locate zone: set up the time of selected city to local time.
Multimedia
Multimedia includes media player and radio.
Media Player
The media player supports the play function of audio file and video file, and
play according to sequence of audio and video files in play list.
If desired to enter into the media player menu, please click[Central Key]
under the standby status, enter into the main functional menu to select
<Multimedia> and enter into “Media Player”.
Create Play List
1. Operation path: Main menu > Multimedia > Media player.
2. Click “Option” to select “Play List”, click “Option” to view the play list.
3. Select “Add”, and then select to add “Folder/Files”, click[Central Key]
to open the My stuff.
4. Select media folder/file of required playing, click[Central Key]to finish
the addition of play list.
Delete the File from the Play List
1. Operation path: Main menu > Multimedia > Media player.
2. Click “Option” to select “Play List”, click “Option” to unfold the play
list.
3. Click “Option” to select “Remove”, click to select deletion mode.
4. If selecting batch deletion mode, you can use[Central Key]to select the

71
file you want to remove, and then click “Option” to unfold the option
menu, select “Remove”, and then click “Yes”.
Option Menu of Play List:
z Add: add folder/files to the play list.
z Remove: remove the current/ delete a batch file from the play
list.
Play Audio/Video Files
1. Operation path: Main menu > Multimedia > Media player.
2. Click[Central Key]to begin the media file in play list when the play list
is full.
3. You can use the keys of or to play the previous or latter media
files, press key to pause and key to stop playing.
4. Press side key to adjust the volume of player.
Option Menu When Playing:
z Play list: the media player will play the audio and video
according to the play list, you can add or remove the play fi le
by play list.
z Play mode: you can set up cycle play and random play.
z Equalizer: set up play audio effect mode.
z Download: you can input website and download designated
audio and video.
z Send: you can send the playing audio and video files by MMS,
E-mail or Bluethooth.
z Full scr een (only video): you can conceal the panel to p lay
video with full screen while playing the video.
z Details: display the attribute message of play file, including
name, format, creation date, playing extent and size of the file.
Radio
The radio will select the frequency band according to network received
country or regional message.

72
Listen to the broadcast
Please note that the effect of receiving broadcast by radio which depends on
the coverage inner the customized region of broadcasting station. The
antenna used by FM radio is not the antenna of wireless device. The function
of FM radio will work normally as long as connecting with the compatible
earphone or fittings.
1. Operation path: Main menu > Multimedia > Radio.
2. Activate the radio search, please click “Search”, the search will stop after
searching the station. Press[Up/Down Nevigation Key]to slightly adjust
the frequency, the[Left/Right Nevigation Key]is to adjust the channel.
3. Press side key to adjust the volume of the radio.
Broadcast Setting
1. Click “Option” to select “Auto Save”, and search the signal channel
automatically and save.
2. Select “Save channel”, you can save the current displayed channel to
the channel list.
3. If you save the stored broadcasting station, you can enter “Channel
List” to select your required station.
4. Change the frequency manually, please click “Option” to select
“Manual input”.
5. If desired to listen to the broadcast by loudspeaker, please click
“Option” to select “Speaker”, the sound path will be switched to the spe aker.
6. Open option to select “Quit”, you will drop out the radio.
My stuff
The My stuff supports the operation of images, sounds, videos and java files.
If desired to enter the My stuff menu, please click[Central Key]under the
standby mode, enter into the main functional me nu, and select <My stuff>.

73
For the resource file downloaded in the phone, you should transact the
relevant processing such as DRM digital copyright management, you just
can use it by obtaining licence information such as CEKs etc. when you use
these resource files. If a file obtains the protection from the digital copyright,
it can not be copied or sent. When DRM file used as wallpaper and ringtone
etc., it will be according to restriction condition of valid term and will give
the prompt prior to the mature date, and inquire about whether to need to
re-purchase the copyright or others.
Folder
Newly-built Folder
1. Operation path: Main menu > My stuff >
Images/Sounds/Videos/Applications/ Others.
2. Click “Option” to select “New folder”, and click “Ok”.
3. After inputting the name of folder, click[Central Key]to save the
folder.
Option Menu of Folder Type:
z New Folder: create the new folder in the current folder.
z Delete folder: delete the selected folder.
z Move floder: move the selected folder from the current
position to other position.
z Copy folder: Copy the current folder to other position.
z View mode: list and abbreviatory image.
z Memory status: display the phone and storage status of
external memorizer.
File
View the File
1. Operation path: My stuff > Images/Sounds/Videos/Applications/
Others.
2. Select folder, click[Central Key]to open the folder.
3. Select file to click[Central Key]to view.

74
Operate the File
1. Operation path: Main menu > My stuff >
Images/Sounds/Videos/Applications/ Others.
2. Select and open the folder, select the required file.
3. Click the “Option” to select “Delete/Move/Copy”, and select specific
operation mode: “Delete / Batch to delete”, “Move/ Batch to move”,
“Copy/ Batch to copy”.
4. For the batch operation, using[Central Key]to select the required file,
click “Option”, open option menu to select the specific operation.
Option Menu of Image List:
z Set as: set up the selected file as wallpaper/contact image.
z Send: send the selected files by MMS/E-mail/Bluetooth.
z Move: move the selected file from the current position to other
position.
z Copy: copy the selected the file to other position.
z Delete: delete the selected file.
z Rename: rename the current file.
z New Folder: create the new folder in the current folder.
z View mode: set up to array the files by list/abbreviatory
image.
z Details: display the current detailed message of the file,
including name, mode, type, time creation, size, resolution,
position and file protection.
z Memory status: view the phone and occupied status of
external memorizer.
Option Menu When Viewin g Image Status:
9 Set as: set up the selected file as wallpaper/contact
image/screen protection.
9 Rotation+flip: rotate or overturn the image.
9 Add effect: original image, decoloration, old picture,
reversion, brightening, darkling, exposal and cartoon.

75
9 Slides show: display the file by playing slide.
9 Send: send thecurrent files by MMS/E-mail/Bluetooth.
9 Delete: delete the current file.
9 Details: display the current specific message of the file,
including name, mode, type, time creation, size,
resolution, position and file protection.
Option Menu of Music Ring List:
z Set as: set up the selected file as voice call ring/message
alert/email alert.
z Send: send the selected files by MMS/E-mail/Bluetooth.
z Move: move the selected file from the current position to other
position.
z Copy: copy the selected file to other position.
z Delete: delete the selected file.
z Rename: rename the current file.
z New folder: create the new folder in the current folder.
z View mode: set up to array the files by list/abbreviatory
image.
z Details: display the current detailed message of the file,
including name, mode, type, time creation, size, position and
file protection.
z Memory status: view the phone and occupied status of
external memorizer.
Option Menu of Video List:
z Send: send the selected files by MMS/E-mail/Bluetooth.
z Move: move the selected file from the current position to other
position.
z Copy: copy the selected file to other position.
z Delete: delete the selected file.
z Rename: rename the current file.
z New folder: create the new folder in the current folder.
z View mode: set up to array the files by list/abbreviatory
image.

76
z Details: display the current detailed message of the file,
including name, mode, type, time creation, size, position and
file protection.
z Memory status: view the phone and occupied status of
external memorizer.
Option Menu of Application List:
z Send: send the selected files by MMS/E-mail/Bluetooth.
z Move: move the selected file from the current position to other
position.
z Copy: copy selected file to other position.
z Delete: delete the selected file.
z Rename: rename the current file.
z New folder: create the new folder in the current folder.
z View mode: set up to array the files by list/abbreviatory
image.
z Details: display the current detailed message of the file,
including name, mode, type, time creation, size, position and
file protection.
z Memory status: view the phone and occupied status of
external memorizer.
Calendar
You can save the Anniversarty, Appointment, Memo.
The phone will timely remind you of the related events, assisting for you to
manage your routines.
If desired to enter into calendar menu, please select [Central Key] under the
standby status, then enter into the main functional menu to select < Calendar
>.
After you enter into the calendar window, the present date will prominently
display in the calendar month view.
Option Menu of Calendar Status:
z New event: create an event in a selected date.
z Week view: view the specific routine in the week.
z Delete: delete the Current/A certain day ago/ All/Partcial

77
events.
z To certain day: skip to a designated date.
z Settings: set up alarm ringtones for different types of events,
and set up the parameter for Week View including the date and
name of Week View.
z Expired Event: display all outdated event logs.
Event Recording Entry
Create Event
1. Operation path: Main menu > Calendar.
2. Select newly-built event’s date in calendar, click[Central Key]to enter
into the event management list in the present day.
3. Click “Option” to select “New event”.
4. You can input the event message such as title, type, summary, address,
start date, start time, end date, end time, alarm, (alarm ringtone) repeat
cycle etc. in calendar setting.
5. After finishing setting, click “Save” to save the message.
Delete Event
1. Operation path: Main menu > Calendar.
2. Select date in calendar, click[Central Key]to enter into the event
management list in the present day.
3. Click “Option” ti select “Delete”, and then select the deletion mode and
click “Ok”.
4. If selecting batch deletion mode, you can click[Central Key]to select
the delete event and click “Option” to select “Delete”, and then click
“Ok”.
Option Menu of Present Event Management List:
z New event: create an event in a present date.
z Delete: delete the current or delete a batch files.
z To certain day: skip to the event management list window of
designated date.

78
View Calendar
View Events in Designated Date
1. Operation path: Main menu > Calendar.
2. Click “Option” menu to select “To certain day” , click “Ok’.
3. After inputting the date, click “Ok”.
Week View
1. Operation path: Main menu > Calendar.
2. Click “Option” to select “Week view”, click “Ok’.
3. If there is an event log in a time interval, the week view will
prominently display the time interval.
Outdated Event
1. Operation path: Main menu > Calendar.
2. Click “Option” to select “Expired event” and click “Ok”.
3. Click “Option” to view the detailed event info.
Call Log
You can view the number of outgoing calls, incoming calls, missed calls and
relevant message by viewing the call log.
If you need to enter into the menu of call log, please click[Central Key]
under the standby status, enter into the main functional menu to select <Call
Log>.
Missed calls: display the list of recently missed calls.
Outgoing calls: display the list of recently outgoing calls.
Incoming calls: display the list of recently incoming calls.
All Calls: display all call records including missed calls, outgoing calls,
incoming calls and call log.
Data transmition: display the volume of sent and received messages. If you
want to recalculate data volume, please click “Reset”.
Call duration: display recent call duration, all outgoing calls time, all
incoming calls time. If you want to recalculate call duration,
please click “Reset”.
Call cost: display recent call cost and all call cost. You can set up toll

79
restriction, Rate standard or replacement.
Call Log
View Call Log
1. Operation path: Main menu > Call log > Missed calls/Outgoing calls/
Incoming calls/All calls.
2. View call log entries.
Save Record Number
1. Operation path: Main menu > Call log > Missed calls/Outgoing calls/
Incoming calls/All calls.
2. Select call log entry to open “Option”, select “Save number”, and then
select save mode, click “Ok”.
3. If as newly-added save mode, select the type of number, click “Ok” to
input the other information of contact, click “Save”.
4. If as updated save mode, select updated entry of contact, and then select
number’s type, you can edit other information of contact, click “Save”.
Call Record Number
1. Operation path: Main menu > Call log > Missed calls/Outgoing calls/
Incoming calls/All calls.
2. Select call log entries.
3. Click [Call Key] to call the current number.
Option Menu in Record List:
z Edit and dial: you can edit and call again if displaying the
recorded number of contact.
z Send message: send the SMS/MMS to the recorded contacts.
z Delete: delete the current/ delete a batch records.
z Save number: add the message of recored contact to the
Contacts.
z Set speed dial: set up the selected contact’s number as speed
dial number.
z Set reject call: set up the selected contact’s number as filter

80
number.
View the Transmission Data Capacity
1. Operation path: Main menu > Call log > Data transmission.
2. Click “Reset” to re-set and recalculate the data capacity.
Review Call duration
1. Operation path: Main menu > Call log > Call duration.
2. Click “Reset” to reset and recalculate the call duration.
Call cost Setting
You can re-set the call cost calculation or set the relevant parameters related
call cost.
Call cost Re-set
1. Operation path: Main meun > Call log > Call cost.
2. Open “Option” to select “Reset expense”, and then click “Ok”.
3. Input PIN2, and then click “Ok”.
Call cost Restriction
1. Operation path: Main menu > Call log > Call cost.
2. Open “Option” to select “Modify limitation” and click “Ok”.
3. Input PIN2, and then click “Ok”.
4. Launch call cost restriction and input call cost quota, and then click
“Save”.
Rate Setting
1. Operation path: Main menu > Call log > Call cost.
2. Open “Option” to select “Call cost setting”, and then click “Ok”.
3. Input PIN2, and then click “Ok”.
4. Input currency and unit price, and then click “Save”.
Settings
The settings function will help you customize the phone .
Do not revise the setting parameters provided by the network supplier.

81
If desired to enter into setting menu, please click the central key under the
standby status to enter into the main functional menu and then select
[Settings].
Parameter Value Setting
The general steps for setting parameter value.
1. Operation path: Main menu > Settings.
2. Select your required type of setting and select required setting of
specific parameter items.
3. You can use the following operation method to set up the parameter
value:
z Use to launch or close a certain setting.
z Click to select a certain parameter from the list.
z Click to launch text editing window, then input character or
number.
z Increase or decrease the numerical value in the slide bar.
4. Click “Save” to save the parameter setting.
5. Click “Ok” to return to the Previous.
Profile
You can set up personal ringtone and relevant prompt tone of the phone in
different scenes.
1. Operation path: Main menu > Settings > Profile.
2. Select required Profile of setting, click to open the window of
parameter setting.
3. Select your required type of setting to set up, after completing, click
“Save” to save the setting value.
4. Click “Select” when the phone returns back to the Profile and then
launch the Profile.
Items of Standard Mode Settings:
z Voice call ring: set up ringtone of voice incoming call.
z Volume: set up the up and down of ringtone’s volume.
z Message alert: set up prompt tone of message.
z Email alert: set up prompt tone of email.
z Vibrating alert: set up whether vibrating or not.

82
z Key tone: set up whether to launch the key tone or not.
z Warning tone: set up whether to launch the warning tone or
not.
Items of Silent Mode Settings:
z Voice call ring: set up ringtone of voice incoming call.
z Message alert: set up prompt tone of message.
z Email alert: set up prompt tone of E-mail.
Display Settings
Set up screen display parameters for the phone.
1. Operation path: Main menu > Settings > Display settings.
2. Select required type of setting, then click to open parameter setting
window to set up.
3. After finishing setting, click “Save” to save the setting value.
Items of Display Settings:
z Idle screen: set up standby menu for the phone. It includes
wallpaper and whether to display the time and date.
z Backlight time: set up the waiting time of screen light,
including 10sec/20sec/30sec/Always.
z Brightness: set up the brightness of display screen.
Phone Settings
Set up the language, time, date and shortcut of the phone.
1. Operation path: Main menu > Settings > Phone settings.
2. Select required type of setting, then click to open parameter setting
window to set up.
3. After finishing setting, click “Save” to save the setting value.
Items of Phone Settings:
z Language: you can set up the displayed language of the phone.
z Time and date: set up reference time, date, displayed format of
time, displayed format of date and summer time of the pho ne.
z Shortcuts: set up the displayed status and function of shortcut

83
key.
Call Settings
Set up the attribute parameter of call function.
1. Operation path: Main menu > Settings > Call settings.
2. Select required type of setting, then click to open parameter setting
window to set up.
3. After finishing setting, click “Save” to save the setting value.
Items of Call Settings:
z Phone number: set up whether displaying the local phone
number in the contactee’s phone, and the sending local phone
number requires the network support.
z Call waiting: set up whether answering the second incoming
call under the call status of the phone.
z Answer mode: set up to receive the call by random
key/receving key.
z Auto redial: set up whether continuing to dial if calling failure,
this function supports at most 10 times automatic re-dial.
z Minute prompt: set up whether reminding 10 seconds prior to
integral minute under the call status of the phone.
z Answer prompt: prompt the receving function of the phone.
z Call divert: transfer the voice incoming call/video incoming
call to another number or voice/video message box which you
designated.
z Call barring: set up the purview of calling and receving,
including to prohibit the phone from dialing out, forbid dialing
international long-distance call, forbid dialing international
long-distance outer domestic, forbid all incoming calls, forbid
the incoming call during the international roam, cancel all call
restriction. This function requires netw ork support.
z Voicemail: set up the number of voice mail box.
Network Settings
Set up the connected network attribute of the phone and net-searching mode.

84
1. Operation path: Main menu > Settings > Network settings.
2. Select required type of setting, then click to open parameter setting
window.
3. Click “Ok” to select your required type of setting and to set up.
Items of Network Settings:
z Network mode: set up the connected network mode of the
phone to support the automatic /GSM/WCDMA modes.
z Search mode: set up the mode of network searching of the
phone, including automatically and manually.
z Perferred network: set up to connect the network firstly under
the multi-nets mode.
Security Settings
The unauthorized use of the phone will be prevented through management
of the phone and (U)SIM card passwords.
The phone and (U)SIM card passwords as well as PIN2 support 4-8 digits
but not support other characters. The original lock password of the phone
when leaving the factory is 0000, the (U)SIM card password and PIN2 are
provided by the network operator.
If you input PIN/PIN2 wrongly in continually 3 times, your (U)SIM card
will be locked.
If you want to unlock the locked (U)SIM car d, you need to input personal
unlock key (PUK/PUK2), which are provided by the network supplier.
If you input PUK wrongly in continually 10 times, your (U)SIM card will be
discarded as useless permanently.
1. Operation path: Main menu > Settings > Security Settings
2. Select required type of setting, then click to open parameter setting
window to set up.
3. After finishing setting click “Save” to save the setting value.
Items of Safe Settings:
z Automatic keylock: Set up to launch or close the auto
keyboard lock function. After launching the auto keyboard

85
lock, it will lock the keyboard automatically after operating
one minute without key pressing under the standby status of
the phone to prevent dialing the number wrongly.
z Phone lock: set up to launch or close the function of phone
lock. After launching the phone lock, you should input the
password of phone lock at a time when you turn on the phone.
z PIN lock: set up to launch or close the function of PIN lock.
After launching of PIN lock, you should input the password of
PIN lock at a time when you turn on the phone.
z Change phone code: alter the password of phone lock.
z Change PIN: alter password of PIN.
z Change PIN2: alter password of PIN2.
Connection Settings
Parameter setting of Bluetooth and USB connecting and management of
data account.
Operation path: Main menu>Settings>Connection settings.
Items of Connection Settings:
z Bluetooth: activate or deactivate the Bluetooth function,
search Bluetooth devices or set up Bluetooth parameters.
z USB: Launch PC in-phase, USB function.
z Data account: Set up the parameter of data account.
Bluetooth Settings
Operation path: Main menu > Settings > Connection Settings > Bluetooth>
Settings.
Items of Bluetooth Settings:
9 Visibility: Aiming at other Bluetooth device to display
or conceal the local phone.
9 Dial up: Launch or close the Dial-up Mode.
9 Device name: Input the name of local phone.

86
Bluetooth Connection
1. Operation path: Main menu > Settings > Connection Settings >
Bluetooth>Turn on.
2. Operation path: Main menu > Settings > Connection Settings >
Bluetooth>Devices.
3. Click “Search”, searching a certain range of Bluetooth Device, and the
divice name will be displayed on the device list if searching out
Bluetooth device.
4. Select the device name of required connecting and click to match.
5. When the device enquires about the matched password, input a matched
password value.
6. If the input matching password of the phone and the matching password
of Bluetooth device to be connected are correct, then you can connect
the Bluetooth.
7. You can click “Search” to search again if you do not inquire about the
required Bluetooth device.
USB Connection
1. Operation path: Main menu >Settings >Connection Settings >USB
2. Connecting the phone and USB interface device, such as PC.
3. If you want to set up USB, the screen will display to inquire whether to
launch the U disc, click “Ok” to confirm the startup.
4. If you want to set up PC in-phase, the screen will display to inquire
whether to launch the PC in-phase, click “Ok” to confirm the startup.
Data Account Settings
1. Operation path: Main menu > Setting >Connection Settings > Data
Account.
2. Select a data account; click the[Central Key]to view the account info
including account name, access point, authentification type, user’s name
and password.
3. If desired to create a new data account, select “Create” via option, input
account setting parameters, and click “Save”.
4. If desired to re-edit the data account, select “Edit” via option, input

87
account setting parameters and click “Save”.
Reset Settings
If at partial recovery of default settings, the default preset parameter settings
are restored only when the phone leaves the factor y and the us er-created fil e
info, such as contacts, message and file massage will be reserved. If at
complete recovery of default settings when the phone leaves the factory, the
user-created file info, such as contacts, message and file massage and so on
will be deleted. Note: you may lose the existing contents at original
purchase.
1. Operation path: Main menu > Settings > Default Settings > Restore
specific /Restore all.
2. Input the phone password. The original password of the phone is 0000
when the phone leaves the factory.
3. Click the OK to determine the operation.
4. After the phone is reset, it will return to the stand-by window.
FAQs and Troubleshooting Solution
Please carry on the following straightforward check prior to contact with a
professional post-sale service in order to save your time and unnecessary
expenses.
The phone cannot be started up
z Check whether the power key is pressed and held continuously.
z Check whether the battery is contacted well or not. Please firstly
remove the battery and refit it, then re-power on the device.
z Check whether the battery is run up or not. Please recharge it.
There is a piece of info displayed upon powering on the phone
z Input the phone lock password: select a function of automatically

88
locking the phone. The phone lock password must be input before
using it.
z Input PIN: select a function of inputting PIN upon powering on the
device each time. The PIN must be input; (the PIN of USIM card
should be input when firstly used the phone).
z Input PUK: input PIN wrongly in continually 3 times. The
operator-supplied PUK must be input.
(U)SIM Card is Error
z (U)SIM car d metal surface is contaminated. Wipe the (U)SIM car d
metal contacts with a piece of clean cloth.
z (U)SIM card is not installed. Install the (U)SIM card correctly
according to User’s Manual.
z (U)SIM card is damaged. Pease contact with your network service
supplier.
The network cannot be accessed to
z Weak signal. Please move to a location of strong signal for a trial.
z Beyond the coverage of the network service supplier.
z (U)SIM card is invalid. Please contact with your network service
supplier.
Cannot Dial Out
z Please confirm whether the dial key is pressed after the number is
dialed.
z Please confirm w hether the call is barred due to owned toll.
z Please confirm whethe r the (U)SIM card is valid or not.
z Please confirm w hether the call restriction function is set up.
z Please confirm w hether the fixed dial function is set up.
Bad call quality

89
z Check whether the volume is adjusted appropriately.
z Use the phone at the place where the receiving quality is not good, such
as near to the building or in the basement where the radio wave cannot
reach.
z Use the phone at the peak time, such as at the time of going on/off the
duty, the channel is congested.
Contact cannot call you
z Please confirm that the phone is powered on and is uplinked with
network;
z Please confirm that the call is barred because of owned toll;
z Please confirm whether the (U)SIM card is valid;
z Please confirm w hether the fixed dial function is set up;
Contact cannot hear you
z Please confirm that the microphone is opened.
z Please keep the microphone at the bottom of the phone close to your
mouth.
Short standby time
z The stand-by time is relevant to the system setup. The phone is possibly
at the place where the signal state is bad. When the phone cannot
receive the signal, the phone will transmit to search the base station
continuously; consuming a great deal of battery capacity and shortening

90
the stand-by time of the battery. Please move to the place where the
signal is strong to use the phone or temporarily powe r the phone off.
z The battery requires to be displaced with a new battery.
Cannot charge
z Bad contact! Please check that the plug is connected well.
z Wipe the interfaces of the phone and battery with soft and dry clothing.
z Please change the charging environment when charge at the
environment below 0 or beyond 45℃℃.
z The battery or adapter is damaged and requires to be replaced.
Please record the phone model and SN, aut horized or in surance infor mation
and detailed statement and then contact with the local after sales servicer if
the aforementioned instruction cannot facilitate you to conquer these
problems.

91
Health & Safety Information
RF/SAR Information
Your phone is a low-energy wireless receiver. Upon powering it on, the
phone will emit a low-level radio frequency (RF).
All governments around the world use the national safety directives framed
by specialized scientific organizations, such as ICNIRP and IEEE. These
directives have established an approved level of radio waves exposure to
common population. The approved level includes a ny metrological deviation,
such as age and health levels, providing a guarantee within a safe range for
human being.
The specific absorption rate (SAR) is a measurement unit of body-absorbed
wireless wave quantity when the phone is used. The SAR value is instituted
according to the highest energy level validated in the lab status. The true
SAR level when the phone is operated will be far lower than this level. The
nearer the phone is from a base station, the lower is the energy emitted by
the phone.
The SAR levels of different models of phones will vary possibly. In order to
ensure the subscriber safe and healthful, the phone is designed and
manufactured by abiding by the Wireless Exposure Directive.
The SAR limit fit for the public radio wave is 2.0watt/kg (W/kg) per 10
body issues. After test, the phone confor ms to this limit.
Battery
Do not use the damaged adapter or battery.
Please use the battery correctly, do not make the battery short circuit, or
otherwise produced heat will cause the fire.
Prohibit putting the battery under an elevated temperature or into the fire, or
otherwise the battery will explode.
Should return the waste battery to the supplier or place at the designated

92
recycling location, and should not discard with the life trash.
The battery charging time depends on the remained capacity, type and
adapter. The battery may be charged for thousands of times, but will wear
out gradually. Please purchases new battery when the standby time is shorter
than the normal time obviously.
Please use the adapter and battery dedicated to or authorized for the phone.
Please disconnect the adapter and the power supply when the adapter is not
used.
Please do not charge the battery for too long time, or otherwise damage the
battery and shorten the service life of the battery.
Please cool or heat the battery to the normal temperature because the
temperature extremes will affect recharging (because the lithium ion battery
will be affected when the temperature is lower than 0 ).℃
Traffic Safety
The phone has a strong wireless voice communication function. With it, you
can call at any time and any place, thus the subscriber shall undertake some
important responsibilities.
To drive is your first duty when you are driving. Should be aware of
answering the call and abide by the local regulation s during the drive.
Understand the wireless phone and its function, such as speed dials and
redial, which can help you to dial out conveniently without distraction
during the drive.
Should use the hand-free device if there is and use any hand-free attachment
currently-offered if possible to enhance the convenience and safety for the
use of the wireless phone.

93
Place the wireless phone at an easy-to-find place. Do not distract from the
road to sue the phone. Should use the voice mailbox as far as possible to
answer the call if receiving a call at an inconvenient time.
Tell the caller that you are driving. If necessary, hang up during the traffic
congestion and bad weather. It is dangerous in rainy, snowy, freeze, icy and
traffic congestion situation.
Safety airbag, brake, speed control system and fuel injection system shall
not be affected by the wireless transmission. Please contact with automobile
distributor in case of the above problems.
Please close your mobile phone when fuelling or at any place where the
bidirectional wireless devices are prohibited using. Please do not place the
phone together with the flammable and explosive articles because the
internal sparkle can ignite.
Please close the mobile phone before the plane takes off. Be sure not use the
phone during the flight in order to prevent the phone form disturbing the
plane communication system. To use the phone before the plane takes off
shall be approved by the screw members based on the safety regulation.
Please confirm that the phone alarm will not be opened automatically during
the flight.
Operating Environment
Please abide by this regulation at any place. Please close the phone at place

94
where the phone is prohibited using or the phone may cause the risks.
Should read the User’s Manual; understand the security instruction when the
phone is connected with other device. The phone is prohibited connecting
with other incompatible devices.
The subscriber shall use the phone at the correct location (to the ear with the
antenna pointing to top of the arm) in order to operate satisfactorily and
protect your health.
Please use the phone at applicable temperature range --10℃ to 50℃.
Electronic Apparatus
Most electronic devices shield the radio information. Please contact with the
manufacturer for related information.
Pacemaker: keep the phone 6 inches (15cm) or above apart from the
pacemaker; should not carry the phone in the chest pocket; answer the
incoming call with the ear at the other side of the pacemaker to lower the
possible disturbance. Please close the phone if you concern about the
disturbance of the phone.
Hearing aid: partial digital wireless phones disturb the hearing aid possibly.
Please contact with the hearing aid manufacturer in case of disturbance.
Other medical apparatus: please consult with manufacturer if you use other
personal medical apparatus in confirmation of wireless shield wave. The
doctor may assist you obtaining the information. Please close the phone if
the phone is prohibited using near the healthcare facilities.

95
Automobile device: please consult the manufacturer in confirmation of the
information because the wireless si gnal may affect the electronic devices
installed in the automobile.
Emergency Call
The phone uses the wireless signal similarly with other rope less phone and
cannot be ensured to connect under all cases. Thus, the important calls
should do not rely on the wireless phone only, in stance medical emergency
call.
The phone shall be kept on with enough strong signals within the network
coverage.
Please input the emergency call under the standby mode and then press the
key to dial out if you want to dial the emergency call.
Other Important Safety Information
z Please use the accessories of the original manufacturer or the
accessories approved by the manufacturer. The usage of any
unapproved accessory will affect the phone performance and damage
the phone, even result in the human body risks.
z Please do not place your phone near to the magnetic memory medium
such as PC disk. The phone may disturb the TV, radio, PC, thus
affecting the call performance when using t he phone near them.
z Do not connect the phone with other device not supporting the phone.
z The device is only maintained or the phone-related device is only
installed in the automobile by the professional qualifie d personnel.
Repair &Maintenance
z This product is designed delicately and manufactured with hi-tech.

96
Please use it cautiously. The following suggestions will help you use
the phone happily in a long time.
z Do not let the kids or pets contact the phone, or otherwise cause kid’s
suffocation or damage the phone.
z Keep the phone dry, and avoid all types of liquids entering in interior
of the phone so as to prevent against damage.
z Do not operate the phone with wet hands, or otherwise cause electric
shock.
z Please do not store the phone under elevated temperature, or
otherwise shorten the service life of the electronic apparatus, damage
the battery and melt the accessories.
z Please do not store the phone under the low temperature. When the
phone restores a normal operating temperature, the vapor will enter in
the interior of the phone to damage the phone circuit board.
z Please do not expose your phone under the strong sunlight and avoid
your phone being heated.
z Please do not place your phone near to flammable liquid and gas or
explosive objects.
z Please do not throw and beat your phone. The cruelty to the phone
will cause the damage of the internal circuit board.
z When cleaning the phone, please use wetter or static-proof cloth, but
not dry or static-prone cloth. When cleaning the p hone surface, do not
use chemicals, such as detergents. Pl ease power off th e phone befor e
cleaning it.
z Please do not paint your phone because the pigments will impede
your phone from being used normally.
z If your phone has flash lamp, please do not get too close to the eyes
and prevent the eye from hurting.
z If your phone or battery gets wet, the internal tags of the phone will
be damaged. And post-sale agencies will not guarantee the quality
assurance of the producers even within the guarantee period.

97
1. NOTE: This equipment has been tested and found to compl y with
the limits for a Class B digital device, pursuant to Part 15 of the FCC
Rules. These limits are designed to provide reasonable protection
against harmful interference in a residential installation. This
equipment generates uses and can radiate radio frequency energy
and, if not installed and used in acco r da nc e wit h the ins tr uc t io ns , ma y
cause harmful interference to ra dio communications. Ho wever, there
is no guarantee that interference will not occur in a particular
installation. If this equipment does cause harmful interference to radio
or television reception, which can be determined by turning the
equipment off and on, the user is encourage d to try to correct the
interference by one or more of the following measures:
1. Reorient or relocate the receiving antenna.
2. Increase the separation between the equipment and receiver.
3. Connect the equipment into an outlet on a circuit different
from that to which the receiver is connected.
4. Consult the dealer or an experienced radio/TV t echnician for
help.
2. The phone with internal antenna has been teste d fo r c ompliance
with FCC RF Exposure (SAR) limits and is complied with FCC
RF exposure compliane requirements.
MAX. SAR Measued (1g)
Head: 1.28 W/kg (At left-Cheek High Channel)
Body: 0.948 W/kg (At Body Middle Channel)
3. We Shanghai Longcheer3g Technology Co.,Ltd declared that
the product is installed with battery separately in the box. The

98
FCC ID label is placed on the mobile phone clearly visible to all
persons at the time of purchase.
4. This device complies with part 15 of the FCC Rules. O pera tion is
subject to the following two conditions: (1) This may not cause
harmfull interference, and (2) this device must accept any
interference received, includeing interference that may cause
undesired operation.
 Loading...