

Page 1
MV2458 Router
User Manual
For Technical Assistance, please call (800) 638-3600,
or visit www.magnadyne.com
Page 2

Contents
Establish a WiFi Connection
Pair MV2400
...................................
Set SSID
Set Login Password
........................................
.........................
Restore Factory Settings
Upgrade Firmware
Connection History
Reboot
........................................
Set Date & Time
..........................
.........................
.............................
...................
...............
10
11
12
13
3
5
6
7
8
2
Page 3
Establish a WiFi Connection
To access the internet using the MV2458 a WiFi connection must be established with the host WiFi.
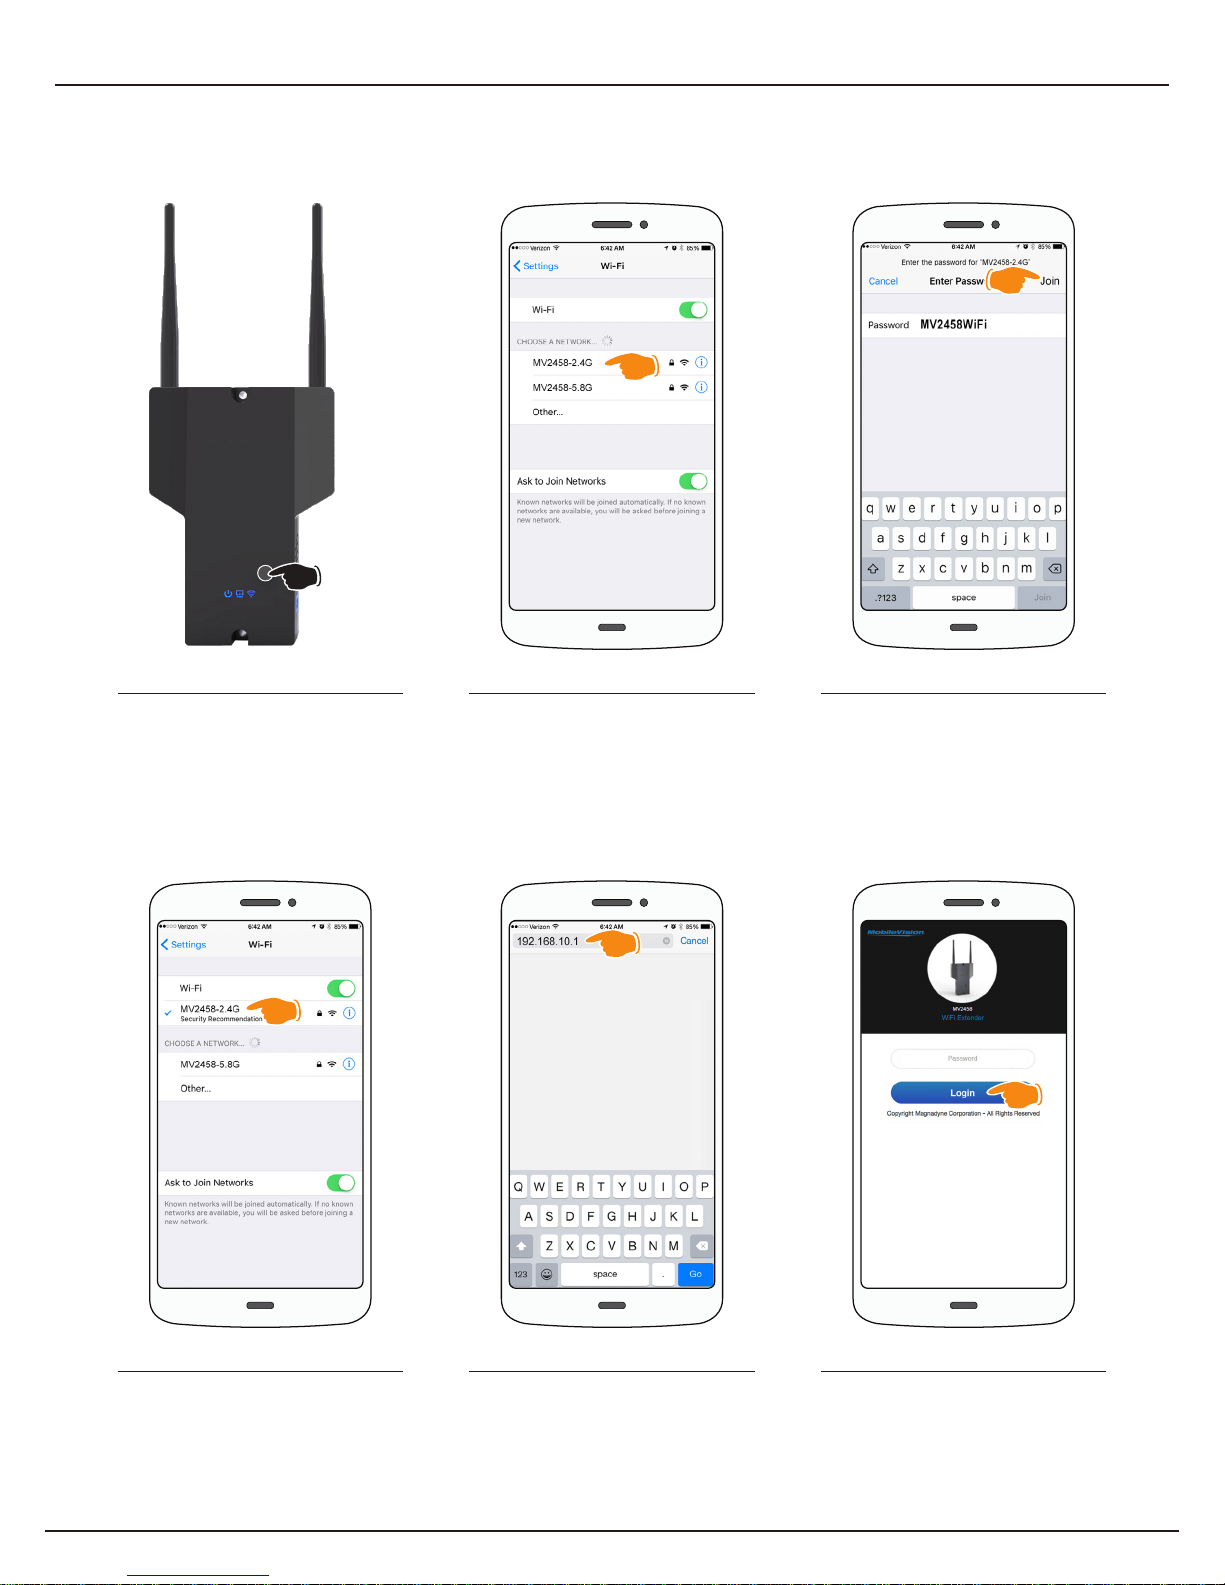
Step 1
Press power button on the MV2458 to
power up the Router and wait until all
lights are blue and flashing
(approximately 2 min).
Step 2
Go to the WiFi setting on your device
(phone, tablet, laptop, etc., make sure
your WiFi is turned on) and click on the
MV2458-2.4G Network. If avaliable, you
can also choose to connect to the
MV2458-5.4G Network.
Step 3
In the Password field type in the
password MV2458WiFi and click the
Join button.
Password: MV2458WiFi
*Case Sensitive
Step 4
Wait until your device is connected to the
MV2458-2.4G Network.
3
Step 5
Go to your web browser and in the
address field type in 192.168.10.1 and
click Go or hit Enter.
Address: 192.168.10.1
Step 6
The Login screen will open. In the
Password field type in the password
admin and click the Login button.
Password: admin
*Case Sensitive
Page 4

Establish a WiFi Connection
Step 7
Wait until the scanning countdown has completed.
The Available WiFi List screen will appear. Click on the
WiFi Network that you would like the Router to connect
to. (If the scroll bar isn’t showing and you are using a
Mac Computer, move the cursor up and down over the
SSID names and the scroll bar should appear.)
If scanning does not happen automatically you may need
to complete the “Reboot” instructions on Page 12.
Step 8
The password pop-up window will appear.
Type in the password for the chosen WiFi
host and click on the Connect button.
Please acquire password from WiFi Host
at your location.
If previously connected, the password will
refresh automatically from your
connection history.
Step 9
Wait until the connecting countdown
has completed.
If the unit will not connect at this
step, it may not have finished it’s 2
minute boot cycle. Start again from
Step 1 and wait 2 minutes for boot
cycle to complete.
Step 10
The Login screen will open. In the
Password field type in the password admin
and click the Login button. If login is
successful, unit will proceed to Step 12.
Password: admin
*Case Sensitive
4
Step 11
If the password was not typed correctly
a pop-up window will appear stating that
the connection to the Network failed.
Click the OK button. The unit will return
to Step 7 and scan again.
Double check that you are typing the
correct Network password in.
Step 12
The Status Screen will appear showing
the connected Network under the title
MV2400 (Outside) Information.
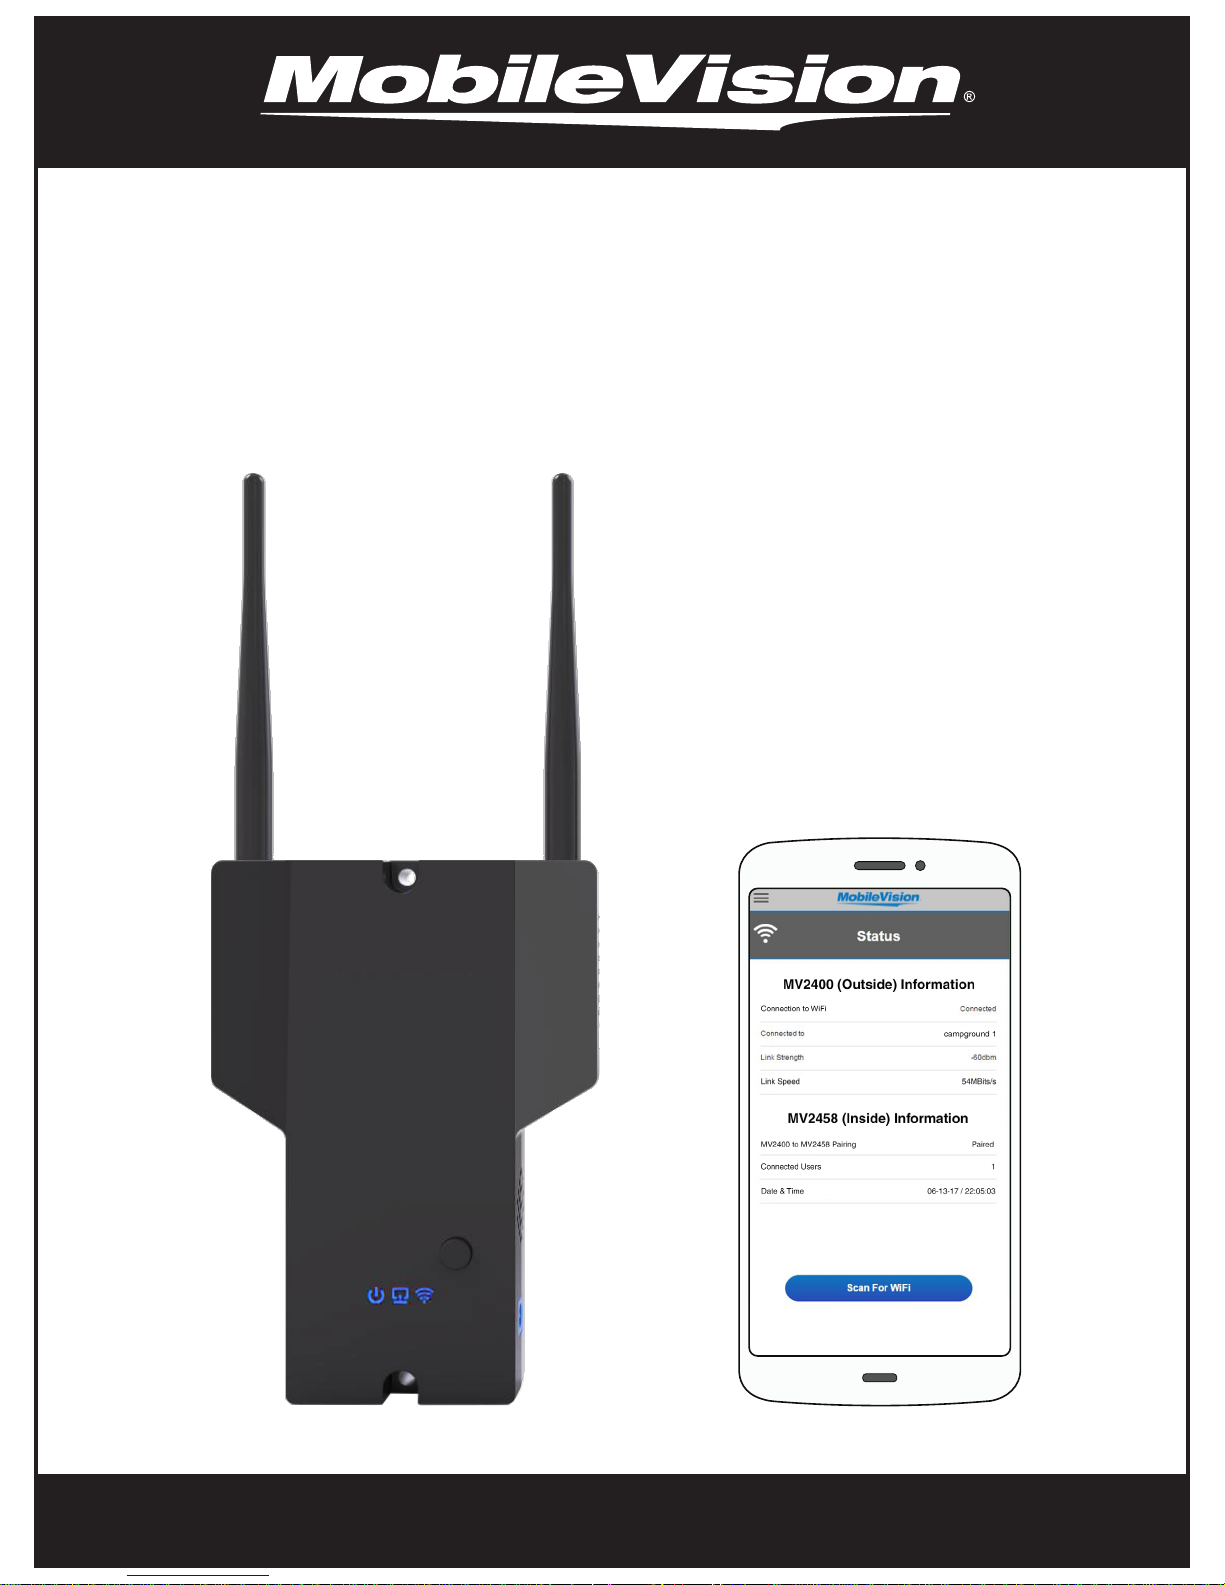
Congratulations, Setup Complete.
Page 5

Pair MV2400
The MV2458 and MV2400 have been designed to operate cabled by Ethernet or wirelessly. If the WiFi
system is used wirelessly the MV2400 must be paired to the MV2458 for proper operation.
Step 1
Select Settings from the drop-down
menu.
Step 2
In Settings select Pair MV2400.
Step 3
In the field Enter Mac Address enter the
MAC address listed in the user’s manual or
the address listed on the device.
The MAC address will have the format of
XX:XX:XX:XX:XX:XX
(Example 40:a5:ef:e1:e2:e9).
It is important to enter this number exactly
as displayed on the device or in the user’s
manual. The MAC address you enter MUST
match the device you are connecting to.
Step 4
After entering the MAC address click the
Apply button.
5
Step 5
Wait until the Pair MV2400 countdown
has completed.
Step 6
Return to Page 3, Step 6 of
“Establish a WiFi Connection”.
Page 6

Set SSID
Personalize your WiFi experience and increase the security of your MV2458 wireless network by
changing the SSID and Password.
Step 1
Select Settings from the drop-down
menu.
Step 2
In Settings select Set SSID.
Step 3
In the field under 5.8G WiFi SSID
replace the default name MV2458-5.8G
with a name of your choice.
Step 4
If you would like to change the required
password to connect to the 5.8G WiFi
SSID, enter a new password in the field
5.8G WiFi Password to replace the
default MV2458WiFi.
6
Step 5
Repeat this process for the 2.4G WiFi
SSID and 2.4G WiFi Password to
personalize your connection names and
passwords.
Step 5
Click Apply. Wait until the Set SSID
countdown has completed.
Return to Page 3, Step 2 of
“Establish a WiFi Connection” and use
new SSID & Passwords.
Please note - if you forget your login
password, just use Option 1 of the
“Restore Factory Settings” instructions.
Page 7

Set Login Password
After initial setup, it’s recommended that the default login password be changed.
admin is the default password.
Step 1
Select Settings from the drop-down
menu.
Step 2
In Settings select Set Login Password.
Step 3
In the field Enter Current Password type
in the current password used to login to
the application.
Step 4
In the field Enter New Password type in
the new password to be used to log in
to the application.
7
Step 5
Click Apply.
Wait until the Set Login Password countdown has
completed.
Return to Page 3, Step 2 of
“Establish a WiFi Connection” and use new password.
Please note - if you forget your login password, just use
Option 1 of the “Restore Factory Settings” instructions.
Page 8

Restore Factory Settings - Option 1
The RV WiFi system can be restored to factory default settings if it is not functioning correctly. Option 1
resets the system by depressing the reset button on the bottom of the MV2458. (This option may be
necessary if you forget your admin password. Default passwords will apply after reset.)
Step 1
Make sure the MV2458 is powered on
and wait approximately 2 minutes for it
to completely start up.
8
Hold for 8 Sec
Step 2
Using a paper clip, press and hold the
reset button located on the bottom of the
MV2458 for approximately 8 seconds
and then let go.
The WiFi symbol light
will go out and the MV2458 will restore
to factory settings.
Step 3
Wait approximately 2 minutes then
return to Page 3, Step 2 of
“Establish a WiFi Connection”
Page 9

Restore Factory Settings - Option 2
Option 2 uses the in-software restore option. This option can be used to reset both MV2458 (inside unit)
and MV2400 (outside unit) back to factory defaults.
2
1
Step 1
Select Settings from the drop-down
menu.
Step 2
In Settings select Restore Factory
Settings.
Step 3
If you want to restore both units to
factory settings, first restore the
MV2400 and then restore the
MV2458.
Step 4
To clear and restore the MV2400 to
factory settings click the Apply button
below MV2400 Restore.
Wait until the MV2400 Restore status
bar has completed.
9
Step 5
When complete, you will be taken to the
Login screen.
Return to Page 3, Step 6 of
“Establish a WiFi Connection” and use
the appropiate password. If the
password has not been changed then
use admin to login.
Step 6
To clear and restore the MV2458 to
factory settings click the Apply button
below MV2458 Restore.
Wait until the MV2458 Restore status
bar has completed. All settings will be
restored to default.
Return to Page 3, Step 2 of
“Establish a WiFi Connection”.
Page 10

Upgrade Firmware
As improvements become available, it may be necessary to upgrade the Firmware of the MV2400 and MV2458.
Check for upgrades at www.Magnadyne.com. A PC may be needed to download & perform upgrade.
Step 1
Select Settings from the drop-down
menu.
Step 2
In Settings select Upgrade Firmware.
Step 3
For either the MV2400 or the MV2458
click the Choose File button to select
the firmware update file that you will be
using. This file must be accessible by
the device you are using to perform the
update.
Step 4
Once the file is selected the file name
will be displayed in the field next to the
Choose File button.
10
Step 5
Click the Upload button located below the
file name. The device will begin the update
process. Follow on screen prompts.
Do NOT turn off the power.
Step 6
After the update is complete, navigate
to the Upgrade Firmware Screen in Step
3 and check the file name (located
above the Choose File button) to make
sure the update installed correctly.
Page 11

Connection History
The connection history page shows past WiFi connections that have been made. If a previously visited
WiFi location is no longer working for you, clearing the history and reestablishing the WiFi connection
may solve your issue.
Step 1
menu.
Step 2
In Settings select Connection History. Select Settings from the drop-down
Step 3
The history can be cleared by pressing
the Clear All button.
Wait until the Connection History
countdown has completed.
11
Step 4
When complete, you will be taken to the
Login screen.
Page 12

Reboot
Occasionally you might have connection issues or difficulty connecting new devices to your MV2458, to
fix this you can reboot the system.
A reboot is not the same as Restore Factory Settings. A reboot only instructs the devices to refresh and
start up again, it does not delete any of the settings.
Step 1
Select Settings from the drop-down
menu.
Step 2
In Settings select Reboot.
Step 3
Click the Apply button and the entire
system (MV2400 and MV2458) will
reboot (approx. 45 sec.).
Step 4
Wait until the Reboot countdown has
completed.
12
Step 5
Return to Page 3, Step 2 of
“Establish a WiFi Connection”.
Page 13

Set Date & Time
Your MV2458 has the ability to automatically synchronize date and time with the device you are using to
run the application. If it has become desynchronized, follow the steps below to resynchronize.
Step 1
Select Settings from the drop-down
menu.
Step 2
In Settings select Set Date & Time.
Step 3
Click the Apply button.
Step 4
Wait until the reboot countdown has
completed.
13
Step 5
Return to Page 3, Step 2 of
“Establish a WiFi Connection”.
Copyright © 2017 Magnadyne Corp.
MOBILEVISION-MV2458-IM Rev. A
 Loading...