

Page 1

Body Worn Camera User Guide
P/N 1073160A • REV 01.01 • ISS JULY 2016
Page 2

Body Worn Camera User Guide
This guide is item number 1073160A, dated July 2016.
© 2016 United Technologies Corporation. All rights reserved.
All trademarks are the property of their respective owners. Interlogix is part of
UTC Climate, Controls & Security, a unit of United Technologies Corporation.
MobileView and logos are trademarks of United Technologies Corporation.
Microsoft, Internet Explorer, and Windows are either registered trademarks or
trademarks of Microsoft Corporation in the United States and/or other countries.
Other trade names used in this document may be trademarks or registered
trademarks of the manufacturers or vendors of the respective products.
www.interlogix.com/mobileview-bodycamera
1-855-MOBVIEW (662-8439)
[email protected]
Page 3

Table of Contents
Chapter 1 Introduction . . . . . . . . . . . . . . . . . . . . . . . . . . . . . . . . . . . . . . . . . . . . .3
Package Contents . . . . . . . . . . . . . . . . . . . . . . . . . . . . . . . . . . . . . . . . . . . . . . . . . . . . . . . . . . . . . . .3
Chapter 2 Body Worn Camera Design . . . . . . . . . . . . . . . . . . . . . . . . . . . . . . . . .5
Body Worn Camera Front . . . . . . . . . . . . . . . . . . . . . . . . . . . . . . . . . . . . . . . . . . . . . . . . . . . . . . . . .5
Body Worn Camera Back . . . . . . . . . . . . . . . . . . . . . . . . . . . . . . . . . . . . . . . . . . . . . . . . . . . . . . . . .7
Body Worn Camera Side . . . . . . . . . . . . . . . . . . . . . . . . . . . . . . . . . . . . . . . . . . . . . . . . . . . . . . . . . .8
Chapter 3 Camera LCD Screen . . . . . . . . . . . . . . . . . . . . . . . . . . . . . . . . . . . . . 11
Main Menu . . . . . . . . . . . . . . . . . . . . . . . . . . . . . . . . . . . . . . . . . . . . . . . . . . . . . . . . . . . . . . . . . . .12
Recording Resolution Menu . . . . . . . . . . . . . . . . . . . . . . . . . . . . . . . . . . . . . . . . . . . . . . . . . . . . . . . . . . . 13
Snapshot Resolution Menu . . . . . . . . . . . . . . . . . . . . . . . . . . . . . . . . . . . . . . . . . . . . . . . . . . . . . . . . . . . . 14
Burst Menu . . . . . . . . . . . . . . . . . . . . . . . . . . . . . . . . . . . . . . . . . . . . . . . . . . . . . . . . . . . . . . . . . . . . . . . . 14
Self Timer Menu . . . . . . . . . . . . . . . . . . . . . . . . . . . . . . . . . . . . . . . . . . . . . . . . . . . . . . . . . . . . . . . . . . . . 14
Continuous Shooting Menu . . . . . . . . . . . . . . . . . . . . . . . . . . . . . . . . . . . . . . . . . . . . . . . . . . . . . . . . . . . 15
Quality . . . . . . . . . . . . . . . . . . . . . . . . . . . . . . . . . . . . . . . . . . . . . . . . . . . . . . . . . . . . . . . . . . . . . . . . . . . 15
Pre-record . . . . . . . . . . . . . . . . . . . . . . . . . . . . . . . . . . . . . . . . . . . . . . . . . . . . . . . . . . . . . . . . . . . . . . . . 15
Post Record . . . . . . . . . . . . . . . . . . . . . . . . . . . . . . . . . . . . . . . . . . . . . . . . . . . . . . . . . . . . . . . . . . . . . . . 15
Split Time . . . . . . . . . . . . . . . . . . . . . . . . . . . . . . . . . . . . . . . . . . . . . . . . . . . . . . . . . . . . . . . . . . . . . . . . . 15
Slide Show . . . . . . . . . . . . . . . . . . . . . . . . . . . . . . . . . . . . . . . . . . . . . . . . . . . . . . . . . . . . . . . . . . . . . . . . 16
Infrared . . . . . . . . . . . . . . . . . . . . . . . . . . . . . . . . . . . . . . . . . . . . . . . . . . . . . . . . . . . . . . . . . . . . . . . . . . 16
Record Warning . . . . . . . . . . . . . . . . . . . . . . . . . . . . . . . . . . . . . . . . . . . . . . . . . . . . . . . . . . . . . . . . . . . . 16
GPS . . . . . . . . . . . . . . . . . . . . . . . . . . . . . . . . . . . . . . . . . . . . . . . . . . . . . . . . . . . . . . . . . . . . . . . . . . . . . 16
Screen Saver . . . . . . . . . . . . . . . . . . . . . . . . . . . . . . . . . . . . . . . . . . . . . . . . . . . . . . . . . . . . . . . . . . . . . . . 16
LCD Brightness . . . . . . . . . . . . . . . . . . . . . . . . . . . . . . . . . . . . . . . . . . . . . . . . . . . . . . . . . . . . . . . . . . . . 16
Auto Power Off . . . . . . . . . . . . . . . . . . . . . . . . . . . . . . . . . . . . . . . . . . . . . . . . . . . . . . . . . . . . . . . . . . . . 16
LED Light . . . . . . . . . . . . . . . . . . . . . . . . . . . . . . . . . . . . . . . . . . . . . . . . . . . . . . . . . . . . . . . . . . . . . . . . 17
Key Tone . . . . . . . . . . . . . . . . . . . . . . . . . . . . . . . . . . . . . . . . . . . . . . . . . . . . . . . . . . . . . . . . . . . . . . . . . . 17
MobileView Body Camera User Guide
Page 4

Table of Contents
Volume . . . . . . . . . . . . . . . . . . . . . . . . . . . . . . . . . . . . . . . . . . . . . . . . . . . . . . . . . . . . . . . . . . . . . . . . . . . 17
ID Setting . . . . . . . . . . . . . . . . . . . . . . . . . . . . . . . . . . . . . . . . . . . . . . . . . . . . . . . . . . . . . . . . . . . . . . . . . 17
Date and Time Settings . . . . . . . . . . . . . . . . . . . . . . . . . . . . . . . . . . . . . . . . . . . . . . . . . . . . . . . . . . . . . . 17
Default Setting . . . . . . . . . . . . . . . . . . . . . . . . . . . . . . . . . . . . . . . . . . . . . . . . . . . . . . . . . . . . . . . . . . . . . 17
Chapter 4 Body Worn Camera Use . . . . . . . . . . . . . . . . . . . . . . . . . . . . . . . . . . 19
Recording on Power On . . . . . . . . . . . . . . . . . . . . . . . . . . . . . . . . . . . . . . . . . . . . . . . . . . . . . . . . . 19
Start Recording Manually while Device is On . . . . . . . . . . . . . . . . . . . . . . . . . . . . . . . . . . . . . . . . 19
Stop Recording . . . . . . . . . . . . . . . . . . . . . . . . . . . . . . . . . . . . . . . . . . . . . . . . . . . . . . . . . . . . . . . . 19
Mute Video Recording . . . . . . . . . . . . . . . . . . . . . . . . . . . . . . . . . . . . . . . . . . . . . . . . . . . . . . . . . . 20
Take Snapshots . . . . . . . . . . . . . . . . . . . . . . . . . . . . . . . . . . . . . . . . . . . . . . . . . . . . . . . . . . . . . . . . 20
Record Audio Only . . . . . . . . . . . . . . . . . . . . . . . . . . . . . . . . . . . . . . . . . . . . . . . . . . . . . . . . . . . . . 20
Navigate Menu . . . . . . . . . . . . . . . . . . . . . . . . . . . . . . . . . . . . . . . . . . . . . . . . . . . . . . . . . . . . . . . . 20
Playback Video . . . . . . . . . . . . . . . . . . . . . . . . . . . . . . . . . . . . . . . . . . . . . . . . . . . . . . . . . . . . . . . . 21
Playback by Segment . . . . . . . . . . . . . . . . . . . . . . . . . . . . . . . . . . . . . . . . . . . . . . . . . . . . . . . . . . . 21
Turn On White Light . . . . . . . . . . . . . . . . . . . . . . . . . . . . . . . . . . . . . . . . . . . . . . . . . . . . . . . . . . . 21
Turn On Laser Pointer . . . . . . . . . . . . . . . . . . . . . . . . . . . . . . . . . . . . . . . . . . . . . . . . . . . . . . . . . . 22
Chapter 5 Camera Accessories . . . . . . . . . . . . . . . . . . . . . . . . . . . . . . . . . . . . . 23
Accessories . . . . . . . . . . . . . . . . . . . . . . . . . . . . . . . . . . . . . . . . . . . . . . . . . . . . . . . . . . . . . . . . . . . 23
Docking Bay . . . . . . . . . . . . . . . . . . . . . . . . . . . . . . . . . . . . . . . . . . . . . . . . . . . . . . . . . . . . . . . . . . . . . . . 23
Epaulette Clip . . . . . . . . . . . . . . . . . . . . . . . . . . . . . . . . . . . . . . . . . . . . . . . . . . . . . . . . . . . . . . . . . . . . . 23
Gator Clip . . . . . . . . . . . . . . . . . . . . . . . . . . . . . . . . . . . . . . . . . . . . . . . . . . . . . . . . . . . . . . . . . . . . . . . . 23
Universal USB Cable . . . . . . . . . . . . . . . . . . . . . . . . . . . . . . . . . . . . . . . . . . . . . . . . . . . . . . . . . . . . . . . . 23
USB Power Adapter . . . . . . . . . . . . . . . . . . . . . . . . . . . . . . . . . . . . . . . . . . . . . . . . . . . . . . . . . . . . . . . . . 23
Car Charger . . . . . . . . . . . . . . . . . . . . . . . . . . . . . . . . . . . . . . . . . . . . . . . . . . . . . . . . . . . . . . . . . . . . . . . 24
Individual Body Worn Camera Dock . . . . . . . . . . . . . . . . . . . . . . . . . . . . . . . . . . . . . . . . . . . . . . . 24
Chapter 6 Troubleshooting . . . . . . . . . . . . . . . . . . . . . . . . . . . . . . . . . . . . . . . . 25
Cannot enter menu of Body Worn Camera . . . . . . . . . . . . . . . . . . . . . . . . . . . . . . . . . . . . . . . . . . 25
IR are not turning on . . . . . . . . . . . . . . . . . . . . . . . . . . . . . . . . . . . . . . . . . . . . . . . . . . . . . . . . . . . 25
Indicator LEDs are not lit . . . . . . . . . . . . . . . . . . . . . . . . . . . . . . . . . . . . . . . . . . . . . . . . . . . . . . . . 25
The Body Worn Camera only records for short periods of time . . . . . . . . . . . . . . . . . . . . . . . . . . 25
MobileView Body Camera User Guide
Page 5

CHAPTER 1 Introduction
The MobileView Body Worn Camera is a full featured body worn camera specifically designed for
Law Enforcement. The camera features real time HD video, 1080P recording, and a high resolution
still image capture viewable on the 2" LCD screen for instant playback. The rugged design is resilient
to withstand demanding work environments faced by law enforcement officers, corrections, military
and security detail.
Package Contents
• Body Worn Camera
• USB cable
• USB power adapter
• Single dock
• Car charger
• Manual
• Universal metal clip
• Epaulette clip
• Gator clip
MobileView Body Worn Camera User Guide 3
Page 6

Introduction
4 MobileView Body Worn Camera User Guide
Page 7
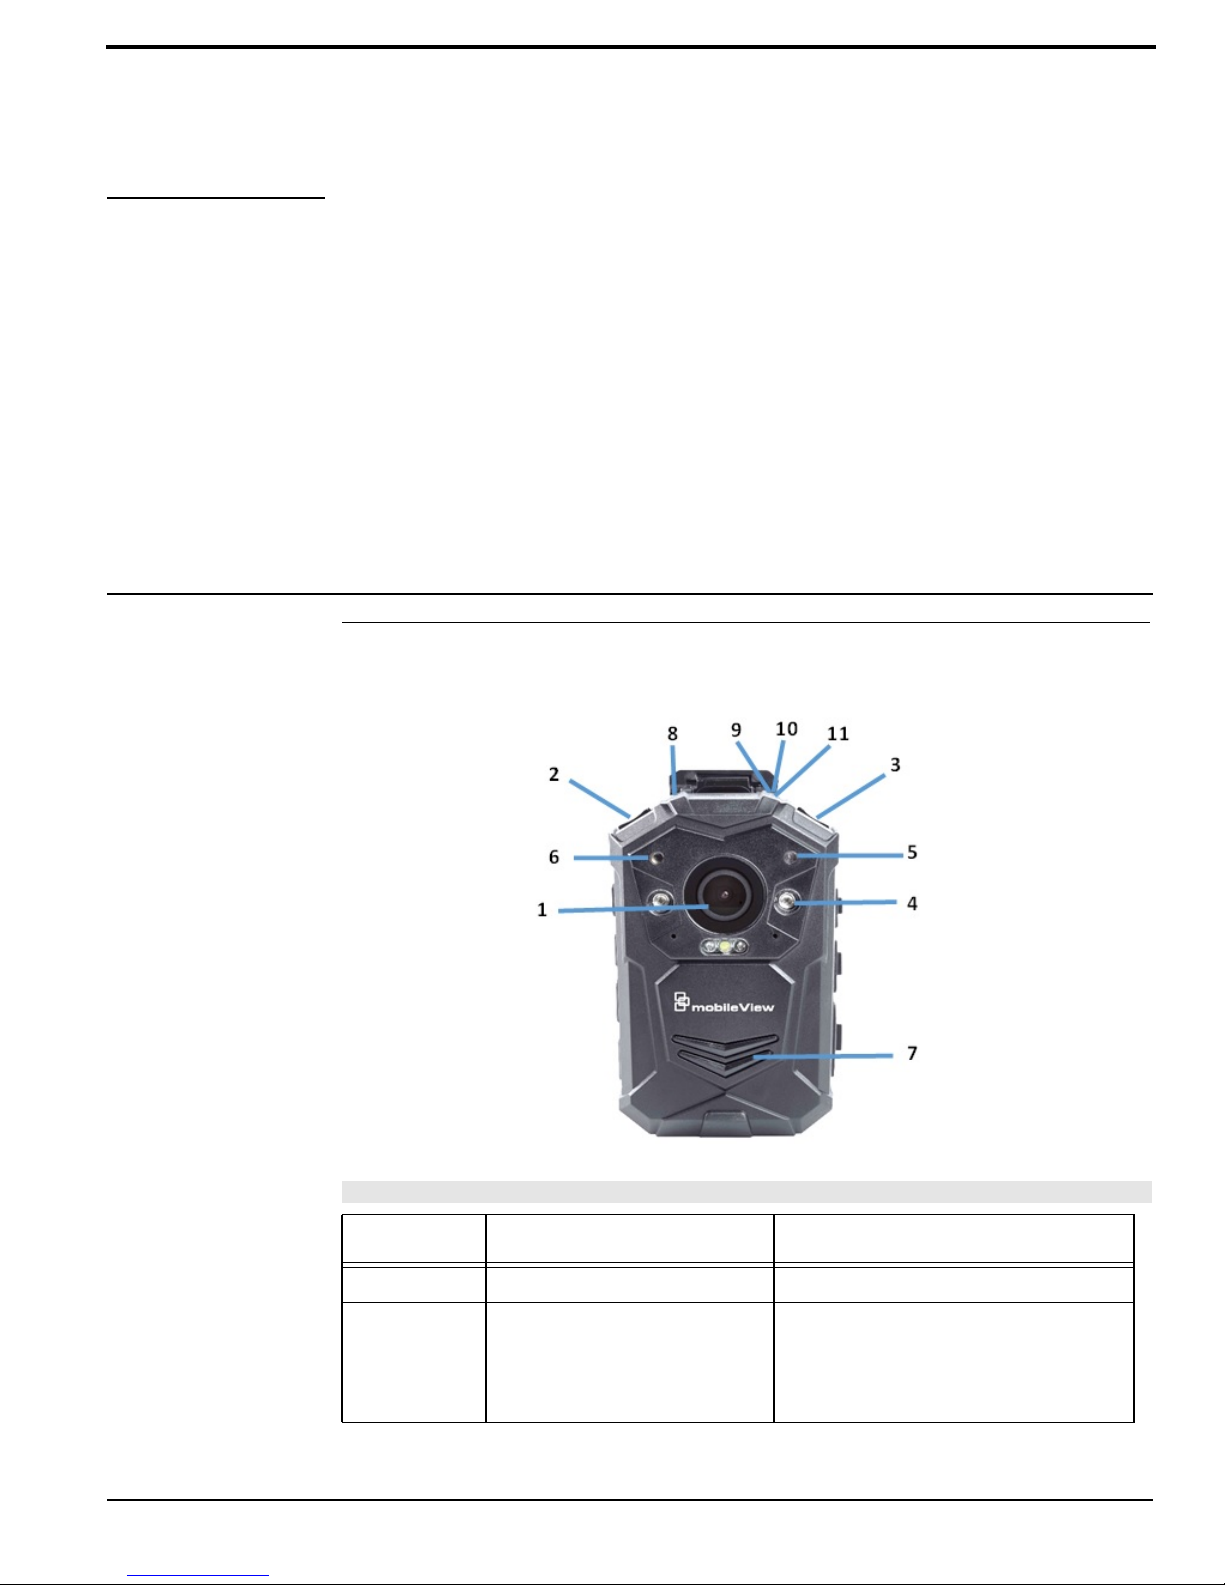
CHAPTER 2 Body Worn Camera Design
Body Worn Camera Front
Item Part Description
1 Camera Lens High Definition Camera
2 Power Button Hold down for 3 seconds to turn camera
MobileView Body Camera User Guide 5
ON/OFF
Press to exit from menu
Press to exit from Playback
Page 8
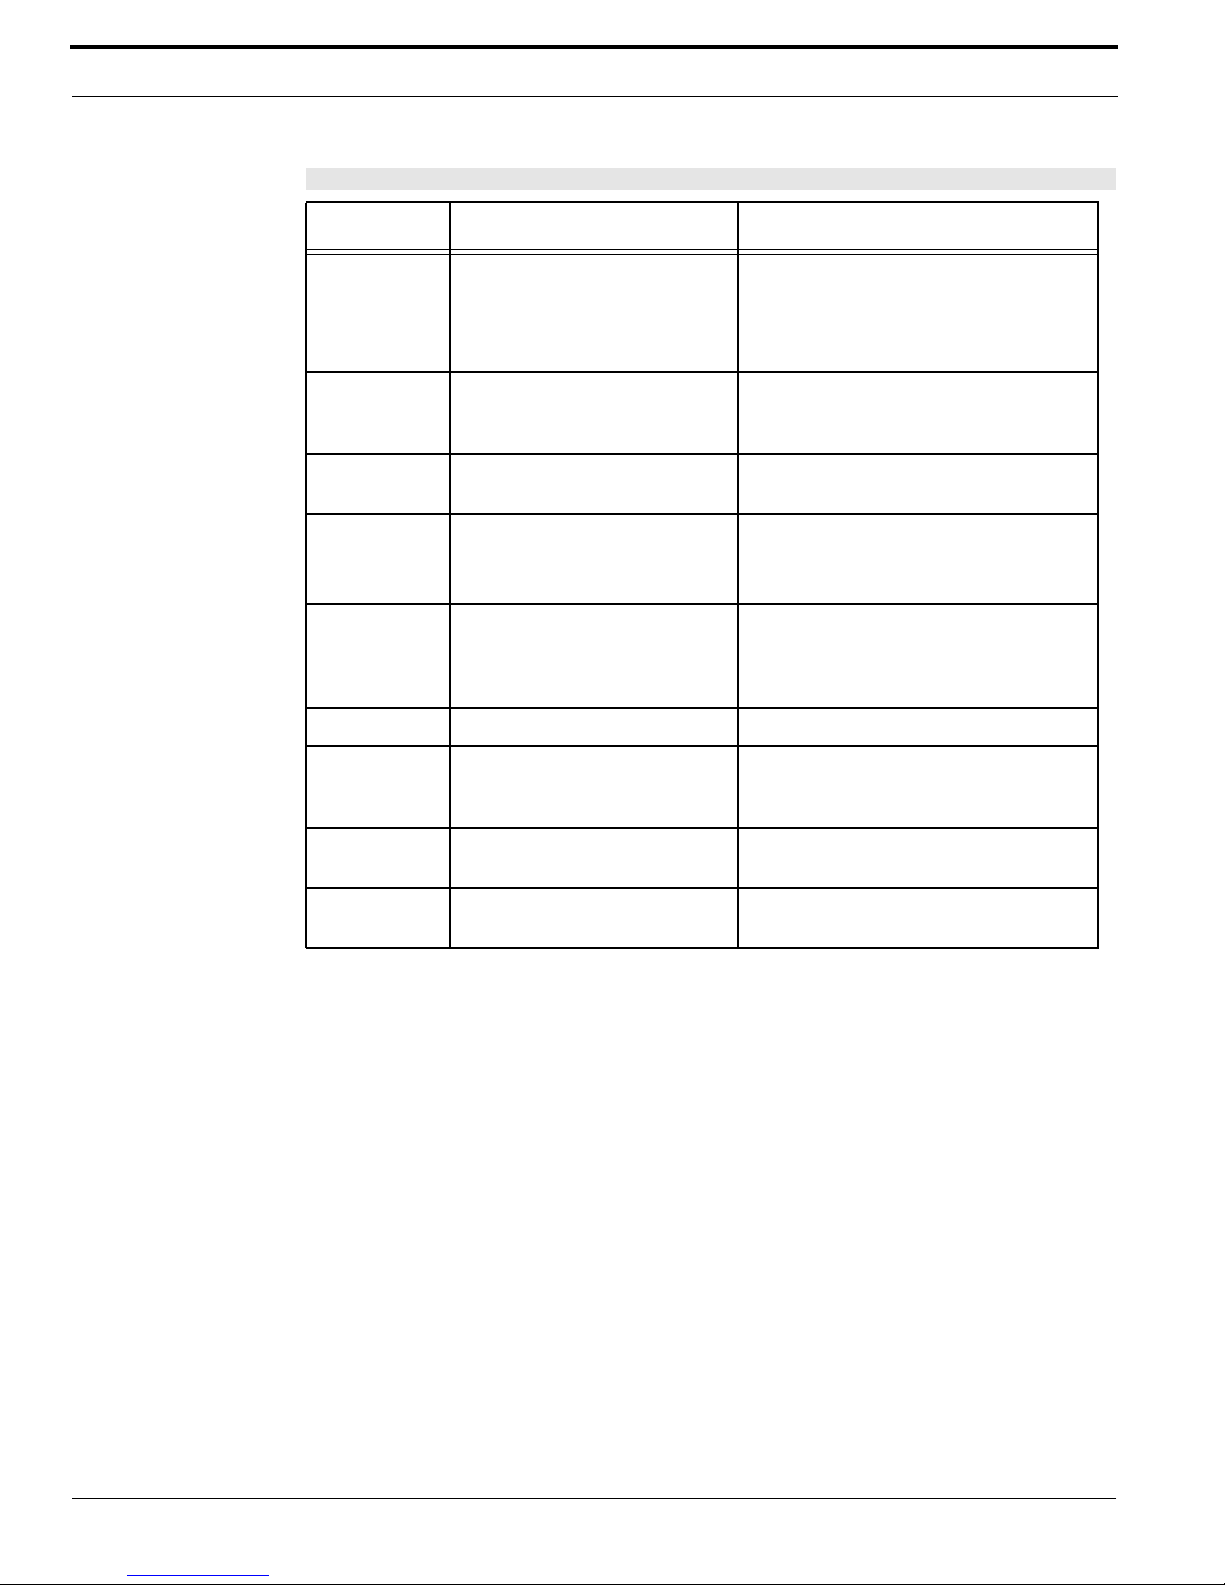
Body Worn Camera Design
(Continued)
Item Part Description
3 White Light and Laser Pointer
Button
4 IR LED Records clear image in HD in low light
5 Light Sensor Detects changes in light and automatically
6 Laser Pointer Pinpointing an object from a distance.
7 Audio Support Two-way audio capability with built-in
8 Blue Indicator LED Charging status indicator LED.
9 Green Indicator LED Green LED light indicates camera is
10 Red Indicator LED Red LED light indicates cameras is
Press once to turn on White LED Light
Press twice to turn off White LED light and
turn on Laser Pointer
Press three times to turn Off Laser Pointer
situations. Enables clear face view with up
to 30 feet away.
turns on IR for night recording.
Press Light button two times to turn Laser
Pointer on and one more to turn it off
microphone and speaker. The MobileView
Body Worn Camera can integrate with
PTT 2 way wireless audio devices.
powered up and in standby mode, not
recording.
recording.
11 Orange Indicator LED Orange LED Light indicates Audio
Recording Only
6 MobileView Body Camera User Guide
Page 9
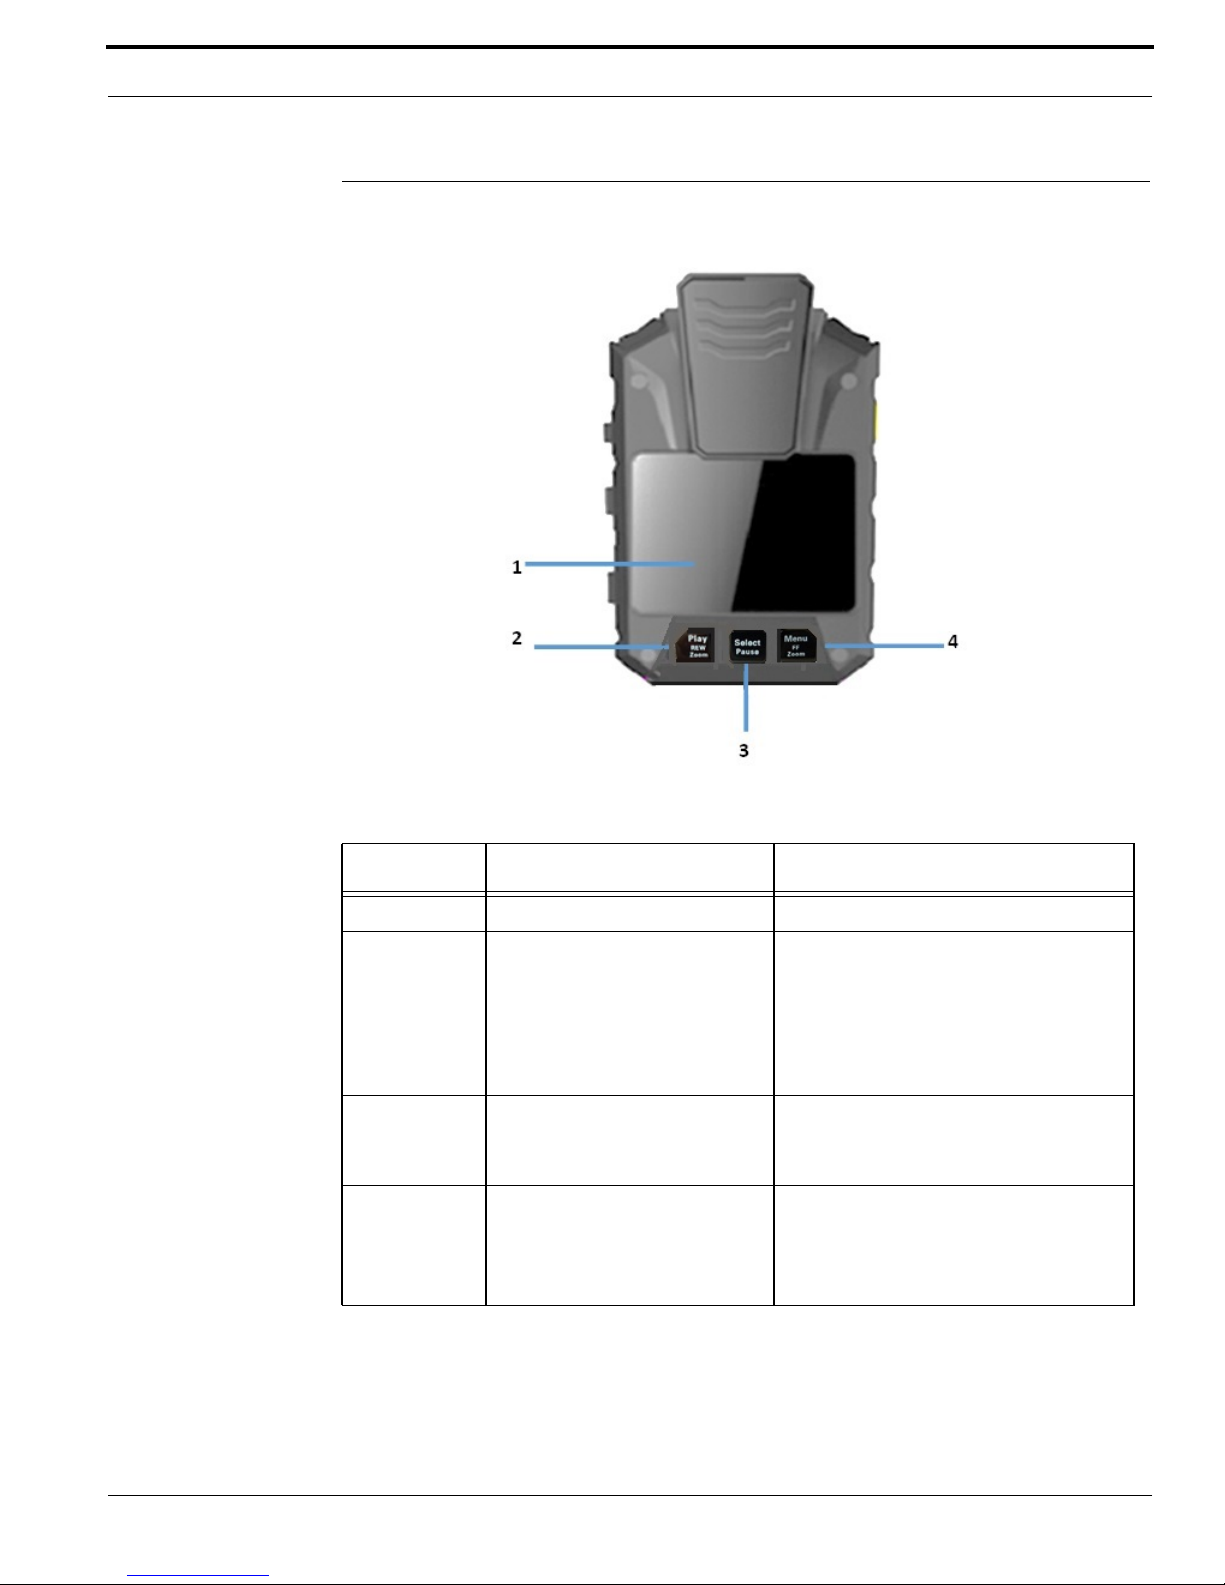
Body Worn Camera Back
Body Worn Camera Back
Item Part Description
1 LCD Screen 2 inch TFT-LCD color display screen
2 Play Button Press to Scroll up in Menu mode.
Play back last recorded segment by
pressing this button when camera is not
recording.
In play mode, hold to zoom-out from
image.
3 Select Button Press to make a selection in Menu mode
Press to pause/resume video or audio
playback in Play mode
4 Menu Button Press to enter into Menu mode
Press to scroll down in Menu mode
In Play mode, hold to zoom-In the playing
image.
MobileView Body Camera User Guide 7
Page 10
Body Worn Camera Design
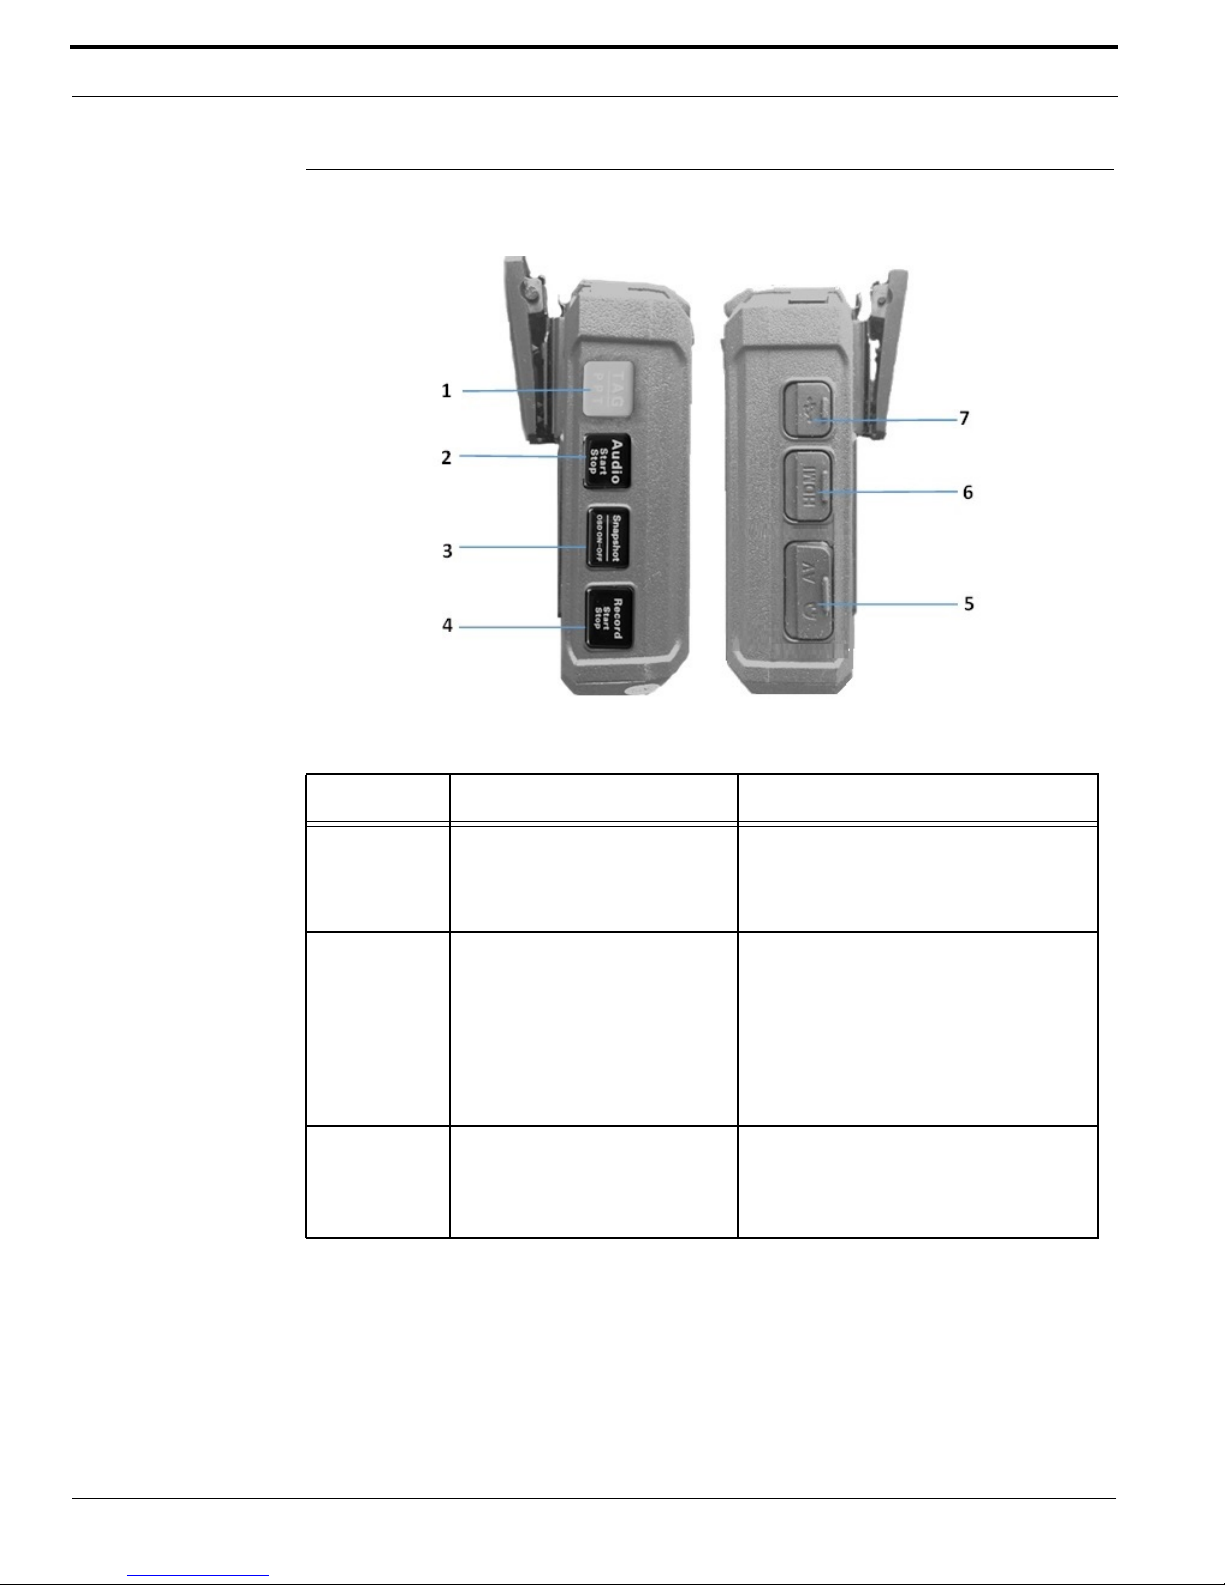
Body Worn Camera Side
Item Part Description
1 TAG/ PTT Button Press to communicate via connected
walkie-talkie
Press to identify important recording when
walkie-talkie is not connected (if equipped)
2 Audio Button Press to record audio when not in
Recording mode
While in Video Record Mode, PRESS
Audio button to turn Mute ON or OFF.
(Note) The camera will beep if Mute is
enabled to remind User.
3 Snapshot Button Press to take a single high-resolution
snapshot image
In playback mode, press to turn OSD on/
off
8 MobileView Body Camera User Guide
Page 11

Body Worn Camera Side
Item Part Description
4 Record Button PRESS to turn recording ON/OFF while
Camera is Powered On. This function will
give user with up to 30 seconds of prerecorded video.
If Camera is Powered Off, HOLD for 3
seconds to immediately start recording.
Note: Pre-recorded video is not available
for first recorded video after Power On
using this function.
5 AV Input Port Connect external mini covert camera to
Body Worn Camera using AV inputs.
6 HDMI Port Connects to 1.3 HDMI cable for video
playback only
7 USB Port Connects to USB cable for charging or
connection to PC
MobileView Body Camera User Guide 9
Page 12

Body Worn Camera Design
10 MobileView Body Camera User Guide
Page 13
CHAPTER 3 Camera LCD Screen
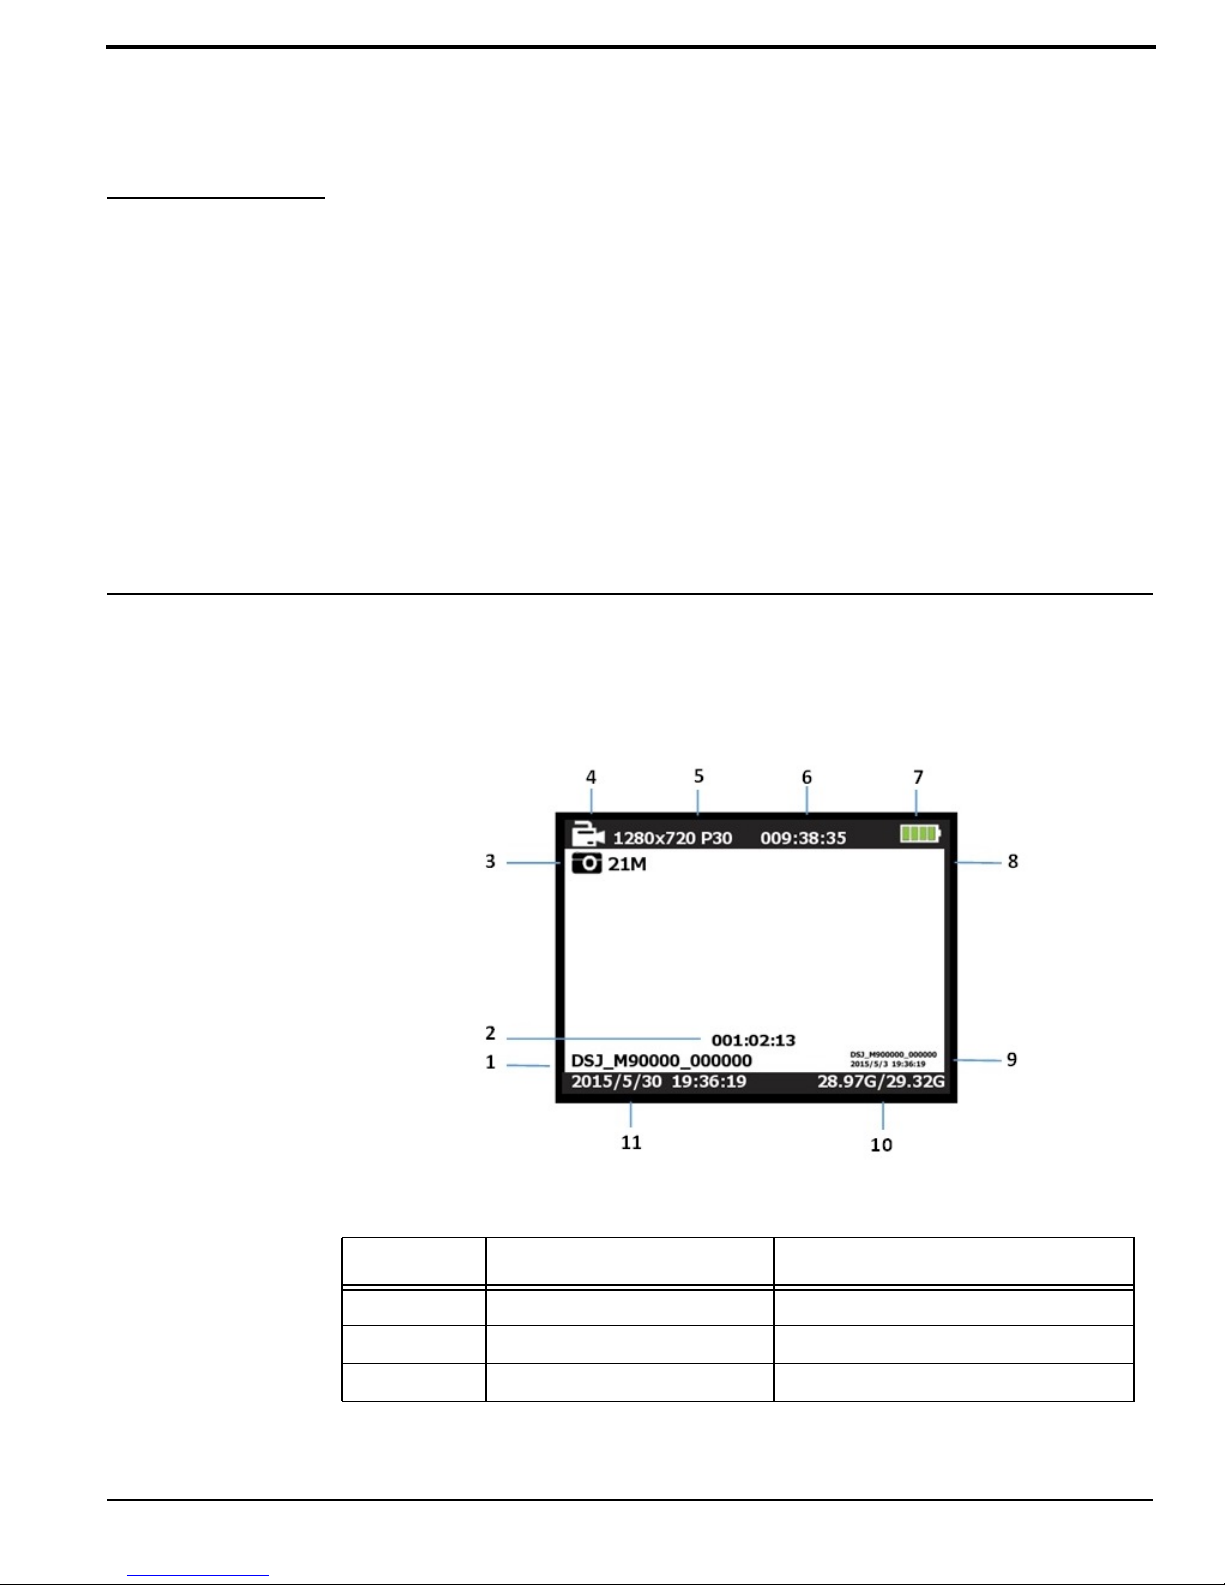
The Body Worn Camera LCD screen is a small monitor on the camera where various camera
information is displayed. Once a menu is selected, use the Play or Menu buttons to navigate. Use the
Select button to make a selection. Press the Power button to exit menu.
Item Display Area Description
1 Camera and Officer ID Assigned camera and officer IDs.
2 Video Recording Time Recorded time of current clip
3 Snapshot Resolution Current snapshot mega-pixel resolution
Body Worn Camera User Guide 11
Page 14
Camera LCD Screen
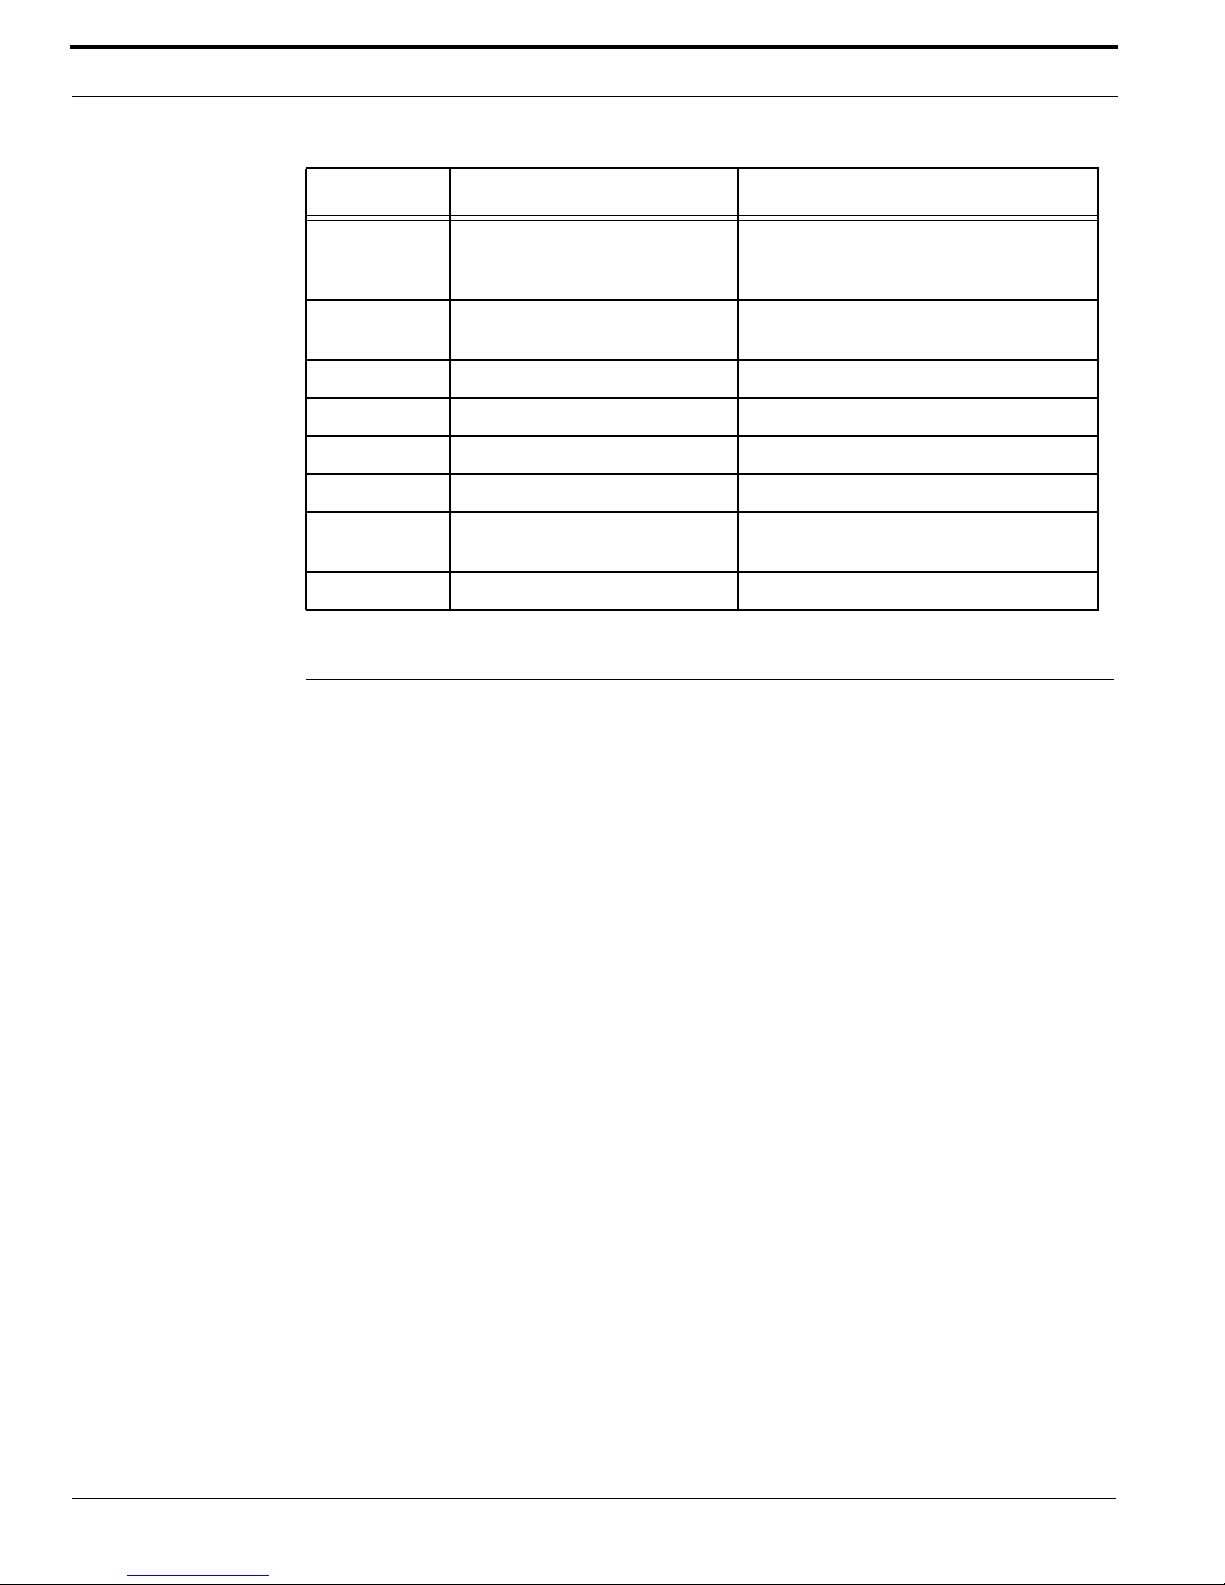
Item Display Area Description
4 Record Status Red blinking record status icon indicates
camera is recording, white solid is standby
mode
5 Recording Resolution Currently selected recording resolution
and recording frame rate
6 Remaining Time Estimated recording hours remaining
7 Battery Charge Current battery charge level
8 GPS GPS coordinates if available.
9 Date and Time Stamp Recorded video ID, date and time stamp
10 SD Card Memory Internal SD Card capacity: Free space/
Total capacity
11 Current Date and Time Current date and time
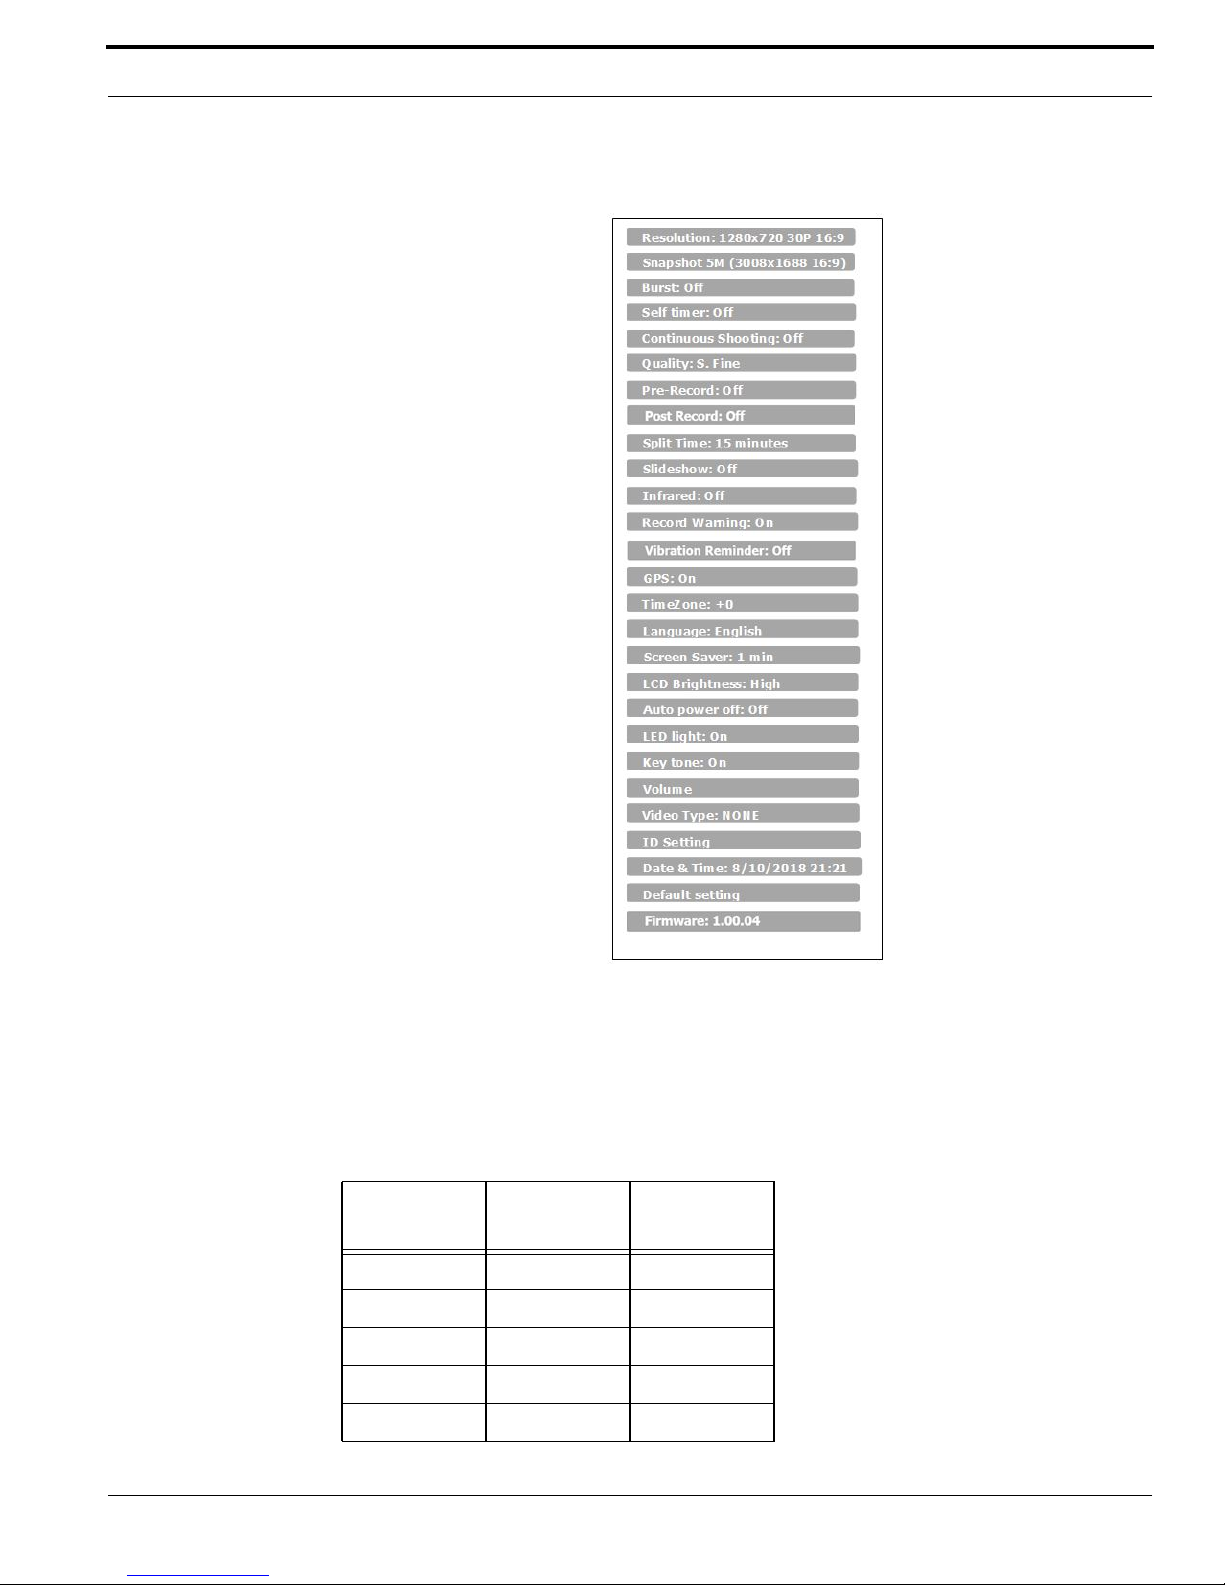
Main Menu
1. Press the Record button found on the side of the camera to be sure the camera is not recording.
2. Press the Menu button on the back of the camera to open the Main menu.
3. The Body Worn Camera prompts for password. Use the Play button or the Menu button to
highlight a character and press the Select button.
4. Once all six (6) characters are selected, the Body Worn Camera opens the Main menu.
Note: The default password for the Body Worn Camera is 000000. After logging in, change
the default password to a secure password of your choice.
12 MobileView Body Camera User Guide
Page 15
Main Menu
Recording Resolution Menu
The Body Worn Camera offers five different recording resolutions. Resolution and Frame Rate
options feature a proper balance between maximizing video quality and maximizing amount of video
stored.
140 degree Angle View
Display
Resolution
1920 x 1080 30 16:9
1140 x 1080 30 16:9
1280 x 720 60 16:9
1280 x 720 30 16:9
848 x 480 60 16:9
MobileView Body Camera User Guide 13
Images per
second Aspect Ratio
Page 16

Camera LCD Screen
140 degree Angle View (Continued)
Display
Resolution
848 x 480 30 16:9
720 x 480 30 4:3
Images per
second Aspect Ratio
Snapshot Resolution Menu
The Snapshot resolution menu provides options for still image resolution.
The following resolutions displayed in mega-pixels are available for snapshot:
• 5MP
• 8MP
• 10MP
• 12MP
• 16MP
• 21MP
• 32MP
Burst Menu
When the Snapshot button is pressed, the Body Worn Camera shoots the selected number of
snapshots.
Note: Bursts are only active when Body Worn Camera is not in Record mode. If the Camera is
in recording mode, bursts are not activated and only a single snapshot is taken.
Snapshot burst options are:
• OFF
• 2 Snapshots,
• 3 Snapshots
• 5 Snapshots
• 1 extra 5 Snapshots
• 10 Snapshots
• 15 Snapshots
• 20 Snapshots
Self Timer Menu
The Self Timer delays up to 10 seconds before taking still images when the Snapshot button is
pressed.
Note: The Self Timer function is only active when the camera is not in record mode.
Self timer menu options:
• OFF
• 5 seconds
14 MobileView Body Camera User Guide
Page 17

Main Menu
• 10 seconds
Continuous Shooting Menu
Continuous shooting takes a snapshot at a set interval.
Continuous shooting options:
• OFF
• 5 seconds
• 10 seconds
Note: Continuous shooting function is only active when the camera is not in record mode.
Quality
Select video quality based on the need of quality video recording. Set to Super Fine for best quality,
Fine for better quality, or for more recording time on the internal storage, click Normal video.
Quality.
Pre-record
Pre-record saves an additional 30 seconds of video from before the Record button is pressed. Prerecord works when the camera is in idle mode. Turn Pre-record On or Off.
Post Record
Select Post Record to choose how long the camera should continue to record after the Record button
is pressed to Stop Recording.
Post record options:
• OFF
• 5 seconds
• 1 minute
• 10 minutes
Split Time
Split time selection defines the length of each video segment. Split time does not apply to audio only
recording.
Split time options:
• 5 minutes
• 10 minutes
• 15 minutes
• 30 minutes
• 45 minutes
MobileView Body Camera User Guide 15
Page 18

Camera LCD Screen
Slide Show
Use the Slide Show menu to choose how snapshots are viewed. If OFF, only a single selected
snapshot is displayed; if ON, snapshots cycle, starting with the selected snapshot.
Infrared
Use the Infrared menu on the camera to automatically enable the Infrared LED lights, based on
lighting conditions, if set to Auto. Infrared lights can be turned off.
Record Warning
If Record Warning is ON, Body Worn Camera announces when the camera starts and stops recording.
Vibration Reminder
If enabled, the camera will vibrate every 1 minute, 3 minutes, 5 minutes, 10 minutes while it's in
video recording mode to remind user that the camera is in use.
GPS
If ON, Body Worn Camera stamps GPS coordinates on recorded video.
Screen Saver
To preserve battery, the mini LCD screen automatically turns off after a pre-configured time of
inactivity, while recording or in standby mode.
Screen saver menu options:
• 30 seconds
• 1 minute
• 3 minutes
• 5 minutes
• Off
LCD Brightness
Adjust the Body Worn Camera LCD brightness to fit lighting situation for better image and video
view.
LCD brightness menu options:
• Low
• High
Auto Power Off
Select how long to delay before Body Worn Camera automatically turns off.
Auto power off menu options:
• OFF
• 30 seconds
16 MobileView Body Camera User Guide
Page 19

Main Menu
• 1 minute
• 3 minutes
• 5 minutes
LED Light
Select to turn status LEDs ON or OFF. These lights are located on the top of the camera.
Key Tone
Select to turn key tone ON or OFF.
Volume
Select volume level option to increase or decrease Playback volume.
ID Setting
Use ID Setting menu to assign a unique ID for Body Worn Camera, and for the person to whom the
camera is assigned. Both IDs are watermarked to prevent tampering.
Date and Time Settings
Use Date and Time setting to manually enter date and time on Body Worn Camera. The Body Worn
Camera with GPS option automatically synchronizes the time on Body Worn Camera. Date format
used in Body Worn Camera is DD/MM/YYYY.
Default Setting
Use Default Setting menu to reset Body Worn Camera to factory settings. Selecting Yes results in
defaulting of the camera. Selecting No results in canceling default function.
MobileView Body Camera User Guide 17
Page 20

Camera LCD Screen
18 MobileView Body Camera User Guide
Page 21

CHAPTER 4 Body Worn Camera Use
Refer to the refer to Chapter 2: Body Worn Camera Design for more detailed information on where
buttons and options are found on the Body Worn Camera. The Body Worn Camera needs to be fully
charged prior to first time use for at least 4 hours.Charge the Body Worn Camera using a power outlet
by connecting a USB cable and USB power adapter to a docking bay. For more information about the
docking bay refer to Chapter 5: Camera Accessories.
Recording on Power On
The Body Worn Camera starts recording when it is powered on. Recording initiates automatically
followed by audio prompt, visual LED, LCD indicators, and vibration.
1. Hold the Power button for 3 seconds to power up the Body Worn Camera. This function does not
include prerecorded video from first initiated recording upon power up.
2. Recording begins automatically.
3. To stop recording press the Record button found on the side of Body Worn Camera.
Start Recording Manually while Device is On
Start recording by pressing the Record button while the device is powered on. The device does not
record in Menu or Playback mode. Recording initiates with audio prompt, visual LED, LCD
indicators, and vibration.
Note: The Body Worn Camera does not start recording in Menu or Playback mode.
Stop Recording
Stop recording at any time by manually pressing the Record button. Stopping of recording is
announced by the Body Worn Camera audio, visual, and vibration prompts.
MobileView Body Camera User Guide 19
Page 22

Body Worn Camera Use
Mute Video Recording
Use to Mute video recording.
1. While recording video, press Audio button to turn Mute ON.
2. Press Audio button again to turn Mute OFF and resume recording both video and audio.
Note: If muted, the camera will beep every 10 seconds as a reminder that video recording is
muted.
Take Snapshots
Take Snapshots by pressing Snapshot button.
Note: Bursts (multiple images taken at each press of Snapshot button) only apply when the
Body Worn Camera is not in Record Mode.
When the Body Worn Camera is recording, only a single snapshot is taken.
Record Audio Only
With this option, audio is only be recorded.
The Body Worn Camera needs to stop recording to record Audio only.
1. Stop Recording by pressing the Record button.
2. Press the Audio button once.
3. Press the Audio button once again to stop Audio only recording.
Navigate Menu
1. Stop recording to enter the main menu of Body Worn Camera. Press the Record button on the
side of the camera.
2. When recording has stopped, press the Menu button on the back of the camera to open the menu.
3. A password field appears. Enter the password for the Body Worn Camera using the Play and
Menu buttons to scroll through characters, followed by the Select button to enter a
character.
4. Enter the correct Password.
5. Make changes in Body Worn Camera menu. Use the Play button and the Menu button to scroll
through menu options.
6. Press the Select button. The selection is saved and the menu is exited.
7. If no changes are desired, exit from the menu by pressing the Power button.
8. Press the Power button again to exit from the main menu.
9. To start recording manually, press the Record button.
20 MobileView Body Camera User Guide
Page 23

Playback Video
Note: Once recording has stopped, it needs to be restarted manually by the user by pressing
the Record button.
Playback Video
Playback video directly from the Body Worn Camera. Stop Recording first by pressing the Record
button. The Body Worn Camera announces by audio, visual, and vibration prompt when the camera
stops recording.
1. On the back of the device, press the Play button to access Playback menu.
2. Make a selection between Quick Playback and Video/Photo/Audio playback options by using
Play or Menu buttons. Press the Select button to make a selection.
3. Once video is playing, use the Play button to rewind or the Menu button to fast forward. Camera
options to fast forward or rewind are 2X, 4X, 8X, 16X, 32X, 64X, and 128X times.
4. To pause playback, press the Select button on device.
5. To resume playback, press the Select button on device.
6. To exit playback, press the Power button,
7. Press the Record button to start recording again.
Note: Quick Playback will playback last recorded segment whether it is video, audio, or a
snapshot.
Playback by Segment
Select which recorded file to review on the Body Worn Camera. Stop recording first by pressing the
Record button.
1. On the back of the device, press the Play button to access Playback menu.
2. Select Video/Photo/Audio Playback and make a selection using the Play or Menu buttons. Press
Select button to make selection
3. If Video, Photo, or Audio Playback is chosen, use the Play button and Menu buttons to move
through segments, press the Select button to choose. The Body Worn Camera starts playback of
selected video segment.
4. Pressing the Power button exits Playback menu. Choose to playback a different segment from
this menu. To exit the menu completely from Segment Playback menu, press the Power button.
5. To start recording again, press the Record button.
Turn On White Light
Enable the White Light equipped on the Body Worn Camera in Standby or Record modes.
1. To turn White Light on, press the Light button once.
2. To turn White Light off, press the Light button twice.
MobileView Body Camera User Guide 21
Page 24

Body Worn Camera Use
Turn On Laser Pointer
Enable the laser pointer equipped on the Body Worn Camera in Standby or Record modes. The laser
may not show up in playback video.
1. To turn the Laser Pointer on, press the Light button twice.
2. To turn Laser Pointer off, press the Light button once.
22 MobileView Body Camera User Guide
Page 25

CHAPTER 5 Camera Accessories
Accessories
The Body Worn Camera has various accessories including the Individual Docking Bay..
Docking Bay
• Multipurpose docking bay for the Body Worn Camera
• Charge Body Worn Camera using USB cable or car charger
• Upload video directly to PC (proprietary driver is required)
Epaulette Clip
• Gives flexibility to wear Body Worn Camera off the shoulder strap.
Gator Clip
Two adjustable gator clips with a 360 degree rotation keep the Body Worn Camera secured on various
types of uniforms.
• Long Gator clip
• Short Gator clip
Universal USB Cable
Connects the Docking Bay to a PC to download video or to power outlet using USB Power Adapter
USB Power Adapter
Use along with a universal USB Cable, connecting the Docking Bay directly to power outlet to charge
the Body Worn Camera
MobileView Body Camera User Guide 23
Page 26
Camera Accessories
Car Charger
• Connect directly to the Docking Bay with the Body Worn Camera connected to charge the
camera on board or continue recording from vehicle.
Individual Body Worn Camera Dock
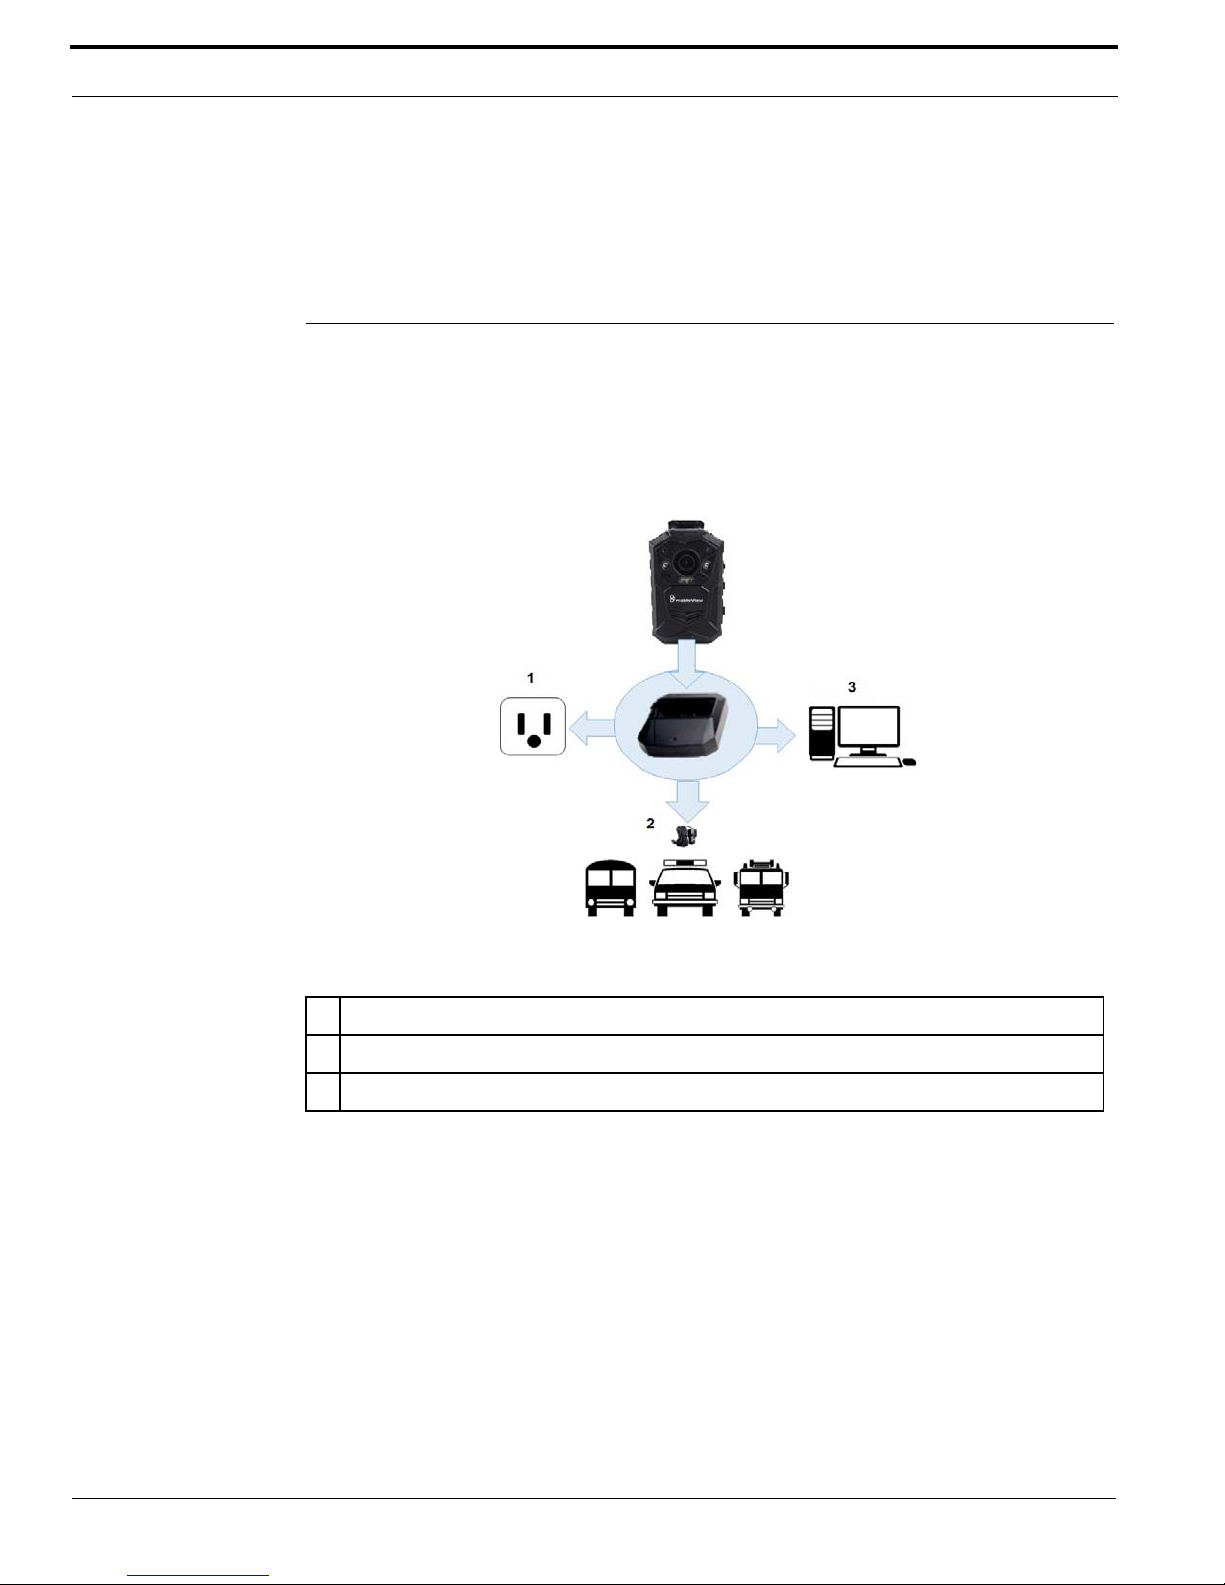
The Body Worn Camera multipurpose Individual Docking Bay is used to upload video onto PC or
mounted on a vehicle dashboard for easy charge and continued video recording. Use a wall power
outlet to charge the Body Worn Camera. A typical Individual Dock setup may be similar to the
following:
1 Power Outlet
2 Car Charger
3 PC using USB cable connection from PC to Docking Bay
24 MobileView Body Camera User Guide
Page 27

CHAPTER 6 Troubleshooting
Cannot enter menu of Body Worn Camera
Stop recording prior to opening the Body Worn Camera menu by pressing the Record button. The
Body Worn Camera supports a six character alphanumerical password format. Prior to opening the
menu of Body Worn Camera, ensure that correct password is entered. Only authorized Administrators
using the Body Worn Camera workstation software can change The Body Worn Camera menu
password.
IR are not turning on
IR turn on automatically only if set to Auto in the Infrared menu. Otherwise the Infrared remains
unavailable.
Indicator LEDs are not lit
If the camera is powered up and the status LEDs are not lit, use the Body Worn Camera menu and
click the LED Light menu option. Ensure that it is set to ON.
The Body Worn Camera only records for short periods of time
In the event the Body Worn Camera records for a brief moment then shuts off, ensure the menu option
Auto Power OFF is set to OFF.
MobileView Body Camera User Guide 25
Page 28

Troubleshooting
26 MobileView Body Camera User Guide
Page 29

Index
A
audio ....................................................5, 8, 20
B
burst .............................................................14
C
card ..............................................................11
D
date and time stamp ..................................... 11
F
fine ...............................................................15
G
GPS ..............................................................11
H
HDMI ............................................................8
L
laser ................................................................5
laser pointer .................................................22
LCD .............................................................11
LED .........................................................5, 17
lens .................................................................5
M
menu button ................................................... 7
N
normal video ............................................... 15
P
password ..................................................... 12
play ...........................................................7, 11
power .......................................... 5, 16, 19, 21
PTT ............................................................... 8
R
record ................................................ 8, 13, 19
resolution .................................................... 13
S
SD card ........................................................11
segment ....................................................... 21
select ............................................................. 7
snapshot .......................................8, 11, 14, 20
split time ..................................................... 15
T
timer ............................................................ 14
U
USB ......................................................... 8, 19
V
volume ........................................................ 17
W
white light ................................................... 21
MobileView Body Camera User Guide
Page 30

Index
MobileView Body Camera User Guide
 Loading...