

Page 1
TRIO & TRIO MAX
Portable Laptop Monitor
USER GUIDE
Page 2

Table of content
SECTION 1: PACKAGE OVERVIEW
1.1 MONITOR ...................................................................................................................................................... 1
1.2 ACCESSORIES ............................................................................................................................................... 1
SECTION 2: DRIVER INSTALLATION GUIDE
2.1 WINDOWS INSTALLATION GUIDE ................................................................................................................. 2
2.2 MAC INSTALLATION GUIDE ........................................................................................................................... 3
SECTION 3: MONITOR POSITIONING GUIDE
3.1 ATTACHMENT MODE..................................................................................................................................... 4
3.2 PORTRAIT MODE .......................................................................................................................................... 6
3.4 PRESENTATION MODE .................................................................................................................................. 7
3.5 THREE-SCREEN MODE ................................................................................................................................. 8
SECTION 4: DISPLAY SETTINGS
4.1 DUPLICATE MODE TO EXTEND MODE ........................................................................................................ 9
4.1.1 WINDOWS SETTINGS ................................................................................................................................... 10
4.1.2 MAC OS SETTINGS ....................................................................................................................................... 10
4.2 ROTATE DISPLAY AND LAYOUT SET UP ...................................................................................................... 11
4.2.1 WINDOWS SETTINGS ................................................................................................................................... 11
4.2.2 MAC OS SETTINGS ....................................................................................................................................... 12
4.3 CHANGE DISPLAY SETTINGS TO ADJUST CONTENT SIZE ........................................................................ 13
4.3.1 WINDOWS ...................................................................................................................................................... 13
4.3.2 MAC OS ......................................................................................................................................................... 14
SECTION 5: TECHNICAL INFORMATION
5.1 SPECIFICATIONS ............................................................................................................................................ 16
5.2 REMOVING METAL PLATES .......................................................................................................................... 17
Copyright @ 2020 MOBILE PIXELS INC. All Rights Reserved. No part of this manual, including the products and software described in it, may be reproduced, transmitted, transcribed, stored in a
retrieval system, or translated into any language in any form or by any means, except documentation kept by the purchaser for backup purposes, without the express written permission of MOBILE
PIXELS INC. Product warranty or service will not be extended if: (1) the product is repaired, modied or altered, unless such repair, modication of alteration is authorized in writing by MOBILE
PIXELS INC.; or (2) the serial number of the product is defaced or missing. MOBILE PIXELS INC. PROVIDES THIS MANUAL “AS IS” WITHOUT WARRANTY OF ANY KIND, EITHER EXPRESS OR IMPLIED,
INCLUDING BUT NOT LIMITED TO THE IMPLIED WARRANTIES OR CONDITIONS OF MERCHANTABILITY OR FITNESS FOR A PARTICULAR PURPOSE. IN NO EVENT SHALL ASUS, ITS DIRECTORS, OFFICERS,
EMPLOYEES OR AGENTS BE LIABLE FOR ANY INDIRECT, SPECIAL, INCIDENTAL, OR CONSEQUENTIAL DAMAGES (INCLUDING DAMAGES FOR LOSS OF PROFITS, LOSS OF BUSINESS, LOSS OF USE OR
DATA, INTERRUPTION OF BUSINESS AND THE LIKE), EVEN IF MOBILE PIXELS INC. HAS BEEN ADVISED OF THE POSSIBILITY OF SUCH DAMAGES ARISING FROM ANY DEFECT OR ERROR IN THIS MANUAL
OR PRODUCT. SPECIFICATIONS AND INFORMATION CONTAINED IN THIS MANUAL ARE FURNISHED FOR INFORMATIONAL USE ONLY, AND ARE SUBJECT TO CHANGE AT ANY TIME WITHOUT NOTICE, AND
SHOULD NOT BE CONSTRUED AS A COMMITMENT BY MOBILE PIXELS INC. MOBILE PIXELS INC ASSUMES NO RESPONSIBILITY OR LIABILITY FOR ANY ERRORS OR INACCURACIES THAT MAY APPEAR IN
THIS MANUAL, INCLUDING THE PRODUCTS AND SOFTWARE DESCRIBED IN IT. Products and corporate names appearing in this manual may or may not be registered trademarks or copyrights of their
respective companies, and are used only for identication or explanation and to the owners’ benet, without intent to infringe.
Page 3

Safety information
• Before setting up this Portable USB Monitor, carefully read all the documentation
that came with the package.
• To prevent re or shock hazard, never expose this Portable USB Monitor to rain
or moisture.
• Never try to open this Portable USB Monitor cabinet.
• Before using this Portable USB Monitor, make sure all cables are correctly
connected and the power cables are not damaged. If you detect any damage,
contact your dealer immediately.
• Avoid dust, humidity, and temperature extremes. Do not place this Portable USB
Monitor in any area where it may become wet. Place this Portable USB Monitor
on a stable surface.
• Never push objects or spill liquid of any kind into the slots on this Portable USB
Monitor cabinet.
• If you encounter technical problems with this Portable USB Monitor, contact a
qualied service technician, your retailer or [email protected]
Page 4
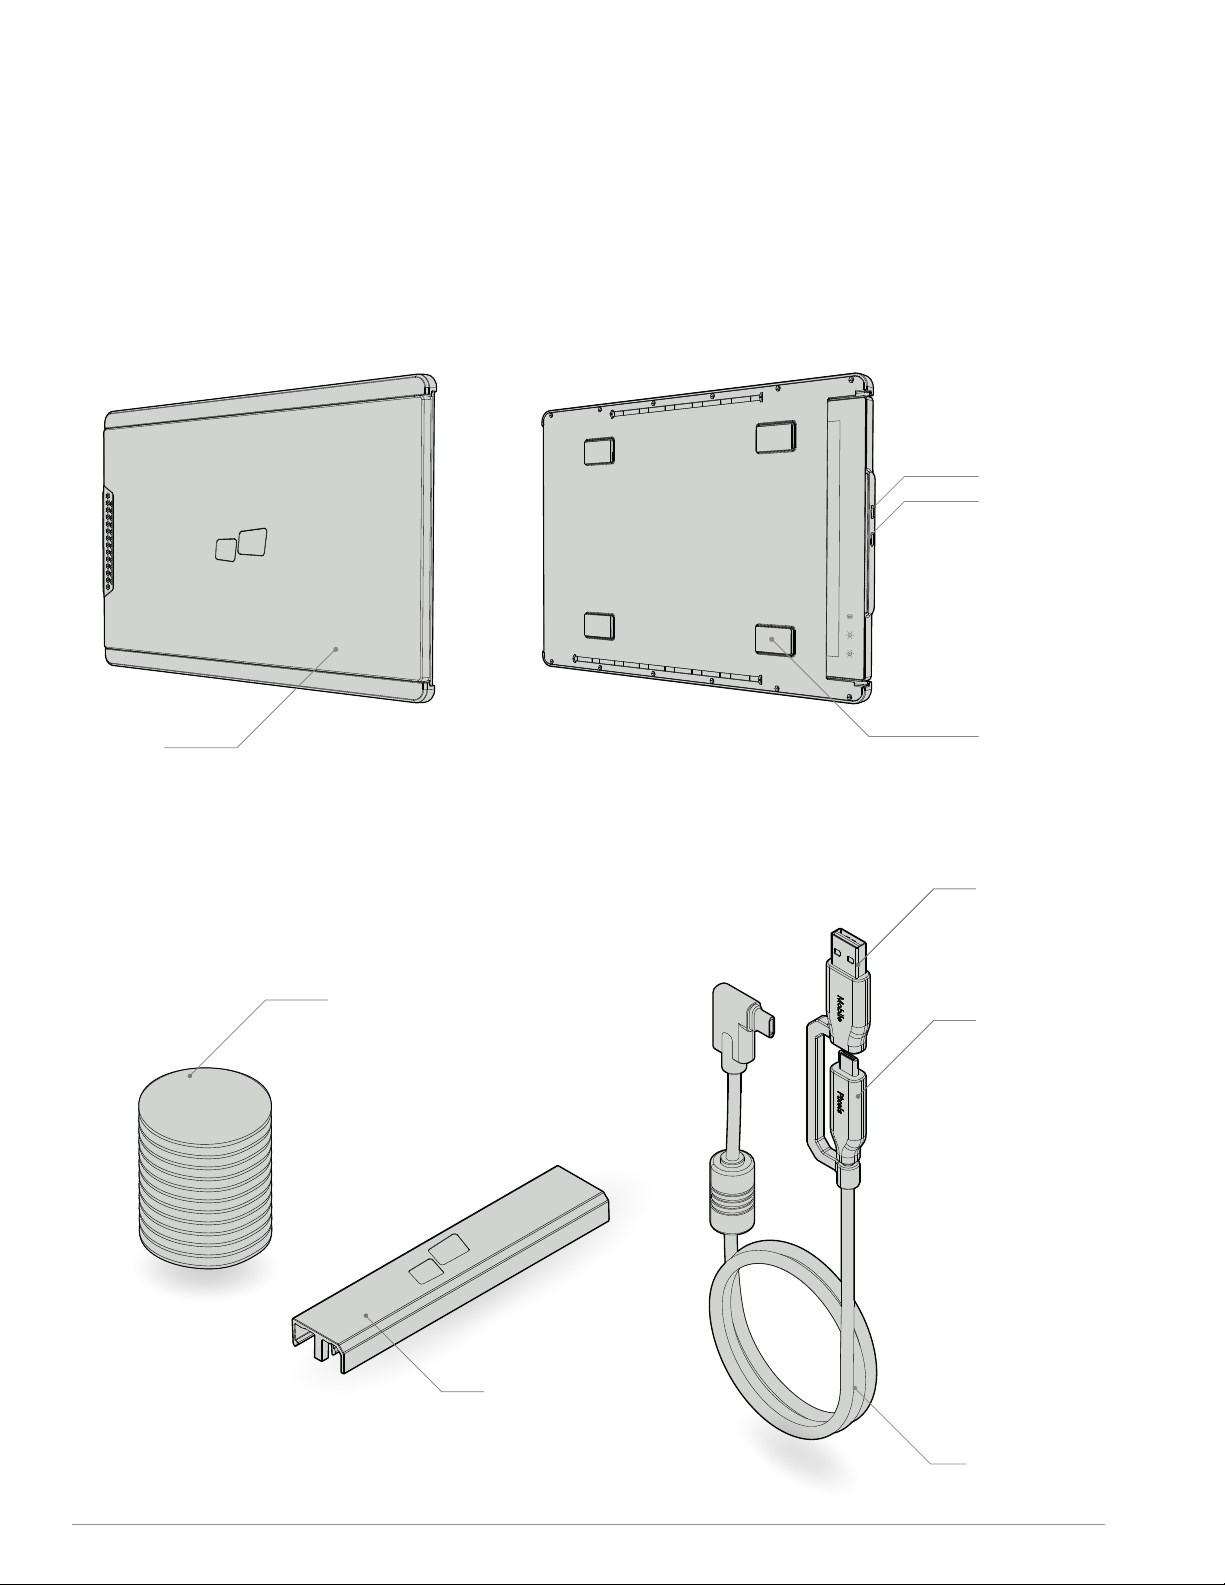
SECTION : PACKAGE OVERVIEW
1.1 MONITOR
INTERCHANGEABLE
USB TYPE-C PORTS
BACKCHARGING PORT
AND SIGNAL PORT
SCREEN
1.2 ACCESSORIES
METAL PLATE
12 METAL PLATES TOTAL
FOR 3 LAPTOPS
MAGNETIC PLATES
USB TYPE-C CABLE
TO TYPE A
USB TYPE-C CABLE
TO TYPE C
TRIO/TRIO MAX CLIP
EACH TRIO/TRIO MAX WILL INCLUDE
ONE TRIO CLIP. THUS, ONCE TWO
TRIOS/TRIO MAX'S ARE PURCHASED,
YOU WILL HAVE A SET TO CLIP THEM
TOGETHER
USB CABLE
1
Page 5
2.
3.
4.
5.
6.
1.
SECTION : DRIVER INSTALLATION GUIDE
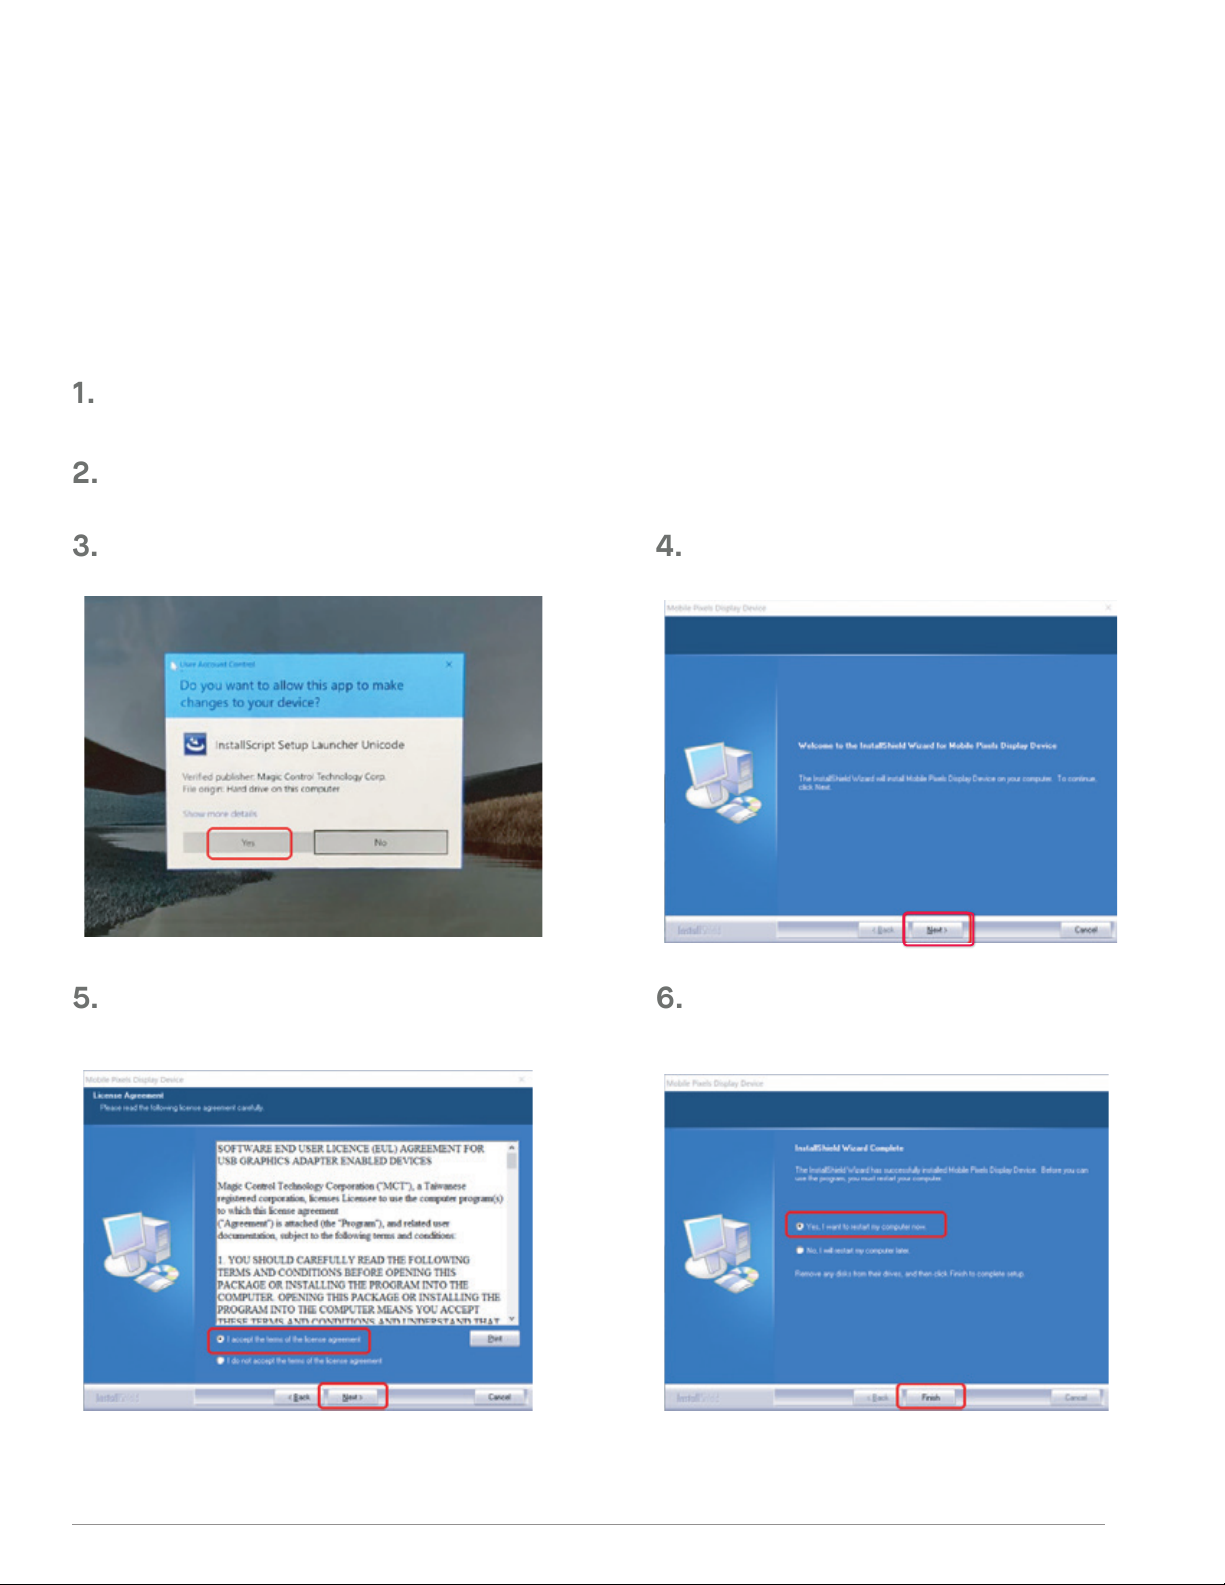
When using USB C to connect, driver installation is not necessary.
2.1 WINDOWS INSTALLATION GUIDE
Connect Windows Laptop to Mobile Pixels Trio/Trio Max Monitor, wait 20 secs and the monitor
should turn on. In the event the monitor does not turn on, please follow the steps below:
Please download the correct windows driver from:
Double click and launch the installer.
Click “Yes” in the window below.
WWW.MOBILEPIXELS.US/PAGES/DOWNLOAD-DRIVERS
Click ”Next” in the Window below:
Please select “I accept the terms of the license agreement”
and click Next
Please select “Yes, I want to restart my computer now”
and click Finish
2
Page 6
2.
4.
5.
6.
7.
8.
3.
1.
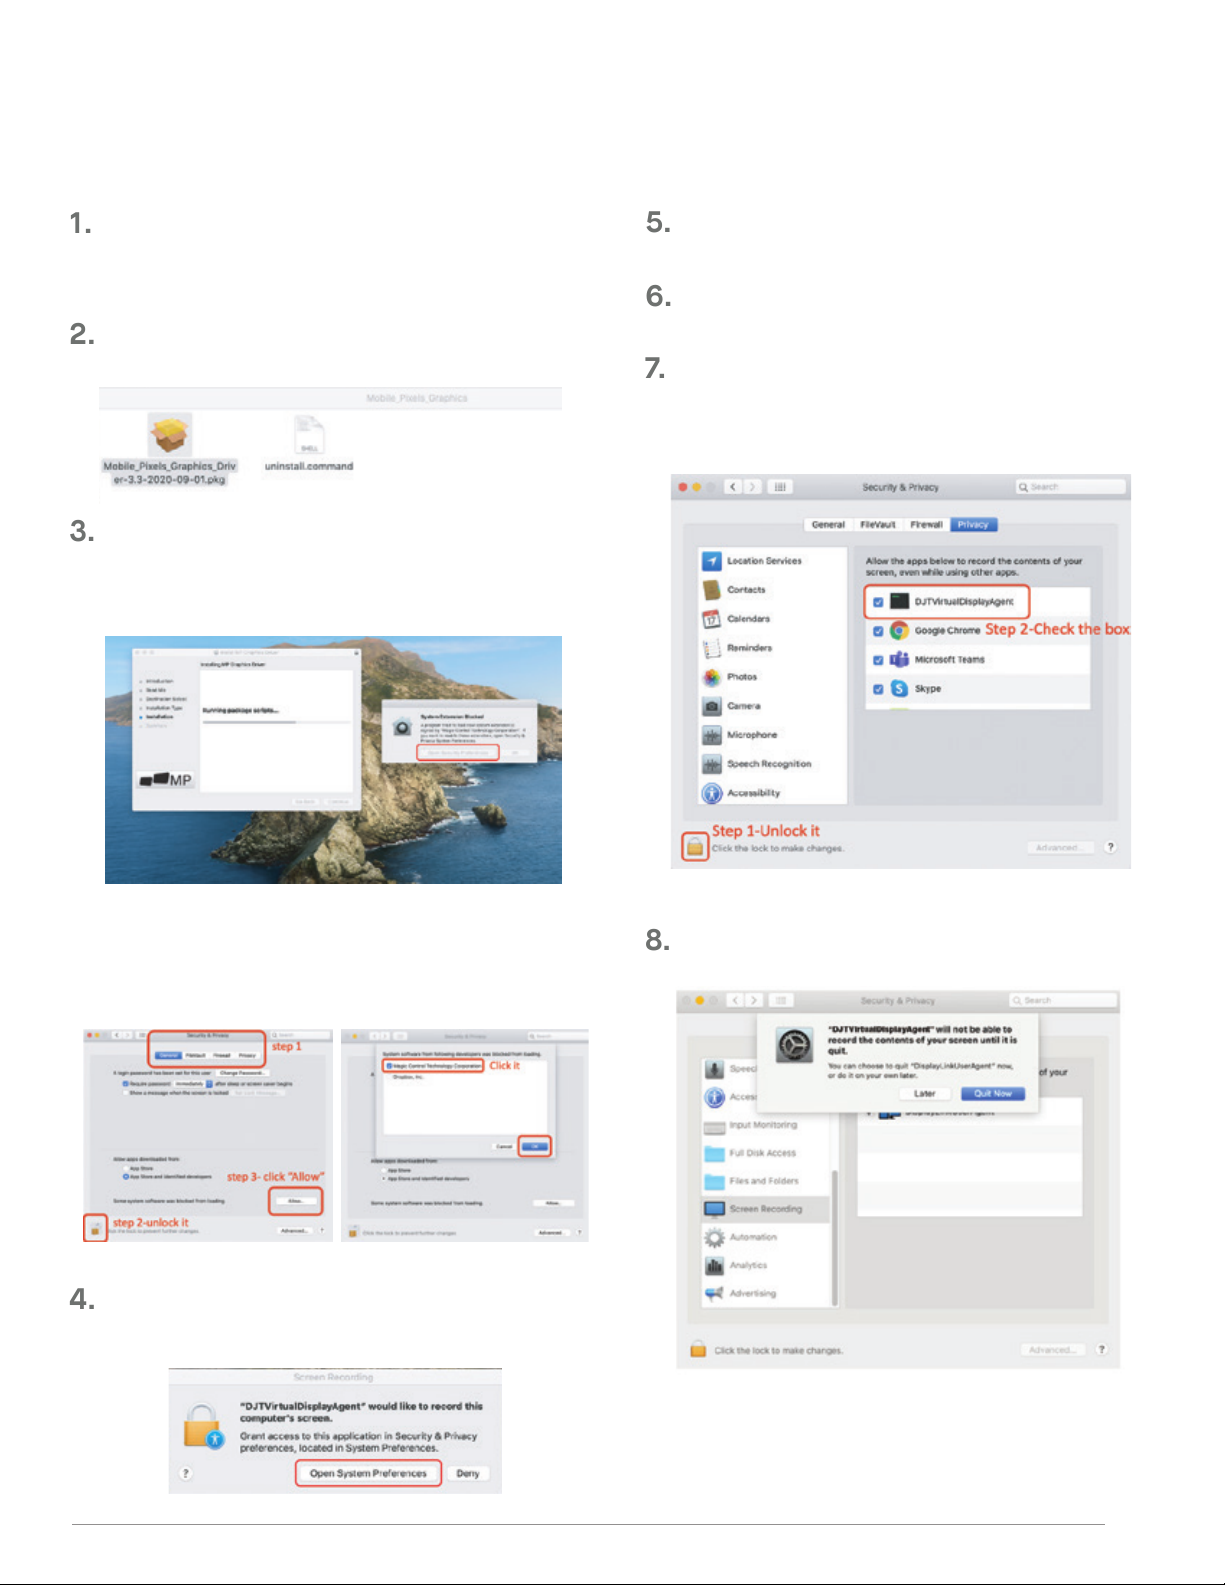
. MAC INSTALLATION GUIDE
Do not plug the Mobile Pixels Device into your mac before executing the driver installation
Please download the Mac driver from the link below.
Run the .pkg file to load the drivers to the mac folder
WWW.MOBILEPIXELS.US/PAGES/DOWNLOAD-DRIVERS
Click “MP_Graphics_Driver_v1.0.0.pkg”, please follow
the instructions to install the device driver.
The system should pop‐up a screen “System Extension
Blocked” after installation asks the user to enable these
extensions forthe first time .Click “Open Security
Preference” to go setting.
Go to System Preferences > Security & Privacy > Privacy
Click on the Lock to make changes
Scroll and select “Screen Recording” and check
“DJTVirtualDisplayAgent”
Important: This warning is not always shown. Even if it is
not shown, for new installations the user must “Allow” to
install the Mobile Pixels driver and restart the laptop
(After System Reboot) Connect Mobile Pixels device to Mac
computer, a screen recording prompt should pop up
“Click Open System Preferences”
Click on the Lock to save changes Click “Quit Now”
and restart the laptop.
3
Page 7
3.
1.
4.
2.
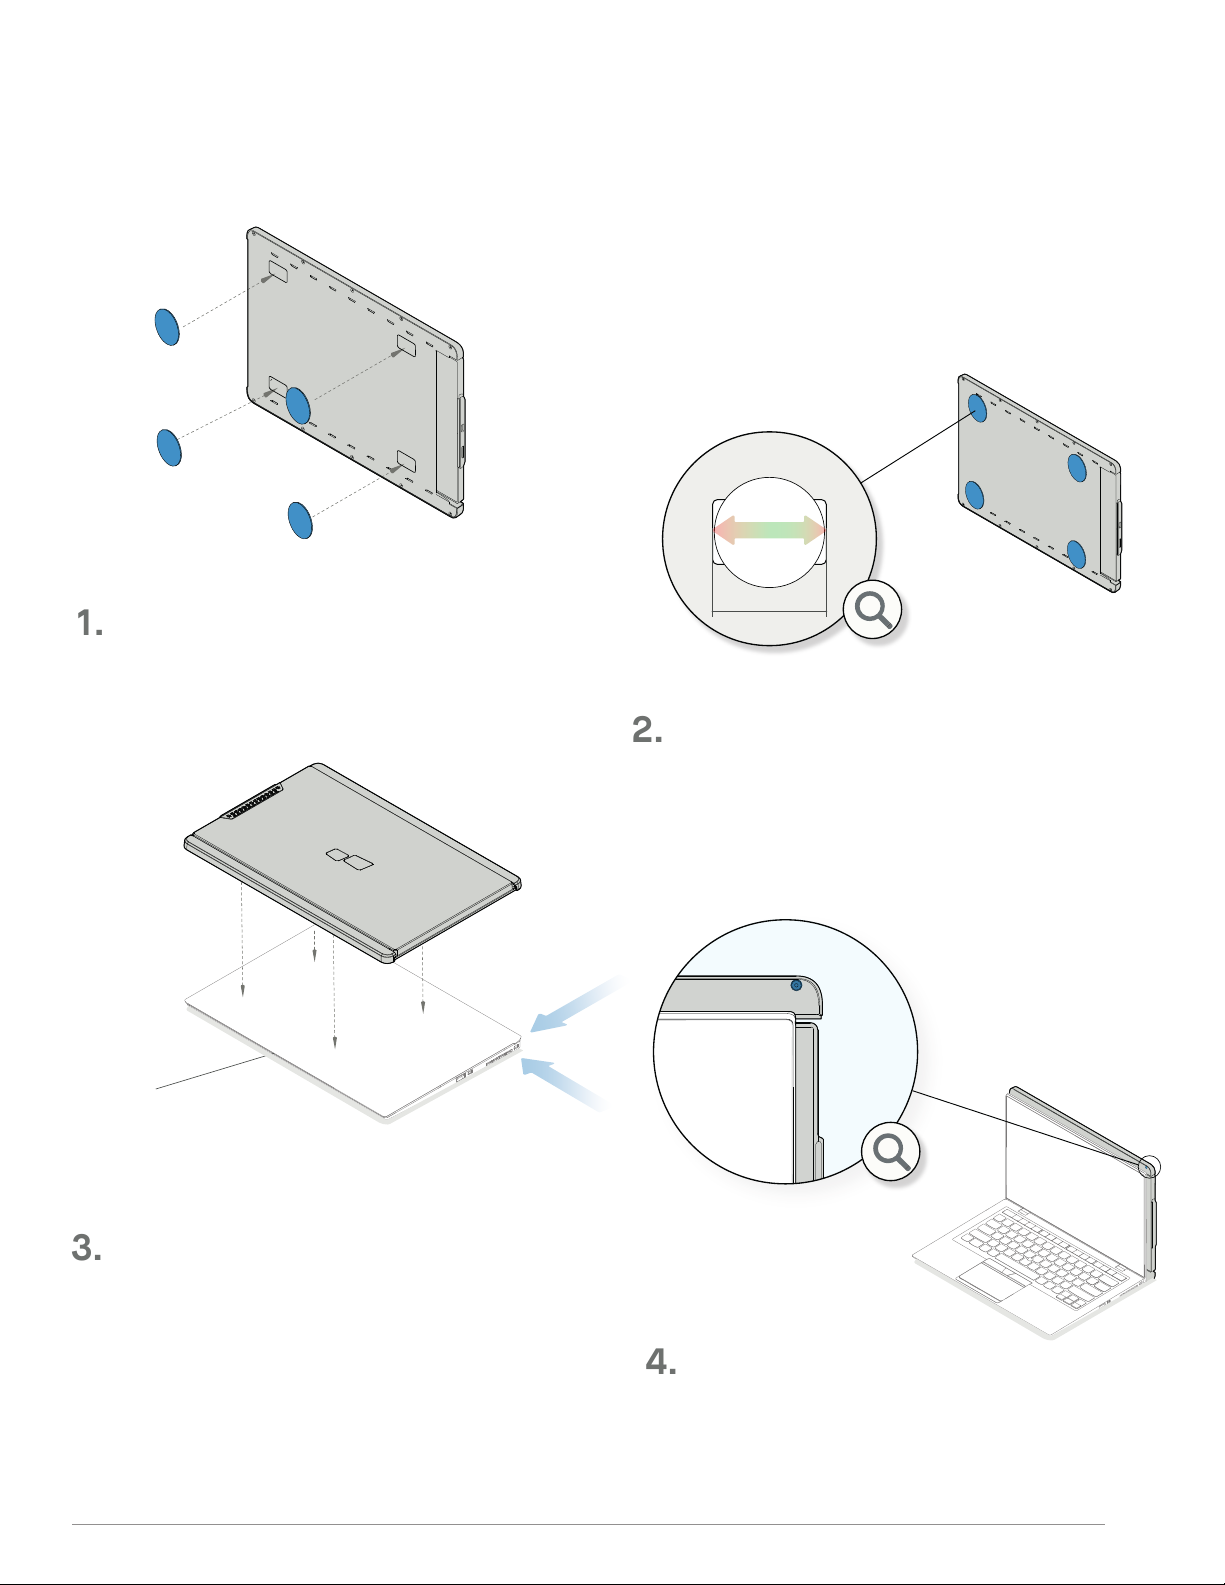
SECTION : MONITOR POSITIONING GUIDE
. ATTACHMENT MODE
Place the metal plates (included in the box) over
the magnets in the back of TRIO/TRIO MAX.
Front of
the laptop
36
Make sure round plate is centered on the magnet
Once the metal plates are all placed, close your
laptop and align TRIO/TRIO MAX.
For a proper install try to match the right edge of
TRIO/TRIO MAXwith one screw exposed past the edge
of the laptop.
Align bottom of TRIO/TRIO MAX to bottom of the laptop.
*USB Cable omitted
4
Page 8
2.
4.
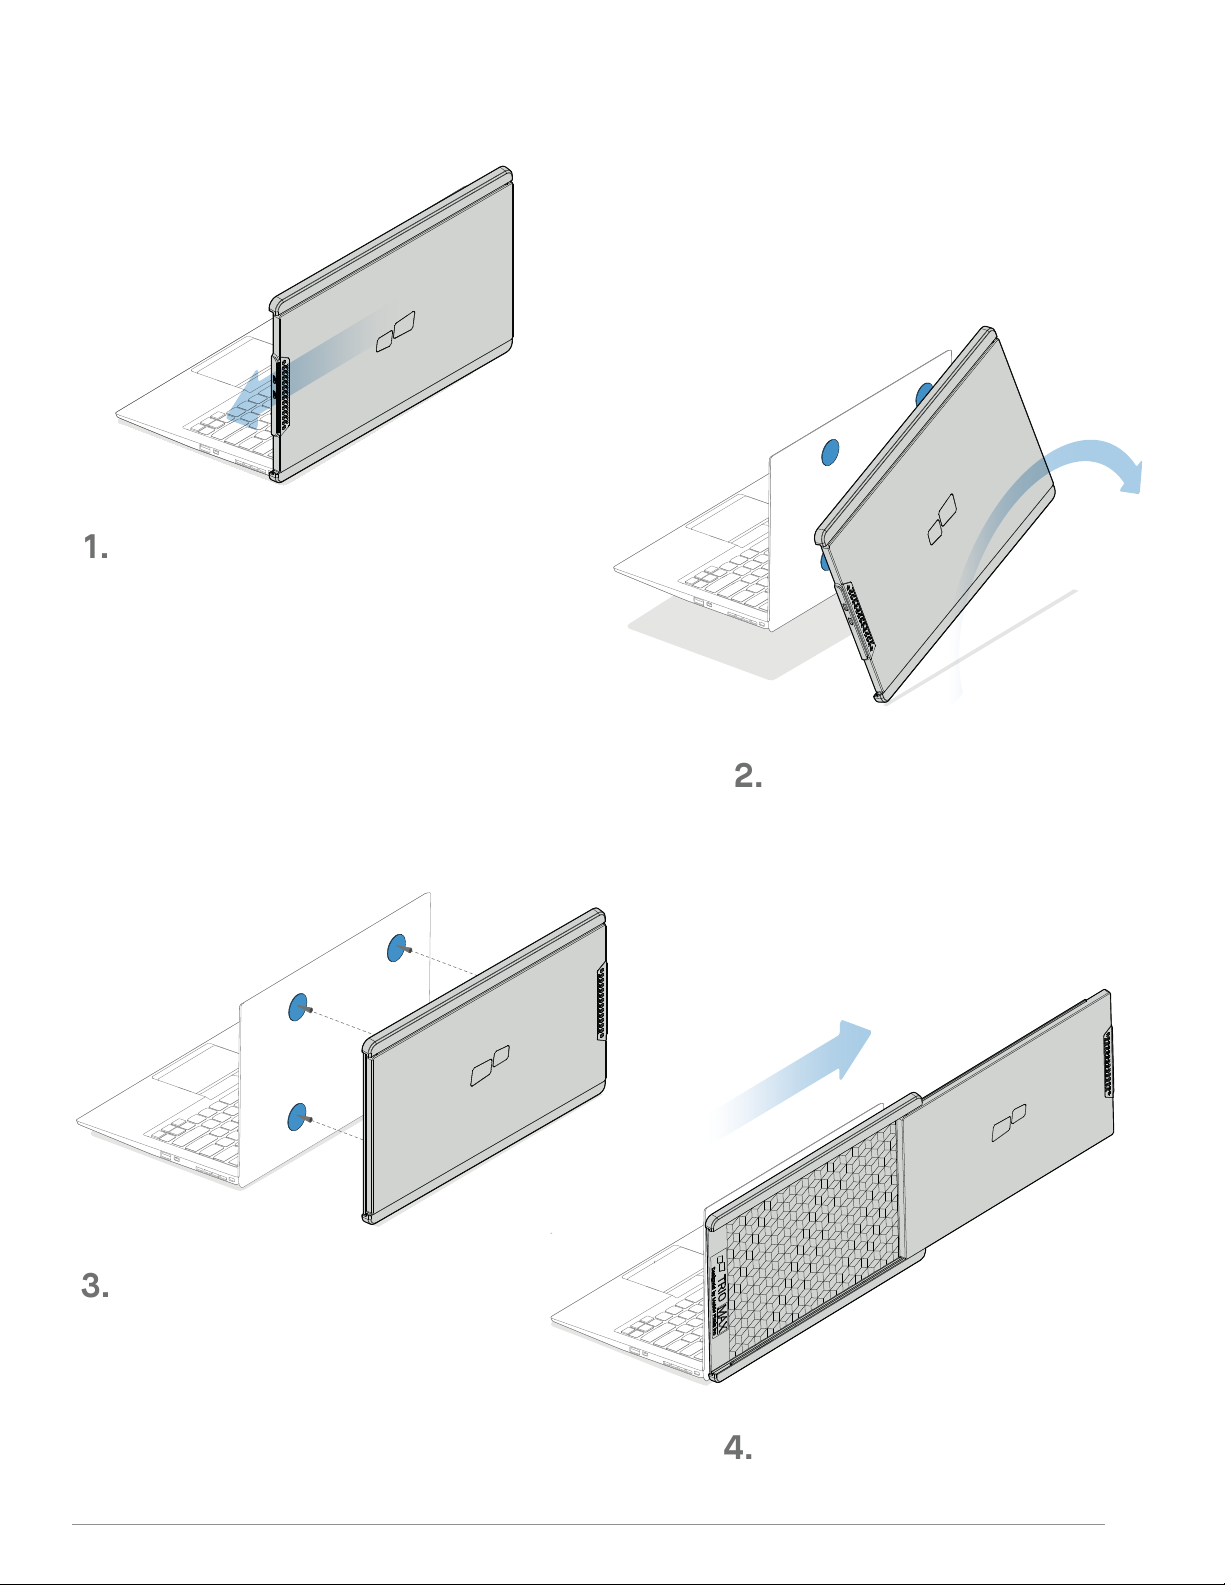
To remove it, slide TRIO/TRIO MAX off of the
1.
3.
magnets, do not pull.
To use it on the other side, rotate 180 degrees.
Snap into the back of the laptop.
You are ready to work.
*USB Cable omitted
5
Page 9
1.
2.
3.
4.
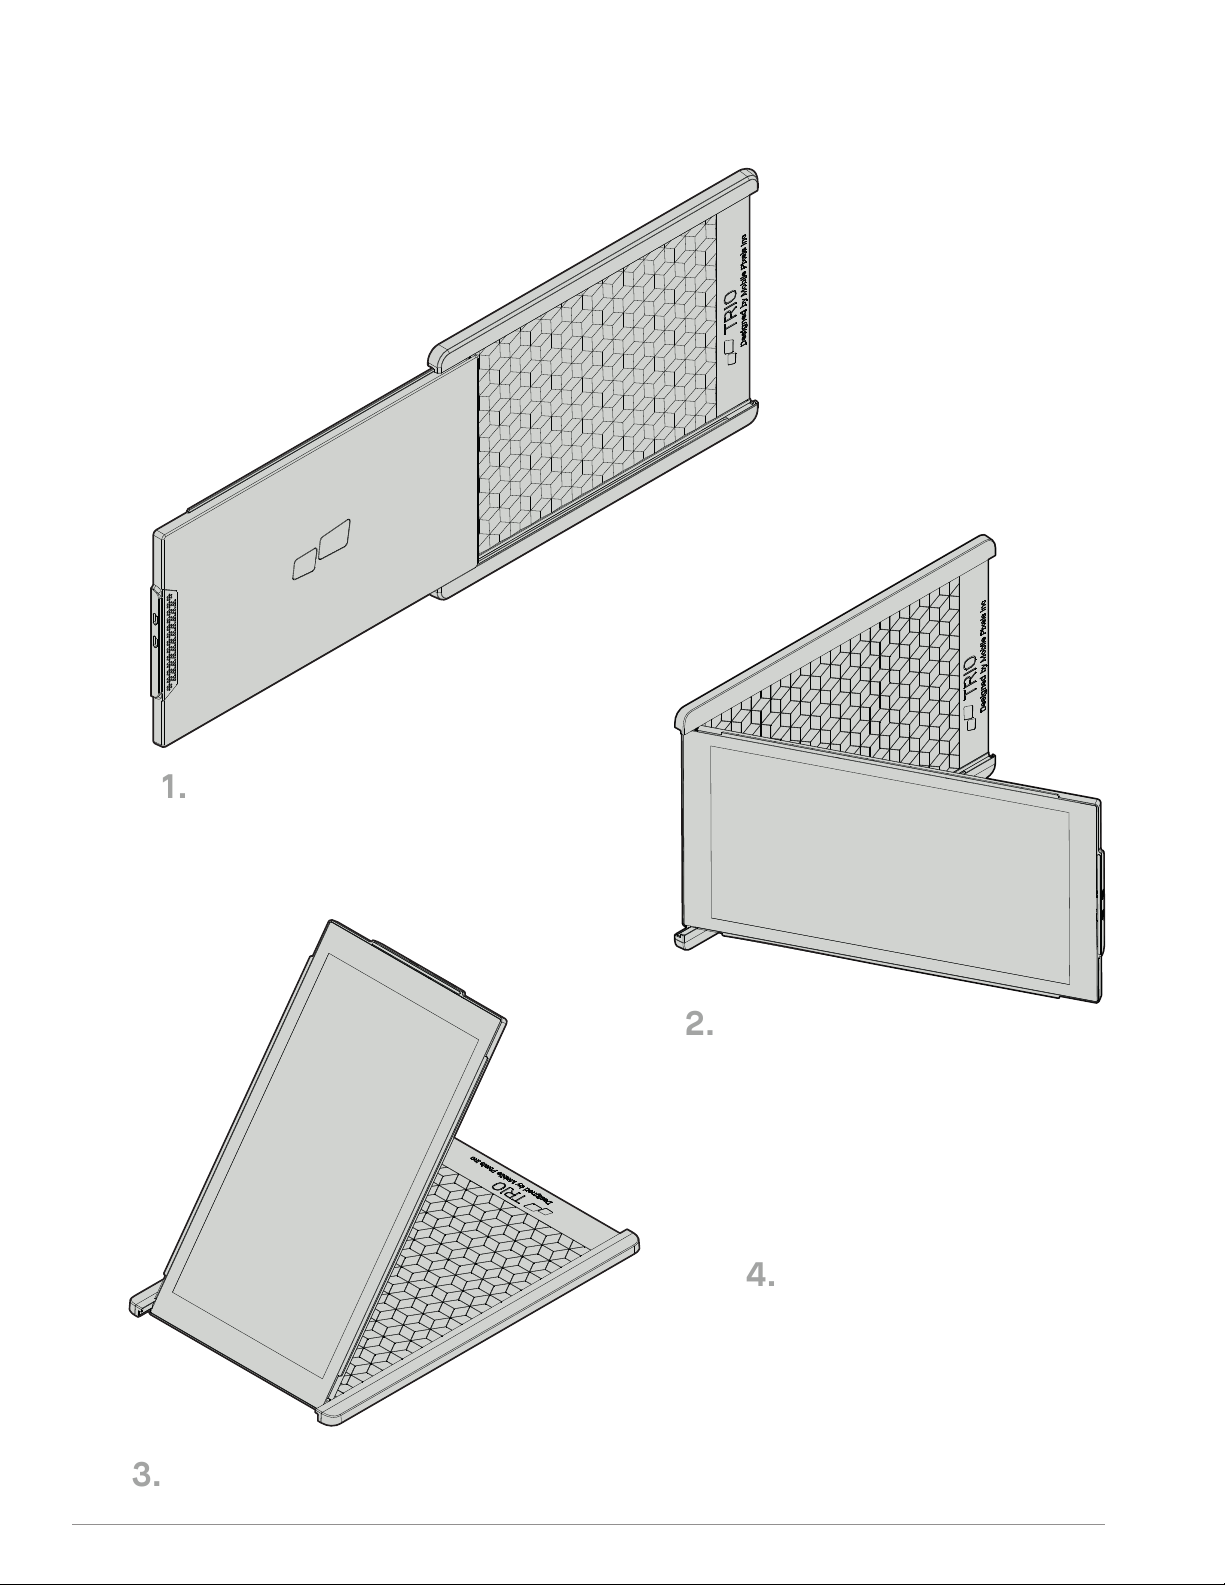
3.2 PORTRAIT MODE
Slide Trio
Rotate around 110° degrees
Go to Display settings to rotate display
See section 4.2
*USB Cable omitted
Connect Trio to the Pc and use it in portrait mode
6
Page 10
1.
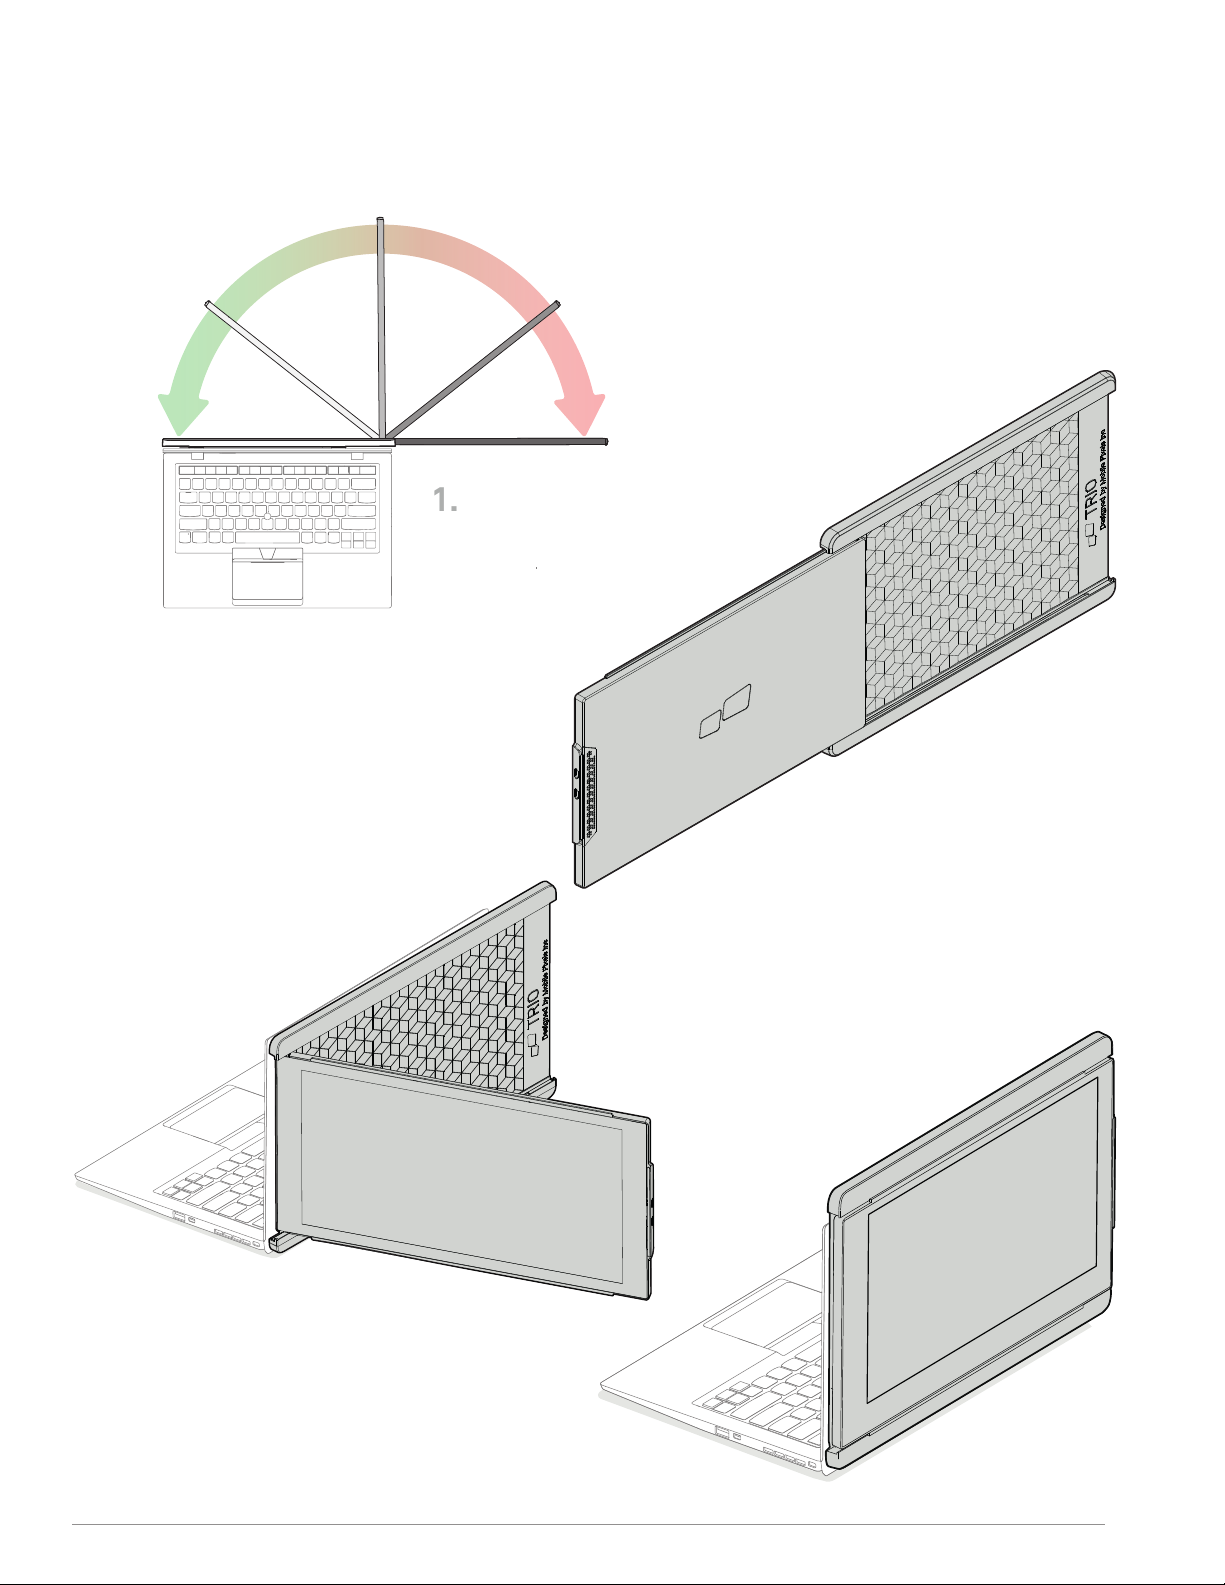
3.4 PRESENTATION MODE
180º
To access
presentation mode,
simply swivel
TRIO/TRIO MAX 180
degrees to the back of
the laptop.
*USB Cable omitted
7
Page 11
1.
2.
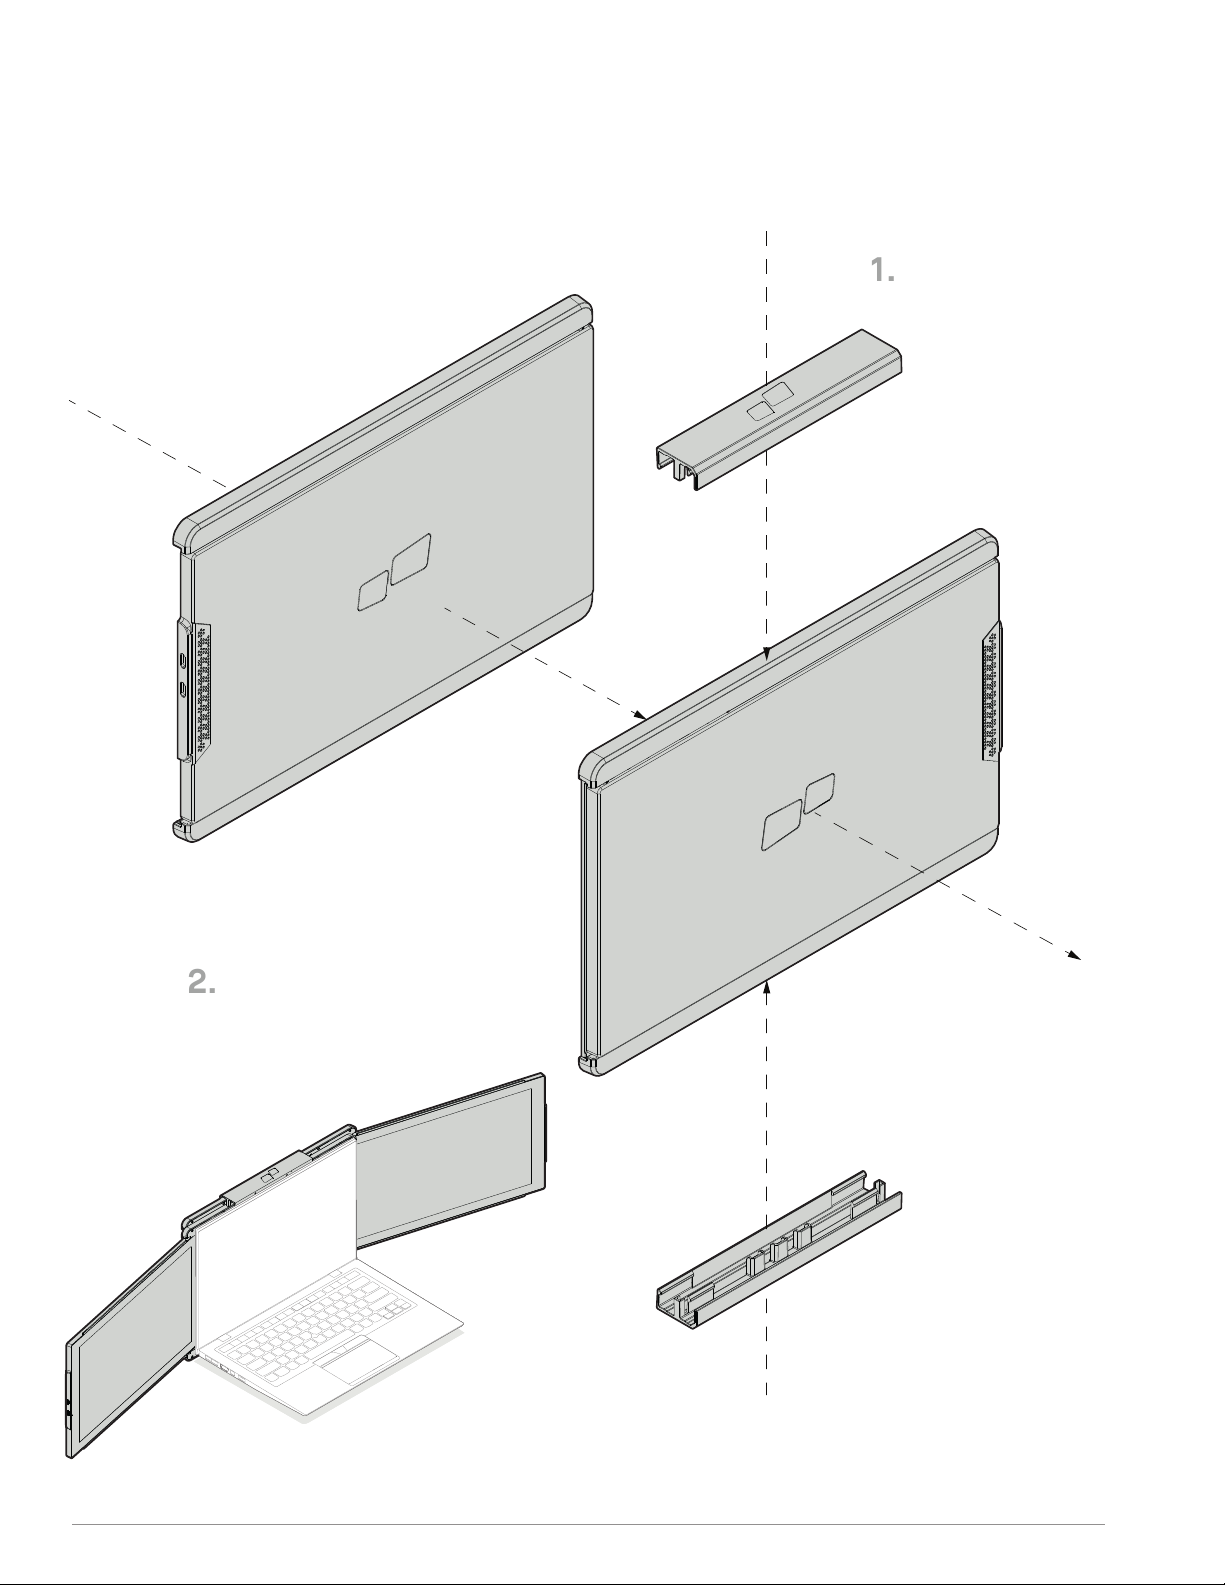
3.5 THREE-SCREEN MODE
Attach the clips to Trio/Trio Max
Attach the second unit of
Trio/ Trio Max to the clips
*USB Cable omitted
8
Page 12
SECTION : DISPLAY SETTINGS
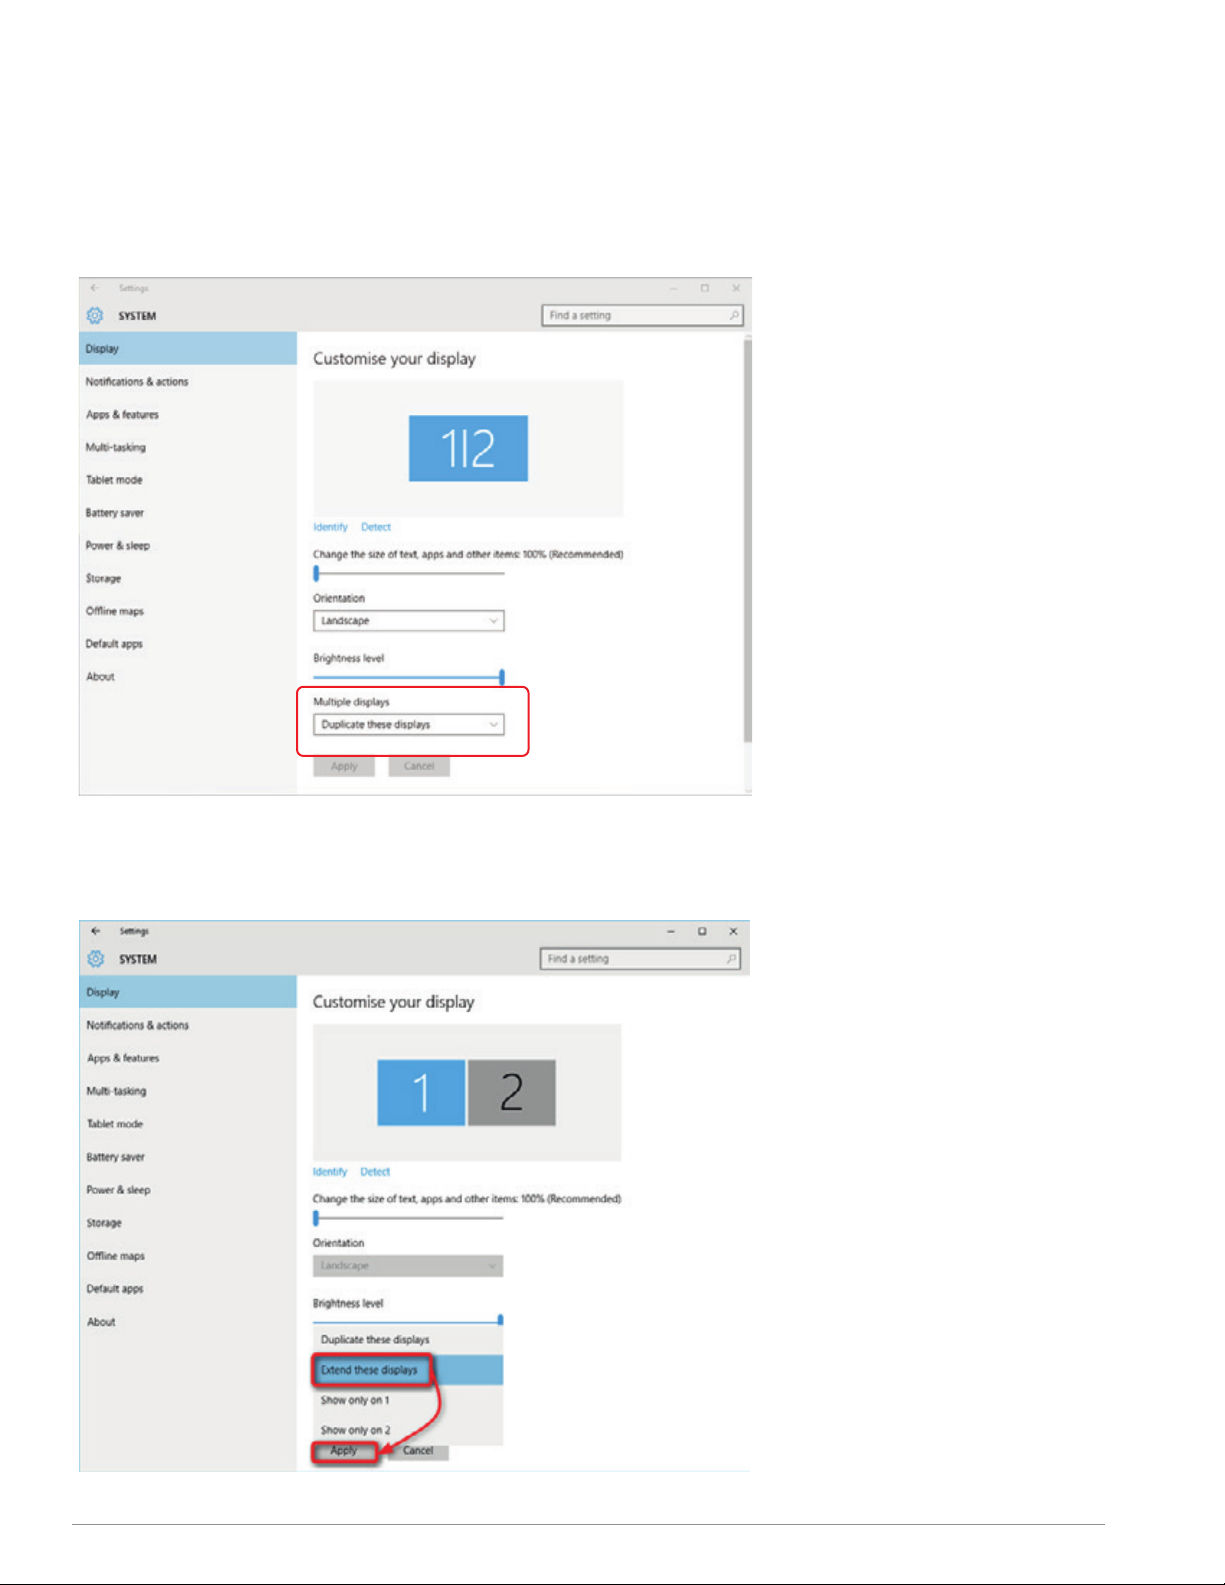
. DUPLICATE MODE TO EXTEND MODE
4.1.1 WINDOWS SETTINGS
-Right click on your desktop while TRIO/TRIO
MAX Is connected and choose “Display
Setting”
-Then you should either see this screen or
the one at next Section
-If you have a duplicate screen and want to
change it to extend mode, click on the
“Duplicate these displays” from the drop
down box
-When the drop down box is opened,
choose “Extend these displays”
-Then click “Apply”
-Now you are in Extend Mode
9
Page 13
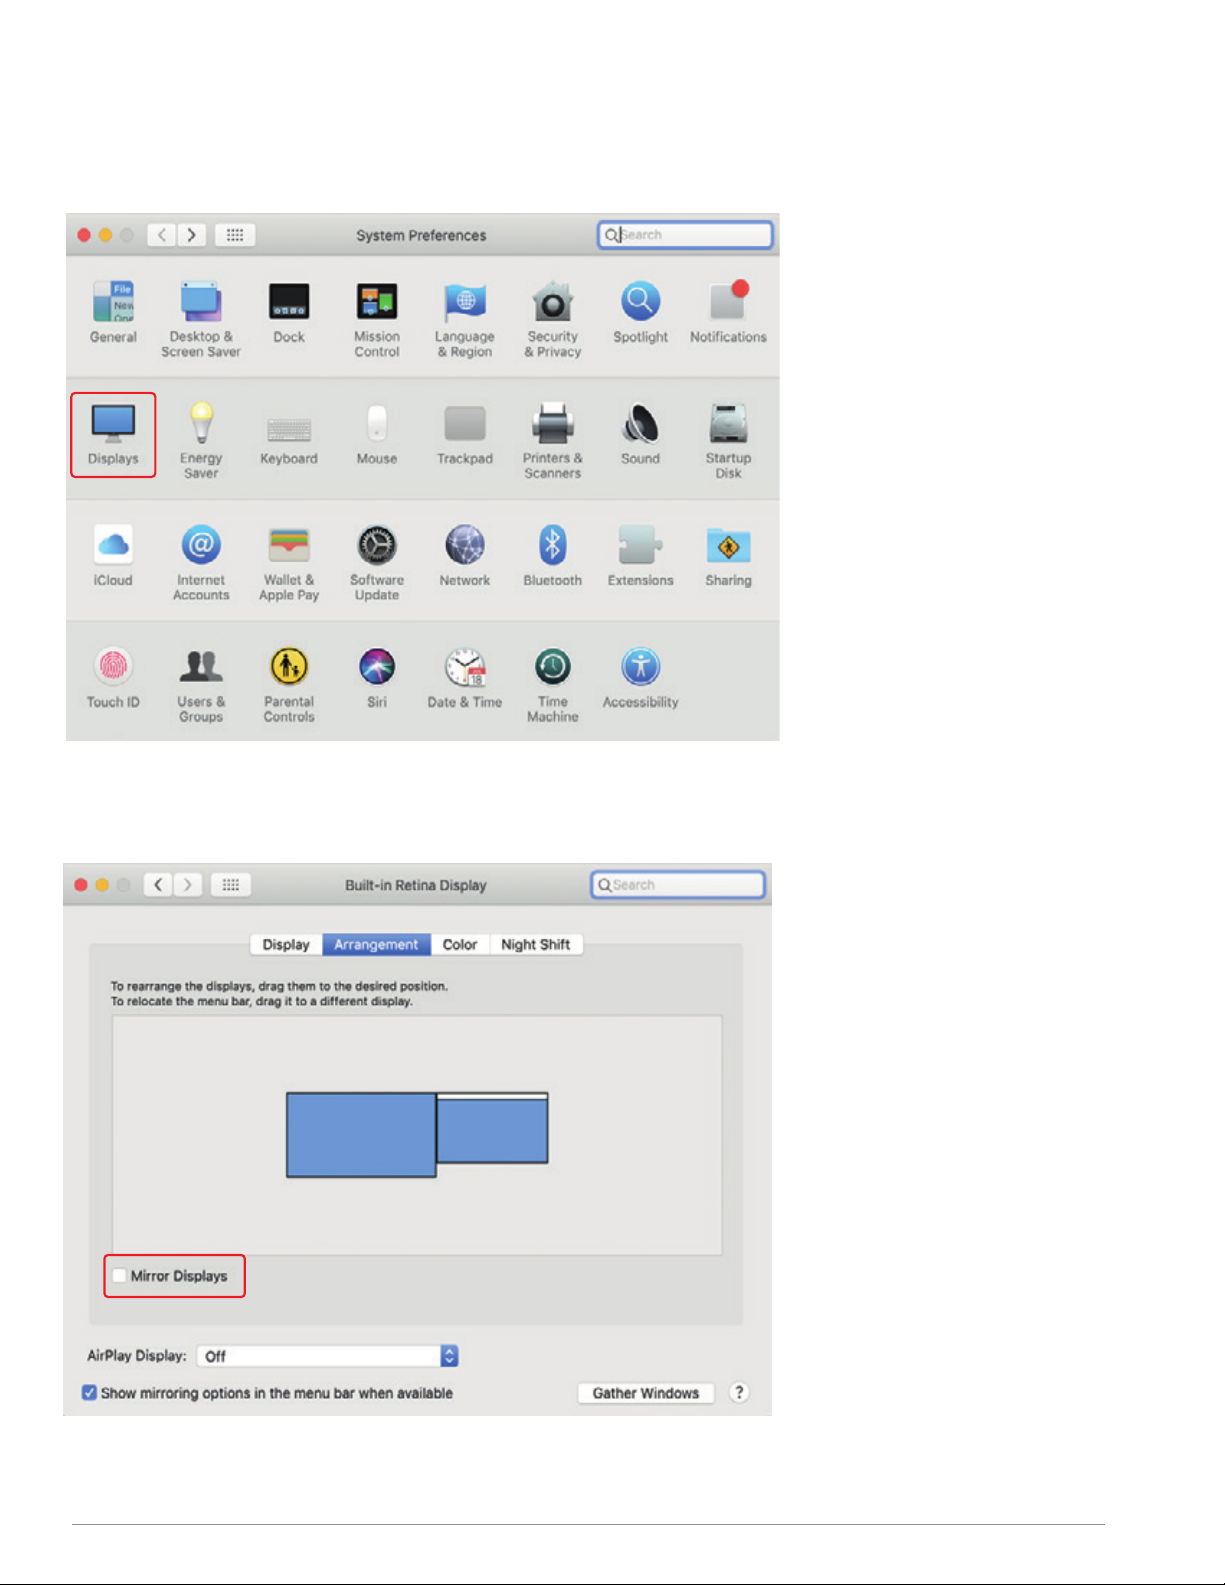
.. MAC OS SETTINGS
- Click on system preference and go to
Displays
- Checking the “Mirror Displays” box
will switch between duplicate and
extend mode for Duex Pro.
10
Page 14
1.
2.
3.
. ROTATE DISPLAY AND LAYOUT SET UP
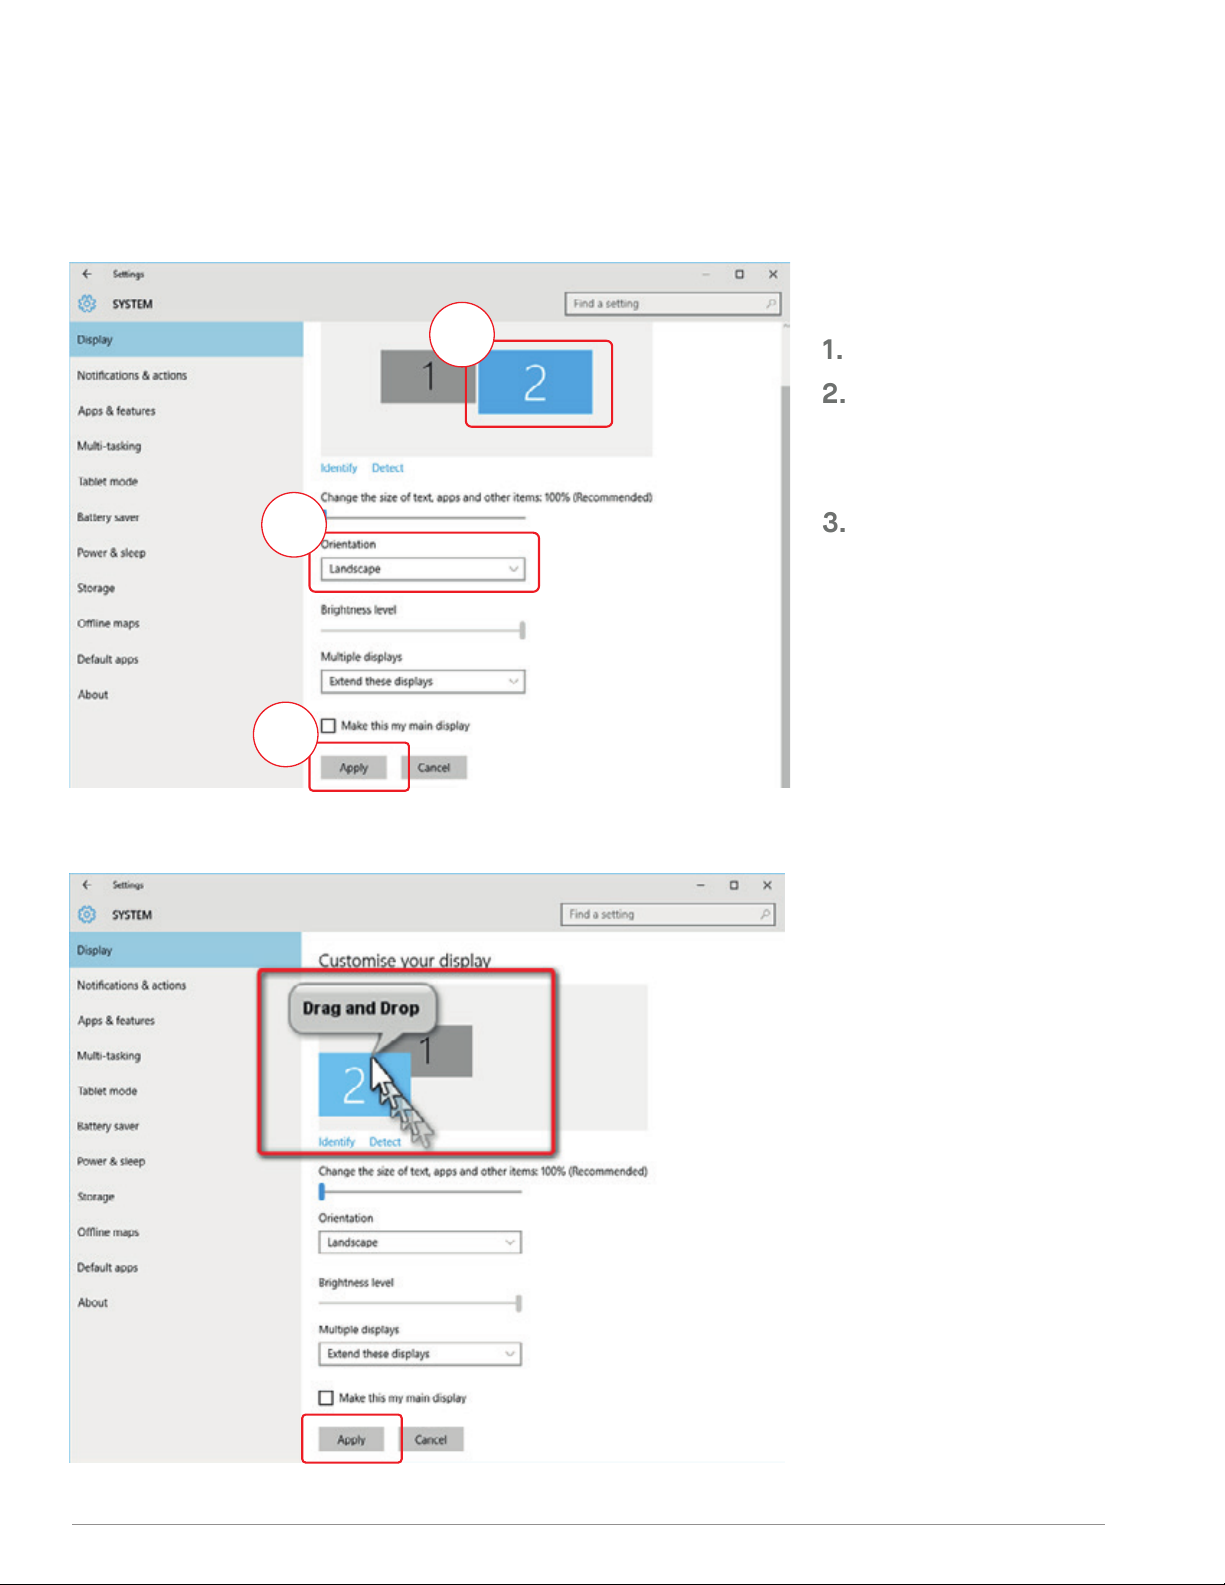
4.2.1 WINDOWS SETTINGS
If you are already in “Extend mode”
and want to use TRIO/TRIO MAX on
the left
#1
First click on the 2nd screen icon
Then open the Orientation drop
down box and change it from
“Landscape” to “Landscape
(flipped)”; Choose "Portrait" for
Portrait Mode".
#2
#3
Then click “Apply”
-Now your screen is upside down
and ready to be use on the left with 1
extra step.
-Move the 2nd display icon from the
right to the left of the 1st display by
simply “Drag and Drop” it.
-Click “Apply” to finish the setting of
the lay out.
11
Page 15
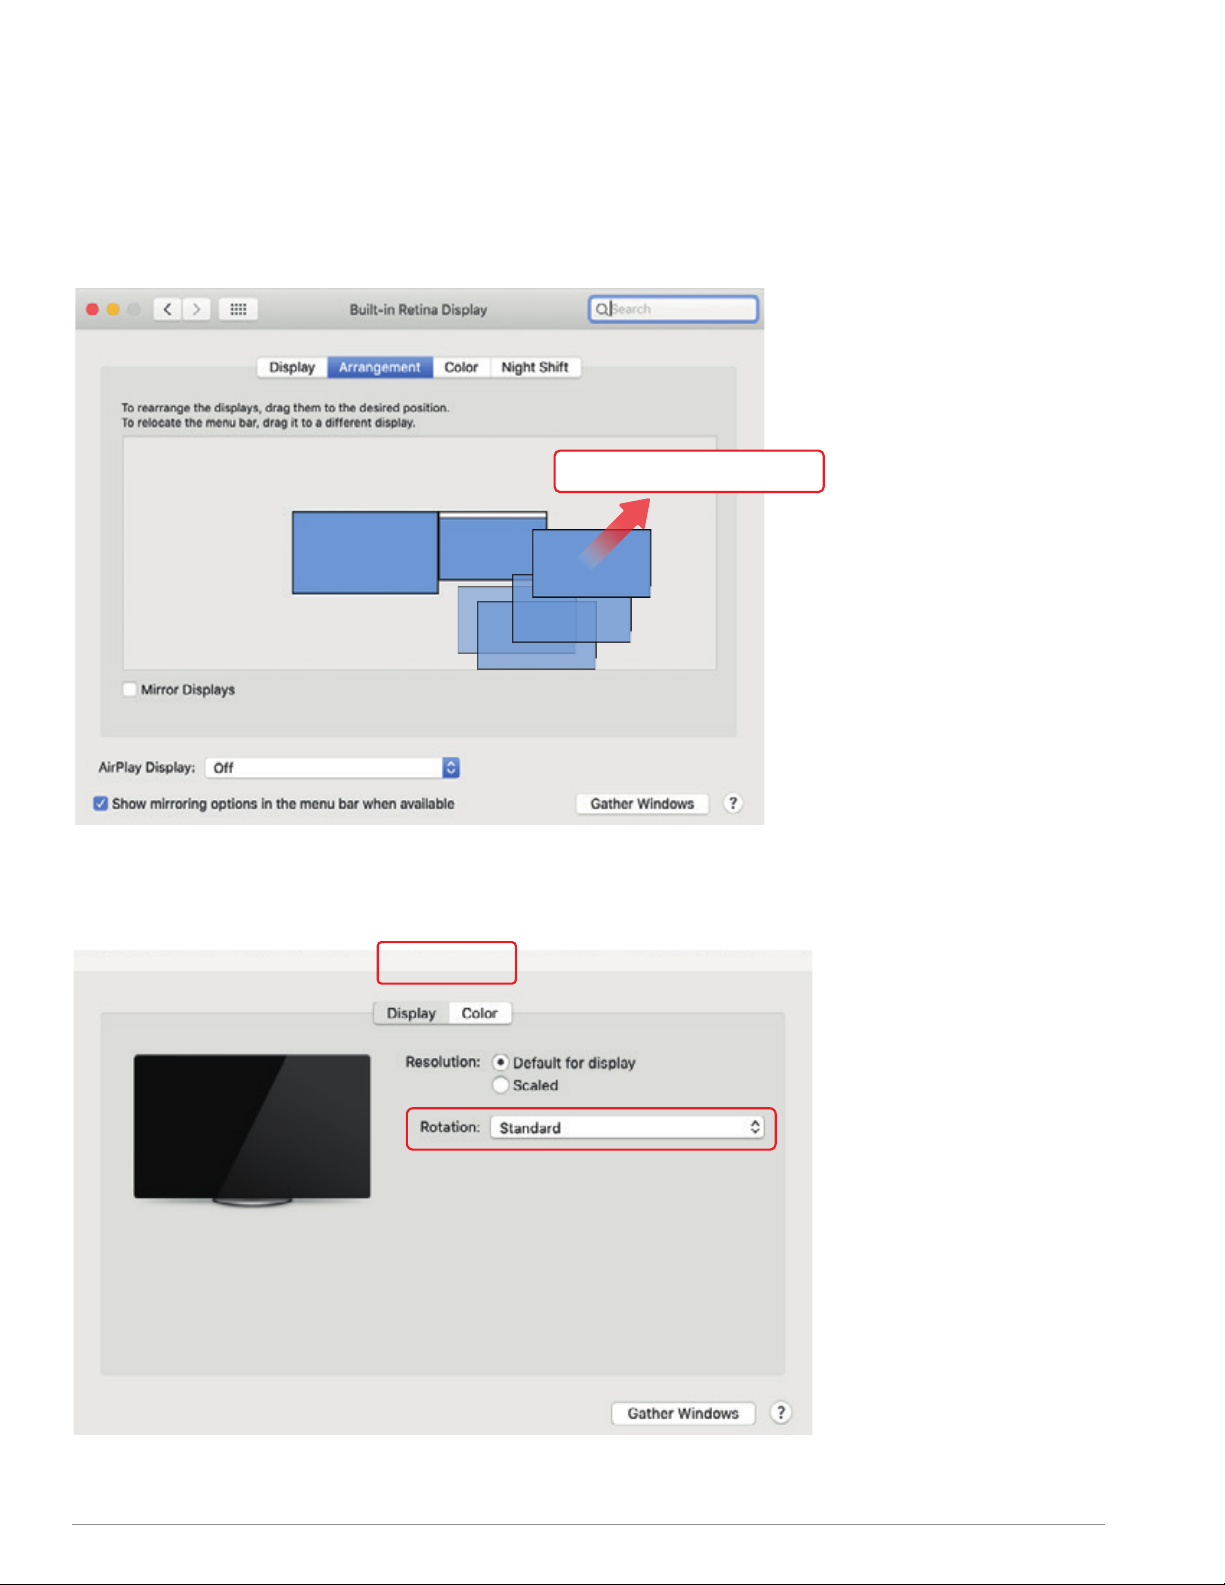
4.2.2 MAC OS SETTINGS
- To position the display on either left
or right, simply drag and drop it to the
side you want.
DRAG AND DROP
TRIO/TRIO MAX
- To rotate the display, go to the
“Trio/Trio Max” display window and
choose the suitable “Rotation”
options.
12
Page 16
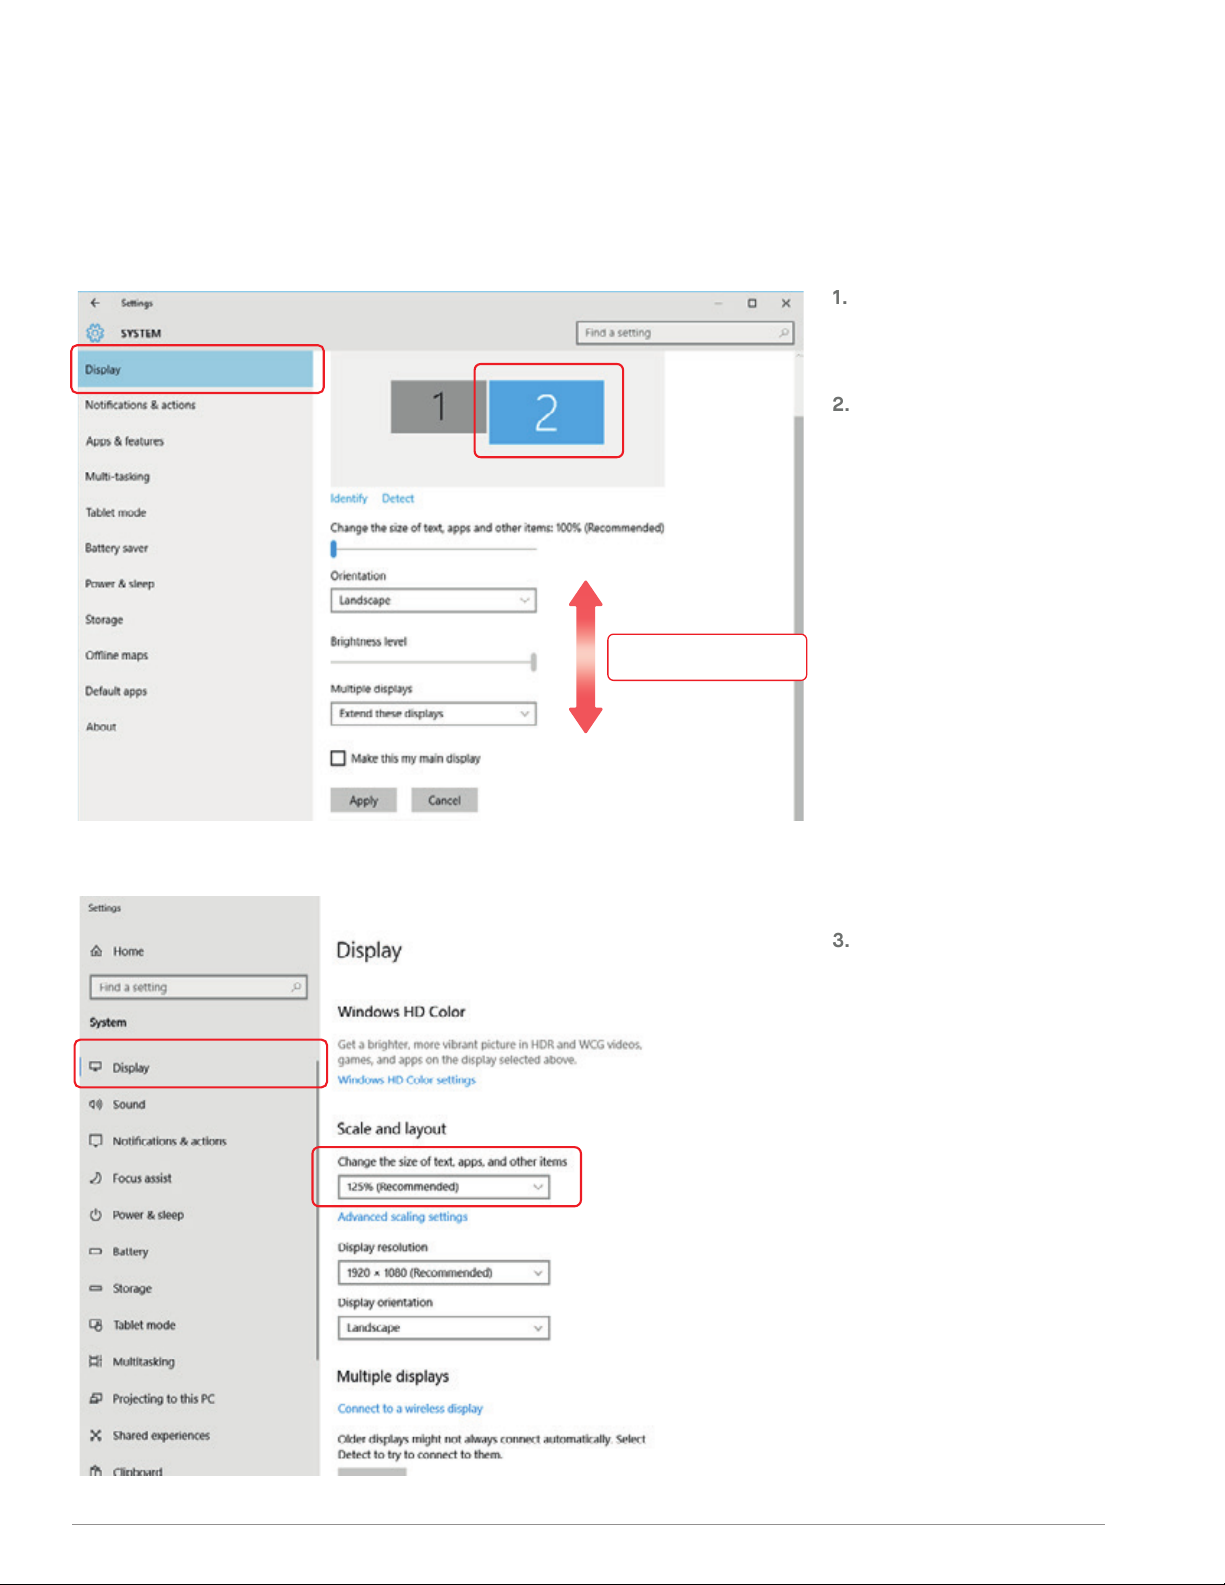
. CHANGE DISPLAY SETTINGS TO ADJUST CONTENT
1.2.3.
SIZE
.. WINDOWS
To adjust content size on Trio/Trio
Max monitor, first click on the
number “2” monitor under Display
setting.
Scroll down and look for “scale and
layout” options
Scroll Down
Default size of text is set at 125%
and user can increase it up to 175%
or reduce back to 100% base on
user preference.
13
Page 17
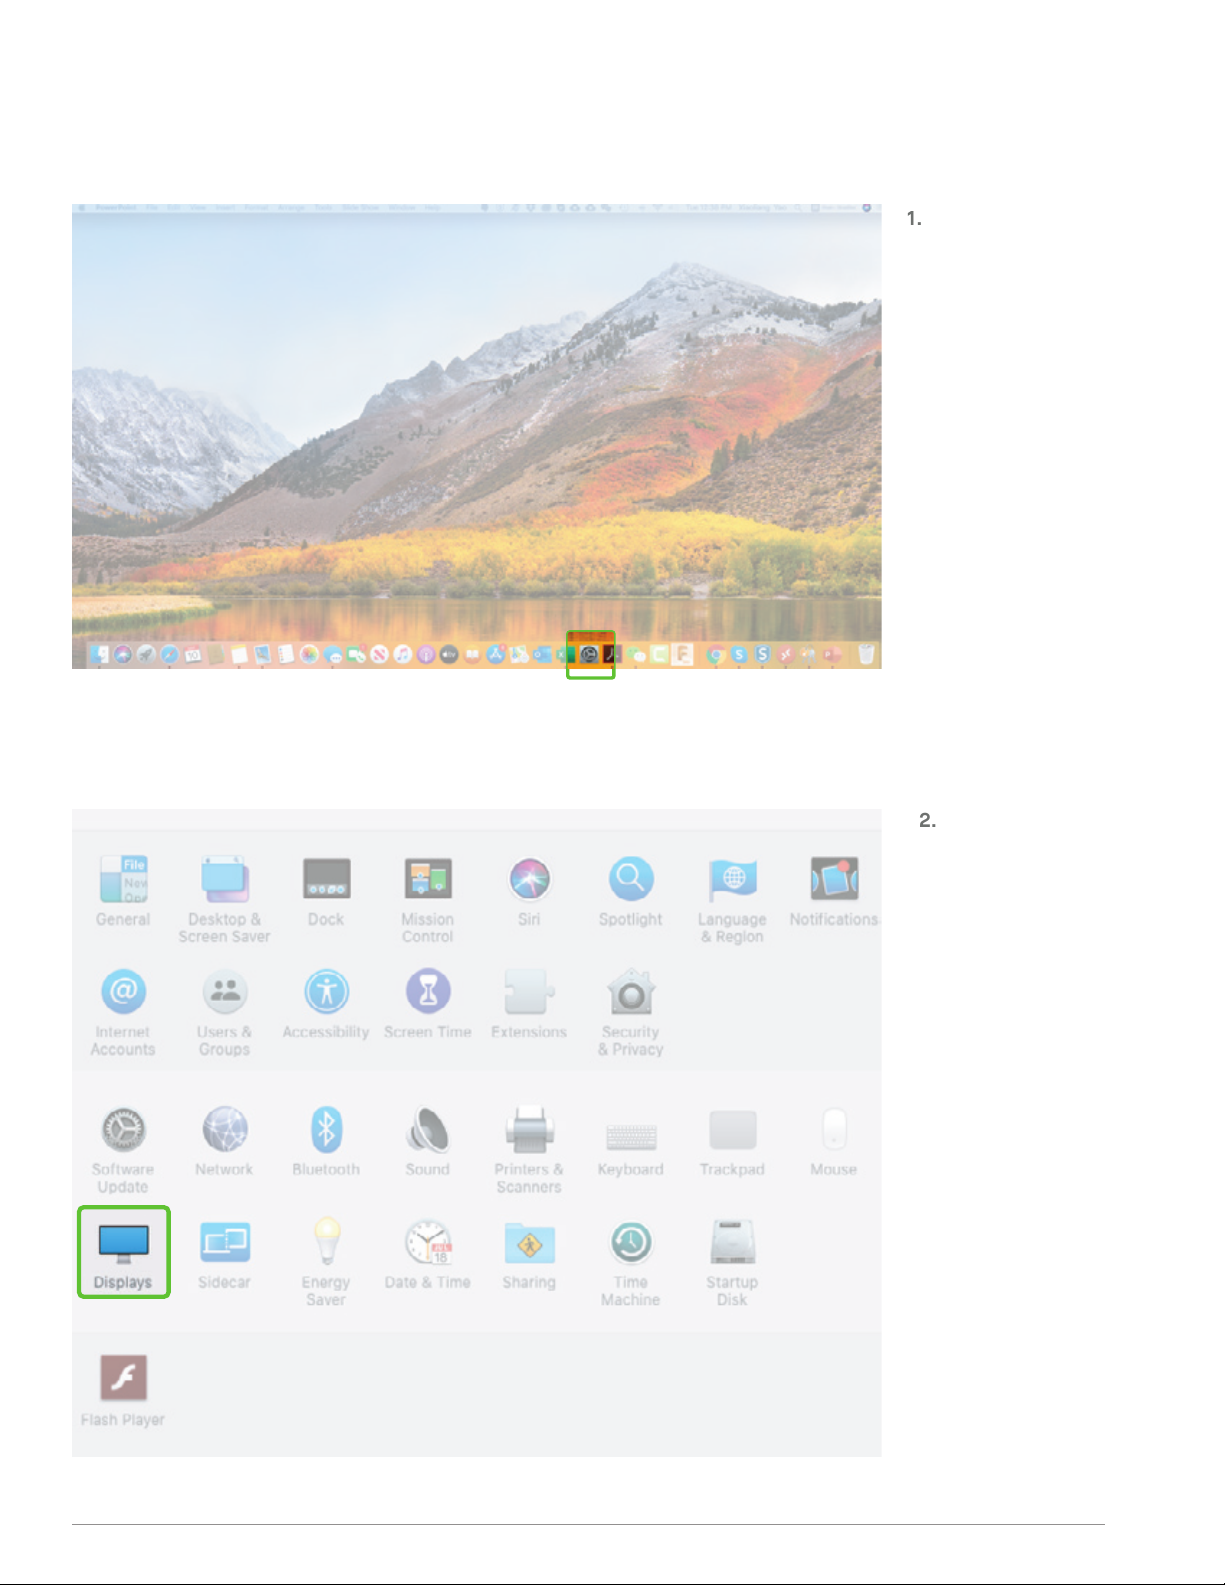
1.
2.
.. MAC OS
Click System Preferences
Click Displays
14
Page 18
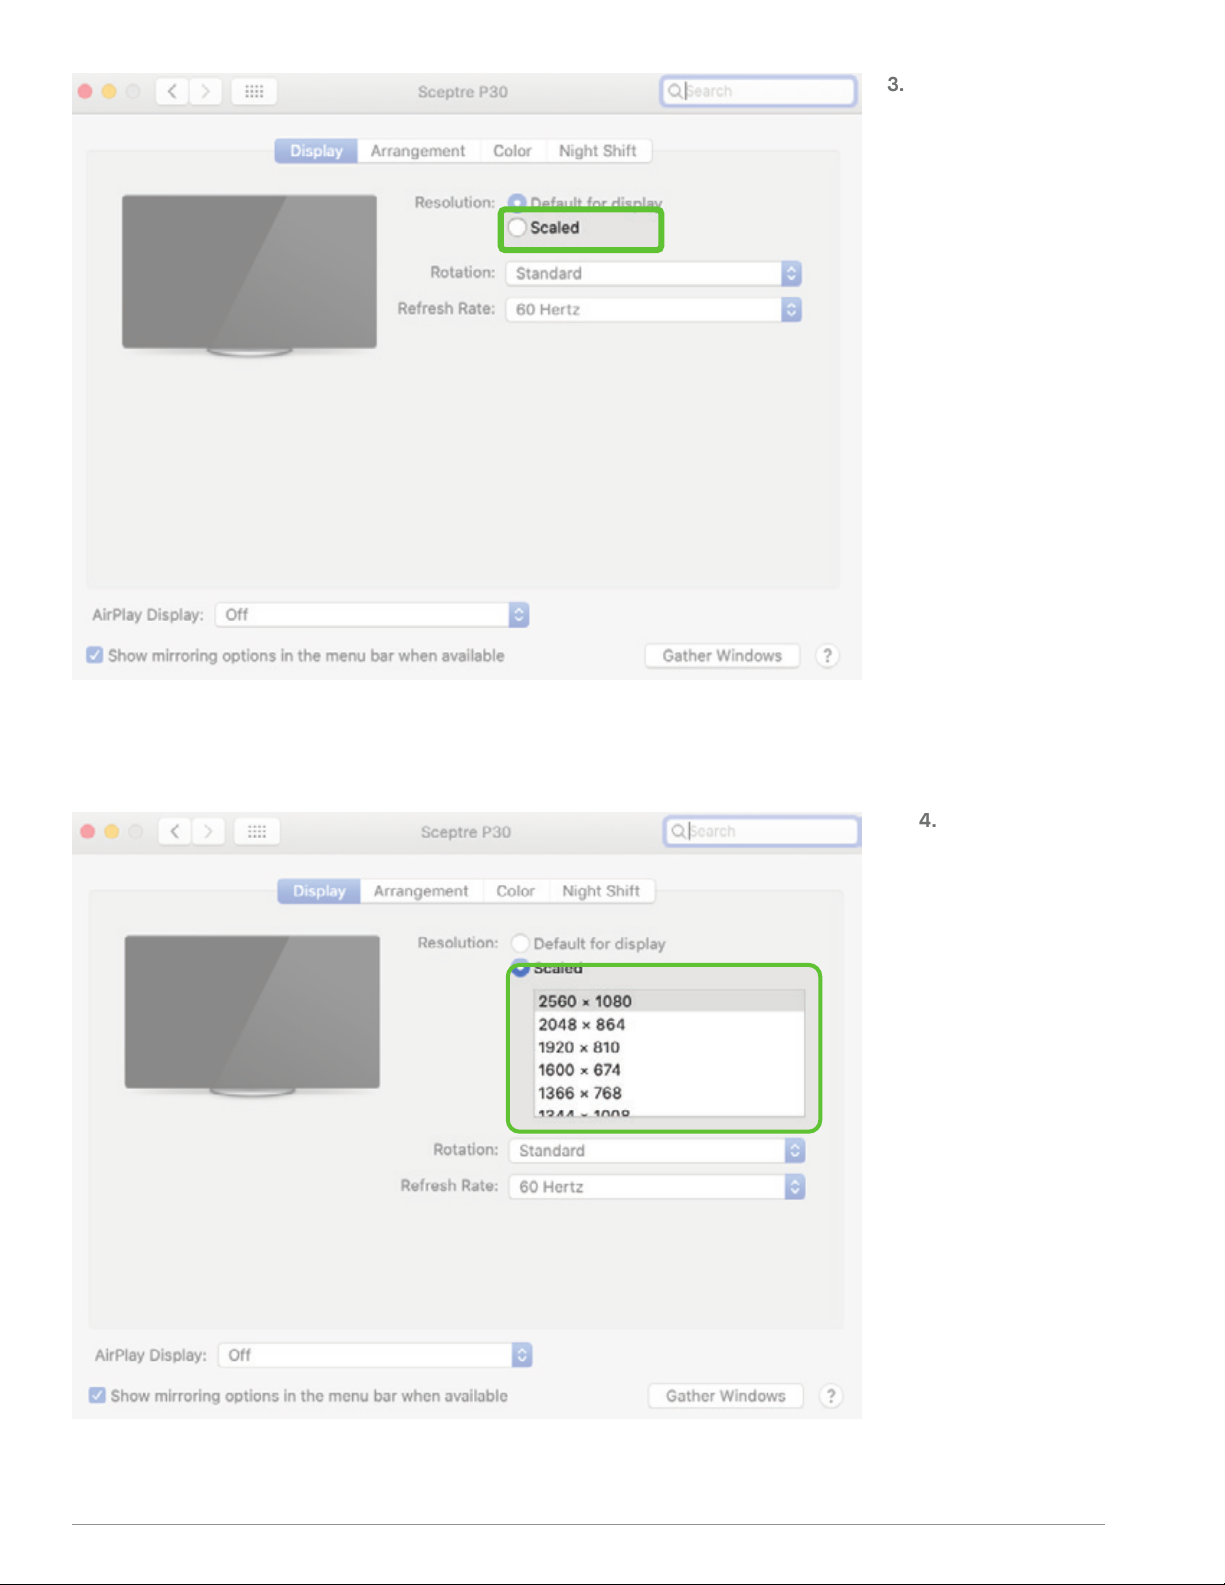
Hold down “Option” key and
3.
4.
click “Scaled”
Select the resolution
that fits your need
15
Page 19
SECTION : TECHNICAL INFORMATION
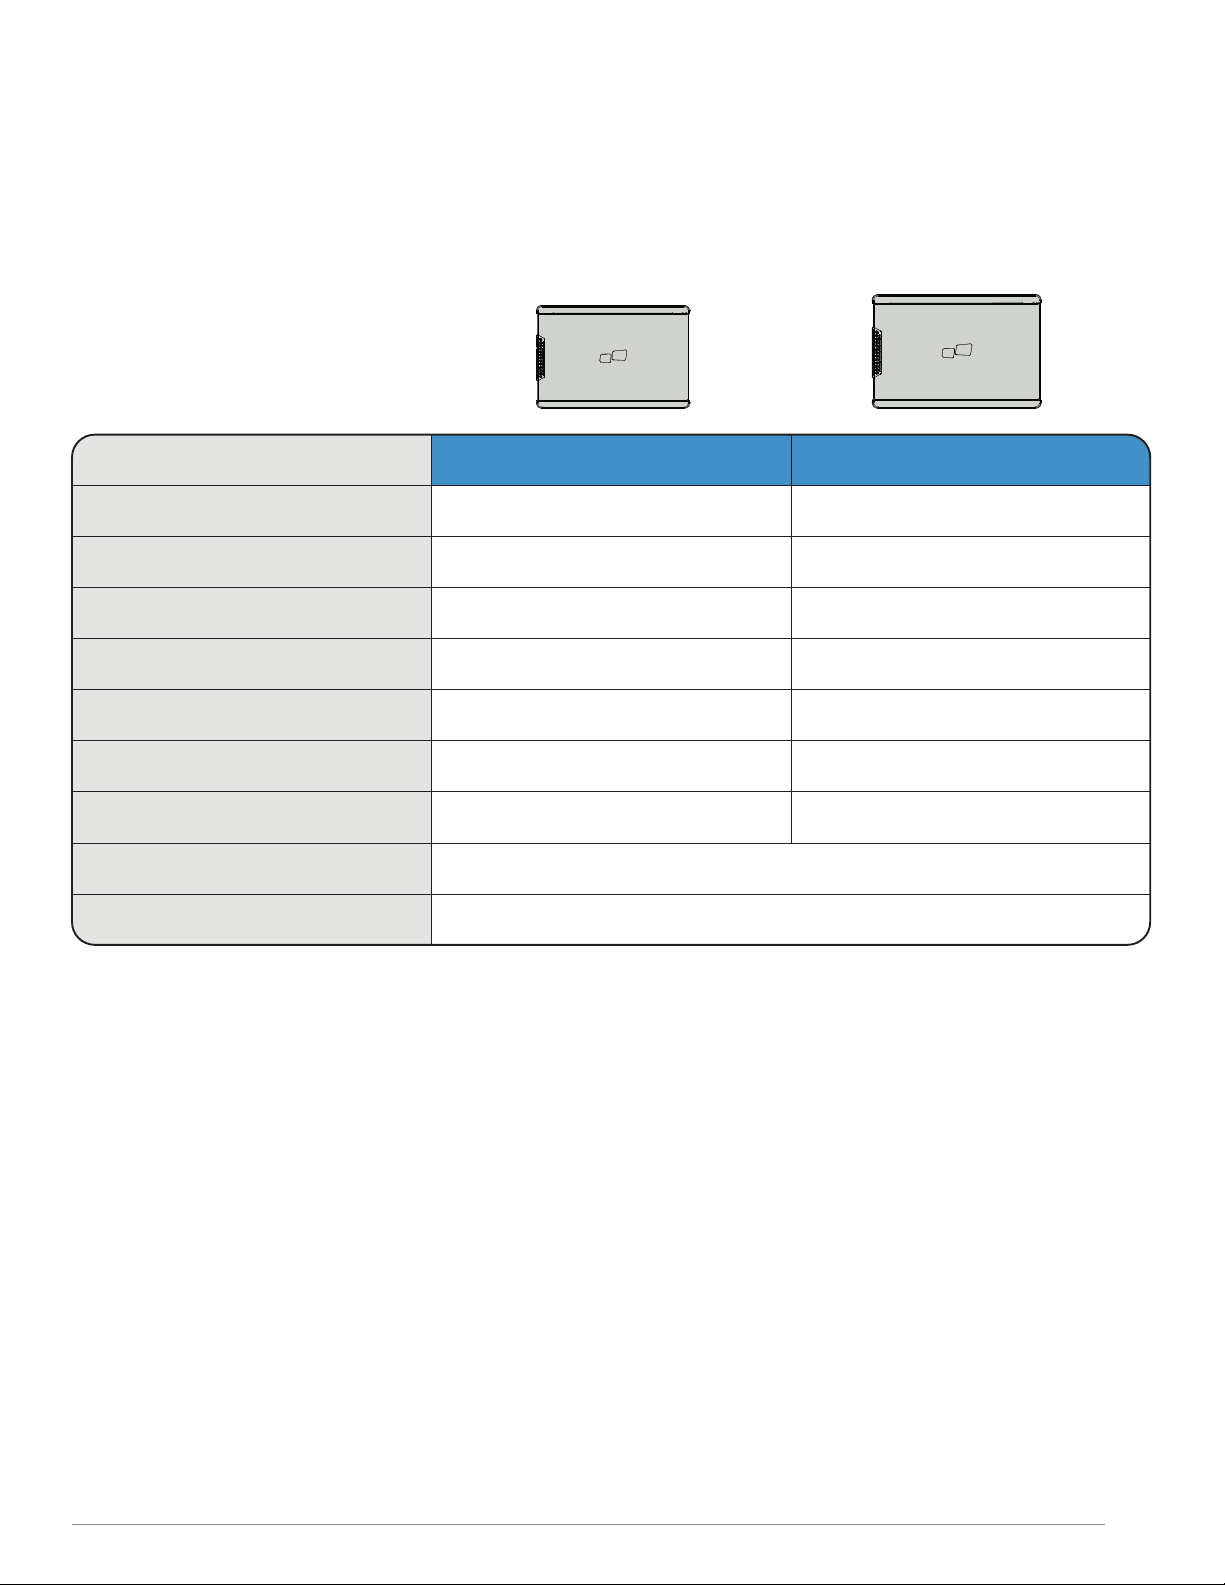
. SPECIFICATIONS
Model
Screen Size
Weight
Resolution
Refresh Rate
Brightness
Power Consumption
Dimension
Compatible OS
Video Signal
*Specifications are subject to change without notice.
12.8”x8.6”x0.5”
Trio Trio Max
12.5 In
1.8 Lb
1080p FHD
60Hz
300N
<4.5W
USB-C DP/HDMI Alternate Mode; Displaylink
14 In
2.2 Lb
1080p FHD
60Hz
220N
<4.5W
14.1”x9.5”x0.5”
Android, Mac, Windows
16
Page 20
4.
3.
2.
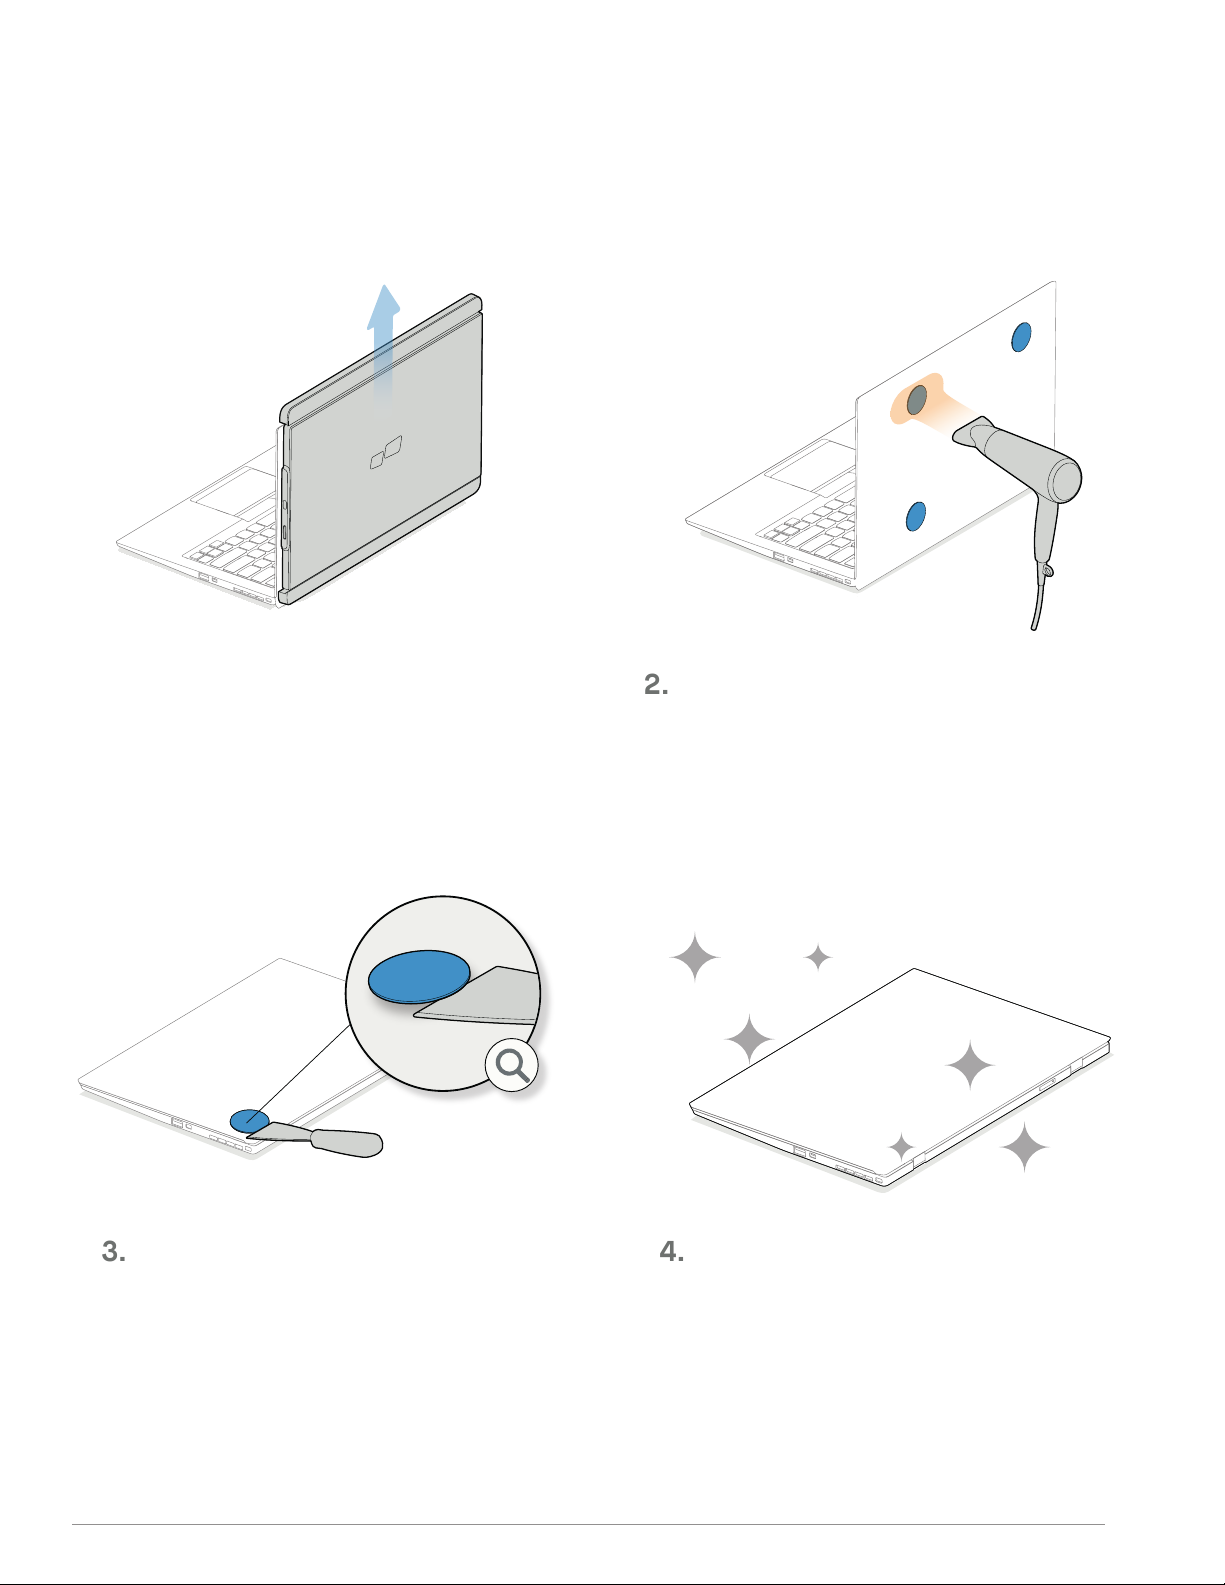
. REMOVING METAL PLATES
Take TRIO/ TRIO MAX off from the back of
1.
the laptop.
Once the adhesive is warmed up, it is ready
to be removed. A plastic scraper (not
included) is recommended to remove the
adhesive.
Get a hair dryer and set it to medium heat
level (do not use high heat setting as it may
over heat your own laptop).
Gentlely apply the warm air across the metal
plates to soften the adhesive material
(don't continuously focus on a single area).
Now the surface is fresh and ready for a
new set of plates.
17
Page 21
CHOKING HAZARD:
MEDICAL DEVICE INTERFERENCE:
SAFETY AND HANDLINGT
PART I
SUPPORT:
IMPORTANT SAFETY INFORMATION:
Carefully go through the user manual and
other documentation before setting up
the TRIO/ TRIO MAX.
If any part is broken or damaged, do not
try to open TRIO/ TRIO MAX or attempt to
fix it yourself, please contact the retailer,
a qualified service technician or email us
directly at [email protected].
Store TRIO/ TRIO MAX under appropriate
conditions, avoid exposure to extreme
heat, moisture and dust.
We recommend you to place TRIO/ TRIO
MAX on a stable surface and keep your
TRIO/ TRIO MAX in a sleeve to protect it
during transport.
Never spill liquid of any kind onto the
surface or into the openings of the TRIO/
TRIO MAX. Do not spray any cleaner on
the screen to avoid an electric shock. If
your TRIO/ TRIO MAX gets wet, unplug all
cables and reconnect till the TRIO/ TRIO
MAX is completely dry.
Carefully unplug all cables before
cleaning TRIO/ TRIO MAX. Clean with a
soft, dry, lint-free cloth.
Please disconnect the cables when you
reverse the position of TRIO/ TRIO MAX,
decouple the TRIO/ TRIO MAX from the
backplane of your laptop, rotate 180。
About a vector normal to the backplane,
and re-couple to the backplane of the
laptop computer.
TRIO/ TRIO MAX and accessories contain
small parts that may present a choking
hazard to small children, please keep
them out of reach from small children.
The TRIO/ TRIO MAX contains magnets.
The TRIO/ TRIO MAX also contain
components and radios that emit
electromagnetic fields. It may interfere
with personal medical devices, e.g.
pacemakers or defibrillators. Keep a safe
distance between the TRIO/ TRIO MAX
and your medical device. Consult a
physician or medical device manufactu-
rer for specific details of your medical
device. Stop using TRIO/ TRIO MAX if the
interference is observed with your
personal medical devices.
be sensitive to magnetic or electromagnetic
fields, hence should be kept at a distance
from TRIO/ TRIO MAX.
For detailed troubleshooting information,
contact:
To ensure satisfactory experience, use
the TRIO/ TRIO MAX with recommended
display size of your laptop.
Items with magnetically-stored data
such as credit cards and hard drives may
18
Page 22

FCC COMPLIANCE STATEMENT
WARRANTY
PART II PART III
This device complies with Part 15 of the
FCC Rules. Operation is subject to the
following two conditions:
This device may not cause harmful
interference.
This device must accept any interference received including interference that may cause undesired operation.
Note: This equipment has been tested
and found to comply with the limits for a
Class B digital device, pursuant to Part 15
of the FCC Rules. These limits are designed to provide reasonable protection
against harmful interference in a
residential installation.
This equipment generates, uses, and can
radiate radio frequency energy, and if not
installed and used in accordance with
the instructions, may cause harmful
interference to radio communications.
However, there is no guarantee that
interference will not occur in a particular
installation. If this equipment does
cause harmful interference to radio or
television reception, which can be
determined by turning the equipment off
and on, the user is encouraged to try to
correct the interference by one or more
of the following measures:
Reorient or relocate the receiving
antenna.
Increase the separation between the
equipment and receiver.
Connect the equipment into an
outlet on a circuit different from that
to which the receiver is connected.
Consult the dealer or an experienced
radio/TV technician for help.
Mobile Pixels INC warrants this product
for a period of 1 year upon the original
date of purchase. Product or service
warranty will not be extended to any
losses or damages that are due to improper installation, misuse, neglect, modification, alteration by non-authorized
third party, improper environment, or
other irregularities.
19
 Loading...