

Mobile One notebook Quick Start Manual
+2B2.::7+!
Quick Start Guide
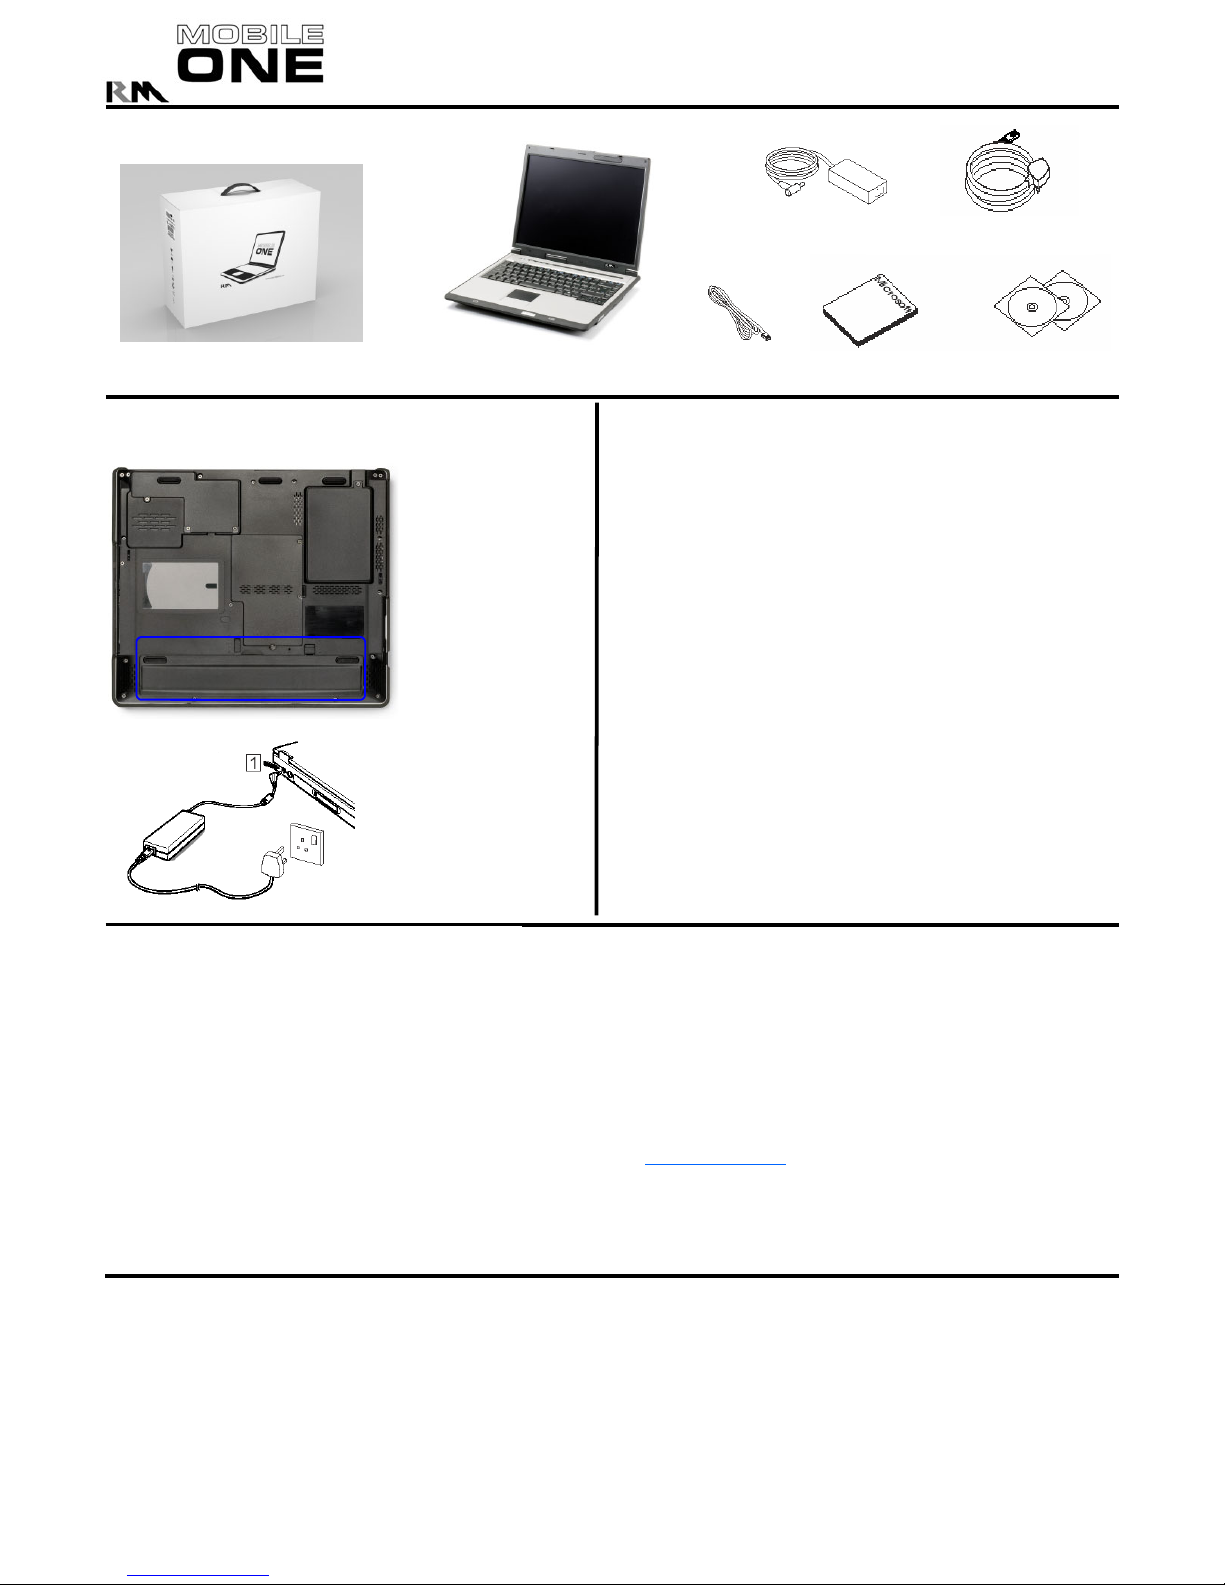
1 Check Contents
Please keep the packaging for future
storage or transport
Mobile One Notebook
Microsoft
Manual
RM Recovery CDs
2 Setting Up
3 Using your Mobile One Notebook
Setting up Windows
When you first switch on your notebook you will be asked for your details. If
required the “Certificate of Authenticity can be found underneath your notebook.
Using PC (PCMCIA) Cards
To remove a PC Card you m ust stop the card functioning. Double click on the PC
Card icon in the System Tray (lower right corner of your screen), then select the
required card and click “Stop”.
Display Settings
Your notebook has a high resolution display. Any external projector you use, must
support a refresh (scan) rate of 60Hz vertical and 37.7KHz horizontal (SVGA
display) and 48KHz horizontal (XGA display).
Troubleshooting Guide
My wireless connection does not work?
The Mobile One has a feature to disable the wireless network card to preserve
power. Hold down the ‘Fn’ key and press the ‘F2’ key. This will enable the
wireless. There is also an option to disable this hotkey functionality in the BIOS.
Switch the notebook on and press F2 to enter the setup screen. Select
‘Advanced’, then set ‘Wireless On/Off Toggle’ to Enabled to enable the hotkey.
Note: This BIOS function does not disable wireless, only the function of the hotkey
My track pad does not work?
The Mobile One has a feature to disable the track pad so it does not interfere with
typing. Next to the Power button is a row of ‘Hot Keys’. The third hot key enables
the track pad. (see overleaf).
Some letter keys appear as numbers on the screen. Why?
Pressing NUM Lock hot key turns some of the letters into a number pad. Press
the NUM lock key to change
Where can I find the user manual for the Mobile One?
The user manual can be found by clicking the user manual link on the desktop.
Alternatively, the manual can be found on the RM Support website.
4 Battery Information
RM plc, New Mill House, 183 Milton Park, Abingdon, OX14 4SE
Support Telephone Number: 08709 202202
AC power lead
AC Mains Adapter
Modem
Cable
Connect the Mobile One to
the Mains
Insert the mains cable into
the mains adapter.
Insert the mains adapter plug
into the socket on rear of the
notebook.
Plug the mains cable into a
AC mains socket and switch
on the mains..
Battery Use
Your Notebook battery will store more charge and have an increased life span if you keep the battery fully charged whenever possible and do not allow it to
become completely discharged. Top-up charges are much less stressful to a Lithium-Ion battery than full discharge/charge cycles.
Battery Charging
The supplied AC adapter will run the Notebook and charge the battery simultaneously, however the battery will charge more rapidly if the Notebook is switched
off during charging . Ensure that the AC adaptor is not placed under or near the battery compartment during charging because heat from the AC adaptor can
seriously degrade battery life. For the same reason, avoid charging the battery in a confined space where heat may build up (e.g. a cupboard). Ensure
adequate ventilation during charging.
Useful Battery Life
The battery is rated to provide good service for 250-350 full charge/discharge cycles. As with all rechargeable batteries performance will decline slowly with
use, dependent on usage patterns. If the battery performance begins to seriously decline you should consider replacing the battery. For the best advice on
how to get the longest life from your batteries, please visit the RM website at www.rm.com/support
and search our Knowledge Library for 'Battery'.
Storage of your Battery
If you are not using your Notebook for several months you should ensure that the battery is between 40% and 90% charged before storage (preferably
90%) and remove the battery from the notebook. Leaving the battery in a fully discharged state can permanently damage the battery.
Calibration
Lithium-ion (Li-Ion) batteries may periodically require re-calibrating if battery life seems much shorter than is usual. Refer to the Notebook User Manual for
details.
5 Safety Information
The mains cable provided has a sealed moulded plug and fuse. Always use the supplied cable, plugged into a standard 3-pin power socket. Always replace a
blown fuse with one of the same rating, and ensure the fuse cover is refitted. Check the condition of cables regularly. If any are damaged, replace them
immediately. Place the Mobile One near to outlet sockets to avoid the trip hazard of trailing cable s.
Do not use the Mobile One in conditions of extreme temperature, humidity, dust, vibration, or electromagnetic radiation. They may damage your Mobile One or
make it unsafe to use.
To avoid over-heating ensure the ventilation slot on the rear is not obstructed. Leave a gap of at least 10cm (4 inches). When the Mobile One is switched on
avoid sudden movement of the unit. Hard disks are easily damaged if moved whilst operating. Failure to comply with these guidelines may cause damage to the
Mobile One and are not covered by any warranty. The Mobile One User Manual contains more information and may be found pre-installed on your Mobile One
system.
Connecting the Battery
(if not fitted)
Place the unit on a smooth
surface. With the unit
orientated as shown, insert
the battery with the edge
closest to you first. Push
the far edge in until the clip
clicks into place. Close the
second clip to secure fully.

Disable/Enable Track pad
Ventilation
General Functions
RM plc, New Mill House, 183 Milton Park, Abingdon, OX14 4SE
Support Telephone Number: 08709 202202
See the Mobile One user manual for further details.
Version 2
DC Mains
Inlet
S-Video
Out
Power Button
Ethernet
Socket
Modem
Socket
Microphone
Socket
USB2.0
Sockets
Optical Drive (if fitted )
External VGA Connector
(Projector or Monitor)
Docking Port
PCMCIA
Slot
Headphone
Socket
IEEE1394
(Firewire)
Socket
USB2.0
Sockets
Open Web
Open Email Application
Adjust Power Profile
Number Lock Indicator
CAPS Lock Indicator
Hard Disk Activity Indicator
Scroll Lock Indicator
Wireless Disable/Enable
(Press Fn+F2)
Kensington
Lock
Infrared
Port
 Loading...