

Page 1

MobileDemand xTablet C1200
USER MANUAL
Page 2

Table of Contents
C
OPYRIGHT
................................................................................................
4
REGULATORY
S
TATEMENT
................................................................................
4
Federal Communications Commission Statement ................................................. ........ .... ........ ........ ............................. 4
Declaration of Conformity ............................................................................................................................................... 4
RF exposure warning........................................................................................................................................................ 5
European Notice ............................................................................................................................................................... 5
R&TTE (CE) MANUAL REGULATORY REQUIREMENT (WLAN - IEEE 802.11b/g).............................................. 5
Canadian Department of Communications..................................................................................................................... 6
Battery Disposal................................ .... ........ ........ ........ .... ........ ........ ................................................................................ 6
CLASS 1 LASER PRODUCT ....................... ........ ........ .... ........ ........ .......... .... ........ ........ ........ .... ...................................... 6
SAFETY
I
NSTRUCTIONS
..................................................................................
7
BEFORE YOU START
................................................................
9
PACKAGE C
ONTENTS
..................................................................................... 9
FEATURES ............................................................................................... 10
C
OMPONENTS
........................................................................................... 11
Front View ....................................................................................................................................................................... 11
Left View .................................... ........ ........ .... ........ ........ .................................................................................................. 13
Right View........................................................................................................................................................................ 13
Back View ........................................................................................................................................................................ 14
Bottom View..................................................................................................................................................................... 15
Status Indicators............. ........ .... ....... ........ ........ .... ........ ........ ........ .... .......... ........ ........ .................................................... 16
GETTING
STARTED ................................................................
17
POWERING UP YOUR XTABLET
CONVERTIBLE ..................................................................... 17
Connecting the AC Adapter............................................................................................................................................ 17
Using Battery Power................... .......... .... ........ ........ ........ .... ........ .................................................................................. 17
INSTALLING THE BATTERY ............................................................................. 18
Charging the Battery....................................................................................................................................................... 18
Checking the Battery Level................... .... ........ ........ ........ .... ........ .......... ........ .... ........ ........ ............................................ 18
Removing the Battery.................. .......... ........ ........ .... ........ ........ ........ ...... ........ ........ ........ ................................................ 19
STARTING YOUR
XTABLET
CONVERTIBLE .......................................................................... 19
Using the Display Panel ............................... ........ ........ ........ .... ........ .......... ........ ........ .... ................................................ 19
Turning On Your xTablet
Convertible............................................................................................................................................. 20
Adjusting the LCD Panel Brightness ............................................................................................................................. 20
Changing the Display Orientation................................................................................................................................. 21
Shutting Down Your xTablet
Convertible ....................................................................................................................................... 21
USING THE KEYBOARD................................................................................. 22
USING THE TOUCH PAD................................................................................ 23
USING THE STYLUS .................................................................................... 24
Calibrate the Screen........................................................................................................................................................ 24
USING THE QUICK MENU.............................................................................. 25
Page 3

USING THE MEMORY
C
ARDS
.......................................................................... 26
Inserting a Memory Card ............................................................................................................................................... 26
Removing a Memory Card ............................................................................................................................................. 26
USING THE 3G ANTENNAS ........................................................................... 27
MAKING
CONNECTIONS ........................................................
28
CONNECTING EXTERNAL DISPLAY D
EVICES
......................................................... 28
Connecting a Projector or Display Monitor ................................................................................................................. 28
Connecting a TV ............................................................................................................................................................. 28
CONNECTING USB DEVICES.......................................................................... 29
CONNECTING H
EADPHONES
........................................................................... 30
CONNECTING EXTERNAL
M
ICROPHONE
.............................................................. 30
CONNECTING TO A LOCAL AREA NETWORK (LAN)................................................. 31
CONNECTING AN EXTERNAL SATA HDD ............................................................ 31
CONNECTING TO WIRELESS C
ONNECTIONS
......................................................... 32
Connecting to a Wireless Local Area Network .............................................................................................................. 32
Connecting to a Bluetooth Device ................................................................................................................................. 33
POWER
MANAGEMENT ..........................................................
34
USING THE POWER P
LAN
.............................................................................. 34
USING THE POWER SAVING M
ODE
................................................................... 35
USING THE BIOS SETUP
UTILITY..........................................
36
BIOS SETUP MENU.................................................................................... 36
STARTING THE BIOS SETUP U
TILITY
................................................................ 36
NAVIGATING AND ENTERING INFORMATION IN BIOS.............................................. 36
MAIN M
ENU
............................................................................................. 37
ADVANCED MENU ...................................................................................... 37
BOOT MENU............................................................................................. 38
SECURITY MENU........................................................................................ 38
SAVE & EXIT M
ENU
.................................................................................... 39
MOBILEDEMAND XTABLET C1200 DATAGUARD
SOFTWARE....................................
40
USING MOBILEDEMAND XTABLET C1200
D
ATAGUARD
......................................................................
40
Creating New Tasks........................... ........ ........ ........ .... ........ ........ .......... .... ........ ........ ....... ............................................. 44
Running the Mirror Backup ........................................................................................................................................... 45
Deleting Tasks ................................................................................................................................................................. 45
Using Tools...................................................................................................................................................................... 47
TROUBLESHOOTING..............................................................
48
SPECIFICATIONS ..................................................................
49
Page 4

Preface
4
Copyright
Copyright© 2011. All rights reserved.
No part of this user manual may be transmitted, stored in a retrieval system, or
translated into any language or computer language, in any form or by any
means, without the prior written permission of the manufacturer. Information is
subject to change without prior notice.
Regulatory Statement
Federal Communications Commission Statement
This equipment has been tested and found to comply with the limits for a Class
B digital device, pursuant to Part 15 of the FCC Rules. These limits are designed
to provide reasonable protection against harmful interference in a residential
installation. This equipment generates, uses, and can radiate radio frequency
energy and, if not installed and used in accordance with the instructions, may
cause harmful interference to radio communications. However, there is no
guarantee that interference will not occur in a particular installation. If this
equipment does cause harmful interference to radio or television reception,
which can be determined by turning the equipment off and on, the user is
encouraged to try to correct the interference by one or more of the following
measures:
Reorient or relocate the receiving antenna.
Increase the separation between the equipment and the receiver.
Connect the equipment into an outlet on a circuit different from that
to which the receiver is connected.
Consult the dealer or an experienced radio/TV technician for help.
Shielded interconnect cables and shielded AC power cable must be
employed
with this equipment to insure compliance with the pertinent RF emission limits
governing this device. Changes or modifications not expressly approved by the
system's manufacturer could void the user's authority to operate the equipment.
Declaration of Conformity
This device complies with part 15 of the FCC rules. Operation is subject to the
following conditions:
This device may not cause harmful interference
This device must accept any interference received, including
interference that may cause undesired operation.
Page 5

Preface
5
RF exposure warning
This equipment must be installed and operated in accordance with provided
instructions and must not be co-located or operating in conjunction with any
other antenna or transmitter. End-users and installers must be provided with
antenna installation instructions and transmitter operating conditions for
satisfying RF exposure compliance.
SAR Value: 0.150 W/kg
European Notice
Products with the CE Marking comply with both the EMC Directive (89/336/EEC)
and the Low Voltage Directive (73/23/EEC) issued by the Commission of the
European Community.
Compliance with these directives implies conformity to the following European
Norms:
EN 55022 ( CISPR 22 ) Radio Frequency Interference
EN 55024 ( EN61000-4-2, EN61000-4-3, EN61000-4-4, EN61000-4-
5, EN61000-4-6, EN61000-4-8,EN61000-4-11, EN61000-3-2,
EN61000-3-3 )
Generic Immunity Standard
EN 60950-1 ( IEC 60950-1 ) Product Safety
R&TTE (CE) MANUAL REGULATORY REQUIREMENT (WLAN - IEEE
802.11b/g)
802.11b Restrictions:
European standards dictate maximum radiated transmit power of
100mW EIRP and frequency range 2.400-2.4835GHz.
In France, the equipment must be restricted to the 2.4465-
2.4835GHz frequency range and must be restricted to indoor use.
CE Declaration of Conformity
CE!
Is herewith confirmed to comply with the requirements set out in the Council
Directive on the Approximation of the Laws of the Member States relating to
Electromagnetic Compatibility (89/336/EEC), Low-voltage Directive
(73/23/EEC) and the Amendment Directive (93/68/EEC), the procedures
given in European Council Directive 99/5/EC and 89/3360EEC.
The equipment was passed. The test was performed according to the
following European standards.
EN 300 328 V1.7.1 (2006-05)
EN 301 489-1 V.1.4.1 (2005-09) / EN 301 489-17 V.1.2.1 (2002-04)
EN 60950-1:2006
Page 6

Preface
6
Canadian Department of Communications
This class B digital apparatus meets all requirements of the Canadian
Interference-causing Equipment Regulations.
Battery Disposal
THIS PRODUCT CONTAINS A LITHIUM-ION OR NICKEL-METAL HYDRIDE
BATTERY. IT MUST BE DISPOSED OF PROPERLY. CONTACT LOCAL
ENVIRONMENTAL AGENCIES FOR INFORMATION ON RECYCLING AND
DISPOSAL PLANS IN YOUR AREA.
CLASS 1 LASER PRODUCT
LASERSCHUTZKLASSE 1 PRODUKT TO EN60825
CAUTION: THIS APPLIANCE CONTAINS A LASER SYSTEM AND IS
CLASSIFIED AS A "CLASS 1 LASER PRODUCT.” TO USE THIS
MODEL PROPERLY, READ THE INSTRUCTION MANUAL
CAREFULLY AND KEEP THIS MANUAL FOR FUTURE REFERENCE.
IN CASE OF ANY TROUBLE WITH THIS MODEL, PLEASE CONTACT
YOUR NEAREST "AUTHORIZED SERVICE STATION.” TO PREVENT
DIRECT EXPOSURE TO THE LASER BEAM, DO NOT TRY TO OPEN
THIS ENCLOSURE.
ANNEX IV
Symbol for the marking of electrical and electronic equipment
The symbol indicating separate collection for electrical and electronic equipment
consists of the crossed-out wheeled bin, as shown below. The symbol must be
printed visibly, legibly and indelibly.
Page 7
Preface
7
Safety Instructions
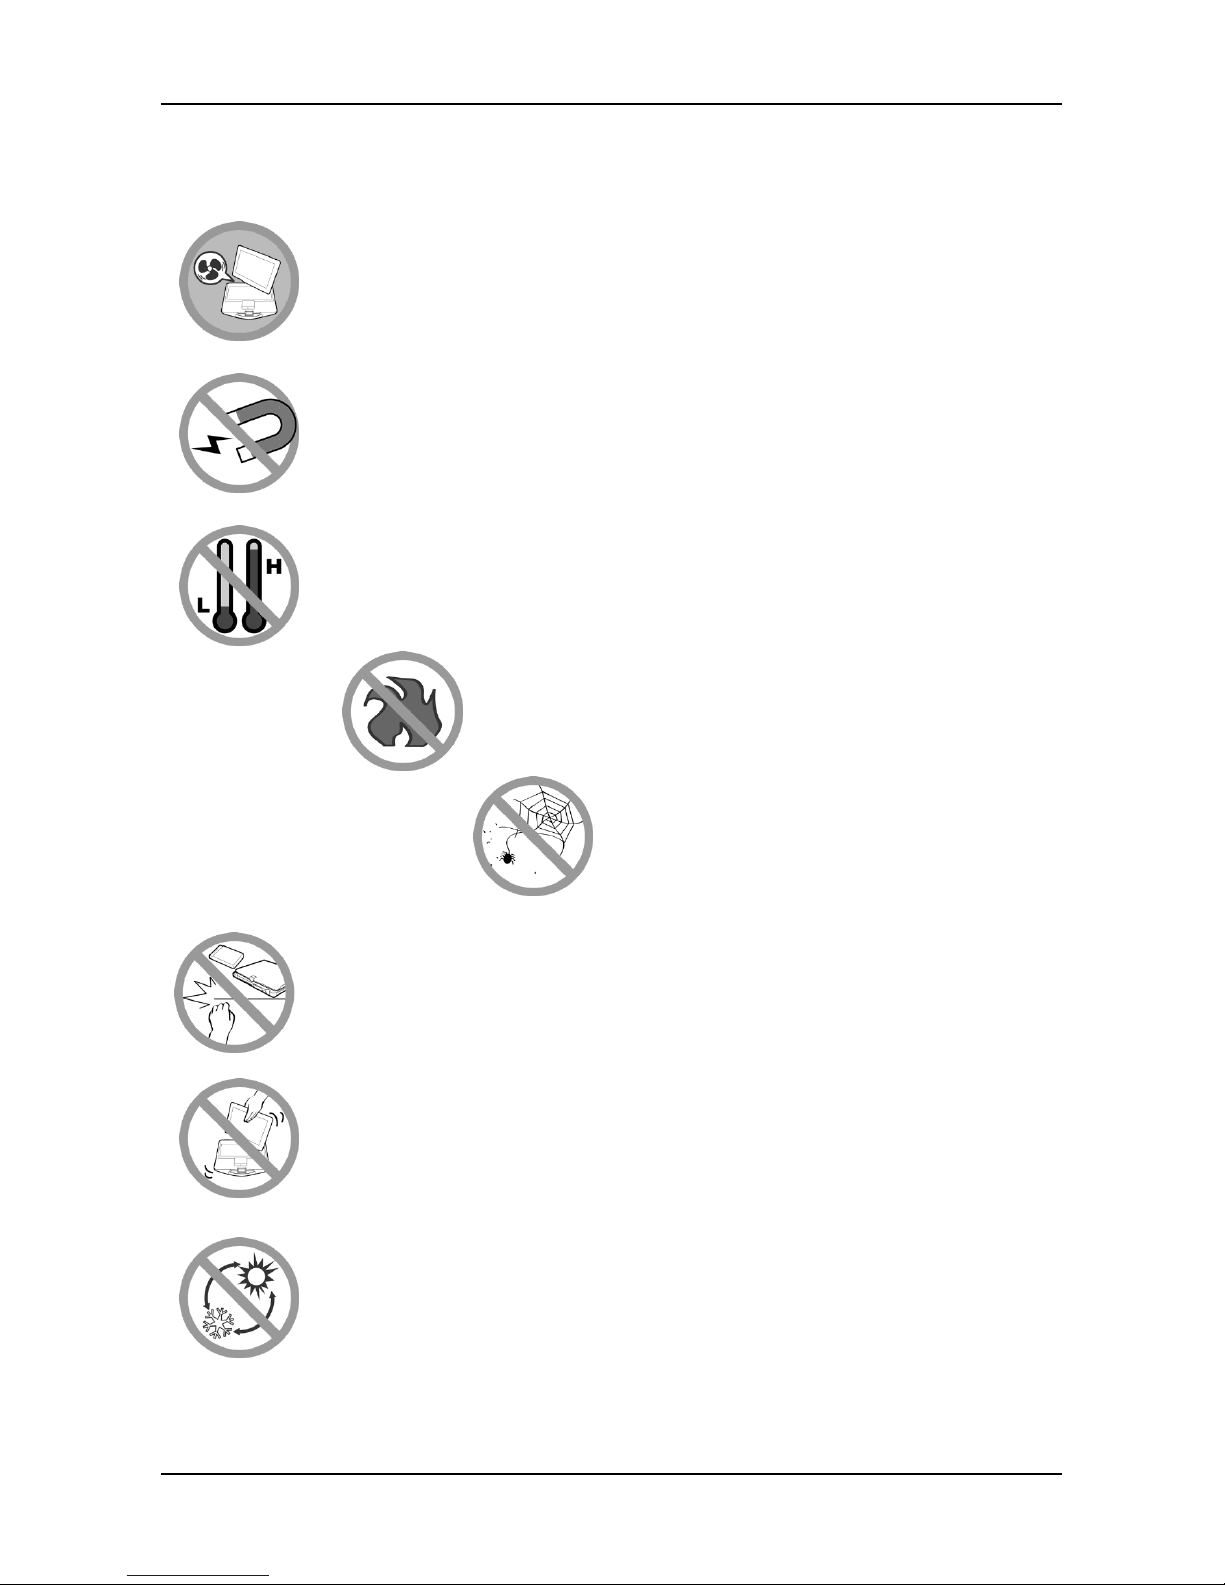
DO NOT block the opening vents provided for ventilation.
Blocking these vents may cause the xTablet Convertible
processor to overheat.
Always keep strong magnetic or electrical objects away from your
xTablet Convertible.
DO NOT use or store your xTablet Convertible in extreme
temperatures. DO NOT place your xTablet Convertible near fire
or other sources of heat. DO NOT expose to dust or corrosive
materials.
DO NOT tamper the battery. Keep it away from children.
Never pick up or hold your xTablet Convertible by
the display.
DO NOT expose your xTablet Convertible to sudden changes in
temperature or humidity. Keep your xTablet Convertible away
from air conditioners or heating vents.
Page 8

Preface
8
DO NOT attempt to service your xTablet Convertible yourself.
Any attempt to do so will make the warranty invalid.
When servicing, refer to qualified service personnel.
For better environmental protection, waste batteries should be
collected separately for recycling or special disposal.
CAUTION FOR ADAPTER
THIS XTABLET CONVERTIBLE IS FOR USE WITH DEDICATED AC ADAPTER.
BATTERY SAFETY
DANGER OF EXPLOSION IF BATTERY IS INCORRECTLY REPLACED.
REPLACE ONLY WITH THE SAME OR EQUIVALENT TYPE RECOMMENDED BY THE
MANUFACTURER. DISPOSE OF USED BATTERIES ACCORDING TO THE
MANUFACTURER'S INSTRUCTIONS.
Page 9

9
Before You Start
Before You Start
Congratulations on your purchase of this xTablet Convertible.
This business xTablet Convertible is portable and suits a wide-range of user
requirements, providing users with maximum computing experience. Before you
begin using your xTablet Convertible, read this chapter to familiarize yourself
with the main components installed in the system.
Package Contents
The following items come with your package. If any of them is damaged or
missing, please contact your retailer.
xTablet Convertible Power adapter
Utility DVD Power cord
NOTE
•
The pictures are for reference only, actual items may slightly differ.
Page 10

10
Before You Start
Features
•
Intel HM55 platform
•
Operating system supports Microsoft
®
Windows 7
•
12.1” convertible LCD display
•
High capacity hard disk drive
•
Light weight
•
Spill Proof
•
Intel WLAN capability
•
Bluetooth connectivity
•
WWAN
•
Express card slot
•
Optional Solid State Primary Drive (SSD)
•
Optional Gobi
TM
2000 3G and GPS
Page 11

11
Before You Start
Components
Front View
No.
Item
Description
1
Camera
Use to take picture, record videos, or video
conference.
2
Display panel
Provides visual output.
3
Fingerprint scanner
Scans fingerprints for biometric identification.
Page 12

12
Before You Start
No.
Item
Description
4
Brightness control
button
Press to increase the LCD panel brightness by one
level.
5
Brightness control
button
Press to decrease the LCD panel brightness by one
level.
6
SAS button
Press to exit Windows and switch to Standby
mode.
7
Power button
Press to turn your xTablet Convertible on or off.
8
Quick menu button
Press to access the quick menu.
9
LCD direction button
Press to rotate the screen orientation.
10
Program button
Press to start playback of chosen program.
11
Stealth mode button
Press to disable all emitting lights and sound.
12
Status Indicators
(Power, Wireless,
HDD, Caps Lock,
Num lock, Battery)
Indicates the corresponding function status.
13
Keyboard
Press the keys to input information.
14
Touch pad
Use to point, select, drag, or scroll objects on the
screen.
15
Touch pad button
Press to select objects or display a shortcut menu.
16
Chassis latch
Locks the xTablet Convertible chassis.
17
Handle
Use for carrying the xTablet Convertible around onthe-go.
Page 13

13
Before You Start
Left View
No.
Item
Description
1
USB port
Connects USB peripheral devices.
2
Card reader
Use to insert memory cards to transfer pictures,
music, and data between your xTablet Convertible
and flash compatible devices. The card reader
supports SD (Secure Digital), SDHC, Mini-SD
(with adapter), cards.
3
eSATA/USB Combo
port
Connects an external hard disc drive using an
eSATA cable for faster data transfer, or a USB cable
for USB peripheral devices.
4
ExpressCard slot and
PC Card slot
Use to insert one 34/54 ExpressCard or Type II PC
Card.
5
Microphone jack
Connects an external microphone.
6
Headphone jack
Connects headphones or external speakers.
Right View
No.
Item
Description
1
USB port
Connects USB peripheral devices.
2
Serial port (RS232)
Connects a peripheral device, such as a printer or
other device with serial port.
3
USB port
Connects USB peripheral devices.
Page 14
14
Before You Start
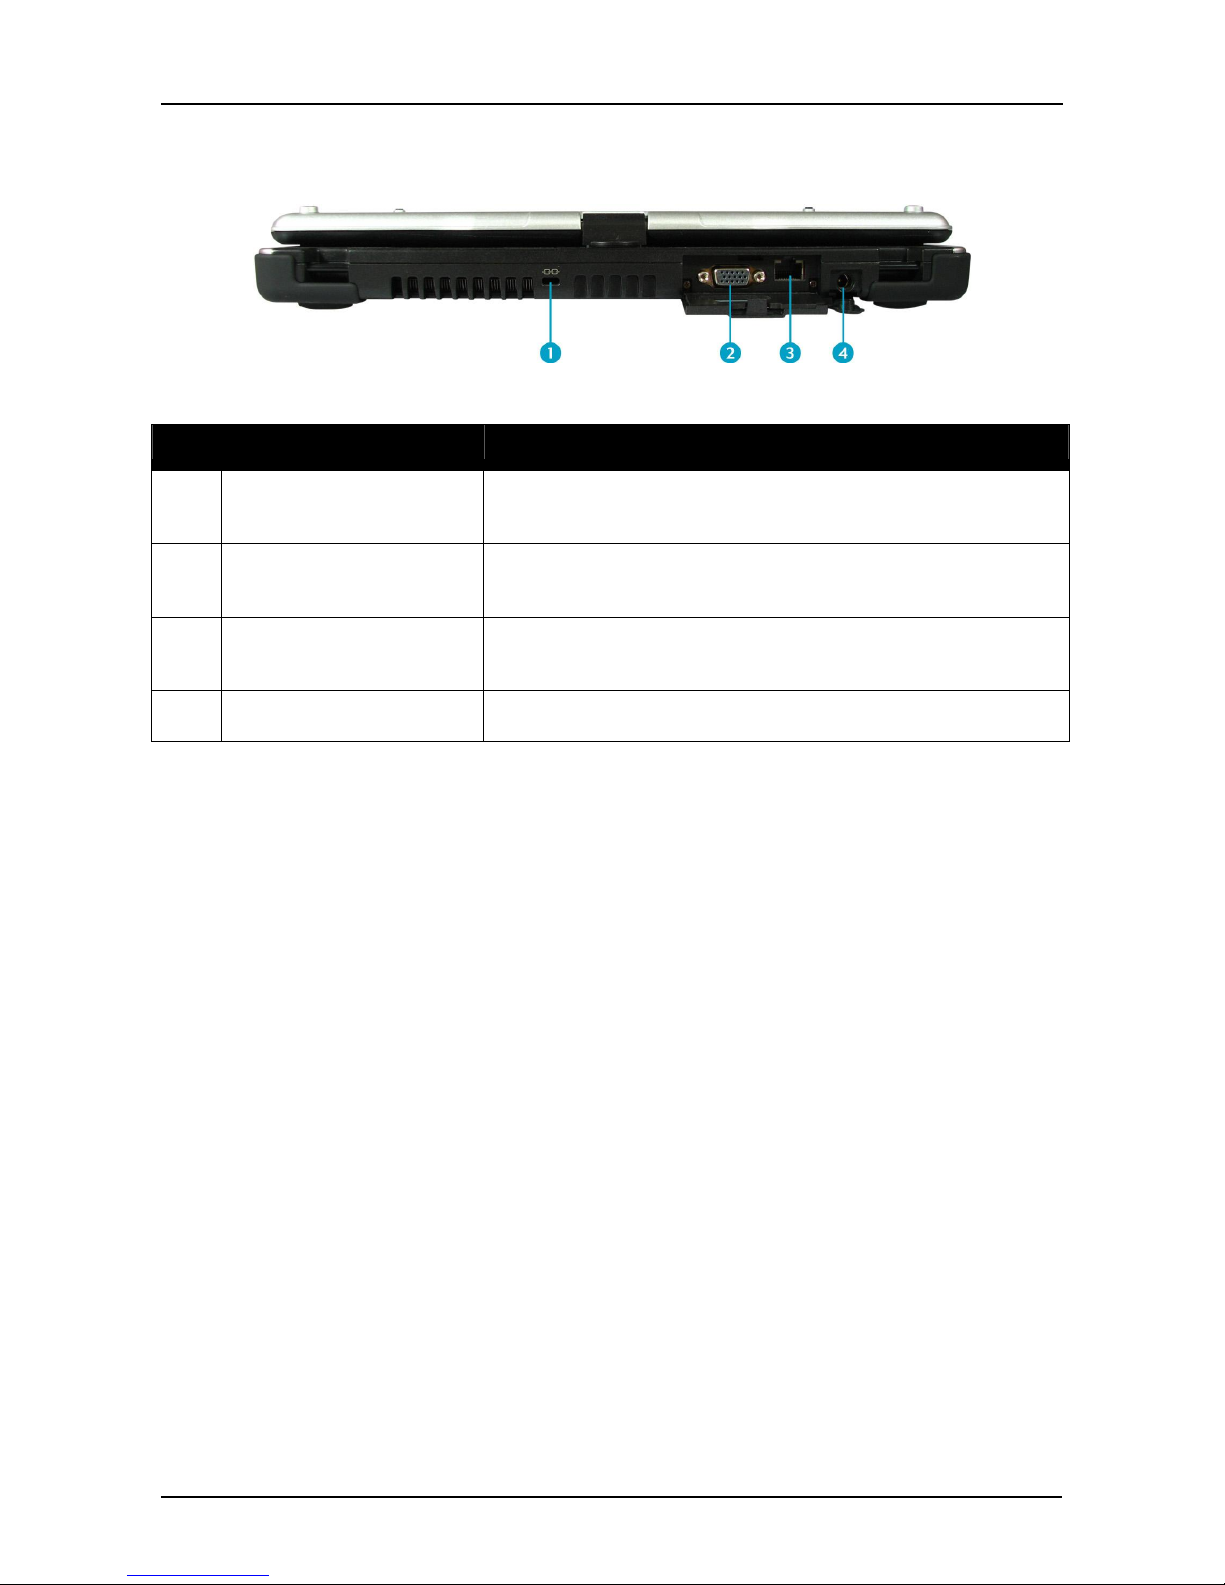
Back View
No.
Item
Description
1
Kensington lock slot
Connects to a Kensington-compatible xTablet
Convertible security lock.
2
VGA port
Connects to a display device. (e.g. external
monitor, LCD projector).
3
LAN (RJ-45) port
Connects to a local area network (LAN) using an
Ethernet cable.
4
DC-in jack
Connects the power adapter.
Page 15

15
Before You Start
Bottom View
No.
Item
Description
1
Docking station port*
Connects the xTablet Convertible to a docking
station.
2
Modular I/O port
bays
Use for user changeable modular I/O bay to
accommodate various devices applications.
3
Cooling vents
Use for air convection. Do not cover the cooling
vents to protect your xTablet Convertible from
overheating.
4
Stylus
Use for accurate control input to the LCD touch
panel and digitizer.
5
Battery compartment
Contains the battery.
6
Battery latch
Locks the battery in place.
7
Hard disk drive
(HDD) compartment
Contains the hard disk drive.
8
HDD latches
Locks the HDD in place.
*Docking station port function might not work on your system. Please check
with your dealer for more details.
Page 16

16
Before You Start
Status Indicators
The status indicators in the upper left corner of the keyboard light up when a
particular function of the xTablet Convertible is active. Each indicator is
marked with a symbol.
Icon
Item
Description
Power indicator
The LED always lights on (blue) when the
system is running. When the system is in sleep
mode, the LED will blink.
WLAN
Indicates the status of wireless LAN
communication.
HDD
A blinking HDD LED indicates HDD activity (data
is being read or written).
Num Lock
Lights on when Num Lock is activated.
Caps Lock
Lights on when Caps Lock is activated.
Battery
Indicates the battery status:
•
Green light means the battery is fully charged.
•
Orange light means the battery is being
charged.
•
Blinking red light means the battery power is
low.
Page 17

17
Getting Started
Getting Started
This chapter will guide you on how to use your xTablet Convertible.
Powering Up Your xTablet
Convertible
Your xTablet Convertible can be powered up using the AC adapter or the
Lithium-ion battery.
Connecting the AC Adapter
The AC adapter powers up your xTablet Convertible and charges the battery.
1. Connect the AC adapter to the DC-in jack of your xTablet Convertible.
2. Connect the AC adapter to the power cord.
3. Plug the power cord to an electrical outlet.
Using Battery Power
1. Install a charged battery in the battery compartment.
2. Remove the AC adapter (if plugged). Your xTablet Convertible will
automatically use the battery power.
NOTE
•
If your xTablet Convertible is connected to an electrical outlet and the
Page 18

18
Getting Started
battery is installed, your xTablet Convertible uses power from the
electrical outlet.
Page 19

19
Getting Started
Installing the Battery
To install the battery, follow the steps below:
1. Slide and hold the battery latch to the unlock
position.
2. Align and insert the battery to the battery
compartment.
3. Push completely until the battery locks into place.
4. Release the latch to the lock position to secure the
battery.
Charging the Battery
The Lithium-ion battery is not fully-charged upon purchase.
To charge the battery, follow the steps below:
1. Install the battery to your xTablet Convertible. See procedures above.
2. Connect the AC adapter to the DC-in jack of your xTablet Convertible.
3. Connect the AC adapter to the power cord.
4. Plug the power cord to an electrical outlet.
NOTE
•
The charging time may be longer if you are using your xTablet
Convertible while charging the battery.
CAUTION
•
DO NOT charge the battery if the temperature is below 0ºC or higher than
50ºC.
•
Use only the supplied AC adapter. Using other AC adapters may damage the
battery or your xTablet Convertible.
Checking the Battery Level
The Battery LED flashes red when the battery is nearly depleted.
When this happens, save your work and plug the AC adapter to charge the
battery or replace the battery with a fully charged one.
NOTE
•
Make sure the system has shut down before you change the battery.
Page 20

20
Getting Started
Removing the Battery
To remove the battery, follow the steps below:
1. Slide and hold the battery latch to the unlock
position.
2. Remove the battery out of the battery compartment.
Starting Your xTablet Convertible
Using the Display Panel
• To open the display panel, unlock the chassis
latch to open the xTablet Convertible chassis.
Lift the cover lid up to upright position.
• To adjust the LCD panel, twist the LCD panel
according to your preference.
Page 21
21
Getting Started
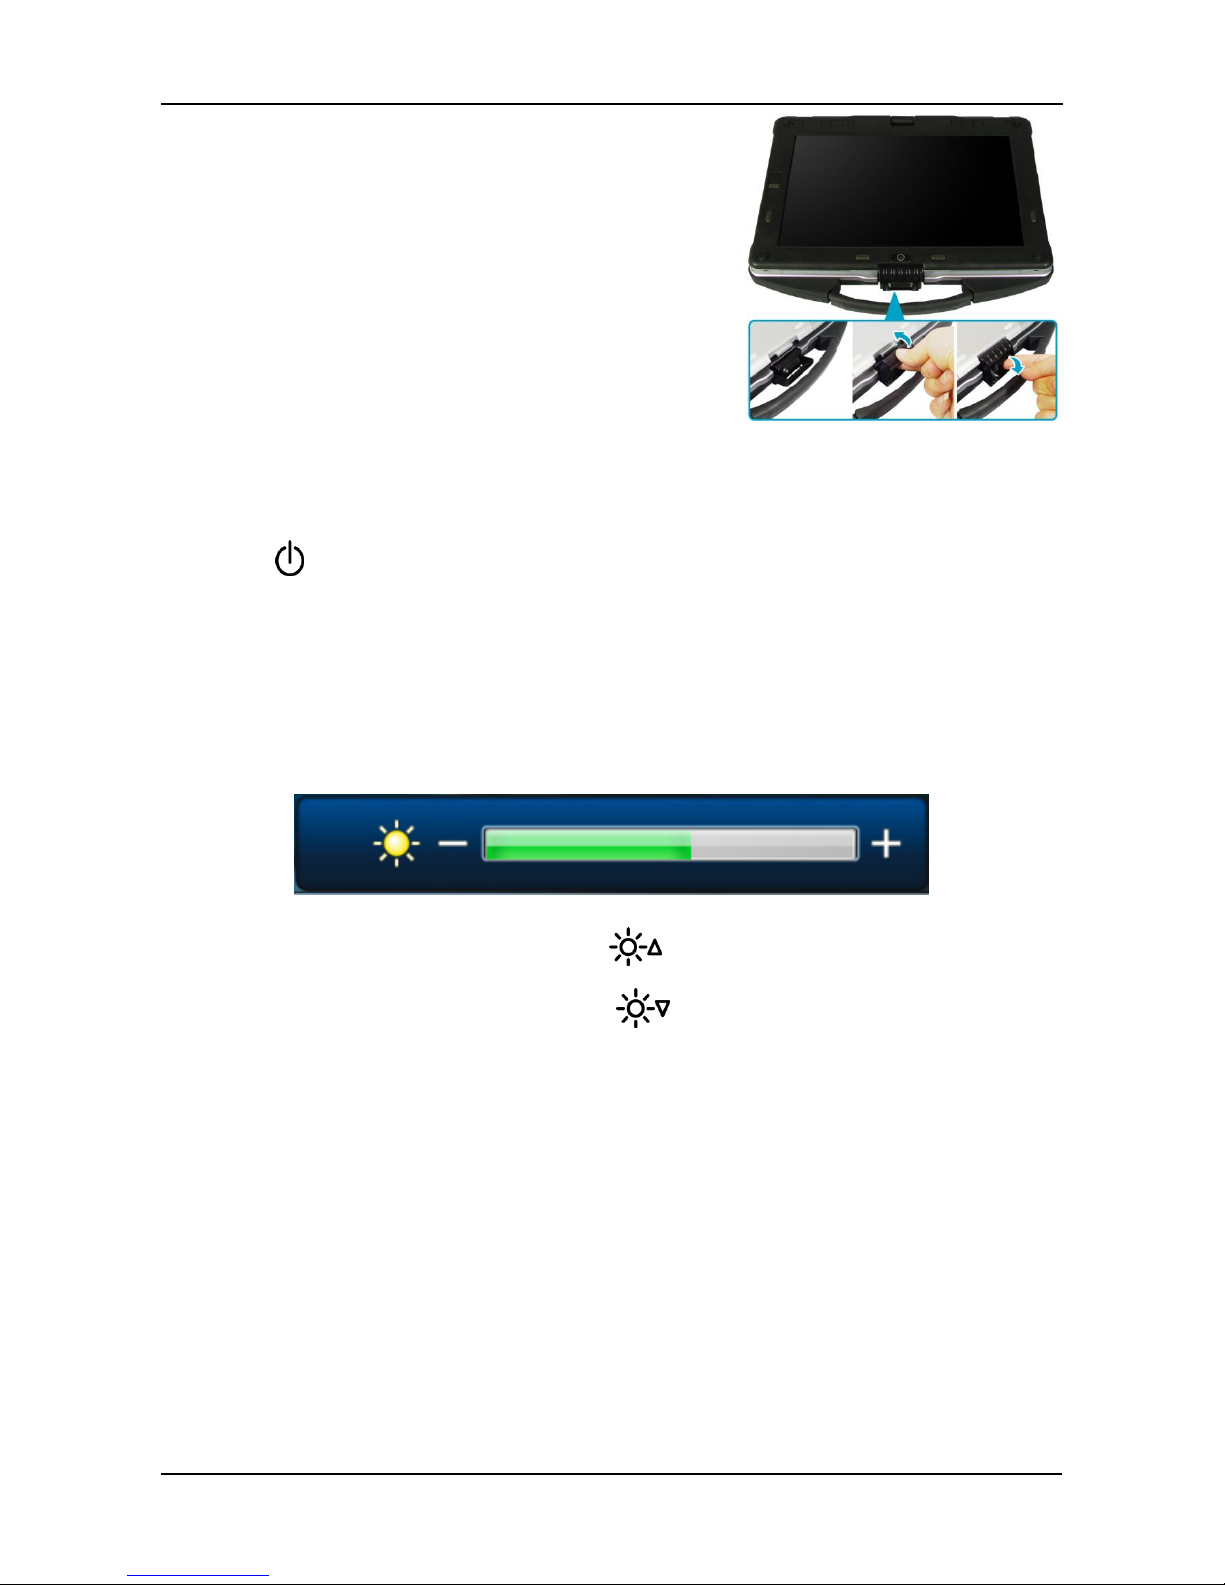
• To switch to tablet mode operation, twist the
LCD panel 180°, then place it back on the
xTablet Convertible chassis. Lock the chassis
latch to secure the LCD panel.
Turning On Your xTablet Convertible
Press the button until the Power LED lights up.
Adjusting the LCD Panel Brightness
You can adjust the brightness by pressing the Brightness control buttons.
•
To increase the brightness, press the button.
•
To decrease the brightness, press the button.
Page 22

22
Getting Started
Changing the Display Orientation
You can rotate the display orientation to suit your preference. Each press of the
button will rotate the display 90° clockwise.
Shutting Down Your xTablet Convertible
It is important to properly shut down your xTablet Convertible to avoid the loss
of unsaved data. To shut down your xTablet Convertible, follow the steps below:
1. Click Start.
2. Click Shut down.
Wait for your xTablet Convertible to turn off
power completely before removing the power
source (if necessary).
Page 23
23
Getting Started
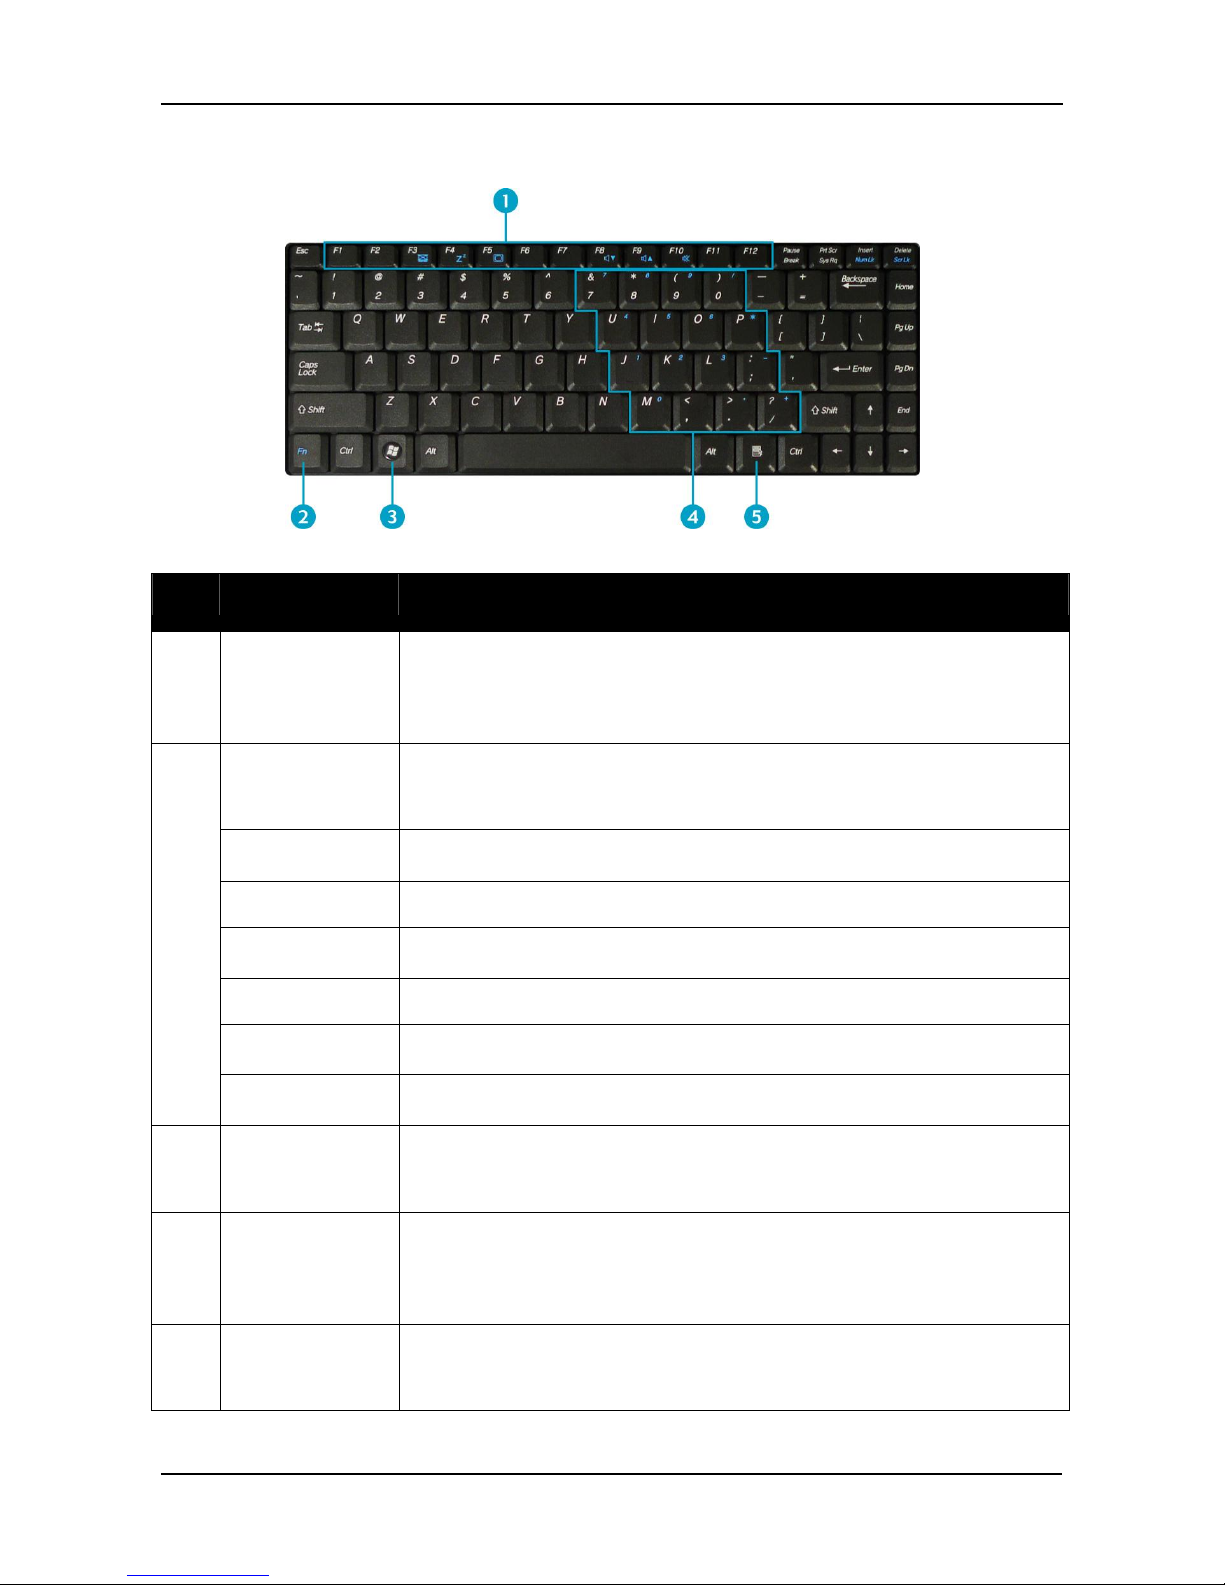
Using the Keyboard
No.
Keys
Description
1
Function keys
These function keys are used to perform designated tasks.
The tasks for each key may vary from one application to
another.
2
[Fn]
Press the [Fn] key in combination with other keys to
execute a command.
[Fn] + F3
Toggles the touch pad to on/off.
[Fn] + F4
Switches to suspend mode.
[Fn] + F5
Toggles between LCD, External display, or both.
[Fn] + F8
Decreases the volume by one level.
[Fn] + F9
Increases the volume by one level.
[Fn] + F10
Turns on or mutes the volume.
3
Windows key
Press to display the Start menu. This action is the same
as clicking the Start icon.
4
Numeric
keypad
Press the Num lock key to activate the numeric keypad.
Press the keys on the numeric keypad to enter numbers or
operands as you would on a calculator.
5
Application
key
Press to display an application shortcut menu. This action
is the same as right-clicking a mouse button.
Page 24

24
Getting Started
Using the Touch Pad
The touch pad is a cursor-pointing device that provides all the features of a twobutton mouse. Its primary function is to move the cursor around the screen.
You can also point, select, or drag items or objects on the screen.
Main touchpad
Left button
Right button
Point
Slide your finger on the touch pad to point the cursor to an item or object on the
screen.
Click
To left-click, move the cursor to the item or object on the screen, then lightly
tap the touch pad or press the left button.
To right-click, move the cursor to the item or object on the screen, then press
the right button.
Double-click
To double-click, move the cursor to the item or object on the screen, then tap
the touch pad twice or press the left button twice.
Drag
To drag an item or object, press and hold the left button then slide your finger
on the touch pad to move the item or object.
Scroll
To scroll a page, press and hold the left button then slide your finger on the
touch pad to scroll a page.
Page 25

25
Getting Started
Using the Stylus
This xTablet Convertible comes with an integrated stylus for accurate control
input to the LCD touch panel and digitizer. You can use the stylus to point,
select, or drag items or objects on the screen.
To use the stylus, simply remove it from the back of the xTablet Convertible.
Calibrate the Screen
To ensure touch accuracy, calibrate the screen.
1. Click Start > Control Panel.
2. Select Hardware and Sound > Calibrate the screen for pen or touch
input.
Page 26

26
Getting Started
3. Click Calibrate.
4. Follow the on-screen instructions to
complete screen calibration.
Using the Quick Menu
Press the button to enter the Quick menu.
Click on the icon to
enable the
respective function
including wireless
network, Bluetooth,
3G, GPS, and
airplane mode.
Click the icon to
set up the media file
for the program
mode.
Select the media file
and click Open.
View the battery
charge cycles.
Page 27

27
Getting Started
Using the Memory Cards
Your xTablet Convertible supports different types of memory cards to provide
faster data transfer. Supported types are as follows:
•
SD card
•
SDHC card
•
Mini-SD card (with adapter)
•
MS card (Memory Stick/PRO)
•
MMC card
•
Mini-MMC card (with adapter)
Inserting a Memory Card
With the label side up, push the
memory card into the memory card
slot until it clicks into place.
Removing a Memory Card
It is important to remove the memory card properly. Improper removal may
cause the data in the memory card to be corrupted and your xTablet
Convertible to malfunction.
To properly remove the memory card, follow the steps below:
1. Click the removable disk icon on the
system tray.
2. Click Safely Remove Hardware and
Eject Media.
The system confirms that the device can be safely removed.
3. Push the memory card to eject it.
4. Pull the card out from the slot.
Page 28

28
Getting Started
Using the 3G Antennas
Gobi
TM
2000 3G and GPS is an optional module. In order to have better signal,
the antennas suggest using angle as below:
CAUTION
•
If the antennas turn to other angles, it may cause low signal.
Page 29

29
Making Connections
Making Connections
This chapter will guide you on installing peripheral devices to maximize the use
of your xTablet Convertible.
Connecting External Display
Devices
You can connect your xTablet Convertible to other display devices, such as a
projector, another display monitor, or a TV.
Your xTablet Convertible is equipped with a VGA port which provides both
digital and analog video signals. VGA D-sub and HDMI interfaces use digital
signals; VGA interface uses analog signals.
Connecting a Projector or Display Monitor
1. Connect one end of a VGA D-sub cable to the VGA port of your xTablet
Convertible.
2. Connect the other end to a projector or display monitor.
Connecting a TV
1. Connect a DVI-HDMI or DVI-VGA cable to the VGA port of your xTablet
Convertible.
2. Connect the cable to the adapter.
3. Connect the other end of the cable to the TV.
NOTE
•
The VGA D-sub cable, DVI-HDMI, and DVI-VGA adapters are not included in
Page 30

30
Making Connections
the package. They are sold separately.
Page 31

31
Making Connections
Connecting USB Devices
You can connect your xTablet Convertible to other USB devices, such as
a mouse, keyboard, digital camera, printer, or an external hard disk
drive.
1. Connect one end of a USB cable to the USB port of your xTablet Convertible.
2. Connect the other end to the USB device (if necessary).
NOTE
•
The USB cable is not included in the package. It is sold separately or it may
come with your USB device.
Page 32

32
Making Connections
Connecting Headphones
You can connect your xTablet Convertible to a headphone or external speakers.
Plug the audio jack of the headphone or speakers to the Headphone jack of your
xTablet Convertible.
NOTE
•
The headphone is not included in the package. It is sold separately.
Connecting External Microphone
You can connect your xTablet Convertible to an external microphone.
Plug the audio jack of the microphone to the Microphone jack of your xTablet
Convertible.
NOTE
•
The microphone is not included in the package. It is sold separately.
Page 33

33
Making Connections
Connecting to a Local Area Network
(LAN)
You can connect your xTablet Convertible to a local area network (LAN) using the
RJ-45 LAN port.
1. Connect one end of an RJ-45 cable to the LAN port of your xTablet Convertible.
2. Connect the other end to network hub or a wall socket.
NOTE
•
The RJ-45 cable is not included in the package. It is sold separately.
Connecting an External SATA HDD
You can connect your xTablet Convertible to an external SATA device using
the eSATA/USB combo port.
Connect the eSATA cable to the eSATA/USB combo port of your xTablet
Convertible.
Page 34
34
Making Connections
Connecting to Wireless Connections
You can connect your xTablet Convertible to a wireless local area network, WWAN,
Bluetooth, or GPS.
Before using a wireless built-in device, you need to turn the respective built-in
wireless functions on.
Connecting to a Wireless Local Area Network
Your xTablet Convertible comes with a WLAN module. A wireless network can
be added either when the network is detected or by manually entering the
settings information.
To connect, follow the steps below:
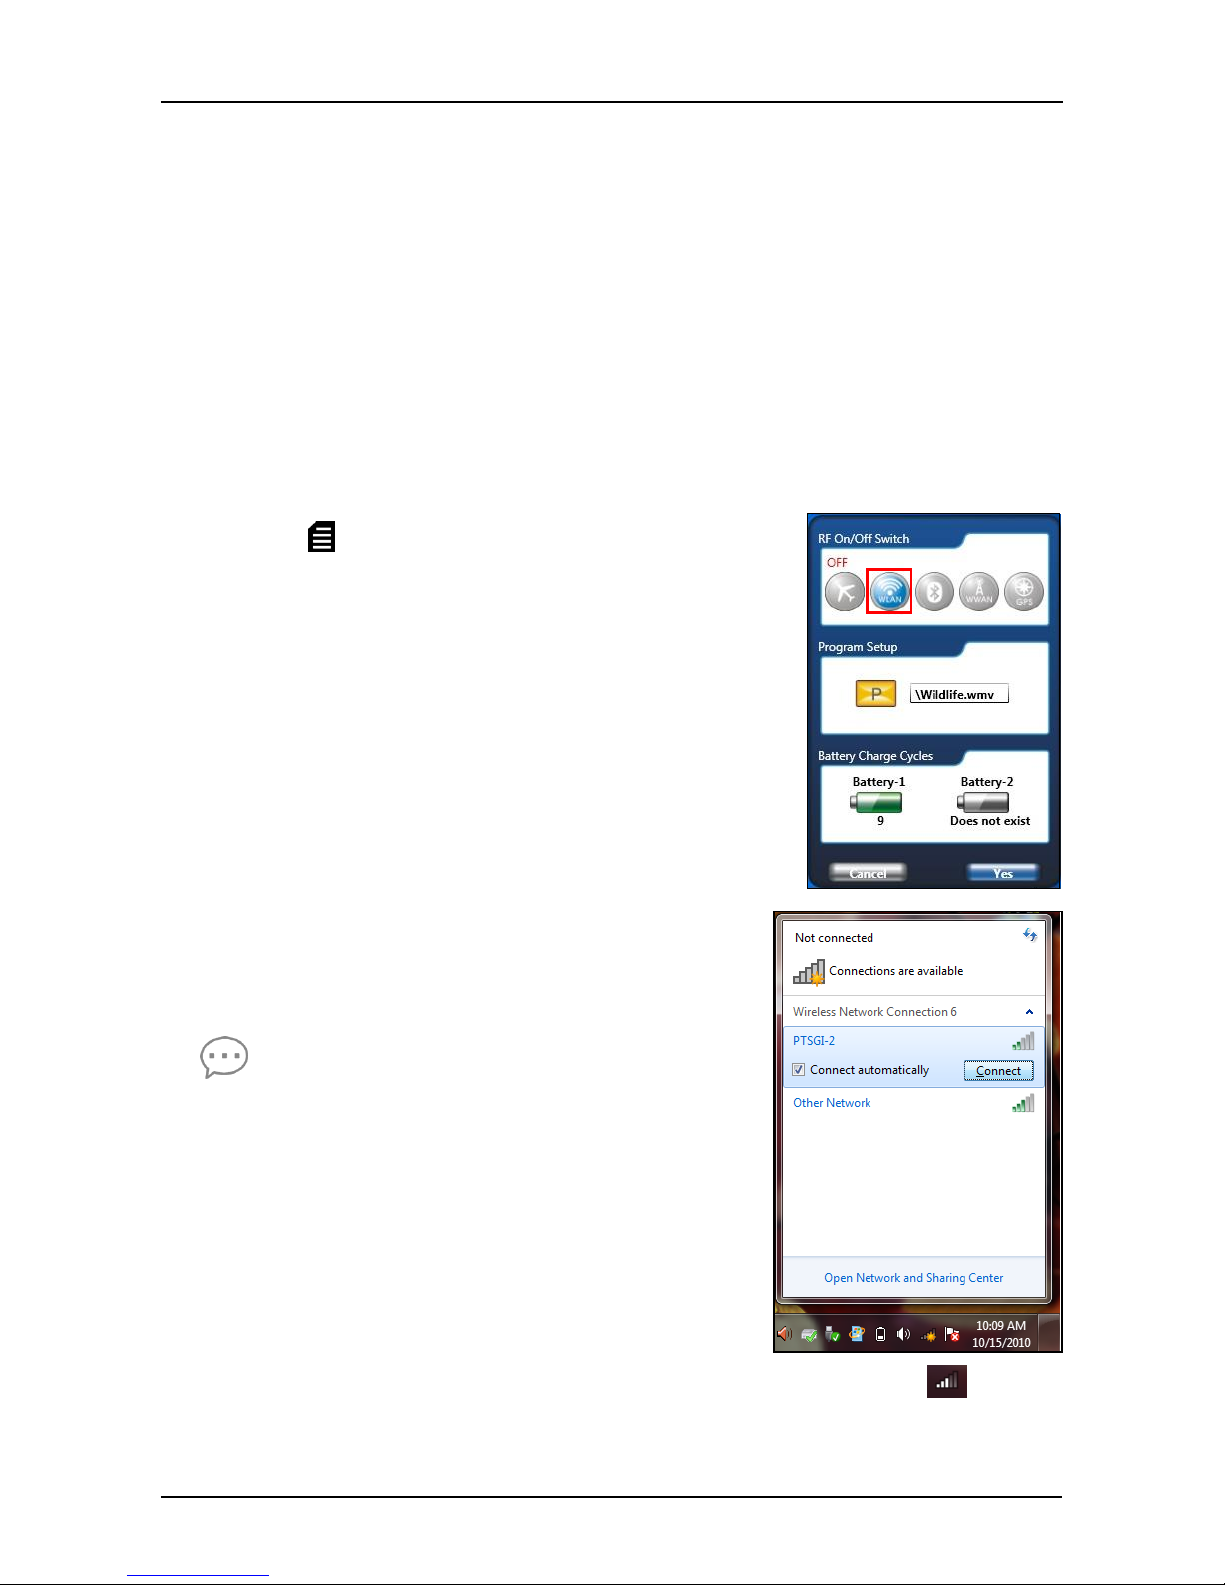
1. Press the button to open the Quick menu.
2. Click the WLAN icon to turn on the wireless network
function, and click Yes to exit the Quick menu.
3. Click the wireless network icon on the system tray.
4. Available wireless network connections are displayed.
Click the desired wireless network.
5. Click Connect.
Some networks require a network security key or
a password.
TIPS
•
Check Connect automatically box to
automatically connect to this network when it
is available.
6. Enter the network security key.
7. Click OK.
8. After the connection is established, you can see the wireless icon ( ) in the
Notification area.
Page 35
35
Making Connections
NOTE
•
Wi-Fi access requires service from a wireless service provider. Contact your
service provider for more information.
•
Actual wireless connectivity will depend on system configuration. Please
contact your dealer for more information.
Connecting to a Bluetooth Device
Your xTablet Convertible can connect and communicate with other
Bluetooth-enabled devices.
To add a device, follow the steps below:
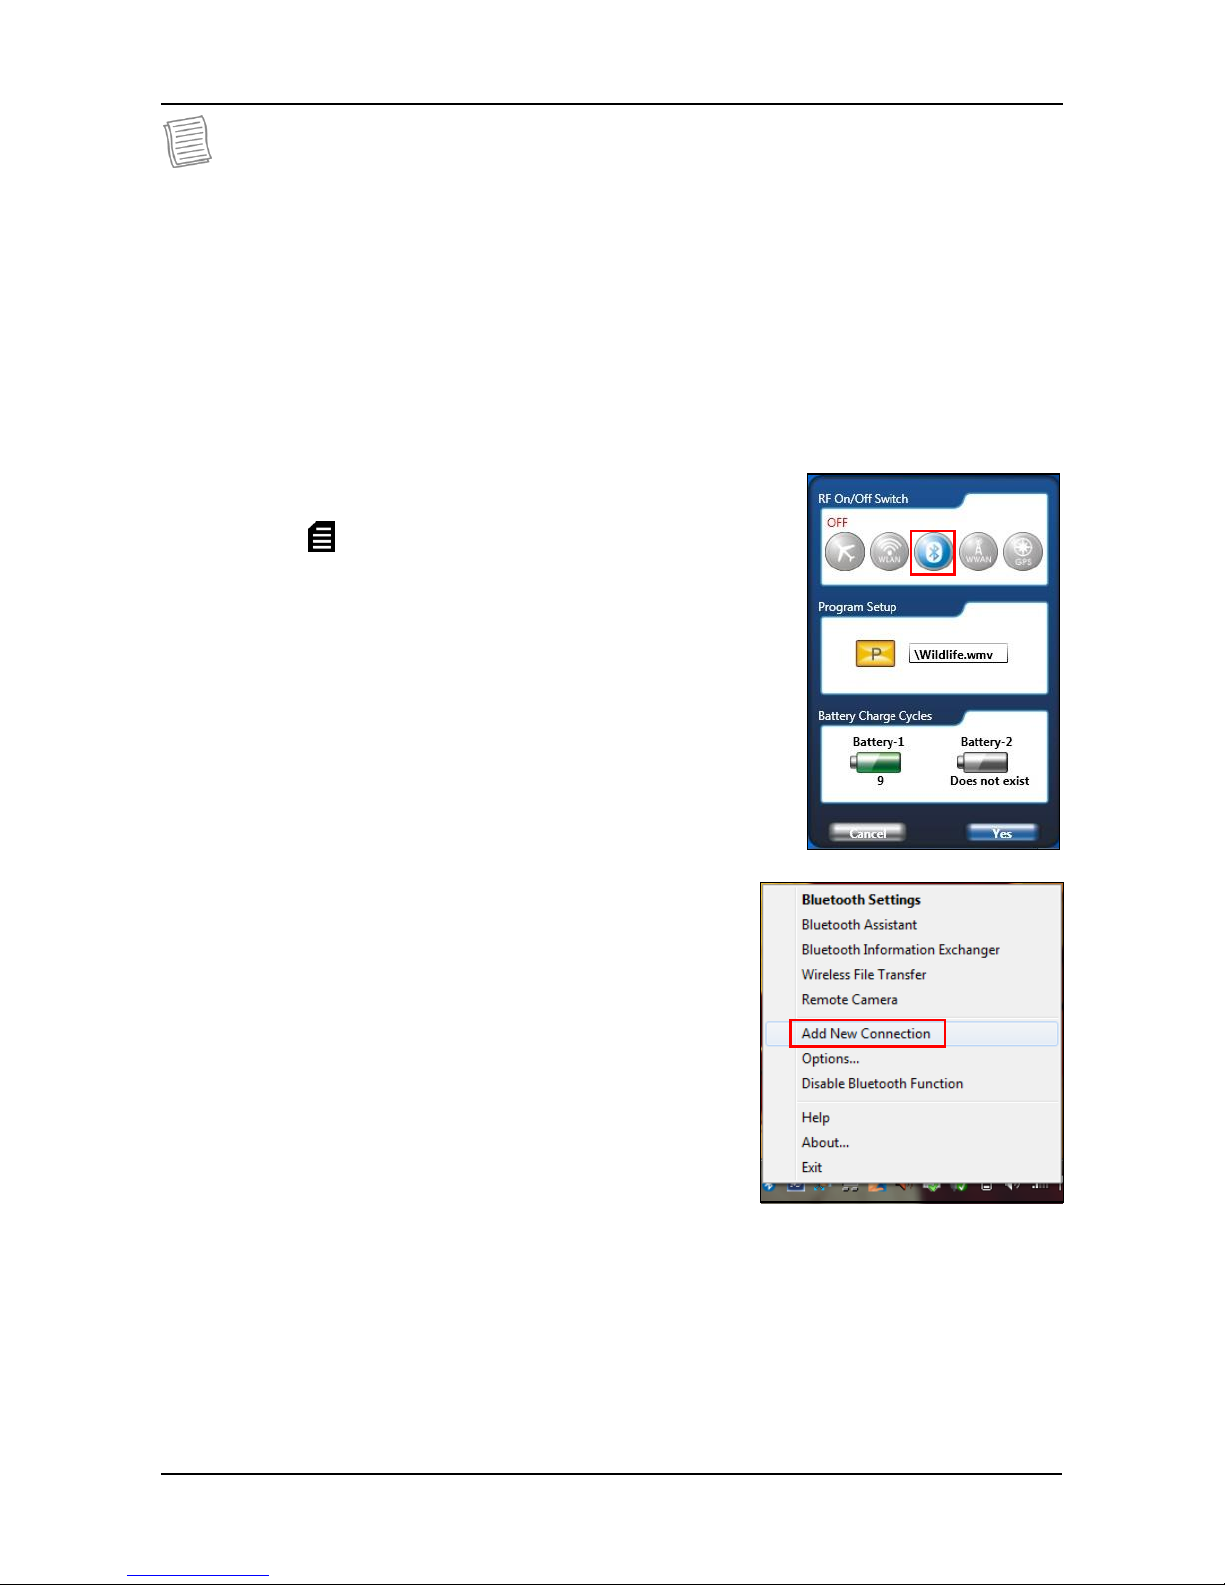
1. Press the button to open the Quick menu.
2. Click the Bluetooth icon to turn on the Bluetooth
function, and click Yes to exit the Quick menu.
3. Click the arrow on the system tray to display
hidden icons.
4. Right-click the Bluetooth icon.
5. Click Add New Connection. The system starts
scanning for Bluetooth devices and displays the
available devices.
6. Click on a device, then click Next.
Page 36

36
Making Connections
7. The system displays the selected Bluetooth
device. Double-click on the device icon to
connect.
8. Enter the passkey (PIN) to start pairing, and click OK.
NOTE
•
The PIN you enter on the xTablet Convertible must be the same PIN to be
entered on the other Bluetooth device.
•
Once a partnership has been created, connecting to that device again will no
longer require entering the PIN.
Page 37

Page 38

34
Power Management
Power Management
This chapter will guide you on how to manage the system power.
Using the Power Plan
To improve energy efficiency, you can use the power plan to reduce the amount
of power your xTablet Convertible uses, maximize the performance, or balance
the two.
1. Click Start > Control Panel.
2. Select System and Security > Power Options.
3. Select a power plan.
4. To adjust the selected power plan settings, click Change plan settings.
Page 39

35
Power Management
Using the Power Saving Mode
When you are not using the xTablet Convertible, turn off the xTablet Convertible
or set the xTablet Convertible to enter sleep mode.
To set the xTablet Convertible to enter sleep mode, follow the steps below:
1. Click Start.
2. Click Shut down > Sleep.
To wake up the xTablet Convertible from sleep mode, do one of the following:
•
Press the button.
•
Press any key on the keyboard.
Page 40

36
Using the BIOS Setup Utility
Using the BIOS Setup
Utility
Your xTablet Convertible has a BIOS setup utility which allows you to configure
important system settings, including settings for various optional functions of the
xTablet Convertible. This chapter explains how to use the BIOS setup utility.
BIOS Setup Menu
The BIOS setup Utility allows you to configure your xTablet Convertible basic
settings. When you turn your xTablet Convertible on, the system reads this
information to initialize the hardware so that it can operate correctly. Use the
BIOS setup utility to change your xTablet Convertible start-up configuration.
For example, you can change the security and power management routines of
your system.
Starting the BIOS Setup Utility
You can only enter the BIOS setup utility as the xTablet Convertible is booting,
that is between the time you turn on the xTablet Convertible and before the
Windows interface appears. If your xTablet Convertible is already on, shut down
your xTablet Convertible completely (power off) and restart it and then press the
Delete key to enter the setup utility.
Navigating and Entering
Information in BIOS
Use the following keys to move between fields and to enter information:
Function Key
Description
Selects screen.
Moves up/down to select items.
Enter
Confirms the selection and enters the selected menu screen.
+ / -
Changes an option for the selected items.
F1
Displays the Help screen.
F2
Invokes the previous values.
F3
Loads optimized default values.
F4
Saves the changes and exits Setup.
Esc
Press Esc to exit any section. If you wish to exit the BIOS utility
without saving changes, go to the main menu, then press Esc.
Page 41

37
Power Management
Users are allowed to enter new values to replace the default settings in certain
fields, and the rest of the fields are specified by system default parameters and
Page 42

38
Using the BIOS Setup Utility
cannot be modified by users. Reverse the attribute of the main options and
press Enter to enter into the submenu. Press Esc to return to the previous
configuration page.
Main Menu
Display the system overview information about BIOS version, CPU features, and
total memory size. You can also set the system date and time.
Advanced Menu
View and configure SATA mode, FAN calibration, battery calibration, wake up
event, and RF device control settings.
Page 43

39
Using the BIOS Setup Utility
Boot Menu
Configure the boot type and boot sequence.
Security Menu
Set or change the Administrator and User passwords, and configure TPM
settings.
Page 44

40
Using the BIOS Setup Utility
Save & Exit Menu
Save or discard the changes, or restore the default values for all setup options
before leaving the BIOS Setup Menu.
Page 45

41
MobileDemand xTablet C1200
MobileDemand xTablet
C1200 DataGuard
Software
Your xTablet Convertible supports MobileDemand xTablet C1200 DataGuard
software that enables users to backup file(s) from the hard disk drive to the
Disk on Module (DOM). With this software, users can do both automatic
backup and mirror backup.
Automatic backup: Synchronize the files users create or update and
backup the files changed in HDD to DOM automatically.
Mirror backup: Backup all the files within the task list from HDD to DOM.
Using MobileDemand xTablet
C1200 DataGuard
1. When you launch the MobileDemand xTablet C1200 DataGuard software
for the first time, you will be asked to specify the DOM path.
NOTE
•
Launch the software by double-clicking MobileDemand xTablet C1200
DataGuard Software
icon on the computer desktop.
Page 46

42
MobileDemand xTablet C1200
2. Click OK and enter the main menu.
There are mainly three parts: Tool bar, HDD task list and DOM task list.
Tool bar:
a b c
d
e f
a. New button: create a new task.
b. Mirror button: do mirror backup.
c. Delete button (on the left): delete tasks in HDD task list.
d. Delete button (on the right): clean up backup in DOM.
e. Tools button: access the software user’s manual and configure its setting.
f. History button: view the latest mirror backup log.
Page 47

43
MobileDemand xTablet C1200
HDD task list:
It consists of the task list in HDD. The file number and file size of all tasks
are displayed on the bottom left of the screen.
Task list fields include: task, notes, local path, size, file number, and owner.
Task: a unique task name.
Notes: users can input notes for a task to describe the task.
Local Path: the local path that the user chooses when creating tasks.
Size: the total file size of a task.
File Number: the total file number of a task.
Owner: the user who created the task.
Page 48

44
MobileDemand xTablet C1200
DOM task list:
It consists of the task list in DOM. The free space in DOM is displayed on the
bottom right of the screen.
Task information includes: task name, local path, size, file number last
backup date, owner, and backup process status.
Task: the task name created by the user.
Local Path: the local path that the user chooses when creating tasks.
Size: the total file size of a task.
File Number: the total file number of a task.
Last Backup: the date of the last backup.
Process: the status of the backup.
Owner: the user who created the task.
Page 49
45
MobileDemand xTablet C1200
Creating New Tasks
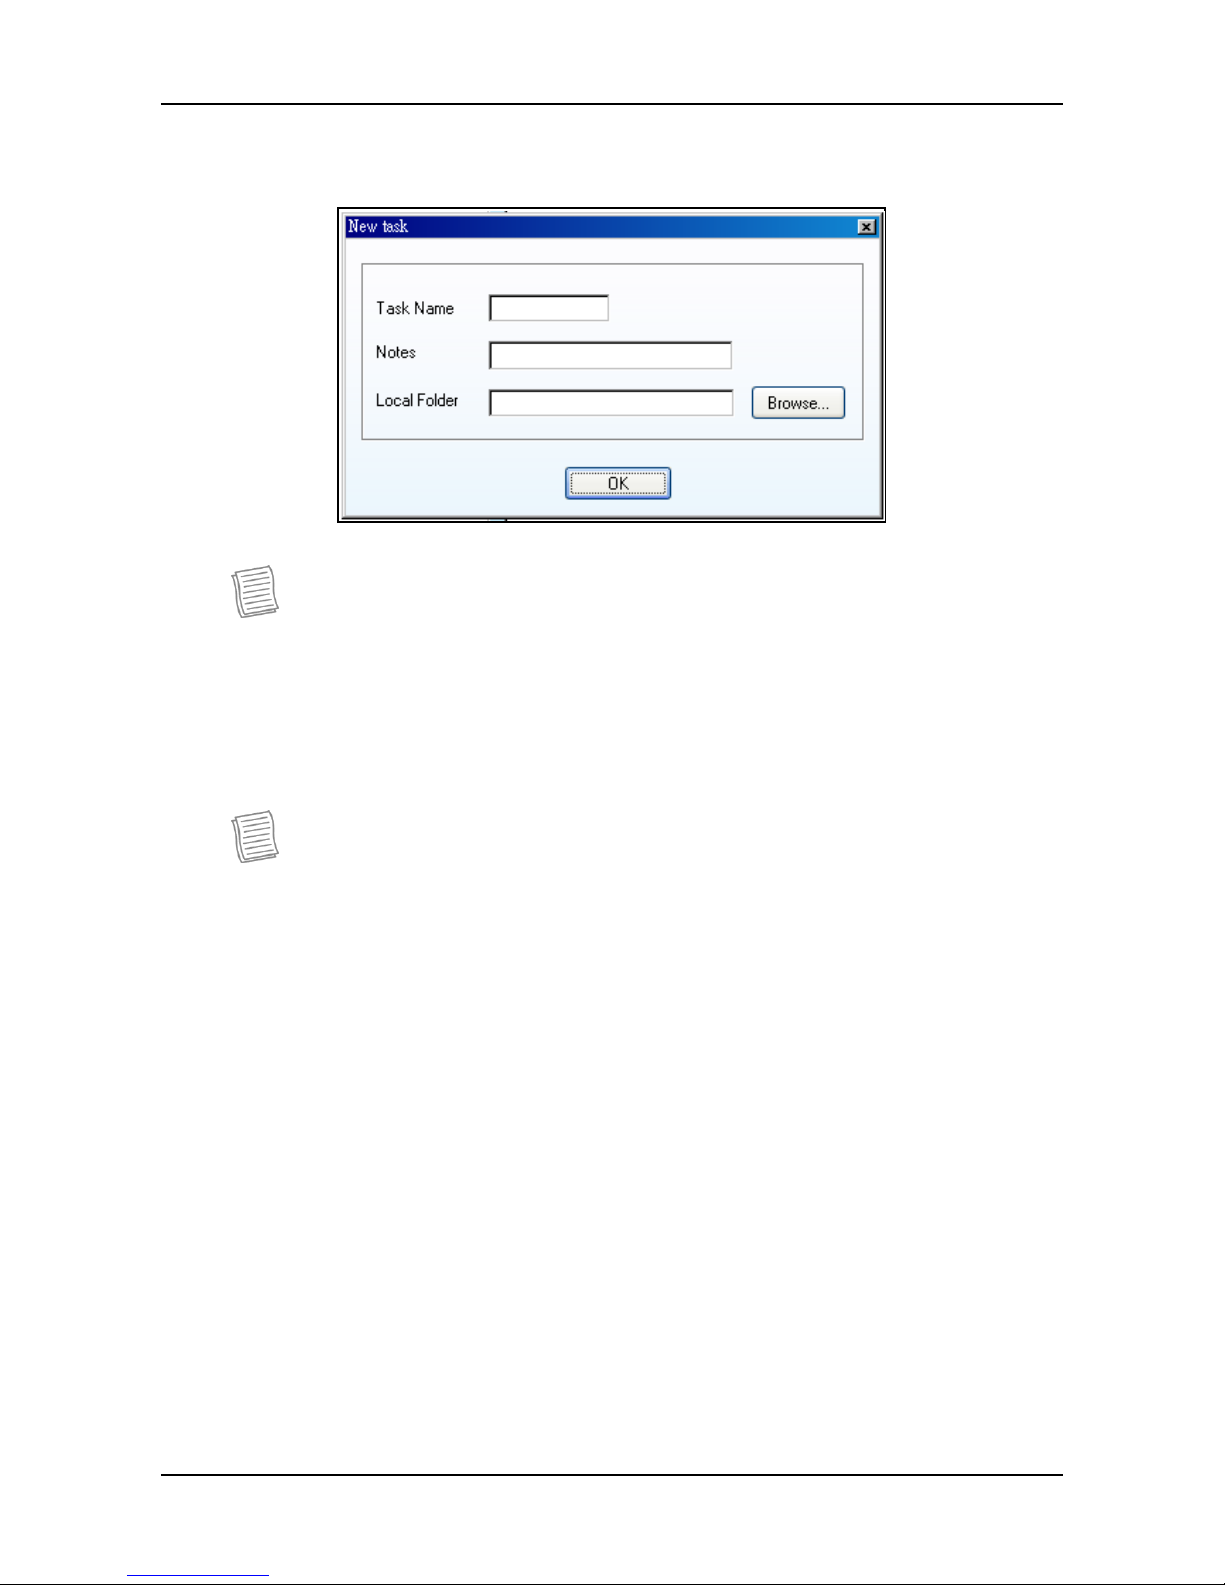
1. Create a new task by clicking the New button.
NOTE
•
The maximum character input for Task Name and Notes is 64.
2. Enter the task name and choose the folder that you want to backup, then
click OK.
It will back up the file(s) in the folder immediately.
NOTE
•
MobileDemand xTablet C1200 DataGuard will monitor the task(s) you
have checked and if there are any changes on the file(s), it will do
automatic backup.
3. When the automatic backup is running, the system tray icon will blink
until the automatic backup is complete.
Page 50

46
MobileDemand xTablet C1200
Running the Mirror Backup
Click the Mirror button to run the mirror backup. When mirror backup is
complete, the backup log appears on the screen.
Deleting Tasks
Users can delete the task(s) in HDD. Check the box on the HDD task list and
click the Delete button to delete the task(s).
Page 51

47
MobileDemand xTablet C1200
Check the box on the DOM task list and click the Delete button to clean up
the folder(s) exists in DOM which not mapping with the task(s) in HDD task
list.
If the task is listed in the HDD task list, users are not allowed to delete the
relevant task(s) in DOM.
Page 52

48
MobileDemand xTablet C1200
Using Tools
Click the Tools button on the tool bar and do the following:
•
Select Help to get the software user’s manual.
•
Select Setting to set whether you want to run MobileDemand xTablet
C1200 DataGuard when
Windows starts up.
•
Select About to view the current software version.
Page 53

Page 54

48
Troubleshooting
Troubleshooting
This chapter contains a list of common problems that you might experience
when using your xTablet Convertible, and techniques to try and overcome the
problem. If you need additional help, contact your retailer.
Problems
Solutions
The battery isn’t charging.
• Check if the power adapter is properly
connected.
• Make sure that the battery is within the
recommended charging temperature of
-20°C to 50°C.
The screen suddenly turns
blank.
The brightness control is not properly set.
Adjust the LCD screen brightness.
Your xTablet Convertible might be in
standby or hibernate mode. Press the
Power button to wake the system.
If using the battery, the battery may be
depleted. Replace with a fully charged battery
or connect the power adapter to an electrical
outlet.
The xTablet Convertible cannot
connect to
Internet.
Check if the LAN cable is properly connected.
If using wireless, check if your location is out
of range of the network. Move your xTablet
Convertible closer to the access point.
If the network you are connecting to requires
a security password, make sure you enter the
correct password.
Check to make sure the settings
configurations are correct.
Nothing happens when I press
the Power button.
Check if the power adapter is connected to an
electrical outlet.
If using a battery pack, make sure it has
enough power. Otherwise, replace the battery.
The xTablet Convertible
cannot resume from
hibernate or standard mode.
The battery power level might be too low.
Connect the power adapter to an electrical
outlet or replace the battery.
The xTablet Convertible does
not produce any sound.
Audio has been muted. Click on the Speaker
icon on the right of your Windows taskbar.
When the volume control box appears,
uncheck the Mute check box.
Page 55

49
Specifications
Specifications
Features
Specifications
Processor
Type & Speed
Intel I3 and I5 UVL serial
Install
Method
BGA
Power
Consumption
18W
Major Chipsets
Chipsets
Intel HM55
System Memory
Type
DDR-III 800/1333
Capacity
Two 204-pin DDRIII SODIMM sockets each
for 2GB, 4GB (if available)
Maximum
Memory
8GB
Display
LCD
12.1” WXGA (1280x800) TFT, LED backlight
Camera
1.3 Megapixel Webcam
Touch Screen
Optional resistive type touch panel support
palm rejection feature:
Optional 12.1” digitizer with digital stylus
Non-digitizer touch panel with
dummy stylus
Storage
HDD
User removable HDD module without
using
a tool
Support 2.5” SATA HDD
Supports an external data rate 3.0 Gbps
(300 MB/s) (Serial-ATA Generation-2)
SSD
For the operating of unit under 0°C
by
using SSD as the main storage
User removable SSD module without
using a tool
SATA 2.5” (Gen. 2) SSD supports an
external data rate 3.0 Gbps
Data Backup
An optional internal SATA SSD for
data
backup
Software utility for auto back-up of
selected data files between HDD and SSD
(For HDD data backup)
Page 56

50
Specifications
Features
Specifications
Graphic
Graphic
Controller
Integrated graphic controller
Graphic
Memory
TBA
I/O Devices
Point Device
Hidden Capacitive Touch Pad – PS/2 mouse
interface / 2 buttons support Right/Left
Expansion
Card
One Express 34 card slot
Memory Card
One SD Card reader slot supports SDHC
Communications
Networking
devices
Integrated Gigabit bps Ethernet
Support PXE function
Wireless
networking
devices
One Mini Express card slot
One is for WLAN (PCI-e only)
Intel© WiFi Link 1000 (1x2) with PCI-e
Half
Bluetooth
Support BT 2.1 EDR (optional)
I/O Ports
Standard
One USB 2.0 connectors
One e-SATA/USB 2.0 combo connector
One RJ-45 jack for internal
10/100/1000M
bit Ethernet
One DC-In jack
One 15 pin D-sub VGA port for
external monitor/projector
Audio jacks (support stereo Mic. Jack)
One 84 pin docking connector which
supports DC, VGA, LAN and USB
(USBx2,VGA, LAN are direct signals
from Unit)
Audio
High Definition Audio
Stereo, supports two 1.5W speakers
Analog Microphone
Power
AC Adapter
AC power input:100V-240V,50Hz-60Hz,
65W
Output: 19V
Compliant with Energy Star 5.0
Battery Pack
Standard Li-Ion 6-cell (3S2P, 5200mAH)
Smart Battery Pack
2nd Battery
Optional 2nd Li-lon 6-cell (3S2P, 5000mAh)
Page 57

Specifications
51
Features
Specifications
Environment
Temperature
/ Humidity
Operating Environment
Temperature:
-20°C ~ 50°C
(Operating under 0°C by using SSD
as the main storage)
Non-operating Environment Temperature:
-40°C ~ 70°C
Operating Humidity:20% ~ 90%,
relative
humidity, non-condensing
(Depends on temperature)
Dimensions
328mm (W) x 277mm (D) x 40.8mm (H)
Weight
2.5kg (with standard Battery)
Specifications are subject to change without prior notice.
Page 58

52
MobileDemand
1501 Boyson Square Drive
Suite 101
Hiawatha, Iowa
52233
Phone - 1.877.784.4338
Fax - (319) 363-4122
 Loading...