

Page 1
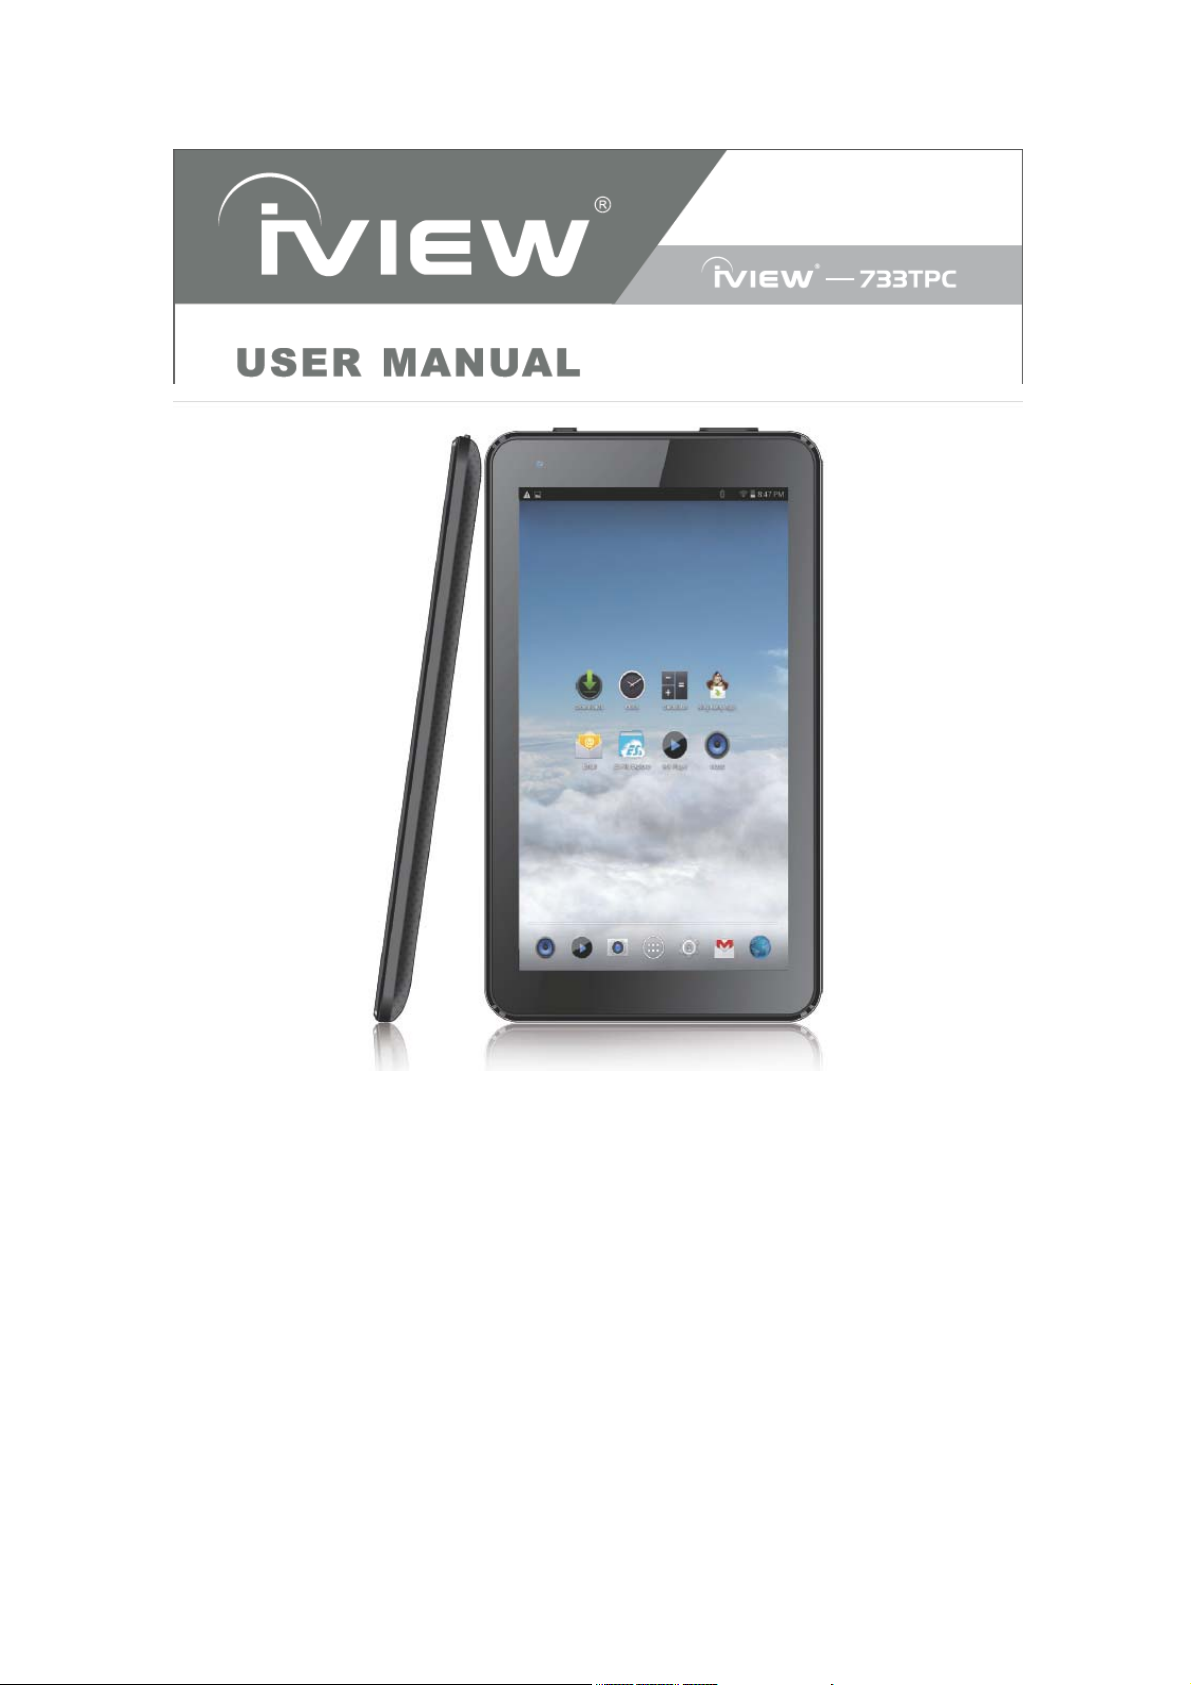
Tablet PC
Smoothtalker
TBWP
Page 2

Content
1. Appearance and button .................................................................................. 2
2. Start-up and shut-down .................................................................................. 3
3. Desktop .......................................................................................................... 3
4. Buttons ........................................................................................................... 4
5. Main menu operation ...................................................................................... 5
System settings ............................................................................................ 5
*Time/ Date setting: ............................................................................... 6
*Brightness: ........................................................................................... 7
*Screen standby: ................................................................................... 8
*Wireless & network: .............................................................................. 8
*Install, unload, run the application ...................................................... 10
*Backup & reset .................................................................................... 11
*Storage ............................................................................................... 12
*Language & keyboard ........................................................................ 12
*File Manager ...................................................................................... 13
6. Network ........................................................................................................ 16
7. Music playback ............................................................................................. 17
8. Video playback ............................................................................................. 18
9. Photo browse ............................................................................................... 19
10. Wallpaper
11. Record ........................................................................................................ 21
12. Photograph ................................................................................................. 21
13. E-mail ......................................................................................................... 22
14. External device ........................................................................................... 25
15. Features ..................................................................................................... 26
16. Accessories ................................................................................................ 26
1
Page 3
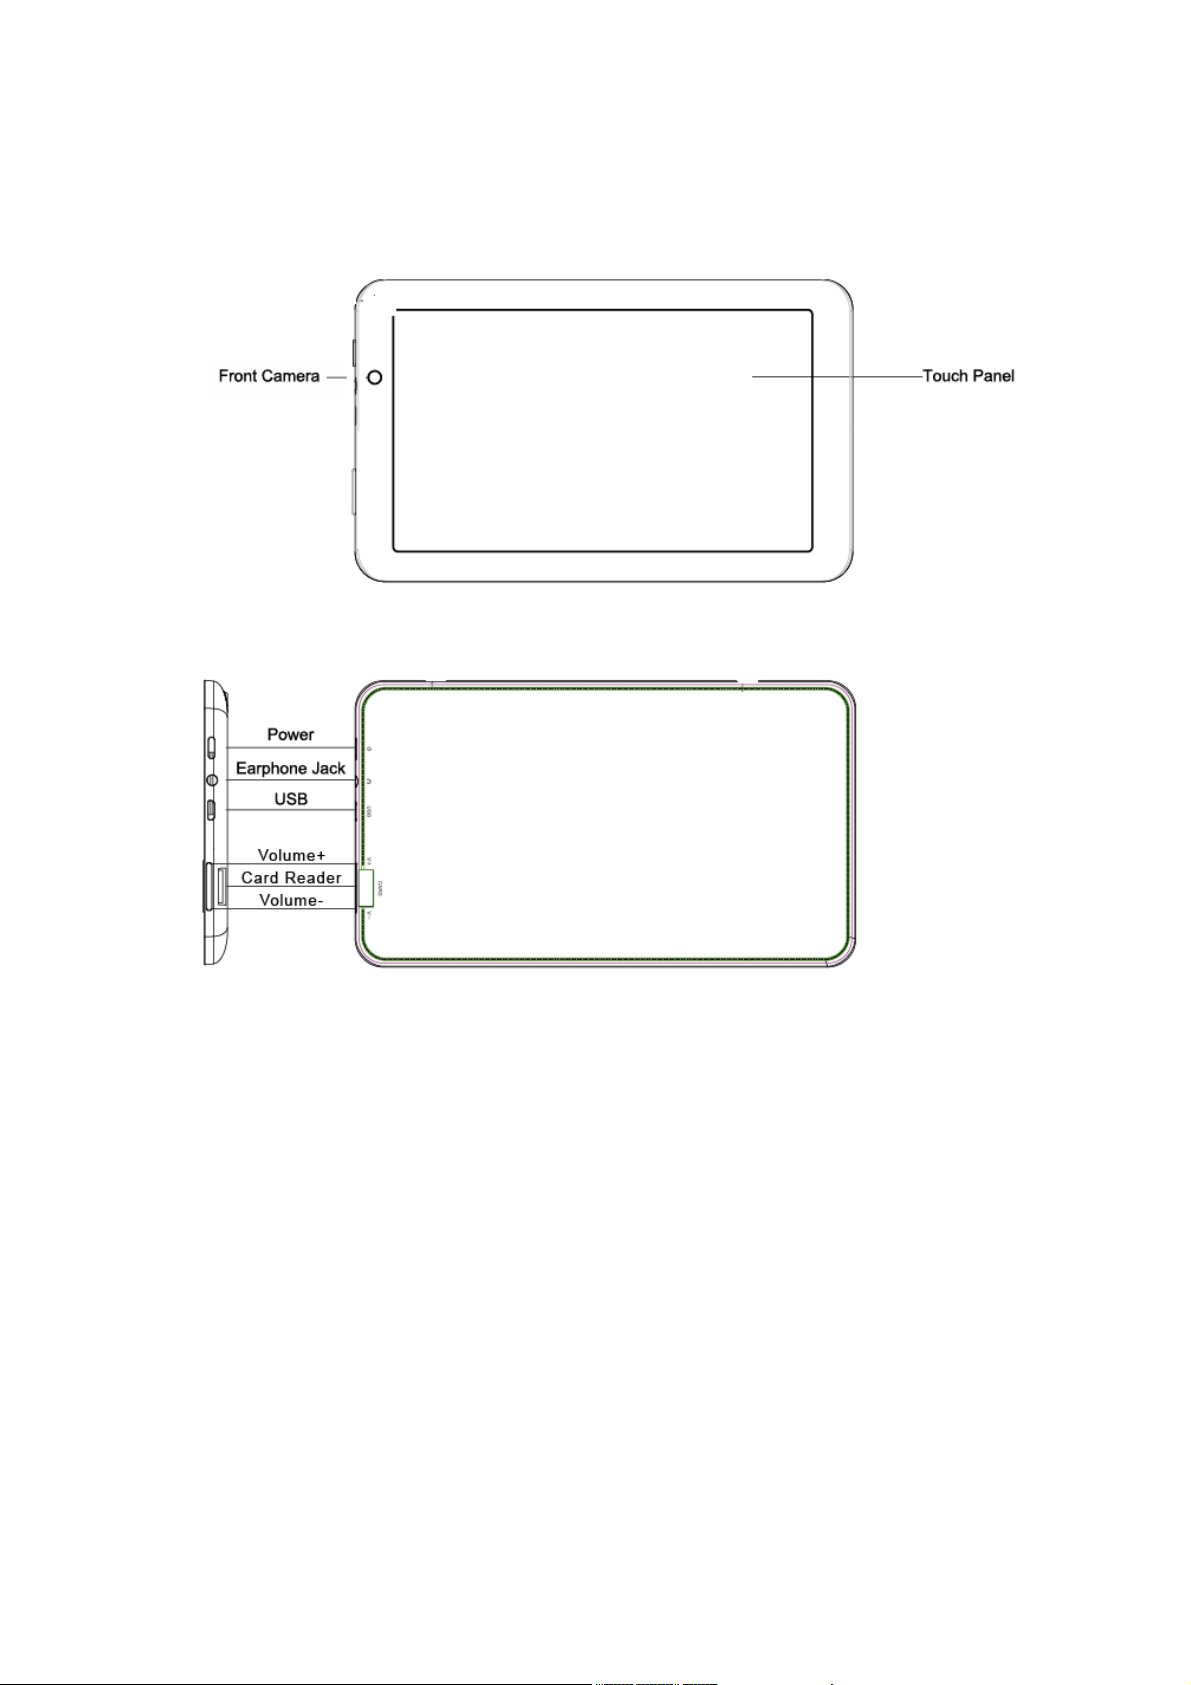
1. Appearance and button
[Note]
To power on: Press and hold the power button, the system will enter the main
interface.
To power off: In the main menu interface, press the power button for about 5
seconds to power off, the system will appear “power off” option, click “ok” and
you can safely power off.
Lock screen: Press power button to lock screen or unlock screen.
Screenshot: Press power button and Volume- buttons at the same time, and hold
for 3 seconds.
When the power ran out, the system will power off automatically.
2
Page 4
2. Start-up and shut-down
Startup: To press the power key and the system will enter the process of
Start-up.
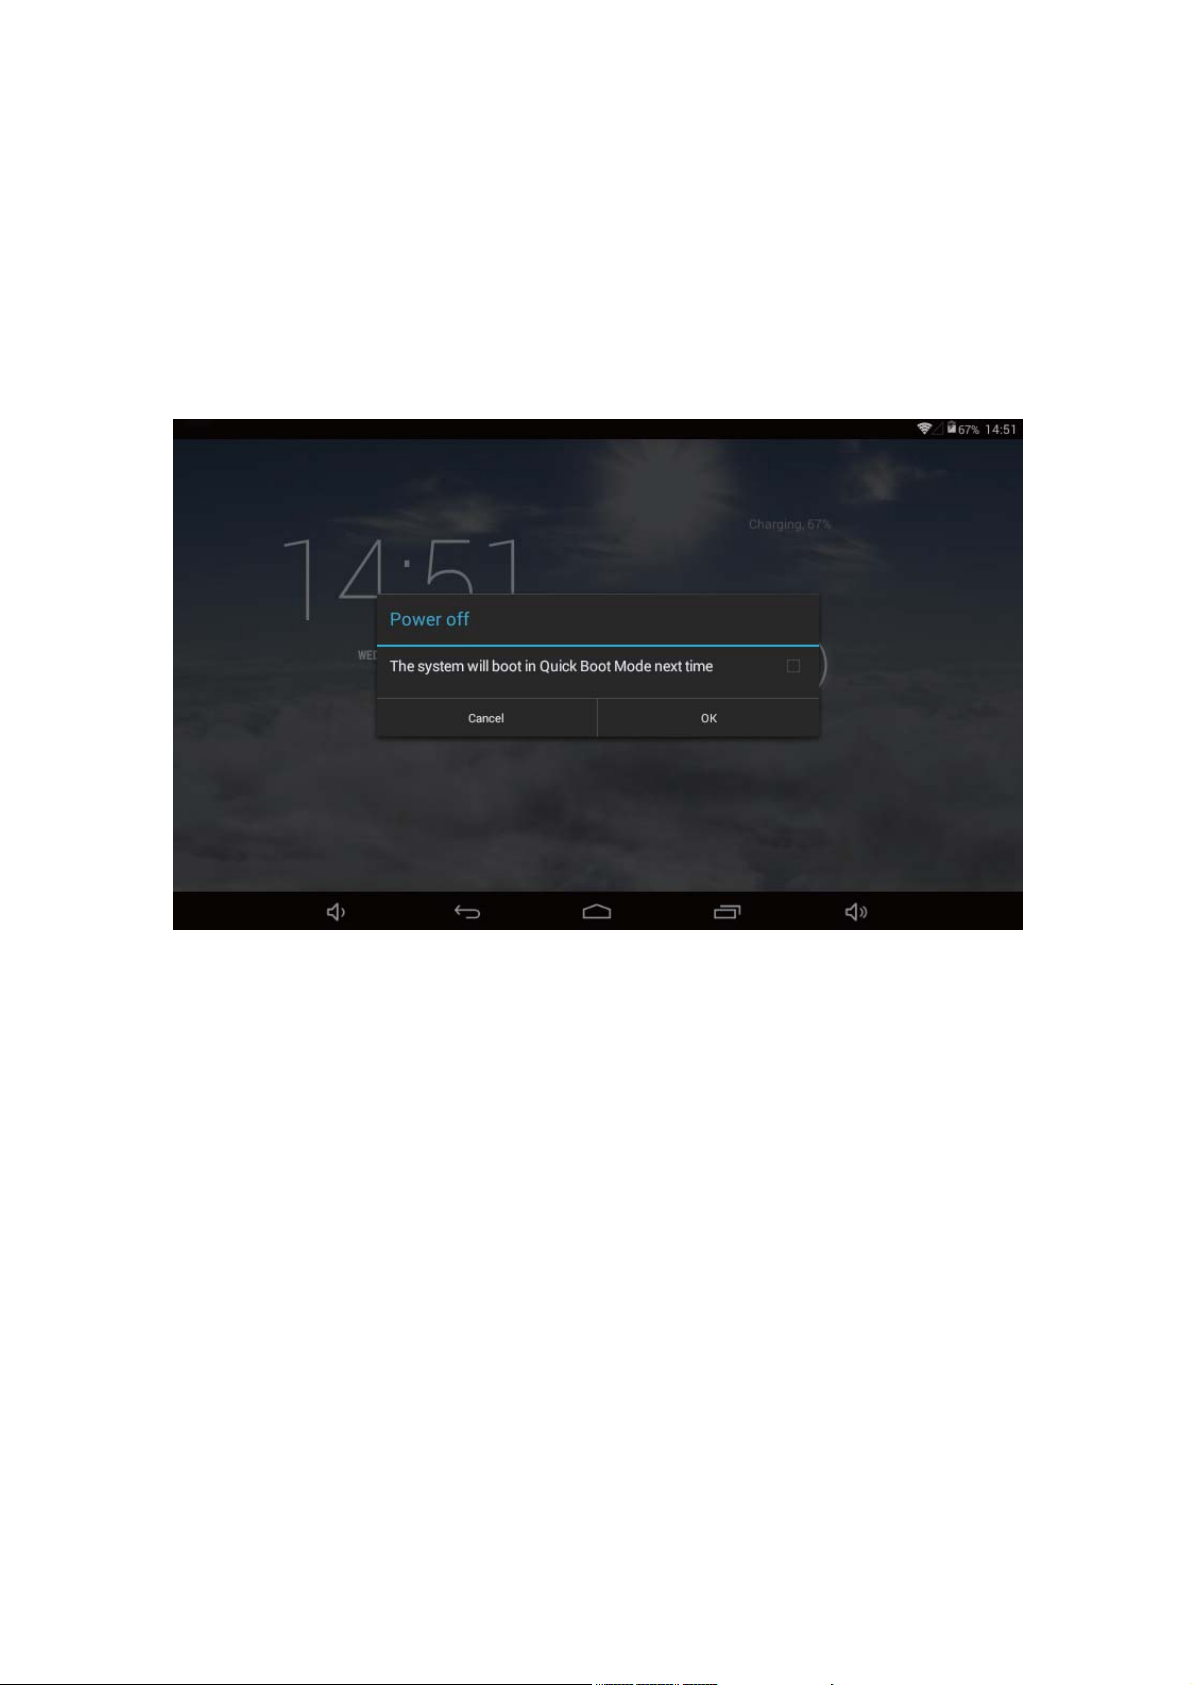
Shutdown: Press the power key then pop-up options will be on the desktop,
choose the option of Power off as shown below.
Click OK to shutdown
Sleep: In the normal state operation of the machine, press the power button,
enter a state of dormancy, at this time, the screen will be closed. Another short
press on the power button will resume to normal mode. When SupraPad is not in
use you can start this function to reduce power consumption.
3. Desktop
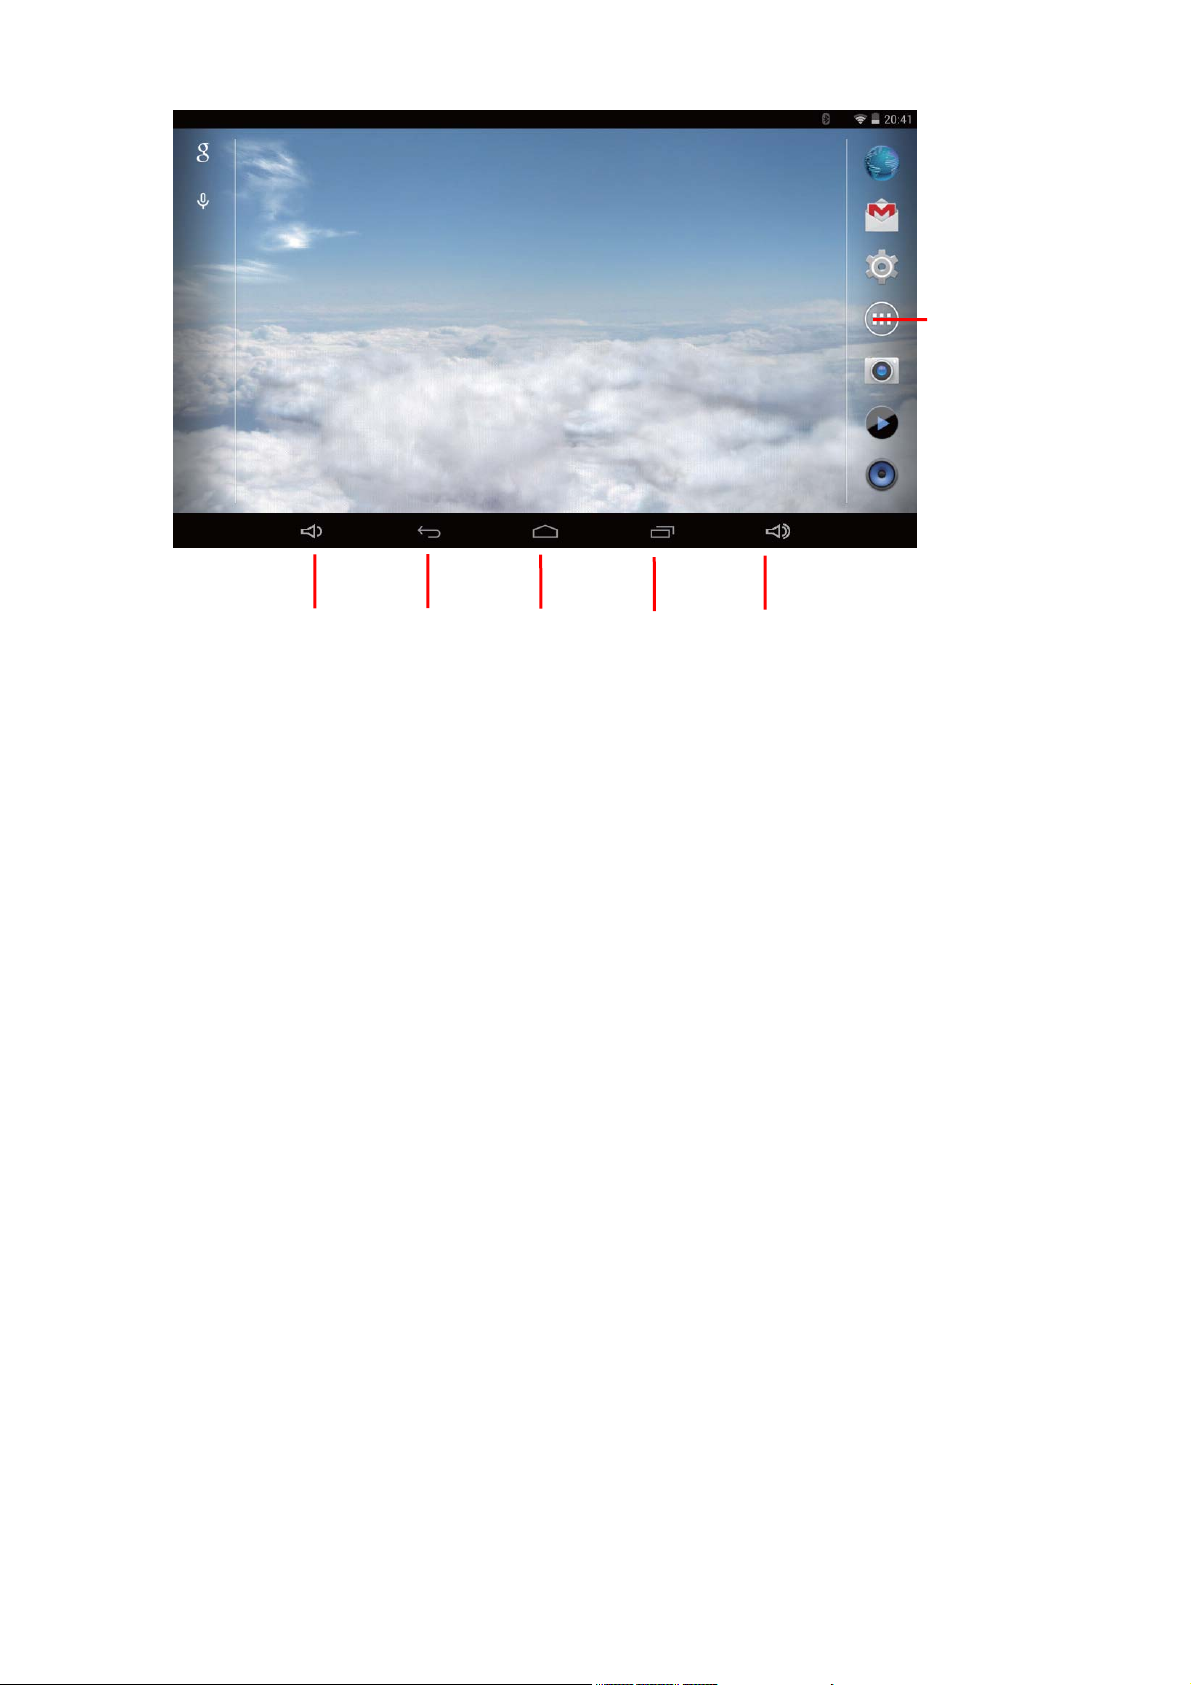
After the normal startup of the system is completed, you can see the Android 4.4
desktop (below). The default desktop is consisted of quick search bar, status bar,
and menu label icon.
3
Page 5
Menu
Volume- Return Home
Screen
View
Records
Volume+
The status bar is used to display the network status of current system, battery
power, time and other information.
Quick search box is used by the typing keywords to do the Internet search.
The main menu tag is in the right middle side of the screen, click it and the
default menu bar can be expanded.
4. Buttons
Keys used in And roid systems process:
The volume keys: Volume+, Volume- in the taskbar can be used for Volume
change.
The power button: Press long time for switching machine. Press quickly to enter
or leave the state of dormancy.
Menu key: Return or select the main interface.
Return key: Return to the last interface .
4
Page 6
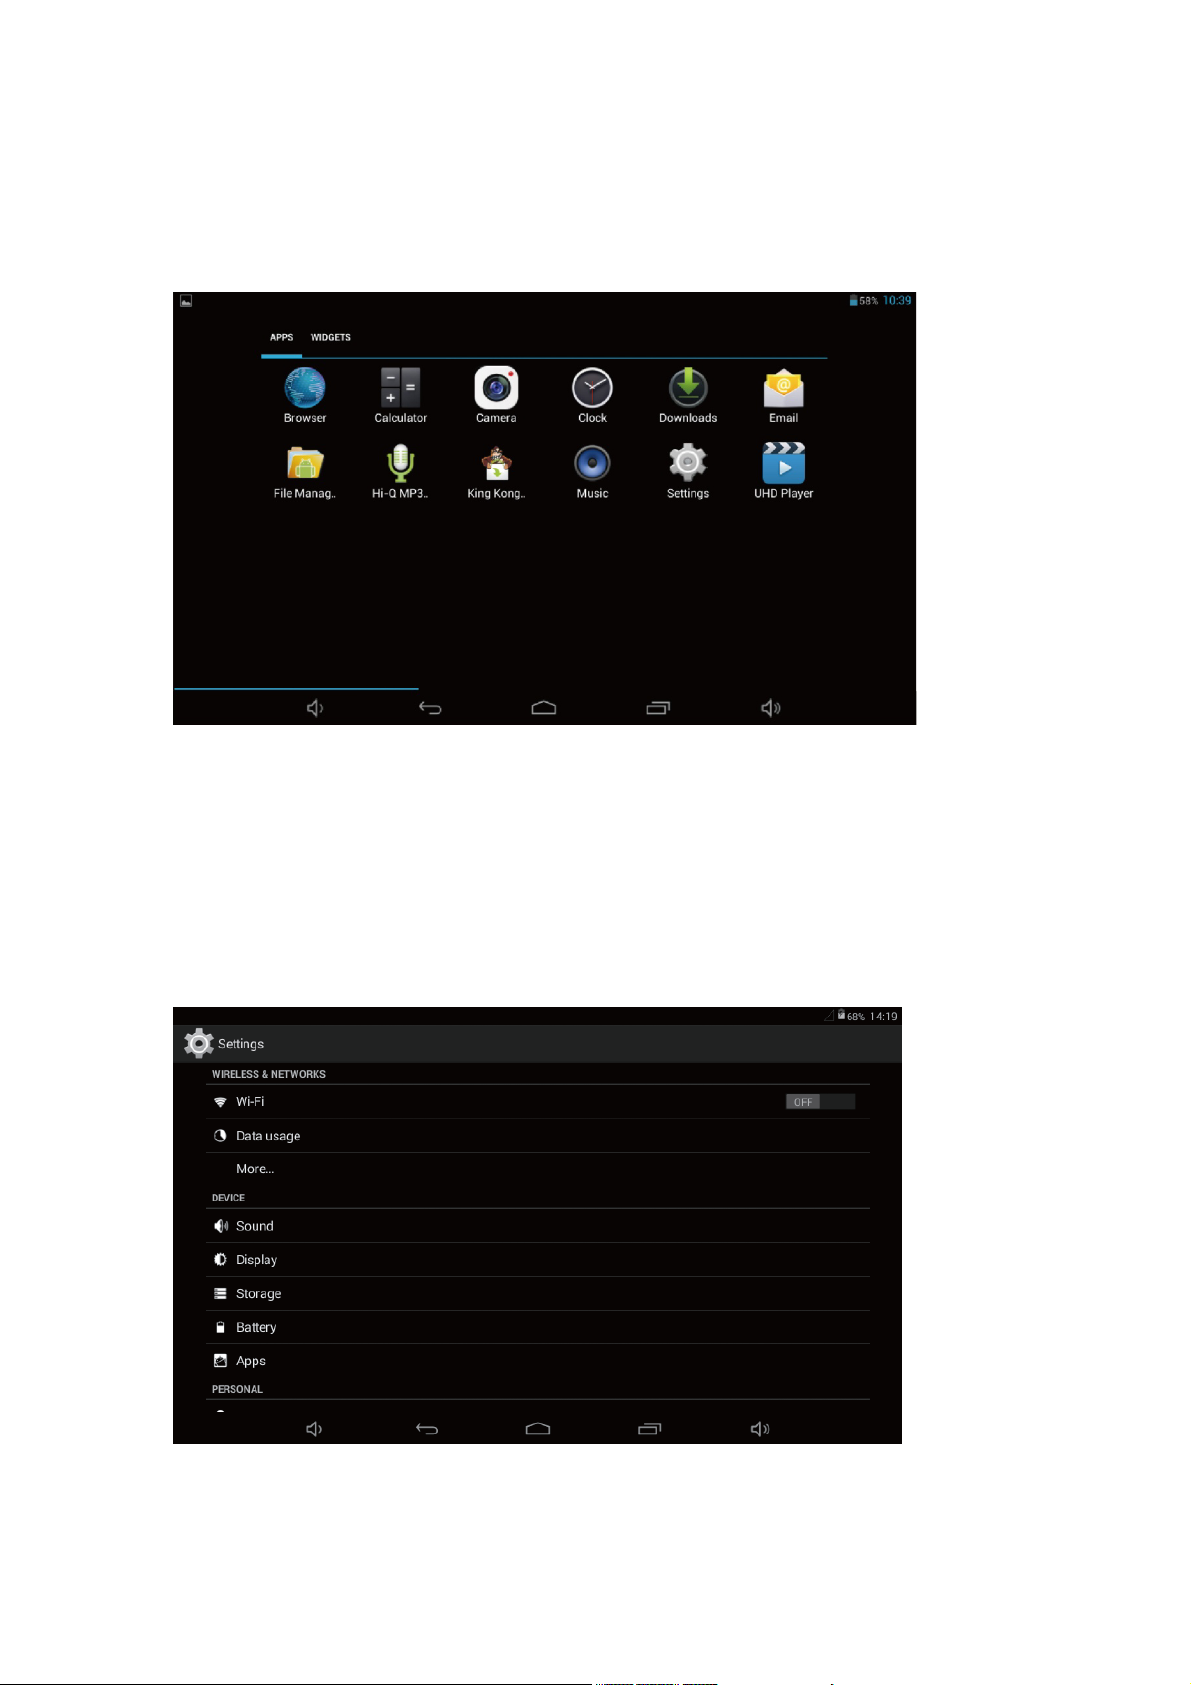
5. Main menu operation
Press the main menu tag on the main menu, as shown below:
In the main menu, you can set the system, operate the existed application, install
a new application, and start touch calibration, play music and video, browse
webpage, play game and other operations.
System settings
Click on the main menu interface in the “Settings” icon, and then open the
system settings interface, as shown below:
5
Page 7
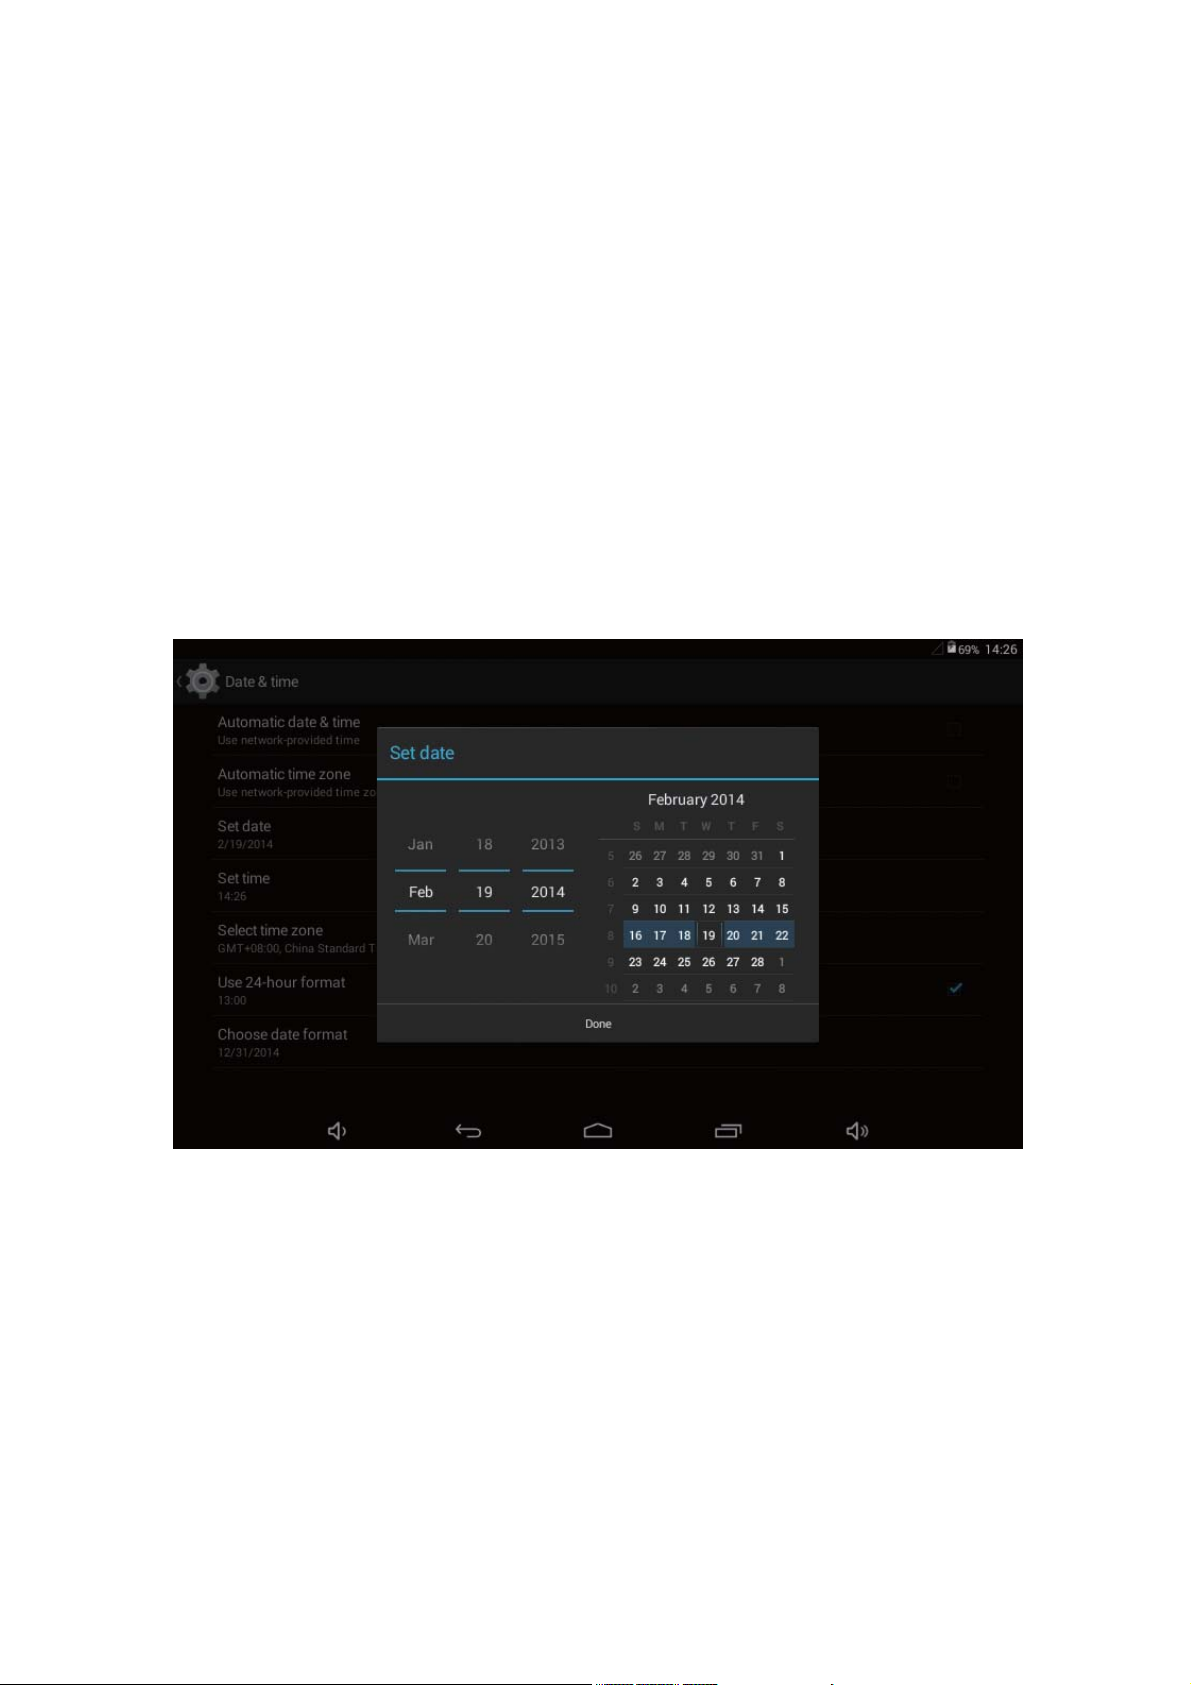
Select the relevant items to do corresponding operation, for example:
* Wireless & network * Date & Time
* Sound & Display * The equipment and so on
*Time/ Date setting:
In the interface of the setting, select 'the time and date settings' to enter the
date and time settings interface:
You can choose the automatic mode by using the network time.
You also can choose to set the date, select time zone, set time, select date
format, set date and other information.
For example, choose the set date, as shown below:
Choose+: It means increase of l unit;
Select-: It means it reduces l unit;
You can also choose the number to enter the input pattern. Directly input the
number, and then select the button done, as shown below:
6
Page 8
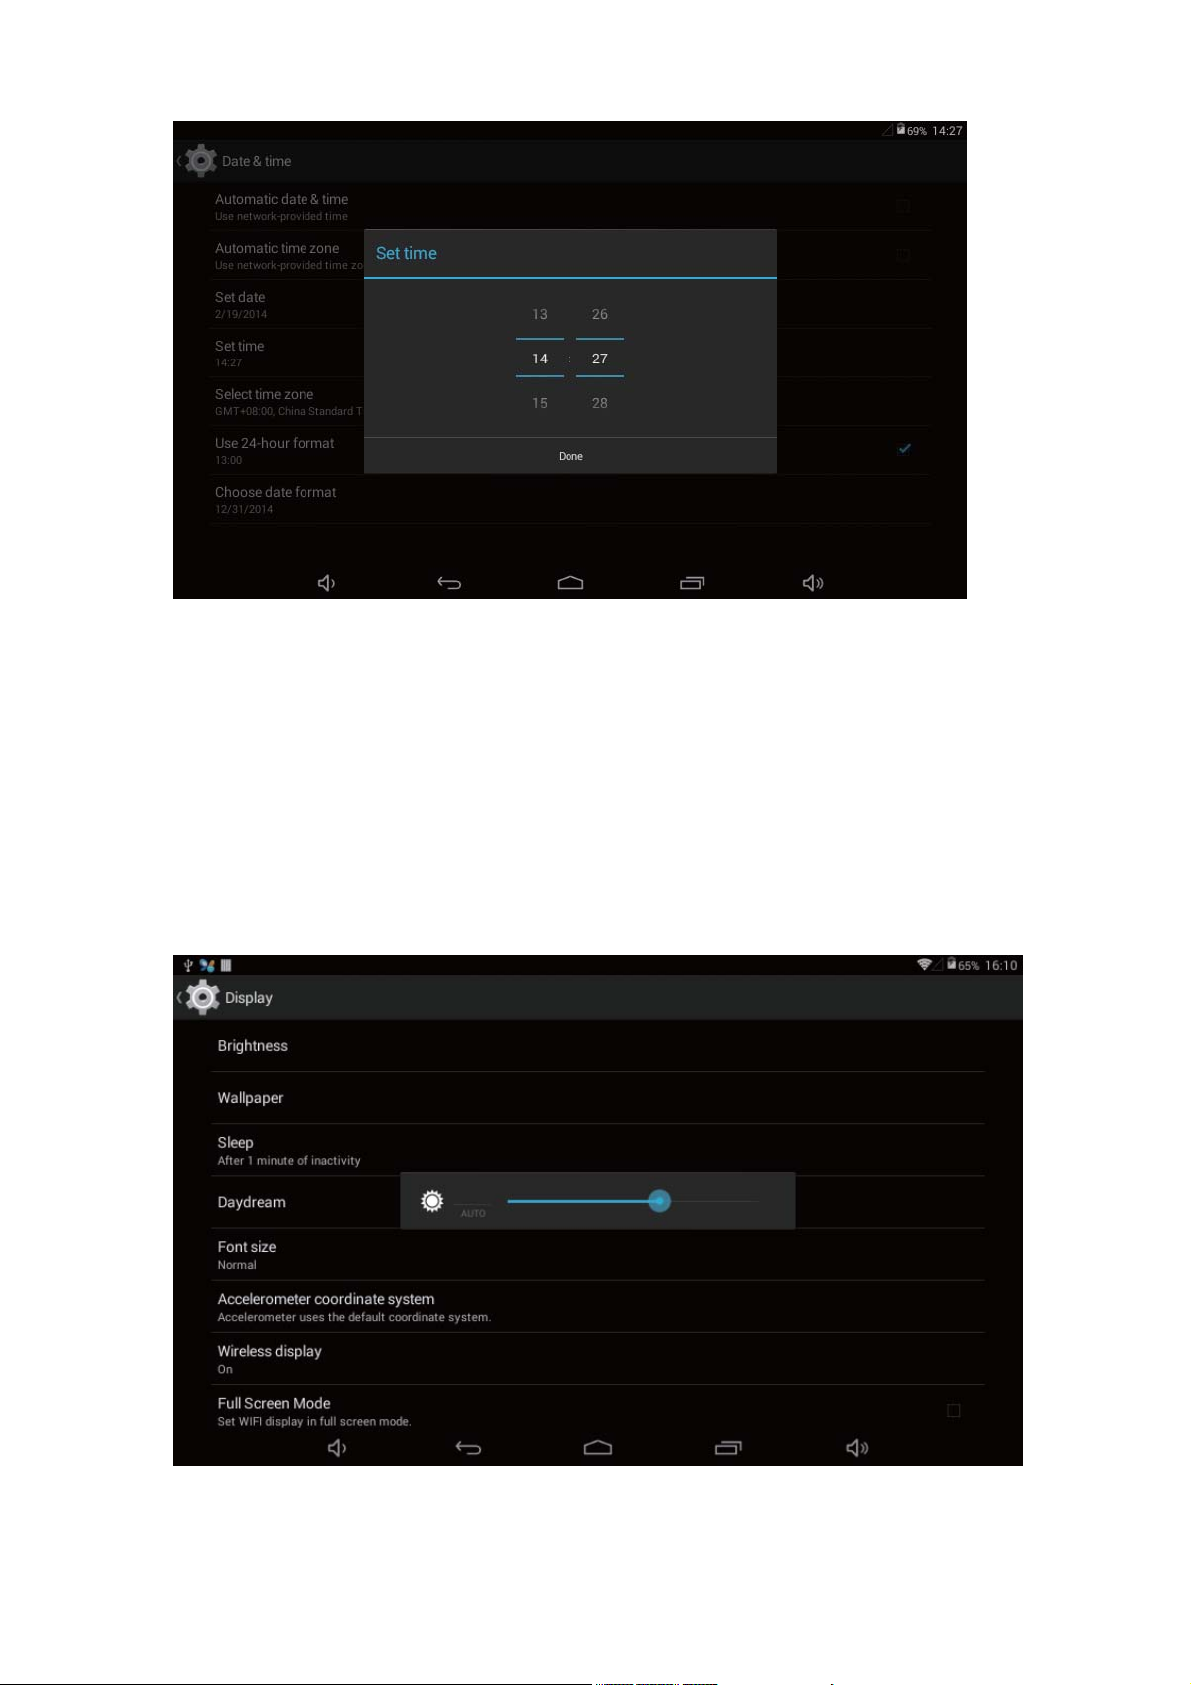
Select “done”, if the input number is legitimate, then the operation is successful,
and the system will use the new settings.
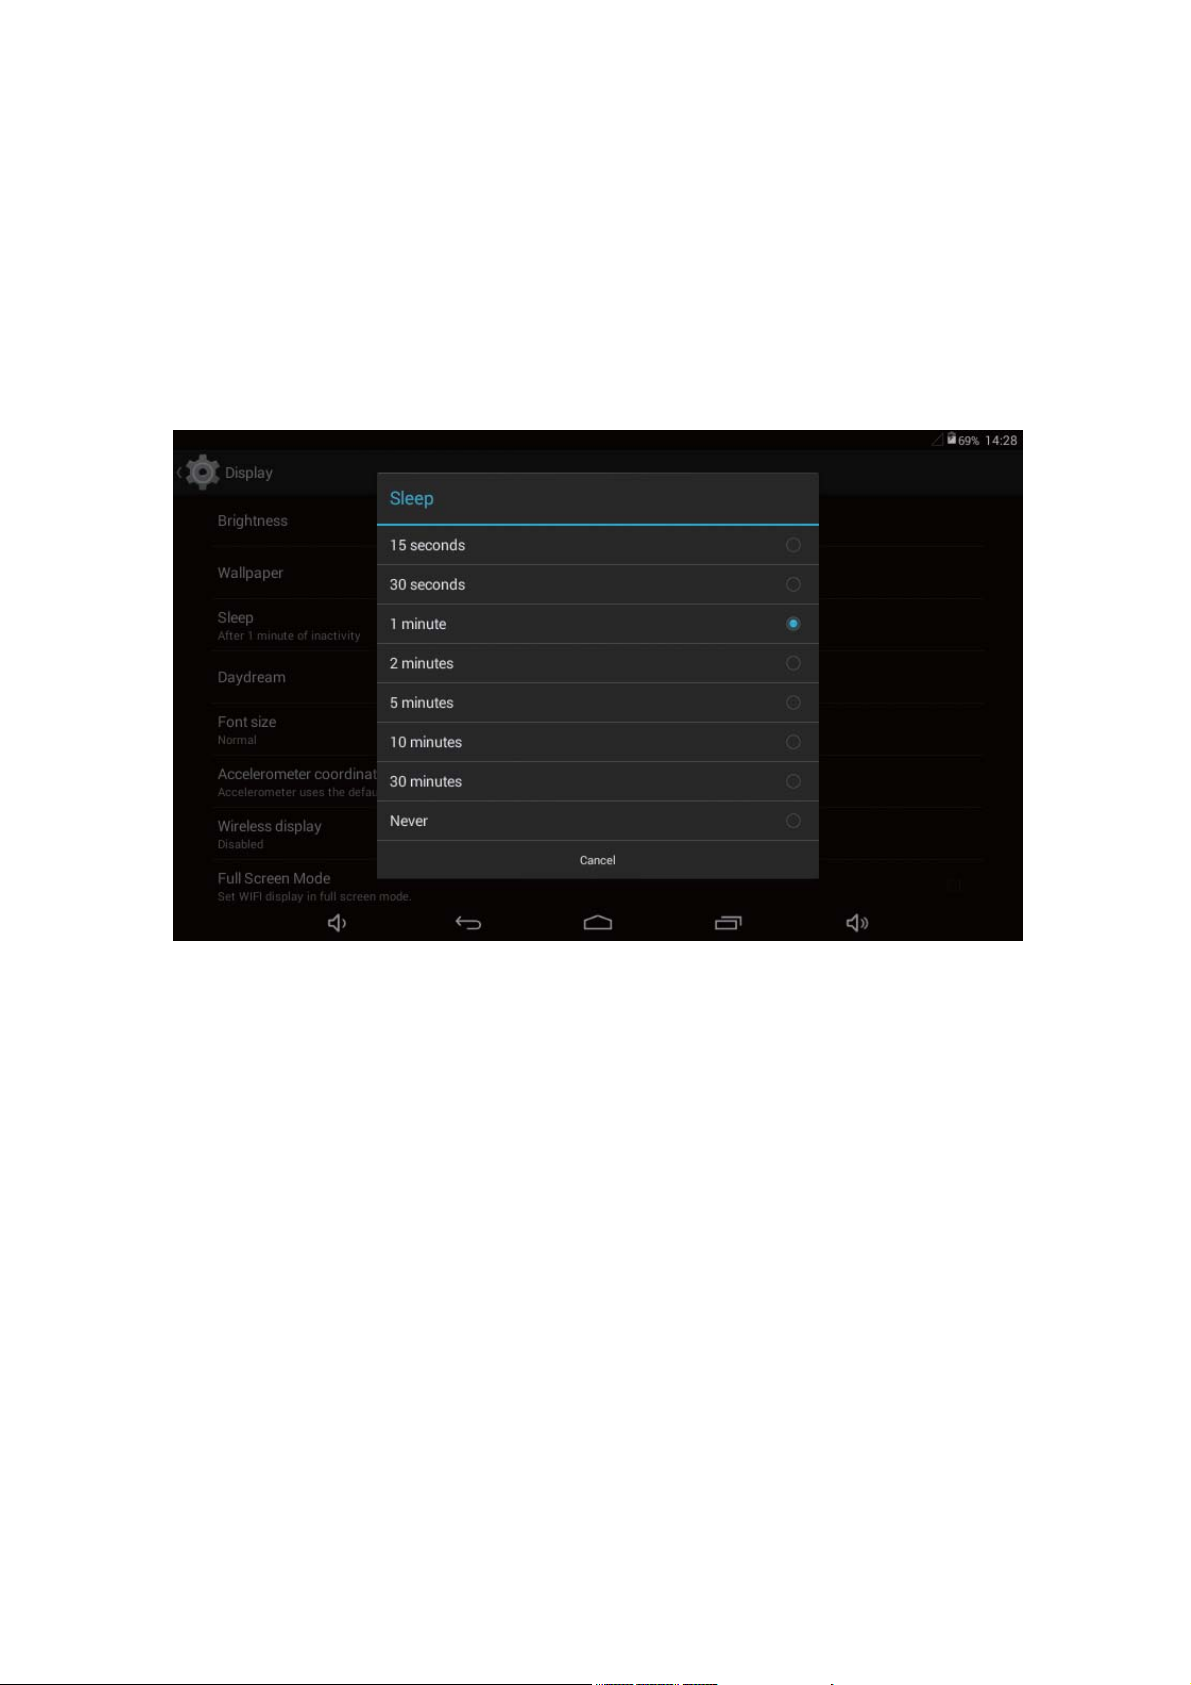
*Brightness:
In the setting of the interface to select”display settings” into the display settings
interface, roll drop-down lists to select “Brightness” as appeared in the following
dialogue.
7
Page 9
*Screen standby:
Screen standby: You can set the time for the screen standby function to occur.
After it starts it will lock the screen the screen saver appears.
In the setting of the interface to select “display settings” into the display settings
interface, roll drop-down lists to select 'screen standby' as appeared in the
following interface.
Note: During video playback, the screen standby function is automatically
inhibited.
*Wireless & network:
Click on the “Settings” icon in the main menu, click on the “wireless and network”
into the “wireless and network” settings. Click on the “WIFI” column and WIFI
function can be started at once. Click “WIFI settings” column can enter “WIFI
setting interface”, as shown below:
8
Page 10
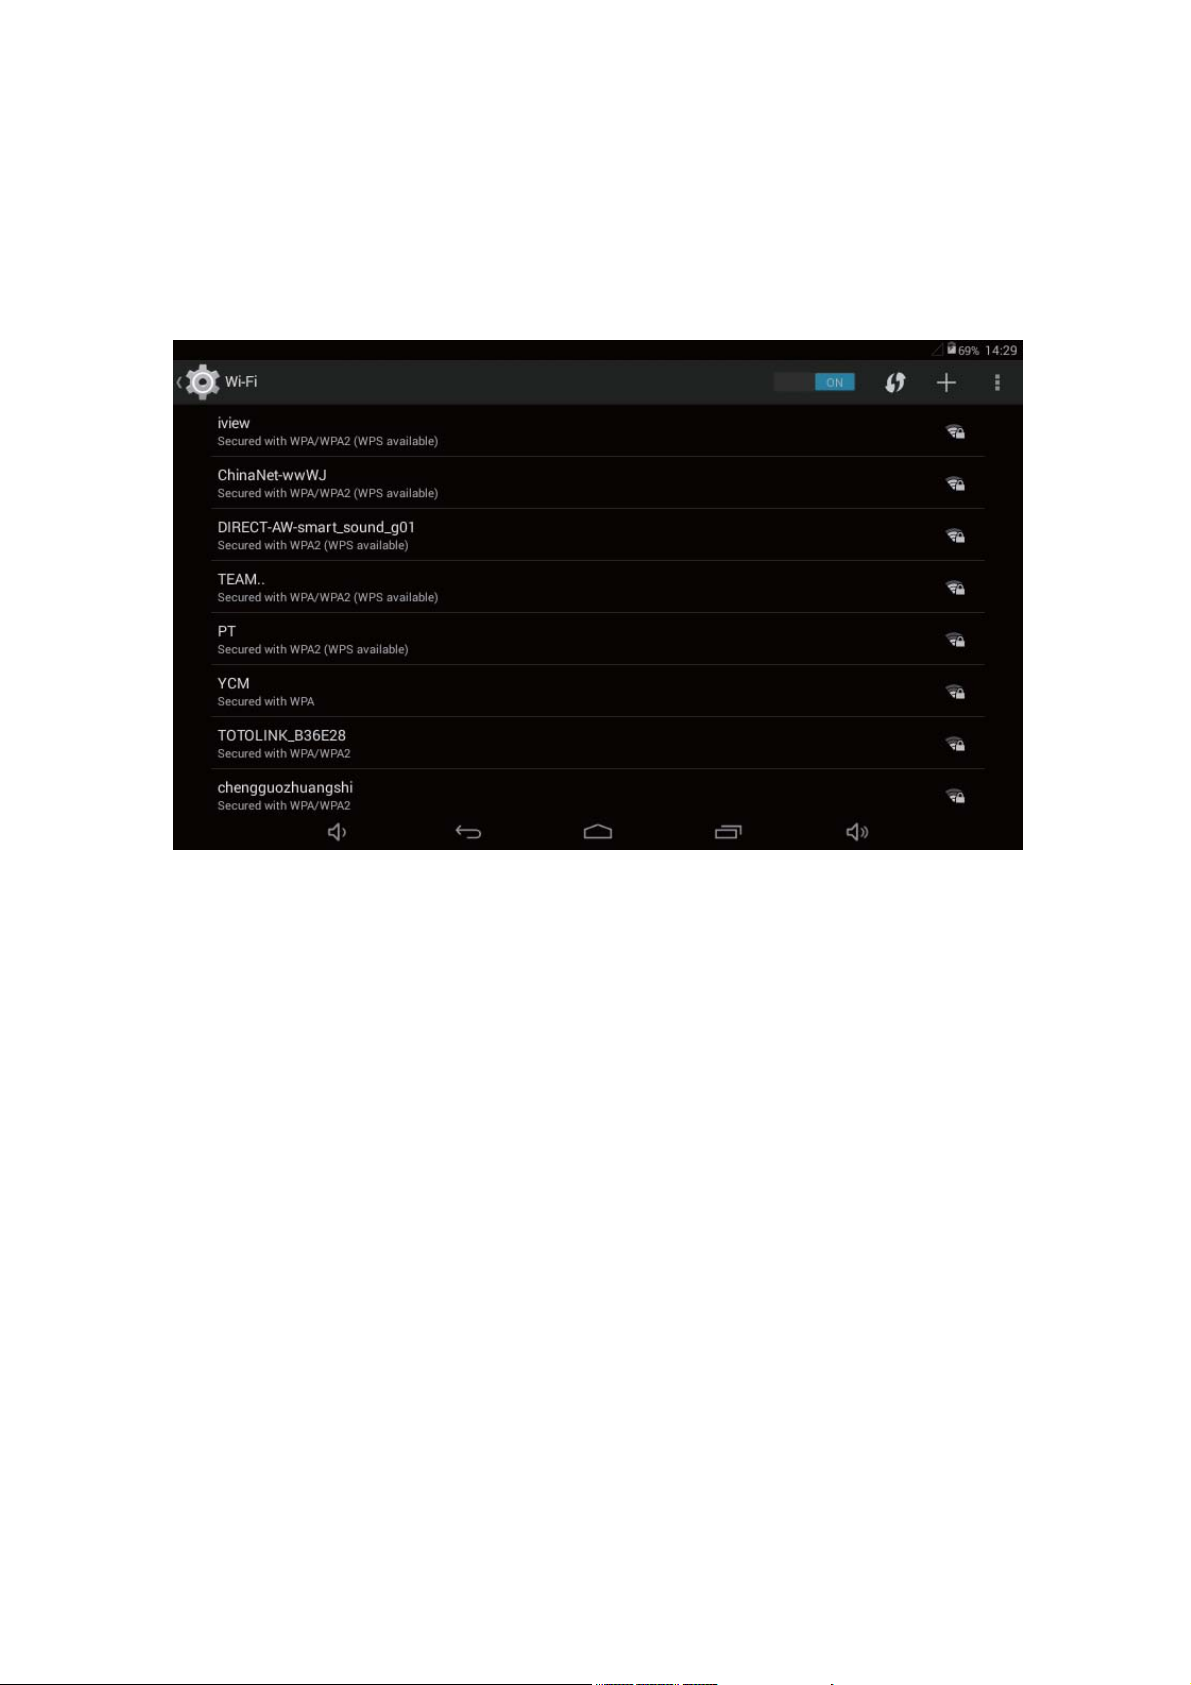
In the “WIFI” interface (Pictured above), by dick on the WIFI column you can
open and dose the WIFI function. Click "network notification" to list the wireless
router that is searched by SupraPad. Click the searched wireless router and
setup window will pop-up. Follow the prompts to complete the WIFI network
links.
9
Page 11
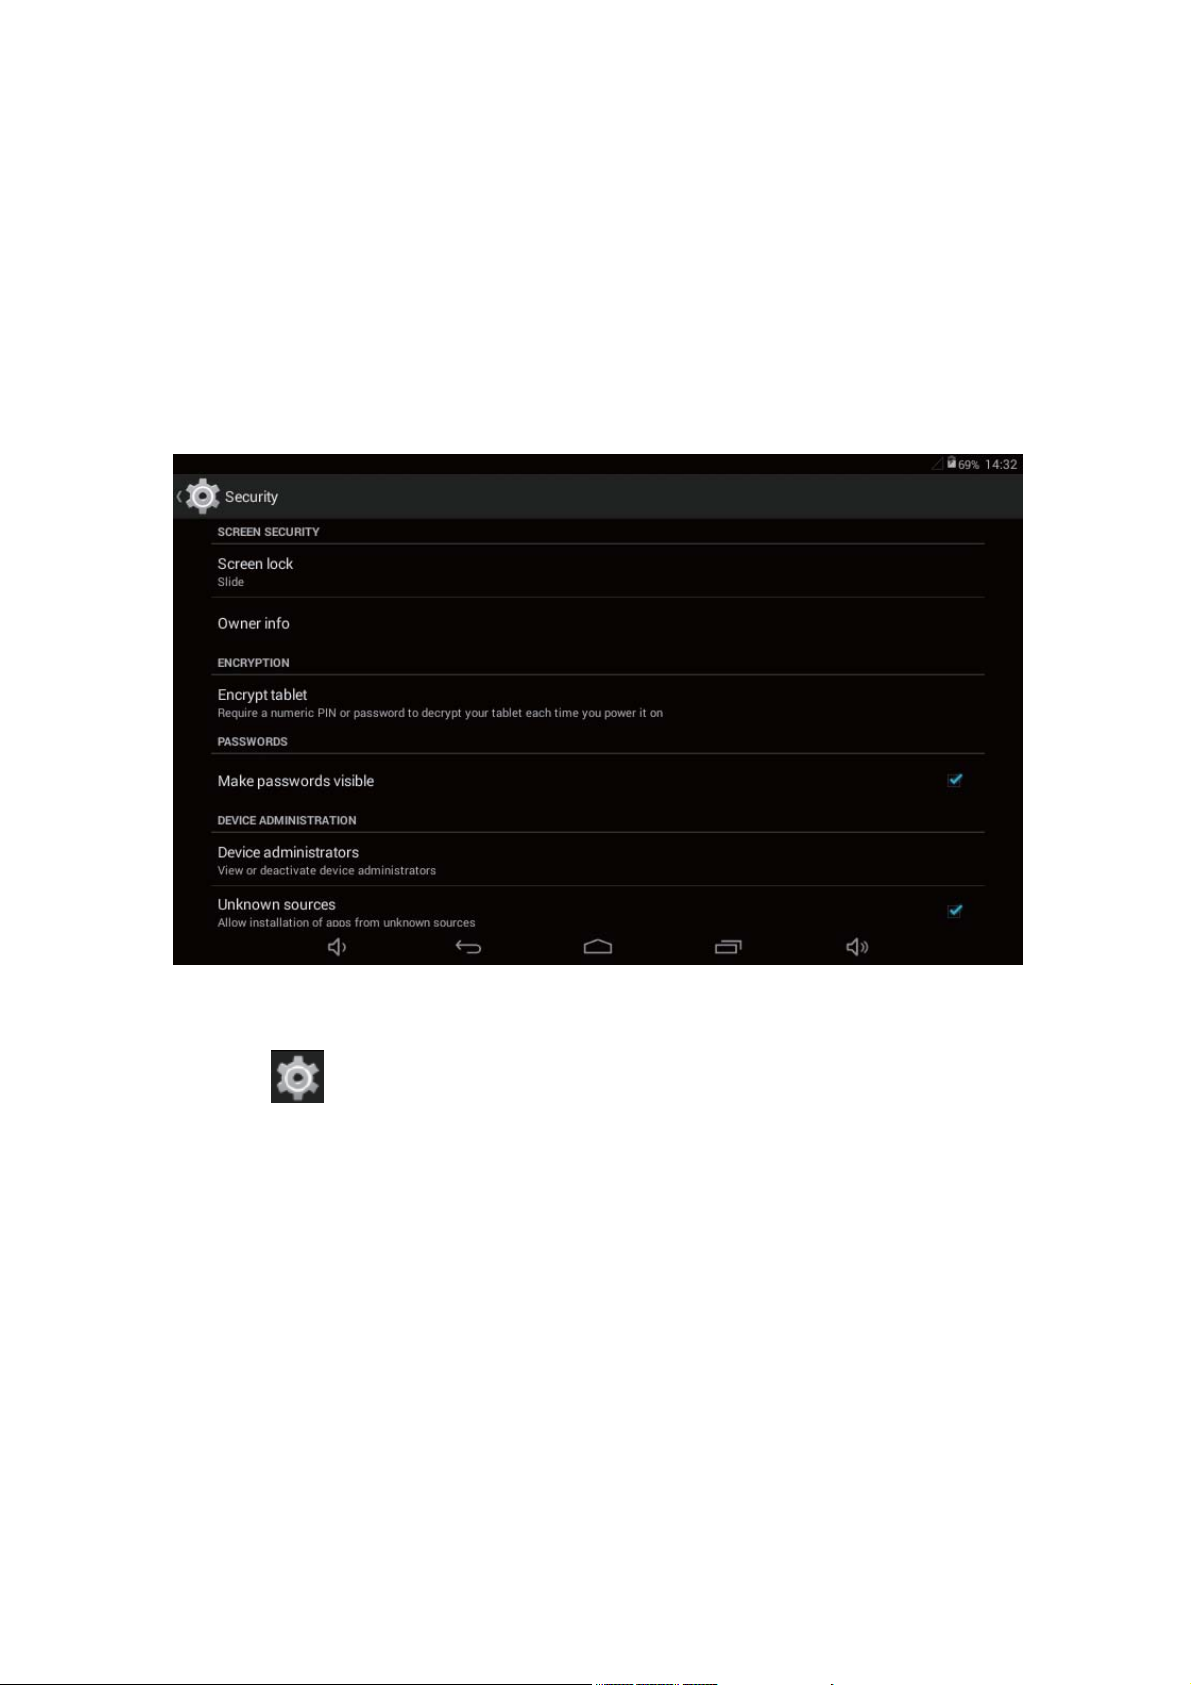
*Install, unload, run the application
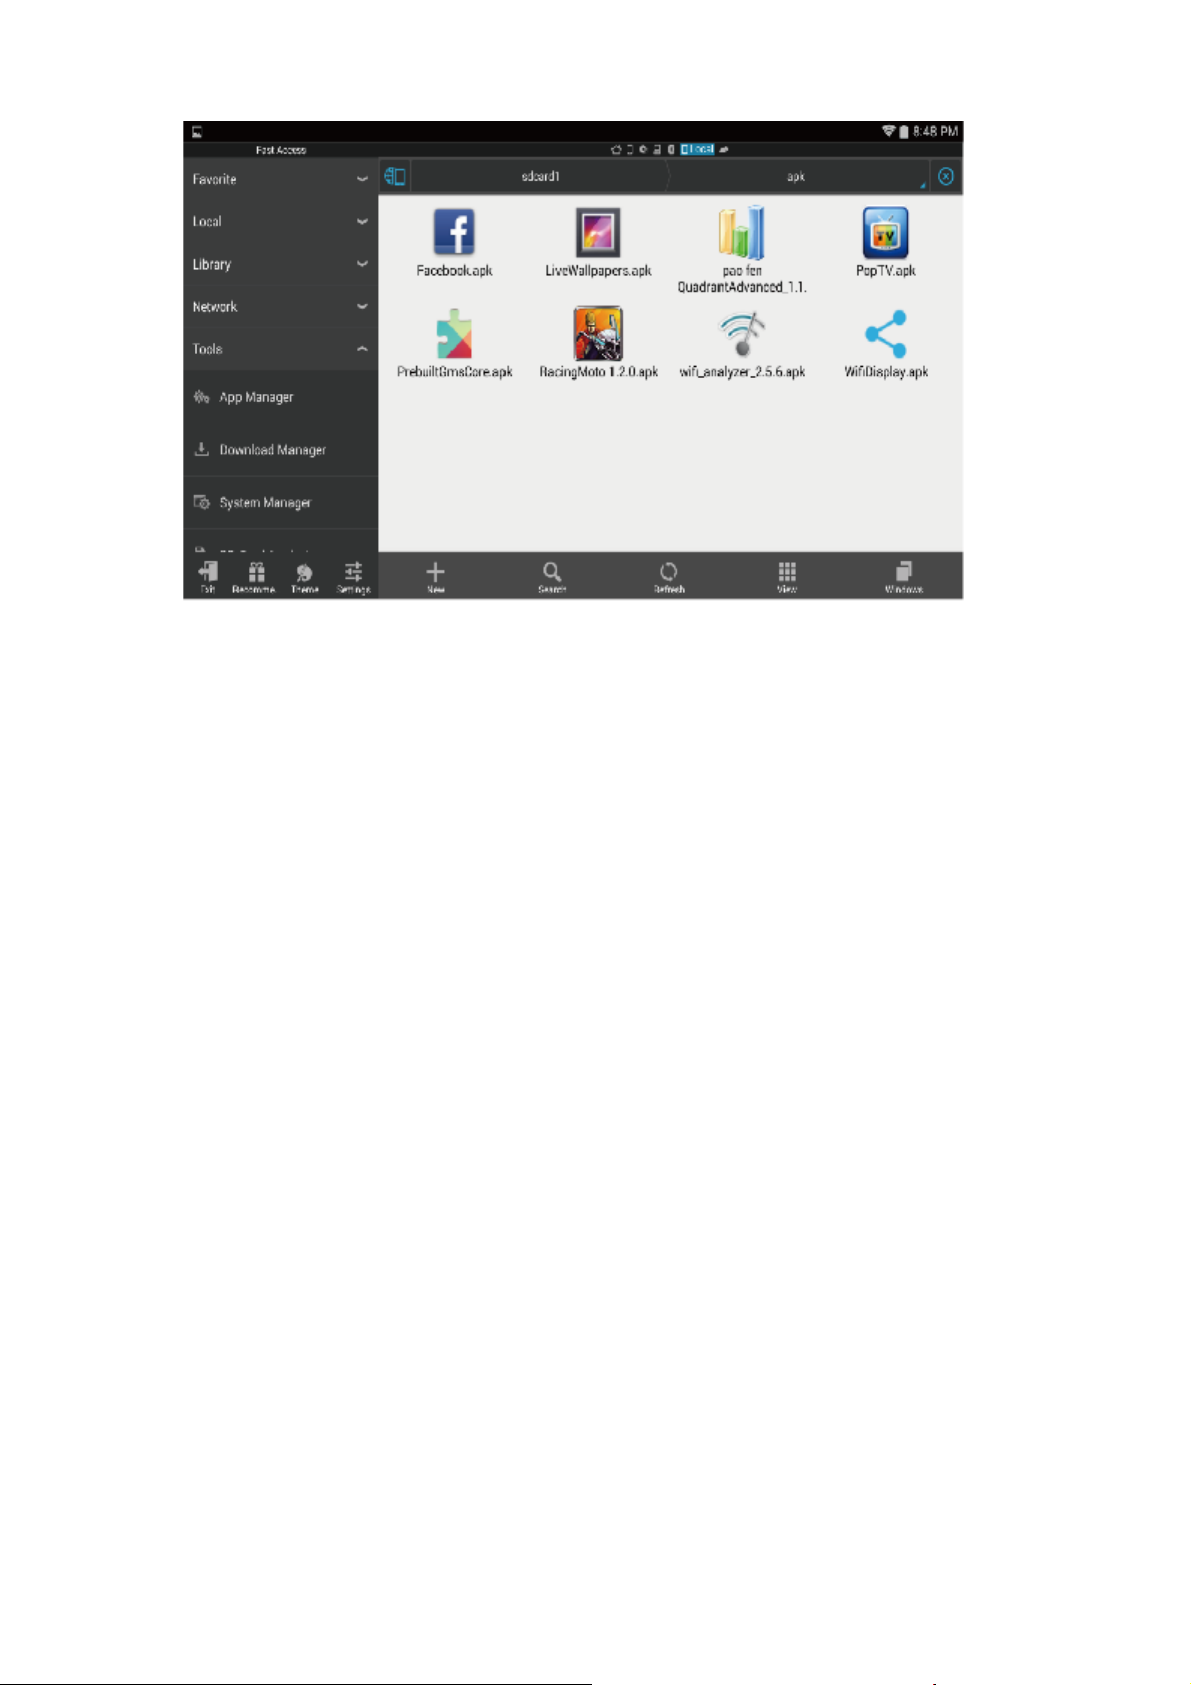
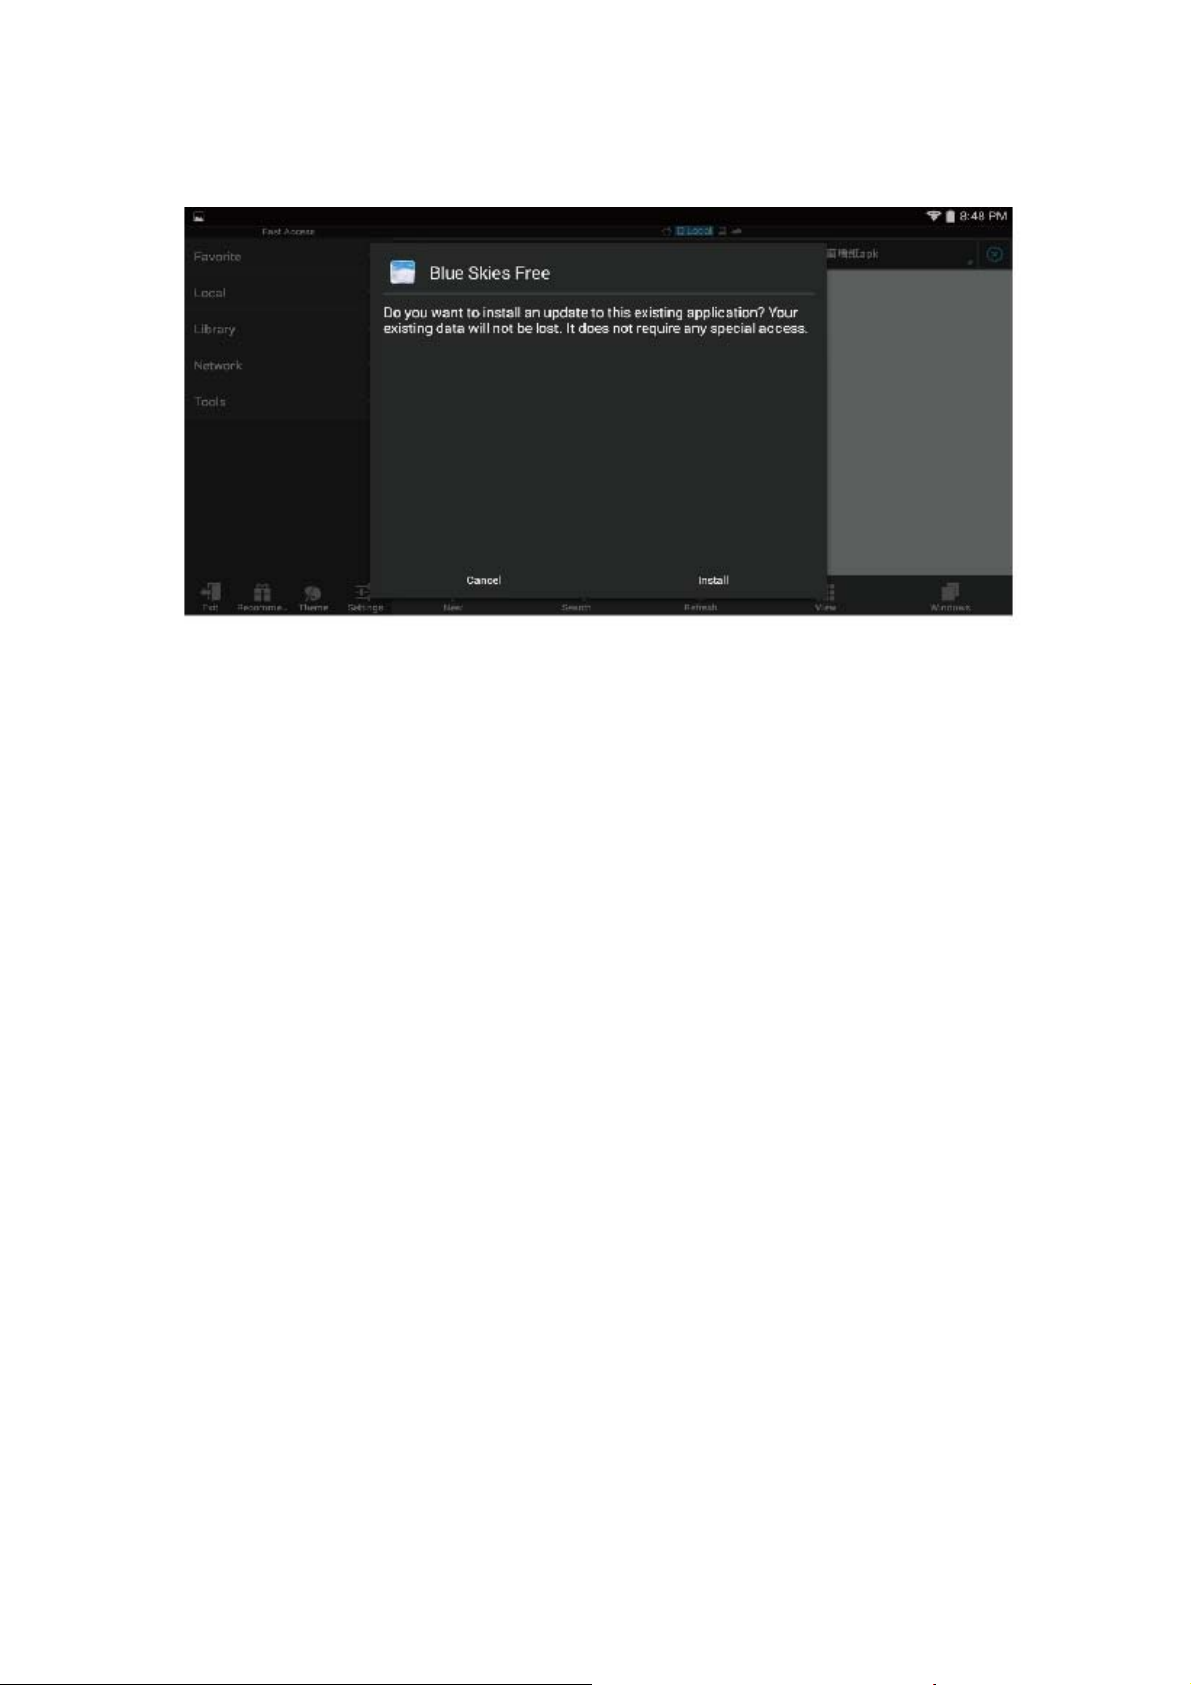
*Android installation: There are a variety of ways to install applications, for
example, you can click on the Apk file directly and it will automatically be
installed. In case that it is the third party programs installation the system may
identify it as unsafe and will need the following procedures for installation.
Enter "Settings">"Security", select "Unknown sources", then "OK".
How to uninstall?
1. Enter “setting” > “Application” > “Manage application” And then there
will be installed the program list.
2. Click you want to uninstall icons, will enter the following interface.
3. Click Uninstall, then you can delete the application.
10
Page 12
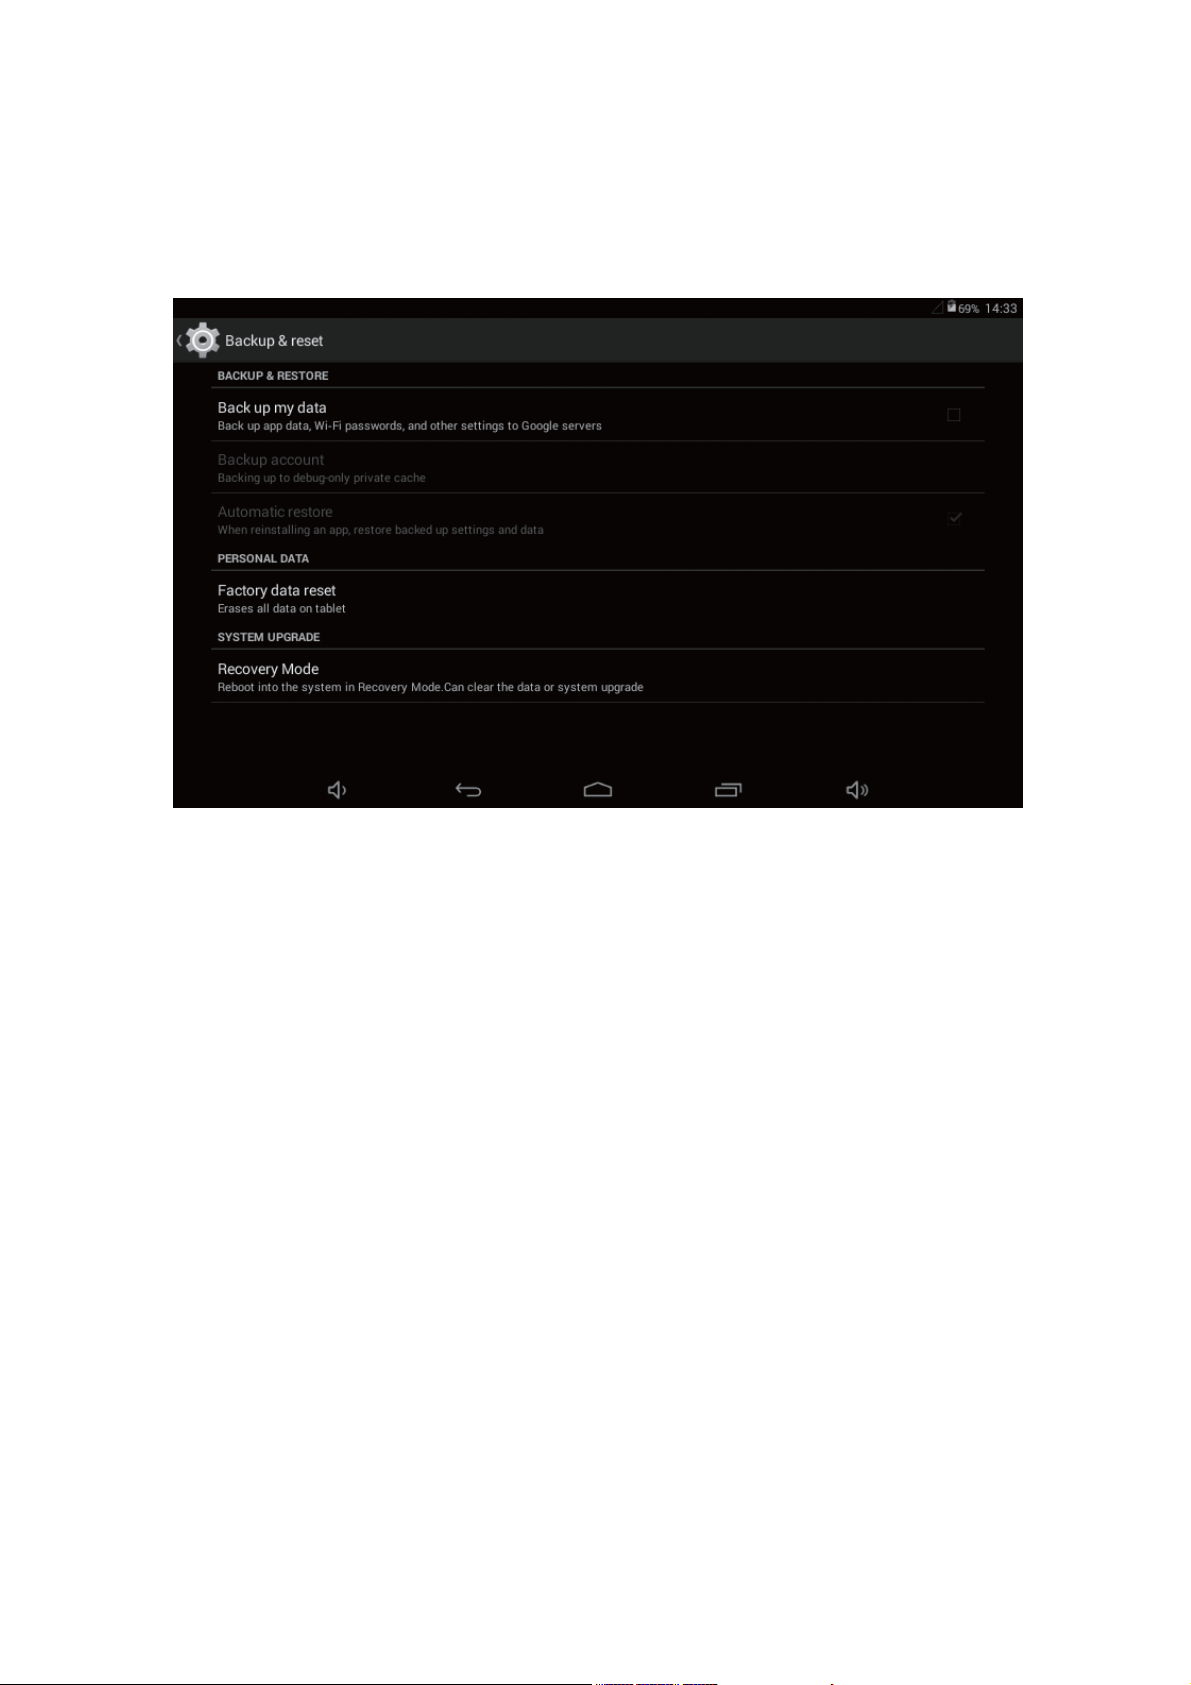
*Backup & reset
Click on the “Settings” icon in the main menu, click on the “Backup & reset”.
11
Page 13
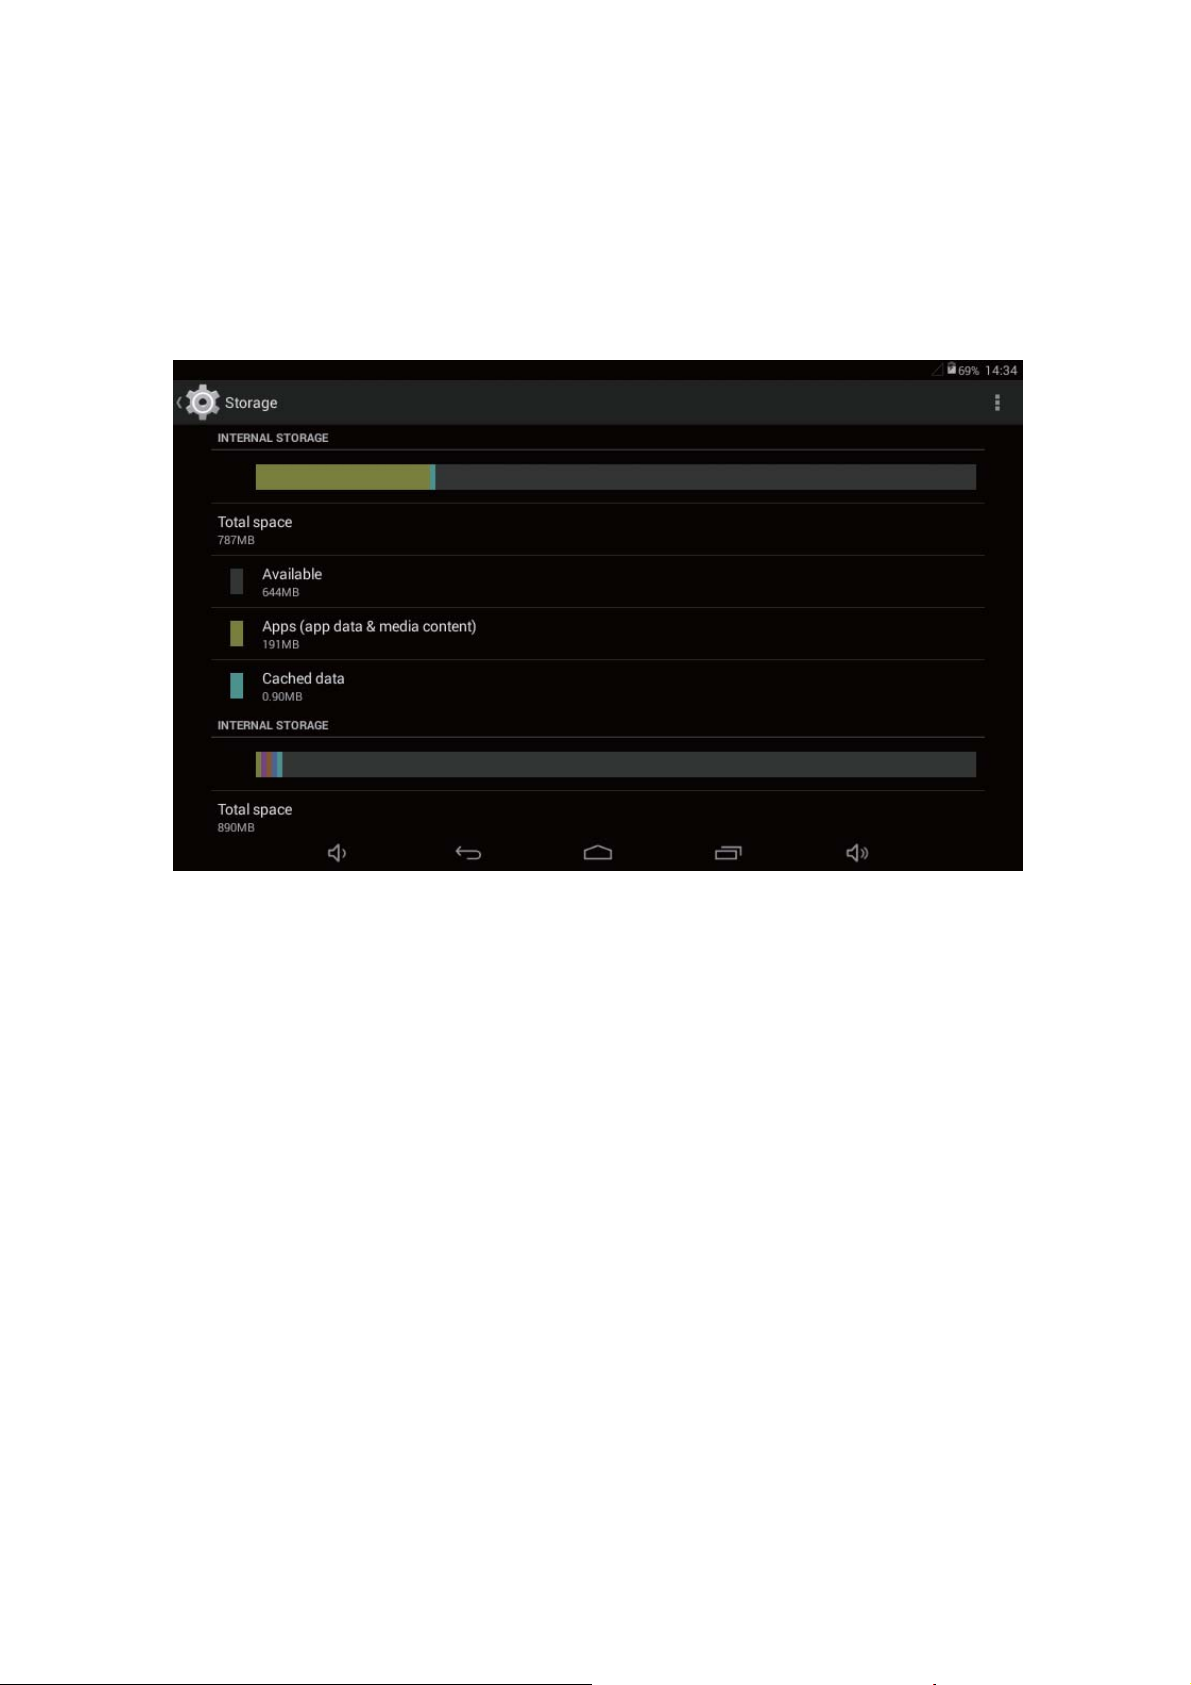
*Storage
Remove TF card , view of the available storage space.
【Remark】: Pls touch option "delete SD card", so that can safety to romeve
SD card.
*Language & keyboard
Setting: (Language), text input and automatic error correction options;
Select Language: 54 kind of national languages are available.
Remark: Android system can support 54 kind of language, now manu interface
just support 14 language.
Android keyboard: Android keyboard setting
Sound on Key-press
Auto-capitalisation
Show suggestions: Display suggested words while typing
12
Page 14
Auto-complete: Specebar and punctuation automatically insert highlig.
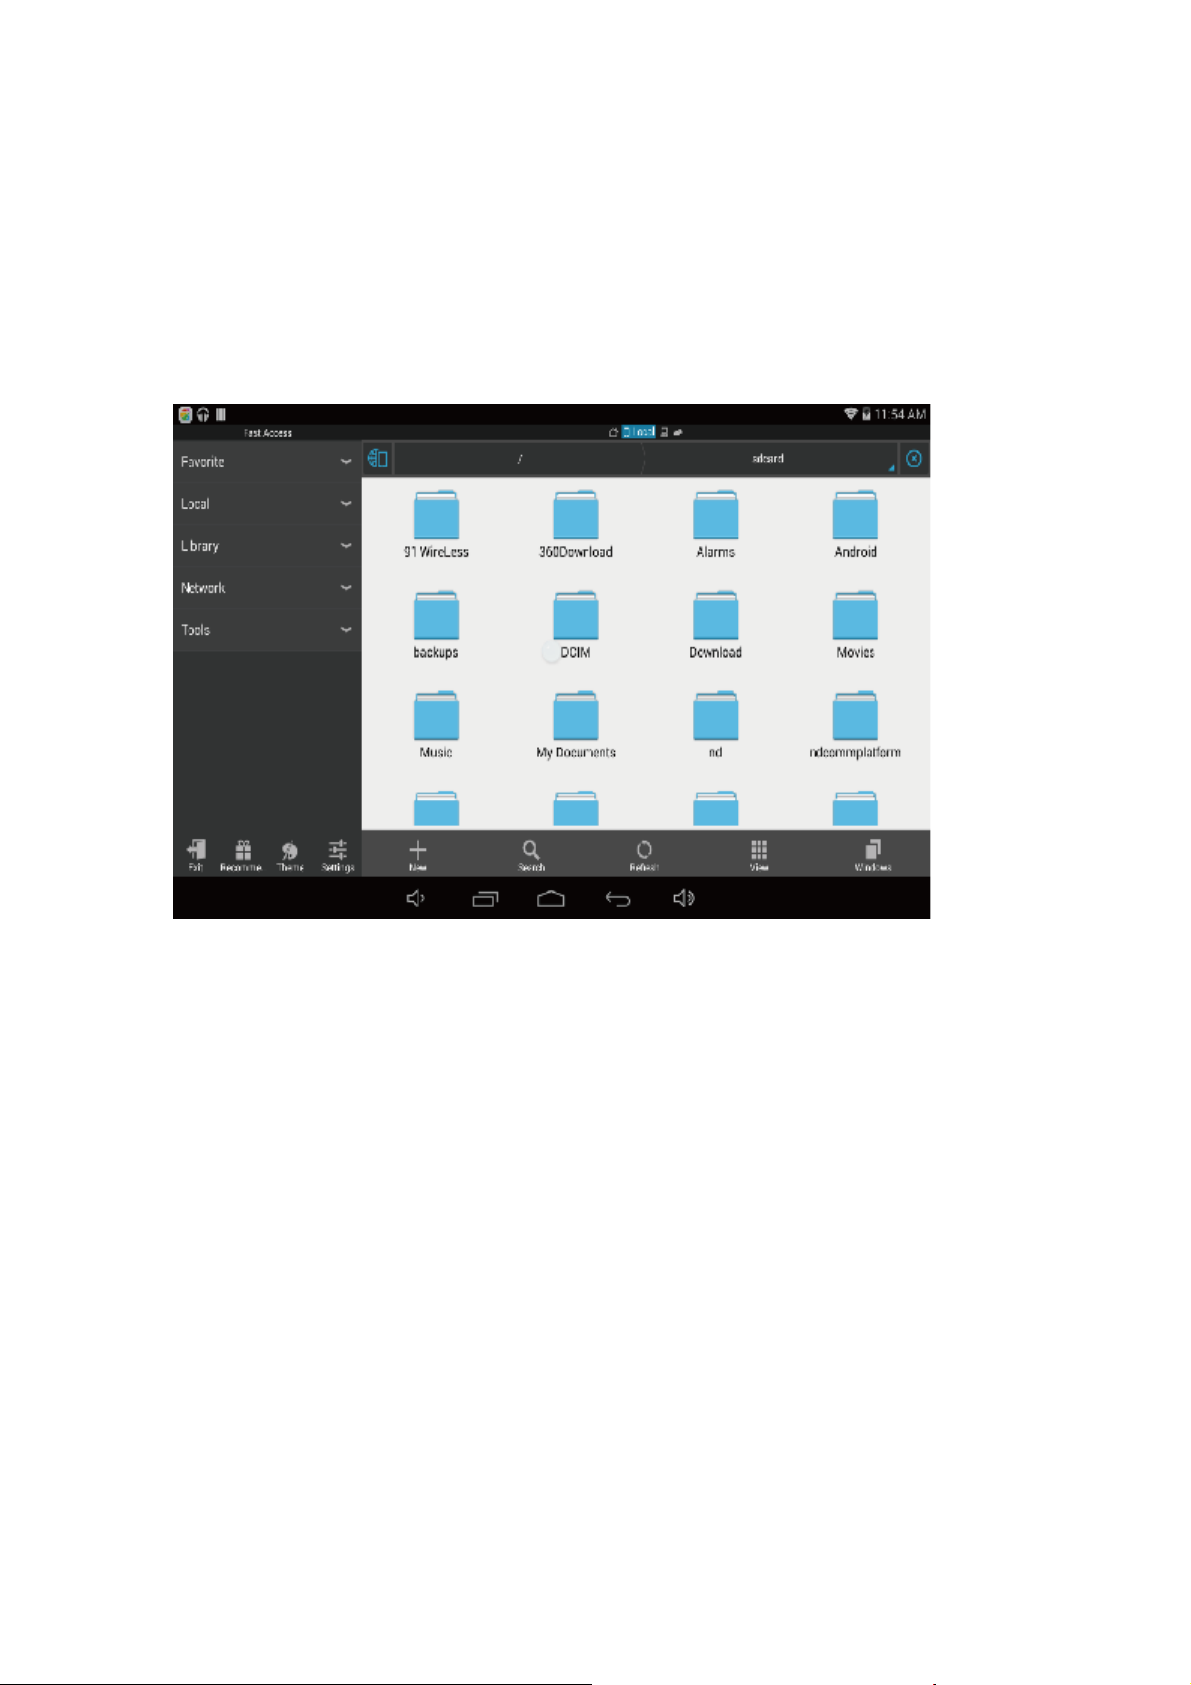
ES file explorer
In the main menu interface, you can manage your files and install APK
software with “ ES File Explorer ”. Tap the “ES File Explorer”, you can choose
the directory from SD Card, Internal Memory, or USB disk.
If your APK setup application is on Micro SD card. The system will automatically
search the directory from Micro SD Card .
13
Page 15
14
Page 16
Install the searched application :
The user can do on-line installation through “market”, or download and install by
the computer, or through a built-in browser download and install online.
*Uninstall the application: You can use the third party software management
tools or use the built-in Android application management software.
Select “Settings” / “application” / “management application”, and select the
corresponding installed applications to check the program.
15
Page 17
6. Network
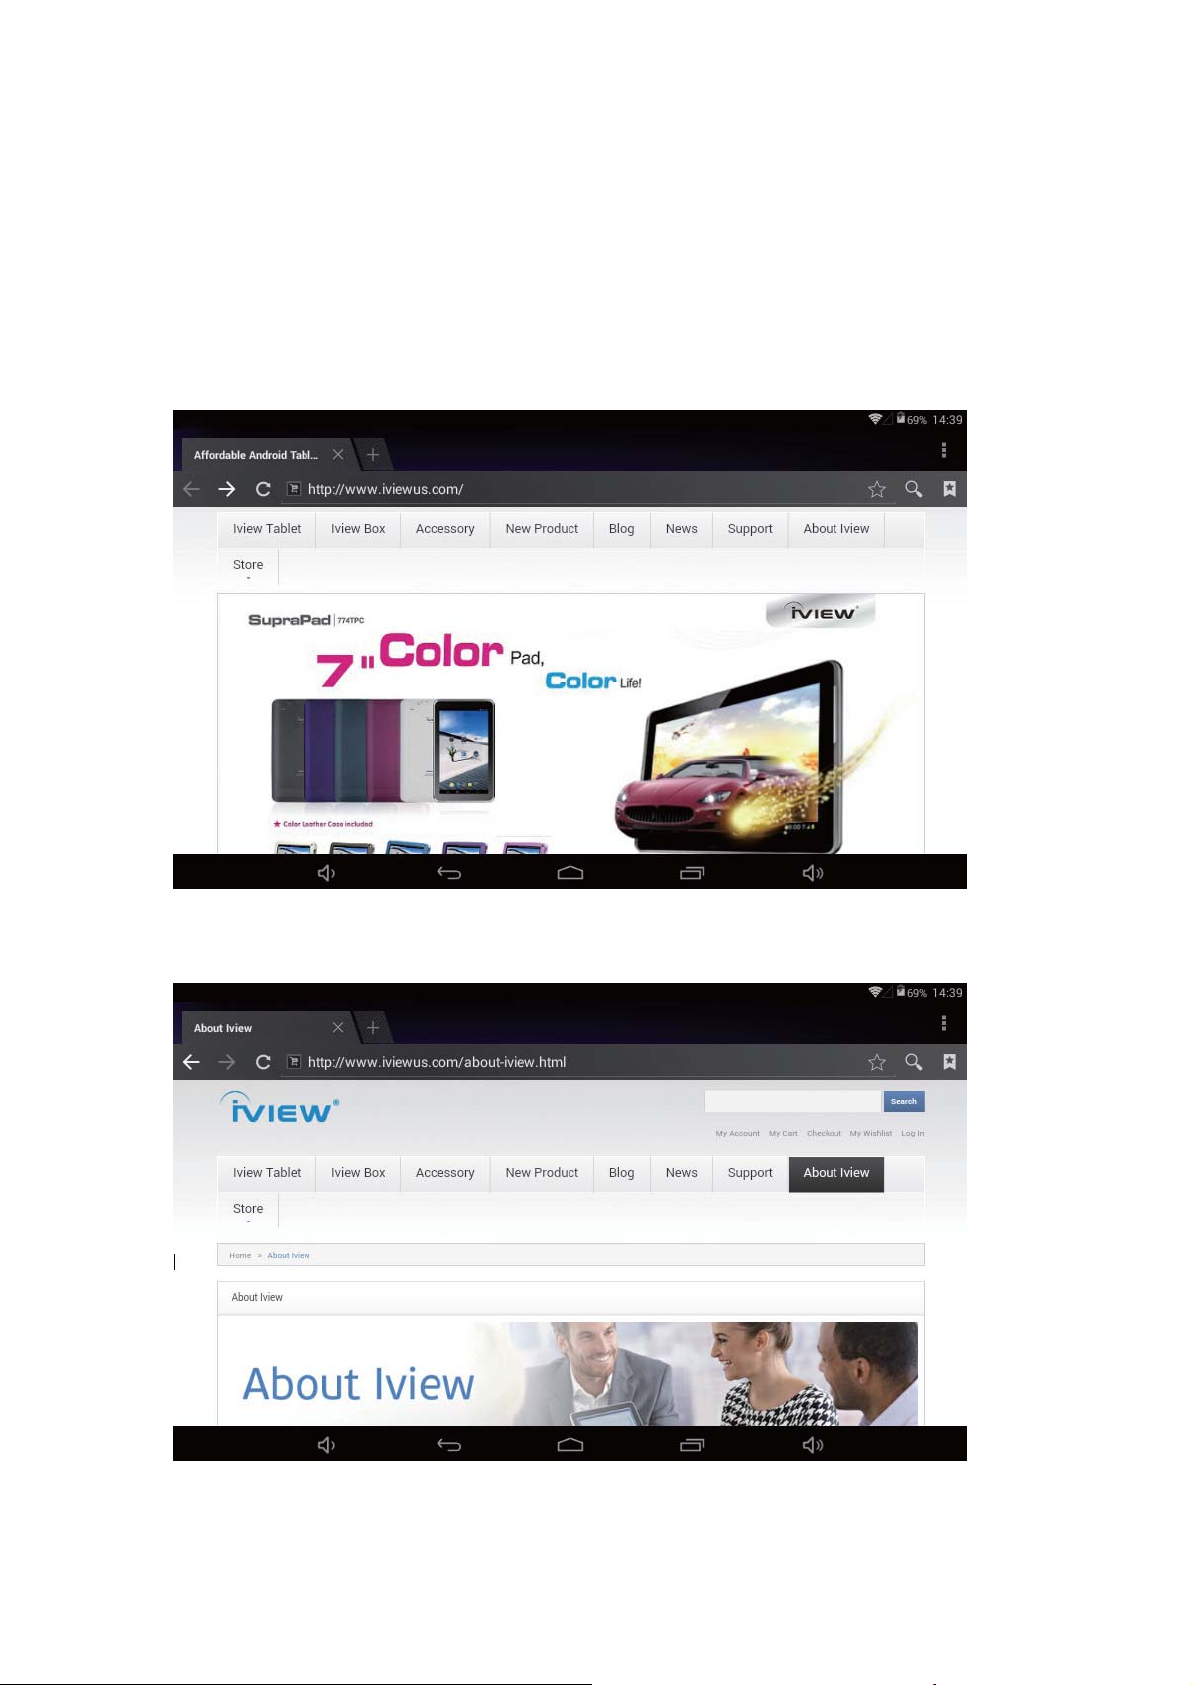
Webpage browsing:
When the network is connected. open the webpage browser and enter the URL,
you can browse.
Webpage can be free scaled by the scaling controller, as shown below:
16
Page 18
Online video:
Users can use the “market” or other ways to download online video player
software, online TV player software, online music software, and then install in
the machine. To open the installed software, you can watch online video or
online TV, and listen to online radio.
Users can also download other third party network application software,
including the webpage browsing, video player, website client, instant messaging
and other software.
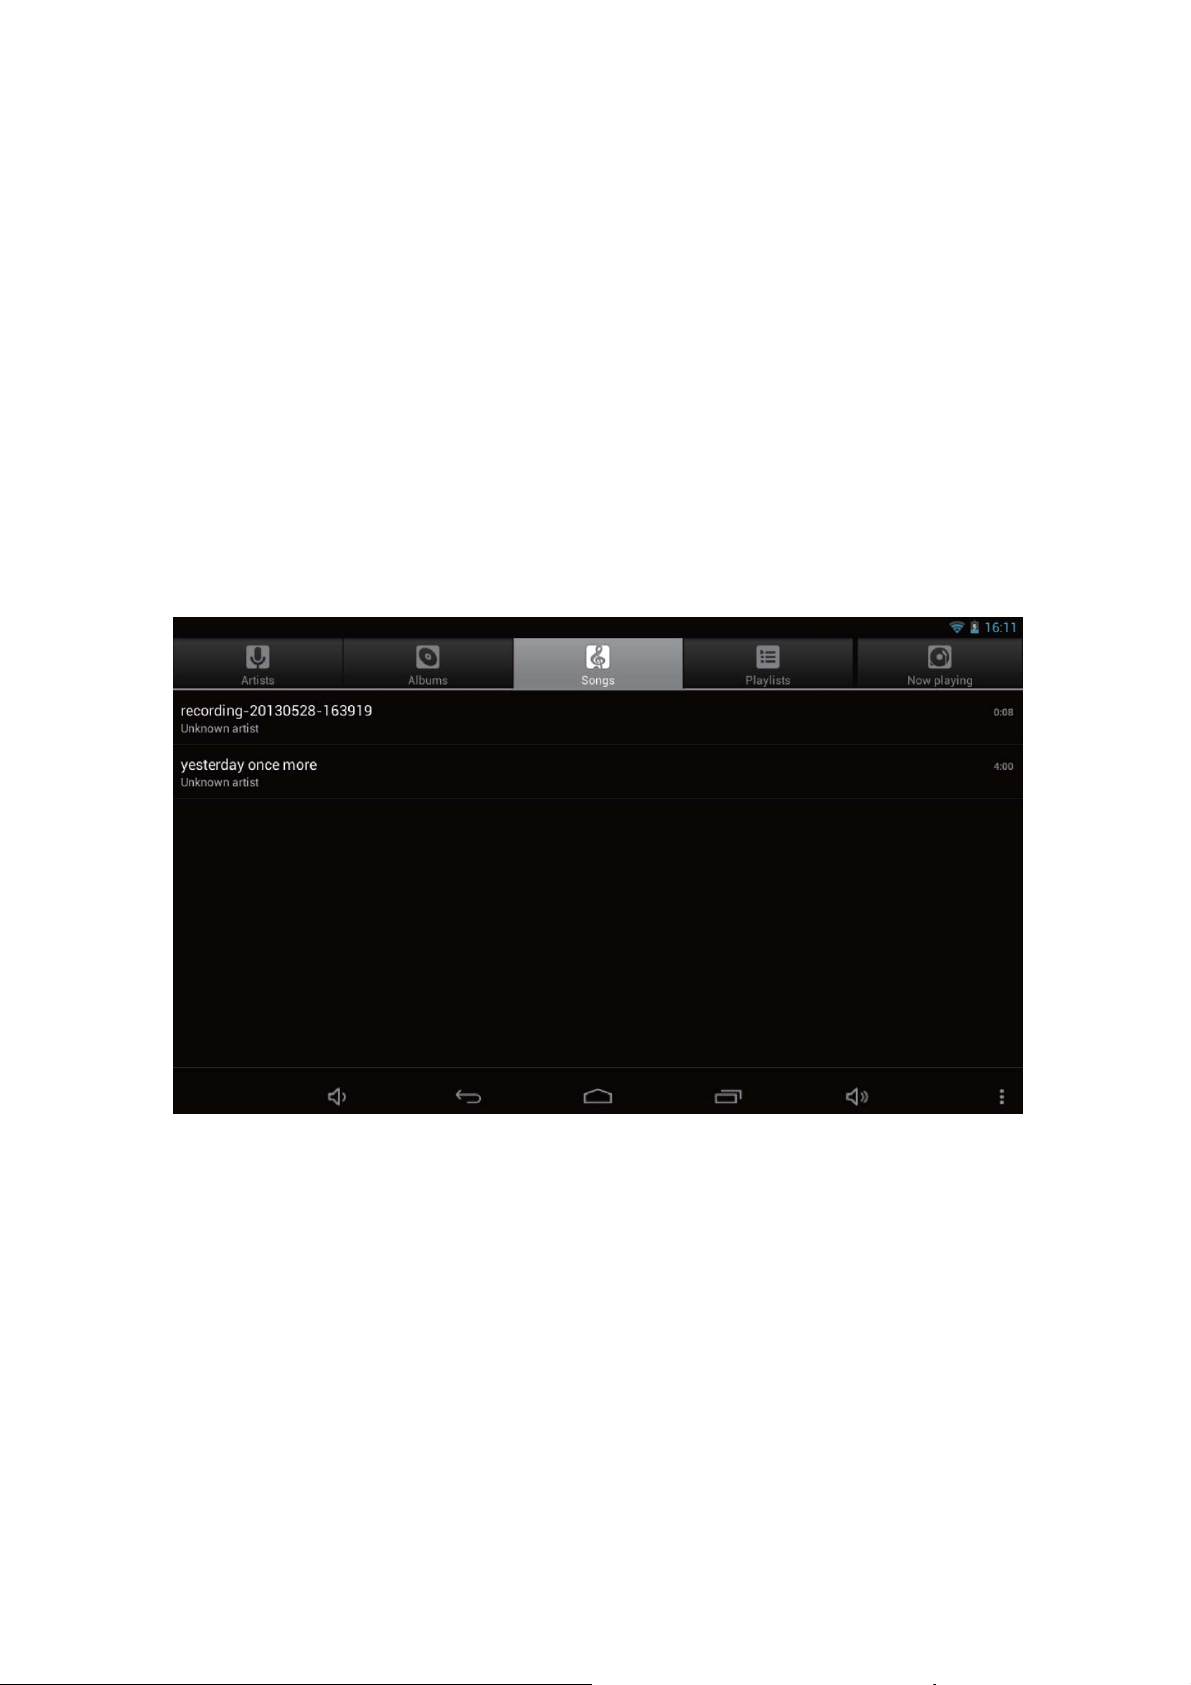
7. Music playback
Click on the “music” icon in the main menu, and then enter the music player
interface. The default list system in the user data area for all audiofiles is shown
as below:
You can use synchronous USB to input audio file, or by inserting a Micro SD
card with audio file to input audio files. You can also use the network to
download the audio file.
Select the corresponding tag, and check the interface as “artists”, “album”, and
“song” and so on to play the song.
17
Page 19
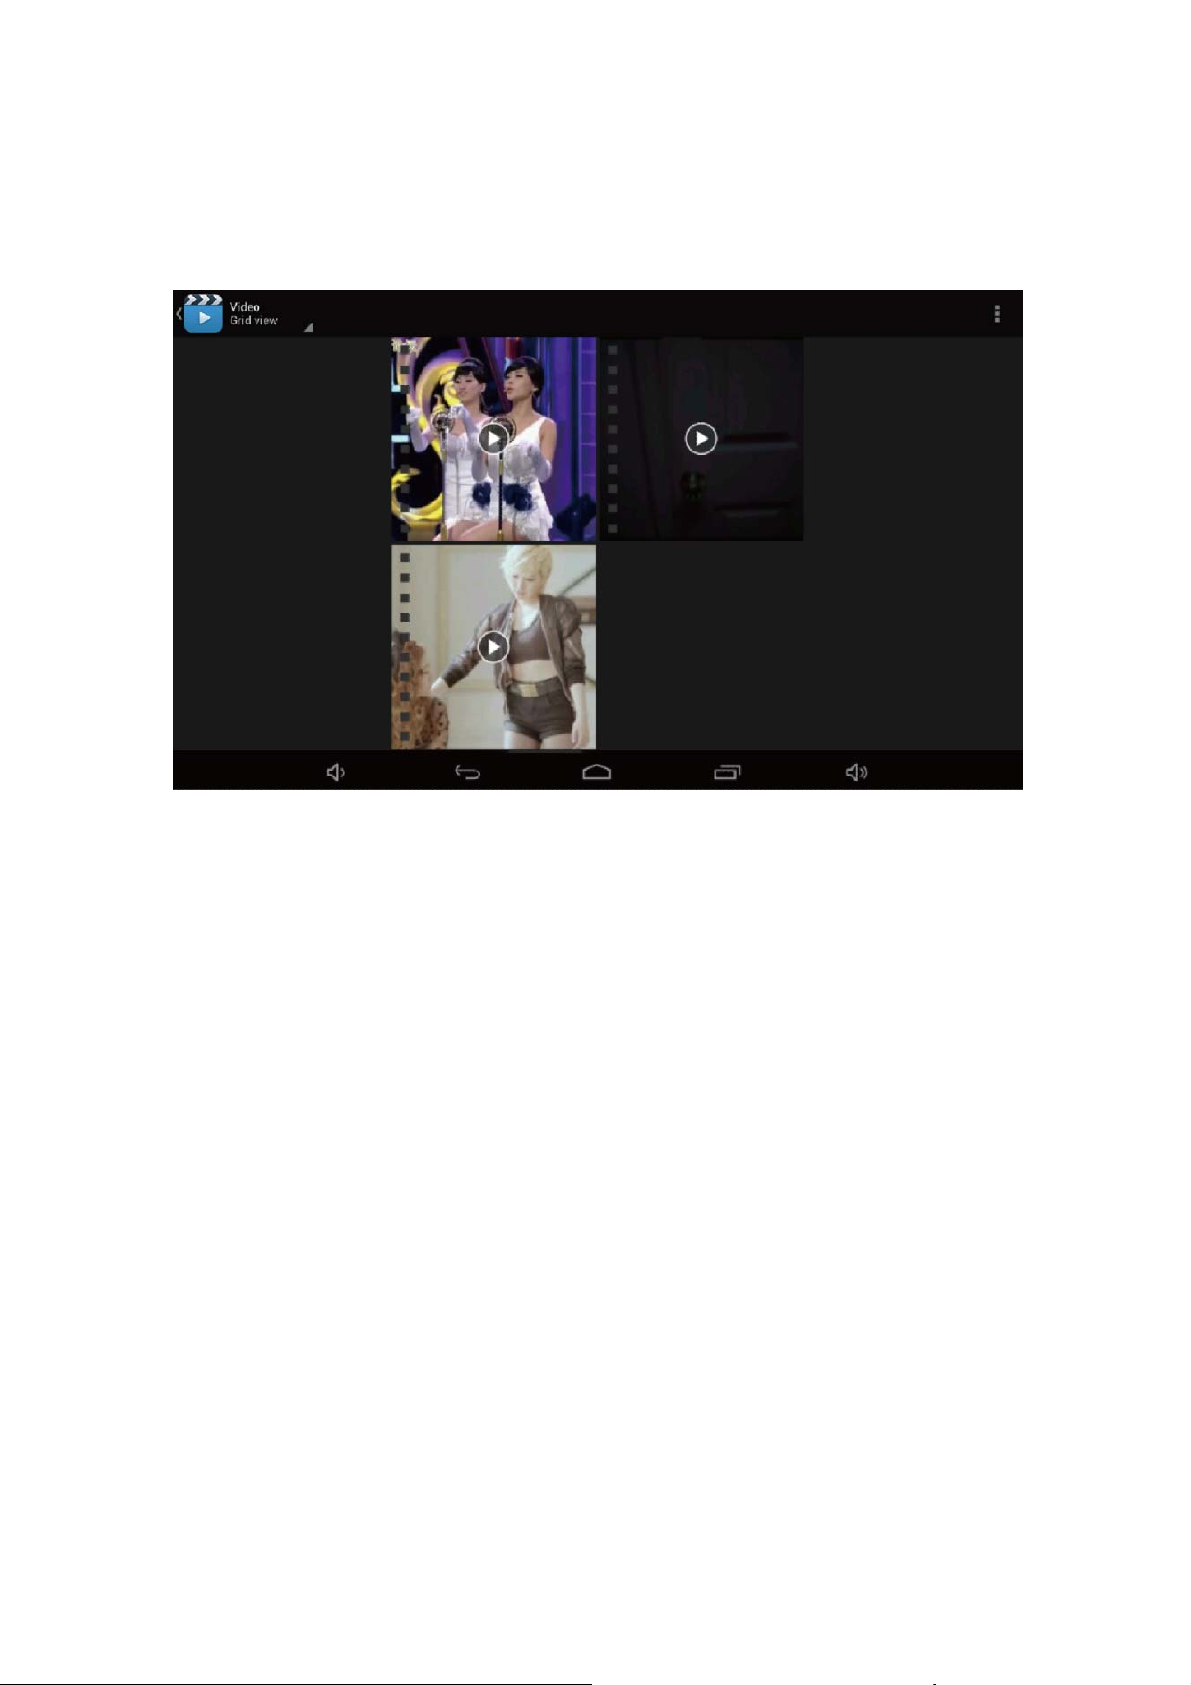
8. Video playback
Click on the “UHD Player” in the main menu, to enter the “UHD Player” main
interface. It lists all video files and image files as shown below:
Select the video file and enter the video playing interface, as shown below.
Select “play”, “stop”, “fast forward”, “rewind”, “progress” and other control keys to
control the payback schedule.
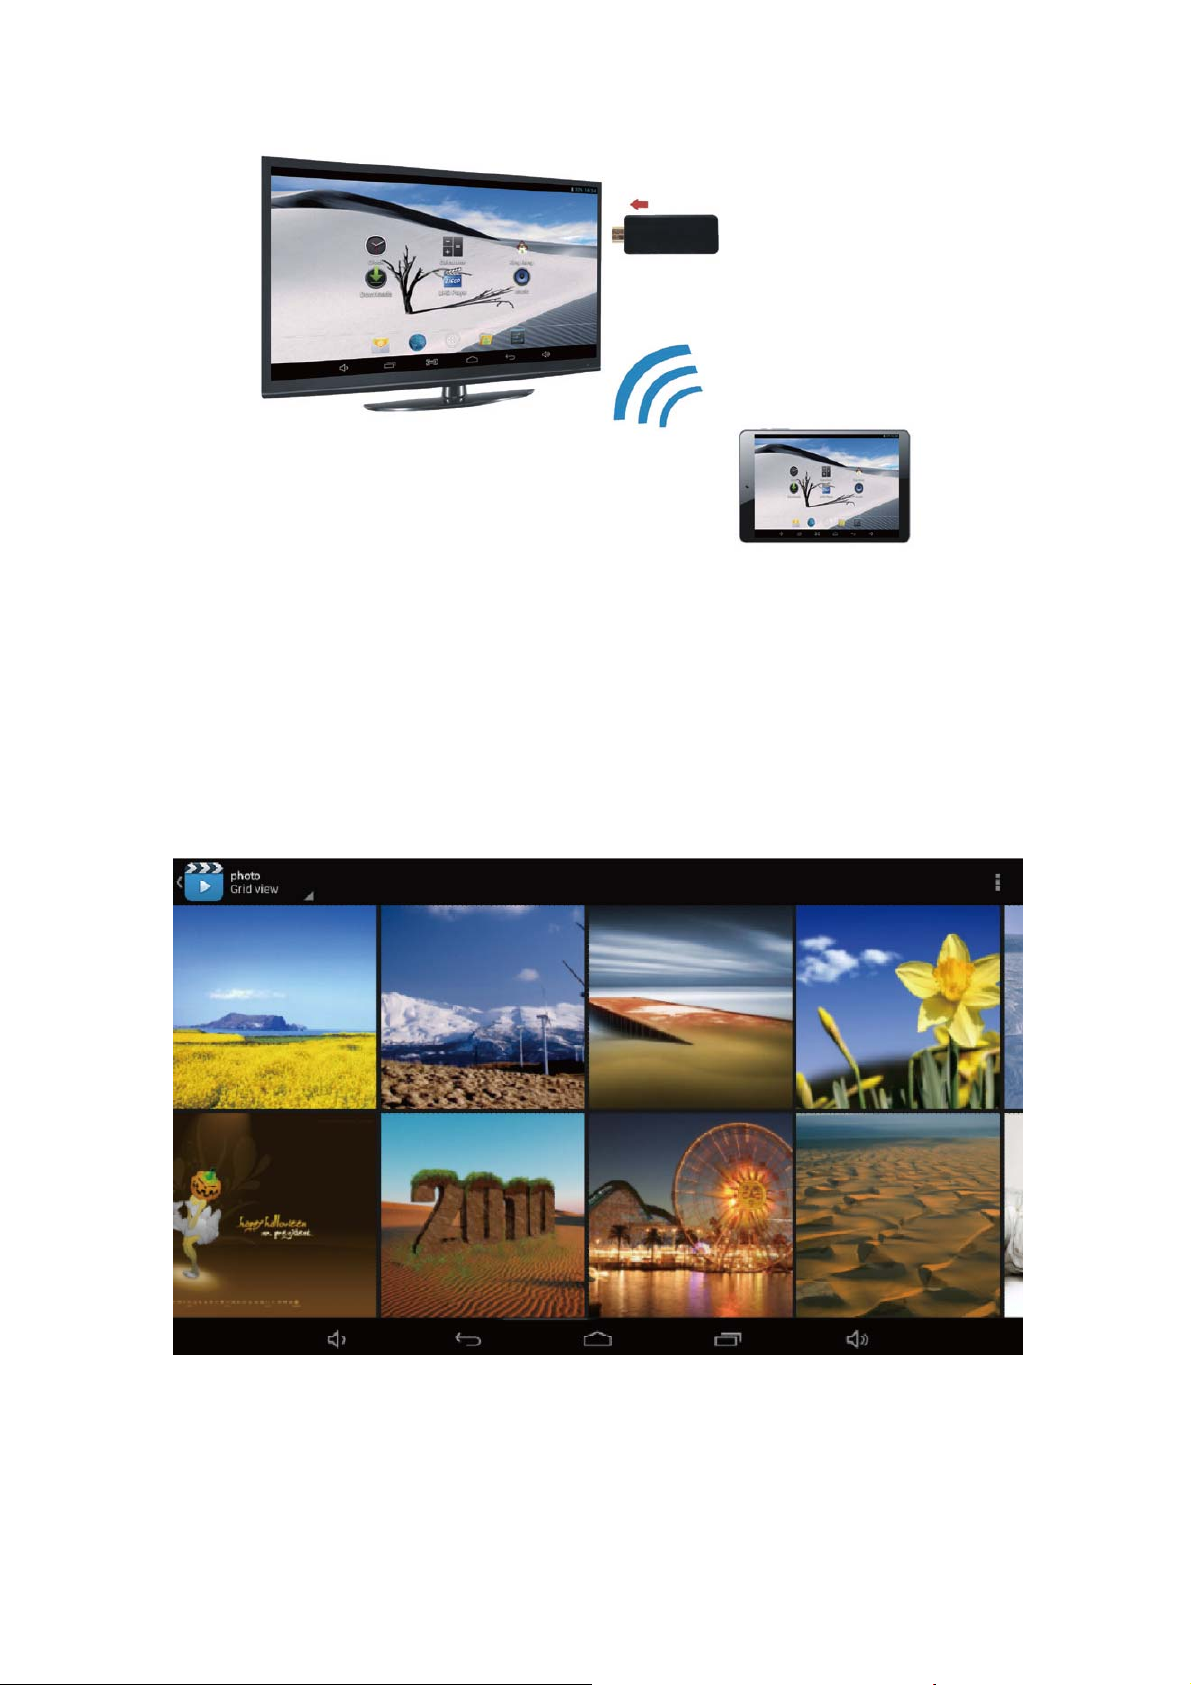
Share the Splendid moment with your family
Share pictures and video from your android Tablet to the TV screen
18
Page 20
9. Photo browse
Click on the main menu "UHD Player" to enter the "UHD Player" interface. It lists
all the picture files and video files as shown below: Select a picture file, enter the
picture play interface. Select "zoom", "narrow" "set" and "delete" operation.
19
Page 21
10. Wallpaper
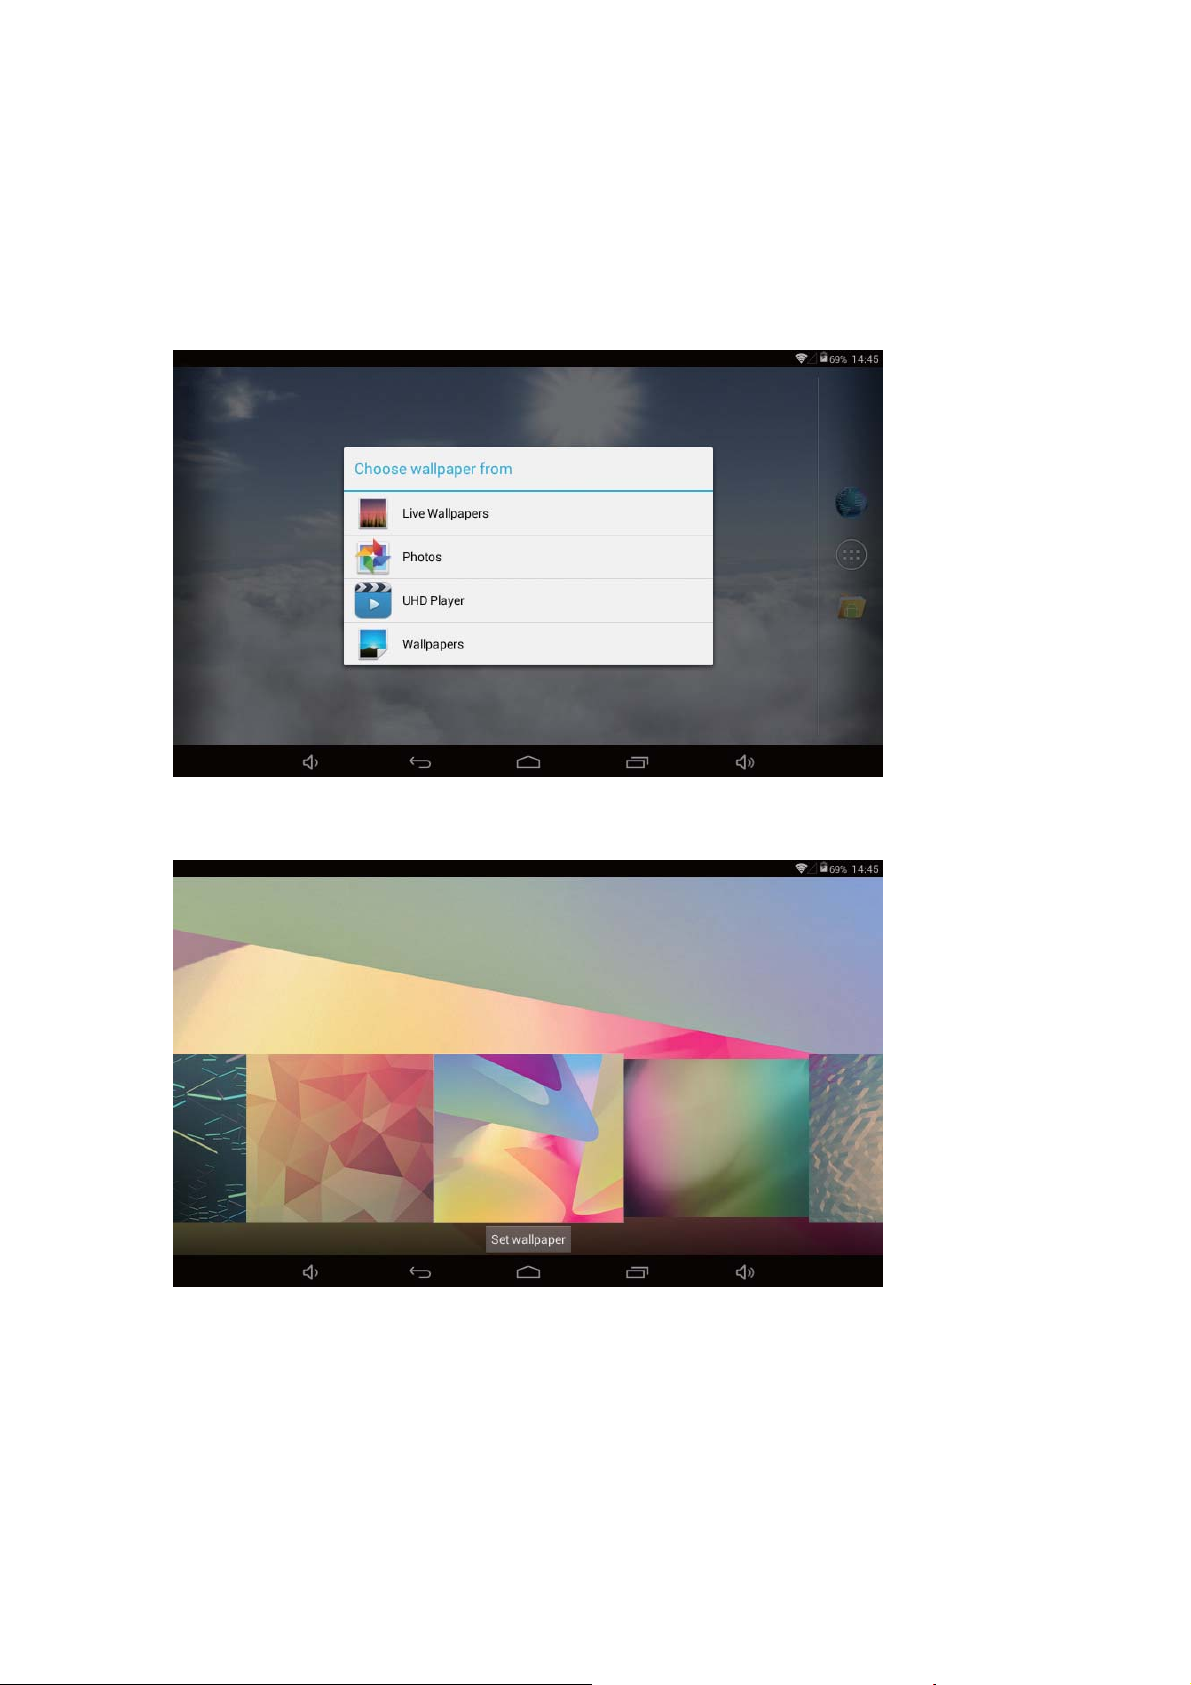
The system supports static wallpaper, and 3D wallpaper.
In the desktop interface, press down the Menu key for pop-up menu options,
select "wallpaper" and "choose the wallpaper source" selection box:
Or press on the screen and dialog box for the following to pop:
Into the above dialog box, click on the "wallpaper" set;
The following options will display:
Select "wallpaper" to customize wallpaper.
Select the "dynamic wallpaper" to use the system-supplied 3D wallpaper.
Select the "Gallery" to choose a picture supplied by the system as the static
wallpaper.
20
Page 22
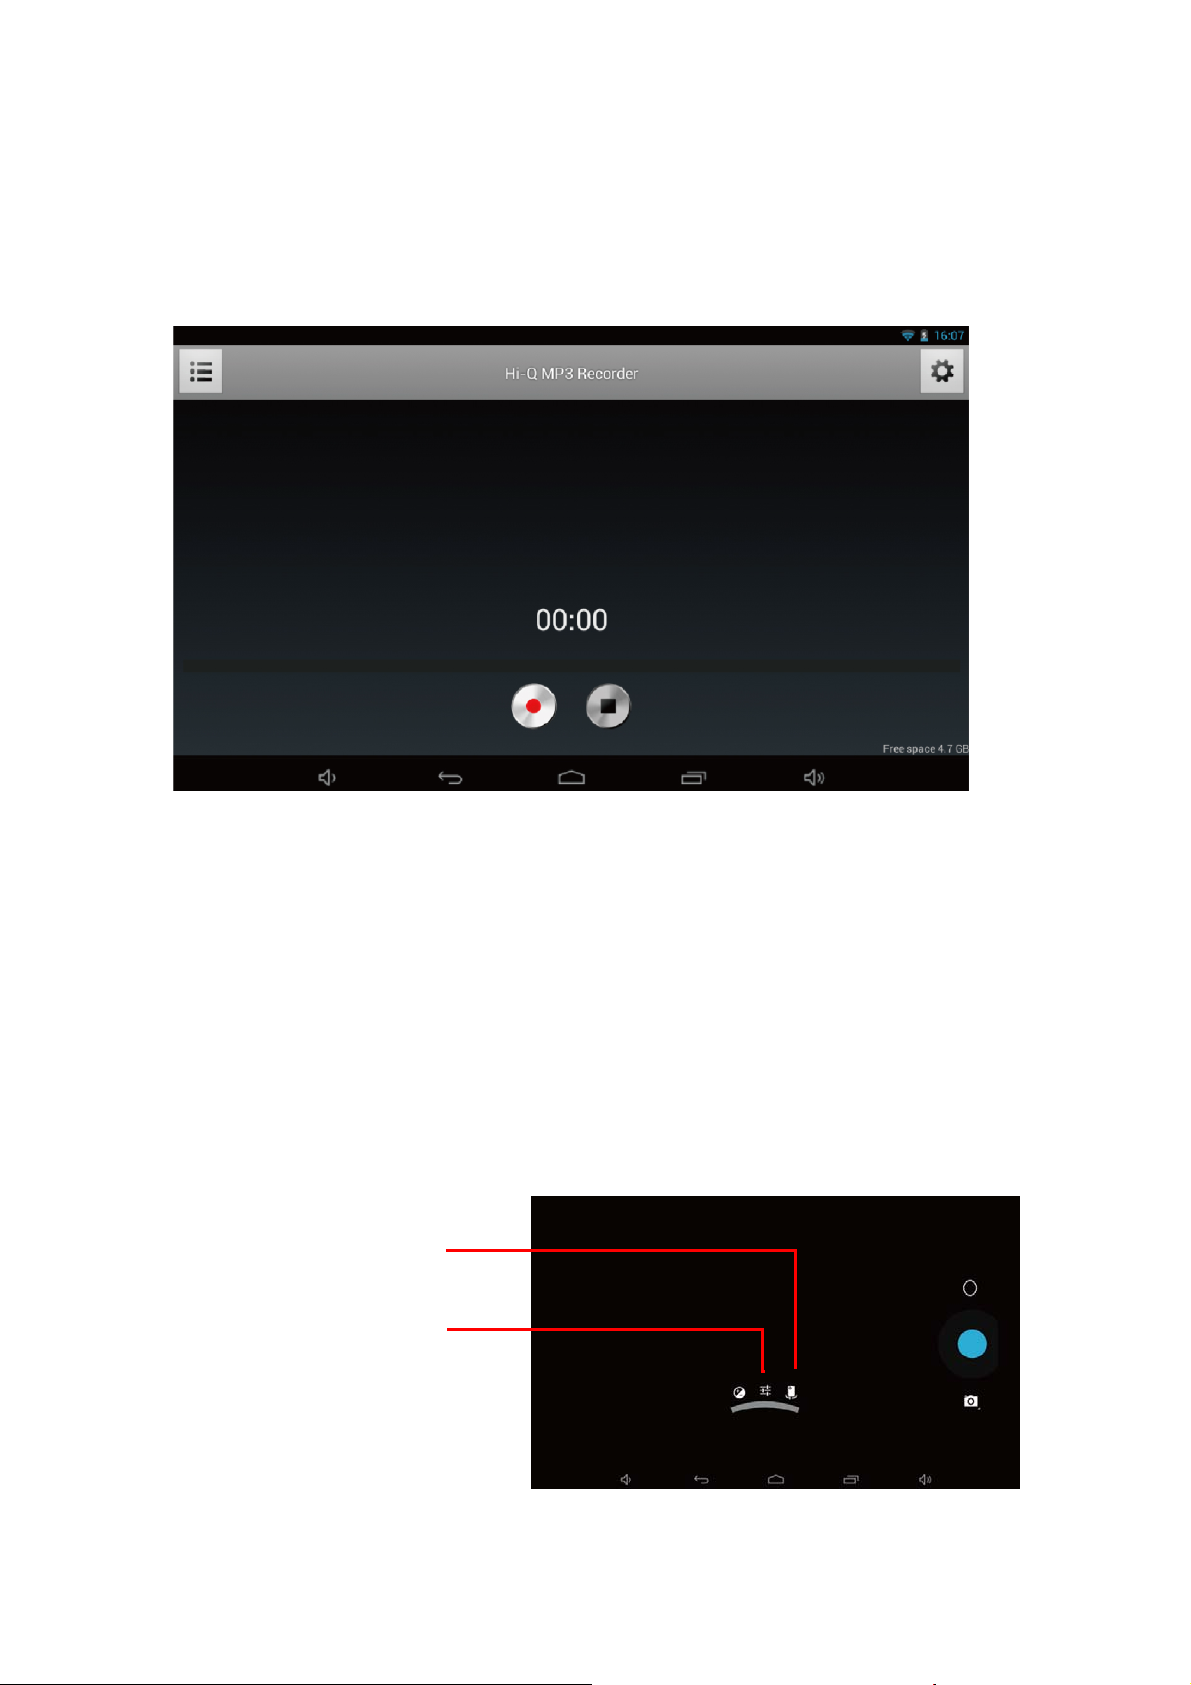
11. Record
Click on the "sound recorder" icon in the main menu and enter the "sound
recorder" main interface as shown below:
Select the "recording" button to record and after recording is completed
press "stop" button. At this time you can select the "play" button to play the
recorded sound. Select "Use this recording" button to save the recording, so
that you can find the corresponding audio files in "NAND"; If you do not
need to save, you can select the "give up" button.
12. Photograph
Click on the "camera" icon in the main menu and enter the "camera" main
interface as shown below:
Front and back camera
interconvertibility
Settings
21
Page 23
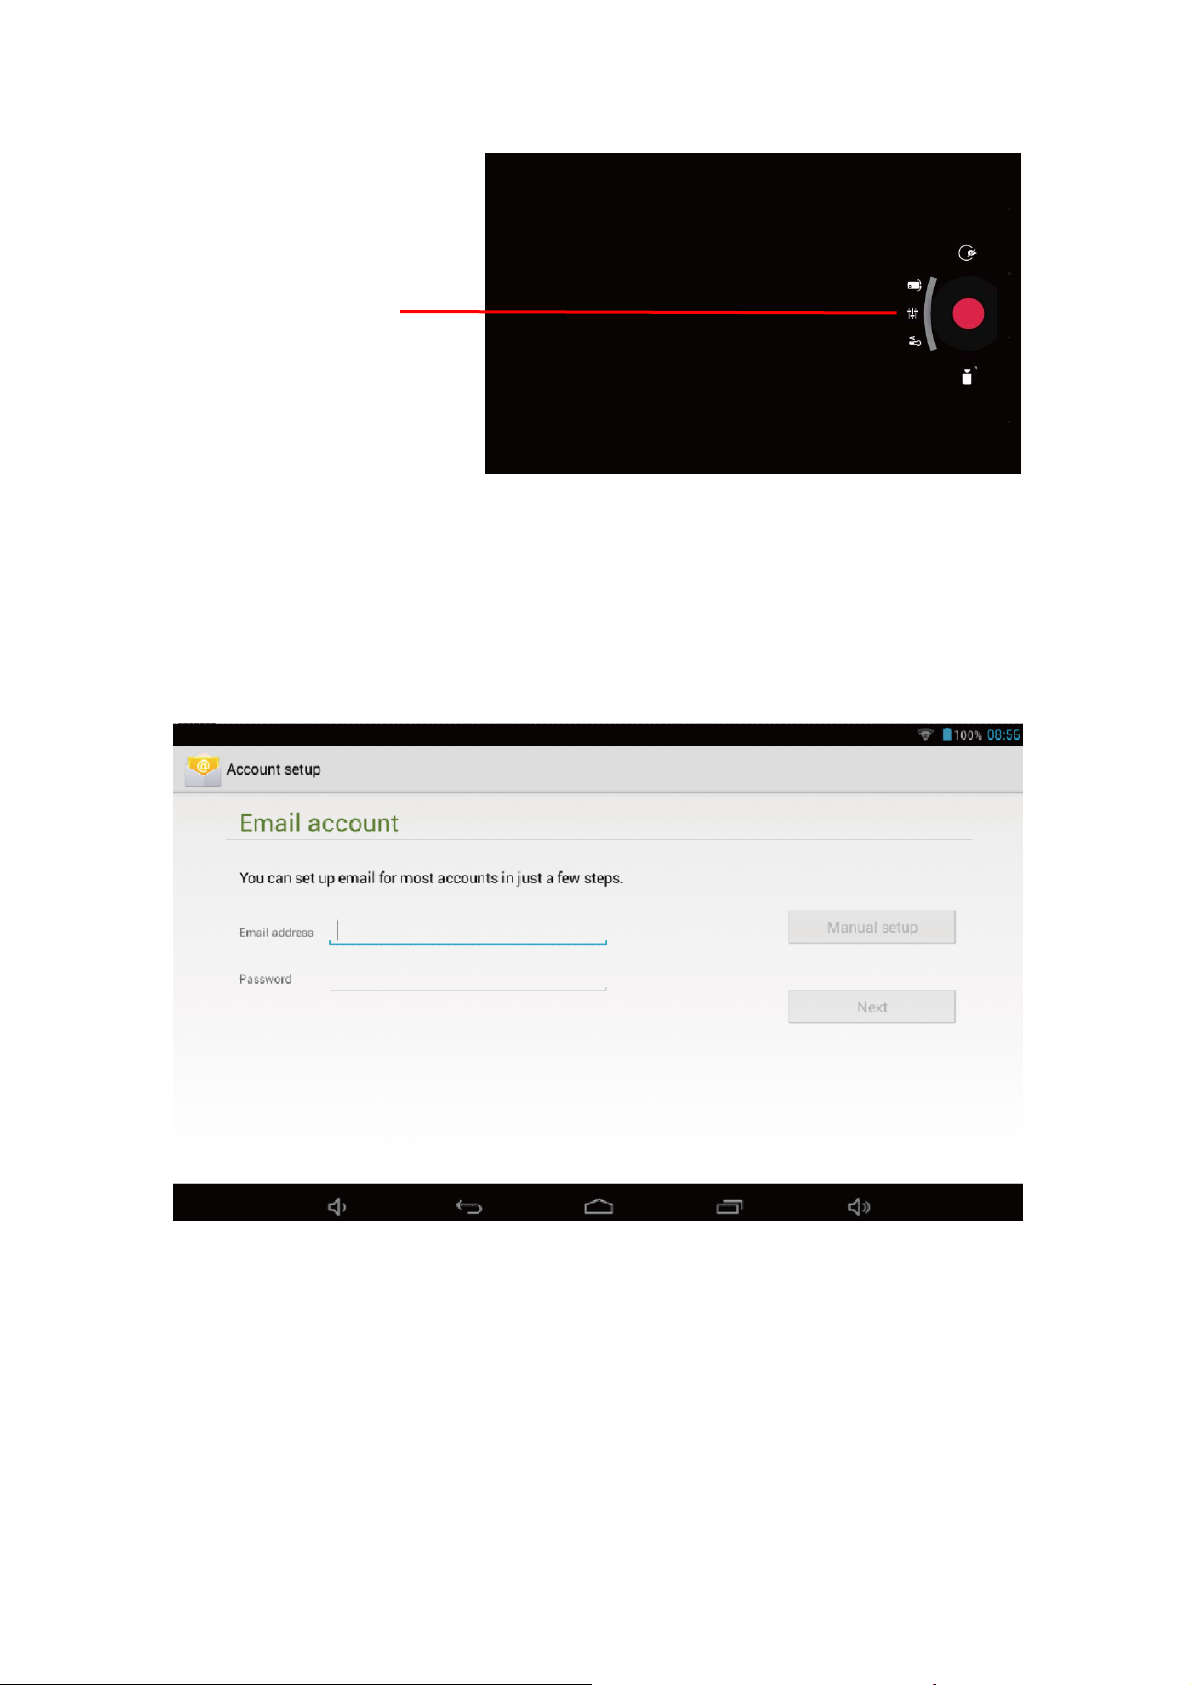
Click on shutter in the camera
Settings
13. E-mail
Click on the "e-mail" icon in the main menu to enter email client. Allocation of
account information will be required the first time. As shown below:
Email requires network support. Make sure that network link is normal.
Here we take [email protected] as an example:
22
Page 24
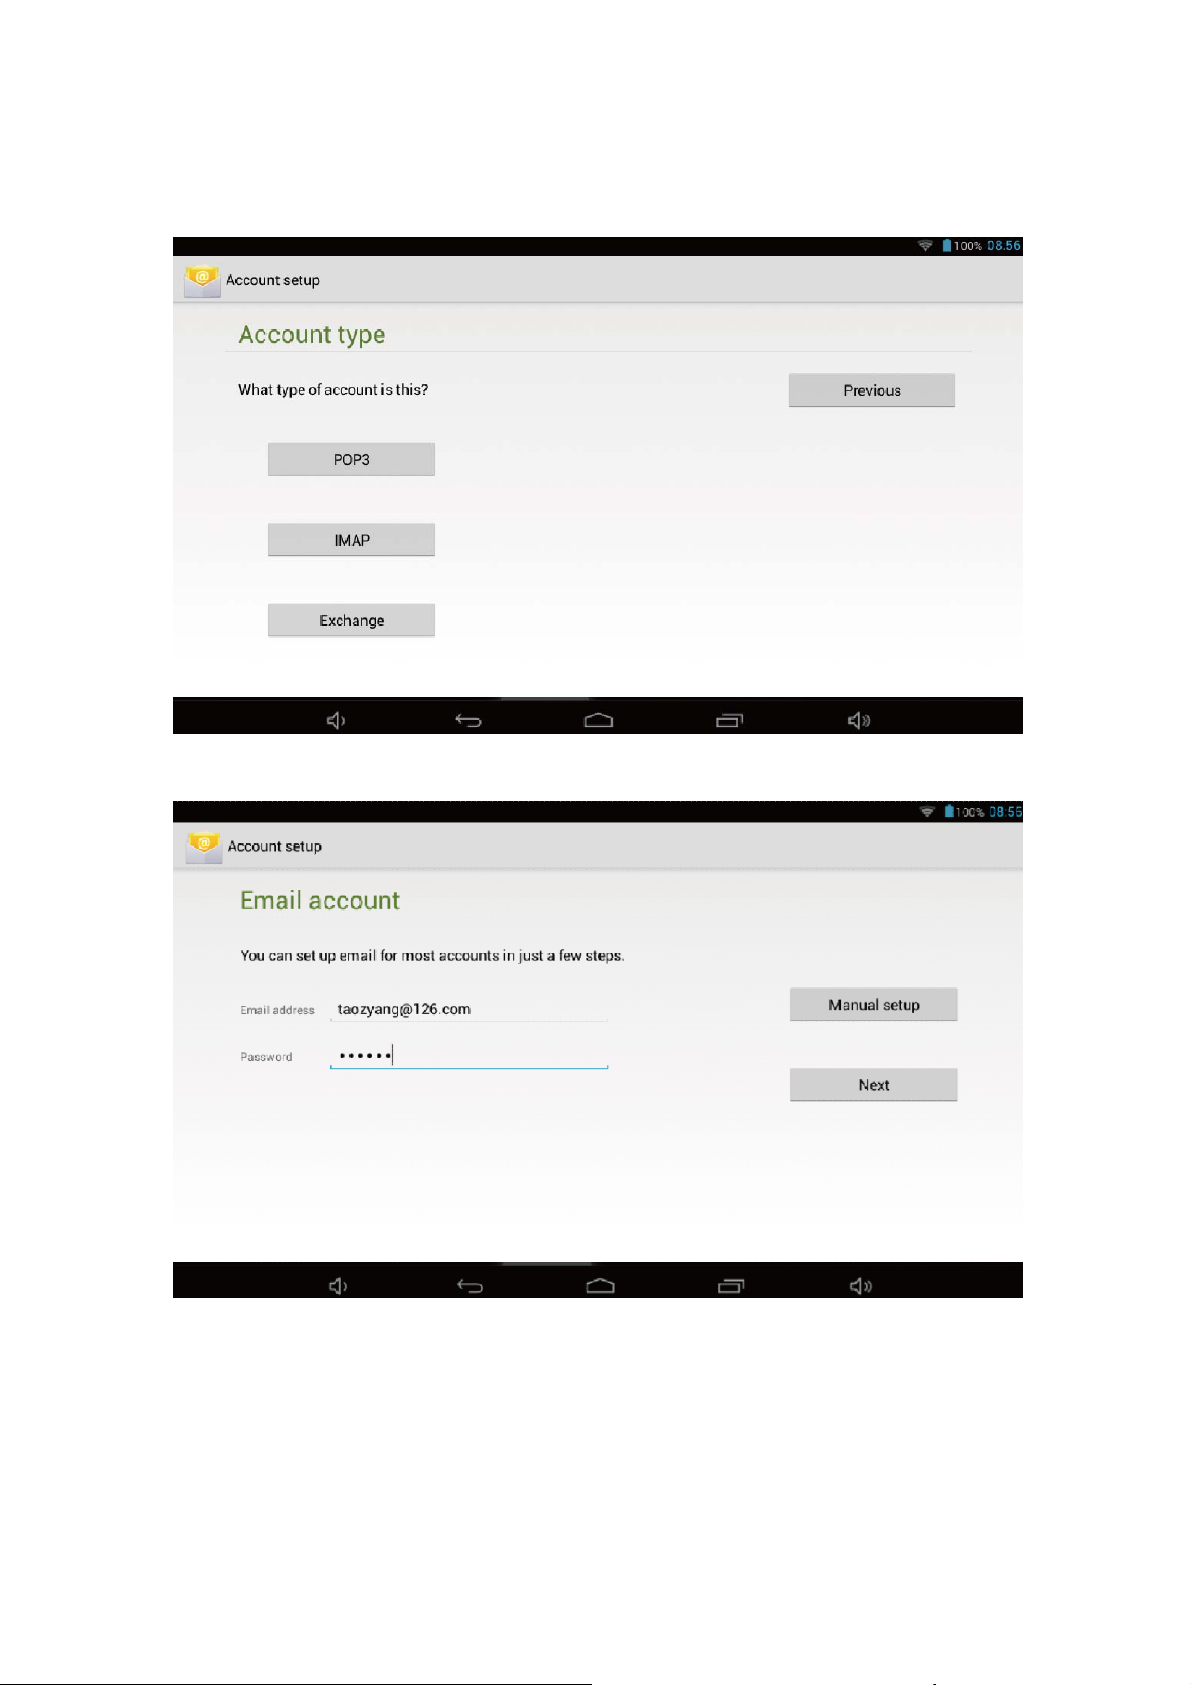
In the email address bar, enter your valid email address: whhpwjh@126. com
In the email address bar, enter your valid password :********
Then you can choose the "next", account type selection interface will appear as
shown below:
Choose POP3 account. And the receiving service settings will appear as shown
below:
Please according to each email provider"s information to set different parameter,
such as:
23
Page 25
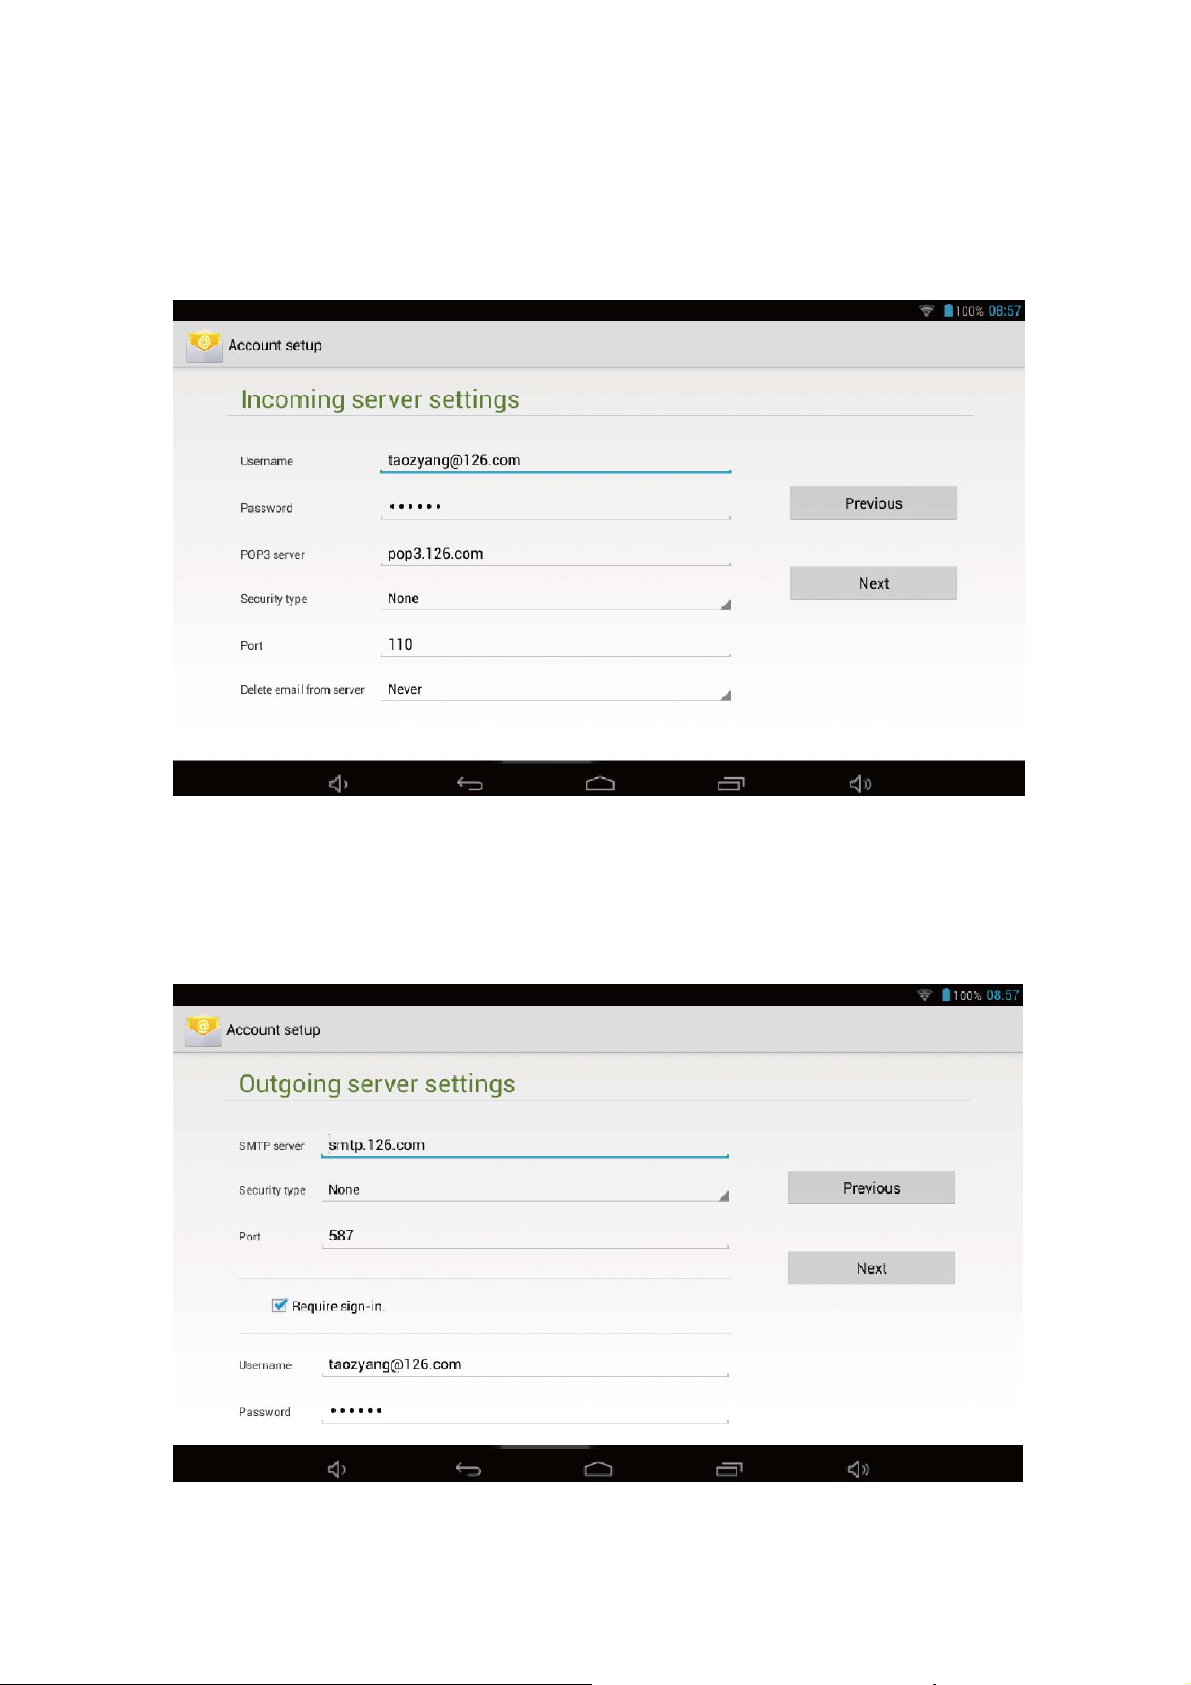
The POP3 server: Default is "126.com", and should be modified as
"pop.126.com"
The port number is "110"
Then select the "next", you will enter the "inspection acceptance server
settings", if set up correctly, there will be a "foreign server settings" interface as
follows:
In the column"name", input the name you want to display in the outgoing
message, and then click "finish" button, you can enter the mail interface. It will
load the mail automatically;
Select one of the column to be viewed in the message. You can do "Reply",
"delete", "more reply"i and other operations at the view bar.
24
Page 26

14. External device
Using USB to connect the SupraPad and PC, the default connection mode
is a synchronous mode.
You can drag the status bar to drop, appeared as the following interface:
Click I into the USB connection hints.
"USB connected": It means that the external memory(SD) loading is completed,
and you can see the corresponding letter in the PC terminal.
OTG use
SupraPad supports FAT32 format mobile devices such as U disk and mobile
hard disk.
The plug-and-play connection method:
Use the OTG wire to connect the Tablet PC USB OTG and the external
equipment .
Keyboard and mouse
SupraPad supports plug and play USB mouse and keyboard device.
25
Page 27

15. Features
* Screen: 7" CapacitiveTouch Screen 1024x600 Resolution
* Processor: Quad Core, Cortex A7, 1.3GHz
* OS: Android 4.4
* RAM: 512MB
* Memory: 8GB
* Wireless connection: WIFI 802.1 1 b/g/n
* Support Dual Camera : Front 0.3MP, Rear 2.OMP
* Support Skype Video Call
* Support 1080P full HD video
* I/O port : Micro USB
* Card Slot: Micro SD Card (Max:32GB)
* Audio Output: Stereo Speaker (8Ω 1.0w)/3.5MM Stereo Headphone Jack
* King Kong Market, Internet Browser,0friCe, Calendar, Calculator, E-mail
* Picture Viewing, Music l Video Playback, Games
* Supports Multi Languages
* Battery: Built in 2500 mAh / 3.7V Li-ion, rechargeable
* Power Source: 5V 1.5A
16. Accessories
Below items are included in your tablet package:
* SupraPad complete device
* Power adapter
* OTG cable
* USB cable
* Earphone
* User manual
26
Page 28

Basic Warranty Statement
This product is warranted to the original purchaser ONLY, to be free from defects in
materials and workmanship under normal use, for ninety (90) DAYS (parts and labor) and
one (1) YEAR (parts only) from the date of original purchase. We agree under the warranty
period to replace product if it is determined to be defective at 'No Charge" This limited
warranty does not cover any loss or damages that occur as result of:
Cosmetic damage.
Shipping or improper installation or maintenance.
Misuse.
Neglect.
Any cause other than ordinary commercial or industrial
application.
Adjustment by non-authorized source or any of the
products firmware or hardware that you or any third
party have modified or altered
Improper environment
Excessive or inadequate heating or air conditioning or electrical power failures, surges.
connection to
improper voltage supply or settings or other irregularities
Accidents. acts of God
In the United States and Canada contact Customer Service at (909) 627 - 9888.
Please note that in order to have your merchandise repaired and replaced by
warranty, you must contact our customer service representatives by phone or email,
and get RMA number.
To obtain factory service, the original purchaser MUST present the following:
1. A sales receipt/proof of purchase indicating date of purchase
2. Your Name. Place of Purchase. Address. Unit Model.and Description of Problem.
3. Send the unit pre-paid to the address below in the original packaging or reasonable
substitute to prevent damage. No return will be shipped back to a PO BOX.
4. All of the accessories that came with the product package must be sent along with the
main unit
5. Please include your check or money order in the amount of $20.00 to cover handling and
return shipping charges We will not be responsible for delays or unprocessed claims
resulting from purchaser's failure to provide any or all of the necessary information
6.There is Additional Shipping Charge for areas outside of United States. For shipping
charge please consult with our customer service.
Page 29

FCC Information and Copyright
This equipment has been tested and found to comply with the limits for a Class B digital device,
pursuant to part 15 of the FCC Rules.
These limits are designed to provide reasonable protection against harmful interference in a residential
installation. This equipment generates,
uses and can radiate radio frequency energy and, if not installed and used in accordance with the
instructions, may cause harmful interference
to radio communications. However, there is no guarantee that interference will not occur in a particular
installation. If this equipment does
cause harmful interference to radio or televi si on rece pt i on , whi ch can be determined by turning the
equipment off and on, the user is
encouraged to try to correct the interference by one or more of the following measures:
—Reorient or relocate the receiving antenna.
—Increase the separation between the equipment and receiver.
—Connect the equipment into an outlet on a circuit different from that to which the receiver is
connected.
—Consult the dealer or an experienced radio/TV technician for help.
15.19 Labelling requirements.
This device complies with part 15 of the FCC Rules. Operation is subject to the
following two conditions:
(1)This device may not cause harmful interference, and
(2) this device must accept any interference received, including interference that may
cause undesired operation.
changes or modifications not expressly approved by the party responsible for compliance could
void the user's authority to operate the equipment.
FCC RF warning statement: the device has been evaluated to meet general RF exposure
requirement , The device can be used in portable exposure condition without restriction.
Page 30

Please review your user
Guide carefully before
Using this product.
If you need further assistance
please contact us at:
(909) 627 - 9888
Additional troubleshooting information
can also be found on the web at:
www.iviewus.com and click on “Support”
or email us at [email protected]
 Loading...