

Page 1
DS3 / DS31 User Manual
DSIC CO., LTD
• Please read the following warnings before using the product..
• Contents of manual may differ based on the software version of products.
• Please visit web site(www.mobilebaseglobal.com) for the more detailed information.
Page 2

< Table of Contents >
Notice 2
Cautions and Instructions 3
1 Understanding the Product 5
1.1 Components 6
1.2 Closed view of product 7
1.3 Install/Remove the Battery 9
1.4 Charging the Battery 10
1.5 Using SD Memory 11
1.6 Reset(H/W and S/W) 12
2 Basic Use 13
2.1 Display Calibration 14
2.2 Using Keyboard 15
3 Communication 16
3.1 Using Wireless LAN 17
3.2 Using Bluetooth 19
4 Scanner and Camera 20
4.1 Using Barcode Scanner 21
4.2 Using Camera 22
5 Connecting ActiveSync 25
5.1 Installing ActiveSync 26
5.2 Using ActiveSync 27
5.3 Solving Problem 28
6 Technical Support 29
1
Page 3

2
< Notice >
! Please read “Caution and Instruction” and conform according to the direction.
! The contents in manual could be modified without pre-notice and different according to PDA software version.
! The figure and color of components could be different with the actual.
! Unauthorized copying, transferring, or deletion is strictly prohibited.
! Microsoft, Windows, Window Logo, Windows CE 5.0 Logo, ActiveSync, Microsoft Office, Outlook and Internet
Explorer
are registered trademarks of Microsoft Corporation legally protected by law.
! This manual is protected by Copyright Laws.
Page 4

3
< Cautions and Instructions >
! In order to use the product properly and safely and to prevent accidents in advance,
Please follow the guidelines indicated bleow.
User Cautions
- Please use the authorized battery and accessory, which provided with PDA.
* For a defect by using a non-authorized equipment, You can not receive A/S.
- Please do not modify the product at discretion.
* It could create a fire, an injure, an electric shock and have the product damaged
* Also, You can not receive A/S for a defect, which is generated by modification.
Keeping Caution
- Please don’t input an impact like drop and not use in environment with high temperature and humidity.
- Please full charge the battery before first using.
Use prohibited
- Please do not use in dangerous areas explosive, such as construction, gas station, etc.
* Please accordingly observe the rule, instruction and signal in the areas.
* During refueling, Please turn off phone function for safety.
- Please prohibit using PDA and related things while driving. It could cause danger.
- Please turn off the PDA when boarding an airplane and in hospital
* Electromagnetic waves of phone function could effect a certain flying and hospital equipment.
- Please turn off the PDA in other restricted areas.
* A problem or danger of electromagnetic waves could occur.
Page 5

4
< Cautions and Instructions >
Precaution
for Product
- Please don’t put PDA, battery and charger in or near heating equipment such as stove, microwave oven.
* It could bring on fatal injury. In addition, Could cause product explosion, transformation or a certain defect.
Furthermore, Free repair service is not provided.
- Please don’t use PDA with any other purpose except for the original.
Precaution
for Battery
- In case of battery that is damaged, impacted, heat and submerged, it could explode.
- You should never use a transformed or damaged battery.
- Use only original or authentic batteries and adaptors, and do not use them for applications other than those of the PDA.
(If you do otherwise there is a risk of explosion or possibilities for shorter durability of the PDA, battery, and adaptor.)
- You should use authorized adaptor and charger when charging.
If otherwise, the battery life get shortened or could be exploded.
- A damage could be occurred when you compulsory install the battery.
- You should change the battery after power-off. It causes a damage or software problem.
- Please be careful that key, coin or other metal material is not connected to battery’s terminal.
Page 6
5
1 Understanding the Product
1.1 Components
1.2 Closed view of Product
1.3 Install/Remove the Battery
1.4 Charging the Battery
1.5 Using SD Memory Card
1.6 Reset(H/W and S/W)
Page 7
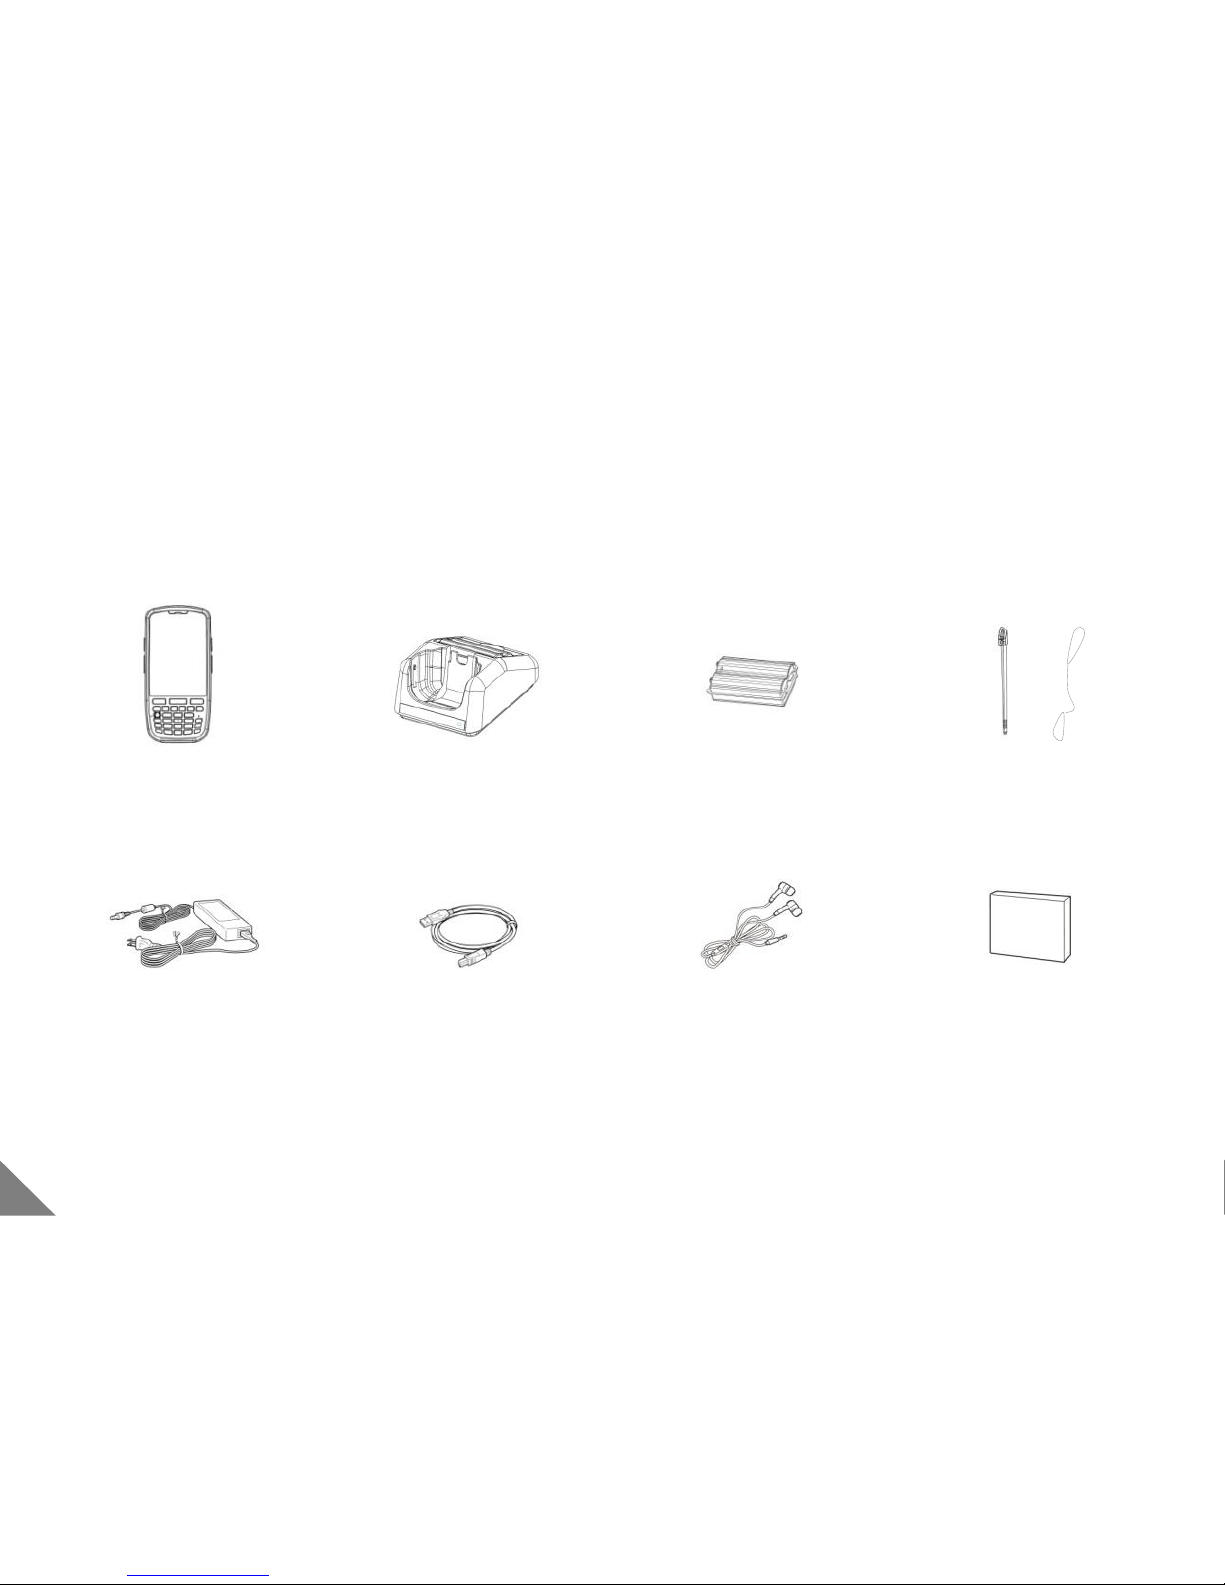
[ DS-3 PDA ] [ Cradle ] [ Battery ] [ Stylus Pen and String ]
[ Power Cable ] [ USB Cable ] [ Ear Microphone(Options) ] [ User Manual ]
● ●
6
1 Understanding the Product
1.1 Components
Page 8
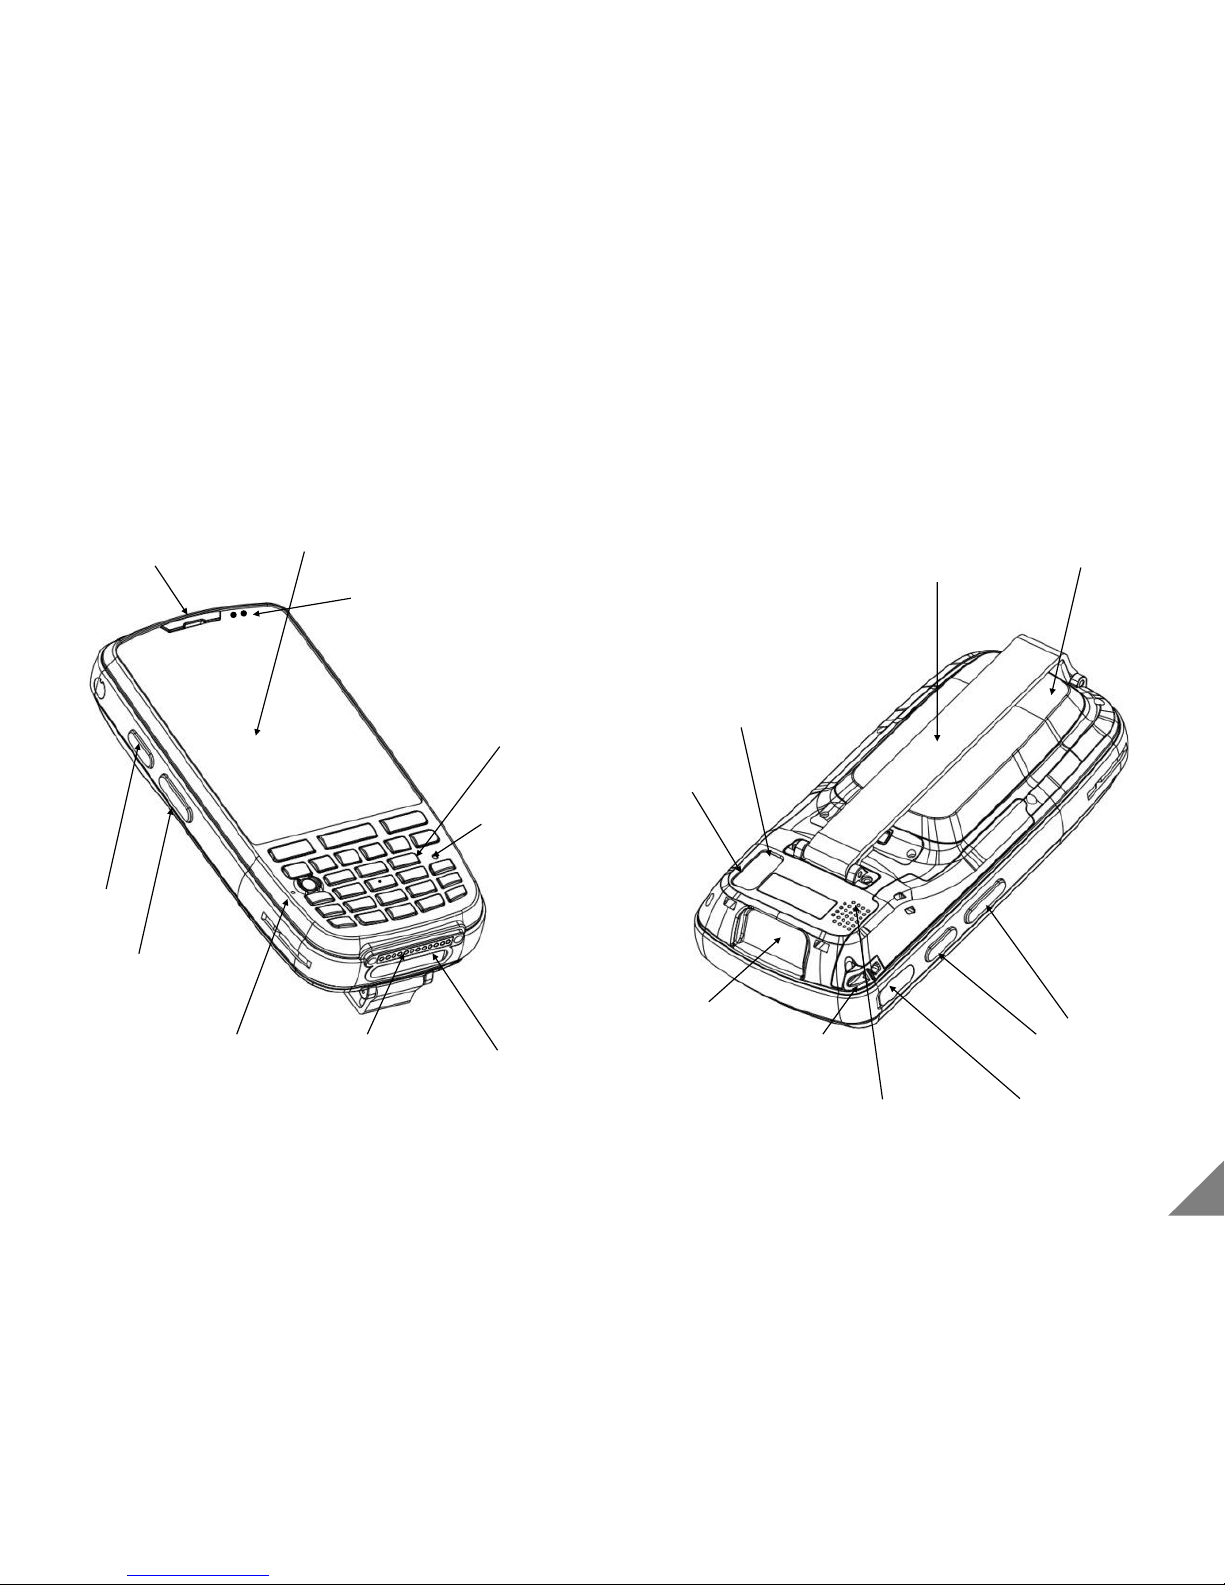
1.2 Closed view of Product
Status LED
(Modem/Barcode Scan)
LCD Touch Screeen
Keypad
Microphone
Voice call Speaker
Barcode scanner
button
Cradle
connector
Stylus pen
Barcode
scanner
Reset
Flash
Camera lenz
Handstrap
Battery cover
Sound speaker
24-pins Connector
(Charging/Data Comm./
Connecting Cable)
7
[ PDA Body]
Volume Up / Down
Ear Microphone
jack
Barcode scanner
button
Camera
button
Page 9
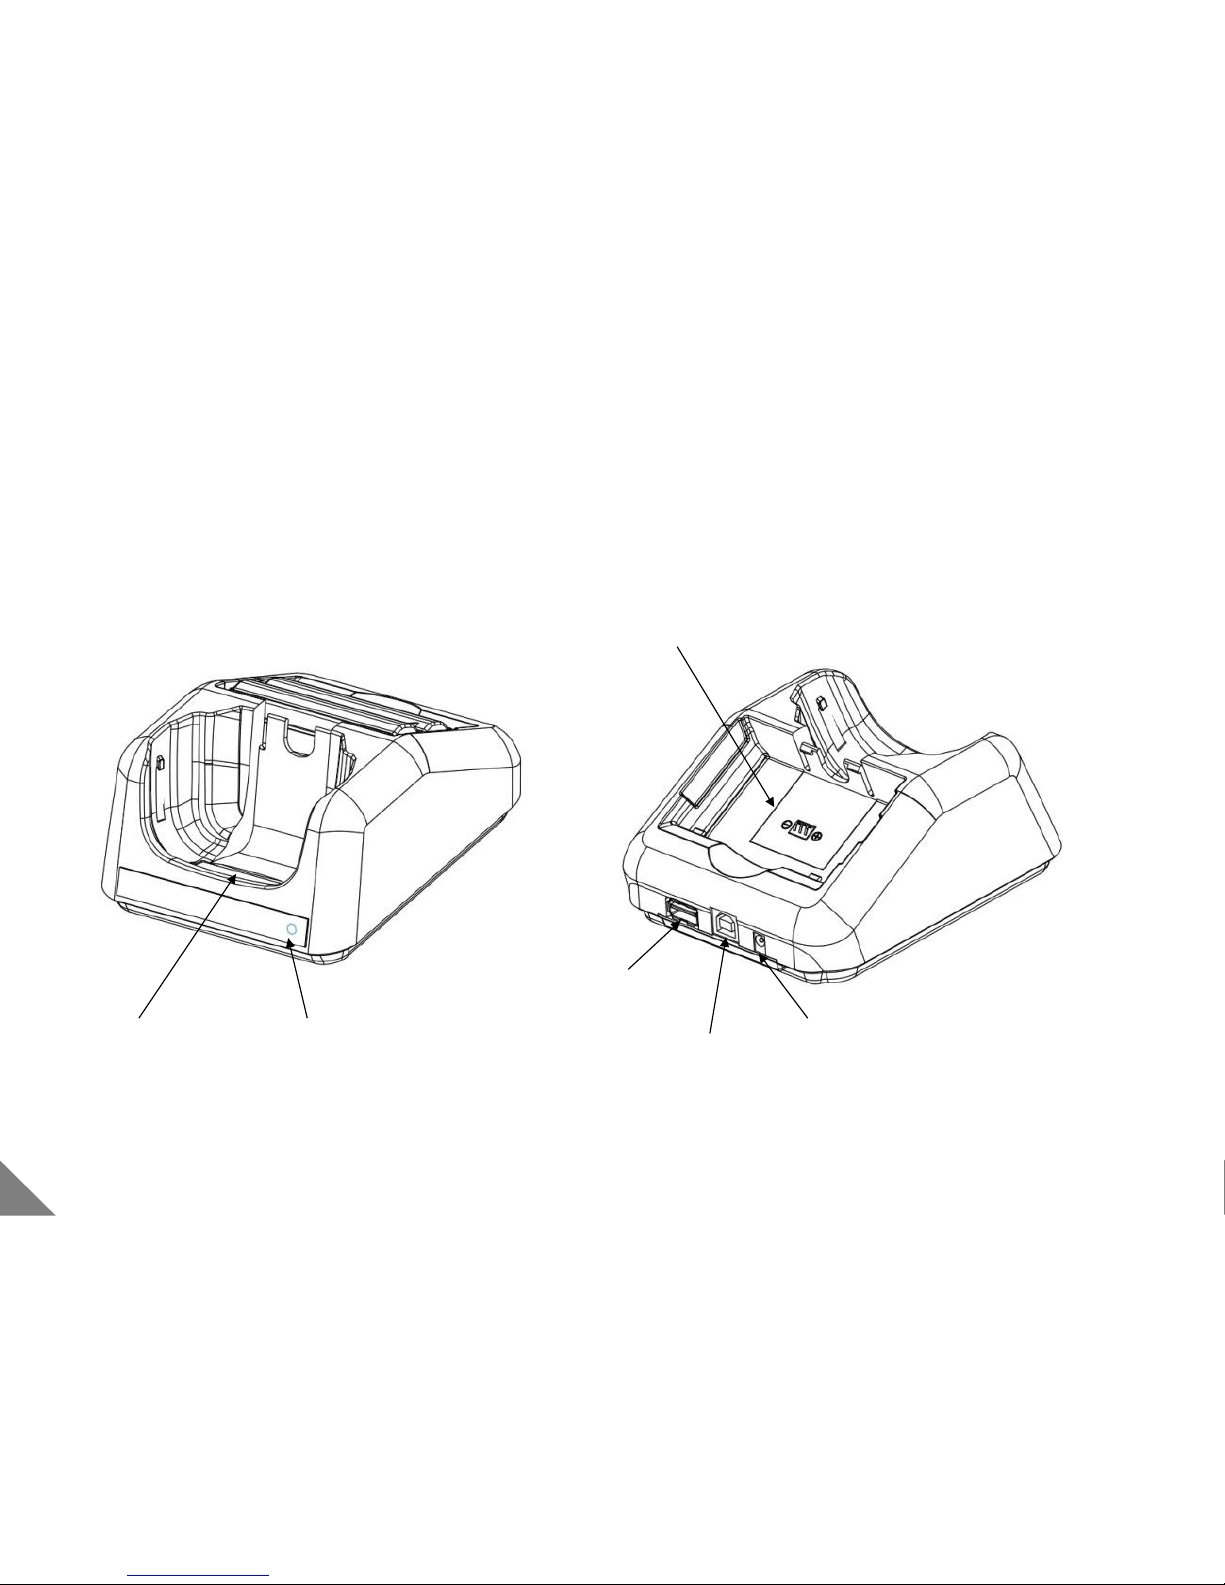
1.2 Basic Terms
[ Cradle ]
Charging Status LED
Connecting
Connector
Extra-Battery
Charging Part
USB
Connector
(Host)
Power
Connector
USB
Connector
(Client)
8
Page 10
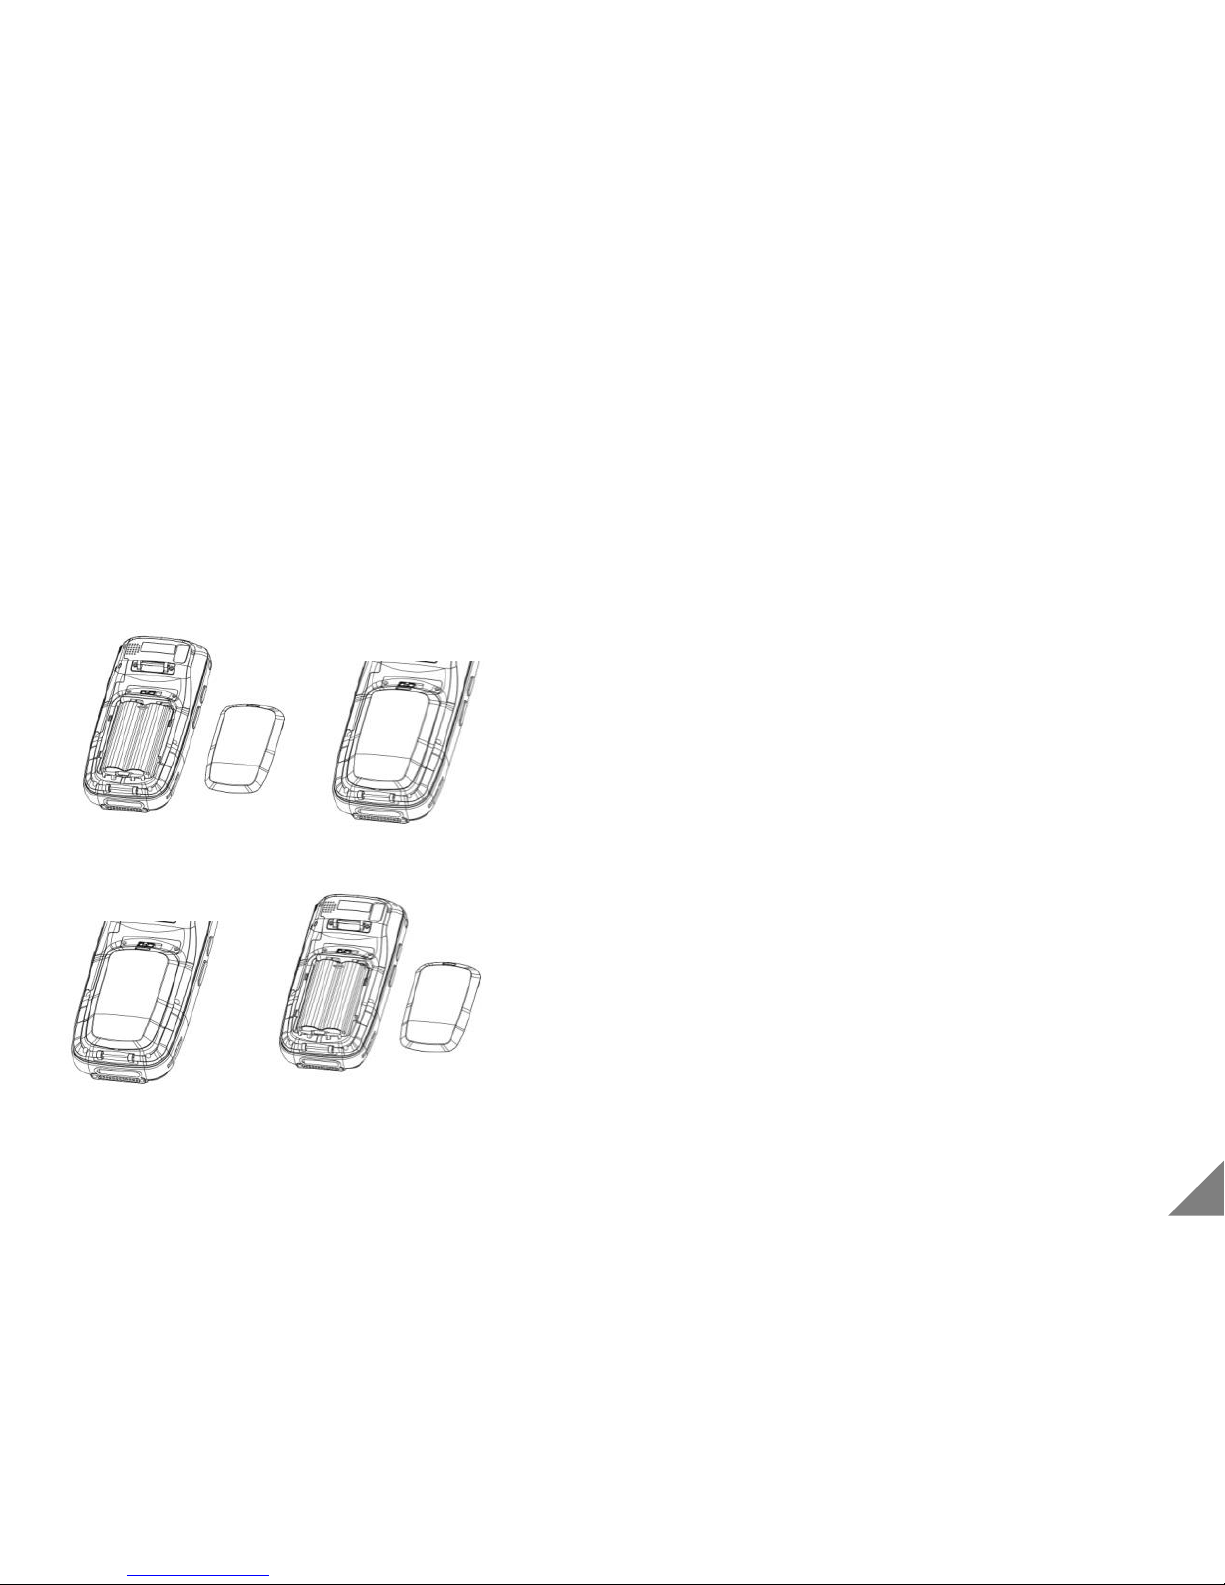
1.3 Install/Remove the Battery
9
① Install battery by making connector upward.
② Close battery cover
③ Push the locker to left side
④ Fix the hand strap on back of body.
① Separate the hand strap
② Push the locker to right side to unlock
③ Pull out the battery cover by using groove
④ Pull out the battery
⑤ Release the battery lock and remove.
[ Install the Battery]
[ Remove the Battery]
*P.S : when battery is installed or removed, power-off should be required.
Page 11
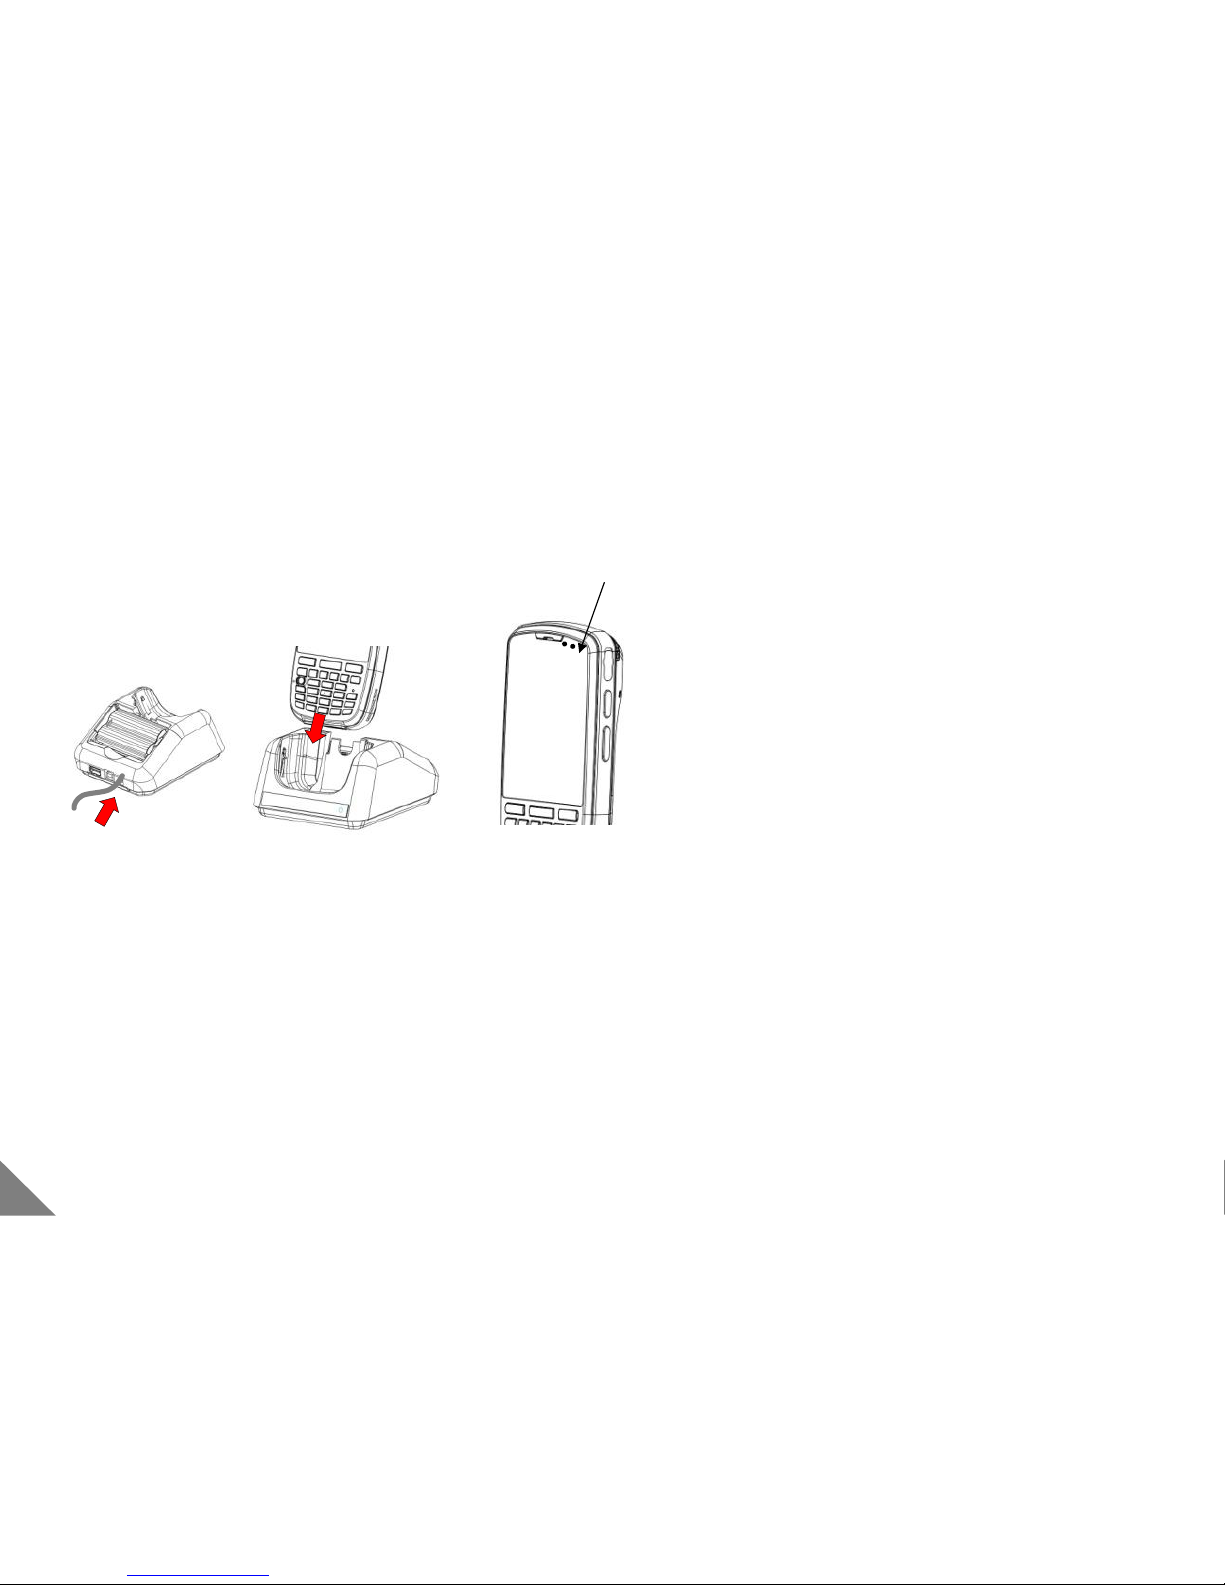
1.4 Charging the battery
[ Charging by Cradle]
① Connect the power cable to the connector of cradle
② Mount the PDA body to Cradle
③ During the charging, it displays in red color.
When the charging completed, it turns to green color.
<Caution>
Don’t use any other power cables, except for the authorized
cable .
②
①
Charging status LED
10
Page 12
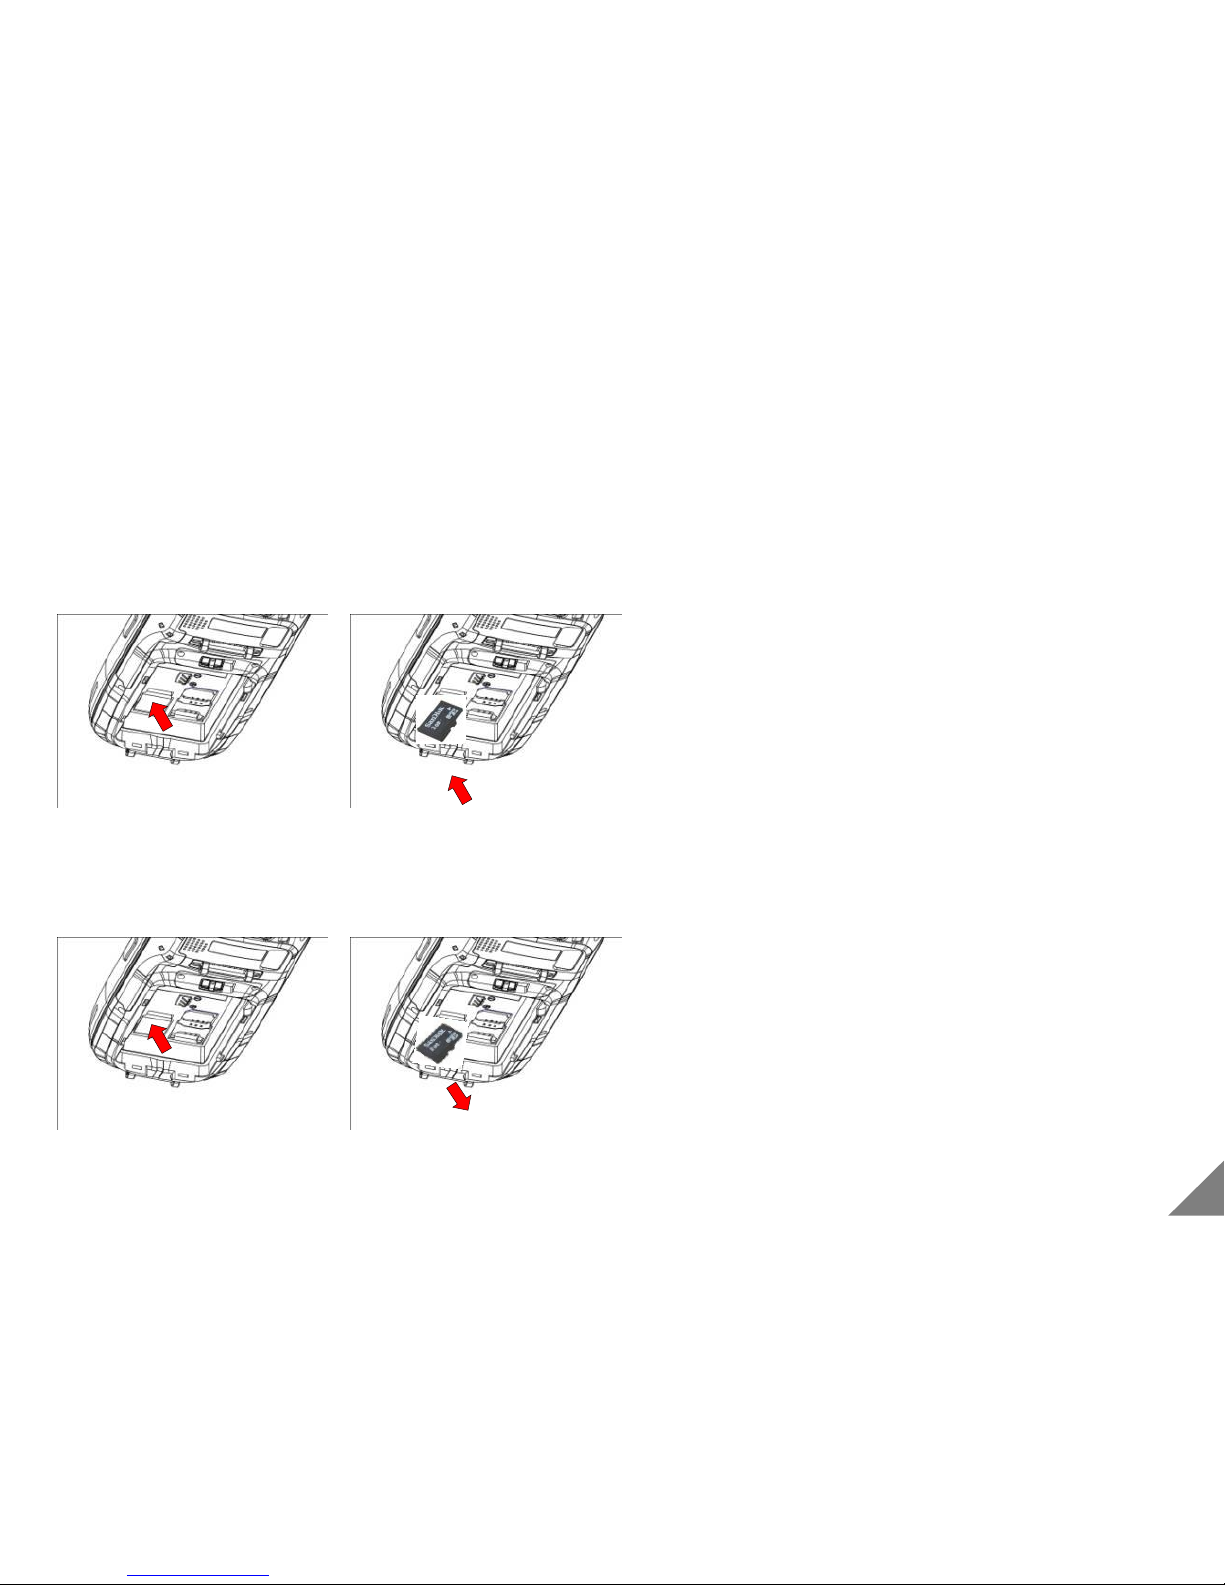
1.5 Install & Remove Micro SD Card
① Pull out the battery
② Inset a SD card.
③ Install the battery back.
④ Fix a hand strap on PDA..
<Caution>
• Please power-off before installing or removing the battery
• Since battery should be removed when SD card is installed
and removed, save all data in operation.
• Please be careful of the direction of Micro SD card
① Pressing the Micro SD card inserted, a part comes out.
② Pull out the Micro SD card
③ Install the battery
11
[ Install SD Card ]
[ Remove SD Card ]
Page 13
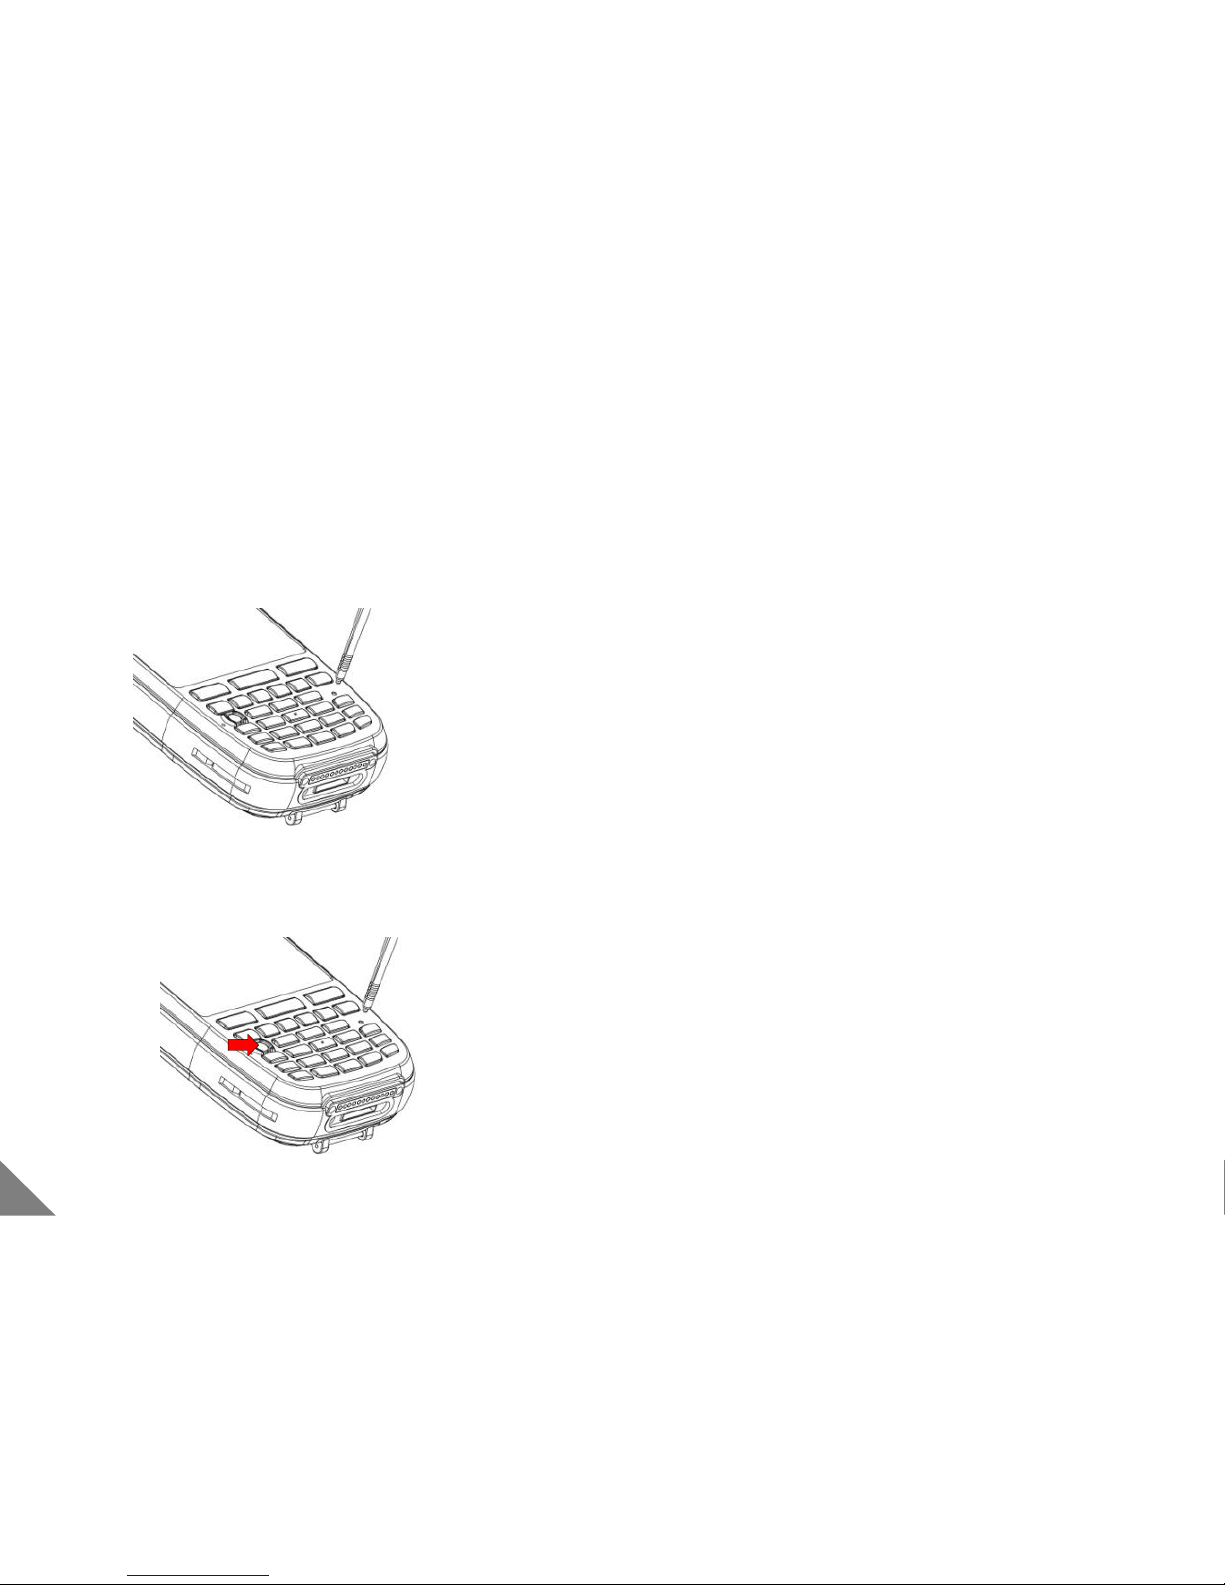
1.6 Reset(H/W and S/W)
① Please press [reset] button at the front of the body
using the stylus pen
② Programs currently in use will be shut down and data or
file can be deleted. However, Saved files are out of
effect.
① Press Power button + [reset] button
② All data and programs will be initialized expect for
just data saved in Flash Disk
< Caution >
• Please back-up data in you need before operating [reset]
12
[ Software Reset ]
[ Hardware Reset ]
Page 14
13
2 Basic Use
2.1 Display Calibration
2.2 Using Keyboard
Page 15
14
[Start]
2 Basic Use
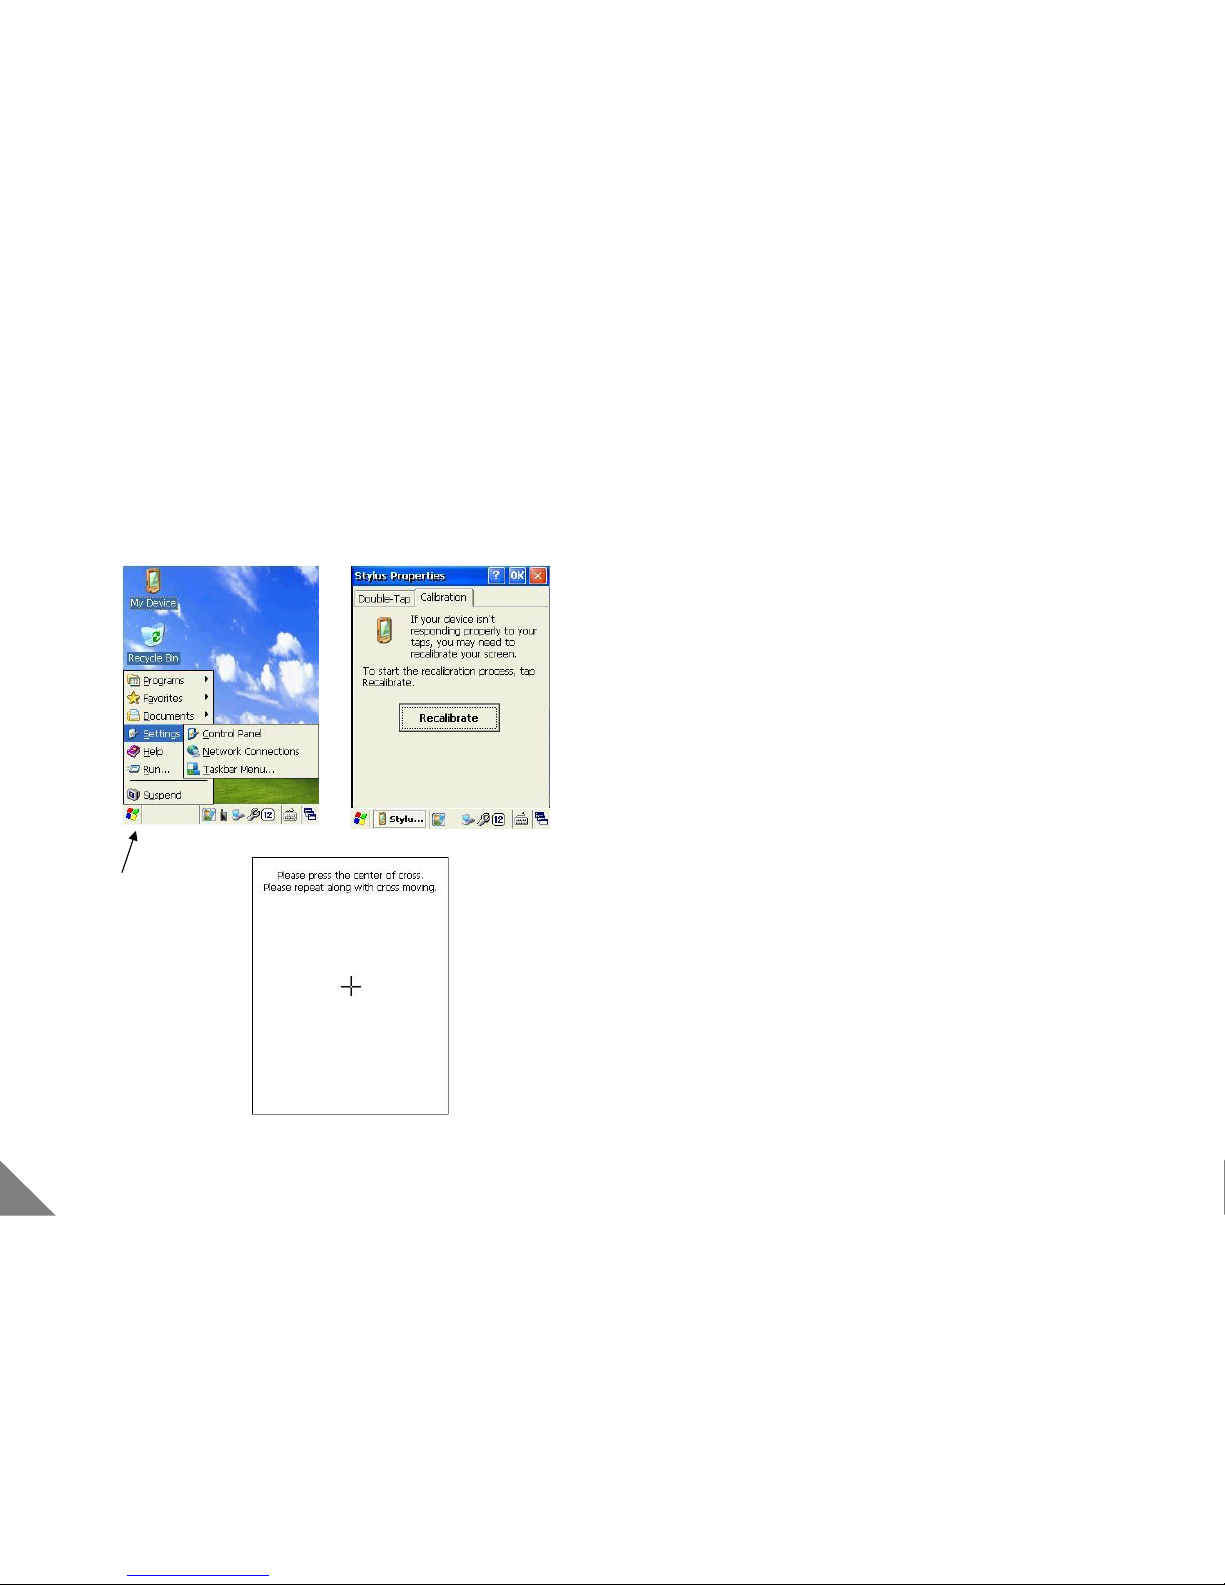
2.1 Display Calibration
[ Display Calibration ]
① Execute the Display Calibration when correct position is not
selected with using stylus pen.
② When H/W reset done or when needed, please execute
[start]-[setting]-[control panel] in stylus properties.
③ If you press [+] for over 1 second, [+] move to the next.
Then, Act the same along with [+]
④ If all process done, Automatically, Display Calibration ends.
Then, Confirm if input is correct.
< Caution >
• When manipulating LCD display, do not another except stylus
pen.
(LCD Screen could be flow or PDA [reset] button could be
damaged)
Page 16
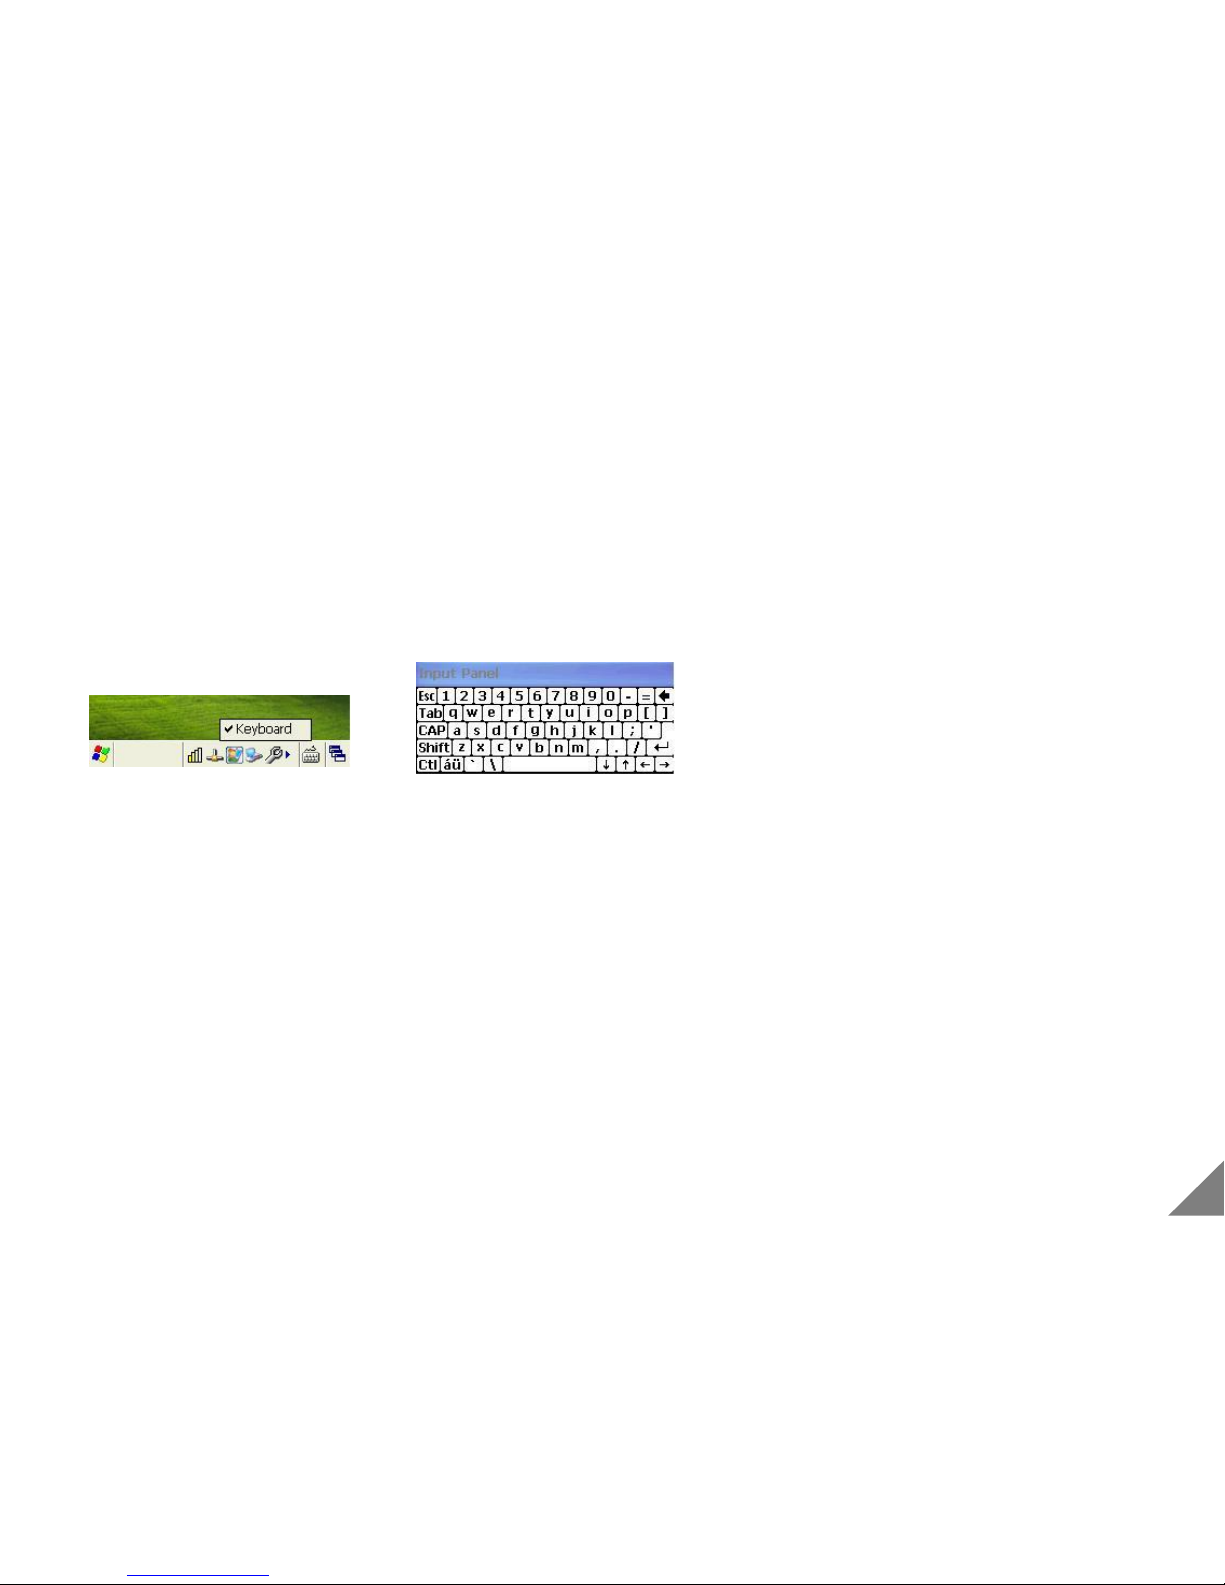
2.2 Using Keyboard
① When inputting a letter, you can use keyboard function.
② Press [keyboard] icon with stylus pen in taskbar.
③ If pressing a button in [keyboard screen], the
appropriate letter is input.
[ Using Keyboard ]
18 15
Page 17
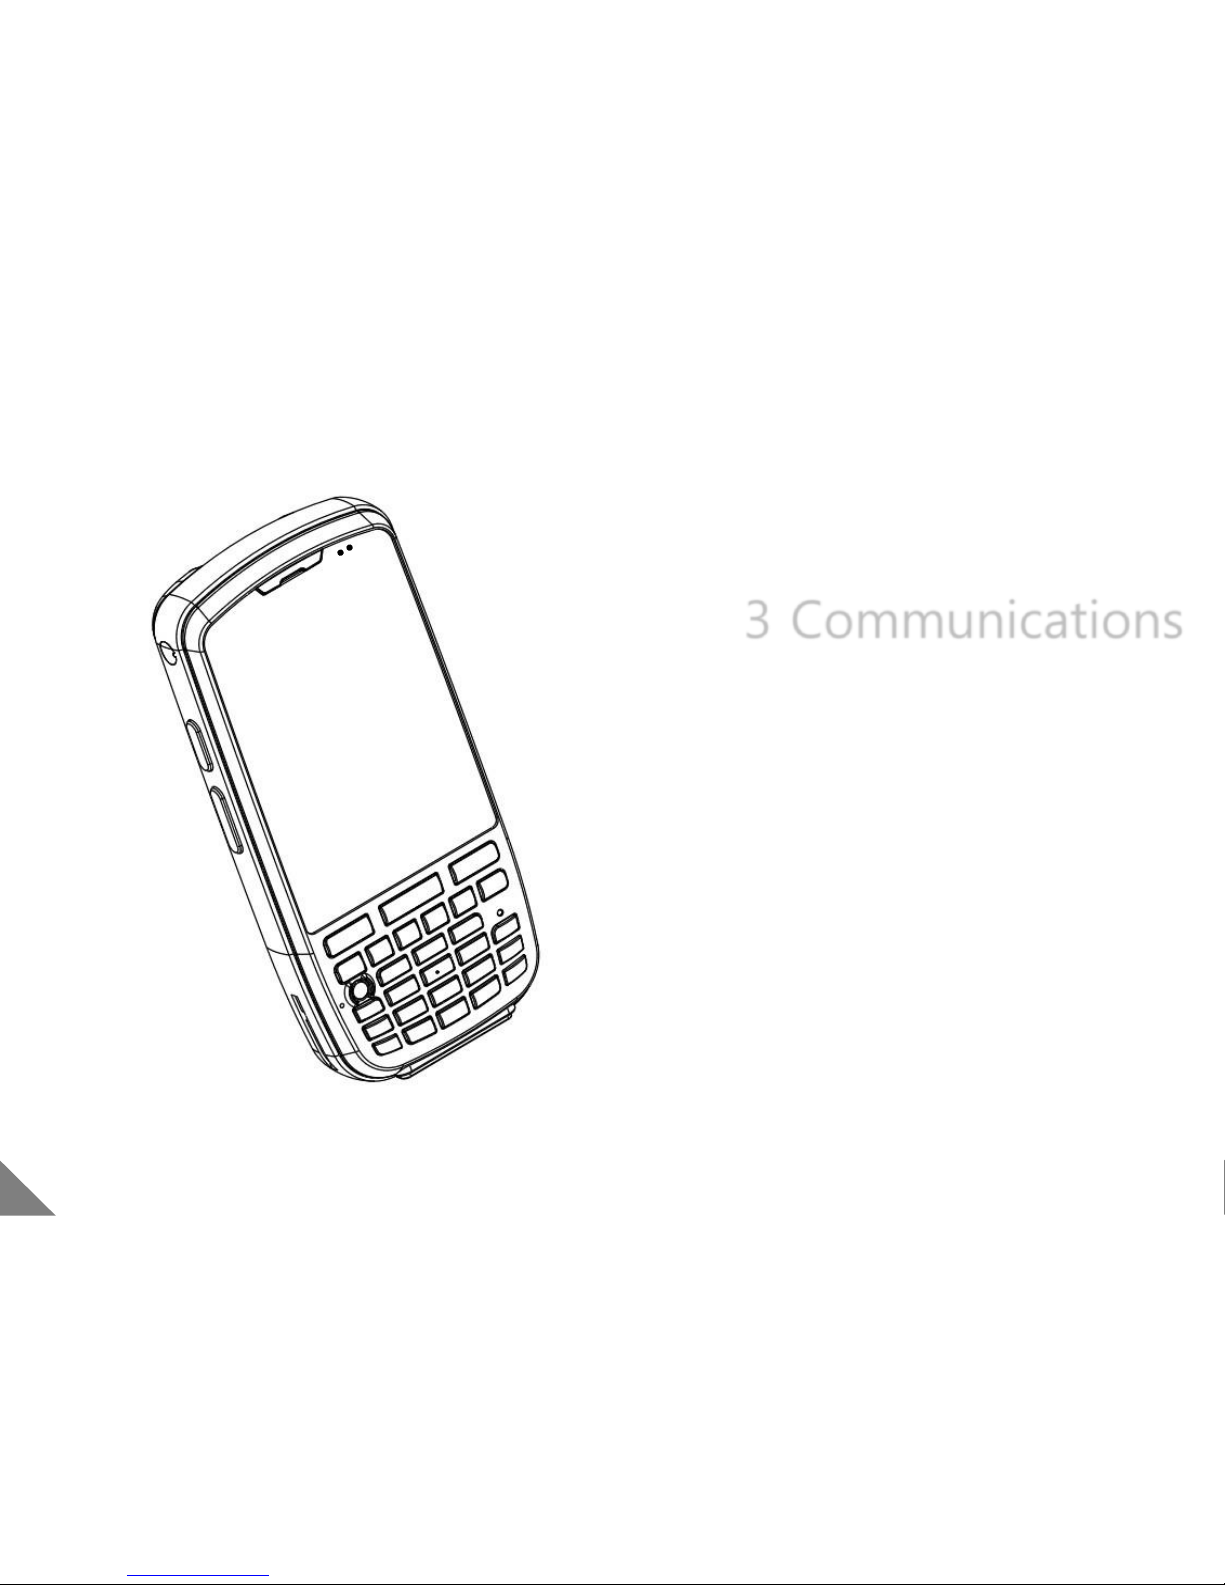
3 Communications
3.1 Using Wireless LAN
3.2 Using Bluetooth
16
Page 18
17
3.1 Using Wireless LAN
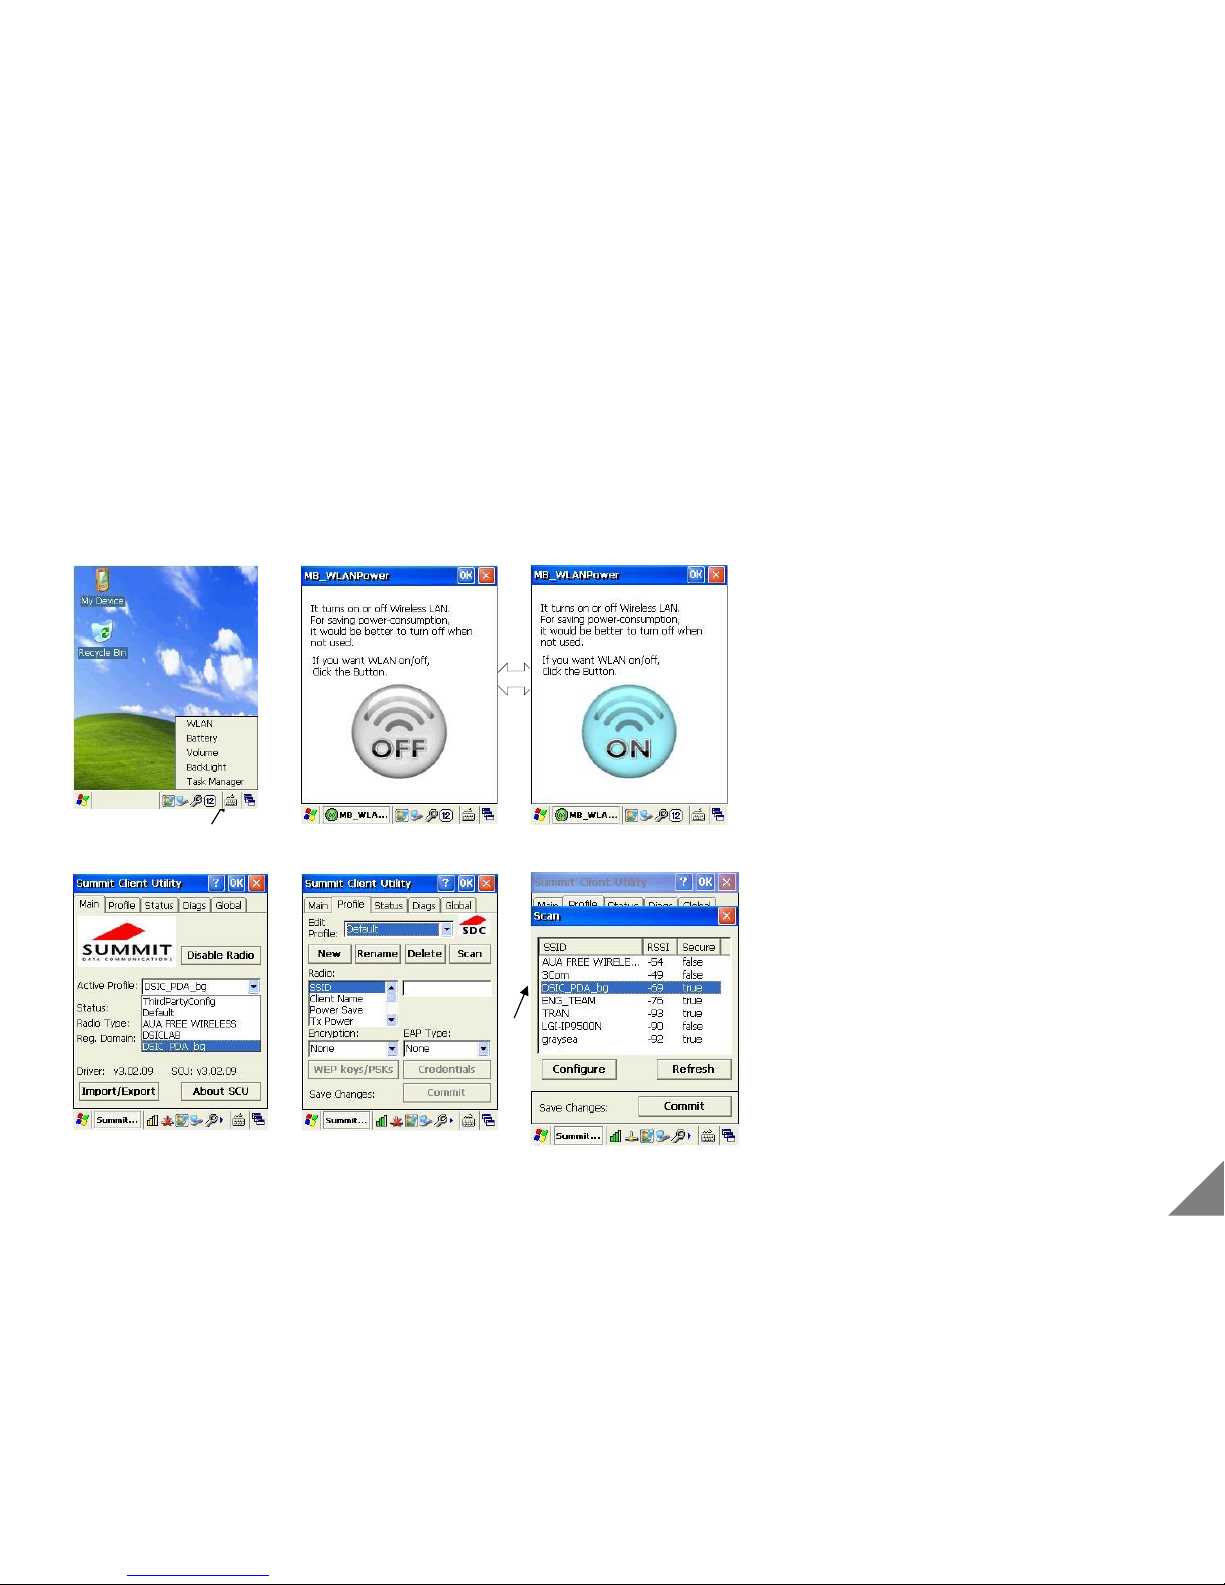
[ Wireless LAN ON/OFF]
< Reference >
• Wireless LAN supports IEEE 802.11 b/g
• To connect the wireless LAN, There should be AP(Access
Point) to support 802.11 b or 8002.11.g around.
• Please use the wireless LAN after manually or
automatically setting-up IP.
[Wireless LAN ON/OFF]
①After pressing the spanner icon in taskbar and selecting the
Wireless LAN, and pressing the ON/OFF icon.
②If Wireless LAN is correctly connected, Antenna icon is
appeared in taskbar.
[AP Access]
To connect AP, Wireless LAN should be ON.
①If pressing the Antenna icon double click, the Wireless LAN
Connection display is appeared.
②Move [Profile] tap, and press [Scan] button.
③After few seconds, the pop-up window of AP list and select
one of them and press [Configure] button.
* Wireless LAN function is just available with a product with a built-in Wireless LAN module.(Option)
[ AP Access ]
Page 19
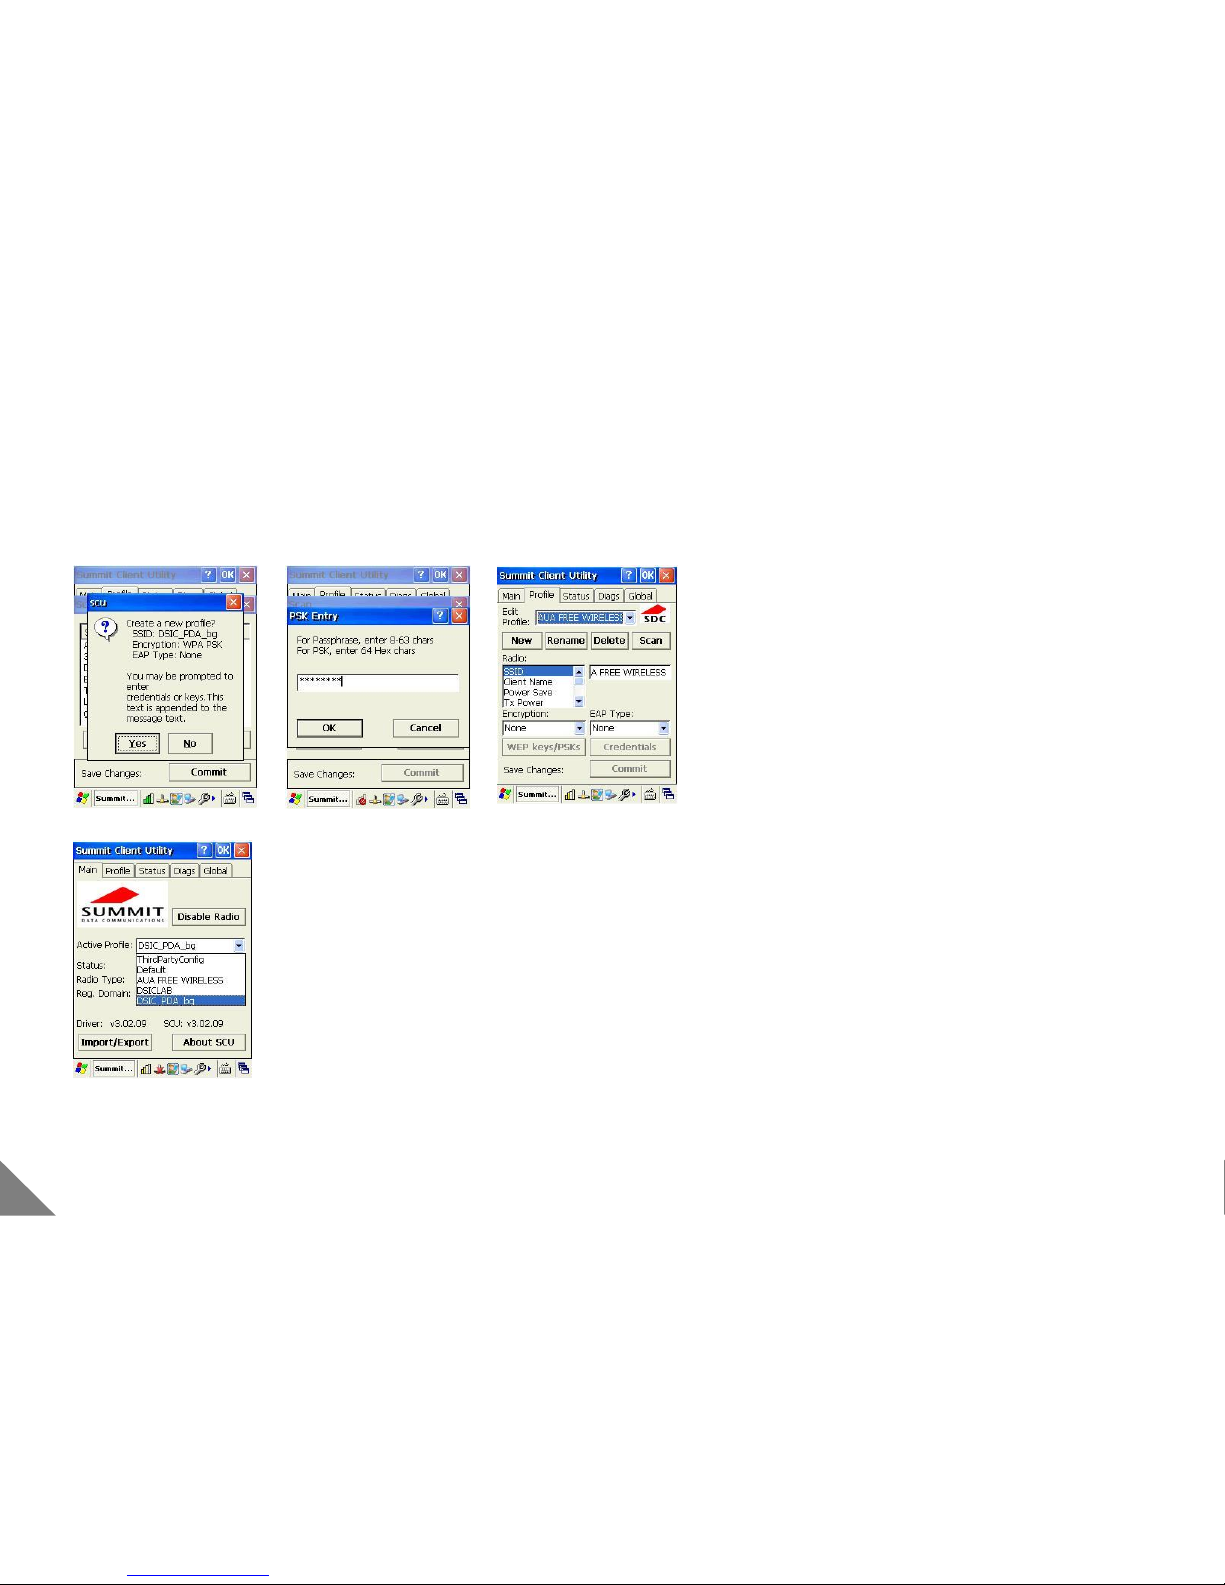
①Press “Yes” in pop-up window about creating a new profile.
② Write the setting password of AP and press the OK button.
③To save the all settings, press Commit button.
④Move the [Main] Tab and select the settings of AP from
Active Profile.
3.1 Using Wireless LAN
18
Page 20
3.2 Using Bluetooth
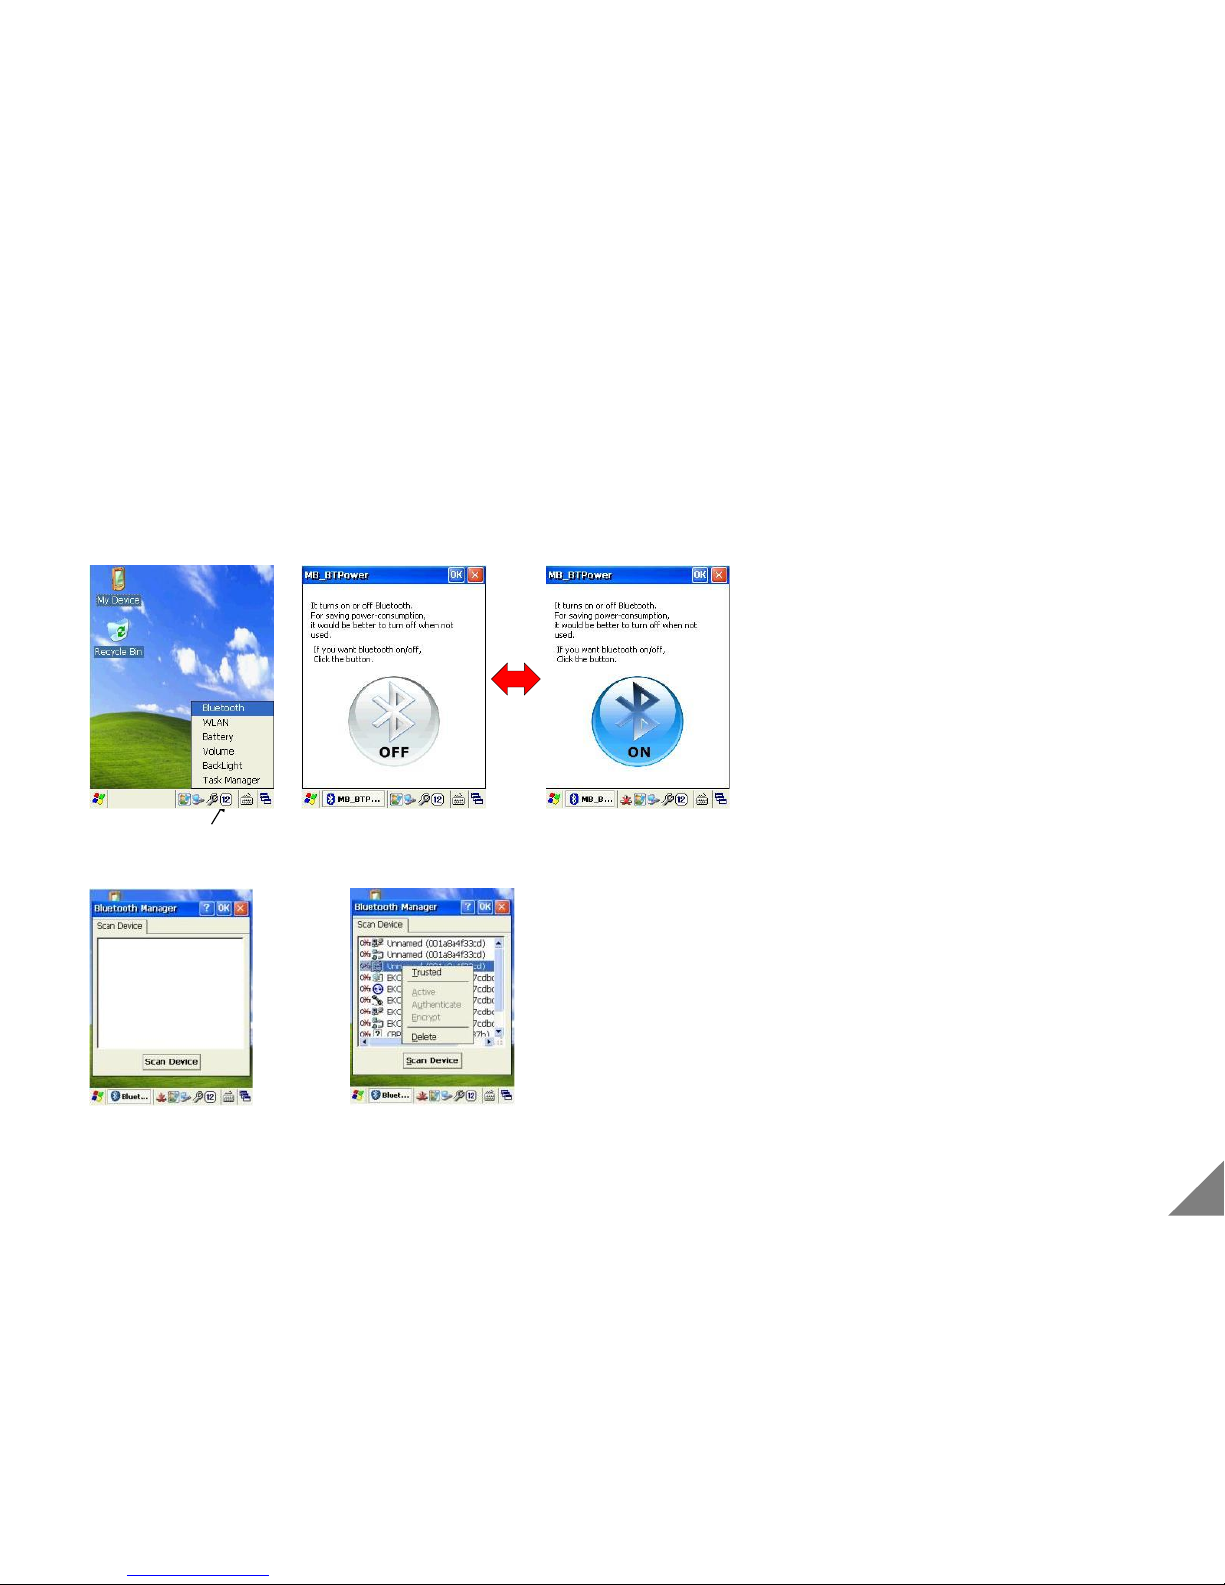
[ Bluetooth On/Off ]
[Bluetooth On/Off]
①After pressing the spanner icon in taskbar and selecting the
Bluetooth, and pressing the B ON/OFF icon.
[Bluetooth Device Search]
①Press the [Device search] after executing [Bluetooth
manager] in [Control Panel].
② Select one of the Bluetooth devices.
* Bluetooth function is just available with a product with a built-in bluetooth module.(Option)
[ Bluetooth Device Search ]
19
Page 21
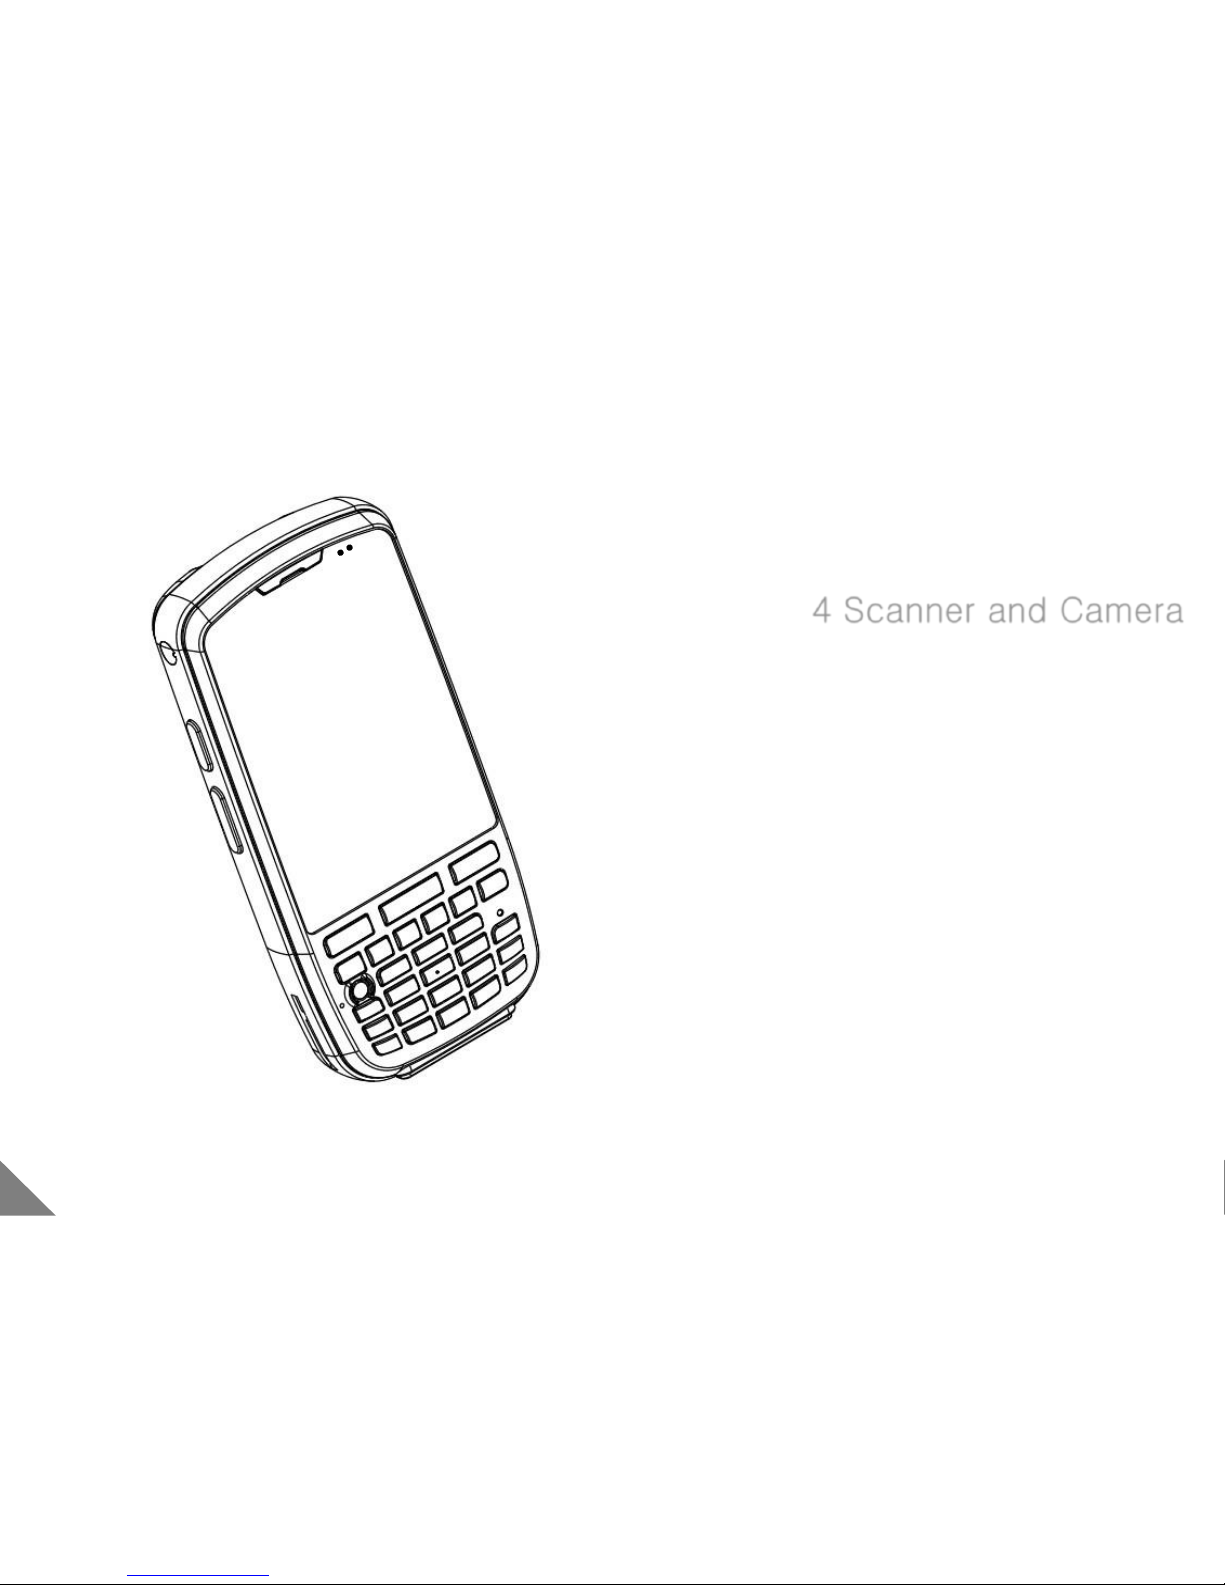
4 Scanner and Camera
4.1 Using Barcode Scanner
4.2 Using Camera
20
Page 22
4 Scanner and Camera
4.1 Using Barcode Scanner
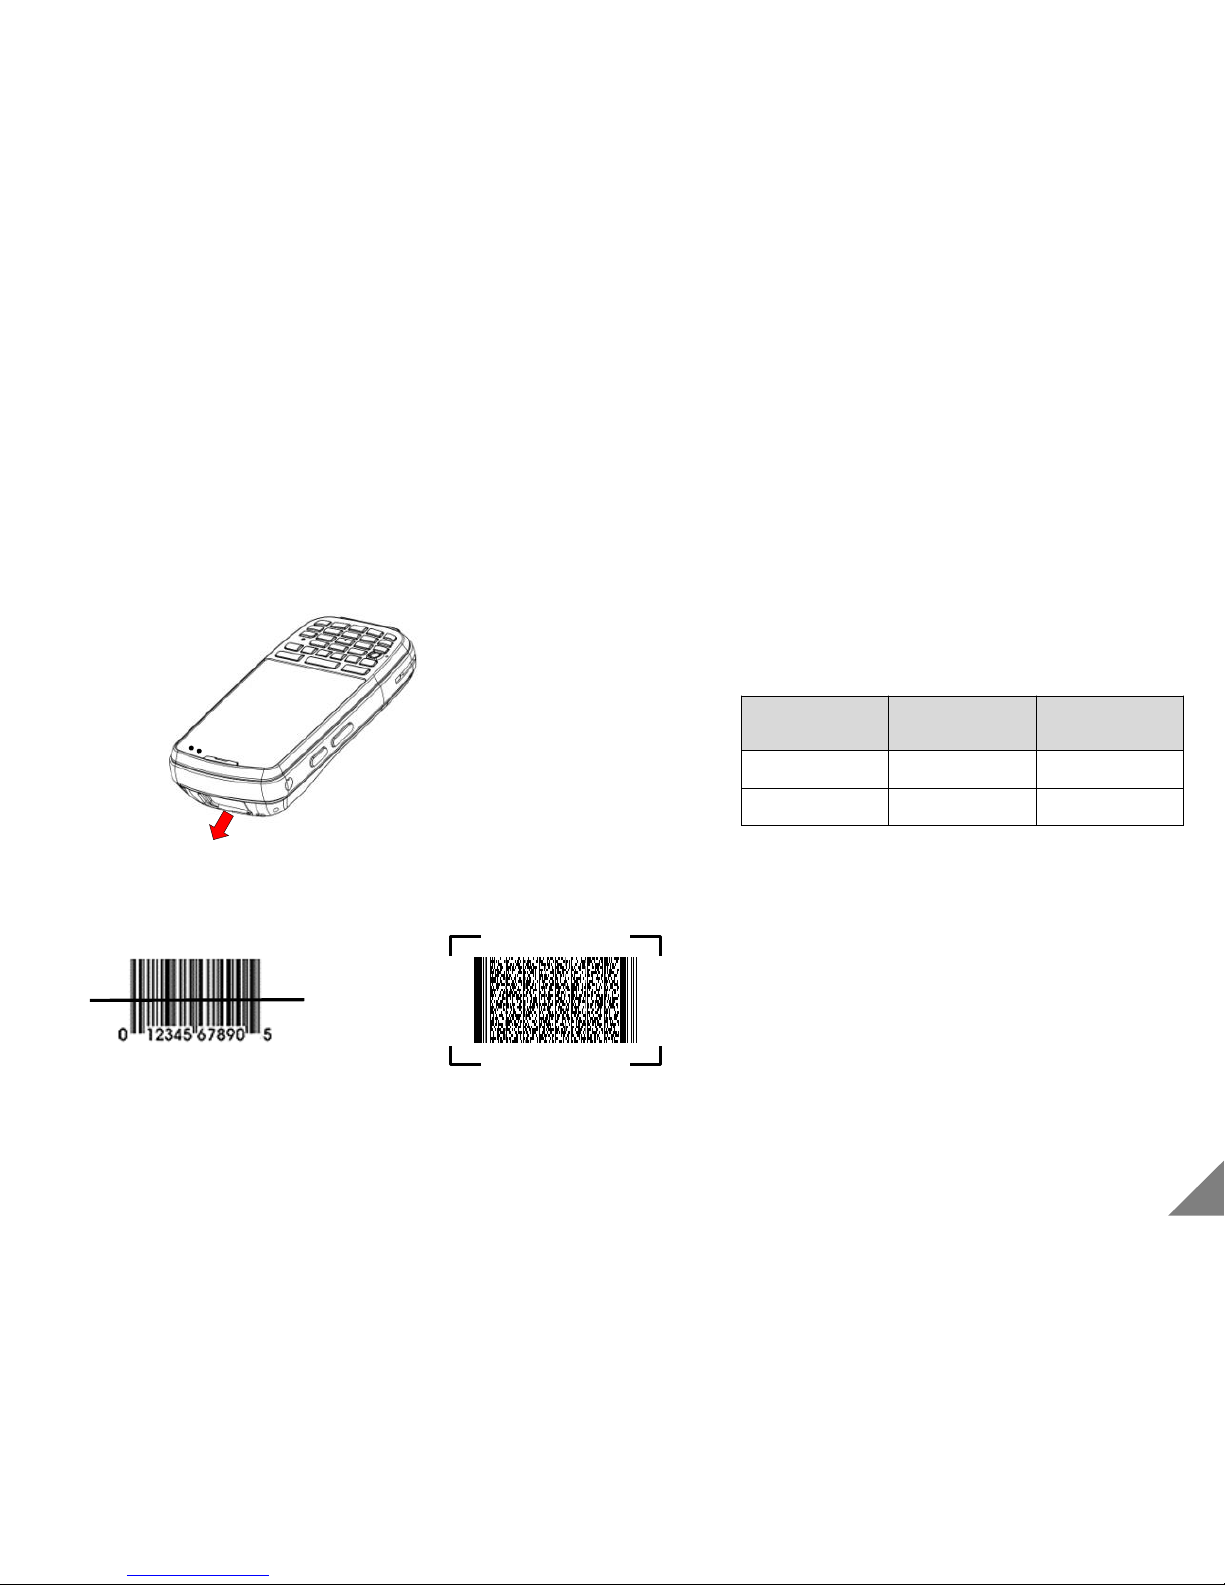
[ Using Barcode Scanner ]
In order to operate it, Press red button on the upper right
side for 3 seconds.
<Reference>
Scanning
Method
Model Dimension
Laser DS3 1D
Image DS3 2D support
< Caution >
• Reading 1D Barcode : You should position the laser at the
the middle of barcode.
• Reading 2D Barcode : You should position the barcode
in red recognition guide line.
• When operating barcode scanner, please don’t shed
directly or indirectly to eyes. It causes a critical injure
including loss of eye sight
* Barcode scanner function is just available with a product with a built-in camera module.(Option)
< Correct the use of 1D Scanner > < Correct the use of 2D Scanner >
Barcode scanner
21
Page 23
4.2 Using Camera
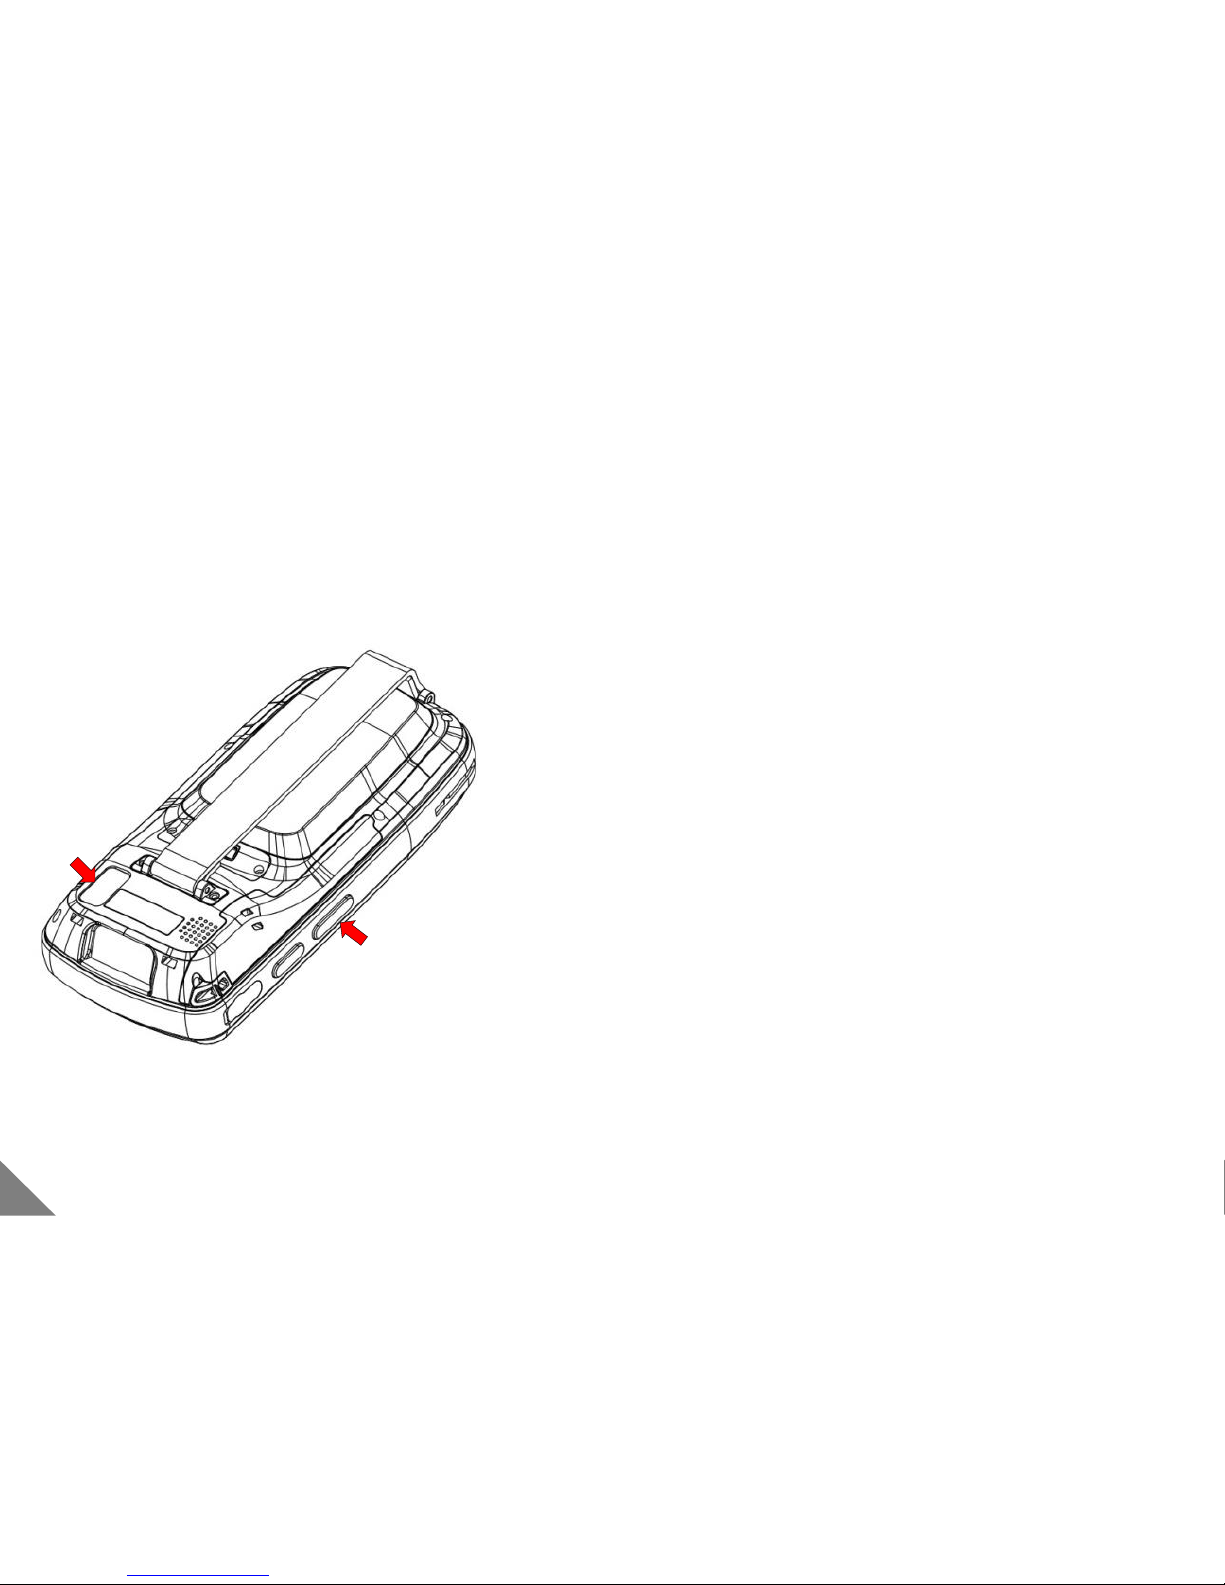
[ Using Camera]
① Press the bottom of right side camera key.
② Press [Preview] button in [Camera] and then,
have a subject moved on preview display.
③ Pressing [Focus] button, it can automatically adjust the
focus.
④ In case that surrounding is dark, please operate the flash
by pressing [Flash On] button.
By adjusting status bar, you can use zoom function.
⑤ Pressing [Shot] button, the photo is saved
simultaneously.
* Camera function is just available with a product with a built-in camera module.(Option)
Camera button
Camera
22
Page 24
4.2 Using Camera
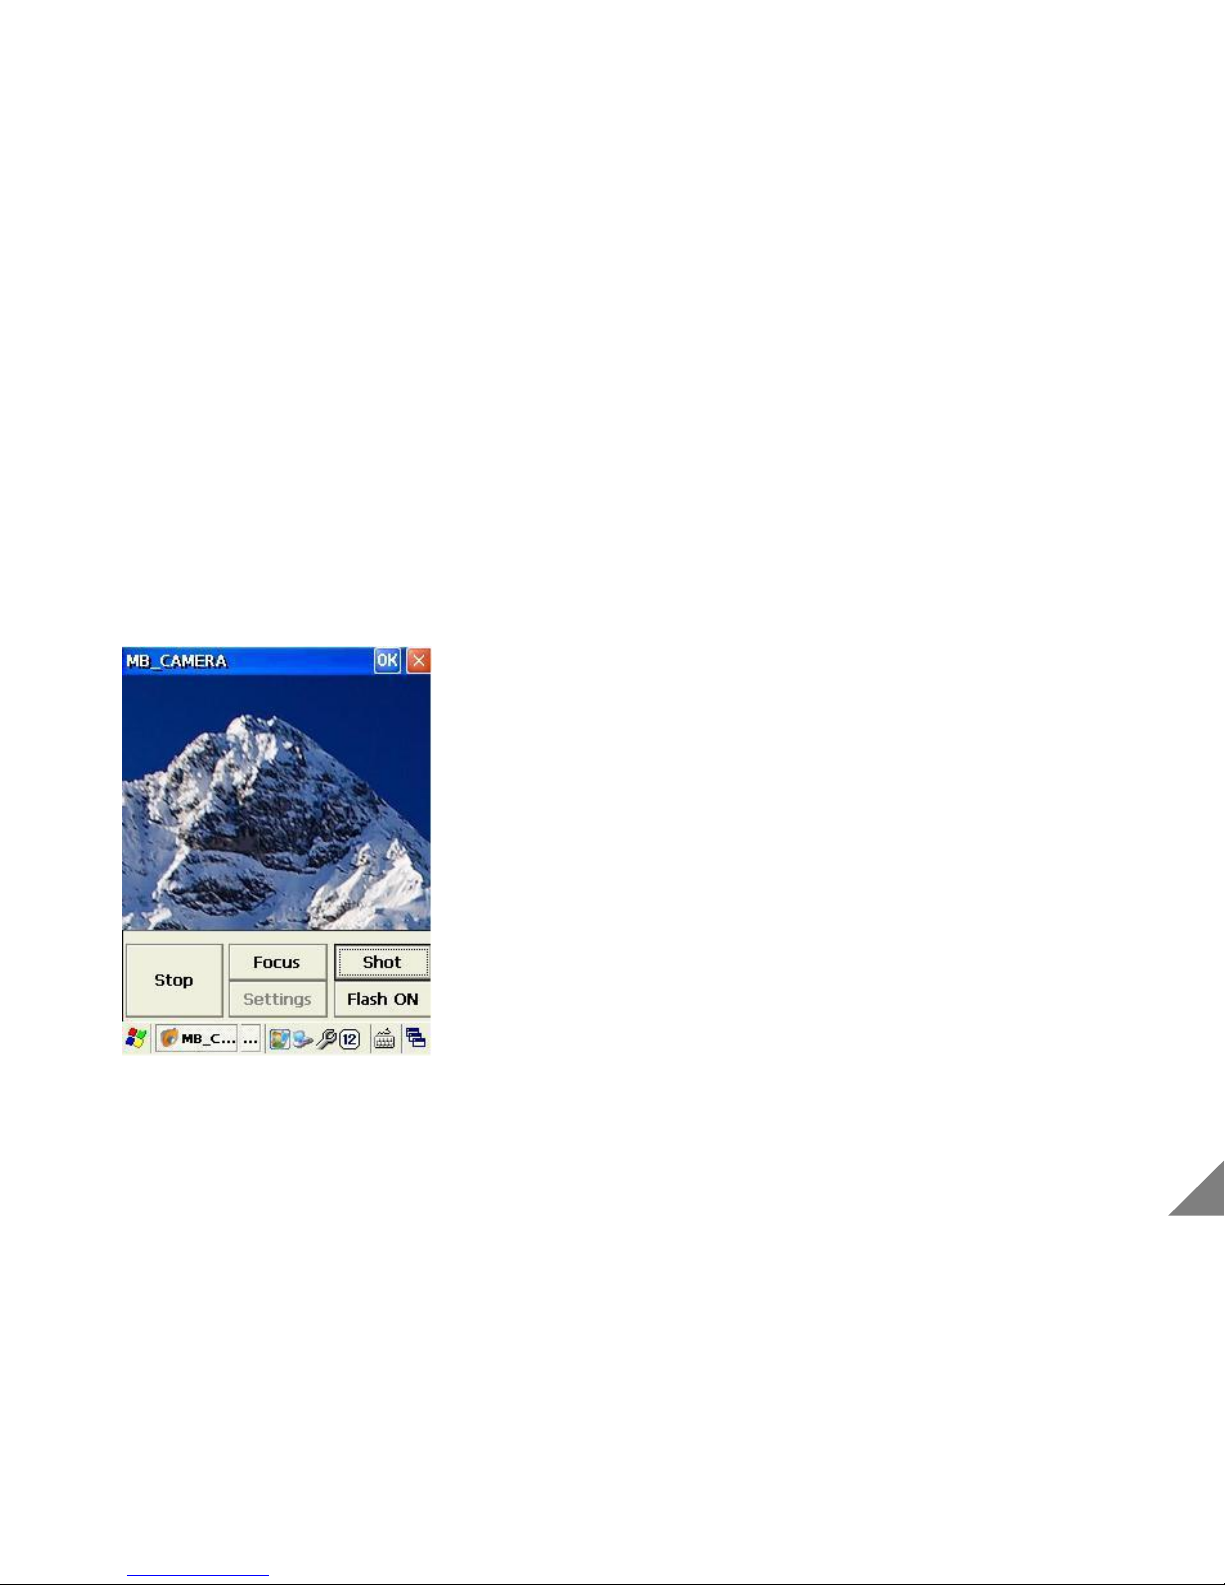
[ Using Camera]
① Execute Camera program.
② Camera preview display is on/off when pressing
[Preview]/[Stop] button.
③ Pressing [Focus] button, it can automatically adjust the
focus .
④ In case that surrounding is dark, please operate the flash
by pressing [Flash On] button.
By adjusting status bar, You can use zoom function.
⑤ Pressing [Shot] button, the photo is saved
simultaneously.
* Camera function is just available with a product with a built-in camera module.(Option)
23
Page 25
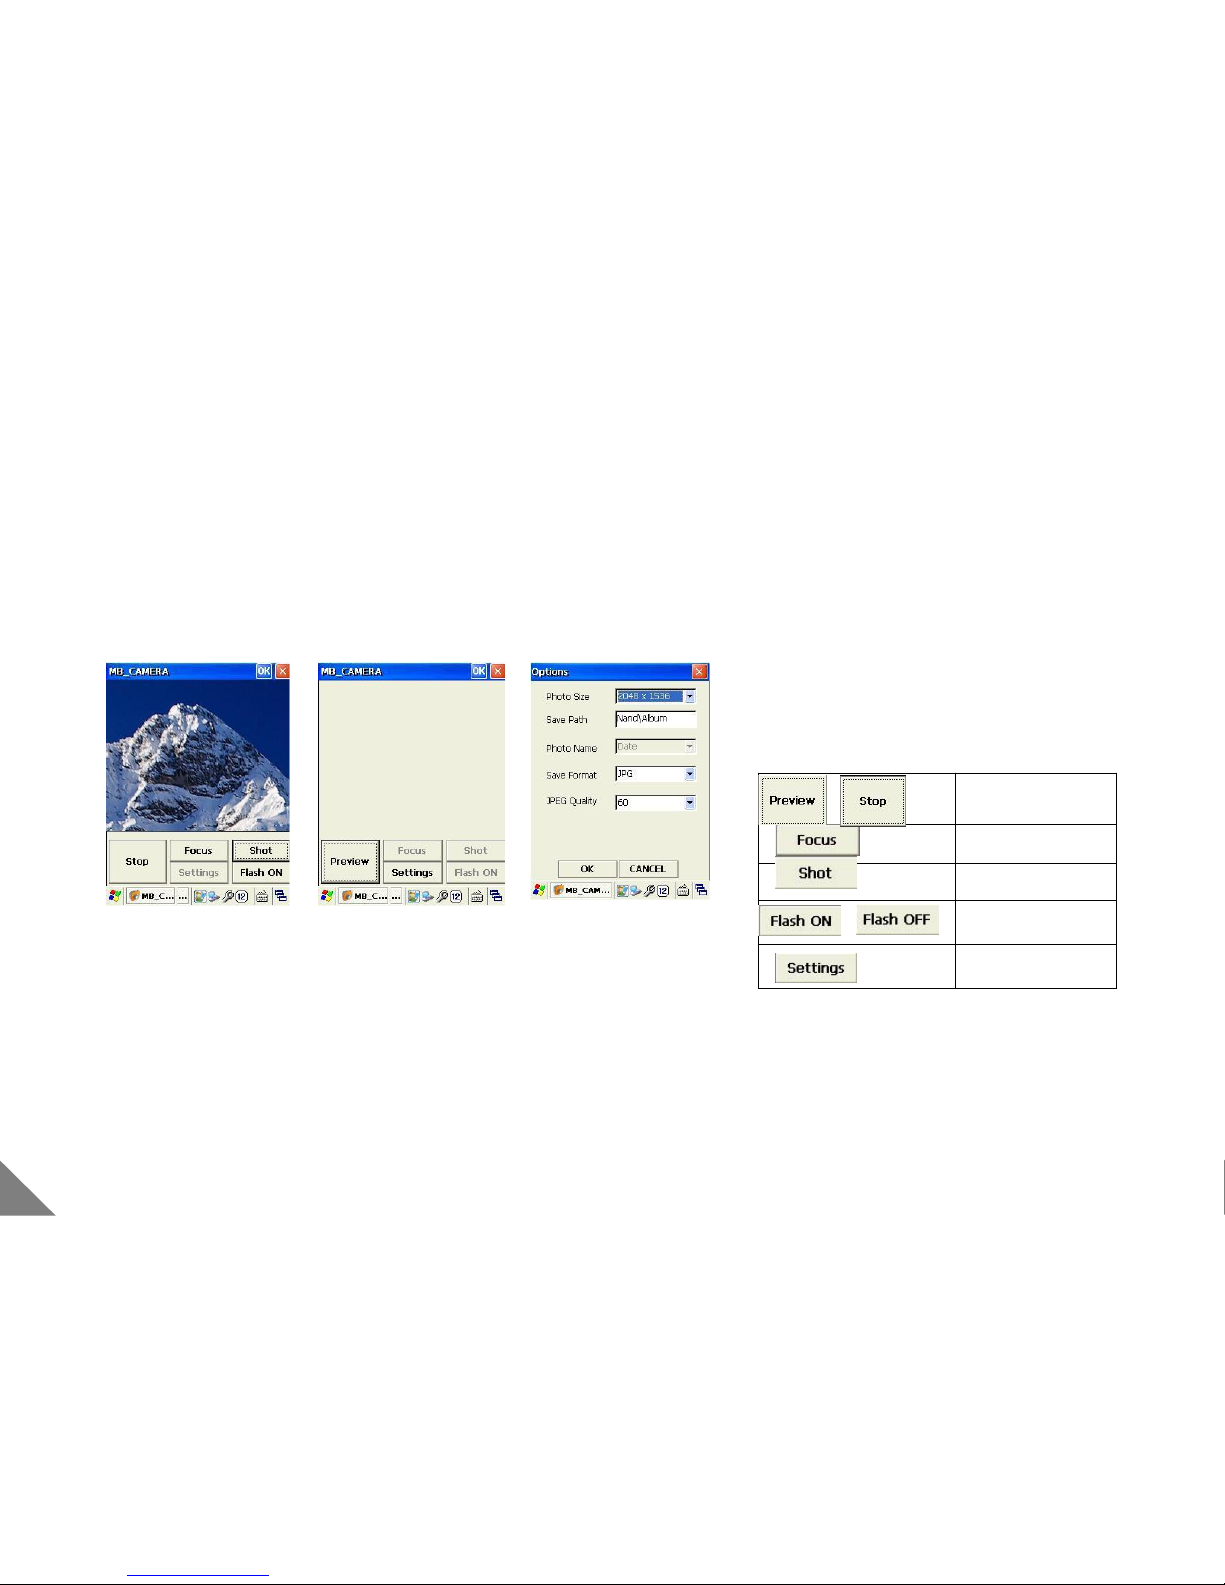
Preview / Stop
Auto Focus
Shooting and Save
Flash on / off
Setting
4.2 Using Camera
< Reference >
• Activate [setting] after pressing [Stop] button of the display.
• You can do set up by pressing [Setting] in [Camera].
* Program related with camera could be modified.
* Camera function is just available with a product with a built-in camera module.(Option)
24
Page 26
5 ActiveSync
5.1 Installing ActiveSync
5.2 Using ActiveSync
5.3 Solving Problem
25
Page 27
5 ActiveSync
5.1 Installing ActiveSync
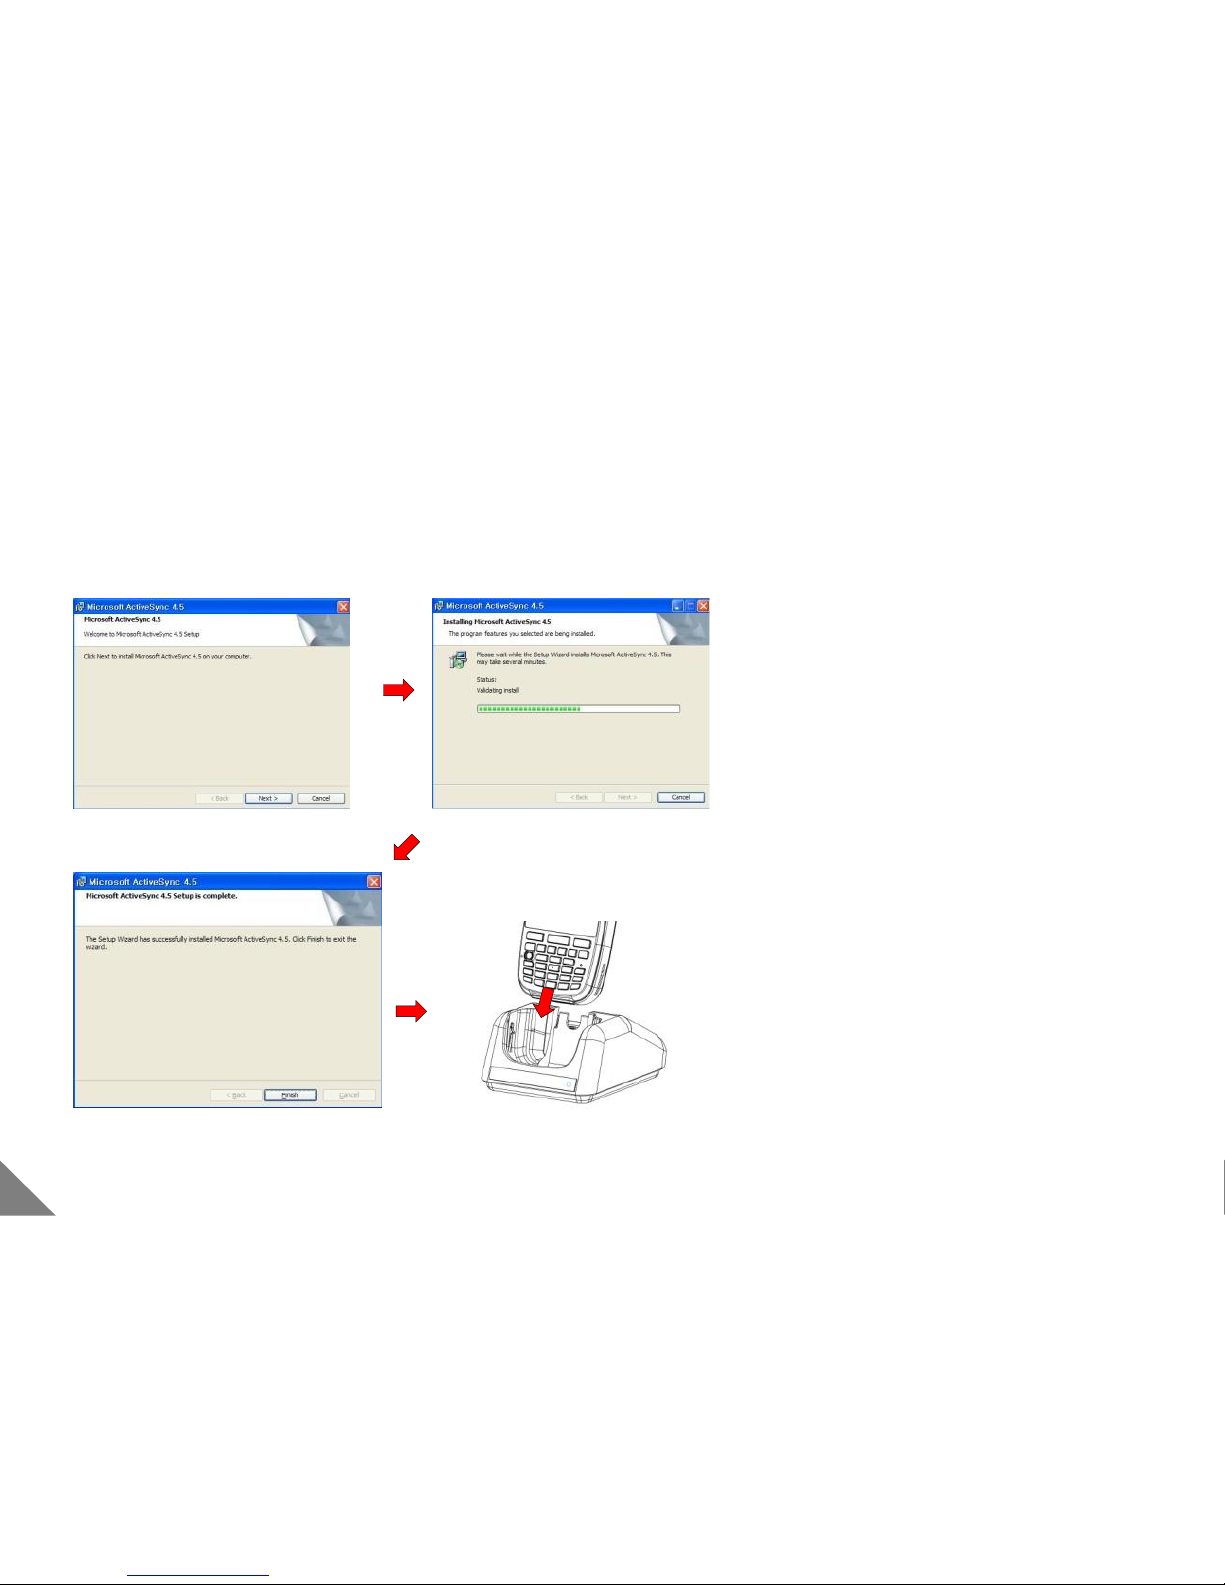
[ Installing ActiveSync ]
① Please download ‘ActiveSync’ and ‘USB driver’ from
www.mobilebase.co.kr
② Please start the installation by executing the files.
③ Please have it proceed with pressing [Next] button.
④ Please connect the computer with a cradle by USB cable
when the installation is completed.
⑤ Please mount the PDA into a cradle.
< Reference >
• During installation, if [new hardware search wizard]
comes out, install ‘USB driver’ and then press [OK]
⑥ If [set up a partnership] comes out, select
synchronization settings and then press [OK]
< Caution >
• Please install ActiveSync, when PDA is not connected.
26
Page 28
5.2 Using ActiveSync
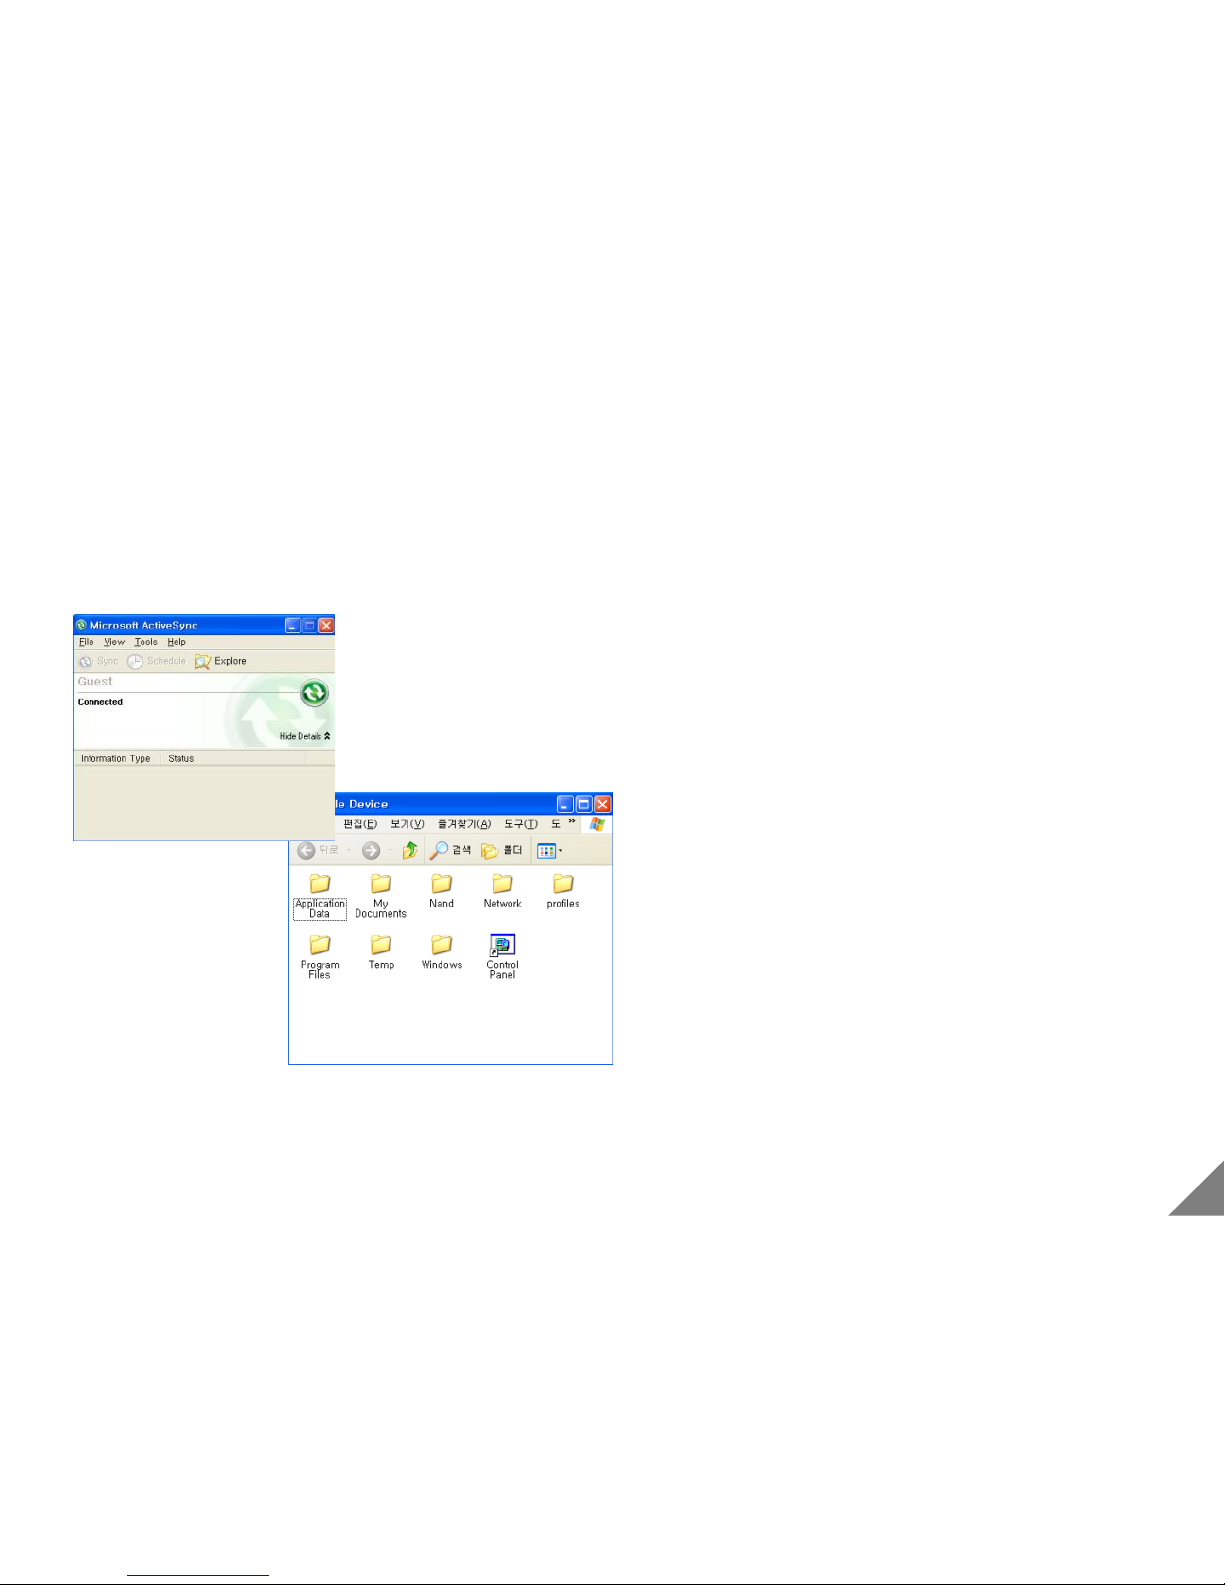
[ Using ActiveSync ]
① By using ActiveSync, You can synchronize the data of
PDA and computer.
② You can load a file in PDA or transfer a file in computer
after clicking [Search] button in ActiveSync..
③ You can back-up or revert PDA information in [tool]
- [Back/Restore].
27
Page 29

5.3 Solving Problem
[ Solving Problem ]
< When ActiveSync not installed >
1. When installing ActiveSync with connection to PDA, a error message could come out.
If so, Please disconnect PDA and computer. Then, install it again.
2. In case that ActiveSync file is damaged, installation could not be completed.
You can download ActiveSync program from www.microsoft.com or www.mobilebase.co.kr
3. If you use MS Vista OS in computer, ActiveSync is not available.
Please download WMDC(Windows Mobile Device Center) from Microsoft homepage.
< When ActiveSync installed >
1. Please check if USB connector of cradle or computer is correctly connected.
2. Please check if PDA power is turned on.
3. Please check if USB driver file is correctly installed.(You can download the latest drive file from www.mobilebase.co.kr
4. Please check if “allow USB connections” is selected in [file]-[connection setting] in ActiveSync screen.
5. Please connect again after software reset
28
Page 30

Contact point
Technical Support Team
Tel : 1577-7131
Fax: 02-2107-5119
Address : 153-772 2F, DeaRung TechnoTown 448 Gasan-dong KuemChun-gu Seoul
Korea
Online Technical
Support
Website : http://www.mobilebaseglobal.com
E-mail : [email protected]
6 Technical support
29 29
Page 31

BY
 Loading...