

Mobiky genius Owner's Manual
TECHNICAL SPECIFICATIONS
Weight 13 Kg
Folded dimensions 63,5 x 30,5 x 77 cm
Unfolded dimensions 127 x 45 x 102,5 cm
Saddle : Max level 102,5 cm
Handlebar : Max Level 98 cm
Frame Aluminium 6061
Rims Aluminium 6061 12’’
Chains Rust preventive steel
Front brake Disk 120 mm diam.
Rear brake Band brake 80 mm diam.
Colors
9 Red
9 Green
9 Orange
9 Cobalt
9 Dark blue
Rider’s weight < 105 Kg
Adjusting torks
www.mobiky.com
OWNER’S MANUAL
by
www.mobiky.com
Model Head set Stem
Seat
clip
Seat
sheath
Front
wheel
Rear
wheel
Pedals &
Cranks
Arms &
Synchronism
GENIUS
10/15
N.m
Clamp
12/16
N.m
Clamp
37/42
N.m
37/42
N.m
37/42
N.m
30/35 N.m
Thank you for becoming a new owner of GENIUS folding bike.
We hope you will be fully satisfied and enjoy riding it.
Before using your bicycle for the first time, please take some time to read this
owner’s manual, and in particular to practice the folding and unfolding
procedures properly.
Proper operation of your bicycle is important for your safety and enjoyment.
With just a bit of experience, you should be able to fold and unfold your
bicycle in 3 seconds.
If you carry out any adjustments or maintenance work yourself, do read the
relevant section of this manual first.
Be sure to follow the sequence of steps carefully.
TABLE OF CONTENTS Pages
Safety 2
GENIUS bicycle terms 3
Riding position settings 4
How to use GENIUS 6
o Unfolding procedure 6
o Folding procedure 7
Running adjustments & checks 9
Maintenance 11
Routine replacements 12
Warranty 14
SAFETY
Before your first ride
Make sure it has been checked and adjusted by a bicycle technician. This will
validate your warranty and ensure that your bicycle is optimally adjusted for
performance and safety.
Riders should be between 1,20 m and 1,95 m in height and weight no more than
105 kg or 230 lbs.
¾ When using be sure you know all local road regulations
¾ A helmet is recommended for safe riding
¾ Use appropriate lights, front and rear, when riding after dark
GENIUS is only for use on roads and well made paths. Other surfaces can
overstress the frame. The tyres and wheels are also quite unsuitable for riding on
uneven ground.
Be aware it has not been designed for cross country or freestyle riding.
All use out of the above instructions can cause injury and will cancel the
warranty immediately.
Before each ride
Saddle and handlebars should be ajdusted to suit your own riding position.
Please, follow the instructions below.
WARNING
In unfolded position (riding position), be sure that :
¾ Stay tube (Refer to GENIUS Bicycle Terms: 33 ) is properly secured to
the back of the rear fork slot
¾ All latches and saddle, stay and stem clamps are properly secured
(Refer to GENIUS Bicycle Terms: 44
¾ Check your brake system and tyre pressure
Do not ride your bicycle if it is damaged or if one of the above
instructions is not followed.
Have it serviced immediately by an authorised technician.
1
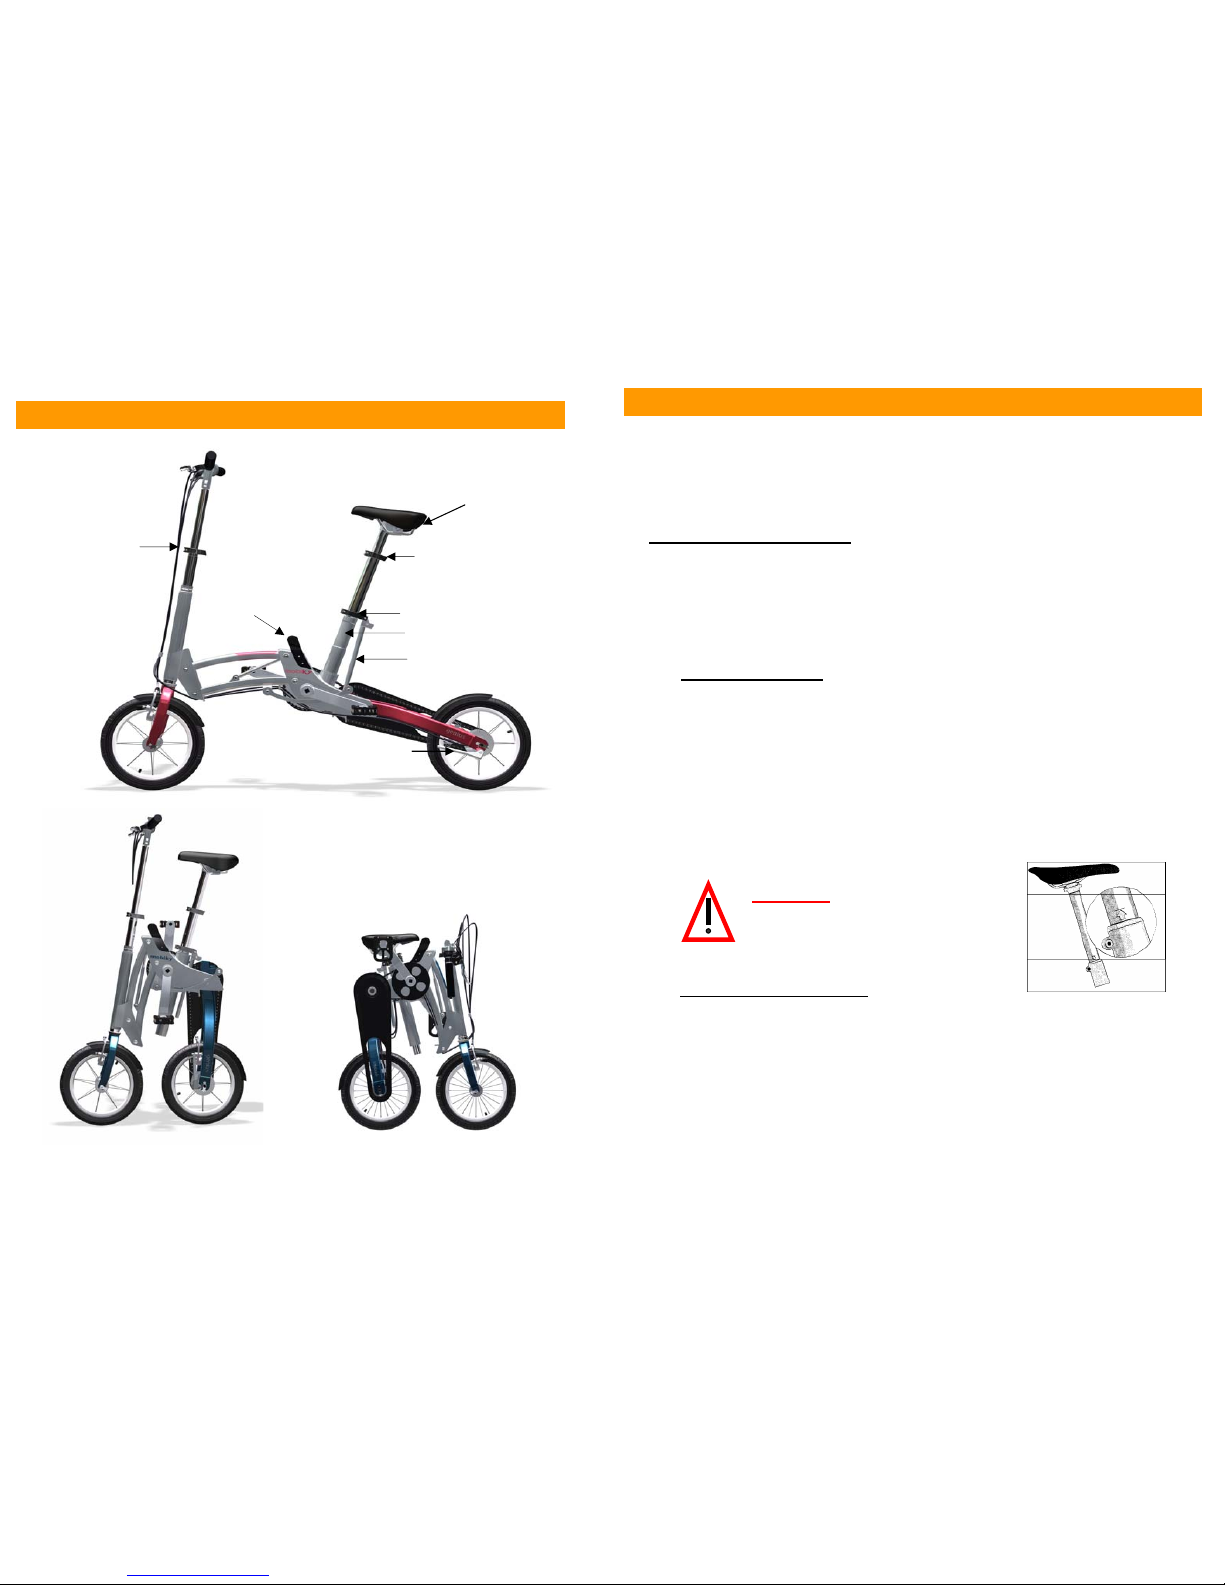
GENIUS BICYCLE TERMS
Riding position
Walking position Storage position
RIDING POSITION SETTINGS
The proper fit of the saddle and the handlebars is very important for safety and
good riding comfort.
Below you will find all the adjustements you need to make to the GENIUS before
riding.
GENERAL INSTRUCTIONS
For a comfortable riding position, the height of the saddle should be adjusted
according to your size.
When seated, straighten your leg until your heel lays on the pedal in its lowest
position.
Saddle adjustment
¾ Unlock the stay clamp o
¾ Draw the saddle up to the right position
¾ If it’s not high enough and the seat pillar reaches the end, follow the
same procedure with the saddle clamp u.
¾ Once the saddle is well adjusted, secure the quick releases properly.
¾ Before riding check the saddle is correctly tightened. If it is loose, screw
the quick releases again and lock.
WARNING
Never draw out the seat post beyond
the stamped security line.
Saddle angle adjustment
The saddle angle is already adjusted in the normal way.
The best position is reached when the front pad is 0,5 cm to 1 cm higher than
the rear to prevent it from sliding.
¾ Slacken the nut securing the mounting clip, choose a suitable angle
and re-tighten the nut: torque 13NM. Use an Alen key diam. 6 mm.
¾ Check the saddle is correctly tightened. If necessary, screw again.
Stay Tubep
Stem clamp n
Saddle sheathq
Stay Clampo
Carry Handles
Saddle r
Kickstand t
Saddle clamp u
3
4
2
 Loading...