

Page 1

User Menu
introducing
C6 series
Page 2

Getting to know your new phone
ongratulations on the purchase of your new Mobicom
phone!
Your Mobicom phone is an advanced communications
device with many features and functions. Please take a moment to
familiarize yourself with the capabilities and options of your Mobicom
phone. Your familiarity with the operation of your Mobicom phone
will help you enjoy it in a safe and productive manner
2
Page 3
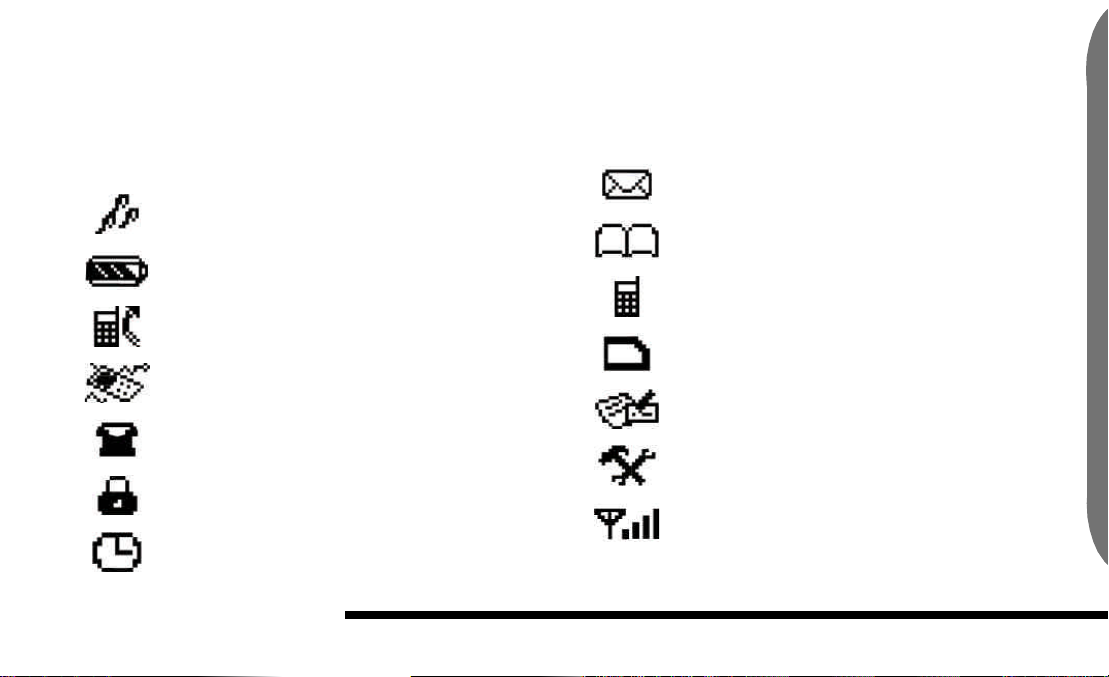
Display Icons
Audio Settings
Battery level and charge
Call Divert Activated
Divert
Incoming call and on-call indicator
Keypad locked
Memo or alarm set
Messages
Phone book
Phone number saved in phone
Phone number saved in SIM card
Secretary
Settings
Signal strength indicator
3
Page 4

4
Page 5
Safe use of
your n
ew phon
e
Safe use of your new phone
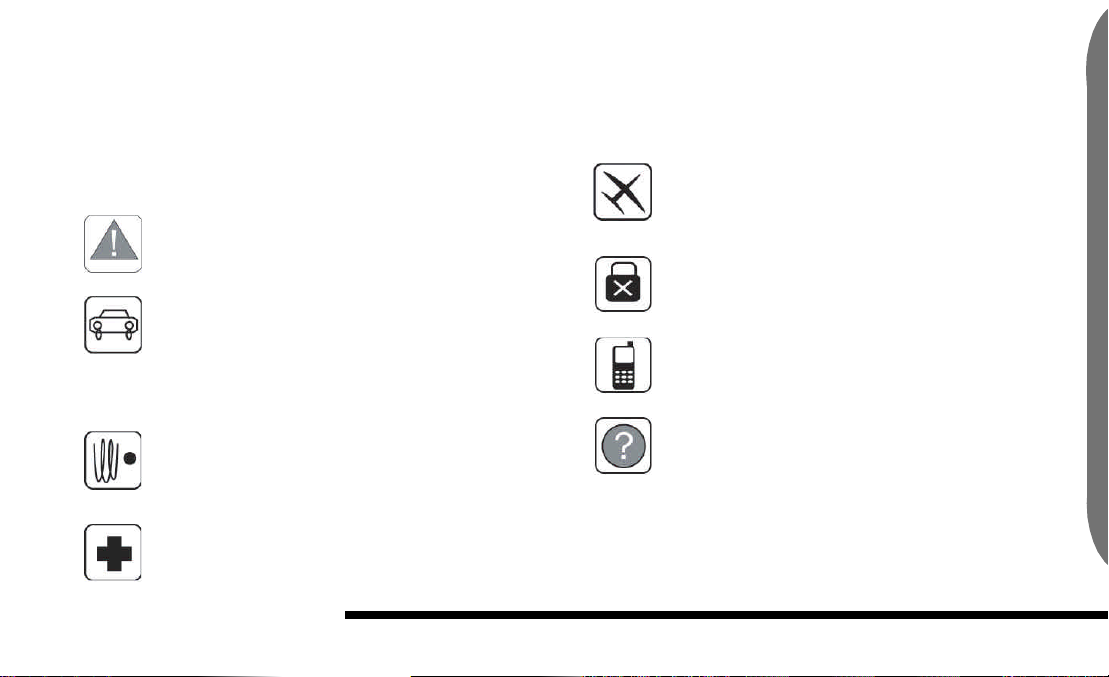
Please observe the following guildlines for safe and respon-
sible opperation of your cellular phone
use of your phone. See detailed information in this
manual.
calls while driving. You should try to find a safe
place to pull over and stop driving before placing or
receiving a phone call while driving. The use of a
hands free headset is required for cell phone use
while driving in some areas.
blasting areas where explosives are being detonated.
Always observe local rules and regulations that may
restrict or prohibit phone use in some areas.
ment local rules and regulations may require that
your phone be switched off.
Follow all guidelines for safe and legal
Use caution while placing or receiving
Keep your phone switched off near
When in hospitals or near medical equip-
FCC regulations require that your phone
be switched off while on airplanes. Wireless phones
could cause interference with the airplanes equipment or air traffic control signals.
Keep your phone switched off while
refueling. Do not use your phone while near fuel or
flammable chemicals.
Avoid contact with your phones antenna
while the phone is in use.
All wireless phones, including this one
may receive interference from other sources, which
may affect the phones performance.
5
Page 6

Safe use of
your n
ew phon
e
Table of contents
Getting to know your new phone 2
Display Icons 3
Safe use of your new phone 5
Table of contents 6
Key Featuresof the Mobicom C6088 & C6288
Phone 11
Getting Started 13
UnPacking 14
Contents 14
Your new phone’s box should contain the following items: 14
6
Installing your SIM Card 14
Charging your phone’s battery 15
Connecting a hands free headset
adapter to your phone 16
Using your Phone 17
Turn phone on 17
Welcome Screen 17
Menu: 17
Navigation Keys: 17
Menu Tree 19
Messaging Management- Stay Con-
nected with Mobicom 19
Phone Book Management 20
Audio Settings 21
Diverting your Calls 22
Page 7

Safe use of
your n
ew phon
e
Settings 23
Secretary 25
Making and Recieving Phone Calls 27
Dial By Number 27
Dial By Name 27
Receive Calls 28
Flip Open Answer: 28
Any Key Answer 28
Audio Settings 29
Audio Settings 29
Setting volume 29
Setting Speach Volume 29
Setting Ringer Volume 29
Setting Tone Volume 30
Settinging a Ringer Type 30
Setting Tone Types 31
Setting Key Tones 31
Setting Info Tones: 31
Setting the SMS Rx. Tone 31
Setting the Serve Tone: 31
Setting One Min Beep Tone 32
View Missed, Received and Placed Calls 33
Viewing Missed Calls 33
Viewing Missed Call details: 33
Copying Missed calls to Phone
Book: 34
Editing Missed Calls: 34
34
Deleting Missed Calls: 34
There are several ways to delete the
details regarding a Missed call from
your phone’s memory: 34
Viewing Received Calls 35
Viewing Received Call details: 35
Copying Received calls to Phone
7
Page 8

Safe use of
your n
ew phon
e
Book: 35
Editing Received Calls: 35
Deleting Received Calls: 36
Viewing Placed Calls 36
Viewing Placed Call details: 36
Copying Placed calls to Phone
Book: 37
Editing Placed Calls: 37
Deleting PlacedCalls: 37
Voice Mail 39
Managing Voice Mail: 39
Short Messaging Service ( SMS ) 41
Reading Messages: 41
Reading messages in your INBOX
41
Reading Messages in your Outbox
42
8
Composing Messages 42
Deleting Messages 43
Delete ALL messages 44
Deleting Messages in your Outbox:
44
Delete a particular Message 44
Delete ALL messages 45
Checking available message memo-
ry space 45
Message Set-Up 45
Message Display: 45
Message: 45
Message deliverability 46
Message Status 46
Broadcast: 46
Phone Book 47
Searching by name: 47
Creating an entry in the phone book:
Page 9

Safe use of
your n
ew phon
e
47
Deleting an entry in the phone book:
48
Copying a Phone book entry from
the SIM card to the phone: 48
Viewing SIM card and Phone phone
books: 48
Checking available phone book
memory space: 48
Entering your phone's number into
phone book: 49
One-Touch Dialing: 49
Changing Phone Settings 51
Call Settings 51
Flip Open Answer: 51
1 Touch Dial 51
Auto Redial 52
Any Key Answer 52
Call waiting: 52
Clock Setup 53
To Set The Time 53
Seting The Date 53
Setting Time Format 53
Setting Time Zone: 53
Setting Daylight Savings: 53
Screen Setting 54
Setting the Backlight 54
Setting the Contrast 54
Language Settings 55
Setting the Language: 55
Setting the Greeting on your phone
55
Setting the default phone 55
Setting the Security features on your
phone: 55
Setting the Network details on your
phone: 55
9
Page 10

Safe use of
your n
ew phon
e
Secretary Mode 57
Entering A Memo 57
Setting an Alarm 57
Setting Area Code Search 58
Using the Calculator Utility 58
Using the Global Time Clock 58
Diverting Messages 59
Diverting all calls: 59
Diverting calls when phone is in use:
60
Diverting calls when there is no reply: 60
Diverting calls when phone is off:
60
Status of diverting calls: 61
Cancel diverting calls: 61
Troubleshooting 63
10
Care and maintenance of your new phone 65
Batteries care and maintenance 67
Warranty 69
Page 11

K
ey Featuresof the Mobicom C6088 &
Key Featuresof the Mobicom C6088 & C6288 Phone
est, lightest cellular phone.
Size L x W x H (mm) C6088 68 x 38 x 20
Weight C6088 74 g
2-band (900/1800MHz or 900/
Talk time up to 3 h 45 min
Standby time up to 115 hours
Charging time 2.5 hours
Multi-party conversation Yes
Connection tone Yes
Ringing tones 32
One-key ringer stop Yes
Internal vibrator Yes
Phone book copy (phone <--> SIM )
Your feature-packed MobiCom phone is the world's small-
C6288 68 x 38 x 24
C6288 74 g
1900MHz)
Phone book size (phone) 200
Phone book size (SIM) defined by operator
Short message service (SMS) Yes
Predictive text Input Yes
Preset SMS Yes
SMS auto-display Yes
SMS delivery report Yes
Recent calls list
Dialed 25
Received 25
Missed 25
Pager mode Yes
Clock and clock alarm Yes
Calendar (1900 - 2049)
Calculator Yes
Global time Yes
Area code search Yes
11
Page 12

K
ey Featuresof the Mobicom C6088 &
13Getting Started
12
Page 13

Getting Started
Page 14

Getting Started
UnPacking
Installing your SIM Card
Carefully unpack and inspect the contents of your new
phone’s box.
Contents
Your new phone’s box should contain the following
items:
Phone
Battery
Charger
User Manual
Neck Strap
Hands Free Kit
14
Depending upon how you purchased your Mobicom phone,
it may or may not have come with a SIM card already installed. The
SIM card acts as the heart of the phone, providing the ability to store
both your phone's own number as well as those numbers that you frequently dial.
If the SIM card is not installed, please follow these instructions::
1. Remove the battery from the back of the phone.
2. Slide the SIM card into the slot, with the electrical con-
tacts facing inward.
3. Move the latch downward to hold the SIM card in place.
4. Put the battery back into position.
Warning: The SIM card is a delicate piece of precision electronic hardware; care should be
taken while handling it to prevent damage. Avoid excessive or unnecessary handling of the
SIM card. Never touch the golden electrical contacts on the SIM card with fingers or other
objects. Never bend the SIM card. Never force the SIM card into its connector; when
properly aligned the card should slide in effortlessly
Page 15

Getting Started
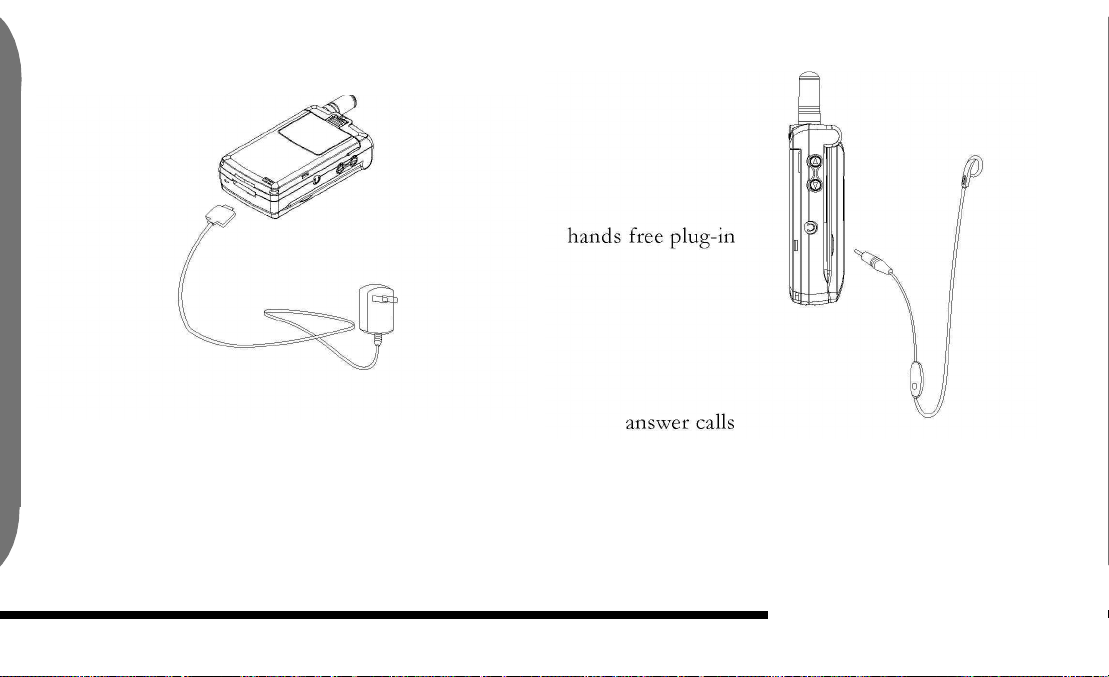
Installing SIM card In new Phone. Charging your phone’s battery
To ensure proper operation, your new phone's battery
should be fully charged prior to its first use. Charge the battery by
using the enclosed MobiCom AC wall charger or the MobiCom mobile
charger. It may take up to three hours to fully charge your phone's battery.
Gently align and insert the charger into the phone by pressing the release buttons on the side of the charger... place the , until you
hear it click into place.
15
Page 16
Getting Started
.Gentely connect charger to Phone.
Connecting a hands free headset adapter to your
phone
Blah BLah BLah
16
Description of connect Handsfree
Page 17

Getting Started
Using your Phone
Turn phone on
To Turn your phone on, press and hold down the (red
phone key) key for a few seconds. To Turn off your phone, follow the
same procedure.
Welcome Screen
The welcome screen appears when you open your phone
and turn it on, as well as when your phone is in a latent state when you
are not acessing functions and features.
Press the SELECT key to enter one of the 6 menu and submenu items. Press the EXIT key to return to exit the phone’s menu or
sub-menu items.
Menu numbering:
The Menu and sub-menu items of your phone
numbers assigned to them
you can use these numbers as shortcuts to access menu and
sub-menu functions and features.
Navigation Keys:
Menu:
Scrolling through the menu:
To access your phone’s menu, press the MENU key at the
welcome screen. Use the left, right, up and down scroll keys to access
from the various menu and sub-menu items.
Soft keys: Your phone features two soft keys that appear
below the display screen. Their current function is indicated by the
words apprearing above the keys on the display screen. Simply press
the corresponding key under the option you want to select.
Scroll Keys: Your phone has four scroll keys. They have left,
right, up and down arrows on them to indicate directional use. Use the
scroll keys to navigate among the menu and sub-menu items
17
Page 18

Getting Started19Menu Tree
18
Page 19

Menu Tree
Messaging Management- Stay Connected with Mobi-
com
Mobicom understands the importance of maintaining connectivity, and has built a variety of messaging management features
and functions into the (Mobicom Model Phone) that will allow you a
breadth of message access options and management functionality.
Messaging
Read
Inbox
List Of Messages ( Select to View )
Outbox
Write
Delete
Free Count
List Of Messages ( Select to View )
Send to
Send
Send and Store
Store
Inbox
Outbox
Total / Free
Setup
Auto display ( On / Off )
SMS Center
Valid Time
12 Hours
1 Day
1 Week
1 Month
Status Report ( On / Off )
Broadcast
Auto Display ( On / Off )
Voice Mail
Mail Box Number
Max Time
Read
Languages
Multiple languages depending upon market
List
Connect
Enter Number
Enter Number
Page 20

Menu Tree
Phone Book Management
Managing the details for your professional and personal contacts can be a time consuming task. Your (Mobicom model phone) is
the ideal tool to centralize this process. Your(Mobicom model phone)
offers you the ability to quickly and conveniently configure, categorize,
update and manage all your various contacts. Access to important people is now right at your fingertips!
Phone Book
Search Name
Enter First Chars
Create
Enter Name
Delete
Copy
SIM <-> Phone
Directory
SIM
Phone
Free Count
Total / Free SIM
Total / Free Local
Own Number
Enter Number
One Touch Dial
Key 1
Key 2
Key 3
20
Key 4
Key 6
Key 7
Key 8
Key 9
Page 21

Menu Tree
Audio Settings
We're all unique. From classical to traditional to contempo-
rary to whimsical, your (Mobicom phone model) offers a variety of
ringer options and tone settings to fit every personality and preference.
Audio Settings
Set Vol
Speech Vol
Ringer
Tone Vol
Ring / Vib
Ring Tone
Blip
Simple 1
Submarine
Chirp
Brring
Walking Bass
Nee Naw
Wild Rover
Town I Love
Connemara
Wild Mountain
Chopin
Bach
Blue Bonube
Maple
Scherzo
Simple 2
Sleeping
Phone Ring 1
Phone Ring 2
Phone Ring 3
Phone Ring 4
Two Tone
Ring Vib
Ring
Vibration
Ring / Vib
Vib / Ring
Silent
Set Tone
Key Tone
Key Click
DTMF
Silent
Info Tone ( On / Off )
SMS Rx. Tone
Silent
Beep Once
Meeting
Standard
Outdoor
Vibration
Serve Tone ( On / Off )
One Min Beep ( On / Off )
21
Page 22

Menu Tree
Diverting your Calls
Never miss another phone call. Period. You can instantly
and seamlessly divert calls from your Mobicom (model phone) to any
other phone. Anywhere. Whether you are at work, at home-or even on
vacation- make sure those important calls reach you.
Divert
All Calls
Activate
Cancel
Status
If Busy
Activate
Cancel
Status
If No Reply
Activate
Cancel
Status
Phone Off
Activate
Cancel
Status
Status
22
Cancel All
Page 23

Menu Tree
Settings
This directory highlights some of the more advanced,
diverse and useful features and functions of your Mobicom (model
phone). Through the settings menu, you will be introduced to a variety
of options that offer the opportunity to configure your phone to
reflect personal tastes and preferences.
Settings
Phone Setup
Paging Mode
Pager On
Settings
Pager Off
Ringer Vol.
Ringer Tone
Blip
Simple 1
Submarine
Chirp
Brring
Walking Bass
Nee Naw
Wild Rover
Town I Love
Connemara
Wild Mountain
Chopin
Bach
Blue Bonube
Maple
Scherzo
Simple 2
Sleeping
Phone Ring 1
Phone Ring 2
Phone Ring 3
Phone Ring 4
Two Tone
Ringer Vib
Pager Alert
Vibration
Ring & Vib
Back Light ( On / Off )
Contrast
Language
English
Chinese
Spanish
Greeting
Greeting On
No Greeting
Edit Text ( Enter Text )
Default
Phone Lock Code
Call Settings
23
Page 24

Menu Tree
Flip Open Answer
One Touch Dial
One touch Dial
Auto Redial
Any Key Answer
Call Wait
Activate
Cancel
Status
Clock Setup
Set The Time
Set The Date
Time Format
12 Hour
24 Hour
Set Time Zone
Offset from GMT
Daylight Savings
Automatic Adjust Summertime
USA
Europe
Security
PIN Setting
PIN Enable
Network
PIN Change
PIN to Change
Phone Lock
Lock Phone
Change Code
Bar Calls
All Out
All International
Out Except Home
All In
In if Roam
Cancel All
Change Password
Fixed PB ( On / Off )
SIM Lock
Set Lock
ChangePC?
Change Password
Select Method
Manual Select
Auto Select
Select PLMN ( Public Land Mobil Network )
List??
Edit PLMN
List ?
24
Page 25

Menu Tree
Secretary
Remind yourself of important dates and meetings. Capture
valuable ideas and information through electronic memos. Instantly
launch a 12-month calendar- or retrieve the time in Tokyo, London or
New York by accessing a global clock. Your Mobicom phone is truly a
communication device and personal assistant combined.
Secretary
Alarm
Set Alarm
Re-Set Alarm
Select Tone
Blip
Simple 1
Submarine
Chirp
Brring
Walking Bass
Nee Naw
Wild Rover
Town I Love
Connemara
Wild Mountain
Chopin
Bach
Blue Bonube
Maple
Scherzo
Simple 2
Sleeping
Phone Ring 1
Phone Ring 2
Phone Ring 3
Phone Ring 4
Two Tone
Memo
Write
Once
Daily
Weekly
View Today
Edit Memo
View
Delete
View All
Edit Memo
View
Delete
Delete
Delete All
Calendar
(Enter Something )
Enter Date
Enter Alarm Time
Do You Want to Set Alarm ( Yes / No )
25
Page 26

Menu Tree
Global Time
Query
Add
Delete
26
Page 27

Making and Reci
eving Phone Calls
Making and Recieving Phone Calls
Dial By Number
Using the phone’s key pad, enter the number you wish to
call. When you have finished entering the phone number, press the
(green phone) key to place the call.
If you want to dial a number that is already stored in your
Phone Book (see Storing Phone Numbers, pg. xxx) use the scroll up
and down keys to locate the phone book entry you wish to dial. Press
the (green phone) key to place the call.
Dial By Name
Using the scroll keys, highlight the Phone Book icon from
the main menu of features. Press the select key. Scroll to the SEARCH
NAME function, and press the select key. Using the phone’s keypad,
enter the name of the contact you wish to call. Press the search key
when finished. The name and number will appear on the screen. Press
the (green phone) key to place the call.
If you want to dial a name that is already stored in your
Phone Book (see Storing Phone Numbers, pg. xxx) use the scroll up
and down keys to locate the name of the person you want to call. Press
the (green phone) key to place the call.
27
Page 28

Making and Reci
eving Phone Calls
Receive Calls
There are several ways to answer incoming calls:
Flip Open Answer:
This allows you to answer a phone call simply by flipping
open the phone. To enable this function, scroll to the FLIP OPEN
ANS function and press the select key. To enable the flip open answer
function, Press the ON key. To disable the flip open answer function,
press the OFF key.
If “flip open answer” has been deactivated ( see Call Settings
pg XXX ) press the XXX key to answer the call.
Any Key Answer
This allows you to answer a phone call simply by pressing
any key on the phone. To enable this function, scroll to the ANY KEY
ANSW function and press the select key. To enable the any key answer
function, Press the ON key. To disable the any key answer function,
press the OFF key.
28
If any key answer has been deactivated ( see Call Settings pg
XXX ) press the xxx key to answer the call.
Page 29

A
udio Settings
Audio Settings
We're all unique. From classical to traditional to contemporary to whimsical, your (Mobicom phone model) offers a variety of
ringer options and tone settings to fit every personality and preference.
Audio Settings
This directory offers you a variety of different menu options
to set audio volume and tones. To access the audio setting options,
press the ____ Menu key and select the _____ Audio Settings icon
from the main menu of features. Press the __ Exit key to return to the
main menu of features.
Setting volume
To set volume levels, scroll to the SET Vol function and
press the select key.
Setting Speach Volume
To set the speech volume, scroll to the SPEECh VOL. function and press the select key. Adjust the volume up or down using the
right and left scroll keys.
Setting Ringer Volume
To set Ringer Volume, scroll to the RINGER VOL. function and press the select key. Adjust the volume up or down using the
right and left scroll keys.
29
Page 30

A
udio Settings
Setting Tone Volume
To set the Tone Volume, scroll to the Tone Volume function and press the select key. Adjust the volume up or down using the
right and left scroll keys.
Settinging a Ringer Type
Blue Bonube
Maple
Scherzo
Simple 2
Sleeping
Phone Ring 1
Phone Ring 2
Phone Ring 3
Phone Ring 4
Two Tone
To adjust the ringer type and tone, scroll to the ringer/vib
function and press the select key.
To adjust the ringer tone, scroll to the Ringer Tone function
and press the select key. Using the scroll down key, select from the following ring tones:
Blip
Simple 1
Submarine
Chirp
Brring
Walking Bass
Nee Naw
Wild Rover
Town I Love
Connemara
Wild Mountain
Chopin
Bach
30
Tones will automatically sound as they are highlighted.
To specify a combination of ringer and vibration options,
scroll to the Ringer/Vib function and press the select key. You will
then have the ability to choose from the following choices:
Ring Only
Vibration Only
Ring / Vib
Vib / Ring
Silent
Use the scroll dowm key to move between the various selections. Press the select key to choose an option.
Page 31

A
udio Settings
Setting Tone Types
Setting the SMS Rx. Tone
You can set tones for a variety of different functions. To set
tones, scroll to the SET TONE function and press the select key.
Setting Key Tones
To set various key tones, scroll to the KEY TONE function
and press the select key. You have 3 different key tones to choose
from:
Key Click Tone
DTMF Tone
Silent
Use the scroll dowm key to move between the various selections. Press the select key to choose an option.
Setting Info Tones:
To set an Info tone, scroll to the INFO TONE function and
press the select key. To turn the info tone on, press the ON key. To
turn the Info tone off, press the OFF key.
To set a tone to indicate the arival of a text message , scroll
to the SMS Rx. Tone function and press the select key. You will have
several different key tones to choose from:
Silent
Beep Once
Meeting
Standard
Outdoor
Vibration
Use the scroll dowm key to move between the various selections. Press the select key to choose an option.
Setting the Serve Tone:
To set a Serve tone, scroll to the SERV. TONE function
and press the select key. To turn the serv. tone on, press the ON key.
To turn the serv. tone off, press the OFF key.
31
Page 32

A
udio Settings
Setting One Min Beep Tone
Your phone can be programmed to emit a short beep every
minute to help you track how long you have been connected.
To set an One Minute Beep tone, scroll to the 1 Min Beep
function and press the select key. To turn the One Minute Beep tone
on, press the ON key. To turn the One Minute Beep tone off, press
the OFF key.
32
Page 33

V
i
ew Missed, Rece
ived and Placed Calls
View Missed, Received and Placed Calls
Calls
Missed calls (shows a list)
Incoming calls (shows a list)
Outgoing calls (shows a list)
Number info
Copy to pb (phone book)
Edit and Send (store, erase)
Delete
Viewing Missed Calls
To view detailed information about the calls you have
missed, press the CALLS key, scroll to the MISSED CALLS function
and press the select key. A list will appear of all the calls you have
missed.
You can access useful information about the calls you have
missed.
Viewing Missed Call details:
Use the Up amd Down Arrow keys to scroll through the
missed calls. Press the select key to access a specific missed call.
A list will appear with details regarding the call you have
missed, including :
The first call out of the total calls missed
the time the missed call was received
33
Page 34

V
i
ew Missed, Rece
ived and Placed Calls
who the missed call was from
The date the missed call was received
Copying Missed calls to Phone Book:
You can store the details of a missed call in your phone
book. Simply select the missed call you would like to store. Scroll to
the COPY to PB function and press the select key. Using your phone's
keypad, enter the first and last name for the contact. When finished,
press the STORE key.
Editing Missed Calls:
You can edit the details of a missed call . Simply select the
missed call you would like to edit. Scroll to the EDIT function and
press the select key. Using your phone's keypad, enter the new information regarding the missed call. When finished, press the STORE
key. To erase a keystroke, press the ERASE key.
34
Deleting Missed Calls:
There are several ways to delete the details regarding
a Missed call from your phone’s memory:
Delete using CALLS sub-menu:
To delete the details regarding a specific missed call, press
the CALLS key, scroll to the DELETE function and press the select
key. Scroll to the Missed Calls function and press the select key. Use
the Up amd Down Arrow keys to scroll through the missed calls. Press
the select key to delete the details regarding a specific missed call from
your phone’s memory.
Delete using To delete a specific missed call, scroll to the
entry of the call you wish to delete and press the select key. Next, scroll
down to the DELETE function and press the select key. The entry will
be automatically deleted from your phone’s memory.
Page 35

V
i
ew Missed, Rece
ived and Placed Calls
Viewing Received Calls
Copying Received calls to Phone Book:
To view detailed information about the calls you have
received, press the CALLS key, scroll to the INCOMING function
and press the select key. A list will appear of all the calls you have
missed.
You can access useful information about the calls you have
received .
Viewing Received Call details:
Use the Up amd Down Arrow keys to scroll through the
received calls. Press the select key to access a specific received call.
A list will appear with details regarding the call you have
received, including :
The first call out of the total calls received
the time the call was received
who the call was received from
The date the call was received
You can store the details of a received call in your phone
book. Simply select the received call you would like to store. Scroll to
the COPY to PB function and press the select key. Using your phone's
keypad, enter the first and last name for the contact. When finished,
press the STORE key.
Editing Received Calls:
You can edit the details of a received call . Simply select the
received call you would like to edit. Scroll to the EDIT function and
press the select key. Using your phone's keypad, enter the new information regarding the received call. When finished, press the STORE
key. To erase a keystroke, press the ERASE key.
35
Page 36

V
i
ew Missed, Rece
ived and Placed Calls
Deleting Received Calls:
Viewing Placed Calls
There are several ways to delete the details regarding a
Received call from your phone’s memory:
To delete the details regarding a specific call received, press
the CALLS key, scroll to the DELETE function and press the select
key. Scroll to the INCOMING function and press the select key.Use
the Up amd Down Arrow keys to scroll through the received calls.
Press the select key to delete the details regarding a specific received
call from your phone’s memory.
To delete a specific received call, scroll to the entry of the
call you wish to delete and press the select key. Next, scroll down to
the DELETE function and press the select key. The entry will be automatically deleted from your phone’s memory.
36
To view detailed information about the calls you have
placed, press the CALLS key, scroll to the OUTGOING function and
press the select key. A list will appear of all the calls you have missed.
You can access useful information about the calls you have
placed.
Viewing Placed Call details:
Use the Up amd Down Arrow keys to scroll through the
placed calls. Press the select key to access a specific placed call.
A list will appear with details regarding the call you have
placed, including :
The first call out of the total calls placed
the time the call was placed
who the call was placed to
The date the call was placed
Page 37

V
i
ew Missed, Rece
ived and Placed Calls
Copying Placed calls to Phone Book:
You can store the details of a placed call in your phone
book. Simply select the placed call you would like to store. Scroll to the
COPY to PB function and press the select key. Using your phone's
keypad, enter the first and last name for the contact. When finished,
press the STORE key.
Editing Placed Calls:
You can edit the details of a placed call . Simply select the
placed call you would like to edit. Scroll to the EDIT function and
press the select key. Using your phone's keypad, enter the new information regarding the placed call. When finished, press the STORE key.
To erase a keystroke, press the ERASE key.
Deleting PlacedCalls:
There are several ways to delete the details regarding a
Received call from your phone’s memory:
To delete the details regarding a specific call placed, press
the CALLS key, scroll to the DELETE function and press the select
key. Scroll to the OUTGOING function and press the select key.Press
the select key to delete the details regarding a specific placed call from
your phone’s memory.
To delete a specific placed call, scroll to the entry of the call
you wish to delete and press the select key. Next, scroll down to the
DELETE function and press the select key. The entry will be automatically deleted from your phone’s memory.
37
Page 38

V
i
ew Missed, Rece
ived and Placed Calls
38
Page 39

V
oice Mail
Managing Voice Mail:
o access new or existing messages, scroll to the VOICE
MAIL function and press the select key.
Connecting to your voicemail:
To connect to your voice mailbox, scroll to the CONNECT
function and press the select key. You are then prompted to enter your
Voice Mailbox Number. Once you have enetered your voicemailbox
number, press the OK key to connect. Press the EXIT key to return to
the previous menu.
Mail Box Number
Prompt you to Enter Number
Voice Mail
39
Page 40

V
oice Mail41Short Messaging Service ( SMS )
40
Page 41

Short Messaging Service ( SMS )
Messages
This directory offers you a variety of different menu options
to fuel messaging management. To access your messaging options,
press the ____ Menu key and select the _____ Messages icon from the
main menu of features. Press the __ Exit key to return to the main
menu of features.
Reading Messages:
To read your messages, scroll to the READ function amd
press the select key. You will then be given the option to read messages
in your INBOX or your OUTBOX.
Reading messages in your INBOX
To read the messages in your Inbox, scroll to the INBOX
function and press the select key. The following will be displayed:
The first message out of the total messages in your Inbox
the time the message was received
who the message was sent from
The date the message was received
Use the Up amd Down Arrow keys to scroll through the
messages
Page 42

Short Messaging Service ( SMS )
Press the __Exit key top return to the READ (1) Menu
Composing Messages
Reading Messages in your Outbox
To read the messages in your OutBox, scroll to the OUTBOX function and press the select key. The following will be displayed:
The first message out of the total messages in your OUTBOX
the time the message was sent
who the message was sent to
The date the message was sent
Use the Up amd Down Arrow keys to scroll through the
messages
Press the __Exit key to return to the READ (1) Menu
42
To write text messages, scroll to the WRITE function and
press the select key. Using the keypad on your phone, press the number that corresponds to the letter you wish to display. Press the number once for the first letter, twice for the second letter and three times
for the third letter.
If you make an error while writing a message, press the __Erase key.
When you have completed writing your message and are
ready to send it, press the ___ OK key. This will bring up the SEND
TO: screen. Enter the number you wish to send the text message to.
Press the OK key when you are finished.
When sending your text message, you will have three
options:
To send the message without storing it, scroll to the SEND
function and press the select key. You will be advised as to whether the
task was Successful or Unsuccessful.
To send and store the message, scroll to the SEND and
STORE function and press the select key. You will be advised as to
whether the task was Successful or Unsuccessful.
Page 43

Short Messaging Service ( SMS )
To store the message without sending it, scroll to the
STORE function and press the select key. You will be advised as to
whether the task was Successful or Unsuccessful.
Deleting Messages
To delete messages, scroll to the DELETE function and
press the select key. You will then be given the option to delete messages in your INBOX or your OUTBOX.
Deleting messages in your INBOX:
To delete the messages in your Inbox, scroll to the INBOX
function and press the select key. You will then be given the option to:
Delete a particular Message
To delete a particular message in your INBOX, scroll to the
DELETE MSG. function and press the select key. The following will
be displayed:
The first message out of the total messages in your INBOX
the time the message was sent
who the message was sent to
The date the message was sent
43
Page 44

Short Messaging Service ( SMS )
Use the Up amd Down Arrow keys to scroll through the
messages. Press the ___ delete key to select a message for deletion.
Press the YES key to delete, press the NO key to cancel. Press the
__Exit key to return to the DELETE Menu.
Delete ALL messages
To delete all messages in your INBOX, scroll to the
DELETE ALL. function and press the select key. You will be asked if
you would like to delete all your messages from your INBOX. Press
the YES key to delete, press the NO key to cancel. Press the __Exit
key to return to the DELETE Menu
Deleting Messages in your Outbox:
To delete the messages in your OUTBOX, scroll to the
OUTBOX function and press the select key. You will then be given
the option to:
44
Delete a particular Message
To delete a particular message in your OUTBOX, scroll to
the DELETE MSG. function and press the select key. The following
will be displayed:
The first message out of the total messages in your OUTBOX
the time the message was sent
who the message was sent to
The date the message was sent
Use the Up amd Down Arrow keys to scroll through the
messages. Press the ___ delete key to select a message for deletion.
Press the YES key to delete, press the NO key to cancel. Press the
__Exit key to return to the DELETE Menu.
Page 45

Short Messaging Service ( SMS )
Delete ALL messages
Message Set-Up
To delete all messages in your OUTBOX, scroll to the
DELETE ALL. function and press the select key. You will be asked if
you would like to delete all your messages from your OUTBOX. Press
the YES key to delete, press the NO key to cancel. Press the __Exit
key to return to the DELETE Menu.
Checking available message memory space
To determine how much message memory space your
phone has, scroll to the FREE COUNT function and press the select
key. You will be able to view:
TOTAL: the TOTAL number of messages that are currently
stored on your phone
FREE: the amount of space that is still available for storing
future messages
The Messages Set-up function offers the advantage of customizing the viewability and deliverability of your messages. To access
the messages set-up features, scroll to the SETUP function and press
the select key.
Message Display:
Through the AUTO DISPLAY function, you can receive
instant notification when new messages are received. When the AUTO
DISPLAY function is enabled, new messages will be immediately
viewable, eliminating the step of having to search for new messages via
the Messages directory.
To enable the AUTO DISPLAY function, scroll to the
AUTO DISPLAY function, press the select key and then press the On
key. To disable this function, press the OFF key.
Message:
SMS Center- service center (phone company number that
you send SMS messages to )
45
Page 46

Short Messaging Service ( SMS )
Message deliverability
When sending a message, you have the ability to specify the
length of time a particular message is valid for delivery. To program
the deliverability timeframe for a specific message, scroll to the
VALID TIME function and press the select key. You can choose from
these various time intervals:
12 Hours- message is able to be delivered for up to 12 hours
1 Day- message is able to be delivered for up to 1 day
1 Week- message is able to be delivered for up to 1 week
1 Month- message is able to be delivered for up to 1 month
Max Time (?)- message is able to be delivered for max. time
possible
Message Status
You can track the delivery status of all the messages you
send. To enable the viewability of message delivery status, scroll to the
STATUS REPORT function and press the select key.
46
To enable the STATUS REPORT function, scroll to the
STATUS REPORT function, press the select key and then press the
On key. To disable this function, press the OFF key.
Broadcast:
Read
Languages
Multiple languages depending upon market
None
List
Auto Display ( On / Off )
Page 47

Phone Boo
k
Phone Book
Your new phone is equipped with plenty of internal memory
and has the capacity to store up to 200 names and phone numbers.
However, if you move your SIM Card frequently between multiple
GSM phones, you may want to save some names and phone numbers
on the SIM card for ease of use. Names and phone numbers saved on
your SIM Card will be available on any GSM phone you install the SIM
Card in; however, please note that the SIM Card does have limited
capacity, so you may want to store only your most important or frequently accessed names and phone numbers on it.
This directory offers you a variety of different menu options
to manage and access important contact information. To access your
phone book options, press the ____ Menu key and select the _____
Phone Book icon from the main menu of features. Press the __ Exit
key to return to the main menu of features.
Searching by name:
To search for a Name entry in your phone book, scroll to
the SEARCH NAME function and press the select key. Using your
phone's keypad, enter letters of the name you wish to find. When finished, press the VIEW key. To edit the entry, press the EDIT key.
Press the ------scroll key to highlight the areas you want to edit. Press
the ERASE key to remove letters and make the appropriate changes.
When edits are complete, press the STORE key.
Creating an entry in the phone book:
To create a new entry in your phone book, scroll to the
CREATE function and press the select key.
-Using your phone's keypad, enter the first and last name for
the contact. When finished, press the OK key.
-Next, enter the phone number for the contact. Press the
OK key to accept the entry. Press the ERASE key to edit your entry.
47
Page 48

Phone Boo
k
Deleting an entry in the phone book:
Viewing SIM card and Phone phone books:
To delete an entry in your phone book, scroll to the
DELETE function and press the select key.
-Using the scroll keys, find the phone book entry you would
like to delete. When the entry is selected, press the DELETE key.
-Press YES if you would like to delete the entry. Press NO if
you would not like to delete the entry. Press EXIT to return to the previous menu.
Copying a Phone book entry from the SIM card to the
phone:
To copy a phone book entry from the SIM card to your
phone, scroll to the COPY function and press the select key.
Using the scroll keys, find the phone book entry you wish to
copy. When the entry is selected, press the COPY key. Press YES to
copy the entry to the phone. Press NO to cancel this function. Press
EXIT to return to the previous menu.
48
To view the phone book directory on your SIM card or on
your phone, scroll to the DIRECTORY function and press the select
key.
To view the phone book directory for the SIM card, scroll to
the SIM function and press the select key.
-To view the phone book directory for your phone, scroll to
the LOCAL function and press the select key.
Checking available phone book memory space:
To determine how much phone book memory space your
phone has, scroll to the FREE COUNT function and press the select
key. You will be able to view:
-SIM: the TOTAL number of phone book entries that are
currently stored on your SIM card and the amount of space that is still
available for storing future entries
-LOCAL: the TOTAL number of phone book entries that
are currently stored on your phone itself and the amount of space that
is still available for storing future entries
Page 49

Phone Boo
k
Entering your phone's number into phone book:
To enter your phone's number into the phone book, scroll
to the OWN NUMBER function and press the select key. Enter your
phone's number and press the OK key. Press the ERASE key to make
changes to the number.
One-Touch Dialing:
You can program one-touch dialing for up to 9 phone numbers. To set-up one touch dialing, scroll to the 1 TOUCH DIAL function and press the select key. Scroll to the Key 1 function and press
select. Enter the phone number you would like to set 1 touch dialing
for, and press the OK key. Press the Erase key to edit this entry.
Repeat these steps for Keys 2-9. Press EXIT to return to the previous
menu.
Storing a Phone Number in your SIM Card
Storing a Phone Number in your phones internal memory
49
Page 50

50
Phone Boo
k51Changing Phone Settings
Page 51

Changing Phone Settings
Your new phone is factory configured to be a useful and
productive tool. However, your phone is an extension of yourself and
only you will know what works best for you. Your phone allows virtually every aspect of its operation to be custom configured to suit the
way you live, work and play.
Call Settings
Flip Open Answer:
This allows you to answer a phone call simply by flipping
open the phone. To enable this function, scroll to the FLIP OPEN
ANS function and press the select key. To enable the flip open answer
function, Press the ON key. To disable the flip open answer function,
press the OFF key.
1 Touch Dial
You can program one-touch dialing for up to 9 phone numbers. To set-up one touch dialing, scroll to the 1 TOUCH DIAL function and press the select key. Scroll to the Key 1 function and press
select. Enter the phone number you would like to set 1 touch dialing
for, and press the OK key. Press the Erase key to edit this entry.
Repeat these steps for Keys 2-9. Press EXIT to return to the previous
menu.
Page 52

Changing Phone Settings
Auto Redial
If you dial a number and it is busy, you can tell your phone
to automatically redial the number. To enable this function, scroll to
the AUTO REDIAL function and press the select key. To enable the
auto redial function, Press the ON key. To disable the auto redial function, press the OFF key.
Any Key Answer
This allows you to answer a phone call simply by pressing
any key on the phone. To enable this function, scroll to the ANY KEY
ANSW function and press the select key. To enable the any key answer
function, Press the ON key. To disable the any key answer function,
press the OFF key.
Call waiting:
To activate the call waiting, scroll to the ACTIVATE function and press the select key.
To cancel call waiting, scroll to the CANCEL function and
press the select key.
52
To check the status of call waiting, scroll to the STATUS
function and press the select key.
Page 53

Changing Phone Settings
Clock Setup
To Set The Time
To set the time on your phone, scroll to the SET THE
TIME function and press the select key. Using the left and right scroll
keys and the phone's numerical keypad, enter the correct time. Press
the OK key to accept, press the EXIT key to return to the previous
menu.
Seting The Date
To set the date on your phone, scroll to the SET THE
DATE function and press the select key. Using the left and right scroll
keys and the phone's numerical keypad, enter the correct date. Press
the OK key to accept, press the EXIT key to return to the previous
menu.
Setting Time Format
You have the option to view what time it is based on a 12hour or 24-hour range. To select a time format, scroll to the TIME
FORMAT function and press the select key.
To choose a 12-hour format, scroll to the 12 HOUR func-
tion and press the select key.
To choose a 24-hour format, scroll to the 24 HOUR func-
tion and press the select key.
Setting Time Zone:
To set the correct Time Zone on your phone, scroll to the
SET TIME ZONE function and press the select key. Using the left
and right scroll keys and the phone's numerical keypad, enter the correct time zone offset from GMT. Press the OK key to accept, press the
EXIT key to return to the previous menu.
Setting Daylight Savings:
To set Daylight Savings, scroll to the DAYLIGHT SAVIN
function and press the select key. You will be asked whether you want
to Automatically adjust for Summer Time?
Press the YES key to Automatically adjust for Summer
Time.
You will then be prompted to enter the country in which
you are adjusting for Daylight savings.
53
Page 54

Changing Phone Settings
USA
Europe
54
Press USA if you are adjusting for Daylight Savings in the
Press Europe if you are adjusting for Daylight Savings in the
Press the No key to cancel this function.
Screen Setting
Setting the Backlight
Your phone offers a backlit function for increased viewability. To set backlight options, Scroll to the BACKLIGHT function and
press the select key. To Turn the backlight on, press the ON key. To
turn the backlight off, press the OFF key.
Setting the Contrast
Your phone offers options in contrast. To set contrast
options, Scroll to the CONTRAST function and press the select key.
Increase or decrease the contrast by using the right and left scroll keys.
Page 55

Changing Phone Settings
Language Settings
Setting the Language:
Your phone is a multi-lingual device offering access to
phone features and functions in several different languages. To set the
language on your phone, scroll to the LANGUAGE function and
press the select key. You will have the option to choose from:
English
Chinese
Spanish
Use the scroll dowm key to move between the various selections. Press the select key to choose an option.
Setting the Greeting on your phone
You have the option for a textual greeting to display when
you turn on or open your phone. To set a greeting to display on your
phone, scroll to the GREETINGS function and press the select key.
-To Turn on a greeting, scroll to the GREETING ON key
and press the select key. Your greeting will automatically appear the
next time you turn on or open your phone. To Cancel this function,
scroll to the NO GREETING function and press the select key. No
greeting will appear the next time you turn on or open your phone.
Setting the default phone
Default- set lock- enter phone lock code
Setting the Security features on your phone:
Setting the Network details on your phone:
55
Page 56

Changing Phone Settings57Secreta
56
Page 57

ry Mode
Secretary Mode
Entering A Memo
Scroll to the WRITE function and press the select key. You
have the option
Once- scroll to the ONCE function and press the
select key. Using the keypad on your phone, press the number that corresponds to the letter you wish to display. Press the number once for
the first letter, twice for the second letter and three times for the third
letter. When you are finished entering your memo, press the OK key.
Enter the date you’ve written the
memo. Press the OK key.. Enter the alarm time if. Do you want to set
an alarm? Press the YES key if you would like to set an alarm for the
memo. Press the NO key to cancel this function. Your memo will be
stored.
Daily
Weekly
Monthly
Yearly
View Today
View All
Delete
Delete All
Setting an Alarm
Interdum volgus videt, est ubi peccat. Si veteres ita miratur
laudatque poetas, ut nihil anteferat, nihil illis comparet, errat. Si
quaedam nimis antique, si peraque dure dicere credit eos, ignave multa
fatetur, et sapit et mecum facit et Iova iudicat aequo. Non equidem
insector delendave carmina Livi esse reor, memini quae plagosum mihi
parvo Orbilium dictare; sed emendata videri pulchraque et exactis minimum distantia miror. Inter quae verbum emicuit si forte decorum, etsi
versus paulo concinnior unus et alter, iniuste totum ducit venditque
poema.
Page 58

Secreta
ry Mode
Setting Area Code Search
Interdum volgus videt, est ubi peccat. Si veteres ita miratur
laudatque poetas, ut nihil anteferat, nihil illis comparet, errat. Si
quaedam nimis antique, si peraque dure dicere credit eos, ignave multa
fatetur, et sapit et mecum facit et Iova iudicat aequo. Non equidem
insector delendave carmina Livi esse reor, memini quae plagosum mihi
parvo Orbilium dictare; sed emendata videri pulchraque et exactis minimum distantia miror. Inter quae verbum emicuit si forte decorum, etsi
versus paulo concinnior unus et alter, iniuste totum ducit venditque
poema.
Using the Calculator Utility
ICalculator can perform additiona, subtraction, multiplication and division functions.
Using the Global Time Clock
IQuery, Add, delete.
58
Page 59

D
iverting Messages
Diverting Messages
This directory offers you the opportunity to divert calls from
your Mobicom model phone to any another phone. To access call
diversion functions, press the ____ Menu key and select the _____
Divert icon from the main menu of features. Press the __ Exit key to
return to the main menu of features.
Diverting all calls:
To divert all your calls to another phone, scroll to the ALL
CALLS function and press the select key.
-To activate the diversion of all your calls to another phone,
scroll to the ACTIVATE function and press the select key. Enter the
number you wish to divert all your calls to and press the OK key. Press
the Erase key to edit this entry.
--To cancel the diversion of all your calls to another phone,
scroll to the CANCEL function and press the select key. Enter the
divert number you wish to cancel all your calls from going to and press
the OK key. Press the Erase key to edit this entry.
--To check the status of the diversion of all your calls to
another phone, scroll to the STATUS function and press the select
key. This will tell you if call diversion for all your calls is currently in
operation.
59
Page 60

D
iverting Messages
Diverting calls when phone is in use:
Diverting calls when there is no reply:
To divert calls only when your phone is in use, scroll to the
IF BUSY function and press the select key.
-To activate the diversion of your calls to another phone
only when your phone is in use, scroll to the ACTIVATE function and
press the select key. Enter the number you wish to divert your calls to
and press the OK key. Press the Erase key to edit this entry.
--To cancel the diversion of your calls to another phone
when your phone is in use, scroll to the CANCEL function and press
the select key. Enter the divert number you wish to cancel your calls
from going to and press the OK key. Press the Erase key to edit this
entry.
--To check the status of the diversion of your calls to
another phone if your phone is in use, scroll to the STATUS function
and press the select key. This will tell you if call diversion when your
phone is in use is currently in operation.
60
To divert calls only when your phone does not reply, scroll
to the IF NO REPLY function and press the select key.
-To activate the diversion of your calls to another phone
only when your phone does not reply, scroll to the ACTIVATE function and press the select key. Enter the number you wish to divert your
calls to and press the OK key. Press the Erase key to edit this entry.
--To cancel the diversion of your calls to another phone
when your phone does not reply, scroll to the CANCEL function and
press the select key. Enter the divert number you wish to cancel your
calls from going to and press the OK key. Press the Erase key to edit
this entry.
--To check the status of the diversion of your calls to
another phone if your phone does not reply, scroll to the STATUS
function and press the select key. This will tell you if call diversion
when your phone does not reply is currently in operation.
Diverting calls when phone is off:
To divert calls only when your phone is off, scroll to the
PHONE OFF function and press the select key.
Page 61

D
iverting Messages
-To activate the diversion of your calls to another phone
only when your phone is off, scroll to the ACTIVATE function and
press the select key. Enter the number you wish to divert your calls to
and press the OK key. Press the Erase key to edit this entry.
--To cancel the diversion of your calls to another phone
when your phone is off, scroll to the CANCEL function and press the
select key. Enter the divert number you wish to cancel your calls from
going to and press the OK key. Press the Erase key to edit this entry.
--To check the status of the diversion of your calls to
another phone if your phone is off, scroll to the STATUS function and
press the select key. This will tell you if call diversion when your phone
is off is currently in operation.
Status of diverting calls:
To check the status of a call diversion function, scroll to the
STATUS function and press the select key. This will tell you how many
calls were diverted, and are viewable by diversion function:
All Calls
If Busy
If no Reply
Phone Off
Cancel diverting calls:
To cancel diversion of your calls, scroll to the CANCEL
ALL function and press the select key. This will cancel any call diversion functions currently in effect.
61
Page 62

D
iverting Messages63Troubleshooting
62
Page 63
Troubleshooting
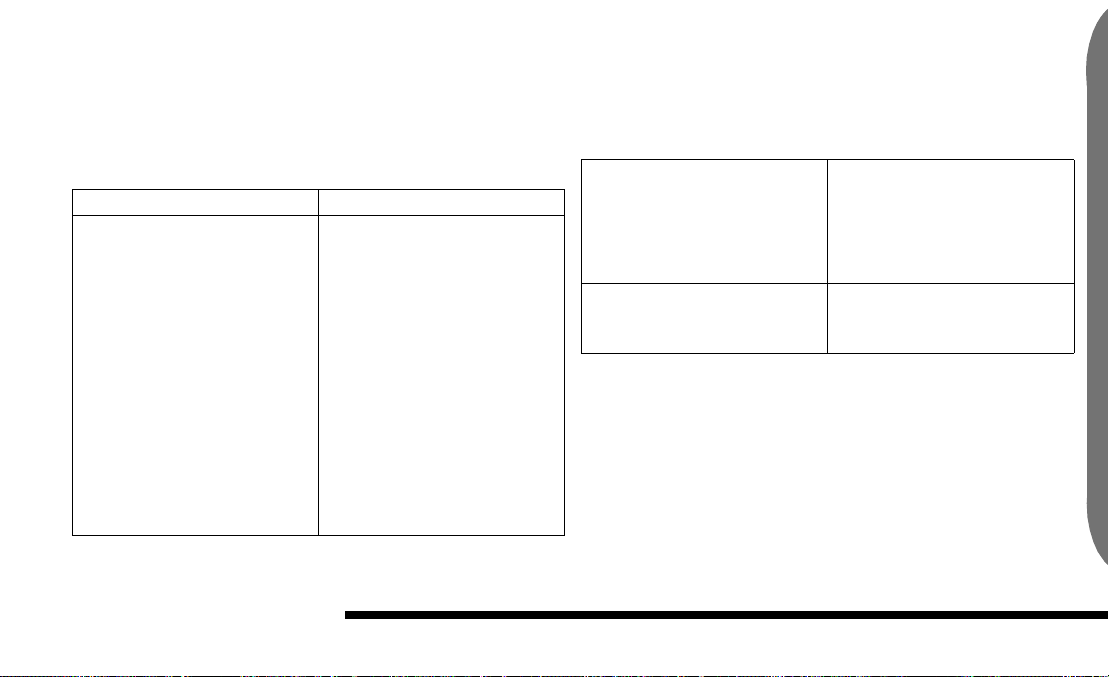
Symptom What to Check
Unable to dial phone Verify Phone is
receiving signal, move to an
open area.
Verify keypad is
unlocked, press * and 6 key
Verify screen does
not read “restricted”, turn off
call barring
Verify phone was not
locked before a different SIM
card is used. SIM card PIN
number required to unlock
phone.
SIM card does not
work
Phone unable to
delete divert or barring call
Verify SIM Card has
not been damaged.
Verify Sim card is
making contact with its connector in the phone
Verify Phone is
receiving signal, move to an
open area.
Page 64

64
Troubleshooting65Care and maintenance of
Page 65

your n
ew phon
e
Care and maintenance of your new phone
Only authorized service personnel may repair
or perform service on your MobiCom phone.
Repairs or service performed on your MobiCom
phone by unauthorized personnel may void your
warranty.
Use only MobiCom approved batteries and
accessories with your MobiCom phone. Use of
incompatible batteries and accessories may affect
your phone’s performance, damage your phone or
void your phones warranty.
Keep your phone out of the reach of small
children.
Avoid exposing your phone to rain, snow
and liquid.
Use only soft cloth or tissue paper to clean
your phone. Other material or cleaning
solvents may scratch or damage the phones finish.
Do not paint your phone, paint may cause
electrical and mechanical damage.
Only MobiCom approved antennas should
be used with your phone to ensure the performance.
Page 66

Care and maintenance of
your n
ew phon
e67Batteries care and maintenanc
66
Page 67

e
Batteries care and maintenance
Use only MobiCom proved chargers to
recharge your phones battery. The use of unapproved chargers may result in fire, damage to the
phone and will void the warranty.
Avoid using batteries in a wet ,humid and
high temperature conditions.
Use caution when handling or storing a
detached battery from your phone. If the batteries
two terminals are accidentally shorted together by a
metal object, the battery and object may become hot,
causing property damage, injury or burns. Exercise
care in placing batteries inside a pocket, purse or
other packages that may contain metal objects
Your new phones battery will require about
2.5 hours of charging to reach full strength.
The performance of all rechargeable batteries
degrades over time. When replacing your phones
battery do not dispose of old the battery in fire, the
battery may explode causing injury or damage.
Page 68

68
Batteries care and maintenanc
e69Warrant
Page 69

y
Warranty
1. The limited warranty for the Product extends for
one (1) year beginning on the date of purchase of the
Product.
2. The limited warranty extends only to the original
consumer purchaser (Consumer) of the Product and
is not assignable or transferable to any subsequent
purchaser/end-user.
3. The limited warranty extends only to Consumers
who purchase the Product in the .
4. During the limited warranty period, Mobicom will
repair, or replace, at Mobicom's option, any defective
parts, or any parts that will not properly operate for
their intended use with new or factory rebuilt
replacement items. No charge will be made to the
Consumer for any such parts. Mobicom will also pay
for the labor charges incurred by Mobicom in repairing or replacing the defective parts. The external
housing and cosmetic parts shall be free of defects at
the time of shipment and, therefore, shall not be covered under these limited warranty terms.
5. Upon request from Mobicom, the Consumer must
provide information to reasonably prove the date of
purchase.
6. The Consumer shall bear the cost of shipping the
Product to Mobicom Inc . Mobicom
Page 70

Warrant
y
shall bear the cost of shipping the Product back to
the Consumer after the completion of service under
this limited warranty.
b) Mobicom was not notified by Consumer of the
alleged defect or malfunction of the Product during
the applicable limited warranty period.
7. The Consumer shall have no coverage or benefits
under this limited warranty if any of the following
conditions are applicable:
a) The Product has been subject to: abnormal use,
abnormal conditions, improper storage, exposure to
moisture or dampness, unauthorized modifications,
unauthorized connections, unauthorized repair, misuse, neglect, abuse, accident, alteration, improper
installation, or other acts which are not the fault of
Mobicom, including damage caused by shipping and
blown fuses.
70
c) The Product serial number plate or the accessory
date code has been removed, defaced or altered.
d) The defect or damage was caused by the defective
function of the cellular system, or by inadequate signal reception by the external antenna.
8. If a problem develops during the limited warranty
period, the Consumer should take the following
step-by-step procedure:
The Consumer shall return the Product to the place
of purchase for repair or replacement processing.
Page 71

Warrant
y
b) If a is not convenient the Consumer shall ship the
Product prepaid and insured to:
Mobicom Corporation
d) The Consumer will be billed for any parts or labor
charges not covered by this limited warranty. The
Consumer shall be responsible for expenses related
to reinstallation of the Product.
960 Holmdel Rd.
Holmdel, NJ 07733
USA
The customer shall include a return address, daytime
phone number and/or fax number, complete
description of the problem, proof of purchase, and
service agreement (if applicable). Expenses related to
removing the Product from an installation are not
covered under this limited warranty.
e) If the Product is returned to Mobicom during the
limited warranty period, but the problem with the
Product cannot be fixed under the terms and conditions of this limited warranty, the Consumer will be
notified and given an estimate of the charges the
Consumer must pay to have the Product repaired,
with all shipping charges billed to the Consumer. If
the estimate is refused, the Product will be returned
freight collect. If the Product is returned to Mobicom after the expiration of the warranty period,
Mobicom's normal service policies shall apply and
the Consumer will be invoiced for all shipping
charges.
71
Page 72

Warrant
y
9. The Product consists of newly assembled equipment that may contain used components which have
been reprocessed to allow machine compliance with
Product performance and reliability specifications.
10. ANY IMPLIED WARRANTY OF MERCHANTABILITY, OR FITNESS FOR A PARTICULAR PURPOSE OR USE, SHALL BE LIMITED
TO THE DURATION OF THE FOREGOING
WRITTEN WARRANTY, OTHERWISE, THE
FOREGOING WARRANTY IS THE PURCHASERS SOLE AND EXCLUSIVE REMEDY AND
IN LIEU OF ALL OTHER WARRANTIES,
EXPRESS OR IMPLIED. Mobicom SHALL NOT
BE LIABLE FOR INCIDENTAL OR CONSEQUENTIAL DAMAGES OR A
72
LOSS OF ANTICIPATED BENEFITS OR PROFITS, RESULTING FROM THE PURCHASE OR
USE OF THE PRODUCT OR ARISING FROM
THE BREACH OF THE WARRANTY EVEN IF
Mobicom KNEW OF THE LIKELIHOOD OF
SUCH DAMAGES.
11. Mobicom neither assumes nor authorizes any
authorized service center or any person or entity to
assume for it any other obligation or liability beyond
that which is expressly provided for in this limited
warranty.
12. The limited warranty period for Mobicom supplied attachments and accessories arespecifically
defined within their own warranty cards and packaging.
Page 73

Warrant
y
13. Questions concerning this limited warranty may
be directed to:
Mobicom Corporation
960 Holmdel Rd.
Holmdel, NJ 07733
USA
73
Page 74

FCC Notice And SAR Statement
This device complies with part 15 of the FCC Rules. Operation is
subject to the condition that this device does not cause harmful
interference.
NOTE: This equipment has been tested and found to comply
with the limits for a Class B digital device, pursuant to part 15 of
the FCC rules. These limits are designed to provide reasonable
protection against harmful interference in a residential
installation. This equipment generates, uses and can radiate radio
frequency energy and, if not used in accordance with the
instructions, may cause harmful interference to radio
communications. However, there is no guarantee that
interference will not occur in a particular installation. If this
equipment does cause harmful interference to radio or television
FCC Notice And SAR Statement
reception, which can be determined by turning the unit off and
on, the user is encouraged to try to correct the interference by
one or more of the following measures:
-Reorient or relocate the receiving antenna.
-Increase the separation between the equipment and the receiver.
-Connect the equipment into an outlet on a circuit different from
that to which the receiver is connected.
74
-Consult the dealer or an experienced radio/TV technician for help.
Any changes or modifications not expressly approved by Mobicom
Corporation will void the user's authority to operate this equipment.
Only use approved batteries and chargers.
Specific Absorption Rate (SAR) is a value that corresponds to the
relative amount of RF energy absorbed by the user of a wireless
phone. The Federal Communications Commission of the U.S.
Government sets SAR limits. The maximum allowed SAR value of
1.6W/kg allows for a substantial safety margin, designed to assure
the safety of all persons. Tests for SAR values are conducted using
FCC approved operating positions at the highest possible power
levels. The actual SAR level while using the phone is likely to be well
below the maximum value.
Highest reported SAR levels for this phone are: Head 1.18 W/kg,
body 0.244 W/kg. SAR compliance for body-worn operating
configurations is limited to the specific beltclips/holsters/accessories shipped with this product. SAR
compliance is limited to the batteries shipped with this product.
 Loading...